

Page 1

C R Y S T A L
engineering corporation
User’s Manual
DaTa
Lo
GGerXP
TM
Page 2

DataLoggerXP User’s Manual • Page 1
C R Y S T A L
e n g i n e e r i n g
c o r p o r a t i o n
Contents
Introduction . . . . . . . . . . . . . . . . . . . . . . . . . . . . . . . . . . . . . . . . . . . . . . . . . . . . . . . .1
How it works . . . . . . . . . . . . . . . . . . . . . . . . . . . . . . . . . . . . . . . . . . . . . . . . . . . . . . . .1
XP2i Operational Modes . . . . . . . . . . . . . . . . . . . . . . . . . . . . . . . . . . . . . . . . . . . . . . . . . .1
Datalogger Terminology . . . . . . . . . . . . . . . . . . . . . . . . . . . . . . . . . . . . . . . . . . . . . . . . . .2
Typical Usage. . . . . . . . . . . . . . . . . . . . . . . . . . . . . . . . . . . . . . . . . . . . . . . . . . . . . . . . . . .2
Installing the Software . . . . . . . . . . . . . . . . . . . . . . . . . . . . . . . . . . . . . . . . . . . . . . . .3
Quick Start . . . . . . . . . . . . . . . . . . . . . . . . . . . . . . . . . . . . . . . . . . . . . . . . . . . . . . . . .3
XP2i Initial Setup. . . . . . . . . . . . . . . . . . . . . . . . . . . . . . . . . . . . . . . . . . . . . . . . . . . . . . . . .3
Recording Pressure . . . . . . . . . . . . . . . . . . . . . . . . . . . . . . . . . . . . . . . . . . . . . . . . . . . . . . 5
Downloading
. . . . . . . . . . . . . . . . . . . . . . . . . . . . . . . . . . . . . . . . . . . . . . . . . . . . . . . . . . .6
Operation . . . . . . . . . . . . . . . . . . . . . . . . . . . . . . . . . . . . . . . . . . . . . . . . . . . . . . . . . .6
DataLoggerXP Software Operation . . . . . . . . . . . . . . . . . . . . . . . . . . . . . . . . . . . . .6
The Main Window . . . . . . . . . . . . . . . . . . . . . . . . . . . . . . . . . . . . . . . . . . . . . . . . . . . . . . .6
Setting the Options . . . . . . . . . . . . . . . . . . . . . . . . . . . . . . . . . . . . . . . . . . . . . . . . . . . . . . 7
Setting the Default Unit . . . . . . . . . . . . . . . . . . . . . . . . . . . . . . . . . . . . . . . . . . . . . . . . . . . 7
Changing Modes . . . . . . . . . . . . . . . . . . . . . . . . . . . . . . . . . . . . . . . . . . . . . . . . . . . . . . . . 8
Connecting to the Gauge . . . . . . . . . . . . . . . . . . . . . . . . . . . . . . . . . . . . . . . . . . . . . . . .8
Password Protection . . . . . . . . . . . . . . . . . . . . . . . . . . . . . . . . . . . . . . . . . . . . . . . . . . . . .8
Data Logging Parameters . . . . . . . . . . . . . . . . . . . . . . . . . . . . . . . . . . . . . . . . . . . . . . . . .8
Logging Interval . . . . . . . . . . . . . . . . . . . . . . . . . . . . . . . . . . . . . . . . . . . . . . . . . . . . . . . . .9
Logging Type . . . . . . . . . . . . . . . . . . . . . . . . . . . . . . . . . . . . . . . . . . . . . . . . . . . . . . . . . . .9
Maximum Number of Readings . . . . . . . . . . . . . . . . . . . . . . . . . . . . . . . . . . . . . . . . . . . . 9
Data Management . . . . . . . . . . . . . . . . . . . . . . . . . . . . . . . . . . . . . . . . . . . . . . . . . . . . .10
Downloading
. . . . . . . . . . . . . . . . . . . . . . . . . . . . . . . . . . . . . . . . . . . . . . . . . . . . . . . . . .10
Page 3

Page 2 • DataLoggerXP User’s Manual
Viewing . . . . . . . . . . . . . . . . . . . . . . . . . . . . . . . . . . . . . . . . . . . . . . . . . . . . . . . . . . . . . . . 10
Saving
. . . . . . . . . . . . . . . . . . . . . . . . . . . . . . . . . . . . . . . . . . . . . . . . . . . . . . . . . . . . . . . .11
Clearing
. . . . . . . . . . . . . . . . . . . . . . . . . . . . . . . . . . . . . . . . . . . . . . . . . . . . . . . . . . . . . .11
Authorizing a Gauge . . . . . . . . . . . . . . . . . . . . . . . . . . . . . . . . . . . . . . . . . . . . . . . . . . . .11
XP2i DataLogger Gauge Operation . . . . . . . . . . . . . . . . . . . . . . . . . . . . . . . . . . .12
Differences Between the XP2i Data Logger and XP2i . . . . . . . . . . . . . . . . . . . . . . . . .12
Logging Parameters . . . . . . . . . . . . . . . . . . . . . . . . . . . . . . . . . . . . . . . . . . . . . . . . . . . . 12
Unit Operation . . . . . . . . . . . . . . . . . . . . . . . . . . . . . . . . . . . . . . . . . . . . . . . . . . . . . . . . .12
Operating Behavior . . . . . . . . . . . . . . . . . . . . . . . . . . . . . . . . . . . . . . . . . . . . . . . . . . . . .14
On/Off Control . . . . . . . . . . . . . . . . . . . . . . . . . . . . . . . . . . . . . . . . . . . . . . . . . . . . . . . . .14
XP2i Reset or Battery Change. . . . . . . . . . . . . . . . . . . . . . . . . . . . . . . . . . . . . . . . . . . . .14
Excel Templates . . . . . . . . . . . . . . . . . . . . . . . . . . . . . . . . . . . . . . . . . . . . . . . . . . . .15
Workbooks . . . . . . . . . . . . . . . . . . . . . . . . . . . . . . . . . . . . . . . . . . . . . . . . . . . . . . . . . . . . 15
Templates
. . . . . . . . . . . . . . . . . . . . . . . . . . . . . . . . . . . . . . . . . . . . . . . . . . . . . . . . . . . . .15
Excel Password Protection . . . . . . . . . . . . . . . . . . . . . . . . . . . . . . . . . . . . . . . . . . . . . . .15
Data
. . . . . . . . . . . . . . . . . . . . . . . . . . . . . . . . . . . . . . . . . . . . . . . . . . . . . . . . . . . . . . . . .16
Default Template File . . . . . . . . . . . . . . . . . . . . . . . . . . . . . . . . . . . . . . . . . . . . . . . . . . . .16
Service and Support . . . . . . . . . . . . . . . . . . . . . . . . . . . . . . . . . . . . . . . . . . . . . . . .16
Troubleshooting . . . . . . . . . . . . . . . . . . . . . . . . . . . . . . . . . . . . . . . . . . . . . . . . . . . . . . . . 16
How to contact us:. . . . . . . . . . . . . . . . . . . . . . . . . . . . . . . . . . . . . . . . . . . . . . . . . . . . . .16
Disclaimer of Warranty . . . . . . . . . . . . . . . . . . . . . . . . . . . . . . . . . . . . . . . . . . . . . .17
Page 4

DataLoggerXP User’s Manual • Page 1
Introduction
Thank you for buying DataLoggerXP! With Datalogger XP you can record up to six thousand
measurements, on an intrinsically safe, fully temperature compensated pressure gauge. With the
XP2i’s long battery life you can take measurements for up to three months, without the need for
external power supplies or battery replacements.
With an XP2i and DataLoggerXP you can:
Record up to 6000 pressure measurements (data points)
•
Change data collection parameters, with or without a computer
•
Start and stop multiple collection runs from the keypad
•
Record pressure readings at intervals as quick as once per second or as slow as once
•
every 18 hours.
Record the averages, averages and peaks, or just the pressure indication.
•
Store an indicated pressure by pushing one button.
•
View the data on any Windows-equipped computer.
•
Save the data les directly into Microsoft® Excel spreadsheets (Excel 95 through Excel 2003), or
•
as comma separated text les.
How it works
There are two parts of this solution—the DataLoggerXP program and the XP2i Digital Test
Gauge. Both are required to form a data logging solution. The Windows application handles all
the transfer and saving of data from the gauge to your computer’s hard drive, while the XP2i performs all the actual data collection.
XP2i Operational Modes
A data logger XP2i operates dierently than a standard XP2i. When operating as a data logger, the
software internal to the XP2i, called the rmware, is replaced. The rmware within the XP2i denes
the mode of the gauge.
When the gauge is operating in standard mode, the XP2i provides all of the functionality documented in the XP2i’s Operation Manual. This is the mode in which all gauges are shipped from the factory.
The DataLoggerXP program switches a gauge into data logger mode. Mode changes take less
than a minute, and can be done an unlimited number of times. Datalogger mode adds the capability to record pressure readings. The accuracy of the gauge is unaected by this change, but
some capabilities (such as peak display and multiple pressure scales) are removed to allow for
maximum memory availability. For information on the changes in gauge operation while operating in data logger mode, see “Dierences Between the XP2i Datalogger and XP2i “ on page 12.
C R Y S T A L
e n g i n e e r i n g
c o r p o r a t i o n
Page 5

Page 2 • DataLoggerXP User’s Manual
Note: An evaluation mode allows up to 100 data points to be taken after which authorization
is required. For unlimited operation, the gauge must be authorized for use as a data logger.
The gauge can be authorized either by the factory, prior to shipment, or in the eld, by the
use of an authorization key. Gauges are always shipped from the factory in standard mode.
Datalogger Terminology
The XP2i stores data in memory. Memory is expressed in terms of bytes available, with each data
point taking some number of bytes to store. A clear gauge (one without any data in memory) will
have approximately 8,000 bytes available. How long a gauge can log data depends on several factors, each of which is described below.
The rst factor is the logging interval. This is the time, in seconds, between each data point.
The second factor is the logging type. The logging type controls what kind of data is stored for
each reading, with dierent modes requiring dierent amounts of memory for each reading.
The third factor is the dynamics of the input pressure. Data is compressed into memory whenever possible. Therefore, pressure that is changing slowly over time will require less memory as
compared to large variations of input pressure. More information on how these factors aect the
maximum number of readings can be found under “Maximum Number of Readings” on page 9.
Together, the logging interval and logging type are referred to in this document as the logging
parameters. Logging parameters can be set up one of two ways: on a computer connected to an
XP2i, or on an XP2i by itself. This second option allows the user to make changes in the logging
parameters while in the eld.
Once the logging parameters have been selected, the gauge can begin sampling data. A set of
one or more readings taken by the gauge is called a run. The user can specify dierent logging parameters for each successive run. There is no limit to the number of runs a gauge can store, providing there is sucient memory to store them.
After one or more runs have been stored on the gauge, DataLoggerXP can download the data to a
computer for viewing and/or saving to the computer’s hard drive. This is done by simply connecting the gauge to the computer via a serial cable and using the Download function of the application software.
Once the data is downloaded to the computer, you will typically clear the gauge. This removes
any existing runs from the gauge’s memory, so that all of the memory is available for the next
sequence of runs.
Typical Usage
While there are a variety of ways in which the DataLogger software and XP2i digital test gauge can
be used, a typical way to use the Datalogger might be like this:
1 You set up the logging parameters—either on the computer or directly on the XP2i keypad—
and start recording data.
Page 6
DataLoggerXP User’s Manual • Page 3
C R Y S T A L
e n g i n e e r i n g
c o r p o r a t i o n
2 Once the logging is complete, the test gauge is connected to a computer.
3 Using the DataLoggerXP application, you download one or more runs to the computer.
4 You save one or more of the runs to Excel worksheets, or as text les.
Installing the Software
DataLoggerXP can either be installed from a CD provided by Crystal Engineering, or downloaded
from the Crystal Engineering web site; however, it’s recommended to check the Crystal Engineering (www.xp2i.com) web site for the latest version of the software.
To install from the CD, simply run the Setup.exe application located on the install CD. This is typically D:\Setup.exe, but may be dierent on your computer.
To install from the Internet, visit http://www.crystalengineering.net and select the DataLoggerXP software page to download the latest version of the software.
Once the setup application is started, simply follow the on-screen prompts to complete the installation.
If DataloggerXP is being upgraded, the prior version does not need to be uninstalled. The new version will be installed over any existing version.
Quick Start
For experienced users, the following quick-start should provide sucient information to get up
and running quickly:
XP2i Initial Setup
Because the gauge is not shipped in Datalogger mode, rst time setup requires the use of a computer. Once the XP2i has been congured as a datalogger, settings can be changed from either
the DataloggerXP application, or from the XP2i’s keypad.
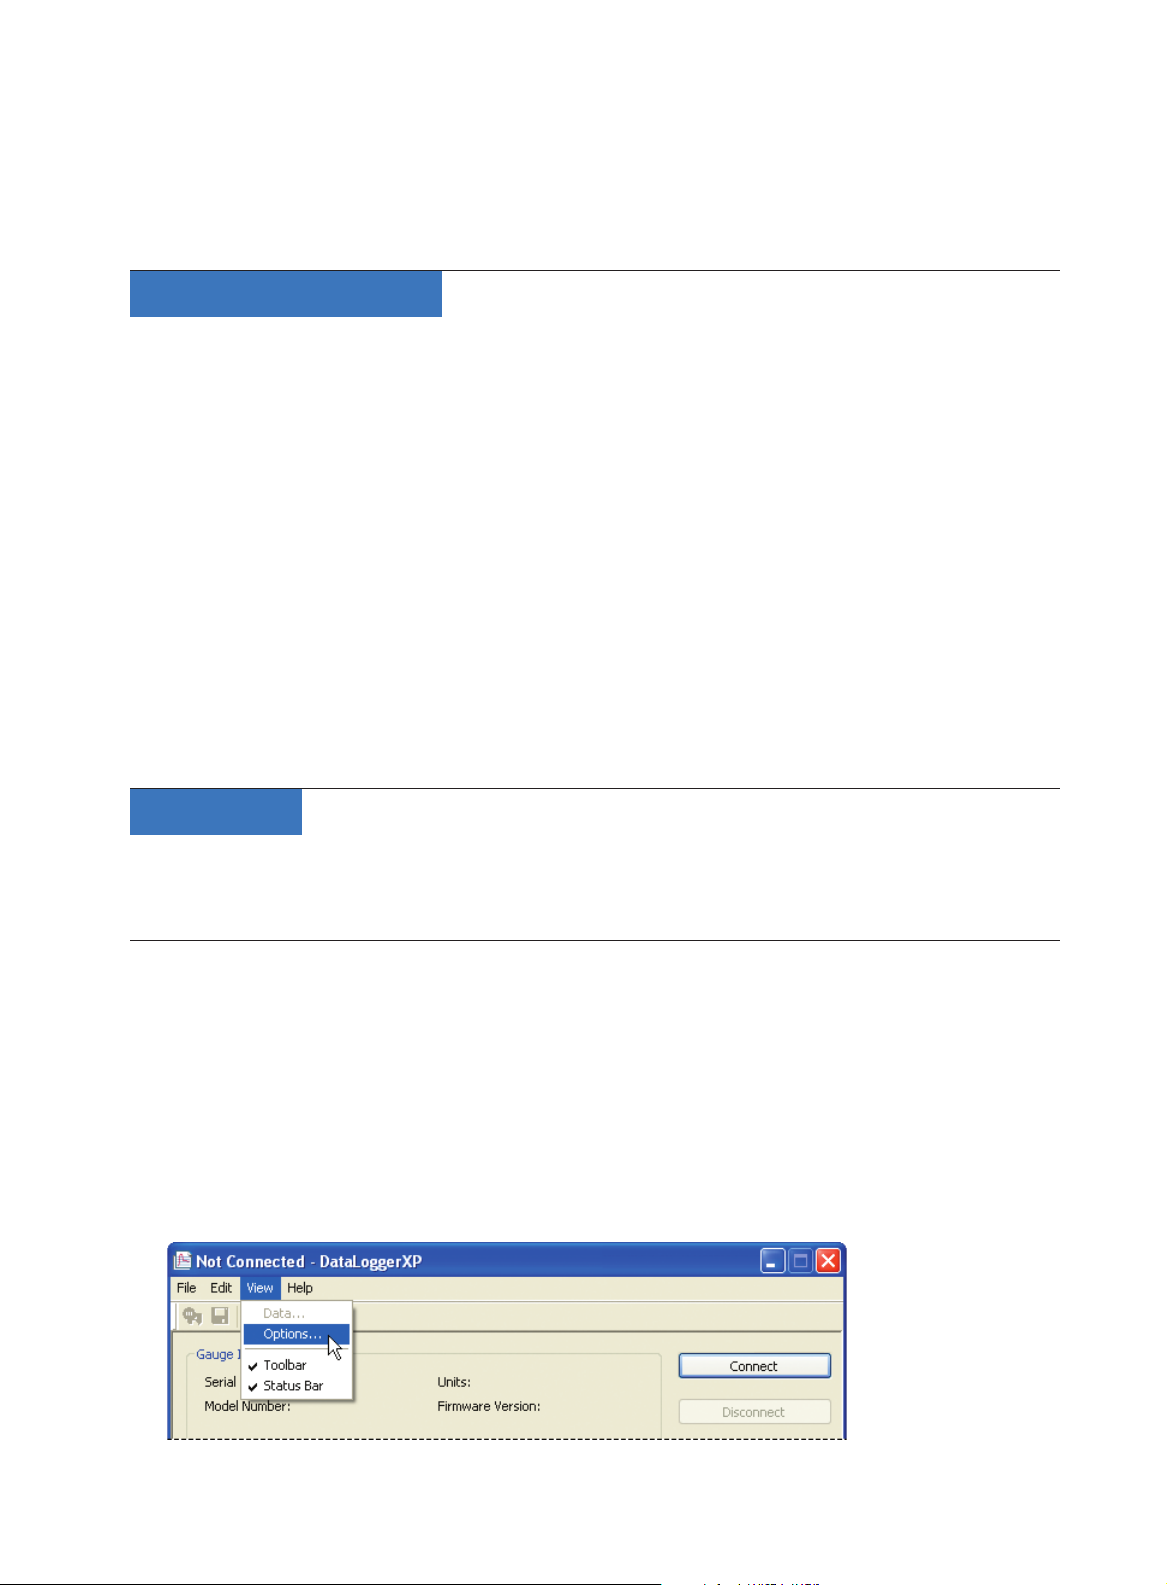
1 Connect the gauge to the computer with a serial cable, P/N 2400 or equivalent.
2 By default, DataloggerXP is congured for automatic serial port detection. If you need to set a
specic port, select View > Options from the main menu.
Page 7
Page 4 • DataLoggerXP User’s Manual
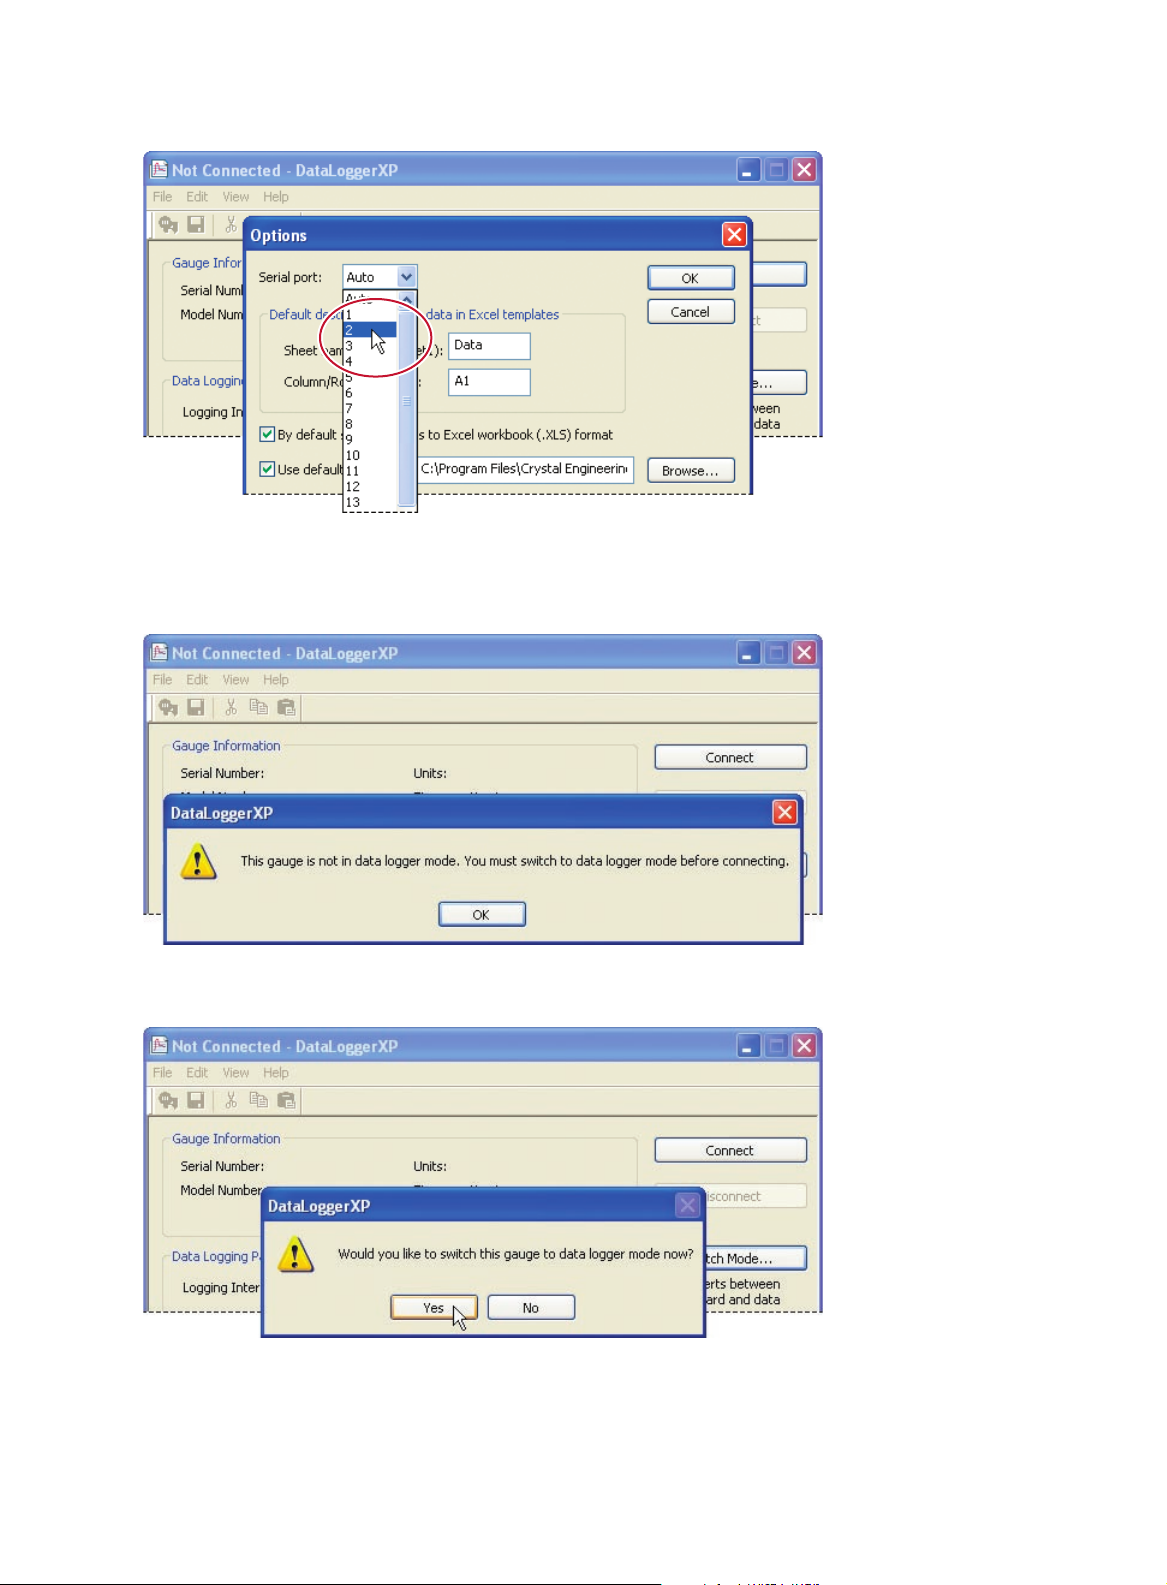
3 Then select the Serial port from the drop down list and click OK.
4 Click the Connect button to connect to the gauge.
5 If the gauge is not in datalogger mode (as shipped from the factory) you will see this message:
Press the Switch Mode button to convert it to datalogger mode, then press Yes.
Page 8

DataLoggerXP User’s Manual • Page 5
C R Y S T A L
e n g i n e e r i n g
c o r p o r a t i o n
Don’t disconnect or turn o the gauge while it’s being updated.
6 After the gauge has been updated, press the Connect button again. Then set the logging
parameters: The Logging Type, and the Logging Interval (if it applies). Click Send to Gauge to
update the gauge parameters.
7 When nished, click Disconnect.
Recording Pressure
1 Connect the gauge to the pressure line to be monitored and turn it on.
2 Press and hold the UNITS button on the gauge until it says “Start”—data is now being logged.
3 Once the test is complete, press and hold the UNITS button again until it says “Stop”.
The gauge displays the current state, then the number of bytes available, and then the new state.
Page 9

Page 6 • DataLoggerXP User’s Manual
Downloading
1 Reconnect the gauge to the serial cable and run DataloggerXP.
2 Click the Connect button to connect to the gauge.
3 Click Download to retrieve the data from the gauge.
4 Click View or Save to view or save the data, respectively.
Operation
Detailed operating instructions on the operation of the software and gauge can be found below.
DataLoggerXP Software Operation
As described in the prior section, the DataLoggerXP application provides complete control of the
XP2i digital test gauge. Logging parameters, downloading, and saving to disk are all done using
the application. In this section, you will nd a description of each of the functional areas of the application. For a guide to operation of the gauge itself, see “XP2i Datalogger Gauge Operation”.
The Main Window
Page 10

DataLoggerXP User’s Manual • Page 7
C R Y S T A L
e n g i n e e r i n g
c o r p o r a t i o n
The DataLoggerXP main window provides most of the functions of the application. From this
window, connecting to a gauge, changing data collection parameters, downloading and viewing
data, clearing data and switching operating modes can all be performed. The paragraphs below
oer additional information on each of these features.
Setting the Options
By default, DataLoggerXP is congured for automatic serial port detection. However, in some
cases automatic serial port detection may not work or cause undesirable results. To select a specic serial port, open the Options dialog box, by choosing View > Options. Select the serial port,
which is typically 1, and press OK to save any changes. If your installation supports additional
langauges, you can choose the language from the Select Language drop-down list. The settings
for Excel templates are covered in “Excel Templates”, on page 15.
Setting the Default Unit
When in data logger mode, the gauge always measures pressure in the default engineering unit
of the gauge, such as PSI or kPa. Measuring in a dierent unit requires changing the default unit,
which can be done by selecting the File > Change Units menu option. Ensure the gauge is in data
logger mode prior to selecting this option, as the changing the default unit cannot be done while
in standard mode.
The Select Units dialog will display a drop down list of the available units. Simply select the desired unit and click OK.
Page 11

Page 8 • DataLoggerXP User’s Manual
Changing Modes
Changing modes on the XP2i is accomplished by clicking the Switch Mode button. The software
will then proceed to make the appropriate mode change.
When converting to data logger mode, the gauge must be upgraded to operate as a data logger. The
software will automatically detect whether or not the gauge is authorized. If it is not, and you have
received an authorization key from your distributor or Crystal Engineering, the software will guide
you through the process of upgrading your gauge. See “Authorizing a Gauge”, on page 11. If you do
not have a authorization key, you can choose to use the gauge in an evaluation mode, but the gauge
will be limited to taking 100 points before the evaluation expires and authorization is required.
If an error occurs during the programming process, and the gauge is left in a mode where the display is continuously ashing, use the File > Repair Gauge menu option to x this problem.
When changing modes, the rmware of the gauge is changed. So, when a new version of rmware
is released, the DataLoggerXP software should also be upgraded.
Note: DataLoggerXP will not work with a gauge if its rmware is newer than what is sup-
ported by the installed version of DataLoggerXP. See “Installing the Software” on page
3 for
instructions on checking the version and upgrading the DataLoggerXP software.
Connecting to the Gauge
Connecting to the gauge is very straightforward: once the correct serial port has been set in the
Options dialog box (see section “Setting the Options”, above), simply plug the serial cable into the
computer and XP2i gauge ports and click Connect. If the gauge is already in data logger mode,
the program will retrieve the current logging parameters, and then allow downloading, viewing,
and saving data, as well as updating the logging parameters.
Password Protection
The password protection feature of the gauge allows you to prevent
unauthorized changes to the data logging parameters. Once the password is set, the Send to Gauge and Switch Mode buttons will require
the password, and changing logging parameters through the keypad will be disabled.
Passwords can only be set or removed using
DataLoggerXP or CongXP. In the event you
lose the password, you will need to contact
the factory for an unlock code, which will
remove the password protection.
Page 12

DataLoggerXP User’s Manual • Page 9
C R Y S T A L
e n g i n e e r i n g
c o r p o r a t i o n
Data Logging Parameters
The two parameters that aect data logging (logging interval and logging type) are covered below.
LOGGING INTERVAL
The logging interval controls how frequently the gauge takes a measurement. A logging interval
can be as short as one second or as long as eighteen hours.
LOGGING TYPE
There are four logging types in which the gauge is capable of operating:
•
Actual: The gauge stores the value displayed on the gauge at each logging interval. No averag-
ing is performed.
•
Average: The gauge stores the average of all readings taken during the entire logging interval.
•
Average with Peaks: Similar to Average, except the highest and lowest value throughout the
logging interval is recorded along with the average value.
•
On Demand: This mode diers from the other three, in that the logging interval does not
apply. Instead, data is stored whenever the PEAK button on the XP2i is pressed. Each time the
PEAK button is pressed, the displayed value is stored with a timestamp of when it was pressed.
MAXIMUM NUMBER OF READINGS
The number of readings that can be stored on the XP2i is dependent on three factors: free memory, the logging type, and pressure dynamics.
Free memory can be determined by simply holding down the UNITS button until the available
memory is displayed. Note that if the gauge contains any data, the free memory will be lower than
the valued displayed on a cleared gauge.
Page 13

Page 10 • DataLoggerXP User’s Manual
Each logging type has a dierent storage requirement. The chart below provides the memory
consumed per data point for each logging type:
LOGGING TYPE BYTES PER DATA POINT
ACTUAL OR AVERAGE 3
AVERAGE WITH PEAKS 9
ON DEMAND 7
The third factor, the pressure dynamic, can signicantly impact the maximum number of readings
recorded. The gauge employs a data compression mechanism to store a greater number of data
points. The mechanism compares the current data point with the prior data point and only stores
the dierence between the two. This dierence in pressure between the current and prior reading is the pressure dynamic. When the pressure dynamic is small, the dierence is small, and less
space is required to store the reading. Depending on the pressure dynamic of the input pressure,
the gauge may only require 60% to 75% of the memory as compared to the requirements listed
above for the same number of readings, allowing the remaining memory to be used for additional
readings. However, the memory savings is application dependent, and should be tested in the
actual application before assuming any increase in the maximum number of readings.
Data Management
DOwNLOADING
To download data from the gauge, simply click the Download button after connecting to the
gauge. Depending on the number of readings, it can take up to 15 seconds to download all the
data. Once the data has been downloaded, the View and Save buttons will be available.
VIEwING
Clicking on the View button from the Main Window will bring up the View dialog box. In this dialog
box, you can choose to select the data to display, as well as include or exclude events from the display. Events are non-data readings, such as tare values, low battery indications, or logging parameters. To save data from this window, simply click the Save button to open the Save dialog box.
Page 14

DataLoggerXP User’s Manual • Page 11
C R Y S T A L
e n g i n e e r i n g
c o r p o r a t i o n
SAVING
Saving data can be accomplished from two places: clicking the Save button either directly from
the main window or from the View dialog box. In either case, the application will rst ask for the
name of the le to save, and then which run data to save.
A le can be saved as either an Excel workbook or comma separated text le (”.txt” or “.csv”) format. To save a le in Excel format, select either an Excel template le (ending in “.xlt”), or an Excel
workbook le (ending in “.xls”) in the “Save as type:” dropdown box. If you use the Excel template
(“.xlt”) a new Excel document will be created using that template. If you choose the Excel worksheet (“.xls”), you must have already selected the default Excel template in the Options dialog box .
The Excel le will be created and saved using this default template. For more information on Excel
templates see page 15.
If the le name does not include a “.xlt” or “.xls” extension, the data will be saved as a comma separate text le (ending either “.txt” or “.csv”) of that name.
CLEARING
Pressing the Clear button erases all runs from the gauge, making all memory available for the next
sequence of runs.
Authorizing a Gauge
Existing XP2i Digital Test Gauges that do not have the data logger option can be upgraded for
data logger operation. The gauge can be authorized using a key provided by the local distributor
or Crystal Engineering. The key is a small le that can be emailed or provided on CD and copied
to a computer. The key is specic to a gauge’s serial number, so the key can only be used with the
gauge it was meant to authorize.
To authorize a gauge, connect the gauge to your computer, then select File > Authorize Gauge
from the main menu. This starts the Authorization Wizard—follow the on screen instructions.
Page 15

Page 12 • DataLoggerXP User’s Manual
XP2i DataLogger Gauge Operation
When in data logging mode, XP2i provides data logging capability along with the many of the
features of a standard XP2i. In order to allow operation as a data logger, some of the functionality
of the standard XP2i has been removed. However, using DataLoggerXP, it is possible to switch the
XP2i ‘s mode as needed.
Differences Between the XP2i Data Logger and XP2i
Other than the data logging functionality itself, the changes in gauge behavior while in data logger mode is listed below:
•
Units (PSI, kPA, etc.) are set to the gauge’s default unit and cannot be changed*.
•
The UNITS button is used to start and stop runs
•
The PEAK button is used to store data when in on demand logging type
•
The standard mode serial commands are not supported
•
The backlight will not automatically turn o
•
“No Auto O” mode does not apply – once the gauge is turned on, it remains on until the ON
button is pressed to turn it o.
•
Userspan and H2O reference cannot be changed.
•
The unit never fully turns o, aecting storage life – see section 2.5 below for more details.
* Note: The default unit can be changed by selecting Change Units... under the File menu, but
this can only be done when the gauge is in data logger mode.
Logging Parameters
When viewing the logging interval on the gauge, it will always be presented in seconds. Logging
type is indicated by a digit—1 through 4 correspond to actual, average, average with peaks, and
on demand types, respectively. These settings can be adjusted directly on the gauge, allowing
changes in logging congurations without the need of the computer.
Unit Operation
The following buttons and button combinations are used to control the XP2i. Where two keys are
indicated, the operation is executed by pressing and holding down the rst key indicated then
pressing and holding down the second key until the action is completed.
UNITS + ON: Used only when the gauge is turned o, this
causes the XP2i to enter logging type and logging interval
selection mode.
+
Page 16

DataLoggerXP User’s Manual • Page 13
C R Y S T A L
e n g i n e e r i n g
c o r p o r a t i o n
The PEAK key will cycle through the types, where “Lt 1” is Actual, “Lt 2” is Average, “Lt 3” is Average
with peaks, and “Lt 4” is on demand. The UNITS key accepts the format and the display advances
to the logging interval, displayed in seconds.
The PEAK key decrements and the ZERO key increments the logging interval. The UNITS key accepts the logging interval and the display reverts to normal. Note that when in on demand logging type, the logging interval will not be displayed.
UNITS: Pressing and holding this button causes the XP2i to display information
about the logging state, and to start or stop logging. Immediately after pressing the
UNITS button, the gauge will display the operating mode as one of these values:
The logging memory is clear, data is empty, and the XP2i is idle.
The XP2i is logging data.
The XP2i is logging in on demand logging type.
The XP2i is not logging data but there is room for more data.
The XP2i is not logging data and memory is full.
Authorization is required before additional logging is allowed.
If you continue to hold the UNITS button, the number of bytes remaining in logging memory is
displayed.
Holding the UNITS button even longer will then cause the operating state to change as follows:
•
If the gauge is in a CLR or OFF state, the gauge will briey display START, begin logging data,
and change its state to ON.
•
If the gauge is in an ON state, it will stop logging, briey display STOP, and change its state to
OFF.
•
The FULL state will not change by holding the UNITS button. In order to get out of the FULL
state, you must clear the logging memory as shown below.
UNITS + ZERO: Holding these two keys will clear the log-
ging memory of the XP2i. If the gauge is in logging type (ON),
you must rst stop logging as described above. When these
buttons are pressed, the gauge will rst display its current
state (OFF, CLR, etc), then the number of bytes remaining, and then CLR, indicating the clear action
was successful. Once cleared, the XP2i will be in the CLR state.
+
Page 17

Page 14 • DataLoggerXP User’s Manual
PEAK: When in data format 4, a reading is stored each time the PEAK key is
pressed. When in this mode there is no need to press and hold UNITS to begin
logging, although it is permissible to do so. If the unit has not already entered data
logging type, “Start” is briey displayed. The PEAK key has no function except as
described above.
Operating Behavior
Each time a data point is stored, the peak HI and LOW icons will blink, giving you visual feed back
as data points are recorded. While logging is active, the unit icon will blink. The blink rate indicates
the logging type the unit is in. When the gauge is in on demand logging type, the units icon will
blink on and o equally (i.e., on for the same amount of time as it is o). In all other modes, the
gauge blinks at a 3:1 on/o rate (i.e., on for three times as long as it is o). Note that when the
units of the gauge are user dened, no units icon will be lit at any time.
On/Off Control
While in data logger mode, the gauge never actually turns o (even if the display is blank). This is
to maintain the accuracy of the real-time clock inside the unit. As a result, the operational life of
the unit is aected accordingly. When the unit is o, or displaying “d oFF”, it still draws about onehalf the power as it does in full operation. This means that a gauge in data logger mode displaying
“d oFF” will continue to draw down the batteries to a BATT condition, though half as fast as if the
gauge were left on continuously—approximately 3,000 hours. However, you cannot connect to
the gauge if “d oFF” is displayed – you must turn on the gauge to connect.
In addition, during logging in modes 1, 2, or 3, the ON/OFF key is disabled. If the ON/OFF key is
pressed, ON is displayed and the XP2i remains on. In logging type 4 (on demand), the ON/OFF key
will turn the unit o as described above.
If the unit is not logging, or is logging in on demand logging type, it can be placed in standby
mode as described above by pressing the ON/OFF button. If the unit has logged data, the display
will show “d oFF” to indicate that the gauge is in an o state, but contains data not yet transferred
to the computer.
XP2i Reset or Battery Change
Data collected by the XP2i will not be lost with a gauge reset or battery change, although any run
in progress will be stopped. In addition, a reset or battery change will aect the operation of the
gauge’s real-time clock. When the XP2i is connected to DataLoggerXP and the logging parameters
are set, DataLoggerXP also sets the gauge’s real-time clock. However, if the gauge resets, or if the
batteries are changed or become momentarily disconnected (if the gauge is dropped to the oor,
for instance), the real-time clock can be reset. When this occurs, the time stamps of subsequently
logged data will no longer be correct. DataLoggerXP reacts to this by attempting to resynchronize
Page 18

DataLoggerXP User’s Manual • Page 15
C R Y S T A L
e n g i n e e r i n g
c o r p o r a t i o n
the gauge’s clock with the computer’s clock which will allow the time stamps to be correctly read.
However, if multiple resets have occurred with the gauge, only time stamps after the last reset will
be xed. When a reset occurs, it is stored as a run with a reset event and no data.
Excel Templates
In order to provide for a exible reporting solution, DataLoggerXP is capable of directly interfacing
with Microsoft® Excel to paste run data for reporting and graphing. DataLoggerXP supports Excel
95 through Excel 2003. This section assumes some familiarity with Excel.
Note: For information on how to save data to the dierent le types see “Saving”, on pg 11.
DataLoggerXP works with two Excel le types: workbook (.xls) les and template (.xlt) les. The
key dierence is when using a template le, the template is loaded and data is copied to a specic
location, whereas a workbook le is a new document with only the run data.
Workbooks
When using workbook les, Excel is started and a new workbook is created with the default worksheets. Data is then copied into the rst worksheet at cell location A1. The le is then saved using
the lename provided by the user. If the le already exists, it will be overwritten with the new
workbook le. Any formatting or reporting is then done by the user after the document is created.
Templates
As opposed to workbooks, templates use an existing Excel template le to create the new workbook. This allows any amount of formatting or graphing to be done beforehand and stored as a
template le. Then, when the Excel workbook is created, the template le is opened and data is
copied to the location specied in the Options Dialog. When selecting the template le directly
during the le save process, the new workbook is created with the Excel template using the name
of the template le followed by a number, typically 1. The user must also save the le manually,
making any changes to the le name as necessary. However, it is possible to save directly to the
user provided le name, see section 3.2.2 below for more information.
As an example on how to use templates, a sample template le, DataLoggerXP.xlt, is located in the
DataLoggerXP program directory, and can be used as-is or modied to meet the user’s requirements.
Excel Password Protection
It is possible to password protect the Excel workbook by selecting the Password Protect Excel
Documents checkbox in the Options dialog. Only the data sheet and rst sheet of the workbook
will be password protected. To protect other sheets, password protect them in the template itself.
Page 19

Page 16 • DataLoggerXP User’s Manual
Data
Data is copied to the location specied in the Options Dialog. The user must provide the sheet,
row, and column reference. If the reference is invalid, the data will be copied to the default active
cell when the template is opened (usually column A of row 1 in the rst worksheet in the Excel
workbook). When the data is copied, it will overwrite any existing cell contents, but cell formatting
will not be modied.
Default Template File
It is possible to congure DataLoggerXP to always use a specic template le when saving data in
Excel workbook format. By checking the Use Excel template by default checkbox in the Options
Dialog and selecting the Excel template le to use, when saving data, the system will automatically open this template le to create the workbook. The Use Excel template by default option
also changes the default save type from a Comma Separated Text File to an Excel Workbook.
Service and Support
Troubleshooting
This section provides possible solutions to common problems encountered when working with
DataLoggerXP and the XP2i in data logging mode. For additional troubleshooting support, please
see the troubleshooting section in the XP2i operation manual.
Problem: Gauge display is constantly ashing
Solution: This condition indicates the gauge’s onboard program is corrupted. This is typically
caused by a failure during a mode switch, and be recovered by using the File/Repair Gauge…
menu option. If this process fails, contact customer service for support.
Problem: The XP2i will not connect with DataloggerXP
Solution: Make sure the gauge is on (and not displaying “d o”).
How to contact us:
Phone (805) 595-5477
Toll-Free (800) 444-1850
Fax (805) 595-5466
Email service@crystalengineering.net
Web www.crystalengineering.net
Send your comments to: feedback@crystalengineering.net
Page 20

DataLoggerXP User’s Manual • Page 17
C R Y S T A L
e n g i n e e r i n g
c o r p o r a t i o n
Disclaimer of Warranty
DATALOGGERXP AND THE CORRESPONDING PRESSURE GAUGE (COLLECTIVELY “PRODUCT”)
IS PROVIDED “AS IS.” CRYSTAL ENGINEERING CORPORATION DOES NOT AND CANNOT WAR-
RANT THE PERFORMANCE OR RESULTS PURCHASER MAY OBTAIN BY USING THE PRODUCT.
CRYSTAL ENGINEERING CORPORATION MAKES NO PROMISES, REPRESENTATIONS, OR WAR-
RANTIES, EXPRESS OR IMPLIED, INCLUDING, BUT NOT LIMITED TO, THE PRODUCT’S CONDI-
TION, ITS CONFORMITY TO ANY REPRESENTATION OR DESCRIPTION, THE EXISTENCE OF ANY
LATENT OR PATENT DEFECTS, ANY NEGLIGENCE, AND ITS MERCHANTABILITY OR FITNESS FOR
A PARTICULAR USE.
Good data processing procedure dictates that any Product be thoroughly tested with non-
critical data before relying on it. The purchaser must assume the entire risk of using the Prod-
uct. ANY LIABILITY OF CRYSTAL ENGINEERING CORPORATION FOR A DEFECTIVE PRODUCT
WILL BE LIMITED EXCLUSIVELY TO REPLACEMENT OF PURCHASER’S COPY OF THE PRODUCT
WITH ANOTHER COPY OR, IF SO ELECTED BY CRYSTAL ENGINEERING CORPORATION IN ITS
SOLE DISCRETION, REFUND OF THE INITIAL AMOUNT PAID BY PURCHASER TO CRYSTAL EN-
GINEERING CORPORATION FOR THE PRODUCT. IN NO EVENT WILL CRYSTAL ENGINEERING
CORPORATION OR ITS SUPPLIERS BE LIABLE TO PURCHASER FOR ANY CONSEQUENTIAL, IN-
CIDENTAL OR SPECIAL DAMAGES, INCLUDING ANY LOST PROFITS OR LOST SAVINGS, EVEN
IF CRYSTAL ENGINEERING CORPORATION WAS ADVISED OF THE POSSIBILITY OF SUCH DAM-
AGES, OR FOR ANY CLAIM BY ANY THIRD PARTY.
Page 21

C R Y S T A L
engineering corporation
© 2006 Crystal Engineering Corporation
708 Fiero Lane, Suite 9, San Luis Obispo, California 93401-8701
PN: 3212—Re v C2
 Loading...