

Cryptophone 220 User Manual
USER MANUAL SUPPLEMENT
for the CryptoPhone 220
Dear CryptoPhone customer,
thank you very much for purchasing the
latest generation of secure voice
communication devices, powered by
GSMK CryptoPhone™ technology: the
CryptoPhone 220.
The smaller form factor and the
technological advances incorporated in
the underlying hardware platform have
allowed us to introduce certain technical
improvements, which result in some
minor changes to the user manual. This
user manual supplement describes these
changes.
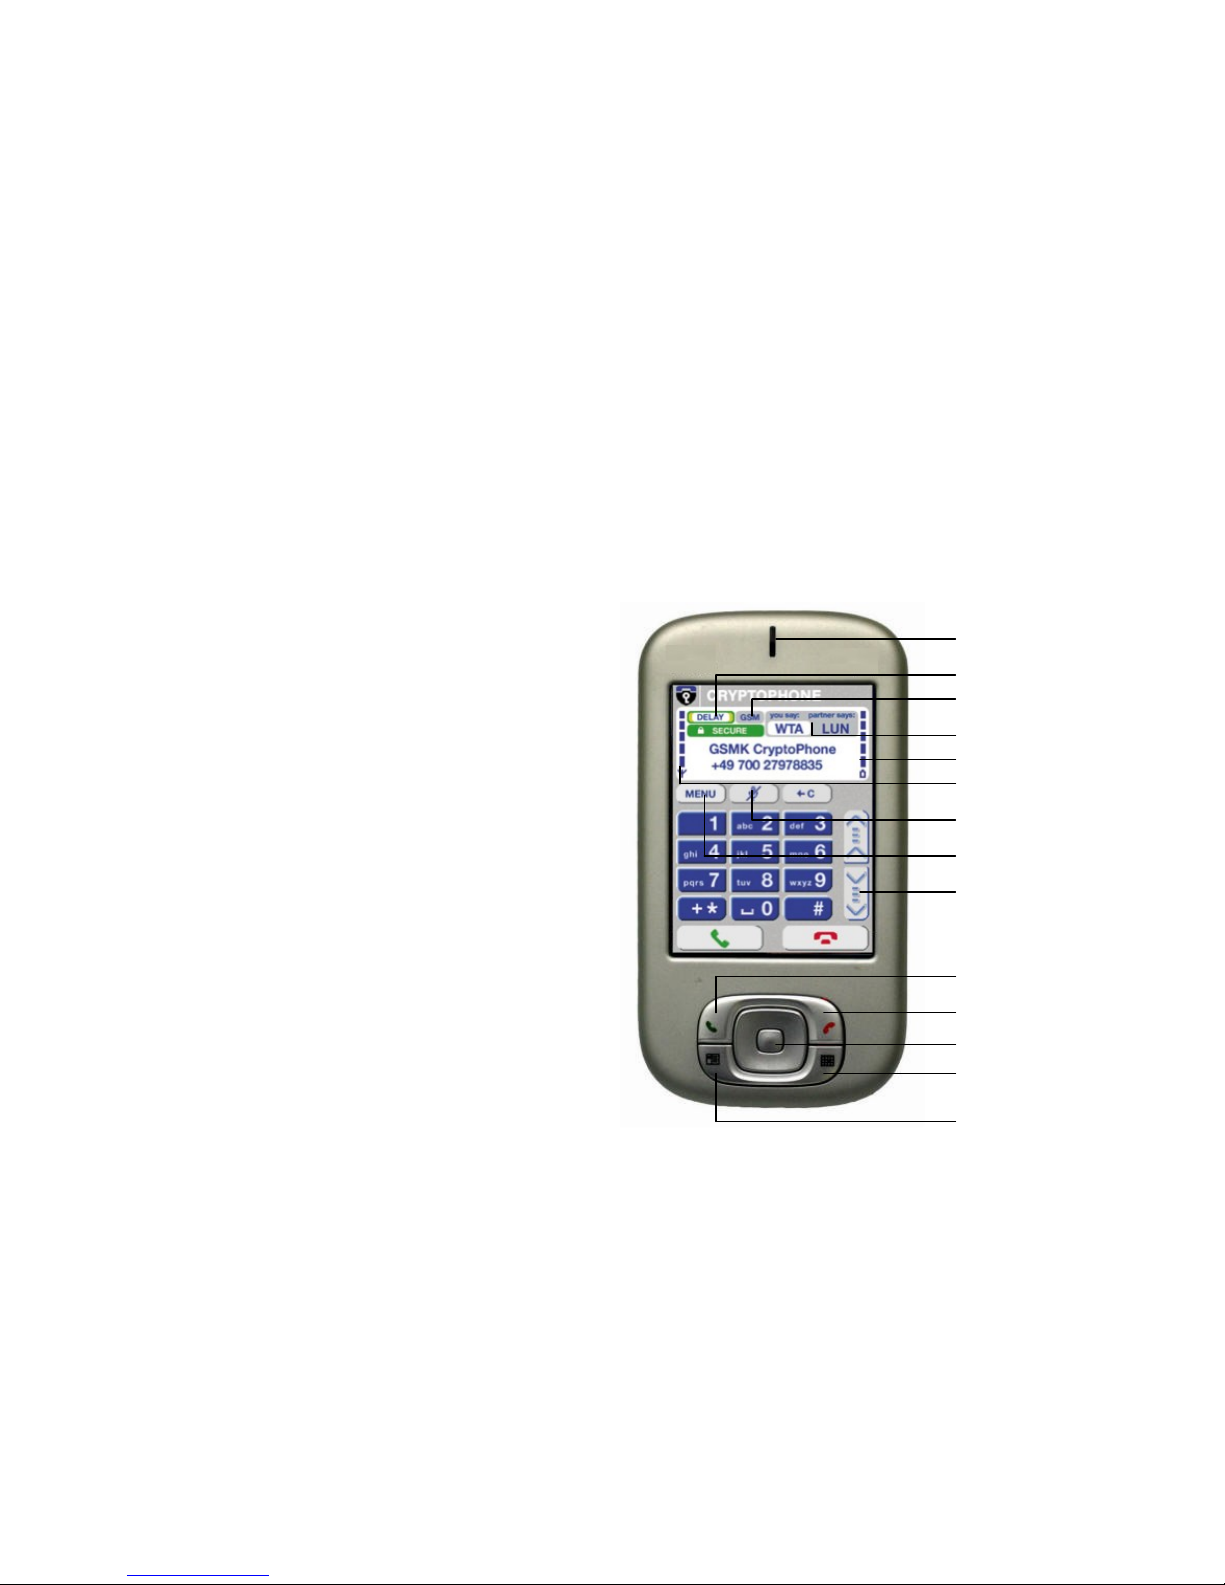
Speaker
Talk
Contacts
Calendar
Hang up
Center
Delay indicator
Line type indicator
Security code (Hash)
Battery meter
GSM signal strength
Mute button
Configuration menu
Up / down buttons

Charging (page 5)
The CryptoPhone 220 has an improved
standby time of 190 hours and a talk
time of 3 hours 30 minutes in secure
mode.
It also no longer requires a desk stand,
but can be charged directly from either
the supplied AC power adaptor or your
personal computer’s USB port, using the
supplied USB cable.
Speaker
The CryptoPhone 220 features two
speakers, one for regular GSM calls in
front of the device and one for encrypted
calls on the back. For best audio quality,
always use the speaker on the back of
the device when making encrypted calls.
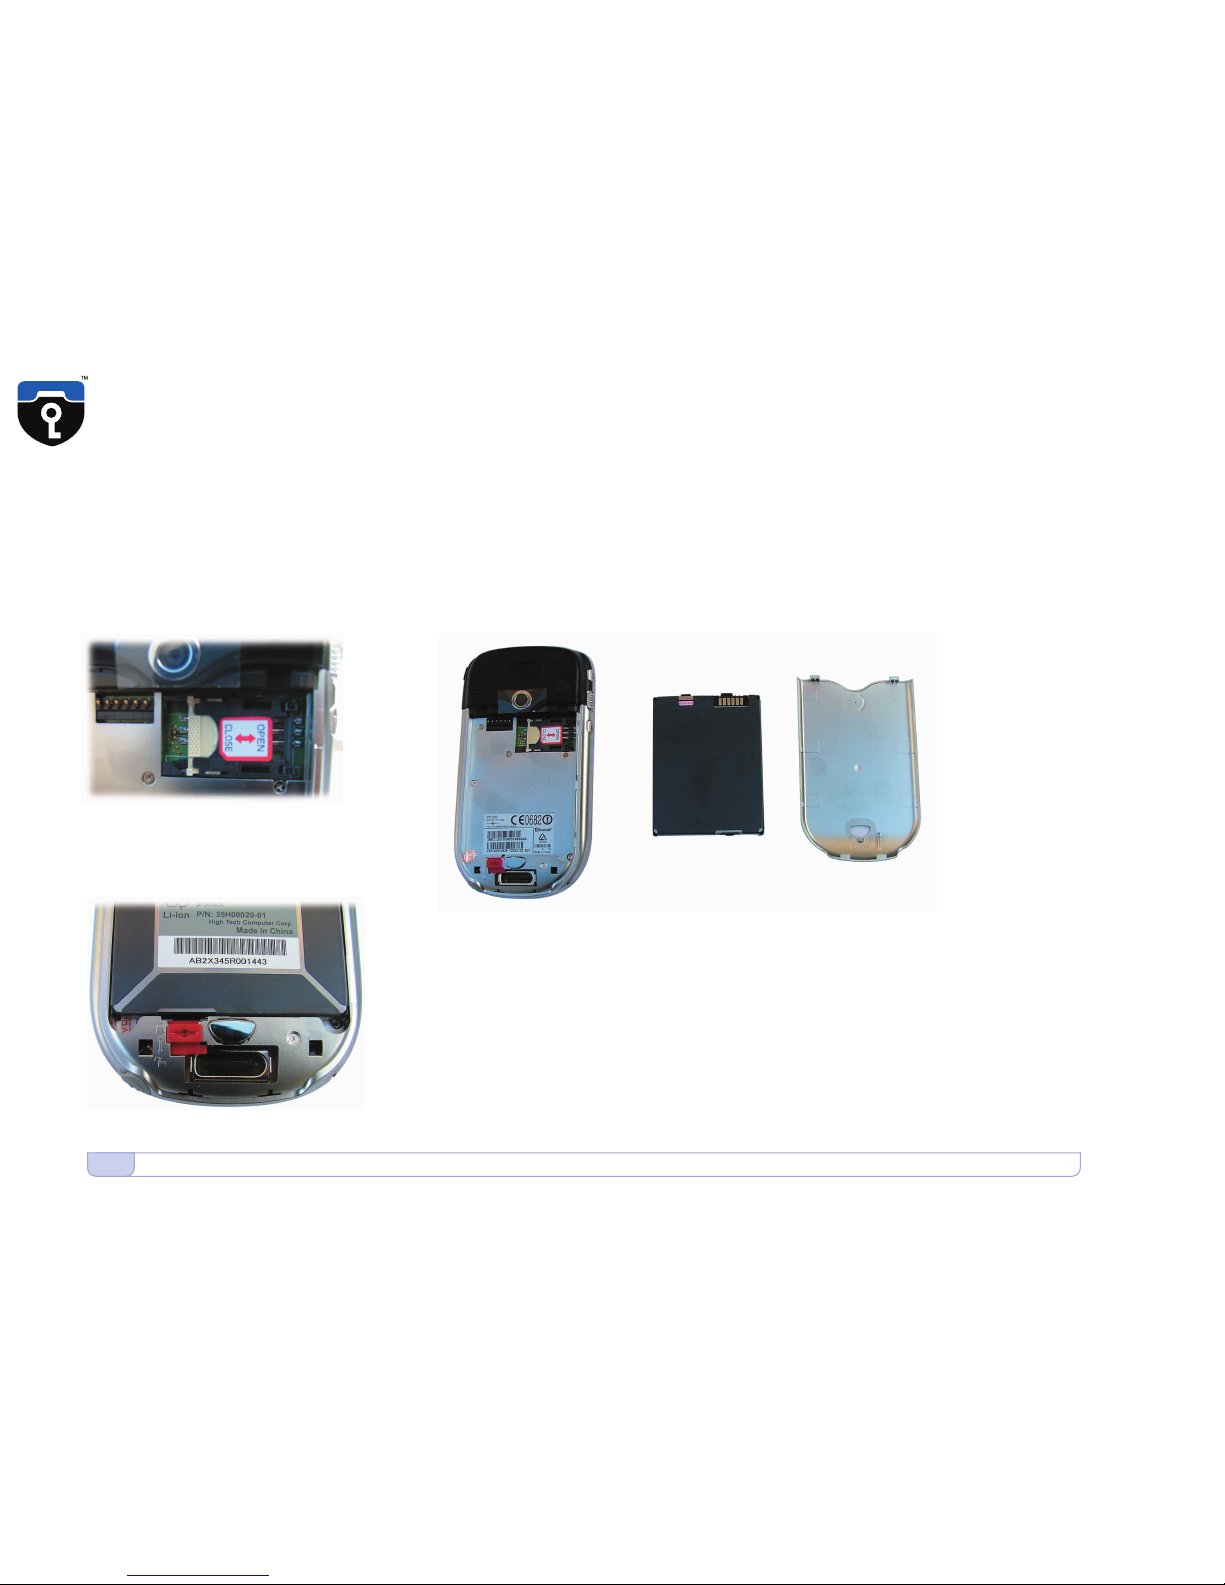
Inserting your SIM card (page 6)
The CryptoPhone 220’s back cover can
be removed by carefully sliding the lower
part of the back cover downwards. It is
no longer necessary to press a button.
The SIM card slot of the CryptoPhone
220 is in the upper left corner of the
device. Insert your SIM card with its gold
contacts face down. The SIM card’s cut
off corner should match the cut off
corner in the slot. If you wish to take the
SIM card out, use the stylus to press into
the SIM card slot hole, and then lightly
lift up the SIM card while applying gentle
pressure on left-most side of the SIM
card, and then slide it out.
After inserting the battery, push the red
battery lock into place to fix the battery.
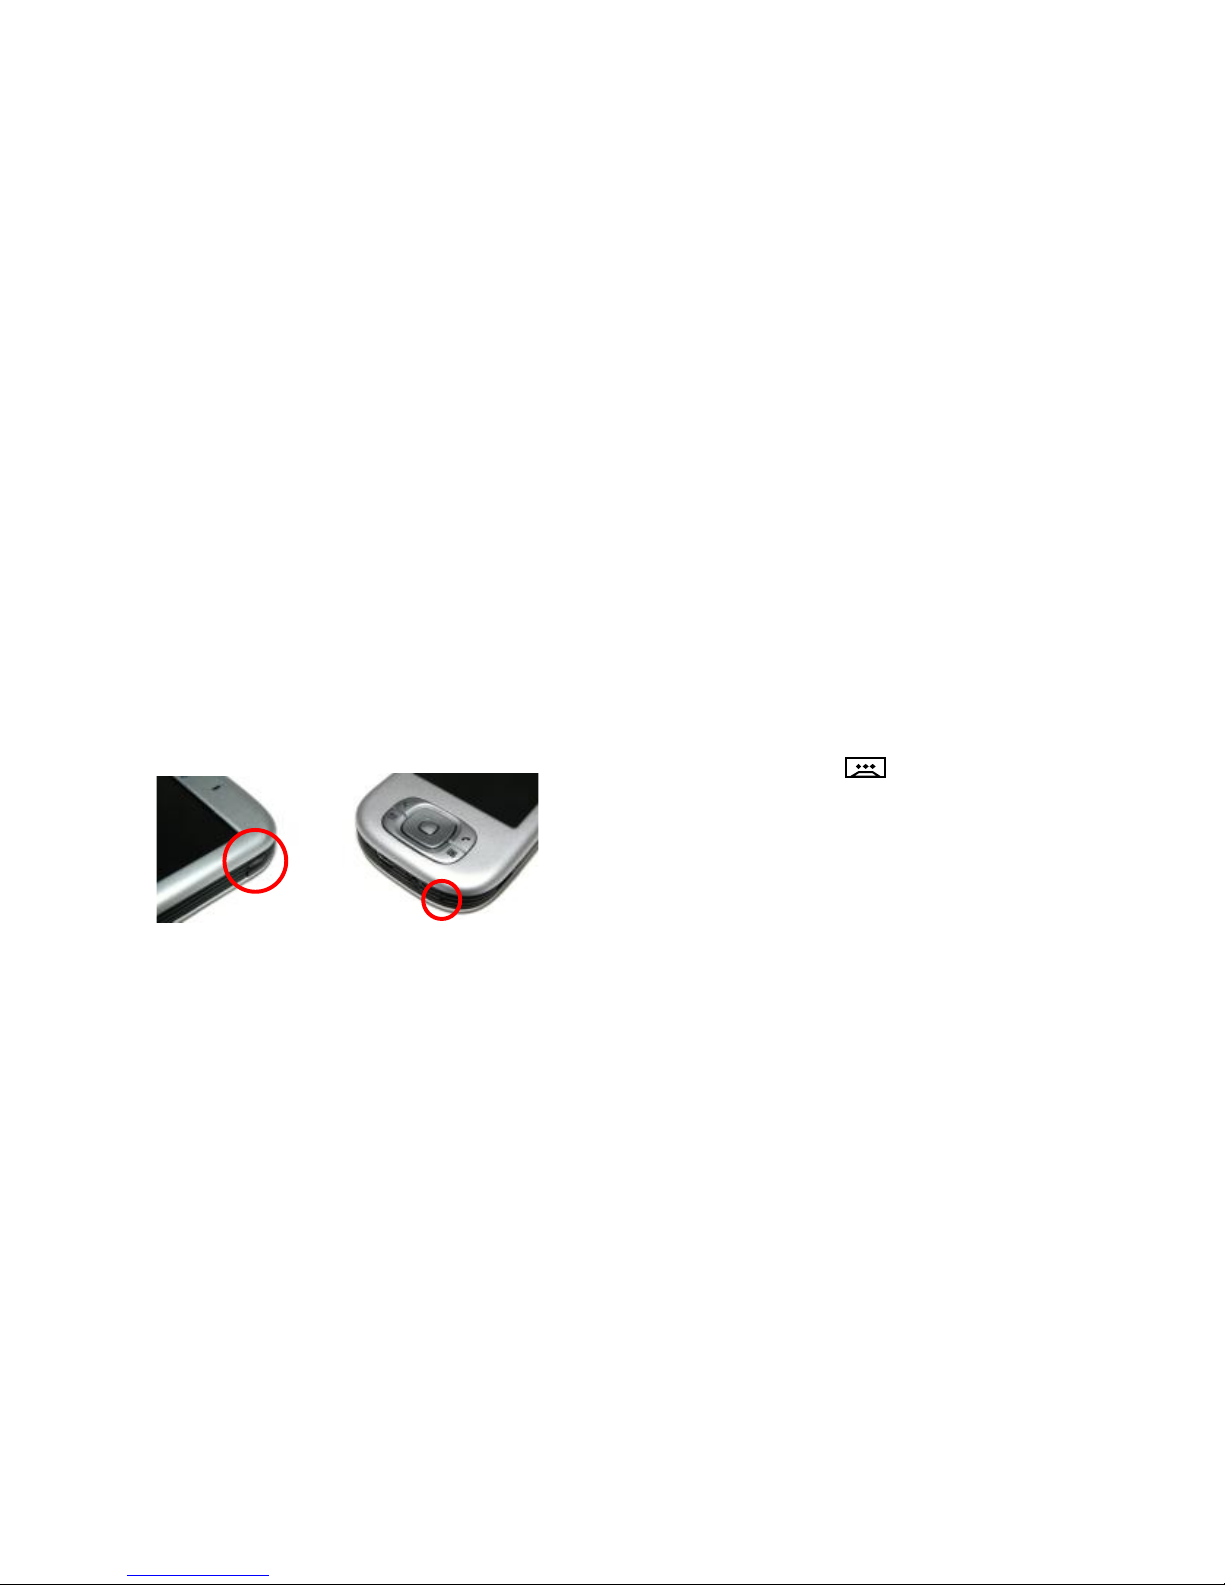
Standby (page 11)
The CryptoPhone 220’s standby button is
no longer located on top of the device,
but on its right hand side.
The soft reset button is no longer located
on the bottom left side of the device, but
on its bottom right side.
Standby button Soft reset button
Mute during call (page 21)
To suppress audible echo that might
otherwise disturb your conversation
when not using a headset, the
CryptoPhone 220 features a “Push to
Talk” option. If the “Push to Talk” option
is activated, the microphone is switched
off by default and will only be switched
on while you press and hold down the
“record” button ( ) on the left side
of the unit while talking.
To activate or deactivate the “Push to
Talk” option, press the “Menu” button on
the CryptoPhone application, then select
or deselect the “Push to Talk” option on
the bottom of the menu screen and
press “OK”.
3
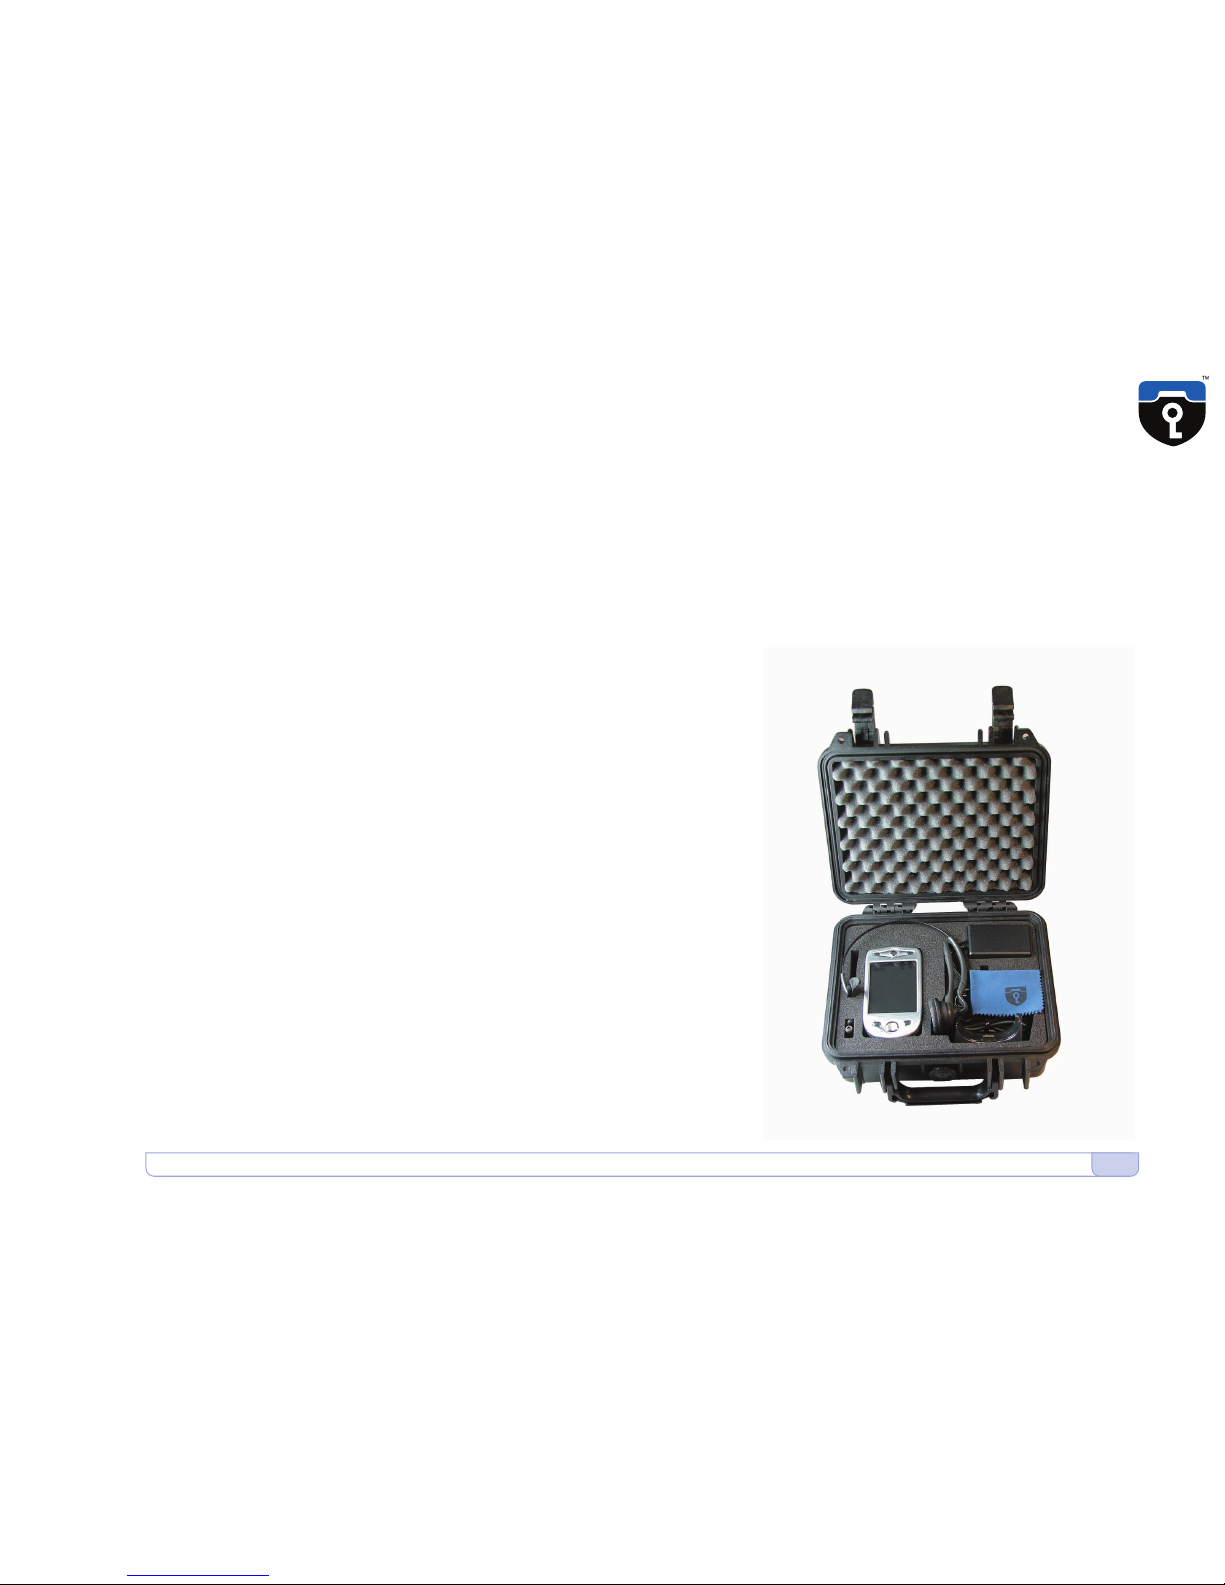
Unpacking
carrying case •3•
Unpacking
Your CryptoPhone was packaged using several tamper-evident seals to
ensure that nobody manipulated your device while it was in transit.
Please take a minute to follow the security verification procedure outlined
in the anti-tamper verification instructions that are placed above the
CryptoPhone inside the carrying case. To open the carrying case, place
it in front of you, so that the handle faces you. Then use a sharp knife to
cut the seals. Now open the carrying case by lifting upwards the levers
on the front. The levers are robust and at first use might require a bit of
force to move. Inside the carrying case you will find your CryptoPhone
packaged in a security sealed, transparent plastic film nested in the foam
pad. Please also verify the plastic film and seal for tampering. The
unevenness of the film and the seal are intentional and a method of
individualization to make tampering harder. You can verify the authenticity
with the Anti Tamper Verification procedure. You will also find the headset,
desk stand, power supply, direct charge adaptor and headset ear clip in
the carrying case. (carrying case •3•)
Behind the foam pad in the lid of the carrying case you will find the
Admin Policy Password and other printed documentation. We recommend
to store this manual in the lid behind the foam as well so it won't get
lost.
4
General • Charging
General
Your CryptoPhone is based on a generic tri-band (900/1800/1900) GSM
equipped PDA that is sold under different brands, and uses the PocketPC
2003 operating system. On this device, a few additional applications
besides the necessary components for the CryptoPhone are installed,
like an address book, a calendar and an unencrypted phone application.
The firmware and operating system have been modified to accommodate
the CryptoPhone functionality and provide added security, so a number
of things that you might know from other PocketPC PDAs are not available
on the GSMK CryptoPhone for security reasons. We supply the original
PocketPC2003 manuals, license sticker and CD with the GSMK CryptoPhone
200, but you need to be aware that some functionality of the PocketPC
OS have been disabled by us for security reasons. Installing 3rd party
applications requires an Admin Policy Password. Do not try to use Pocket
PC or Windows Mobile system updates as this will destroy the CryptoPhone
firmware and void your warranty.
Charging
Before using your CryptoPhone, we recommend that you charge the
battery until full. In order to do this, you must connect the power supply
to the CryptoPhone. Depending on your location, you may need a plug
adaptor to use the power supply if the plug does not fit in your outlet.
The power supply is rated 100-240V, which means it will accept your line
voltage without conversion as long as it lies within this range. The LED

5
Charging
Direct-charge adaptor •5•
Desk Stand •5•
in the upper right corner of your CryptoPhone will change its color to
yellow while the device is being charged, and to green when fully charged.
You can either charge the CryptoPhone in the desk stand or use the small
direct-charge adaptor (Direct-charge adaptor •5•). You can also see the
current battery status by tapping on the clock item on the upper right
corner of the CryptoPhone display. The battery of the CryptoPhone allows
for a standby time of 180 hours and a talk time of 3 hours 15 minutes in
secure mode. Due to the higher power consumption of the built-in
computer and the backlit display, this is less than what you might be
used to from normal GSM phones. Also please note that these times
may vary depending on your distance to the nearest GSM base station:
the further away the base station, the more power your phone needs to
use to reach it.
If you purchase a second battery for the CryptoPhone, you can charge
it in the Desk Stand. Spare batteries are available in normal electronic
stores that sell PDAs and mobile phones (Desk Stand •5•).
Note: we recommend to charge your GSMK CryptoPhone every night
or have a charged spare battery ready, so you will not run out of
battery unexpectedly. For security reasons explained later in the
chapter ‘Security, Storage and Handling’, we suggest you place the
CryptoPhone in your close vicinity such that it is under your permanent
supervision while it is charging. If the phone rings or you need to
place a call while the phone is charging, you can leave it plugged in
while operating the phone.
6
Insert your SIM and Switch On for the first time
SIM card slot •6• back cover •6•
battery •6•
Inserting your SIM card and switching the phone on for the first time
You need to insert a valid GSM card (SIM) in the GSMK CryptoPhone 200
in order to be able to place calls. To insert the SIM, remove the back cover
of the device by pressing the silver button on the backside and sliding
the cover downwards. (back cover •6•)
You will see the SIM card slot in the upper right corner of the device (SIM
card slot •6•). Lift up the SIM card cover and insert the SIM. Then push
the SIM card cover down and push it towards the "closed" position.
Now insert the battery (which is stored in the carrying case on the left
hand side of the phone) and push the red battery lock upwards to secure
the battery. (battery •6•)
7
Insert your SIM and Switch On for the first time • Security Profile Manager
Security profile selector •7•
This will power up the device. Replace the back cover by sliding it gently
upwards onto the device.
Now the screen will lighten up and the GSMK CryptoPhone 200 begins
its firmware initialization. This may take a moment. You will then be
requested to calibrate the touchscreen of the GSMK CryptoPhone 200 by
tapping the center of a cross with your stylus as it moves around the
screen and go through a brief tutorial on how to do Copy & Paste on the
device. Simply follow the instructions on the screen. After the calibration
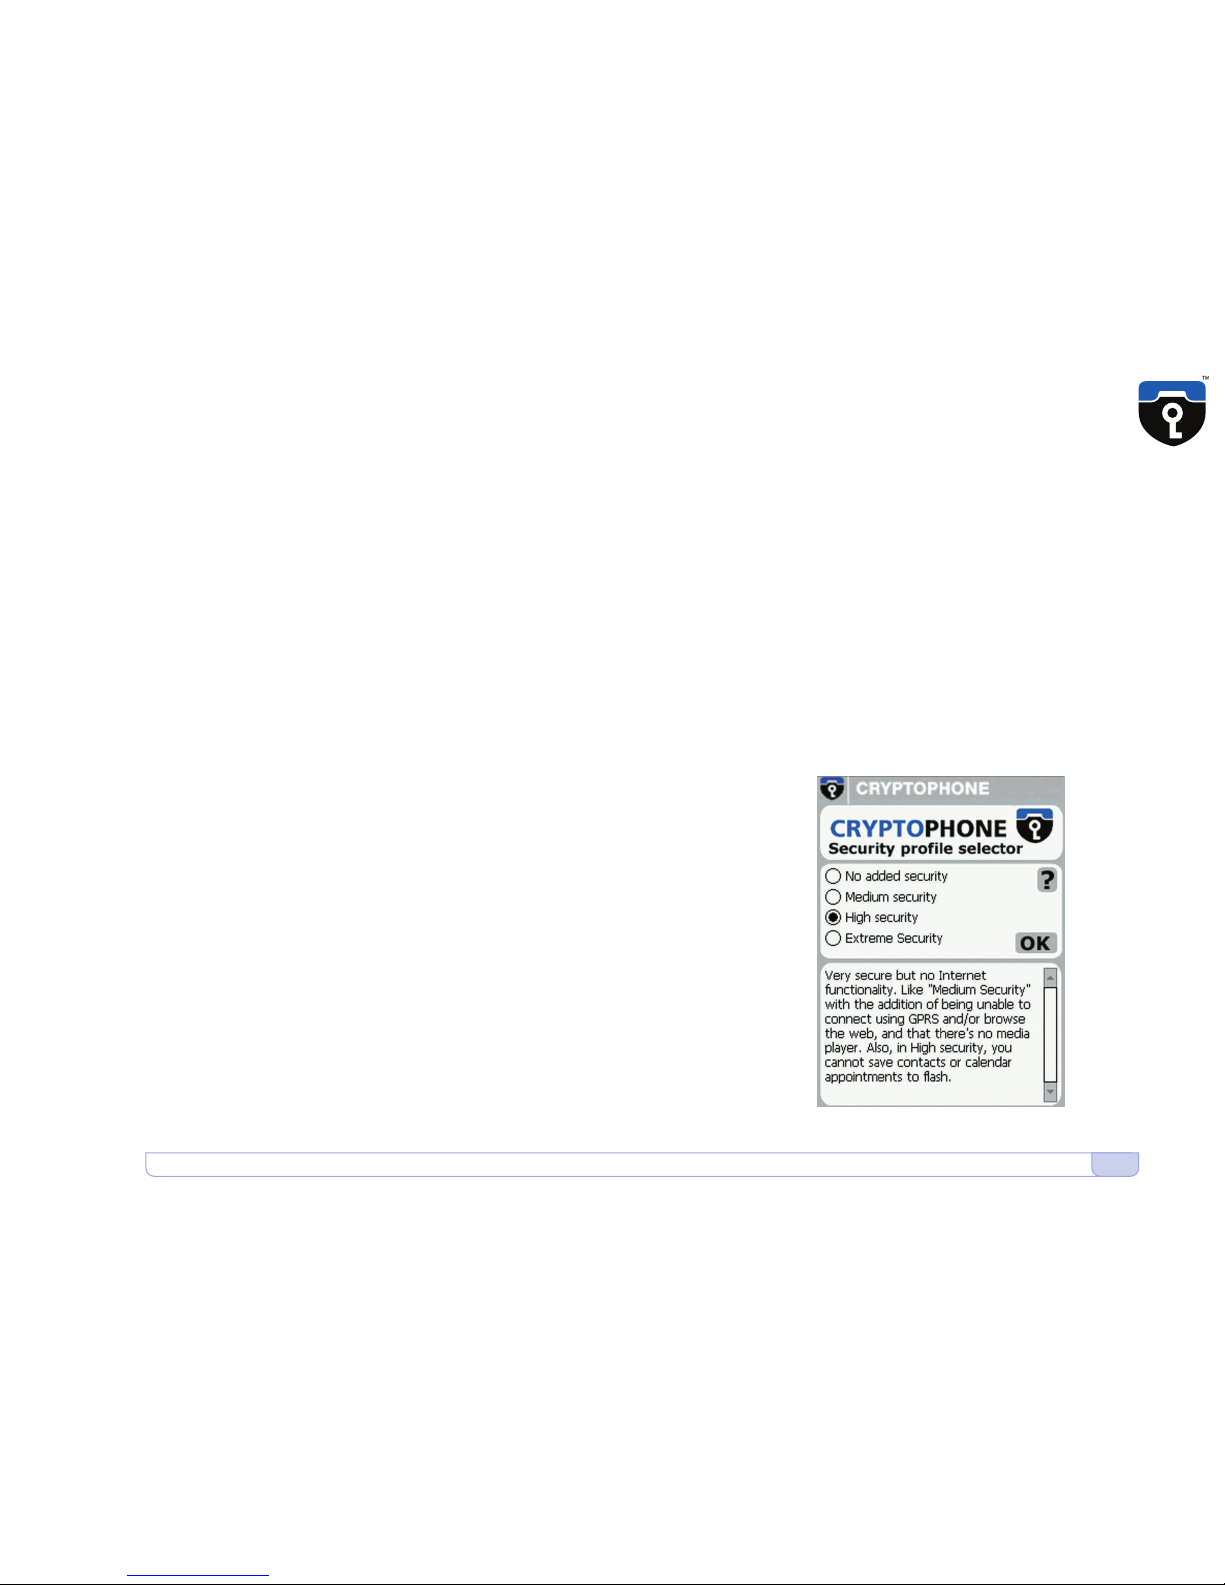
and tutorial, the Security Profile Manager will boot up.
Security Profile Manager
The CryptoPhone is based on the Windows Mobile (PocketPC 2003)
operating system which contains some potentially vulnerable, yet
convenient features and applications. To reduce the risk of attacks against
your CryptoPhone's integrity, we recommend to disable some of these
features. The Security Profile Manager helps you to select between
security and extra features: the more features you enable, the larger the
risk of vulnerabilities. In the following section, the different settings of
the Security Profile Manager are explained in detail. Please take your
time to read all the options to make an informed decision. After you have
selected a Security Profile, click the OK button on the screen (Security
profile selector •7•). Now the phone will install the operating system
components according to the profile you selected.

8
Security Profile Manager • Security Profile choises
The default setting is "Medium Security" which provides a good balance
of convenience and security for most users.
Note: You can always change the Security Profile setting by performing
a Cold Boot (see page 14). After each Cold Boot you will be asked for
your choice of Security Settings.
Security Profile choices:
No Added Security
This setting leaves the CryptoPhone unprotected against potential attacks
on the operating system. New threats (against any system) are discovered
from time to time, and we feel selecting "No Added Security" exposes
the CryptoPhone to unneccessary risk. Choose this setting only if you
really need one of the services that would otherwise be disabled in the
"Medium security" setting and if doing so matches your risk profile.
Medium Security
At this level of security, the CryptoPhone disables a number of functions
which are likely vulnerable to attacks, but are not essential for most users.
Once you select "Medium Security", the following functionality is disabled:
• Picture Caller ID and Picture Contacts
• .NET compact framework
• Javascript
• MS scripting
 Loading...