

Page 1
D E S I G N E D T O L E A D
Manufacturer of Hydronic Heating Products
P.O. Box 14818 3633 I. Street
Philadelphia, PA 19134
Tel: (215) 535-8900 • Fax: (215) 535-9736 • www.crownboiler.com
Models:
: Improper installation, adjustment, alteration,
MWC116ENT
MWC116ELT
MWC116ENL
MWC116ELL
service or maintenance can cause property damage, injury,
or loss of life. For assistance or additional information, con-
sult a qualied installer, service agency or the gas supplier.
This boiler requires a special venting system. Read these
instructions carefully before installing.
Page 2

Page 3

Table of Contents
I. Product Description 2
II. Specifi cations 4
III. Before Installing 5
IV. Locating The Boiler 5
V. Mounting The Boiler 7
VI. Air For Ventilation 10
VII. Venting 12
A. Vent System Design 12
B. Removing An Existing Boiler From Common Chimney 19
C. Assembly of Crown 60/100 Concentric Venting 20
D. Assembly of Crown 80/125 Concentric Venting 24
E. Condensate Trap and Drain Line 33
VIII. Gas Piping 34
IX. System Piping 36
X. Domestic Water Piping 43
XI. Wiring 46
XII. Start-up and Checkout 51
XIII. Operation 58
XIV. Service and Maintenance 62
XV. Troubleshooting 66
XVI. Parts 69
Appendix A Special Requirements For Side-Wall 84
Vented Appliances In The Commonwealth
of Massachusetts
1
Page 4

I Product Description
The MWC Series are gas fi red condensing boilers designed for use in forced hot water heating systems
requiring supply water temperatures of 176F or less and return water temperatures greater than 86F. The
primary heat exchanger is a copper water tube design. Additional heat is extracted from the fl ue gas in a
stainless steel secondary heat exchanger located down stream of the inducer. These boilers include a built in
circulator, expansion tank, and automatic air vent. In addition, “combi” models include a plate exchanger for
domestic hot water (DHW) generation. All MWC Series boilers are designed for installation on a wall and may
be vented vertically or horizontally with combustion air supplied from outdoors.
Key Component
1 Primary Heat Exchanger
2 Secondary Heat Exchanger
3 Inducer
4 Burner
5 Electrodes and Flame Rod
6 Circulator
7 Automatic Air Vent
8 Condensate Trap
9 Control Box
10 Differential Boiler Water Pressure Switch
11 Ignition module/Gas Valve
12 Air Pressure Switch
13 Flue Gas Temperature Limit
14 Supply Temperature Limit
* Expansion Tank
* Plate Heat Exchanger (Combi Only)
* 3-Way Diverting Valve (Combi Only)
* Supply Temperature Sensor
* DHW Temperature Sensor (Combi Only)
* DHW Flow Switch (Combi Only)
* Not visible
2
Page 5
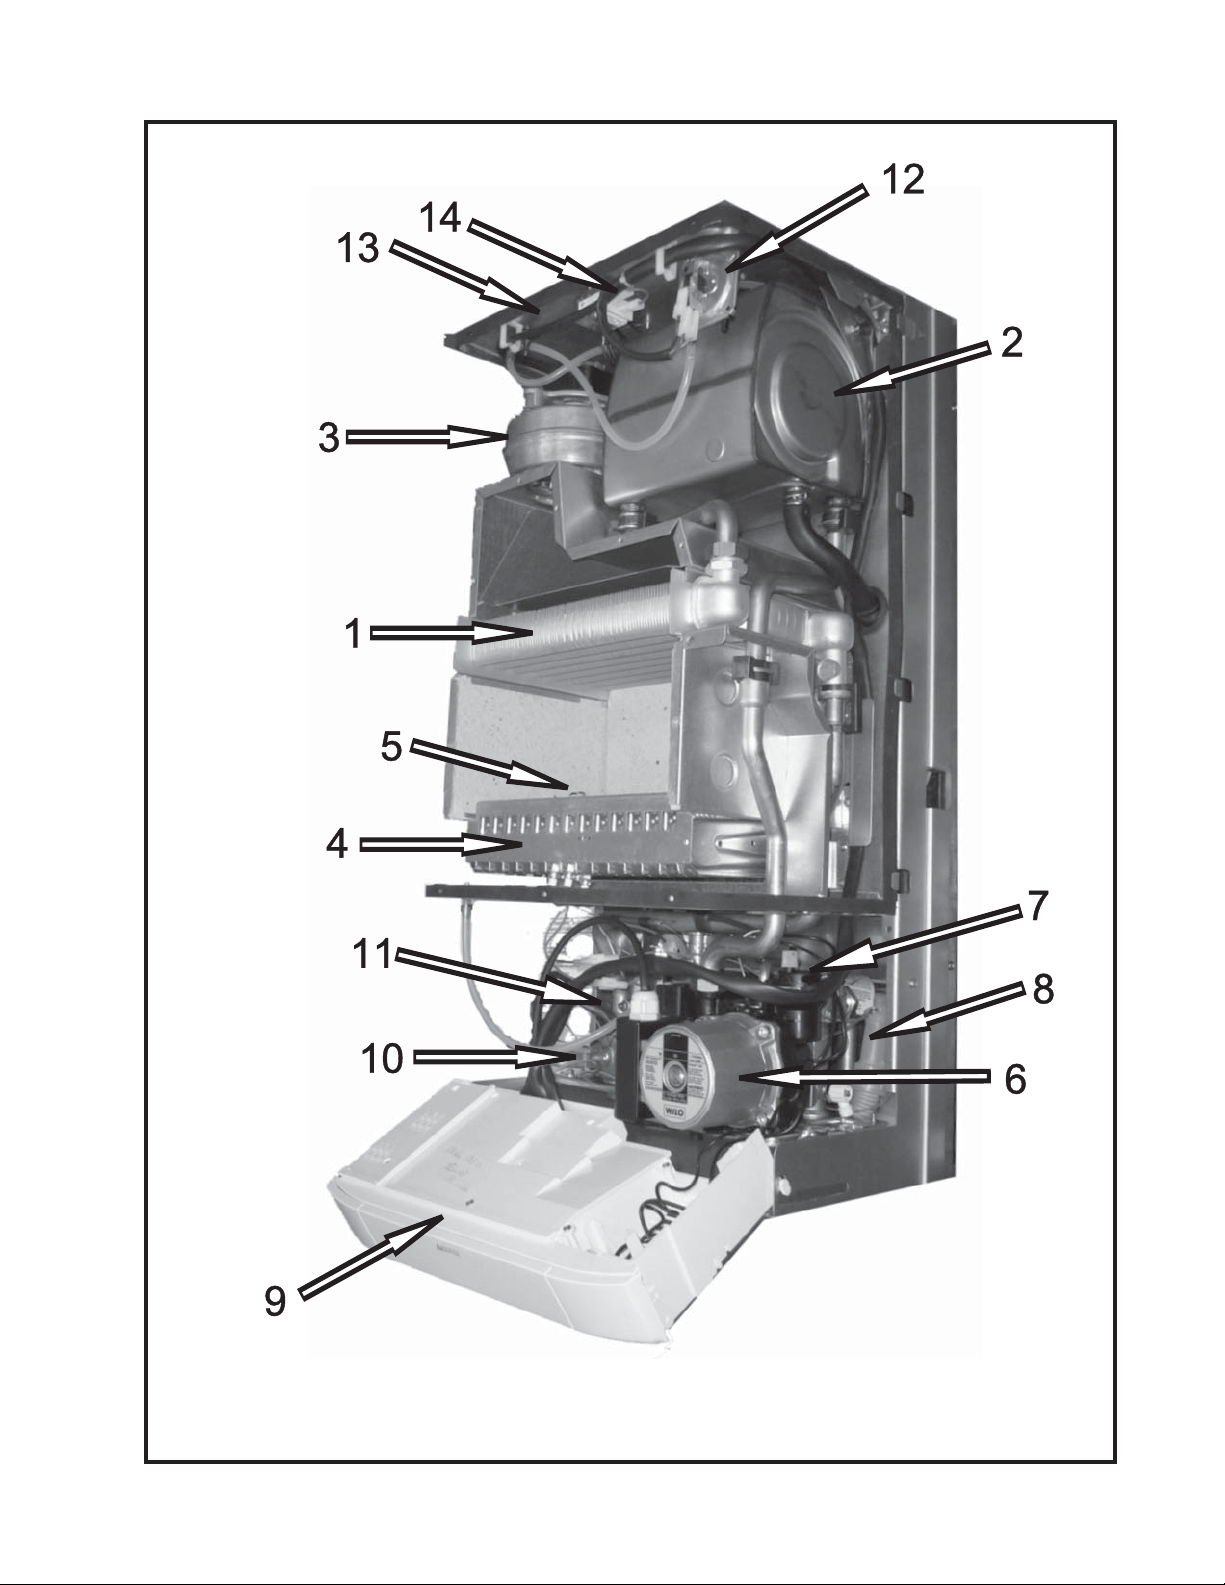
Figure 1.1: MWC Boiler Principle Components
3
Page 6
II Specifi cations
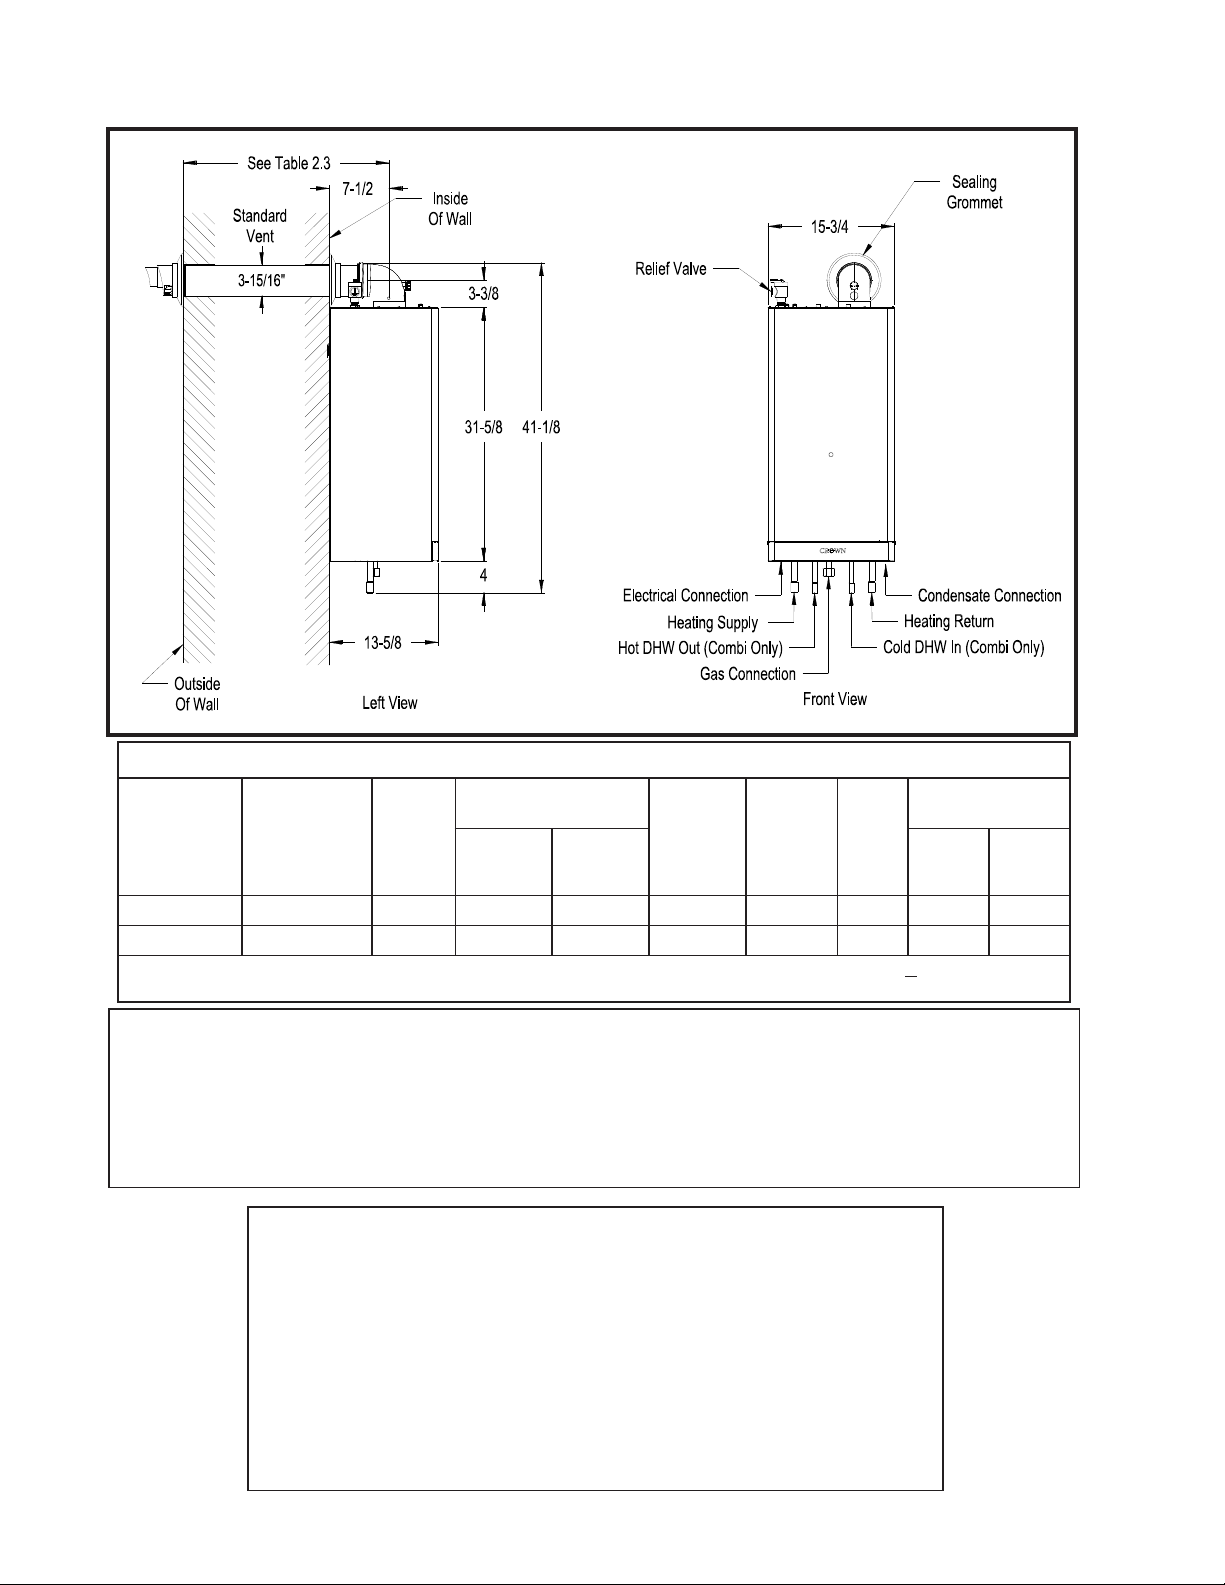
Figure 2.1: General Confi guration
Table 2.2: Ratings
MINIMUM INPUT (BTU/
MAX.
MODEL* APPLICATION
MWC116E*T Combi 116,000 75,000 49,500 102,000 89,000 85.0 2.67 2.25
MWC116E*L Heat Only 116,000 75,000 N/A 102,000 89,000 85.0 N/A N/A
* Insert suffi x “N” for natural gas and “L” for propane. Ratings are the same for both fuels (Example: MWC116ENT denotes Natural
Gas, Combi).
INPUT
(BTU/hr)
HEATING DHW 77F Rise 90F Rise
hr)
D.O.E.
HEATING
CAPY.
(BTU/hr)
IBR NET
RATING
(BTU/hr)
AFUE
DHW Output (GPM)
(%)
Table 2.3: Maximum Vent Lengths
Using 60/100mm Concentric Vent System Supplied with the Boiler ................................................................25 in.
Using Optional 60/100mm Concentric Vent Components ...............................................................................8ft -10in
Using Optional 80/125mm Concentric Vent Components ................................................................................27 ft
See Vent Section for additional venting options and requirements
Table 2.4: Other Specifi cations
Maximum Supply Temperature .............................................176 F
Minimum Continuos Return Temperature .............................86F
Maximum Allowable Working Pressure ................................30 psi
Minimum System Pressure (at boiler ...................................4.4 psi
Maximum Achievable Flow Through Boiler .........................5.5 GPM
Minimum Temperature Rise Across Boiler at High Fire ........37 F
Maximum Gas Inlet pressure ...............................................10.5” Nat / 13.0” LP
Minimum Gas Inlet Pressure ................................................5.3” Nat / 10.5” LP
Electrical Ratings ..................................................................120VAC/60Hz/1.8A
Thermostat Voltage ..............................................................120VAC
4
Page 7

III Before Installing
Safe, reliable operation of this boiler depends upon installation by a professional heating contractor in 1)
strict accordance with this manual and the authority having jurisdiction.
In the absence of an authority having jurisdiction, installation must be in accordance with this manual •
and the National Fuel Gas Code, ANSI Z223.1.
Natural Gas and Propane Installation Code.
Where required by the authority having jurisdiction, this installation must conform to the • Standard for
Controls and Safety Devices for Automatically Fired Boilers (ANSI/ASME CSD-1).
Read Section VII to verify that the maximum combustion air and exhaust pipe lengths will not be 2)
exceeded in the planned installation. Also verify that the vent terminal can be located in accordance with
Section VII.
Make sure that the boiler is correctly sized:3)
For heating systems employing convection radiation (baseboard or radiators), use an industry a)
accepted sizing method such as the I=B=R Heat Loss Calculation Guide (Pub. #H21 or #H22)
published by the Hydronics Institute in Berkeley Heights, NJ.
In sizing the boiler take into consideration the following boiler water fl ow/temperature limitations:b)
Maximum regulated supply temperature is 176F•
Maximum fl ow through the boiler is approximately 5.5GPM. •
Minimum boiler temperature rise is approximately 37F at high fi re. •
For new radiant heating systems, refer to the radiant tubing manufacturer’s boiler sizing guidelines. c)
For combi boilers make sure that the domestic hot water fl ow rate shown in Table 2.2, will be d)
adequate to meet the peak demand for domestic hot water.
/NFPA 54 and/or CAN/CSA B 149.1
Make sure that the boiler received is confi gured for the correct gas (natural or LP).5)
Make sure that the boiler is confi gured for use at the altitude at which it is to be installed. 6)
NOTICE
This product must be installed by a licensed plumber or gas fi tter when installed within the
Commonwealth of Massachusetts. See Appendix A for additional important information about
installing this product within the Commonwealth of Massachusetts.
IV Locating the Boiler
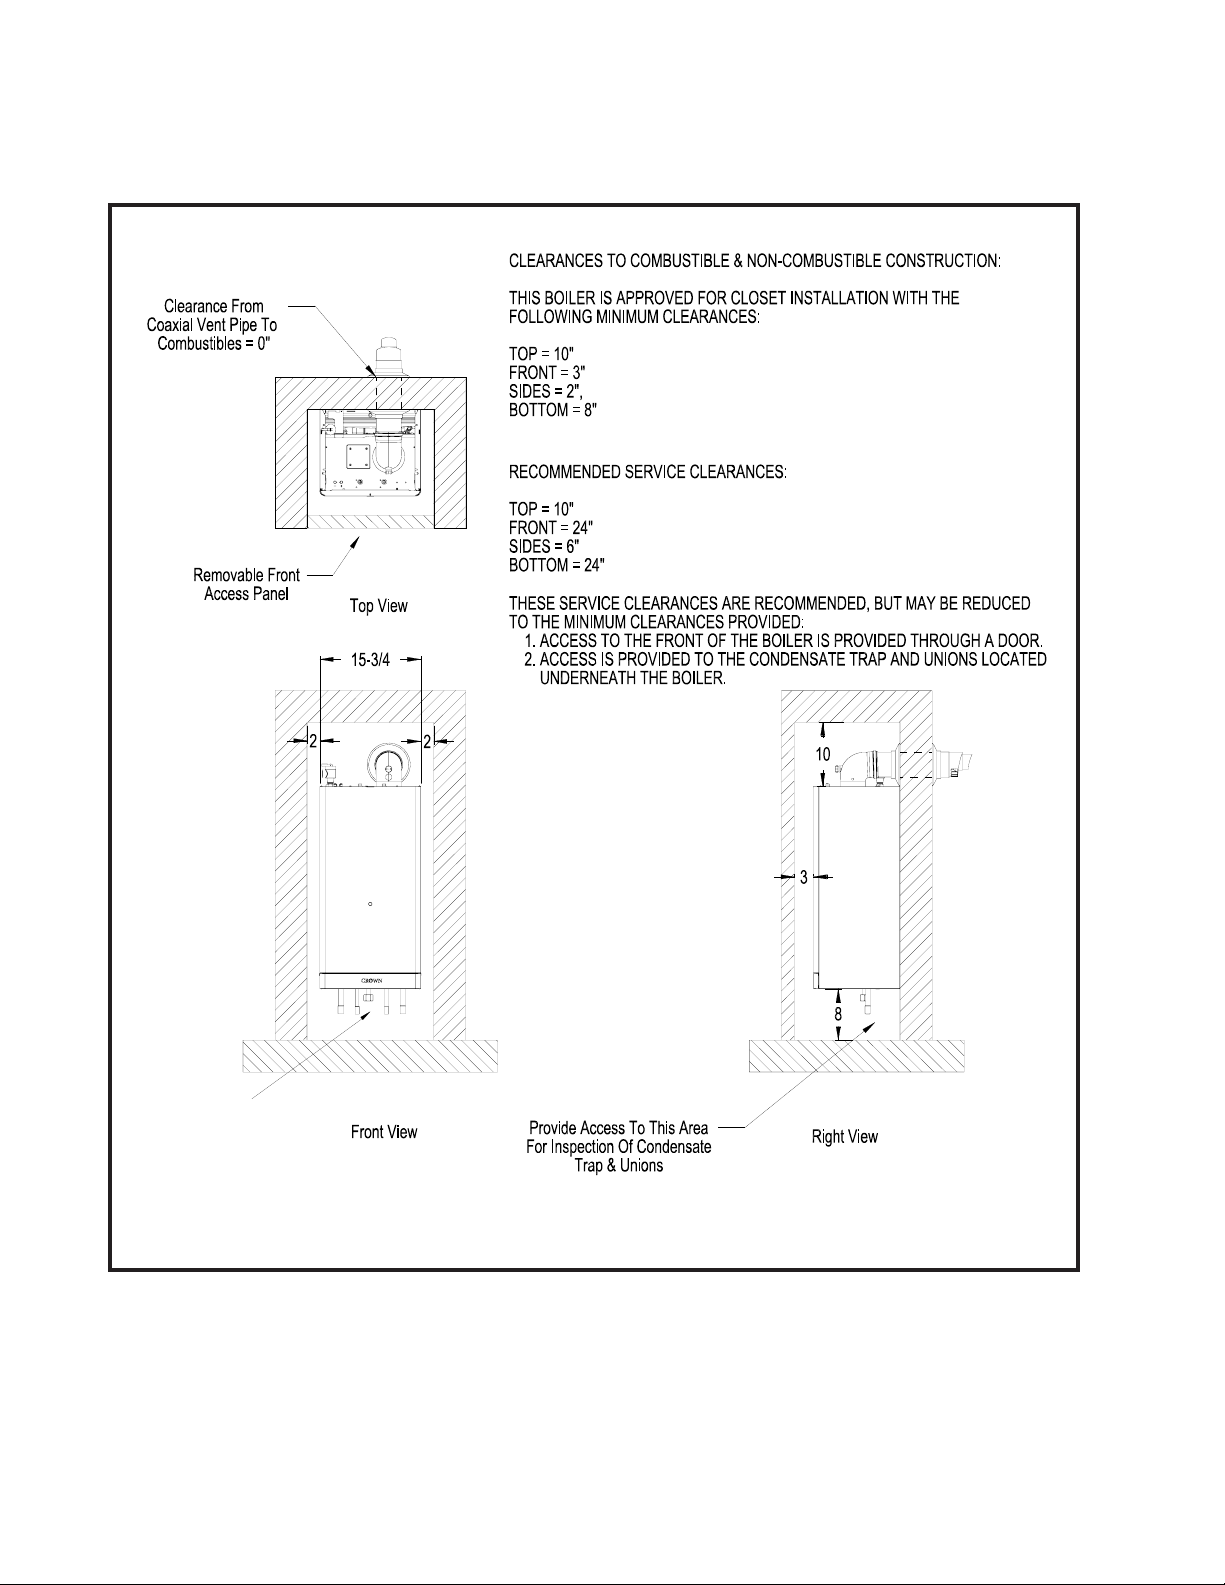
Observe the minimum clearances shown in Figure 4.1. These clearances apply to both combustible and 1)
non-combustible materials.
Note the recommended service clearances in Figure 4.1. These service clearances are recommended, 2)
but may reduced to the combustible clearances provided:
Access to the front of the boiler is provided through a door•
Access is provided to the condensate trap located underneath the boiler.•
The relief valve must be installed in the factory specifi ed location.3)
The boiler should be located so as to minimize the length of the vent system.4)
The boiler must not be installed on carpeting.5)
The combustion air piping must terminate where outdoor air is available for combustion and away from 6)
areas that will contaminate combustion air. Avoid areas near chemical products containing chlorine,
chloride based salts, chloro/fl uorocarbons, paint removers, cleaning solvents and detergents.
5
Page 8
Clearance From
Hot Water Pipes To
Combustibles = 1”
Figure 4.1: Clearances To Combustible Or Non-combustible Material
6
Page 9

V Mounting The Boiler
CAUTION
This boiler weighs approximately 110 pounds:
Two people are required to safely lift this boiler onto the wall mounting hook.•
Make sure that wall mounting hook is anchored to a structure capable of supporting the •
weight of the boiler and attached piping when fi lled with water.
Jurisdictions in areas subject to earthquakes may have special requirements for supporting
this boiler. These local requirements take precedence over the requirements shown below.
Mounting Steps:
If the boiler is installed on a framed wall, minimum acceptable framing are 2 x 4 studs. The boiler 1)
mounting holes are on 11-5/8” centers. Usually the wall studs will be on 16” centers. In such cases, both
boiler bracket mounting holes must be anchored to ¾” Plywood, horizontal 2 x 4s anchored to the studs,
or some other framing system capable of supporting the boiler. Attachment of either bracket hole to
wallboard alone is unacceptable.
When mounting this boiler directly onto studs covered with 1/2” wall board, 5/16 x 2” lag screws are 2)
recommended. When the boiler is attached to other types of construction, such as masonry, use fasteners
capable of supporting the weight of the boiler and attached piping in accordance with good construction
practice and applicable local codes.
Make sure that the surface to which the boiler is mounted is plumb.3)
Before mounting the boiler, make sure that wall selected does not have any framing or other construction 4)
that will interfere with the vent pipe penetration.
Tape the paper template to the wall in the chosen location. Be sure to level the template.5)
Pre-drill two holes in the center of the “oval” slots on the mounting bracket sized for the hardware being 6)
used.
Mount the bracket to the wall. Be sure to level the bracket by adjusting the screw in the vertical slot.7)
Pre-drill the remaining hole in the mounting bracket and secure the fi nal screw.8)
Cut the opening in the wall for the vent system. The recommended hole diameter for the standard 9)
60/100mm venting is 4-3/8”.
Hang the boiler on the wall bracket as shown in Figure 5.2.10)
Verify that the front and sides of the boiler are plumb.11)
See Section VII (“Venting) for instructions on attaching the vent system to the boiler. 12)
A hot water boiler installed above radiation level or as the Authority having jurisdiction,
13)
must be provided with a low water cutoff device either as a part of the boiler or at the time of installation.
7
Page 10
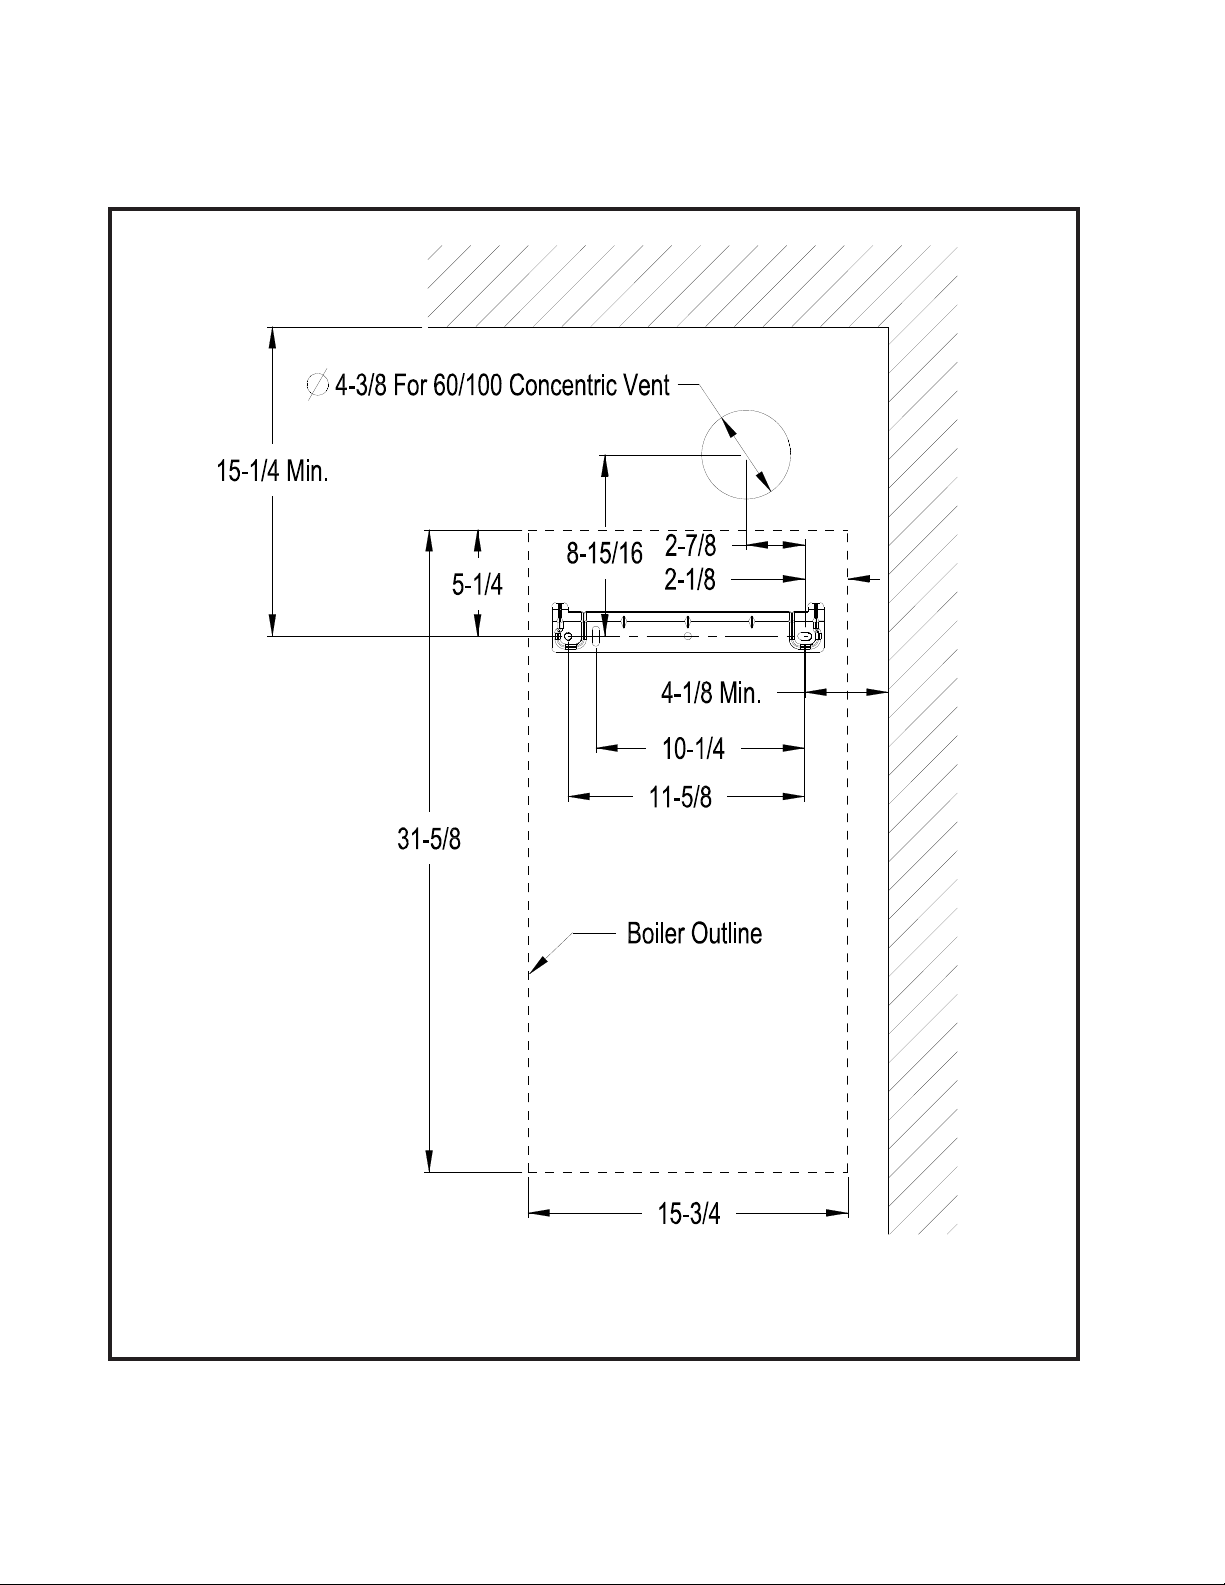
Figure 5.1 Wall Mounting Hole Locations
8
Page 11
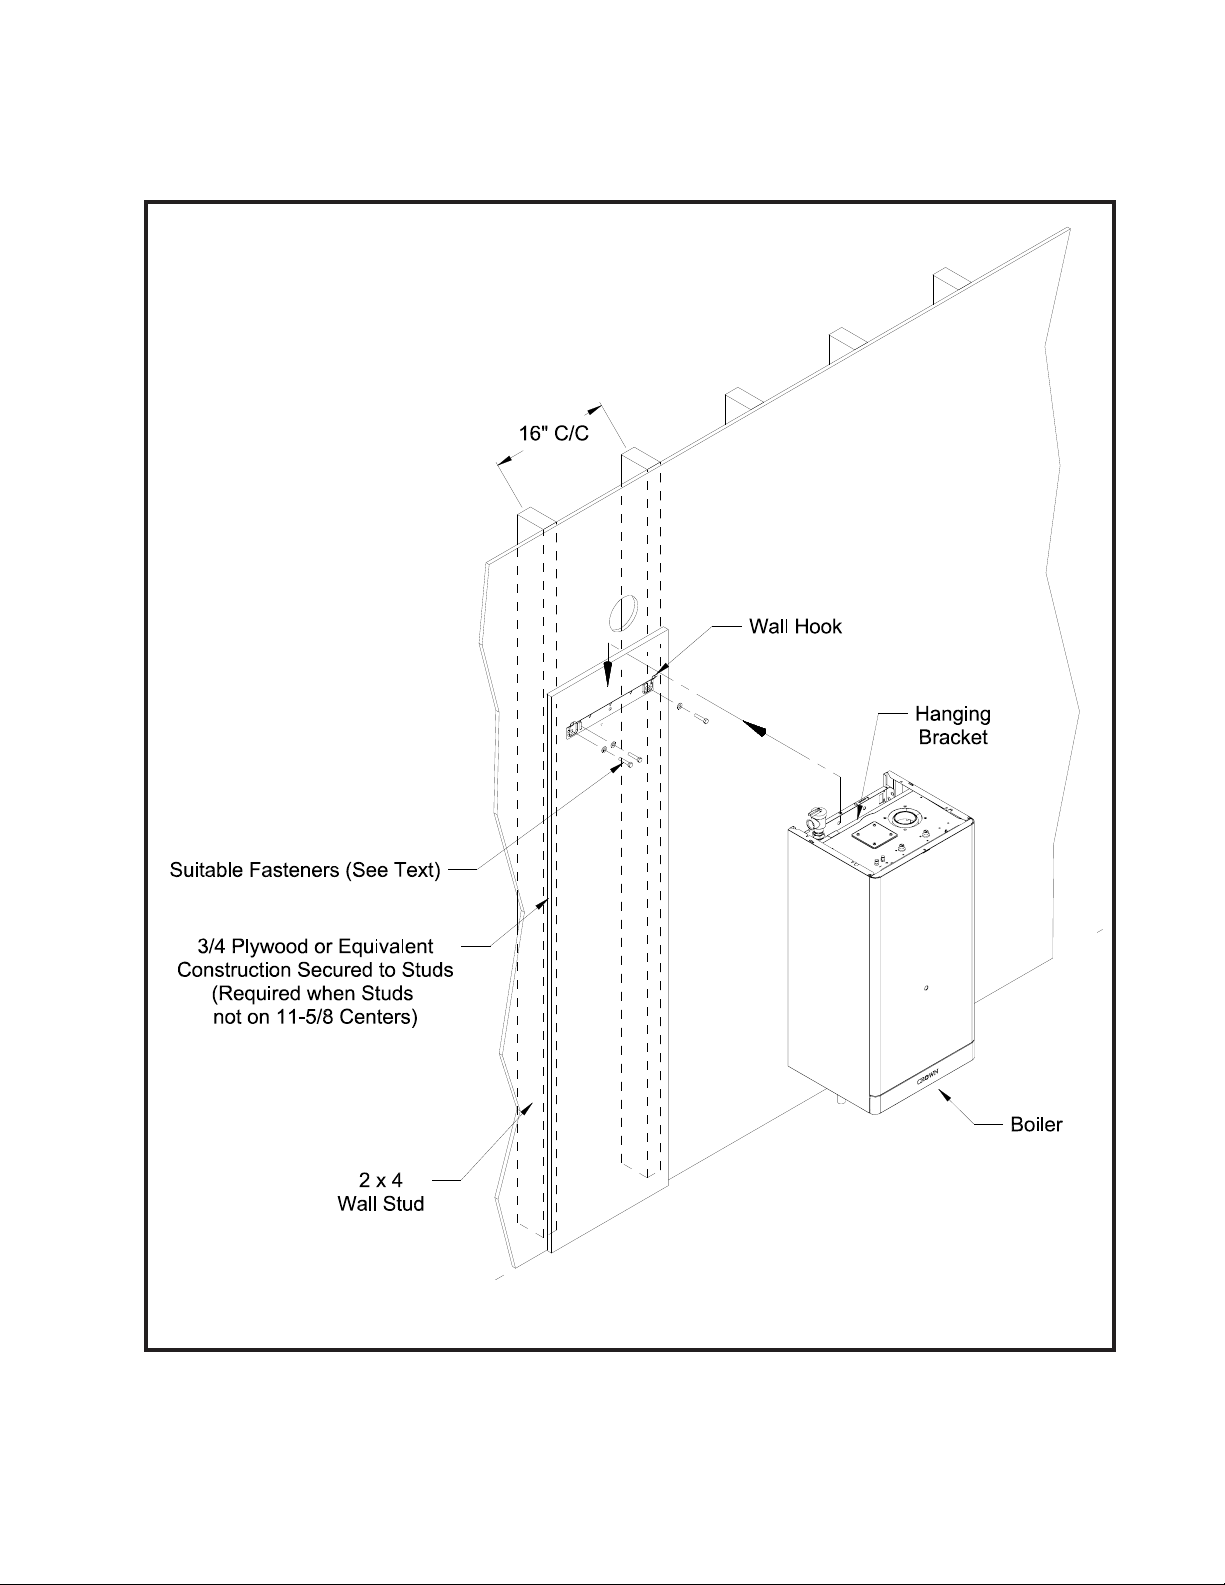
Figure 5.2 Boiler Mounting
9
Page 12

VI Air for Ventilation
WARNING
Outdoor combustion air must be piped to the air intake. Never pipe combustion air from areas containing
contaminates such as areas where swimming pool chemicals are stored. Contaminated combustion
air will damage the boiler and may cause property damage, personal injury or loss of life.
Air for combustion and ventilation, of the National Flue Gas Code, ANSI Z223.1/NFPA 54 CAN/CSA B 149.1
Natural Gas and Propane Installation Code, or applicable provisions of the local building codes.
Air for combustion must always be obtained directly from outdoors, however suffi cient air for ventilation must
still be provided in the boiler room. Air for ventilation is required to keep various boiler components from
overheating and is always obtained from indoors. To ensure an adequate ventilation air supply, perform the
following steps:
Step 1: Determine whether the boiler is to be installed in a confi ned space - A confi ned space is defi ned by
the
as having a volume less than 50 cubic feet per 1000 BTU/hr input of all appliances
installed in that space. To determine whether the boiler room is a confi ned space:
Total the input of all appliances in the boiler room in thousands of BTU/hr. Round the result to the next A.
highest 1000 BTU/hr.
,ANSI Z223.1.
/NFPA 54 and/or CAN/CSA B 149.1National Fuel Gas Code
Natural Gas and Propane Installation Code.
Find the volume of the room in cubic feet. The volume of the room in cubic feet is:B.
Length (ft) x width (ft) x ceiling height (ft)
In calculating the volume of the boiler room, consider the volume of adjoining spaces only if no doors
are installed between them. If doors are installed between the boiler room and an adjoining space, do
not consider the volume of the adjoining space, even if the door is normally left open.
Divide the volume of the boiler room by the input in thousands of BTU/hr. If the result is less than 50, the C.
boiler room is a confi ned space.
Example:
A MWC116 and a water heater are to be installed in a room measuring 6ft – 3 in x 7ft with an 8 ft ceiling. The
water heater has an input of 30000 BTU/hr:
Total input in thousands of BTU/hr = (116000 BTU/hr + 30000 BTU/hr) / 1000 = 146 MBTU/hr
Volume of room = 6.25 ft x 7 ft x 8 ft = 350 ft
350/146 = 2.40. Since 2.33 is less than 50, the boiler room is a confi ned space.
Step 2a: If the boiler is to be placed in a confi ned space, provide two openings into the boiler room, one near
the fl oor and one near the ceiling. The top edge of the upper opening must be within 12” of the ceiling and the
bottom edge of the lower opening must be within 12” of the fl oor (Fig 6.1). The minimum opening dimension is
3 inches.
3
If the MWC boiler is the only gas-burning appliance in the boiler room, these openings must each •
have a minimum free area of 54 square inches.
If other gas-burning appliances are in the boiler room, size the openings in accordance with the •
appliance manufacturer’s instructions or the National Fuel Gas Code
/NFPA 54 and/or CAN/CSA B 149.1.
54 square inches even if opening requirements for other appliances are less.
Minimum opening free area is
ANSI Z223.1.
10
Page 13
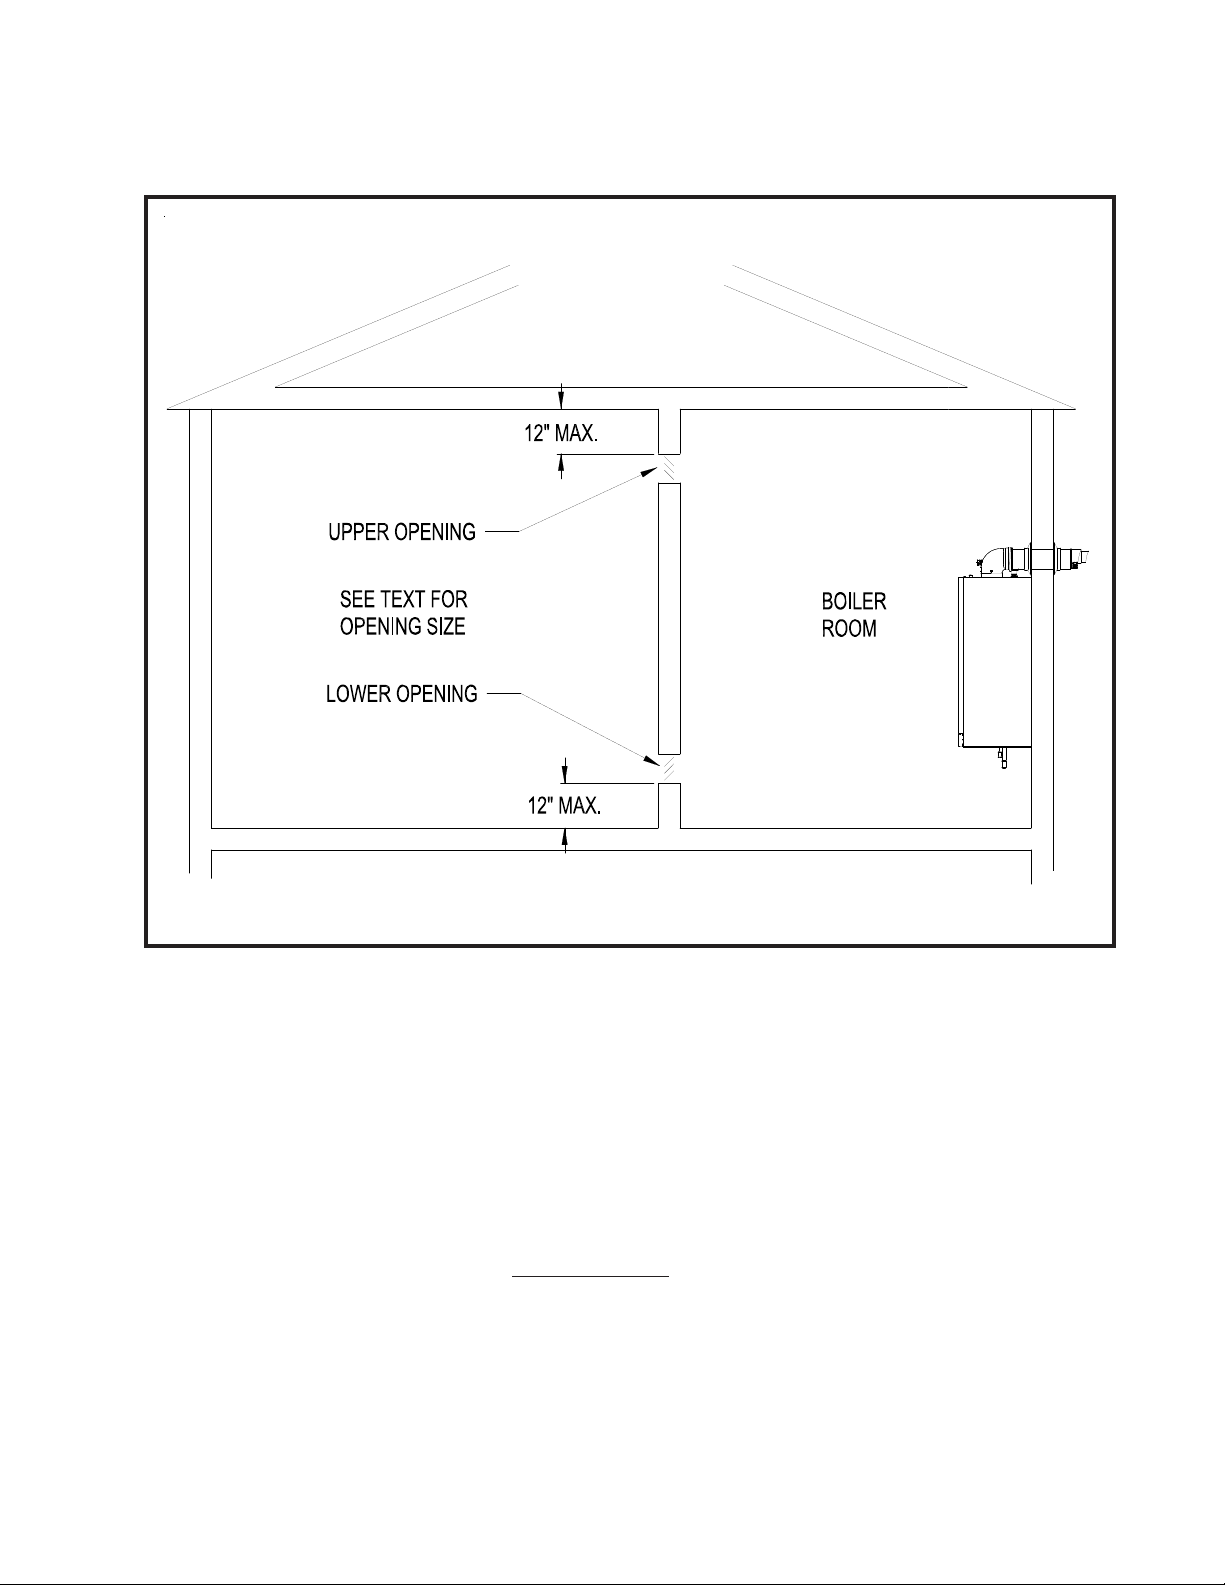
Figure 6.1: Boiler Installed In A Confi ned Space, Ventilation Air From Inside
Step 2a (contd.)
If the total volume of both the boiler room and the room to which the openings connect is less than •
50 cubic feet per 1000 BTU/hr of total appliance input, install a pair of identical openings into a third
room. Connect additional rooms with openings until the total volume of all rooms is at least 50 cubic
feet per 1000 BTU/hr of input.
The “free area” of an opening takes into account the blocking effect of mesh, grills, and louvers. •
Where screens are used, they must be no fi ner than ¼” (4 x 4) mesh.
Step 2b: If the boiler is to be placed in an unconfi ned space the natural infi ltration into the boiler room will
provide adequate air for ventilation without additional openings into boiler room.
11
Page 14
VII Venting
WARNING
Failure to vent this boiler in accordance with these instructions could cause fl ue gas to enter
the building resulting in severe property damage, personal injury, or death:
Do not attempt to vent this boiler with galvanized, PVC, or any other vent components not •
listed in Table 7.3.
Do not obtain combustion air from within the building. •
Do not install a barometric damper or drafthood on this boiler.•
CAUTION
Moisture and ice may form on the surfaces around the vent termination. To prevent
deterioration, surfaces should be in good repair (sealed, painted, etc.).
A. Vent System Design
There are two basic ways to vent this boiler:
Horizontal (“Side Wall”) Concentric Venting• - Vent system exits the building through an outside
wall. Concentric venting consists of a “pipe within a pipe”. Flue gas exits the building through the inner
pipe and combustion air is drawn into the boiler through the space between the inner and outer pipe.
Vertical Concentric Venting - • Vent system exits the building through the roof. Concentric venting
consists of a “pipe within a pipe”. Flue gas exits the building through the inner pipe and combustion
air is drawn into the boiler through the space between the inner and outer pipe.
Both of these systems are considered “direct vent” because in both, combustion is drawn directly from the
outdoors into the boiler. A description of all of these venting options are shown in Tables 7.1 and 7.6. For
clarity, these vent options are numbered from 1 to 6. One of the vent option columns in Tables 7.1 or 7.6 must
match the planned vent and air intake system exactly. In addition, observe the following guidelines:
Approved vent systems1) - Use only one Concentric vent system components supplied by Crown. The
standard boiler is supplied with a concentric vent system having a maximum usable length of 25” (Figure
2.1). For longer runs, additional straight lengths and elbows are available from Crown. In some cases,
larger diameter concentric pipe must be used. Each Crown concentric vent component consists of an
inner pipe of polypropylene and the outer pipe of steel. Integral gaskets on each concentric fi tting provide
a gas tight seal. A list of all Crown concentric vent components is shown in Table 7.3.
In this manual, concentric pipe sizes are called out in terms of the inner and outer pipe nominal
diameters in millimeters. For example, “60/100mm” pipe consists of a 60mm exhaust pipe inside a
100mm diameter outer pipe.
Maximum Vent and Air Intake Lengths2) - The maximum length of the vent air intake piping depends upon
the vent option selected. See Table 7.1 or 7.6 for the maximum vent length. In horizontal vent systems,
the lengths shown in Table 7.1 are in addition to the Elbow Adaptor on top of the boiler. If more elbows
are desired, the maximum allowable vent length must be reduced by the amount shown in Table 7.5 for
each additional elbow used. Termination fi ttings are never counted, although the length of the concentric
terminal section is counted.
12
Page 15

2 (contd.)
Example: A 60/100mm concentric vent system is planned for a horizontally vented MWC116 which
has the following components:
60/100mm Elbow Adaptor (supplied with the boiler)•
1 ft Straight Pipe•
90 elbow•
Uncut Terminal Section (supplied with the boiler)•
The Vent Option #2 column in Table 7.1 describes a horizontal direct vent system using 60/100mm
concentric vent pipe. From this column, we see that a MWC116 may have a vent length of up to 8ft10in. The 60/100 Elbow Adaptor supplied with the boiler is not considered. The length of the terminal
section (not including the plastic terminal itself) is approximately 22 1/2” (1.9ft) installed. From Table
7.5, we see that the equivalent length of the 60/100mm elbow is 4.5ft. The total equivalent length of
the planned venting system is therefore:
1ft (Straight ) + 4.5ft (90 Elbow) + 1.9ft (Uncut Terminal Section) = 7.4ft.
Since Table 7.1 shows a maximum allowable vent length of 8ft-10in, the planned vent system length
is acceptable. Note that the 82mm inlet air orifi ce supplied with the boiler is not used.
Minimum Vent and Air Intake Lengths 3) - Observe the minimum vent lengths shown in Tables 7.1 and 7.6.
Permitted Terminals for Horizontal Venting:4)
Vent Option 1, 2• - The 60/100mm concentric vent terminal is supplied with the boiler as part of the
standard vent system.
Vent Option 3• - Use the optional 80/125mm Concentric Vent Terminal (Crown PN 230531)
Horizontal Vent Terminal Location5) - Observe the following limitations on the vent terminal location (also
see Figure 7.4).
Vent terminal must be at least 1 foot from any door, window, or gravity inlet into the building.•
The bottom of the terminal must be at least 12” above the normal snow line. In no case should it be •
less than 12” above grade level.
The bottom of the vent terminal must be at least 7 feet above a public walkway. •
Do not install the vent terminal directly over windows or doors.•
The bottom of the vent terminal must be at least 3 feet above any forced air inlet located within 10 •
feet.
In the USA, maintain a clearance of at least 4ft horizontally from the vent terminal to gas meters, •
electric meters, regulators and relief equipment. In Canada, maintain a 6ft clearance between the
vent terminal and these devices.
Do not locate the vent terminal under decks or similar structures.•
Top of vent terminal must be at least 5 feet below eves, soffi ts, or overhangs. Maximum depth of •
overhang is 3 ft.
Vent terminal must be at least 6 feet from an inside corner.•
Vent Terminal must be at least 2ft from adjacent buildings.•
Under certain conditions, water in the fl ue gas may condense, and possibly freeze, on objects around •
the vent terminal including on the structure itself. If these objects are subject to damage by fl ue gas
condensate, they should be moved or protected.
If possible, install the vent and air intake terminals on a wall away from the prevailing wind. Reliable •
operation of this boiler cannot be guaranteed if these terminals are subjected to winds in excess of 40
mph.
Air intake terminal must not terminate in areas that might contain combustion air contaminates, such •
as near swimming pools. See Section IV for
more information on possible contaminates.
13
Page 16
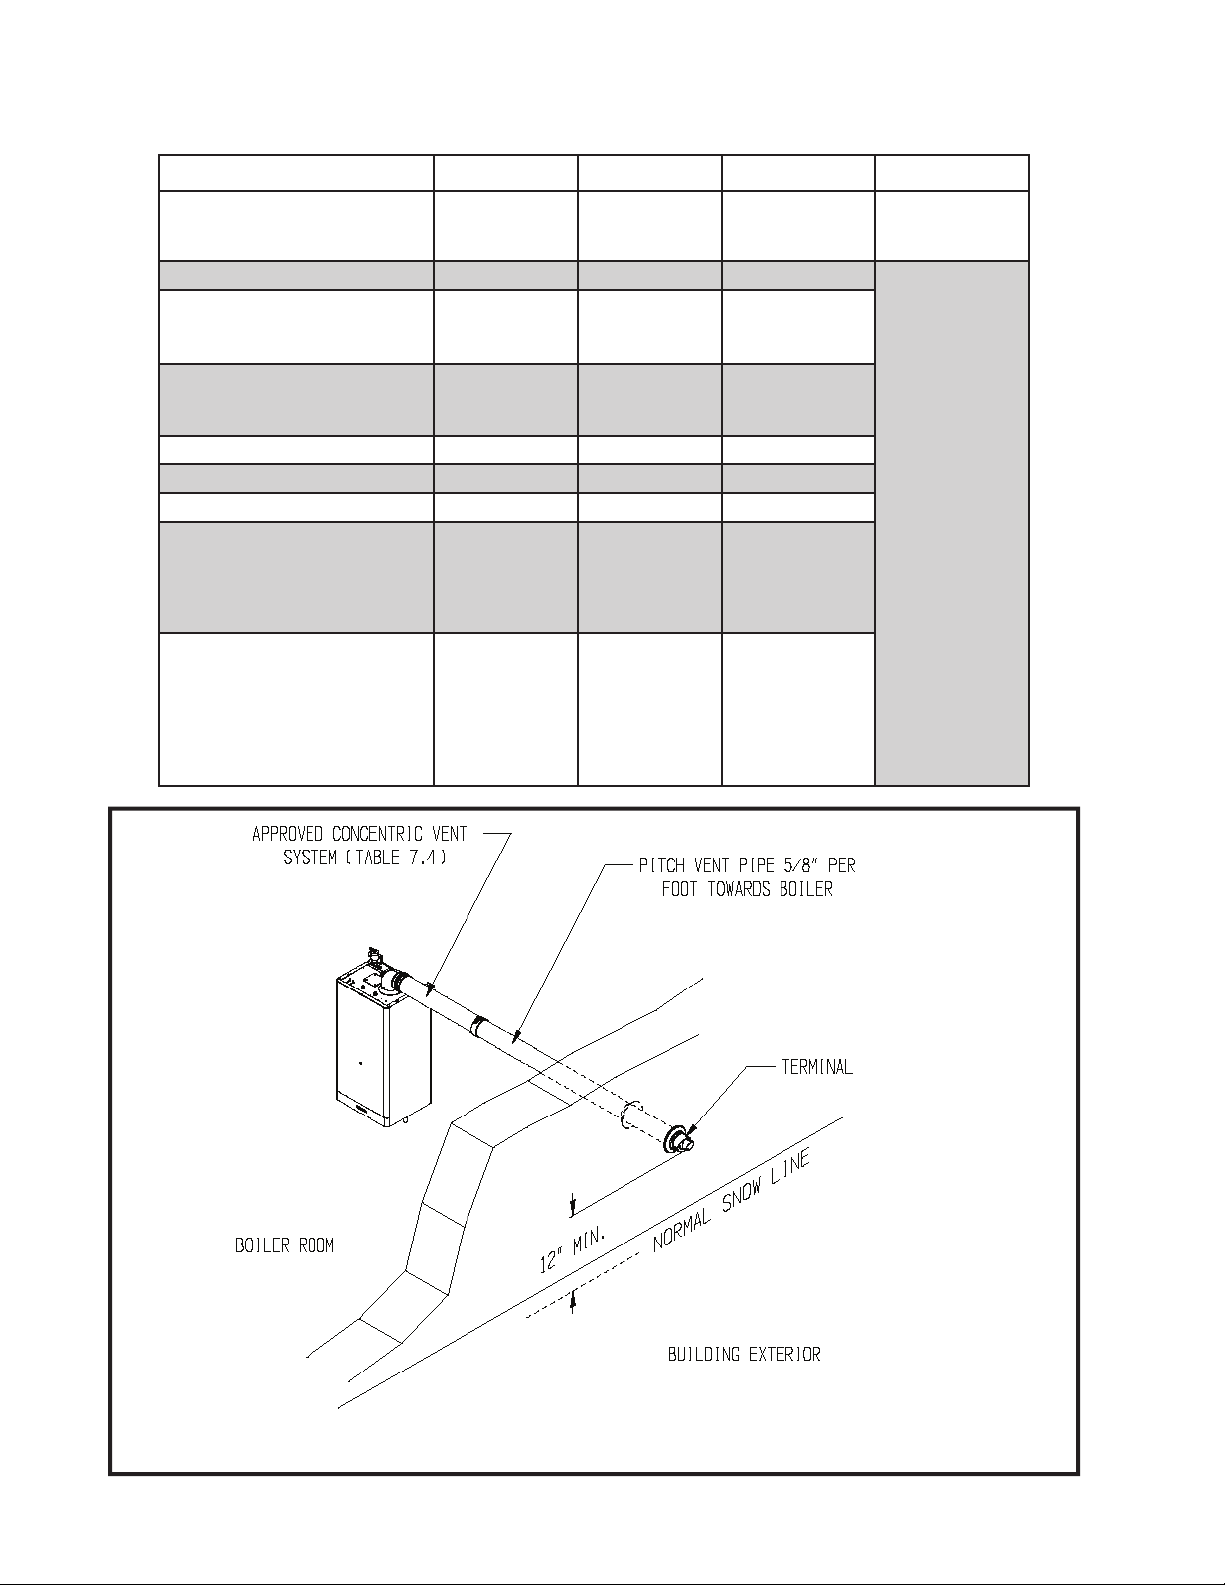
Table 7.1: Summary Of Horizontal Venting Options
VENT OPTION # 1 2 3 4
CLASSIFICATION USED IN THIS
MANUAL
ILLUSTRATED IN FIGURE 7.2 7.2 7.2
HORIZONTAL
CONCENTRIC
HORIZONTAL
CONCENTRIC
HORIZONTAL
CONCENTRIC
RESERVED
FOR FUTURE
USE
VENT PIPE PENETRATION
THROUGH STRUCTURE
VENT PIPE SIZE
INLET AIR ORIFICE SIZE
MAX. VENT LENGTH
MIN. VENT LENGTH
VENT TERMINAL
VENT MATERIAL
WALL WALL WALL
60/100 mm
CONCENTRIC
82mm
25in
6in
CROWN
#230520
(INCLUDED
WITH BOILER)
CROWN
60/100mm
VENT
COMPO-
NENTS
SHOWN IN
TABLE 7.3a
60/100 mm
CONCENTRIC
Not Used 82mm
8ft - 10in 27ft - 10in
26in 6in
CROWN
#230520
(INCLUDED
WITH BOILER)
CROWN
60/100mm
VENT
COMPO-
NENTS
SHOWN IN
TABLE 7.3a
80/125 mm
CONCENTRIC
CROWN
#230531
CROWN
80/125mm VENT
COMPONENTS
SHOWN IN
TABLE 7.3b
Figure 7.2: Horizontal Concentric Venting (Vent Options 1-3)
14
Page 17
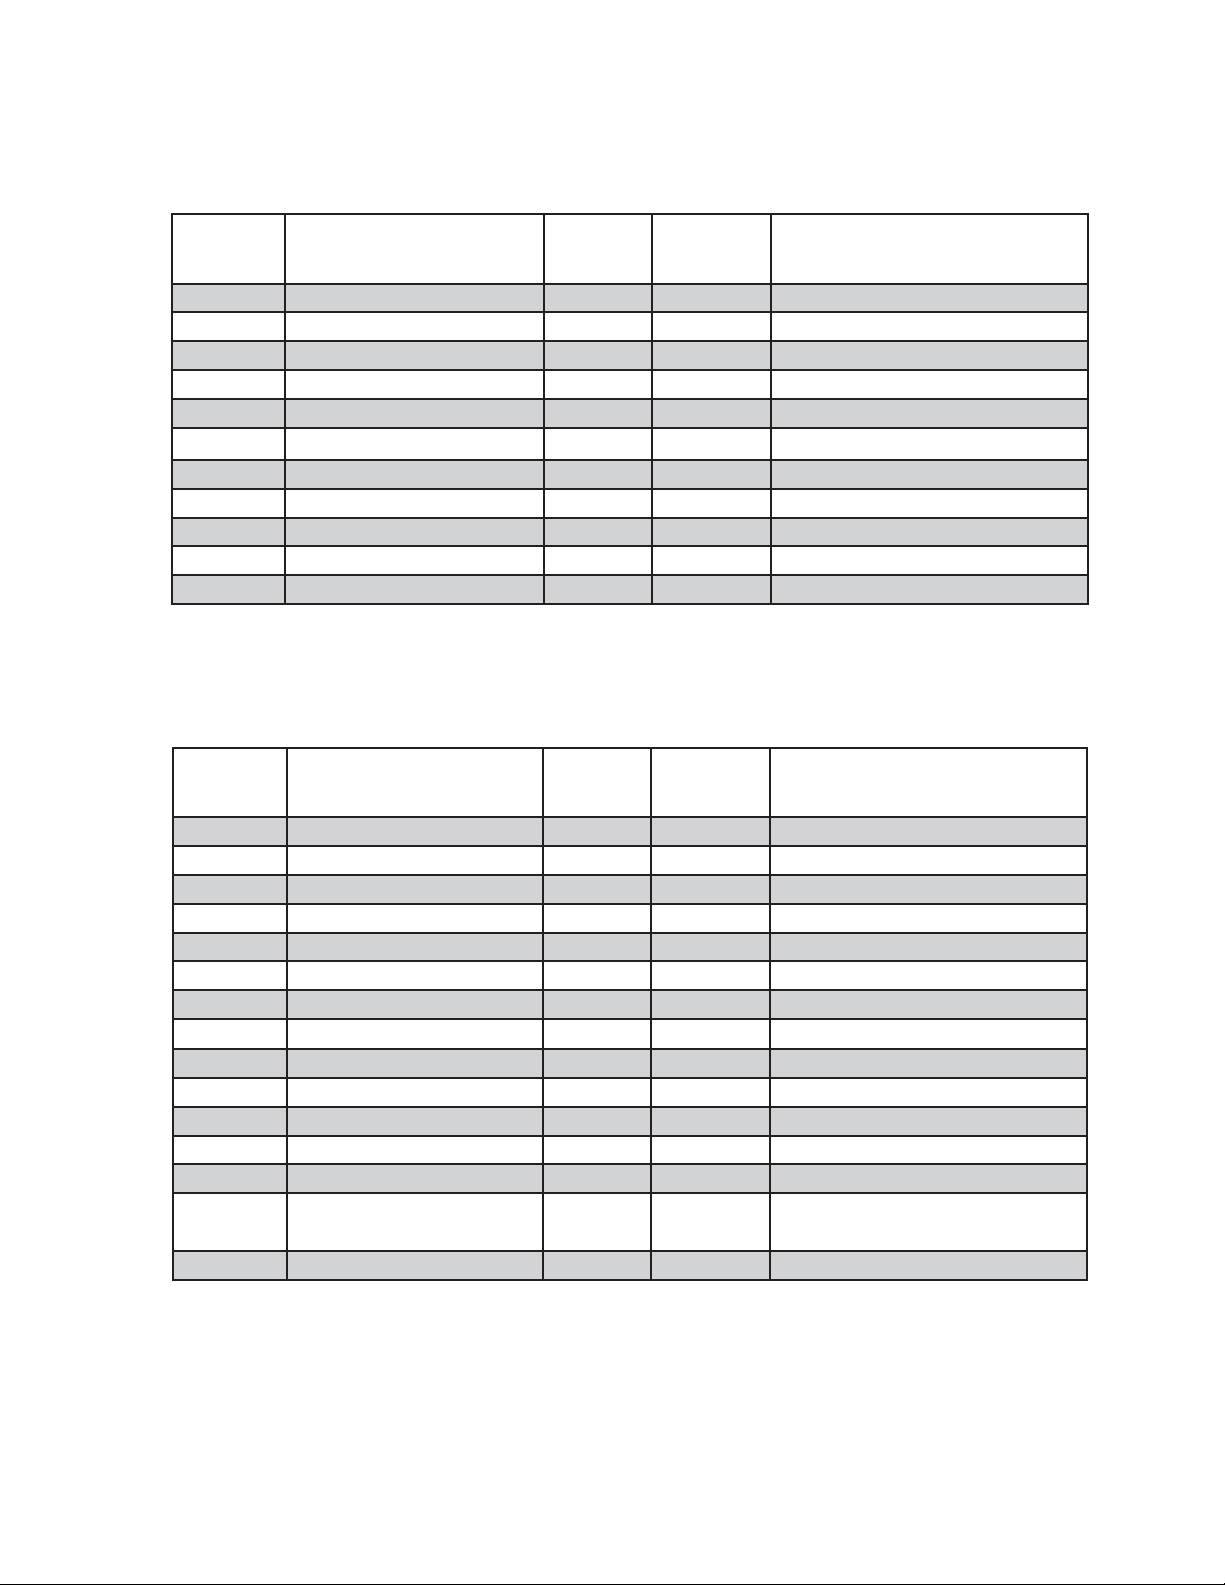
Table 7.3a: Crown Concentric 60/100 Vent Components (Vent Options 1,2)
USED ON
CROWN PN DESCRIPTION SIZE
340509 60/100mm ELBOW ADAPTOR 60/100mm 1,2 INCLUDED WITH STANDARD BOILER
340503 60/100mm STRAIGHT ADAPTOR 60/100mm 2 OPTIONAL
230520 TERMINAL SECTION 60/100mm 1,2 INCLUDED WITH STANDARD BOILER
230522 WALL GROMMET 60/100mm 1,2 INCLUDED WITH STANDARD BOILER
230505 39” STRAIGHT 60/100mm 2 OPTIONAL - MAY NOT BE CUT
230504 78” STRAIGHT 60/100mm 2 OPTIONAL - MAY NOT BE CUT
230506 19 1/2” STRAIGHT 60/100mm 1,2 OPTIONAL - CAN BE CUT
230507 90 DEGREE ELBOW 60/100mm 2 OPTIONAL
230508 45 DEGREE ELBOW 60/100mm 2 OPTIONAL
230515 39” STRAIGHT 80/125mm 1 OPTIONAL - CAN BE CUT
340130 82mm AIR INLET ORIFICE 82mm ID 1 INCLUDED WITH STANDARD BOILER
VENT
OPTION #
COMMENTS
Table 7.3b: Crown Concentric 80/125 Vent Components (Vent Options 3,5)
USED ON
CROWN PN DESCRIPTION SIZE
340523 80/125 STRAIGHT ADAPTOR 80/125mm 3,5
230527 90 DEGREE EL (STANDARD) 80/125mm 3,5
230528 90 DEGREE EL (SWEEP) 80/125mm 3,5
230526 45 DEGREE EL 80/125mm 3,5
230517 19 1/2” STRAIGHT 80/125mm 3,5 CAN BE CUT
230515 39” STRAIGHT 80/125mm 3,5 CAN BE CUT
230518 39” STRAIGHT 80/125mm 3,5 MAY NOT BE CUT
230519 78” STRAIGHT 80/125mm 3,5 MAY NOT BE CUT
230525 TELESCOPING STRAIGHT 80/125mm 3,5 ADJUSTABLE FROM 12-1/2” TO 16-1/2
230531 HORIZONTAL TERMINAL 80/125mm 3
230532 VERTICAL TERMINAL 80/125mm 5 (NOTE #1)
230533 FLAT ROOF FLASHING 80/125mm 5
230535 SLOPED ROOF FLASHING 80/125mm 5 (NOTE #2)
230530
230536 SUPPORT BAND 80/125mm 3,5
Table 7.3b Notes:
1) Vertical terminal can be used with either of the roof fl ashings listed beneath it.
2) Sloped roof fl ashing suitable for roof angles between 25 and 45 degrees.
3) Used at base of vertical run inside unused masonry chimney.
SUPPORT ELBOW WITH
CHIMNEY CHASE BRACKET
80/125mm 5 (NOTE #3)
VENT
OPTION #
COMMENTS
15
Page 18
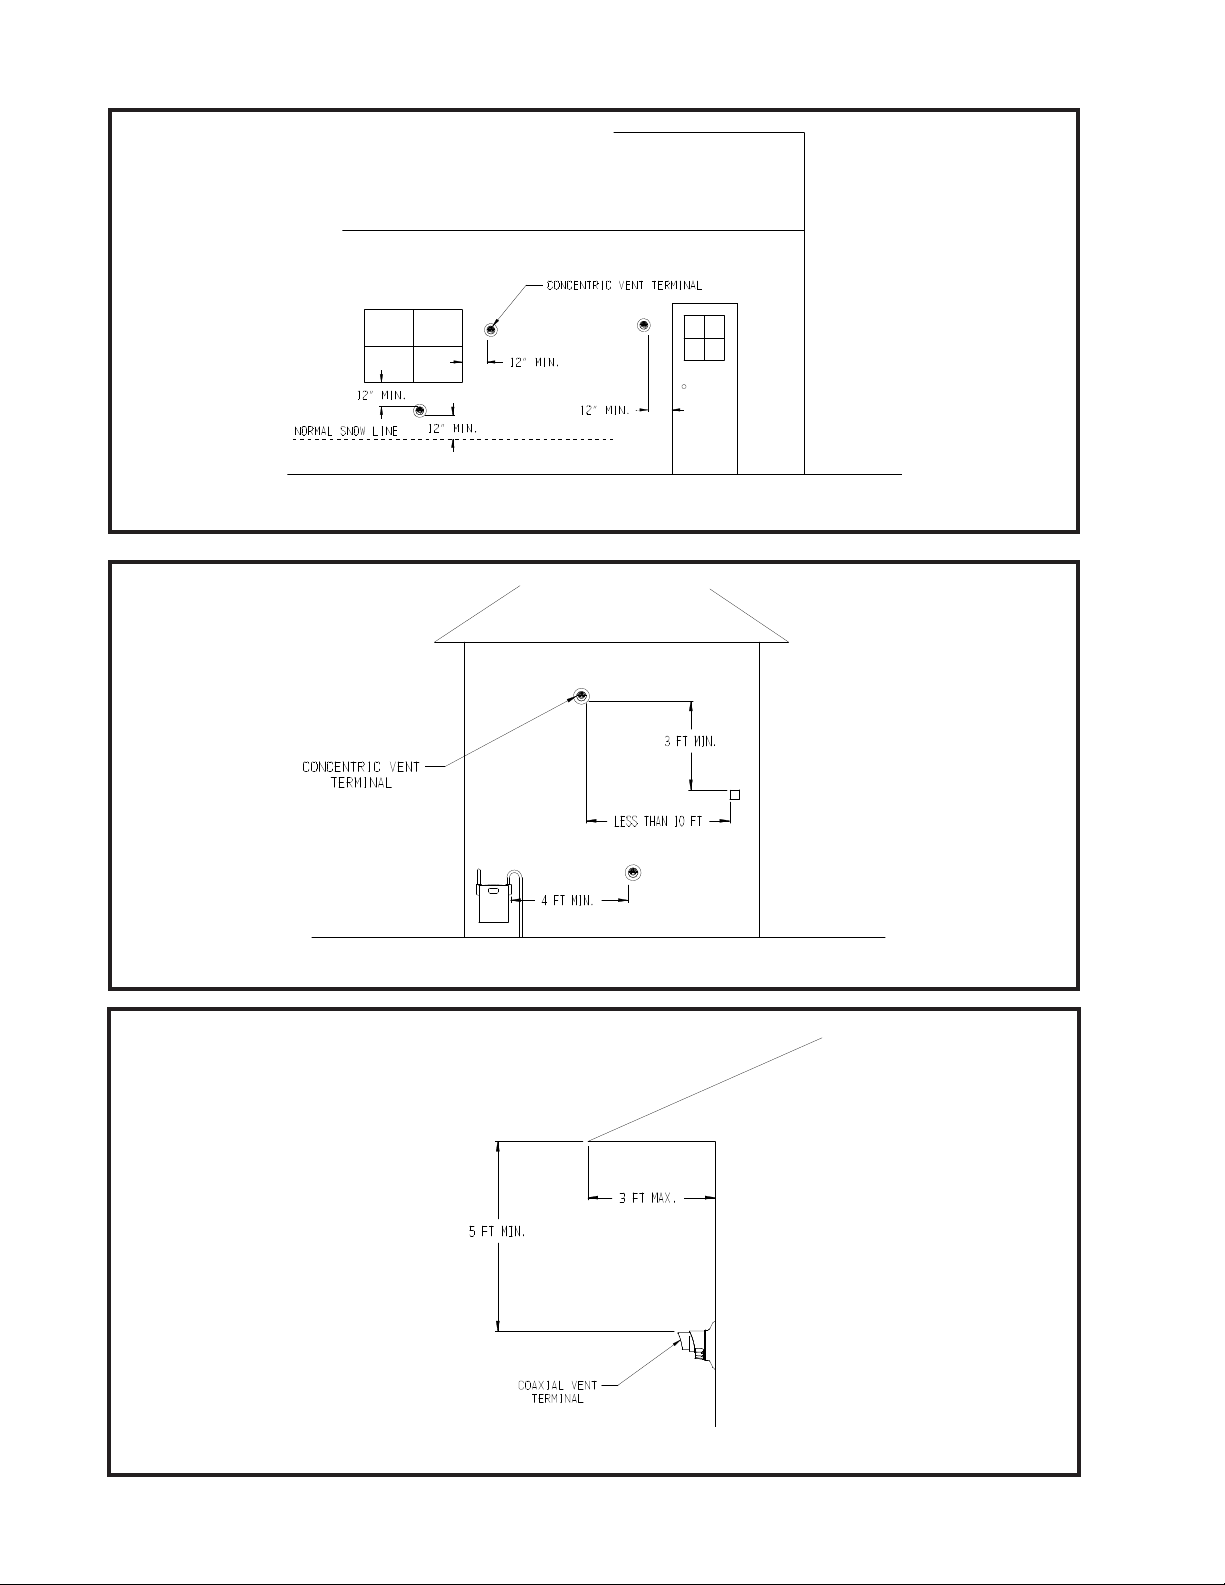
Figure 7.4a: Location Of Vent Terminal Relative To Windows, Doors, Grade
Figure 7.4b: Location Of Vent Terminal Relative To Meters And Forced Air Inlets
Figure 7.4c: Positioning Vent Terminal Under Overhangs
16
Page 19
VENT FITTING EQUIVALENT LENGTH (ft)
60/100mm 90° CONCENTRIC ELBOW 4.5
60/100mm 45° CONCENTRIC ELBOW 4.0
80/125mm 90° CONCENTRIC ELBOW 8.5
80/125mm 90° SWEEP CONCENTRIC ELBOW 5.5
80/125mm 45° CONCENTRIC ELBOW 3.0
80/125mm 90° CONCENTRIC SUPPORT ELBOW 8.5
Permitted Terminals for Vertical Venting6) - Use Crown PN 230532 with the appropriate ashing (Table 7.3b)
Vertical Vent Terminal Locations (Vent Option 5)7) - Observe the following limitations on the location of all
vertical vent terminals (see Figure 7.7):
The top of the vent pipe must be at least 2 feet above any object located within 10 feet.•
The bottom of the air inlet terminal must be at least 12” above the normal snow accumulation that can be •
expected on the roof. The terminal used in Vent Option #5 has a xed distance above the storm collar of
19”. If a greater distance is needed to provide the clearance above the snow line, build a chase on the
roof and mount the vertical terminal on top of the chase.
Wall thimbles8) – Concentric vent has a “zero” clearance to combustibles and therefore does not require the
use of wall thimbles.
Pitch of Horizontal Piping9) - Pitch all horizontal piping so that any condensate which forms in the piping will run
towards the boiler. Pitch Crown horizontal concentric venting 5/8” per foot
Supporting Pipe10) - Vertical and horizontal sections of pipe must be properly supported. Support Crown
concentric venting near the female end of each straight section of pipe. Exception: Vertical runs of concentric
pipe in an unused chimney (Figure 7.36) need only be supported at the terminal and at the base of the run.
VENT OPTION # 5 6
CLASSIFICATION USED IN THIS
MANUAL
ILLUSTRATED IN FIGURE 7.7
VENT PIPE PENETRATION
THROUGH STRUCTURE
VENT PIPE SIZE
INLET AIR ORIFICE SIZE
MAX. VENT LENGTH
MIN. VENT LENGTH
VENT TERMINAL
VERTICAL
CONCENTRIC
ROOF
80/125mm
CONCENTRIC
82mm
27ft - 10in
6in
CROWN #230532
CONCENTRIC
TERMINAL (TABLE
7.3b)
RESERVED FOR
FUTURE USE
CROWN 80/125 mm
VENT MATERIAL
VENT COMPONENTS
SHOWN IN TABLE
7.3b
17
Page 20

Figure 7.7: Vertical Concentric Vent System (Vent Option 5)
18
Page 21

B. Removing an Existing Boiler From a Common Chimney
Read this only if the MWC boiler is replacing an existing boiler that is being removed from a common
chimney. This section does not apply to the installation of a MWC boiler.
In some cases, when an existing boiler is removed from a common chimney, the common venting system
may be too large for the remaining appliances. At the time of removal of an existing boiler, the following
steps shall be followed with each appliance remaining connected to the common venting system placed
in operation, while the other appliances remaining connected to the common venting system are not in
operation.
(a) Seal any unused openings in the common venting system.
(b) Visually inspect the venting system for proper size and horizontal pitch and determine there is no
blockage or restriction, leakage, corrosion and other defi ciencies which could cause an unsafe
condition.
(c) Insofar as practical, close all building doors and windows and all doors between the space in which
all the appliances remaining connected to the common venting system are located and other
spaces of the building. Turn on clothes dryers and any appliance not connected to the common
venting system. Turn on any exhaust fans, such as range hoods and bathroom exhausts, so they
will operate at maximum speed. Do not operate a summer exhaust fan. Close fi replace dampers.
(d) Place in operation the appliance being inspected. Follow the lighting instructions. Adjust
thermostat so the appliance will operate continuously.
(e) Test for spillage at the draft hood relief opening after 5 minutes of main burner operation. Use
the fl ame of a match or candle, or smoke from a cigarette, cigar, or pipe.
(f) After it has been determined that each appliance remaining connected to the common venting
system properly vents when tested as outlined above, return doors, windows, exhaust fans,
fi replace dampers and any other gas-burning appliances to their previous condition of use.
(g) Any improper operation of the common venting system should be corrected so the installation
conforms with the National Fuel Gas Code, ANSI Z223.1.
Natural Gas and Propane Installation Code.
common venting system, the common venting system should be re sized to approach the minimum
size as determined using the appropriate tables in Part 11 of the National Fuel Gas Code, ANSI
Z223.1.
/NFPA 54 and/or CAN/CSA B 149.1
When re-sizing any portion of the
/NFPA 54 and/or CAN/CSA B 149.1
WARNING
Never common vent a MWC boiler with other appliances.
19
Page 22

C. Assembly of Crown 60/100mm Concentric Venting
Figure 7.20. For V
(IMPORTANT - Skip to Section D for 80/125mm Concentric V ent Assembly)
WARNING
Failure to follow the instructions could result in fl ue gas leakage into the combustion air or indoor
air, resulting in unsafe or unreliable operation.
• Do not lubricate concentric gaskets with anything other than water.
• Do not attempt to cut any piping except as permitted in this section. When cutting these
sections, make sure all cuts are square and allow for proper insertion.
• Do not attempt to try to mix this concentric pipe with other venting systems.
Concentric vent components supplied with the boiler are packed in a separate carton and include the following:1)
60/100mm elbow adaptor (Crown PNa) 340509).
60/100mm terminal section (straight section with a terminal and overall length of 27 3/4” (Crown PN 230520).b)
Two (2) Rubber wall grommets (Crown PN c) 230522).
Vent gasket and screws for attachment of vent system to boiler. d)
The 82mm air inlet orifi ce required for Vent Option 1 is packed in the boiler carton.
The 60/100 straight adaptor is optional equipment. It is supplied with the same screws and gasket as the 60/100
elbow adaptor.
Start by attaching the elbow adaptor (or straight adaptor, if used instead) to the top of the boiler using the gasket 2)
and four 4.2mm sheet metal screws provided in the vent kit as shown in
82mm air inlet orifi ce as shown.
If no additional sections of concentric pipe are required, attach the terminal section to the elbow. In most cases, it 3)
will need to be cut before doing so. Use the following procedure to cut the pipe:
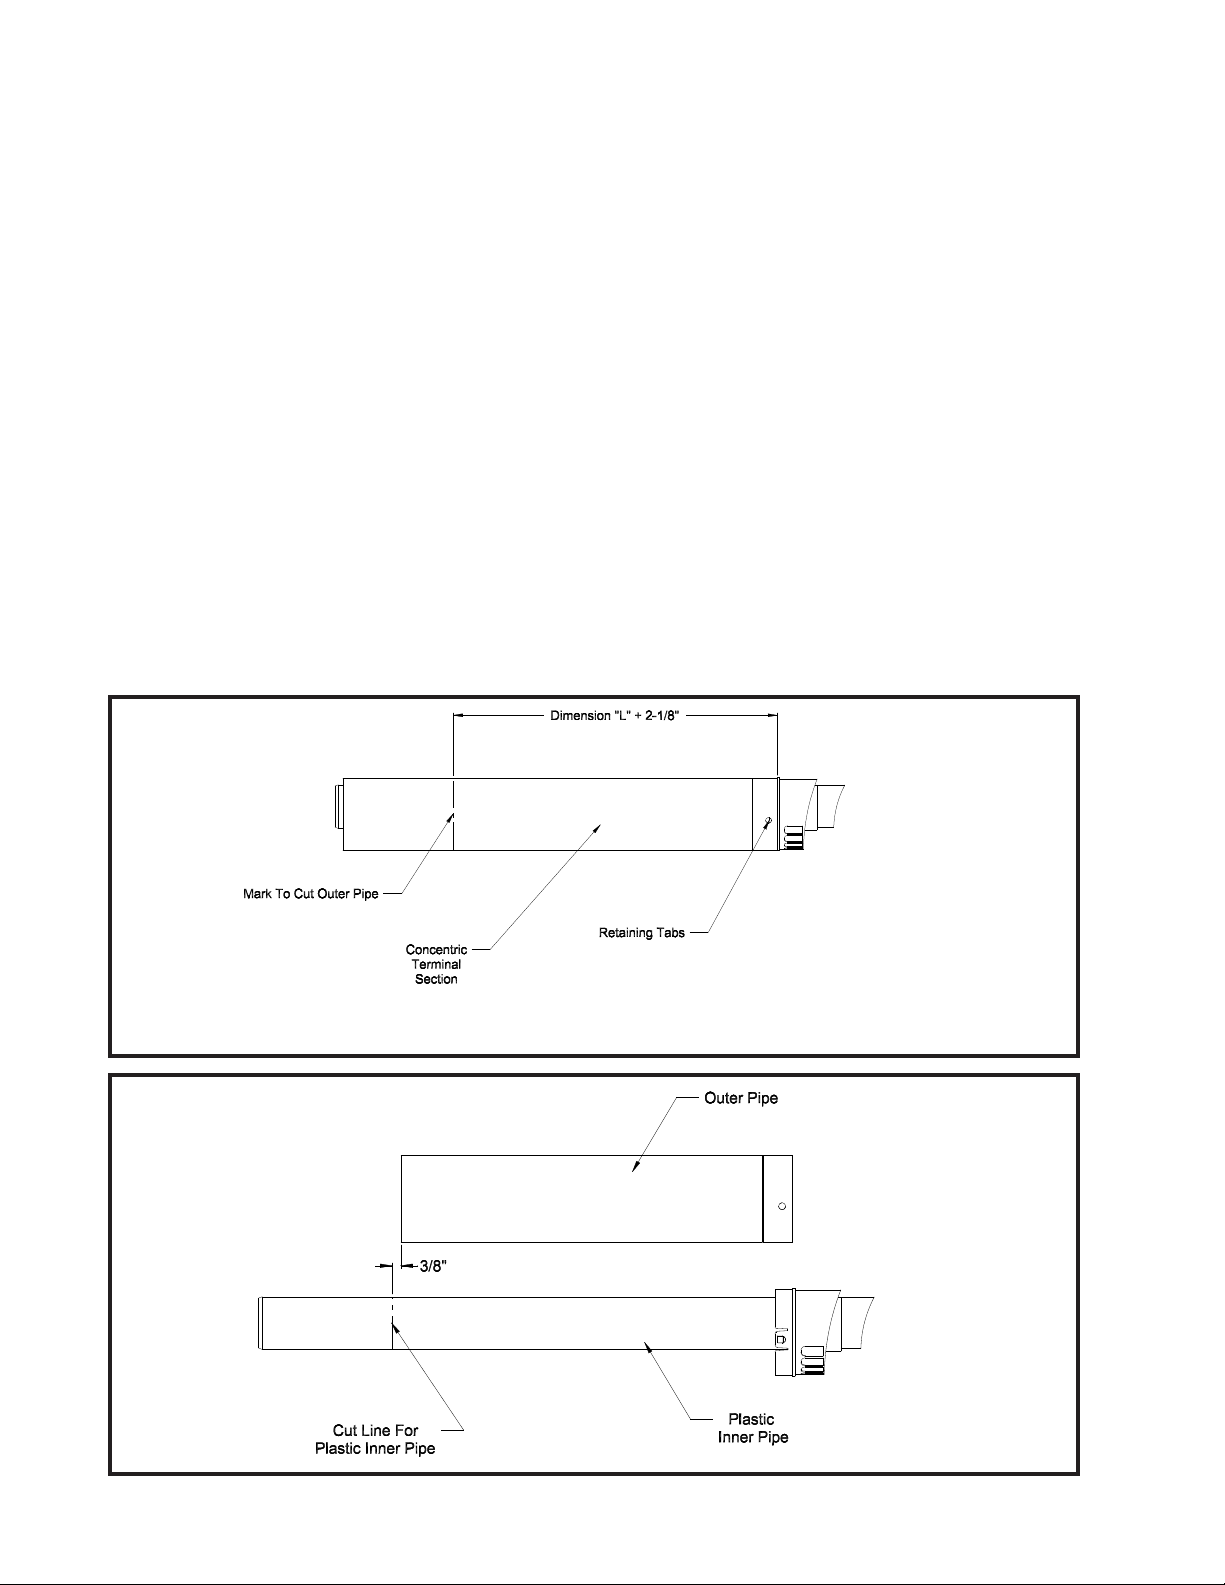
Measure distance “L” from the outside surface of the exterior wall to the end of the elbow as shown in Figure a)
7.21.
Add 2-1/8” to distance “L”. Carefully mark this length on the pipe as shown in Figure 7.22.b)
Press in the two tabs holding the plastic terminal in the terminal section (Figure 7.22). Carefully pull out the c)
terminal and the inner pipe.
Cut the d) outer pipe only at the point marked in Step (b) using aviation shears, a hacksaw, or an abrasive
wheel cutter. Be careful to cut the pipe square. De burr the cut end with a fi le or emery cloth.
Cut the plastic inner pipe so that it will protrude 3/8” beyond the outer pipe when reinstalled in the terminal e)
section (Figure 7.23). Use a fi ne tooth hacksaw or a PVC saw to cut the plastic pipe and be careful to cut the
pipe square. De burr the cut edge of the plastic pipe with a fi le, razor blade, or fi ne sandpaper.
Reinstall the inner pipe in the terminal section. Slip the outside wall grommet over the terminal section and f)
position so that it covers the joint between the outer pipe and the terminal (Figure 7.24).
Make a mark on the terminal section 1” from the cut end of the outer pipe as shown in Figure 7.24.g)
Pass the terminal section through the wall from the outside. Push the remaining wall grommet over the h)
terminal section on the inside of the wall. Push the terminal section into the elbow until the mark made in Step
(g) is no longer visible. If necessary , the brown gasket in the inner pipe may be lubricated with a few drops of
water.
The terminal section must be attached to the elbow with a single #10 x 1/2” sheet metal screw ( not supplied) i)
at the top of the elbow. Drill a 1/8” hole in the location shown in Figure 7.25. Use a short drill bit or a drill
stop to ensure that the drill bit does not penetrate the pipe by more than 3/8”. Install a #10 x 1/2” screw
in this hole. Do not use a screw longer than 1/2” long.
If not already done, make sure that both wall grommets are fi rmly against the interior and exterior wall j)
surfaces. Seal any cracks or other openings near the terminal through which exhaust could enter the building.
Figure 7.20. For Vent Option 1, install the
20
Page 23
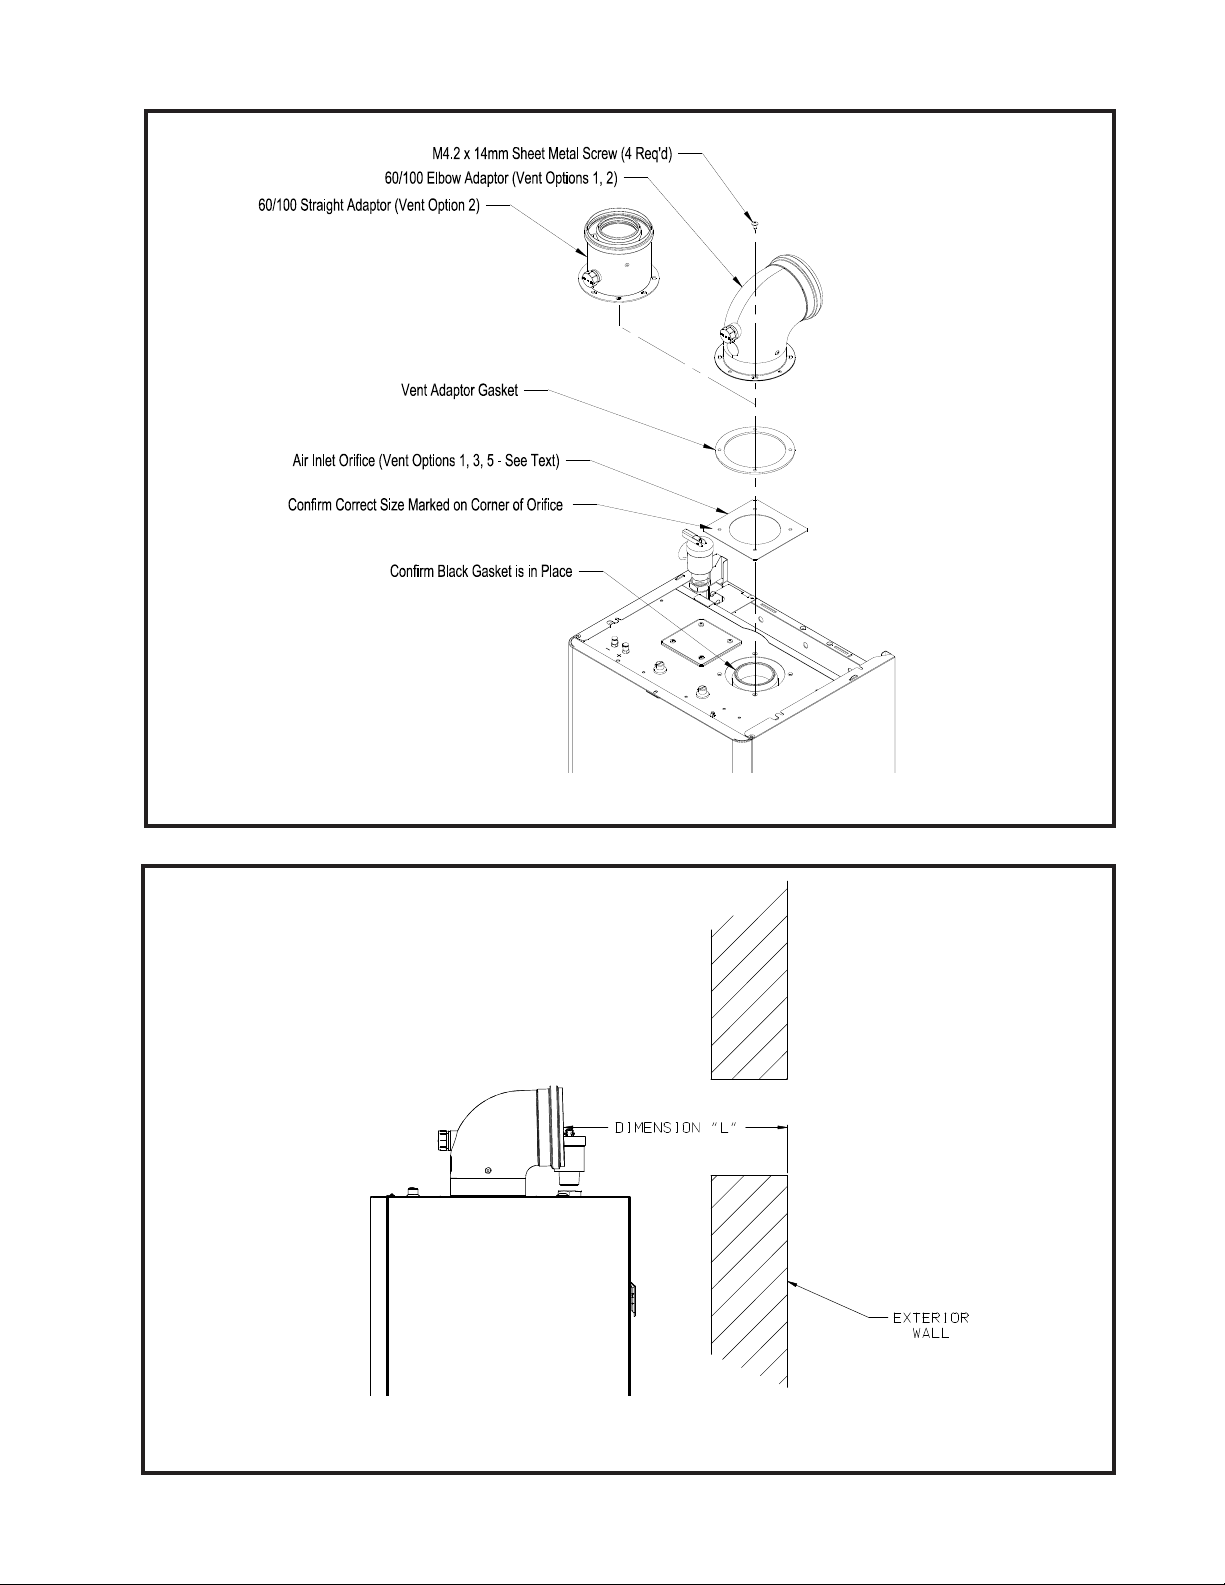
FIGURE 7.20: INSTALLATION OF 60/100 ADAPTORS ON BOILER
FIGURE 7.21: DIMENSION “L”
21
Page 24
If additional pieces of pipe are used, install them starting at the boiler elbow. Support each section of straight pipe 4)
at its female end.
Use locking bands provided to join adjacent sections of non-cuttable pipe as well as fi ttings. The male end of the 5)
terminal section and other cuttable sections must be held to the female end of the adjoining pipe with at least
three #10 x 1/2” sheet metal screws. Drill a 1/8 hole through both outer pipes to start this screw. Use a drill stop
or other means to ensure that the drill bit does not penetrate more than 3/8” into the outer pipe. Do not
use a sheet metal screw longer than 1/2”.
The only straight pipe that can be cut is the terminal section and the 19-1/2” section (Crown PN 230506). To cut 6)
this pipe:
Cut pipe from the male end. After marking the desired length of the outer pipe, remove the plastic inner pipe a)
by pulling it out from the female end.
Cut the b) outer pipe only at the point marked in Step (b) using aviation shears, a hacksaw, or an abrasive
wheel cutter. Be careful to cut the pipe square. De burr the cut end with a fi le or emery cloth.
Cut the plastic inner pipe so that it will protrude 3/8” beyond the outer pipe when reinstalled in the outer pipe. c)
Use a fi ne tooth hacksaw or a PVC saw to cut the plastic pipe and be careful to cut the pipe square. De burr
the cut edge of the plastic pipe with a fi le, razor blade, or fi ne sandpaper.
Reinstall the inner pipe.d)
Install the terminal as outlined in Step (4) above. Dimension “L” described in Step 3 is the distance from the 7)
exterior surface of the wall to the end of the last piece of pipe inside the building.
Figure 7.22: Cutting Outer Pipe
Figure 7.23: Cutting Inner Pipe
22
Page 25
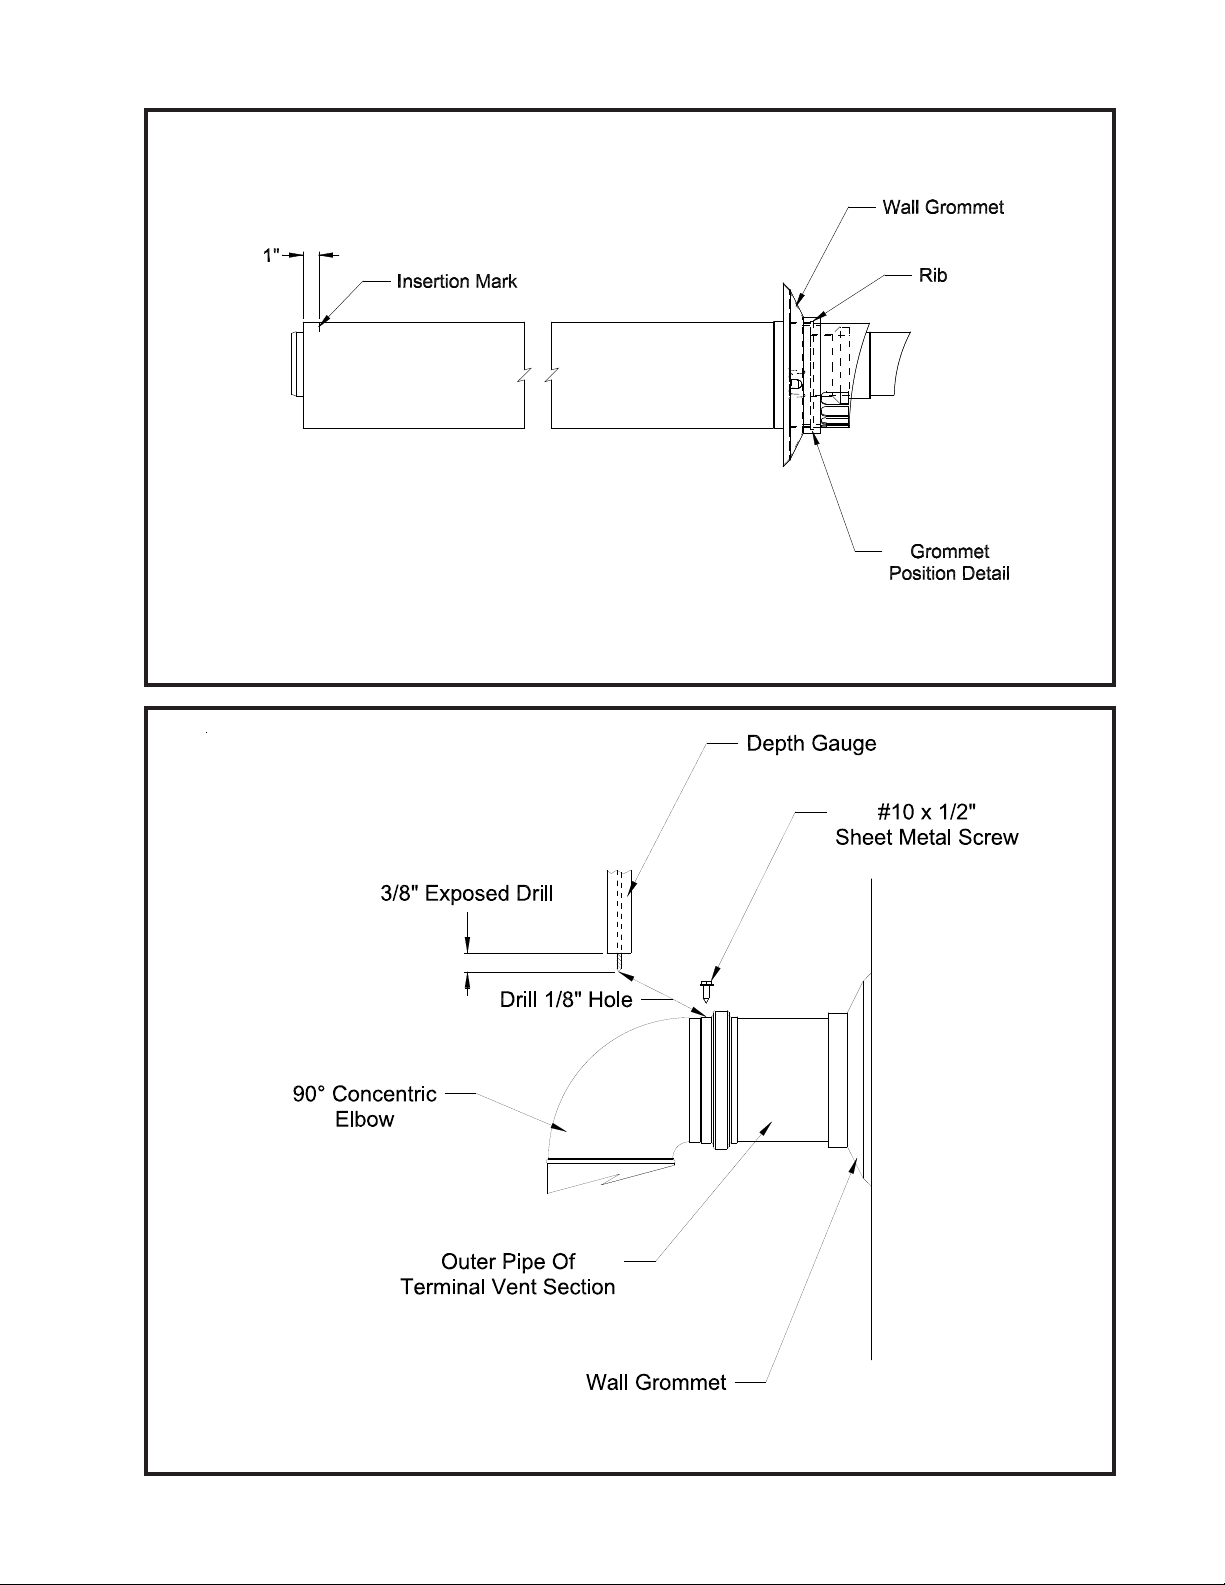
Figure 7.24: Preparing 60/100mm Terminal Section For Installation In The Wall
Figure 7.25: Attaching 60/100mm Terminal Section
23
Page 26
D. Assembly of Crown 80/125mm Concentric Venting
(IMPORTANT - See Section C for 60/100mm Concentric V ent Assembly)
WARNING
Failure to follow the instructions could result in fl ue gas leakage into the combustion air or indoor
air, resulting in unsafe or unreliable operation.
• Do not lubricate concentric gaskets with anything other than water.
• Do not attempt to cut any piping except as permitted in this section. When cutting these
sections, make sure all cuts are square and allow for proper insertion.
• Do not attempt to try to mix this concentric pipe with other venting systems.
The 60/100mm terminal section and concentric reducing elbow supplied with the boiler are not used in 1)
80/125mm vent systems. The components listed in Table 7.3b are required for 80/125mm installations and
are not supplied with the boiler. Before starting assembly of an 80/125mm vent system, make sure that
the planned installation is in accordance with the “Vent System Design” section of this manual and that
all required 80/125mm vent components are on hand. These components are available through Crown
distributors.
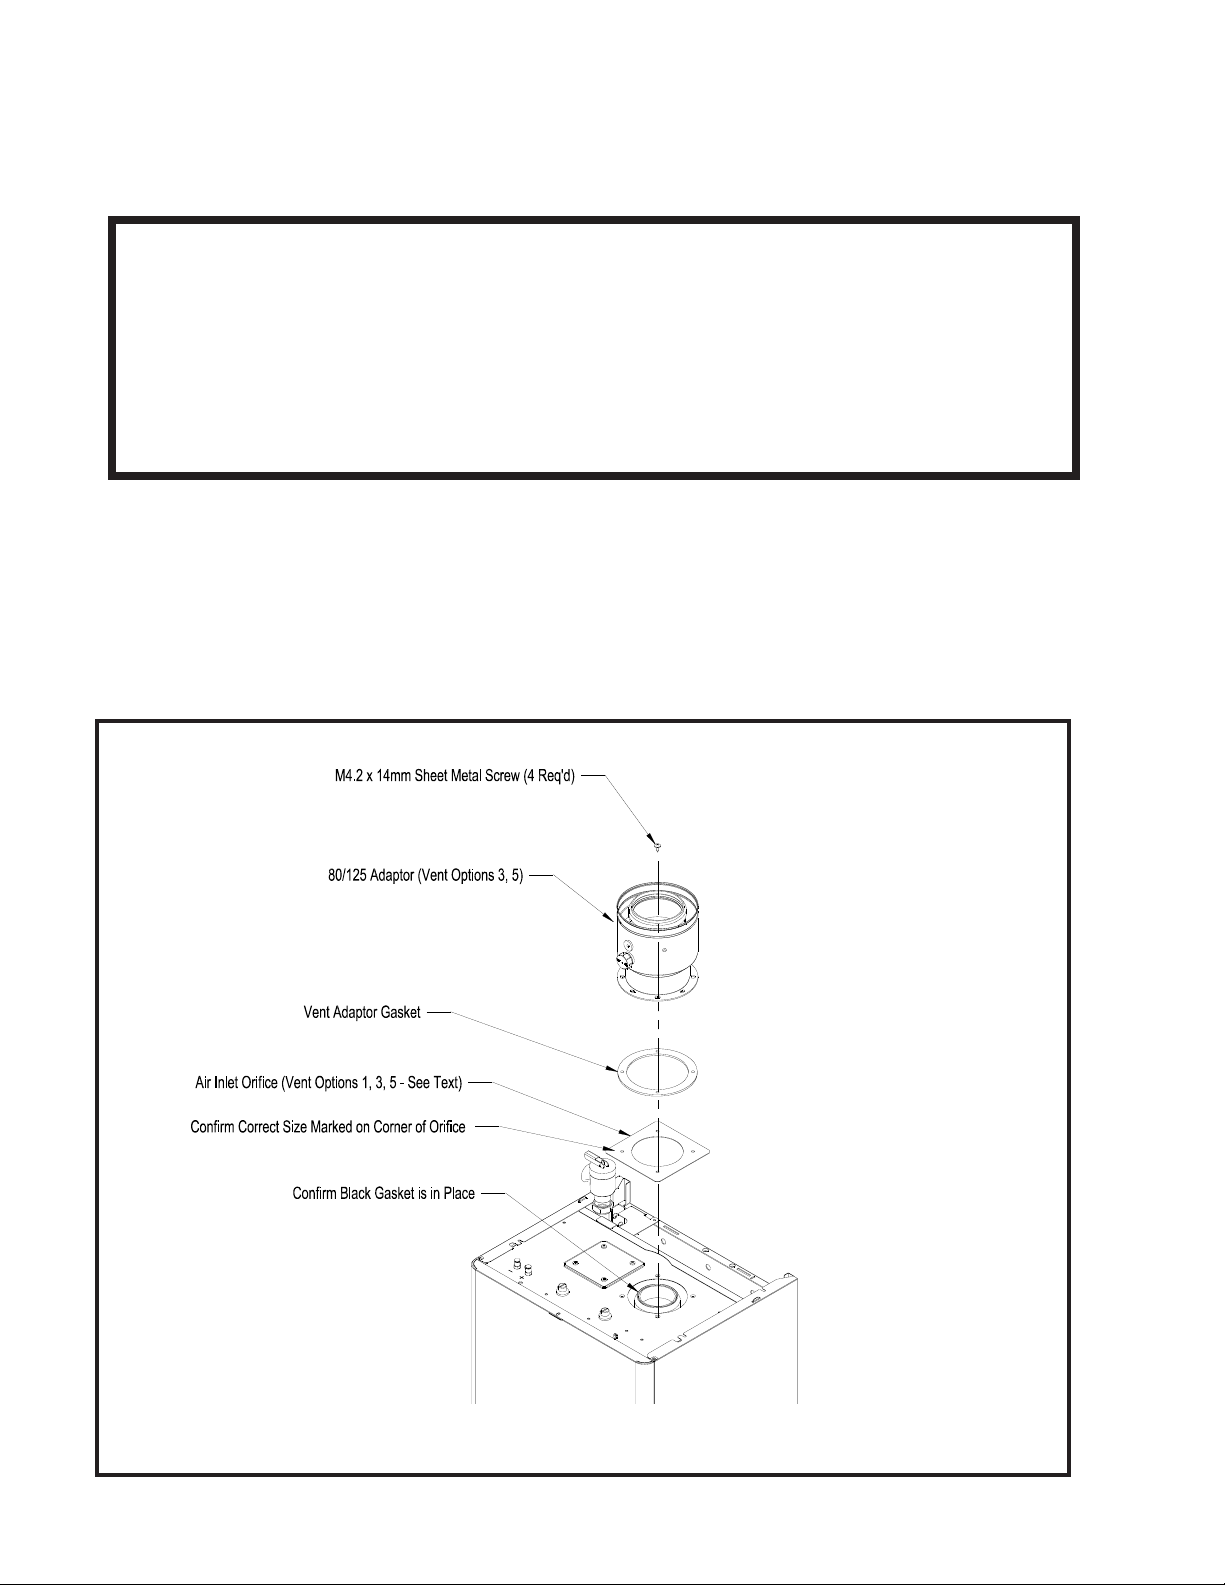
Figure 7.30: Installation Of 80/125 Adaptor On Boiler
24
Page 27
Installation of the MWC1 16 with 80/125mm venting requires the use of the 80/125mm appliance adaptor 2)
(Crown PN 340523). This adaptor is installed on top of the boiler as shown in Figure 7.30. For vent options 3
and 5, sandwich the 82mm air inlet orifi ce between the boiler and the adaptor as shown.
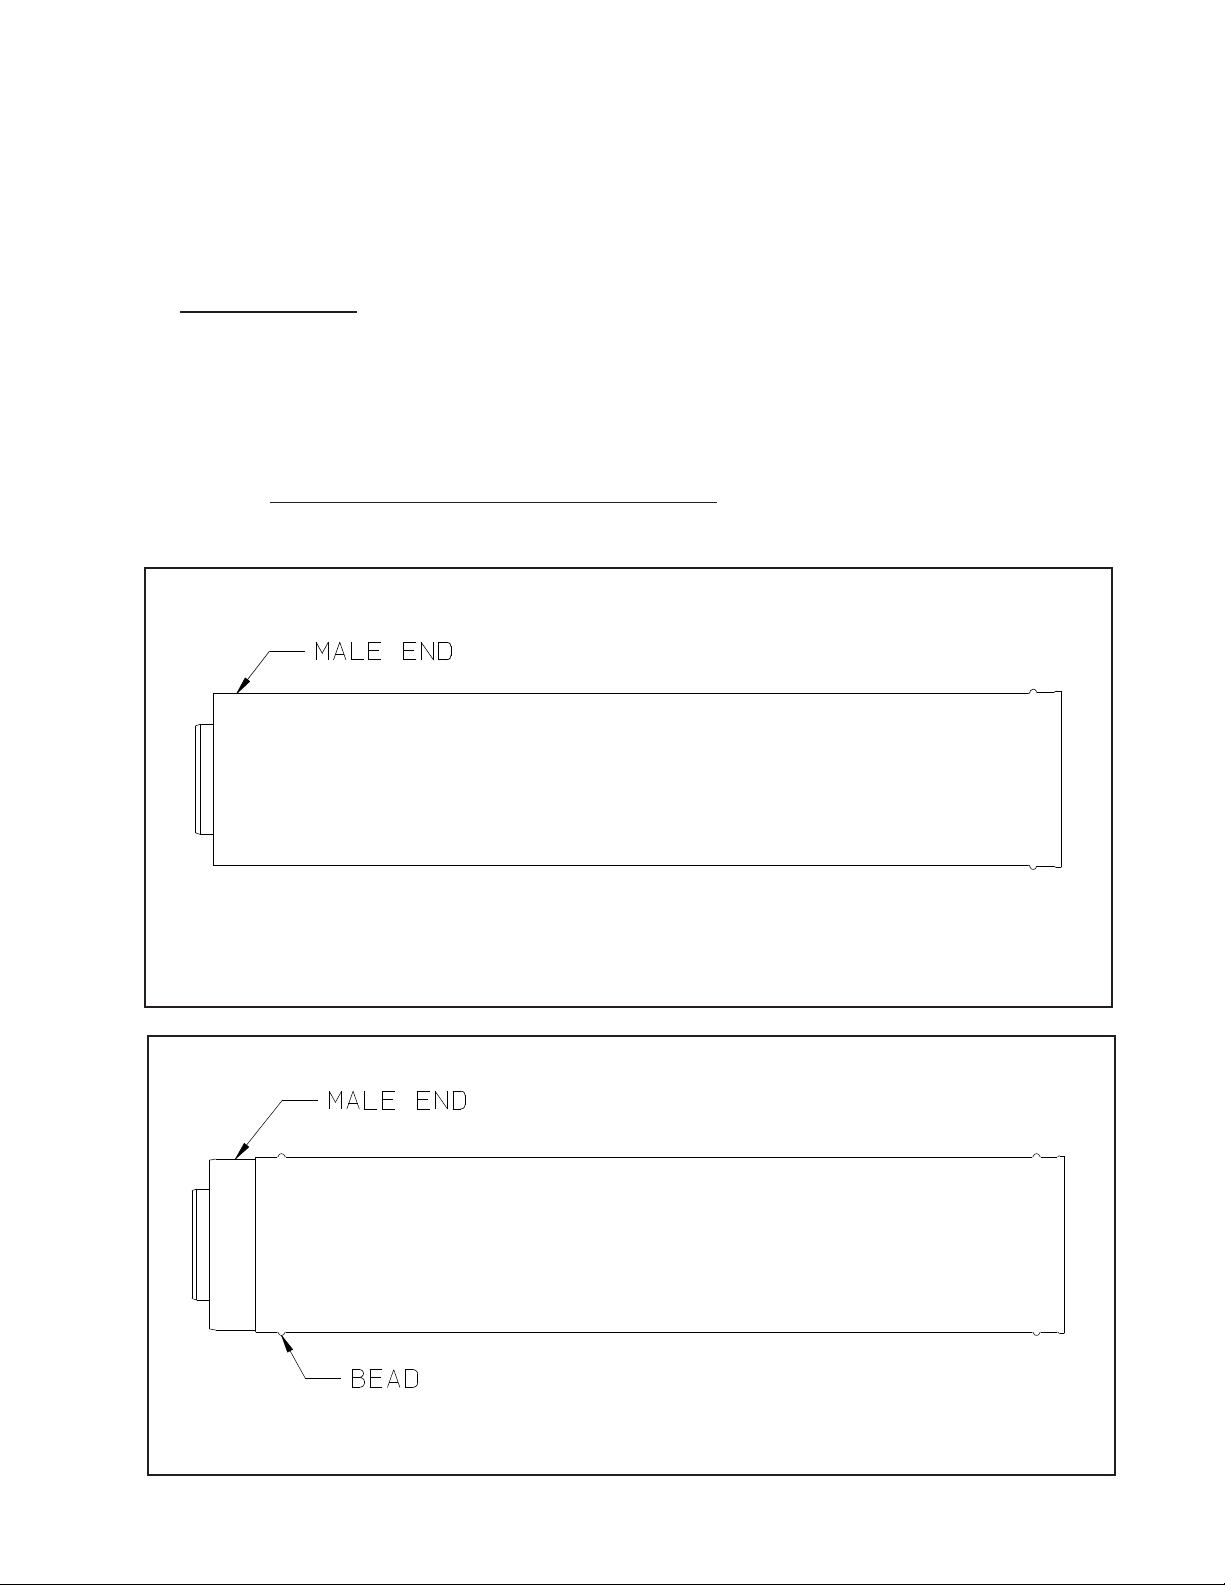
Cutting Straight Pipe3) - The following straight pipe sections may be cut:
Part # Description
230517 19 1/2” Straight
230515 39” Straight
These sections have a plain male end (without beads - see Figure 7.31a). They are always cut from the
male end. Sections not shown on the above list may not be cut. These sections have beads on the male end
(Figure 7.31b).
Figure 7.31a: Cuttable Straight Section
Figure 7.31b: Non Cuttable Straight Section
25
Page 28

3) (contd.) To cut the straight sections listed above refer to Figure 7.32 and the following instructions:
Determine the required length of the a) outer pipe. When doing this allow an additional 1” of length for
insertion into the female end of the adjoining pipe. Mark the cut line on the outer pipe.
Remove the plastic inner pipe by pulling it out from the female end. b)
Cut the c) OUTER PIPE ONLY at the point marked in Step (a) using aviation shears, a hacksaw, or an
abrasive wheel cutter. Be careful to cut the pipe square. De burr the cut end with a fi le or emery cloth.
Make an insertion mark 1” from the male end of the outer pipe. d)
Cut the plastic inner pipe so that it will protrude 3/8” beyond the male end of the outer pipe when e)
reinstalled in the outer pipe. Use a fi ne tooth hacksaw or a PVC saw to cut the plastic pipe and be careful
to cut the pipe square. De burr the cut edge of the plastic pipe with a fi le, razor blade, or fi ne sandpaper.
Reinstall the inner pipe.f)
Joining Pipe4) -
Start assembly of the vent system at the boiler. Lubricate the brown gasket in the boiler vent collar with a a)
few drops of water.
Push the male end of the fi rst fi tting into the boiler collar until it bottoms out. The male end of cuttable b)
sections should go 1” into the collar until the insertion mark (made in Step 3d above) is covered. On other
fi ttings, the bead on the male pipe will bottom out on the collar (Figure 7.33b).
The male end of cuttable fi ttings must be held to the collar with three #10 x 1/2” sheet metal screws. Drill c)
a 1/8 hole through both outer pipes to start this screw. Use a drill stop or other means to ensure that
the drill bit does not penetrate more than 3/8” into the outer pipe. Do not use a sheet metal screw
longer than 1/2” (Figure 7.33a).
Use locking bands (provided with all fi ttings) to secure non-cuttable pipe, as well as fi ttings, to the boiler d)
collar (Figure 7.33b).
Use the same method to join all remaining vent components except for the terminal. e)
Figure 7.32: Cutting Straight Pipe
26
Page 29

Figure 7.33a: Joining Cuttable Pipe
Figure 7.33b: Joining Non-Cuttable Pipe
27
Page 30

80/125mm Horizontal Terminal Installation5) -
Cut a 5-1/2” diameter hole through the exterior wall at the planned location of the horizontal terminal. a)
Measure distance “L” from the outside surface of the exterior wall to the end of the last fi tting as shown in b)
Figure 7.34a.
Add 1-1/4” to distance “L”. Carefully mark this length on the pipe as shown in Figure 7.34b.c)
Remove the inner pipe from the terminal, by gently pulling on it from the male end. Set aside.d)
Cut the e) outer pipe only at the point marked in Step (c) using aviation shears, a hacksaw, or an abrasive
wheel cutter. Be careful to cut the pipe square. De-burr the cut end with a fi le or Emory cloth.
Reinstall the inner pipe in the terminal, making sure that the female end of this pipe is completely f)
bottomed out over the aluminum male connection visible behind the air intake grill. Place a mark on the
inner pipe 3/8” beyond the end of the outer pipe (Figure 7.34c). Use a fi ne tooth hacksaw to cut the pipe
and be careful to cut the pipe square (if necessary , the pipe can be removed from the terminal again for
cutting). De-burr the cut edge of the pipe with a fi le, razor blade, or fi ne sandpaper.
Make a mark on the terminal section 1” from the cut end of the outer pipe as shown in Figure 7.34c.g)
Slip the terminal section through the wall from the outside. Pass the terminal through the inner wall plate h)
and push into the last section of vent pipe until the mark made in Step (g) is not longer visible (Figure
7.34d). Secure the terminal to the last piece of pipe with three #10 x 1/2” sheet metal screws. Drill a 1/8
hole through both outer pipes to start these screws. Use a drill stop or other means to ensure that
the drill bit does not penetrate more than 3/8” into the outer pipe. Do not use a sheet metal screw
longer than 1/2”.
Slip the outer wall plate over the terminal and secure to the wall (Figure 7.34d). Apply a 1/8” bead of i)
weather resistant RTV over the joint between the outside wall plate and the terminal. Secure the other
wall plate to the inside wall.
Figure 7.34a: Dimension “L”, 80/125mm Horizontal Terminal
Figure 7.34b: Cutting Outer Pipe Of 80/125mm Horizontal Terminal
28
Page 31

Figure 7.34c: Cutting Inner Pipe Of 80/125mm Horizontal Terminal
Figure 7.34d: Completing 80/125mm Horizontal Terminal Installation
29
Page 32

Vertical Terminal Installation6) - In addition to the vertical terminal, either a Flat Roof Flashing (PN 230533) or
Sloped Roof Flashing (PN 230535) is required for this installation.
Determine the center line of the terminal location on the roof. If the roof is fl at, cut a 5-1/2” diameter hole a)
for the terminal. If the roof is sloped, cut a hole large enough for the terminal to pass through the roof while
remaining plumb. Caution: If the boiler is installed directly under the hole, cover it while cutting the
hole to prevent saw dust and other debris from falling into the boiler.
Install the roof fl ashing using standard practice for the roofi ng system on the structure.b)
If not already done, assemble the venting system inside the building. The last section of pipe needs to be on c)
the same center line as the terminal and within 19-1/4” of the top edge of the roof fl ashing (Figure 7.35a).
Measure distance “H” from the top edge of the storm collar to the end of the last fi tting as shown in Figure d)
7.35a.
Add 1” to distance “H”. Carefully mark this length on the pipe as shown in Figure 7.35b.e)
Cut the f) outer pipe only at the point marked in Step (e) using aviation shears, a hacksaw, or an abrasive
wheel cutter. Be careful to cut the pipe square. De-burr the cut end with a fi le or emery cloth.
Place a mark on the aluminum inner pipe 3/8” beyond the end of the outer pipe (Figure 7.35b). Use a fi ne g)
tooth hacksaw to cut the aluminum pipe and be careful to cut the pipe square. De-burr the cut edge of the
aluminum pipe with a fi le or emery cloth.
Make a mark on the terminal section 1” from the cut end of the outer pipe as shown in Figure 7.35b.h)
Slip the terminal section through the roof from the outside. Push into the last section of vent pipe until the i)
mark the mark made in Step (h) is not longer visible. Secure the terminal to the last piece of pipe with three
#10 x 1/2” sheet metal screws. Drill a 1/8 hole through both outer pipes to start these screws. Use a drill
stop or other means to ensure that the drill bit does not penetrate more than 3/8” into the outer pipe.
Do not use a sheet metal screw longer than 1/2”.
Secure the terminal section to the inside of the roof structure using the mounting bracket provided with the j)
terminal Figure 7.35c).
Chimney Chase Installation7) - A vertical 80/125mm vent system can be installed in an unused masonry chimney.
This installation is similar to other vertical installations with the following exceptions (Also see Figure 7.36):
The chimney chase elbow kit (PN230530) is used at the base of the chimney . This kit consists of a support a)
elbow and a mounting bracket. Slip the elbow over the M10 x 35 screw in the support bracket. Determine
the desired vertical location of the support elbow in the chimney and mark the location of the pin on the back
of the support bracket on the back wall of the chimney . Drill a 7/16”dia x 2-1/2” deep hole at this location to
support the back of the bracket. The front of the elbow mounting bracket is supported by the bottom of the
opening into the chimney or by an installer supplied bracket.
Construct a weather-tight fl at roof to cover the top of the old chimney. Install the vertical terminal through this b)
roof using the fl at roof fl ashing.
Figure 7.35a: Dimension “H”
30
Page 33

Figure 7.35b: Cutting Vertical Terminal
Figure 7.35c: Completing Vertical Terminal Installation
31
Page 34

WARNING
Do not attempt to construct a vertical vent system inside a chimney that is used to vent a •
fi replace or other appliances.
Do not attempt to construct a vertical vent system inside a chimney fl ue adjacent to another •
fl ue used by a fi replace or other appliances.
Figure 7.36: Chimney Chase Installation
32
Page 35

E. Condensate Trap and Drain Line
All condensate which forms in the boiler or vent system leaves the boiler through the condensate trap.
This trap allows condensate to drain while retaining fl ue gases in the boiler. This boiler is supplied with a
length of drain hose already attached. Route this hose to a drain or other suitable location to dispose of the
condensate. Note the following when disposing of the condensate:
If the condensate drain line must be extended, construct the extension from PVC or CPVC pipe. •
Insert the hose provided with the boiler into the end of the extension as shown in Figure 7.40.
Condensate is slightly acidic. Do not use metallic pipe or fi ttings in the condensate drain line. Do not •
route the drain line through areas that could be damaged by leaking condensate.
Some jurisdictions may require that the condensate be neutralized before being disposed of. Dispose •
of condensate in accordance with local codes.
Do not route, or terminate, the condensate drain line in areas subjected to freezing temperatures. •
If the point of condensate disposal is above the trap, it will be necessary to use a condensate pump to •
move the condensate to the drain. In such cases, select a condensate pump that is approved for use
with condensing furnaces. If overfl ow from this pump would result in property damage, select a pump
with an overfl ow switch and use this switch to shut down the boiler. Alternatively, if heat is a necessity,
use the overfl ow switch to trigger an alarm.
Do not attempt to move the trap from the location shown in Figure 7.40. Do not attempt to substitute •
another trap for the one provided with the boiler.
WARNING
Failure to install the condensate trap and condensate drain in accordance with the above
instructions could cause fl ue gas to enter the building, resulting in personal injury or death.
CAUTION
Boiler condensate is corrosive. Route condensate drain line in a manner such that any
condensate leakage will not cause property damage. Some jurisdictions may require that
condensate be neutralized prior to disposal.
Figure 7.40: Condensate Piping Arrangement
33
Page 36

VIII Gas Piping
Gas piping to the boiler must be sized to deliver adequate gas for the boiler to fi re at the nameplate input at
an inlet pressure between the minimum and maximum values shown on the rating plate. For more information
on gas line sizing, consult the utility or the National Fuel Gas Code
Natural Gas and Propane Installation Code.
The gas line is connected to the boiler using the 3/4” NPT female connection in the tailpiece shown in Figure
8.1. This tailpiece is supplied in the boiler’s fi tting package, along with the fi ber gasket shown.
Figure 8.2 shows the fi nished gas piping connection to the MWC boiler. A sediment trap must be installed
upstream of all gas controls. Install the factory provided manual shut-off valve outside the jacket with a ground
joint union as shown.
The boiler and its gas connection must be leak tested before placing the boiler in operation. When doing this,
the boiler and its individual shut-off must be disconnected from the rest of the system during any pressure
testing of that system at pressures in excess of 1/2 psi. When pressure testing the gas system at pressures of
1/2 psi or less, isolate the boiler from the gas supply system by closing its individual manual shut-off valve.
ANSI Z223.1
/NFPA 54 and/or CAN/CSA B 149.1
Figure 8.1: Gas Tailpiece Installation
34
Page 37

Figure 8.2: Gas Connection To Boiler
35
Page 38

IX System Piping
CAUTION
Install boiler so that the gas ignition system components are protected from water (dripping, •
spraying, rain, etc) during appliance operation and service (circulator replacement, etc).
Operation of this boiler with continuous return temperatures below 86F can cause severe heat •
exchanger corrosion damage.
Operation of this boiler in a system having frequent additions of make-up water can cause severe •
heat exchanger damage.
Do not use toxic additives, such as automotive antifreeze, in a hydronic system.•
Before connecting boiler, make sure that the system is free of sediment, fl ux and any residual boiler •
water additives. Flush the system if necessary to ensure that these contaminates are removed.
A. Standard Piping
Figure 9.1 shows typical boiler system connections on a single zone system. Additional information on hydronic system
design may be found in Installation of Residential Hydronic Systems (Pub. #200) published by the Hydronics Institute in
Berkeley Heights, NJ. The components in this system and their purposes are as follows:
Relief valve (Included & Required)1) – Install the relief valve in the 3/4” connections on the top of the boiler as shown
in Figure 9.3. The relief valve shipped with the boiler is set to open at 30 psi. This valve may be replaced with
one having a setting at or below the Maximum Allowable W orking Pressure (MAWP) shown on the ASME plate
attached to the heat exchanger. If the valve is replaced, the replacement must have a relief capacity in excess of
the Minimum Relief V alve Capacity shown on the rating plate.
Pipe the discharge of the relief valve to a location where water or steam will not create a hazard or cause property
damage if the valve opens. The end of the discharge pipe must terminate in an unthreaded pipe. If the relief
valve discharge is not piped to a drain, it must terminate at least 6 inches above the fl oor. Do not run relief valve
discharge piping through an area that is prone to freezing. The termination of the relief valve discharge piping must
be in an area where it is not likely to become plugged by debris.
DANGER
Pipe relief valve discharge to a safe location.•
Do not install a valve in the relief valve discharge line.•
Do not move relief valve from factory specifi ed location.•
Do not plug relief valve discharge.•
Circulator (Included & Required)2) – This boiler is equipped with a factory piped circulator , which is often the only
circulator required. Figure 9.2 is a performance curve for this circulator. Note that this curve is has been adjusted to
take into the account of all internal boiler piping. This performance curve therefore shows the amount of fl ow that
can be achieved at various heating system pressure drops.
Throttling V alve or Flow Restrictor3) - This boiler is equipped with a differential pressure switch to prove that there is
fl ow through the boiler before allowing it to fi re. Reliable operation of this switch requires that there be a head loss
across the heating system of at least 5.1ft wc. In order to assure that this head loss will always be present, either a
throttling valve must be installed as shown in Figure 9.1 or the fl ow restrictor shown in Figure 9.4 must be installed.
Use the following guidelines to determine which device to use:
If the boiler is installed an a single zone system, or one having zone valves, install the throttling valve. At start-•
up, start with this valve fully open and then close it just enough to obtain reliable operation of the pressure
switch.
If the boiler is connected to a primary-secondary system (Figure 9.5), install the orifi ce in the supply tailpiece •
as shown in Figure 9.4.
If the boiler is connected to a circulator zone system, primary-secondary piping must be used. Install the orifi ce •
as shown in Figure 9.4.
36
Page 39

Figure 9.1: Basic Piping
CAUTION
Failure to install the throttling valve or fl ow restrictor described on the boiler supply could result
in unreliable boiler operation
Expansion Tank (Included & Required)4) – This boiler is equipped with a built in expansion tank. This tank is suitable
for use on systems having a water content of up to 40.6 Gal. This tank is pressurized to approximately 14.7 psi.
On systems having water content in excess of 40.6 gallons, a second expansion tank must be provided. Locate 5)
this tank as close as possible to the return connection on the boiler.
As shipped, the expansion tank is suitable for installations where the vertical distance between the relief valve and 6)
the highest point in the system is 23ft or less. Consult the factory if it is desired to install this boiler on a system
having a greater height.
Fill V alve (Required)7) – Either a manual or automatic fi ll valve may be used. Connect the fi ll as shown in Figure 9.1.
Automatic Air Vent (Included & Required)8) – The boiler is equipped with an automatic air vent. Manual vents will
usually be required in other parts of the system to remove air during initial fi ll.
Low Water Protection9) – This boiler is equipped with a fl ow switch which will only allow the boiler to fi re when there
is fl ow through the boiler, and therefore water in the heat exchanger.
Isolation V alves (Optional - Not Shown)10) – Isolation valves are useful if the boiler must be drained, as they will
eliminate having to drain and refi ll the entire system.
Drain V alve (Required)1 1) – Install a 3/4” boiler drain (not supplied) in the return piping as shown in Figure 9.1.
37
Page 40

Figure 9.2: Circulator Performance Curve (Adjusted For Pressure Drop Through
Boiler)
B. Boiler Connections
Boiler supply and return connections are located on the bottom of the boiler as shown in Figure
pieces are provided in the fi tting bag along with gaskets. Sweat the fi rst copper fi ttings to these tail pieces and then
connect the tail pieces to the boiler using the gaskets provided. If required, install the fl ow restrictor in the supply as
shown in Figure 9.4.
The relief valve is installed using the union connection on top of the boiler as shown in Figure 9.3. Route the relief
valve discharge to a safe location as described on Page 36.
9.4. Copper 3/4” tail
Figure 9.3: Relief Valve Installation
38
Page 41

Figure 9.4: Supply And Return Tailpiece Installation
C. Piping for Special Situations
Certain types of heating systems have additional requirements. Some examples follow:
Primary-Secondary Piping1) – Primary-secondary piping is required when circulator zoning is used or when the
system fl ow rate must be greater than 5.5 GPM. In these cases, the piping shown in Figure 9.5 is used so that the
fl ow through the system is completely independent of the fl ow through the boiler. This ensures reliable operation of
the boiler’s fl ow switch.
When assembling the piping shown in Figure 9.5, be sure to observe the minimum dimensions shown. The
minimum pipe size of the primary piping in the vicinity of the tees is 1 1/4”. At least 11” (8 diameters) of 1-1/4”
straight pipe must be installed upstream of the tees as shown. At least 5 1/2” (4 diameters) of 1-1/4” straight pipe
must be installed downstream of the tees.
Piping with a Chiller2) – If the boiler is used in conjunction with a chiller, pipe the boiler and chiller in parallel as
shown in Figure 9.6. Use isolation valves to prevent chilled water from entering the boiler.
3) Air Handlers – Where the boiler is connected to air handlers through which refrigerated air passes, use fl ow control
valves in the boiler piping or other automatic means to prevent gravity circulation during the cooling cycle.
D. Internal Boiler Piping
Schematics of the internal boiler piping are shown in Figures 9.7 and 9.8 for the MWC1 16E*T (combi) and
MWC1 16E*L (heat-only) models respectively. A schematic of the internal domestic hot water piping for the MWCE*T is
shown in Figure 10.3.
39
Page 42

Figure 9.5: Primary-Secondary Piping
Figure 9.6: Chiller Piping
40
Page 43

Figure 9.7: MWC116E*T (Combi) Internal Boiler-Side Piping Schematic
41
Page 44

Figure 9.8: MWC116E*L (Heat-Only) Internal Piping Schematic
42
Page 45

X. Domestic Water Piping
CAUTION
If the MWC is connected to a water supply having a hardness in excess of 200PPM, scale
may prematurely form in the DHW heat exchanger, signifi cantly shortening its life. If
necessary, soften the water upstream of the cold water connection to the MWC.
If the MWC is equipped for domestic hot water (DHW) production, connect the domestic hot water piping
as shown in Figure 10.1. Connections to the boiler are made with 1/2” copper tail pieces as shown in Figure
10.2. Solder the fi rst fi tting to these tail pieces before mounting them on the boiler. The components in this
system and their functions are as follows:
Anti-scald Devices 1) (Required - Not Shown) - Install anti-scald protection devices in accordance with local
codes. In the absence of any local Codes, install such devices as required by the Uniform Plumbing Code
(IAPMO UPC).
WARNING
Like all domestic water heaters, the MWC is capable of generating water that is hot enough to
cause injury or death due to scalding. To minimize the risk of scalding:
Set domestic hot water (DHW) thermostat as low as possible (see the Start-up Section of this •
manual for the location of this thermostat.
Feel water before showering or bathing.•
If anti-scald or anti-chill protection is required, use devices specifi cally designed for such •
service. Install and maintain these devices in accordance with the manufacturer’s instructions.
Flow Restrictor (Recommended)2) - If domestic hot water is drawn from the MWC at a rate in excess of
the rating in Table 2.2, the temperature of the hot water may be too low to be of use. The use of a fl ow
restrictor will prevent this problem by limiting the rate at which water can pass through the DHW heat
exchanger. If a restrictor is used, select one having a rating in GPM approximately equal to that shown in
Table 2.2.
Pressure Relief Valve (Required)3) - Limits the pressure in the domestic hot water piping. Use a valve
designed for DHW service, such as the Watts #3L or #53L. Note that this is a pressure relief valve, not a
T&P valve. Select a valve with a pressure setting less than or equal to 145 psi. Pipe the discharge to a
safe location using piping the same size as the discharge connection on the valve.
Hose Bib Valves (Recommended)4) - These valves permit the DHW plate heat exchanger be periodically
“back fl ushed” to remove sediment.
Globe or Ball Valve (Recommended)5) - Used to aid in back fl ushing the heat exchanger and to isolate the
DHW piping if it must be serviced. In addition, the upstream valve may be used to limit the DHW fl ow if
necessary.
43
Page 46

Figure 10.1: DHW Piping
Figure 10.2: DHW Tailpiece Installation
44
Page 47

Figure 10.3: MWC116E*T (Combi) Internal DHW-Side Piping Schematic
45
Page 48

XI Wiring
WARNING
All wiring and grounding must be done in accordance with the authority having jurisdiction
or, in the absence of such requirements, with the National Electrical Code (ANSI/NFPA 70),
and / or, the Canadian Electrical Code Part I ,CSA C22.1,Electrical Code.
All electrical connections are line voltage (120 VAC) and are located under the cover on the cover on the top of the 1)
control box (Fig 11.1). To access these connections, use the following procedure:
Remove the three screws on the top of the front jacket panel and lift off the panel. a)
There are three screws in the bottom of each side jacket panel: two near the front and one near the back. b)
Remove the two screws near the front and loosen the screw near the back.
Spread the side jacket panels apart slightly, slide the control box forward and then rotate the control box down c)
as shown in Figure 11.1.
Remove the cover shown in Figure 11.1 to access the electrical connections. d)
Crown supplies the “Whip” shown in Figure 11.2 to route the power and thermostat wiring from an installer supplied 2)
junction box into the boiler’s control box. This Whip is designed to provide proper strain relief at the boiler and also
permits the control box to be easily slid in and out of the boiler with all wiring connections intact. A 7/8 hole is located
in the metal rail behind the control box as shown in Figure 11.3. Power and thermostat wiring is routed into the boiler
from underneath (Figure 11.5) and the BX connector on the “boiler end” of the Whip is secured in this 7/8” opening.
Route the whip leads into the electrical connection compartment. DO NOT CUT THE WHIP LEADS ON THE 3)
BOILER END.
Two terminal blocks are located in the electrical connection compartment: one for power connections and one for the 4)
thermostat connections. Figure 11.3 shows the location of these terminal blocks in the connection compartment.
Connect the whip leads to the terminals as shown in Figure 11.4:5)
Whip Color To Factory Wire Color Description
Black Brown 120VAC “Hot”
White Blue 120 VAC Neutral
Green Green/Yellow Ground
Orange (either) Blue 120VAC Thermostat
Orange (either) Red 120VAC Thermostat
Important: Remove the factory installed jumper from the thermostat terminals (Figure 10.4)
Reinstall the compartment cover removed in Step #1d.6)
Figure 11.5 shows connections at the junction box end of the whip. Provide a dedicated circuit for the boiler with 7)
at least one emergency shut-off switch located in accordance with applicable codes. The thermostat connections
provided are 120VAC. If a thermostat is directly connected to these leads, it and all intervening wiring, must be
suitable for use with 120VAC power. If it is desired to control the boiler with a low voltage thermostat, or other low
voltage control system, use a fan center to do so as shown in Figure 11.6
WARNING
Attempting to directly connect a low voltage thermostat and/or low voltage wiring to the orange
thermostat leads could cause property damage and/or create hazard of fi re or electricutuion.
46
Page 49

Figure 11.1: Accessing Electrical Connections
Field Supplied
J-Box End
Boiler End
Figure 11.2: “Whip”
47
Page 50

Figure 11.3: Location of Terminal Blocks and 7/8 Hole for Whip
Figure 11.4: Electrical Connections Inside Control Box.
48
Page 51

Figure 11.5: Field Wiring - 120VAC Thermostat
Figure 11.6: Field Wiring - 24V Thermostat Using Installer-Supplied Fan Center
49
Page 52

terminal block
External controls
terminal block
3 2 1
L N
gnye bubn
Flue
thermostat
FanElectric supply
M
~
gnyegywh
or
wh
Safety
thermostat
rd
wh
Air pressure
switch
NC
Ignition
electrodes
Flame detection
electrode
NO
bubn
COM
bk
burd
gnye
rd bu bn gnye gnye
bubu
rdbk
bkbk
ygyg
rd rdtrd
whbu
rd
bu
COM
rd
wh
rd
**D.h.w.
**flow switch
**D.h.w.
**NTC
bk
bk
NO
Prmary circuit
flow switch
bn - brown
bu - blue
bk - black
gn - green
gnye - green / yellow
gy - grey
or - orange
rd - red
wh - white
vt - violet
ye - yellow
ye wh bu
bk
gy
yebk whgy bu rd
wh bk rd
M
~
rd
or
wh
gy
bk
bu
bn
gy
wh
bu
bk
rd
bu
1
2
ubeyngyg
bk
rd
gy
gy
M
~
wh
bk
rd
gybugnye
3
bu
t
**Three way
**diverter valve
bu
Pump Gas valveC.h. temperature
probe NTC
*--- directly connected to the electronic ignition board
** - Not for model c.h. only
Caution: Label all wires prior to disconnection when
servicing controls. Wiring errors can cause
improper and dangerous operation.
Verify proper operation after servicing
rd
Figure 11.7: Internal Boiler Wiring
50
Page 53

XII Start-up and Checkout
NOTE
Safe lighting and other performance criteria were met with the gas train assembly provided
on the boiler when the boiler underwent the tests specifi ed in Z21.13.
WARNING
Never attempt to fi ll a hot empty boiler
Use the following procedure for initial start-up of the boiler:
If not already done, fl ush the system to remove sediment and debris. 1) This should be done with the boiler
isolated from the system.
Fill the boiler and hydronic system with water and purge the system of air. To do this:2)
Unscrew the cap on the automatic air vent by one turn and leave open permanently. This air vent is a)
located on top of the circulator (Figure 12.1).
Open the fi ll valve and pressurize the boiler to approximately 15psib)
Bleed air out of each manual air vent in the system until a steady stream of water appears. Start with c)
the lowest manual vents in the system and work towards the highest. If a manual fi ll valve is used,
periodically add water to the system so that the pressure at the boiler is maintained at approximately
15 psi.
Remove the shaft cover screw on the front of the circulator (Figure 12.2). Using a screw driver, d)
manually spin the shaft in the direction of rotation shown on the pump until a small amount of water
appears at the end of the shaft. Replace the shaft cover screw.
At the end of the purging process, make sure that the pressure gauge on the boiler reads between 5 e)
and 19 psi.
Make sure that a manual air vents are closed. If an automatic fi ll valve is used, make sure that it is set f)
to the automatic position.
Auto Air
Vent Cap
Figure 12.1: Location of Automatic Air Vent Cap
51
Page 54

Shaft Screw Cover
Figure 12.2: Location of Circulator Shaft Cover
WARNING
Never use a fl ame to check for gas leaks.•
Make sure that the area around the boiler is clear and free from combustible materials, •
gasoline and other fl ammable vapors and liquids
CAUTION
Leaks in the hydronic system can result in the addition of excessive amounts of makeup water. This can cause severe damage to the boiler’s heat exchanger from corrosion or
calcium deposits. Repair any leaks in the system immediately.
Check all new water and gas piping for leaks and purge piping sections that are fi lled with air. Fix any 3)
leaks found immediately. See the National Fuel Gas Code
Natural Gas and Propane Installation Code,
Vent system must be complete and free of obstructions before attempting to fi re boiler. 4)
Inspect all line voltage wiring for loose or uninsulated connections.5)
Start the boiler using the lighting instructions on page 56. After the power to the boiler is turned on:6)
Initiate a call for heat from the thermostat. Once this is done, Lamp a) 1 on the control panel (Figure
12.3) should fl ash every 4 seconds.
Rotate the Heating System Knob clockwise from “0” to the maximum supply water temperature b)
setting (at approximately 5:00) . Lamp 1 should then fl ash every two seconds and the boiler
should light after approximately 15 - 30 seconds. Once the boiler has lit, Lamps 1 and 3 will fl ash
continuously.
More information on the boiler controls and indicator lamps is presented in the Operation Section of this
manual. Note: On a new installation, there is a good chance that one of the following two problems will
occur:
The differential water pressure switch may not close. If this switch does not close after 180 seconds, •
the boiler will lockout. Lamp #2 will stay on continuously and Lamp #1 will fl ash. If this happens, look
for air in the system or insuffi cient pressure drop across the boiler supply and return connections.
If the latter problem is suspected, close the throttle valve on the supply further. If no throttling valve
is present, make sure that the fl ow restrictor is installed (See Part IX). To reset the boiler, turn the
Heating System Knob to “0” for a few seconds and then return it to the max water temperature
setting.
for additional information on testing and purging gas lines.
, ANSI Z223.1.
/NFPA 54 and/or CAN/CSA B 149.1
52
Page 55

Lamp 2
Lamp 1
Lamp 3
Heating System Knob
DHW
Thermostat
(Combi Only)
Flame Lockout Lamp
Flame Reset Button
Figure 12.3: Control Panel
The burner may not light on the fi rst try. The most likely cause of this problem on a new installation •
is a gas line that has not been completely purged. Other possibilities include inadequate inlet gas
pressure or a boiler that is confi gured for the wrong fuel. If the boiler does not light on the fi rst try, it
will go into a lockout condition. When this happens, the Flame Lockout Lamp (Figure 12.3) will be
illuminated. In addition, Lamps 1 and 3 will fl ash and Lamp 2 will be on continuously. To reset the
boiler, push the Flame Reset Button shown in Figure 12.3 AND rotate the Heating System Knob back
to “0” for a few seconds.
Inspect the fl ame visible through the window. The fl ame should be stable and mostly blue (Fig.12.4). 7)
No yellow tipping should be present; however, intermittent fl ecks of yellow and orange in the fl ame are
normal.
Check the inlet and manifold pressures. To do this, use the following procedure:8)
Remove the inner cover (fi gure 12.5). Note: this is necessary in order to read the manifold pressure a)
accurately because the gas valve regulator is referenced to the burner area.
Figure 12.4: Main Burner Flame
53
Page 56

Loosen the screw in the gas inlet tap on the gas valve and connect a manometer (see Figure 12.6). b)
Make sure the boiler is at high fi re. To do this:c)
On heat only boilers, make sure that the heating system knob is rotated fully clockwise and that •
the supply temperature is less than 150F during the entire conduct of this test.
For combi units, rotate the DHW knob fully clockwise and open enough hot water fi xtures to keep •
the exiting hot water temperature under 110F during the entire conduct of this test.
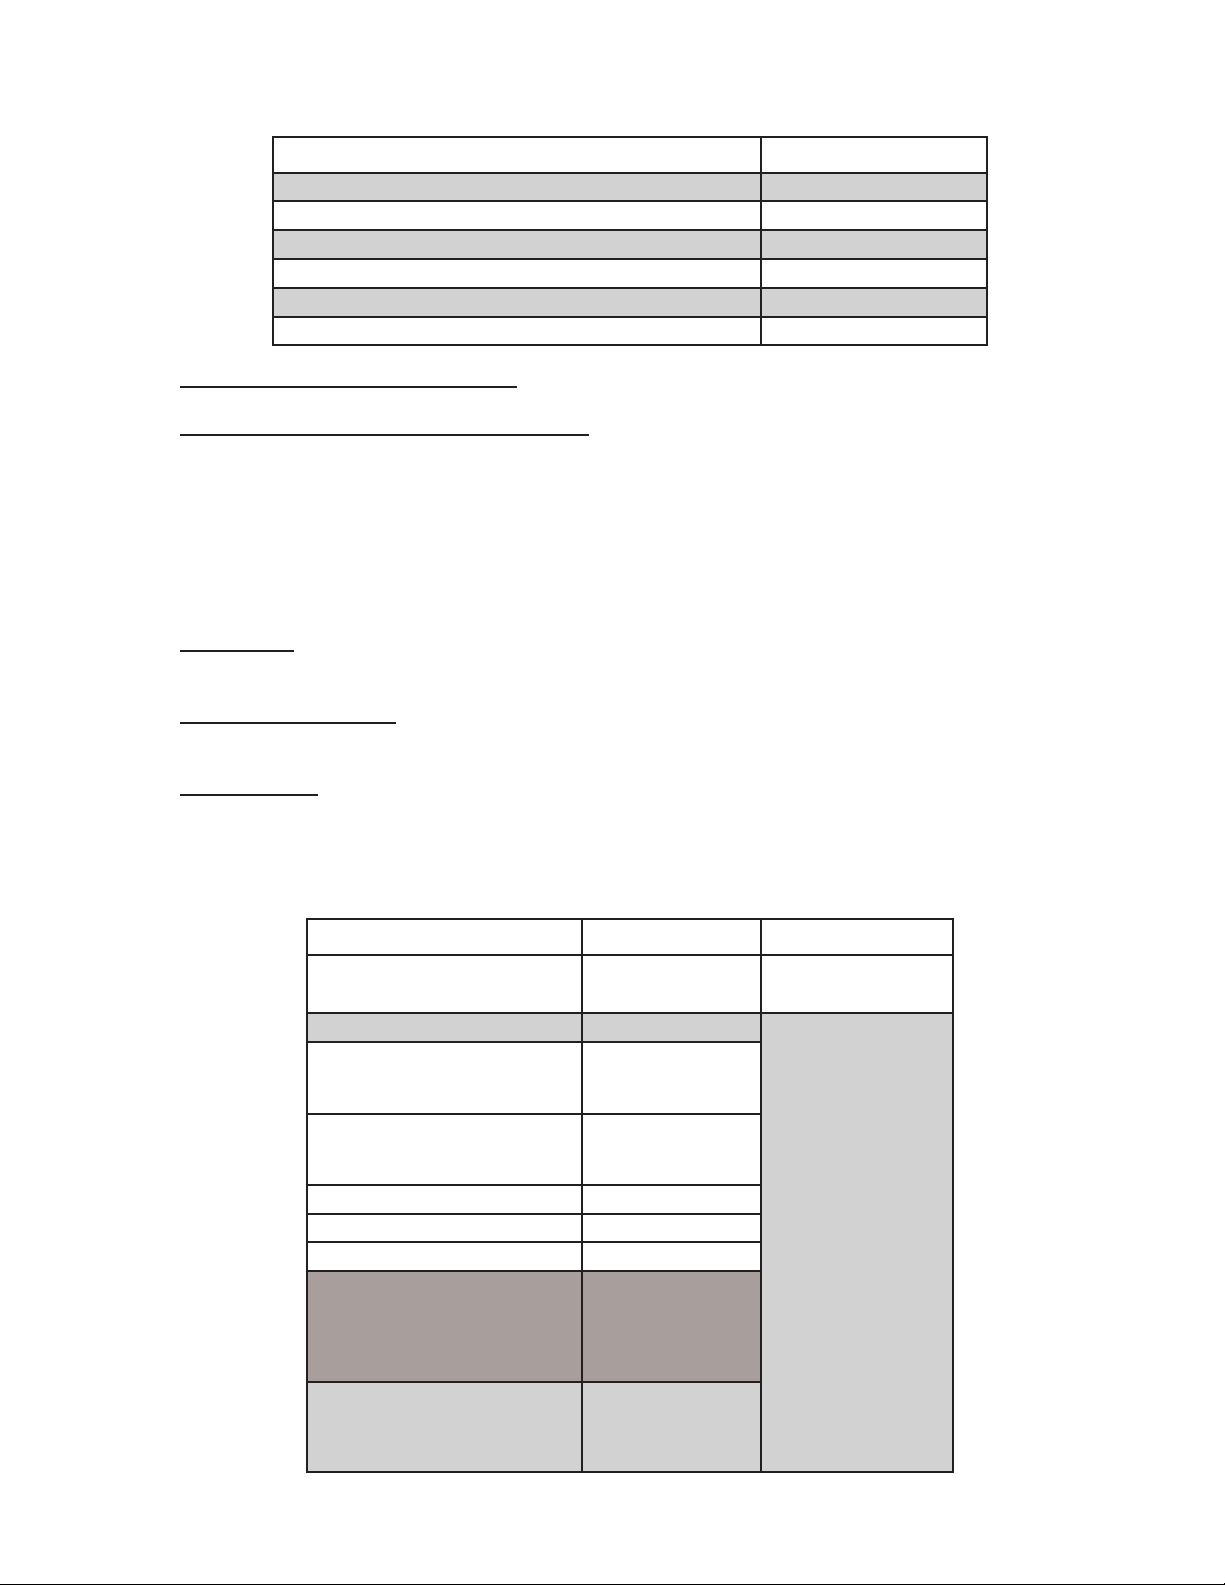
Check the inlet pressure with all the MWC, and all other gas appliances turned on and off. The inlet d)
pressure at the boiler must be within the following limits regardless of what combination of appliances
is fi ring:
Inlet Press. (inches w.c.) Natural Gas LP Gas
Minimum 5.6 10.4
Maximum 10.5 13.0
If the inlet pressure falls outside of these limits, fi nd and correct the cause of the problem before
proceeding further.
Connect a manometer to the manifold (outlet) pressure tap on the gas valve (Figure 12.6).e)
Read the high fi re manifold pressure. It should be set at:f)
Natural Gas LP Gas
Manifold Press. (inches w.c.) 4.8 +/-0.25” w.c. 10.3 +/- 0.50” w.c.
If an adjustment is necessary, pry the clear plastic cap off of the regulator. Turn the outer brass nut g)
clockwise to increase the manifold pressure or counter-clockwise to reduce the pressure.
Check the low fi re manifold pressure. To do this, turn off the boiler and remove one of the modulation h)
leads (Figure 12.6). Turn the boiler back on. Read the low fi re manifold pressure. It should be set at:
WARNING
The gas valve manifold pressures are factory set and should rarely need to be adjusted.
Failure to adjust the gas valve in strict accordance with these instructions could result in
unreliable operation, property damage, personal injury or death due to carbon monoxide
poisoning. When making adjustments, pay particular attention to the following precautions:
Be certain that the inlet pressure are within the limits shown before attempting to make •
manifold pressure adjustments.
Be sure that the boiler is not modulating when making the high fi re adjustment•
Be sure to remove the inner cover before reading or adjusting the manifold pressure.•
Model Number Fuel L.F, Manifold Pressure (in w.c.)
MWC116ENL (Heat Only) Natural 2.2 +/- 0.10
MWC116ELL (Heat Only) LP 4.8 +/- 0.10
MWC116ENT (Combi) Natural 1.0 +/-0.10
MWC116ELT (Combi) LP 2.0 +/-0.10
If an adjustment is necessary, turn the inner black hex shaft clockwise to increase the manifold i)
pressure or counter-clockwise to reduce the pressure (Figure 12.7).
Turn off the boiler, reconnect the modulation lead removed in Step (h) and restart the boiler.j)
Recheck the manifold pressure at high fi rek)
Recheck the inlet pressurel)
Replace the inner cover.m)
54
Page 57

Manifold Pressure Ta p
Inlet Pressure Ta p
Modulation Leads
Low Fire Adjustment
(Inner Hex Shaft)
High Fire Adjustment
(Outer Brass Nut)
Figure 12.5: Inner Cover Removal
Figure 12.6: Gas Pressure Taps
Figure 12.7: Gas Pressure Adjustments (Pry Off Transparent Cover to Access)
55
Page 58

MWC Series Lighting and Operating Instructions
WARNING: If you do not follow these instructions exactly, a fire or explosion may result
causing property damage, personal injury or loss of life.
A This appliance does not have a pilot. It is
equipped with an ignition device which
automatically lights the burner. Do not try to
light the burner by hand.
B BEFORE OPERATING smell all around the
appliance area for gas. Be sure to smell next
to the floor because some gas is heavier than
air and will settle on the floor.
WHAT TO DO IF YOU SMELL GAS
--- Do not try to light any appliance.
--- Do not touch any electric switch; do not use
any phone in your building.
--- Immediately call your gas supplier from a
neighbor’s phone. Follow the gas supplier’s
instructions.
--- If you cannot reach your gas supplier, call the
fire department.
C Use only your hand to push in or turn the gas
control knob.
Never use tools. If the knob will not push in or
turn by hand, don’t try to repair it, call a
qualified service technician.
Force or attempted repair may result in a fire
or explosion.
D Do not use this appliance if any part has been
under water. Immediately call a qualified
service technician to inspect the appliance and
to replace any part of the control system and
any gas control which has been under water.
FOR YOUR SAFETY READ BEFORE OPERATING
OPERATING INSTRUCTIONS
1. STOP! Read the safety information above on
this label.
2. Turn off all electric power to the appliance.
3. Set the thermostat to lowest setting.
4. This appliance is equipped with an ignition
device which automatically lights the burner.
Do not
try to light the burner by hand.
5. Close main gas shut off valve.
6. Wait five (5) minutes to clear out any gas.
Then smell for gas including near the floor. If
you smell gas STOP! Follow “B” in the safety
information above on this label.
If you don’t smell gas, go to next step.
7. Open the main gas shut off valve and the
valve on the domestic cold water inlet pipe.
8. Turn on the electricity supply to the boiler,
switching on the circuit breaker. The appliance
operation light 1 (figure 1) will flash every 4
seconds (stand --- by condition).
9. If the boiler is to be used for c.h and d.h.w
position the function selector 2 as in figure 2.
The appliance operation light 1 will flash every
2 seconds (operating boiler).
Position the knobs 2 and 3 for the desired c.h.
and d.h.w. temperature (for detailed
information see the user manual).
10.If the boiler is to be used for d.h .w. only
position the function selector 2 as in figure 3.
The appliance operation light 1 will flash every
2 seconds (operating boiler).
Position the knob 3 for the desired d.h.w.
temperature (for detailed information see the
user manual).
11.If the appliance will not operate, follow the
instructions “To turn off gas to appliance” and
call your service technician or gas supplier.
1
2 1 2 1 2
Figure 1 Figure 2 Figure 3
TO TURN OFF GAS TO APPLIANCE
1. Turn off all electric power to the appliance if
service is to be performed.
2. Turn the boiler off by setting the function
selector 2 to the position shown in figure 1.
3. Set the thermostat or other operating control
to lowest setting
4. Close the main gas gas shut off valve and the
valve on the domestic cold water inlet
pipe.
3 (Combi Only)
3 (Combi Only)
56
Page 59

Remove the monometer and make sure that the inlet and manifold pressure tap screws are closed9)
Check the entire gas train for leaks. Fix any leaks found immediately.10)
Run the gas valve safety shut-down test. With the boiler fi ring, close the gas cock upstream of the boiler. 11)
The gas valve should close as soon as loss of fl ame is detected (within a few seconds of closing the gas
cock). The boiler should then make one attempt to relight before going into a hard lockout. To reset the
boiler, push the red reset button, rotate the heating system knob back to zero for a few seconds, then
rotate the heating system knob fully clockwise.
Run a combustion test with the boiler operating at high fi re. CO2 or O2 readings should be reasonably 12)
close to the values shown in Table 12.8. The CO level should be less than 50PPM. Consult the factory if
the CO level is exceeded or if the CO2 or O2 are signifi cantly different from the valves shown.
Table 12.8: High Fire Combustion Readings
Fuel Approx. O2 (%) Approx. CO2 (%) Maximum CO (PPM)
Natural Gas 9.7 6.3 50
Propane 9.5 7.5 50
Verify that the fl ue system is tight and securely assembled in accordance with the Venting section in this 13)
manual.
Replace all jacket panels 14)
After the boiler has operated for at least 30 minutes recheck the boiler and system for leaks. Repair ant 15)
leaks found before leaving the boiler in operation.
Test any external limits or other controls in accordance with the manufacturer’s instructions.16)
Verify that the boiler starts and stops in response to calls for heat from the heating thermostat/s. Make 17)
sure that the appropriate circulators also start and stop in response to the thermostats.
Set the Heating System Knob and the DHW knob for the desired target supply and DHW temperatures 18)
(see the Operation section for more information on how to do this).
57
Page 60

XIII Operation
Lamp 2
Lamp 1
Lamp 3
Heating System Knob
DHW
Thermostat
(Combi Only)
Flame Lockout Lamp
Flame Reset Button
Figure 13.1: Control Panel
Figure 13.1 shows the control panel for the MWC boiler. The purpose of the adjustments and lamps on this panel are
as follows:
Lamps 1, 2, 3 - These lamps show the status of the boiler by lighting and/or fl ashing in various combinations. 1)
Table 13.4 shows lamp codes that will be seen during normal operation. Lamp codes indicating a problem are
shown in Section XV.
Heating System Knob2) - A detail of the heating system knob is shown in Figure 13.2. This knob has three discrete
settings:
Off • - Boiler will not respond to a call for heat or domestic hot water (DHW). The boiler will fi re, if necessary ,
to protect itself from freezing. In addition, it will operate the circulator and the 3-way valve for a few seconds
every 24 hours to prevent these devices from sticking.
The “Off” setting is also used to reset the boiler after it experiences a lockout. To reset the boiler, rotate the
Heating System Knob to “Off” for a few seconds and then return it to its original position (if the lockout is due
to a loss of fl ame, it will ALSO be necessary push the Flame Reset Button).
Summer Operation (Combi Only)• - Boiler will not respond to a call for heat from the heating thermostat, but
will respond to a call for DHW.
T arget Supply Temperature Setting• - When the Heating System Knob is rotated clockwise to any position
from “Off” the boiler will respond to a call for heat. During the call for heat, the boiler will attempt to maintain
a “target” supply temperature. This target supply temperature can bet set anywhere between 100F and 178F
(Figure 13.2) .
DHW Thermostat (Combi Boilers Only)3) - This knob determines the target domestic hot water (DHW) temperature.
It is adjustable from 95F to 131F (Figure 13.3). If a call for heat is present at the same time as a call for DHW, the
call for DHW has priority; no heat will be delivered to the heating system until the call for DHW is satisfi ed.
Flame Reset Button4) - This button is used to reset the boiler in the event that it locks out due to failure to establish
a fl ame. In addition to pressing this button, it is also necessary to rotate the Heating System Knob back to “0” for a
few seconds to reset the boiler.
Flame Lockout Lamp5) - Illuminates if the boiler locks out due to failure to establish a fl ame.
58
Page 61

Figure 13.2: Heating System Knob
Summer Operation
Off
Target Supply Temp = 100F
Target Supply Temp = 178F
95F Target DHW Temp
131F Target DHW Temp
NOTE
Since a room thermostat will almost always be used to initiate a call for heat (either directly or
through zone controls), it is generally recommended that the Heating System Knob be left at
the appropriate Target Supply Temperature year round.
Figure 13.3: Domestic Hot Water (DHW) Thermostat
The domestic water thermostat on the Maui is not intended to serve as a scald protection device.
Under certain conditions, it is possible for the DHW temperature to climb signifi cantly above the
DHW Thermostat set point. Like all domestic water heaters, the MWC is capable of generating
water that is hot enough to cause injury or death due to scalding. T o minimize the risk of scalding:
Set domestic hot water (DHW) thermostat as low as possible (see the Start-up Section of this •
manual for the location of this thermostat.
Feel water before showering or bathing.•
If anti-scald or anti-chill protection is required, use devices specifi cally designed for such •
service. Install and maintain these devices in accordance with the manufacturer’s instructions.
WARNING
59
Page 62

Sequence of Operation
(Also Refer to Figures 9.7, 9.8, 10.3, 11.7)
Upon a call for heat from the room thermostat, the circulator is started.1)
If the differential pressure switch connected between the supply and return sees a pressure in excess of 5.1 ft 2)
w.c., it closes, allowing the start sequence to continue. If the switch does not see 5.1ft w.c. after 180seconds, the
boiler goes into lockout.
If the common and normally closed contacts on the air pressure switch are made, the inducer starts. 3)
The air pressure switch measures the difference between the combustion air pressure in the cabinet and the 4)
negative pressure generated at a venturi located in the inducer discharge. In this way it measures the air fl ow
through the boiler. If the pressure across the air pressure switch exceeds approximately 0.64” w.c., the switch will
close. If the air pressure does not close after 4 minutes of inducer operation, the boiler will go into lockout.
After the air pressure switch closes, current can pass through the normally closed supply water and fl ue gas 5)
safety limits to the ignition module, initiating a call for burner operation.
The ignition module generates an ignition spark and opens the valve. The presence of fl ame is detected through 6)
a separate fl ame rod. If no fl ame is detected after 10 seconds, the boiler will go into lockout. If the fl ame is proven
and this proof is subsequently lost at any point during the burner cycle, the boiler will attempt to re-light once, then
go into lockout.
When responding to a call for heat, the boiler will attempt to maintain the target supply temperature selected by 7)
the Heating System Knob. The boiler does this by monitoring the supply temperature sensor shown in Figure
and modulating the input based on the difference between the current supply temperature and the
9.7/9.8
target supply temperature. Modulation is achieved by varying a 0-24VDC voltage across a coil on the gas valve
regulator (0V=minimum input).
If the supply water temperature exceeds the target supply temperature while the call for heat is present, the 8)
burner will shut down and the circulator will continue to run. The burner will relight when the supply temperature
drops below the target temperature.
If the supply temperature exceeds 221F (which should never happen unless there is a problem with the supply 9)
sensor), the manual reset supply water high limit will open.
If the condensate trap becomes blocked, the condensate level will rise to the point where it covers two electrical 10)
contacts: a contact connected to ground, and a contact in the fl ame rod lead. The condensate will complete an
electrical circuit between these two contacts, grounding out the unrectifi ed fl ame signal. This will be detected by
the ignition module as a loss of fl ame and result in a lockout.
If the fl ue temperature exceeds 248F, 1 1) the manual reset supply water high limit will open. This protects the PPs
venting from excessive temperatures.
When responding to a call for heat, combi boilers use exactly the same sequence of operation as heat-only 12)
models. When a combi boiler receives a call for domestic hot water (DHW), it responds as follows:
The fl ow switch shown in Figure 11.7a) detects a call for DHW draw when a hot water fi xture is opened having
a fl ow rate in excess of approximately 0.5 GPM.
The main control drives the 3-way diverting valve so that all boiler water fl ow is directed though the plate heat b)
exchanger.
If not already running, the circulator startsc)
The boiler fi res after going through the same start sequence described in steps (3-6) above. d)
The boiler monitors the exiting DHW temperature using the sensor shown in Figure 1 1.7. The boiler’s e)
microprocessor control determines the target boiler supply temperature that is needed to meet the DHW
demand and modulates the input accordingly .
60
Page 63

Table 13.4: Flash Codes During Normal Operation
Lamp Nu m ber
1 2 3
(See Part XV for Error Codes)
Meaning
(Short pulse every 4 seconds): H eat ing Syst em Knob in
“Off” positi on. Boiler will not respo nd t o c all for heat or
DHW. Fros t prot ec t ion and pump/valve exercis e f unc t ion
still active
(1 second pulse every 2 seconds): Heating Sy s t em Knob
set to target supply tem perature. Boiler will r es pond to a
call for heat.
Lamp OF F Lamp ON
Boiler responding to a c all f or heat
Boiler responding to a c all f or DHW
Boiler responding to a c all f or frost protection
Flashing l amp, alone
or simultaneously
with another lam p.
Flashing l amp,
alternate wit h
another la mp
61
Page 64

XIV. Service and Maintenance
IMPORTANT
Warranty does not cover boiler damage or malfunction if the following steps are not
performed at the intervals specifi ed.
Continuously:1)
Keep the area around the boiler free from combustible materials, gasoline and other fl ammable vapors a)
and liquids.
Keep the area around the combustion air inlet terminal free from contaminates .b)
Keep the boiler room ventilation openings open and unobstructed.c)
Monthly Inspections:2)
Inspect the vent system to verify that it is open, unobstructed and free from leakage or deterioration. a)
Call the service technician to make repairs if needed.
Inspect the condensate drain system to verify it is leak tight, open and unobstructed. Call the service b)
technician if the condensate drain system requires maintenance.
Inspect the water and gas lines to verify they are free from leaks. Call the service technician to make c)
repairs if required.
Check the pressure on the boiler and make sure that it is approximately 15psi. If the pressure is less d)
than 5psi, add water to bring the pressure up to 15psi.
CAUTION
Water leaks can cause severe corrosion damage to the boiler or other system components. Immediately repair any leaks found.
Annual Inspections and Service3) : In addition to the inspections listed above the following should be
performed by a qualifi ed service technician once every year:
Follow the procedure for turning the boiler off found in the MWC Series Lighting and Operating a)
Instructions.
Inspect the wiring to verify the conductors are in good condition and attached securely .b)
Access the combustion chamber. To do this remove the front and side jacket panels as shown in c)
Figure 1 1.1 Remove the inner cover as shown in Figure 12.5. Remove the Combustion Chamber
cover as shown in Figure 14.1.
Inspect the fi ns on the primary heat exchanger. If any dirt is observed on the fi ns, cover the burner to d)
protect it from falling debris and clean the heat exchanger with a soft brush.
CAUTION
Label all wires prior to disconnection when servicing controls. Wiring errors can cause
improper and dangerous operation. Verify proper operation after servicing.
62
Page 65

Figure 14.1: Removing Combustion Chamber Cover
WARNING
Soot deposits in the fl ue passages are a sign that the boiler may be operating at high carbon
monoxide (CO) levels. After cleaning the boiler of soot deposits, check the CO level in the fl ue gas
to insure that the boiler is operating properly.
If it is necessary to check CO, use a combustion analyzer, or other instrument which is designed
to measure CO in fl ue gas (see Start-up section). A CO “sniffer” designed for testing CO levels in
ambient air cannot be used to check boiler combustion.
A normal CO reading for an MWC series boiler is less than 50ppm (0.005%). A higher reading is
indicative of a combustion problem.
Some causes of excessive CO include:
• Incorrectly sized or drilled burner orifi ce
• Partially plugged fl ue passages
• Improper manifold pressure
• Partial blockage of vent or intake system
• Foreign material in burner venturis or burner ports
• Disconnected regulator reference tube
• Damaged fan impeller or housing
• Damaged or missing inducer or fl ue gas gaskets
• Distorted or missing combustion chamber or fl ue collector components.
• Flue gas recirculation in damaged or improperly assembled concentric venting
Inspect the burner ports for debris. The burner can be cleaned with a soft brush. If the burner shows signs of e.
deterioration, replace it.
Inspect the electrodes and fl ame rod for deposits. Clean as necessary. f.
Disconnect and remove the inducer from the boiler. The inducer is equipped with sealed ball bearings and g.
does not require lubrication. Inspect the impeller and the pressure switch venturi (Figure 14.2) for dirt or
debris. Clean as necessary with a soft brush.
Inspect the h. secondary (stainless steel) heat exchanger coil for debris. Clean as necessary by fl ushing with
clean water. A soft nylon brush may be used in accessible areas. Drain and fl ush the inside of the heat
exchanger and condensate collector as required. Do not use any cleaning agents or solvents.
Reinstall the inducer. If either of the inducer gaskets show signs of deterioration, replace them.i.
Inspect the vent system and terminal for obstructions and clean as necessary.j.
k. For direct vent appliances, proper reassembly and resealing of the vent-air intake system.
Inspect internal boiler piping for leaks and/or deteriorating gaskets. Repair as necessary. l.
Remove, inspect, and clean the condensate trap (Figure 14.3). Disconnect the wires from the trap. Use m.
pliers to compress the spring clip on the drain hose (the hose leading from the secondary heat exchanger)
and slide it upwards. Disconnect the drain hose from the trap. After removing the condensate trap from the
boiler, disassemble the trap in a tray or pan, being careful to note the way in which the fl oat ball and
retainer fi t into the trap. Flush all parts of the trap with water and reassemble. Reinstall the trap on the boiler.
Reinstall the combustion chamber cover, inner cover, and all jacket panels and any wiring removed during n.
the inspection/.cleaning process.
Perform the start-up and checkout procedure described in Section XII of this manual. o.
fl oat ball
63
Page 66

Neg. Pressure Tap
Venturi
Service Notes
Orifi ce Size1) – Sea level orifi ce sizes are:
Natural Gas – 1.30 mm
LP Gas – 0.85 mm
Consult your Crown representative for correct orifi ce sizes for use at altitudes above 2000 ft. Orifi ce for this boiler
cannot be drilled in the fi eld.
Operating the Boiler with Inner Cover Removed2) – For inspection and troubleshooting purposes, this boiler may
be started and run with the Inner Cover (Figure 12.5) removed.
Pressure Switch3) – If necessary, the air pressure switch signal may be read using a slant tube or electronic
monometer connected across the taps on top of the boiler (Figure 14.4). The N.O. contacts on the pressure
switch make, allowing the boiler to fi re, when the switch signal exceeds the “make setting” shown below. Once
the switch is made, the boiler will fi re as long as the pressure at the switch is above the “break setting” shown
below. It is normal for the pressure reading across the switch to drop as the boiler heats up.
Make Setting - 0.64 w.c.
Break Setting - 0.59 w.c.
Limit Reset Buttons4) - Manual reset buttons for the fl ue temperature and supply water limits are located on the
top of the boiler as shown in Figure 14.4. To access the buttons, unscrew the plastic covers.
WARNING
Do not leave the boiler in service with the Inner Cover removed.•
Do not attempt to fi re this boiler with the Combustion Chamber Cover (Fig. 14.1) removed•
Figure 14.2: Inducer
64
Page 67

Figure 14.3: Condensate Trap Removal
Condensate Trap
Spring Clip
Figure 14.4: Location of Pressure Switch Taps and Limit Reset Buttons
65
Page 68

XV. Troubleshooting
Line Voltage Connections
Fuse
WARNING
Turn off power to boiler before replacing fuses or working on wiring.
Table 15.1: No Error Code Displayed
CONDITION POSSIBLE CAUSES
• No 120VAC Power at boiler. Check breaker and wiring
Boiler does not run, no lights are on or fl ashing
Lamp 1 fl ashes every two seconds, but boiler does not
respond to a call for heat.
Combi boiler does not respond to a call for domestic hot water
(DWH).
Combi boiler responds to a call for DHW, but hot water output
is inadequate.
Boiler responds to a call for heat, but room temperature never
gets high enough to satisfy room thermostat
Boiler short cycles AND heat (or DHW) output is inadequate
between breaker panel and boiler
• Fuse on main PCB is blown (Figure 15.2). Check for short in
boiler wiring, then replace with an idenitcal 4.0A fuse.
• Problem with thermostat or zone wiring
• Domestic draw less than 0.5GPM
• Defective fl ow switch (LED inside fl ow switch will glow red
when it resonds to a call for DHW).
• Inlet and outlet connections reversed.
• Draw rate is in excess of that shown in Table 2.2
• Inlet and/or manifold pressures incorrect (see Start-up
Section).
• Plate heat exchanger is fouled.
• DHW fi lter is dirty
• Air in radiation
• Inlet and/or manifold pressures incorrect (see Start-up
Section).
• No fl ow, or insuffi ent fl ow, through system.
• Boiler is undersized.
• Insuffi cient radiation
• Flue gas recirculation into combustion air
• See causes for inadequate heat or DHW above
Figure 15.2: Fuse Location
66
Page 69

Table 15.3: Error Codes
Lamp Num ber
1 2 3
Flame
L.O.
Lamp
Meaning Corrective Action
Differential Water Pressure
Switch F ai led to Clo se Afte r
180s
Failure t o Establis h F lame
or
Blocked Condensate Trap
or
Reversed Line Voltage
Polarity
(Note: LED #2 will not
illuminate until error has
been present for 4 minutes)
Reset the boiler by turning the Heating System Knob to “0”
for a few seconds, then returning it to its original position.
Then:
• Ver i fy that that boil er and sy stem are purged of a ir
• Verify that there is at least 4.5psi at the boiler
gauge
• Verify that cirulator is running
• Close the throttling valve on the supply more or
install flow restrictor in supply (see piping section)
Reset the boiler by turning the Heating System Knob to “0”
for a few seconds then returning it to its original position.
Push Flame Reset Button. Then verify that:
• Gas line is purged of air (new installations)
• Inlet gas and manifold pressures are correct (see
Start-up Section)
• Manifold pressure is correct (see Start-up section)
• Electrodes have a gap of 0.149” – 0.157”
• Electrodes, flame rod, and wiring are in good
condition
• Condensate trap is draining correctly
• 120VAC exists between the hot (brown)
connection and ground and not
neutral (blue) and ground.
between the
Air Pressure Switch Problem
Flue Gas Limit Open
(Note: LED #2 will not
illuminate until error has
been present for 4 minutes)
Defective Supply Sensor Replace Supply Sensor
Defective DHW Sensor Replace DHW Sensor
Excessive Temperature on
Lamp OFF Lamp ON
or
Supply Limit Open
or
Primary Circuit
Use the flow chart in this section to diagnose the exact
problem.
Consult Factory
Consult Factory
Consult Factory
Flashing lamp, alone
or simultan eously
with another lamp.
Flashing lamp,
alternate with
another la m p
67
Page 70

A
A
Figure 15.4 Flow Chart for Isolating Limit and APS Errors (See Table 15.3)
Push reset button on Flue Temp Limit
(Fig 14.4)
Reset Boiler
Reset Boiler
Does Boiler
Start?
Y
Flue Temp Limit was open and
will probably open again. Look
for:
* Fouled flue passages
* Manifold pressure too high
* Incorrect Burner Orifice
N
Reset Boiler
Push reset button on Supply Temp
Limit (Fig 14.4)
Does Boiler
N
Start?
Y
Supply Temp Limit was open and will probably
open again. Look for:
* A problem with the supply sensor
* Water-side blockage in one of the boiler heat
exchangers or internal boiler piping
Does Inducer
(Fan) start before
error code
reappears?
N
Y
ir pressure switch is not proving airflow:
* Blockage in Vent or Intake
* Vent system too long or undersized (see Vent Section)
* Condensate in pressure switch tubing
* Leaking or kinked pressure switch tubing
* Blockage in primary or secondary heat exchanger
* Fouled Inducer Venturi
* Defective air pressure switch
Is 120VAC present
across Inducer?
Y
* Defective Inducer
ir switch stuck in closed position:
* Condensate in pressure switch tubing
* Kinked pressure switch tubing
* Defective air pressure switch
N
68
Page 71

XVI Parts
The following parts may be obtained from any Crown distributor. To fi nd the closest Crown distributor,
consult the area Crown representative or the factory at:
Crown Boiler Co.
Customer Service
P.O. Box 14818
Philadelphia, PA 19134
www.crownboiler.com
C.h. return group and d.h.w. heat exchanger (Model combi)
13
20
12
15
14
16
15
18
17
11
19
1
2
3
5*
6
7
8
9
10
4
* Includes items 1, 12, 19
69
Page 72

C.h. flow group and three way diverter valve (Model combi)
21
22
23 (upper part)
20
17
27
18
36
20
7
26
23 (lower part)
24
20
24
10
8
9
28 29 30 31 32
7
25*
4
26
27
33
34
35
* Includes items 23, 28, 29, 30, 31, 32, 20, 36
70
Page 73

C.h. flow and return groups (Model c.h. only)
27
7
147*
7
26
146
10
36
20
28 29 30 31 32
8
9
61
2
3
145
7
8
9
33
34
35
* Includes items 20, 28, 29, 30, 31, 32, 36
71
Page 74

Pump and main circuit assembly (Model combi)
37
65
64
63
7
62
38
39
44
61
60
58
59
45
46
47
44
48
41
49
50
38
40
39
41
42
40
43
41
58
7
57
7
3
56
55
54
51
53 52
72
Page 75

Pump and main circuit assembly (Model c.h. only)
37
64
148
63
7
62
38
39
44
61
60
58
59
45
46
47
44
48
41
49
50
38
40
39
41
42
40
43
41
58
7
149
7
3
56
55
54
51
53 52
73
Page 76

Gas assembly
78
41
76
7
77
7
73
75
66
67
68
69
70
71
72
7
74
74
Page 77

Connection pipes
10*
7
7
10*
7
79
* Not for model c.h. only
79
80*
81
80*
75
Page 78

Control panel and ignition device (Model combi)
72
97
82
72
96
72
95
94
72
93
92
91
72
83
53
84
85
77
88
86878990
76
Page 79

Control panel and ignition device (Model c.h. only)
72
97
82
72
96
72
95
94
72
93
92
91
72
83
53
84
85
77
88
868789150
77
Page 80

Wiring (Model combi)
98
113
99
100
113
107
108
112
105
99
109
113
77
108
71
101
102
103
104
100
105
106
107
101
102
103
108 901011111
78
Page 81

Wiring (Model c.h. only)
98
113
99
100
113
151
112
105
99
109
113
77
151
71
101
102
103
104
100
105
106
152
101
102
103
151 901011111
79
Page 82

Fan, combustion chamber and case panels
114
77
142
143
144
130
129
122
131
141
132
133
140
137
72
136
138
139
140
135
134
115
116
77
117
118
119
120
121
77
122
77
123
77
77
121
77
128
80
127
126
125
124
Page 83

Key no. Description Spare part code
1 O-ring gasket 1,78x15,6 BI1001 131
2 Drainage valve BI1011 104
3 O-ring gasket 17,04x4,00 mm BI1212 112
4 Screw M5x25 mm - Hexagon socket cap BI1131 107
5 Return group kit (Model combi) BI1271 504
6 Domestic water restrictor BI1271 102
7 Flat gasket 3/4" BI1001 108
8 Toothed lock washer external 6,4 mm BI1001 124
9 Screw M6x8 mm - BZP RPH BI1001 123
10 Flat gasket 1/2" BI1001 106
11 Flow limiter 10 Litres/min BI1091 102
11A Flow limiter 12 Litres/min BI1091 103
11B Flow limiter 14 Litres/min BI1161 101
12 Magnetic fl ow switch and fi lter kit BI1271 501
13 D.h.w. fl ow switch BI1271 101
14 Exchanger Domestic Hot Water BI1001 102
15 O-ring gasket 1,78x12,42 mm by-pass pipe BI1001 115
16 By-pass pipe (Model combi) BI1271 100
17 O-ring gasket 18,64x3,53 mm KI1043 144
18 By-pass pipe fi xing fork BI1001 111
19 O-ring gasket 1,78x14 mm BI1001 129
20 O-ring gasket 2,62x23,47 mm BI1011 107
21 Diverter valve actuator BI1201 100
22 Diverter valve actuator fi xing spring BI1101 101
23 Diverter valve kit BI1141 501
24 O-ring gasket 2,7x13,6 mm BI1011 117
25 Flow group kit (Model combi) BI1251 503
26 O-ring gasket 9,25x1,78 mm (NTC) KI1001 128
27 Temperature probe (special) BI1001 117
28 Central heating pressure switch membrane BI1011 103
29 Central heating pressure switch disk BI1011 111
30 Central heating pressure switch spring BI1011 110
31 Screw M4x12 mm Stainless steel SCH BI1011 109
32 Microswitch guide bush BI1011 502
33 Microswitch kit BI1011 505
34 Microswitch box fi xing clip BI1011 105
35 Screw 2,9x13 mm AB self tapping BZP - RCH BI1011 108
36 By-pass kit BI1141 505
37 Condensing heat exchanger BI1262 122
38 O-ring gasket 2,62x17.86 mm BI1262 112
39 Condensing heat exchanger connection clip BI1172 101
40 Connection spring BI1262 117
41 Grommet BI1002 113
42 Condensate discharge pipe BI1262 110
43 Condensate trap (withdrawn) BI1262 118
44 O-ring gasket 1,9X16 mm BI1262 114
45 Main exchanger BI1262 135
46 O-ring gasket 17,04x3,53 KI1043 114
81
Page 84

Key no. Description Spare part code
47 Main exchanger connection clip BI1182 106
48 Condensing heat exchanger inlet pipe BI1262 136
49 Automatic air purger valve BI1212 107
50 Pump connection fork BI1262 116
51 Fork BI1262 120
52 Fork KI1042 101
53 Fork KI1042 115
54 Screw 5X16 BI1262 115
55 Pump (complete) BI1262 137
56 Pump gasket BI1172 113
57 Main exchanger outlet pipe (Model combi) BI1262 138
58 Probe holder BI1105 108
59 O-ring gasket 2,62X9,92 mm BI1262 113
60 Expansion vessel connection pipe BI1262 134
61 Flat gasket 3/8" O.D 15 mm, i.d. 8.5 mm BI1202 105
62 Condensing heat exchanger outlet pipe BI1262 107
63 Expansion vessel BI1182 105
64 Safety valve 30 psi BI1262 133
65 Safety valve connection pipe (Model combi) BI1262 132
66 Injectors with gaskets 130 - NG BI1203 502
66A Injectors with gaskets 85 - LPG BI1203 503
67 Burner BI1203 103
68 Detection electrode BI1123 102
69 Ignition electrode - right BI1123 103
70 Ignition electrode - left BI1123 101
71 Grommet BI1002 115
72 Tapping screw 3,5x9,5 mm recessed pan head BI1013 115
73 Taptite screw M4x8 mm Recessed pan head BI1013 111
74 Screw self tapping 3,9x9,5 mm type AB Recessed Pan Head BI1013 112
75 Gas valve BI1203 104
76 Gas pipe to the manifold BI1203 105
77 Tapping Screw ISO No8 B 4,2x9,5 Recessed Pan Head BI1013 110
78 Gas manifold with injectors NG BI1183 105
78A Gas manifold with injectors LPG BI1203 106
79 C.h. connection pipe BI1124 120
80 D.h.w. and d.c.w. connection pipe BI1124 118
81 Gas connection pipe BI1124 119
82 Full sequence control device BI1555 109
83 Fan and APS device BI1555 108
84 Temperature-pressure gauge BI1555 111
85 O-ring gasket 1,78 x 6,75 mm BI1475 119
86 Cover panel BI1555 112
87 Knob BI1555 113
88 Shaft BI1475 105
89 Control panel plug BI1475 110
90 Control panel box (Model combi) BI1555 114
91 Cable holder KI1066 208
92 Terminal block BI1475 109
82
Page 85

Key no. Description Spare part code
93 Screw 3,5x16 mm self tap RPH BI1165 101
94 Electronic control - ignition p.c.b. BI1555 107
95 Fuse 2AF BI1165 112
96 Service panel cover BI1475 111
97 Control panel cover BI1475 112
98 Screw 3,5X9,5 mm self tap RPH BI1615 104
99 Flame detection electrode cable BI1615 111
100 Detection to trap wiring BI1615 108
101 Full nut M5 Hexagon BI1035 111
102 Toothed lock washer external 5,3x10 mm stainless BI1035 110
103 Machine Screw M5x10 mm Recessed Pan Head BI1035 109
104 Trap to earth wiring BI1615 102
105 Ignition electrode cable BI1615 112
106 Ignition electrode cable BI1615 110
107 Pump-diverter valve cable (Model combi) BI1615 113
108 Flow switches, temp. probes and modulator cable (Model combi) BI1615 115
109 Ignition p.c.b. cable BI1615 109
110 Electronic control p.c.b.-fan and APS device connection cable BI1615 114
111 Power supply and external control cable BI1615 116
112 Earth wiring BI1615 117
113 Fan cable BI1615 107
114 Flue pipe gasket BI1016 104
115 Air restrictor d. 82 mm BI1406 124
116 Flue outlet gasket BI1406 112
117 Wall mounting plate BI1124 104
118 Air pressure switch BI1406 125
119 Venturi device tube BI1256 101
120 Air defl ector - right BI1406 114
121 Side case panel BI1416 100
122 Combustion chamber side panel BI1326 100
123 Combustion chamber front panel BI1406 119
124 Front case panel BI1406 127
125 Window (glass + rubber frame) BI1206 118
126 Sealed chamber lid BI1406 105
127 Screw 4,8x13 mm AB self tapping RPH BZP BI1336 114
128 Sealed chamber gaskets kit BI1406 500
129 Combustion chamber rear panel BI1326 108
130 Fan holder bracket BI1406 120
131 Fan inlet gasket BI1406 111
132 Fan BI1406 126
133 Wire saddle BI1406 123
134 Flue hood BI1406 122
135 Fan outlet gasket BI1406 113
136 Venturi BI1406 128
137 Flue pressure switch tube BI1016 107
138 Air switch pressure test point BI1036 101
139 Overheat thermostat BI1262 139
140 Screw M4x5 mm - BZP RPH BI1406 117
83
Page 86

Key no. Description Spare part code
141 Flue thermostat BI1262 104
142 Twin fl ue cover plate BI1366 114
143 Gasket - Air intake twin kit BI1016 101
144 Air restrictor d. 45 mm BI1406 129
145 Return group (Model c.h. only)
146 By-pass pipe (Model c.h. only)
147 Flow group kit (Model c.h. only)
148 Safety valve connection pipe (Model c.h. only)
149 Main exchanger outlet pipe (Model c.h. only)
150 Control panel box (Model c.h. only)
151 Flow switch, temp. probe and modulator cable (Model c.h. only)
152 Pump cable (Model c.h. only)
BI1171 107
BI1171 106
BI1171 103
BI1262 140
BI1262 141
BI1555 115
BI1615 118
BI1615 119
Appendix A: Special Requirements For Side-Wall Vented Appliances
In The Commonwealth of Massachusetts
IMPORTANT
The Commonwealth of Massachusetts requires compliance with regulation 248 CMR 4.00 and 5.00 for
installation of side-wall vented gas appliances as follows:
(a) For all side wall horizontally vented gas fueled equipment installed in every dwelling, building or struc-
ture used in whole or in part for residential purposes, including those owned or operated by the Commonwealth and where the side wall exhaust vent termination is less than seven (7) feet above fi nished
grade in the area of the venting, including but not limited to decks and porches, the following requirements shall be satisfi ed:
1. INSTALLATION OF CARBON MONOXIDE DETECTORS.
At the time of installation of the side wall horizontal vented gas fueled equipment, the installing plumber
or gasfi tter shall observe that a hard wired carbon monoxide detector with an alarm and battery back-up
is installed on the fl oor level where the gas equipment is to be installed. In addition, the installing plumber
or gasfi tter shall observe that a battery operated or hard wired carbon monoxide detector with an alarm is
installed on each additional level of the dwelling, building or structure served by the side wall horizontal
vented gas fueled equipment. It shall be the responsibility of the property owner to secure the services of
qualifi ed licensed professionals for the installation of hard wired carbon monoxide detectors.
a. In the event that the side wall horizontally vented gas fueled equipment is installed in a crawl space
or an attic, the hard wired carbon monoxide detector with alarm and battery back-up may be installed
on the next adjacent fl oor level.
b. In the event that the requirements of this subdivision can not be met at the time of completion of
installation, the owner shall have a period of thirty (30) days to comply with the above requirements;
provided, however, that during said thirty (30) day period, a battery operated carbon monoxide detector with an alarm shall be installed.
84
Page 87

2. APPROVED CARBON MONOXIDE DETECTORS.
Each carbon monoxide detector as required in accordance with the above provisions shall comply with
NFPA 720 and be ANSI/UL 2034 listed and IAS certifi ed.
3. SIGNAGE.
A metal or plastic identifi cation plate shall be permanently mounted to the exterior of the building at a mini-
mum height of eight (8) feet above grade directly in line with the exhaust vent terminal for the horizontally
vented gas fueled heating appliance or equipment. The sign shall read, in print size no less than one-half
(1/2) inch in size, “GAS VENT DIRECTLY BELOW. KEEP CLEAR OF ALL OBSTRUCTIONS”.
4. INSPECTION.
The state or local gas inspector of the side wall horizontally vented gas fueled equipment shall not approve
the installation unless, upon inspection, the inspector observes carbon monoxide detectors and signage
installed in accordance with the provisions of 248 CMR 5.08(2)(a)1 through 4.
(b) EXEMPTIONS: The following equipment is exempt from 248 CMR 5.08(2)(a)1 through 4:
1. The equipment listed in Chapter 10 entitled “Equipment Not Required T o Be Vented” in the most current edition of NFPA 54 as adopted by the Board;
2. Product Approved side wall horizontally vented gas fueled equipment installed in a room or structure
separate from the dwelling, building or structure used in whole or in part for residential purposes.
(c) MANUFACTURER REQUIREMENTS - GAS EQUIPMENT VENTING SYSTEM PROVIDED. When the
manufacturer of Product Approved side wall horizontally vented gas equipment provides a venting
system design or venting system components with the equipment, the instructions provided by the
manufacturer for installation of the equipment and the venting system shall include:
1. Detailed instructions for the installation of the venting system design or the venting system components; and
2. A complete parts list for the venting system design or venting system.
(d) MANUFACTURER REQUIREMENTS - GAS EQUIPMENT VENTING SYSTEM NOT PROVIDED.
When the manufacturer of a Product Approved side wall horizontally vented gas fueled equipment does
not provide the parts for venting the fl ue gases, but identifi es “special venting systems”, the following
requirements shall be satisfi ed by the manufacturer:
1. The referenced “special venting system” instructions shall be included with the appliance or equipment installation instructions; and
2. The “special venting systems” shall be Product Approved by the Board, and the instructions for that
system shall include a parts list and detailed installation instructions.
(e) A copy of all installation instructions for all Product Approved side wall horizontally vented gas fueled
equipment, all venting instructions, all parts lists for venting instructions, and/or all venting design instructions shall remain with the appliance or equipment at the completion of the installation.
85
Page 88

11/07
2008
Manufacturer of Hydronic Heating Products
P.O. Box 14818 3633 I. Street
Philadelphia, PA 19134
Tel: (215) 535-8900 • Fax: (215) 535-9736 • www.crownboiler.com
 Loading...