

Page 1

XTi2.5 Series Power Amplifier
Obtaining Other Language Versions: To obtain information in another language about the use of this product, please
contact your local Crown Distributor. If you need assistance locating your local distributor, please contact Crown at 574-294-8000.
This manual does not include all of the details of design, production, or variations of the equipment. Nor does it cover every possible situation which may arise during installation, operation or maintenance.
The information provided in this manual was deemed accurate as of the publication date. However, updates to this information may
have occurred. To obtain the latest version of this manual, please visit the Crown website at www.crownaudio.com.
Trademark Notice: Crown, Crown Audio, and Amcron are registered trademarks of Crown International. Other trademarks are
the property of their respective owners.
Later versions of this manual and additional information about this product may be available at the Crown website at www.crownaudio.com.
Some models may be exported under the name Amcron®
©2015 by Harman International, 1718 W. Mishawaka Rd., Elkhart, Indiana 46517-9439 U.S.A. Telephone: 574-294-8000.
获得其它语言版本: 如果您需要其它语言版本的产品使用说明,请联系当地的Crown产品分销商。如果您
需要查询您当地的经销商以便获取帮助,请致电574-294-8000与Crown公司联系。
本手册未提供有关产品设计、生产和变更的所有详细信息,也未列举出在安装、运行或维护本产品时可
能出现的所有情况。
本手册里提供的信息在出版时为准确无误。然而,我们仍可能在出版本手册后更新相应内容。如果您需
要获取本手册的最新版本,请登录Crown的官方网站www.crownaudio.com。
本手册之后的更新版本可能在Crown官网下载www.crownaudio.com。
商标声明:本手册中出现的Crown、Crown Audio和Amcron为Harman International的注册商标。其它商标为相应
公司的注册商标。
©2015 Harman International出版所有。地址:1718 W. Mishawaka Rd., Elkhart, Indiana 46517-9439 U.S.A. 电话号
码:574-294-8000
Operation Manual
操作手册
XTi2.5系列功率放大器
XTi 1002A
XTi 2002A
XTi 4002A
XTi 6002A
5055945 01/15
Page 2

XTi2.5 Series Power Amplifier XTi2.5 系列功率放大器
2
Operation Manual
操作手册
Important Safety Instructions .................................................3
1. Welcome ......................................................................4
2. Setup ..........................................................................5
2.1 Unpacking .................................................................................................................5
2.3 Ensure Proper Cooling ..............................................................................................6
2.2 Installing the amplifier ..............................................................................................6
3. Front Panel ...................................................................7
4. Back Panel ....................................................................8
5. Wiring .........................................................................9
5.1 Stereo DSP Off ..........................................................................................................9
5.2 Preset #2: BRIDGE ..................................................................................................10
5.3 Factory Preset #3: CROSSOVER ............................................................................. 11
5.4 Factory Preset #4: BRG SUBS ................................................................................. 12
5.5 Factory Preset #5: SUBSYNTH ................................................................................ 13
6. Front Panel Navigation ................................................... 14
7. Integrated Processing Features ......................................... 16
8. Specification ............................................................... 18
9. Warranty ................................................................... 19
重要安全信息...................................................................3
1. 简介 ...........................................................................4
2. 安装 ...........................................................................5
2.1 拆箱 ......................................................................................................................................... 5
2.2 安装功放 ................................................................................................................................ 6
2.3 保证正常散热 ....................................................................................................................... 6
3. 前面板 ........................................................................7
4. 后面板 ........................................................................8
5. 连接(接上一页) ........................................................................ 9
5.1 关闭立体声DSP模式 ............................................................................................................ 9
5.2 出厂预设#2:BRIDGE(桥接) ....................................................................................... 10
5.3 出厂预设#3:CROSSOVER(分频) ............................................................................... 11
5.4 出厂预设#4:BRG SUBS(桥接低音单元) ................................................................ 12
5.5 出厂预设#5:SUBSYNTH(次谐波合成器) ............................................................... 13
6. 前面板菜单浏览 .......................................................... 14
7. 集成处理功能 ............................................................. 16
8. 规格 ......................................................................... 18
9. 保修 ......................................................................... 19
Contnet 目录
Page 3
XTi2.5 系列功率放大器XTi2.5 Series Power Amplifier
3
Operation Manual 操作手册
1. Read these instructions.
2. Keep these instructions.
3. Heed all warnings.
4. Follow all instructions.
5. Do not use this appa ratus near water.
6. Clean only with a dr y cloth.
7. Do not block any vent ilation openings. Install
in accordance with the manufacturer’s
instructions.
8. Do not install near any heat sources such
as radiators, heat registers, stoves, or other
apparatus (including amplifiers) t hat produce
heat.
9. Do not defeat the safety purpose of the po-
larized or grounding-type plug. A polarized
plug has two blades with one wider than the
other. A grounding-type plug has two blades
and a third grounding pro ng. The wide blade
or the third prong is provided for your safet y.
If the provided plug does not fit into your
outlet, consult an electrician for replacement
of the obsolete outlet.
10. Protect the power cord from being walke d
on or pinched, par ticularly at plugs, convenience receptacles, and the point where
they exit from the ap paratus.
11. Only use attachments/accessories specified
by the manufacturer.
12. Use only with a cart, st and, tripod, bracket,
or table specif ied by the manufact urer, or
sold with the app aratus. When a
cart is used, use caution when
moving the car t/apparat us combination to avoid injur y from tip-over.
13. Unplug this apparatus during lightning
storms or when unused for long periods of
time.
14. Refer all servicing to qualified service
personnel. Servicing is required when the
apparatus has been damaged in any way,
such as powersupply cord or plug is damaged, liquid has been sp illed or objects have
fallen into the apparatus, the apparatus has
been exposed to rain or moisture, does not
operate normally, or has been dropped.
15. Use the mains plug to disconnect the appa-
ratus from the mains.
16. Warning: to reduce the risk of fire
or electric sho ck, do not expose
this apparatus to rain or moisture.
17. Do not expose this equipment to dripping or
splashing and ensure that no objects fille d
with liquids, such as vases, are placed on
the equipment.
18. The mains plug of the power supply cord
shall remain readily operable.
TO PREVENT E LECT RIC SHO CK DO NOT
REMOV E TOP OR BOT TOM COVERS.
NO USER SERVICEABLE PARTS INSIDE.
REFER SERVICING TO QUALIFIED SERVICE
PERSONNEL.
TO COMPLETE LY DISCON NECT THIS
EQUIP MENT F ROM THE AC MAI NS,
DISCO NNEC T THE POW ER SUPPLY
CORD PL UG FROM THE AC RE CEPTACLE. THE MAI NS PLU G OF THE P OWER
SUPPLY CORD SH ALL RE MAIN REA DILY
OPERAB LE.
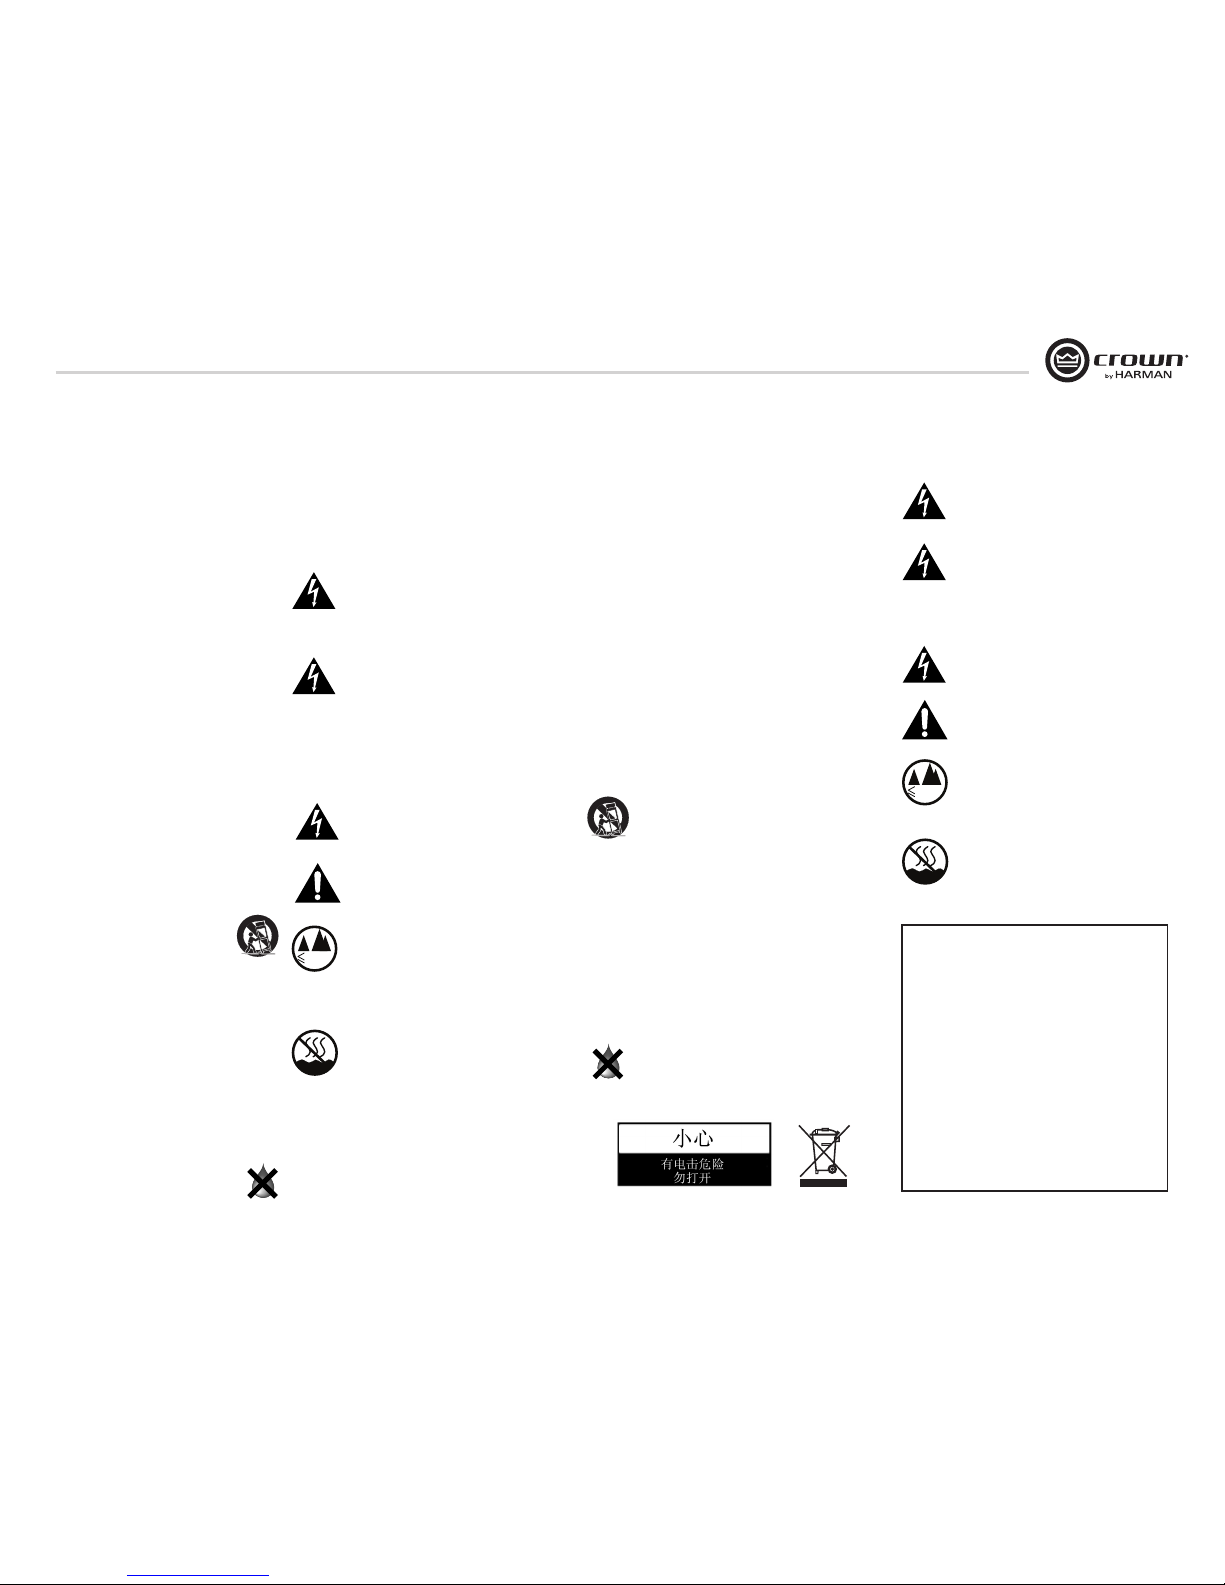
WATCH FOR THESE SYMBOLS:
Warning: The lightning b olt triangle is
used to alert th e user to the risk of electric
shock.
Cauotion: The exclamation point trian gle is
used to alert th e user to import ant operating or maintenance instructions.
This device is designed and evaluated under
the condition of 2 000 meters tall above sea
level; and, it can be only used in locations
below 2000 meters tall above sea level.
Using the device a bove 2000 me ters altitude
would result in high safet y risk.
The device is designed and evaluated under
the condition of non-tropical climate; and, it
can be only used in locations in non-tropical
climate areas. Using t he device in tropic al
climate areas would result in high safety ris k.
1. 阅读本手册。
2. 保留本手册。
3. 留意所有的警告。
4. 遵守本手册中的所有操作说明。
5. 不要在近水区域使用本产品。
6. 仅用干布清洁擦拭本产品。
7. 不要阻挡任何通风口,并严格按照制造商
提供的操作说明进行安装。
8. 不要靠近任何热源安装,比如散热器、电
热器、火炉或者其他产生热量的设备(包
括功放)。
9. 不要破坏具有安全功效的极性插头或者接
地式插头。极性插头有两个插片,一个
宽,一个窄。接地式插头有两个插片和一
个接地针,其中宽插片或者接地针是用来
保障您的安全的。如果所提供的插头不适
合您的插座,请咨询联系电工更换适合
的插座。
10. 保护电源线。避免电源线被踩踏或者被捻
搓。特别注意保护在插头、便捷插座和电
源线接出设备处的电源线。
11. 仅使用制造商指定的附件或选件。
12. 仅使用制造商指定的或者随本产品一同出
售的载车、支架、三角架、托架或者工作
台。在使用推车运输设备时,特别注意推
车及设备,避免其翻倒造成伤害。
13. 在有雷电时或者长时间不使用本设备时,
请拔掉插头。
14. 所有维修服务必须由有资格的维修人员提
供。当设备受到任何形式的损坏时,比如
电源线或者插头被损坏,液体或者异物掉
入设备,遭受雨淋或受潮,不能正常工
作,以及被摔碰等情况,都需要维修。
15. 使用电源插头来断开设备与电源之间的
连接。
16. 警告:为了减小起火或者电击的风险,不
要让设备遭受雨淋或者受潮。
17. 警告:此设备与电源插座连接时需要接
地保护。
18. 不要将设备放置在容易遭受滴漏或者喷洒
的地方。例如,不要将装有液体的物品,
比如花瓶等放到设备上。
19. 电源线的插头需要保持正常可操作状态。
为了避免电击,请不要拆卸设备。设备
内部无用户可以自行维护的部件。请向
有资格的服务人员咨询。
要完全断开此设备与交流电主线的连
接,请把电源线插头从交流电插座中拔
出。需要连接电源时,可再次将电源线
插头插入交流电插座。
注意这些符号:
警告:注意操作程序、习惯、条件及其
它。如果未正确遵行,将导致人员伤害
甚至死亡。
注意:注意操作程序、习惯、条件及其
它。如果未正确遵行,将导致设备及元
部件损坏或损毁。
加贴该标识的设备仅按海 拔2000m进行
安全设计与评估,因此,仅适用于在海拔
2000m以 下 安 全 使 用 ,在 海 拔 2000m以上
使用时,可能有安全隐患。
加贴该标识的设备仅按非热带气候条件
进行安全设计与评估,因此,仅适用于在
非热带气候 条件下安全使 用,在 热带气候
条件下使用时,可能有安全隐患。
本产品符合如下标准:
安全:
IEC60065-2001音频,视频及类似电子设备
安全要求
GB8898-2011音频,视频及类似电子设备安
全要求
EMC:
GB13837-2012声音和电视广播接收机及有关
设备无线电干扰特性限值和测量方法
GB17625.1-2012低压电气及电子设备发出的
谐波电流限值(设备每相输入电流小于或
等于16A)
重要安全信息
≤2000
m
≤2000
m
Important Safety Instructions
Page 4
XTi2.5 Series Power Amplifier XTi2.5 系列功率放大器
4
Operation Manual
操作手册
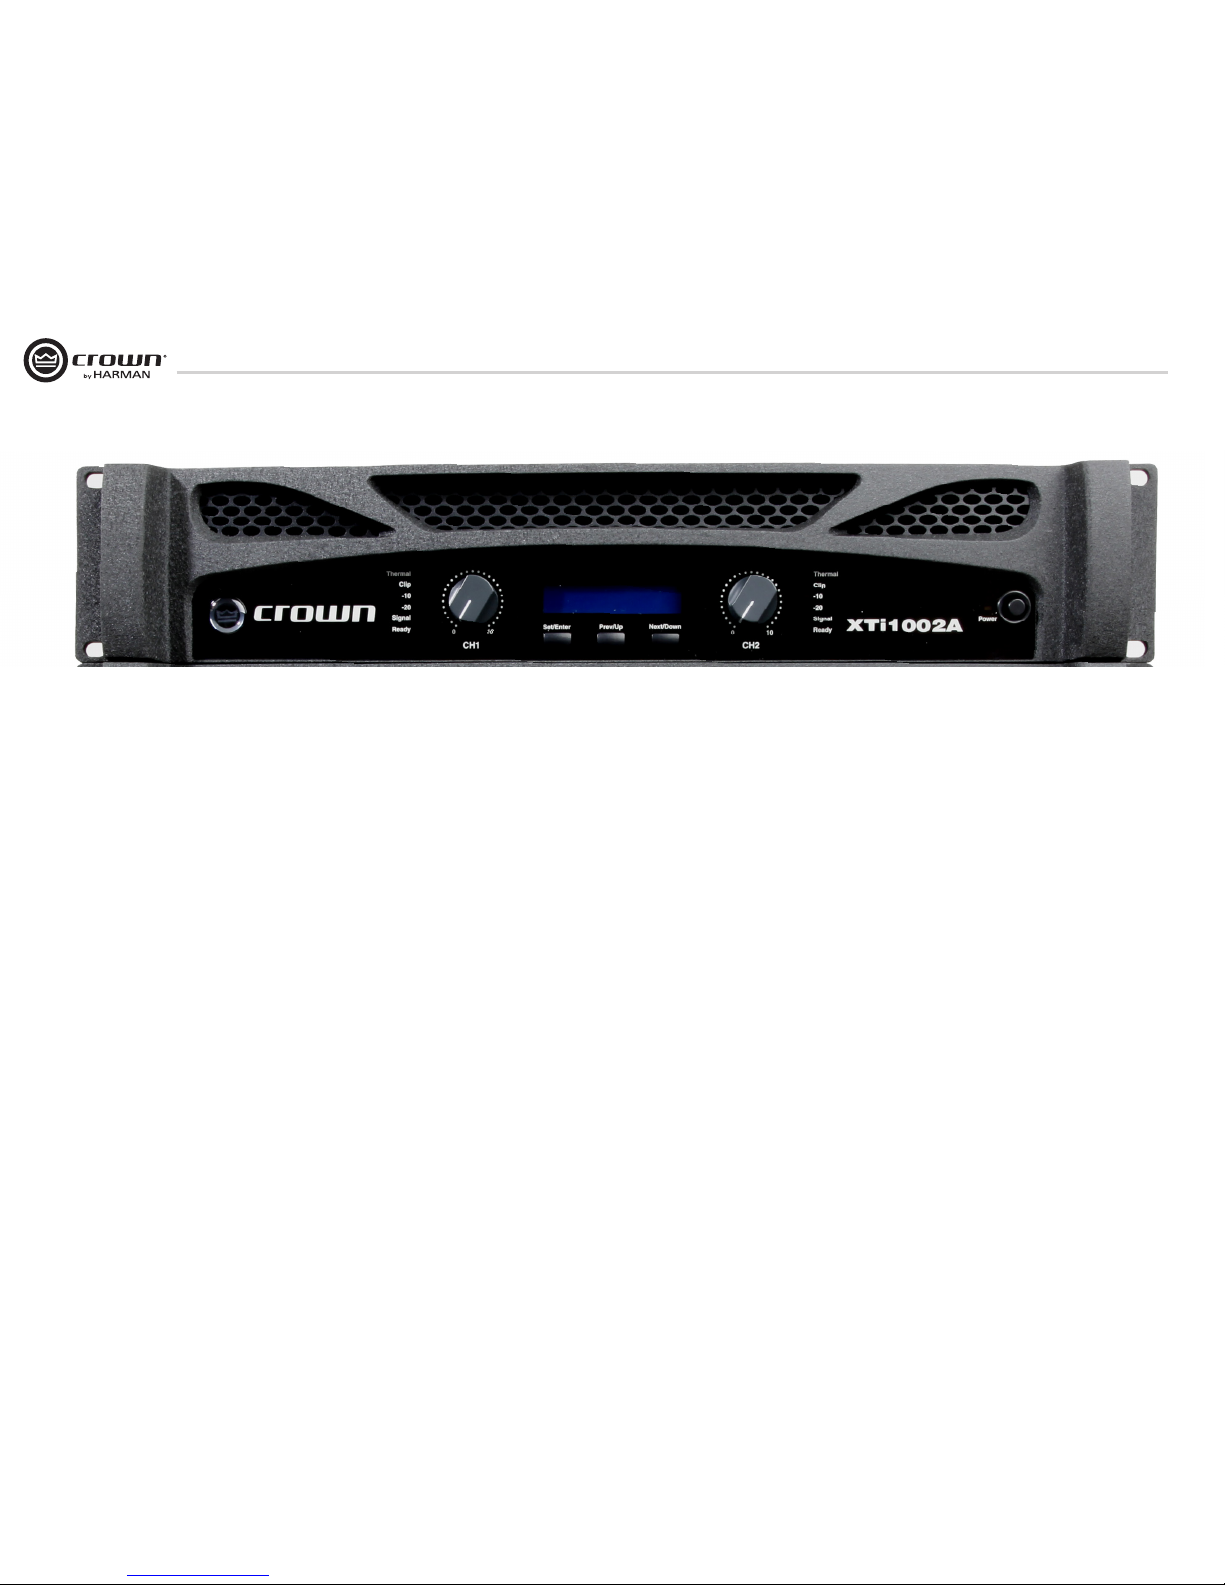
1. 简介
感谢您选择了 Crown XTi2.5 系列功放,凭借诸如通用跟踪开关式电源和全集成扬声器处理工具套件
等创新,这些功放无论在热效率还是系统灵活性上都堪称行业之翘楚。
您将拥有得以显著提高的控制能力。通过PeakX PlusTM 限幅器,您可以完全掌控阈值、启动时间和
恢复时间,同时我们还强化了次谐波合成功能,让您轻松管理频率、增益和滤波器类型,并方便
您采用特定的调谐。
另外,您现在还可以利用高级热控件来调整风扇速度以适应特定的应用,而且通过监视控件,您
还能够从软件中看到电源温度和交流线电压。除了上述功能外,设备还采用了铸铝机架把手,保
证最大的耐用性和便携性。
特点:
• PeakX PlusTM 限幅器让您完全掌控阈值、启动时间和恢复时间,使系统获得最佳的性能和最大保
护
• 增强的次谐波合成部分让用户能够控制分频频率、最大谐波频率和 1 个 PEQ 过滤器,以用于特
定于系统的调谐
• 高级热控件允许设定 3 个用户定义的风扇控制模式 – 正常、初期和全速 – 使风扇性能适应特定
应用的要求
• 高级监视控件使您能够通过软件查看电源的温度和交流线电压
• 预设总数提高到 50 个;其中 49 个可由用户定义
• 内置铸铝把手便于提携,而且增强了耐用性
• 电线锁扣可保证功放与电线之间的安全连接
• 更新的 HiQnet Band ManagerTM 和 System ArchitectTM 控制软件
如何使用本手册
本手册为您提供安全及正确设置和操作功率功放所需的必要信息。但对于每种场合下的所有安装、
设置或操作细节,并没有面面俱到地讲解。有关更多信息,请参阅 Crown 的 Amplifier Application Guide
(可登录 www.crownaudio. com 查看),或联系 Crown 技术支持、系统安装人员或零售商。
强烈建议您阅读本手册包含的所有说明、警告和注意事项。此外,为保护您的利益,请即刻提交
您的质保登记卡。同时请保管好售货单 — 这是您的正式购买凭据。
1. Welcome
Thank you for purchasing Crown’s XTi2.5 Series! With such innovations as a universal tracking switch-mode power supply
and a fully integrated suite of speaker processing tools, these amps are at the top of their class when it comes to thermal
efficiency and system flexibility. You also have greatly improved control capabilities. The addition of PeakX Plus™ Limiters
gives you full command over threshold, attack and release, and we enhanced the Subharmonic Synth so you can easily
manage frequency, gain and filter type, allowing for application specific tuning. Plus, you’ll now be able to tailor fan speed for
specific applications with the Advanced Thermal controls and have software visibility of the Power Supply Temperature and
AC Line Voltage with the Advanced Monitoring controls. Combine all of that with integrated cast-aluminum rack handles for
maximum durability and portability.
Features:
• PeakX PlusTM Limiters provide the ultimate in system performance and protection by allowing full control over
threshold, attack, and release
• Enhanced Subharmonic Synth section provides user control over crossover frequency, max. harmonic frequency, and 1
PEQ filter for system-specific tuning
• New Advanced Thermal controls allow for 3 user-defined fan mode controls - normal, early and full speed - for matching
fan performance to a specific application
• New Advanced Monitoring provides software visibility of the Power Supplly Temperature and AC Line Voltage
• Increased number of presets to total of 50; 49 of which are user definable
• Integrated - cast aluminum handles for easy handling and enhanced durability
• Locking power cord clip provides a secure connection between the amplifier and power cord
• Updated HiQnet Band ManagerTM and System ArchitectTM control software
How to Use This Manual
This manual provides you with the necessary information to safely and correctly setup and operate your amplifier. It does
not cover every aspect of installation, setup, or operation that might occur under every condition. For additional information,
please consult Crown’s Amplifier Application Guide (available at www.crownaudio.com), Crown Technical Support, your
system installer or retailer.
We strongly suggest you read all instructions, warnings and cautions contained in this manual. Also, for your protection,
please send in your warranty registration card today. And save your bill of sale - it's your official proof of purchase.
Page 5
XTi2.5 系列功率放大器XTi2.5 Series Power Amplifier
5
Operation Manual 操作手册
2. Setup
2. 安装
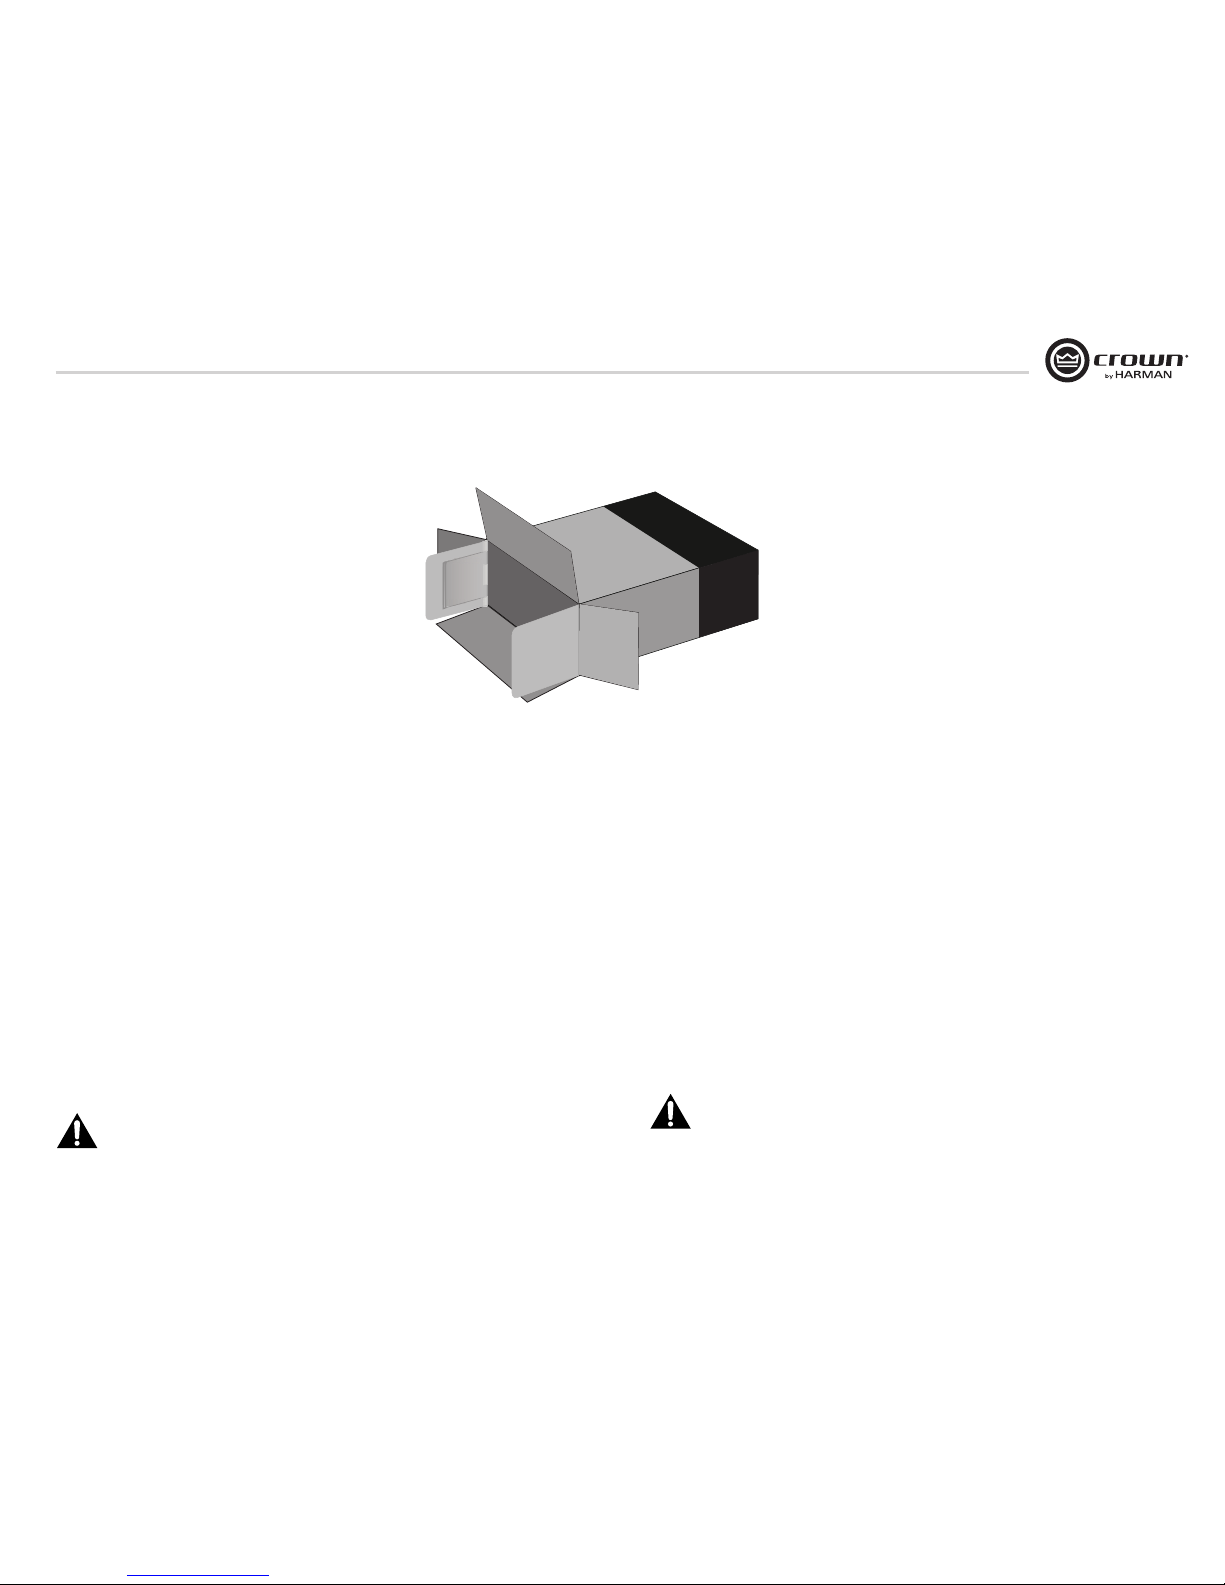
2.1 Unpacking
Please unpack and inspect your XLC amplifier for any damage that may have occurred during transit. If damage is found,
notify the transportation company immediately. Only you can initiate a claim for shipping damage, though Crown will
be happy to help as needed. If the product arrived showing signs of damage, save the shipping carton for the shipper’s
inspection.
We also recommend that you save all packing materials so you will have them if you ever need to transport the unit.
Never ship the unit without the factory carton and packing materials.
Package contains:
• One XTi2.5 amplifier;
• One Power Cord (compatible to retailer’s location);
• One operation manual (this manual);
• One product registration form (at the end of this manual);
• One warranty card (at the end of this manual).
For installation, you will need (not supplied):
• Input wiring cables
• Output wiring cables
• Rack for mounting amplifier (or a stable surface for stacking)
NOTE: Before you start to set up your amplifier, make sure you read and observe the Important
Safety Instructions found at the beginning of this manual.
2.1 拆箱
请将包装箱打开并检查运输过程中设备是否受到损坏。如果发现损坏,请立即通知运输公司。
尽管 Crown 非常乐意在需要时提供帮助,但只有您可以对运输损坏提出索赔。如果产品到达时显
示损坏迹象,请保留包装箱,供运送方核查时,作为认定设备受损的证据。
另外,我们建议您保存所有的包装材料,留待将来运输设备时使用。请不要在没有使用原厂包装
箱和包装材料的情况下装运设备。
单套包装包括:
• 一台XTi2.5功率放大器;
• 一根电源线(规格与经销商所在地匹配);
• 一本操作说明书(本说明书);
• 一份产品注册表(本说明书最后部分);
• 一张保修卡(本说明书最后部分)。
安装时,您还需要(未提供):
• 输入信号电缆;
• 输出信号电缆;
• 用于架设功放的设备支架或稳固台面。
注意:在您安装使用本功放前,请确保已经阅读并遵守本手册前面所列的重要安全信
息。
Page 6
XTi2.5 Series Power Amplifier XTi2.5 系列功率放大器
6
Operation Manual
操作手册
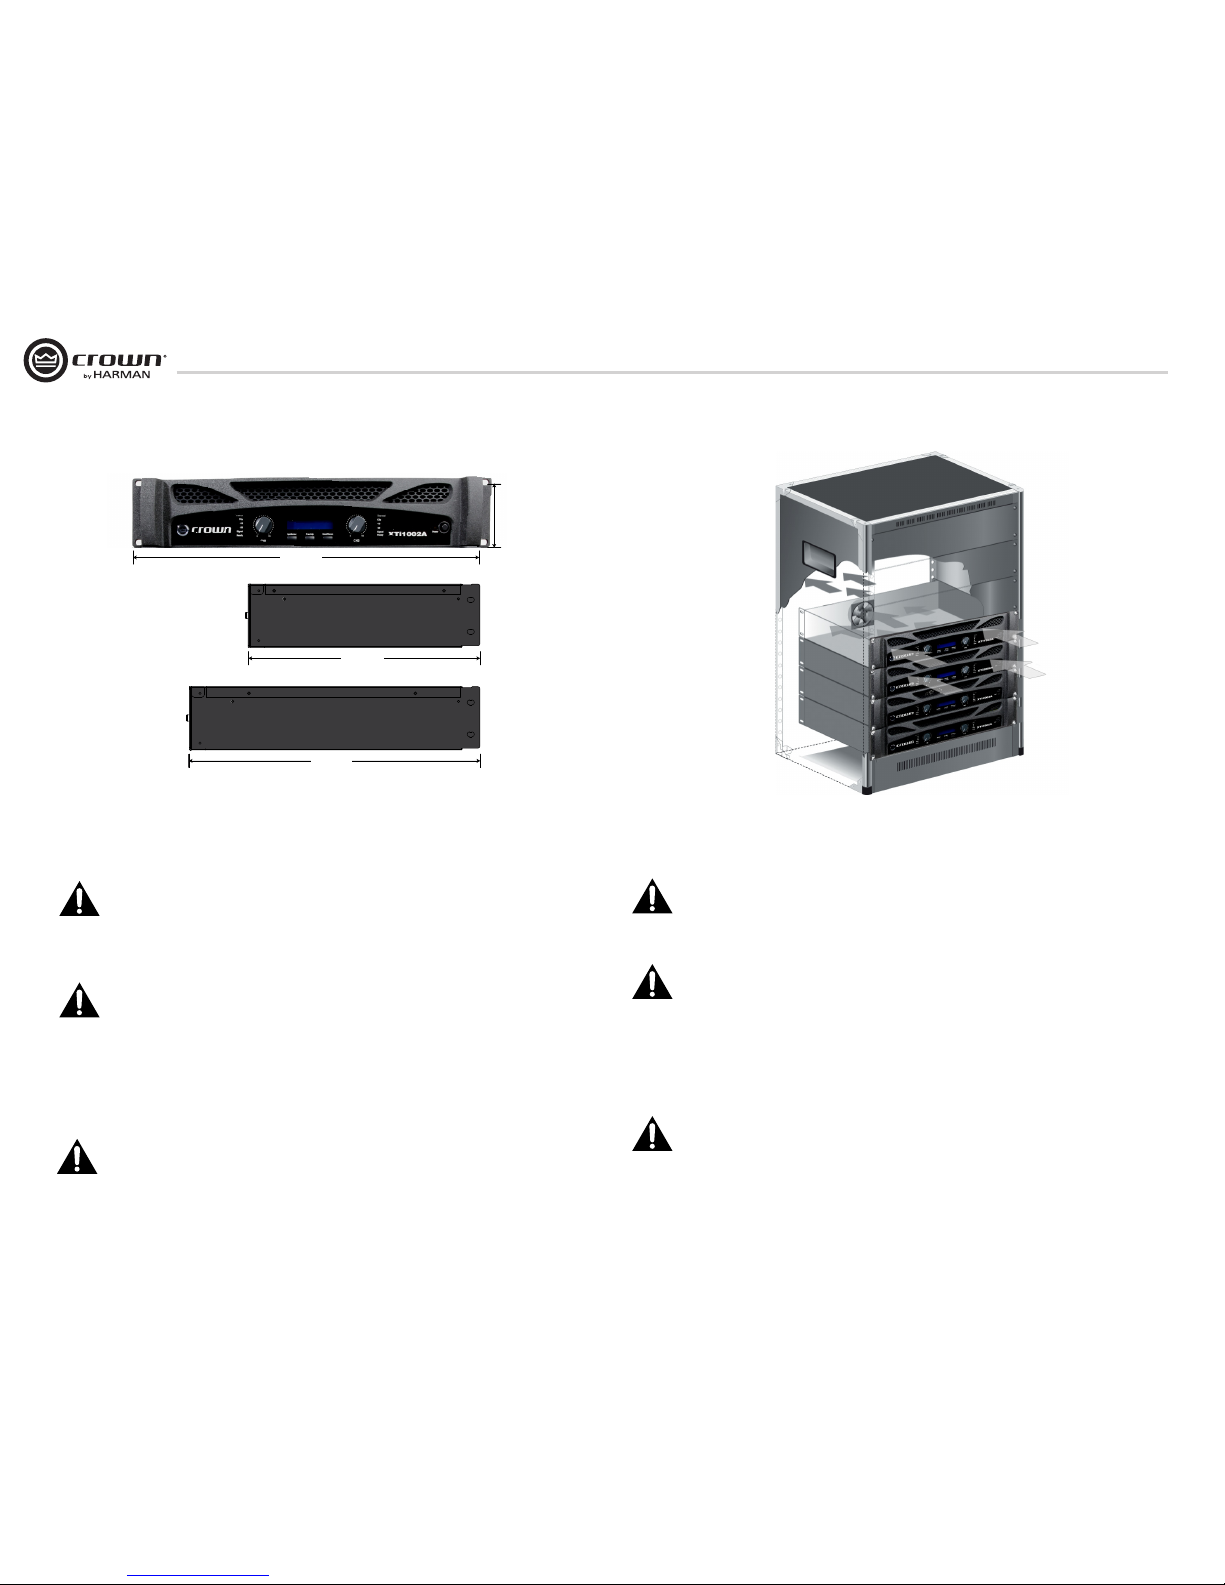
2.3 Ensure Proper Cooling
When using an equipment rack, mount units directly on top of each other. Close any open spaces in rack with blank panels.
DO NOT block front or rear air vents. The side walls of the rack should be a minimum of two inches (5.1 cm) away from the
amplifier sides, and the back of the rack should be open.
CAUTION: Before you begin installing your amplifier, make sure it is disconnected from
the power source, with the power switch in the “off” position and all level controls turned
completely down (counterclock wise).
2.2 安装功放
注意:开始安装前,确保您已断开功放与电源的连接,将功放电源开关设置到关闭位置,
并将所有音量调节到最低(逆时针旋转)。
使用一个标准的19寸( 48.3厘米)设备机架。具体功放尺寸请参见上图。您还可以直接将功放安放
到平台上,而不用将功放安装到机柜。
注:确保机架前后能稳固支撑功放。当将功放安装于机架上时,功放下面需有固定于机架
上的平板或导轨进行支撑。
2.2 Installing the amplifier
NOTE: Before you begin, make sure your amplifier is disconnected from the power source,
with the power switch in the “off” position and all level controls turned completely down
(counterclockwise).
Use a standard 19-inch (48.3 cm) equipment rack. See above diagram for amplifier dimensions. You may also stack
amplifiers without using a cabinet.
NOTE: Amplifiers should be supported at both the front and rear of the rack. When stack the
amplifier with rack, flat plate or rails must be placed under amplifier to provide stable support.
3.5 In.
89 mm
19 In.
482 mm
12.25 In.
311 mm
16.2 In.
411 mm
XTi1002A
XTi2002A
XTi4002A
XTi6002A
2. 安装(接上一页)
2. Setup (continued)
2.3 保证正常散热
在使用设备支架时,直接将设备安装在支架上。使用空面板将所有开放的空间封闭。不要阻挡前面
和后面的通风口。机架两侧与功放之间的间隙至少保持2英寸(5.1cm),后面应该保持开放。
警告:安装功放前,确保功放已从电源上完全断开连接,且电源开关处于“关闭”状态,
所有的音量调到最低(逆时针最低点)。
Page 7
XTi2.5 系列功率放大器XTi2.5 Series Power Amplifier
7
Operation Manual 操作手册
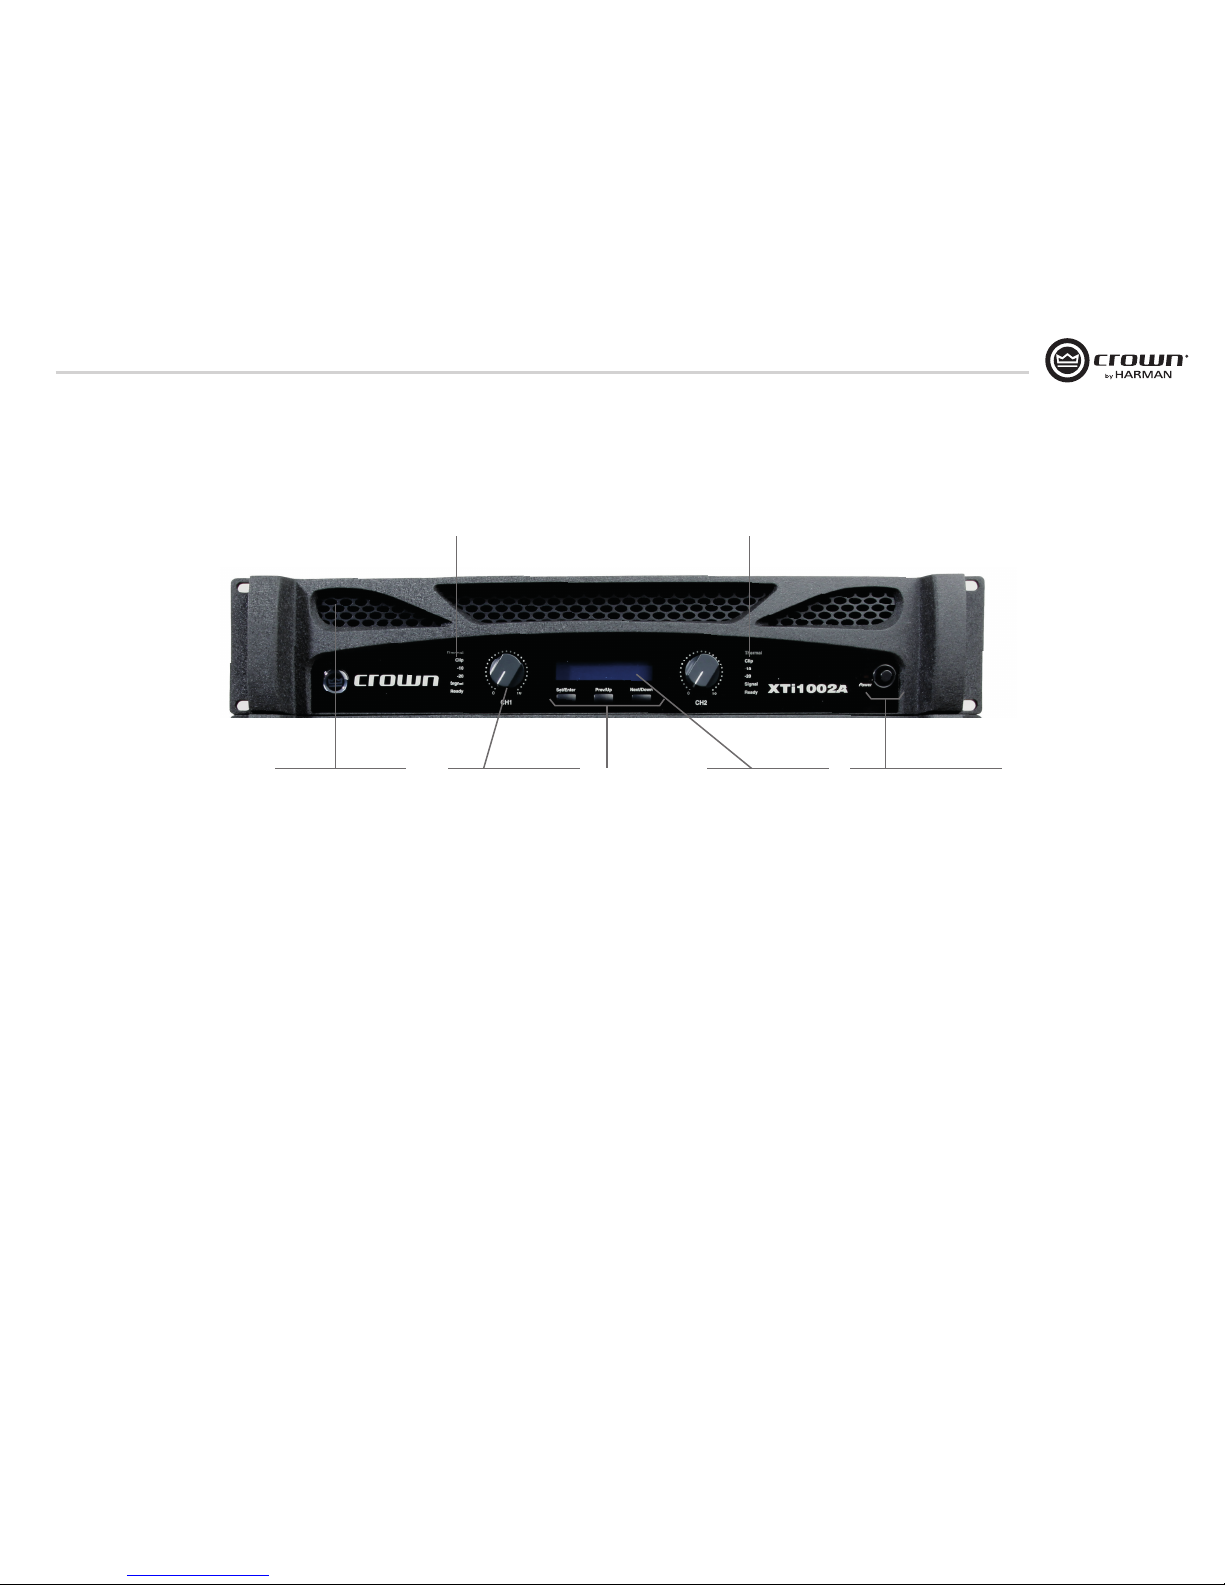
3. 前面板
3. Front Panel
A
B C D E F
A
A. 指示灯:
• 就绪指示灯:每个通道配有一个LED指示灯。
当功放进入就绪状态时,LED指示灯点亮为
绿色。
• 信号指示灯:每个通道配有一个LED指示灯。
当输入信号超过-40dBu时,LED指示灯点亮为
绿色。
• -20指示灯:每个通道配有一个LED指示灯。
当功放输出信号超过-20dB并低于削波阈值
时,LED指示灯点亮为绿色。
• -10指示灯:每个通道配有一个LED指示灯。
当功放输出信号超过-10dB并低于削波阈值
时,LED指示灯点亮为绿色。
• 削波指示灯:每个通道配有一个LED指示灯。
当功放达到失真阈值时,LED指示灯点亮为
红色。
• 温度指示灯:每个通道配有一个LED指示灯。
当运行温度过高时,LED指示灯点亮为红色。
B. 散热通风口:
实现从前往后的强空气对流。
C. 增益控制:
每通道一路黑色电平控制旋钮。
D. Sel/Pre/Next按键:
此三个按键(选取/回车、前一页/往上、下一页/
往下)用于进入菜单选项及前面板锁止功能。
E. LCD显示屏:
背光液晶显示屏显示已启用的预设和扬声器处
理进程。
F. 电源按键和指示灯:
用于开启和关闭此功放。通电时,指示灯点亮
为蓝色。
A. Indicators:
• Ready Indicator: Two green LEDs, one for each channel,
illuminate when the amplifier is ready to produce audio.
• Signal Presence Indicator: Two green LEDs, one for
each channel, illuminate when the channel input
exceeds -40dBu. Useful for troubleshooting cable runs.
• -20 Indicator: Two green LEDs, one for each channel,
illuminate when the output signal exceeds -20dB below
clip.
• -10 Indicator: Two green LEDs, one for each channel,
illuminate when the output signal exceeds -10dB below
clip.
• Clip Indicator: Two red LEDs, one for each channel,
illuminate at the threshold of audible distortion.
• Thermal Indicator: Two red LEDs, one for each channel,
illuminate when thermal compression begins due to
excessive temperature conditions.
B. Cooling Vents:
Front to rear forced air flow.
C. Gain (Level) Controls:
Two black rotary level controls, one for each channel.
D. Sel/Prev/Next Buttons:
Three buttons located underneath the LCD screen used to
access menu items and front panel lockout.
E. LCD Screen:
Backlit liquid crystal display shows enabled presets and
speaker processing.
F. Power Button & Indicator:
Turns amplifier power on and off. Blue LED will illuminate
when power is turned on.
Page 8
XTi2.5 Series Power Amplifier XTi2.5 系列功率放大器
8
Operation Manual
操作手册
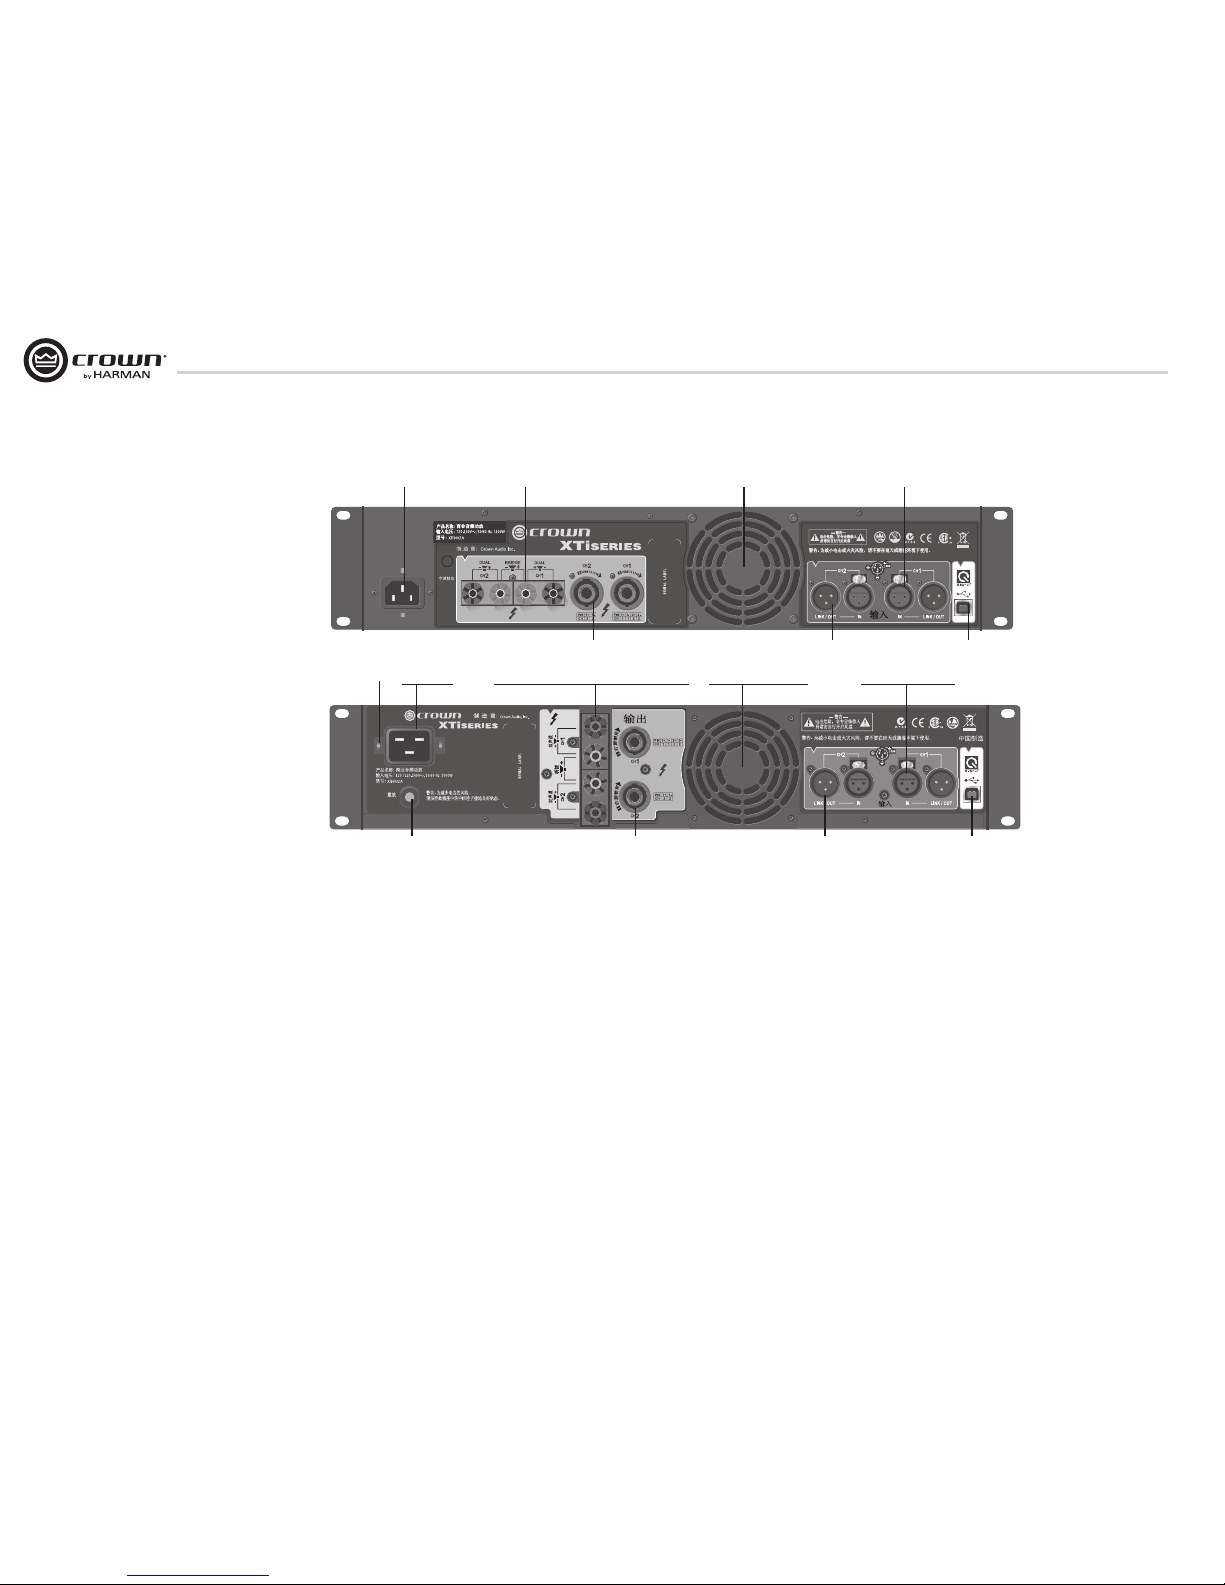
A. 电源线夹:
用于固定电源线。
B. 接线柱输出接口:
每个声道一对,使用香蕉插头或裸线。注:对
于在欧洲市场上出售的型号,接线柱输出端附
有可拆卸式安全插头,用以防止插入欧洲电源
线插头。 因此,对于欧洲型号,应使用位于侧
边的插头接口。
C. 风扇:
从前到后形成通风气流,实现散热。
D. 输入接口:
每路通道一个3针XLR输入接口。
E. 交流电源插口
F. 4极Speakon®输出接口:
这两个接口可使用2极或4极Speakon接口。通道1
的接口可以通过电缆与两个通道相连,因此可用
于桥接单声道模式接线,也可用于两个扬声器
与单个Speakon接口的立体声模式接线。
G: 链接/输出接口:
每路通道一个3针输出接口,用于将信号从一个
功放发送到另一个功放。
H: HiQnet USB接口:
使用此USB B型接口,将功放连接到计算机,以
使用System ArchitectTM和Band ManagerTM软件。
I: 过流断路器:
提供过载保护。
A. Power Cord Clip:
Mounting points for securing, included power cord clip.
B. Binding Post Output Jacks:
One pair per channel, accepts banana plugs or bare wire.
Note: Binding Post outputs on European models come with
safety plugs installed to prevent European power plugs
from being inserted. The side entry positions for these
connectors should be used with European models.
C. Fans:
Provide front to back forced airflow for cooling.
D. Input Connector:
Two 3-pin XLR input connectors are provided (one per
channel).
E. AC Power Connector
F. 4-Pole Speakon® Output Connectors:
These two connectors accept 2-pole and 4-pole Speakon®
connectors. The channel 1 connector is wired for both
channels so it can be used for bridge-mono wiring or stereo
wiring of two speakers to a single Speakon.
G: Link/Out Connector:
Two 3-pin XLR output connectors are provided (one per
channel) to loop-thru signal from one amplifier to another.
H: HiQnet USB Connector:
Type B USB connector allows you to connect the amplifier
to a computer for use with System Architect™ and Band
Manager™ software.
I: Circuit Breaker:
Provides overload protection.
4. Back Panel
XTi 1002A, 2002A,
4002A
XTi 6002A
A B C D
HGFI
E
B C D
HGF
E
4. 后面板
Page 9
XTi2.5 系列功率放大器XTi2.5 Series Power Amplifier
9
Operation Manual 操作手册
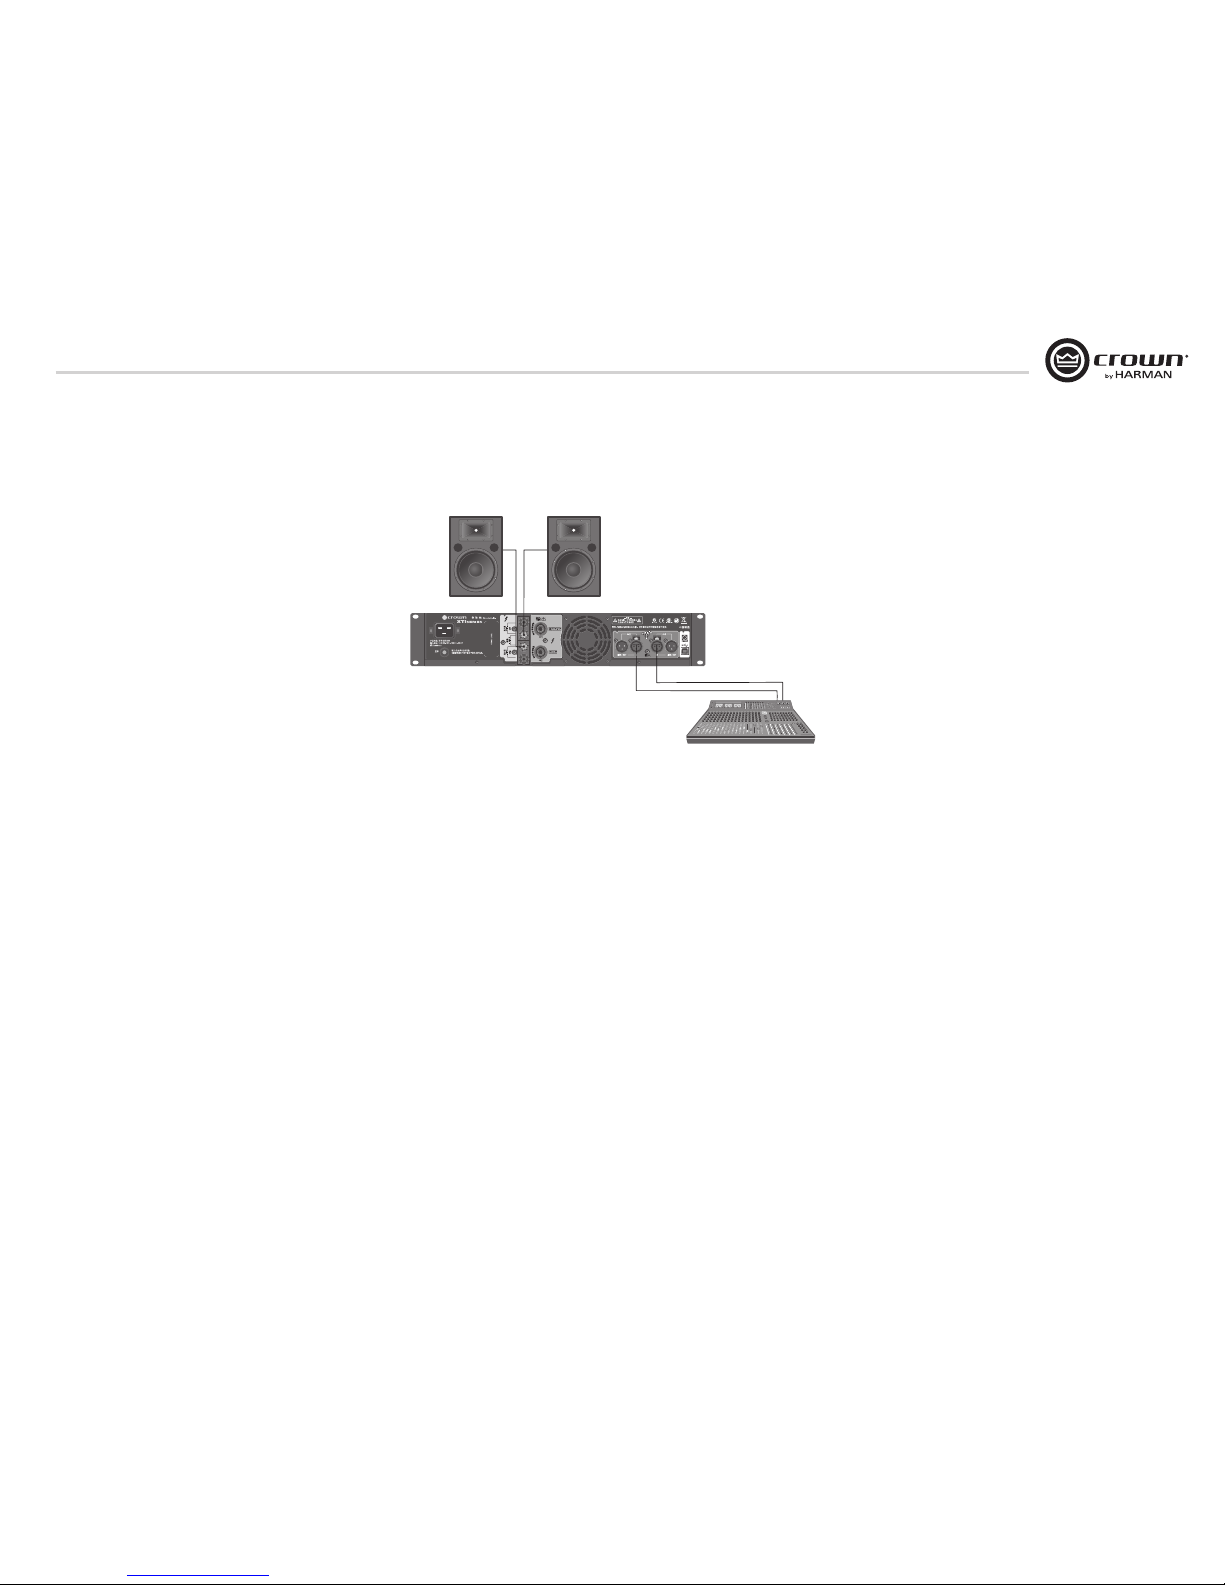
5.1 Stereo DSP Off
This is the default mode the amplifier is set to from the factory. The amplifier is configured for stereo mode with all
processing disabled.
2. Connect Left/Right signal source to Channel 1 and Channel 2 using the XLR connectors.
3. Connect a speaker to each channel output using Speakon®, Banana Plugs, or bare wire.
WARNING: Before you start to set up your amplifier, make sure you read and observe the Important Safety
Instruc tions found at the beginning of this manual.
5. Wiring
5. 连接(接上一页)
5.1 关闭立体声DSP模式
此模式为功放的出厂默认设置。此功放在此模式下为立体声模式,且禁用所有处理功能。
1. 使用XLR连接接口将连接左/右信号源连接到通道1和通道2。
2. 使用Speakon®香蕉插头或裸线将扬声器连接到每路通道输出上。
警告:在您设置功放前,确保您已仔细阅读并注意本手册中提到的重要安全信息。
Page 10
XTi2.5 Series Power Amplifier XTi2.5 系列功率放大器
10
Operation Manual
操作手册
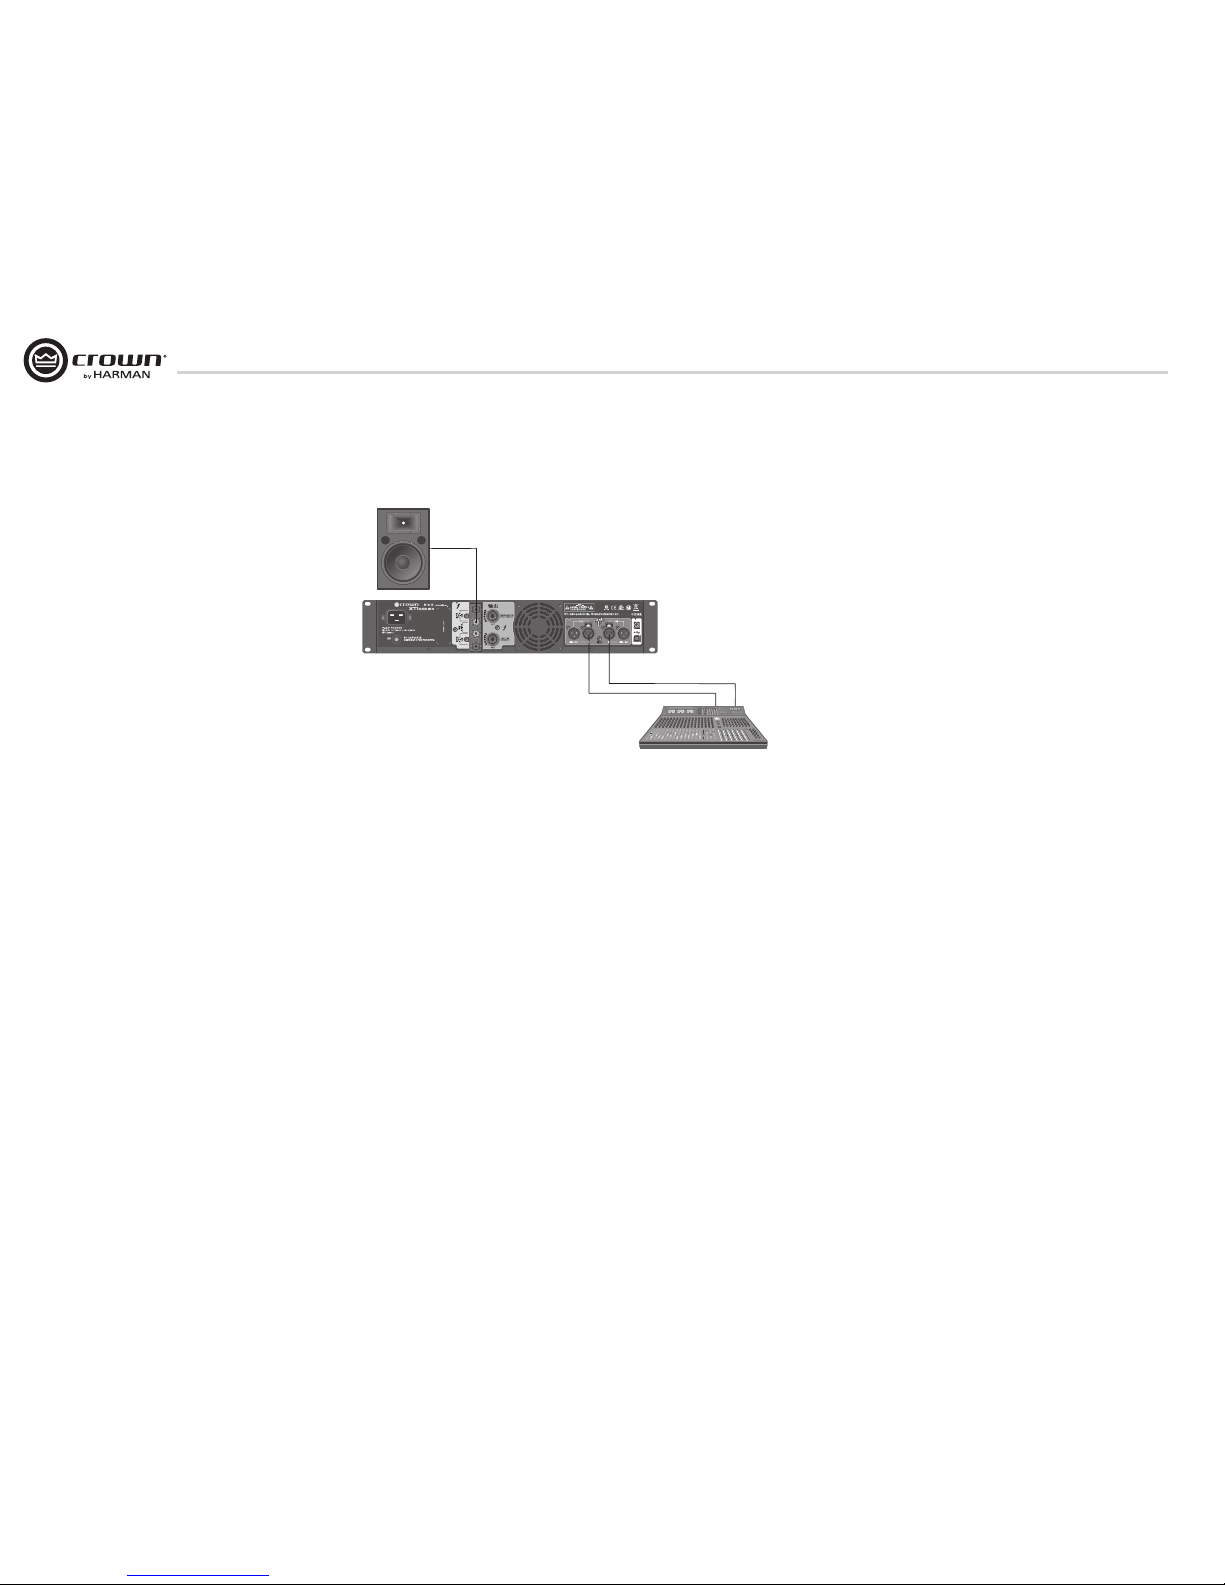
5.2 Preset #2: BRIDGE
Putting the amplifier in BRIDGE (bridge-mono) mode delivers the power of both amp channels into a single 8 or 4 ohm load.
The XTi2.5 Series amplifiers come pre-loaded with a preset that makes it easy to configure the amplifier for this operation.
Before you get started ensure that you:
2. Connect signal source to Channel 1 and Channel 2 using XLR connectors (the amplifier inputs will automatically be
summed together when selecting this preset).
3. Connector the speaker as shown.
a. If using the binding post outputs, connect the positive terminal of the speaker to the positive terminal of Channel
1 and the negative terminal of the speaker to the positive terminal of Channel 2.
b. If using a Speakon® connector, connect the positive terminal of the speaker to 1+ and the negative terminal to
2+. Plug the connector into the Channel 1 output only.
Follow these quick steps to configure the amplifier for BRIDGE operation:
1. Push the “Set/Enter” button and you will see the word “Preset” flashing.
2. Push the “Set/Enter” button again to enter the list of presets in the amplifier.
3. Push the “Next/Down” or “PREV/UP” button until the screen displays “Bridge”.
4. Push the “Set/Enter” button to confirm your selection.
5. The display will now read “Bridge” with the Y icon and Bridge icon highlighted.
NOTE: Custom wiring should only be performed by qualified personnel.
5. Wiring (continued)
5.2 出厂预设#2:BRIDGE(桥接)
功放在BRIDGE (桥接-单声道)模式下,可将功放两路通道的功率发送到单个8或4欧姆的负
载。XTi2.5系列功放预先装载的预设允许用户作简单配置即可使用。
在开始之前,请确保:
1. 使用XLR连接接口将音源连接到通道1和通道2。(当选择此预设时,功放输入自动合并到一
起)
2. 如图连接扬声器。
a. 如果使用接线柱输出接口,将扬声器的正极连接到通道1的正极,再将扬声器的负极连接
到通道2的正极。
b. 如果使用Speakon输出接口,将扬声器的正极连接到1+,再将扬声器的负极连接到2+。然后
只把此接口插入通道1输出接口。
根据如下步骤设置功放作BRIDGE操作:
1. 按下Set/Enter按键,“Preset”闪烁。
2. 再次按下Set/Enter按键,进入功放预设清单。
3. 按下Next/Down或Prev/up按键,直到屏幕显示“Bridge”。
4. 按下Set/Enter按键,确认选择。
5. 显示屏显示“Bridge”字样,同时Y图标和Bridge图标点亮。
注意:线路连接仅可由受训专业人员可以操作。
5. 连接(接上一页)
Page 11
XTi2.5 系列功率放大器XTi2.5 Series Power Amplifier
11
Operation Manual 操作手册
LOW 1+/–
HIGH 2+/–
5. Wiring (continued)
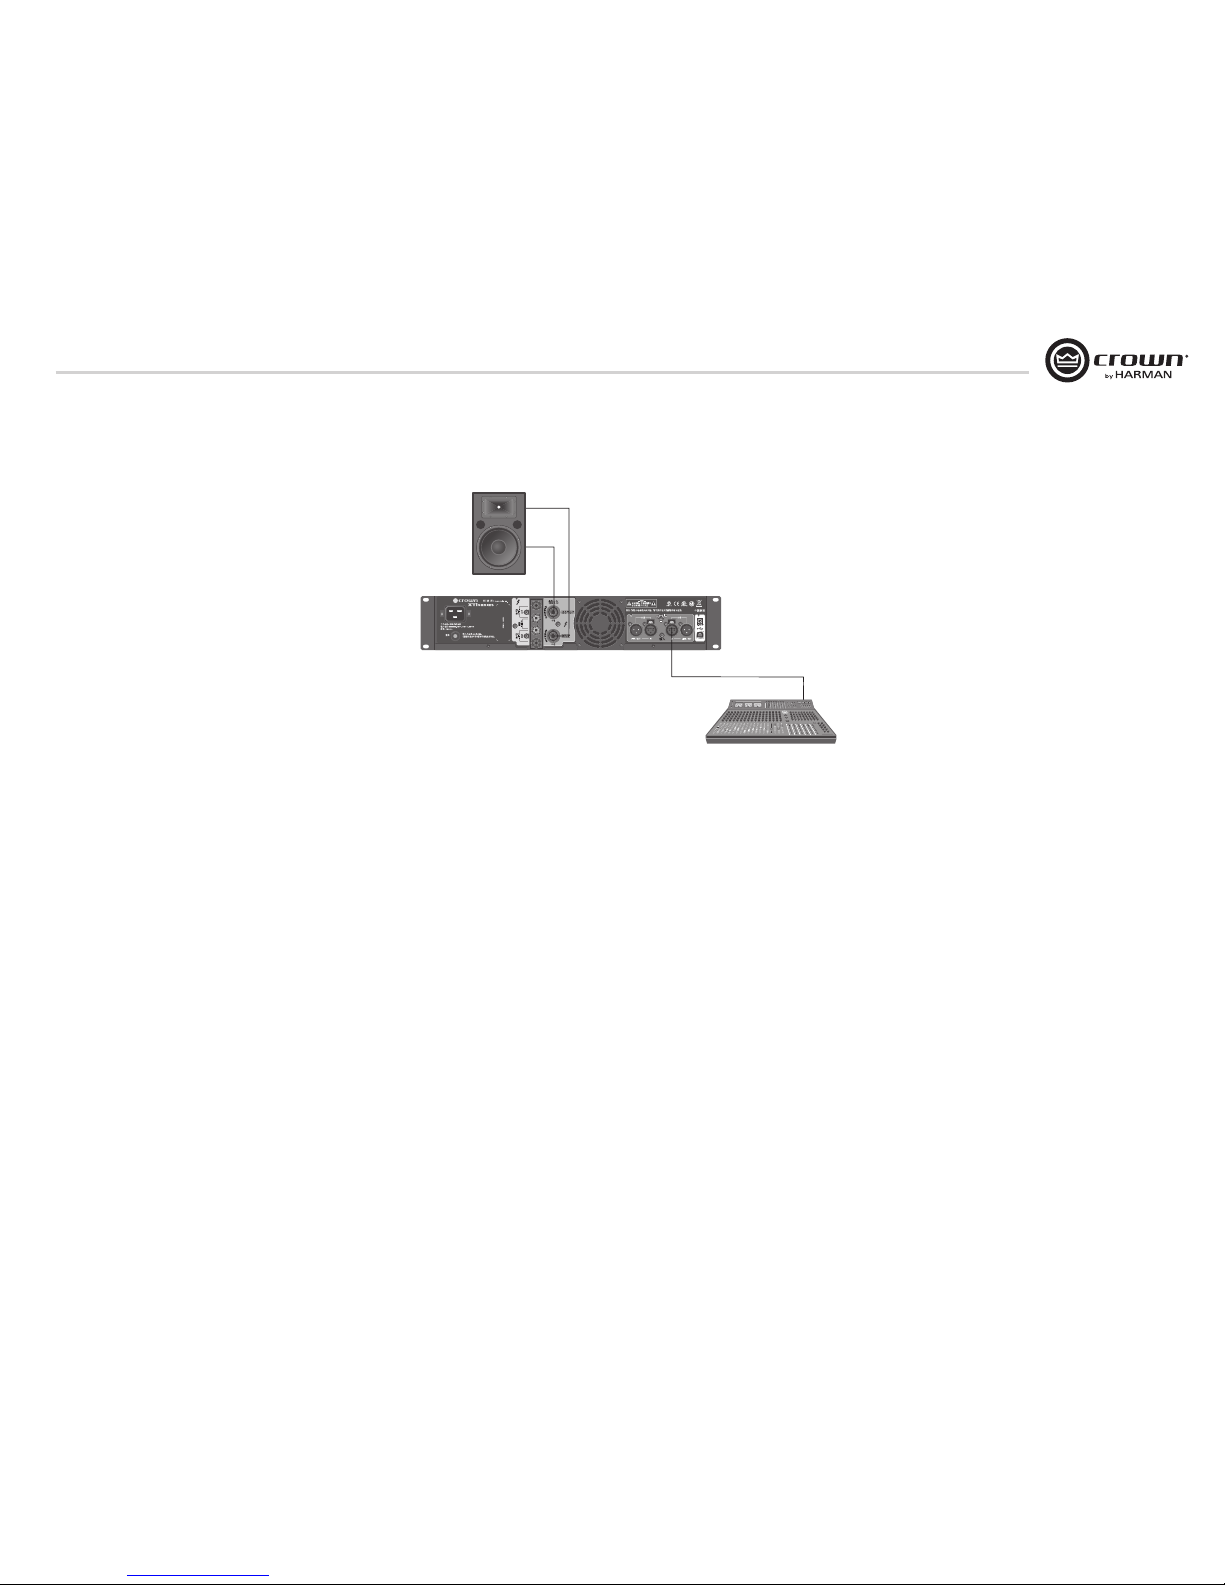
5.3 Factory Preset #3: CROSSOVER
Putting the amplifier in CROSSOVER mode enables a 1.2kHz 4th order (24dB/octave) filter that sends frequencies of 1.2kHz
and below to Channel 1 output and frequencies of 1.2kHz and above to Channel 2 output. The XTi2.5 Series amplifiers come
pre-loaded with a preset that makes it easy to configure the amplifier for this operation.
Before you get started ensure that you:
2. Connect signal source to Channel 1 ONLY using an XLR connector (the amplifier inputs will automatically be put into Y
mode when selecting this preset).
3. Connector the speaker as shown.
a. Connect the speaker you wish to receive the low and mid frequencies (1.2kHz and below) to Channel 1 output
using Speakon®, Banana Plugs, or bare wire.
b. Connect the speaker you wish to receive the high frequencies (1.2kHz and above) to Channel 2 output using
Speakon®, Banana Plugs, or bare wire.
Follow these quick steps to configure the amplifier for CROSSOVER operation:
1. Push the “Set/Enter” button and you will see the word “Preset” flashing.
2. Push the “Set/Enter” button again to enter the list of presets in the amplifier.
3. Push the “Next/Down” or “PREV/UP” button until the screen displays “BIAMP”.
4. Push the “Set/Enter” button to confirm your selection.
5. The display will now read “CROSSOVER” with the Y icon and XOV icon highlighted.
5.3 出厂预设#3:CROSSOVER(分频)
功放在CROSSOVER(分频)模式下时,将1.2kHz第4滤波(24dB/octave)开启,将1.2kHz及以下的频率发
送到通道1输出,将1.2kHz以上的频率发送到通道2输出。XTi2.5系列功放预先装载的预设允许用户作
简单配置即可使用。
在开始之前,请确保:
1. 使用XLR连接接口将音源只连接到通道1。(当选择此预设时,功放输入自动放到Y模式)
2. 如图连接扬声器。
a. 使用Speakon输出接口、香蕉插头和裸线将需要接收中低频的扬声器连接到通道1输出。
b. 使用Speakon输出接口、香蕉插头和裸线将需要接收高频的扬声器连接到通道2输出。
根据如下步骤设置功放作CROSSOVER操作:
1. 按下Set/Enter按键,“Preset”闪烁。
2. 再次按下Set/Enter按键,进入功放预设清单。
3. 按下Next/Down或Prev/up按键,直到屏幕显示”BIAMP”。
4. 按下Set/Enter按键,确认选择。
5. 显示屏显示“BIAMP”字样,同时Y图标和XOV图标点亮。
5. 连接(接上一页)
Page 12
XTi2.5 Series Power Amplifier XTi2.5 系列功率放大器
12
Operation Manual
操作手册
LOW 1+/–
HIGH 2+/–
5. Wiring (continued)
5.4 出厂预设#4:BRG SUBS(桥接低音单元)
功放在BRG SUBS(桥接低音单元)模式下时,您可以桥接功放,以使用一个8或4欧姆的低音单元。
输入将自动合并,并启用一个90Hz第4(24dB/octave)低通滤波,输出模式为桥接单声道模式。XTi2.5
系列功放预先装载的预设允许用户作简单配置即可使用。
在开始之前,请确保:
1. 使用XLR连接接口将音源连接到通道1和通道2。(当选择此预设时,功放输入将自动合并到一
起)
2. 如图连接扬声器。
a. 如果使用接线柱输出接口,将扬声器的正极连接到通道1的正极,再将扬声器的负极连接
到通道2的正极。
b. 如果使用Speakon输出接口,将扬声器的正极连接到1+,再将扬声器的负极连接到2+。然后
只把此接口插入通道1输出接口。
根据如下步骤设置功放作BRG SUBS操作:
1. 按下Set/Enter按键,“Preset”闪烁。
2. 再次按下Set/Enter按键,进入功放预设清单。
3. 按下Next/Down或Prev/up按键,直到屏幕显示”BRG SUBS”。
4. 按下Set/Enter按键,确认选择。
5. 显示屏显示“BRG SUBS”字样,同时Y图标和BRG SUBS图标点亮。
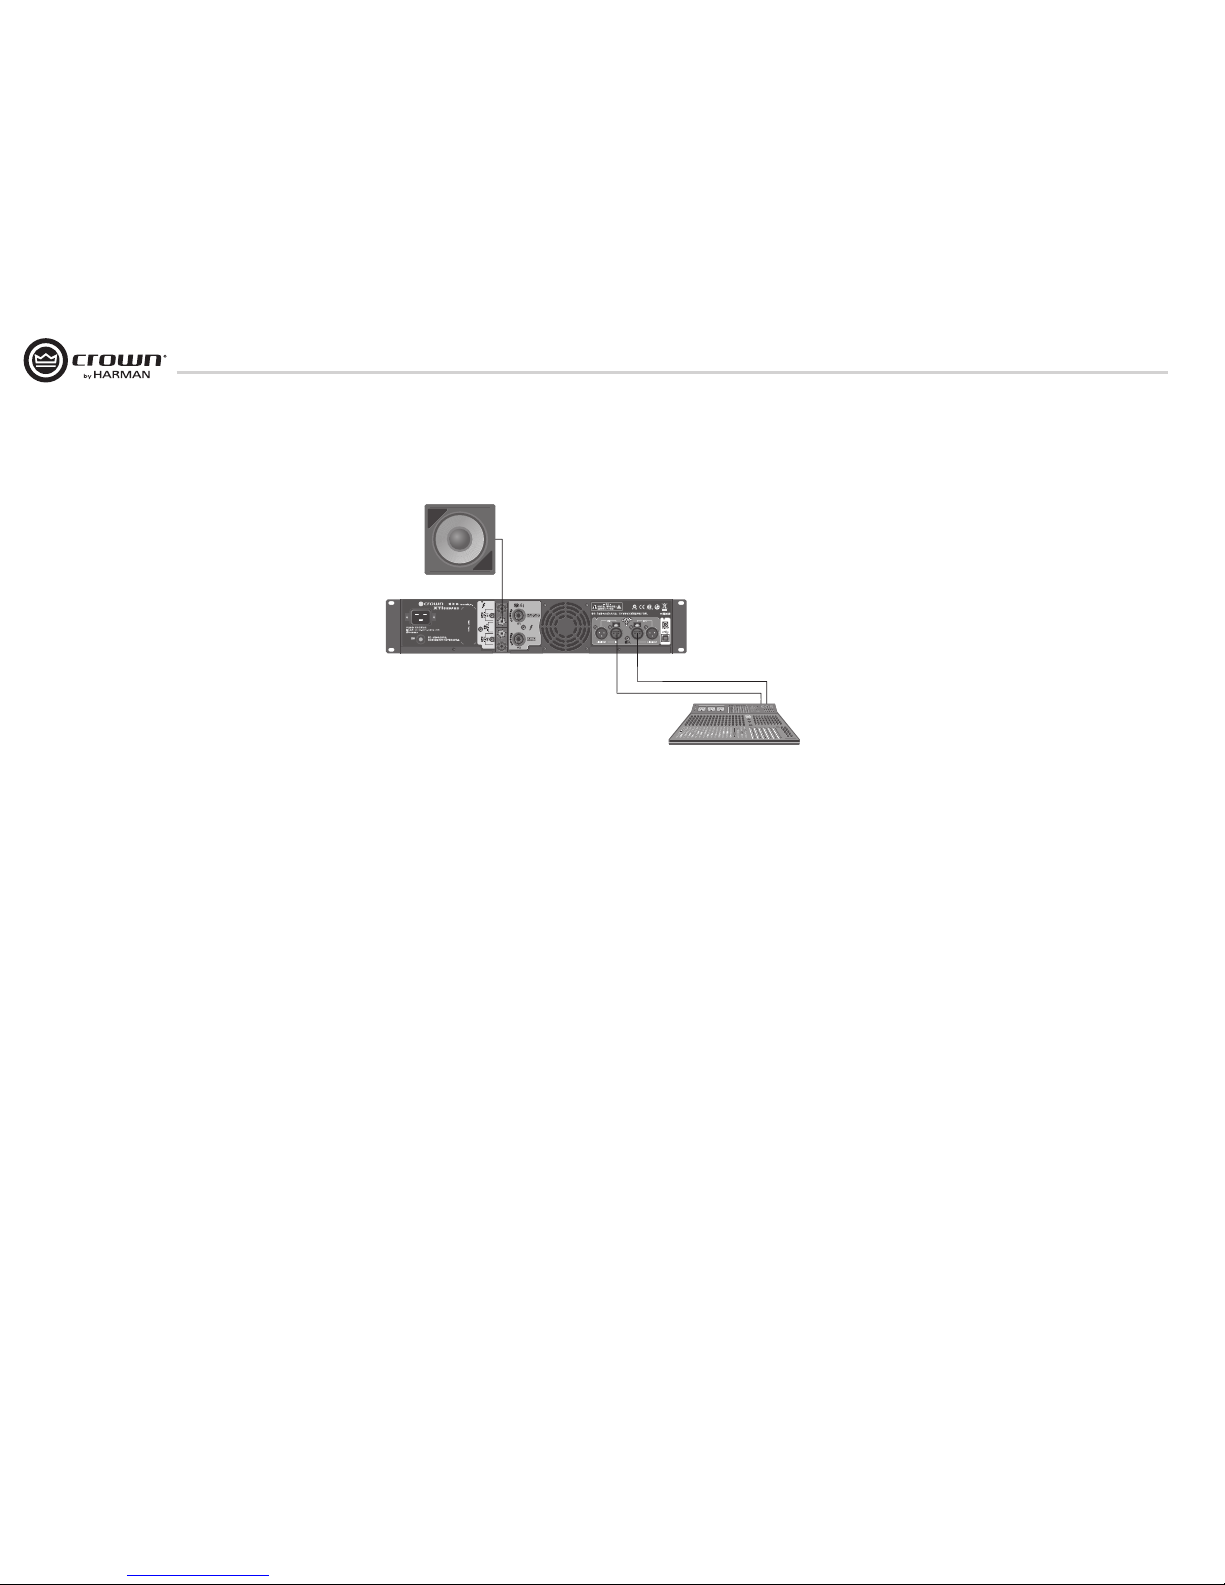
5.4 Factory Preset #4: BRG SUBS
Putting the amplifier in BRG SUBS (bridged subs) mode allows you to bridge the amplifier for use with a single 8 or 4 ohm
subwoofer. The inputs are automatically summed, a 90Hz 4th order (24dB/octave) LowPass filter is enabled, and the output
mode is put into bridge-mono mode. The XTi2.5 Series amplifiers come pre-loaded with a preset that makes it easy to
configure the amplifier for this operation.
Before you get started ensure that you:
2. Connect signal source to Channel 1 and Channel 2 using XLR connectors (the amplifier inputs will automatically be
summed together when selecting this preset).
3. Connector the speaker as shown.
a. If using the binding post outputs, connect the positive terminal of the speaker to the positive terminal of Channel
1 and the negative terminal of the speaker to the positive terminal of Channel 2.
b. If using a Speakon® connector, connect the positive terminal of the speaker to 1+ and the negative terminal to
2+. Plug the connector into the Channel 1 output only.
Follow these quick steps to configure the amplifier for BRG SUBS operation:
1. Push the “Set/Enter” button and you will see the word “Preset” flashing.
2. 2. Push the “Set/Enter” button again to enter the list of presets in the amplifier.
3. 3. Push the “Next/Down” or “PREV/UP” button until the screen displays “BRG SUBS”.
4. 4. Push the “Set/Enter” button to confirm your selection.
5. The display will now read “BRG SUBS” with the Y icon and XOV icon highlighted.
5. 连接(接上一页)
Page 13
XTi2.5 系列功率放大器XTi2.5 Series Power Amplifier
13
Operation Manual 操作手册
5. Wiring (continued)
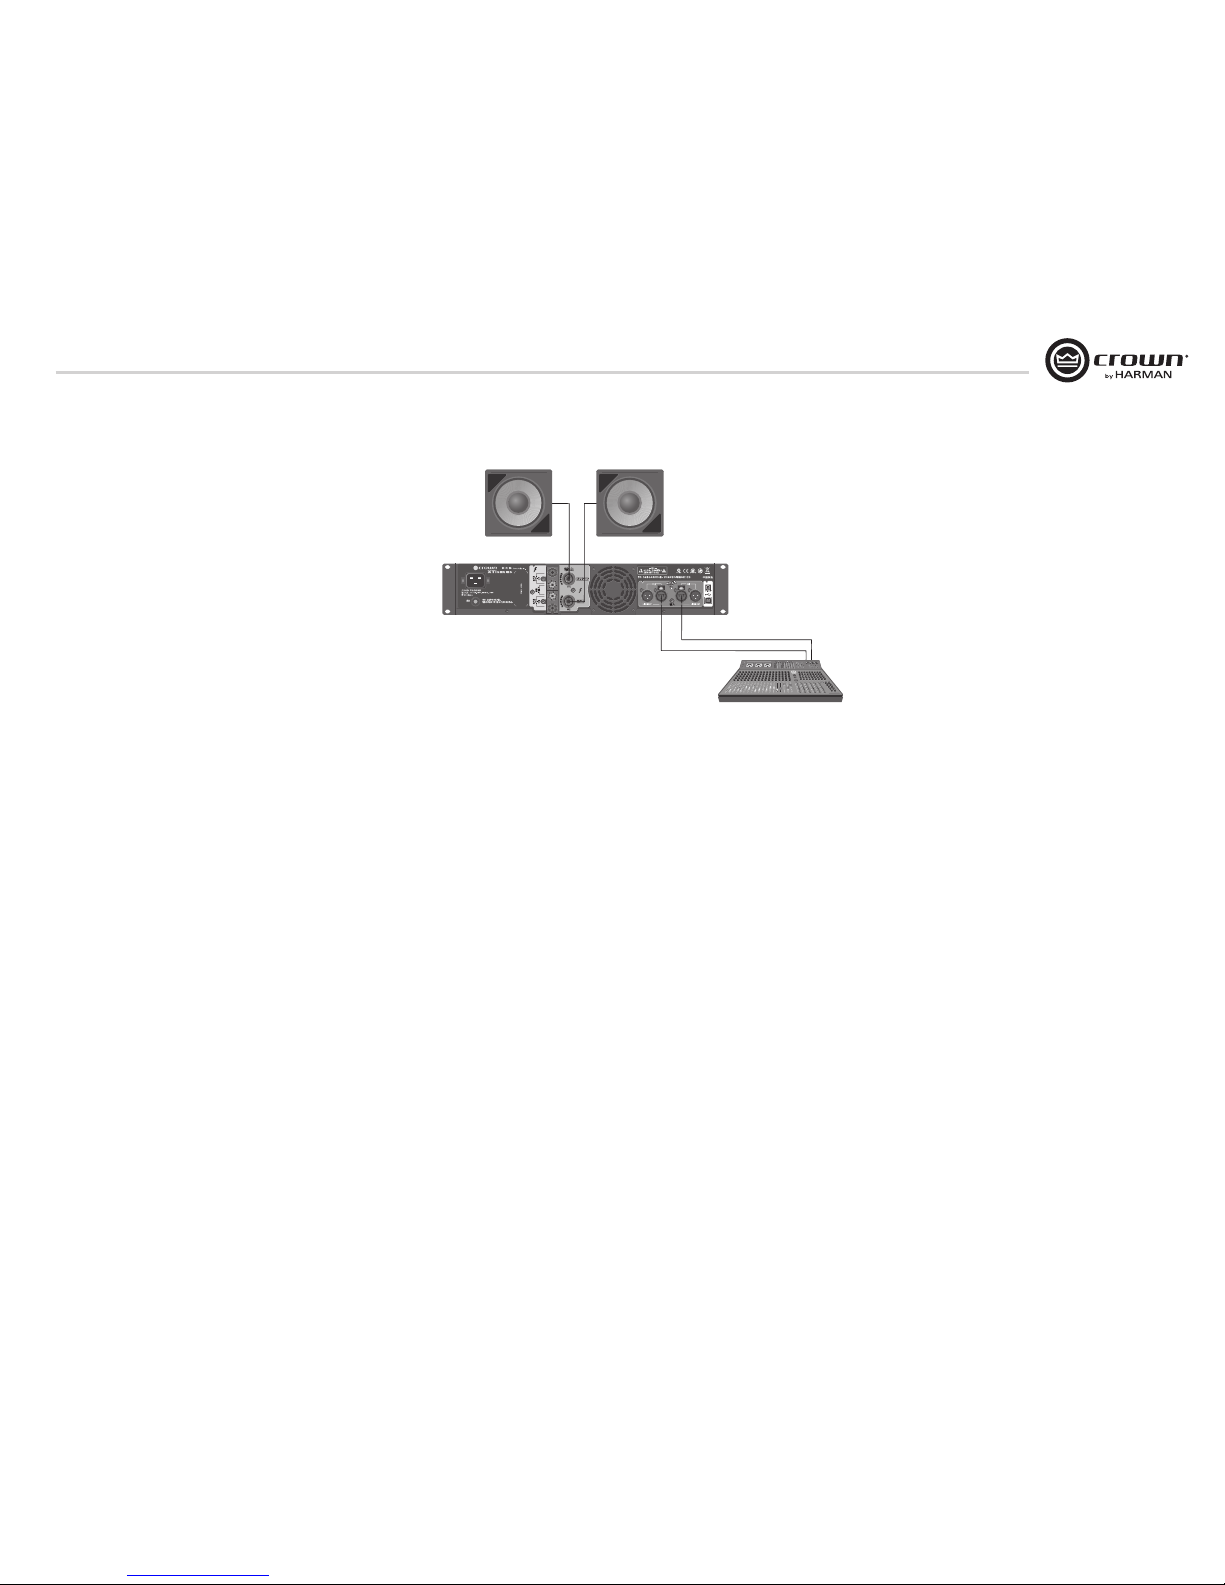
5.5 Factory Preset #5: SUBSYNTH
Putting the amplifier in SUBSYNTH mode allows you to turn on the SubHarmonic Synth feature for use with a subwoofer
on both channels. The inputs are automatically summed, a 90Hz 4th order (24dB/octave) filter is enabled on both Channel
1 and Channel 2, and the SubHarmonic Synth feature is turned on at +12dB level. The XTi2.5 Series amplifiers come preloaded with a preset that makes it easy to configure the amplifier for this operation.
Before you get started ensure that you:
2. Connect signal source to Channel 1 and Channel 2 using XLR connectors (the amplifier inputs will automatically be
summed together when selecting this preset).
3. Connector the speaker as shown.
a. Connect a speaker to each channel output using Speakon©, Banana Plugs, or bare wire
Follow these quick steps to configure the amplifier for SUBSYNTH operation:
1. Push the “Set/Enter” button and you will see the word “Preset” flashing.
2. Push the “Set/Enter” button again to enter the list of presets in the amplifier.
3. Push the “Next/Down” or “PREV/UP” button until the screen displays “SUBSYNTH”.
4. Push the “Set/Enter” button to confirm your selection.
5. The display will now read “SUBSYNTH” with the Y icon and XOV icon highlighted.
5.5 出厂预设#5:SUBSYNTH(次谐波合成器)
功放在SUBSYNTH(次谐波合成器)模式下时,您可以开启SUBSYNTH(次谐波合成器)功能,以在两
个通道上使用低音单元。输入将自动合并,且两个通道都将启用一个90Hz第4(24dB/octave)滤波,
当达到+12dB时,SUBSYNTH功能开启。XTi2.5系列功放预先装载的预设允许用户作简单配置即可使
用。
在开始之前,请确保:
1. 使用XLR连接接口将音源连接到通道1和通道2。(当选择此预设时,功放输入将自动合并到一
起)
2. 如图连接扬声器。
a. 使用Speakon输出接口、香蕉插头和裸线将扬声器连接到每通道输出。
根据如下步骤设置功放作SUBSYNTH操作:
1. 按下Set/Enter按键,“Preset”闪烁。
2. 再次按下Set/Enter按键,进入功放预设清单。
3. 按下Next/Down或Prev/up按键,直到屏幕显示”SUBSYNTH”。
4. 按下Set/Enter按键,确认选择。
5. 显示屏显示“SUBSYNTH”字样,同时Y图标和SUBSYNTH图标点亮。
5. 连接(接上一页)
Page 14
XTi2.5 Series Power Amplifier XTi2.5 系列功率放大器
14
Operation Manual
操作手册
6. Front Panel Navigation
From the front panel, you can change settings for several of the amplifier’s integrated signal processing features: Input Y,
Crossover Frequency, EQ, Delay, Limiting, and Stereo/Bridge-Mono. The Icons in the display illuminate to show which
features are currently applied and turned on.
When you power-on the amplifier for the first time, the LCD screen displays “DSP OFF” (no DSP is applied). Subsequent
power-ons display the preset that was active when you last shut off the amplifier.
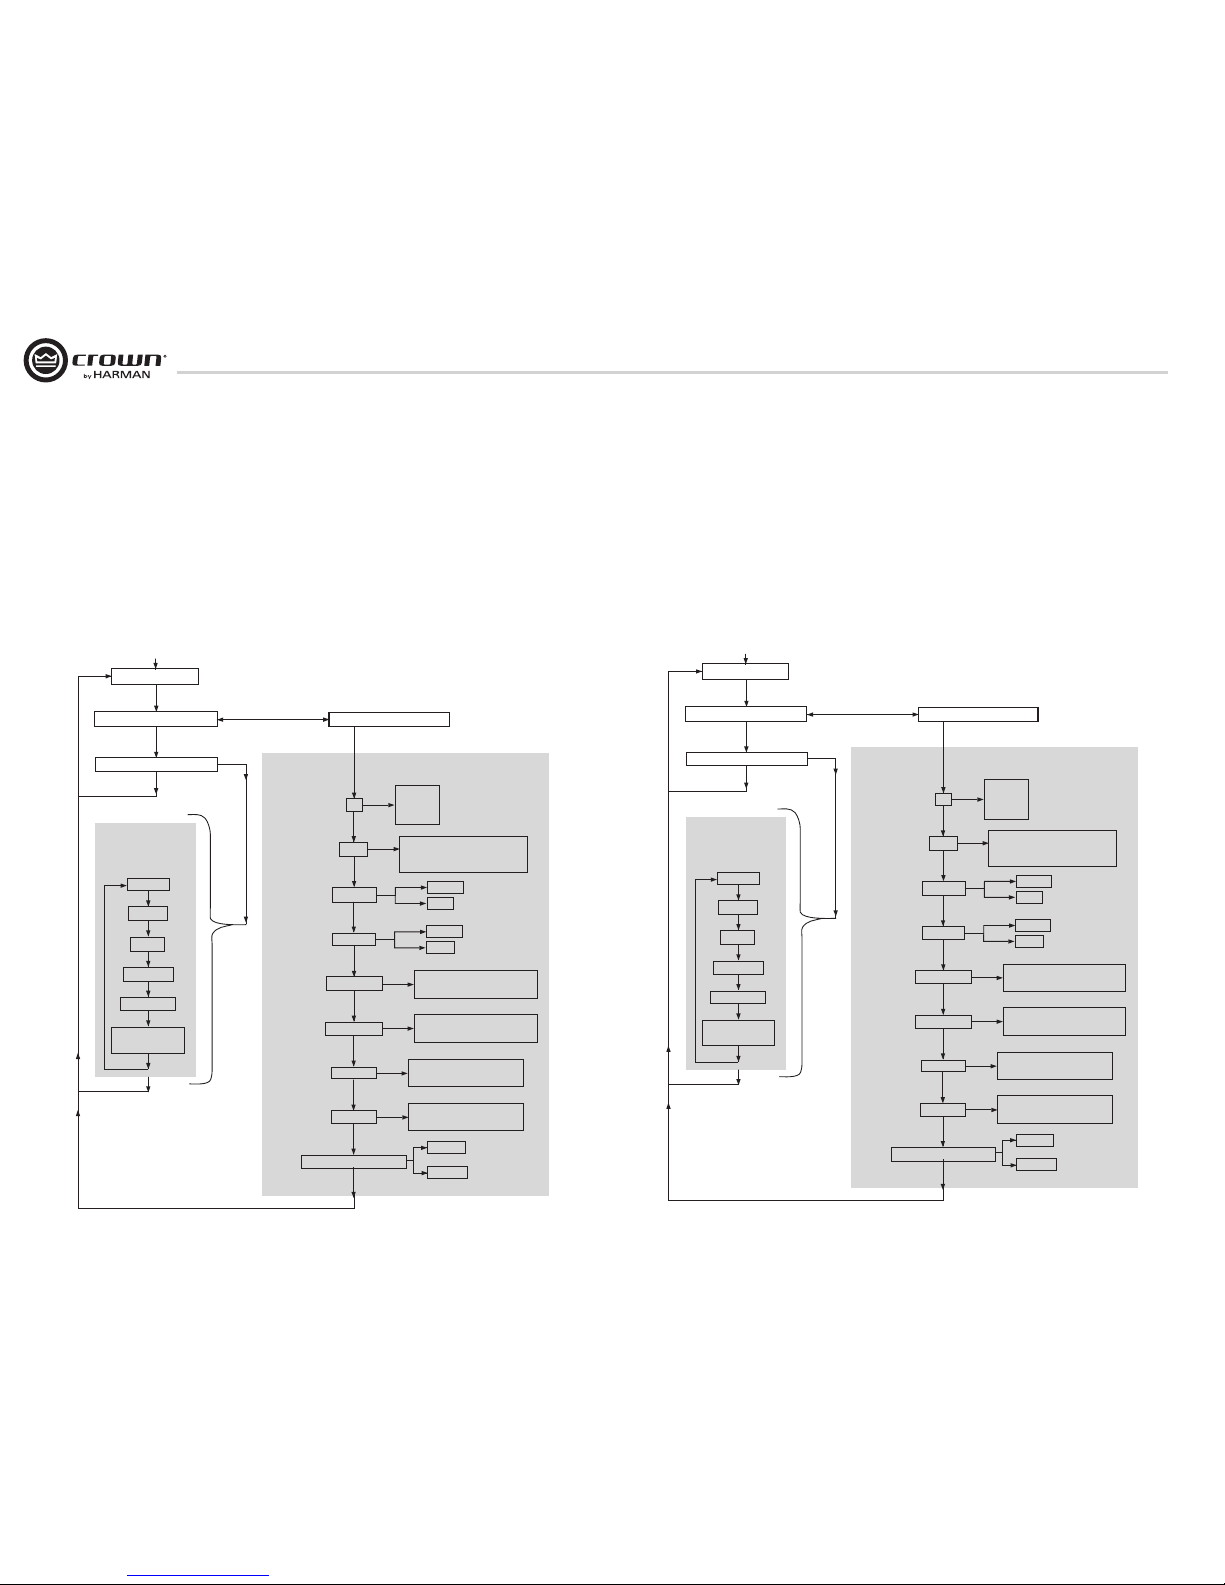
The figure below shows the Menu Tree, which is the navigation path of options in the Menu. It shows how you navigate
through the front panel and which settings are available from the front panel. For full access to all features, it is required that
you hook up the amplifier via USB to a computer and run either HiQnet System Architect™ or Band Manager™ software.
Both are available free via download from the following address: http://hiqnet.harmanpro.com.
Menu Tree
CURRENT PRESET
FLASHING “PRESET” TEXT
FLASHING “PRESET” ICON
Sel
Sel
Sel
Next
BRIDGE
XOVER
BRG SUBS
SUB SYNTH
USER PRESETS
6-50
DSP OFF
Next
Next
Next
Next
Next
Next
Next or Prev
FLASHING “CONFIG” TEXT
Y
XOV
EQ Ch. 1
EQ Ch. 2
DELAY Ch. 1
DELAY Ch. 2
LIM Ch. 1
LIM Ch. 2
STEREO/BRIDGE MONO
BRIDGE
STEREO
Sel
Sel
Sel
Sel
Sel
Sel
Sel
Sel
Sel
Next
Prev
Next
Next
Next
Next
Next
Next
Next
CH1+CH2
INPUT Y
STEREO
OFF, 90 Hz, 100 Hz, 1200 Hz,
1500 Hz, 2000 Hz, 2-CH SUB,
CUSTOM
Sel
Next
Press Next to see
each processor’s
options, then press
Sel to select an option.
PRESETS
(TEXT on screen)
DSP PROCESSES
(ICONS on screen)
Doing nothing returns you to the
CURRENT PRESET after a timeout delay.
Sel > Sel > Next goes to presets.
Sel > Next > Sel lets you
configure the DSP processes.
Starting from the CURRENT PRESET,
Power-up
Sel
EQ IN
Prev
Next
Prev
EQ OUT
EQ OUT
EQ IN
CURRENT, OFF, 50, 40, 30,
20,10, 9, 8, 7, 6, 5, 4, 3, 2, 1
CURRENT, OFF, 50, 40, 30,
20,10, 9, 8, 7, 6, 5, 4, 3, 2, 1
CURRENT, OFF, –0.5 dB,
–1.0 dB, –1.5 dB... –40 dB
CURRENT, OFF, –0.5 dB,
–1.0 dB, –1.5 dB... –40 dB
6. 前面板菜单浏览
从前面板,您可以修改集成在功放上的信号处理功能:输入Y,分频点、EQ、延时、压限和立体声/
桥接-单声道。显示屏上的图标点亮,表现正开启和应用的功能。
当您第一次开启功放时,LCD显示屏显示“DSP OFF”(即无DSP设置)。再次开启电源时将显示最后
一次关闭功放时所激活的预设。
下图显示了菜单树状图,展示菜单路径下的选项。您可以了解从前面板上如何调用这些设定。如需
修改更多功能设置,您需要通过USB接口将功放与电脑连接起来,使用HiQnet System Architect或Brand
Manager软件完成设定。
菜单树状图
Ⳃࠡ乘䆒
ᔧࠡ乘䆒ؐ䮾⚕
Sel
Sel
Sel
Next
BRIDGE
XOVER
BRG SUBS
SUB SYNTH
USER PRESETS
6-50
DSP OFF
Next
Next
Next
Next
Next
Next
Next Prev
Ā&21),*ā䮾⚕
Y
XOV
EQ Ch. 1
EQ Ch. 2
DELAY Ch. 1
DELAY Ch. 2
LIM Ch. 1
LIM Ch. 2
STEREO/BRIDGE MONO
BRIDGE
STEREO
Sel
Sel
Sel
Sel
Sel
Sel
Sel
Sel
Sel
Next
Prev
Next
Next
Next
Next
Next
Next
Next
CH1+CH2
INPUT Y
STEREO
OFF, 90 Hz, 100 Hz, 1200 Hz,
1500 Hz, 2000 Hz, 2-CH SUB,
CUSTOM
Sel
MENU TREE
Next
乘䆒
˄ᰒ⼎ⱘᄫІ˅
ᔧࠄњ᪡ᯊ䰤ᯊˈབᵰӏ
ԩׂᬍˈᇚⳈ䖨ಲᔧࠡ乘䆒DŽ
䗮⬉⑤
Sel
EQ IN
Prev
Next
Prev
EQ OUT
EQ OUT
EQ IN
CURRENT, OFF, 50, 40, 30,
20,10, 9, 8, 7, 6, 5, 4, 3, 2, 1
CURRENT, OFF, 50, 40, 30,
20,10, 9, 8, 7, 6, 5, 4, 3, 2, 1
CURRENT, OFF, –0.5 dB,
–1.0 dB, –1.5 dB... –40 dB
CURRENT, OFF, –0.5 dB,
–1.0 dB, –1.5 dB... –40 dB
ᔧࠡ乘䆒ؐⱘ䮾⚕
Ңᔧࠡ乘䆒ᓔྟˈᣝϟ
6(/!6(/!1H[W䖯ܹ
Ⳃ乘䆒DŽ
6(/!6(/!1H[W䅽ᙼ
ৃҹ䆒ᅮ'63䖛DŽ
'63䖛
˄ᰒ⼎ⱘ˅
ᣝϟ1H[Wᶹⳟ↣Ͼ
䆒㕂ⱘৃ䗝乍ˈ
✊ৢᣝϟ6HO䗝প
᠔䳔䗝乍DŽ
Page 15

XTi2.5 系列功率放大器XTi2.5 Series Power Amplifier
15
Operation Manual 操作手册
6. Front Panel Navigation (continued)
Navigating the LCD Screen Menu: Basics
To step through the Menu options, press the Sel, Next or Prev buttons as described in the menu tree above. Icons illuminated
at the top of the screen show which DSP functions are active with the current preset.
When you are modifying a preset, its icon flashes. You can scroll through its settings with the Prev and Next buttons. When
you see the desired setting, select it by pressing Sel. Doing nothing returns you to the current preset after ten seconds.
In the LCD screen, if the Preset Icon is lit, the current preset is unchanged from its stored settings. If the Custom Icon is lit,
the current preset has been changed from its stored settings.
6. 前面板菜单浏览(接上一页)
浏览LCD显示屏菜单:基础
您可以按下Sel、Next或Prev按键来浏览菜单的所有选项,如上图所示。显示屏最上面点亮的图标表示
当前预设所激活的DSP功能。
当您修改预设时,图标闪烁。您可以按下Prev和Next按键来切换设定。
当您看到所需的设定时,按下Sel选取。10秒钟内未作任何修改,即返回当前预设。
如果LCD显示屏上的预设图标点亮,当前的预设保持上次保存的设定,而将不作任何修改。如果是
定制图标点亮,当前预定将立即更新设定。
Page 16

XTi2.5 Series Power Amplifier XTi2.5 系列功率放大器
16
Operation Manual
操作手册
7. 集成处理功能
XTi2.5系列功放包括一系列作为图标显示在LCD显示屏上的集成处理功能。如下所述:
注意:System Architect软件用于对所有集成处理功能的控制。此软件可在如下URL下载使用:http://
hiqnet.harmanpro.com。当控制超过一台XTi2.5功放,您需要USB扩展坞。推荐使用有源USB扩展
坞。
输入模式
• 立体声 - 在此模式下,通道1到通道1输出,通道2到通道2输出。此模式为功放出厂默认模式。
• SUM(CH1+CH2)- 在此模式下,通道1和通道2的输入信号合并后发送到两路通道。增强6dB电平
信号。
• 输入Y - 在此模式下,通道1输入信号发送到通道1和通道2。通道2的输入信号忽略。
输出模式
• 立体声 - 在此模式下,功放发送通道1的输入信号到通道1输出,通道2的输入信号到通道2输出。
• 桥接-单声道 - 在此模式下,两路功放通道的功率发送到一个8或4ohm的负载。
次谐波合成器
次谐波合成器去除低频并合成或创建低一倍频程的新频段。两个信号合成一起。两个用户可调参数
EQ滤波和分频滤波。这些可用于修改声形并增强所需效果。
均衡
XTi2.5系列提供两组EQ处理。输入EQ组在分频前,通常用于房间EQ。输出EQ组在分频后,通常用于
扬声器调音。
• 输入EQ:此输入EQ组提供每通道6个滤波,且用户可调节频率、增益、和Q值。此组EQ每通道带
高低架滤波,增益和频率可调节。
• 输出EQ:此输出EQ组提供每通道8个滤波,且用户可调节频率、增益、和Q值。
分频
分频部分使得用户能启用每通道带宽通增益功能的高通和低通滤波,和改变极性。这使得用户可以
通过定制分频部分来配置大多数的系统。
对于高通和低通滤波,您有如下选项:Butterworth 6 db/oct、Butterworth 12 db/oct、Butterworth 18 db/
oct、Butterworth 24 db/oct、Butterworth 48 db/oct、Butterworth 6 db/oct、Linkwitz-Riley 24 dB/oct和Linkwitz-Riley 48
dB/oct。
宽通增益提供-15dB到+15dB增益范围。
7. Integrated Processing Features
The XTi2.5 Series amplifiers include a number of integrated processing features which appear as icon on the front panel LCD
screen. They are described below:
NOTE: System Architect Software is required to have full control over all Integrated Processing Features
which can be downloaded from the following URL - http://hiqnet.harmanpro.com/. When controlling mroe
than one XTi2.5 at a time you will need USB Hub. We recommend using a Powered USB Hub.
Input Mode
• Stereo - In this mode, Channel 1 input goes to Channel 1 output and Channel 2 input goes to Channel 2 output. This is
the mode the amplifier is configured for from the factory.
• SUM (CH1+CH2) - In this mode, the Channel 1 input signal and Channel 2 input signal are summed and fed to both
output channels. This provides a 6 dB level boost.
• Input Y - In this mode, the Channel 1 input signal is sent to the Channel 1 and Channel 2 output. The channel 2 input
signal is ignored.
Output Mode
• Stereo - In this mode, the amplifier sends Channel 1 input signal to the Channel 1 output and the Channel 2 input signal
to the Channel 2 output.
• Bridge-Mono - In this mode, the power of both amplifier channels are delivered into a single 8 or 4 ohm load.
Subharmonic Synth
The Subharmonic Synth feature takes the low frequencies and “synthesizes” or creates new frequencies that are one
octave lower. The two signals are then summed together. Also new, are two user adjustable parametric EQ filters and
crossover frequency filter. These can be used to “shape” the sound and enhance the desired effect.
Equalization
The XTi2.5 Series provides two blocks of equalization in the signal processing. The input EQ block is before the crossover
and is usually used for the room EQ. The output EQ block is after the crossover and is usually used for speaking tuning.
• Input EQ: This input EQ block provides 6 filters per channel each with frequency, gain, and Q that is user controllable.
This block also has a High and Low Shelf Filter per channel which has gain and frequency control.
• Output EQ: This output EQ block provides 8 filters per channel each with frequency, gain, and Q control that is user
controllable.
Crossover
The crossover section provides users with the ability to enable a HighPass and LowPass filter per channel along with
BandPass gain and the ability to change the polarity. This allows the Crossover section to be customized to most system
configurations.
For the HighPass and LowPass Filters, you have the choice of the following filters: Butterworth 6dB/oct, Butterworth 12dB/
oct, Butterworth 18dB/oct, Butterworth 24dB/oct, Butterworth 48dB/oct, Linkwitz-Riley 24dB/oct, and Linkwitz-Riley 48dB/
oct. The BandPass gain provides you with -15dB to +15dB of gain.
Page 17

XTi2.5 系列功率放大器XTi2.5 Series Power Amplifier
17
Operation Manual 操作手册
延时
在信号处理的过程中需要使用50msec的延时来调整扬声器的时间。您还可以在软件中以各种计算格
式来设定延时,例如秒、英尺、米等。
峰值压限器
带用户可调节启动、释放和阈值(0.1dB分辨率)的前反馈输出压限器,和集成反馈压限器,用来减少
功放削波。
高级温度控制
能可让您根据现场应用调节风扇转速。有如下选择:
• 常规
• 提前
• 全速
用户可使用前面板的按键或软件来改变风扇模式。默认模式是常规,此模式适用于大多数应用场
合。提前模式可使风扇在较低温度下就运行,全速模式可使风扇全速转动。在较浑浊的空气环境
中,我们不推荐您使用全速模式。
高级监控
此功能可让您透过软件看到电源温度和交流线路电压。交流线路电源是从功放轨道电压而来,几乎
相当于交流线路电压。这样可让您监控功放的健康状态状态,提供故障显征。
前面板锁止
如需锁止前面板上的按键,同时按下Prev和Next按键,直到显示屏显示“locked(锁止)”。此时旋钮
(衰减器)仍工作。如需解锁,再次同时按下Prev和Next按键,直到显示“unlocked(解锁)”。
前面板也可以通过软件的主菜单来锁止和解锁。然后一旦使用软件来锁止,也只能使用软件来解
锁。您无法从前面板上来解锁。旋钮(衰减器)仍工作。
7. 集成处理功能(接上一页)
Delay
There is up to 50msec of delay available in the signal processing for time aligning your speakers. The software allows you to
enter the amount of delay needed in the form of seconds, feet, or meters and does the calculation for you.
PeakX Plus Limiter
Feed-forward output limiter with user-adjustable attack, release and threshold (0.1 dB resolution), plus integrated feedback
limiter to minimize amplifier clipping.
Advanced Thermal Control
In this section, you can tailor the fan speed to specific applications. You have the choice of the following modes:
• Normal
• Early
• Full-Speed
The fan mode can be changed using the front panel buttons at start-up or in the software. The default mode is normal and
should work fine for most applications. Early mode turns the fan on sooner at a “lower” temperature, and Full-speed
mode turns the fan on full-speed full-time. Full-speed mode is not recommended for “dirty” environments.
Advanced Monitoring
This feature allows you to have software visibility of both the Power Supply Temperature and AC Line voltage. AC Line
voltage is “derived” from the amplifier rail voltage and is an approximation of the AC line voltage. This allows you to
monitor the health of your amplifiers and provides for troubleshooting.
Front Panel Lock-Out
To disable or lock the buttons from the front panel, hold the Prev and Next at the same time until the screen says
“locked”. The rotary knobs (attenuators) will still operate. To unlock, hold Prev and Next until the screen says
“unlocked”.
The front panel can also be locked out from the software as well from the main panel. However once it is locked in the
software, it can only be unlocked from the software. You cannot unlock from the front panel. The rotary knobs (attenuators)
will still operate.
7. Integrated Processing Features (continued)
Page 18
XTi2.5 Series Power Amplifier XTi2.5 系列功率放大器
18
Operation Manual
操作手册
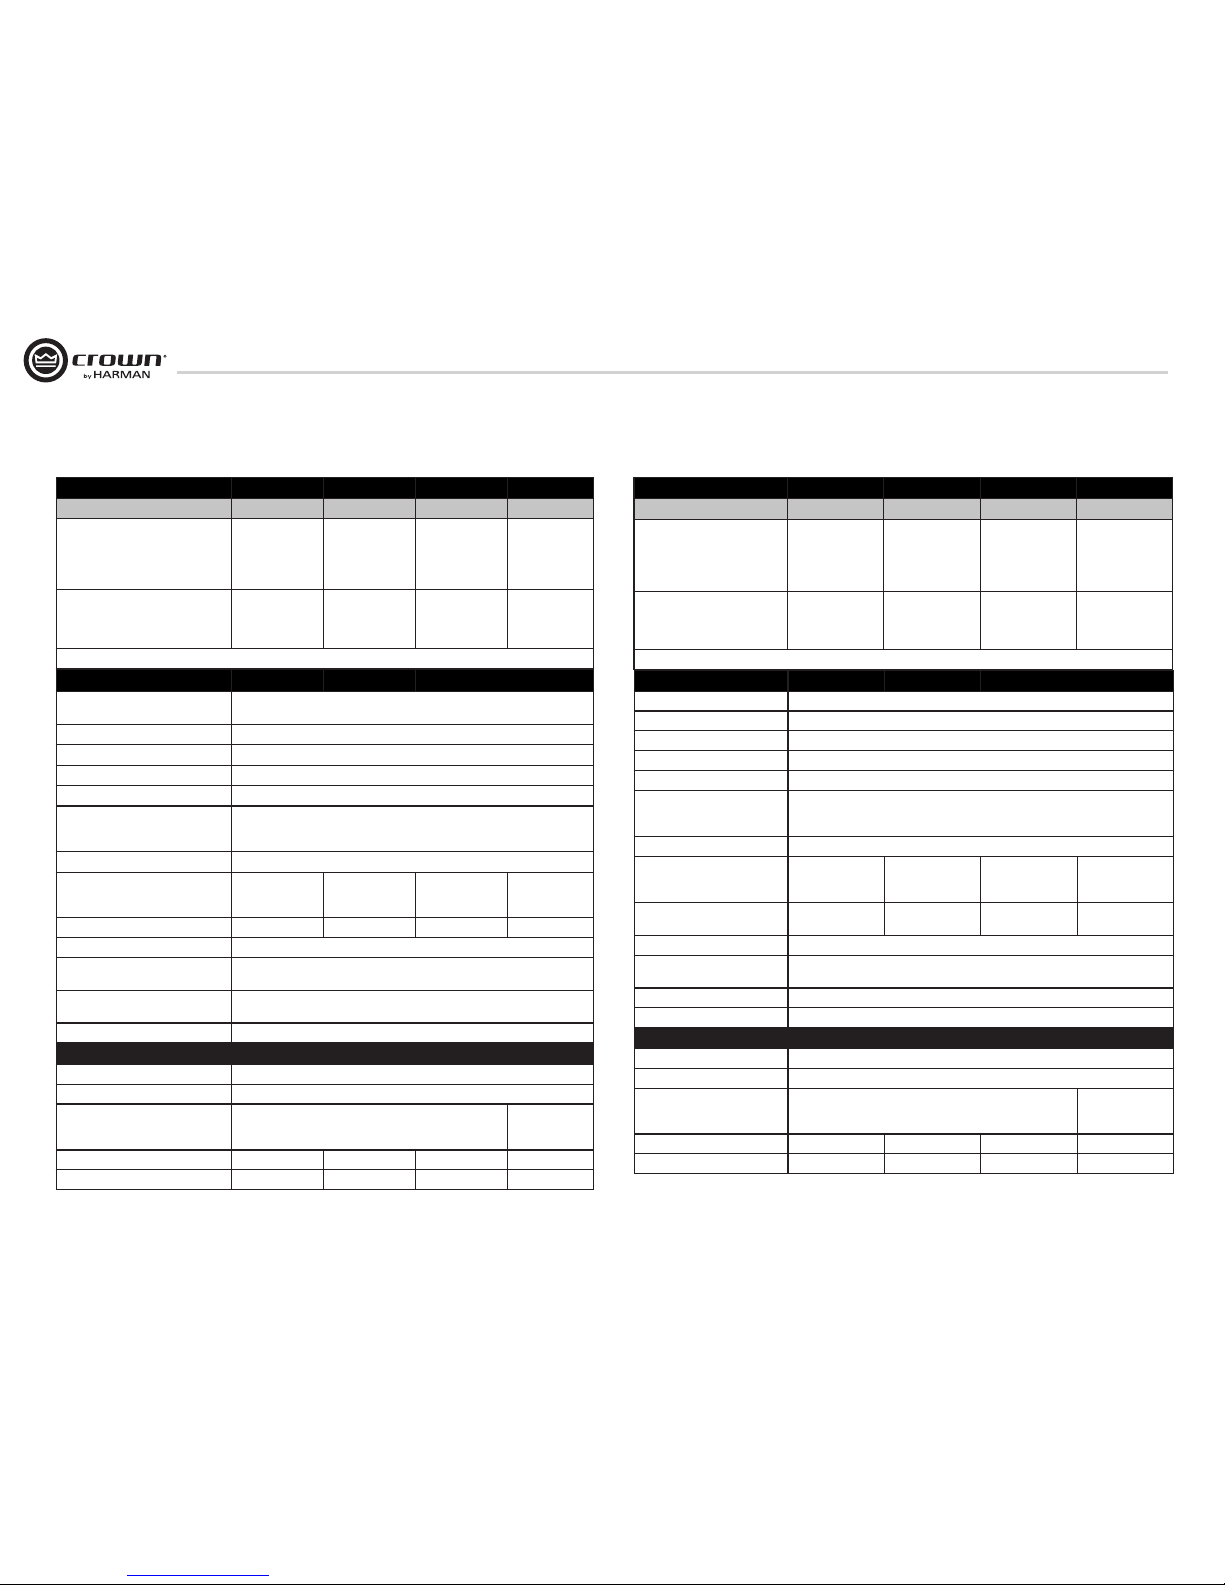
8. 规格
性能
灵敏度(全额定功率,4ohms) 1.4V
频率响应(1 W, 4 ohms) 20Hz - 20kHz, +0/-1dB
信噪比 100 dB (103 dB in XTi 6002A) (低于额定功率,1 kHz, 8 ohms, A计权)
阻尼系数 (8 ohms), 10Hz - 400 Hz > 500
串扰
>70 dB (以额定输出功率为参考)20 Hz -1 kHz
输入阻抗(额定)
平衡
非平衡
20k ohms
10k ohms
输入级
输入是电子平衡采用1%精度电阻。
交流线路电流(120VAC功
放,1/8功率粉红噪音,每通
道4ohms)
6.8A
(闲置电压降,不
超过30W)
8.3A
(闲置电压降,不
超过30W)
10.5A
(闲置电压降,不
超过30W)
15.3A
(闲置电压降,不
超过180W)
电压增益(1kHz, 8 ohms额定
输出)
30.5 dB 32.9 dB 34.2 dB 37.1 dB
最大输入信号 +22dBu典型
负载阻抗(注意:所有负载
均安全)
立体声:2-8 ohms
桥接-单声道:4-16 ohms
交流电压和频率配置(± 10%)
220-240V 50/60 Hz.
运行温度 0° C - 40° C, 95% 相对湿度(非冷凝)
结构
通风 由前往后的空气对流机制
冷却 内部空气强排散热,风扇冷却,快速调节,温度保护
尺寸 (W x H x D) 19"x3.5"x12.25" (482 mm x 89 mm x 311 mm)
19"x3.5"x16.2" (482
mm x 89 mm x 411
mm)
净重 25.1 lb (11.4 kg) 28.0 lb (12.7 kg) 29.7 lb (13.5 kg) 43.0 lb (19.5 kg)
运输重量 18.5 lb (8.4 kg) 21.5 lb (9.8 kg) 24.0 lb (10.9 kg) 30.0 lb (13.6 kg)
最低保证功率,1kHz XTi 1002A XTi 2002A XTi 4002A XTi 6002A
每通道,驱动两个通道
立体声2欧姆
立体声4欧姆
立体声8欧姆
桥接单声道4欧姆
桥接单声道8欧姆
600W
* †
400W
240W
1200W
* †
800W
975W
*
800W
475W
1950W
*
1600W
1275W
*
1100W
650W
2550W
*
2200W
3000W
*
2100W
1200W
6000W
*
4200W
额定220VAC,持续一分钟
立体声2欧姆
立体声4欧姆
立体声8欧姆
600W
* †
400W
240W
975W
*
800W
475W
1275W *
1100W
650W
1100W *
1200W
1000W
总谐波失真:0.5%。*总谐波失真:1%。
†
不是 100V 版的额定值。
8. Specification
Performance
Sensitivity (volts RMS) for full rated power
at 4 ohms
1.4V
Signal Response(1 W, 4 ohms)
20Hz - 20kHz, +0/-1dB
Signal to Noise Ratio
100 dB (103 dB in XTi 6002A) (below rated 1 kHz power at 8 ohms), A-weighted
Damping Factor > 500, (8 ohms), 10 Hz - 400 Hz
Crosstalk
>70 dB (below rated power) 20 Hz -1 kHz
Input Impedance (nominal)
Balance
Unbalance
20k ohms
10k ohms
Input Stage
Input is electronically balanced and employs precision 1% resistors.
AC Line Current (120VAC amplifier playing
1/8 power pink noise into 4 ohms per ch)
6.8A
(at idle draws no
more than 30W)
8.3A
(at idle draws no
more than 30W)
10.5A
(at idle draws no
more than 30W)
15.3A
(at idle draws no
more than 180W)
Voltage Gain (at 1 kHz, 8 ohm rated output) 30.5 dB 32.9 dB 34.2 dB 37.1 dB
Maximum Input Signal +22dBu typical
Load impedance (note: safe with all types
of loads)
Stereo: 2-8 ohms
Bridge Mono: 4-16 ohms
AC Line Voltage and Frequency
Configurations Available (±10%)
220-240V 50/60 Hz.
Operating Temperature 0℃ to 40℃ at 95% relative humidity (non-condensing)
Structure
Ventilation Flow-through ventilation from front to back
Cooling Heat sinks and proportional-speed fan
Dimensions (W x H x D)
19"x3.5"x12.25" (482 mm x 89 mm x 311 mm)
19"x3.5"x16.2"
(482 mm x 89 mm
x 411 mm)
Net Weight 25.1 lb (11.4 kg) 28.0 lb (12.7 kg) 29.7 lb (13.5 kg) 43.0 lb (19.5 kg)
Shipping Weight 18.5 lb (8.4 kg) 21.5 lb (9.8 kg) 24.0 lb (10.9 kg) 30.0 lb (13.6 kg)
Minimum Guaranteed Power 1kHz
XTi 1002A XTi 2002A XTi 4002A XTi 6002A
Per Channel, both channels driven
Stereo, 2 ohms (per ch.)
Stereo, 4 ohms (per ch.)
Stereo, 8 ohms (per ch.)
Bridge-Mono, 4 ohms
Bridge-Mono, 8 ohms
600W
* †
400W
240W
1200W
* †
800W
975W
*
800W
475W
1950W
*
1600W
1275W
*
1100W
650W
2550W
*
2200W
3000W
*
2100W
1200W
6000W
*
4200W
Rated Power @220VAC, 1 min continuous
Stereo, 2 ohms (per ch.)
Stereo, 4 ohms (per ch.)
Stereo, 8 ohms (per ch.)
600W
* †
400W
240W
975W
*
800W
475W
1275W *
1100W
650W
1100W *
1200W
1000W
With 0.5% THD.*With 1% THD.
†
Not rated for 100V versions.
Page 19

XTi2.5 系列功率放大器XTi2.5 Series Power Amplifier
19
Operation Manual 操作手册
9. Warranty
SUMMARY OF WARRANTY
Crown International, 1718 West Mishawaka Road, Elkhart,
Indiana 46517-4095 U.S.A. warrants to you, the ORIGINAL
PURCHASER and ANY SUBSEQUENT OWNER of each
NEW Crown product, for a period of three (3) years from the
date of purchase by the original purchaser (the “warranty
period”) that the new Crown product is free of defects in
materials and workmanship. We further warrant the new
Crown product regardless of the reason for failure, except
as excluded in this Warranty.
Warranty is only valid within the country in which the
product was purchased.
ITEMS EXCLUDED FROM THIS CROWN
WARRANTY
This Crown Warranty is in effect only for failure of a new
Crown product which occurred within the Warranty Period.
It does not cover any product which has been damaged
because of any intentional misuse, accident, negligence,
or loss which is covered under any of your insurance
contracts. This Crown Warranty also does not extend to the
new Crown product if the serial number has been defaced,
altered, or removed.
WHAT THE WARRANTOR WILL DO
We will remedy any defect, regardless of the reason for
failure (except as excluded), by repair, replacement, or
refund. We may not elect refund unless you agree, or
unless we are unable to provide replacement, and repair
is not practical or cannot be timely made. If a refund is
elected, then you must make the defective or malfunctioning
product available to us free and clear of all liens or other
encumbrances. The refund will be equal to the actual
purchase price, not including interest, insurance, closing
costs, and other finance charges less a reasonable
depreciation on the product from the date of original
purchase. Warranty work can only be performed at our
authorized service centers or at the factory. We will remedy
the defect and ship the product from the service center or
our factory within a reasonable time after receipt of the
defective product at our authorized service center or our
factory. All expenses in remedying the defect, including
surface shipping costs in the United States, will be borne
by us. (You must bear the expense of shipping the product
between any foreign country and the port of entry in the
United States including the return shipment, and all taxes,
duties, and other customs fees for such foreign shipments.)
HOW TO OBTAIN WARRANTY SERVICE
You must notify us of your need for warranty service within
the warranty period. All components must be shipped in
a factory pack, which, if needed, may be obtained from
us free of charge. Corrective action will be taken within
a reasonable time of the date of receipt of the defective
product by us or our authorized service center. If the
repairs made by us or our authorized service center are
not satisfactory, notify us or our authorized service center
immediately.
DISCLAIMER OF CONSEQUENTIAL AND
INCIDENTAL DAMAGES
YOU ARE NOT ENTITLED TO RECOVER FROM US ANY
INCIDENTAL DAMAGES RESULTING FROM ANY DEFECT
IN THE NEW CROWN PRODUCT. THIS INCLUDES ANY
DAMAGE TO ANOTHER PRODUCT OR PRODUCTS
RESULTING FROM SUCH A DEFECT. SOME STATES
DO NOT ALLOW THE EXCLUSION OR LIMITATIONS OF
INCIDENTAL OR CONSEQUENTIAL DAMAGES, SO THE
ABOVE LIMITATION OR EXCLUSION MAY NOT APPLY TO
YOU.
WARRANTY ALTERATIONS
No person has the authority to enlarge, amend, or modify
this Crown Warranty. This Crown Warranty is not extended
by the length of time which you are deprived of the use of
the new Crown product. Repairs and replacement parts
provided under the terms of this Crown Warranty shall carry
only the unexpired portion of this Crown Warranty.
DESIGN CHANGES
We reserve the right to change the design of any product
from time to time without notice and with no obligation
to make corresponding changes in products previously
manufactured.
LEGAL REMEDIES OF PURCHASER
THIS CROWN WARRANTY GIVES YOU SPECIFIC LEGAL
RIGHTS, YOU MAY ALSO HAVE OTHER RIGHTS WHICH
VARY FROM STATE TO STATE. No action to enforce this
Crown Warranty shall be commenced after expiration of the
warranty period.
THIS STATEMENT OF WARRANTY SUPERSEDES ANY
OTHERS CONTAINED IN THIS MANUAL FOR CROWN
PRODUCTS. 01/15
保修概述
Crown国际有限公司,1718 West Mishawaka Road,
Elkhart, Indiana 46517-4095 U.S.A.,为您提供保
修,Crown新产品的原始购买者和后续的用户,
可以自原始购买日期起在为期1年的期限内(“
保修期限”)对因Crown新产品的材料和工艺而
引起的问题进行免费维修。我们进一步保证,
在不考虑故障原因的情况下,进行维修。保障
条款中的例外情况除外。
保修条款仅适用于在您购买此产品所在国家。
注意:如果您的产品上标有名称“Amcron”,
在这份保修中,请用名称“Crown”替换。
CROWN 保修条款以外的情况
此保修条款仅对产品保修期内出现的故障有效。
保修不能涵盖的情况包括,由于故意误用、意
外、疏忽引起的产品受损或在任意保险合同下涵
盖的损失。如果产品序列号受损、变更或改动,
新产品所具有的Crown保险条款也将无效。
保修方需要做的事情
不考虑故障原因的情况下(例外情况除外),
我们将会通过维修、更换或退款的方式对故障
采取补救措施。当不能对设备进行更换,而且
无法执行修复或及时修复,我们才会选取退款
方式。如果选择退款,您需要将故障或问题产
品免费提供给我们并不计入任何抵押利息。退
款等同于实际产品的价格,不包括利息、保险、
手续费和其它费用,并减去自购买之日起产品折
旧费。保修只能由经过我们授权的服务中心进
行维修。我们将在合理的时间内,在服务中心
对运来的故障产品及时采取补救措施。
如何得到保修服务
您必须在保修期内向您当地的Crown进口商通告
保修服务的需求。所有的元器件必须放置在原
始包装箱中进行运输,如果需要您可以从我们
这里免费得到包装箱。收到故障产品我们或我
们授权的服务中心将在合理的时间段内及时进
行维修。如果维修的结果不令人满意,请立即
通知我们或我们授权的服务中心。
不承诺相因而生的和附带的损坏
因Crown新产品问题而引起的附带损坏,不在保
修范围内。这其中包括对某一其它产品或某些
其他产品引起的损坏。
保修变更
Crown没有授权任何人对保修条款进行扩大、变
更或修改。这份保修条款不会因您使用产品时间
很短而延长。在这份Crown保修条款下,维修和
部件更换只能在Crown保修期到到前执行。
设计变更
我们保留在未预先通知时便进行产品设计更改的
权利,不负责以前生产的产品之设计变更。
对购买人的法定赔偿
在保修期结束之后,不能执行保修条款规定的
操作。
此保修声明用于代替包含在Crown产品手册的任
何保修声明。 01/15
9. 保修
- WORLDWIDE EXCEPT USA & CANADA
- 除美国和加拿大之外的世界其它地区
Page 20
XTi2.5 Series Power Amplifier XTi2.5 系列功率放大器
20
Operation Manual
操作手册
Online registration is also available at http://crownweb.crownintl.com/webregistration.
Warranty is only valid within the country in which the product is purchased.
When this form is used to register your product, it may be mailed or faxed.
Crown Audio, Inc. Fax: 574-294-8329
1718 W Mishawaka Rd
Elkhart IN 46517
Please note that some information is required. Incomplete registrations will not be processed. * Indicates required information.
OWNER’S INFORMATION - PLEASE PRINT
* First name: ______________________ Middle initial: _____ * Last name: ________________________________
Company: _________________________________________________________________________________
* Mailing address: ____________________________________________________________________________
* City: ____________________________* State: ___________________________* Zip Code: ________________
* Country: __________________________ E-mail address: ___________________________________________
* Phone # (include area code): ___________________________ Fax #: __________________________________
* MODEL * SERIAL # * PURCHASE DATE
e.g. XTi1002A e.g. 8500804905 month/day/year
________________________________ ____________________ ______ /_____ /_____
________________________________ ____________________ ______ /_____ /_____
________________________________ ____________________ ______ /_____ /_____
________________________________ ____________________ ______ /_____ /_____
Product purchased from: *(Business/Individual) ___________________________ Country: ________________________
Comments: ___________________________________________________________________________________
____________________________________________________________________________________________
____________________________________________________________________________________________
Crown Audio, Inc.
1718 W. Mishawaka Rd.
Elkhart, IN 46517-9439
Phone: 574-294-8000
Fax: 574-294-8329
www.crownaudio.com
PRODUCT REGISTRATION
PRODUCT INFORMATION
CUT ON THIS LINE
Page 21
XTi2.5 系列功率放大器XTi2.5 Series Power Amplifier
21
Operation Manual 操作手册
产品也可以在网上登记,网址为:http://crownweb.crownintl.com/webregistration。
保修只在购买产品时所在国家内有效。
如果此表格用于为您的产品登记,则需要将其邮寄或传真至如下地址:
Crown Audio, Inc. 传真:574-294-8329
1718 W Mishawaka Rd
Elkhart IN 46517
请注意,有些信息是必填项,未填写完全的登记表将不被处理。带*的项为必填项。
所有人信息 - 请打印
* 您的姓名:_____________________________________________________________________________________
公司名称:_____________________________________________________________________________________
* 邮寄地址: _____________________________________________________________________________________
* 城市:____________________________* 省: ___________________________* 邮编:_____________________
* 国家:____________________________ 电子邮件地址: _____________________________________________
* 电话号码(包括区号):___________________________ 传真号码:_________________________________
* 型号(如XTi1002A) * 序列号(如0000001017) * 购买日期(月/日/年)
________________________________ ____________________ _________________
________________________________ ____________________ _________________
________________________________ ____________________ _________________
________________________________ ____________________ _________________
* 产品购买自(公司/个人):_______________________________________ 国家:_________________________
备注: __________________________________________________________________________________________
________________________________________________________________________________________________
________________________________________________________________________________________________
请沿此线裁剪
Crown Audio有限公司
1718 W. Mishawaka Rd.
Elkhart, IN 46517-9439
电话: 574-294-8000
传真: 574-294-8329
www.crownaudio.com
产品注册
产品信息
Page 22
XTi2.5 Series Power Amplifier XTi2.5 系列功率放大器
22
Operation Manual
操作手册
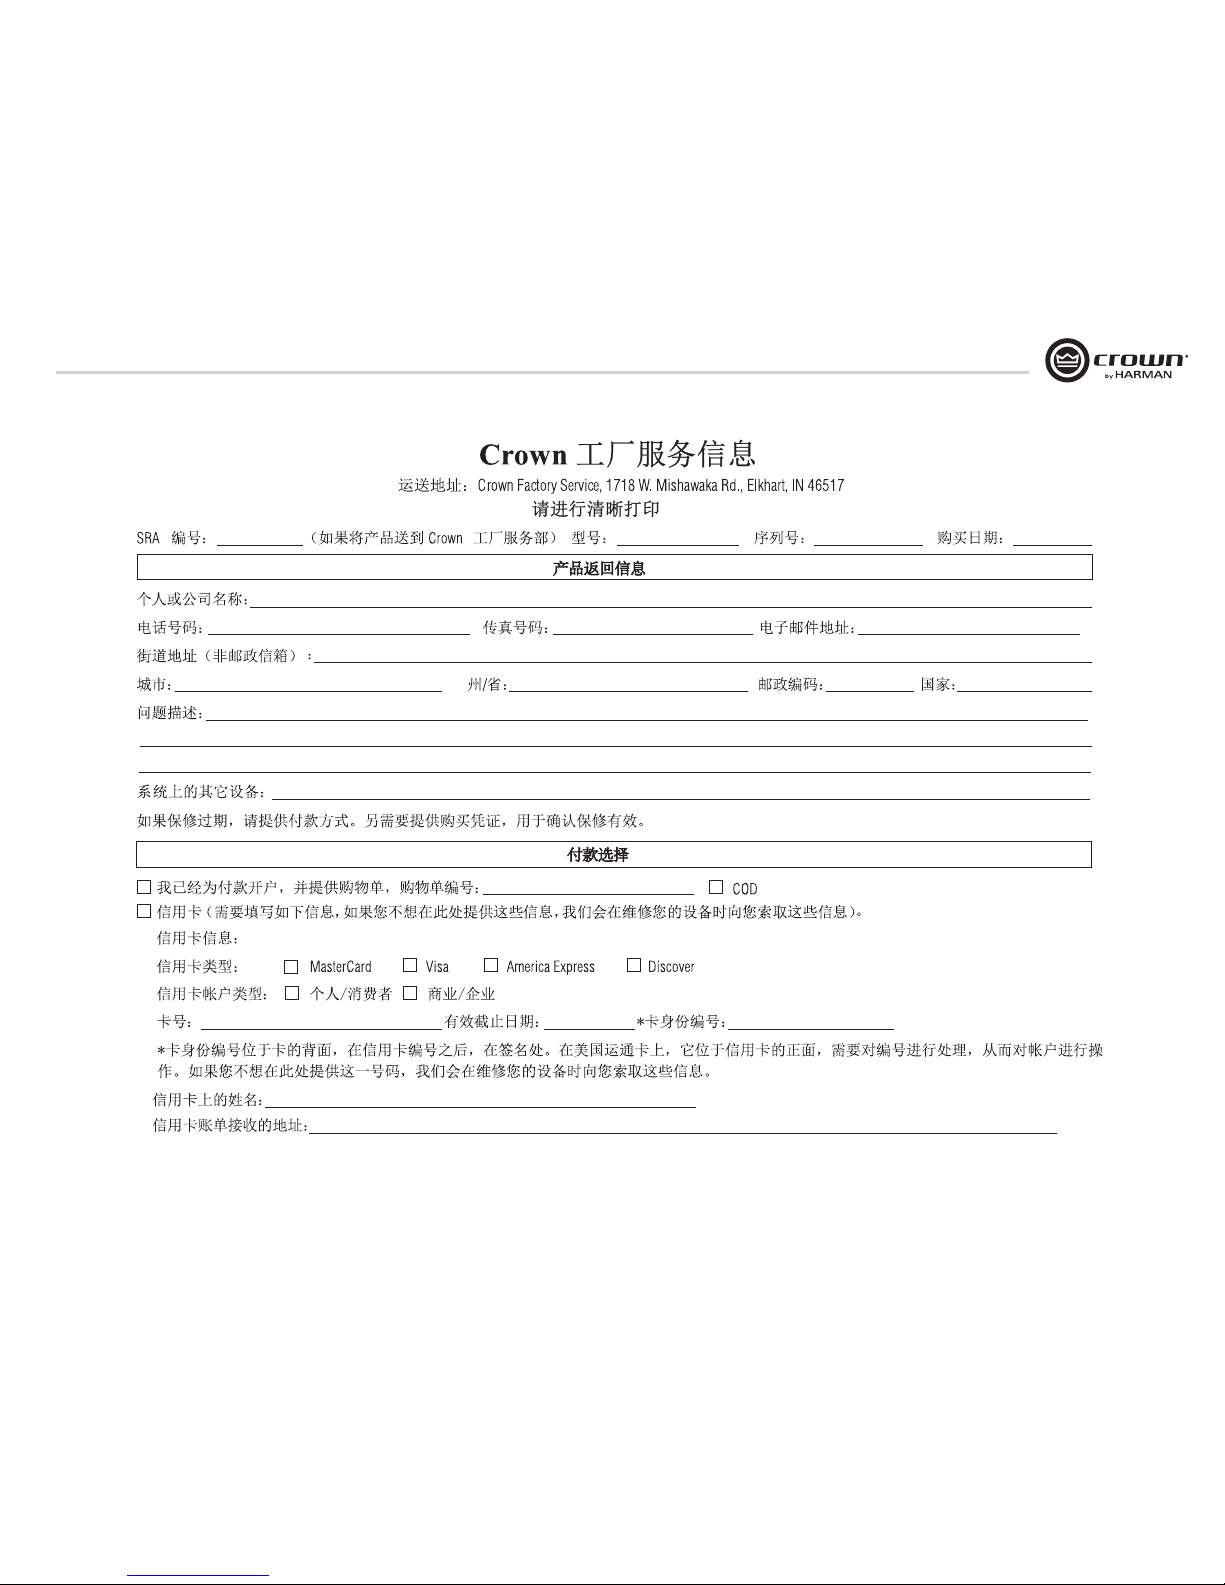
PLEASE PRINT CLEARLY
SRA
#: __________________(If sending product to Crown factory service.) Model: ____________________________________________ Serial Number: _____________________ Purchase Date: _____________
PRODUCT RETURN INFORMATION
Individual or Business Name: _________________________________________________________________________________________________
___________________________________________________________
Phone
#: __________________________________________________ Fax #: ________________________________________ E-Mail: _______________________________________________________
Street Address (please, no P
.O. Boxes): _____________________________________________________________________________________________________________________________________________________
City: __________________________________________ State/Prov: ________________________________
Postal Code: _________________ Country: _________________________
Nature of problem: __________________________________________________________________________________________________________
_________________________________________________________
_
________________________________________________________________________________________________________________________________________________________________________________
_
________________________________________________________________________________________________________________________________________________________________________________
Other equipment in your system: _____________________________________________________________________________________________
____________________________________________________________
If warranty is expired, please provide method of payment. Proof of purchase may be required to validate warrant
y.
PAYMENT OPTIONS
I have open account payment terms. Purchase order required. PO#: __________________________________ COD
Credit Card (Information below is required; however if you do not want to provide this information at this time, we will contact you when your unit is repaired for the information.)
Credit card information:
Type of credit card: MasterCard Visa American Express Discover
Type of credit card account: Personal/Consumer Business/Corporate
Card # ______________________________________________ Exp. date: _____________ * Card ID #: __________________________
* Card ID # is located on the back of the card following the credit card #, in the signature area. On American Express, it may be located on the front of the card. This number is required to process the charge to your account. If you do not want to provide
it at this time, we will call you to obtain this number when the repair of your unit is complete.
Name on credit card: ____________________________________________________________________________
Billing address of credit card: __________________________________________________________________________
__________________________________________________________________________
__________________________________________________________________________
Shipping Address: Crown Audio Factory Service, 1718 W. Mishawaka Rd., Elkhart, IN 46517
Crown Audio Factory Service Information
Page 23
XTi2.5 系列功率放大器XTi2.5 Series Power Amplifier
23
Operation Manual 操作手册
Page 24

 Loading...