

Page 1
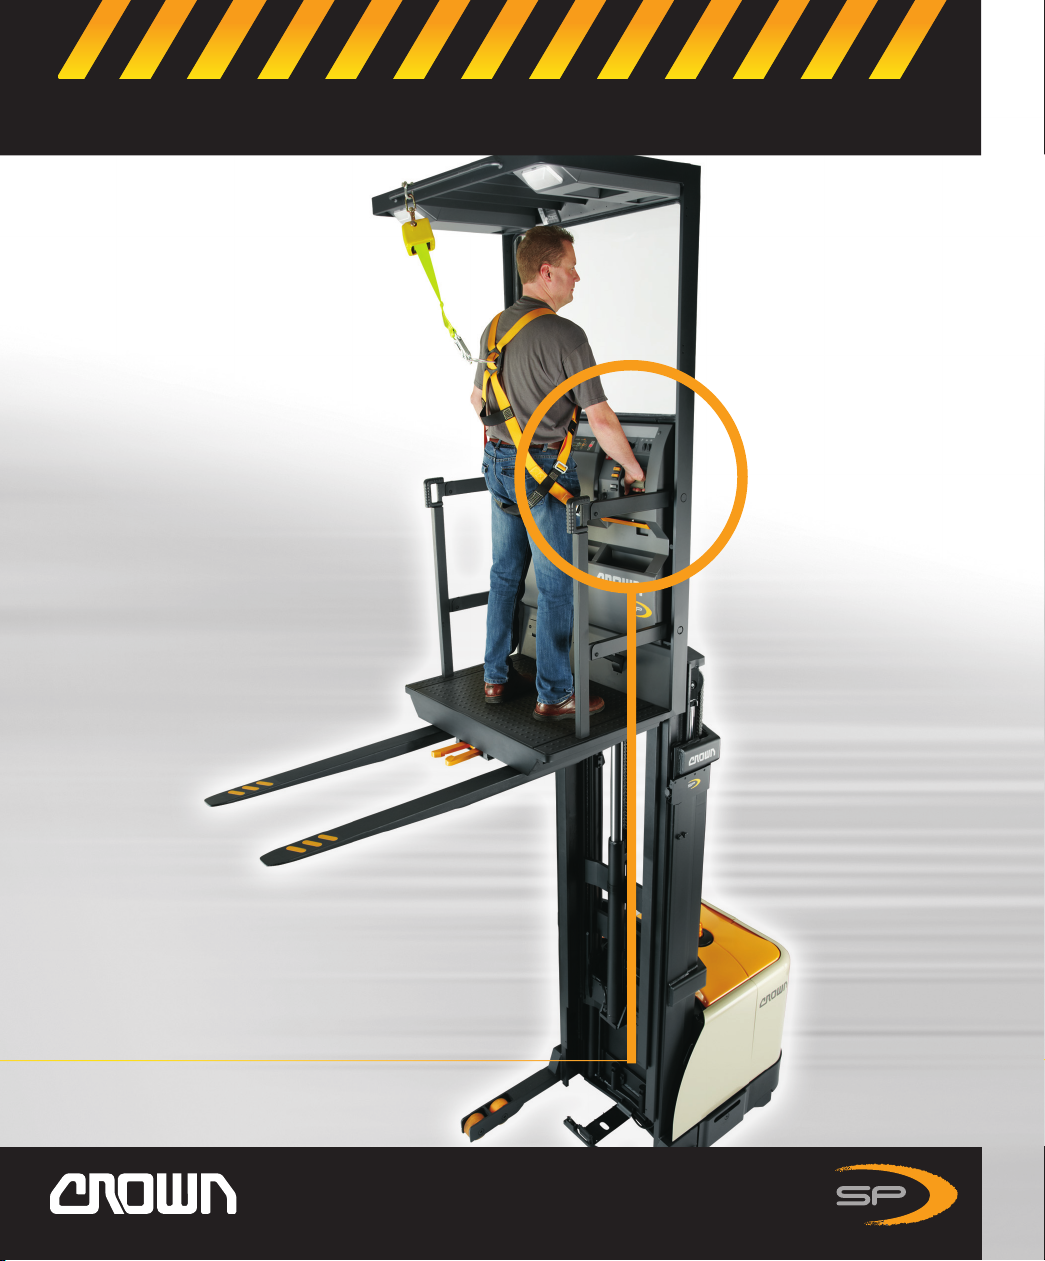
Operator Manual
Page 2
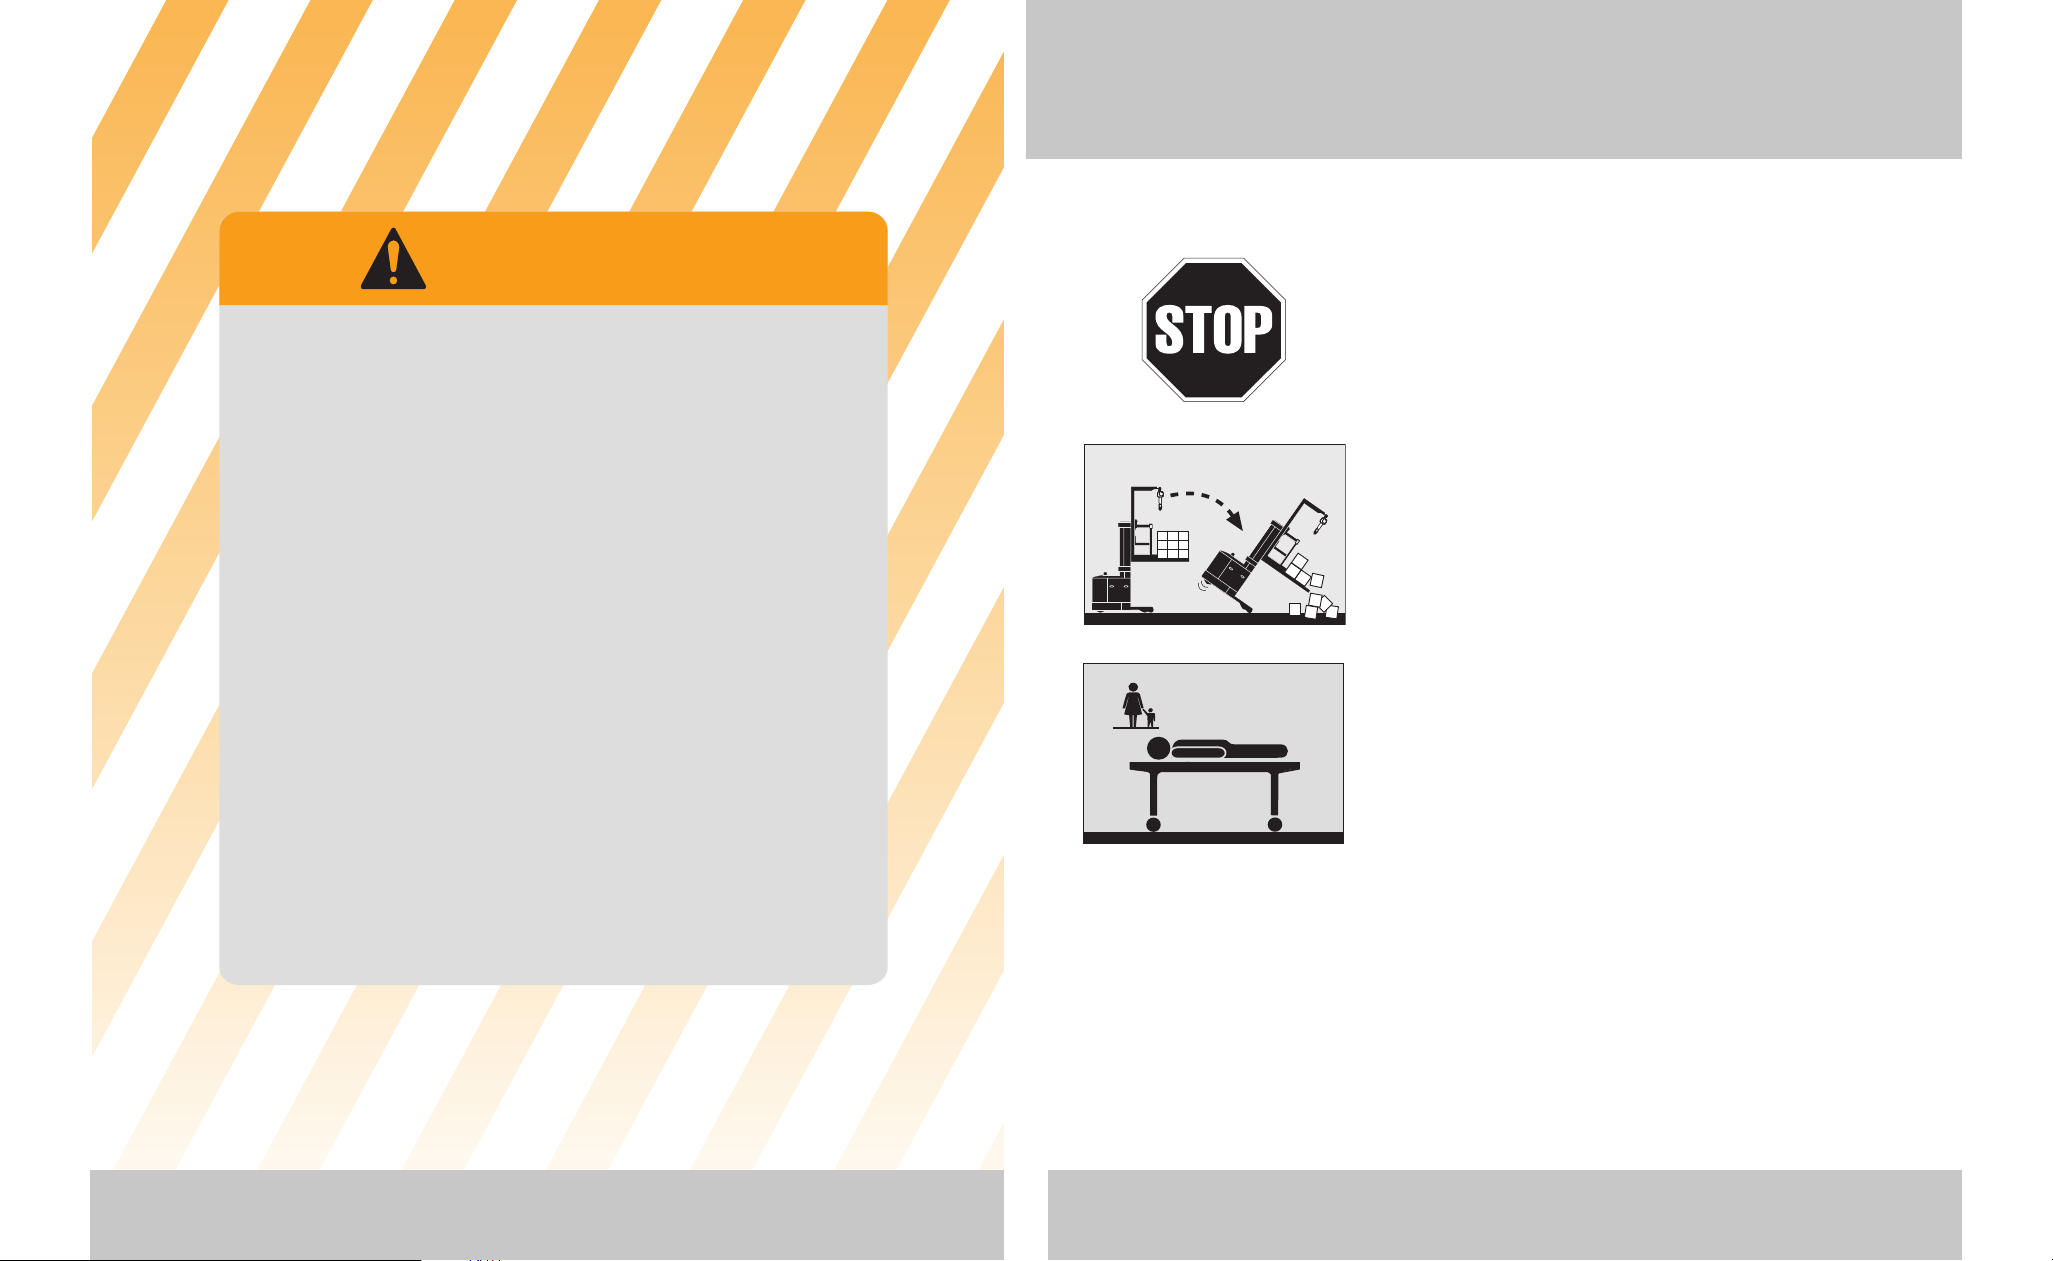
You could be killed or seriously injured
if you are not
adequately trained for lift truck operation!
It’s the law, you must be trained and certifi ed to operate this truck.
(OSHA § 1910.178, Rev. 1999)
You or others around you can be seriously injured or even
killed if you don't use this truck correctly.
Read and obey all warnings and instructions in this Manual*
and on the truck.
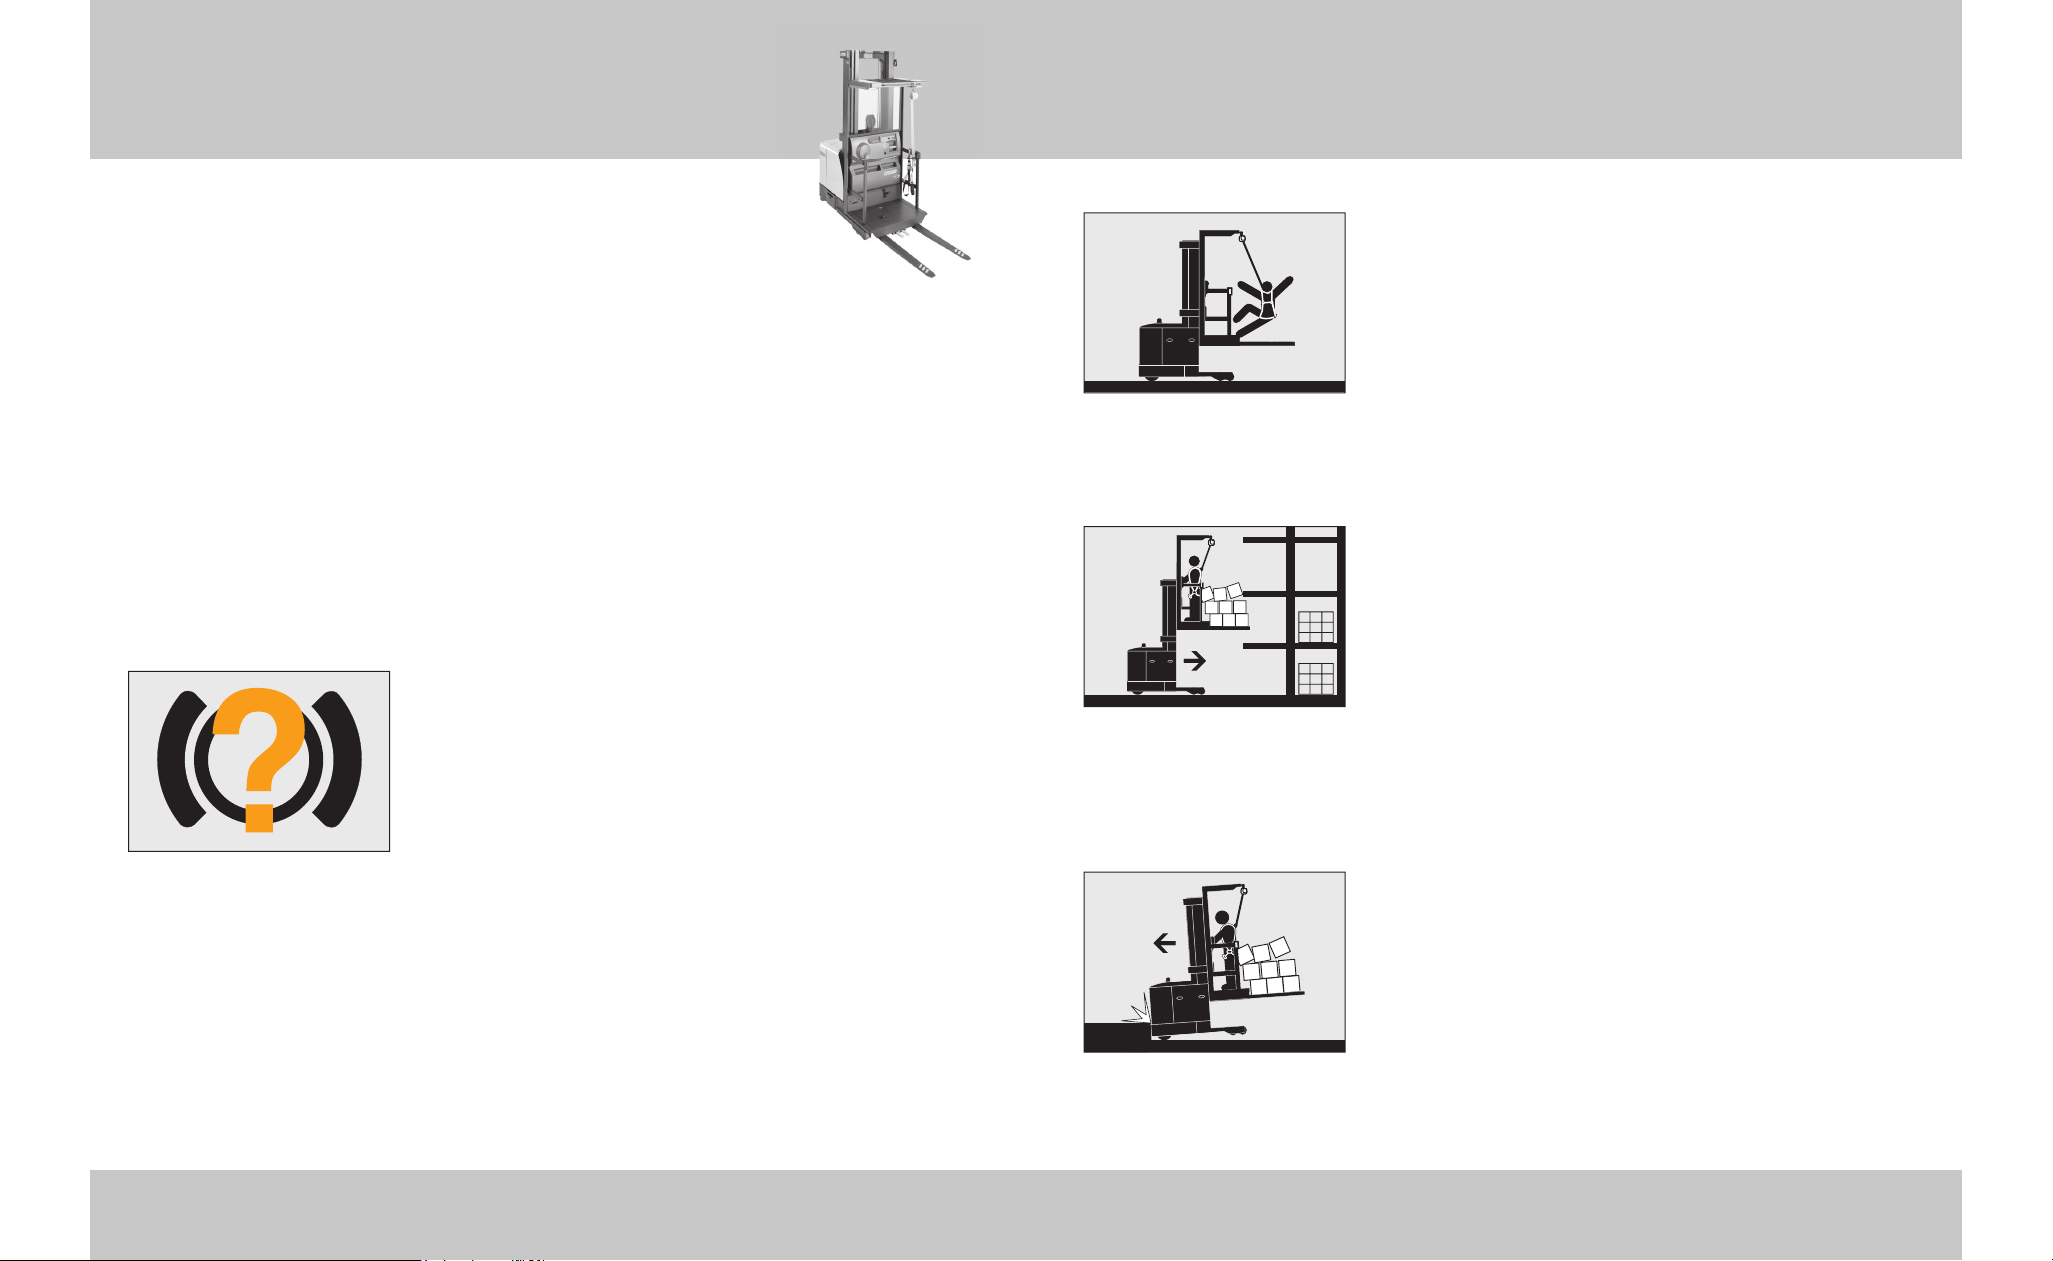
Falling from a platform can cause serious injury or death.
Put on the operator harness and attach lanyard before operating the
truck.
Head, arms, hands, legs or feet outside the operator area
can be pinned or crushed whenever the truck is moving.
Stay within the operator area and
stop the truck completely
before getting off.
A dockboard can move or drop while you are on it. Or you
could drive off a dock. Falls from docks or dockboards can
cause serious injury or even death.
Make sure you are safe.
Inspect your truck before starting work, make sure it is in
good working order.
* Additional copies of this Operator Manual and all Truck Labels can be obtained
from Crown Equipment Corporation, New Bremen, Ohio 45869 U.S.A.
1 Warning
All rights reserved under International
and Pan American copyright conventions
Copyright 2007 Crown Equipment Corp.
You Must be Trained
You Must be Trained 2
IT'S THE LAW, YOU MUST BE TRAINED AND CERTIFIED
Federal law states that only properly trained operators
are permitted to operate a powered industrial truck and
that your employer must train you and certify that you
are qualifi ed to operate this powered industrial truck.
(OSHA §1910.178, Rev. 1999)
Do not operate this truck
in your work place until you have
been trained and certifi ed by your employer.
WARNING
Page 3
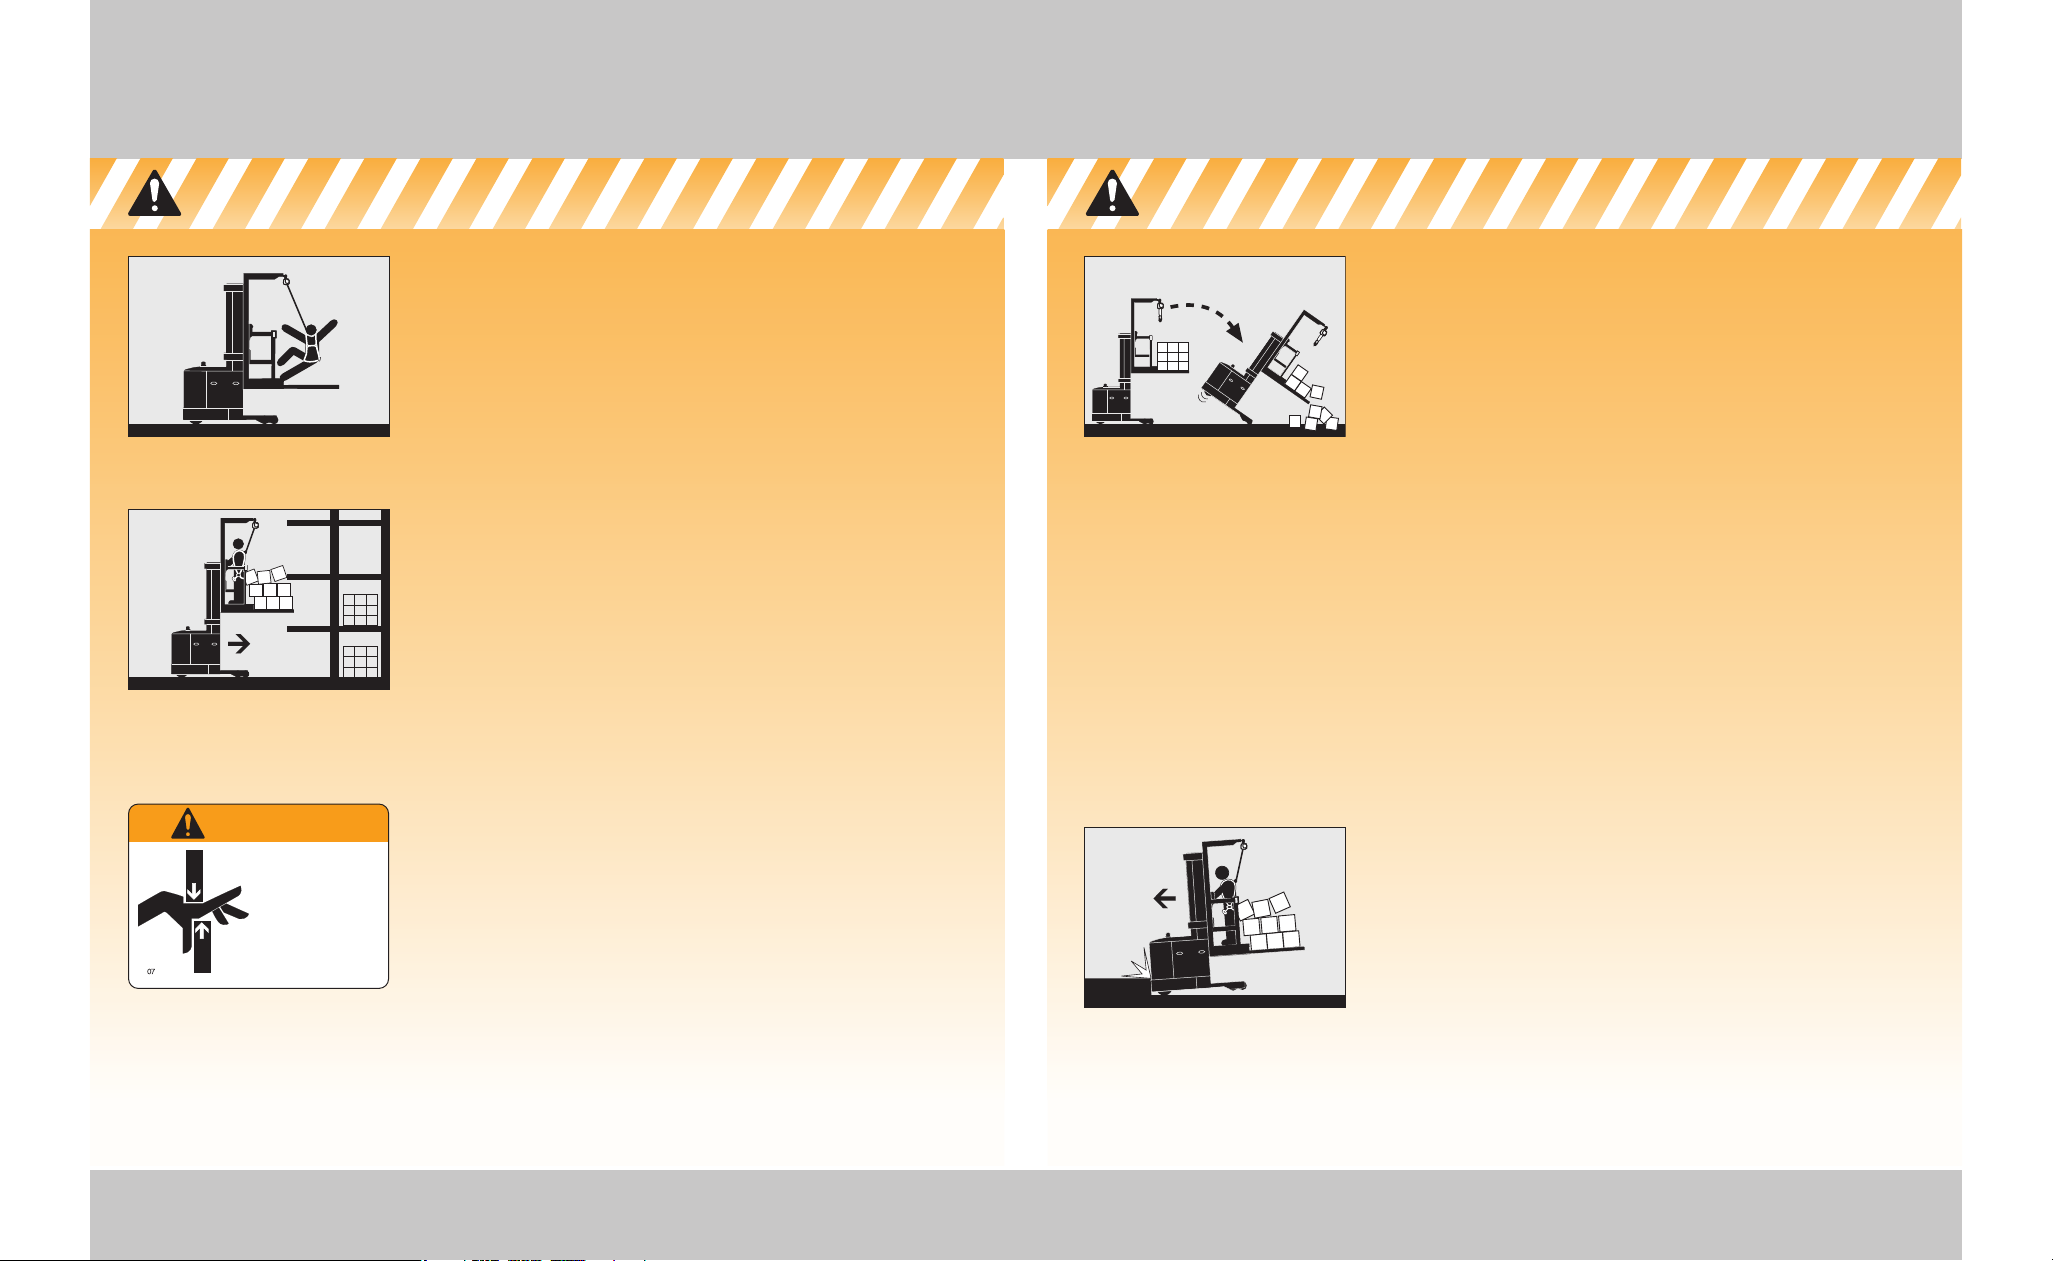
AVOID FALLS AND TIPOVERS
Tipovers are very serious accidents, you can be
crushed or even killed. The best way to prevent injury
is to know where you are at all times and follow the
rules of safe truck operation. There is no sure way to
avoid injury during a tipover or a drop from a dock or
dockboard.
• Be extremely careful when working around docks
and dockboards. Stay away from the edge.
• When you're not picking, travel with the load or forks
close to the ground. Watch for overhead obstructions.
Perform all truck movements smoothly and at a speed
that will give you time to react in an emergency.
• Stockpickers should not be used on ramps or grades.
If you must drive on a grade, travel slowly and never
turn the truck. If carrying a load, point the forks
upgrade. If unloaded, point the forks downgrade.
Keep the fork height below 300mm (12inches).
• An unloaded truck can tip over also. You must be
just as careful using an unloaded truck as you are
using a loaded one.
DRIVE CAREFULLY
• Keep your hands on the controls and your entire
body in the operator area. A foot or hand caught
between the truck and a fi xed object will be crushed
or even cut off.
• Keep your truck under control at all times. Drive at a
speed that allows you to stop safely. Be even more
careful on slippery or uneven surfaces. Do not drive
over objects on the fl oor.
3 Protect Yourself
Protect Yourself
Know the Hazards
WEAR YOUR OPERATOR HARNESS
Falls from a platform can cause serious injury or
even death.
• Put on your operator harness and attach the lanyard
before operating your truck. Read the warnings on
the harness.
• Check your harness and lanyard daily. Have them
replaced if they have ever been used to stop a fall,
or if they look damaged or worn.
LOOK WHERE YOU'RE DRIVING
• If you run into things you can be injured. You could
fall from the truck or the load could shift and hit you.
Make certain there is nothing in your path, on the
floor or sticking out of the racks.
• Always be alert to the area around you and watch
where you are driving.
• Be sure that any equipment added to your truck
(terminal, fan, clipboard, etc.) does not block your
vision or interfere with safe and efficient operation of
your truck.
USE YOUR TRUCK SAFELY
• Make sure your pallet, cart or fork mounted platform
is secure and won't slide or tip.
• Keep hands and feet away from all moving parts
such as masts or wheels. Don't sit or stand on the
side gates.
• Never stand on or under the forks, or allow anyone
else to stand on or under them. Never allow
passengers on the truck. There is no safe place
for them.
• Come to a complete stop before you leave your
truck. Lower the forks to the floor and shut the truck
off with the key switch.
Protect Yourself 4
Know the Hazards
Stay clear of all
moving parts.
Moving parts can
cut or crush hands,
feet, arms or legs.
WARNING
Page 4
Warning 1
You Must be Trained 2
Protect Yourself 3
Contents 5
What's in it for You? 6
Your Stockpicker 7
Lift Truck Parts 9
Capacity & Load Center 11
Capacity Plate 13
Display Panel Standard 15
Driving on Wire Guidance 17
Power On & Off 19
Foot Brake 20
Traveling & Plugging 21
Raise & Lower 25
Platform Safety 27
Daily Safety Check 29
Be a Safe Driver 31
Battery Maintenance 35
Warning Labels 40
Contents
5 Contents
What's in it for You?
What's in it for You? 6
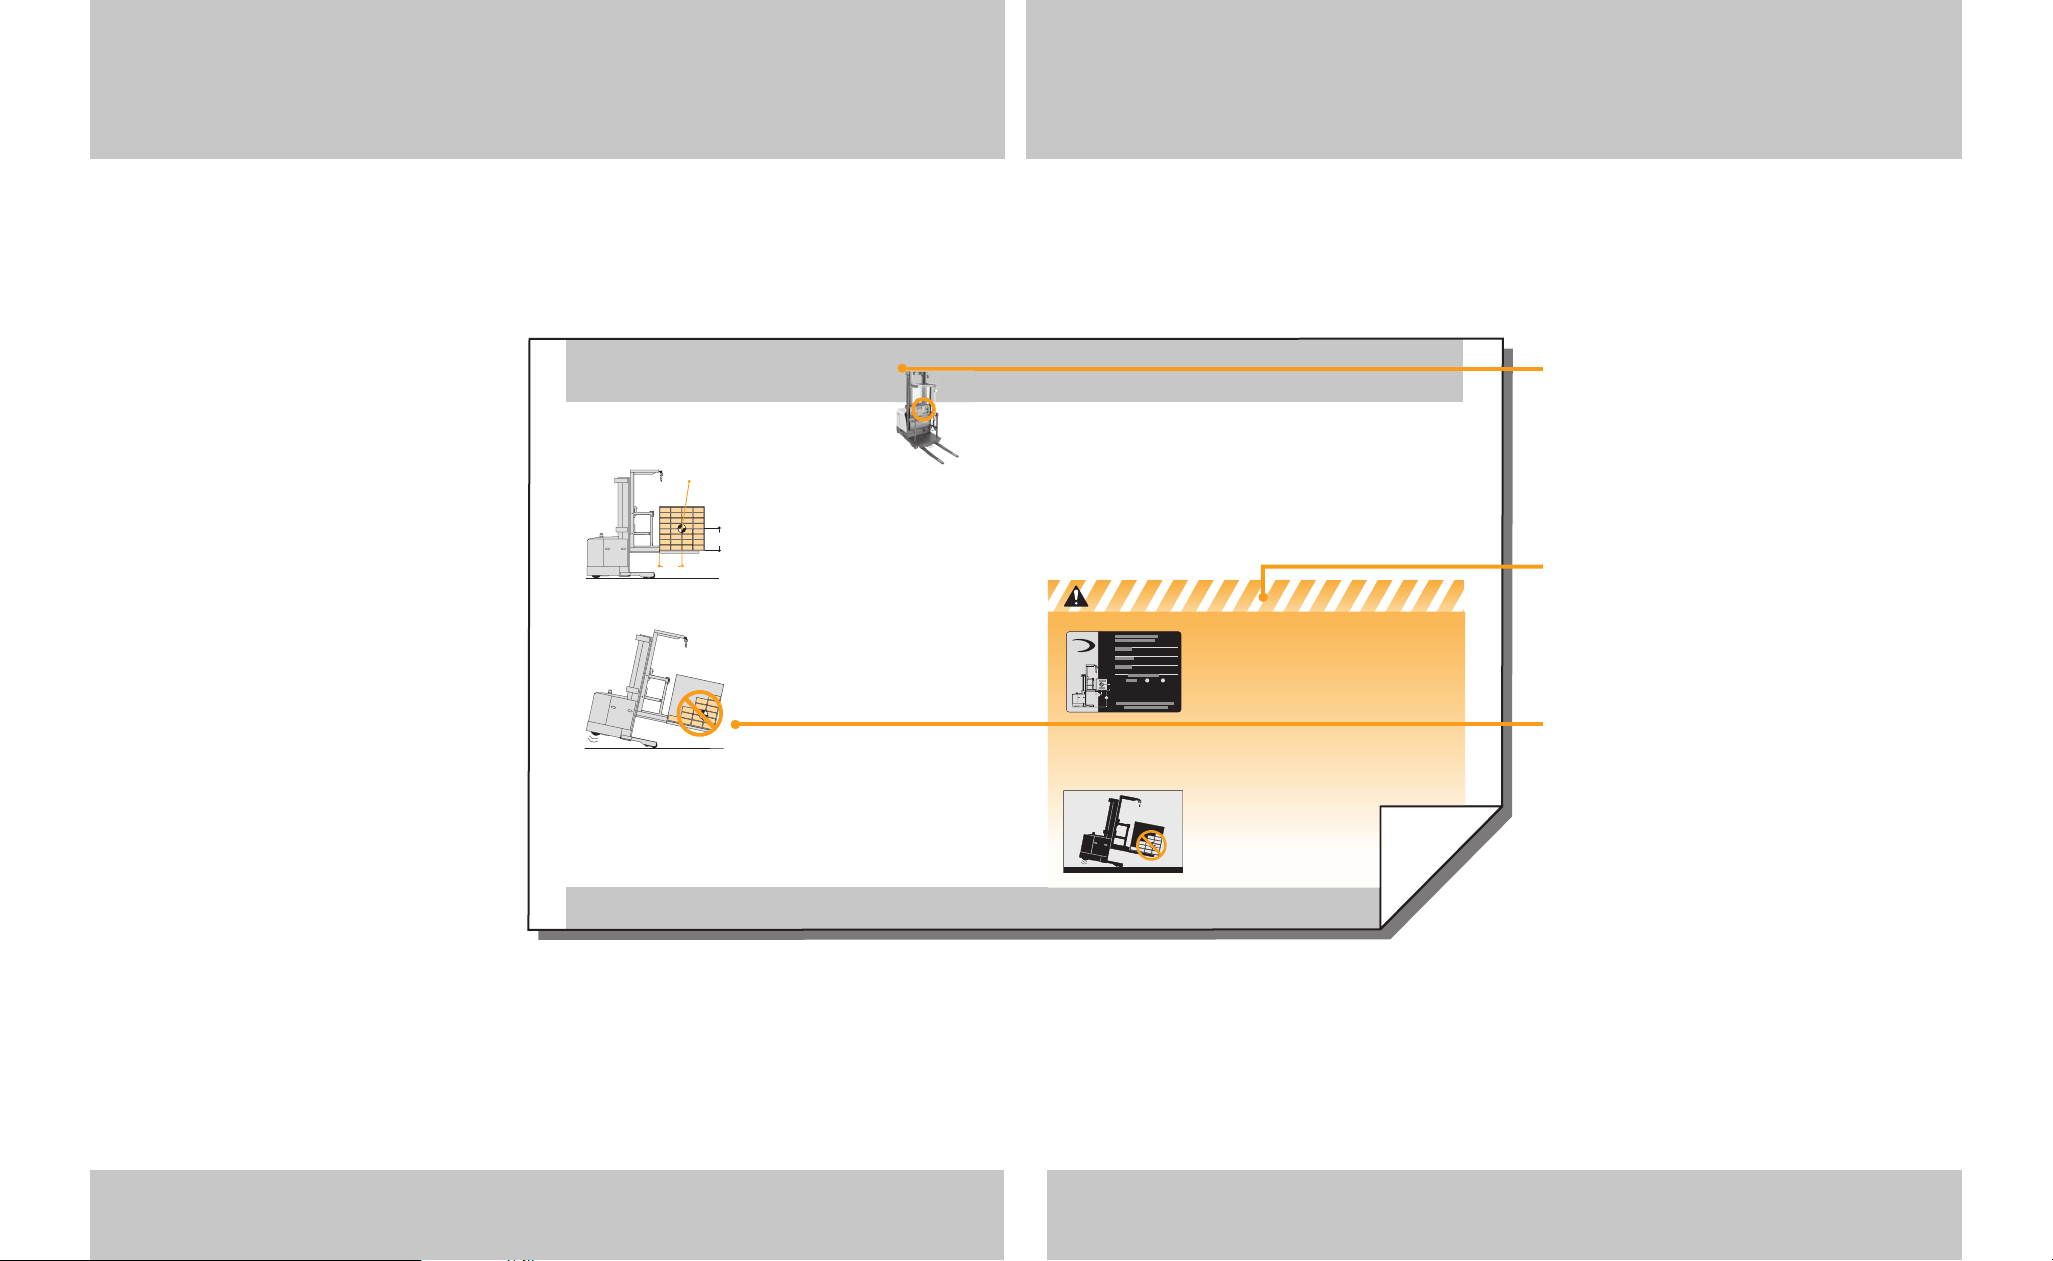
WHAT'S IN IT FOR YOU?
The better you understand your truck and how to use
it, the better and safer operator you can be. Here are
some guides to using this manual.
QUICK LOCATORS
In addition to the "Contents" page
you can use page headings to fi nd
topics. Some pages also have a
picture of the truck in the corner
showing features or functions
covered on that page
.
"KNOW THE HAZARDS"
Watch for and read these special
blocks. You will fi nd information
about possible safety hazards and
how to avoid them
.
HOW-TO-DRAWINGS
On many pages you will fi nd
pictures as well as text to help you
understand how to use your truck
safely and productively.
Capacity & Display Center
11 Capacity & Load Center Capacity & Load Center
Know the Hazards
WHAT IS YOUR TRUCK CAPACITY?
Capacity is the load (including pallet, cart,
container etc.) that can be lifted to a given height
at a given load center. See the capacity plate
on your truck. Make certain you use the correct
units of measure.
WHAT IS LOAD CENTER?
Load center is the distance from the end of the
operator platform to the center of an evenly
distributed load.
LOADS MUST BE EVENLY DISTRIBUTED
Your truck could tip over, in any direction, if a
load is placed or shifted to the front, back or
side of a pallet, cart, platform or container.
Make sure you spread the load evenly as you
load a pallet.
KNOW YOUR LOAD
Do not exceed the capacity shown on your truck's
capacity plate. Be careful when handling long, high or
wide loads. Do not handle unstable loads.
EXCEEDING TRUCK CAPACITY CAN CAUSE AN ACCIDENT
Know the capacity of your truck as shown on your
capacity plate. Make certain you use the correct units
of measure. Pay attention to:
• Weight of load plus attachments
• Load center
• Lift height
CENTER THE LOAD
Your truck could tip over if a load is placed or shifted
to the front, back or side of a pallet or container.
Make sure your load is evenly distributed and
centered over the forks.
Center of evenly
distributed load
600mm
(24 in.) Max
761-B
SP
series
SAMPLE
SAMPLE
Load
Center
4000
Page 5
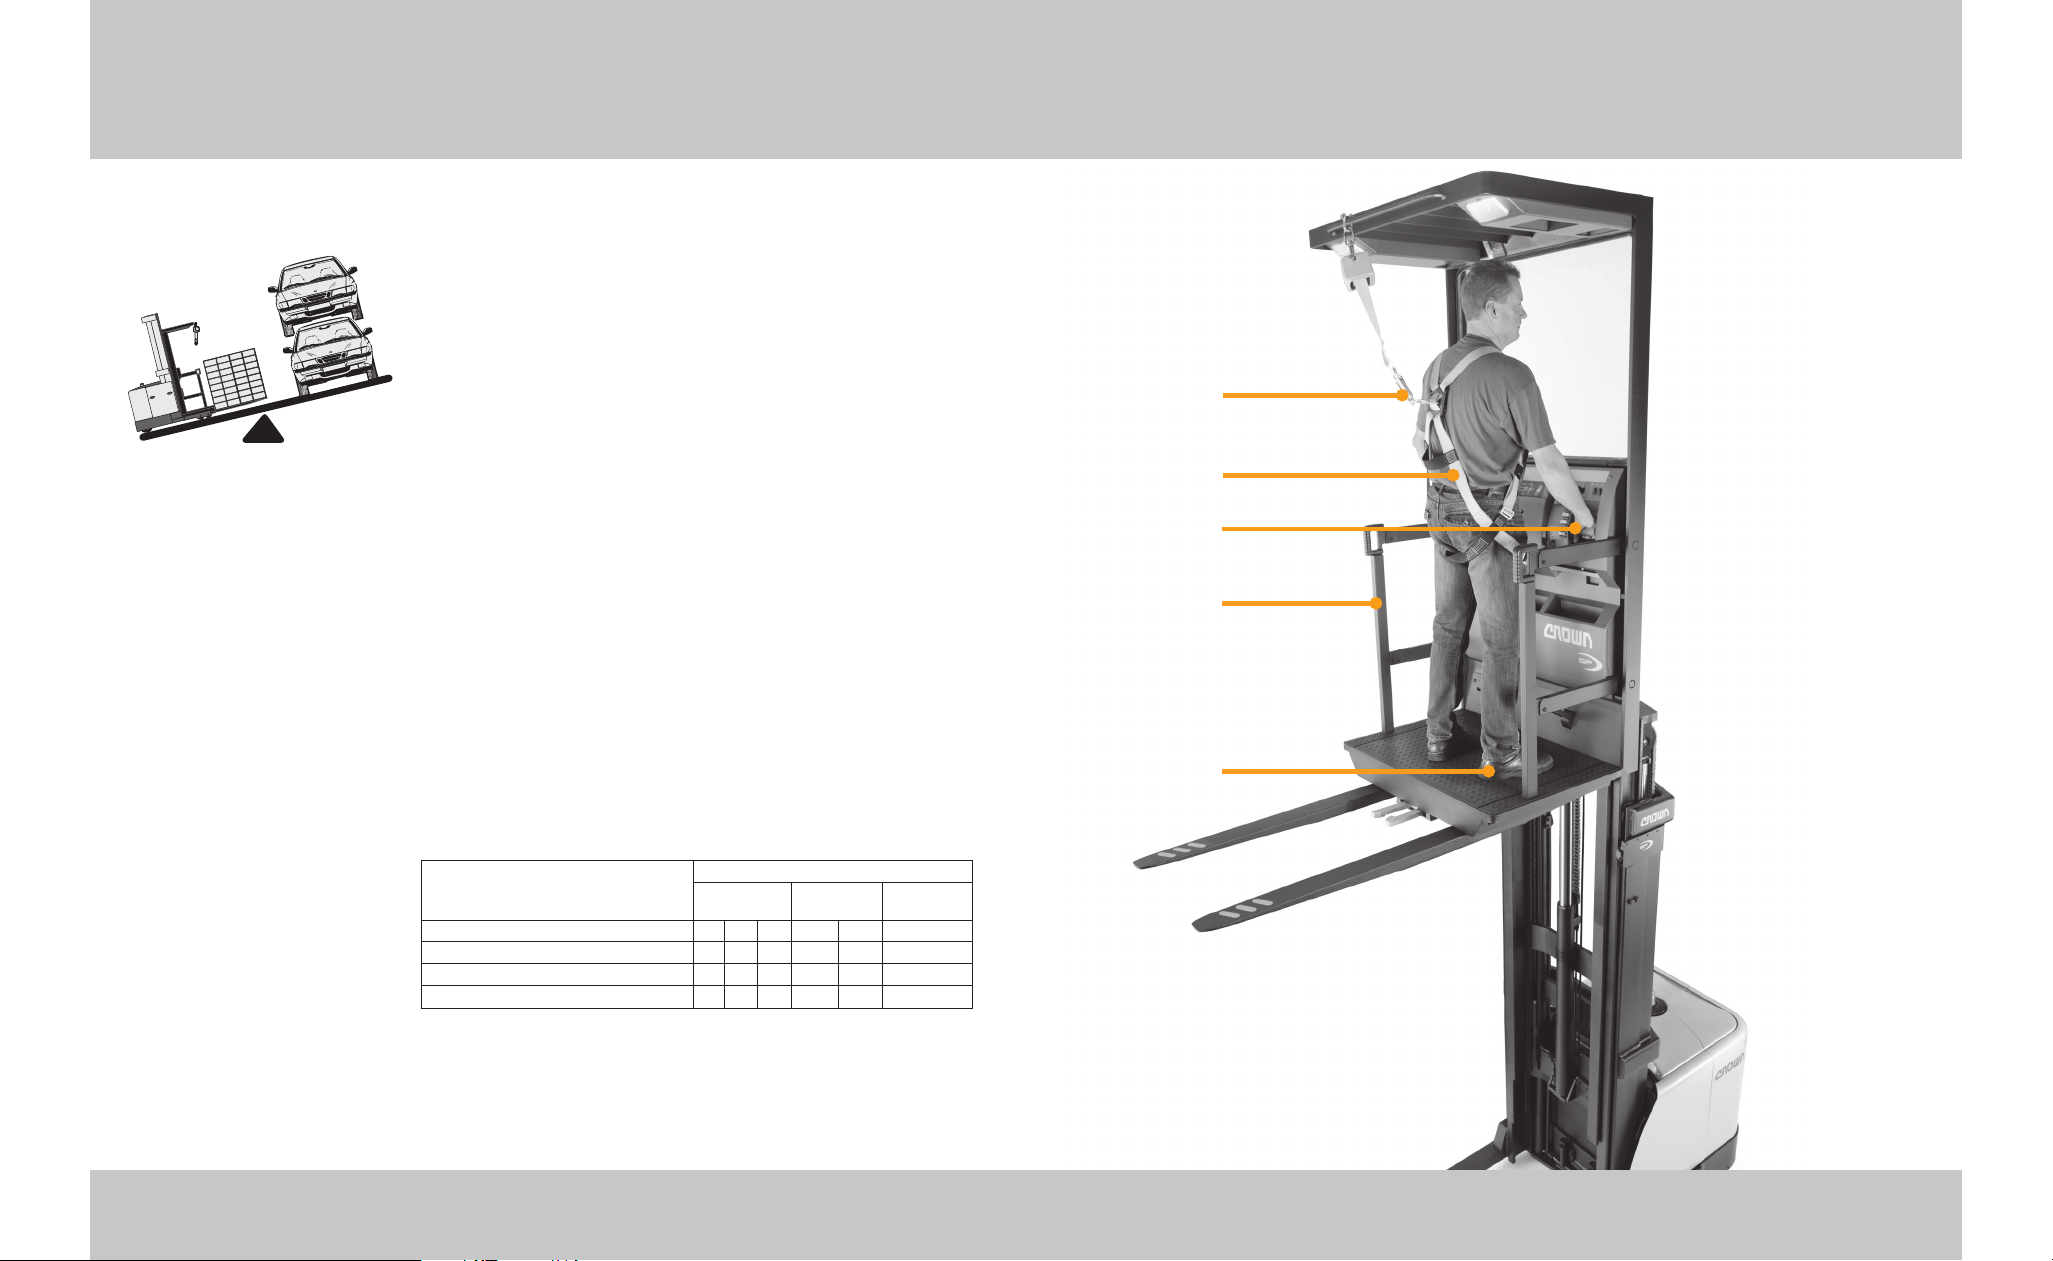
STOCKPICKERS
Your Stockpicker is designed mainly for orderpicking.
It is not as effi cient as other type trucks if it is used to
transport or stack loads.
YOUR LIFT TRUCK IS NOT AN AUTOMOBILE
With a load it may weigh more than 2 automobiles.
• You don't brake the same.
• You don't accelerate the same.
HOW TO DRIVE YOUR TRUCK
Wear your harness and attach the self-retracting
lanyard or energy absorber. (The harness can be either
a belt or a body harness.) See chart below
Put the side gates down. Make sure the pallet, cart or
platform is secure. Put your left hand on the steering
wheel, right hand on the speed control and one foot
on the brake pedal. Look in the direction you're going.
GIVE YOUR BODY A BREAK
Take advantage of stop time. Flex your arms and legs.
Staying alert will help you be a better and safer driver.
FALL PROTECTION / PREVENTION SELECTION CHART
Your Stockpicker
7 Your Stockpicker
BUILT TO STANDARDS
This truck was designed
and built to current
industry and government
standards and guidelines.
For more information see
the following:
• American National
Standards Institute
(ANSI / ITSDF) B56.1
(Download free from
www.itsdf.org)
• Occupational Safety and
Health Act (OSHA)
§1910.178 Rev. 1999
(Download free from
osha.gov)
• Underwriters Laboratory
(UL) 583
• National Fire Prevention
Association (NFPA) 505
Lanyard Fastened
Harness on
Hands on
Controls
Side Gates Down
Foot On
Brake Pedal
Your Stockpicker 8
Fall Protection Devices
Body Belt
Full Body Harness
Energy Absorber - max total length 1.8m (6ft)
Self-Retracting Lanyard - max total length 2.4m (8ft)
Operator Weight kg (lbs.)
Less than 100 kg
(220 lbs.)
100 - 140 kg1)
(220 - 310 lbs.)
1)
141 - 181 kg1)
(311 - 400 lbs.)
1)
X
XX X X X
X
2)
XX
X
X
X
1) Truck capacity shall be reduced by the operator(s) weight in excess
of 100kg (220 lbs)
2) Self-Retracting Lanyard - shall be rated for the operator's weight.
For operator weight over 140kg (310 lbs) - contact Crown.
Page 6
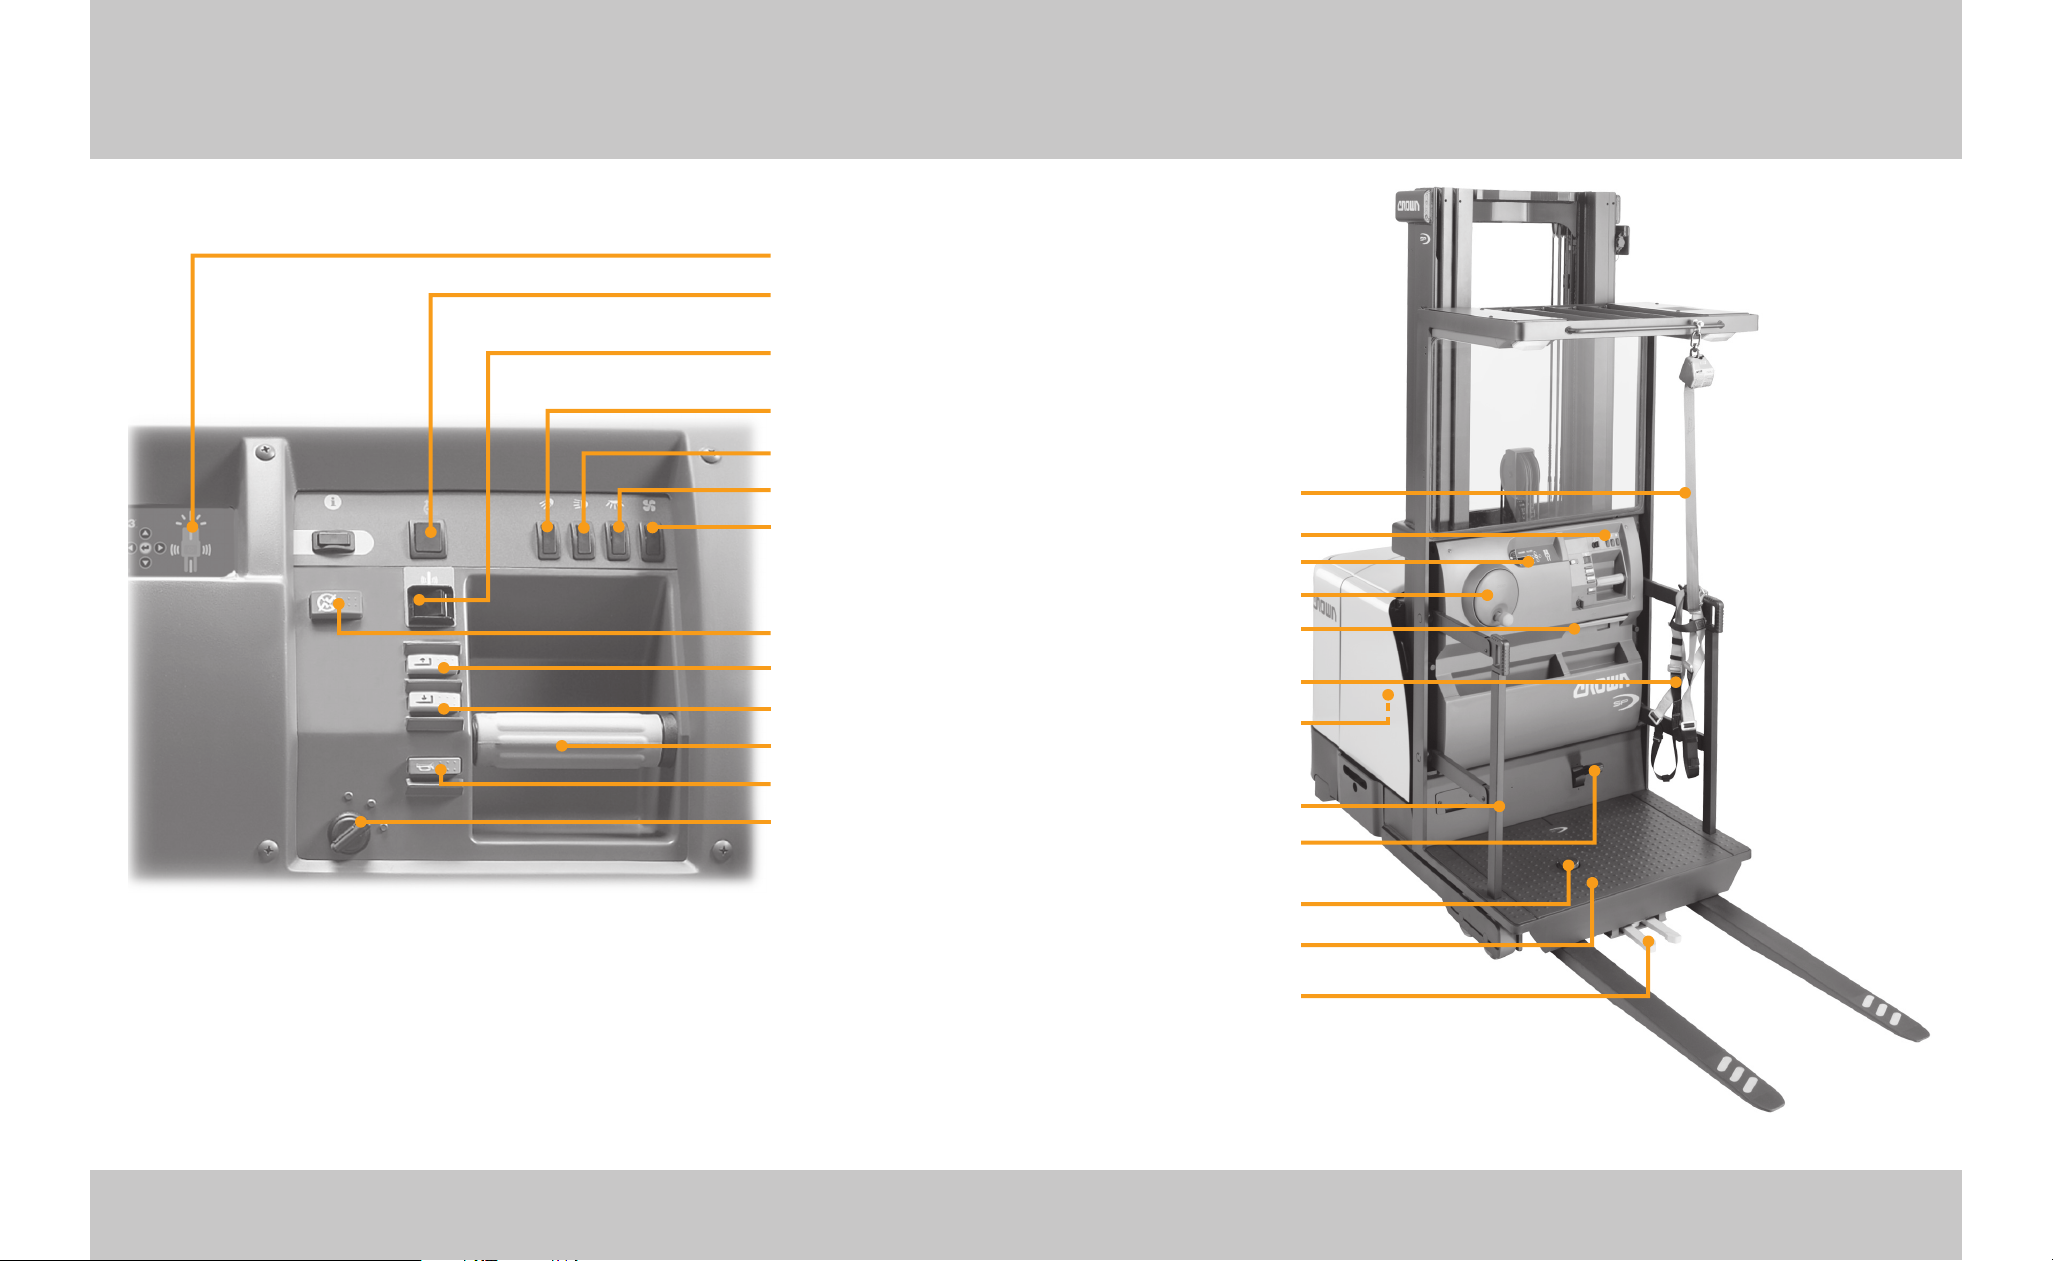
Lift Truck Parts
9 Lift Truck Parts Lift Truck Parts 10
Lanyard
Control Module
Display Panel
Steering Wheel
Pallet Grab
Release Handle
Operator Harness*
Lowering Valve
(inside)
Side Gates
Pallet Grab
Foot Pedal
Brake Pedal
Platform
Pallet Grab
Display Panel
Override Switch
(optional)
Wire Guidance
(optional)
Spotlight (optional)
Work Light (optional)
Dome Light (optional)
Fan (optional)
Emergency Disconnect
Raise
Lower
Twist Grip
Horn
Key Switch
*See page 7 for Lanyard & Harness information
Page 7
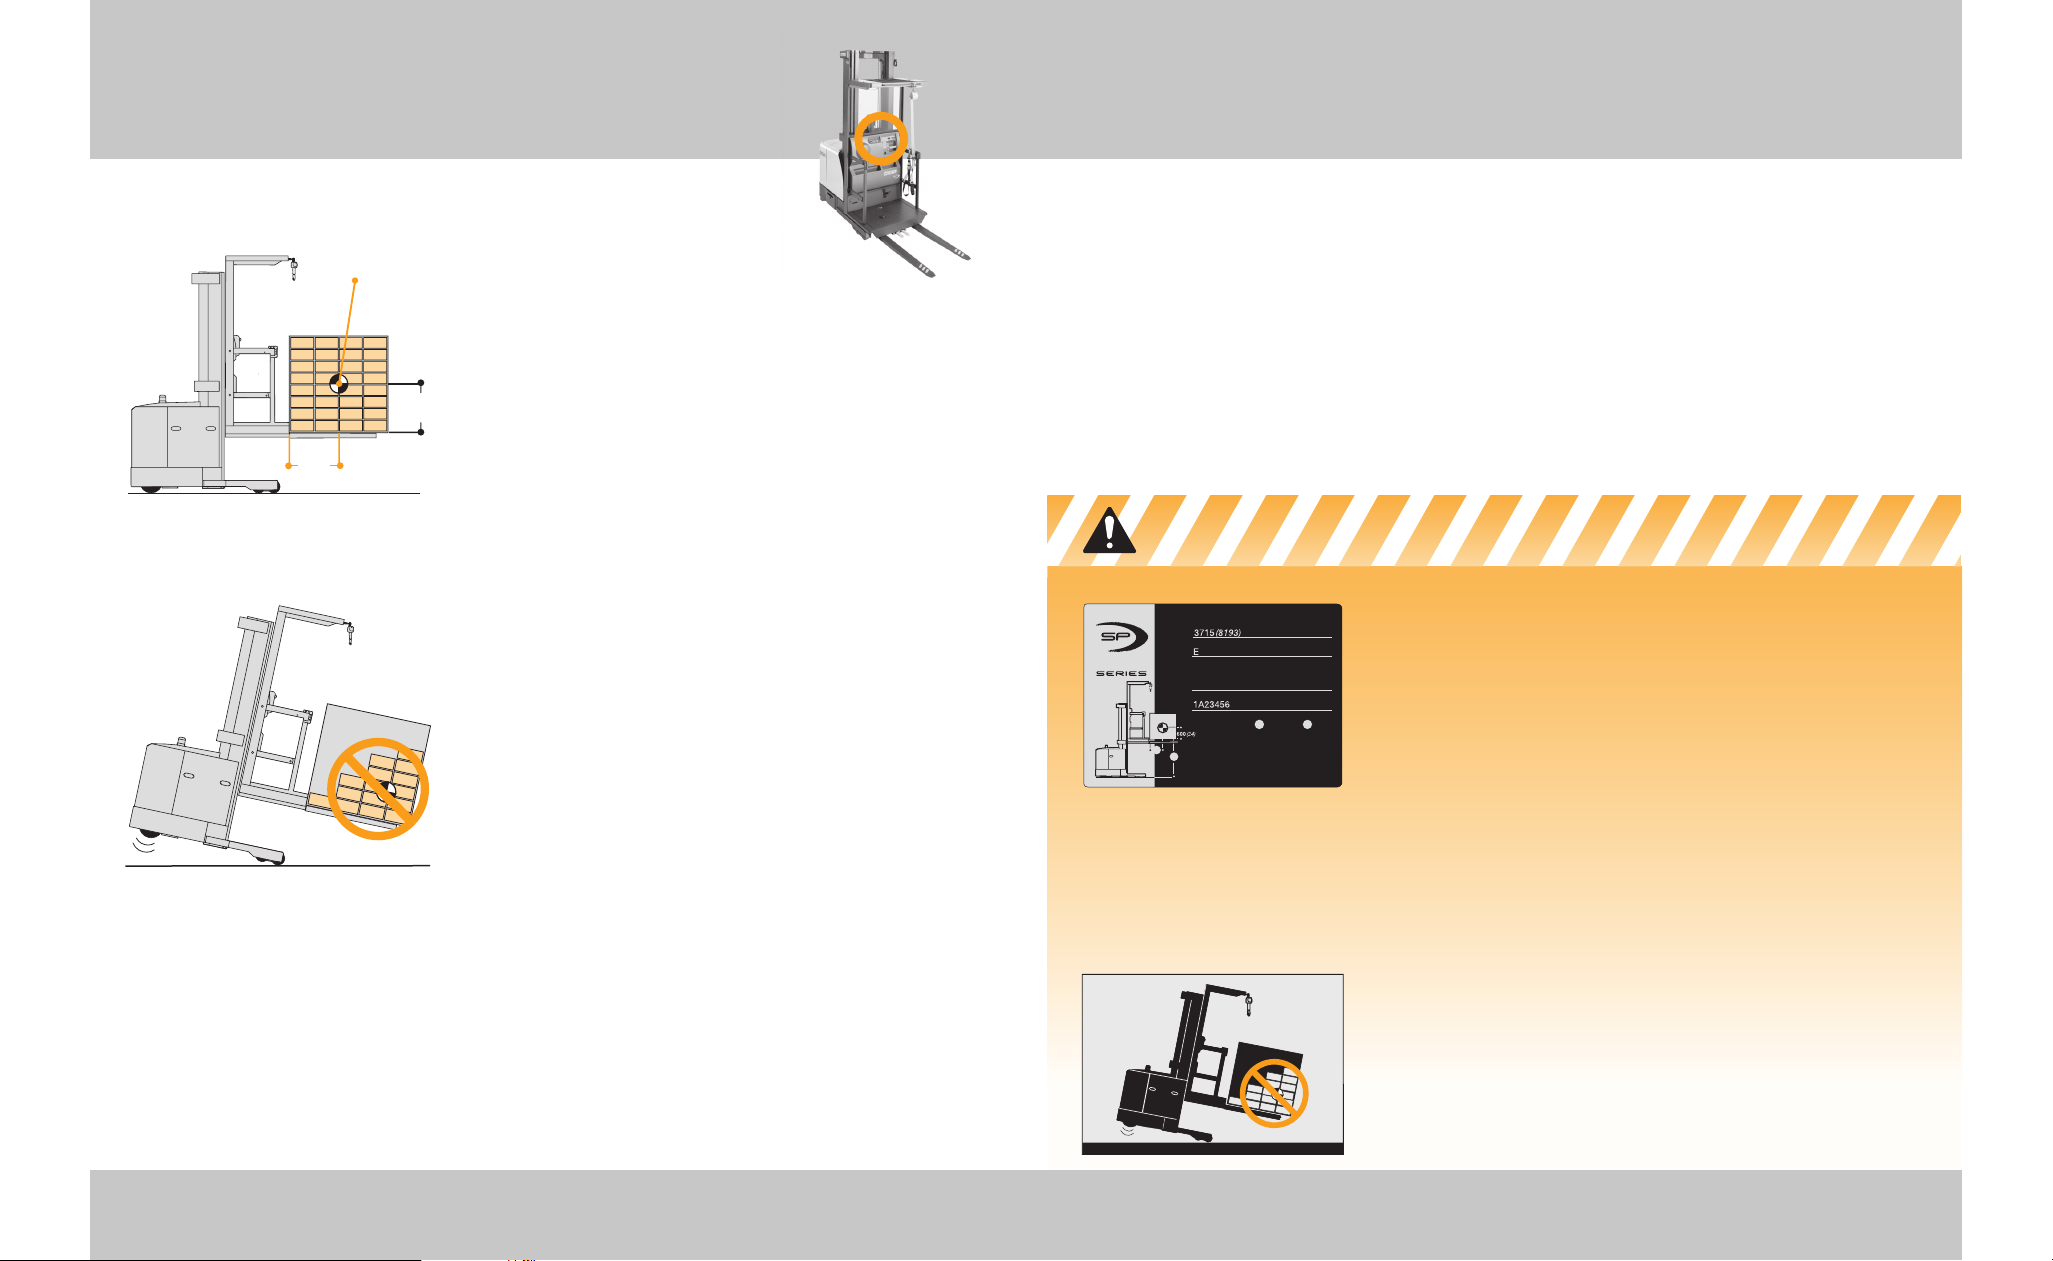
Know the Hazards
Capacity & Load Center
11 Capacity & Load Center Capacity & Load Center 12
WHAT IS YOUR TRUCK CAPACITY?
Capacity is the load (including pallet, cart,
container etc.) that can be lifted to a given height
at a given load center. See the capacity plate
on your truck. Make certain you use the correct
units of measure.
WHAT IS LOAD CENTER?
Load center is the distance from the end of the
operator platform to the center of an evenly
distributed load.
LOADS MUST BE EVENLY DISTRIBUTED
Your truck could tip over, in any direction, if a
load is placed or shifted to the front, back or
side of a pallet, cart, fork mounted platform or
container. Make sure you spread the load evenly
as you load a pallet.
KNOW YOUR LOAD
Do not exceed the capacity shown on your truck's
capacity plate. Be careful when handling long, high or
wide loads. Do not handle unstable loads.
EXCEEDING TRUCK CAPACITY CAN CAUSE AN ACCIDENT
Know the capacity of your truck as shown on your
capacity plate. Make certain you use the correct units
of measure. Pay attention to:
• Weight of load plus attachments
• Load center
• Lift height
• Operator weight
CENTER THE LOAD
Your truck could tip over if a load is placed or shifted
to the front, back or side of a pallet or container.
Make sure your load is evenly distributed and
centered over the forks.
Center of evenly
distributed load
600mm
(24 in.) Max
Load
Center
A
B
*Truck capacity must be reduced by operator
weight in excess of 100kg (220 lb)
Load
Center
1125(2500)
1350(3000)
750(1650)
900(2000)
7010(276)
6095(240)
7010(276)
6095(240)
600(24)
600(24)
900(36)
900(36)
A
Units of measure, kg/mm (lb/in)
B
Truck Weight with Max. Battery
Truck Type
Attachment Data
PLATFORM
Serial Number
Capacity with Mast Vertical
Capacity
4000
SAMPLE
Page 8
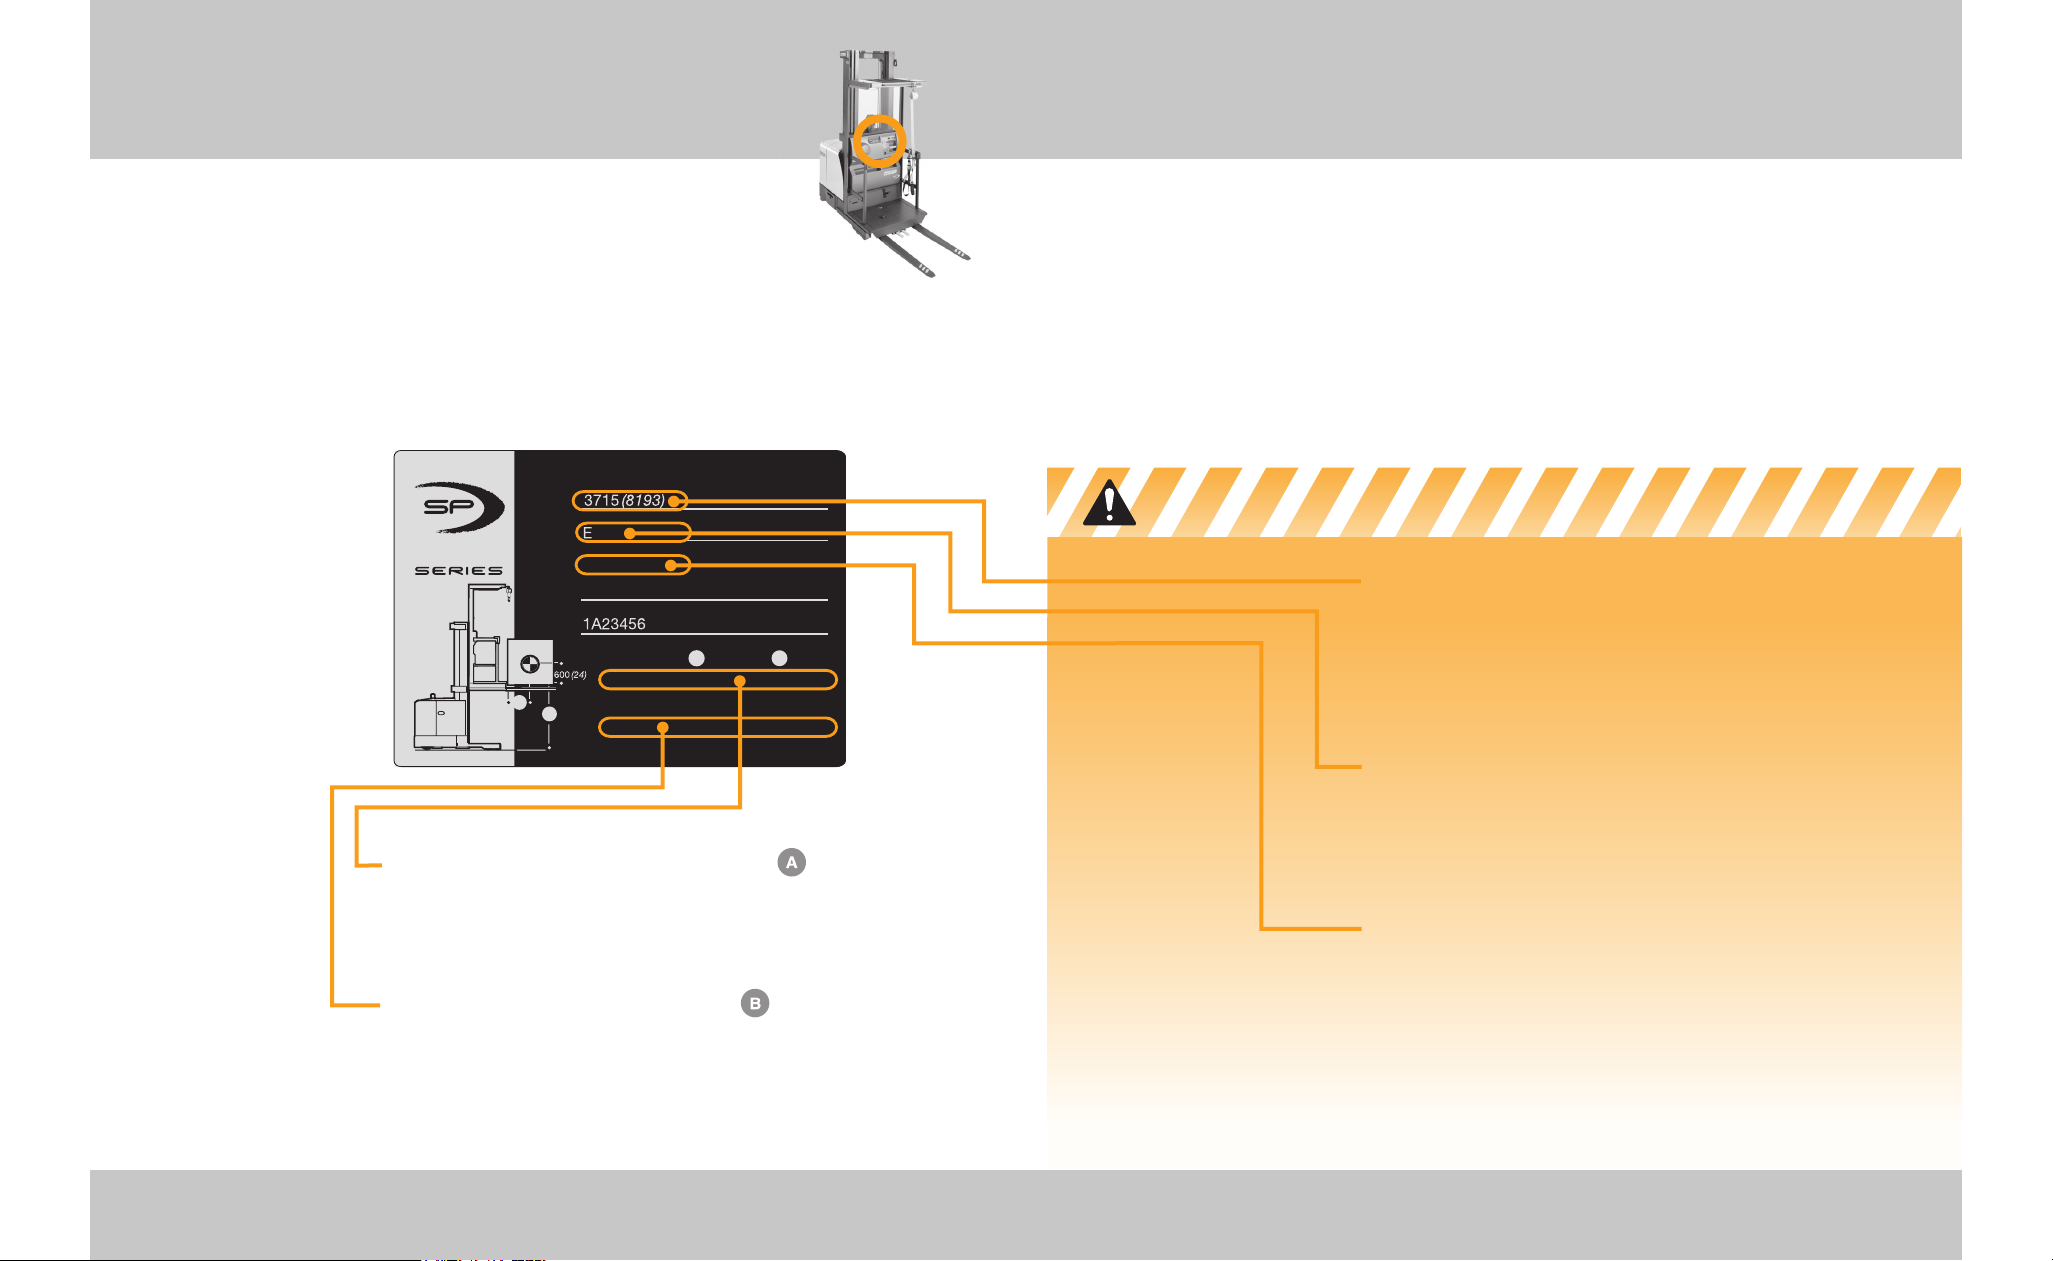
CAPACITY PLATE INFORMATION
The capacity plate is under the
overhead guard. It contains:
• Truck serial number
• Capacity information (load, load center and lift height)
• Truck type (a fi re safety rating)
• Truck weight with battery (does not include load)
• Attachment information (if any)
READING YOUR CAPACITY PLATE
Capacity may be reduced as lift height increases.
For example: On the sample plate, 1350kg (3000 lb)
can be lifted to 6095mm (240 in). But above 6095 (240),
to 7010 (276), capacity is reduced from 1350 (3000) to
1125 (2500).
Capacity is reduced as load center increases.
For example: On the sample plate, 1350kg (3000 lb) can
be lifted if the load center is 600mm (24 in). But if the
load center is increased to 900 (36), capacity is reduced
from 1350 (3000) to 900 (2000).
Know the Hazards
Capacity Plate
13 Capacity Plate Capacity Plate 14
SAMPLE CAPACITY PLATE
The information shown
on this sample plate does
not apply to your truck.
Note:
ANSI B56.1 requires that
all data be shown fi rst
in Metric units and then
USA units.
CAUTION
Truck capacity must be reduced by operator weight
over 100kg (220 lbs).
You may not increase capacity if load center is less
than shown on your capacity plate.
OTHER LIFT HEIGHT AND LOAD CENTERS
Contact Crown for capacities at lift heights or load
centers not given on your capacity plate.
TRUCK WEIGHT
Dockboards, elevators and some fl oors have limited
capacity. Check your capacity plate for the weight of
your truck. Remember to add the weight of the load
you have on the forks. Make certain you use the
correct units of measure.
TRUCK TYPE
Some truck types are not permitted in areas where
there are fi re hazards. Watch for marked areas.
For example: You must not drive a type E or ES truck into
an area restricted to EE or EX trucks.
ATTACHMENT DATA
If an attachment on your truck does not match the
information given here on your capacity plate, don't
operate your truck. Your capacity plate may be
wrong. Report the problem to your supervisor.
A
B
*Truck capacity must be reduced by operator
weight in excess of 100kg (220 lb)
Load
Center
1125(2500)
1350(3000)
750(1650)
900(2000)
7010(276)
6095(240)
7010(276)
6095(240)
600(24)
600(24)
900(36)
900(36)
A
Units of measure, kg/mm (lb/in)
B
Truck Weight with Max. Battery
Truck Type
Attachment Data
PLATFORM
Serial Number
Capacity with Mast Vertical
Capacity
4000
SAMPLE
Page 9
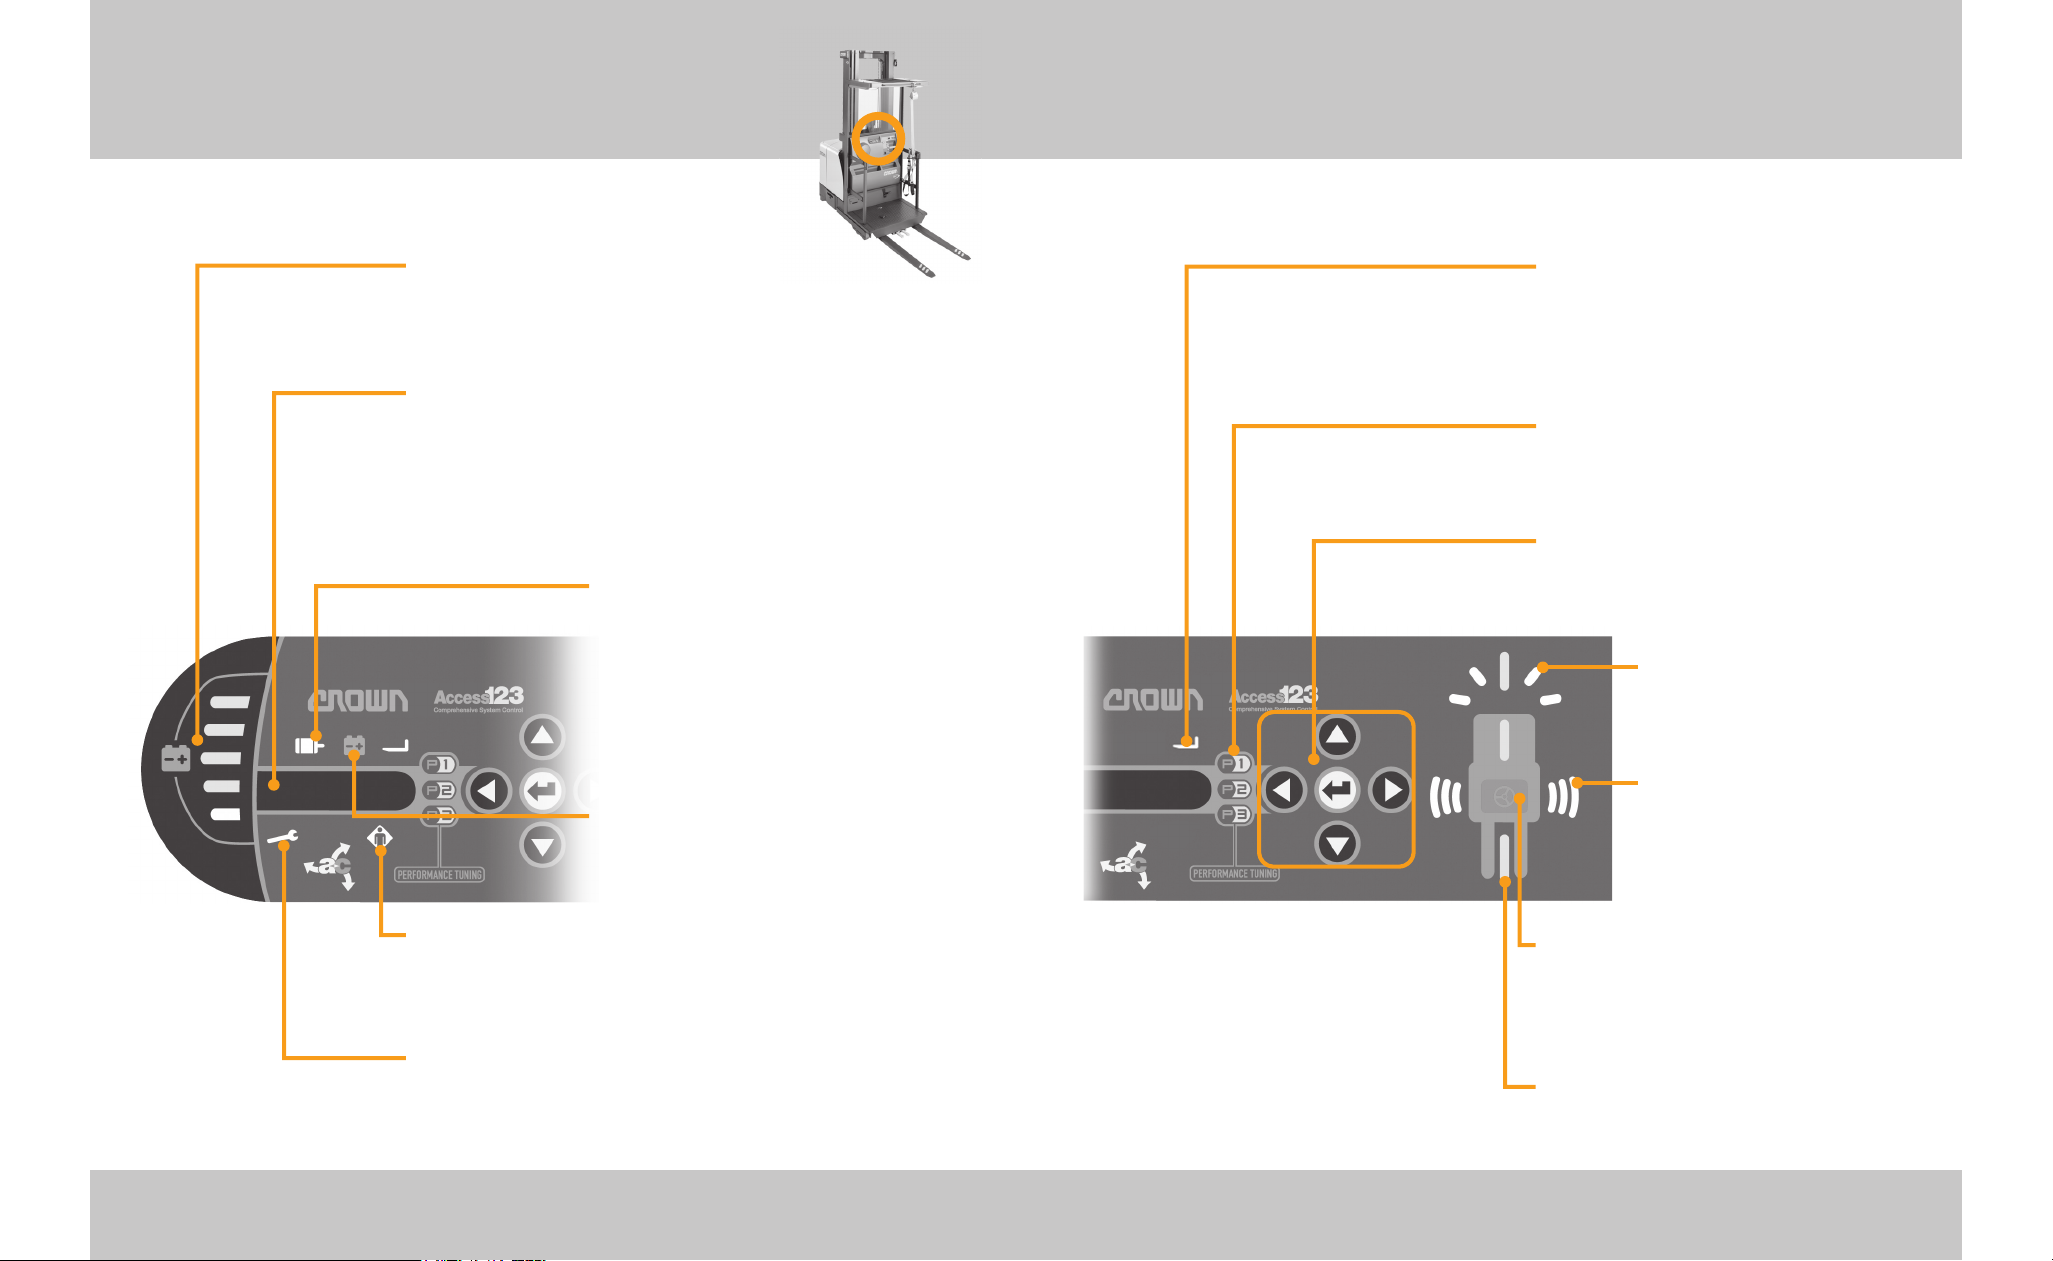
Display
15 Display Display 16
BATTERY CHARGE STATUS
The green bars show how much
charge is left. Have the battery changed
or recharged if the yellow light is flashing.
MESSAGE PANEL
Displays truck information such as: hours of
operation, event codes along with instructions,
battery charge and other data. Anytime you hear
a beep, or if the truck slows down or won’t work,
check the message panel for instructions.
MOTOR LIGHT
A yellow light means a motor may
require service, hydraulic motor
has worn out brushes, or hydraulic
and/or traction motor is overheated
(it may just have to cool down).
Contact your supervisor or service
department.
BATTERY RETAINER LIGHT optional
A red light means the battery
retainers are not properly installed.
EVENT LIGHT (OPERATOR CORRECTABLE)
A yellow light will come on when there is a detected
event which the operator can correct. See the display
for instructions.
SERVICE LIGHT (SERVICE REQUIRED)
A yellow light will come on when there is a detected
event which requires service. Contact your supervisor
or service department.
LIFT OR LOWER CUTOUT LIGHT optional
A red light means either lift or lower
has been cut out. Moving beyond that
point could be hazardous, (see pages
25 & 26).
PERFORMANCE SETTING
Indicates the performance level your
company has selected for this truck.
SERVICE & OPTION BUTTONS
See your Service Manual.
DRIVE WHEEL INDICATOR
LIGHTS optional
See page 19.
WIRE SIGNAL LIGHTS optional
Yellow lights mean the
wire signal is weak. See
message panel.
MANUAL STEERING LIGHT optional
A red light means you are in manual
steering mode. Take control of the
steering tiller.
GUIDANCE LIGHTS optional
Green lights mean you are in wire
guided mode.
Page 10
Right Header Left Header
Protect 017 Driving on Wire Guidance Driving on Wire Guidance 18
Driving on Wire Guidance
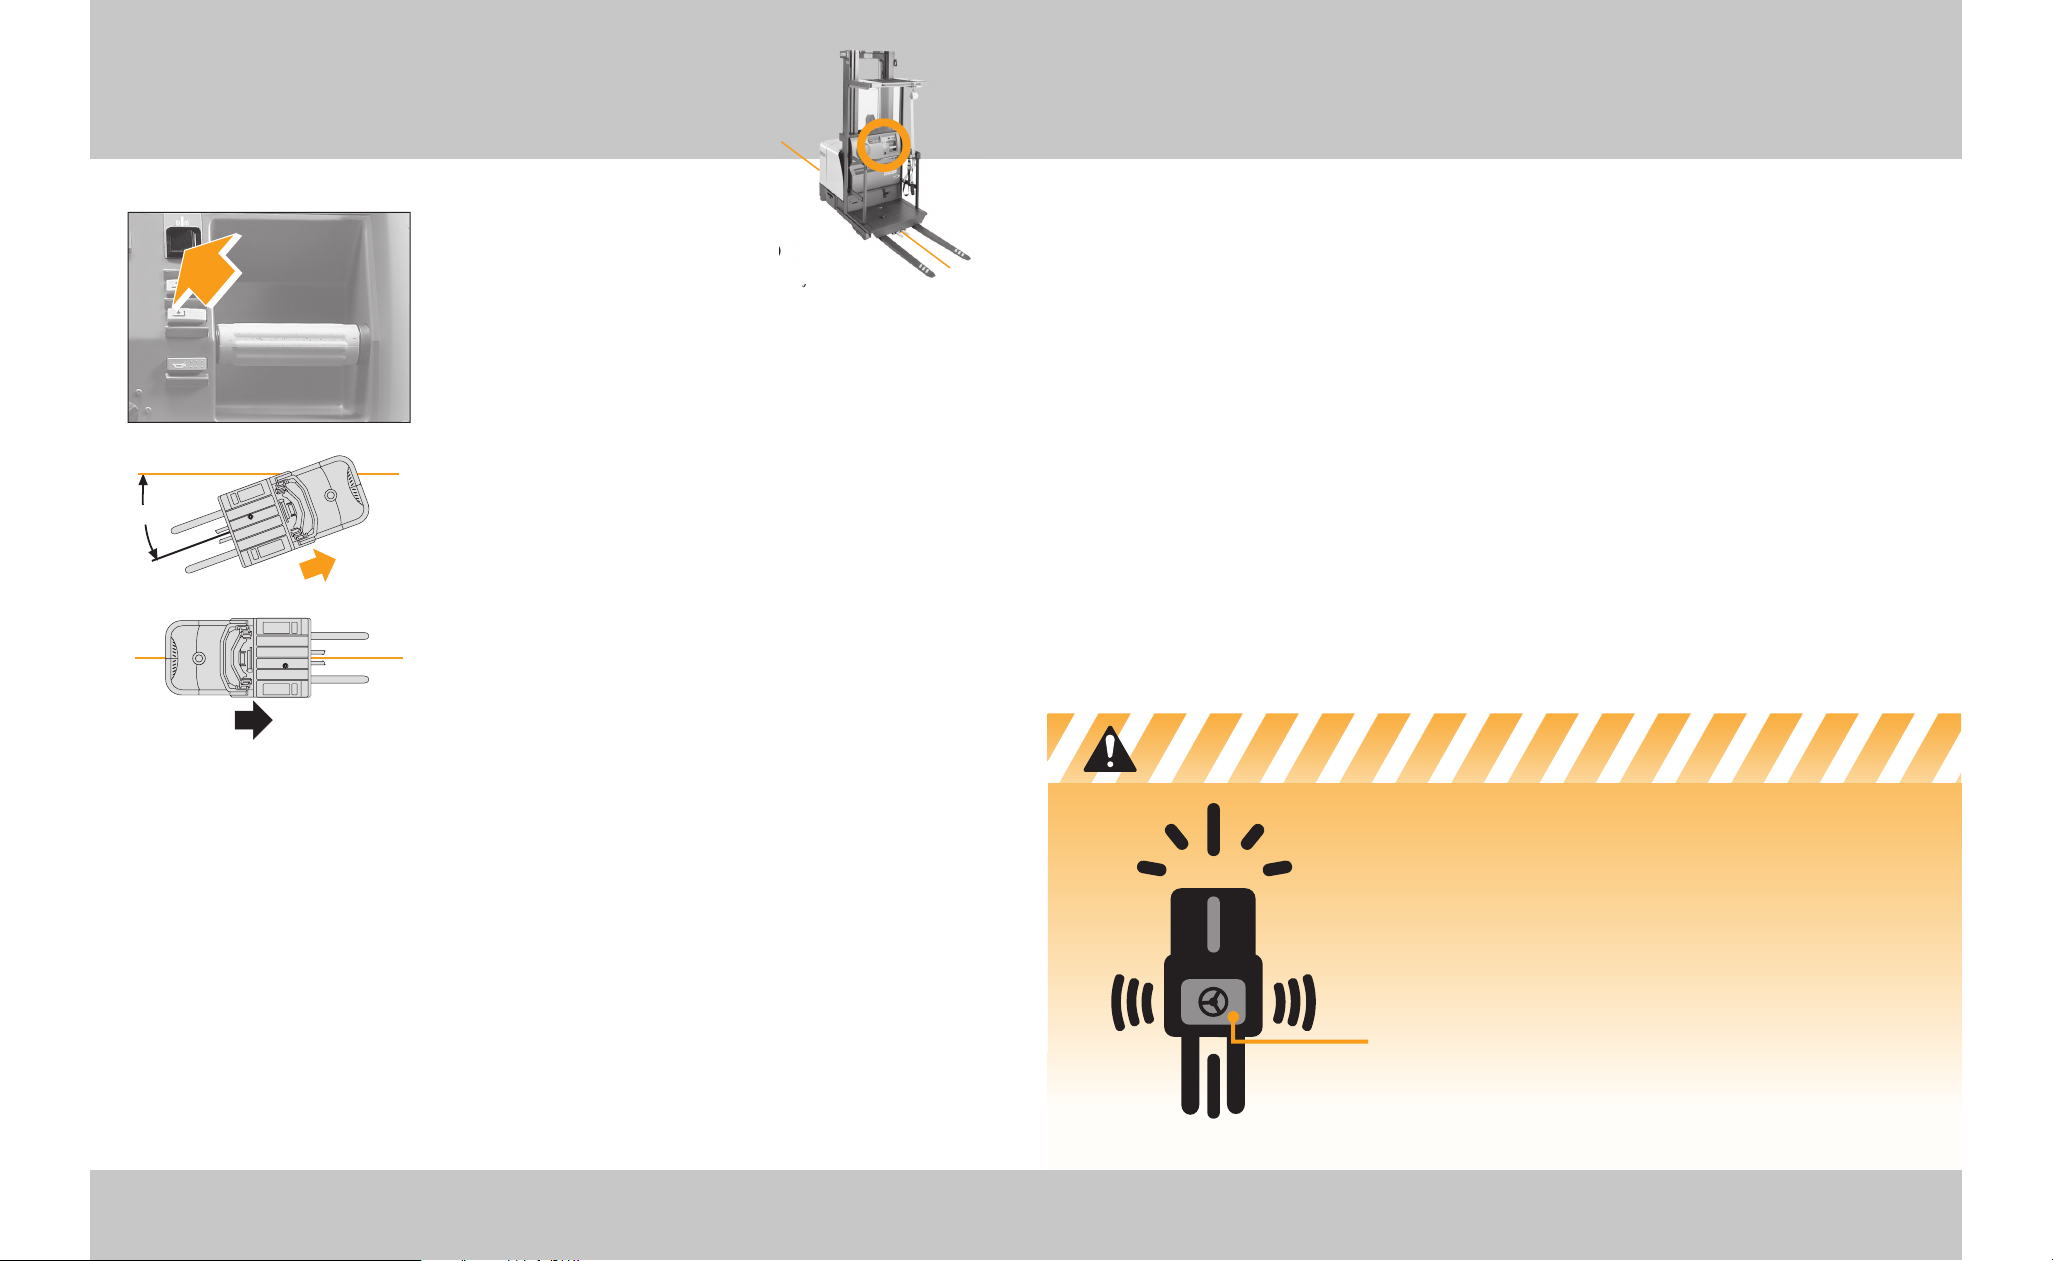
ACQUIRING THE WIRE
Push the Wire Guidance switch to ON
as you near a guided aisle. Drive slowly with the
platform about 300mm (12 inches) above the fl oor,
and center the truck over the wire. Your direction of
travel (power unit fi rst or forks fi rst) controls how you
should approach the guidance wire.
Note:
Power unit fi rst is the recommended direction of
travel for acquiring the wire.
POWER UNIT FIRST
Drive slowly over the wire at an angle of 20° or less.
When you hear a "beep" and the red light turns off,
the truck takes control of steering. Start slowly.
FORKS FIRST
If you must acquire the wire while traveling forks fi rst:
Drive slowly along the wire (no angle allowed) until
you hear a "beep" and the red light turns off.
Continue to drive slowly for two truck lengths before
resuming normal guided driving.
AUTOMATIC SLOW DOWN
While traveling on guidance, your truck may slow
down automatically for certain conditions.
• Low signal strength from the wire.
• Truck deviates slightly from the wire.
• End of Aisle Control (optional) is activated.
AUTOMATIC STOP
Your truck may stop automatically for certain
conditions.
• Signal strength from the wire is lost or is too low.
• Acquiring the wire at an angle greater than 30°.
• Truck deviates too far from the wire.
• End of Aisle Control (optional) is activated.
Guidance Wire
20˚ MAX
Guidance Wire
Know the Hazards
FOR MANUAL STEERING
Take control of the steering handle, toggle the guidance switch OFF.
Note:
Whenever guidance is OFF, the red light on the display will be on to remind
you that you are in manual steering.
If the wire sensing option is turned on, the red light will fl ash and the "beeping" will
speed up, to notify you that the truck senses a wire.
WHEN DRIVING ON THE WIRE
Watch where you're going. Make sure your path is clear.
Drive slowly and be alert for "beeps" from the alarm or changes in the display that
signal changes in guidance status.
END OF AISLE CONTROL OPTION
With this feature, your employer can program your truck to either slow down or stop
automatically when it comes to the end of an aisle. You will hear a “beep” and the
indicator light will turn on.
Return the travel control to neutral, press the Override Switch and resume travel.
STAY ALERT
You must be just as careful and alert while driving on
guidance as you are when driving with manual steering.
• Start slowly and look where you're going.
• Always be prepared to steer manually.
• Make sure there is nothing in your path, on the fl oor
or sticking out of the racks.
LISTEN FOR THE "BEEP", CHECK THE DISPLAY
• Take control of the steering any time the red light is
on, and check the display if you hear a "beep".
with the
Page 11
Foot Brake 20
Foot Brake
19 Power On & Off
Power On & Off
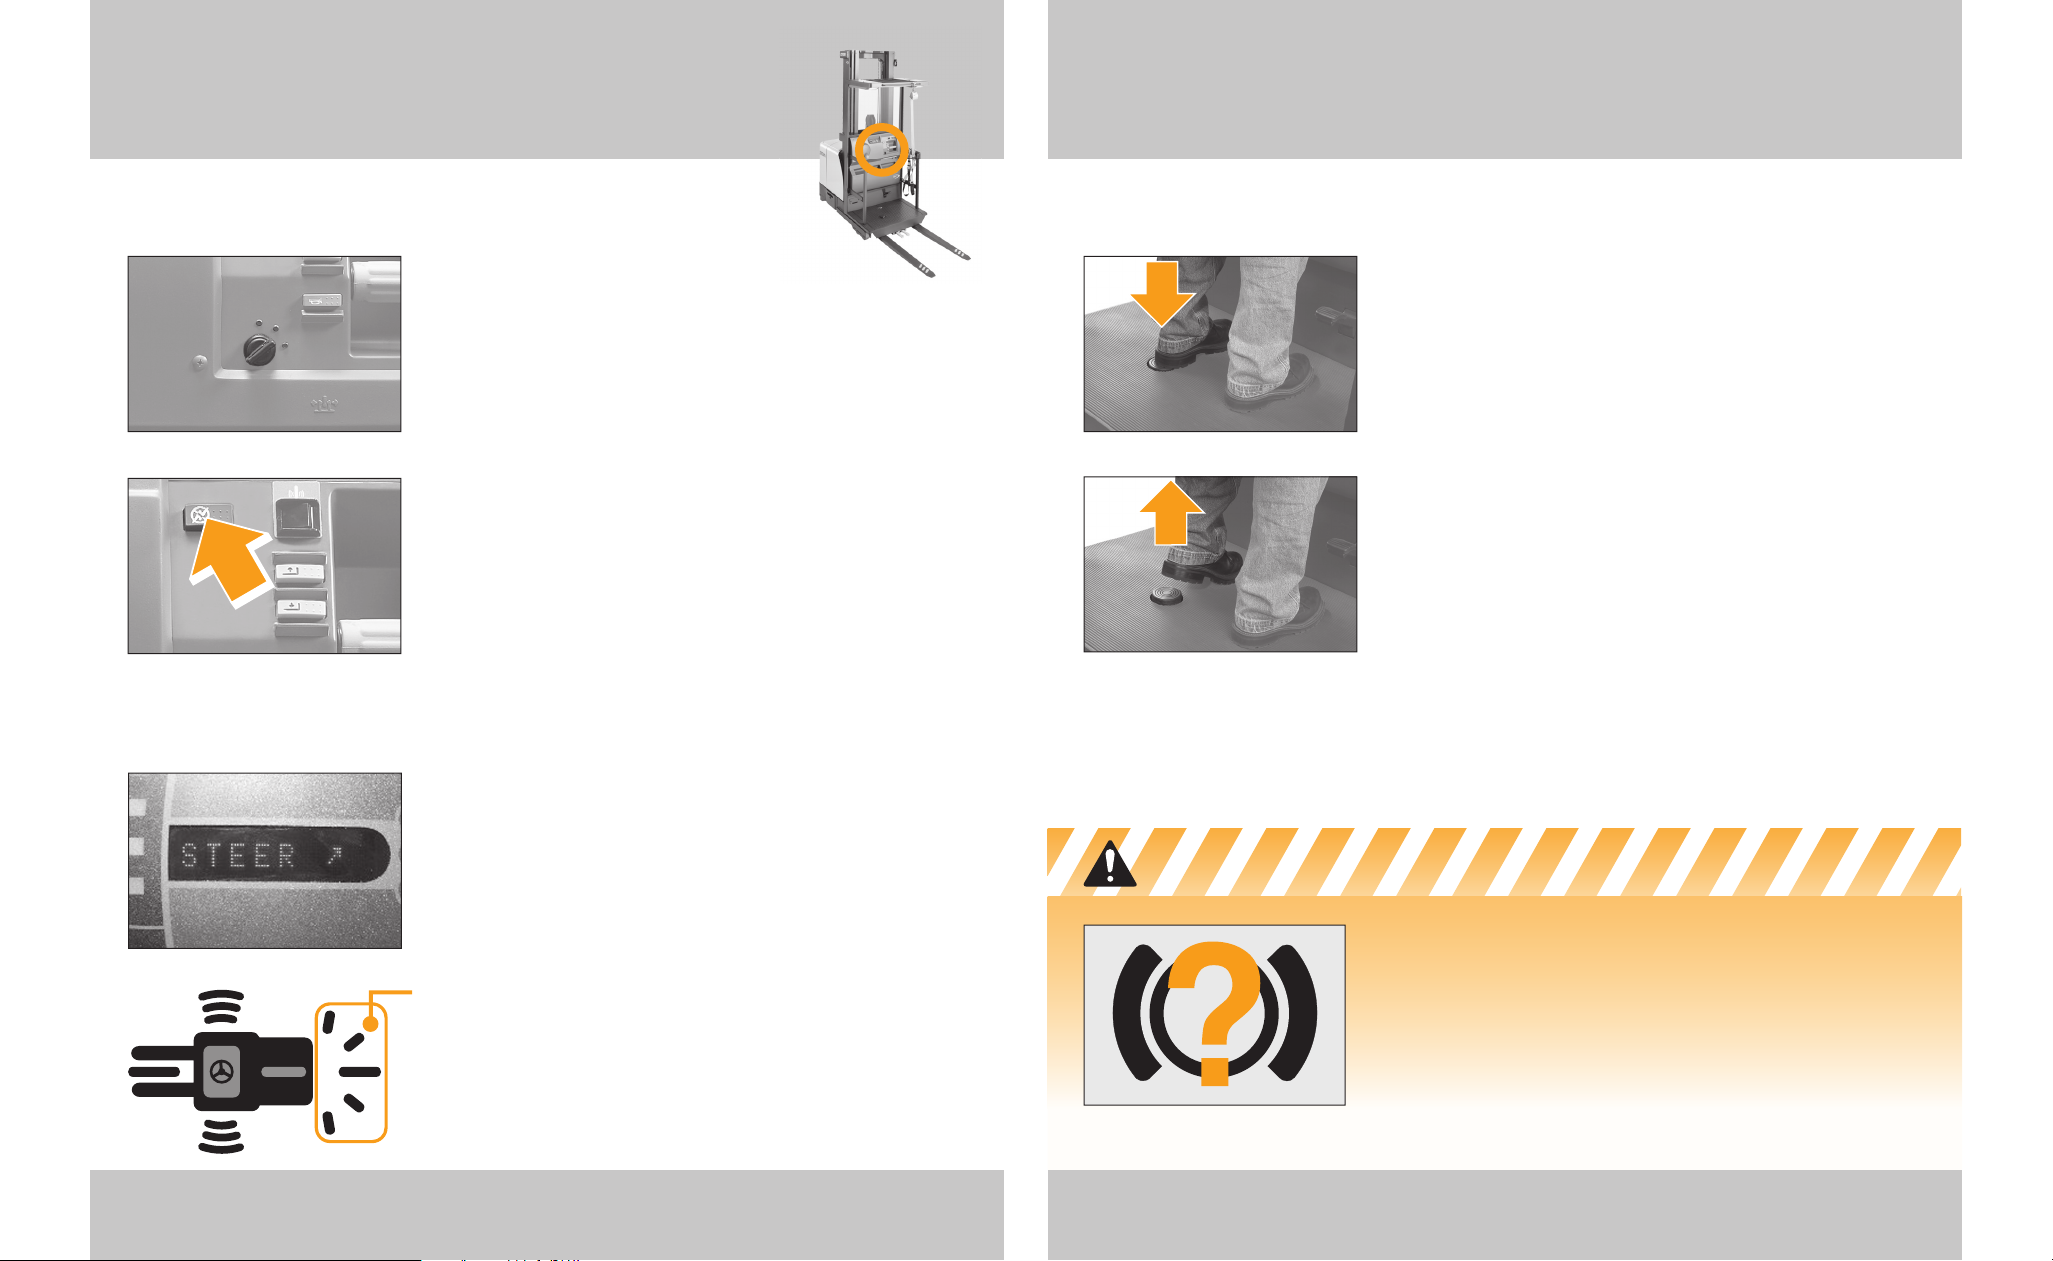
KEY SWITCH
• Turn the key sideways to TEST.
Check that the alarm and all display lights are working.
• Let go of the key and it will return to ON.
• Turn the key vertical to shut the truck off. Always
turn the key to OFF when leaving the truck.
EMERGENCY DISCONNECT
Anytime the truck isn’t working right, fi rst stop the truck
and then press the emergency disconnect to cut power
to all truck functions, including steering.
Don’t use the truck. Report the problem to your
supervisor.
Turn the key switch to OFF and back to ON to
reconnect the battery and reset the emergency
disconnect button.
DRIVE WHEEL DIRECTION INDICATOR (without wire guidance opt.)
When you fi rst step on the brake pedal, and until the
truck begins to travel, the display will show the
approximate drive wheel position.
DRIVE WHEEL DIRECTION INDICATORS (with wire guidance opt.)
The green light in the center shows you that the drive
wheel is straight (within 1 degree).
The yellow lights to either side show the approximate
position of the drive wheel while turning.
BRAKE OFF
Step all the way down on the brake pedal. The brake is
"off" and you can travel.
Note:
Slowing or stopping the truck by plugging (see
page 21), requires power to the drive motor. You must
have the brake pedal all the way down for plugging
to work.
BRAKE ON
Take your foot off of the brake pedal to apply the
brake. When you release the brake pedal, power is cut
to the drive motor. Remember, with the brake applied,
you can't use plugging, (see page 21).
Know the Hazards
MAKE SURE YOUR BRAKES WORK
Test the brake on your truck at the start of each shift.
Know the distance it takes to stop before you start
working.
If at any time the stopping distance is too long for you
to stop safely, don't drive the truck. Report any
problem to your supervisor.
Page 12
Know the Hazards
Traveling & Plugging 2221 Traveling & Plugging
Traveling & Plugging
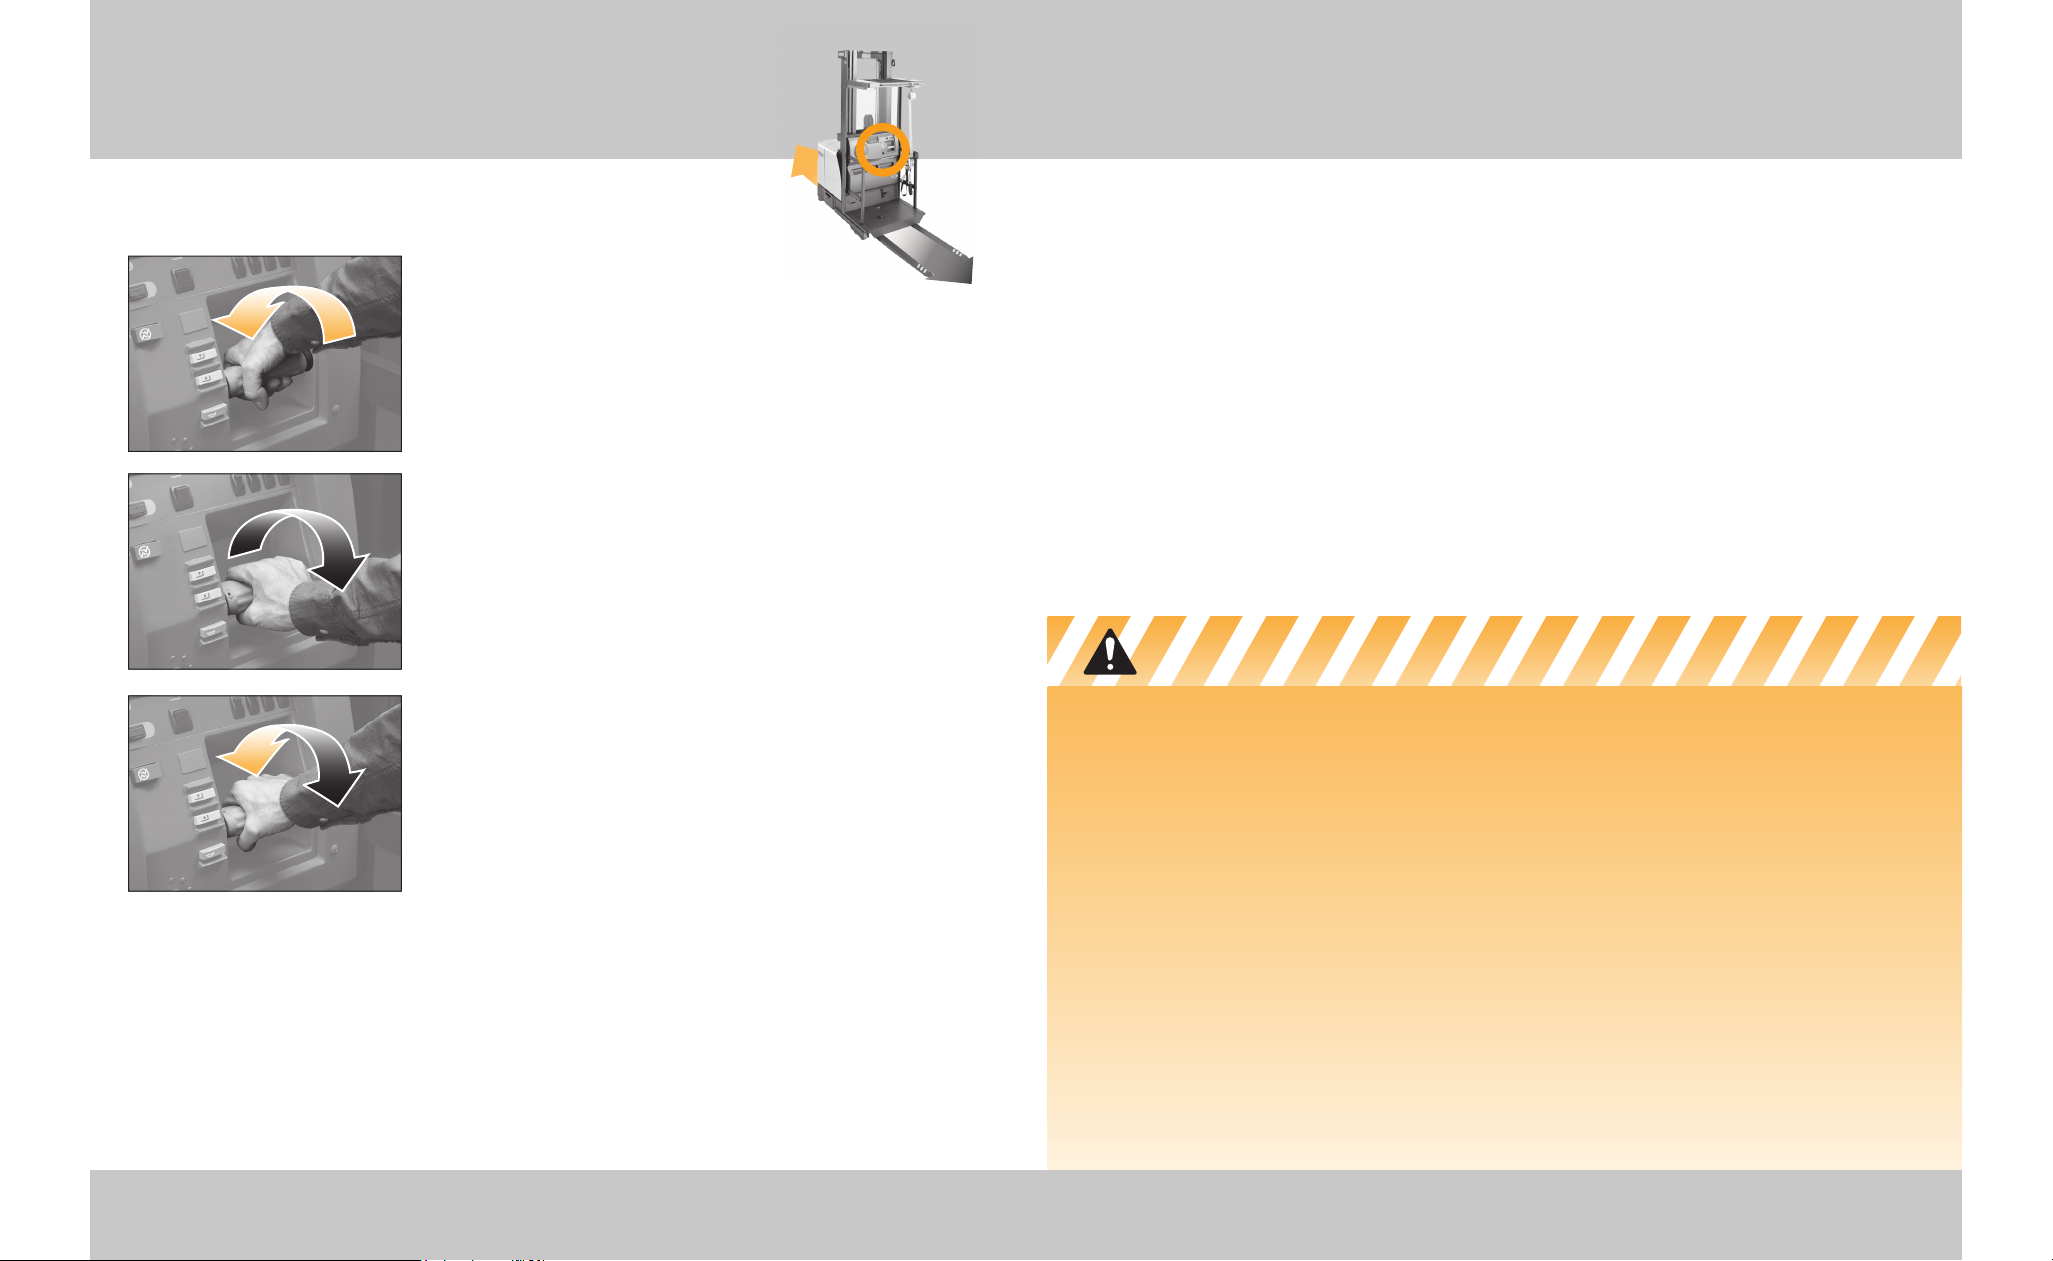
TRAVEL, POWER UNIT FIRST
Rotate the top of the twist
grip away from you to travel in the
direction of the power unit (power unit first).
The farther you rotate the grip from the neutral
position, the faster the truck will travel.
TRAVEL, FORKS FIRST
Rotate the top of the twist grip toward you to travel
in the direction of the forks (forks first).
The farther you rotate the grip from the neutral
position, the faster the truck will travel.
PLUGGING
Plugging is another way to slow down or stop your
truck. While the truck is moving, in either direction,
rotate the twist grip through neutral to the opposite
direction of travel.
Plugging does not hurt your truck.
EMERGENCY DISCONNECT
The Emergency Disconnect cuts power to all truck
functions, including steering. The parking brake will
be applied.
See page 19 for correct use of emergency disconnect.
PLUGGING VS. BRAKING
Of the two, the foot brake is designed to stop the
truck in the shortest distance. Use the foot brake in an
emergency, on ramps or in busy areas.
Plugging works only when you have the brake pedal
all the way down. When you take your foot off the
brake pedal you will not be able to plug.
Continued next page...
Page 13
Traveling & Plugging continued 2423 Traveling & Plugging continued
Traveling & Plugging continued
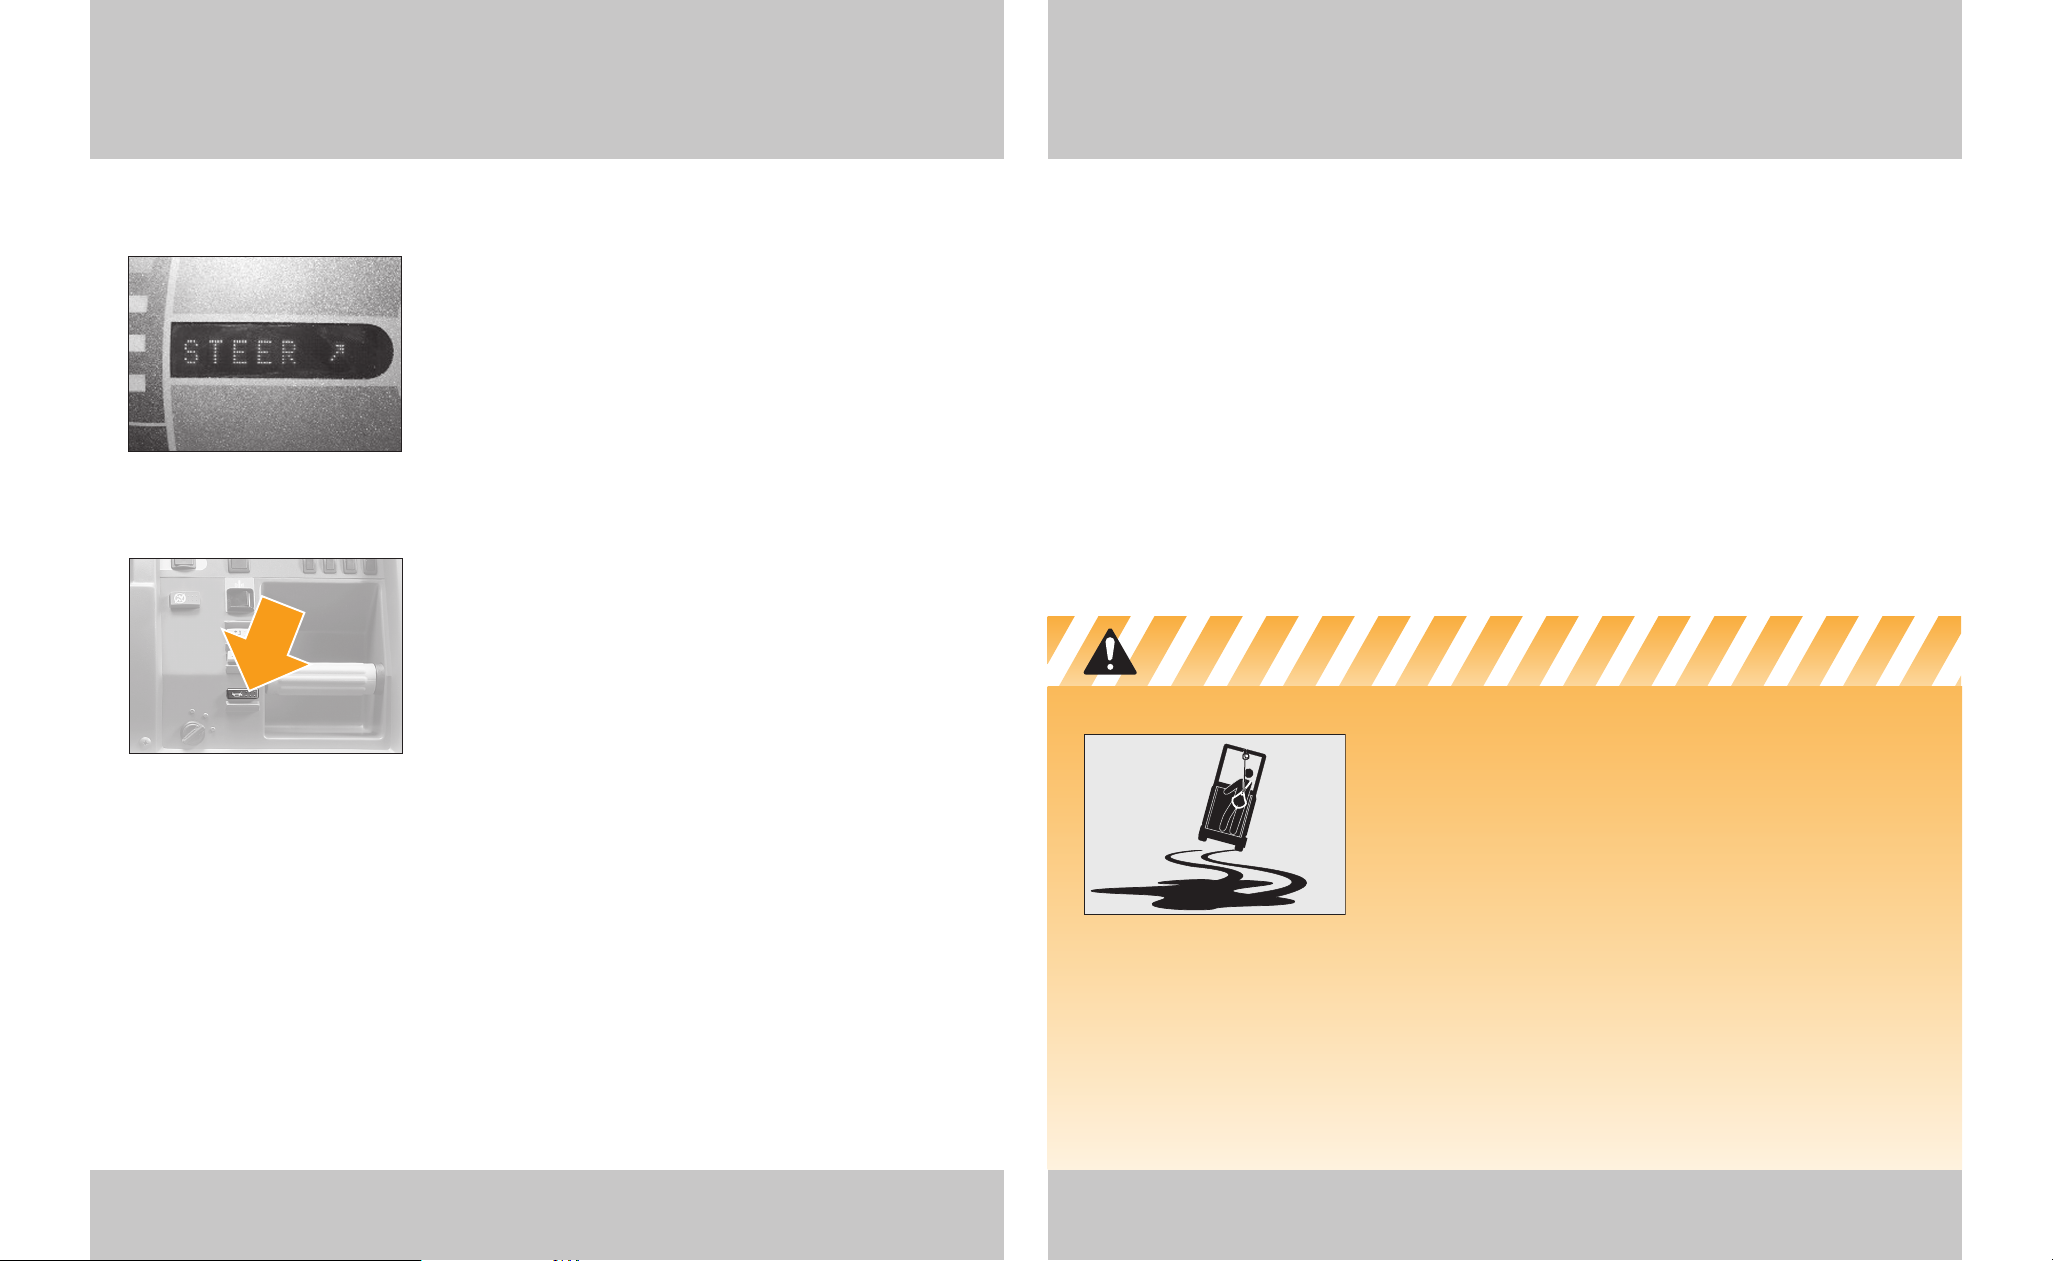
STEERING RESTRICTIONS
For stability, steering angle is limited at certain lift
heights. Check the display. The drive wheel direction
indicator will fl ash if the truck is operating at a
restricted steering height.
TRAVEL RESTRICTIONS
For stability, travel speed is reduced for various
combinations of lift height and drive wheel
steering angle.
HORN
Use the horn button to sound the horn. Use it to warn
pedestrians and other drivers.
Use your horn when you come to an intersection or a
crosswalk.
Know the Hazards
SLOW DOWN FOR SPILLS OR WET FLOORS
Powder or liquid spills can cause slippery fl oors.
Slow down or you could lose control of steering
and braking. Be careful and allow for a longer
stopping distance.
Don't run over objects on the fl oor.
LOOK WHERE YOU'RE GOING
Driver distractions can cause accidents resulting in
injury or even death.
• Don’t use cell phones or similar devices while
operating the truck.
• Travel in the direction where you have the best
visibility.
Page 14
Raise & Lower 2625 Raise & Lower
Raise & Lower
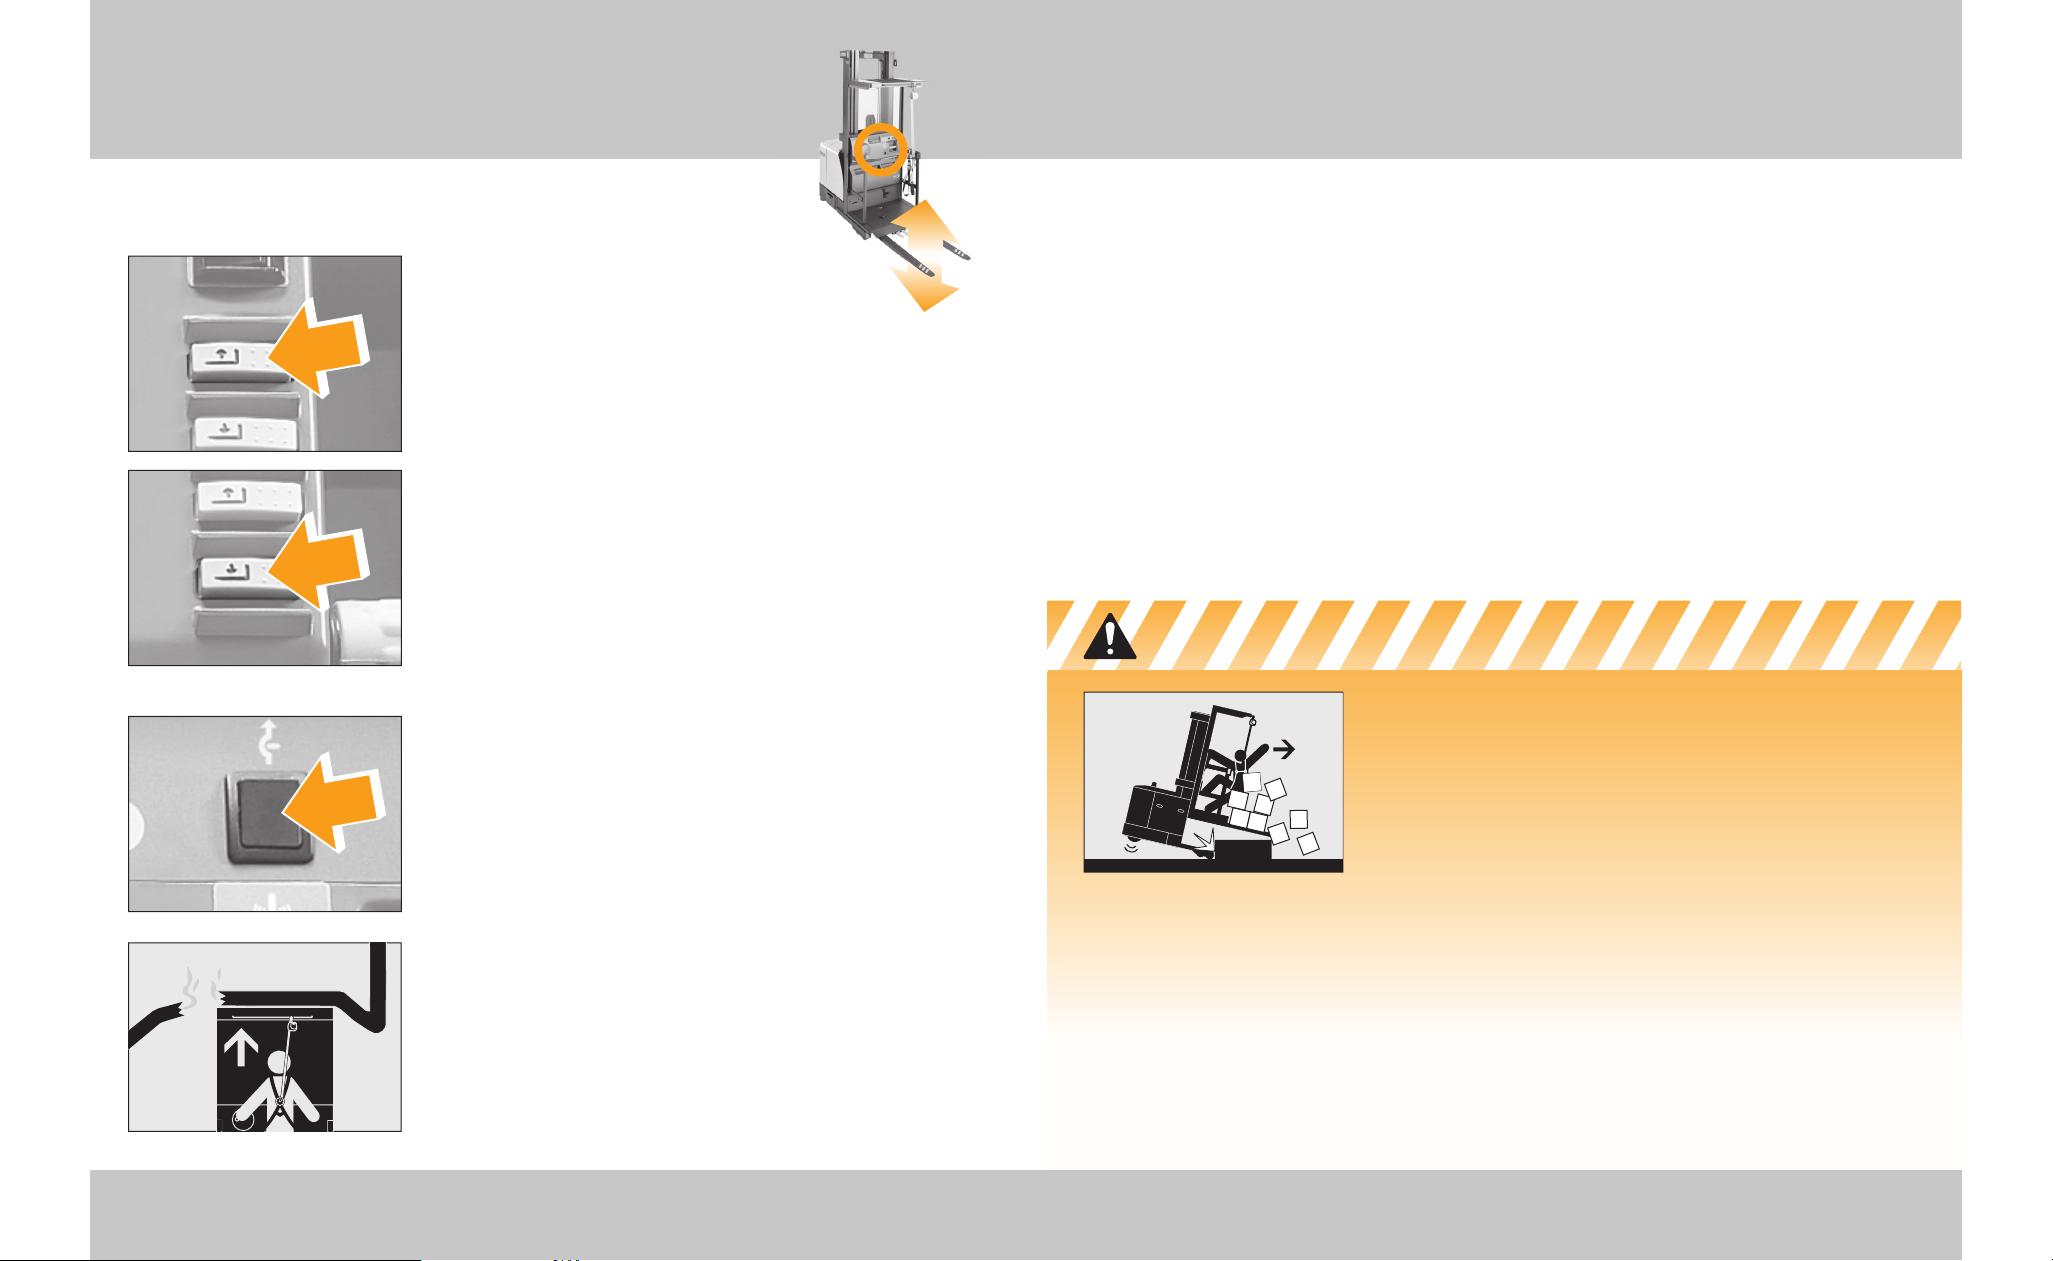
RAISE
Push the Raise button to raise
the platform and forks. Release
the button when you reach the desired height.
If your truck has optional two speed lift, or variable
speed lift, the farther you push the raise button the
faster the forks will raise.
LOWER
Push the Lower button to lower the platform and
forks. Release the button when you reach the desired
height.
Your truck has two lowering speeds. Push the lower
button all the way for a fast lowering speed, and part
way for a slower lowering speed.
Note:
The model SP4000 is equipped with variable
speed lowering as standard.
OVERRIDE SWITCH OPTION
Your truck may be equipped with automatic cutout of
raise and lower at selected heights.
If Raise or Lower stops and the red fork on the
display panel is lit, you are at a raise or lower cutout
height. You can use the Override Switch to travel past
that height.
To travel past the cutout height, push the Override
Switch while, at the same time, pushing either the
Raise or Lower button.
Be very careful and watch that you don't raise,
lower or drive into obstructions when using the
Override Switch.
Note:
The Override Switch is also used with the End of
Aisle Control Option. See page 18.
Know the Hazards
AVOID FALLS FROM THE PLATFORM
Hitting something with the truck could cause you
to fall.
Wear your harness and lanyard at all times.
RAISE/LOWER CUTOUT OVERRIDE
Using the Cutout Override lets you travel or raise the
platform into areas where there are obstructions and
hazards such as pipes, ducts, conduits, low ceilings etc.
Hitting any obstruction could tip the truck over, causing
serious injury or even death.
Watch out for obstructions anytime you're operating your
truck. Be even more careful when using Cutout Override.
SLACK CHAIN CONDITION
Always be alert for slack lift chains. This condition could
allow the platform to drop suddenly and cause injury.
Stop lowering immediately if chains become slack.
CHECK YOUR DISPLAY
If your truck won’t raise, lower, travel, or operates at
a reduced speed, check the message panel on
the display.
MANUAL LOWERING
If normal lowering does not operate, a manual
lowering valve is located behind the power unit
door. Call for authorized assistance to help lower the
platform to the ground.
Note:
Always be alert to a display message or any other
indications that the lift chains have become slack.
A slack chain condition can cause serious injury by
allowing the platform to drop suddenly.
Stop lowering immediately if chains become slack.
Page 15
Know the Hazards
Platform Safety 2827 Platform Safety
Platform Safety
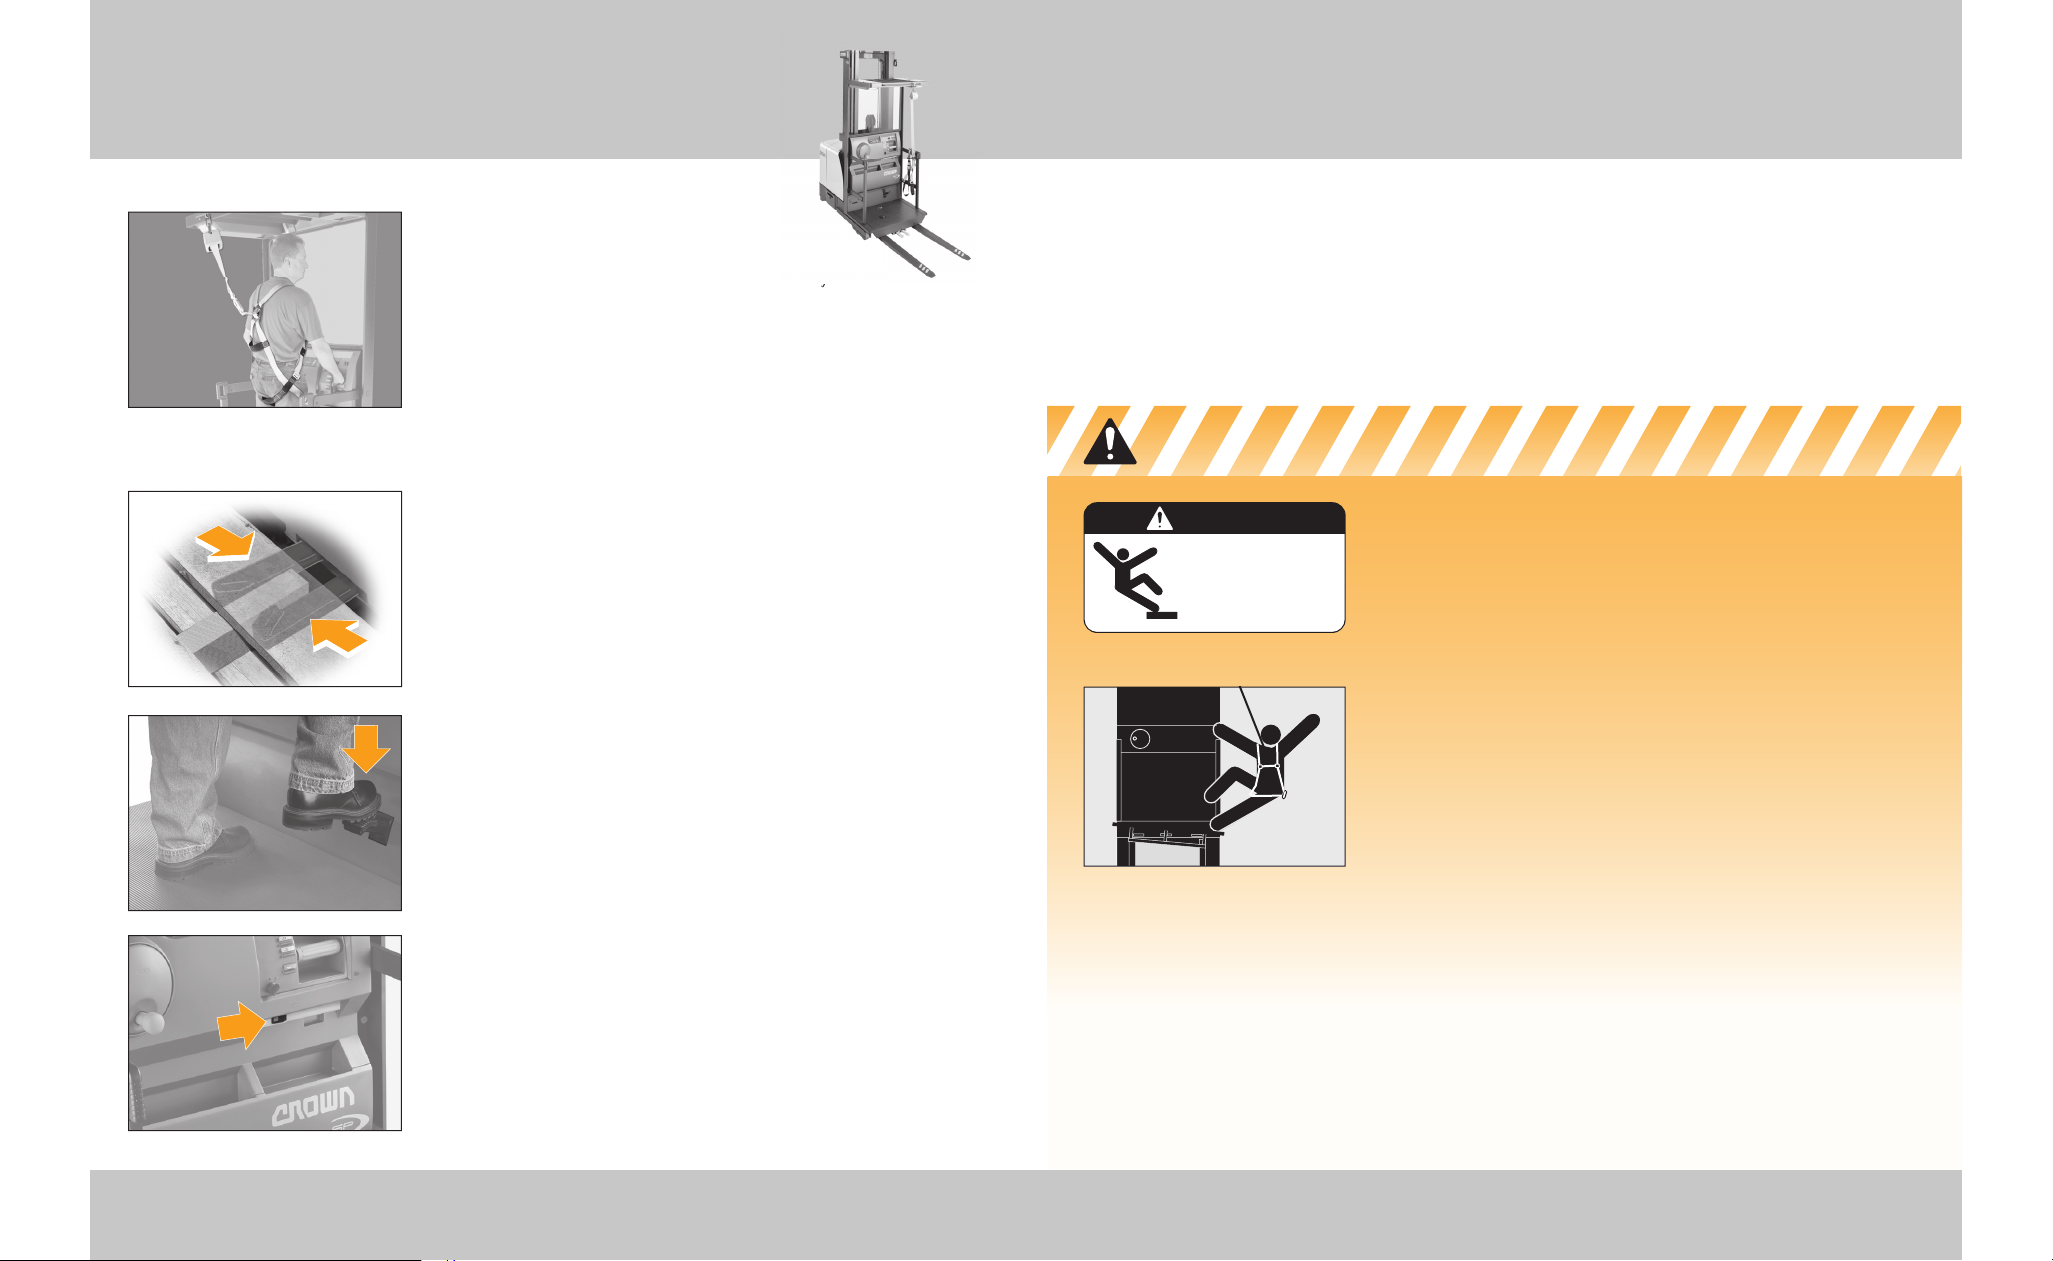
WEAR YOUR HARNESS AND LANYARD
Put on your harness and fasten your lanyard as
soon as you get on the platform, before you do
anything else.
Check the harness, lanyard, snap hooks and mounting
points daily for wear or breakage. If it doesn't look
safe don't use the truck. Report the problem to your
supervisor.
*See page 7 for Harness and Lanyard information.
CLAMP THE PALLET
Be careful of pallets. They can tip or slide on the forks
even when properly centered and clamped. Make
certain the center stringer of the pallet fi ts into the
Pallet Grab.
Spread the forks as far as you can and don’t use
pallets that have missing, loose, broken or undersized
boards.
• Manual clamp
Step down on the Pallet Grab Foot Pedal to clamp the
pallet. Make sure pallet is secure.
Let go of the pallet by lifting on the Pallet Grab
Release Handle.
• Electric clamp
Push the switch on the operator console to the left to
clamp the pallet. Make sure pallet is secure.
Let go of the pallet by pushing the switch to the right.
A light on the switch will illuminate on when the
clamp is in the release position.
Note:
If you work with a fork mounted auxiliary
platform instead of a pallet, your truck may not have
a Pallet Grab. Make certain the platform is fastened to
the truck.
FALLS CAN KILL
You can reduce the risk of injury by being extra careful
while working on an elevated Stockpicker.
• Wear your harness and keep your lanyard fastened
at all times.
• Put the side gates down and keep your entire body
inside the operator area.
• For stability, spread the forks as far as you can and
make certain the pallet or fork mounted platform is
securely fastened.
• A pallet may move or tip, even when the pallet grab
is used. Work from the platform. If you must step
onto a pallet, stay to the center, between the
supporting forks. Never step on or near the edge of
a pallet.
• Watch where you're going. Running into an object
could cause you to fall.
CHECK YOUR PALLET
Check the pallet for missing, loose, broken or
undersized boards. Don’t use damaged pallets.
WORK CLOSE TO THE RACK
When picking, keep your truck close to the rack to
reduce the risk of slipping or dropping things.
05
DANGER
Falling from a raised platform
can cause a serious injury
or death.
Attach harness and lanyard
before operating truck.
lanyard
KEEP THE SIDE GATES DOWN
• Keep the side gates down unless you are leaving the
truck or picking from the side.
• Don't sit or climb on the side gates.
• Keep your entire body in the operator area.
ore you do
as
Page 16
Daily Safety Check 3029 Daily Safety Check
Daily Safety Check
CHECK YOUR TRUCK BEFORE STARTING WORK
You must make sure your truck is safe to use.
1. Walk around your truck and check it over.
• Inspect your harness, lanyard, snap hooks and
mounting points. Have them replaced if they look
damaged or worn or have ever been used to stop a fall.
• Clean the safety shield and keep it clear.
• Check to make sure the battery is charged, water level
is OK and vent caps are in place. Don't use an open
fl ame to check the battery.
• Make certain the battery retainers on both sides of the
truck are properly installed.
• See that all wheels are in good condition.
• Make sure the fl ashing light is working.
• Check that both forks are secure and not bent, cracked
or badly worn.
• Inspect lift chains for damage.
• Look under the truck for signs of hydraulic leaks.
• Turn the key to TEST. See that the alarm and all display
lights are working. Try the horn.
• Make sure the emergency disconnect works.
2. Test drive your truck in an uncongested area.
• Try the hydraulic functions.
• Check that the steering is easy and smooth.
• Drive the truck slowly in both directions.
• Drive through the full speed range in both forward
and reverse.
• Check braking and plugging distances in forward
and reverse. Load size and fl oor conditions can affect
these distances.
• Know the distance it takes to stop before you start
working. If the braking distance is too long to stop
safely, don't drive the truck.
• Check wire guidance operation.
If anything doesn't look, work or feel right, don't drive the truck. Report the
problem to your supervisor.
You can get checklist forms from your Crown dealer (part no.
OF-3772). Used properly, this checklist can alert service people to
needed repairs.
Page 17
Be a Safe Driver 3231 Be a Safe Driver
Be a Safe Driver
MAKE SURE YOU ARE READY TO DRIVE
• Do not use this truck unless you are trained
and certifi ed.
• Be certain you understand how your truck works and
the hazards that go with it. Don't drive the truck if
you have any doubts.
• Know the capacity of your truck (Load Weight, Load
Center and Lift Height). Make certain you use the
correct units of measure.
• Some trucks are not allowed in areas where there are
fi re hazards. Be certain your truck is the correct fi re
safety type for the area.
• Make sure your hands and shoes are clean and dry,
and your clothing is proper for the job.
MAKE SURE YOUR TRUCK IS READY
• Inspect your truck before using it (see pages 29 and
30). If it's not working right, or something is broken,
report the problem. Don't use the truck.
• In an open area, test the braking and plugging.
Check at a slow travel speed fi rst, then a faster
one. Know the distance it takes to stop before you
start work.
DRIVE CAUTIOUSLY, BE ALERT
• Always wear your harness and have the lanyard
fastened. See page 7 for Harness and
Lanyard information.
• Make certain pallets and fork mounted platforms are
secure.
• Never stick a foot, arm or any part of your body
outside the operator area, no matter how slow the
truck is moving. A foot or hand caught between the
truck and a fi xed object will be crushed or even
cut off.
• Keep your hands on the controls and your foot on the
brake pedal.
• Travel in the direction that gives you the best view.
Look where you are going and slow down in
congested areas.
• Slow down for wet or slippery fl oors. Don't run
over things.
• Travel with the platform close to the ground when
outside of an aisle. Place the load against the end of
the platform.
• Look where you are going before you change
direction of travel.
• See that you have room to drive and turn. Check for
overhead objects also. Watch out for power unit and
fork (load) swing. Slow down when making turns.
• Avoid sudden movement of controls. Learn to use
them smoothly at a moderate, even rate.
• Check clearances before raising or lowering the forks
or load. Watch for overhead obstructions.
• Be extra careful if you must use your truck in an area
where there is a risk of falling objects.
The most
important
component
is you.
Continued next page...
Page 18
Be a Safe Driver continued 3433 Be a Safe Driver continued
Be a Safe Driver continued
WATCH OUT FOR OTHER PEOPLE
• Slow down. Yield or stop for pedestrians.
Use your horn when you come to a crosswalk
or intersection.
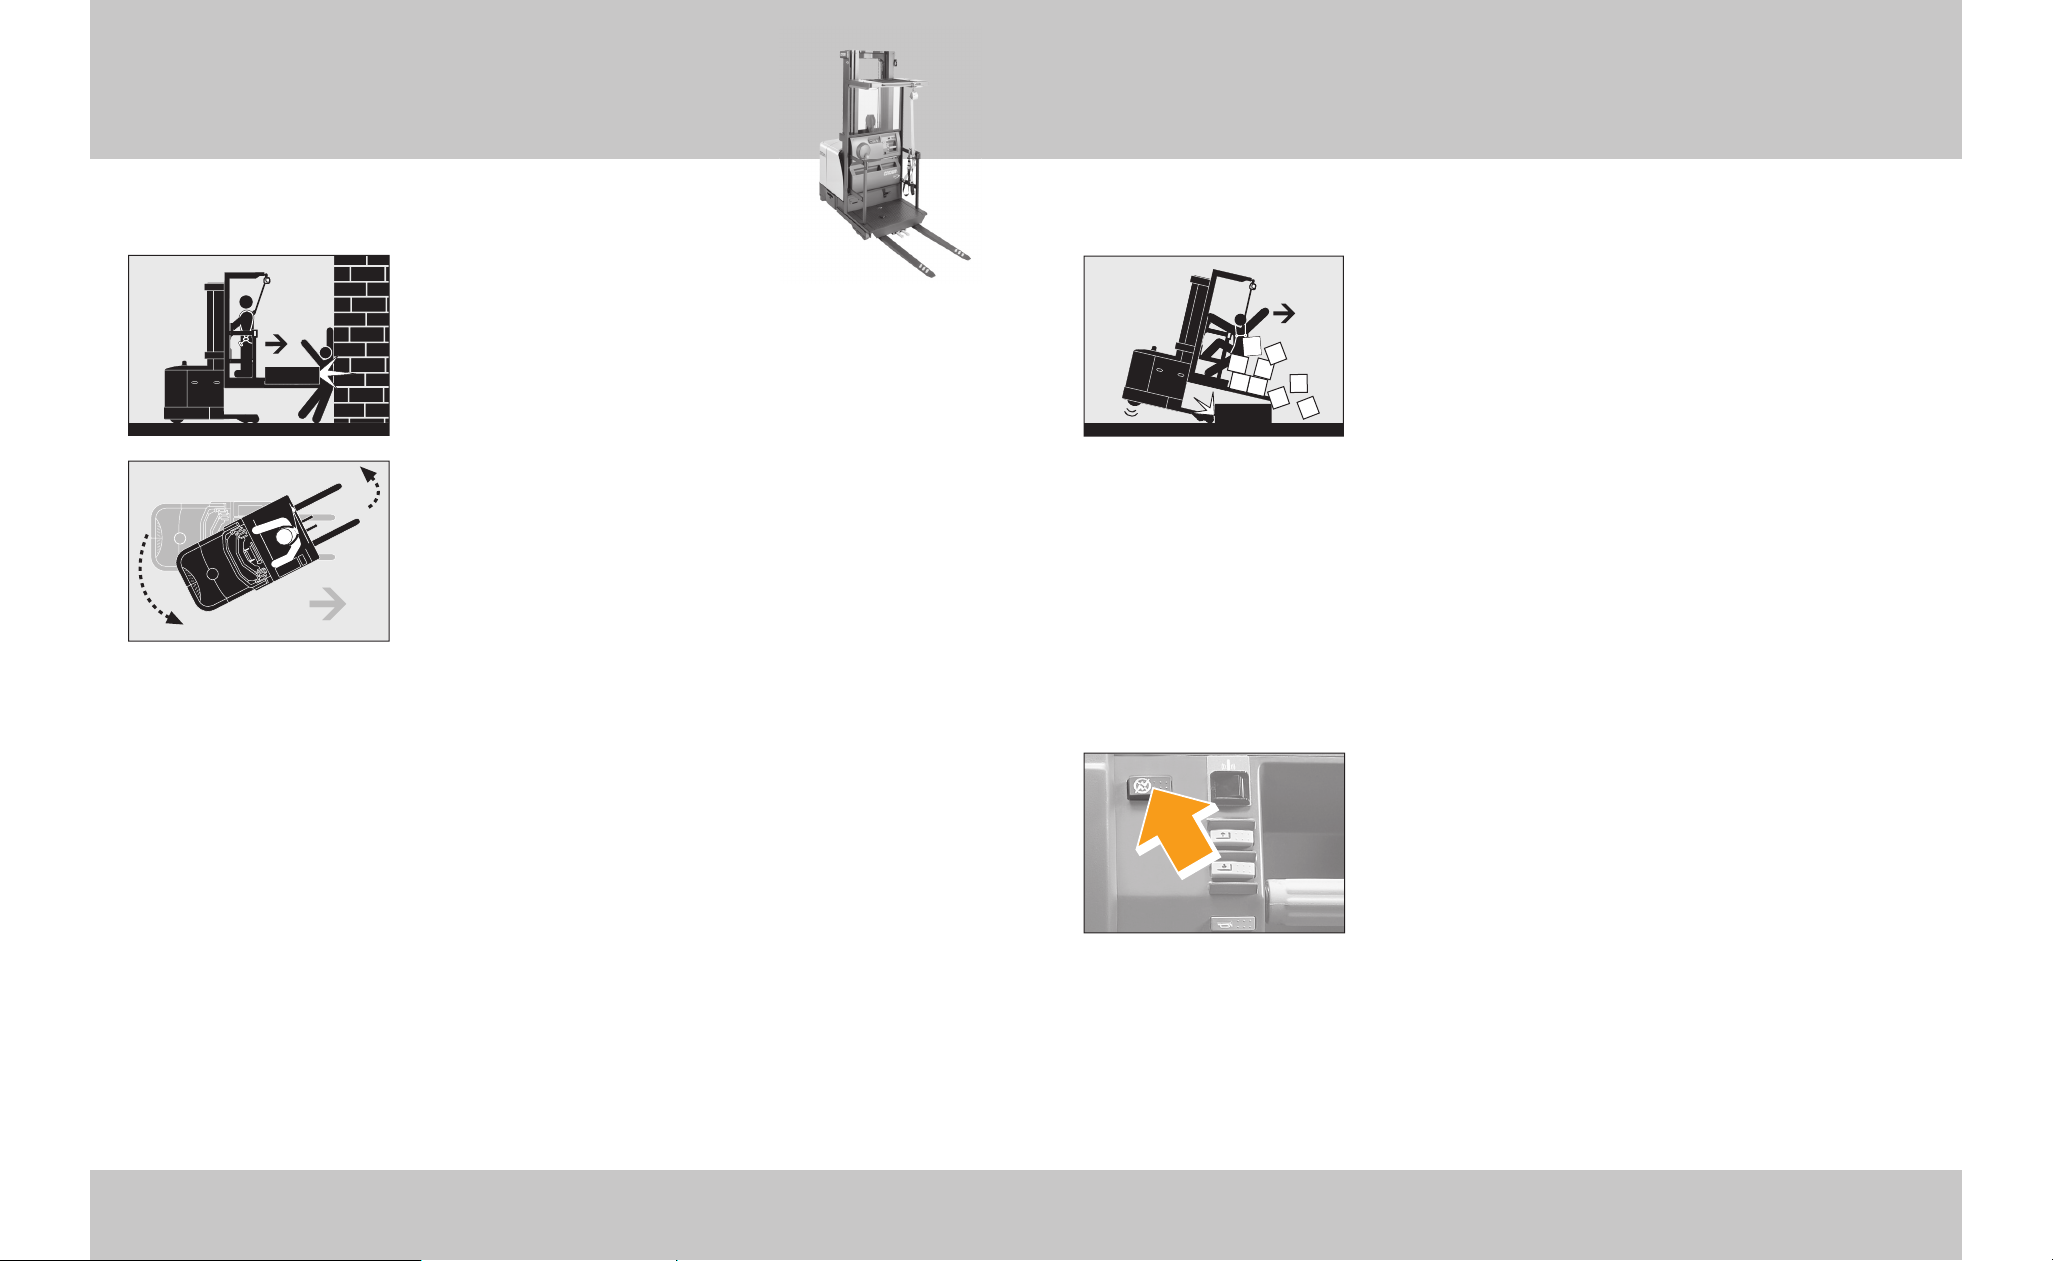
• Be careful that you don't pin or crush someone.
For example: Never drive your truck toward anyone
standing in front of a fi xed object.
• Watch out for power unit and fork (load) swing
when turning.
• Never allow passengers on your truck.
• Keep others away from your truck while you're
working. Don't ever allow anyone on or under the
load or forks.
• Don't let anyone use your truck unless they are
trained and certifi ed.
• Never lift anyone with the forks unless they are using
an approved fork mounted work platform. Even then
use extreme caution:
• Use a securely attached and approved
safety platform.
• Make certain lifting mechanism is
operating properly.
• Make certain truck is in neutral and brake
is applied.
• Lift and lower slowly.
• Watch for overhead obstructions.
• Be sure you can see and hear the person
being lifted.
• Never transport anyone on the platform from one
location to another.
AVOID FALLS AND TIPOVERS
• Be extremely careful when working around docks,
ramps and dockboards. Stay away from the edge.
• Check capacities. Be sure your truck, with load, isn't
too heavy for where you are driving.
• Make sure the load you are moving is stable.
Spread the forks as far as you can and center the
load. Insert the forks as far under the load as you
can. Be even more careful with long, high or wide
loads. They can be less stable.
• Watch out for overhead obstructions.
• Stockpickers should not be used on ramps or
grades. If you must drive on a grade, travel slowly
and never turn the truck. If carrying a load, point
the forks upgrade. If unloaded, point the forks
downgrade. Keep the fork height below
300mm (12 inches).
LEAVING YOUR TRUCK
• Stop your truck completely before getting off.
• Lower the forks to the fl oor and turn the truck off.
• Avoid parking on inclines. But if you must, block the
wheels of your truck.
Page 19
Battery Maintenance 3635 Battery Maintenance
Battery Maintenance
WHEN YOU INSTALL OR CHANGE BATTERIES
• Turn the truck OFF. Check that all controls
are in neutral. Disconnect the battery.
• Make certain you use the correct size and weight
battery. Never operate a truck that has an
underweight or undersized battery installed.
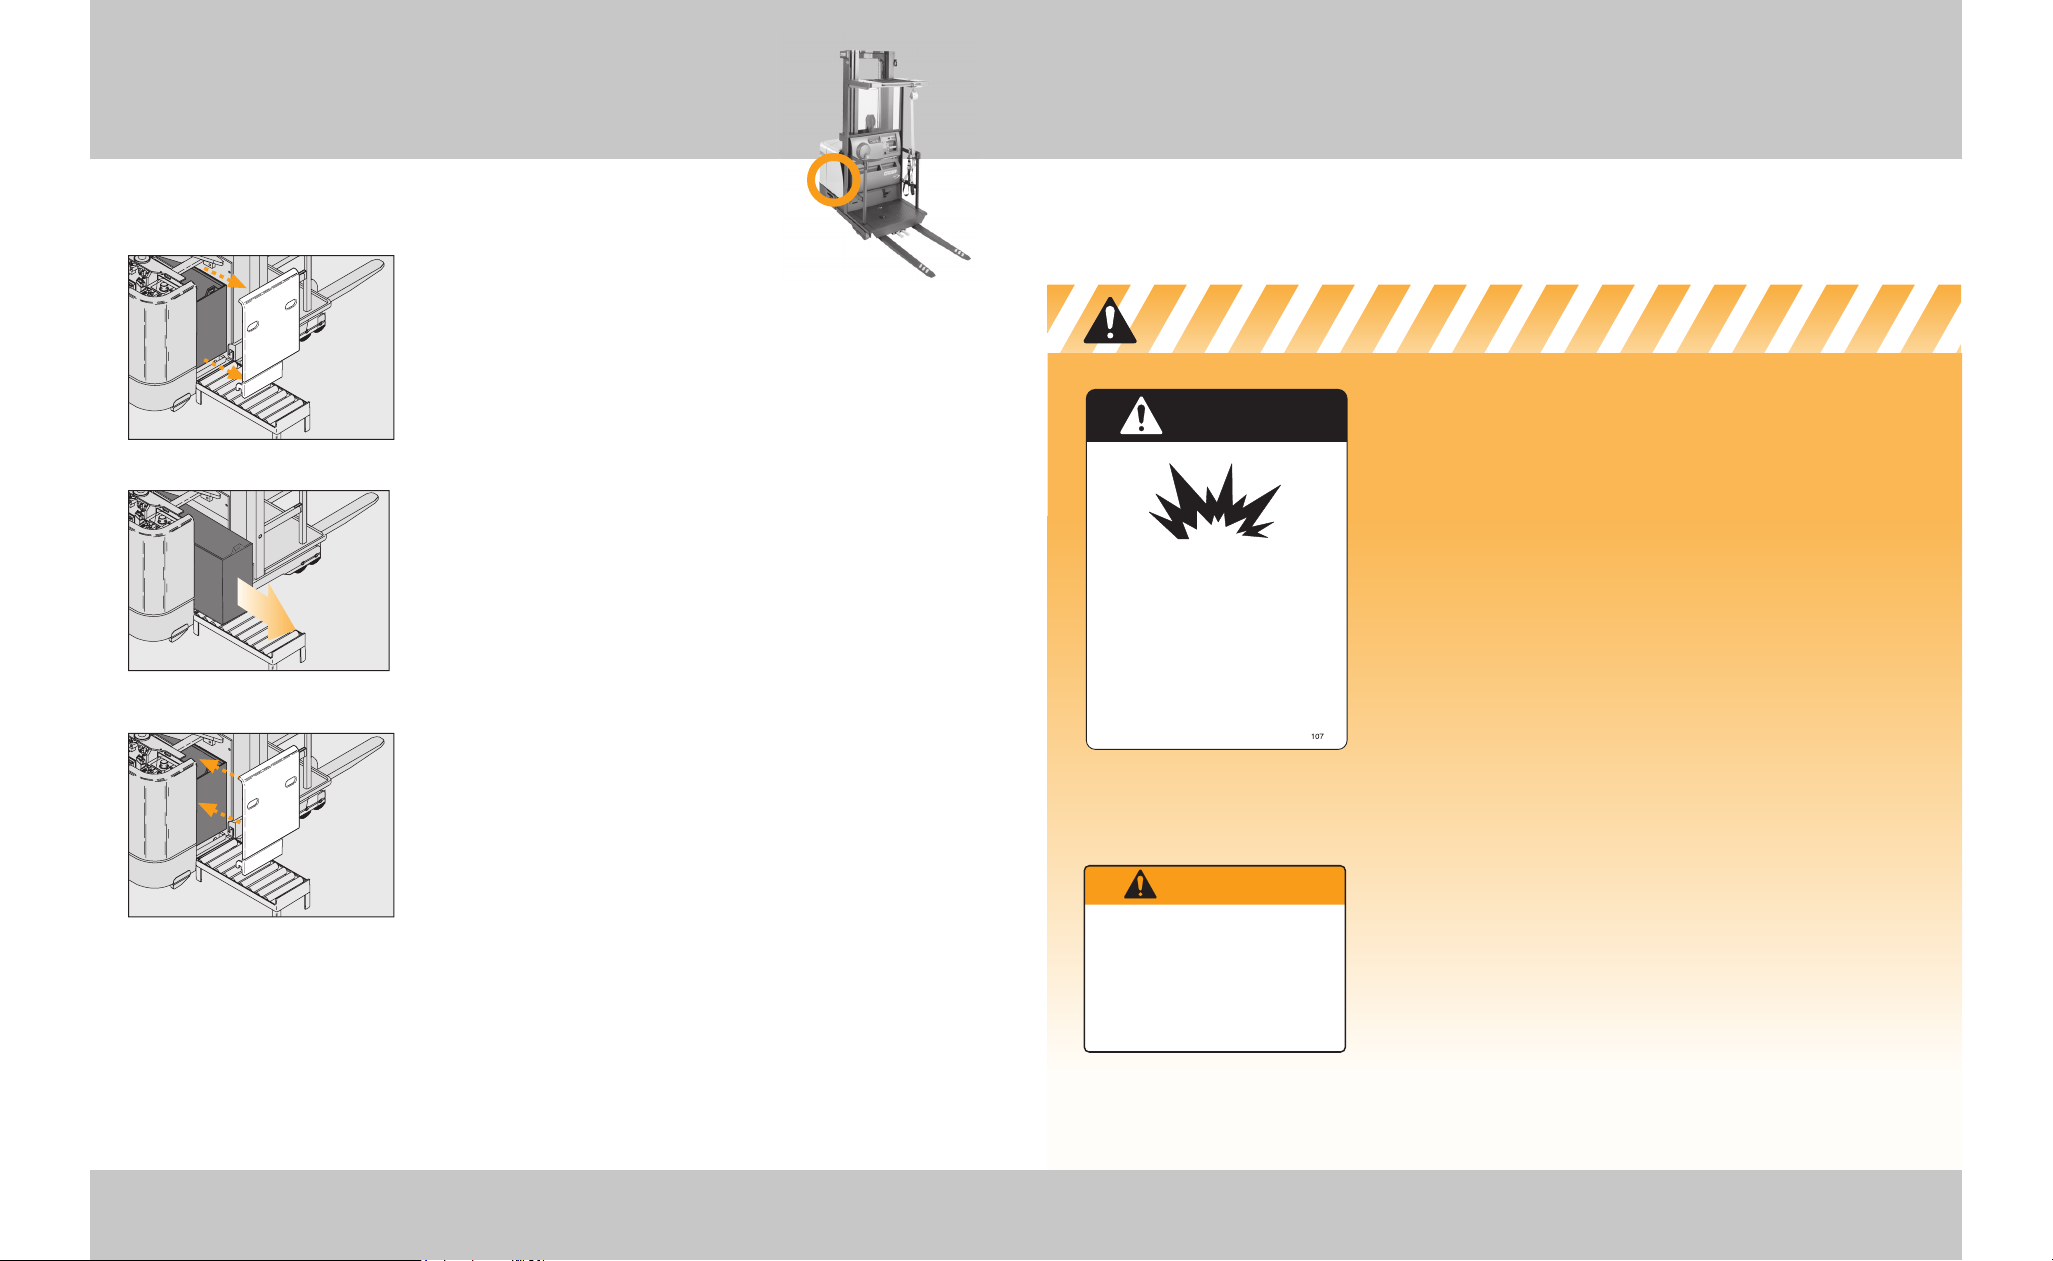
• Use a roller stand to install or remove a battery. Make
sure the roller stand is the same height as the rollers
in the truck's battery compartment. Also make sure
the roller stand is at least as long as your battery.
• Never let anything metal touch the top of the cells.
You could cause sparks or do damage to the battery.
Use an insulator (such as plywood) when necessary.
• Use an approved spreader bar to place a battery on,
or remove it from a stand. Make sure you adjust the
spreader bar hooks to fi t the battery.
AFTER INSTALLING YOUR BATTERY
• Replace the battery retainers. Make certain all
retainers on both sides of the truck are in place.
• Connect the battery. Turn the truck ON and check
truck operation.
Know the Hazards
TRUCK BATTERIES CAN BE DANGEROUS
Your truck battery produces fumes that can explode.
It also contains acid that could burn or disfi gure you.
• Do not try to install, remove, charge or service your
truck battery unless you are trained and authorized.
• Never smoke or use an open fl ame around batteries.
• Your company should provide an area where it is
safe to work on batteries. Use that area for all
battery work.
• Use protective equipment such as gloves, eye
shields, aprons etc.
BATTERY RETAINERS
The battery could slide out if all retainers are not in
place. Check both sides of the truck.
BATTERY SIZE
Make certain you use the correct size and weight
battery. Never operate a truck that has an underweight
or undersized battery installed.
Y
E
L
F
A
U
L
T
G
R
N
P
O
W
E
R
T
P
1
T
P
2
Y
E
L
F
A
U
L
T
G
R
N
P
O
W
E
R
P
1
P
2
WARNING
Minimum battery size allowed
000 mm (00.00 in.) wide
000 mm (00.00 in.) long
Undersize battery can affect truck
handling and stability. You could have
an accident.
Use U.L. classi ed Type E battery
Batteries produce explosive gas.
Do not smoke, use open flame, or
create an arc or sparks near this battery.
Ventilate well in enclosed areas and
when charging.
Batteries contain Sulfuric Acid which
causes severe burns. Do not get in
eyes, on skin, or clothing. In case of
contact, flush immediately. Get medical
attention if your eyes are affected.
DANGER
Continued next page...
L
F
A
U
L
T
R
N
P
O
W
E
R
Page 20
Warning Labels 38
Warning Labels
37 Battery Maintenance continued
Battery Maintenance continued
Know the Hazards
BEFORE CHARGING YOUR TRUCK BATTERY
• Charge the battery only in areas designated for
that use.
• See that the battery cells are fi lled to the proper
level. Never use an open fl ame to check the battery.
• Make certain the charger is the same voltage and
amperage as your battery.
• Read the battery charger instructions.
• Be sure the charger is turned OFF before connecting
the battery to the charger. Otherwise you might
create a spark which could cause the battery to
explode. Also, make sure the truck key switch is
turned off and all controls are in the off position.
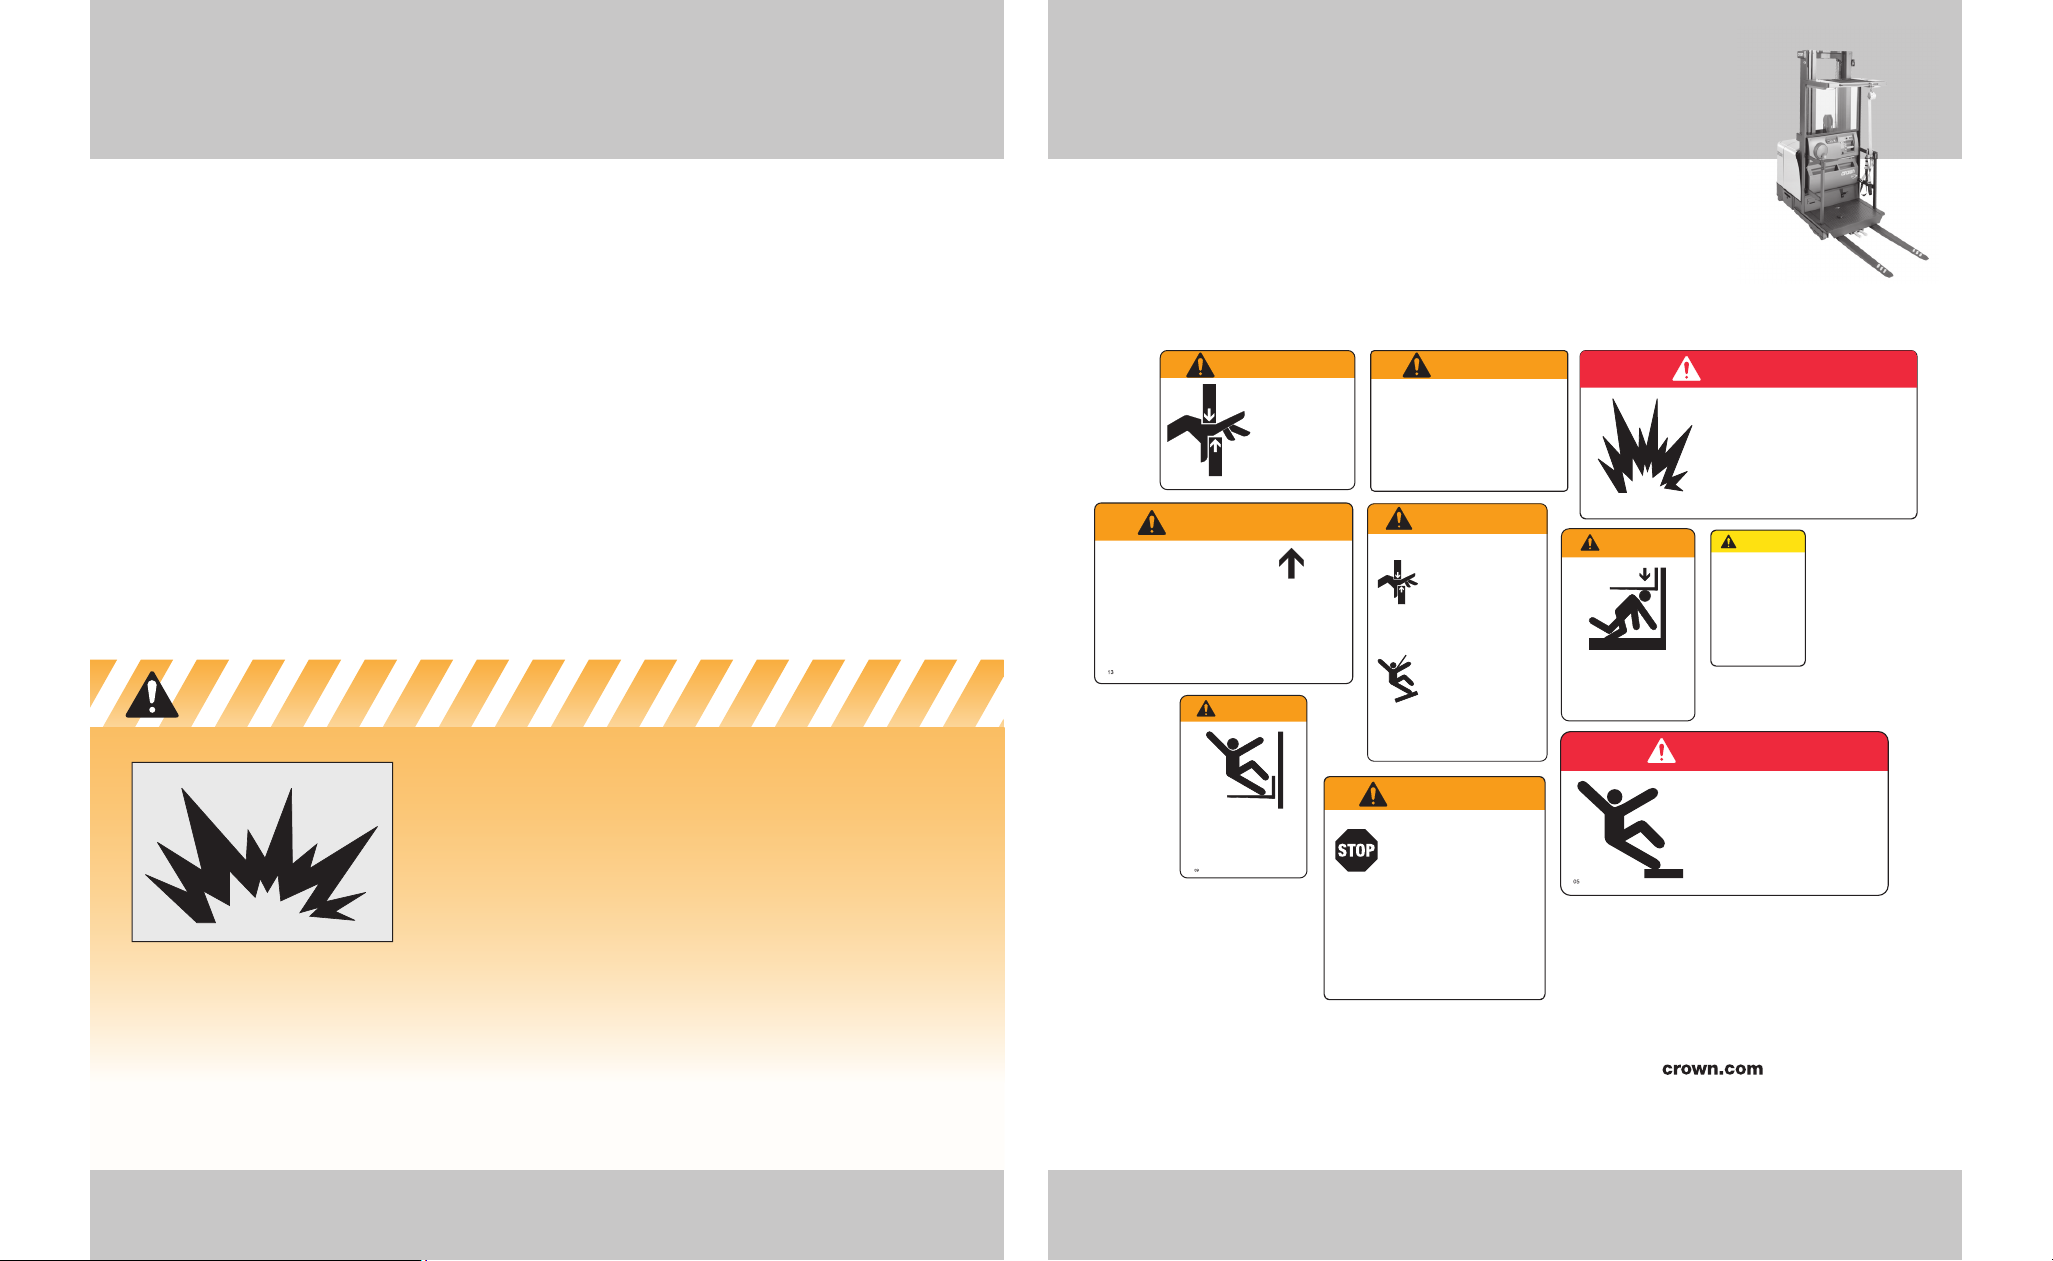
EACH WARNING LABEL
ON YOU TRUCK IS IMPORTANT
Read and obey all of them to
protect yourself and others.
All rights reserved under International
and Pan American copyright conventions
Copyright 2006 Crown Equipment Corp.
07
Stay clear of all
moving parts.
Moving parts can
cut or crush hands,
feet, arms or legs.
WARNING
47
CAUTION
Connect charger
properly or truck
can be damaged.
Make certain
charger is plugged
into the battery
connector, not the
truck connector.
20
DANGER
Batteries can produce explosive gas. Do
not smoke, use open ame, or create an arc or
sparks near this battery. Ventilate well when in an
enclosed area and when charging.
This battery contains Sulfuric Acid which causes
severe burns. Do not get in eyes, on skin, or
clothing. In case of contact, ush immediately and
thoroughly with water. Get medical attention if your
eyes are affected.
WARNING
Minimum battery size allowed
000 mm (00.00 in.) wide
000 mm (00.00 in.) long
Undersize battery can affect truck
handling and stability. You could
have an accident.
Use U.L. classi ed Type E battery
04
WARNING
It's the law, you must be
trained and certi ed to
operate this truck.
(OSHA § 1910.178, Rev. 1999)
You or people around you
could be seriously injured
or even killed if you don’t use
this truck correctly.
Obey all warnings & instructions on the
truck and in the operator manual and
on the truck.
* Additional copies of the Operators Manual
and Truck Labels can be obtained from Crown
Equipment Corp., New Bremen, OH 45869
.
Manual Lowering Valve
Before using valve:
1. Make certain that area under forks is clear.
2. Warn operator to keep all body members
within the operators compartment.
3. Make certain the forks are clear of the rack.
Close valve immediately if chains become
slack.
10
WARNING
Falling objects or lowering forks can
cause serious injury or death.
Never stand under the forks.
While servicing, block the forks so
they won't fall.
DANGER
Falling from a raised platform can cause a
serious injury or death.
Attach safety harness and lanyard before
operating truck.
Standing or riding on the
forks can cause a fall. You
can be seriously injured
or killed.
Never stand or ride on
forks for any reason.
WARNING
WARNING
264
Avoid being crushed.
Keep head, arms,
hands, legs, and feet
within the operator
area. Stop truck
completely before
getting off.
Tipovers and falls can
cause serious injury
or even death. Do not
overload truck. Use
extreme caution
near docks or on
dockplates.
WARNING
T
m to
Page 21
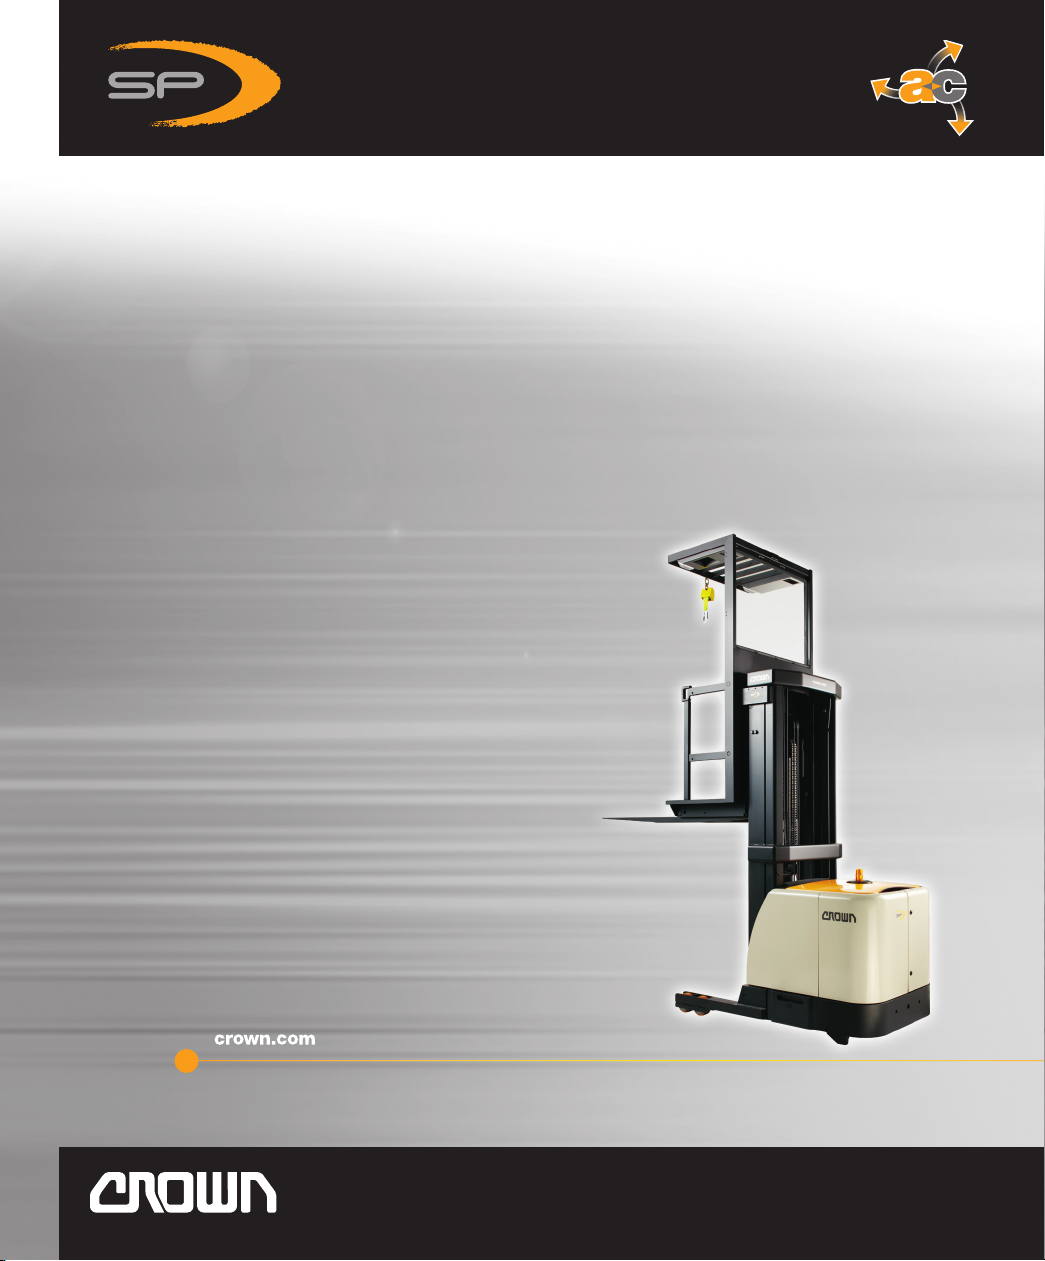
3500 • 4000 SERIES
This operator manual has
information for all
models of series SP 3500
& SP 4000 plus some
options and accessories.
Some of the illustrations
and information may
not apply to your truck.
The most important component is you.
New Bremen, Ohio 45869 USA © 2007 PF18931 Rev. 2/14 Printed in U.S.A.
 Loading...