

Crown Sound Grabber II, SoundGrabber Quick Reference
@crown
Microphone Quick Reference
®
SoundGrabber Mic
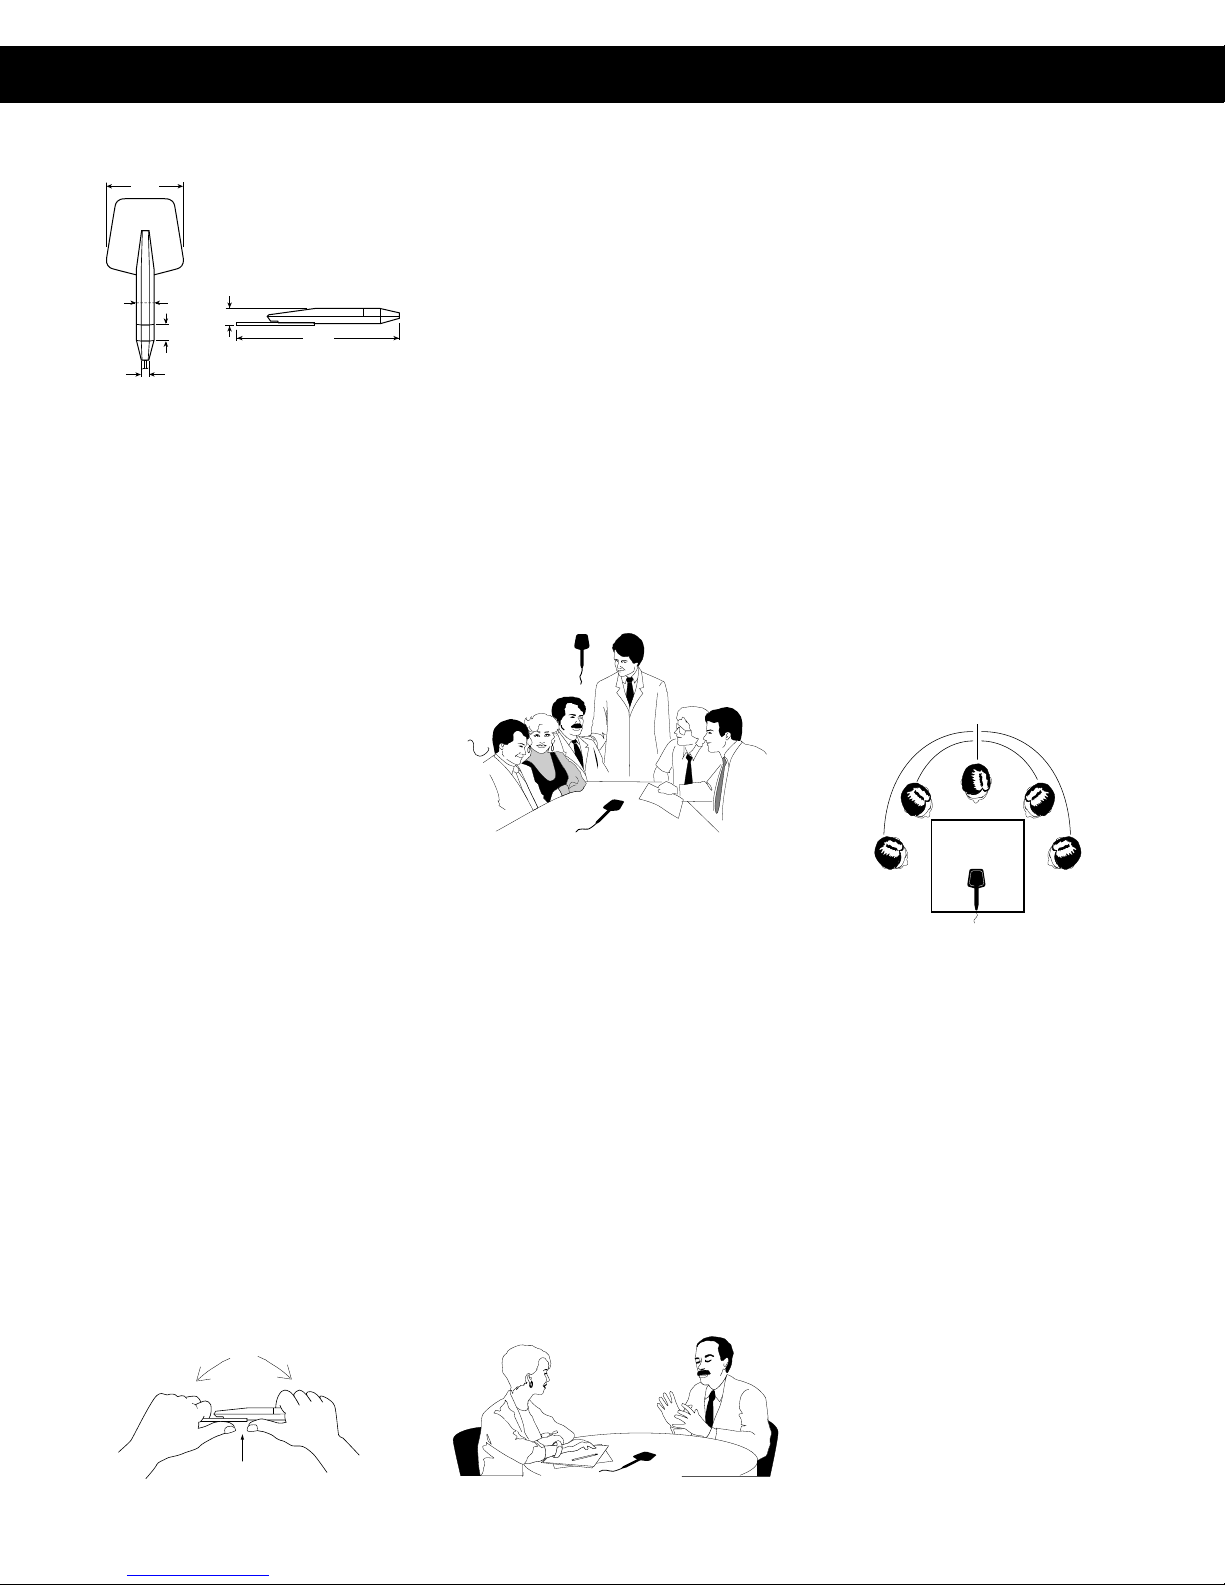
3.93"
.88"
1.000"
.450"
SoundGrabber
The Crown
®
designed around a new method of picking up
sound waves. The design is based on the
Pressure Recording Process,
Long and Wickersham, in which sound waves
reinforce themselves in the area nearest a flat
surface, usually called the boundary.
Top recording engineers all over the world
are using professional versions of the Crown
®
(Pressure Zone Microphone®) to im-
PZM
prove the quality of commercial recordings.
The Sound Grabber is one version of that
technology, designed to meet the needs of
the home or business recordist and bring
the benefits of PZM technology within the
reach of many more people.
Because of this new technology, the Sound
Grabber offers you the opportunity for vast
improvement in the quality of your recordings. Sound Grabber will pick up sounds at
distances you never thought possible and it
will pick them up with a clarity that other
microphones, because of the limitations of
their construction, simply cannot match.
The Sound Grabber does not need to follow
the action, since it has a wide-angle pickup
pattern. So long as the mic “sees” the sound,
in whatever direction, it will pick it up clearly.
Speakers or vocalists can move freely around
the Sound Grabber without their tone quality
changing.
Battery Installation
The SoundGrabber is powered with an alkaline 1.5-volt battery. One is furnished with
the microphone, but it must be inserted into
the microphone.
.89"
8.17"
Fig. 1 SoundGrabber Mic
SoundGrabber is a microphone
™
discovered by
To remove the battery cover, pop it off by
pressing with thumbs on the rear of the
microphone handle (as if you're snapping a
twig). See Fig. 2. Slip the battery into the
hole in the handle, with the positive (+) end
toward the cable. Replace the battery cover.
Your battery will supply the needed power
for the microphone for at least six months
and possibly much longer.
Practical Applications
Conference Recording—
Place the SoundGrabber flat on the conference table somewhere near the center of
the table. One microphone should be able
to pick up groups of twelve or less. Larger
groups may require additional mics, depending on the distances involved. See Fig.
3.
ALTERNATE PLACEMENT
ON WALL
SOUND GRABBER
ON TABLE
Fig. 3 Conference
The SoundGrabber should not be covered
with papers or books, as this could make the
sound muffled.
Should you wish to record a conference
group which is meeting without a table, the
SoundGrabber could be placed on the floor
in the middle of the group.
In a small room, with or without a table, the
SoundGrabber will also work well mounted
on a nearby wall. Double-faced adhesive
tape can be used, providing the wall finish
will not be damaged.
Interviews—
For two-person interviews, the microphone
should be reasonably parallel to the floor,
somewhere between the two speakers. See
Fig. 4.
If both are sitting at a table, the mic can lie on
the table, somewhere on a line between the
two. Be sure to place the included windscreen on the mic for outdoor use.
If the interview is being recorded on television, the mic can easily be positioned out of
the camera range and still have excellent
audio pickup.
Interviews can also be miked with the
SoundGrabber mounted on the ceiling or in
an overhead light fixture.
Pulpits, Lecterns—
Because it lies flat on any surface, the
SoundGrabber is ideal for picking up speech
at a lectern or pulpit. It is invisible to the
audience and can be placed anywhere on
the surface so as not to interfere with any
books or papers. See Fig. 5.
LECTERN
(top view)
Fig. 5 Lectern
It also provides a great amount of freedom
for the speaker, since it is not necessary to
"talk into" the mic, as so many people are
used to doing. Speakers can also move their
head and body more freely than is possible
with conventional mics. So long as they stay
the same distance from the mic, the angle at
which they speak will make no difference.
Cassette Recording—
The SoundGrabber is equipped with a ten
foot cord with a 1/8” mic plug. A micro plug
and 1/4” phone-plug adaptors are also provided.
The SoundGrabber will provide an output
signal that will record easily on any standard
cassette recorder. Because of the mic’s novel
design, you probably will find that your recorder performs better than it ever has before.
Fig. 1 Battery Cover Removal
Fig. 4 Interview
Video—
For video recording with a fixed camera
position, simply plug the mic into the cam-
@crown
+15
Microphone Quick Reference
®
SoundGrabber Mic
era and position the mic as needed for the
type of recording you are doing. If the camera will be moving, you can tape the mic to
the front of the camera or ask an assistant to
hold the mic.
Mic Stands—
Crown has designed a mic stand adapter
for the Sound grabber which is available
from your Crown dealer. Ask for an ASA-1
adapter. One end has a female screw fitting
to match the top end of most mic stands,
while the other end of the adapter clamps
around the mic handle. A swivel mount permits you to position the mic for best pickup.
Musical Soloists, Small Combos—
Put the mic on the floor, 3 to 6 feet in front of
the performer.
If you are recording without an audience, the
mic could be placed on a wall facing the
performer or on a fair-size panel angled up
towards the performer.
Drums—
An effective trick here is to hang the mic
around the drummer’s neck, so the mic lies
on the chest.
Upright Piano
Mount the mic on the wall behind the piano,
so it picks up the sound coming off the
sound board. Or mount the mic in front of the
open kick-board area.
Grand piano—
Use drafting tape (found in office supply
stores) to mount the mic on the underside of
the raised lid, in the middle. Use two for
stereo. If necessary, close the top to eliminate outside noise.
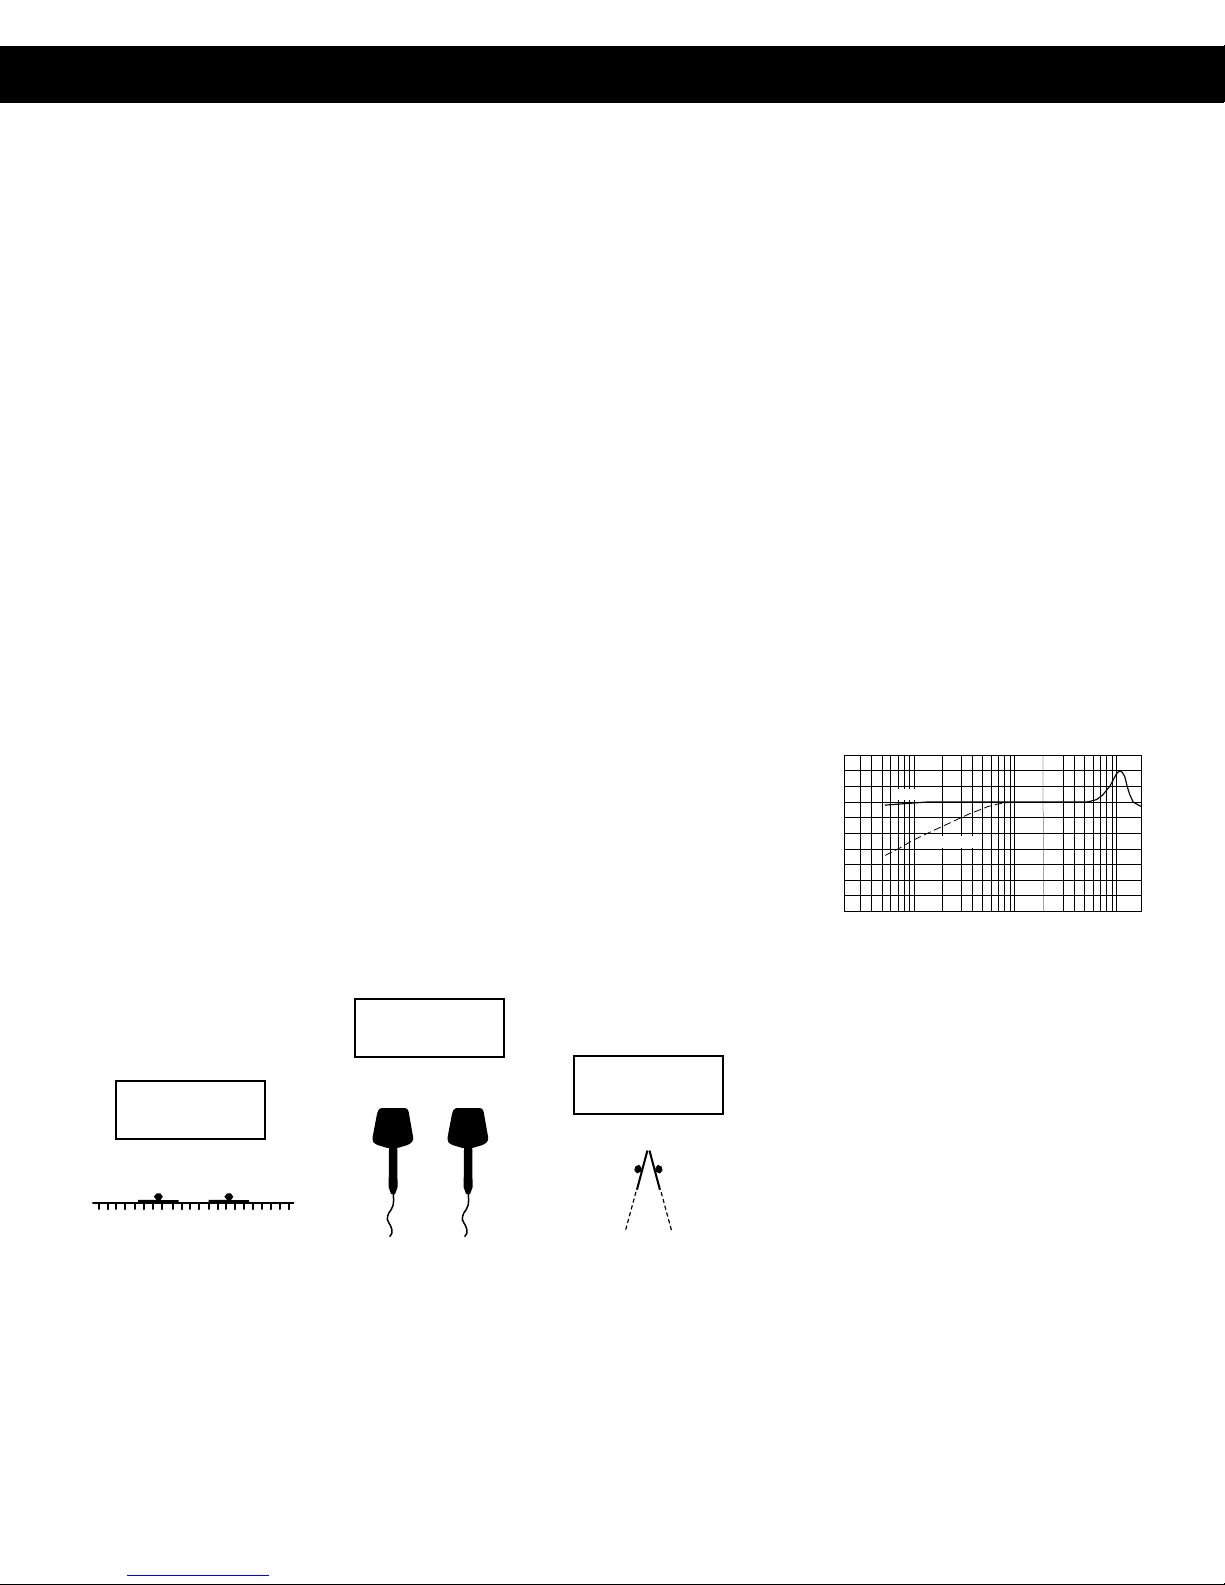
Stereo Recording—
• Mount two Sound Grabbers head high on
a wall or on the floor and about 3 to 10 feet
apart, facing the performers. The mics should
be 5 to 15 feet from the performers (see Figs.
6 and 7).
• Mount two Sound Grabbers on a mic stand
so they are back to back, but angled about
15½ from each other. Position the stand so
the mics face to either side of the performers
(see Fig. 8).
• Position the mics in the air (at least fifteen
feet off the ground), about 3 to 10 feet apart,
facing down towards the performers and
slightly in front of them.
Warranty
This Crown microphone is guaranteed unconditionally against malfunction from any
cause for a period of one year from date of
original purchase. If such malfunction occurs, microphone will be repaired or replaced (at our option) without charge for
materials or labor.
If the unit fails to work check the mic cables,
battery, placement, and connections. If the
microphone seems to be defective, return
the microphone in its original packaging to
Crown’s Service Department at 57620 CR
105, Elkhart, IN 46517. For further assistance or technical support call 800-342-
6939.
Specifications
Type: Pressure Zone Microphone.
Frequency response (typical): 50 Hz to 16
kHz (10 Kohm load), 300 Hz to 16 kHz (1500
ohm load). See Fig. 9.
Polar pattern: Hemispherical when mounted
on a surface boundary.
Impedance: 1600 ohms, unbalanced.
Sensitivity: 20 mV/Pa* (–34 dB re 1 V/Pa*).
Power sensitivity: –52 dBm/Pa*.
Power: One 1.5V size AA battery.
Cable: 10 foot cable with mini-phone plug,
1/4 inch phone plug and micro phone plug
adaptors.
Dimensions: See Fig. 1.
*1 pascal = 10 microbars = 10 dynes/cm
2
=
94 dB SPL.
Frequency in Hz
+10
+5
dB
0
–5
–10
–15
–20
–25
–30
–35
NO LOAD
1.6 K Ω LOAD
20 100 1K
Fig. 9 Frequency Response
10K
PERFORMERS
MICROPHONES ON FLOOR
PERFORMERS
MICROPHONES ON WALL
WALL
Fig. 6 Stereo #1 Fig. 8 Stereo #3Fig. 7 Stereo #2
PERFORMERS
MICROPHONES ON STAND
[
Guaranteed Excellence
Crown International, Inc.
PO Box 1000 Elkhart, IN 46515-1000
Ph. 800-342-6939/219-294-8200
Fax. 219-294-8301
Auto-Fax: 800-294-4094/219-293-9200
http://www.crownintl.com
Trademark Notice:
Crown,® Pressure Zone Microphone,®
are registered trademarks of Crown International
Inc.
and
PZM
®
 Loading...