

Page 1

INSTRUCTION MANUAL
COFFEE MAKER
MODEL:CEM-1518
Read this booklet thoroughly before using and save it for future reference
Page 2

IMPORTANT SAFEGUARDS
Before using the electrical appliance, the following basic precautions should always be followed
including the following:
1. Read all instructions.
2. Before using check that the voltage of wall outlet corresponds to rated voltage marked on the rating plate.
3. This appliance has been incorporated with a grounded plug. Please ensure the wall outlet in your house is
well earthed.
4. To protect against fire, electric shock and injury to persons do not immerse cord, plug, in water or other
liquid.
5. Remove plug from wall outlet before cleaning and when not in use. Allow appliance cool down
completely before taking off, attaching components or before cleaning.
6. Do not operate any appliance with a damaged cord or plug or after the appliance malfunctions, or is
dropped or damaged in any manner. Return appliance to the nearest authorized service facility for
examination, repair or electrical or mechanical adjustment.
7. The use of accessory attachments not recommended by the appliance manufacturer may result in fire,
electric shock or injury to persons.
8. Place appliance on flat surface or table, do not hang power cord over the edge of table or counter.
9. Ensure the power cord do not touch hot surface of appliance.
10. Do not place the coffee maker on hot surface or beside fire in order to avoid to be damaged.
11. To disconnect, remove plug from wall outlet. Always hold the plug. But never pull the cord.
12. Do not use appliance for other than intended use and place it in a dry environment.
13. Close supervision is necessary when your appliance is being used near children.
14. Be careful not to get burned by the steam.
15. Do not touch the hot surface of appliance (such as steam wand, and the steel mesh just boiling). Use
handle or knobs.
16. Do not let the coffee maker operate without water.
17. Scalding may occur if the water tank is removed during the brewing cycles.
18. Do not remove the metal funnel when appliance in brewing coffee or when steam and hot water escape
from metal funnel and ensure to release the pressure in water tank before removing metal funnel.
19. Connect plug to wall outlet before using and turn any switch off before plug is removed from wall outlet.
20. Relief pressure through steam wand before removing tank cover or metal funnel.
21. This appliance is not intended for used by persons (including children) with reduced physical, sensory or
mental capabilities, or lack of experience and knowledge, unless they have been given supervision or
instruction concerning use of the appliances by a person responsible for their safety.
22. Children should be supervised to ensure that they do not play with the appliance.
23. This appliance is intended to be used in household and similar applications such as:
– staff kitchen areas in shops, offices and other working environments;
– farm houses;
– by clients in hotels, motels and other residential type environments;
Page 3
– bed and breakfast type environments.
24. Do not use outdoors.
25. Save these instructions.
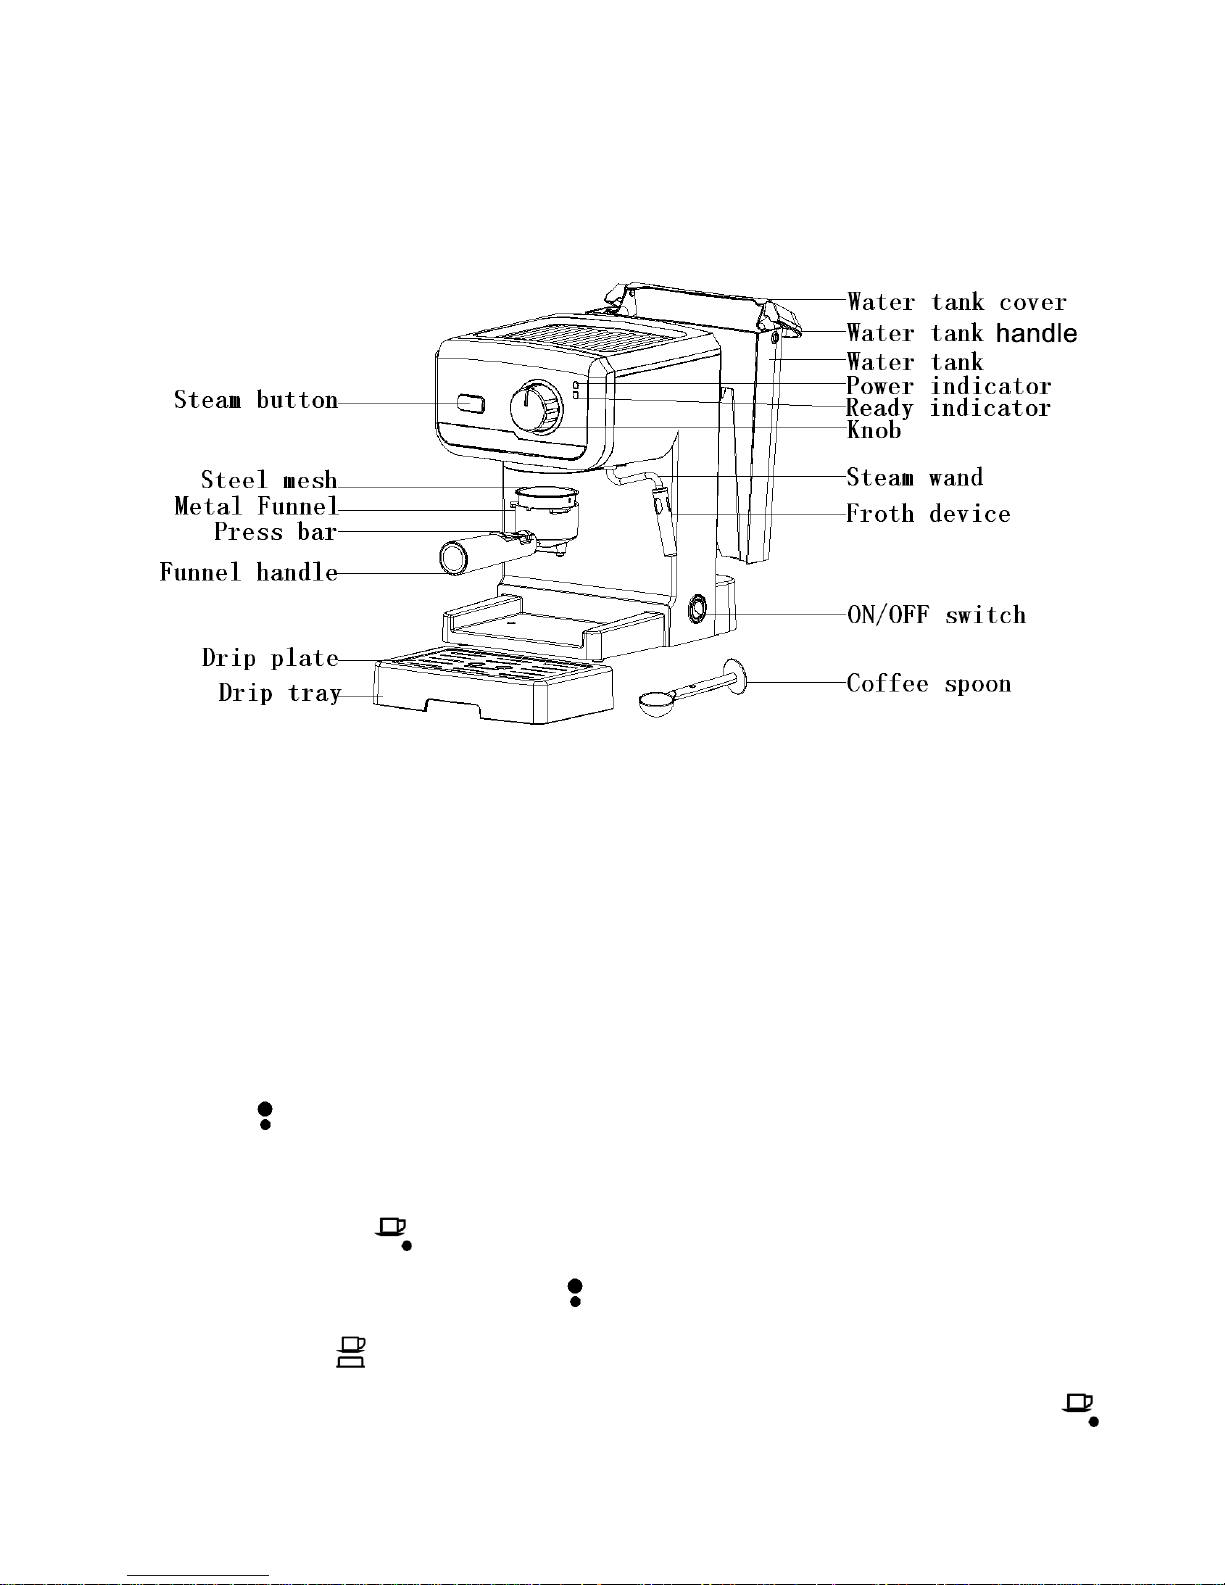
KNOW YOUR COFFEE MAKER
(Product may be subject to change without prior notice)
BEFORE THE FIRST USE
To ensure the first cup of coffee tastes excellent, you should rinse the coffee maker with warm water as
follows:
1. Pour water into water tank, the water level should not exceed the “MAX” mark in the tank. Then replace
the water tank cover.
Note: the appliance is supplied with a detachable tank for easy cleaning, you can fill the tank with water
firstly, and then put the tank into the appliance.
2. Set steel mesh into metal funnel (no coffee in steel mesh). make sure the tube on the funnel aligns with
groove in the appliance, then insert the funnel into the appliance as indicating of “INSERT” mark, and you
can fix them into coffee maker firmly through turn it anticlockwise until it is fully locked.
3. Place an espresso cup (yourself cup) on removable drip plate. Make sure the knob is on the position
which is the“ ”position.
Note: the appliance is not equipped with jug, please use yourself jug or coffee cup.
4. Connect to power source, press the ON/OFF switch. The power indicator (red) will be illuminated.
5. Turn the knob to the “ ” position, the pump will pump water, when there is water flowing out and
close the pump by turning knob again to the “ ” position, make sure the steam button is on the higher
position which is the “ ” position and waiting for a moment, the appliance begins to be pre-heated until
the ready indicator (blue) is illuminated, it shows the pre-heating is finish. Turn the knob to the “ ”
position again, and water will flow out.
Page 4

6. After about one minute, turn the knob to the “ ” position to stop brewing, you can pour the water in
each container out then clean them thoroughly, now you can start brewing.
PRE-HEATING
To make a cup of good hot Espresso coffee, we recommend you preheating the appliance before
making coffee, including the funnel, filter and cup, so that the coffee flavour can not be influenced by
the cold parts.
1. Remove the detachable tank and open the tank cover to fill it with desired water, the water level
should not exceed the “MAX” mark in the tank. Then place the tank into the appliance properly.
2. Set steel mesh into metal funnel, make sure the tube on the funnel aligns with groove in the appliance,
then insert the funnel into the appliance as indicating of “INSERT” mark, and you can fix them into
coffee maker firmly through turn it anticlockwise until it is fully locked.
3. Place an espresso cup (yourself cup) on removable drip plate.
4. Then connecting the appliance to power supply source. Make sure the knob is on the “ ” position.
5. Press the ON/OFF switch, the power indicator (red) will be illuminated, make sure the steam button is
on the higher position which is the “ ” position. Turn the knob to the “ ” position, when there is
water flowing out, close the pump immediately by turning knob again to the “ ” position. The
purpose of the step is that pump the water of the tank into the housing.
6. When the ready indicator (blue) is illuminated, you should turn the knob to the “ ” position again,
there will be hot water flowing out. When the ready indicator (blue) is extinguished, close the pump by
turning knob again to the “ ” position. The pre-heating is finished.
MAKE ESPRESSO COFFEE
1. Remove the funnel by turning it in clockwise, .Add ground coffee to steel mesh with coffee spoon, a
spoon ground coffee power can make about a cup of top-grade coffee, then press the ground coffee
powder tightly with the coffee spoon.
2. Set steel mesh into metal funnel, make sure the tube on the funnel aligns with groove in the appliance,
then insert the funnel into the appliance as indicating of “INSERT” mark, and you can fix them into
coffee maker firmly through turning it anticlockwise until it is at the “LOCK” position .
3. Pour out the hot water in the cup. Then place the hot cup (yourself cup) on drip plate.
4. At the time, the ready indicator (blue) is illuminated, once the blue lamp is illuminated, you should
turn the knob to the “ ” position, waiting for a moment, there will be coffee flowing out.
Note: During continuous operations, the ready indicator is likely to extinguish due to the inadequate
Page 5

temperature of the water in the boiler, but it does not mean the unit will stop operating, you may continue to
make coffee regardless of it.
5.You should turn the knob to the “ ” position manually when desired coffee is obtained or the colour of
coffee changes weak obviously,your coffee is ready now.
WARNING: Do not leave the coffee maker unattended during making the coffee, as you need operate
manually sometimes!
6. After finishing making the coffee, you can take the metal funnel out through turn clockwise, then pour the
coffee residue out with the steel mesh pressed by press bar.
7. Press the power switch to cut off the power source.
8. Let them cool down completely, then rinse under running water.
FROTHING MILK/ MAKE CAPPUCCINO
You get a cup of cappuccino when you toping up a cup of espresso with frothing milk.
Method:
1、Prepare espresso first with container big enough according to the part “MAKE ESPRESSO COFFEE”,
make sure that the knob is at the “ ” position.
2、Press down the steam button to the lower position which is the “ ” position, waiting for until the
ready indicator (yellow) is illuminated.
Note: During continuous operations, the ready indicator is likely to extinguish due to the inadequate
temperature of the water in the boiler, but it does not mean the unit will stop operating, you may continue
to make cappuccino regardless of it.
3、Fill a jug with about 150 grams of milk for each cappuccino to be prepared, you are recommended to
use whole milk at refrigerator temperature (not hot!).
Note: In choosing the size of jug, it is recommend the diameter is not less than 70±5mm, and bear in
mind that the milk increases in volume by 2 times, make sure the height of jug is enough.
4、Insert the steam wand(with the frothing device) into the milk about two centimetre, then turn the knob to
the “ ” position , steam will come out from the steam wand. Froth milk in the way moving vessel
round from up to down.
5. When the required purpose is reached, you can turn the knob to the“ ” position.
Note: Clean steam outlet with wet sponge immediately after steam stops generating, but care not to hurt!
Page 6

6. Pour the frothed milk into the espresso prepared, now the cappuccino is ready. Sweeten to taste and if
desired, sprinkle the froth with a little cocoa powder.
7. Press the power switch to cut off the power source.
Note: we recommend you allow the maker to cool down at least for 5 minutes and press the steam button
to the higher position which is the “ ” position before making coffee again. Otherwise burnt odor may
occurred in your Espresso coffee .
PRODUCING STEAM TO HEAT LIQUIDS
The steam wand (without the frothing device) can be used to make hot beverages like drinking chocolate,
water or tea.
Method:
1. Remove the detachable tank and fill it with desired water, the water level should not exceed the “MAX”
mark in the tank. Then place the tank into the appliance properly.
2. Then connecting the appliance to power supply source.
3. Press the ON/OFF switch, the power indicator (red) is illuminated.
4.Turn the knob to the “ ” position, make sure the steam button is on the higher position which is the
“ ”position, the pump will pump water, when there is water flowing out, close the pump immediately,
pressing down the steam button to the lower position which is the “ ” position and waiting for a moment,
the appliance begins to be heated until the yellow lamp is illuminated, it shows the heating is finish.
5. Remove the frothing device from the steam wand.
6. Dip the steam wand into the liquid to be heated. Turn the knob to the “ ” position.
7. When the required temperature is reached, you can turn the knob to the“ ” position.
8. Press the power switch to cut off the power source.
AUTOMATICALLY POWER-OFF FUNCTION
1. After pressing power switch, if there is no any operation within 25 minutes, the unit will power off
automatically.
2. After pressing power switch, if there is no any operation after pump worked for 3 minutes during
brewing coffee, the unit will power off automatically.
CLEAN AND MAINTENANCE:
Page 7

1、Cut off power source and let the coffee maker cool down completely before cleaning.
2、Clean housing of coffee maker with moisture-proof sponge often and clean water tank, drip tray and
removable shelf regularly then dry them.
Note: Do not clean with alcohol or solvent cleanser. Never immerse the housing in water for cleaning.
3、Detach the metal funnel through turn it clockwise, get rid of coffee residue inside, then you can clean it
with cleanser, but at last you must rinse with clear water.
4、Clean all the attachments in the water and dry thoroughly.
CLEANING MINERAL DEPOSITS
1. To make sure your coffee maker operating efficiently, internal piping is cleanly and the peak flavor of
coffee, you should clean away the mineral deposits left every 2-3 months.
2. Fill the tank with water and descaler to the MAX level ( the scale of water and descaler is 4:1, the detail
refers to the instruction of descaler. Please use “household descaler”, you can use the citric acid (obtainable
from chemist’s or drug stores) instead of the descaler (the one hundred parts of water and three parts of citric
acid).
3. According to the program of pre-heating, put the metal funnel (no coffee powder in it) and carafe (jug) in
place. Brewing water per “ PRE-HEATING”.
4. Press the ON/OFF switch, the power indicator (red) will be illuminated, you should turn the knob to
the“ ” position, make sure the steam button is on the higher position which is the “ ” position, when
there is water flowing out and close the pump by turning the knob to the“ ” position, and waiting for a
moment, the coffee maker begins to be heated.
5. When the ready indicator (blue) is illuminated, it shows the heating is finish. Turning the knob to the“ ”
position and make make two cups coffee (about 2Oz). Then close the pump and wait for 5s.
6. Press down the steam button to the lower position which is the “ ” position, waiting for until the
yellow indicator is illuminated. Make steam for 2 minutes, then turn the knob to the“ ”position to stop
making steam. Press the power switch to stop the unit immediately, make the descalers deposit in the unit
at least 15 minutes.
7. Restart the unit and repeat the steps of 4-6 at least 3 times.
8. Then pressing and release the steam button to the higher position which is the “ ”position, when
the blue lamp is illuminated, Turning the knob to the“ ” position to brew until no descaler is left.
9. Then brewing coffee (no coffee powder) with tap water in the MAX level, repeat the steps of 4-6 for 3
times (it is not necessary to wait for 15 minutes in step of 6), then brewing until no water is left in the tank.
10. Repeat the step of 9 at least 3 times to make sure the piping is cleanly.
Page 8

TROUBLE SHOOTING
Symptom
Cause
Corrections
Water leaks from the bottom of
coffee maker.
There is much water in the drip
tray.
Please clean the drip tray.
The coffee maker is
malfunction.
Please contact with the
authorized service facility for
repairing.
Water leaks out of outer side of
filter.
There is some coffee powder on
filter edge.
Get rid of them.
Acid (vinegar) taste exists in
Espresso coffee.
No clean correctly after
cleaning mineral deposits.
Clean coffee maker per the
content in “before the first use”
for several times.
The coffee powder is stored in a
hot, wet place for a long time.
The coffee powder turns bad.
Please use fresh coffee powder,
or store unused coffee powder in
a cool, dry place. After opening a
package of coffee powder, reseal
it tightly and store it in a
refrigerator to maintain its
freshness.
The coffee maker cannot work
any more.
The power outlet is not plugged
well.
Plug the power cord into a wall
outlet correctly, if the appliance
still does not work, please
contact with the authorized
service facility for repairing.
The steam cannot froth.
The steam ready indicator
(yellow indicator) is not
illuminated.
Only after the steam ready
indicator (yellow indicator) is
illuminated, the steam can be
used to froth.
The container is too big or the
shape is not fit.
Use high and narrow cup.
You have used skimmed milk
Use whole milk or half-skimmed
milk
Do not take apart the appliance by yourself if the cause of failure is not found, you had better contact
certified serving center.
Environment friendly disposal
You can help protect the environment!
Please remember to respect the local
regulations: hand in the non-working
electrical equipments to an appropriate
waste disposal center.
 Loading...