

Page 1
CD and Radio Alarm Clock Model CCR113
guidelines for use
CD/Radio Alarm CCR113 3rd D 7/27/04 5:09 PM Page 2
Page 2

2
CD/Radio Alarm CCR113 3rd D 7/27/04 5:09 PM Page 3
120 people every day lose their sight. Almost one person in sixty
Every year hundreds of babies are
found to have serious eye disease
Please help, by using the donation form at the back of this booklet.
in Britain is blind or partially sighted.
Coronation Street’s
‘Please help’
‘Please help’
Liz Dawn
Reg. Charity Nº: 294087
MBE
The battle against blindness
depends on scientific research
Page 3
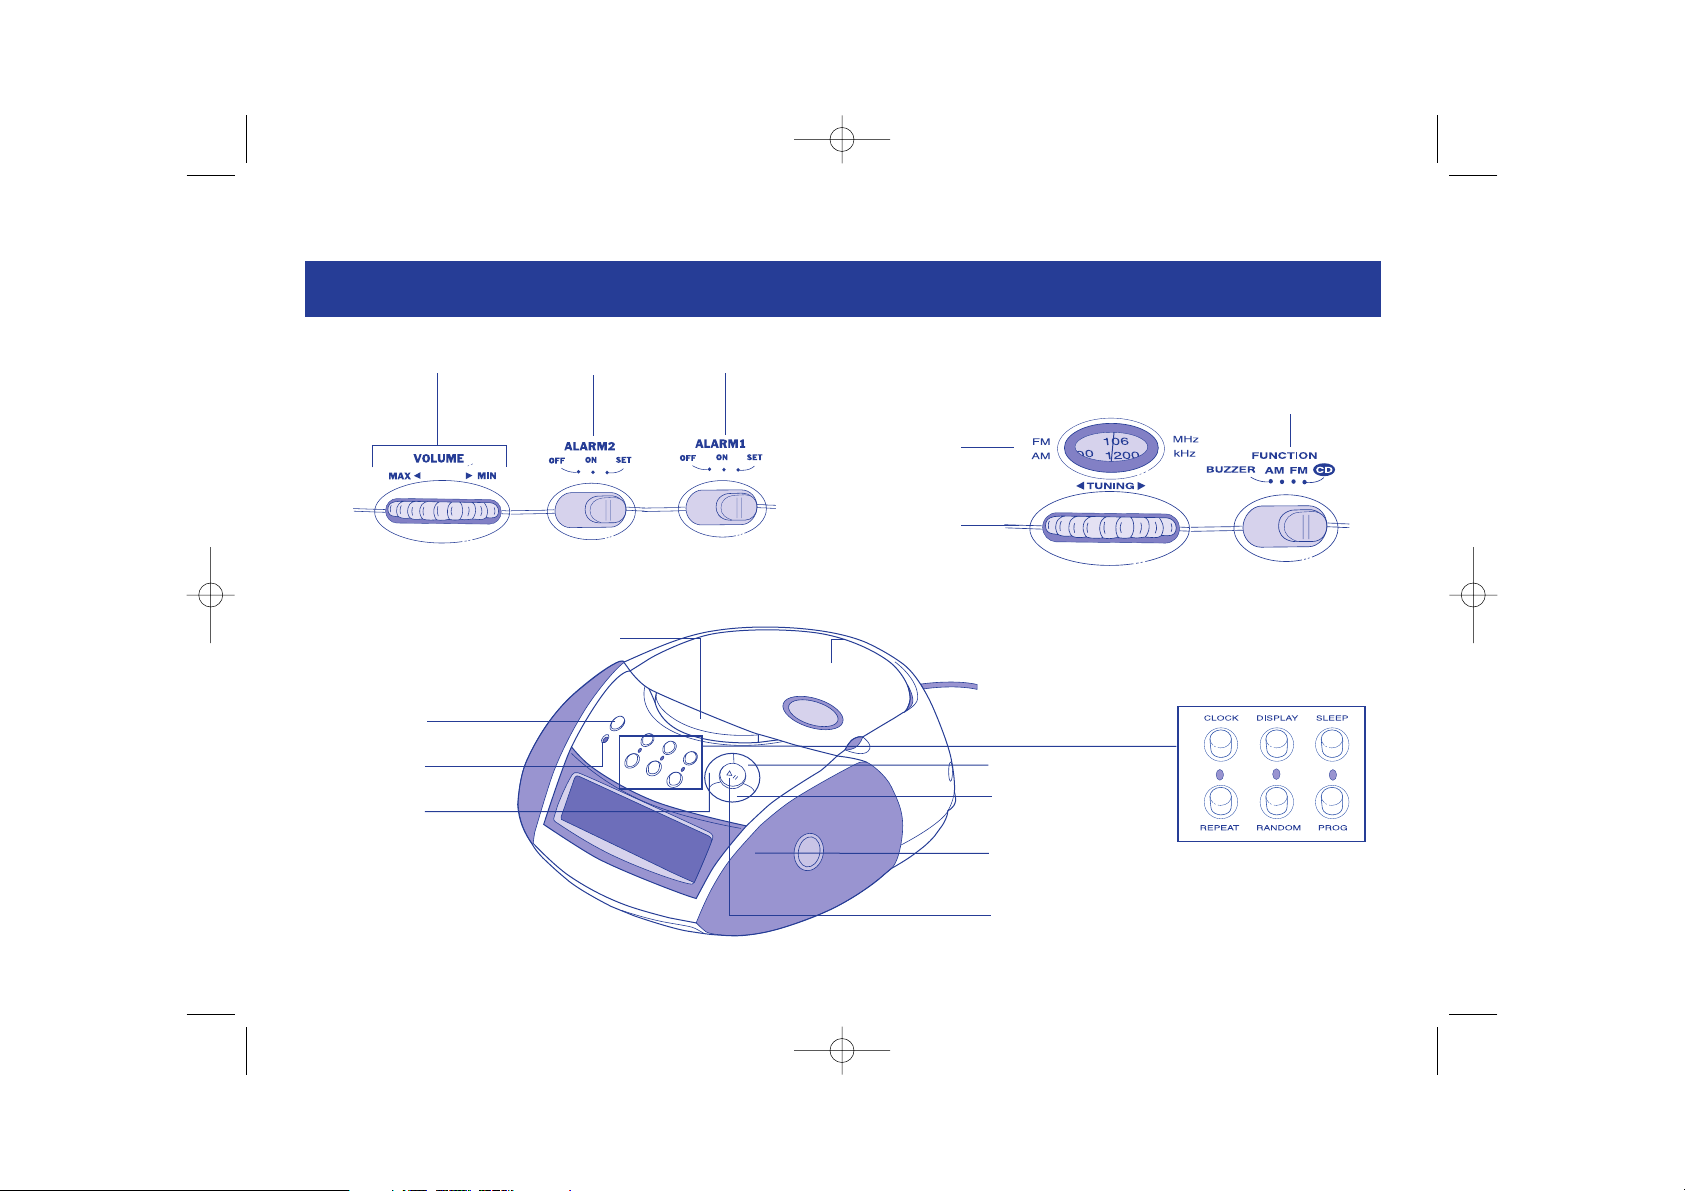
GETTING TO KNOW YOUR ALARM CLOCK RADIO AND CD PLAYER
CD DOOR
VOLUME CONTROL
FUNCTION SELECTOR
switches between the
CD Player, AM, FM or
Buzz.
3
TUNING CONTROL
DISPLAY SCREEN
SNOOZE
CD SEARCH FORWARD/
HOUR SET
ALARM SET 1
PLAY/PAUSE
STOP
FREQUENCY
DISPLAY
CD SEARCH BACKWARDS/
MINUTE SET
CD/RADIO ON/OFF
ALARM SET 2
FUNCTION CONTROLS
CD/RADIO ON/OFF
LED
CD/Radio Alarm CCR113 3rd D 7/27/04 5:09 PM Page 4
Page 4
BEFORE USE
Please read these guidelines and the SAFETY
section on pages 9 & 10 carefully, before
using your new CD/radio alarm clock.
Mains Connection
1 Check that the voltage indicated on the rating
plate on the bottom of your CD/Radio Alarm
Clock corresponds to the voltage of your mains
electricity supply.
2 Take the AC mains lead and insert the plug into
a wall socket.
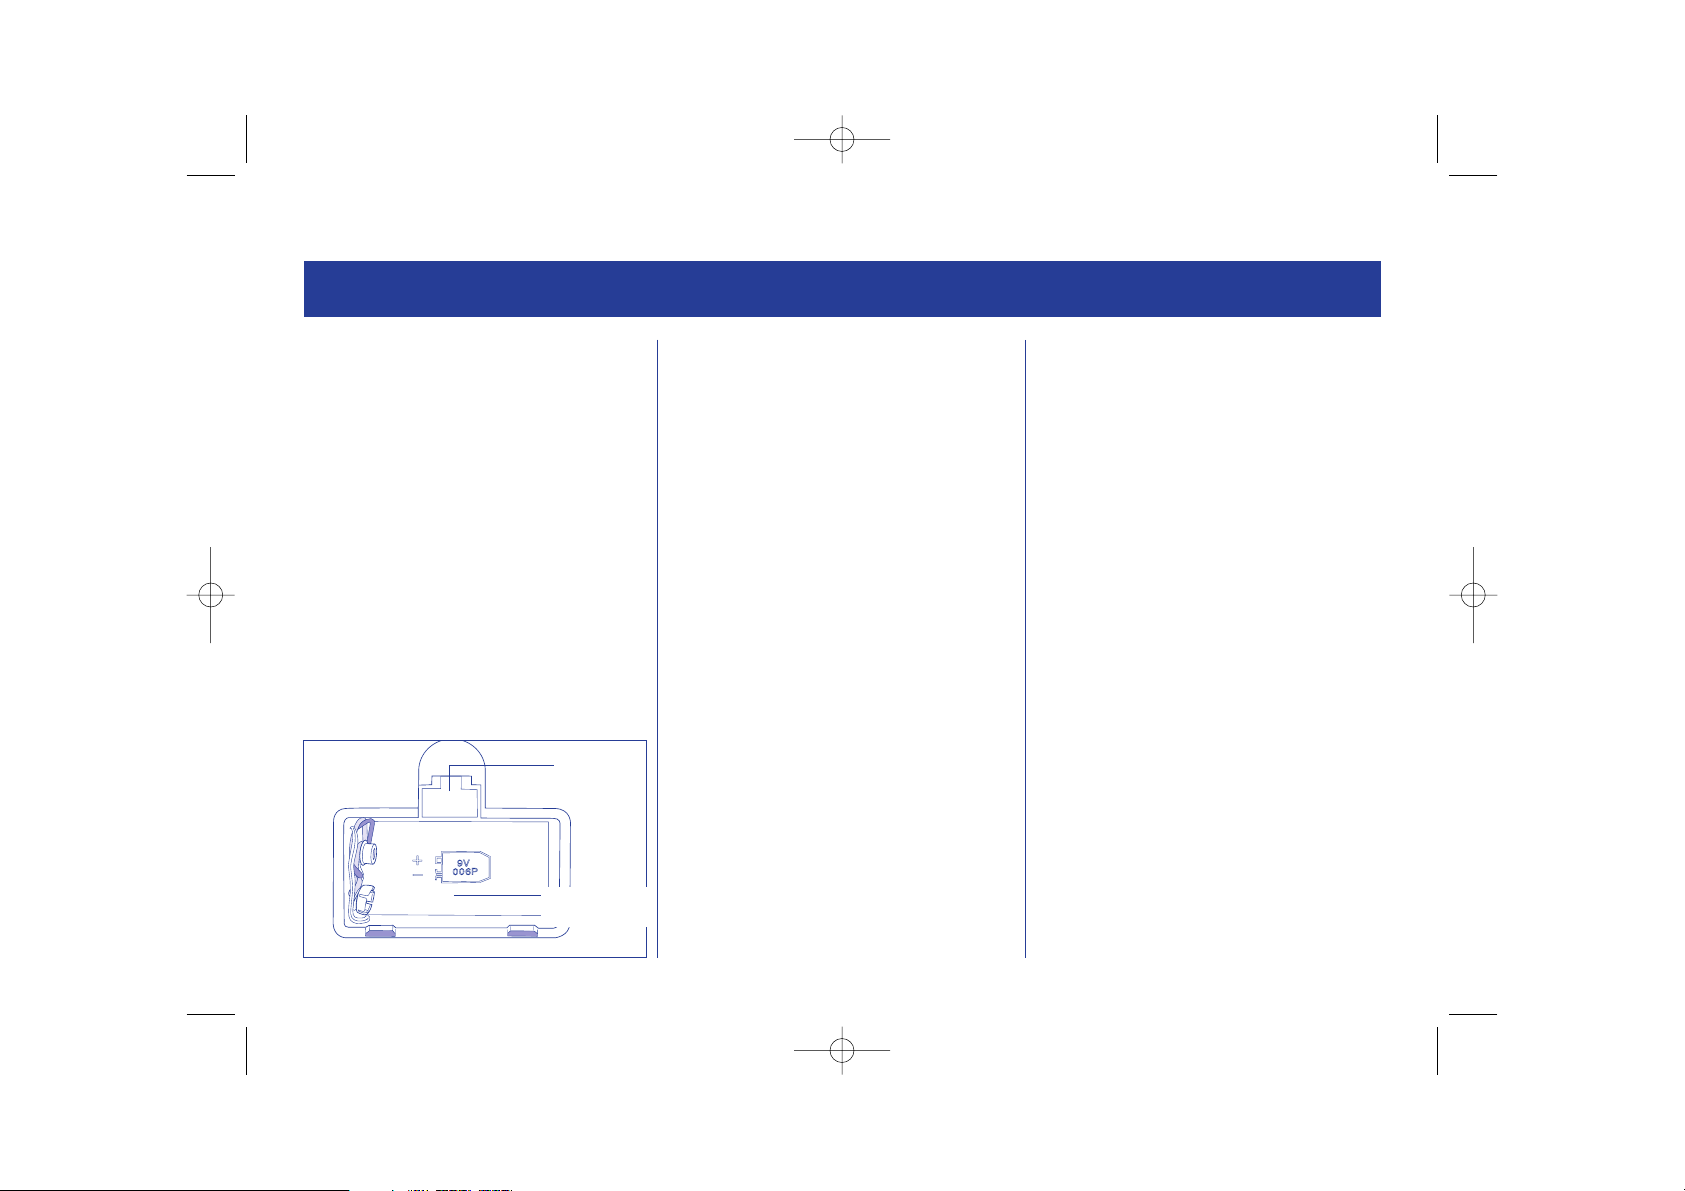
Battery Backup
Your CD/Radio Alarm Clock is equipped with a battery
back up system. It requires a 9V battery (not included)
to protect the time settings during a power failure or
when the mains plug is accidentally removed.
4
1 Ensure that the mains lead is unplugged from
the wall socket.
2 Open the Battery Compartment, located on the
bottom of your CD/Radio Alarm Clock by
pushing down the latch in the direction of the
arrow.
3 Insert a 9 Volt battery (not supplied) to the
battery cap.
4 Replace the Battery Compartment making sure
that the latch has snapped back into place.
Note:If a power failure occurs your CD/Radio
Alarm Clock will automatically switch to the battery
power supply. In battery mode the Clock and Alarm
settings will be maintained; although the Display,
Alarm, CD and Radio functions will not operate
until full power is resumed. Then your CD/Radio
Alarm Clock will automatically switch back to mains
electrical supply and the Display will show the time
again. The clock might have gained or lost a few
minutes and may need to be reset.
Caution
To prevent battery leakage, which may possibly
result in damage, observe the following
precautions:
• If you do not intend using your CD/Radio
Alarm Clock for a long time, remove the
battery.
• When your battery is finished, you must
dispose of it in a safe manner which complies
with applicable laws.
• Replace the battery every 9 to 12 months.
BATTERY
COMPARTMENT
LATCH
CD/Radio Alarm CCR113 3rd D 7/27/04 5:09 PM Page 5
Page 5

5
SETTING YOUR CD/RADIO ALARM
Setting the CD/Radio Alarm
1 After you have set your alarm(s) for the
required wake up time push the Function
Selector to the CD FM or AM position.
2 Turn the volume to MIN and then press the
CD/Radio On/Off button.
3 If you have set the Function Selector to FM or
AM, then tune into your desired radio station
by turning the Tuning Dial in the appropriate
direction.
4 Adjust the volume by turning the Volume Dial
to the required level to wake up to.
5 To improve reception on FM bands, adjust the
Aerial by moving the angle or the location until
you find the best reception. For improving
reception on MW/AM bands it may be
necessary to rotate your radio as the MW/AM
aerial is located within your radio.
6 If you have set the Function Selector to CD you
can programme the CD player to play your
favourite track to wake up to. Programme
mode is described on page 7.
7 After programming press the Play/Pause button
then the Stop button.
8 Finally press the CD/Radio On/Off button to
off, the CD/Radio On/Off LED will go out.
Setting the Buzzer Alarm
1 After you have set your alarm(s) for the
required wake up time, push the Function
Selector to the BUZZ position. When the alarm
time is reached a buzzer will sound.
2 If you want to turn the buzzer off after the
wake up time press the CD/Radio On/Off
button once, the CD/Radio On/Off LED will go
out. This means your buzzer/alarm is set to wake
you up at the same time the following day.
Snooze function
When the buzzer sounds or your CD or Radio
comes on, you can press the Snooze button to turn
them off for 6 minutes. The alarm, radio or CD will
then turn itself on again. This function can be
repeated for 60 minutes, it will then be silent until
the next alarm or until the CD/Radio On/Off button
has been pressed (this means that your Alarm,
Radio or CD is set to wake you up the same time
the following day).
Sleep function
You can set your CD/Radio Alarm Clock to play the
Radio or CD Player for a set time and switch off
automatically.
1 Press the CD/Radio On/Off button to turn your
CD/Radio Alarm Clock on, the CD/Radio On/Off
LED will be lit. Turn the Volume Control Dial to
low.
Setting the time
1 The Display will show 0.00. Make sure that
both Alarm 1 and Alarm 2 Selectors are in the
OFF position. Press and hold the Clock button,
the numbers in the display will start to flash.
Press the Hour button to set the hour,
remember your clock has a 24 hour display.
2 Then press the Minute button until the
required time is displayed.
3 To save your settings release the Clock button.
The Display will stop flashing.
Setting Alarm 1
1 Push the Alarm 1 selector to the SET position,
the Display will flash .
2 Press the Hour button to set the hour
(remember your clock has a 24 hour display.),
and press the Minute to set the minutes,
until your desired wake up time is displayed.
3 Once the alarm has been programmed, slide
the ALARM 1 button to the ON position. The
Alarm 1 indicator light is lit in the Display.
4 To switch off the alarm when sounding either
press the CD/Radio On/Off button once or push
the ALARM 1 selector to the OFF position.
Setting Alarm 2
You must set Alarm 1 before you can set Alarm 2.
• Follow the steps 1 to 4 as set out in in ‘Setting
the Alarm 1’.
CD/Radio Alarm CCR113 3rd D 7/27/04 5:09 PM Page 6
Page 6

SETTING YOUR ALARM USING THE RADIO
2 Push the Function Selector to CD or RADIO.
3 If the Radio is selected it will turn on. If the CD
player is selected press the Play/Pause button.
4 Press the Sleep button once, - - will be shown in the
Display and the Sleep Indicator will flash.
You can choose from 3 different timer periods.
• To select 90 minutes press the Sleep button
once more, 90 will be displayed.
• To select 60 minutes press the Sleep button
again, 60 will be displayed.
• To select 30 minutes press the Sleep button
again 30 will be displayed.
3 To save your settings release the Sleep button.
the Display will stop flashing and the current
time will be displayed, the Sleep Indicator will
be lit.
5 To cancel the Sleep function during the preset
period, press the CD/Radio On/Off button.
6
Radio Operation
1 Turn the Volume Control Dial to low, then press
the CD/Radio On/Off button to turn your
CD/Radio Alarm Clock on, the CD/Radio On/Off
LED will be lit. .
2 Slide the Function Selector to the AM or FM
position.
3 Tune into your desired radio station by turning
the Tuning Dial in the appropriate direction.
If you are tuning in on the FM band using the
FM Stereo mode, the FM Stereo Indicator will
light up to signify the best reception within the
station frequency. See the following section
regarding FM and FM Stereo Switches.
Note: The FM Stereo Indicator will only light up
when in the FM Stereo Mode.
4 Use the Volume Control Dial to adjust the
volume to a comfortable level.
5 After use, press the CD/Radio On/Off button,
the CD/Radio On/Off LED will go out.
Radio Reception
FM
Fully extend the FM Wire Antenna.
AM
As the AM aerial is located within your CD/Radio
Alarm Clock, it may be necessary to rotate the
CD/Radio Alarm Clock for the best reception.
Note: Try to keep metallic objects away from the
CD/Radio Alarm Clock.
CD/Radio Alarm CCR113 3rd D 7/27/04 5:09 PM Page 7
Page 7

CD Operation
Before Use
• Fingerprints and dust should be carefully wiped
off the disc’s signal surface with a soft cloth.
• Always place compact discs in the CD
compartment with the label facing upwards.
• Place only one compact disc in the CD
compartment.
Loading the Disc
1 Press the CD/Radio On/Off button to turn your
CD/Radio Alarm Clock on, the CD/Radio On/Off
LED will be lit. Turn the Volume Control Dial to
low.
2 Slide the Function Selector to the CD position.
3 Open the CD door by pulling where indicated
by PULL TO OPEN on the lid. The lid will then
spring open. Insert a CD. Close the CD door, the
number of tracks on the compact disc will be
shown in the Display for a few seconds, then
the current time will be shown again.
LISTENING TO CDs
3 To advance or return to a particular track
number, press the or buttons one press
at a time until the track number is displayed.
Programme mode
This allows you to programme selected tracks on a
disc to be played in your chosen order. Up to 20
tracks can be programmed for playback.
The CD player can only be programmed while in stop
mode, prior to playing a compact disc and with a
compact disc in the CD compartment.
1 Press the Program button once and P 01 will
appear in the Display, the Program Indicator will
flash.
2 Press the or buttons to the desired
track number.
3 Press the CD Program button again to store the
track to memory. The CD display will show P 02.
4 Repeat steps 2, 3 and 4, until all your selected
tracks are programmed. The Display will show
P 01-09 for the first 9 tracks, P10’ will show
when 10 tracks are selected and ‘P11-20’ for
tracks 11-20.
5 Press the Play/Pause button to start
memory playback. Programme Indicator will
stay lit.
6 To cancel at any time press the Stop button .
If you open the CD Door any programmed
tracks will be cleared from the memory.
Playing the Disc
1 Press the Play/Pause button.
2 Disc play will begin from track number 01. The
Display will momentarily show the track
number that is currently playing.
3 To start play from a designated track, press the
or buttons until the desired track
number is indicated in the Display.
4 Press the Play/Pause button. Play will start
from the selected track.
5 To stop the CD, press the Stop button once.
Note: To check which track is being played at any
time press the CD Display button, the Display will
momentarily show the track number that is
currently playing and will then revert to the clock.
Pause Mode
1 Press the Play/Pause button during play.
2 Disc play will stop temporarily and the current
track number will flash in the Display.
3 Press the Play/Pause again to end the pause
mode. Play will resume at the paused position.
Track Search
1 Press and hold down the or buttons
during disc play to quickly advance or return to
any position within a track.
2 Release the or buttons to continue
disc play.
7
CD/Radio Alarm CCR113 3rd D 7/27/04 5:09 PM Page 8
Page 8

Cleaning
Do not use abrasive cleansers or chemical solvents.
Clean by lightly wiping with a soft cloth.
CD Player Lens
The CD lens is located within the CD compartment.. It should NEVER be touched
with your fingers. To assure continuing high performance from your CD Player, the
CD lens should be cleaned regularly, using a CD lens cleaner. Follow the
instructions on the packaging.
Compact Discs
• If the CD skips or will not play, the disc may need cleaning. Wipe the disc from
the centre out with a cleaning cloth (either with or without CD cleaner fluid).
• Compact discs should be returned to their cases after use.
• Do not expose a disc to direct sunlight, high humidity or high temperature.
• Do not stick paper or write anything with a ball point pen on a compact
disc.
• Do not use cleansers or antistatic sprays on compact discs.
8
OTHER FUNCTIONS CLEANING AND MAINTENANCE
Repeat Mode
This function allows all the tracks on the compact disc or a particular track to
be played repeatedly.
To repeat the same track:
• Press the Repeat button once during Play, on the track you wish to hear
repeatedly. The REPEAT Indicator will light and flash continuously.
To repeat the whole disc:
• Press the Repeat button twice during play (on any track). Repeat Indicator
will stay lit
To turn the Repeat function off:
• Press the Repeat button a third time or until the Repeat Indicator will go
out.
Random Mode
This function will play the tracks on the compact disc in a random order. The
Random Mode can only be activated while in stop mode, prior to playing a
compact disc and with a compact disc in the CD compartment.
• Press the Random button once, then press the Play/Pause button to
play a random selection of tracks from your compact disc. The Random
Indicator will be lit.
To turn the Random function off:
• Press the Random button again. The Random Indicator will go out.
CD/Radio Alarm CCR113 3rd D 7/27/04 5:09 PM Page 9
Page 9

SAFETY
This product was designed and manufactured to meet
strict quality and safety standards. There are, however,
some operational precautions that you should be
aware of:
• Laser beam caution. If your CD/Radio Alarm
Clock is operated whilst the outer casing is
removed, invisible laser light could cause
damage to the eye.
• To prevent a fire or shock hazard, do not
expose the unit to rain, moisture or any form
of naked flame, such as a lit candle.
• Do not place anything on top of the CD/Radio
Alarm Clock such as vases or potted plants.
• To avoid electric shock - never immerse in
water or allow water to drip or be splashed
onto your CD/Radio Alarm Clock. Do not try to
open the unit itself. Always refer servicing to a
qualified service centre.
• Should any heavy object or liquid fall on/into
your CD/Radio Alarm Clock, unplug the system
and have it checked by a qualified service
centre only.
• A small amount of current continues to flow to
the CD/Radio Alarm Clock when not in use but
still plugged into a mains socket. Unplug from
9
WARNING
IT IS HAZARDOUS FOR ANYONE OTHER
THAN AUTHORISED SERVICE PERSONNEL
TO CARRY OUT SERVICING OR REPAIRS
WHICH INVOLVE THE REMOVAL OF
COVERS.
TO AVOID THE RISK OF AN ELECTRIC
SHOCK DO NOT REMOVE THE COVER
AT THE BACK OF THE CD PLAYER.
CLASS I
LASER PRODUCT
the mains if it is not to be used for an extended
period of time.
• To disconnect pull out by the plug itself - never
disconnect by pulling the cable.
• Do not use with an extension lead.
• Do not place anything on top of, or around
your CD/Radio Alarm Clock that will impede
ventilation.
• During use, place your CD/Radio Alarm Clock in
a location with adequate ventilation, to
prevent heat build up.
• Your CD/Radio Alarm Clock is designed for use in
moderate climates (5ºC-35ºC). If your CD/Radio
Alarm Clock is brought directly from a cold
location to a warm location, or is placed in a
very damp room, moisture may condense on
the lens inside the CD Player. Should this occur,
the CD Player will not operate. Remove the CD
and leave the CD/Radio Alarm Clock for about
an hour until the moisture evaporates.
• Close supervision is necessary when the
CD/Radio Alarm Clock is used by children or a
person suffering from any physical impairment.
• Do not drop the CD/Radio Alarm Clock or
subject it to strong shocks as this could result
in damage or failure.
• This CD/Radio Alarm Clock should not be
mounted on a wall or ceiling.
• Do not take the CD/Radio Alarm Clock into or
CD/Radio Alarm CCR113 3rd D 7/27/04 5:09 PM Page 10
Page 10

SAFETY continued SPECIFICATIONS
10
near a bathroom, swimming pool or any other
location where it is likely to come into contact
with water.
• The CD/Radio Alarm Clock should not be used
next to heat sources such as fires or other
appliances.
• Do not use in humid or dusty locations.
• Do not use in locations exposed to heavy
vibration.
• Do not use on unstable or tilted surfaces.
• Do not situate on beds, sofas, rugs or similar
surfaces which may block the CD/Radio Alarm
Clocks ventilation openings.
• The power cord should be sited in such a way
so that it will not cause an accident or
obstruction.
General
Power output 2 x 800mW RMS @10% THD
Power consumption 14W
Speaker 2 x 6.5cm, 8 Ohm
Power source AC 230V ~ 50Hz
(For clock backup only) DC 1 x 9V (6F22)
(battery not included)
Dimensions of Unit 212 x 240 x 117mm
(W x D x H)
Weight 1.35 Kg
(not including battery)
Clock Section
Display LED, 24 Hours
Power source AC 230V ~ 50Hz
Radio Section
FM 88-108 MHz
AM (MW) 530-1600 KHz
Antenna FM wire antenna
AM (MW) Built-in Ferrite Bar
CD Section
S/N Ratio : 55 dB
Wow & Flutter 0.5%
Pick up laser 3 Beam semi-conductor laser
Pick up laser wavelength 760-800 nm
CD/Radio Alarm CCR113 3rd D 7/27/04 5:09 PM Page 11
Page 11

11
CD/Radio Alarm CCR113 3rd D 7/27/04 5:09 PM Page 12
Donation Form
YES I would like to support eye research to save sight. Here is my Cheque/Postal Order for
£ made payable to National Eye Research Centre
If you wish to make a donation by Credit Card: Amount donated £
Card Nº: Expiry Date:
Cardholder’s Name:
Address:
So that we can claim back the tax on your donation, please sign below:
My donation is paid from taxed income.
Signature:
Reg. Charity Nº: 294087
Please return to Giving For Sight, Eye Department, Clarendon Wing
FREEPOST NEA 10577, Leeds LS2 3YY.
Page 12

Crown Corporation (UK) Limited
Express Way, Whitwood,
Wakefield, WF10 5QJ
Tel: 01977 604111 Fax: 01977 603159
This appliance is fitted with a fused three pin plug
which will be suitable for use in all houses fitted
with sockets to current specifications.
If the plug supplied is a moulded type and you need
to remove it, it should not be re-used, but thrown
away immediately. A cut off plug can be dangerous
if plugged into a socket by children.
Fitting a new plug
If for any reason you need to fit a new plug, the
flexible mains lead must be connected as shown here.
The wires in the mains lead fitted to this appliance
are coloured in accordance with the following code:
ELECTRICAL CONNECTIONS
The wire which is coloured Blue MUST be connected
to the terminal which is marked with the letter N.
The wire which is coloured Brown MUST be
connected to the terminal which is marked with the
letter L. This appliance is double insulated, no
connection must be made to the earth terminal of
the plug.
Note: After replacing or changing a fuse on a
moulded plug which has a fuse cover, the cover
must be replaced, the appliance must not be used
without a fuse cover. If lost, replacement fuse covers
can be obtained from an electrical shop.
Only a 3amp fuse approved to B.S. 1362 A.S.T.A.
should be used. If you are unsure which one to use
refer to qualified service personnel.
This appliance conforms with the requirements of
EEC Directive No. 82/499/EEC & BS 800-1983
relating to radio interference suppression.
For further information please contact the
CROWN SERVICE LINE on: 01422 203676.
CONNECT
BROWN TO
LIVE (L)
CONNECT
BLUE TO
NEUTRAL (N)
MAKE SURE THE CABLE IS
HELD BY THE CLAMP
This appliance is double insulated,
no connection must be made to
the earth terminal of the plug.
CD/Radio Alarm CCR113 3rd D 7/27/04 5:09 PM Page 1
 Loading...