

Page 1

IMPORTANT
Please read this manual carefully before installing and operating the TV.
Keep this manual handy for further reference
USER MANUAL
LED TV
39169
MODEL:32167
Page 2

Table Of Contents
1
This user manual for reference only
Remote Controller
Safety Information.................................................................................................................2
Preparations Guide
Important Safety Precautions.................................................................................................3
Installed And Connected TV
TV Bracket assemble.............................................................................................................4
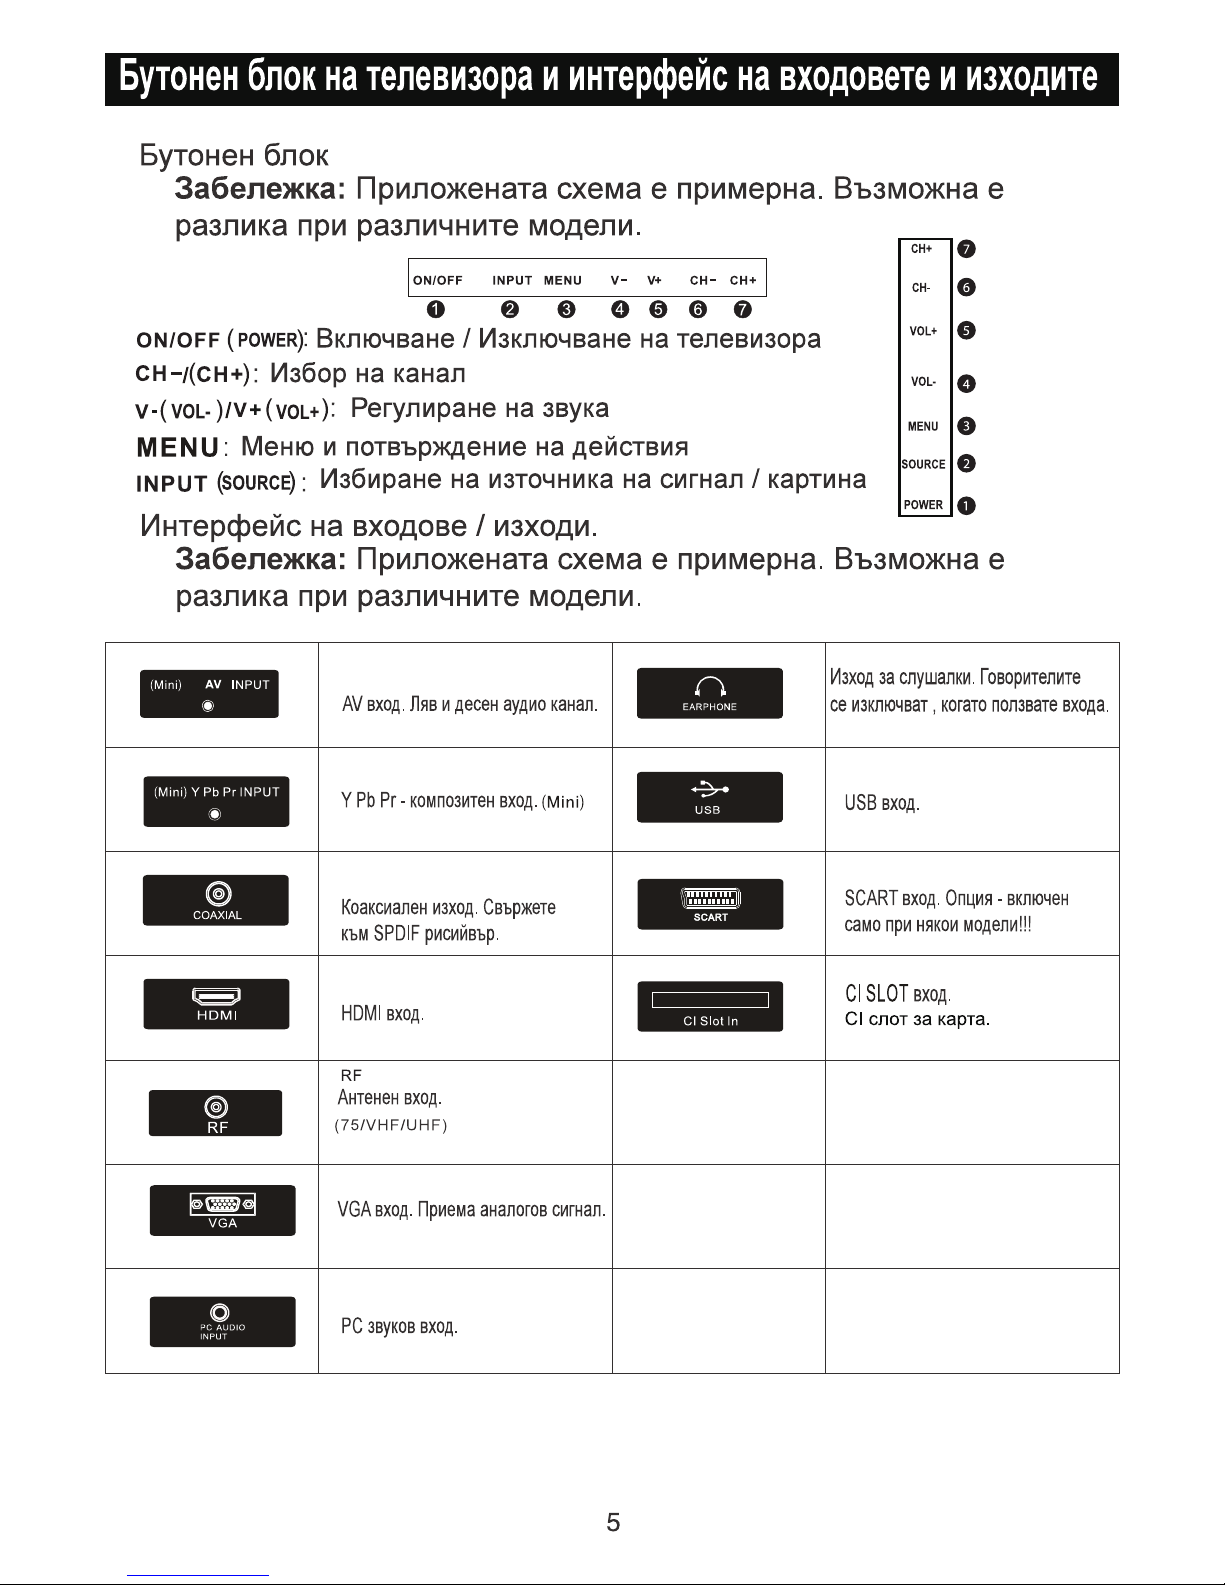
TV Buttons And Terminal Interface........................................................................................ 5
External device connection diagram................................................................... 6
Install And Connect TV...........................................................................................................7
Setup Menu....................................................................................................
USB Operation................................................................................................
Input Source.........................................................................................................................10
TV Menu
Picture Menu........................................................................................................................10
Sound Menu.........................................................................................................................11
Channel Menu......................................................................................................................11
Parental Control Menu.........................................................................................................
Other Information
Help......................................................................................................................................15
Specifications.......................................................................................................................16
TV Stand installation Instructions......................................................................................................................................................................7
8
13
14
14
Page 3
Safety Information
2
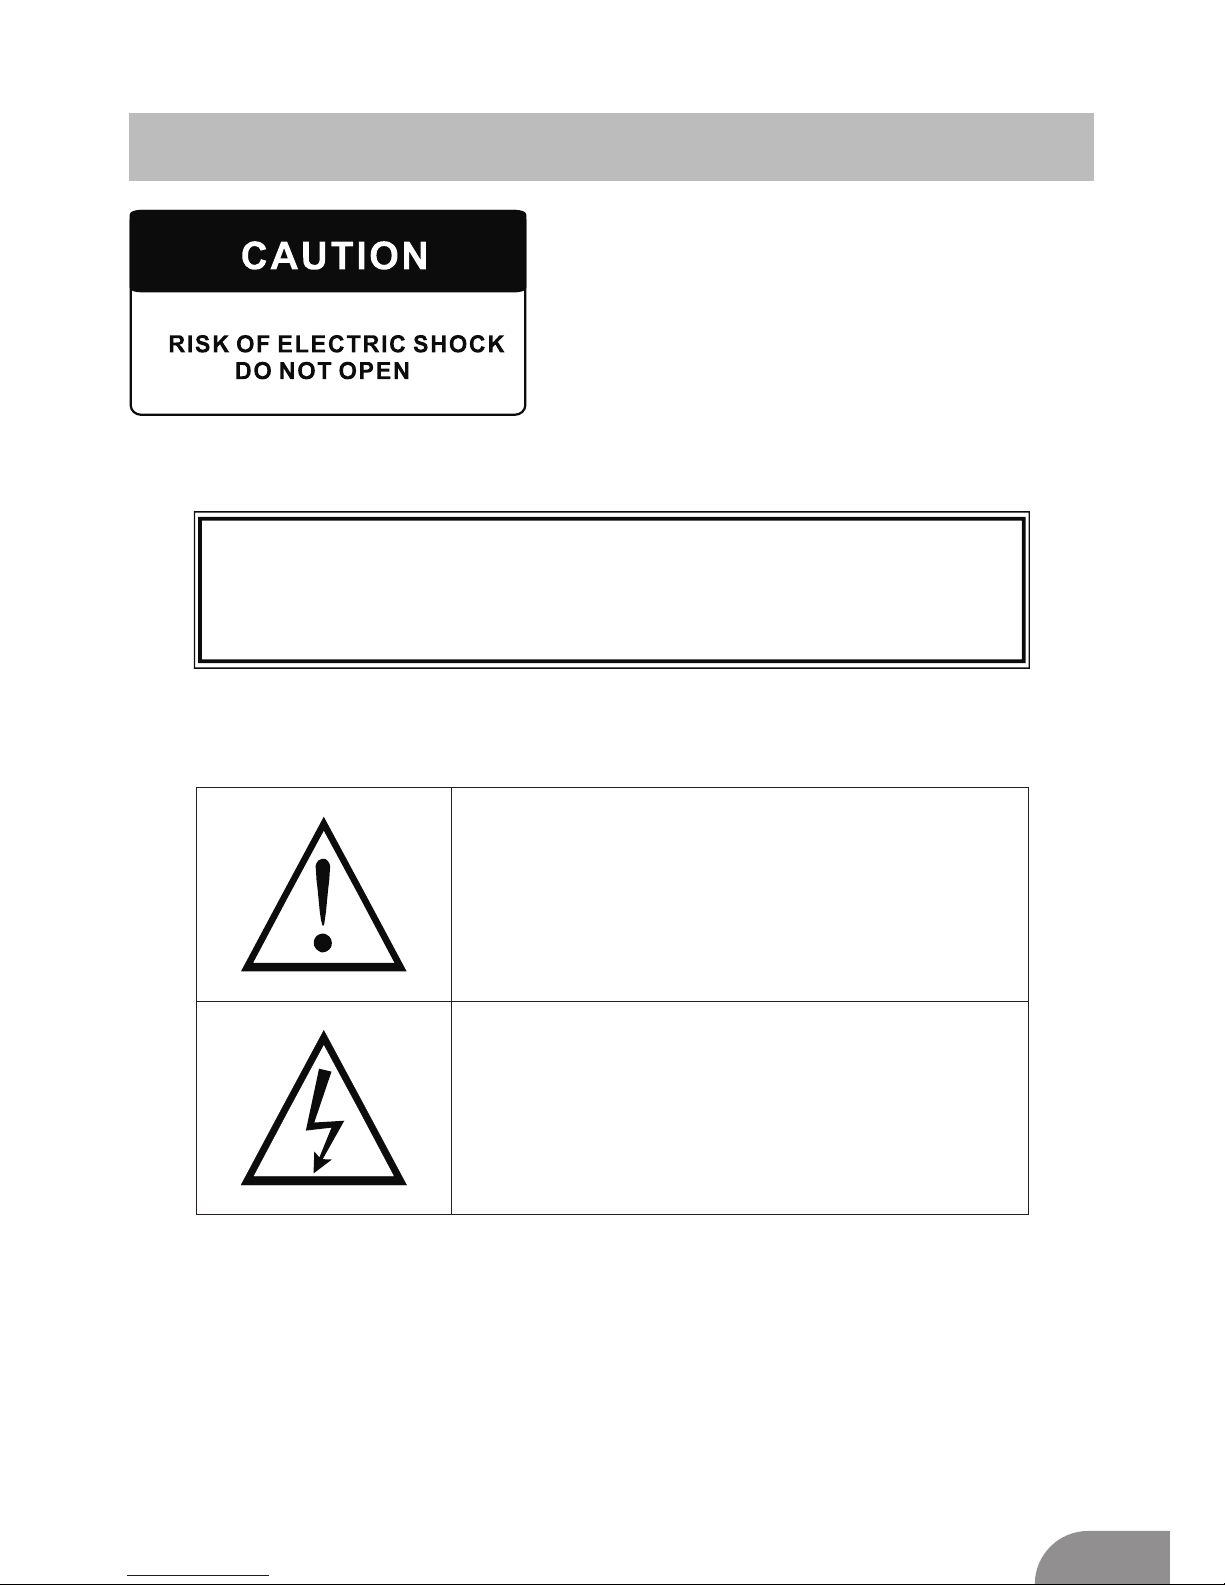
High voltages are used in the operation of
this product.to reduce the risk of electric
shock,do not remove cover of the cabinet,
refer servicing to qualified service personal
If the TV any changes or coarse adjustment, electric shocks
to be hurt, do not attempt to open a machine-maintenance,
customer contact centres needed overhaul.
The exclamation point within an equilateral
triangle is intended to alert the user to the
presence of important operting in the
literature accompanying the appliance.
Warning
The lightning flash with arrowhead symbol
within an equilateral triangle,is inten ded to
alert the user to the presence of uninsulated
dangerous voltage within the products
enclosure that may be of sufficient magnitude
to constitute a risk of electric shock to persons.
Page 4

3
Important Safety Precautions
1. Read these instructions.
2. Keep these instructions.
3. Heed all warnings.
4. Follow all instructions.
5. Do not use this apparatus near water.
6. Clean only with dry cloth.
7. Do not block any ventilation openings. Install in accordance with the
manufacturer ’s instructions.
8. Do not install near any heat sources such as radiators, heat registers, stoves, or
other apparatus (including amplifiers) that produce heat.
9. Do not defeat the safety purpose of the polarized or grounding-type plug. A
polarized plug has two blades with one wider than the other. A grounding type plug
has two blades and third grounding prong. The wide blade or third prong are
provided for your safety. When the provided plug does not fit into your outlet,
consult an electrician for replacement of the obsolete outlet.
10. Protect the power cord from being walked on or pinched, particularly at plugs,
convenience receptacles, and the point where they exit from the apparatus.
11. Only use attachments/accessories specified by the manufacturer.
12. Use only with the cart, stand, tripod, bracket, or table specified by the
manufacturer, or sold with the apparatus. When a cart is used caution when
moving the cart/apparatus combination to avoid injury tip-over.
13. Unplug this apparatus during lightning storms or when unused for long periods
of time.
14. Refer all servicing to qualified service personnel. Servicing is required when the
apparatus has been damaged in any way, such as power-supply cord or plug is
damaged, liquid has been spilled or objects have fallen into the apparatus, the
apparatus has been exposed to rain or moisture, does not operate normally, or has
been dropped. Warning to reduce the risk of fire or electric shock, do not expose
this apparatus to rain or moisture.
15. The apparatus shall be disconnected from the mains by placing the power/standby
switch in the standby position and unplugging the power cord of the apparatus from
the AC mains receptacle.
16. The socket-out shall be installed near the equipment and shall be easily accessible.
17. This product should never be placed in a built-in installation such as a bookcase
or rack unless proper ventilation is provided or the manufacturer's instructions have
been adhered to.
18. Apparatus shall not be exposed to dripping or splashing.
19. Do not place any sources of danger on the apparatus (e.g. liquid filled objects,
lighted candles).
20. Wall or Ceiling Mounting - The appliance should be mounted to a wall or ceiling
only as recommended by the manufacturer.
21. Never place the TV, remote control or batteries near naked flames or other
heat sources, including direct sunlight. To prevent the spread of fire, keep
candles or other flames away from the TV, remote control and batteries at
all times.
22. The USB terminal should be loaded with 0.5 A under normal operation.
Page 5
4
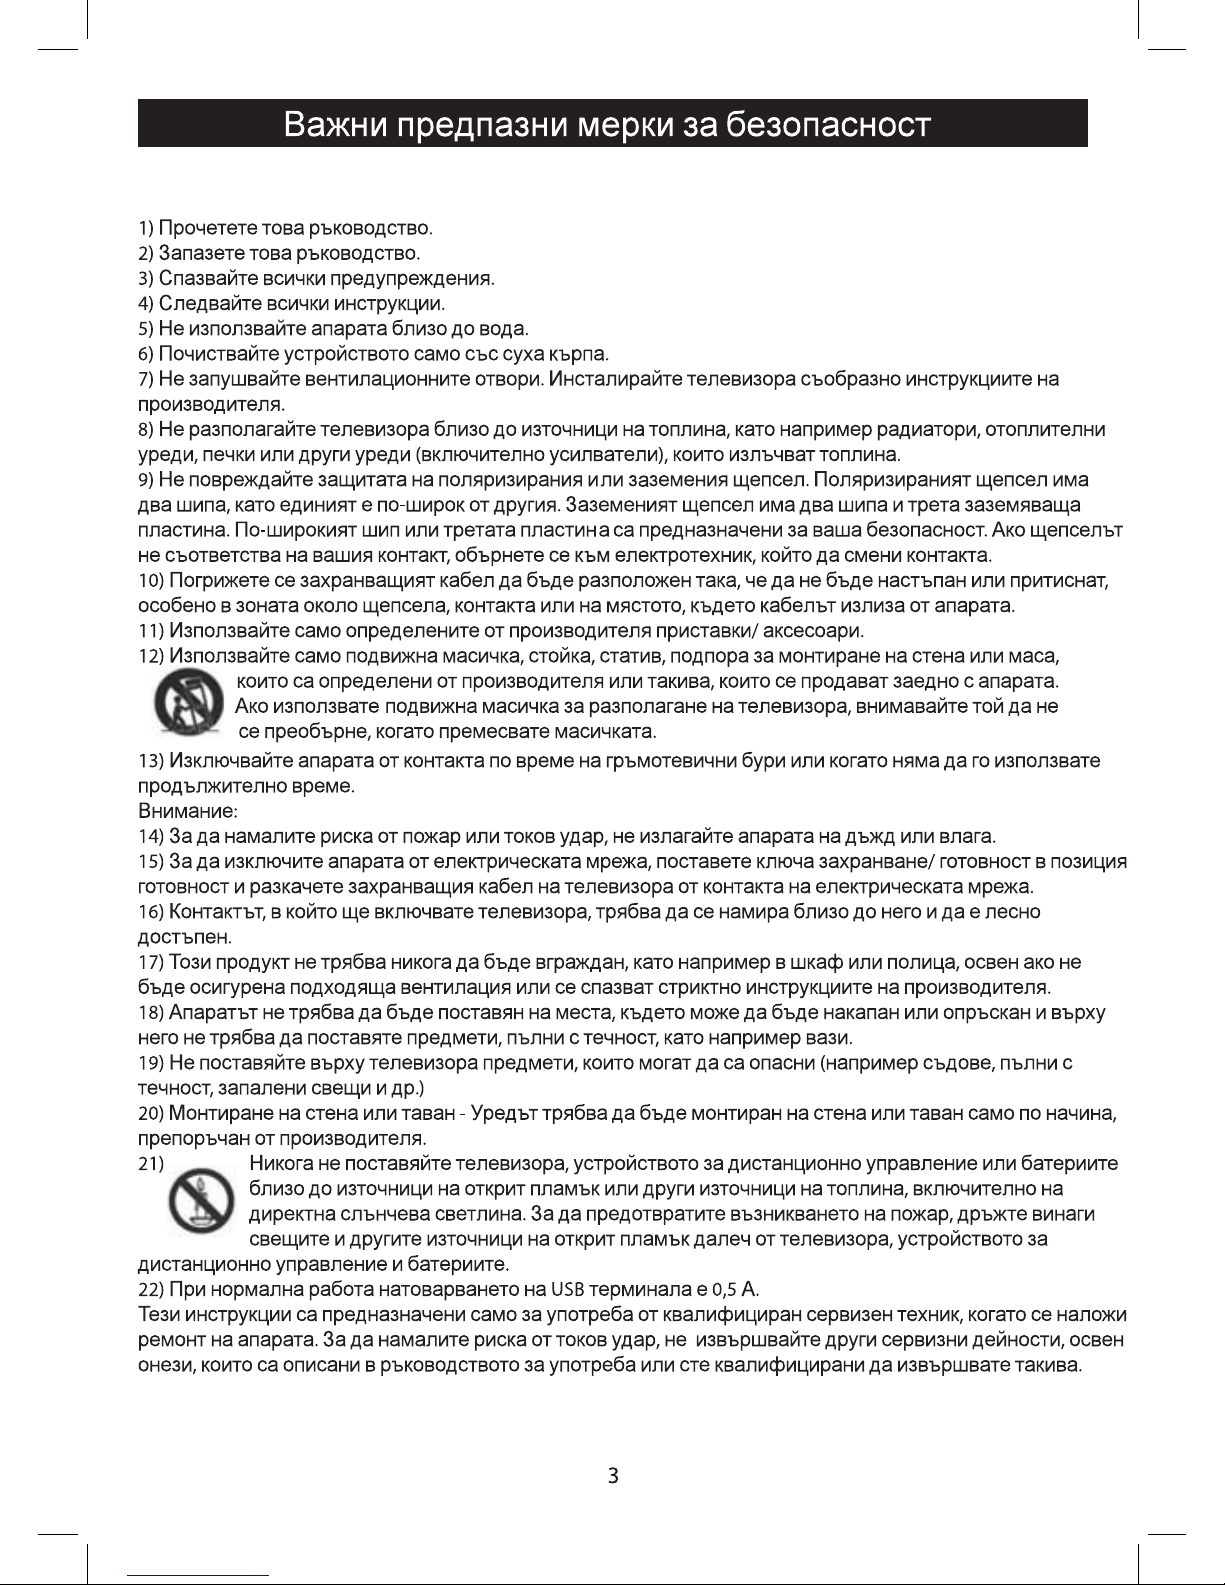
TV Bracket assemble
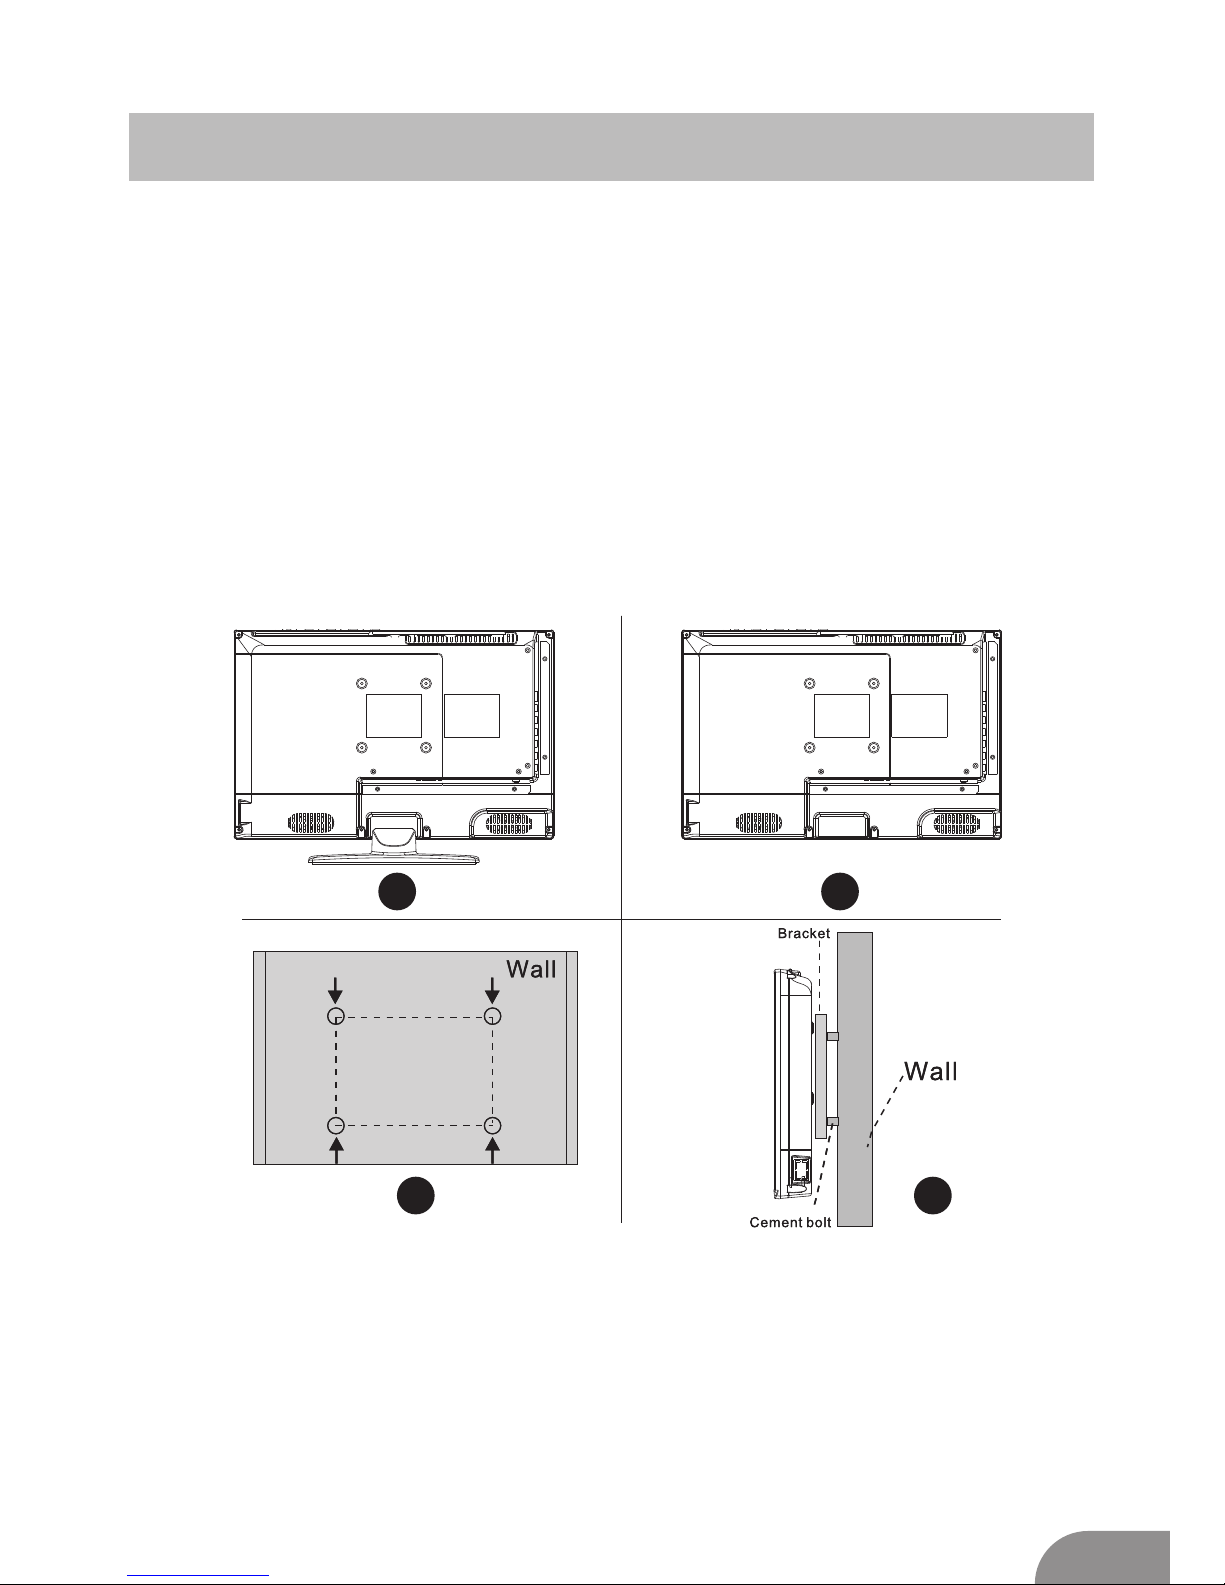
Fix the TV on the wall
1.First,put the TV on the table smoothly and put some soft cloth on the table to avoid
scratching the screen.
2.User the screw driver to take off the screws which are fixed on the bottom stand
(the direction of the arrow, refer to the ptoto1).And take off the bottom stand(please
take off the screws and bottom stand carefully).
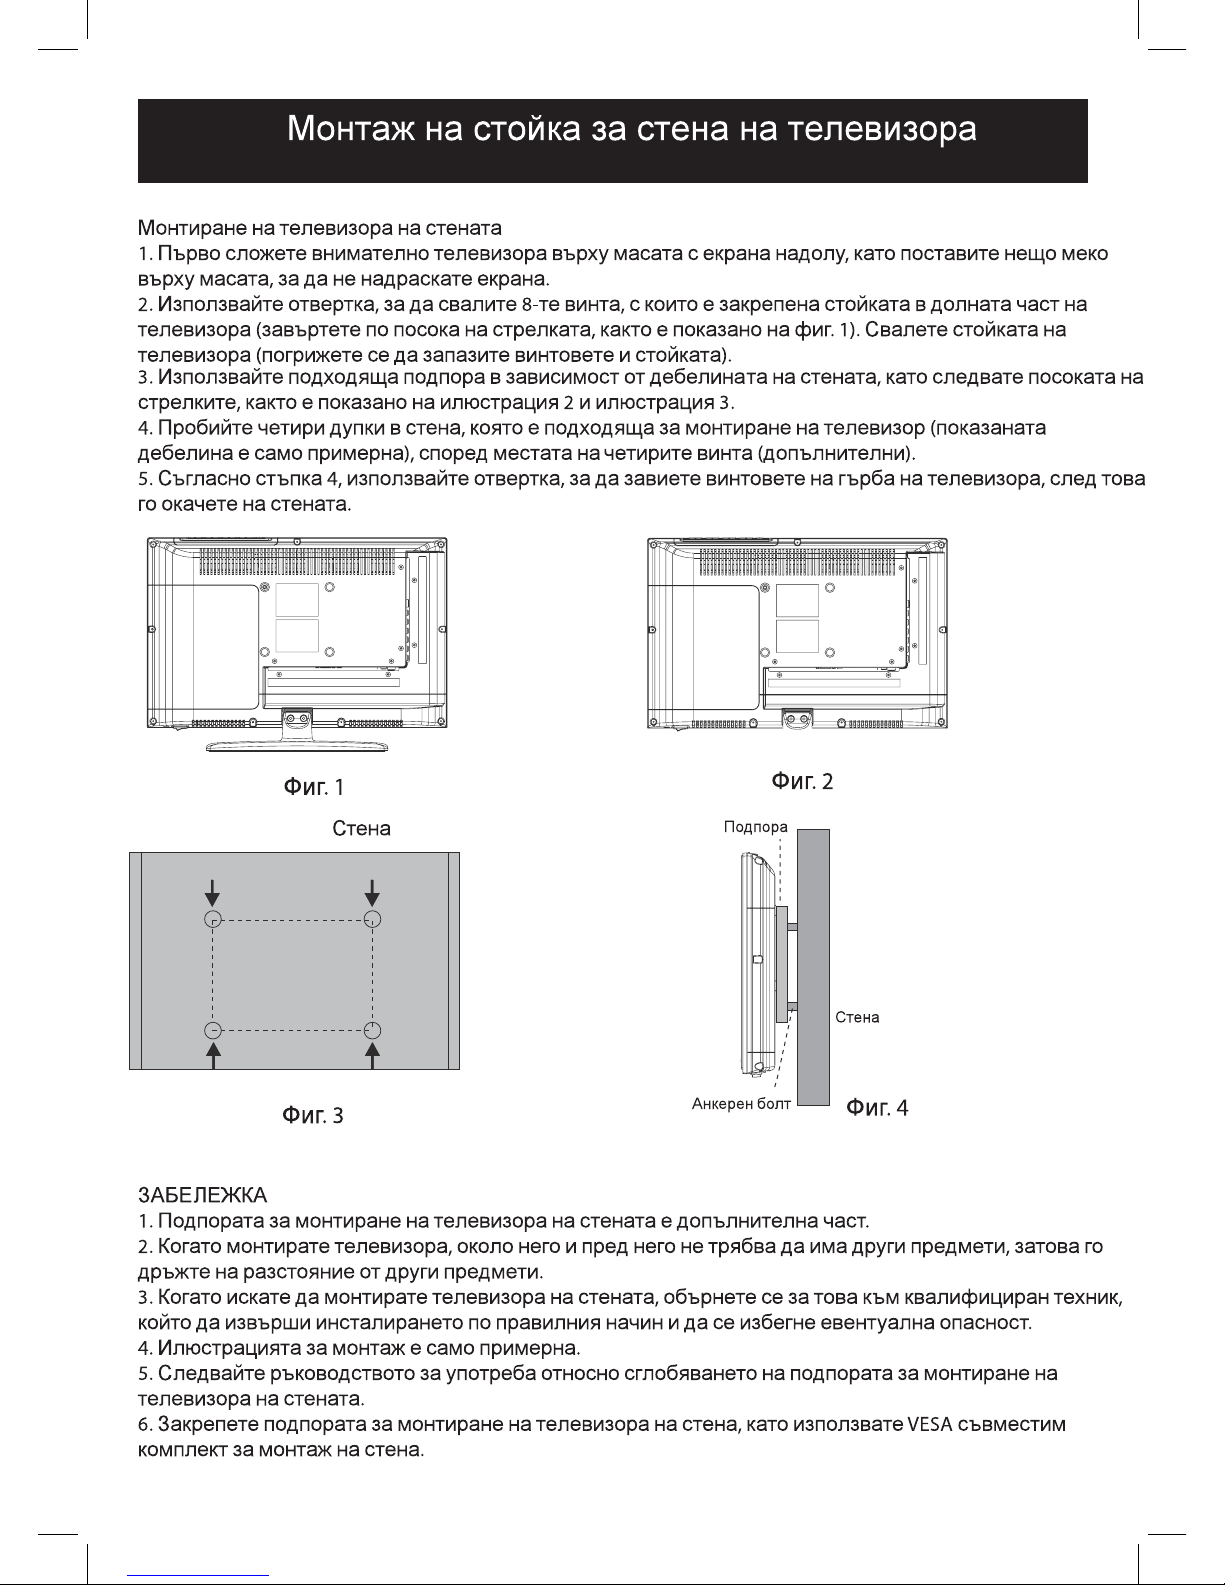
3.Make one bracket which can fix on the wall according to the size of arrow direction
of photo2 and photo3.
4.Drill four holes properly on the wall (the size only for reference) and put into four
screws.(optional parts) Drill four holes properly on the wall (the size only for reference)
and put into four screws.(optional parts)
5.according to the step 4,use the screwdriver to lock the screw on the back of the TV.
then hang the TV on the wall.
1 2
3
4
Note:
1.The bracket fixed on the wall is optional part.
2.when you assemble the TV, there should be no other articles on the around and front
and please keep the distance from other articles.
3.When assemble the TV, please ask the career man to fix in order to avoid the danger.
4.The fixing picture is only for reference.
5.Please follow the use manual about bracket assemble to fix the TV.
6.Attach the mounting bracket from the VESA compatible wall mounting kit.
Page 6
Page 7
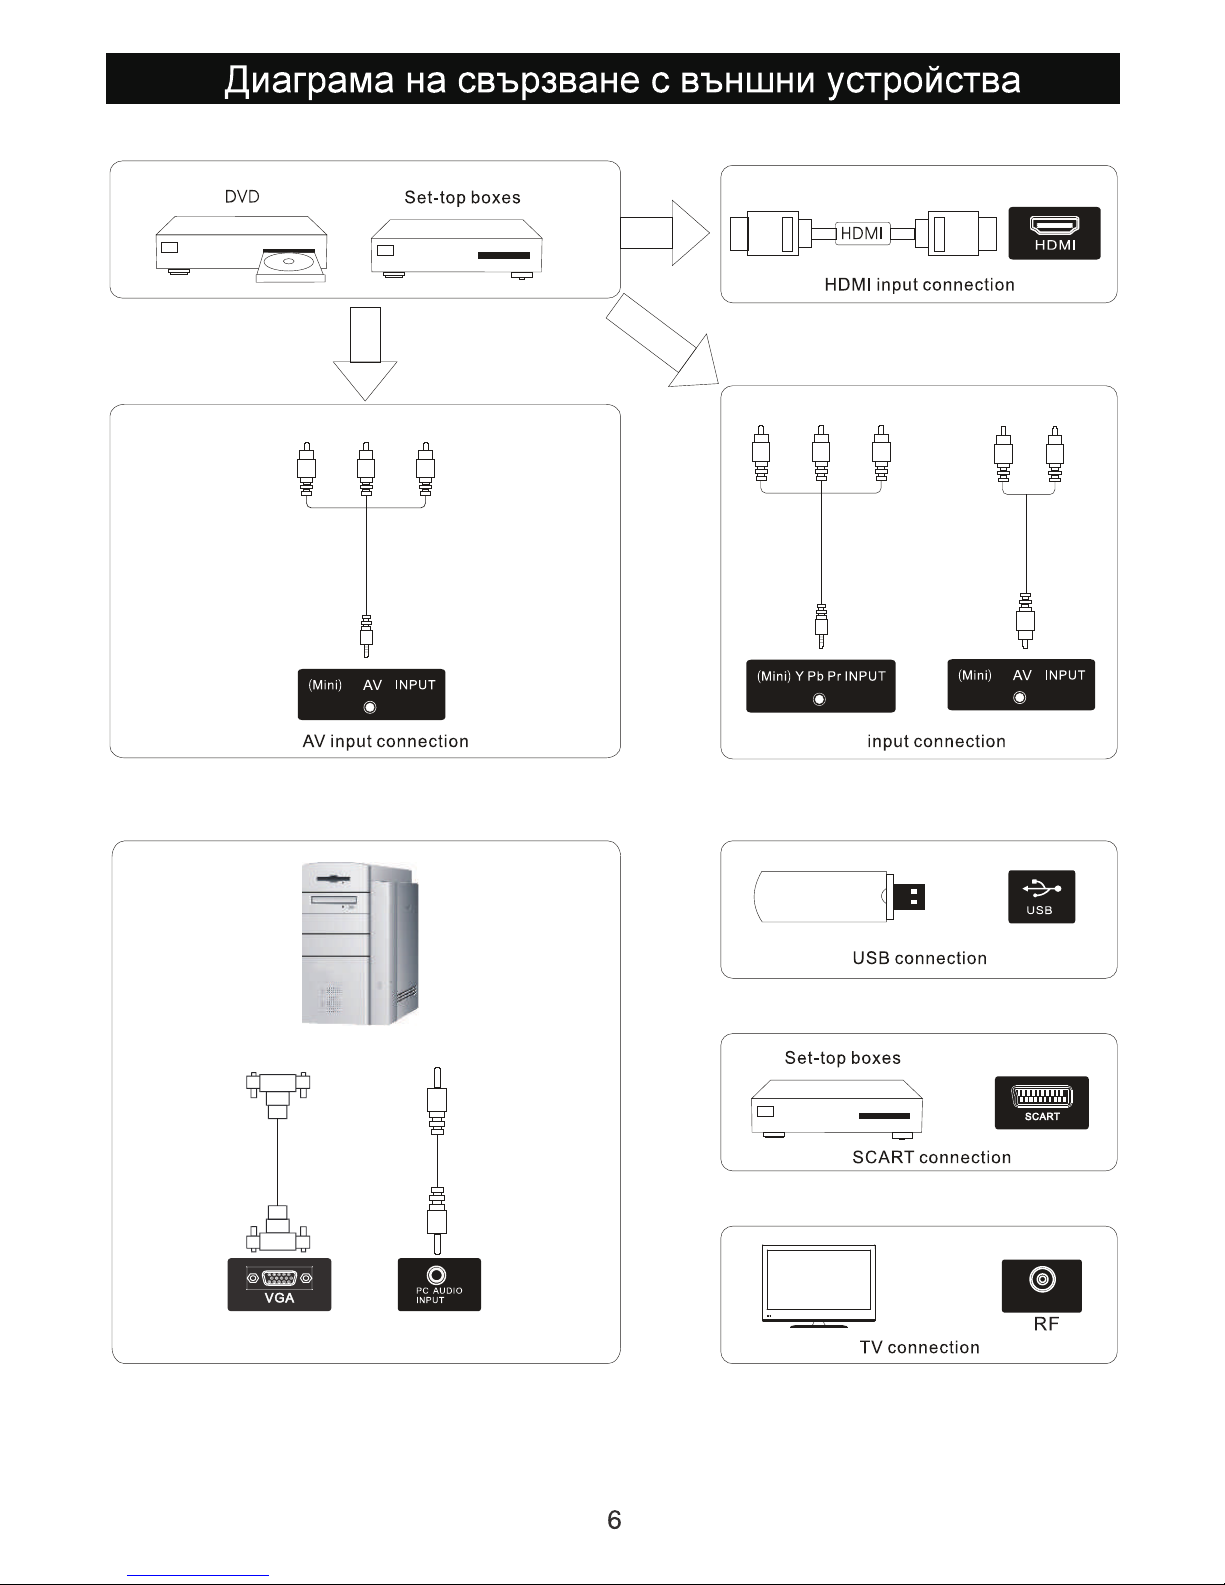
YPbPr
Page 8
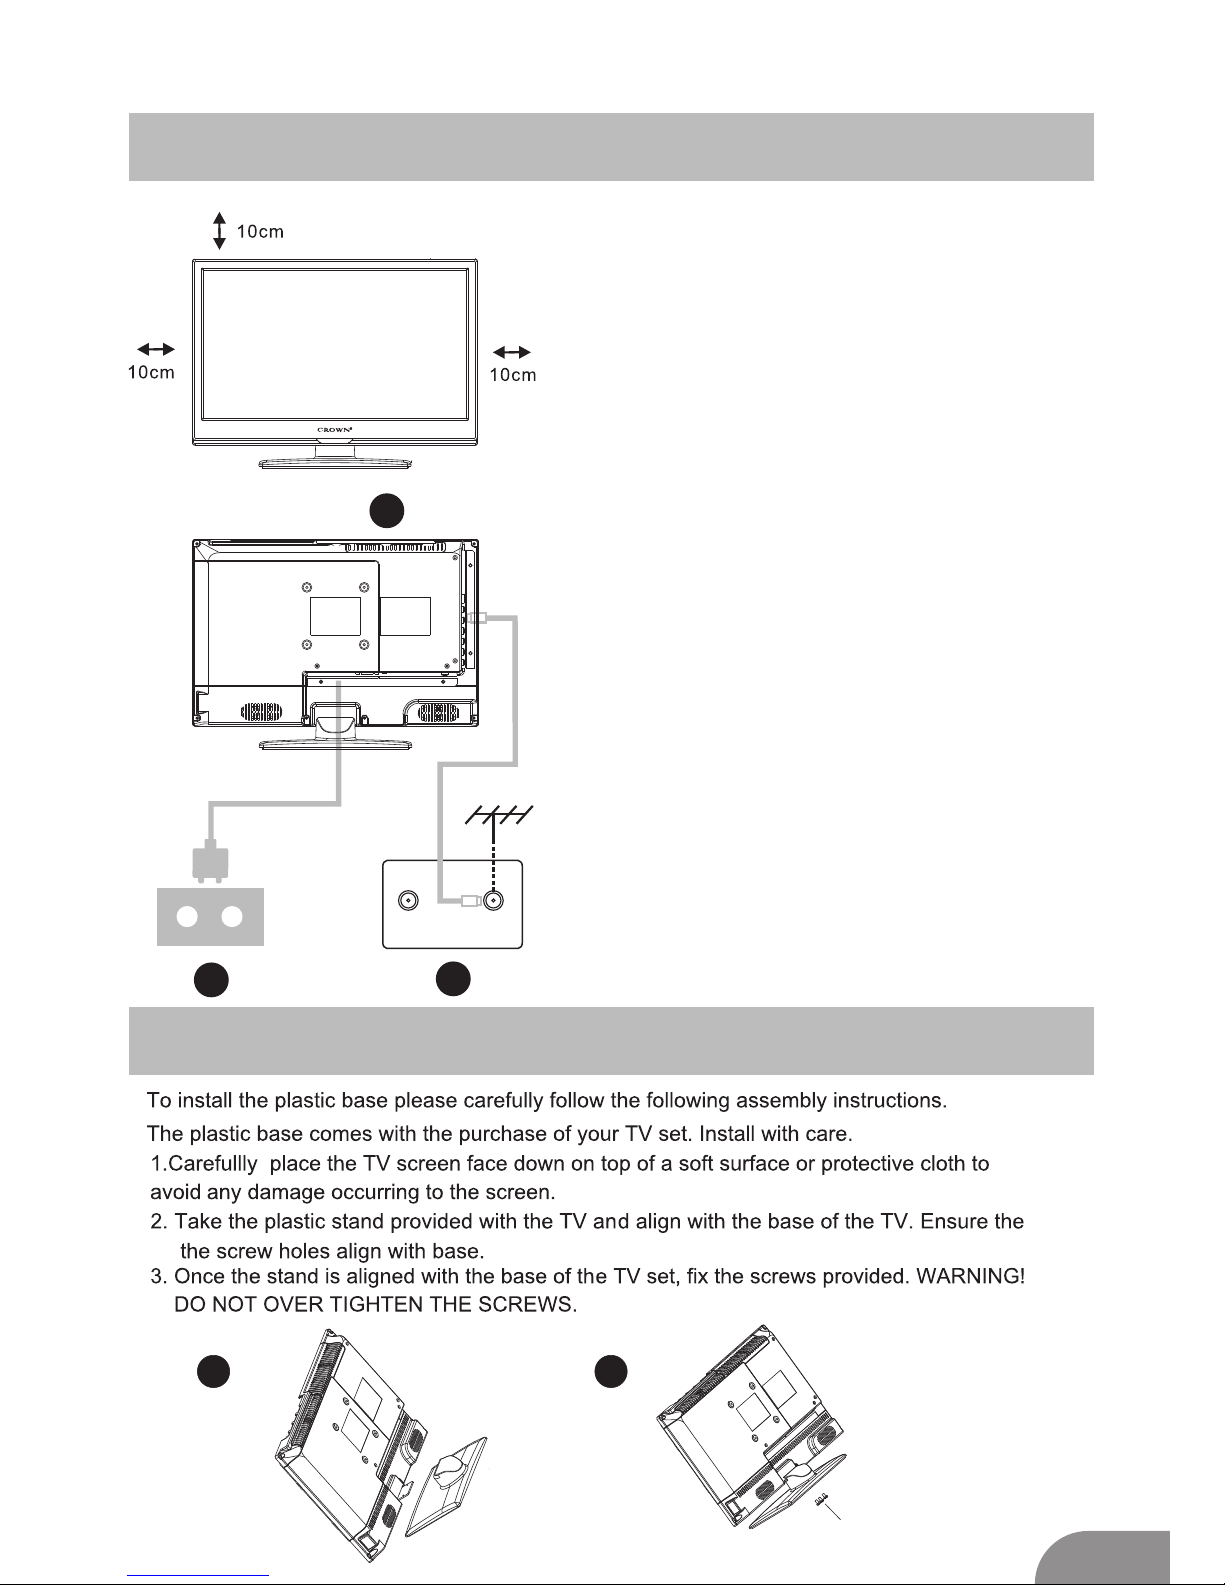
1
2
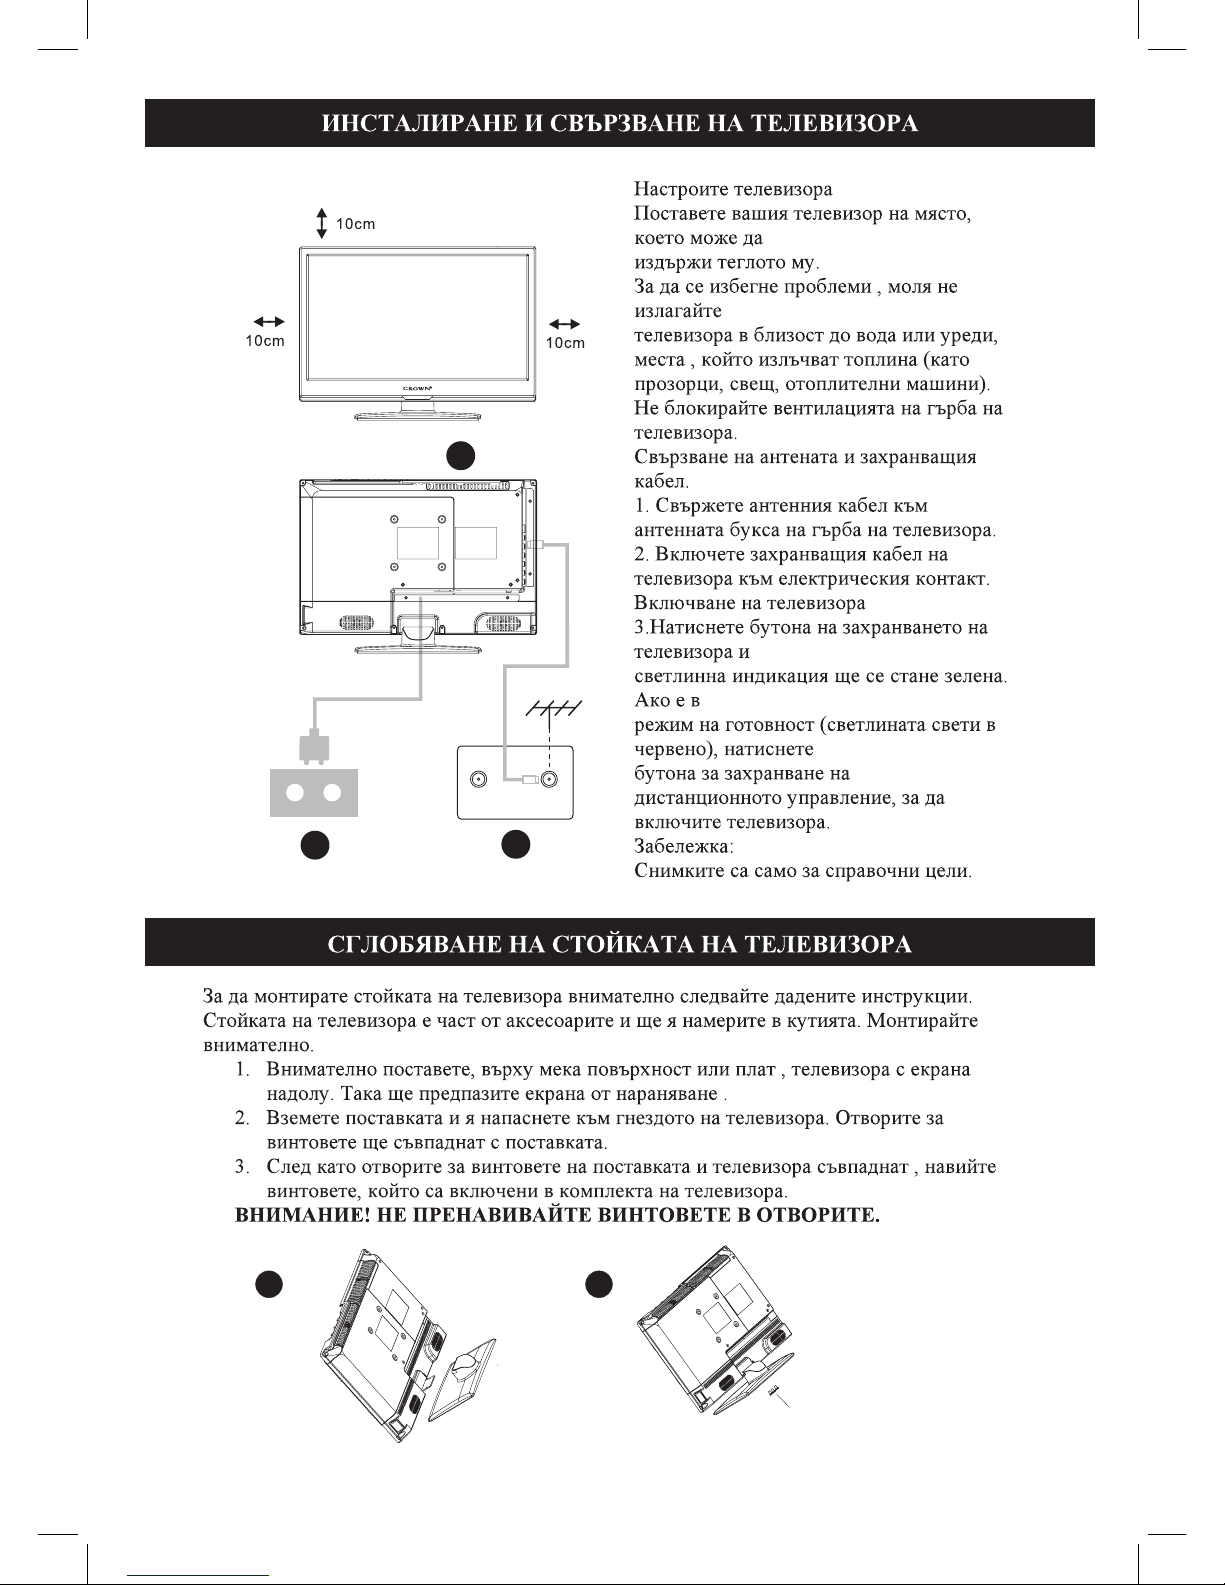
Install And Connect TV
7
TV ANT
FM ANT
TV sig na l output
Set your TV
To put your TV in a firm place which can
bear the weight of the TV.
To avoid danger, please don’t expose the
TV near water or heating place (such as
light, candle, heating machine),do not block
the ventilation at the back of TV.
Connect antenna and power
1.Connect the antenna cable to the antenna
socket on the back of the TV.
2.To plug the power cord of TV.
1
3
Turn on TV
3.Press the power button of the TV the
indication light will turn to green. if it is
on standby mode (the light is red),press
the power button on the remote control
to turn on the TV.
Note:
Picture for reference purposes only.
2
TV Stand Installation Instructions
Page 9
Page 10
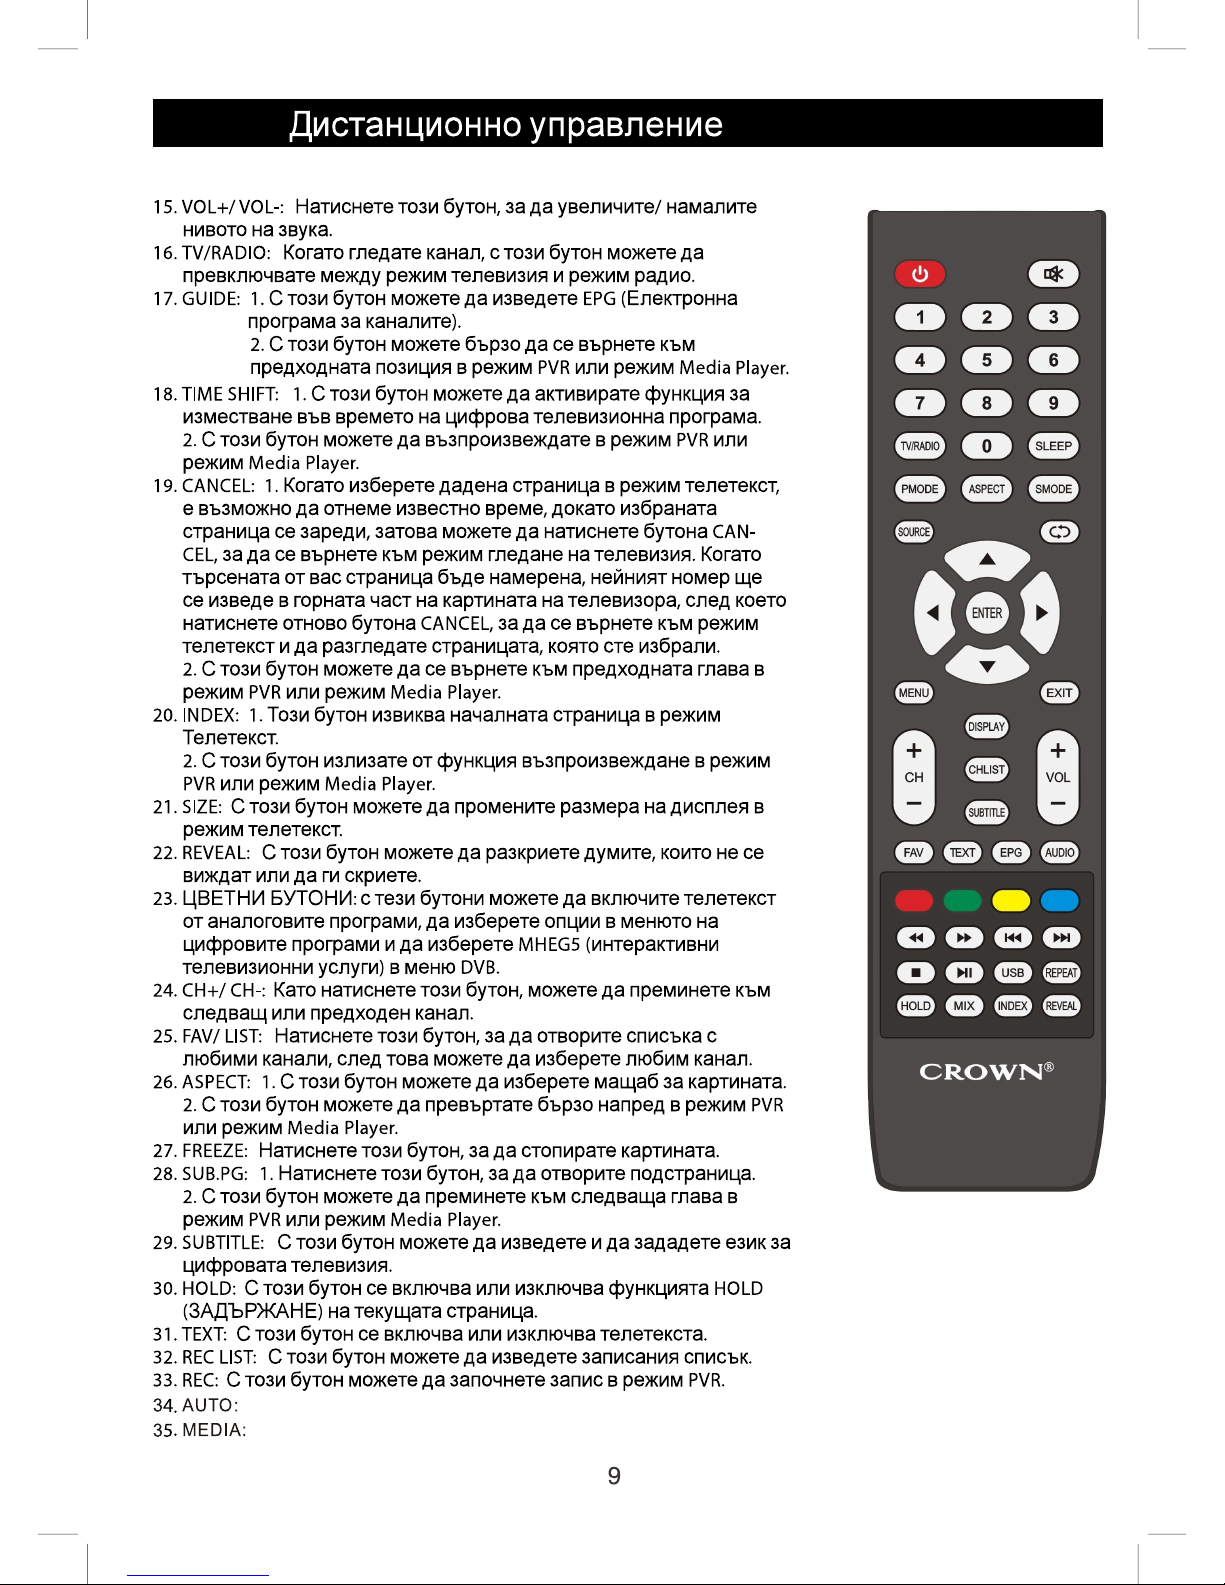
AUTO : PC Auto Adjust
MEDIA: This bu tton select the source ME D IA.
Page 11
Page 12
TV Menu
11
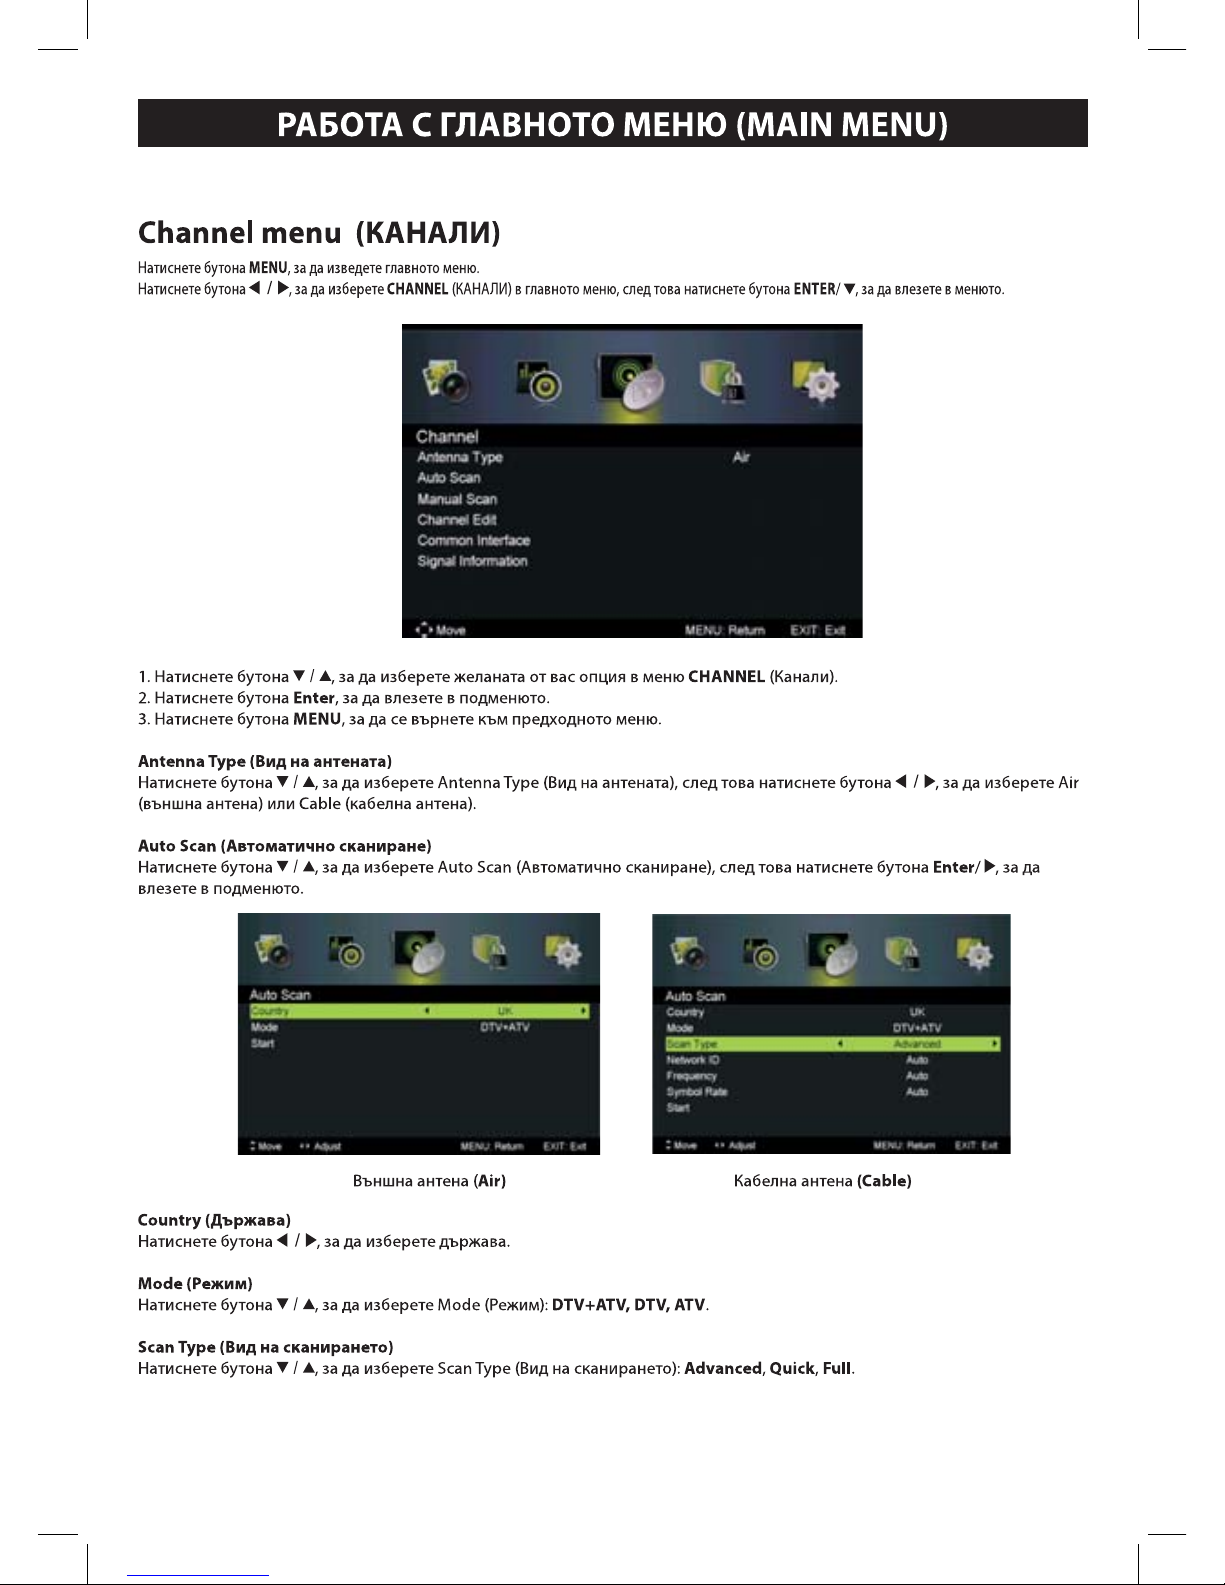
Channel Menu
1. Press ▼ / ▲ button to select the option that you want to adjust in the
SOUND menu.
2. Press Enter/ button to adjust.
3. After finishing your adjustment, Press MENU button to save and return
back to the previous menu.
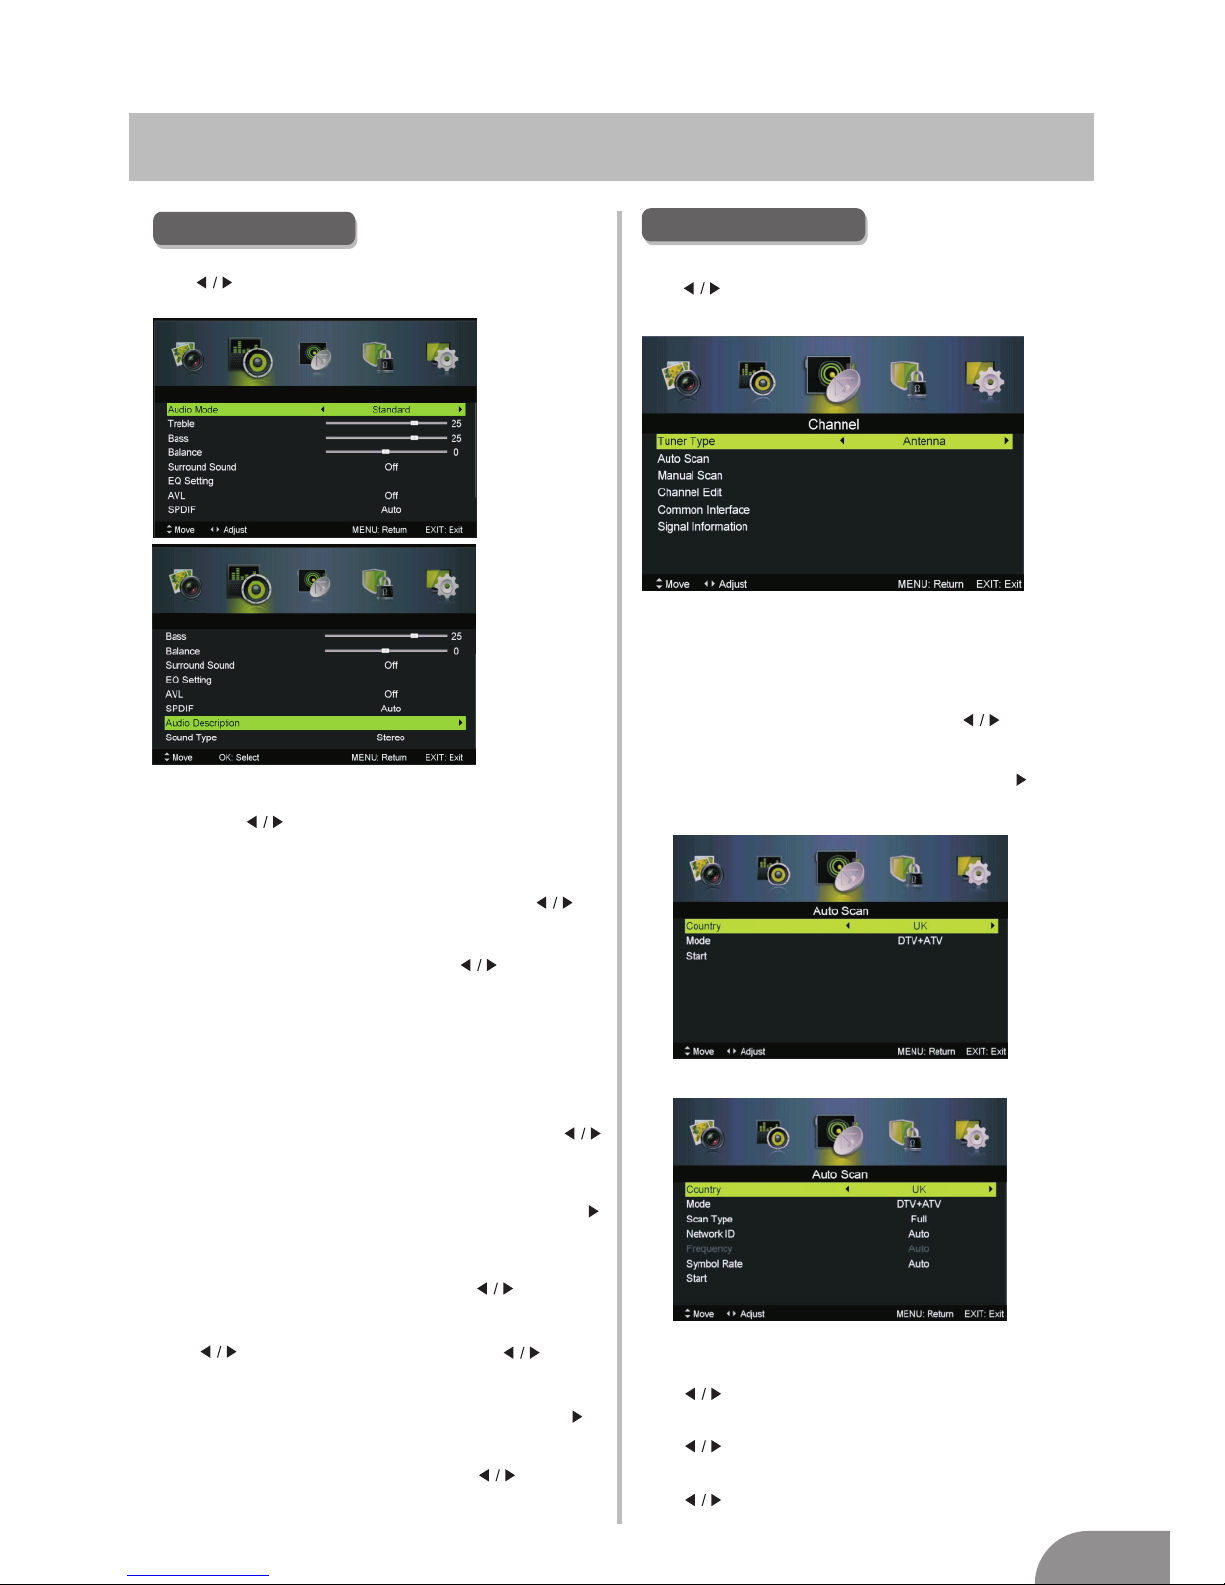
Sound Mode
Sound
Sound ModePress ▼ / ▲ button to select , then press
button to select.
Treble/Bass/Balance
Press ▼ / ▲ button to select option, then press button to adjust.
Treble Adjust the treble effect.Increases or decreases
high-pitched sounds.
Bass Adjust the bass effect.Increases or decreases
lower-pitched sounds.
Balance Adjust the balance between left and right speakers
to adapt to your listening position.
Surround Sound
Press ▼ / ▲ button to select Surround Sound, then press
button to select On or Off.
Press ▼ / ▲ button to select , then press Enter /
button to enter sub-menu.
EQ Setting
EQ Setting
Adjust the curve of 7 bands equalizer.
AVL
Set the auto volume control.
Press ▼ / ▲ button to select AVL, then press button to
select On or Off.
SPDIF
Press button to select SPDIF, then press button
to select Off / Auto / PCM.
Audio Description
Audio DescriptionPress ▼ / ▲ button to select , then press Enter /
button to enter sub-menu.
Sound Type
Press ▼ / ▲ button to select Sound Type, then press button to select.
(Available Sound Type: Stereo,Dual I,Dual II,Mixed).
Press MENU button to display the main menu.
Press button to select CHANNEL in the main menu,then p
ENTER / ▼
ress
to enter.
1. Press ▼ / ▲ button to select the option that you want to select in the
CHANNEL menu.
2. Press Enterbutton to enter sub-menu.
3. Press MENU button to return back to the previous menu.
Tuner Type
Tuner TypePress ▼ / ▲ button to select , then press button to
select
Antenna or Cable.
Auto Scan
Auto Scan
Press ▼ / ▲ button to select
, then press Enter / button to
enter sub-menu.
Country
Press button to select country
Mode
Press button to select Mode: DTV+ATV, DTV, ATV.
Scan Type
Press button to select Scan Type: Advanced,Quick,Full.
SOUND MENU
Press MENU button to display the main menu.
ress
to enter.
Press button select SOUND in the main menu,then p ENTER / ▼
Sound
Tuner Type is Cable
Tuner Type is Antenna
Page 13
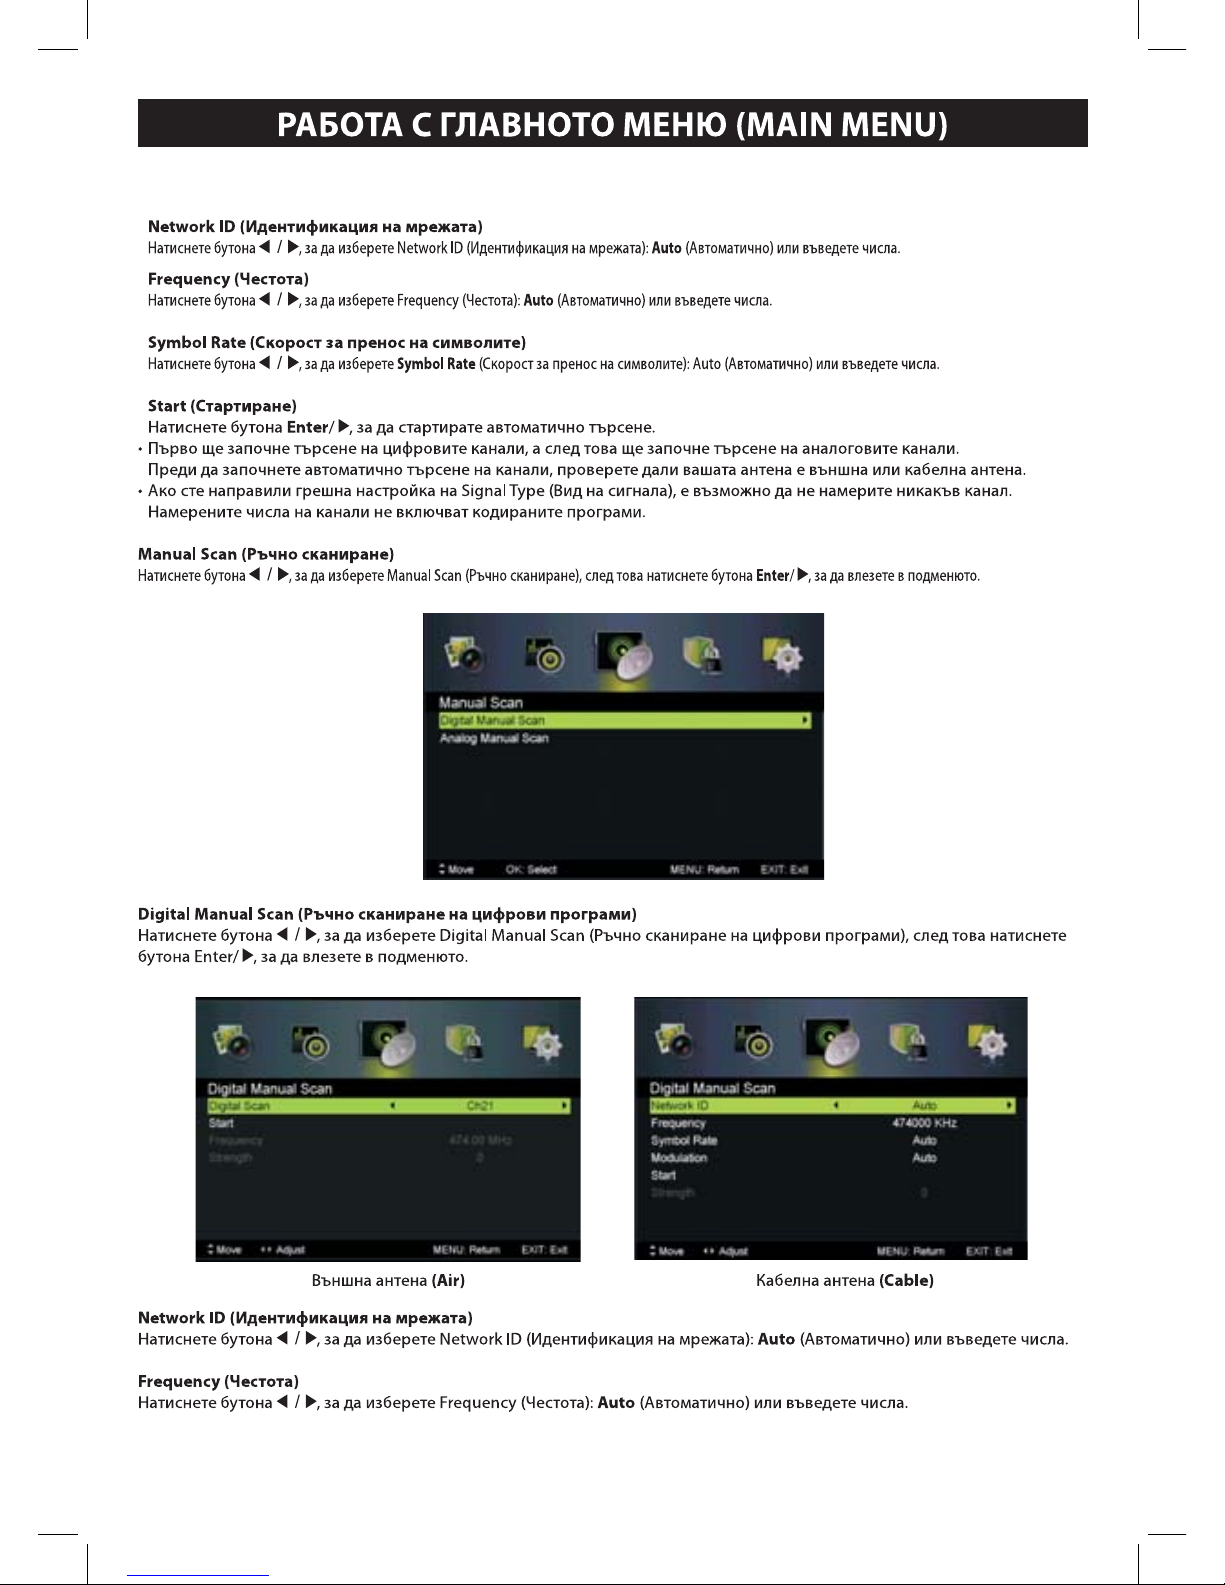
Tuner Type is Cable
Tuner Type is Antenna
TV Menu
12
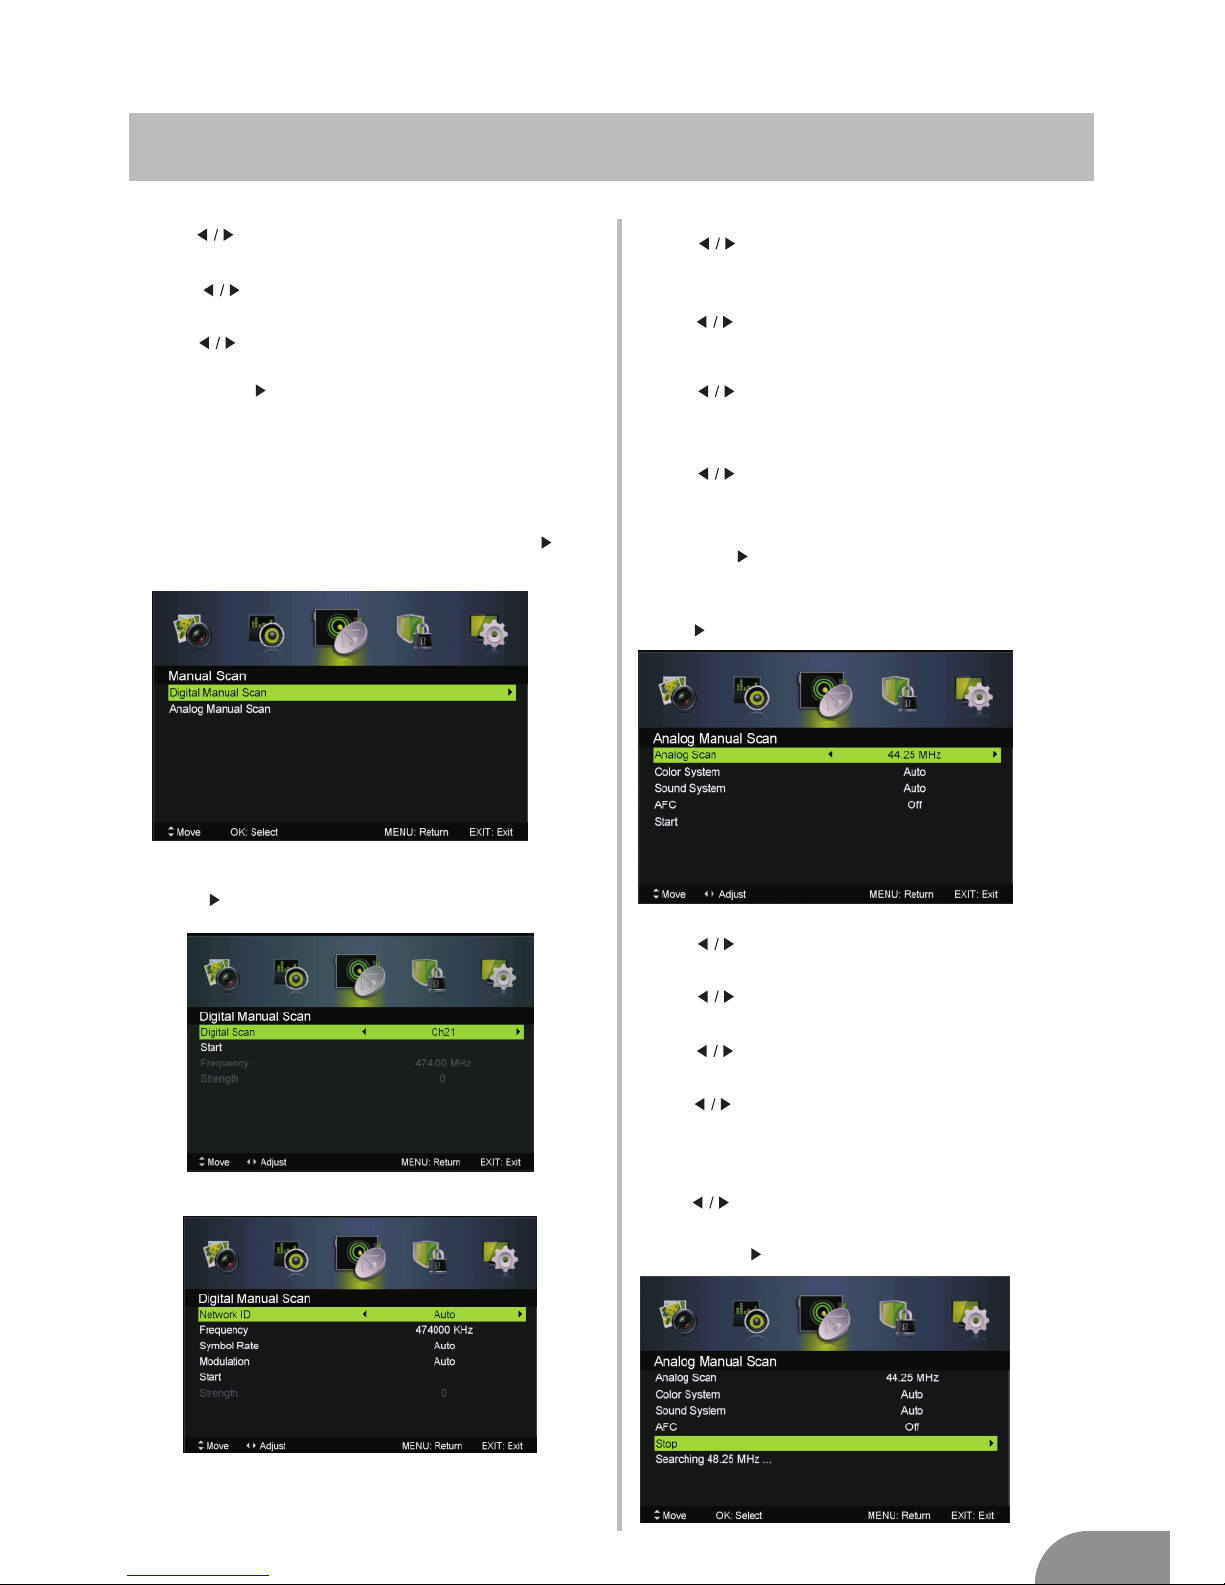
Network ID
Press button to select Network ID:Auto or nter digital numbers. e
Frequency
Press button to select Frequency:Auto or nter digital numbers. e
Symbol Rate
Press button to select Symbol Rate:Auto or nter digital numbers. e
Start
.
.
Press Enter / button to start the auto searching.
It will search digital channels first,then analog channels.
Before execute auto channel search,please confirm your antenna
type is Antenna or Cable.
Wrong setting of Signal Type may not find the channel.
Found numbers do not include
encryption programs.
Manual Scan
Manual ScanPress ▼ / ▲ button to select , then press Enter / button
to enter sub-menu.
Digital Manual Scan
Press ▼ / ▲ button to select Digital Manual Scan, then press
Enter / button to enter sub-menu.
Network ID
Press button to select Network ID:Auto or nter
digital numbers.
e
Frequency
Press button to select Frequency:Auto or nter
digital numbers.
e
Symbol Rate
Press button to select Symbol Rate:Auto or nter
digital numbers.
e
Modulation
Press button to select Modulation:Auto,16QAM,32QAM,
64QAM,128QAM,256QAM.
Start
Press Enter / button to start the channel searching.
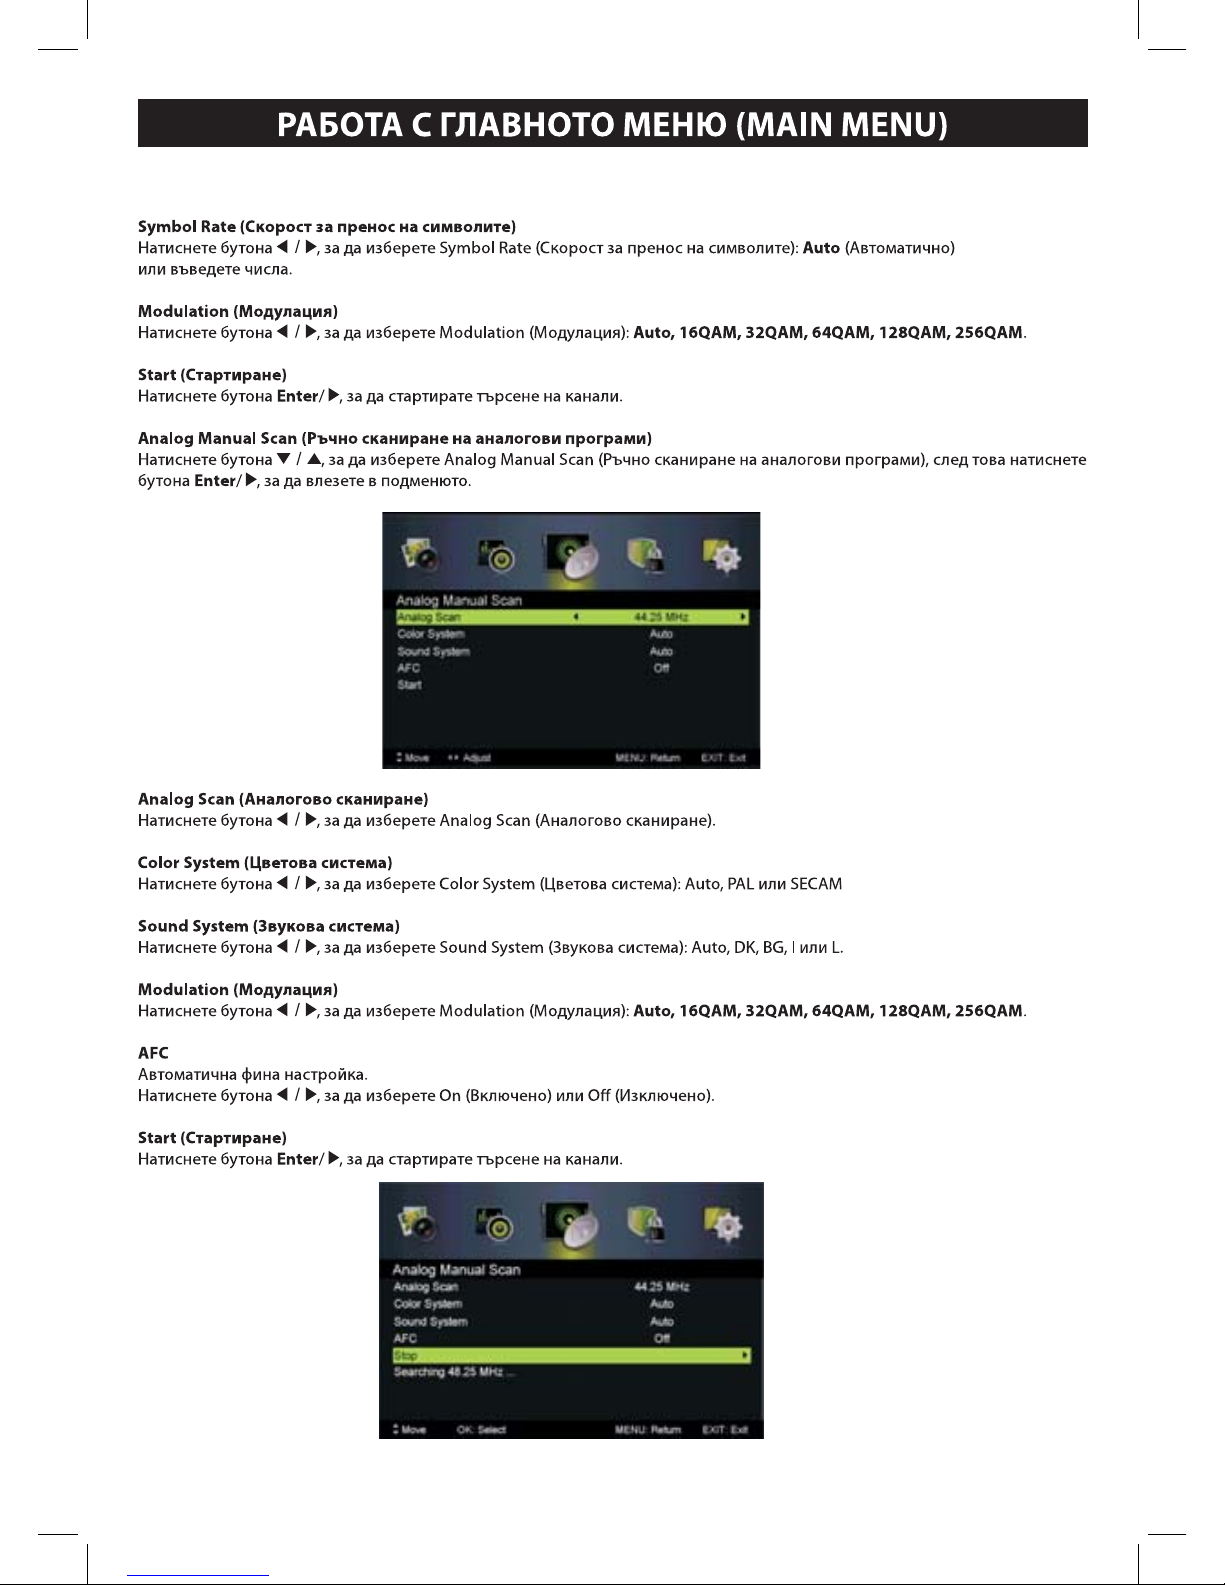
Analog Manual Scan
Press ▼ / ▲ button to select Analog Manual Scan, then press
Enter / button to enter sub-menu.
Analog Scan
Press button to select Analog Scan.
Color System
Press button to select Color System:Auto,PAL or SECAM.
Sound System
Press button to select Sound System :Auto,DK,BG,I or L.
Modulation
Press button to select Modulation:Auto,16QAM,32QAM,
64QAM,128QAM,256QAM.
AFC
press button to select On or Off.
Start
Press Enter / button to start the channel searching.
Automatic Fine tuning.
Page 14
Page 15
Page 16
Help
15
Page 17
Technical Specications
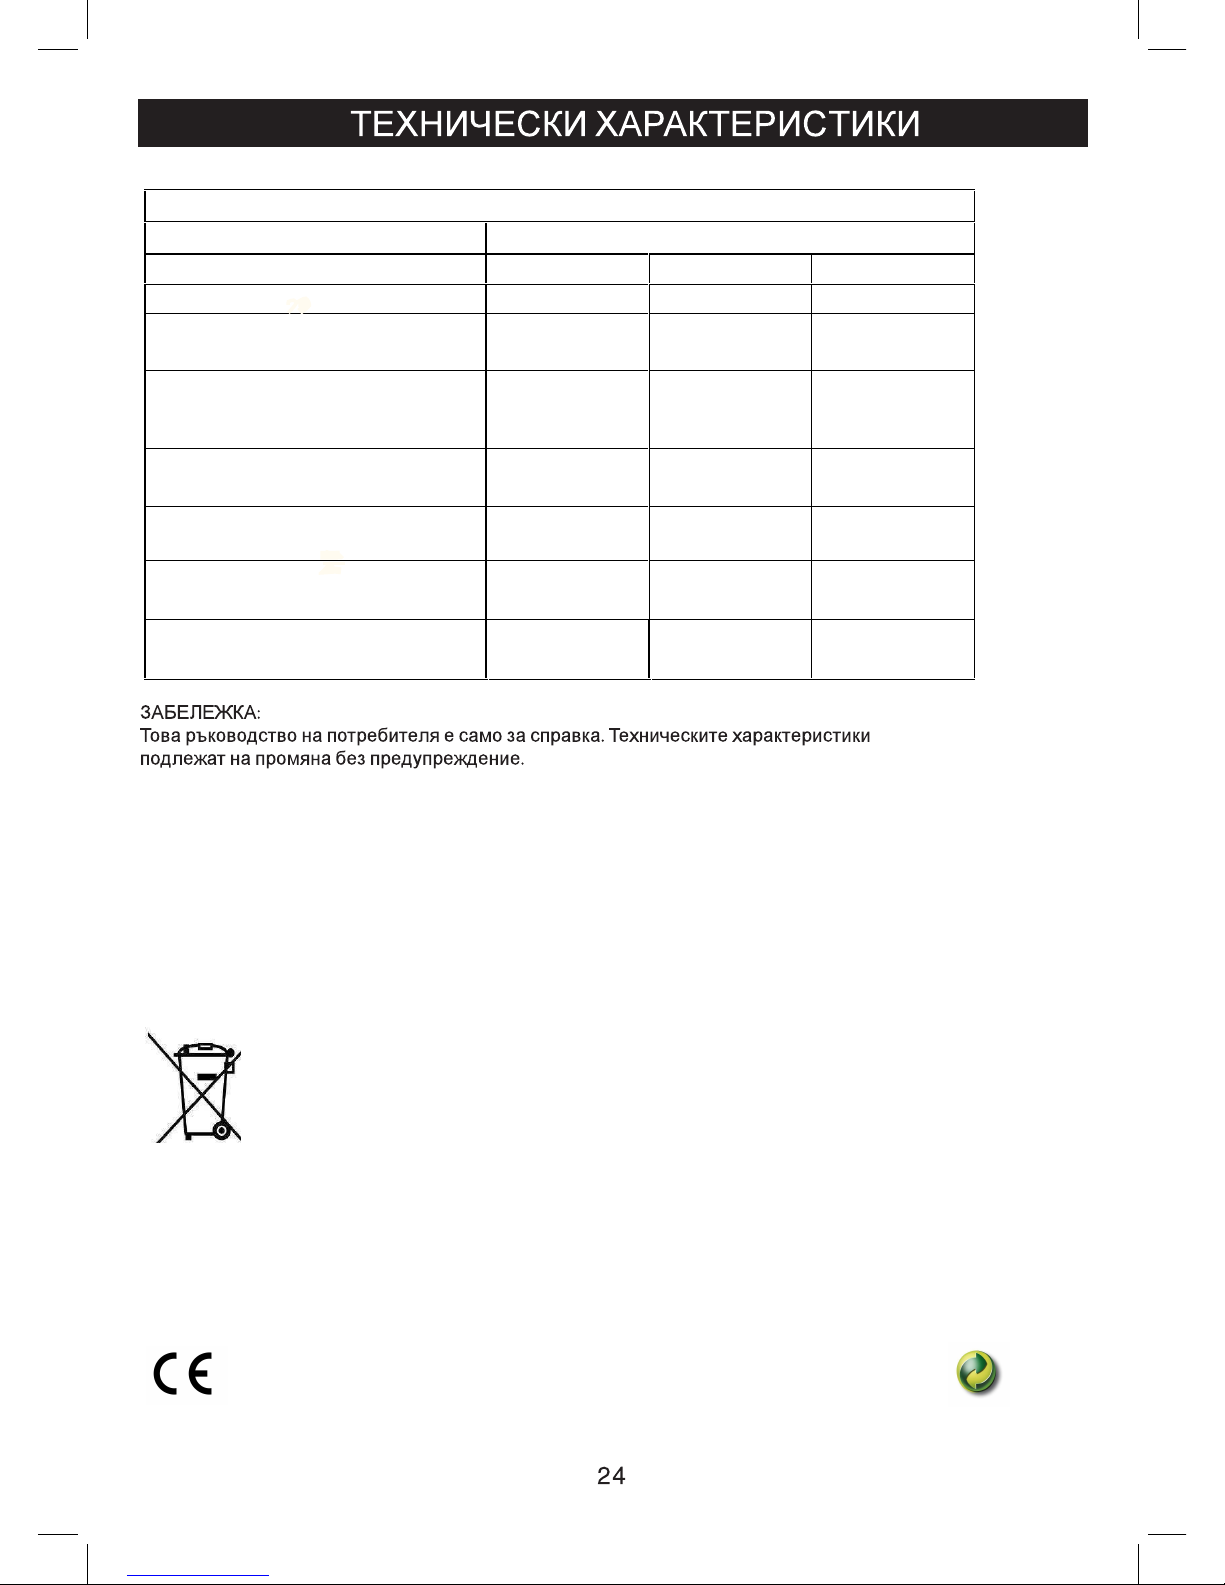
16
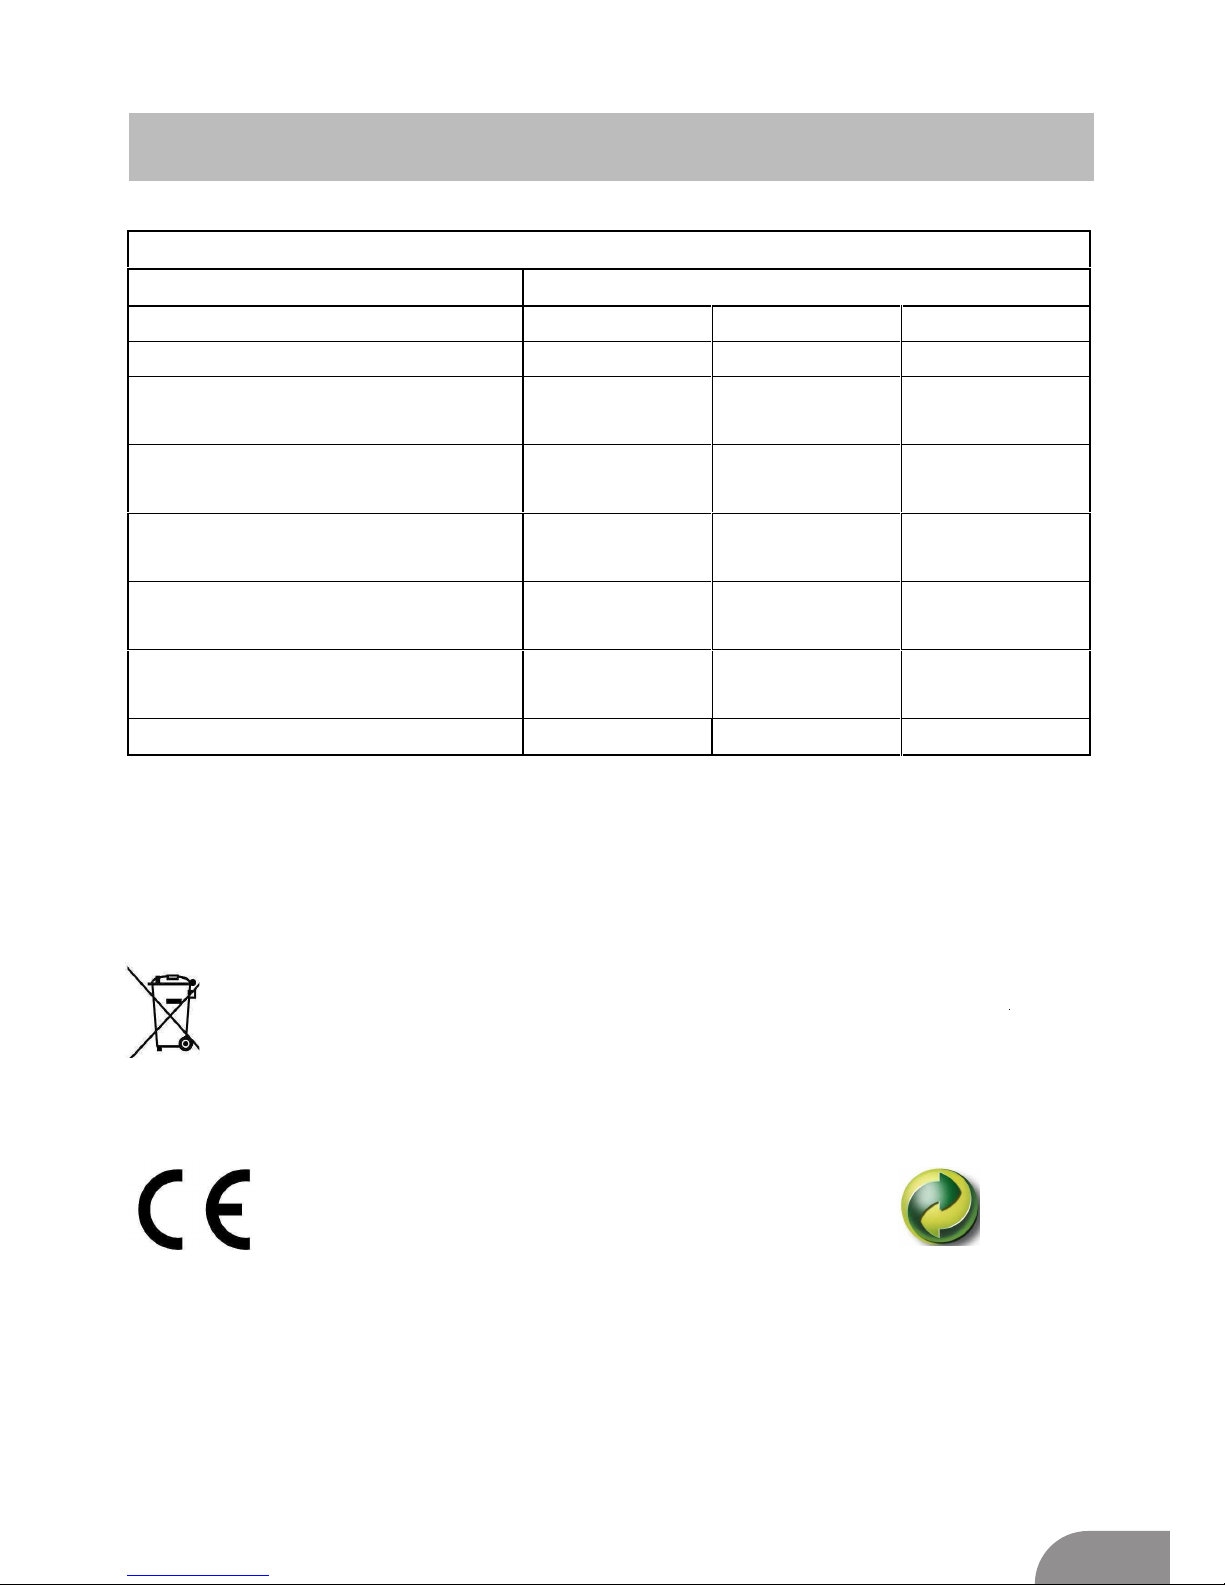
Screen size
(diagonal,approx.) (inch/cm)
On mode average power
consumption (Watt)
Annual energy consumption
(kWh/annum)
Standby power consumption
(Watt)
Off mode power consumption
(Watt)
IMPORTANT:
This appliance is not intended for use by persons (including children) with reduced physical, sensory or
mental capabilities, or lack of experience and knowledge, unless they are under supervision have been
instructed how to use the appliance by a person responsible for their safety!
The children have to observe and watched not to play with the appliance!
Correct Disposal of this product
This marking indicates that this product should not be disposed with other household wastes
throughout the EU. To prevent possible harm to the environment or human health from uncontrolled
waste disposal, recycle it responsibly to promote the sustainable reuse of material resources. To
return your used device, please use thereturn and collection systems or contact the retailer where the product
was purchased. They can take this product for environmental safe recycling.
The product meets the requirements of the applicable EC directives.
0,5 0,5
0 0
Display resolution (px) 1366x768 1366x768
32 inch. / 80 cm 39 inch. / 98 cm
45 65
60 95
Energy efficiency class A A
Product fiche
Brand CROWN
Model 32167 39169
Page 18
32167
39169
Page 19
1
12
18
19
22
23
24
Page 20
2
Page 21
Page 22
4
Page 23
Page 24
YPbPr
Page 25
1
2
TV ANT
FM ANT
TV signal output
1
3
2
7
Page 26
Page 27
С този бутон избирате медийния източник: Филм, Музика, Снимки.....
Автоматична настройка/засичане на компютър
Page 28
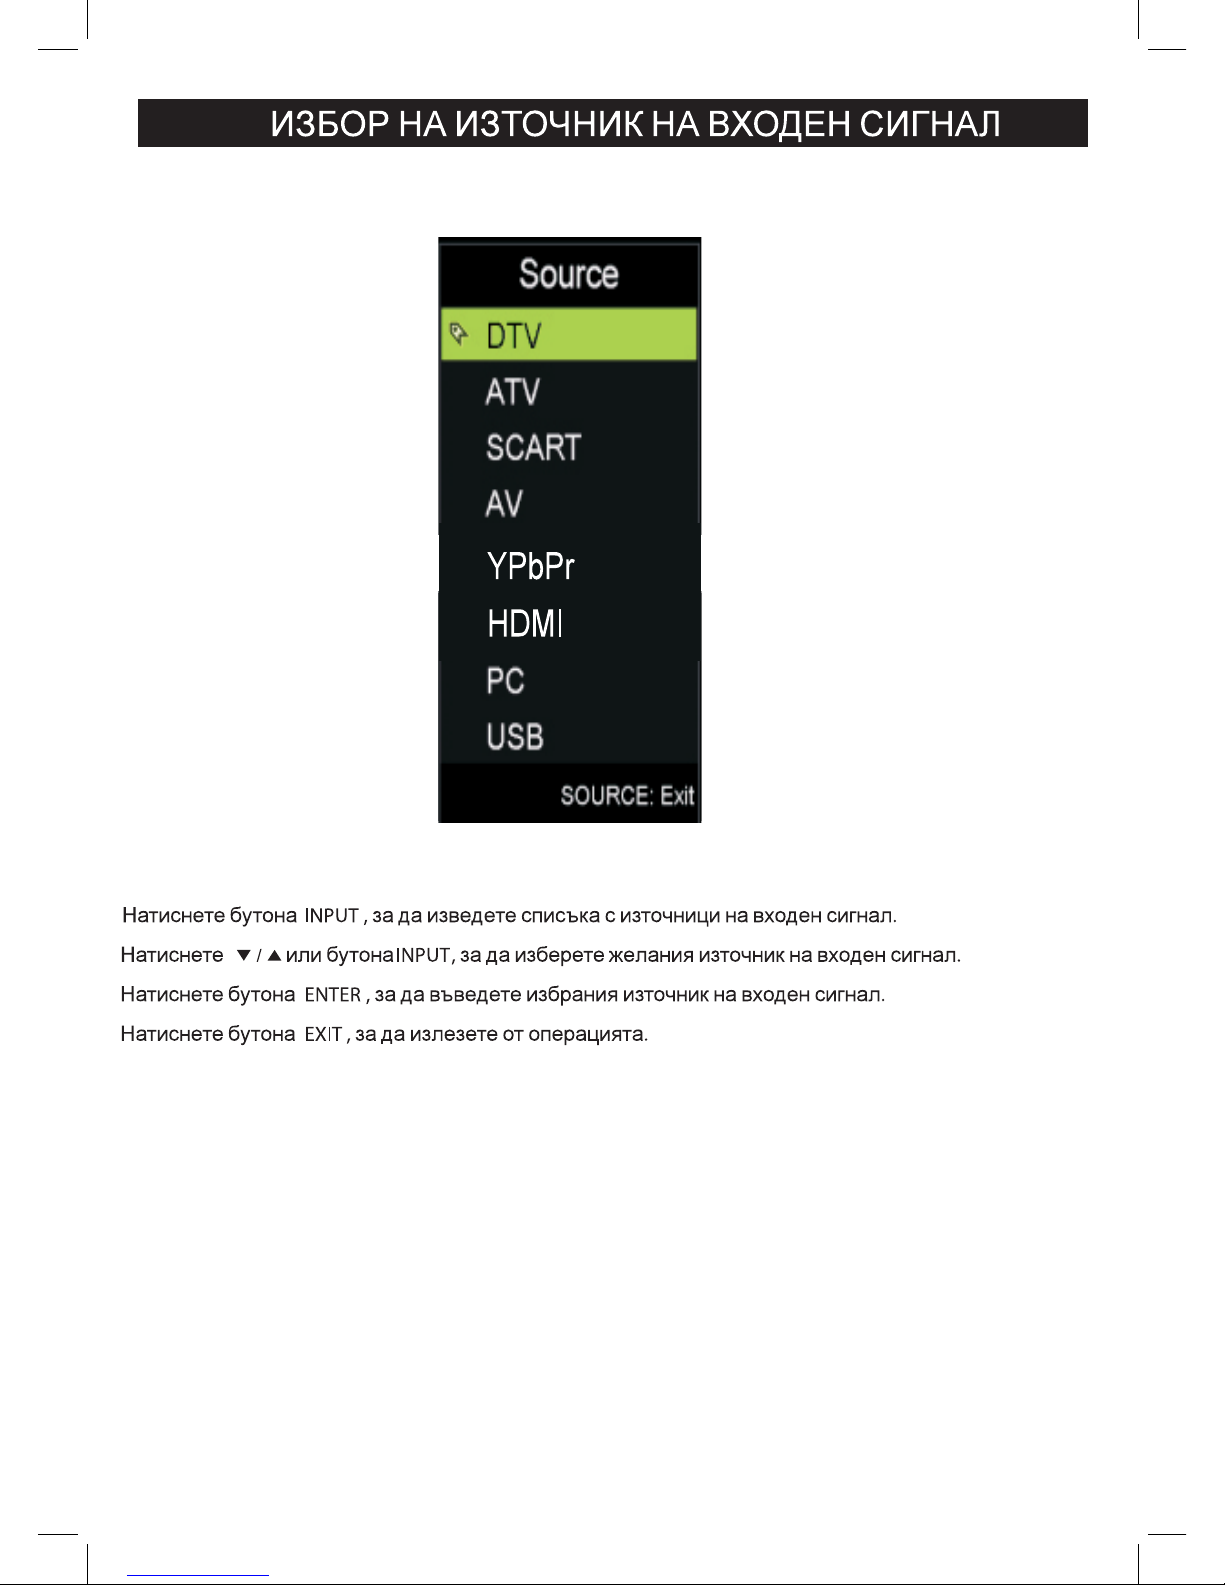
10
Page 29
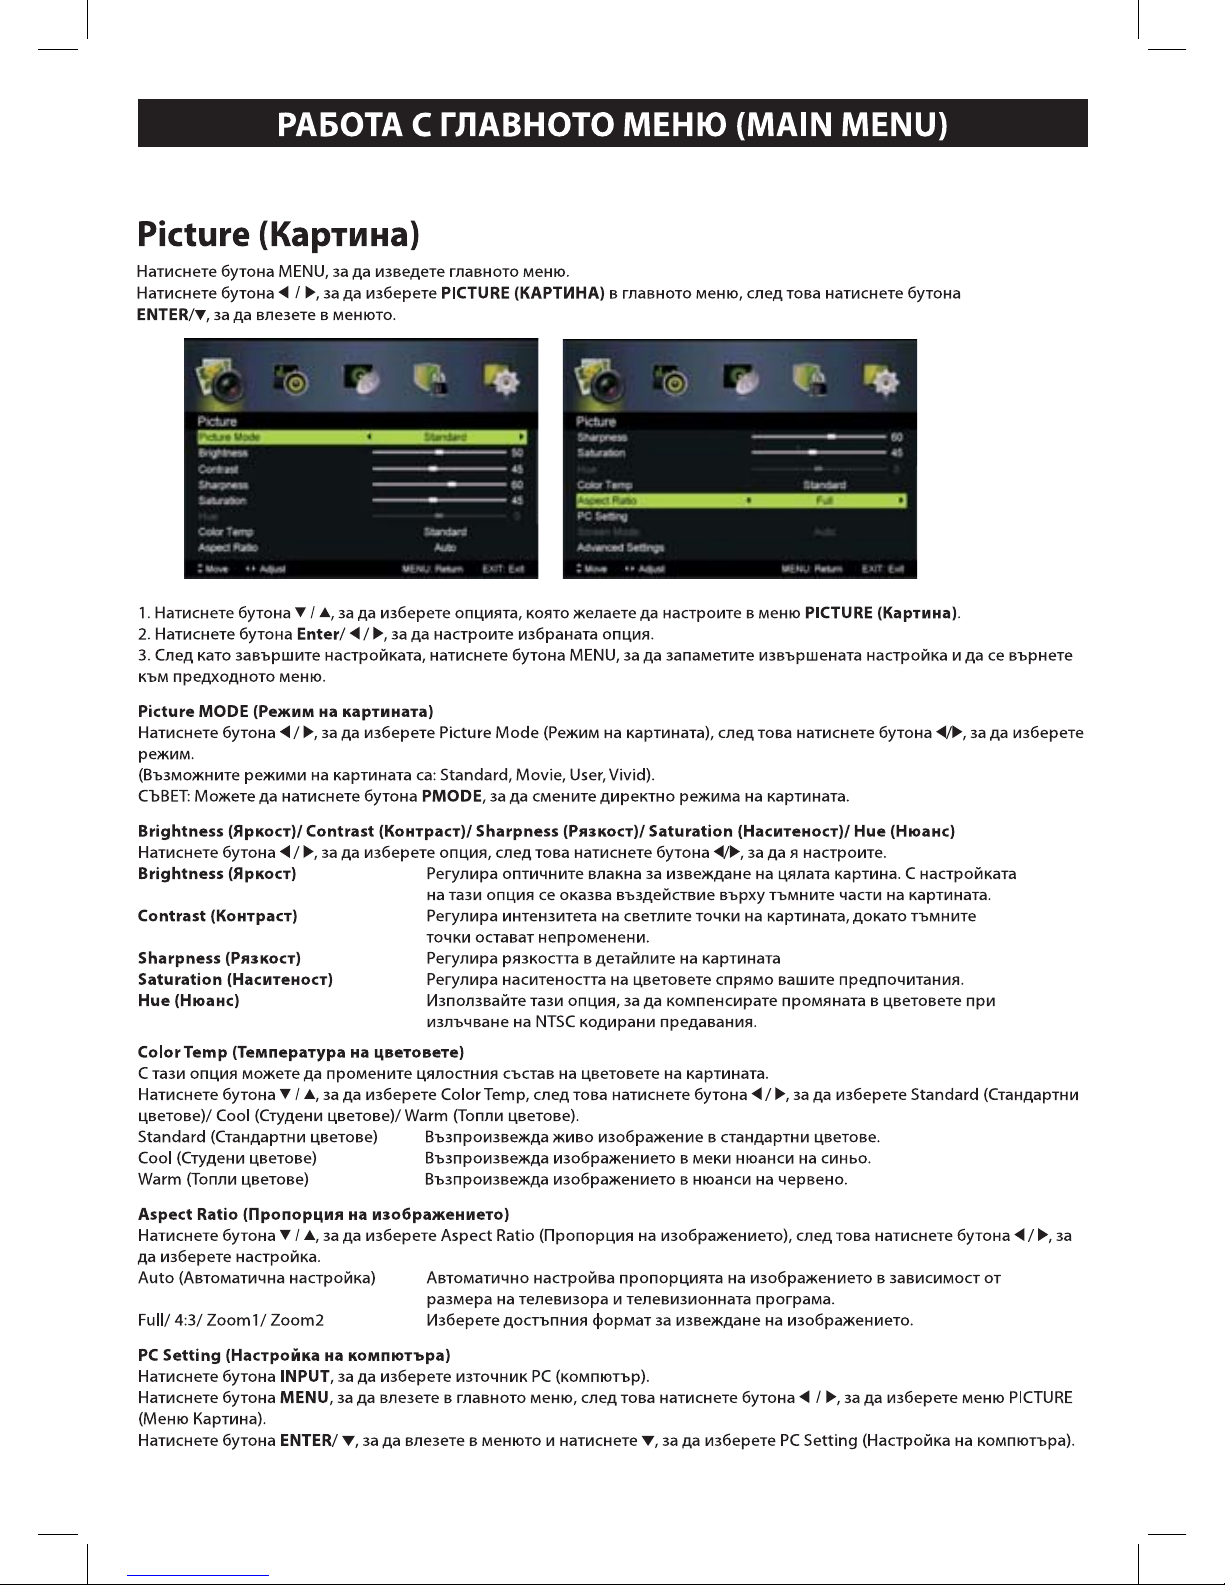
11
Page 30
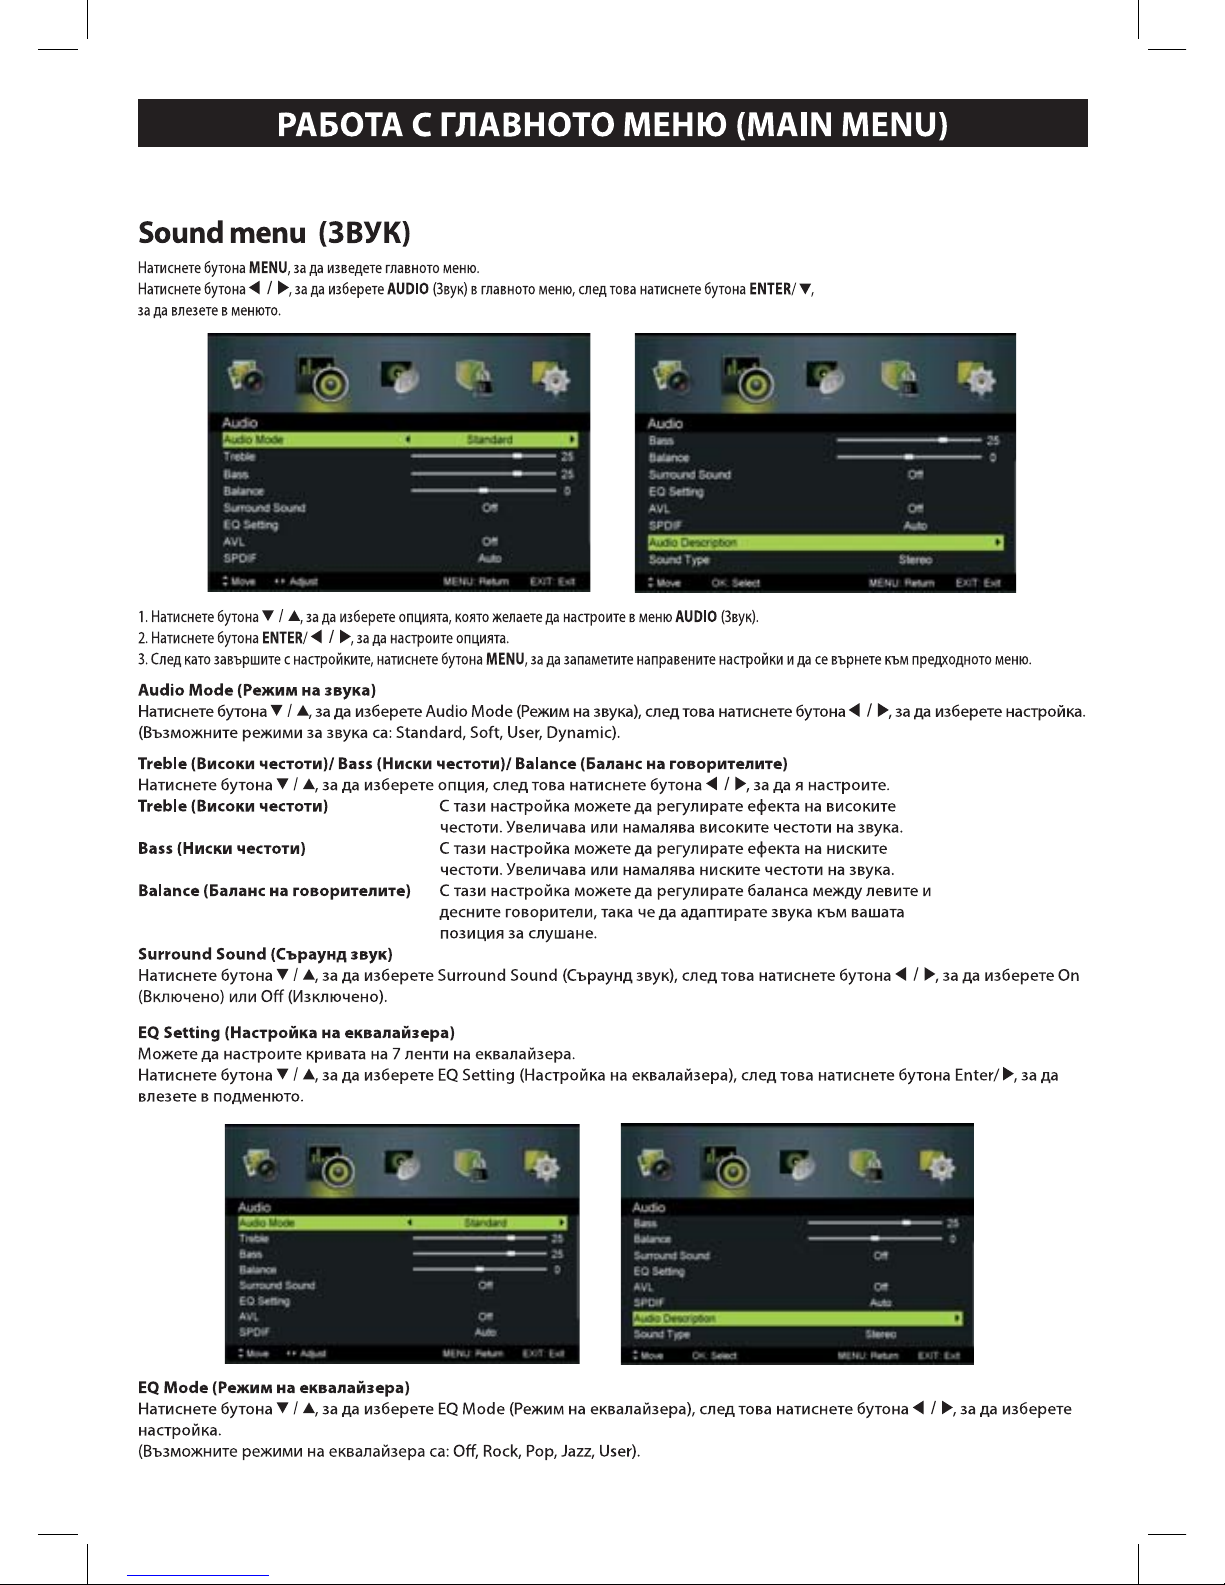
12
Page 31
13
Page 32
14
Page 33
15
Page 34
16
Page 35
17
Page 36
18
Page 37
19
Page 38
20
Page 39
21
Page 40
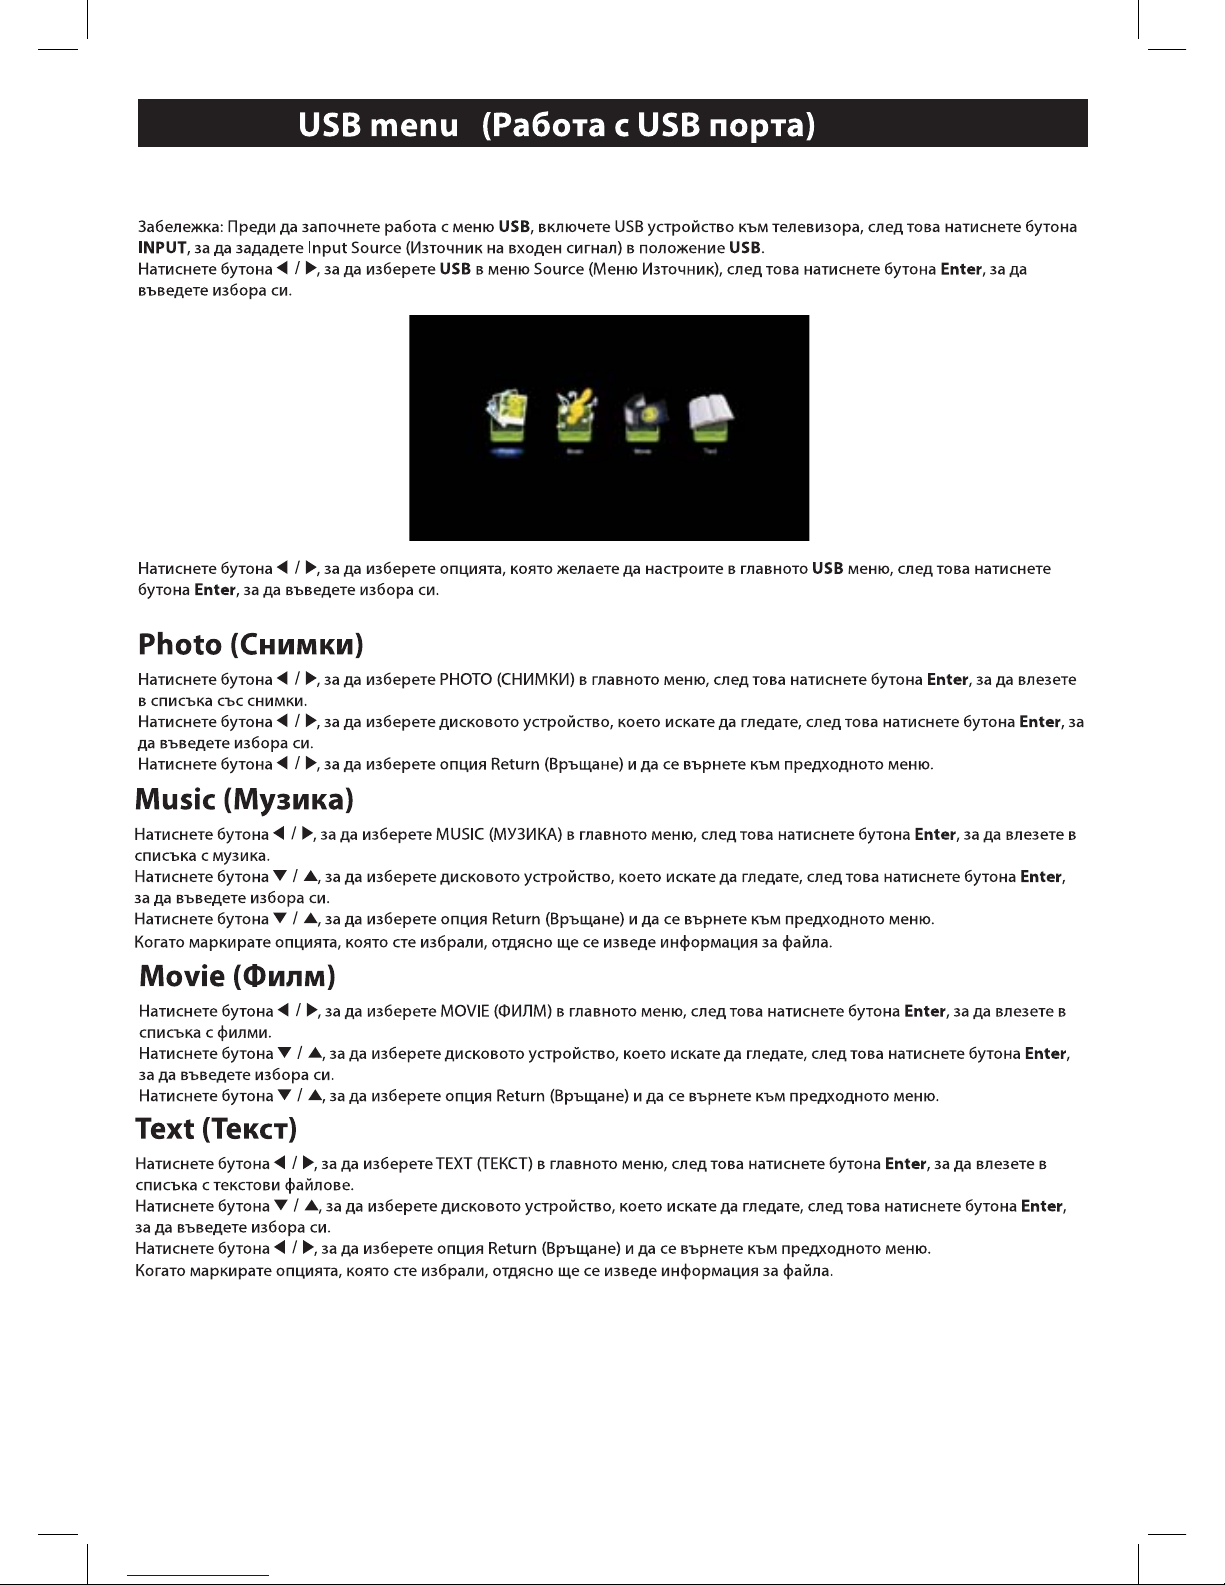
22
Page 41
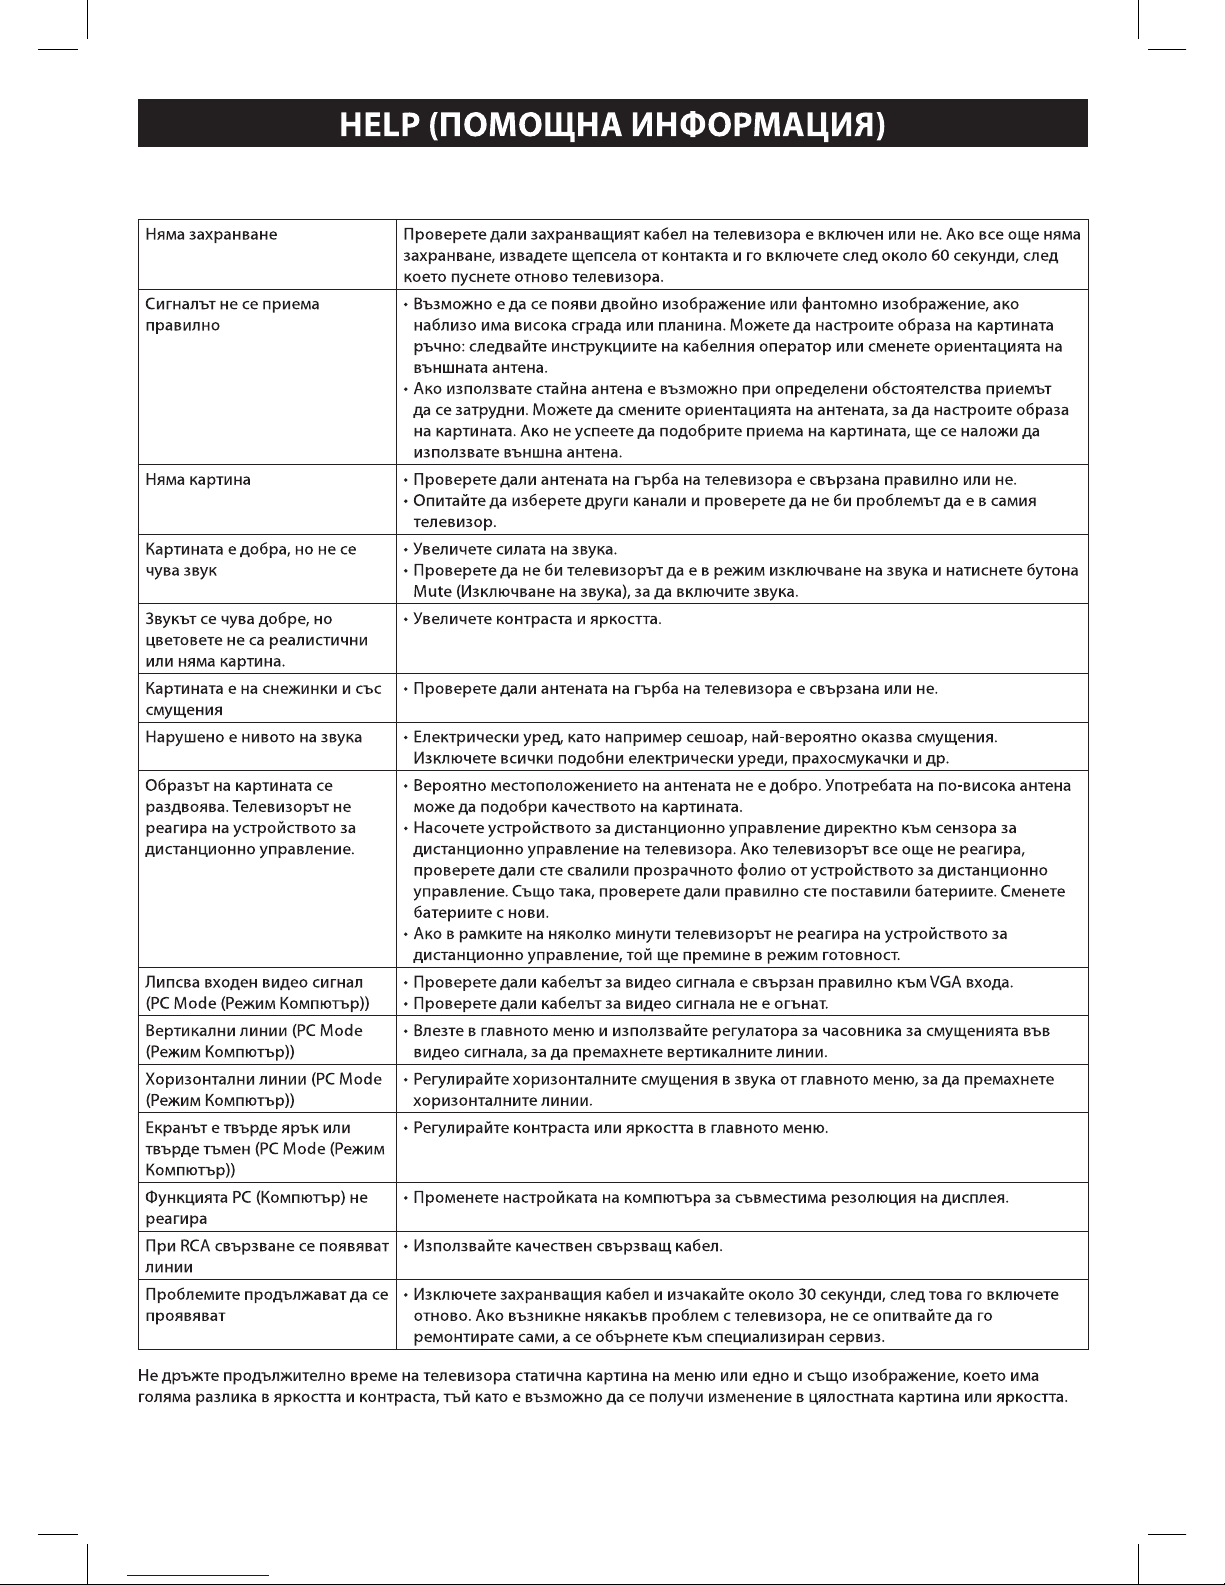
23
Page 42
2222
888
2222
2222
Децата трябва да бъдат наблюдавани да не играят с уреда!
Размер на екрана (диагонал),
(инч/см)
Средна консумация на
електроенергия във включено
състояние(Watt)
Годишна консумация на
електроенергия (kWh/Година)
Консумация в режим на
готовност(Watt)
Консумация на електроенергия в
изключено състояние(Watt)
Разделителна способност на
дисплея(пиксела)
отпадъци, особено електрически и електронни, в определената за това „точка”. Разделното събиране и
рециклиране на това оборудване допринася за опазване на природните ресурси и гарантира
рециклирането им с оглед опазване на околната среда и здравето. За по-подробна информация
относно реда на изхвърляне на електрически и електронни отпадъци следва да се обърнете към
местните компетентни власти, службата за събиране на битови отпадъци или фирмата, от която сте
закупили продукта.
„ИЗХВЪРЛЯНЕТО НА ОТПАДНИТЕ ЕЛЕКТРИЧЕСКИ И ЕЛЕКТРОННИ УРЕДИ ОТ КРАЙНИ
ПОТРЕБИТЕЛИ В ЕВРОПЕЙСКИЯ СЪЮЗ”
Символът върху продукта или опаковката сочи, че този продукт не може да се изхвърля
заедно с битовите отпадъци. Потребителят е отговорен за изхвърлянето на такъв вид
Този продукт е разработен и отговаря нa всички eвропейски директиви
и изисквания.
ВАЖНО:
Този уред не е предназначен за използване от лица (включително деца) с ограничени физически,
сетивни или умствени способности, или с недостатъчен опит и познания, освен ако те са наблюдавaни
или инструктирани относно използването на уреда от лице, отговорно за тяхната безопасност!
45 65
60 95
0,5 0,5
0 0
1366x768 1366x768
Енергиен клас A A
32 inch. / 80 cm 39 inch. / 98 cm
Справочен лист с технически данни
Марка CROWN
Модел 32167 39169
 Loading...