

Page 1
Installation, Operation and Maintenance Instructions
M07192
Issue 7
March 2015
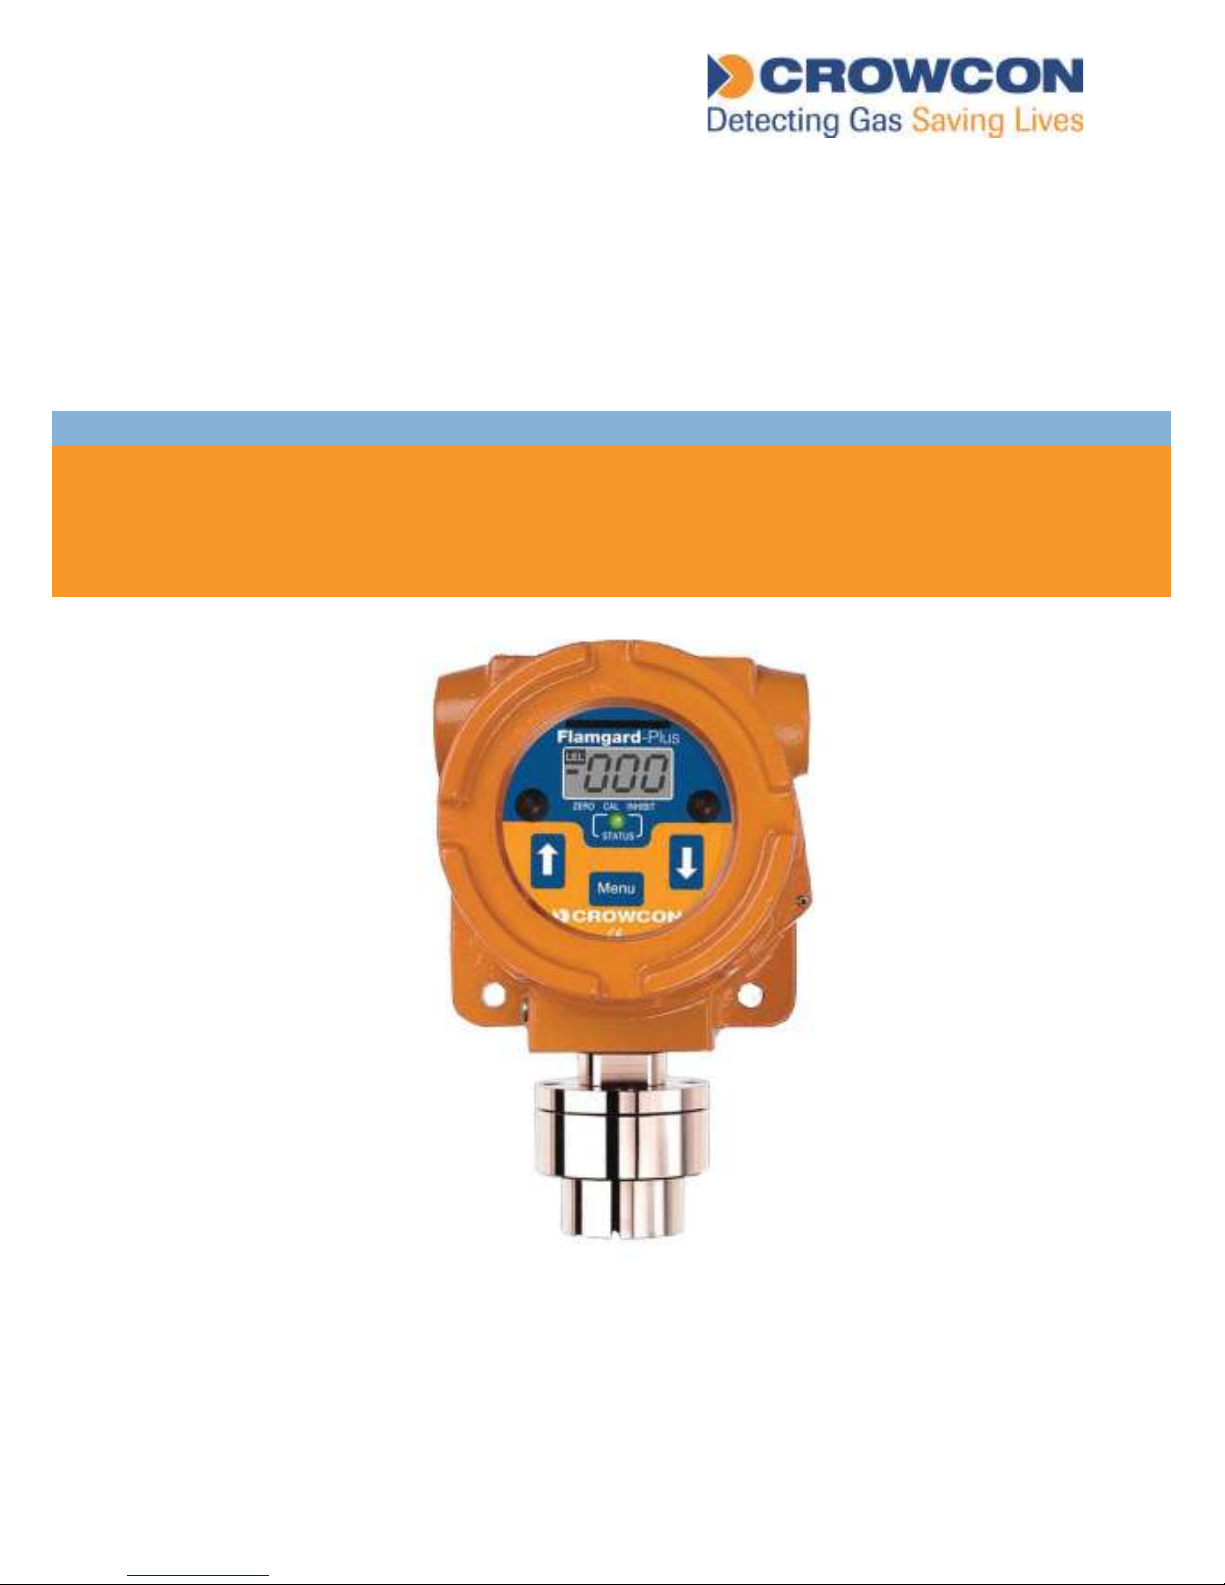
Flamgard-Plus
Flameproof Flammable Gas Detector
Page 2

Page 3

Flamgard-Plus Introduction
1
1 Introduction
1.1 Product overview
Flamgard Plus is a flameproof flammable gas detector suitable for use
in zone 1 or 2 hazardous areas. It is designed to detect flammable gas,
present in ambient air, at concentrations not exceeding the Lower Explosive
Limit (LEL) of the target gas for which it is calibrated. A local display and
magnetically operated switches allow non-intrusive one-man calibration
without a hot work permit. Powered by 24 V dc (nominally) FlamgardPlus provides a 4-20 mA signal (sink or source) proportional to the gas
concentration and can also be fitted with optional alarm and fault relays.
For a list of flammable gases that can be detected, please contact Crowcon.
1.2 Product description
Flamgard Plus comprises four parts; 96HD sensor housing, junction
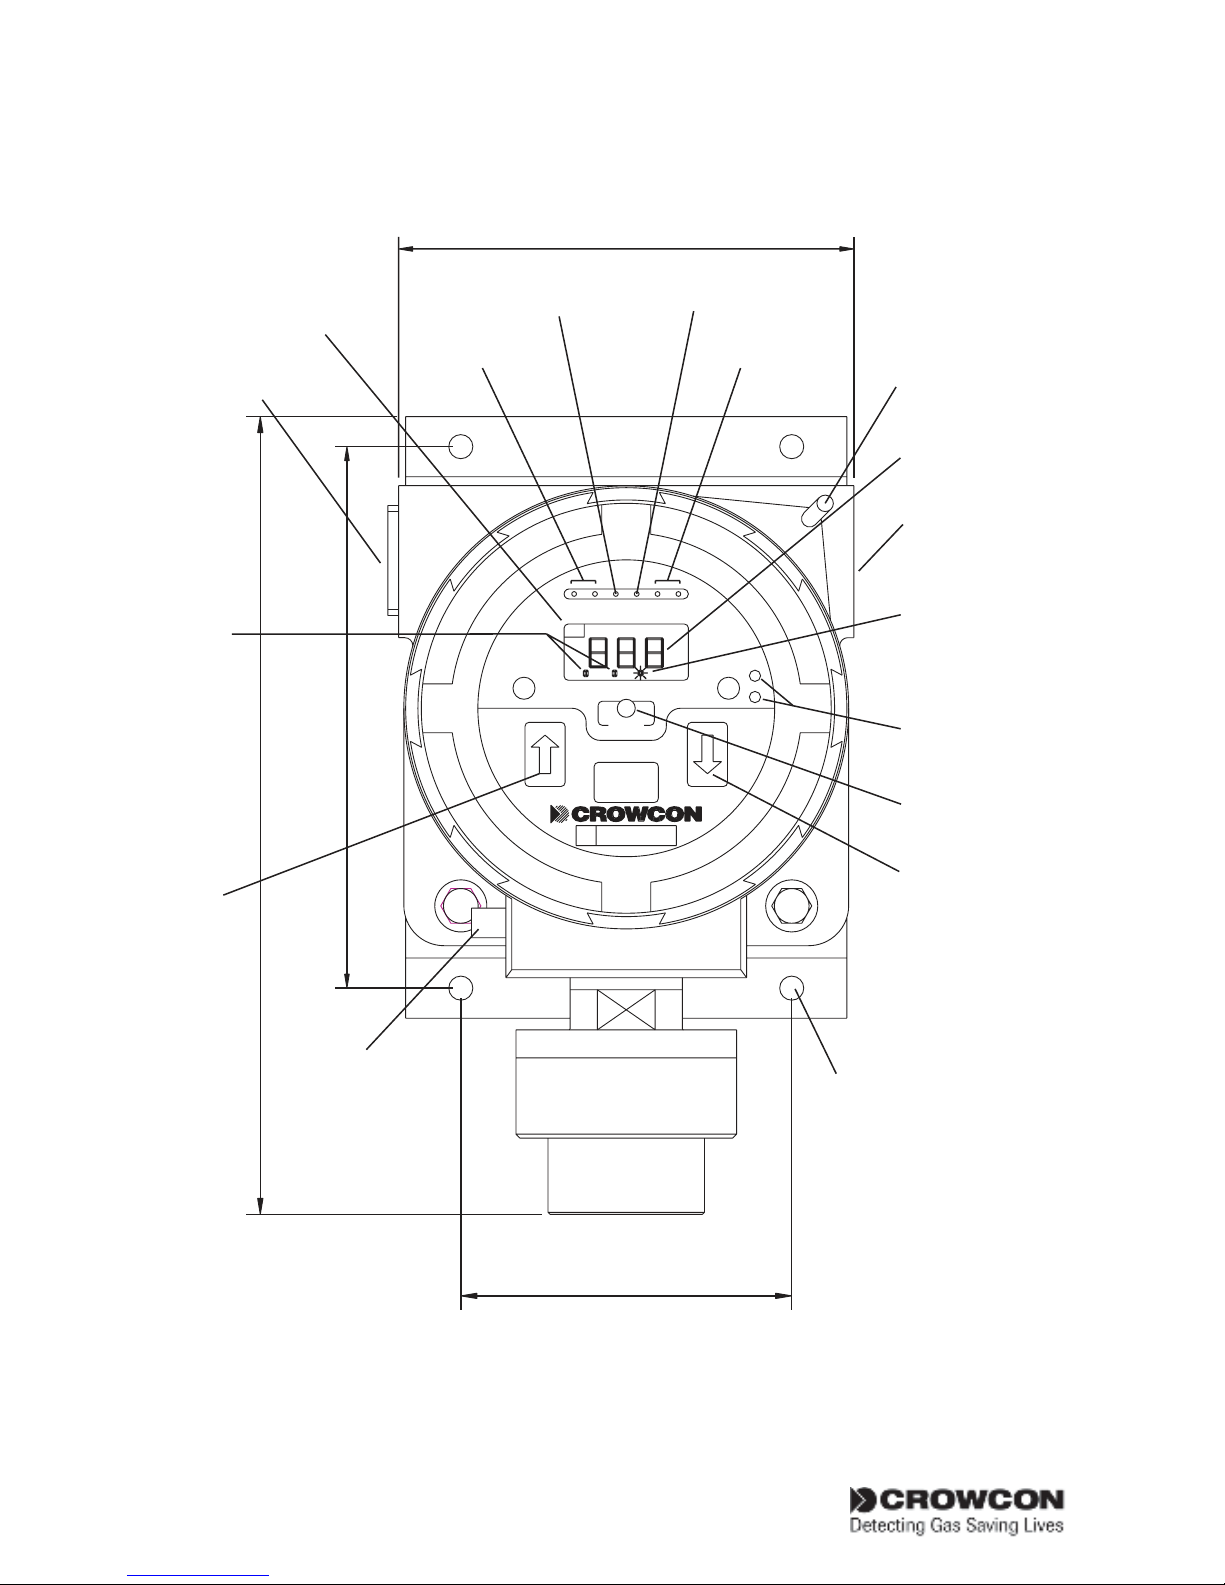
box, amplifier and terminal board. Diagram 1 details Flamgard Plus. The
overall assembly is certified Ex d IIC T6 in Europe and Class 1, Zones
1&2 AEx d IIC T6 in the USA.
The 96HD sensor housing is a modular stainless steel assembly that
dismantles to allow plug in pellistor sensors to be replaced easily (see
Diagram 4). The assembly screws into an M20 entry on the junction box.
The junction box is manufactured from marine grade alloy and is
supplied with 2 x M20 (1/2” NPT for USA) cable entries for customer
use. Alternative cable entries are available from Crowcon.
The amplifier plugs into the terminal board, and is held in place by two
captive screws. The amplifier provides power to the pellistor sensor,
local display and controls, and a 4-20 mA signal proportional to the gas
concentration for connection to a control panel. To remove, turn screws
anti-clockwise and use them to pull amplifier out of the enclosure.
All electrical connections are made via the terminal board mounted in
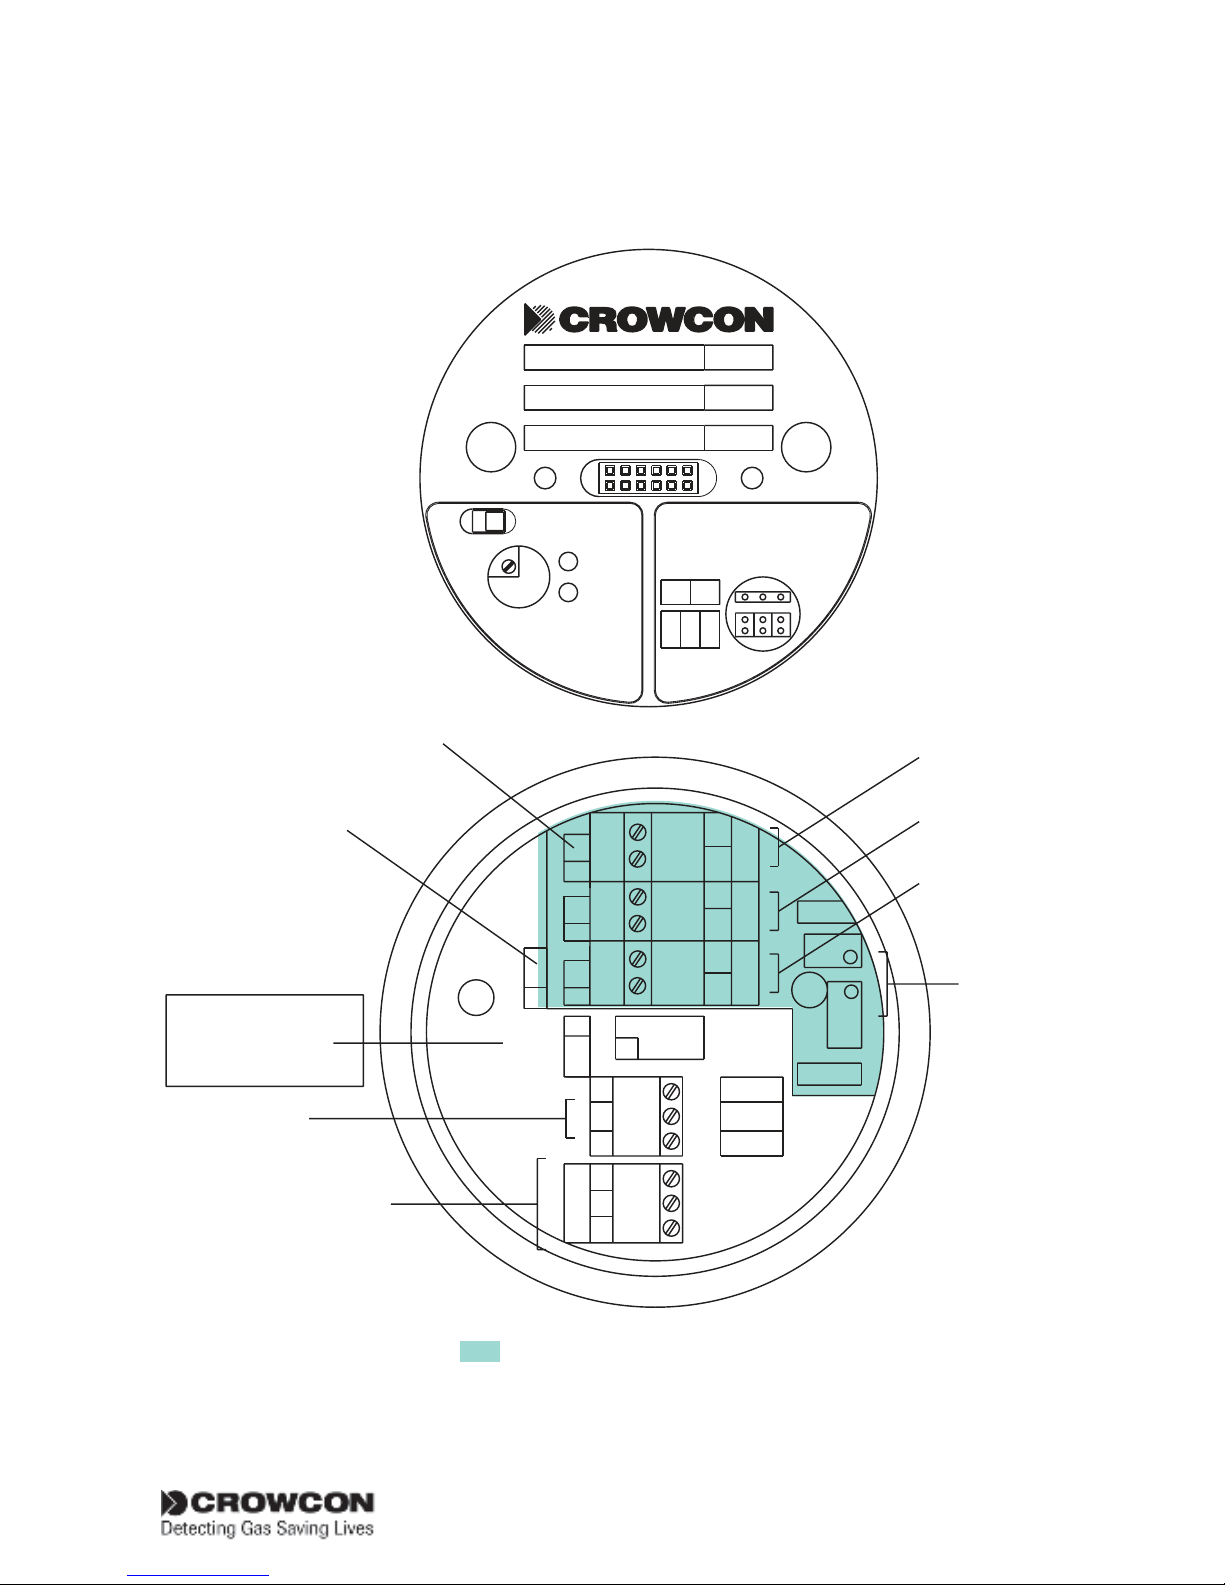
the base of the junction box (see Diagram 2). Optional alarm relays (AL1
& AL2) and one fault relay (FAULT) are mounted on the terminal board
which may be used to drive local warning devices or connect FlamgardPlus to a control panel.
Page 4
Introduction Flamgard-Plus
2
115(4")
1
2
/
135(5 ")
5
16
/
200 (8")
83 (3 )¼"
M20 ( NTP)
CABLE ENTRY
1
/"
2
UNITS
EXTERNAL
EARTH POINT
STEADY ON
INDICATES
ZERO/CAL
MODE
ACTIVATED
"UP"
HEIGHT =115 (4/")
1
2
4OFF
FIXING HOLES
Ø6mm (¼")
"DOWN"
FLASHING
INDICATES
4-20mA/RELAYS
INHIBITED
ALARM1&2
ADJUSTMENT
POTS
M20 (½" NTP)
CABLE ENTRY
STATUS
LED
LOCAL
DISPLAY
TEST
POINTS ‘A’
TEST
POINTS ‘B’
SET BALANCE
POT ‘B’
SET BRIDGE
VOLTS POT ‘A’
Flamgard-Plus
SN:
ZERO
STATUS
Menu
INHIBITCAL
LEL
All dimmensions in mm unless otherwise stated
TAMPER PROOF
GRUB SCREW
(1.5mm ALLEN KEY)
Diagram 1: Flamgard Plus general arrangement
Page 5
Flamgard-Plus Introduction
3
TEST
OUTPUT
40-200mV
POINT
4mA
SK
-
+
SR
OUTPUT OPTIONS
INHIBIT
17
4
N
2
Y
ALARM
RANGE
GAS
NOT USED ON
FLAMGARD PLUS
ALARM1
10
SENSOR
654
3
1 2
ISOLATE
GND
OTHER
NO
NC
0V
NC NO
RL3 RL2
0V
ALARM 2
4-20mA
10-30V
FAULT
7
8 9
ALARM1
NC NO
RL1
ALARM
11
12
OXYGEN
CONTROL
EQUIPMENT
GND
ISOLATE
LINK
INTERNAL TERMINAL LAYOUT
ALARM
SET POTS
CONTACT
REVERSING
LINKS
ALARM 1
FAULT
TO
96HD
SENSOR
ALARM 2
REAR VIEW OF
AMPLIFIER
RELAY
CONTACT
= ALARM RELAY VERSION ONLY
Diagram 2: Terminal and amplifier layouts 1.3 Status Indication
Page 6

Introduction Flamgard-Plus
4
1.3 Status Indication
Flamgard Plus includes a local display and status LED, visible through
the junction box window. This is shown in Diagram 1.
The display shows the current flammable gas concentration in the
range 0-100%LEL and current mode of operation ie NORMAL, ZERO
or CAL. The LED shows the current alarm state of the detector. This is
summarised in Table 1.
Operational
state
LED
indication
4-20mA
outputs*
Relay states* Comment*
Normal
operation
Steady green 4 to 7.2mA AL1 - Off
AL2 - Off
FAULT - On
0 to 20% LEL
Normal
operation
(ALARM 1)
Steady red 7.2 to 10.4mA AL1 - On
AL2 - Off
FAULT - On
20 to 40% LEL
Normal
operation
(ALARM 2)
Flashing red 10.4 to 20mA AL1 - On
AL2 - On
FAULT - On
40 to 100%
LEL
Over-range Flashing red 24mA (clamp) AL1 - On
AL2 - On
FAULT - On
>100% LEL
Display backlight flashes
Zero/
calibration
mode
Flashing
green
Configuration
dependent
(see section 2)
Configuration
dependent
(see section 2)
Latched until
reset via
'MENU'
Detector fault Steady
amber
0mA AL1 - Off
AL2 - Off
FAULT - Off
*As standard, AL1 = 20%LEL and AL2 = 40%LEL
= Relay version only
Table 1: LED status indicator summary.
Page 7

Flamgard-Plus Detector configuration
5
2. Detector configuration
2.1 Standard configuration
As standard, Flamgard-Plus is factory set as follows:
Current source with 0 mA = Fault
2 mA = Inhibit ie. Zero/Cal mode
4-20 mA = Normal operation
24 mA = Over-range clamp
AL1 relay Alarm level 1 set to 20%LEL
Normally de-energised, energising on alarm
Contact normally open (NO), closing on alarm
AL2 relay Alarm level 2 set to 40%LEL
Normally de-energised, energising on alarm
Contact normally open (NO), closing on alarm
FAULT relay Normally energised, de-energised on fault
Contact normally closed (NC), opening on
fault
Alarm/fault relays automatically reset when alarm or fault has cleared.
INHIBIT Normally selected, ie. when CAL/ZERO
selected current output is forced to 2mA and
relays are held in normal/no alarm state.
Page 8

Installation Flamgard-Plus
6
3. Installation
WARNING
Flamgard Plus is designed for use in Zone 1 and 2 hazardous
areas and is certified Ex d IIC T6 (AEx d IIC T6 in USA). Installation
must be in accordance with the recognised standards of the
appropriate authority in the country concerned. For more
information contact Crowcon. Prior to carrying out any work
ensure local regulations and site procedures are followed.
3.1 Location
There are no rules which dictate the siting and location of detectors,
however, considerable guidance is available from BS EN 50073:1999
‘British Standard Code of Practice for the Selection, Installation, Use
and Maintenance of Apparatus for the Detection and Measurement
of Combustible Gases or Oxygen.’ In the USA refer to the National
Electrical Code (NEC 1999). Similar international codes of practice may
be used where applicable. In addition certain regulatory bodies publish
specifications giving minimum gas detection requirements for specific
applications.
The detector should be mounted where the gas is most likely to
be present. The following points should be noted when locating
flammable gas detectors:
•Todetectgaseswhicharelighterthanair(egmethane),detectors
should be mounted at high level and Crowcon recommend the use
of a collector cone (Part No. C01051).
•Todetectheavierthanairgases(egbutane),detectorsshouldbe
mounted at low level.
•Whenlocatingdetectorsconsiderthepossibledamagecausedby
natural events e.g. rain or flooding. For detectors mounted outdoors
CrowconrecommendtheuseofaWeatherproofCap(Part No.
C01442).
•Considereaseofaccessforfunctionaltestingandservicing.
Page 9

Flamgard-Plus Installation
7
•Considerhowtheescapinggasmaybehaveduetonaturalorforced
air currents. Mount detectors in ventilation ducts if appropriate.
•Considertheprocessconditions.Butane,forinstanceisnormally
heavier than air, but if released from a process line which is at an
elevated temperature and/or under pressure, the gas may rise rather
than fall.
The placement of detectors should be determined following advice
of experts having specialist knowledge of gas dispersion, the plant
processing equipment as well as safety and engineering issues. The
agreement reached on the locations of sensors should be recorded.
3.2 Mounting
The mounting detail of Flamgard Plus is given in Diagram 1. Flamgard
Plus should be installed at the designated location with the detector
pointing down. This ensures that dust or water will not collect on the
sinter and stop gas entering the detector.
3.3 Cabling requirement
Cabling to Flamgard Plus must be in accordance with the recognised
standards of the appropriate authority in the country concerned and
meet the electrical requirements of the detector. Crowcon recommend
theuseofsteelwirearmoured(SWA)cableandsuitableexplosion
proof glands must be used. Alternative cabling techniques, such as steel
conduit, may be acceptable provided appropriate standards are met.
Flamgard Plus requires a dc supply of 12-30 V at up to 210 mA. Ensure
the minimum dc supply of 12 V is observed at the detector, taking into
account the voltage drop due to cable resistance.
For example, a nominal dc supply at the control panel of 24 V has
a guaranteed minimum supply of 20 V. The maximum voltage drop
allowed is therefore 8 V. Flamgard Plus can demand up to 210 mA and
so the maximum loop resistance allowed is 38 Ohms. A 1.5 mm2 cable
will typically allow cable runs up to 1500 m.
Page 10
Installation Flamgard-Plus
8
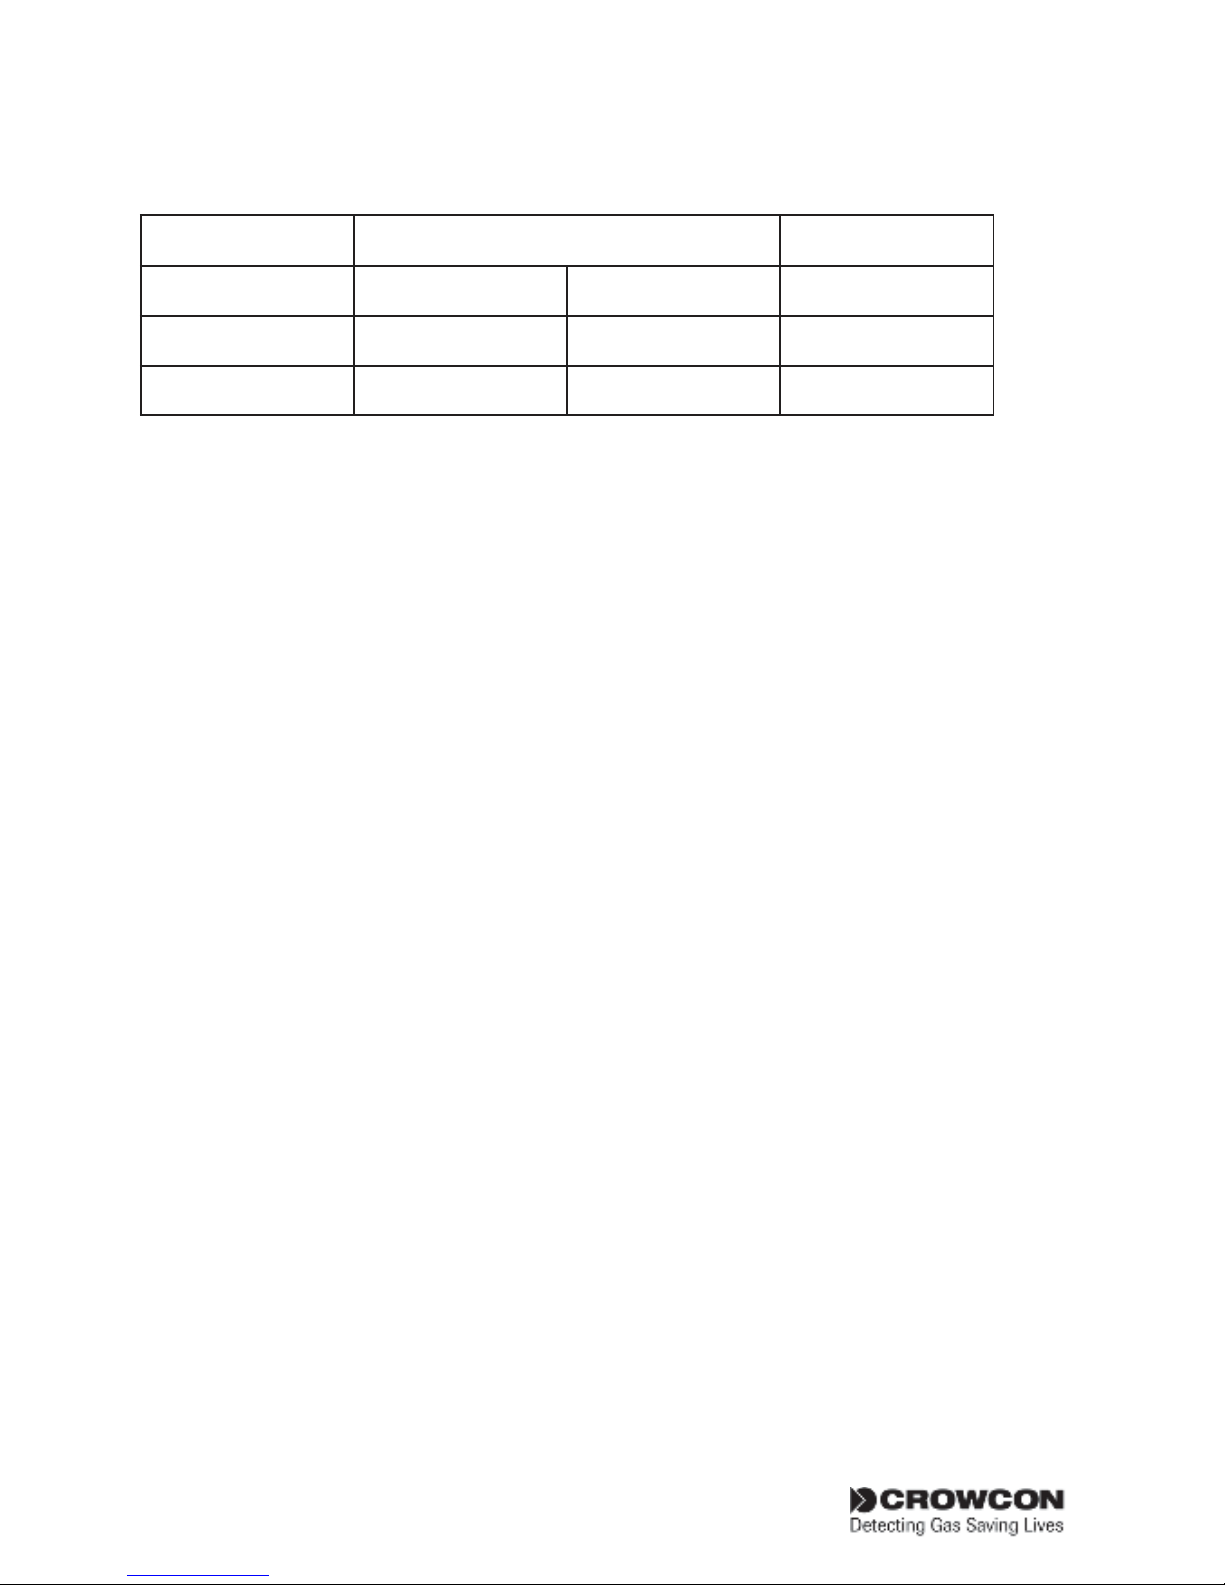
Table 2 shows maximum cable distances given typical cable parameters.
CSA Resistance (Ohms per km) Max. distance
mm2 (awg) Cable Loop m (ft)
1.0 (17) 18.1 36.2 1000 (3280)
1.5 (15) 12.1 24.2 1500 (4920)
Table 2: Maximum cable distances for typical cables
Acceptable cross sectional area of cable is 0.5 to 1.5 mm2. Table 2
provides guidance only, actual cable parameters for each application
should be used to calculate maximum cable distances.
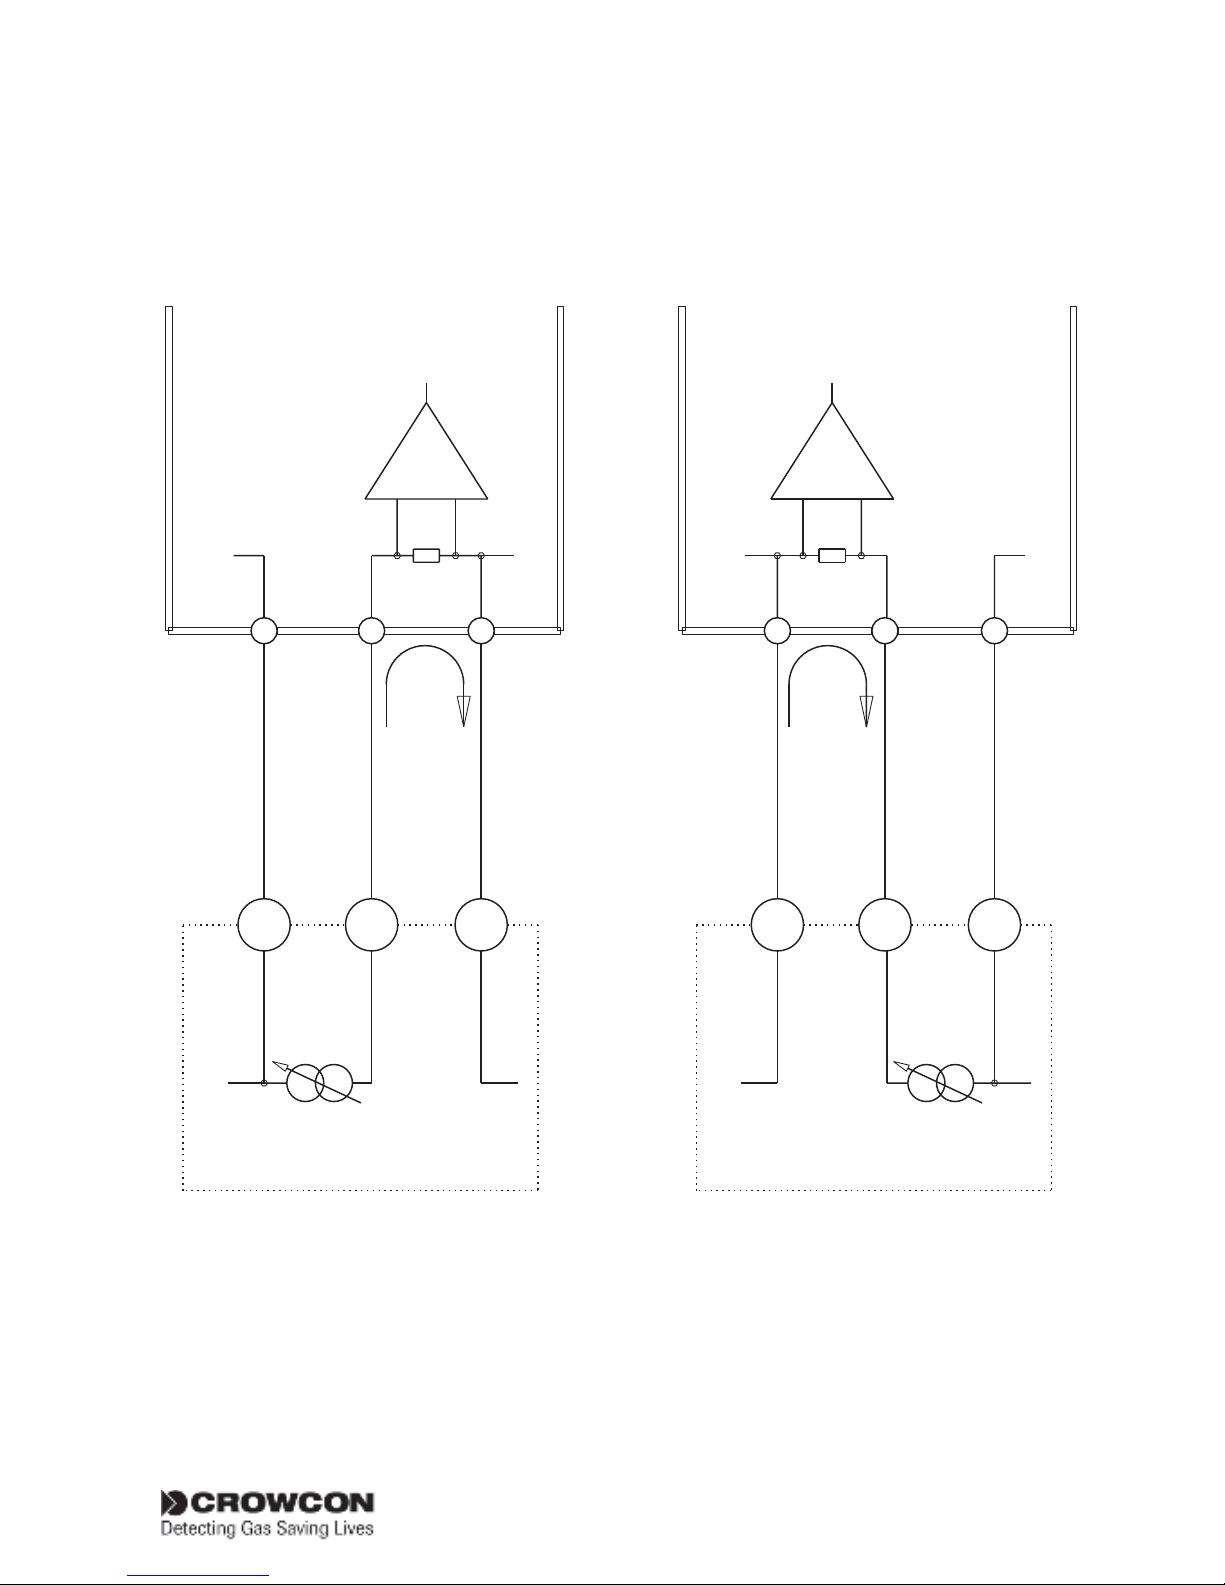
3.4 Electrical connections
All connections are made via the terminal board mounted in the base
of the junction box (see Diagram 2). The 3 wires from the 96HD are
colour coded and should be terminated in the corresponding colour
coded terminal (terminals 4, 5 & 6). Terminals 1 (0 Vdc), 2 (12-30
Vdc) and 3 (4-20mA signal) are connected to the control equipment.
Flamgard Plus is factory set as a 4-20 mA source device unless specified
otherwise when ordering (see Section 2 to change configuration).
Diagram 3 summarises the electrical connections.
Note: The junction box and cable armour must be earthed at the
detector or control panel to limit the effect of radio frequency
interference and to maintain electrical safety.
Note: The junction box for the Flamgard Plus is manufactured from
marine-grade alloy, and has a powder-coated finish. Care should be
taken during installation to protect the painted finish, as use in saline
environments could result in paint flaking off from damaged junction
boxes. This in no way compromises the performance of the detector,
as the marine-grade alloy junction box is approved for use in offshore
environments.
Page 11
Flamgard-Plus Installation
9
All electrical connections to the optional relays are made via the 6-way
terminal block on the terminal board in the base of the junction box
(see Diagram 2). The relay contacts are rated 1 A @ 30 Vdc.
4-20mA
12-30 V
0 V
0 V
4-20mA
12-30 V
SOURCE
FLAMGARD-PLUS
FLAMGARD-PLUS
SINK
CONTROL EQUIPMENT
2
3
+V
1
2
0V
+V
3
1
0V
CONTROL EQUIPMENT
SAFE AREA
SAFE AREA
Diagram 3: Electrical connections to Flamgard Plus
Page 12

Operation Flamgard-Plus
10
4. Operation
WARNING
Prior to carrying out any work ensure local regulations and site
procedures are followed. Never attempt to open the detector
or junction box when flammable gas is present. Ensure that the
associated control panel is inhibited so as to prevent false alarms.
4.1 Commissioning Procedure
a Open the junction box of the detector by loosening the tamper proof
grub screw and removing the lid by rotating it anti-clockwise.
b Remove the amplifier and check that all electrical connections have
been made and are correct as per Diagram 3.
c Replace the amplifier and close the junction box ensuring that all
screws have been re-fitted correctly.
d Apply power to the detector. The status LED will show a steady green
indicating normal operation.
e Leave the detector to stabilise for 1-2 hours.
Zeroing the detector (ZERO Mode):
f Place the end of ‘CRO-Mag’ over the ‘MENU’. Green Status LED will
flash. Decimal point above ‘ZERO’ will illuminate. Display backlight
will illuminate. Decimal point above ‘INHIBIT’ may flash if the option
has been internally selected.
gWithnoammablegaspresentatthedetector,placetheendofthe
‘CRO-Mag’keyoverthe‘UP’or‘DOWN’arrowpadstomakethe
display read zero.
Calibrating the detector (CAL Mode):
h Place the end of the ‘CRO-Mag’ over the MENU pad. The decimal
point above the word CAL will illuminate. Other indications remain
unchanged.
i Apply calibration gas to the detector at a flow rate of 0.5 litres/min.
Crowcon recommend 50% LEL gas for calibration purposes (contact
Crowcon for the supply of calibration gas.)
Page 13

Flamgard-Plus Operation
11
j Allow the gas reading to stabilise.
kPlacetheendofthe‘CRO-Mag’overthe‘UP’or‘DOWN’arrowpads
to make the display read the correct concentration.
l If the control equipment display requires adjustment consult the
operating manual for the equipment.
Returning to normal operation (NORMAL Mode):
n Place the end of ‘CRO-Mag’ over the ‘MENU’ pad. All decimal points
will disappear and the backlight will turn off. The green status LED
will be on steadily (assuming no gas is present at the detector).
o The detector is now operational.
Note: Always return the detector to NORMAL mode to avoid leaving
the detector in a permanently inhibited state.
Note: ATEX certified Flamgard-Plus flammable gas detectors will be
supplied calibrated for compliance with EN60079-20-1 (where for
example 100% LEL methane = 4.4% volume). UL certified detectors
will be supplied calibrated for compliance with North American
standards (where 100% LEL methane = 5% volume).
4.2 Routine maintenance
The operational life of the pellistor sensor depends on the application
for which it is being used. Such a device should work satisfactorily
for up to 5 years in ideal conditions. Site practices will dictate the
frequency with which detectors are tested. Crowcon recommend that
detectors be gas tested at least every 6 months and re-calibrated as
necessary. To re-calibrate a detector follow steps given in 4.1.
Pellistors can suffer from loss of sensitivity when there is a presence
of poisons or inhibitors such as silicones, sulphides, chlorine, lead
or halogenated hydrocarbons. Flamgard Plus uses poison resistant
pellistors to maximise the operational life. In applications where such
compounds are present continuously, we recommend the use of Xgard
IR or IRmax, Crowcon’s fixed point infrared flammable gas detectors,
which are immune to such poisons and inhibitors.
Page 14

Operation Flamgard-Plus
12
4.3 Sensor replacement/servicing of detectors
WARNING
This work should be carried out by Crowcon or an approved
service centre unless suitable training has been received.
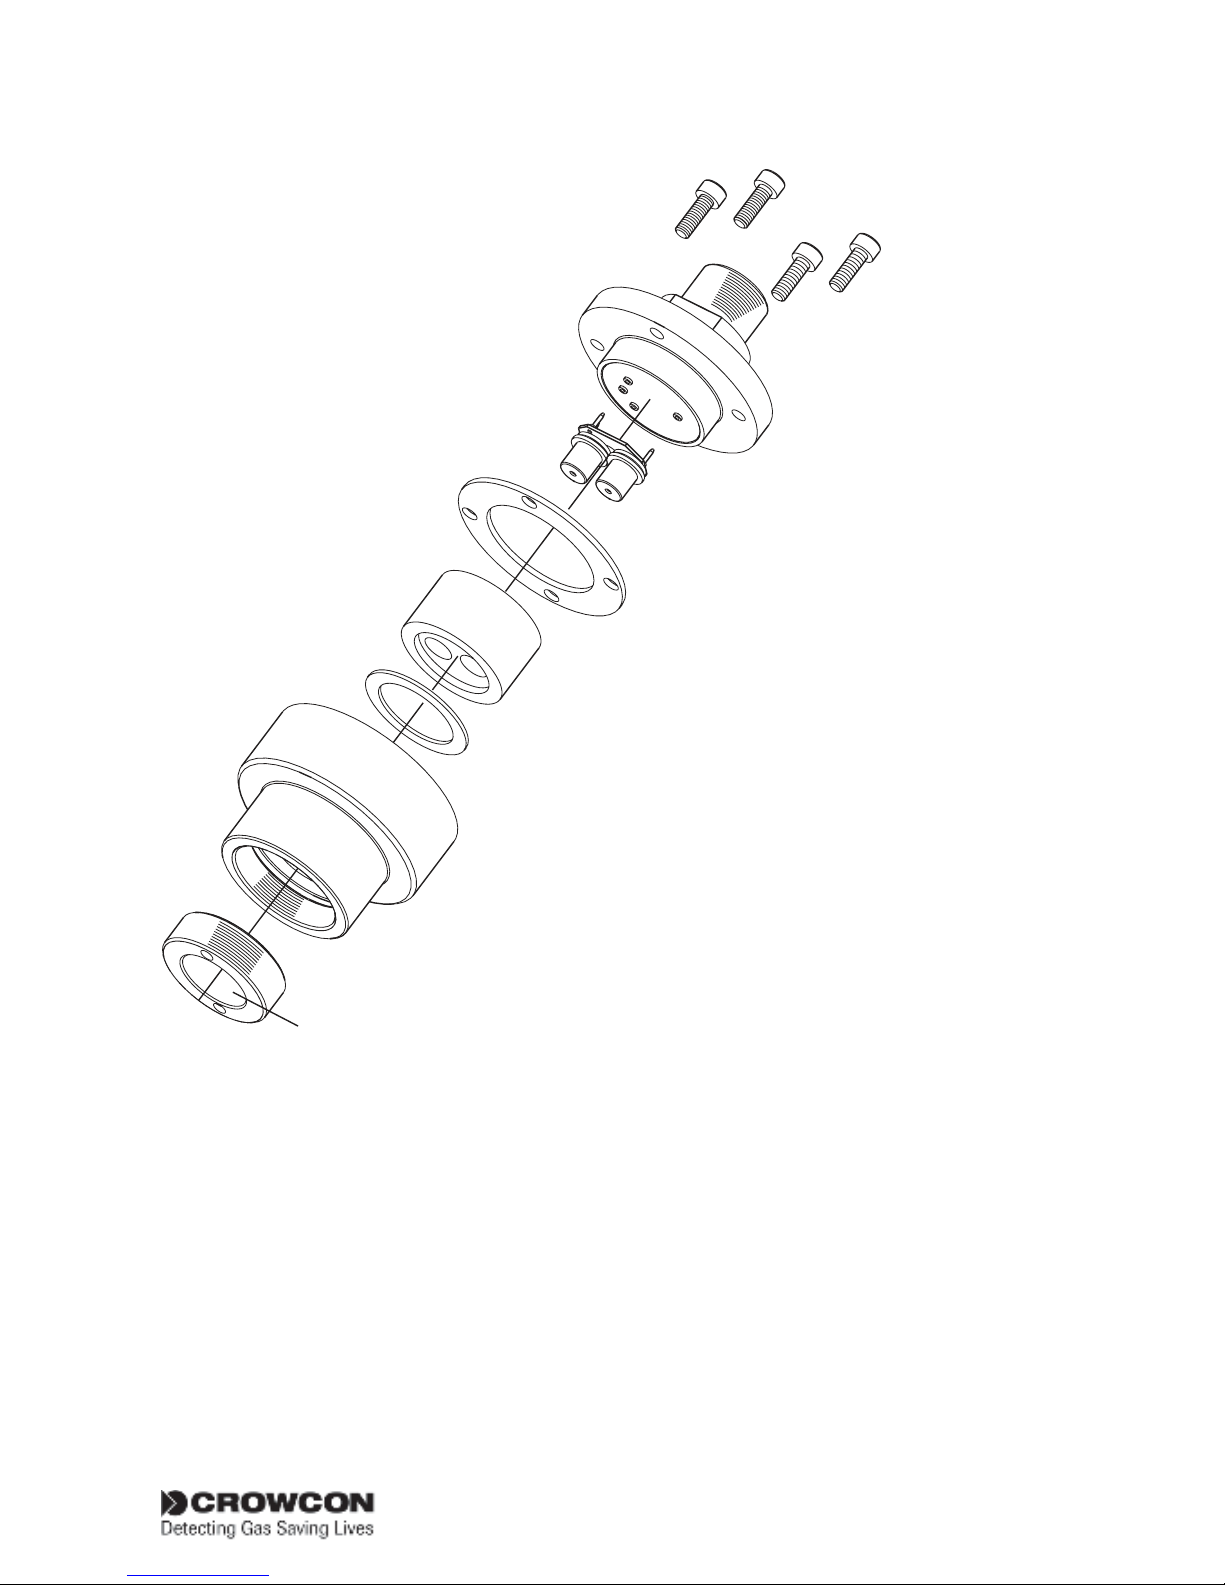
Flamgard Plus uses the 96HD sensor housing which allows the user
to replace the sensors, gaskets and sinter if necessary. An exploded
view of the 96HD sensor housing is given in Diagram 4. The following
procedure may be followed when servicing a Flamgard Plus detector.
a Switch off and isolate power to the detector requiring attention.
b Open the detector Junction box by loosening the tamper proof grub
screw and removing the lid by rotating it anti-clockwise.
c Remove the amplifier.
d Disconnect the 3 sensor wires from the terminal board (terminals 4, 5
& 6).
e Unscrew the complete 96HD sensor housing from the junction box.
Note: If a spare 96HD sensor housing complete with new sensor is
available ignore steps f to k and return the old 96HD to Crowcon or an
approved service centre for repair.
f Open the 96HD sensor housing by removing the four Allen head
screws from the Top Cap with a 3mm Allen key.
g Remove the sensor from the Top Cap PCB. Flammable sensors have
an extra black sleeve which may be separate from the sensor. This is
normal and the sleeve may be re-used.
h Fit the replacement sensor checking the part number is correct. This
part number is labelled on the main body of the detector.
i Inspect the gaskets and replace if necessary.
j The sinter assembly will only need to be replaced if it has become
blocked by dust or oil. Such blockage causes the response time of the
detector to be slow and may affect sensitivity. To remove the sinter a
removal tool (Part # M01614) is required. Loctite No 243 must be used
on the sinter assembly threads to maintain certification.
Page 15
Flamgard-Plus Operation
13
(Part No MO4128)
NEOPRENE GASKET 1
GASKET 2
TOP CAP & SENSOR PCB
MAIN BODY
SINTER
(Part No SO1781)
SINTER ASSEMBLY
(Part No MO4452)
SLEEVE
PELLISTOR
ALLEN HEAD SCREWS
4 OFF M4X12MM
Diagram 4: 96HD assembly
k Re-assemble the 96HD housing taking time to ensure that the 3 mm
Allen head screws are securely fixed into position.
I Fit the 96HD sensor housing to the junction box ensuring that the
colour coded wires are terminated correctly.
m Replace amplifier ensuring the captive screws are fastened securely.
n Switch on power.
Page 16
Operation Flamgard-Plus
14
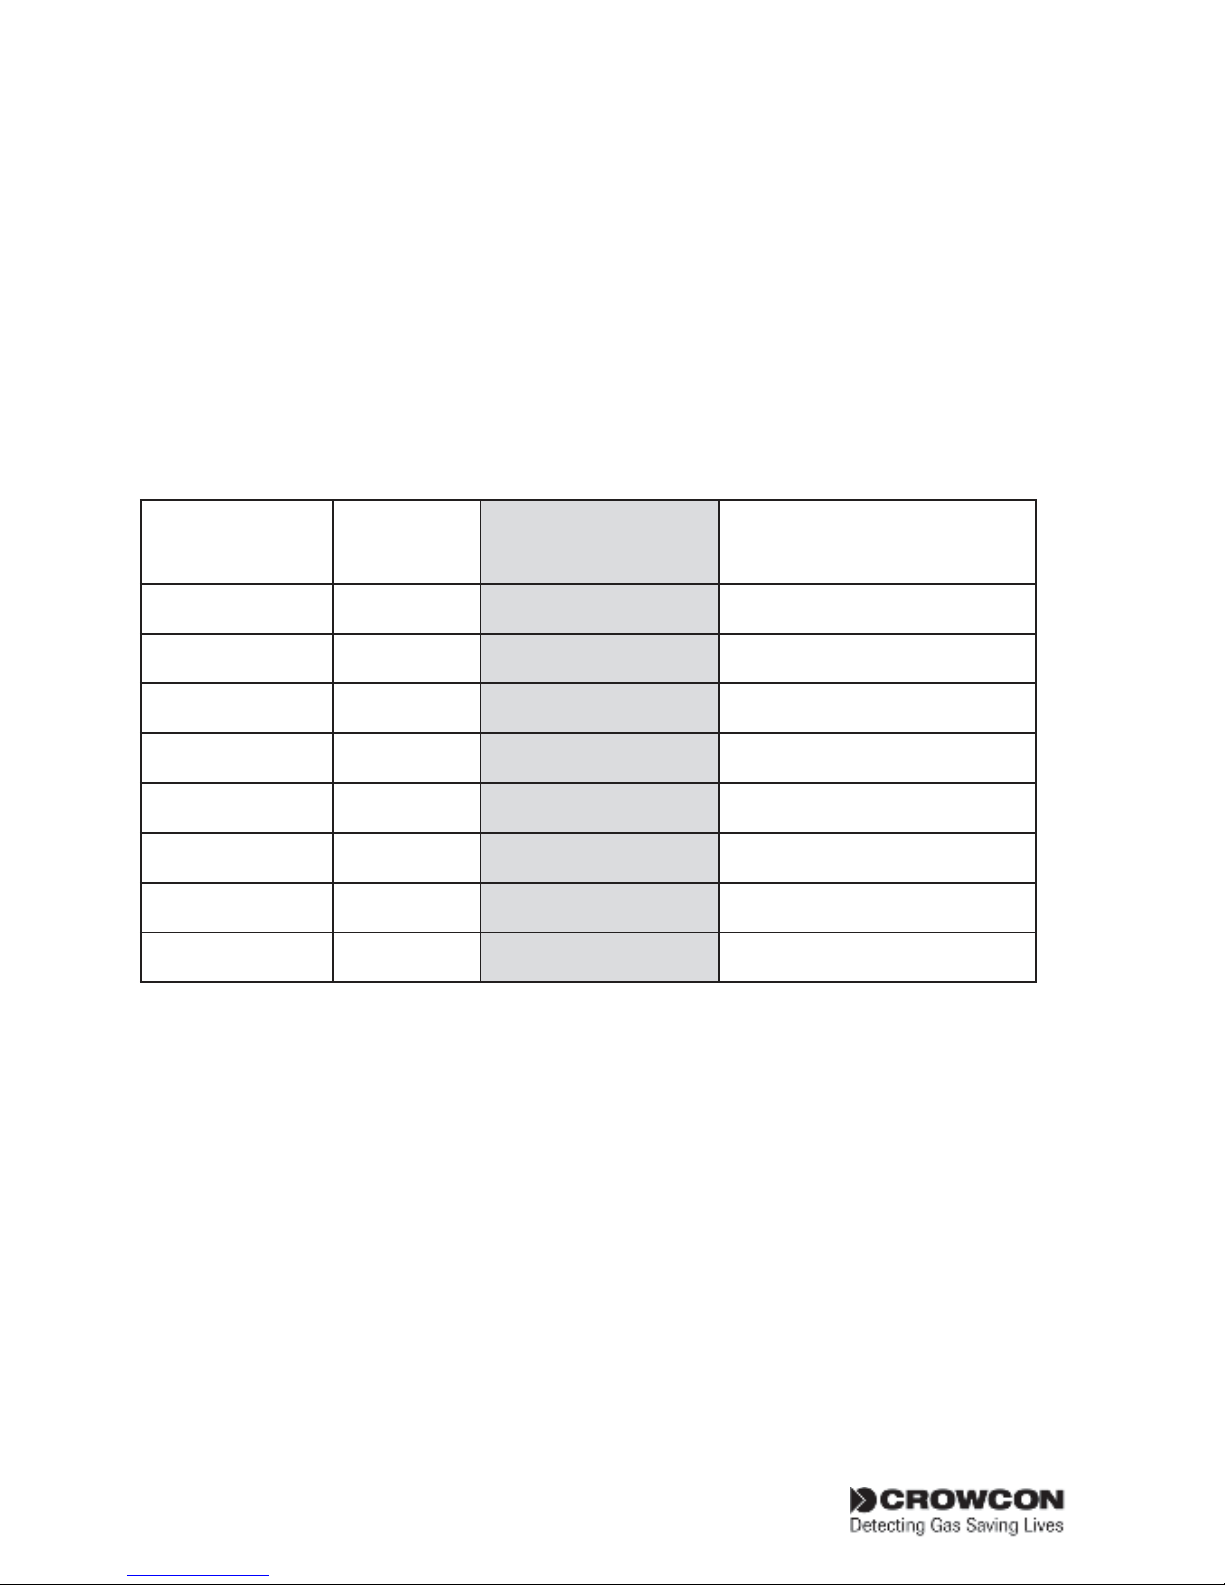
o Using a DVM measure the voltage across Test Points ‘A’ and adjust
Set Bridge Volts (Pot A) until the DVM reads correctly (see Table 3 for
complete list).
p Using a DVM measure the voltage across Test Points ‘B’ and adjust
Set Balance (Pot B) until the DVM reads 0 mV.
q Close the junction box remembering to fasten the tamper proof grub
screw into position.
r Follow the Commissioning Procedure given in 4.1.
Sensor Part
no.
Element Test point ‘A’
voltage (mV)
Comment
S01-637/A VQ21T 310 Poison resistant
/B 300P 280 Poison resistant
/C VQ8 350 Lead resistant
/D VQ16 350 Early model
/E VQ22 170 Low power
/F VQ25 310 For Halogens
/G VQ41 310 Ammonia or aviation fuel
/H VQ1 310 Early model
Storage Instructions: The sensor used in this detector should be
stored in a dry environment, and protected from exposure to silicones,
sulphides, chlorines and lead. Exposure to these compounds will
significantly reduce the sensitivity of the sensor, and render the sensor
warranty void.
Page 17

Flamgard-Plus Operation
15
4.4 Changing Alarm Levels (Relay Version Only)
WARNING
This work should be carried out by Crowcon or an approved
service centre unless suitable training has been received. Before
attempting to change alarm levels ensure the detector is in fresh
air and no flammable gas is present.
As standard the AL1 and AL2 alarm levels are factory set at 20% LEL
and 40% LEL respectively. To change either alarm level:
a Switch off and isolate power to the detector requiring attention.
b Open the junction box of the detector by loosening the tamper proof
grub screw and removing the lid by rotating it anti-clockwise.
c Remove the amplifier from the terminal board.
d Ensure that the ‘INHIBIT’ link is set to ‘N’.
e Re-fit the amplifier to the terminal board ensuring that all screws
have been secured correctly.
f Apply power to the detector and allow the detector to stabilise.
g Place the end of “CRO-Mag’ over the “MENU’ pad. The decimal
point above the word ‘ZERO’ will illuminate.
hWithnoammablegaspresentatthedetector,placetheendofthe
‘CRO-Mag’keyoverthe‘UP’or‘DOWN’arrowpadstomakethe
display read the desired alarm level.
i Using a long instrument screwdriver, turn the relevant ALARM SET
pot mounted on the terminal board (see Diagrams 1 & 2) to adjust
the alarm level. Tripping of the ALARM 1 level relay is confirmed by
the status LED turning a steady red. Tripping of the ALARM 2 level
relay is confirmed by the Status LED flashing red.
j Once the alarm level has been set, place end of ‘CRO-Mag’ over the
‘UP’or‘DOWN’arrowpadsandresetthedisplaytoreadzero.
k Place the end of the ‘CRO-Mag’ over the ‘MENU’ pad to return
the detector to normal operation, ie. No decimal points displayed,
backlight off and the Status LED indicating steady green.
Page 18

Operation Flamgard-Plus
16
l Check that the detector operates correctly by applying test gas as
necessary.
m Switch off and isolate power to the detector.
n Reset jumpers which may have been changed in step ‘d’ above.
o Replace the amplifier and close the junction box, ensuring that all
screws have been re-fitted correctly.
p Apply power to the detector and allow to stabilise before checking
correct operation.
q Re-calibrate if necessary as per section 4.1.
Notes:
Area Classifications:-
Zone 0: An area classified, as Zone 0 will have ignitable
concentrations of flammable gases, vapours or liquids
present continuously or for long periods of time under
normal operating conditions.
Zone 1: An area classified, as Zone 1 is likely to have ignitable
concentrations of flammable gases, vapours or liquids
present under normal operating conditions.
Zone 2: An area classified, as Zone 2 is not likely to have ignitable
concentrations of flammable gases, vapours or liquids
present under normal operating conditions.
Page 19

Flamgard-Plus Spare parts and accessories
17
5. Spare parts and accessories
Description Part number
M20 to 1/2 inch NPT adaptor M02125
M20 to 3/4 inch NPT adaptor M02281
Gasket 1 M04452
Gasket 2 M04128
Sinter removal tool M01614
Collector Cone C01051
Ceiling Mounting Bracket M01401
WeatherproofCapC01442
Replacement ‘CRO-Mag’ C01697
96HD sensor housing complete with sensor S01749*1
Replacement sensor S01673*1
Sinter assembly S01781
Amplifier S01865
Terminal board S01846
Relay board S01847
Loctite No. 243 Contact Crowcon
Calibration gas Contact Crowcon
*1 Flamgard-Plus may be fitted with a range of pellistor sensors depending on
the specific application. The correct spare sensor part number is itemised on the
sensor housing label.
Page 20

Specifications Flamgard-Plus
18
6. Specifications
Dimensions 200 x 115 x 115 mm (8” x 41/2” x 41/2”)
Weight 2.2 kg (4.8 lbs)
Material 96HD sensor housing: 316 Stainless steel
Junction box: Marine grade alloy
Temperature range -10°C to +55°C (14°F to 131°F)
Humidity range 0-99% RH, non condensing
Ingress protection IP65
Explosion protection Flameproof
Approval codes
II 2 G Ex d IIC T6 Gb (+55˚c)
UL Class 1, Zones 1 & 2, AEx d IIC T6
Safety Cert No. Sira03ATEX1124
Standards EN60079-0, EN60079-1: 2007, UL2279
Zones Certified for use in Zone 1 or Zone 2
areas. (see area classifications section)
Gas groups IIA, IIB, IIC
Operating voltage 12-30 Vdc
Operating current Relay version: 210 mA (maximum)
Non-relay version: 160 mA (maximum)
Detector output 4-20 mA source or sink selectable
0 mA = Fault
2 mA = Inhibit (4 mA option)
4-20 mA = 0-100% LEL
24 mA = Over range
Relays outputs 2 x Alarm relays SPNO (SPNC option)
1 x Fault relay SPNC (SPNO option)
Contact rating 1 A @ 30 Vdc
Page 21

Page 22

 Loading...