

Page 1
BA_Migros_ED3EX_GB 09.02.2011 12:13 Uhr Seite 1
Probedruck
C M Y CM MY CY CMY K
F
Pedelec with Lithium-ion battery
DE
GB
ITA
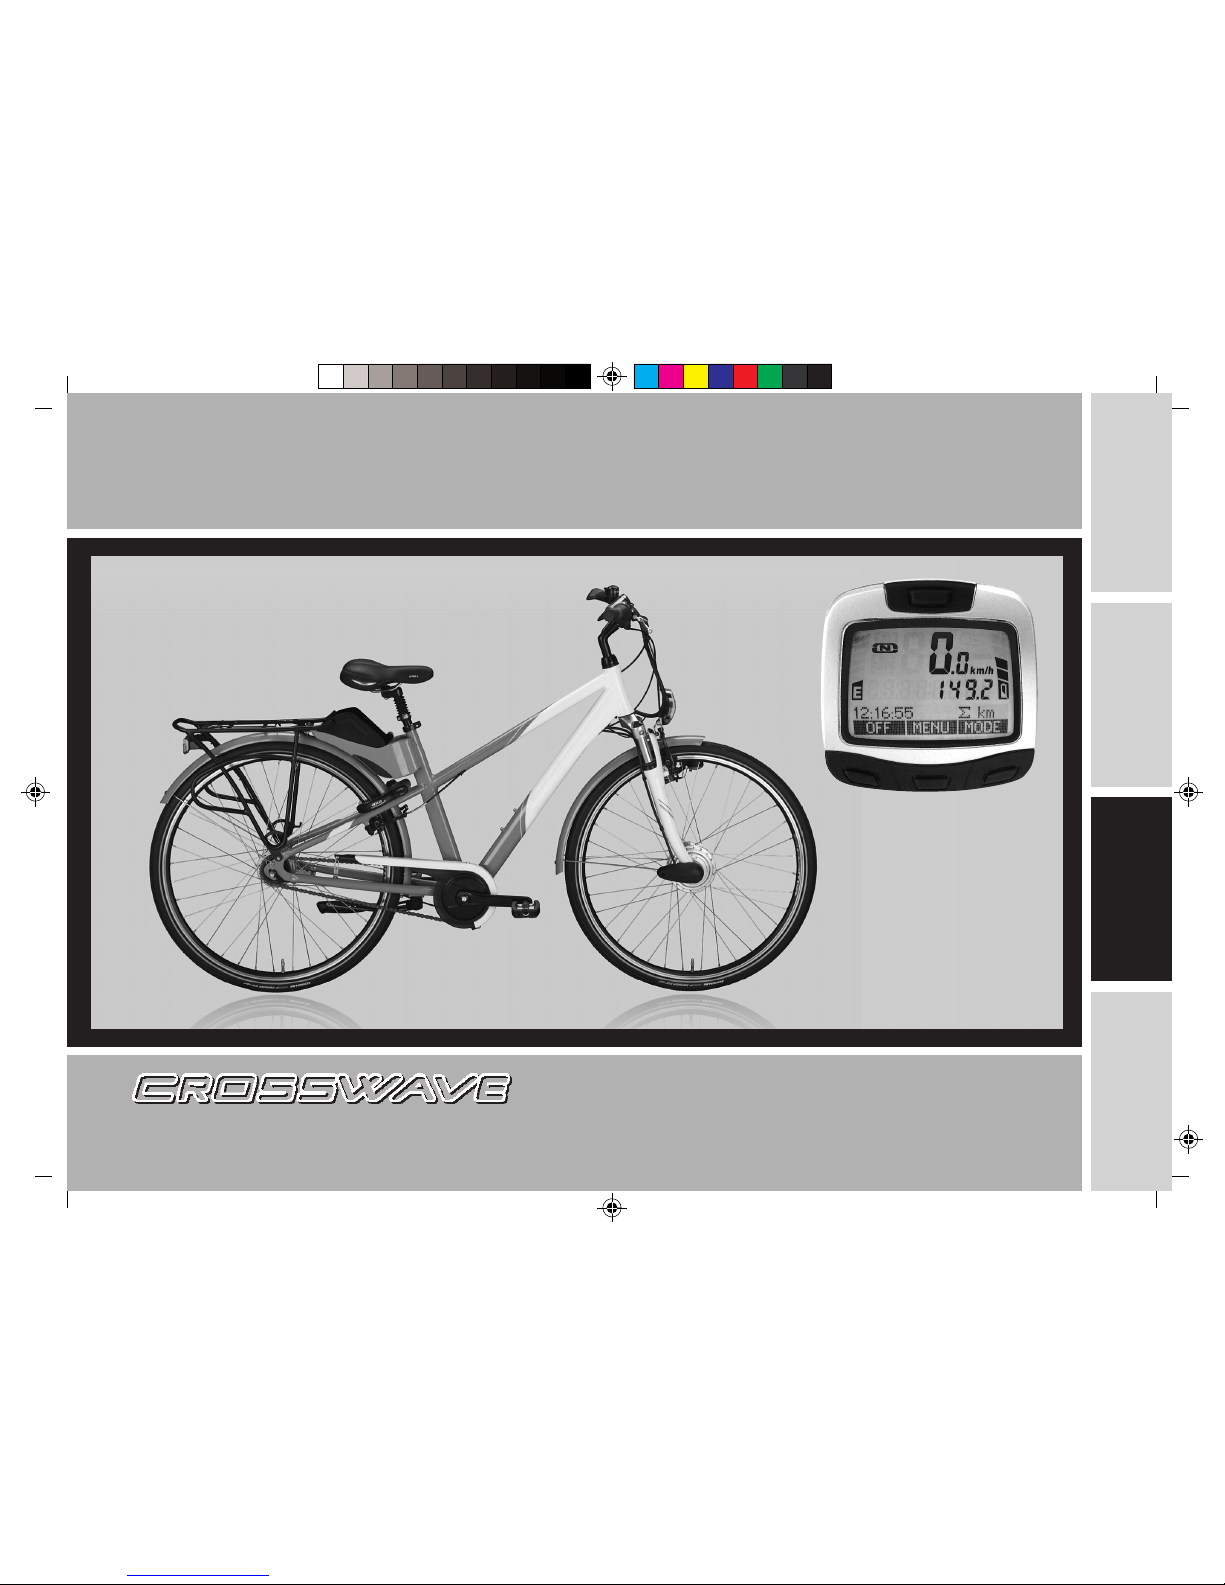
Elektrobike ED-3 EX
Operating Instructions
for your new cycle
Page 2
BA_Migros_ED3EX_GB 09.02.2011 12:13 Uhr Seite 2
Probedruck
C M Y CM MY CY CMY K
98
Bedienungsanleitung
CROSSWAVE Elektrobike ED-3 EX
Pedelec mit Lithium-Ionen Batterie
Mode d’emploi de votre
CROSSWAVE Elektrobike ED-3 EX
Pedelec avec batterie au lithium-ion
Operating instructions
for CROSSWAVE Electro Bicycle ED-3 EX
Pedelec with Lithium-ion battery
Istruzioni d'uso
CROSSWAVE Elektro-Bike ED-3 EX
Pedelec con batteria agli ioni di litio
Operating instructions
ED-3 EX
Page 3

BA_Migros_ED3EX_GB 09.02.2011 12:13 Uhr Seite 3
Probedruck
C M Y CM MY CY CMY K
- Twix Grip Throttle / Boost-Button 123
- Bike Computer Functions 123
- Menu INFO 132
- Error Messages in the Display 133
Mileage and its factors 134
General operation 135
- Gear 135
- Derailleur 135
- Auxiliary gear with coaster brake hub 135
- Brakes 135
- Coaster brake hub 136
- Hand brake 136
- V-Brake braking 136
- Hydraulic brakes 137
- Roller brakes 137
- Disk brakes 137
Load transportation 137
- Trailer 137
- Front wheel luggage carrier 138
- Rear wheel luggage carrier 138
Servicing instructions 138
- Maintenance of the Pedelec drive 138
- General maintenance instructions 139
- Maintenance in winter 139
Removal of the front wheel 140
Battery return / recycling 141
Technical data 142
Faults / cause / remedy 142
Welcome 100
QUICKSTART 102
Your CROSSWAVE Pedelec and its components 103
Before the first start-up 104
Regular inspections 105
- Inspection schedule 106
Loading the Pedelec / Braking response 106
Proper use of the Pedelec 106
Traffic safety tips 107
Guarantee 107
Wear parts 108
Start-up 110
- Start up of drive battery 110
- Charging the drive battery 113
- Long-term trickle charging 114
Adjustments before a ride 115
- Handle bar and handle bar stem 116
- Brake 117
- Pedals 117
- Lighting system 118
- Handle bar bearing 118
- Spokes 118
- Quick release 119
- Tyres 119
- Rims 120
- Torque specifications 120
Operating the CROSSWAVE Pedelec drive 120
- Recommended method 121
- Display & Funktionen 122
- Pedelec Functions 122
99
Content
GB
Pedelec with Lithium-ion battery
Page 4

BA_Migros_ED3EX_GB 09.02.2011 12:13 Uhr Seite 4
Probedruck
C M Y CM MY CY CMY K
100
For your own safety, we recommend that you wear a bicycle
helmet while riding the bicycle!
This quality product will be a source of joy wherever you go,
whether for shopping, to office, for leisure, for picnics or as
companion during vacations!
We have taken a lot of care in designing and selecting the
components so that you have the right vehicle for joining the
enthusiastic group of “electrified” bikers!
If you follow the numerous suggestions compiled in this manual,
you can maintain your Pedelec in an optimal condition and
ensure your own safety.
As you have purchased this Pedelec from a dealer, it is guaranteed
that you have received a fully assembled cycle. In case of any
problems or questions associated with repairs, assembly or
accessories, you can always count on professional help.
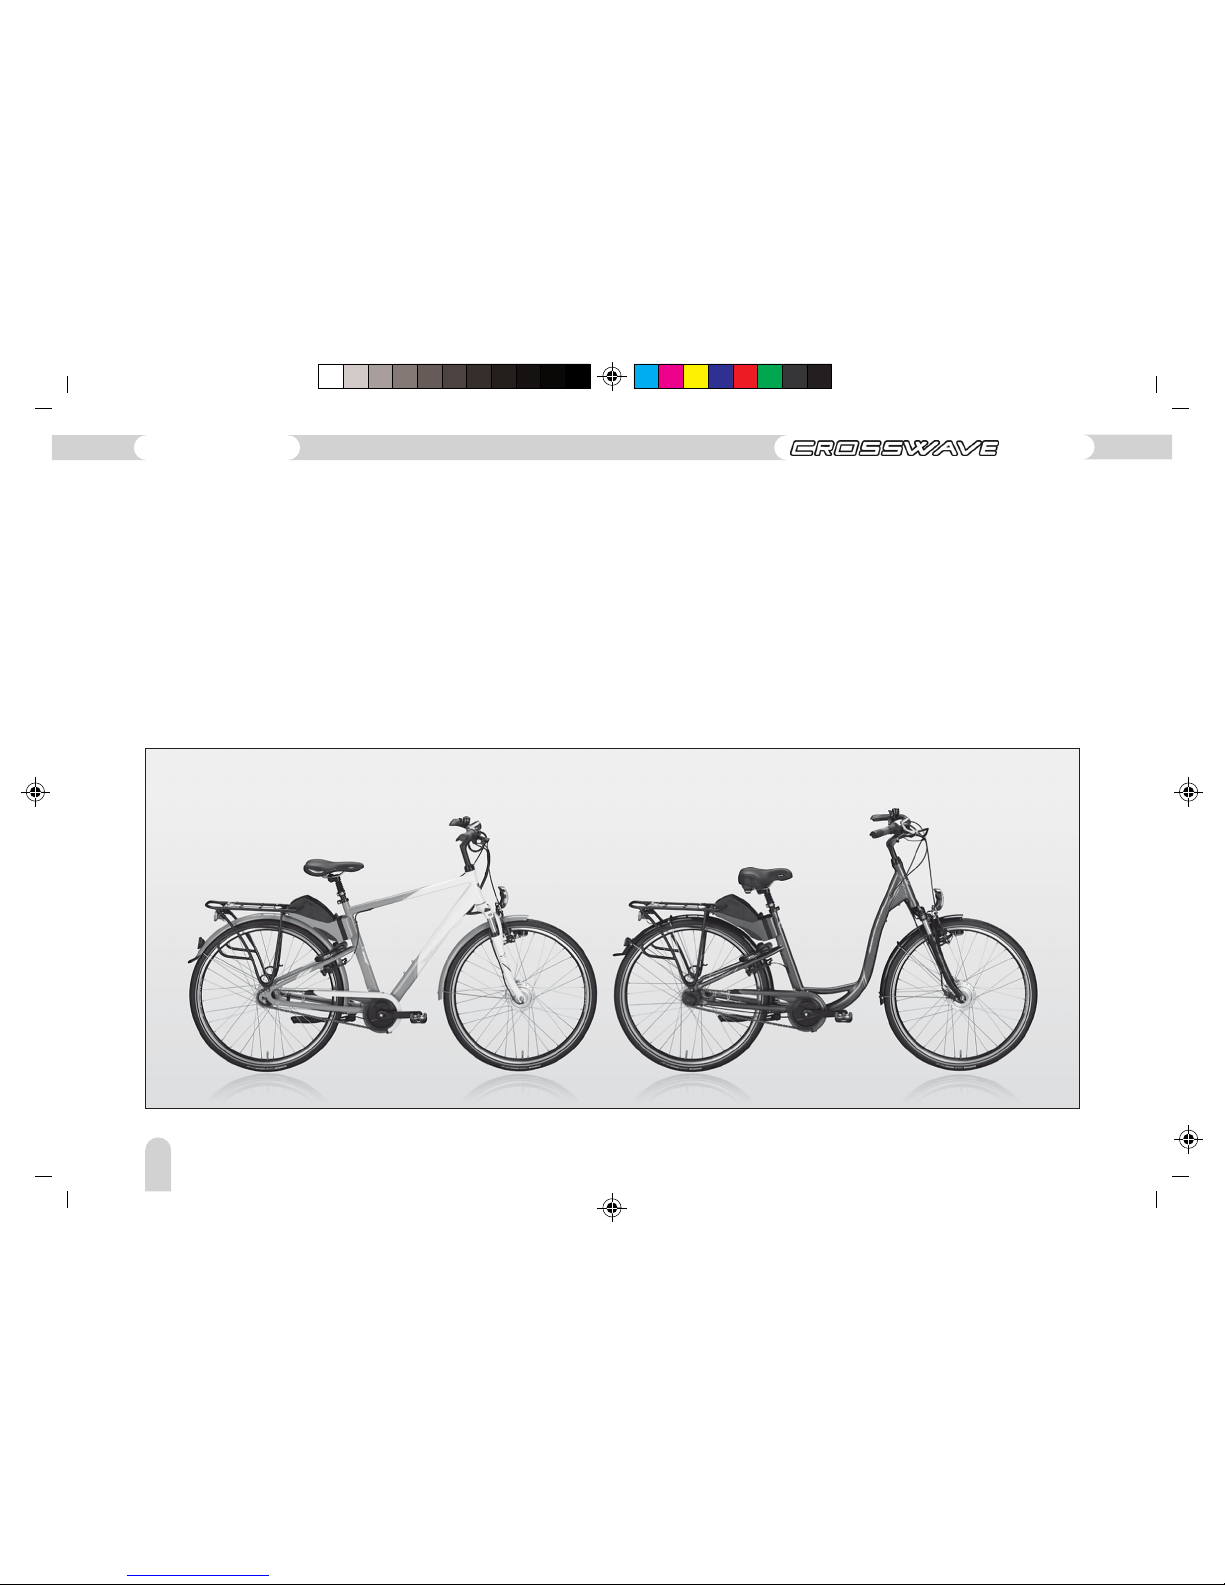
This user manual is valid for different models of CROSSWAVE
Pedelec. Frame and gear shift can vary. Hence, consider only
those sections that are relevant to your cycle. The technical
Welcome
PanTerra™ – Intelligent Electric!
Dear Costumer,
Thank you for choosing the CROSSWAVE Pedelec – a model with
PanTerra™ drive technology! PanTerra offers the technology for
an easy, alternative mobility. You will enjoy this modern and
eco-friendly mode of travel!
This CROSSWAVE electric bicycle is a so-called Pedelec
1
, i.e.,
the additional electrical drive assists you up to a speed of 25
km/h while you are pedalling. The technical design of CROSSWAVE
Pedelec complies with the European standard EN15194 for
electric motor-assisted wheels and the European bicycle standard
EN 14764. For driving this Pedelec on public roads in Switzerland,
you must be at least 16 years old or have a driving license of
the M category (motor cycles
2
). A Velovignette3 will take care
of your liability obligation and insurance.
1
The newly created term Pedelec consists of the words pedal, electric and cycle,
and denotes a special type of electric cycle that is different from the so-called e-bike,
because law stipulates that its additional drive must work simultaneously with the
paddle drive.
2
Traffic Registration Act (VZV), Version on December 5, 2008
3
Traffic Insurance Act (VVV), Version on January 1, 2009
Operating instructions
ED-3 EX
Page 5
BA_Migros_ED3EX_GB 09.02.2011 12:13 Uhr Seite 5
Probedruck
C M Y CM MY CY CMY K
101
GB
design of CROSSWAVE Pedelec complies with the upcoming
European standard EN15194 for electric motor assisted cycles
and with the statutory safety specifications, especially the
European bicycle standard DIN-EN 14764.
Get ready to be electrified!
Your CROSSWAVE Team
CAUTION! In the Operating Instructions, you
find this sign wherever your safety is concerned.
Please inform other users of your cycle about
the safety instructions as well!
Pedelec with Lithium-ion battery
Page 6

BA_Migros_ED3EX_GB 09.02.2011 12:13 Uhr Seite 6
Probedruck
C M Y CM MY CY CMY K
102
5) Start pedalling. The motor is activated after a half-rotation of
the pedals.
6)
If you are riding this bicycle for the first time, please
try out the available operation modes in low-traffic
areas.
7)
The available operation modes are 1, 2, 3 and 4. The modes
1–3 restrict the max. operational power level. This facilitates
an increase in operating distance.
8)
At the end of the ride, shut off the system by pressing the
"ON/OFF“ button (l.)
9) The CROSSWAVE Pedelec will take you home even on an empty
battery like an ordinary cycle. The battery electronics prevents
an excessive discharge of the battery.
10) Recharge the fully empty Lithium-ion battery after completing
the ride. If the Lithium-ion battery is only partially empty,
continue to use it for subsequent rides till the battery is
completely empty.
11) If you do not use the battery for more than 6 month, recharge
it fully.
Enjoy your drive on the CROSSWAVE Pedelec!
Quick start
Even though you might be eager to use your newly purchased CROSSWAVE
Pedelec immediately, we request you to observe the following steps
without fail before taking your first ride. PanTerra™ will not accept
any guarantee obligations otherwise!
1) Remove all the protective foils from the battery. Please check
the current charging status of your battery by pressing the key
on the LED display (refer to Page 14). The CROSSWAVE Pedelec
is powered by a Lithium-ion battery.
Now charge the battery fully first! Please use the original PanTerra™
Lithium-ion charging device only. Then insert the battery in the
luggage carrier holder and secure the lock (refer to Page 14).
2) Adjust the handle bar and seat; check to ensure that the drive
and brakes function and that all screws, especially the wheel
nuts are properly fixed (refer to Page 17).
3) Switch the system on at the left of the handle bar: Press the
switch to “I” on the control unit. The CROSSWAVE Pedelec is now
ready for a ride. The electronic circuit however is deactivated
after approx. 8 min of inactivity in order to save energy! If
this happens, switch off and then on again.
4)
By activating the four-mode panel, the energy-saving
modes 1–3 can be selected via the Assist button.
Operating instructions
ED-3 EX
Page 7
BA_Migros_ED3EX_GB 09.02.2011 12:13 Uhr Seite 7
Probedruck
C M Y CM MY CY CMY K
103
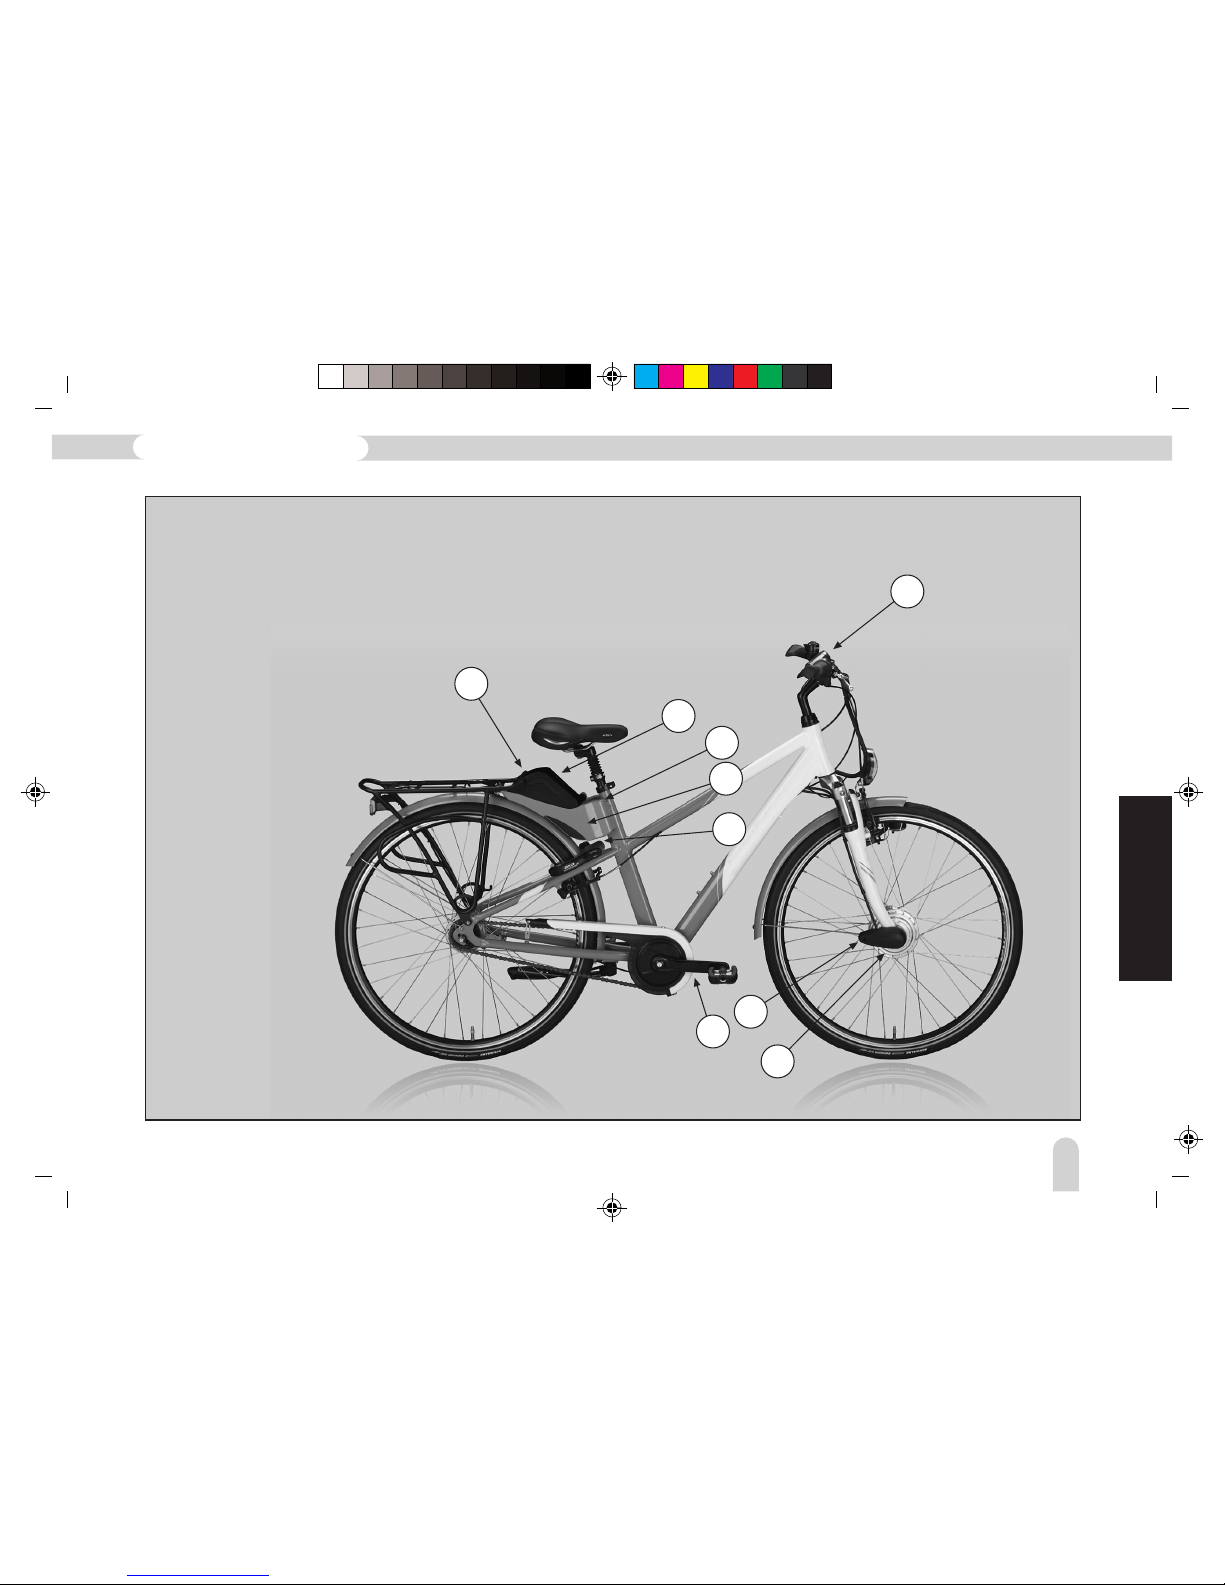
Your CROSSWAVE Pedelec and its components
(A) Drive battery
(B) Status display of the drive battery
(C) Lock of the drive battery
(D) Motor control (electronic)
(E) Charging input bushing
(F) Crank with rotary sensor
(G) Front wheel hub motor
(H) Motor plug cover
(I) Handlebars: operational controls
(panel)
Figure 1
GB
Pedelec with Lithium-ion battery
B
A
C
D
E
F
G
H
I
Page 8
BA_Migros_ED3EX_GB 09.02.2011 12:13 Uhr Seite 8
Probedruck
C M Y CM MY CY CMY K
104
Info:
Ride very carefully in wet conditions. The braking distance
increases if the road is slippery. Under wet conditions, the
braking distance is two or three times as long. Adjust your
manner of driving to the changed conditions. Ride slower and
apply the brakes early.
Switch the lights on under unfavourable conditions of visibility
such as fog, rain, twilight and darkness.
If you leave the public roads, drive only on lanes and never on
open ground. Adjust your speed according to your riding abilities.
Wear tight fitting trousers or use trouser clamps. Wear a helmet
for your own safety. Bright, conspicuous clothing is better seen
under bad visibility conditions.
Do not ride with your hands off the handle bar –
risk of accident and fall.
Before the first start-up
Specifications
Brakes: A cycle must have at least two brakes that function
independently of each other.
Bell: A clear sounding bell is mandatory.
Lights: Both bulbs must function simultaneously. The centre
of the light beam of the front bulb should fall on the road at
a maximum of 10 m ahead of the cycle. The rear light must be
mounted at a height of minimum 25 cm above the road surface.
Reflectors: A white reflector with a large surface area at the
front that can be combined with the headlight. In the rear, at
least one red reflector should be installed. Optionally, the rear
light can be combined with a spot light. Two yellow pedal
reflectors per pedal – one towards the front and one to the
rear! A parking light or a battery light can be installed
additionally.
Special rules for sports cycles
The following special rules are applicable for racing and mountain
bikes: Headlights and taillights can be battery-operated. They
need not be mounted permanently on the cycle, but must be
used when the light conditions so demand. Nevertheless, sports
bicycles must have reflectors. The provisions are not applicable
to official tournaments, provided these take place on cordoned
off roads.
Warning Note: Carry out repairs, servicing or
adjustments on your bicycle only if you have the
requisite knowledge and tools! For your safety,
please assign all repair jobs on your bicycle to a
specialized workshop or to the Service Department
in case of doubt. Components that are bent or
damaged due to accidents or improper handling
must be replaced immediately to avoid the risk of
breakage – e.g., frame, fork, handle bar, handle
bar stem, seat support, pedals or crank arms.
Operating instructions
ED-3 EX
Page 9
BA_Migros_ED3EX_GB 09.02.2011 12:13 Uhr Seite 9
Probedruck
C M Y CM MY CY CMY K
105
GB
Before the first start-up:
Your cycle was tested several times during manufacture and
subjected to a final control. Since during transportation of the
cycle the settings can change, please check the following without
fail before each ride:
Info:
– Proper mounting of the wheels and quick release levers.
– The minimum insertion depth of handle bar stem and seat
support and their mounting.
– Effectiveness and adjustment of the brakes.
– Adjustment and bolting of the spring components.
– Function of the gear and the lights.
– Safe seat of all screws, nuts and the pedals.
– The air pressure and the profile depth of the tyres.
Regular inspections
Check periodically, e.g., after 300–500 km or every 3–6 months,
depending on the intensity of use of the cycle to ensure that
all screws, nuts and the quick release are fixed properly. Check
or service for the first time after approximately 100 km. Checks
or servicing is thereafter necessary at regular intervals. The
indicated amount of kilometres gives only a rough orientation.
You have to take into account the use pattern and the number
of kilometres driven in rain. In addition to the jobs that you
undertake during the regular inspection, please
– Clean cycle and oil moveable components.
– Treat paint rub-offs and rusted areas.
– Apply protective coating on metal parts.
– Replace non-functional or damaged parts.
IMPORTANT NOTE: Caution! To be able to undertake
all the jobs on your cycle on your own, you will need
some experience, suitable tools and skills. While
tightening the screws, please pay attention to the
correct tightening torques. These are given on Page
22 of this Operating Instructions or in the
instructions of the component manufacturers.
Difficult and safety-related jobs are better to be
done by an expert.
Pedelec with Lithium-ion battery
Page 10
BA_Migros_ED3EX_GB 09.02.2011 12:13 Uhr Seite 10
Probedruck
C M Y CM MY CY CMY K
Loading the Pedelec
– The permissible total load (rider and luggage) on the
CROSSWAVE Pedelec is 120kg.
– The permissible load of the luggage carrier is mentioned on
the luggage carrier.
– If your cycle is equipped with a front basket, the additional
load allowed here is 5kg.
Braking response
– Use the front wheel brake carefully on wet, sandy and slippery
roads, wet asphalt and ice, to keep the front wheel from
skidding and to retain the Pedelec under control!
– The brakes must be used with care. Blocked wheels have
a reduced braking effect and can lead to loss of balance
and fall!
– As a matter of principle, do not apply the brakes in curves
but before them; braking increases the risk of skidding!
– The braking lever mounted on the handle bar must always be
tight. Check regularly to ensure that they are not loose,
and tighten if necessary.
– Work on the brake system should be entrusted exclusively
to the dealer!
Proper use of the Pedelec:
Your Pedelec has been designed and equipped like a bicycle for
the use on public roads and paved lanes. Please bear this in
mind when using the Pedelec under off-road conditions and in
case of overloading and improper rectification of faults.
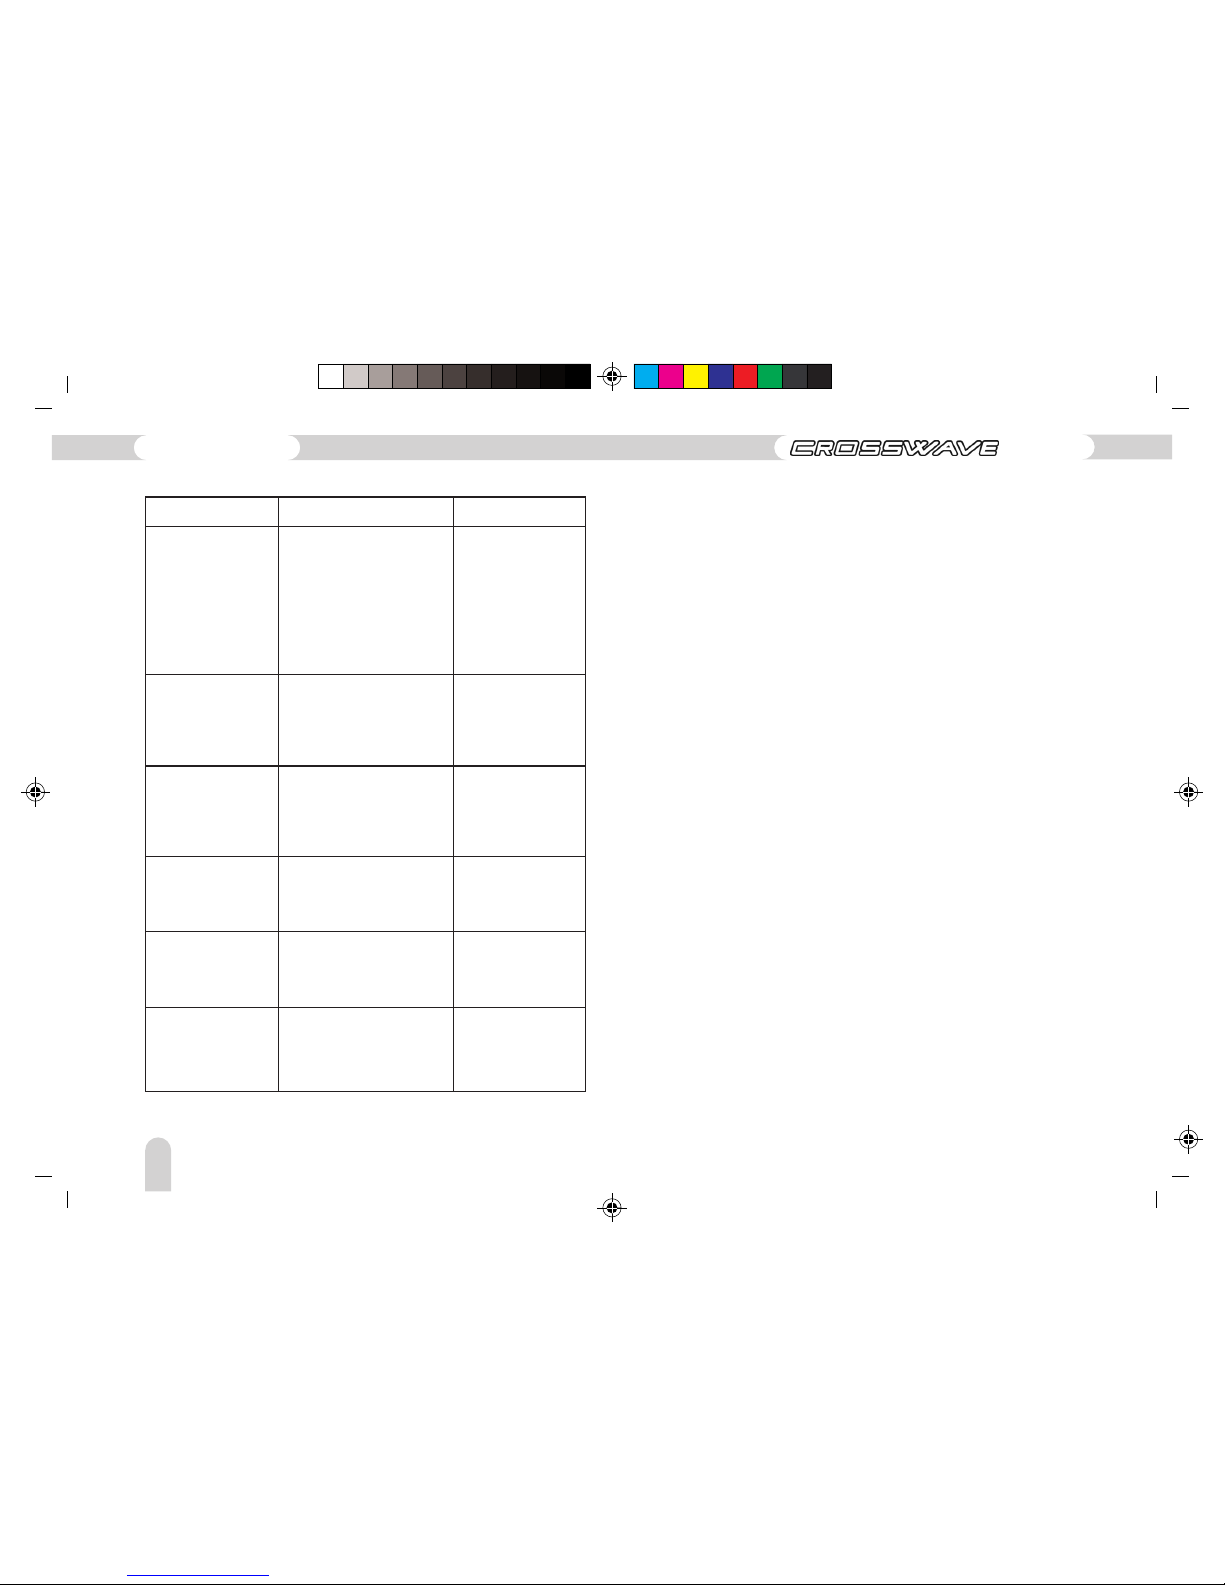
When? Servicing / check Action
After approximately
100 km and
subsequently at least
1x per annum
Check the tightening torque
of screws, cranks, pedals,
handle bar, seat support and
seat. Adjustment of gear,
control set, spring elements
and brakes. Check the wheels
and tyres
Customer Service,
Service Department
or specialized
workshop
After every ride Check the rims, spokes, tyres,
bell, brakes, quick release,
lights and the function of the
gear and springs
Check the rims for
concentricity and
wear marks. Check
tyres for foreign
bodies
Regularly after
300–500 km
Check the cranks, sprocket
wheel and pinion. Check
chain wear and tear, stability
of all screws, wear indication
on the rim
Clean and apply
chain grease
After 1000 km Back pedal brake, VR-HR
hubs
Dismantle, clean and
apply grease. Check
brake jacket, replace
if necessary
After 3000 km Control set, pedals, hubs,
brake and control wires*)
Let Service check,
dismantle, clean,
lubricate and replace
if necessary
After rain Chain, brake, wiring Clean, lubricate
* Do not oil Teflon coated cable jackets!
106
Operating instructions
ED-3 EX
Page 11

BA_Migros_ED3EX_GB 09.02.2011 12:13 Uhr Seite 11
Probedruck
C M Y CM MY CY CMY K
GB
Guarantee
1) Guarantee: Your decision to buy a cycle from our company entitles
you to own a top quality product. Migros gives you a guarantee of 2
years.
2) The guarantee does not cover the following:
– All damages attributable to improper use and application of force
(refer to information about proper use of the Pedelec).
– Components of the cycle that are subject to use-related wear and
tear, unless there are production faults or material defects. (Refer
to list of possible wear parts on Page 12).
– Damages to the cycle attributable to improper or faulty maintenance
and to unprofessionally executed repairs, alterations or replacement
of parts. Detailed servicing or maintenance instructions are given in
this Operating Instructions.
– Accident damages or other such unusual external effects, unless
these are attributable to improper information or product faults.
– Repairs made with used parts or damages ensuing there of.
– Damages on account of use of the product in competitions.
(Refer to information about proper use of the Pedelec according
to manufacturer instructions).
– For subsequent attachments that were not a part of the delivery
scope of the product on the hand over date, or damages that occur
on account of unprofessional assembly of these attachments.
Info: For valid warranty claims, the buyer must present the original
purchase receipt to the vendor.
Caution! Traffic safety tips:
> Always observe the traffic rules.
> Drive carefully. Do not endanger or provoke other vehicle
drivers.
> Switch the lights on early if it is getting dark.
> Cycling is prohibited on the highways. Danger to life!
> Keep sufficient distance from automobiles in front; these
normally have a shorter braking distance.
> Wear bright clothes so that you are detected early.
> Always wear a helmet.
> Ensure that your cycle is always in roadworthy condition.
> Children below 6 years should always use the footpath. Children
must always climb down from the cycle before crossing a
traffic lane. For reasons of safety, the rider must avoid listening
to music with headphones in the midst of vehicular traffic.
Caution! Learn the traffic rules before venturing out onto
busy roads. Learn to anticipate the errors of other drivers!
> Please ride only on the designated lanes and roads, not over
meadows and fields or across forests.
> Never ride the bicycle through water.
> Pay attention to pedestrians and hikers; your hands should
be ready to apply the brakes at blind curves/corners and while
riding downhill, pay attention to your speed and do not leave
any skid marks.
Caution! Riding in the open fields requires a lot of skill, good
fitness and high concentration. Start with easy tours and
increase your difficulty level gradually.
107
Pedelec with Lithium-ion battery
Page 12

BA_Migros_ED3EX_GB 09.02.2011 12:13 Uhr Seite 12
Probedruck
C M Y CM MY CY CMY K
2) Rims in connection with rim brakes
Not only the brake pad but also the rim is subjected to use
related wear on account of the interaction between the rim
brake and the rim. Hence, the rim should be checked at regular
intervals for wear and tear. The occurrence of fine cracks or
deformation of the rim horns when increasing the air pressure
indicates heavy wear and tear. Rims with wear indicators enable
the rider to detect the wear condition of the rim easily.
3) Brake pads
The brake pads for rim brakes, drum brakes and disk brakes are
subject to use related wear and tear. This depends on the use
of the cycle. Riding the cycle in rough or hilly terrain or using
it for sports activities can necessitate the replacement of the
brake pads at shorter intervals. Check the wear condition of the
covers and let your service partner replace them.
4) Chains and drive belts
The cycle chain is subject of use related wear and tear. The
extent of the wear depends on the servicing and maintenance
and the type of use of the cycle (mileage, riding in rain, dirt
and pollution, salt etc.). Regular cleaning and oiling can increase
the life, but replacement is necessary on reaching the wear limit
(approximately 2000–3000 km).
Parts subjected to regular wear and tear
Please note: List of parts subjected to regular wear and tear
1) Tyres
2) Rim in connection with rim brake
3) Brake jackets
4) Chain and drive belt
5) Sprockets, pinions, inner bearings and transmission rollers
6) Bulbs and lighting system
7) Handle bar tapes / handle covers
8) Hydraulic oils and lubricants
9) Gear and brake jackets
10) Paint
1) Tyres
The cycle tyres are subject to use related wear and tear. The
extend depends on the use of the cycle and can be influenced
to a great deal by the rider. Sharp braking that leads to the
blocking of the tyre reduces the life of the tyre significantly.
Moreover, the air pressure should be checked regularly and if
necessary, increased to the value specified by the tyre
manufacturer. Excessive exposure to the sun, petrol, oils etc.
can damage the tyres.
108
Operating instructions
ED-3 EX
Page 13

BA_Migros_ED3EX_GB 09.02.2011 12:13 Uhr Seite 13
Probedruck
C M Y CM MY CY CMY K
GB
5) Sprockets, pinions, inner bearings and transmission rollers
In cycles with derailleur, the pinion, sprockets, inner bearings
and transmission rollers are subject to use related wear and
tear. Regular cleaning and lubrication can increase their life,
but replacement is necessary on reaching the wear limit. The
extent of wear depends on maintenance, servicing, the type of
use of the cycle (mileage, riding in the rain, dirt and pollution,
salt etc.).
6) Bulbs of the lighting system
Light bulbs and other lamps are subject to use related wear.
Hence, replacement may be necessary. The user must always
carry spare light bulbs to enable timely replacement.
7) Handle bar tapes and handle covers
Handle bar tapes and handle covers are subject to use related
wear. Replacement may be necessary regularly for this reason.
Ensure that the handles are connected tightly to the handle
bar.
8) Hydraulic oils and lubricants
Hydraulic oils lose their efficacy in the course of time. All
lubrication points should be cleaned regularly and re-lubricated.
Non replaced lubricants increase the wear in the attached parts
and bearings.
9) Cable and brake housing
All Bowden housings must be serviced regularly and replaced
if necessary. This can be the case especially if the cycle is placed
in the open frequently and is exposed to weather influences.
10) Paintwork
Paintwork requires regular maintenance. Check all painted
surfaces regularly for damages and rectify them immediately.
This will also preserve the good look of your cycle.
109
Pedelec with Lithium-ion battery
Page 14
BA_Migros_ED3EX_GB 09.02.2011 12:13 Uhr Seite 14
Probedruck
C M Y CM MY CY CMY K
Start-up of the CROSSWAVE Pedelec
The following chapters of the user manual of the CROSSWAVE
Pedelec presume that all basic ergonomic settings and necessary
safety checks of your bike have already been done:
– Handle bar and seat have been brought to the desired position
and tightened appropriately.
– The wheels have sufficient tyre pressure and their axle nuts
have been tightened too.
– The function of the brakes and pedal drive has been checked.
– The lighting system is functioning.
For more information refer to the Chapter
“Adjustments before ride”.
Start-up of the drive battery:
Now take the drive battery out of the holder in the luggage
carrier of the CROSSWAVE Pedelec. Remove any protective foils
– especially the ones on the electrical contacts located at the
lower end.
Now check the charging state of the battery
by pressing the key on the LED-charging status
display. If less than two LEDs or no LED lights
up, the battery may be damaged. In this case
please contact your dealer.
110
Operating instructions
ED-3 EX
Page 15
BA_Migros_ED3EX_GB 09.02.2011 12:13 Uhr Seite 15
Probedruck
C M Y CM MY CY CMY K
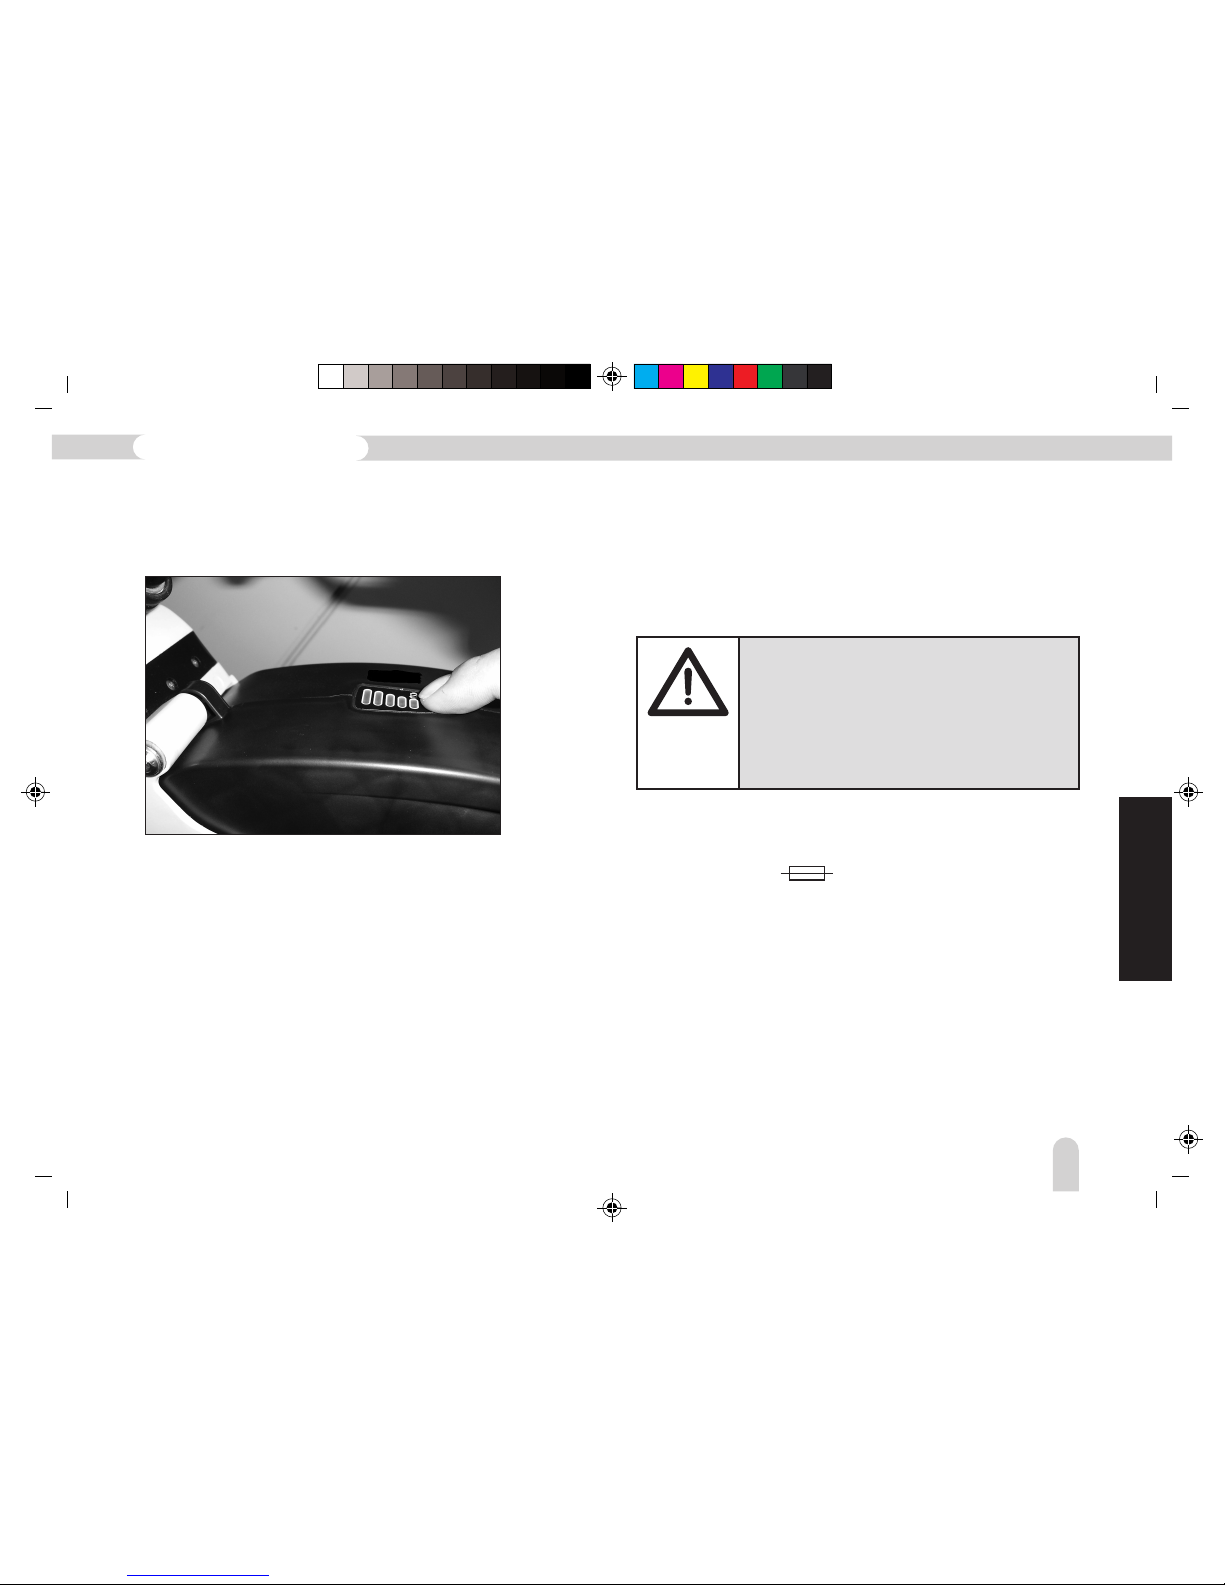
Check the charging status of the battery. To do this, press the
knob at the LED display on the top side of the battery. Refer to
Figure 2
Figure 2
If all the 5 LEDs do not light up, PanTerra™ recommends that
you first charge the battery fully.
To do this, connect the drive battery to the charging device
included in the scope of delivery. Refer to the Chapter “Charging
the drive battery” on Page 113.
The compartment for the battery-fuse is located on the side.
(cover with symbol
).
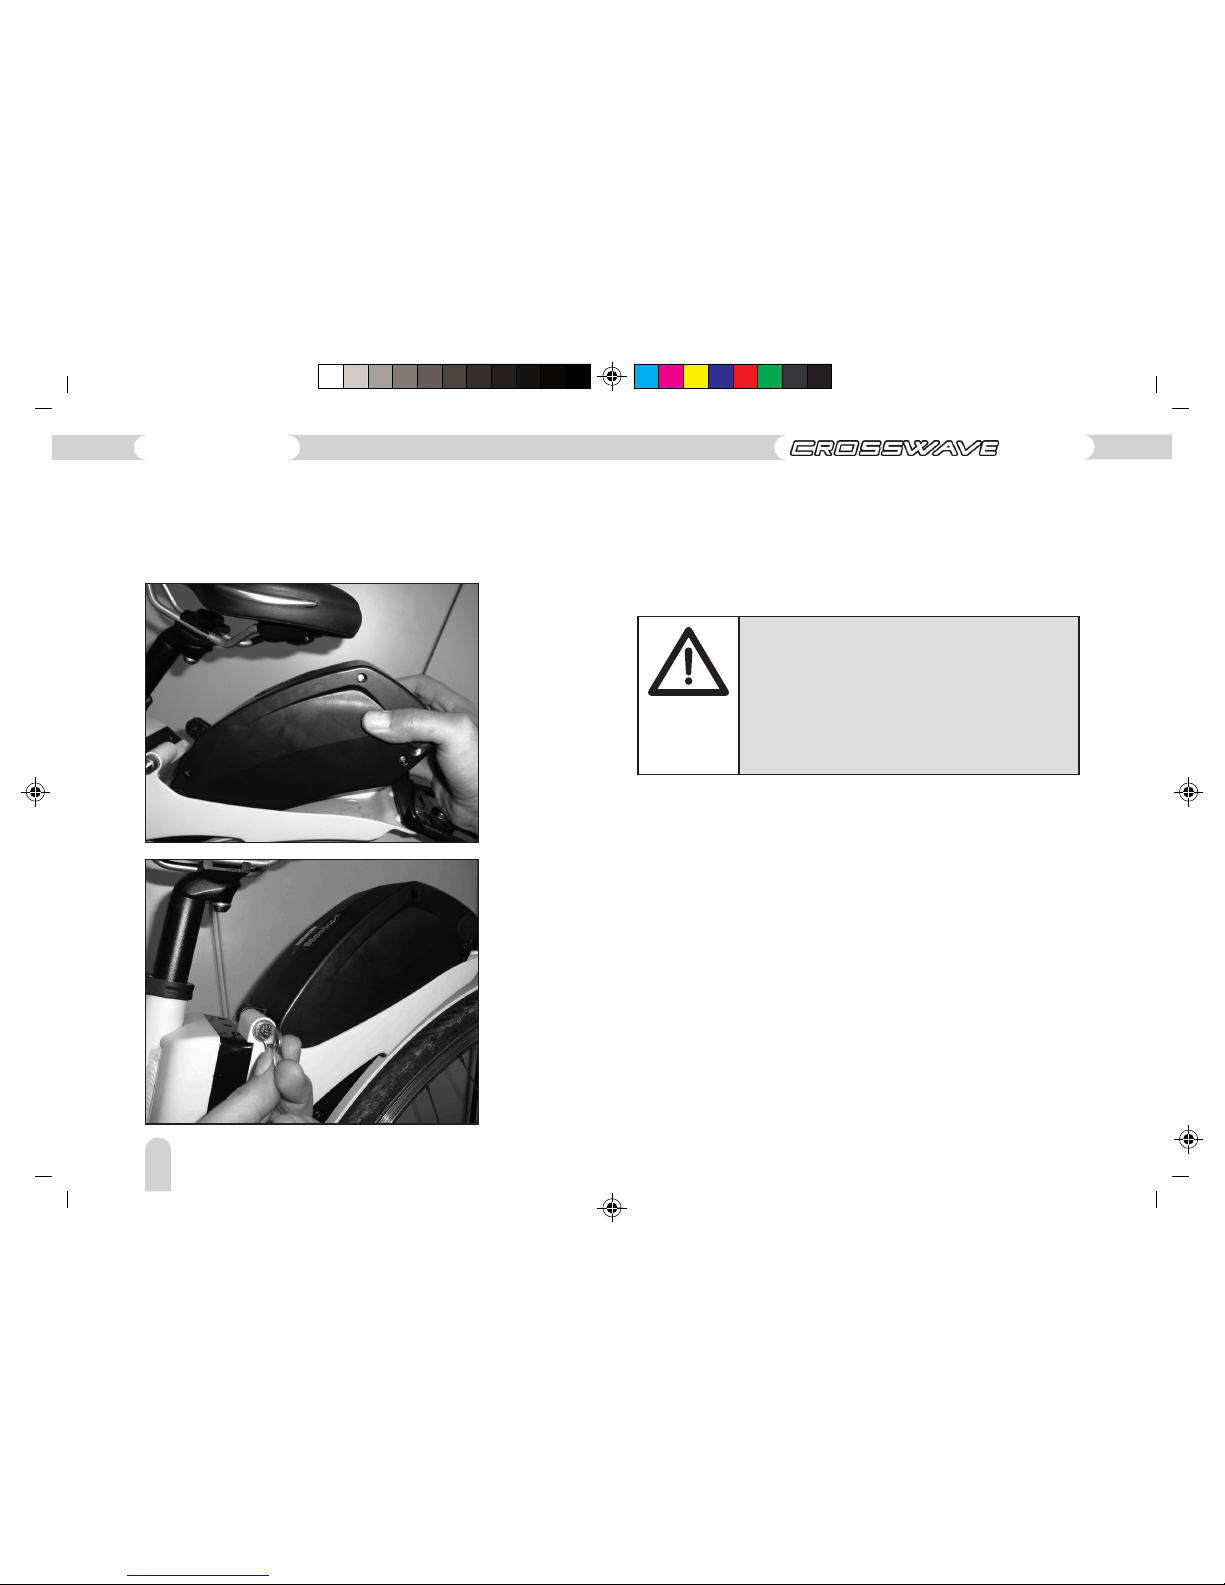
Slide the battery into the support slot on the Pedelec as
demonstrated in Graphic 4 and 5. Ensure that the contact pins,
which are fixed into the support slot, slide smoothly into the
connectors of the battery.
GB
Lithium-ion batteries get self-discharged much
slower than Nickel batteries and can therefore be
stored for approximately 6 months without
recharging. However, if the battery is not recharged
after this period, the chemical structure can be
damaged, which affects the performance of the
battery considerably and can make it unusable.
111
Pedelec with Lithium-ion battery
Page 16
BA_Migros_ED3EX_GB 09.02.2011 12:13 Uhr Seite 16
Probedruck
C M Y CM MY CY CMY K
The key can be removed in both the locked
and unlocked position! PanTerra™ recommends
that the key is always removed!
This ensures that neither can the lock
accidently open by itself with the battery
falling out nor can the key be lost.
The CROSSWAVE Pedelec
is now ready to go!
The battery should now be firmly positioned in the support slot
as demonstrated in Graphic 3. The push cylinder lock should be
cleanly locked into the battery housing.
Figure 3
Locking the battery ensures that it is firmly held so that damage
caused through vibration is prevented; thereby guaranteeing
that optimal electrical contact is maintained between the battery
and the electronics of the Pedelec.
Figure 4
112
Operating instructions
ED-3 EX
Page 17
BA_Migros_ED3EX_GB 09.02.2011 12:13 Uhr Seite 17
Probedruck
C M Y CM MY CY CMY K
Charging and care of the battery
The ED-3 EX Pedelec operates with a 37V 8.8Ah lithium-ion
battery. PanTerra™ uses top-quality cells which are combined
into a 37V cell pack. In addition, the battery also contains an
electronic protection system which prevents deep discharging
and overcharging.
Avoid storing a completely empty battery over several weeks.
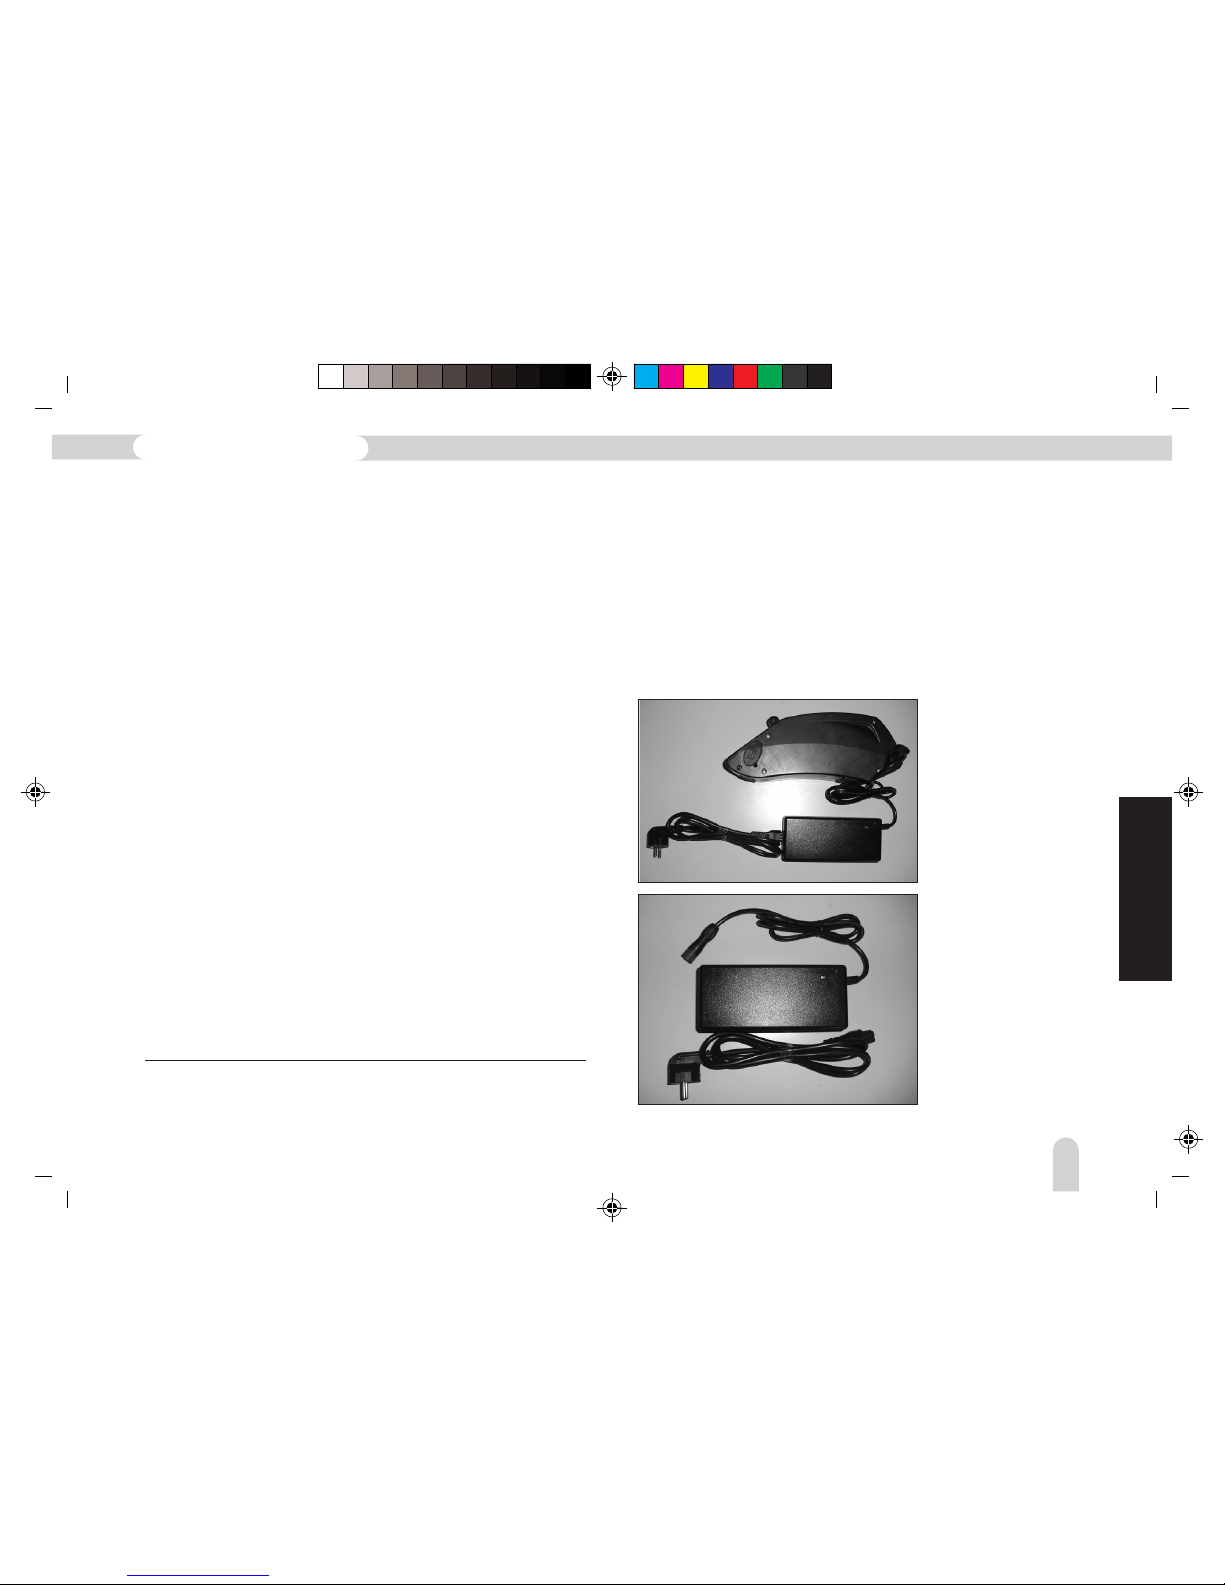
Always use the high-quality lithium-ion charger supplied (Graphic
6) or the corresponding original PanTerra™ replacement part
for charging your battery. The original charger operates using
CC-CV
4
technology. In conjunction with the battery’s electronic
protection system, the possibility of any damage occurring to
the battery at any time can therefore be ruled out as can any
possibility of overcharging through an incorrect charging current.
The charger is for indoor use only! Please read the charger
manual attached prior to initial use.
Remove the charger (Graphic 6) from the box, loosen the bundle
of cables and connect it to the multi-pole charging socket
located on the side of the battery. A rubber cover protects it
from spray.
The battery can also be charged on the bicycle.
Figure 5
Connect the charger
to the mains socket
using the mains cable
supplied. The LED of
the charger changes
from green to red.
Charging begins.
4
CC-CV = Constant Current – Constant Voltage: Controlled current strength is first used
to charge quickly and the battery voltage increases. On approaching the maximum
capacity, the current strength is reduced and the remaining capacity is filled only with
exact maximum specified voltage.
Figure 6
GB
113
Pedelec with Lithium-ion battery
Page 18
BA_Migros_ED3EX_GB 09.02.2011 12:31 Uhr Seite 18
Probedruck
C M Y CM MY CY CMY K
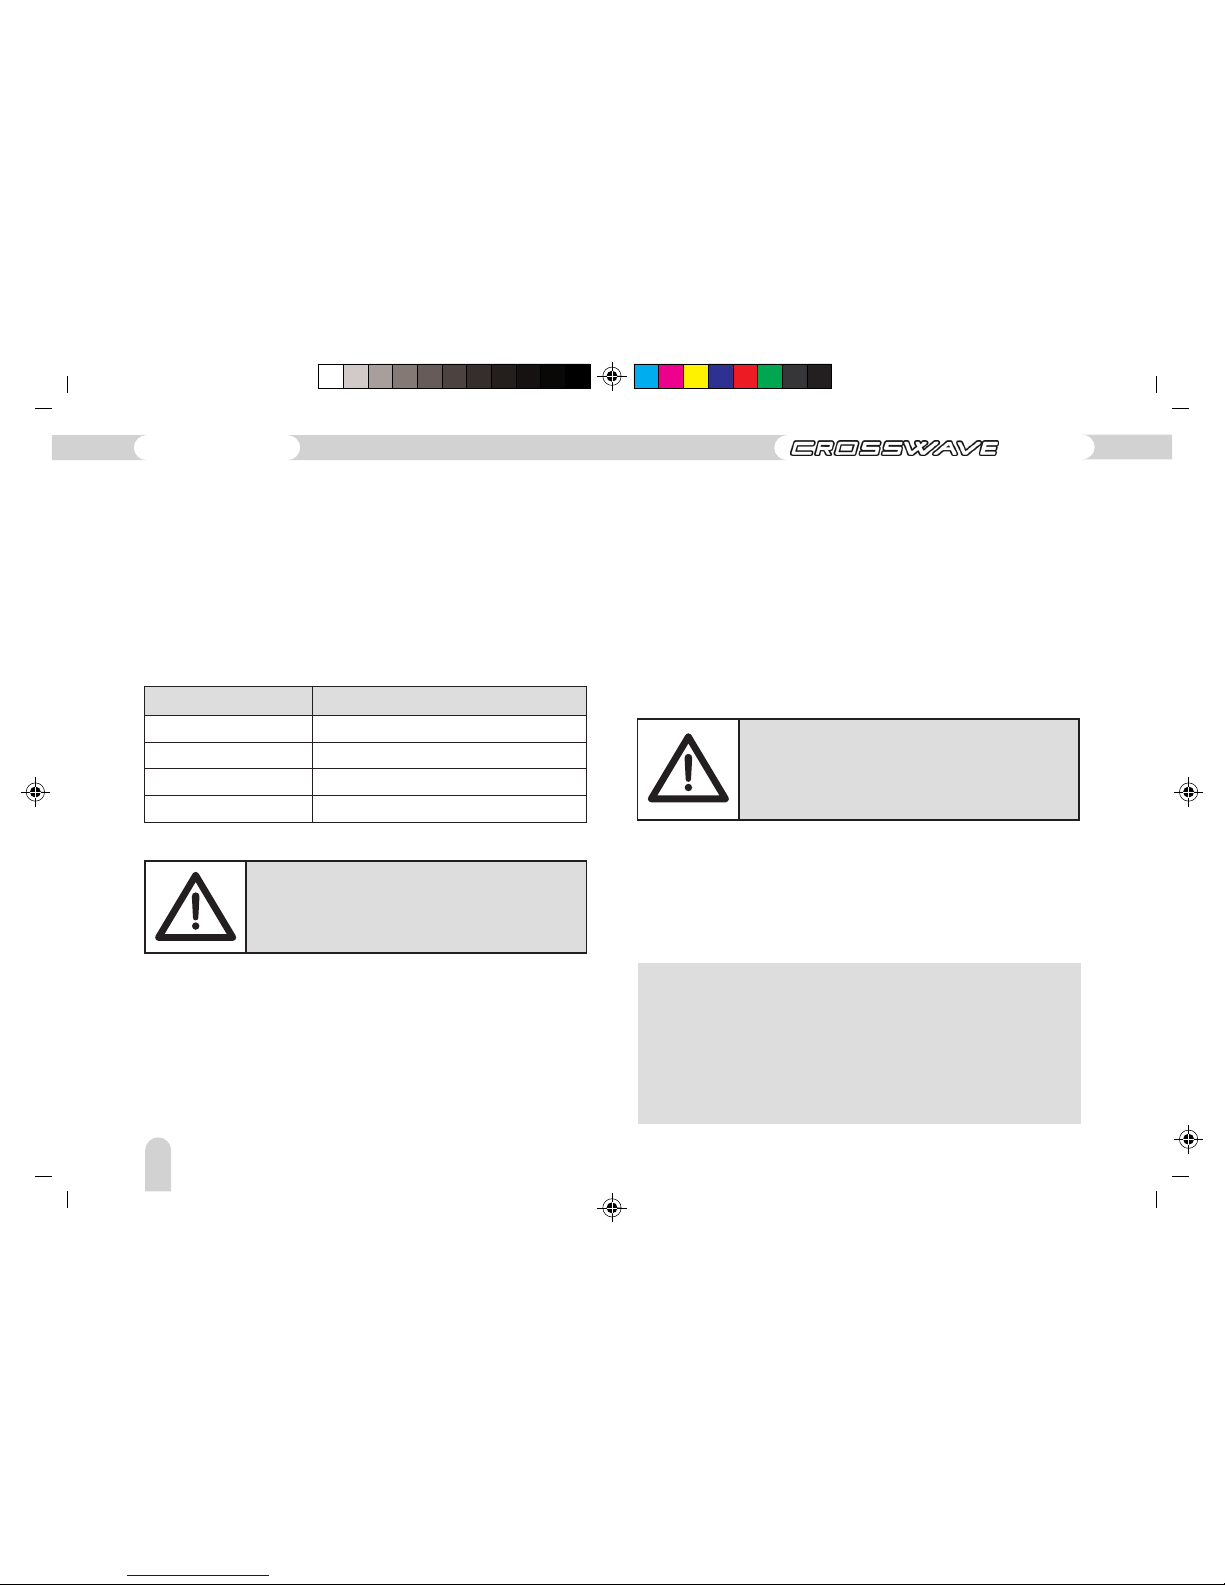
If the battery pack is nearly full (95%), the LED changes from
red to yellow. The first phase of charging has been completed.
The battery pack can be taken out of the charger at any time.
A full charge can require up to nine hours (CC-CV charging
means that after 5.5hours, approximately 95% of the charge
has been completed. It can be estimated that a further four
hours are still required for the remaining 5% capacity in the
slow CV-mode).
Long-term trickle charging:
Lithium-ion batteries do not receive any long-time trickle
charging. Their self discharge is too low and the associated
charging devices therefore are not designed for it.
It is therefore not recommended to connect the battery to the
charging device continuously over a prolonged period of absence
especially in winter. The safety electronic circuit in the battery
will prevent any damage, but the charging device would be
working all the time.
Danger of short circuit! Ensure that no metallic
objects come close to the battery contacts and
the charging plug.
The battery should not be charged at very high and very low
temperatures (below -10 °C and above +40 °C). We recommend
that the cycle should not be exposed to bright sunlight during
charging.
Electrical devices should not be connected to the
mains over long periods without supervision. Hence,
you should pull out the power plug from the mains
socket during vacations or during long periods of
absence.
Tip:
If you do not use the Pedelec for long intervals, please recharge
the Lithium-ion battery once every six months. Pull out the
fuse from the battery during storage to rule out consumption
of electricity (very little) by the protective electronic circuit
itself. Of course, you must reinsert this fuse before charging
again.
114
Operating instructions
ED-3 EX
Steady green light Charging completed/no battery
Steady red light Normal charging (CC) 0–95%
Flashing green normal Charging (CV) 95-100%
Flashing green Charging completed
ModeCharging device LED
Page 19
BA_Migros_ED3EX_GB 09.02.2011 12:13 Uhr Seite 19
Probedruck
C M Y CM MY CY CMY K
GB
Adjustments before a ride
Check the following before each ride
– All screws, wheel nuts or quick release are tight
– The brakes function
– The air pressure of the tyres is sufficient
– The lighting system is intact
– The bell is OK.
Seat and handle bar:
You bicycle is assembled by the dealer and is in a road-worthy
condition. The handle bar and seat position is adjusted to your
height. While adjusting the seat and handle bar height, pay
attention to the minimum insertion depth marked on the handle
stem shaft and seat support. Never pull out the handle bar or
seat above the marking!
Seat:
The seat can be adjusted in three directions:
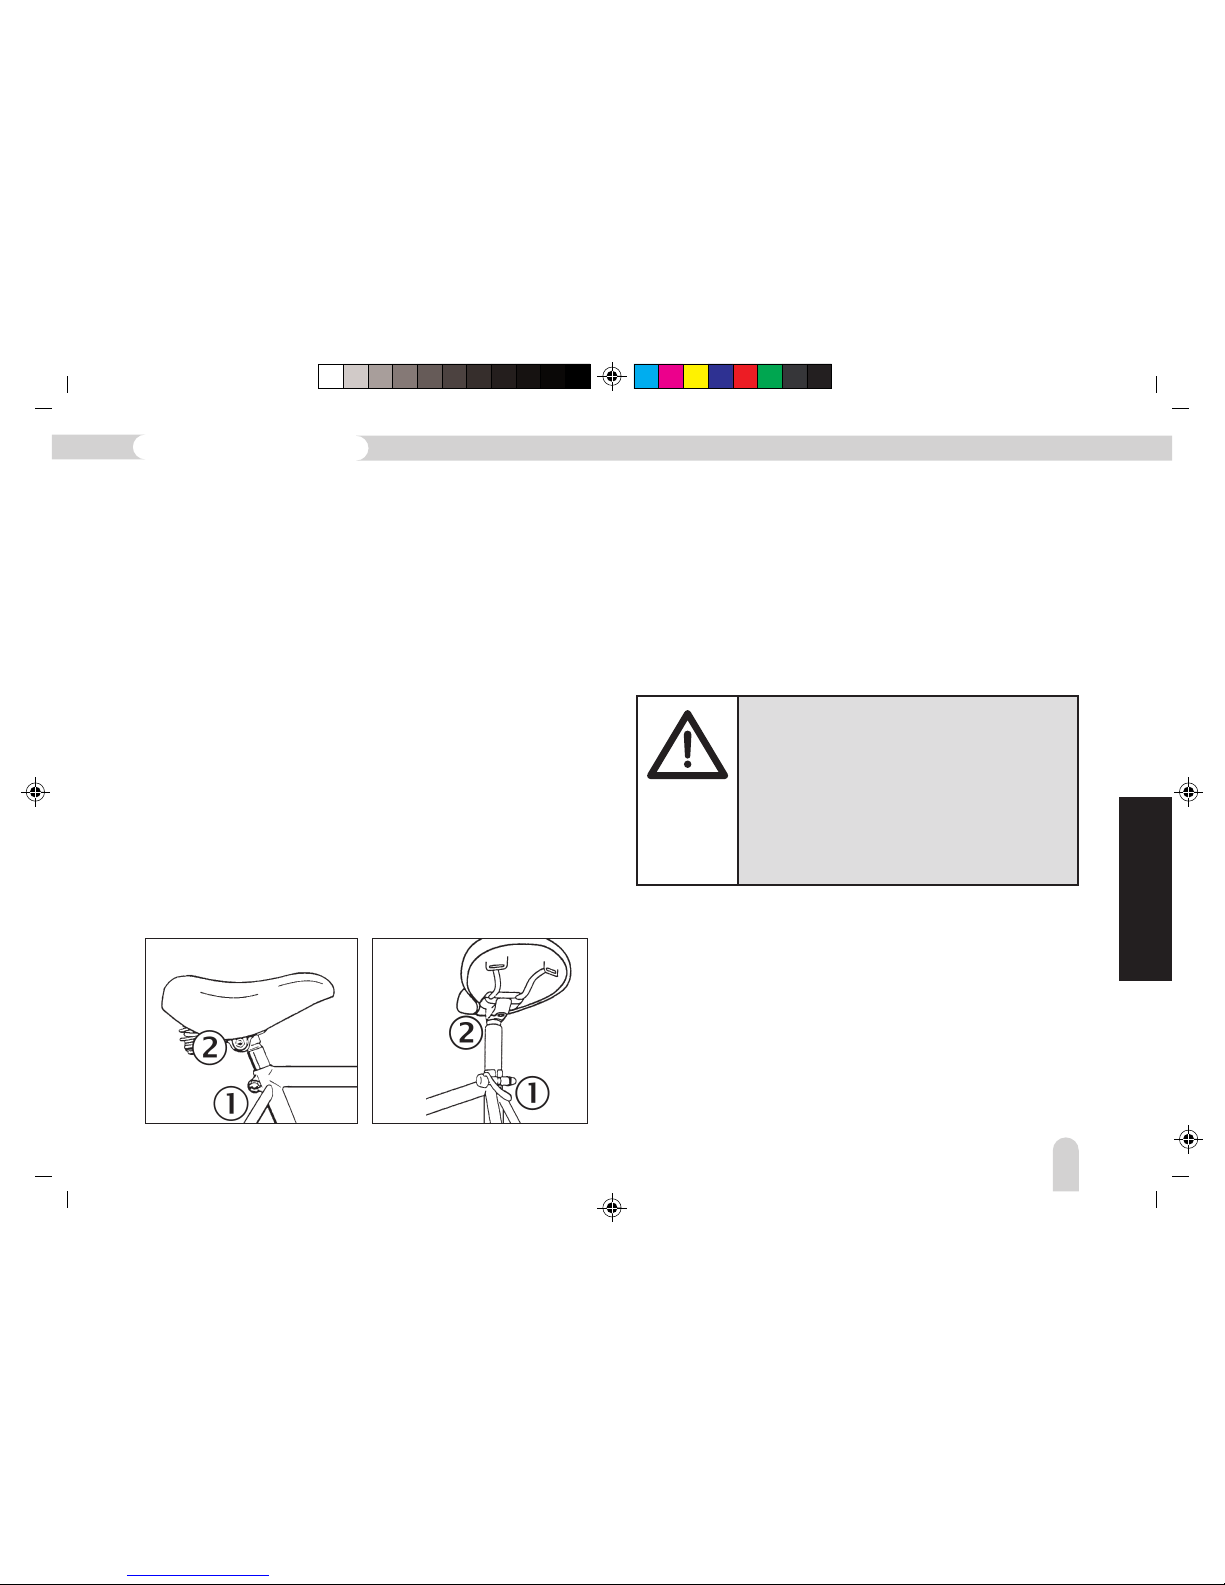
height, inclination and distance from handle bar (Figures 7, 8):
Height:
– Loosen the seat clamping bolts (Figure 7 Pos. 1) or quick
release (Figure 8 Pos. 1)
– Move the seat support in or out
– Tighten the clamp after making the adjustment.
You have adjusted the seat height according to your body size,
so that, while sitting on the seat, the tips of your toes touch
the ground on both sides.
Figure 7 Figure 8
Caution! The seat support must remain clamped at
least up to the mark. Otherwise it might break,
leading to a fall! Leather seats can discolour clothes
when used initially under wet conditions. Frequent
re-adjustments of the seat can leave permanent
scratches on the surface of the seat support due to
the mechanical action. These damages fall under
normal wear and tear, and do not constitute a case
of materials defect liability.
Inclination of the seat and distance from handle bar
(Figures 7, 8):
– Loosen the nut of seat piston or inner hexagon bolt (2)
– Move seat forward or backward
– Incline the seat
– Tighten the nut or inner hexagon bolt
115
Pedelec with Lithium-ion battery
Page 20
BA_Migros_ED3EX_GB 09.02.2011 12:13 Uhr Seite 20
Probedruck
C M Y CM MY CY CMY K
Adjusting the inclination of the handle bar:
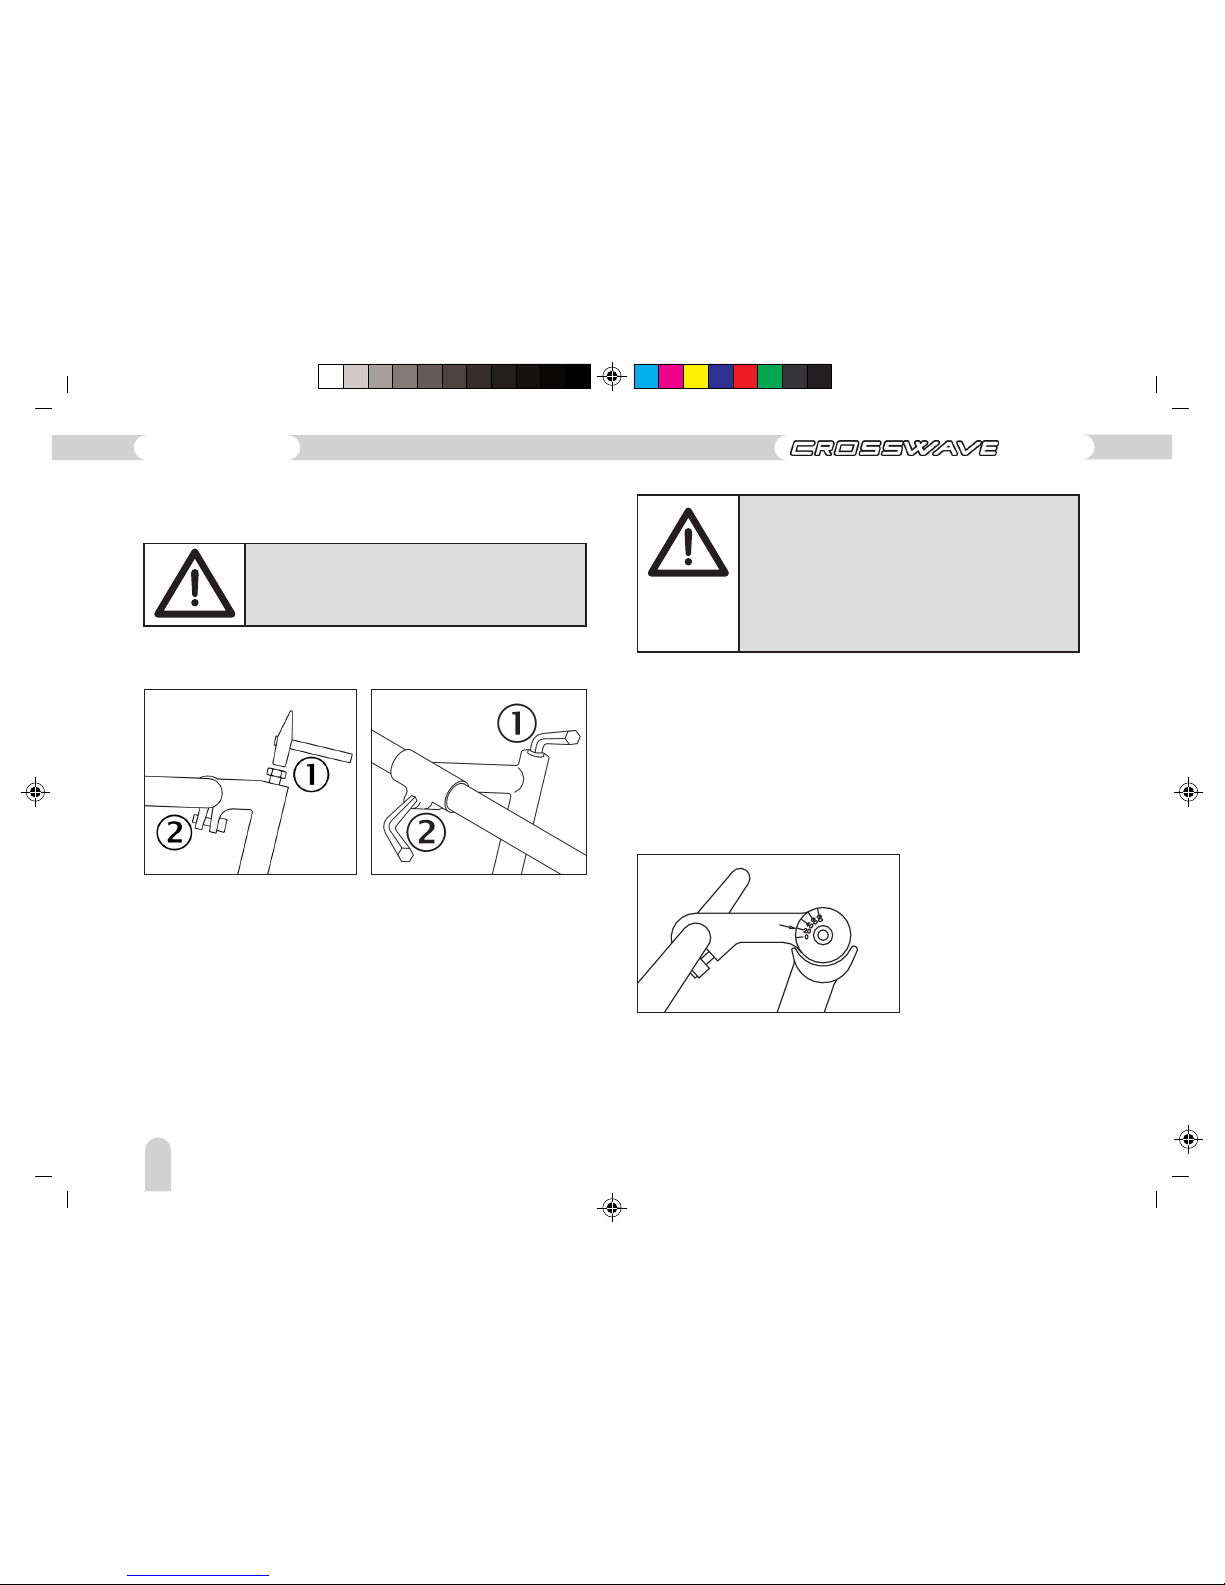
– Loosing the joint (Figure 9, 10, pos. 2)
– Rotate to the correct position
– Tighten the joint
Angular adjustment of handle bar stem:
This stem offers more flexibility in adjusting the handle bar
position:
Handle bar and handle bar stem
Figure 9 Figure 10
The handle bar can be adjusted as follows (Figures 9, 10):
Caution! After a fall on the handle bar, you must
replace the handle bar and stem. Invisible micro
cracks can lead to breakage and therefore, pose a
risk of falling!
Adjusting height:
– Loosen the nut or inner hexagon bolt of the expander bolt
(Figure 9, 10, pos.1)
– Loosen the bolt with a gentle hammer blow and adjust the
correct handle bar height.
– Tighten the expander bolt finally.
Caution! Please pay attention to the marking, which
should under no circumstance project out of the
control tube. Danger of breaking – and therefore,
risk of falling! Frequent re-adjustments of the seat
can leave permanent scratches on the surface of
the seat support due to mechanical action. These
damages falls under normal wear and tear, and does
not constitute a case of materials defect liability.
Figure 11
Adjustment:
– Loosen the screw joint.
– Rotate the handle bar to the desired position.
– Tighten the screw joint.
116
Operating instructions
ED-3 EX
Page 21
BA_Migros_ED3EX_GB 09.02.2011 12:13 Uhr Seite 21
Probedruck
C M Y CM MY CY CMY K
GB
Brake
The brake system must be checked before each ride. Only the
dealer should be entrusted with the job of adjusting the brakes.
Readjustment of the brakes is required when you observe an
increasing idle travel of the hand brake lever. The same comes
closer and closer to the handle bar grip due to the wear and
tear of the brake rubber (shoe). Regular readjustment is
necessary.
The brake rubbers are parts subjected to wear and tear and they
do not constitute a materials defect liability.
Rear wheel back pedal brake
This brake cannot be adjusted.Please note that the brake
becomes ineffective the moment the chain is damaged or comes
off.
Pedals
The pedals must be fixed tightly at all times. During assembly
and dismantling, please keep in mind that the pedals have two
types of threads. The threads on the pedals and the treadle are
exposed to strong forces. They hold only if the pedals are screwed
tightly.
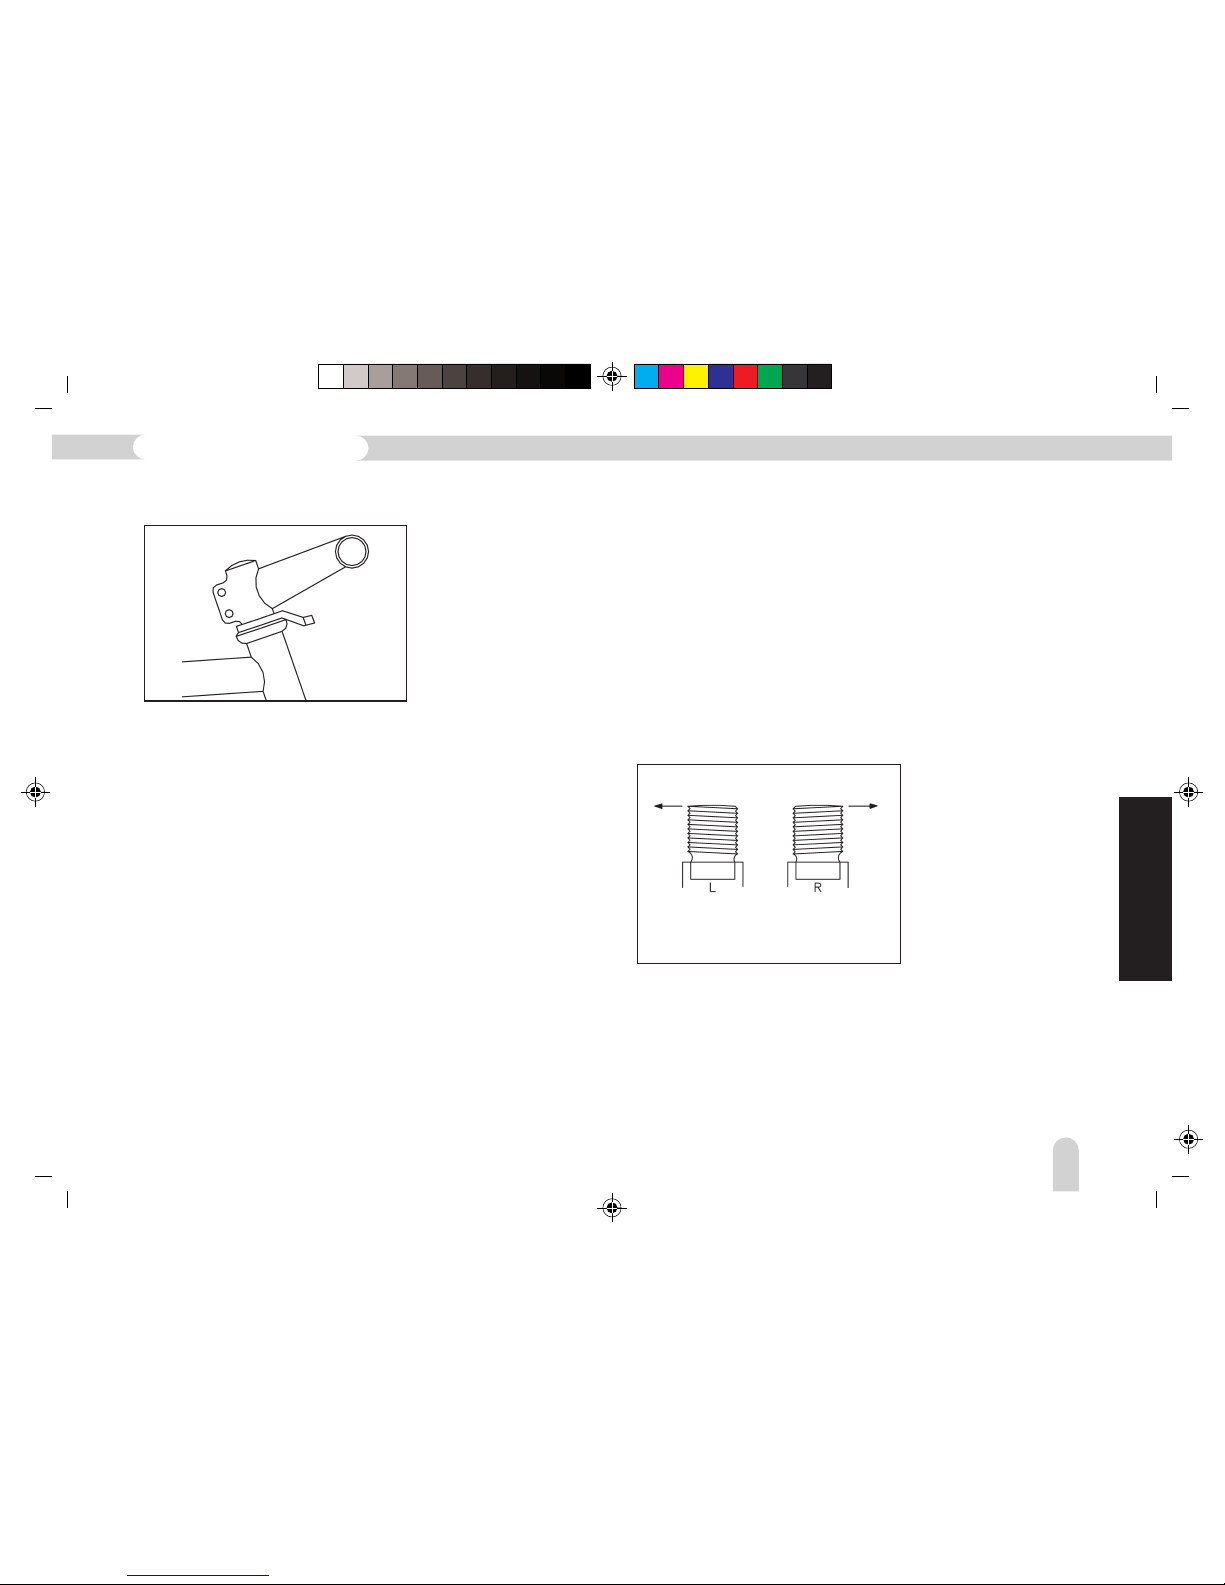
The right pedal (chain side) is marked with R at the axle end
and has right-hand threads.
The left pedal is marked with L at the axle end and has lefthand threads.
“Front-stem”
Figure 12
Figure 13
Foot pedals
The foot pedals are mounted with hexagon bolts on the square
attachments of the bottom bracket axle. The stable hub of the
foot pedal must be checked regularly. Remove the safety caps
and tighten the screws located below them.
The right pedal must
therefore be screwed in
the clockwise direction,
while the left pedal must
be screwed in the opposite
direction.
left-hand
thread
right-hand
thread
117
Pedelec with Lithium-ion battery
Page 22
BA_Migros_ED3EX_GB 09.02.2011 12:13 Uhr Seite 22
Probedruck
C M Y CM MY CY CMY K
Handle bar bearing
Check:
– Apply the brake for the front wheel and move the cycle forward
and backward.
If there is too much tolerance due to wear and tear, the bearing
must be adjusted without delay.
The adjustment should be done by a specialized workshop.
Lighting system
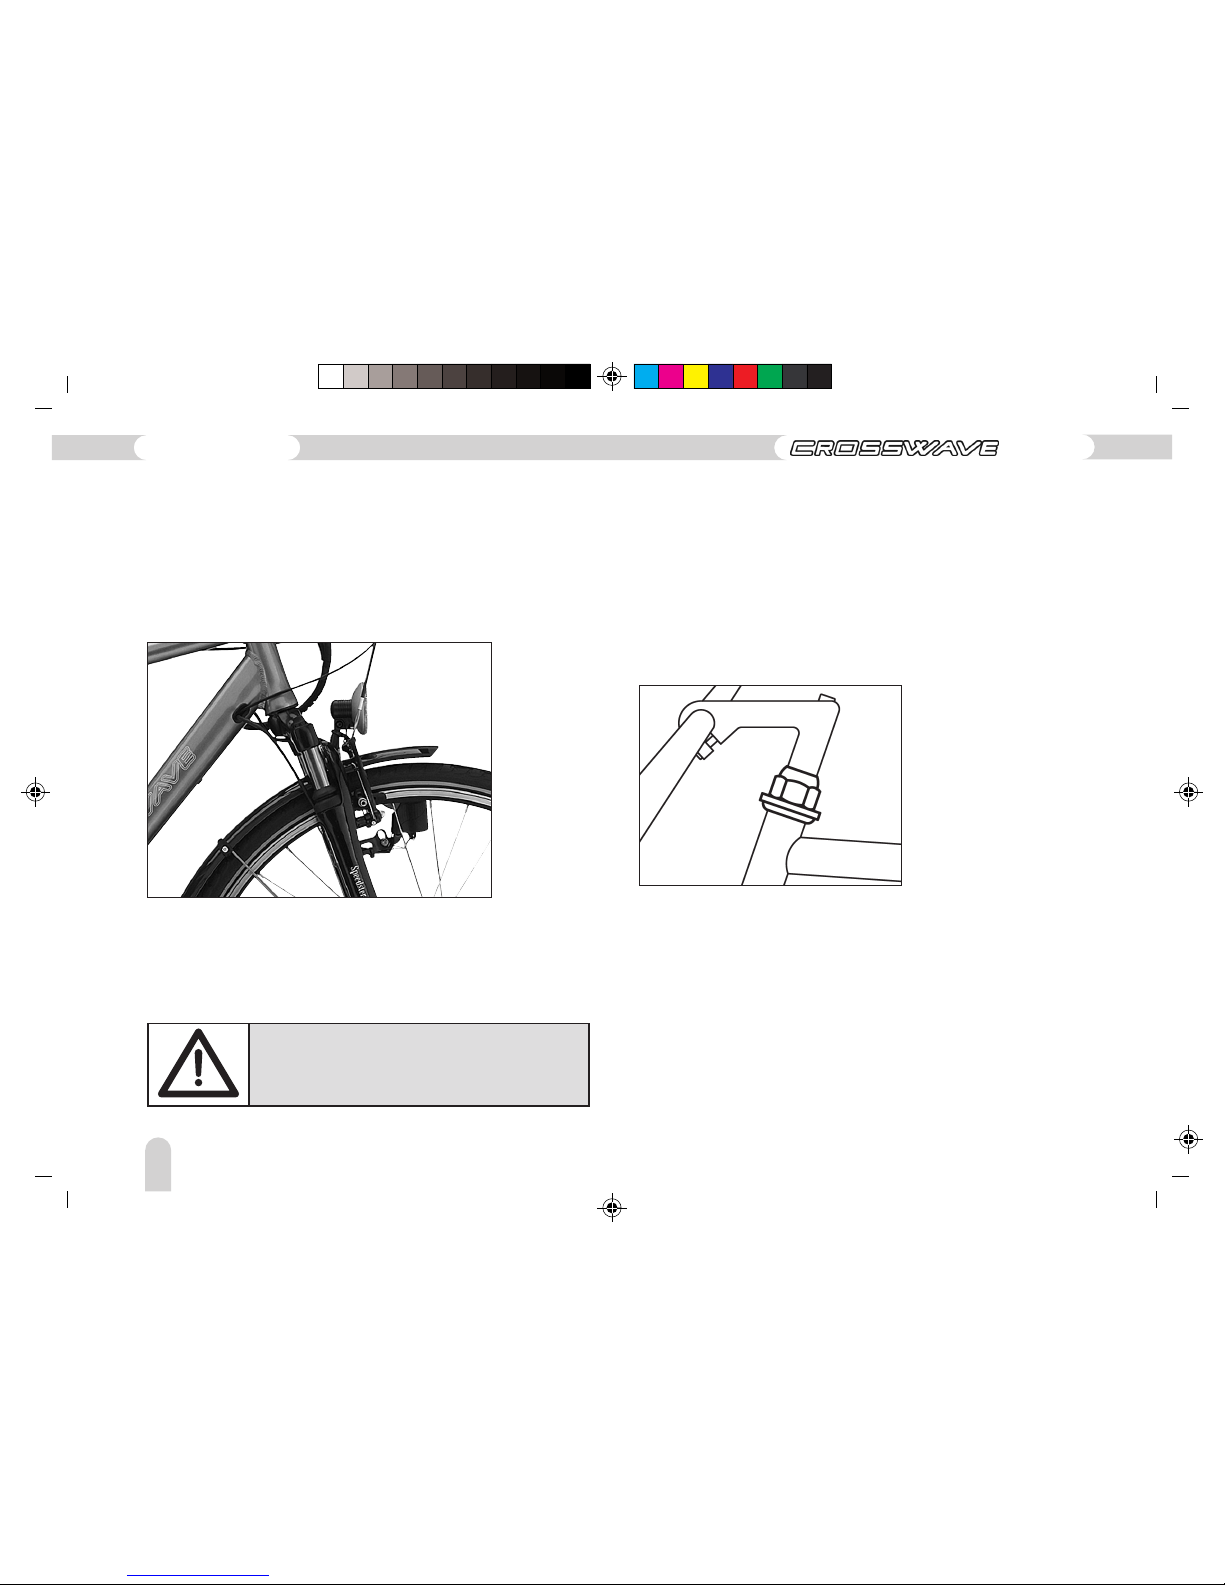
The CROSSWAVE Pedelec is equipped with a lighting system that
draws power from the drive battery. It is switched on and off
via a switch on the front headlight (Figure 14). An electronic
circuit in the headlight converts the 25V of the drive battery
into 6V for the light.
As the power requirement of the bicycle lighting is very low, a
light left on would last about 2-3 days. Moreover, the protective
electronic circuit prevents a depth discharge of the battery if
the light remains switched on inadvertently.
Figure14
Caution! Nevertheless, always switch the light
off while parking the Pedelec else you might
suddenly find the battery empty.
Figure 15
Spokes
The spokes expand and become loose in course of time. They
must be centred regularly according to the degree of use.
The centring of the wheel and tightening of the spokes should
be entrusted to a specialized workshop. A uniform and proper
tightening of the spokes is necessary for a uniform rotation of
the wheels. Loose spokes, non-uniform spanning or overload
may lead to broken spokes.
118
Operating instructions
ED-3 EX
Page 23
BA_Migros_ED3EX_GB 09.02.2011 12:13 Uhr Seite 23
Probedruck
C M Y CM MY CY CMY K
GB
Quick release
Quick release is found at the front and rear wheels as well as
at the seat tube clamp, depending on the model.
Before going on a ride, check that the quick release is closed
and fixed. If the front wheel clamp gets loose when you apply
the brakes, stop right away and tighten the quick release.
Tyres and rims
The maximum permissible tyre pressure is specified on the outer
side of the tyre. Do not ride the cycle with too little air (wheel
skims) or too much air (tube explodes). Wrong air pressure or
flat tyres lead to increased wear and tear even if the bicycle is
not used. Our recommendation:
Caution!
A loose wheel, especially a loose front wheel
poses maximum risk of falling!
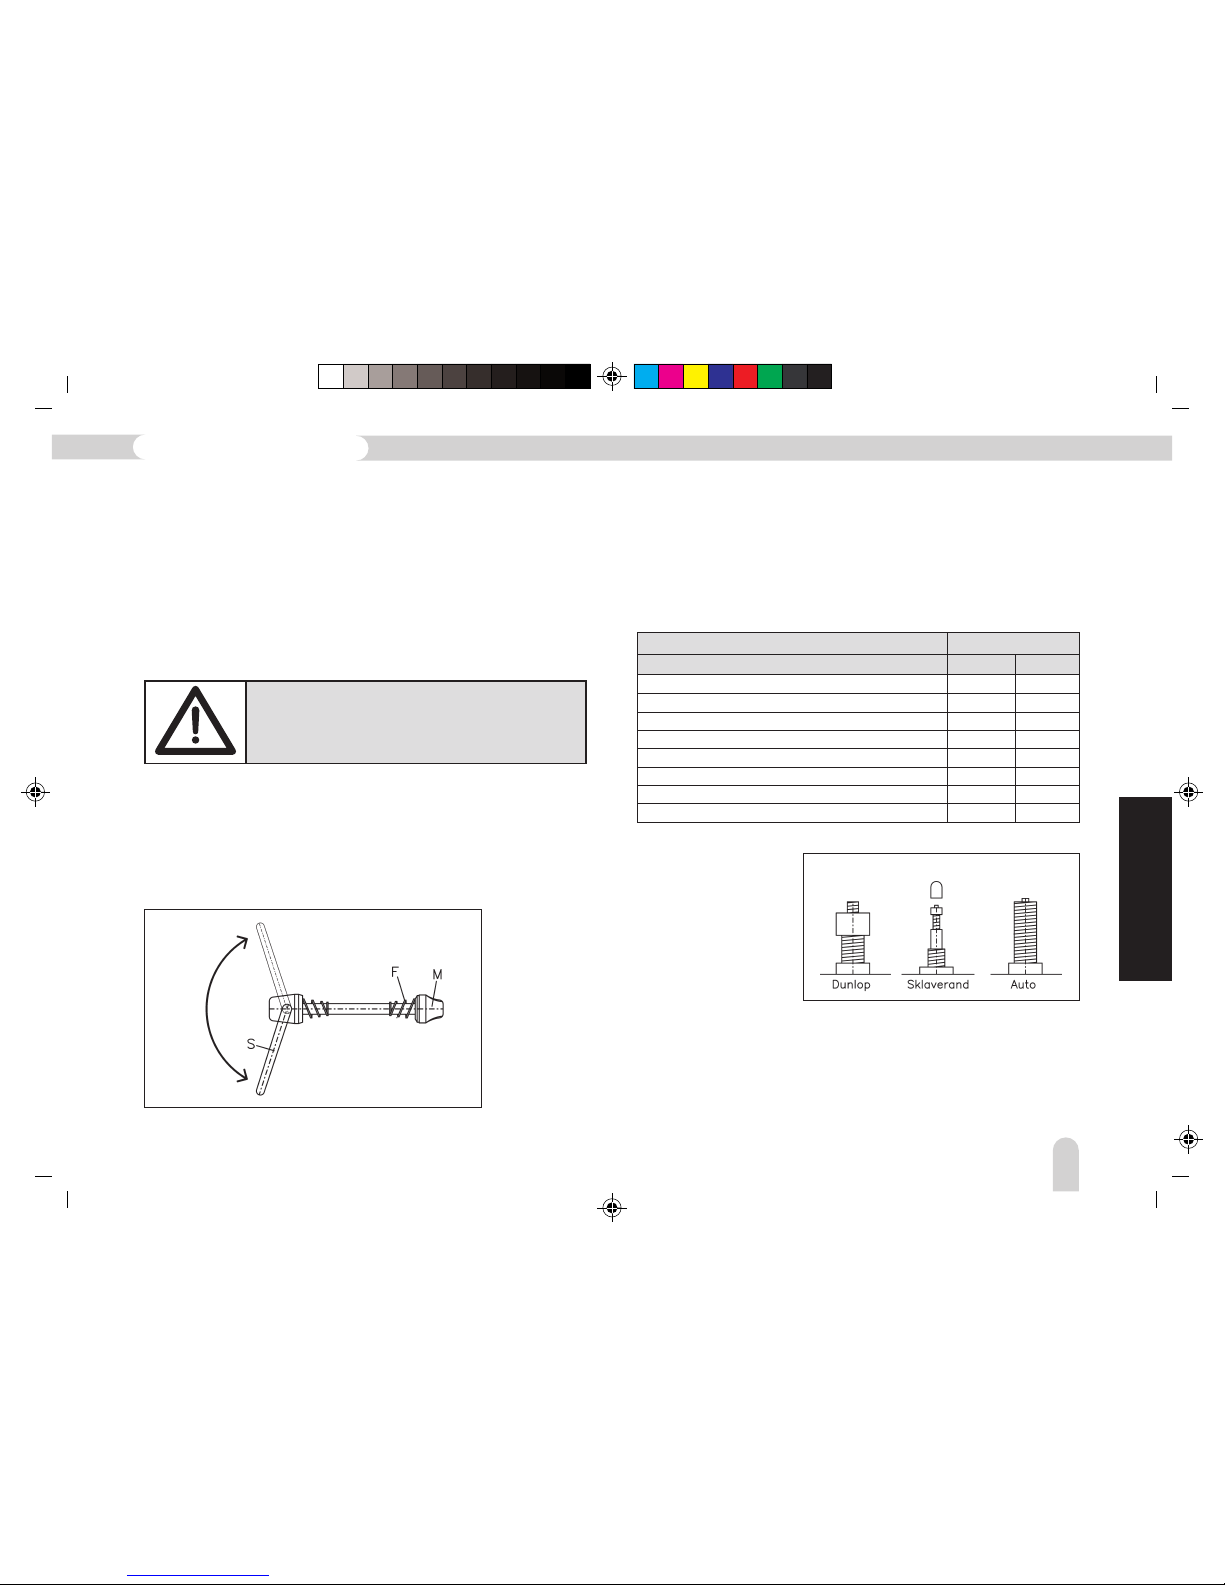
The quick release lever has two positions,
CLOSE and OPEN.
First adjust the tightness with the nut M. Then press the lever
with a little force to the position CLOSE.
Figure 16
There are 3 valve
systems for cycle
tubes:
Please note that in case of Sclaverand valves, you must first
remove the dust cap and loosen the knurled screw to pump or
vent air. Always make sure that the tyres have sufficient profile
and an undamaged body.
Figure 17
Tyre size Air pressure (bar)
47-559 (26“x1,75x2)
50-559 (26“x1,90)
52-559 (26“x2,25x2)
57-559 (26“x2,125)
37-622 (28“x1 3/8x1 5/8)
40-622 (28“x1 3/8)
47-622 (28“x1,75x2)
50-622 (28“x1,90)
RearFront
2,5
2,0
2,0
2,0
3,5
3,0
2,5
2,5
3,0
2,5
2,5
2,5
4,0
3,5
3,0
3,0
CLOSE
OPEN
119
Pedelec with Lithium-ion battery
Page 24
BA_Migros_ED3EX_GB 09.02.2011 12:13 Uhr Seite 24
Probedruck
C M Y CM MY CY CMY K
Operation of the Pedelec Drive
For operation of the bike’s functions, please refer to Page 135
“General operation”.
The LCD instrument display to control the electrical auxiliary
actuator (Fig. 20) is located in the middle of the handlebars.
The ED-3EX Pedelec can be switched on and off using this panel
and the desired operation mode activated. The current status
of the battery, i.e. the remaining capacity, can be seen in a
five-stage LCD display on the right-hand side. The “consumption
display” is found on the left-hand side. The number of bars
indicates whether you are using the best consumption level.
In addition, speed and a clock are also displayed together with
basic bike computer displays.
Torque specifications
Axle nuts of front wheel 20 Nm
Axle nuts of rear wheel 25 Nm
Foot pedal mounting 30 Nm
Brake pad mounting 5 Nm
Dynamo mounting 10 Nm
Other screws:
M4 2,1 Nm
M5 4,2 Nm
M6 7,3 Nm
M8 17 Nm
M10 34 Nm
Rims
Rim wear indicator:
Many aluminium rims are equipped with a wear indicator.
Request your dealer to provide detailed information.
Chain tensioning
Ensure that the chain is tensioned correctly; it is the most
important part of the drive module. A regular check is necessary
since the chain stretches in course of time. If necessary get the
chain re-tensioned by the dealer.
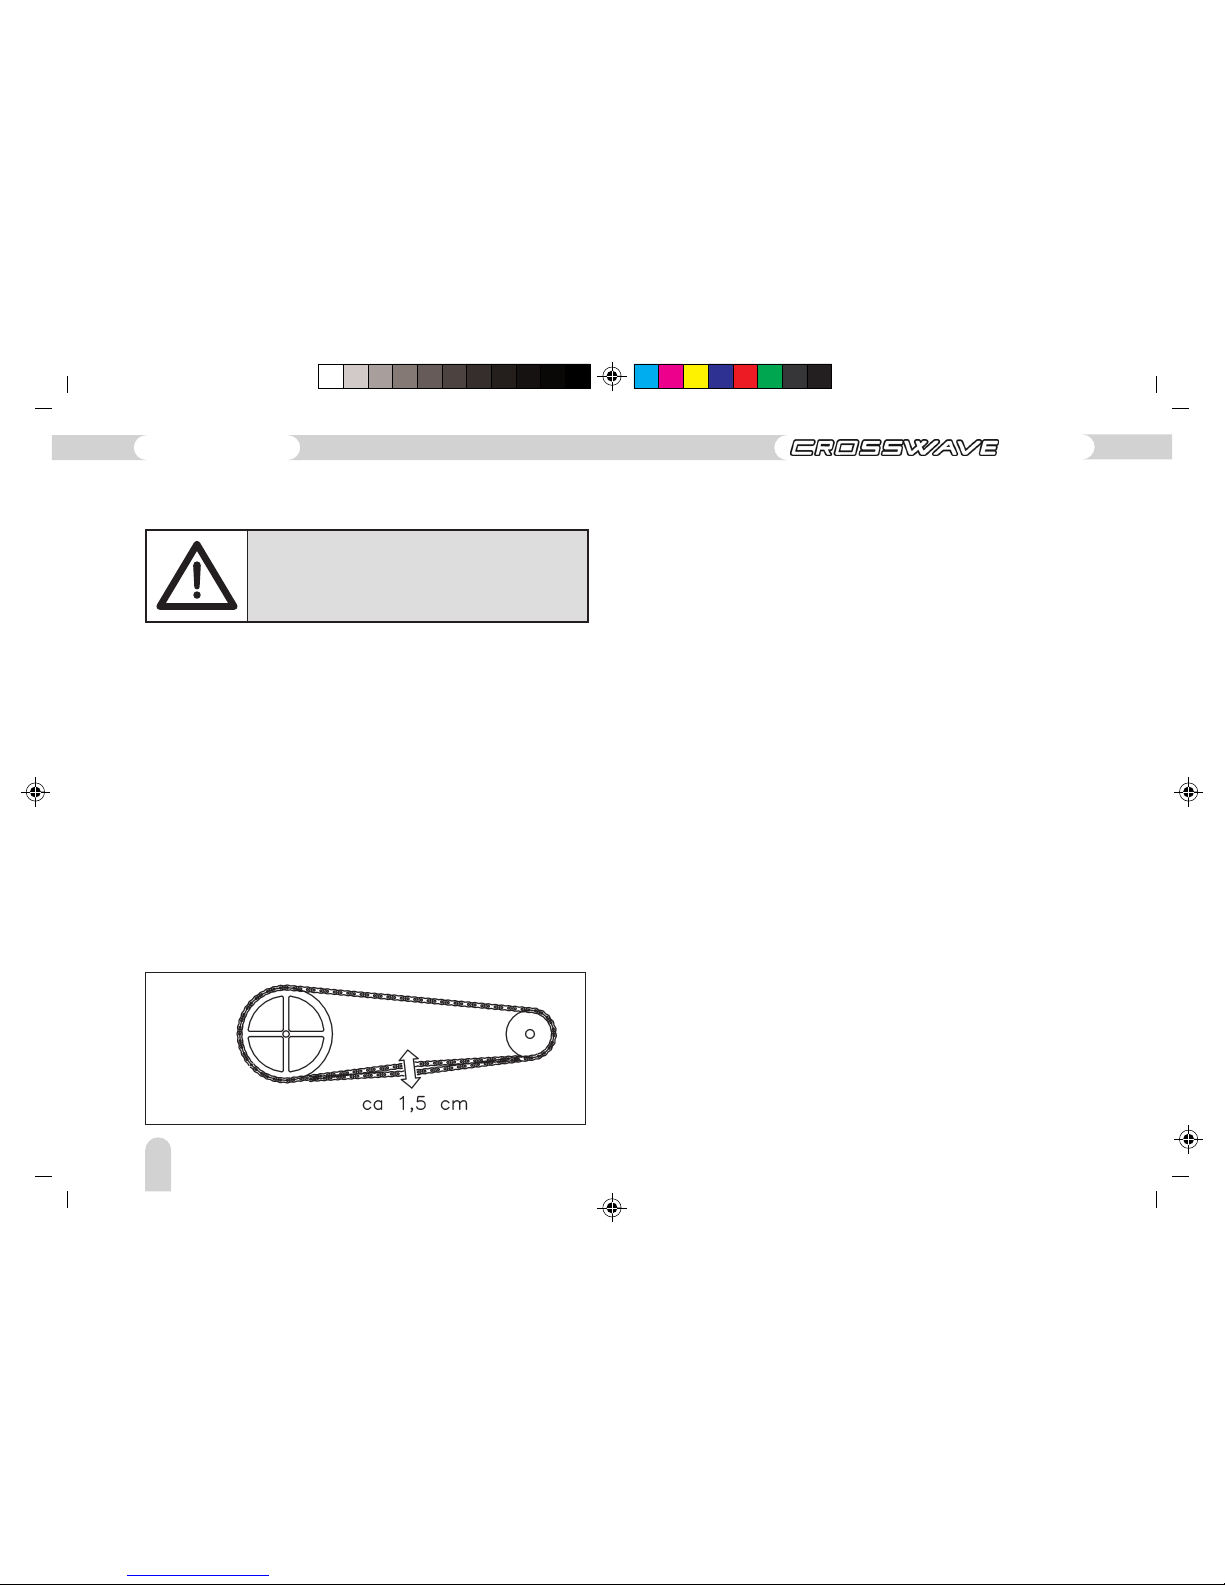
As shown in Figure 18, it should be possible to slightly move
the chain up and down by approximately 1.5 cm at the centre
of the two sprockets.
CAUTION against rim wear!
Check the condition of your rims regularly. Please
contact your dealer in time.
RISK OF FALL AND ACCIDENT!
Figure 18
120
Operating instructions
ED-3 EX
Page 25
BA_Migros_ED3EX_GB 09.02.2011 12:13 Uhr Seite 25
Probedruck
C M Y CM MY CY CMY K
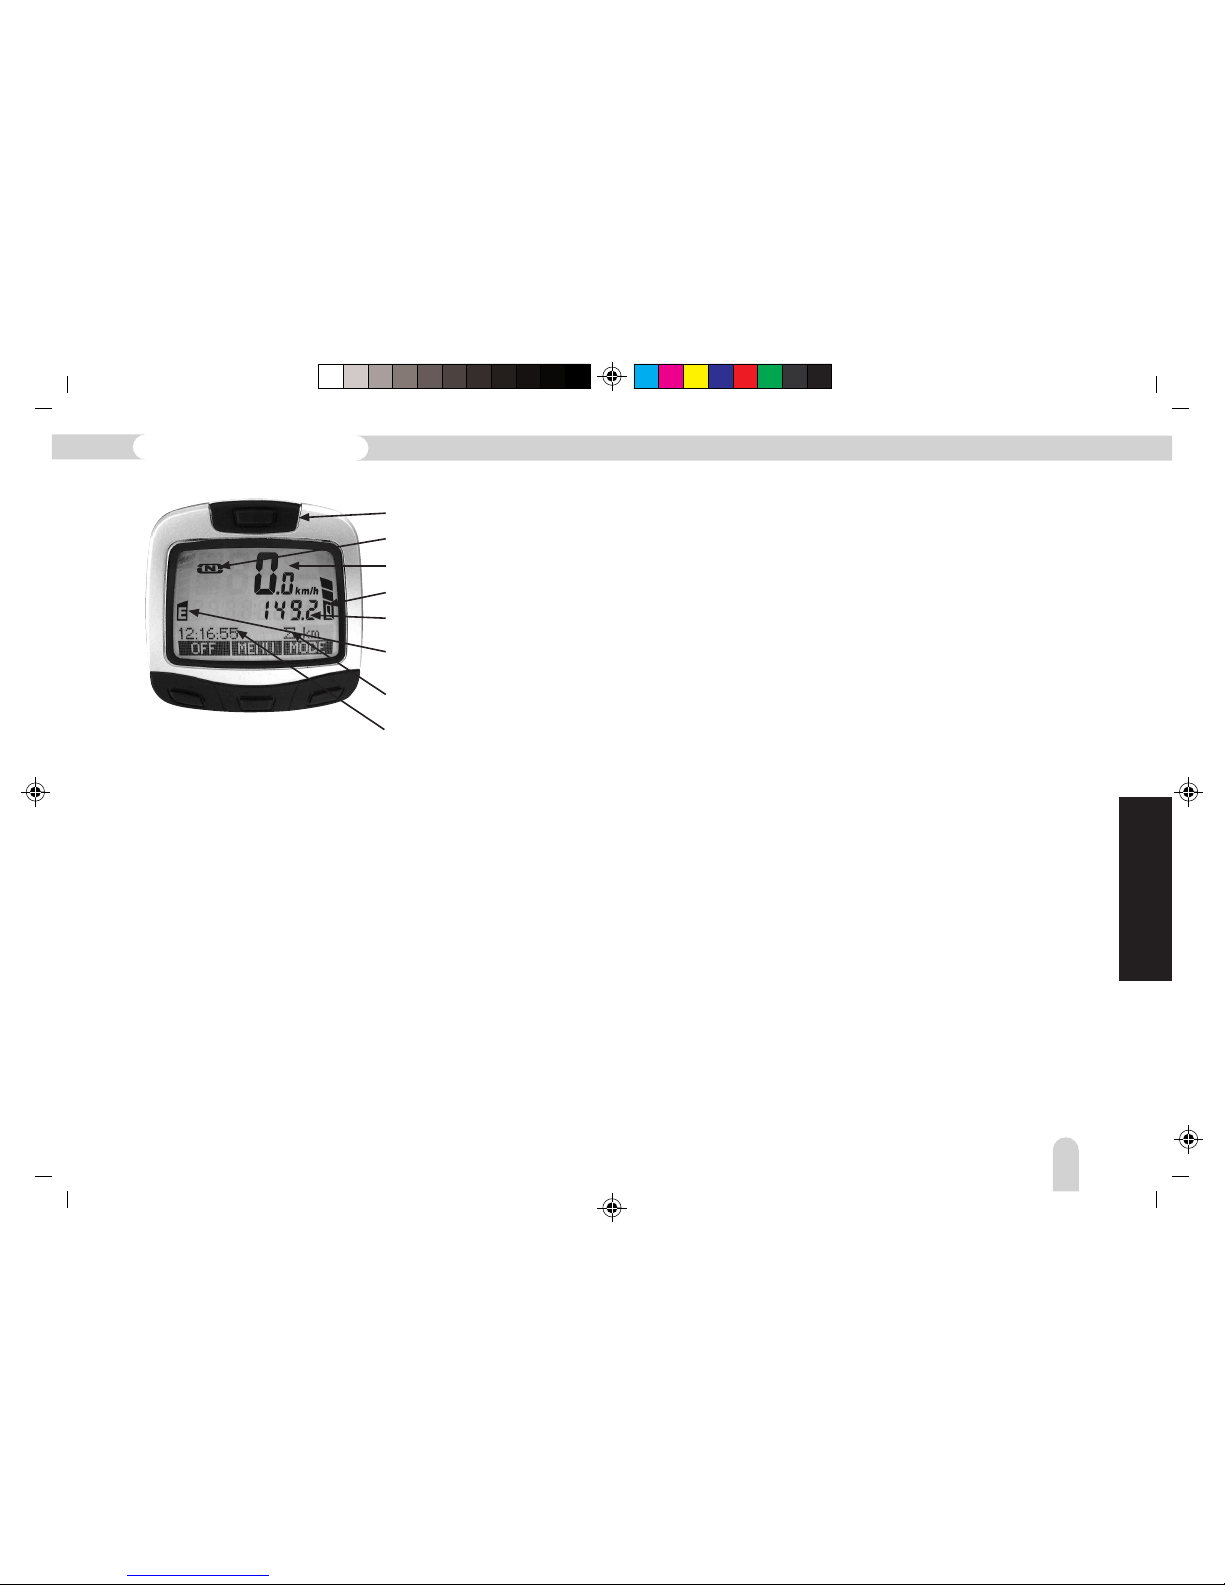
Figure 19 –
LCD Instrument Display
Switch for bike lights
Operational mode display
Speed display
Battery level display
Bike computer display
Present performance output
of the motor
Present function
of the bike computer
Clock
Recommended Mode of Operation
After switching the system on, select the operating mode and
set the ED-3EX Pedelec in motion by pedalling. On gentle
slopes, it is helpful to push the Pedelec slightly forward using
the feet so that the motor does not have to develop the propulsive
power from nil. Otherwise, the Pedelec uses a high amount of
power and cannot develop much drive at speeds between 0 –
3 km/h.
In the interests of operational distance, you should pedal as
much as possible under all driving conditions since the
operational distance lies well below the system’s capabilities
when using mainly motor power.
The activated ECO mode limits the maximum operational power
level and saves the capacity of the battery. You will only notice
the reduced assistance when going uphill and during acceleration.
Press and hold any of the four buttons on the display to switch
on the system. A graphic similar to Fig 21 will appear. With the
mode button on the right-hand side, you have the option of
selecting the assistance level.
The auxiliary actuator is automatically activated upon a halfturn of the pedal. This means that the ED-3EX Pedelec exactly
conforms to future European standards for this type of vehicle.
The ED-3EX system has a “start assist” which is activated by a
twist grip or pressing a “Boost” button.
GB
121
Pedelec with Lithium-ion battery
Page 26
BA_Migros_ED3EX_GB 09.02.2011 12:13 Uhr Seite 26
Probedruck
C M Y CM MY CY CMY K
Your ED-3EX Pedelec has been equipped with a new Multi-InfoDisplay to provide you with the utmost comfort,
(Fig 21). It comprises
the operating functions of the motor, a complete bike computer
as well as the switch for the lighting supported by the cycling
battery. This lighting conforms to StVZO (German Road Traffic
Licensing Regulations) since your bicycle is fitted with a dynamo
so that lighting is available without using battery power. Both
power sources can be operated simultaneously; the more powerful
source will be supported.
Warning!
f2Do not allow yourself to be distracted! If
possible, do not operate the Pedelec display
whilst driving! Risk of falling!
Display & Functions
Warning! Your ED-3X has a battery-powered
lighting supply. The dynamo is compulsory
according to the StVZO regulations and may
not be dismantled!
Pedelec Functions
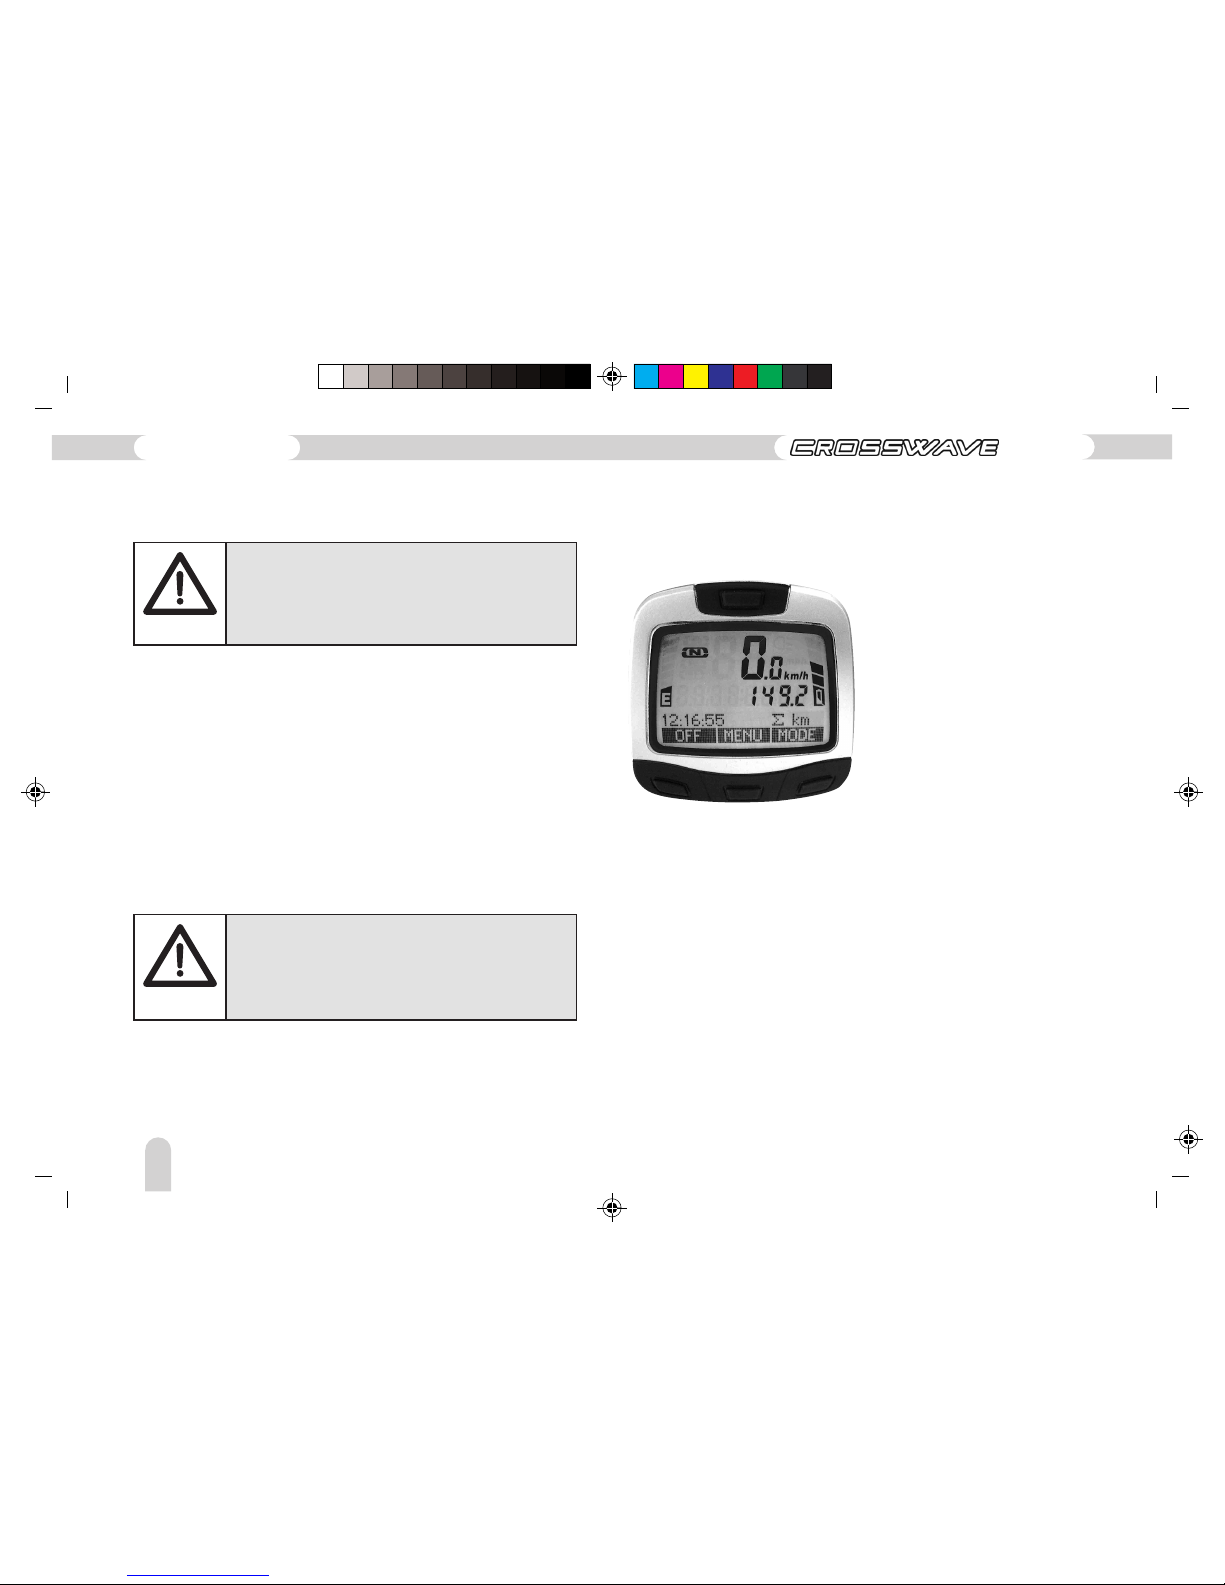
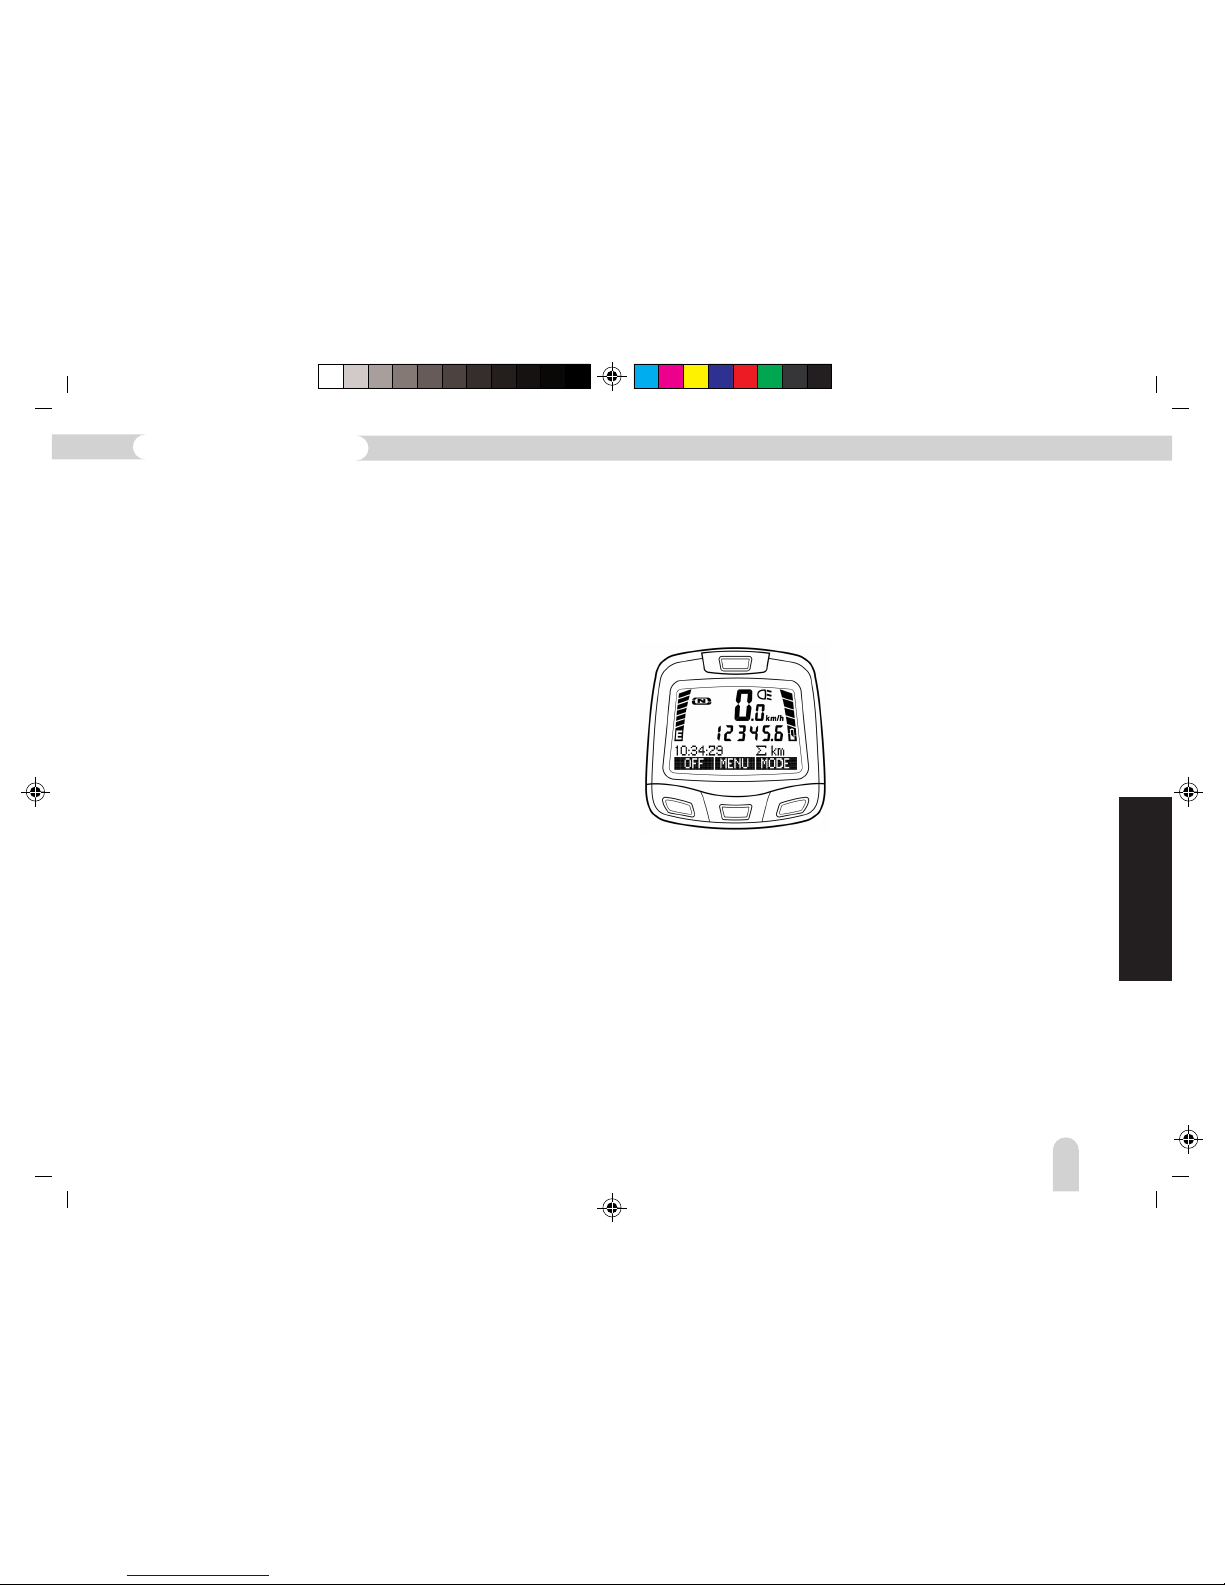
Switch on the bicycle by using any one of the lower buttons.
The display should now appear similar to Fig 21.
Figure 21
Each of the lower buttons is assigned to the functions with a
black background in the display above it. By using the Mode
button on the right-hand side, you can select the correct
operating mode required.
E = Eco lowest assistance level to attain the highest
possible operating distance
N = Normal normal “everyday level”, balanced assistance
with moderate consumption
S = highest level with the highest consumption
122
Operating instructions
ED-3 EX
Page 27
BA_Migros_ED3EX_GB 09.02.2011 12:13 Uhr Seite 27
Probedruck
C M Y CM MY CY CMY K
Press down and hold the Mode button for longer to reach the
OFF mode. This turns off the Pedelec system, the display and
lighting remain switched on. By pressing the Mode button you
will return to the ECO operating level and the bicycle will be
assisted again.
Twist-Grip Throttle or “Boost” Button
with the twist-grip throttle or “Boost” button, where applicable,
you have the option of using starting or pushing assistance. The
bicycle accelerates to 6 km/h without pedalling. Furthermore,
you can use a “Boost” function. If you operate the twist grip or
the button, the assistance is switched into the highest level for
a short time. You then have the full drive performance available
should an unexpected situation occur. By releasing the twist
grip or the button, the ED-3EX returns to the previous operating
mode.
Adds the number of kilometres cycled. This display can be edited
in the sub-menu, for example, you can add the number of
kilometres cycled from a previous bicycle.
– Total kilometres (∑ km)
Bicycle Computer Functions
using the middle “Menu button” scrolls between the various
computer settings. The present function set is displayed as a
symbol. The following symbols correspond to:
GB
123
Pedelec with Lithium-ion battery
Page 28
BA_Migros_ED3EX_GB 09.02.2011 12:13 Uhr Seite 28
Probedruck
C M Y CM MY CY CMY K
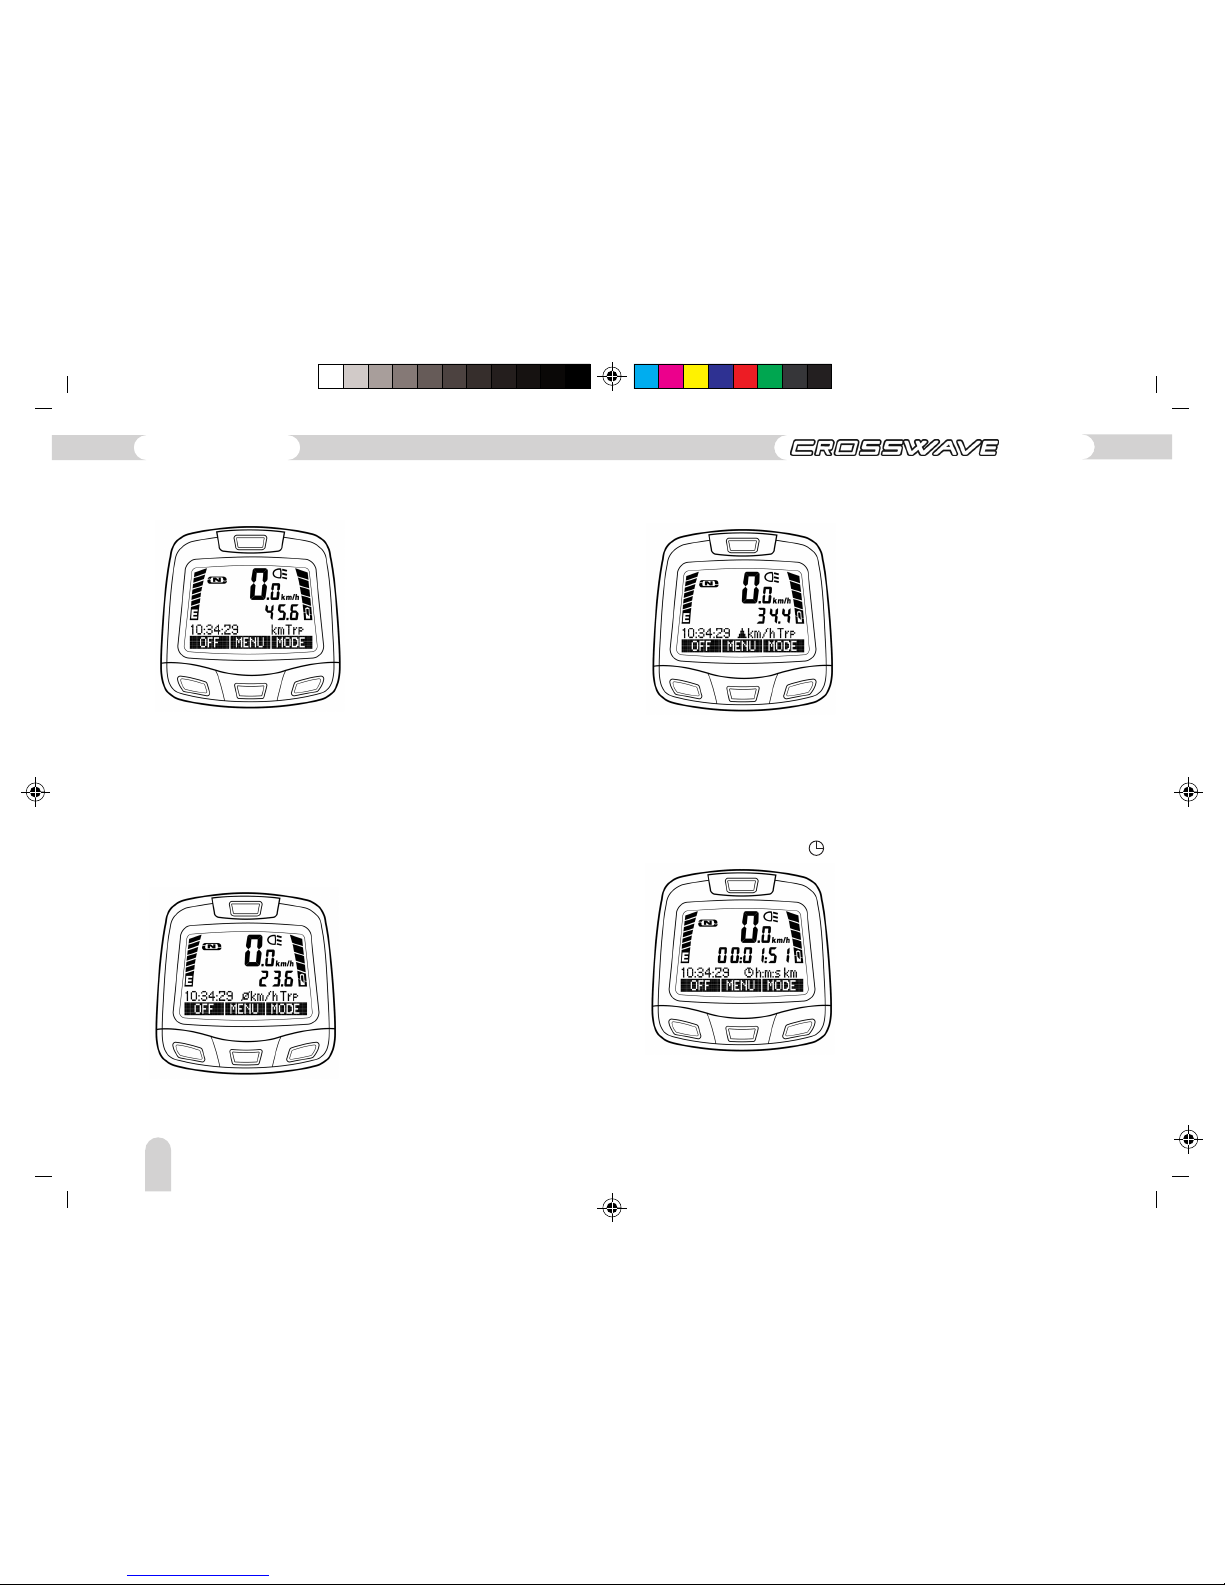
Adds the number of kilometres per tour. By pressing the “CLEAR”
button, you can delete the display or reset it to 0.
– Trip (km Trp)
– Trip (Ø km/h Trp) average km/h Trip
Details of the average speed during the tour. By pressing the
“CLEAR” button, you can delete the display or set it back to 0.
– Trip (▲ km/h Trp) Top speed km/h Trip)
Shows the highest speed reached since last cleared.
– Trip travelling time ( h:m:s Trp)
adds the travelling time taken since the bicycle has been in
motion. Stopping at traffic lights, for example, is not calculated
as travelling time.
124
Operating instructions
ED-3 EX
Page 29
BA_Migros_ED3EX_GB 09.02.2011 12:13 Uhr Seite 29
Probedruck
C M Y CM MY CY CMY K
– Operating distance
Details concerning operating distance are continuously calculated
allowing for the operating level and the individual mode of
operation. Jumps in the display are possible by changing the
assistance level, changes in geography or also through changes
in your mode of operation. As a general rule, the display adjusts
itself to the bike’s settings and your mode of operation. This
calculation is performed for all modes of operation separately.
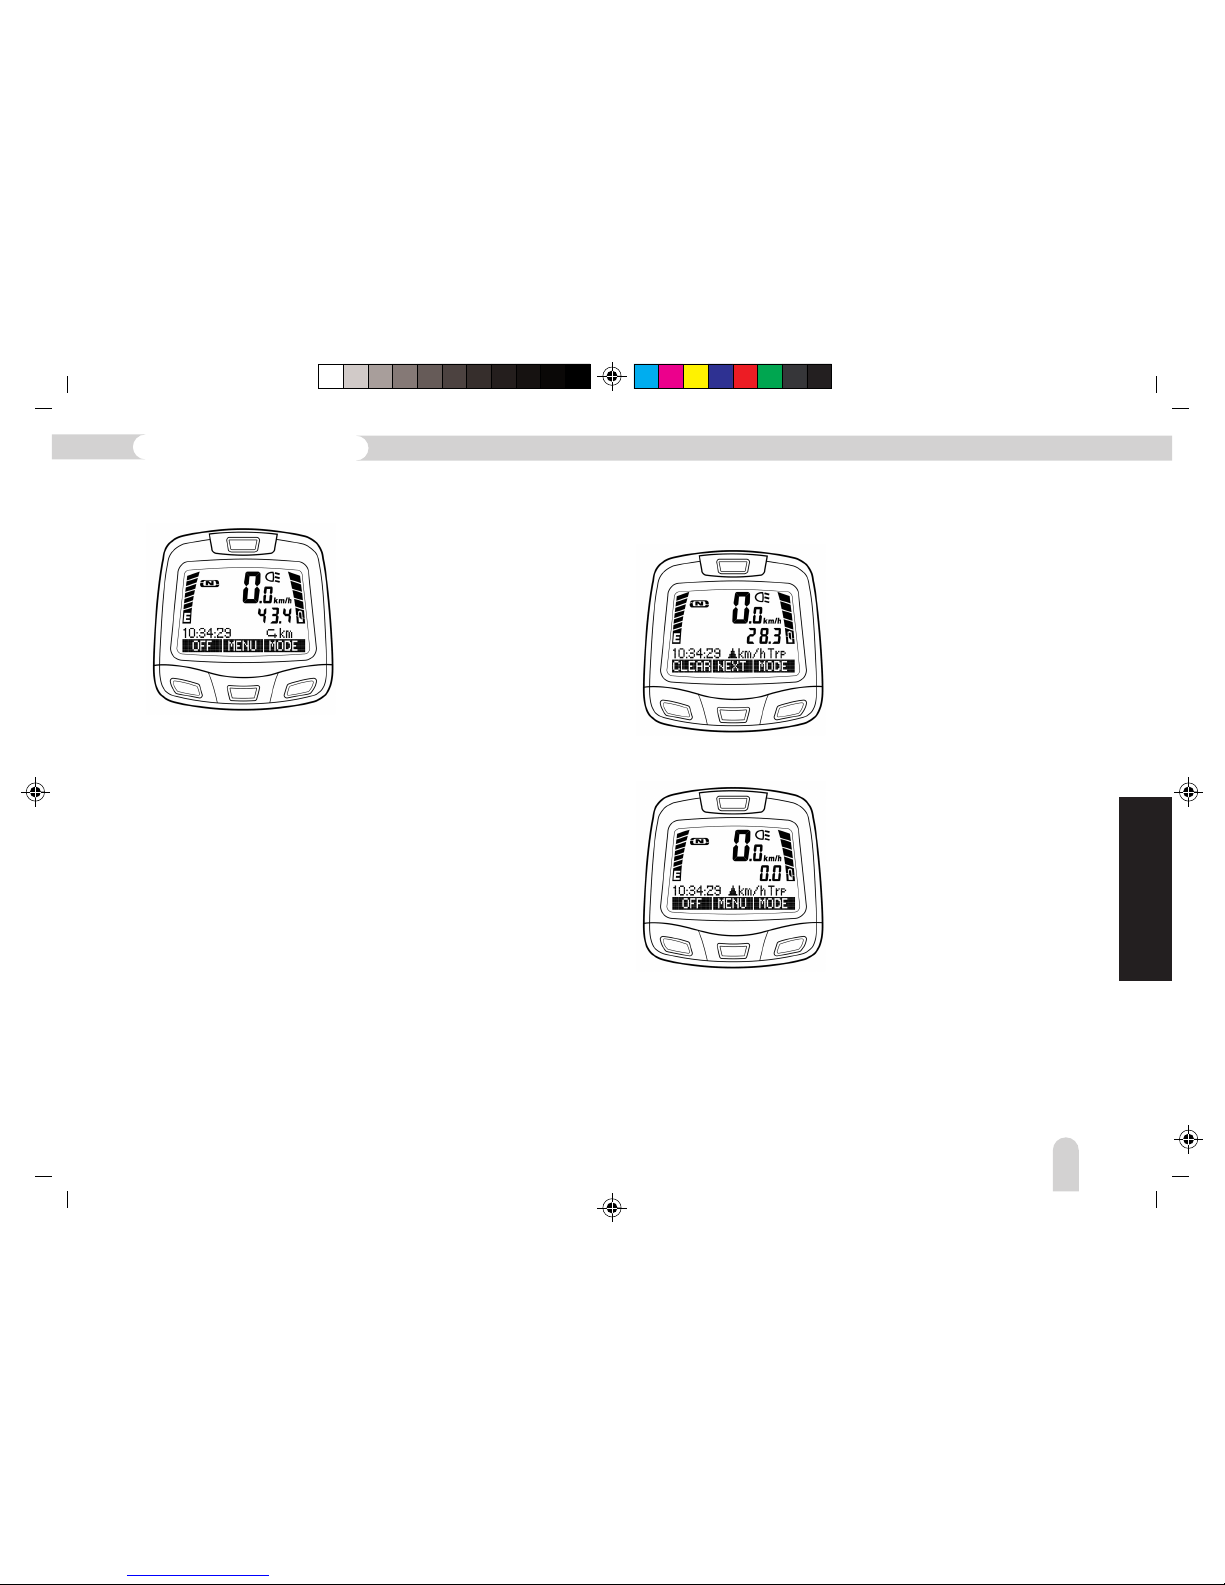
Immediately after scrolling to the Trip Display in the Main Menu
Display, there is a two-second option of deleting the stored trip
data using the “CLEAR” button.
Example: Resetting from the Trip Top Speed display:
reset by pressing the “CLEAR” button
reset by pressing the “CLEAR” button
Second level
You can enter the second level by pressing and holding down
the “MENU” button for longer. The following functions available
here are:
- Stopwatch (CHR)
- SETUP
- INFO
GB
125
Pedelec with Lithium-ion battery
Page 30
BA_Migros_ED3EX_GB 09.02.2011 12:13 Uhr Seite 30
Probedruck
C M Y CM MY CY CMY K
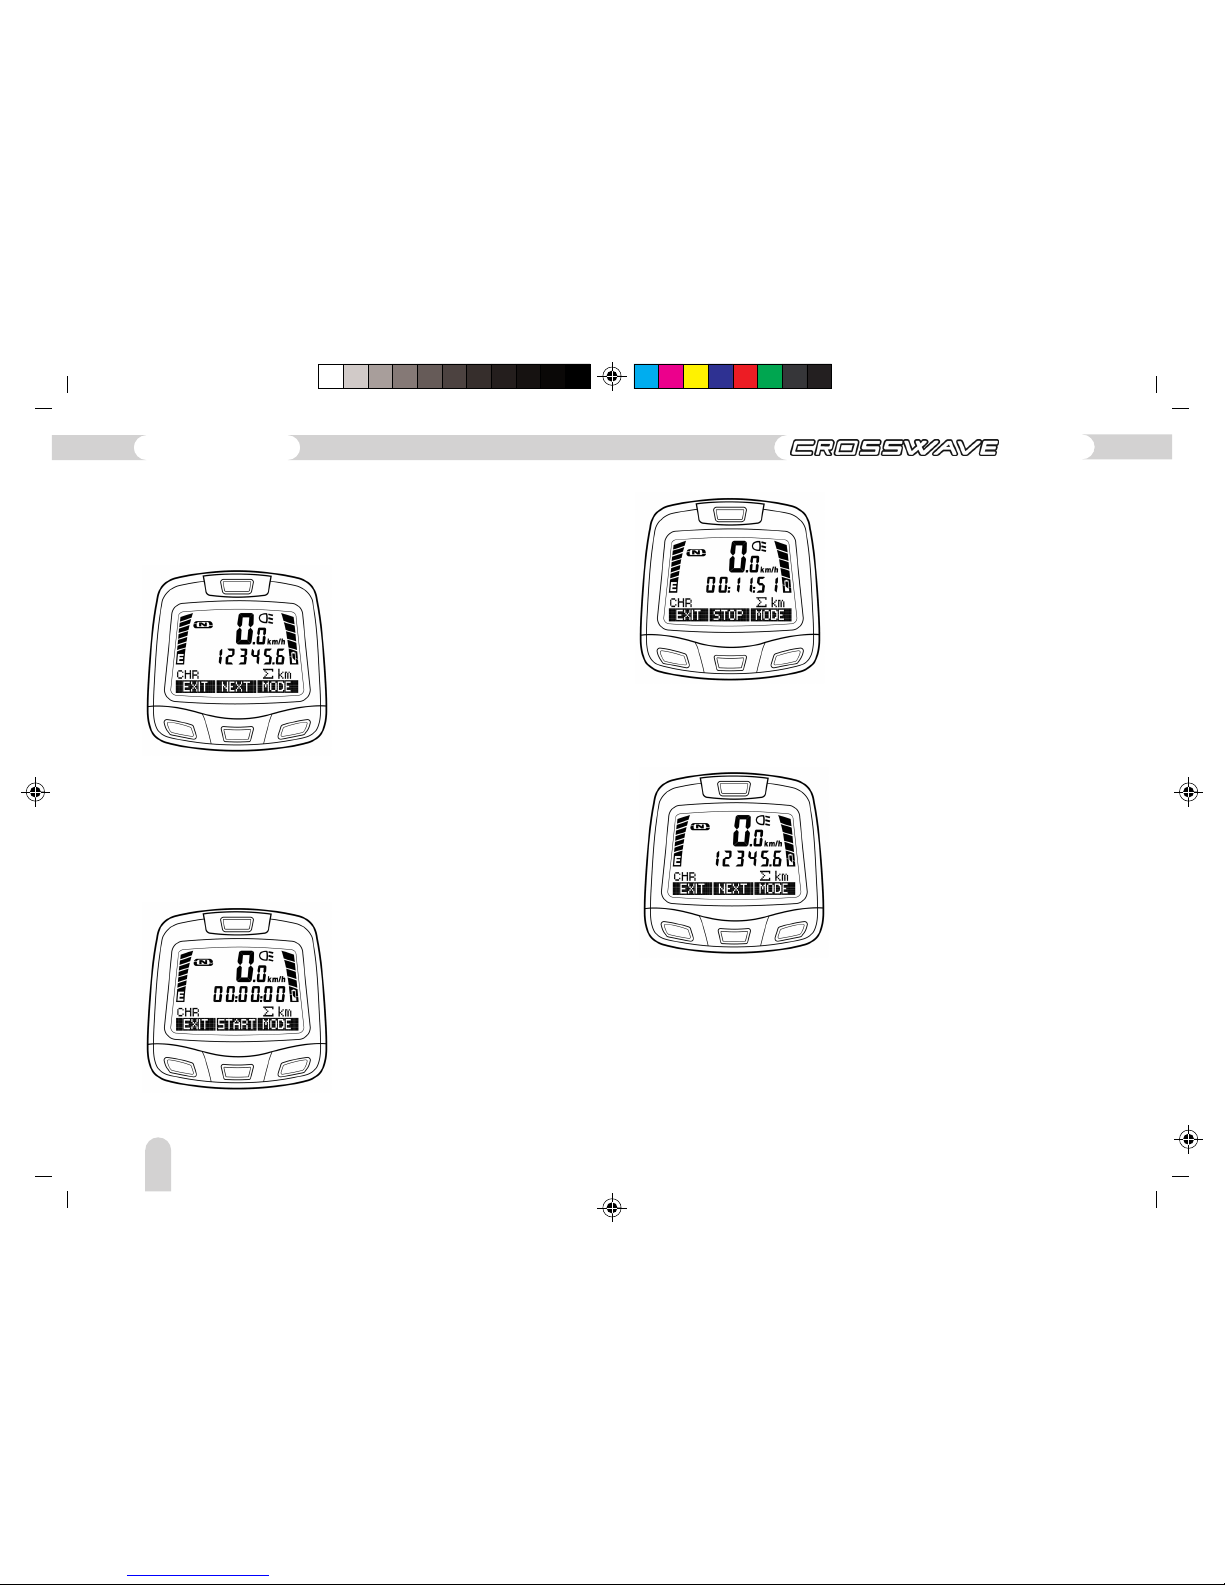
Stopwatch
By using the “ENTER” button, operation of the stopwatch can
be reached:
You can navigate to the next function by pressing the “NEXT”
button. Confirm the desired function using the “ENTER” button.
The stopwatch is started by pressing “START”.
By pressing “STOP” the stopwatch is stopped; by re-pressing
“START” the clock continues running.
By pressing down and holding the “START” button for longer,
the stopwatch can be reset and the display reads 00:00:00 once
more.
Leave the stopwatch menu by pressing “EXIT”. If the clock is
running in the background, it is possible to return back to this
again by pressing and holding down the “MENU” button for
longer and then the “ENTER” button.
126
Operating instructions
ED-3 EX
Page 31
BA_Migros_ED3EX_GB 09.02.2011 12:13 Uhr Seite 31
Probedruck
C M Y CM MY CY CMY K
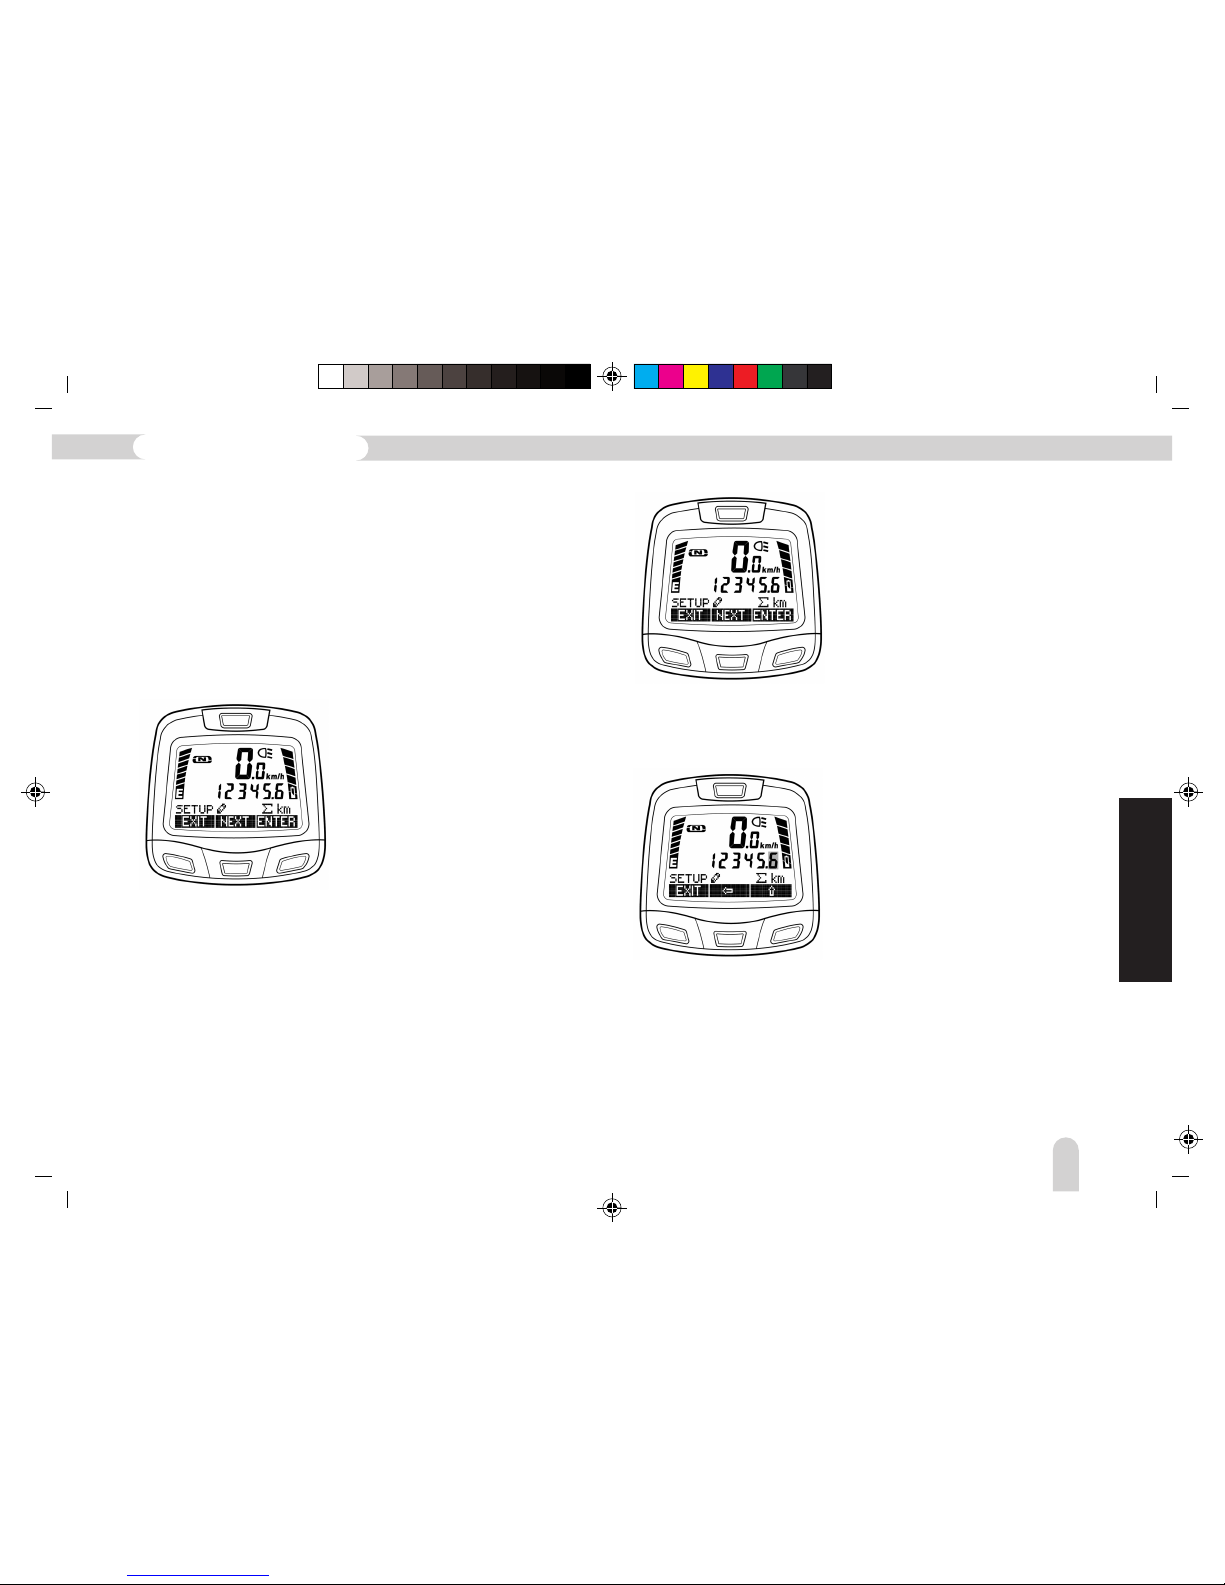
Setup Functions
– Total kilometres
– Time
– PIN
– Wheel (wheel circumference)
– LIGHT (brightness of background lighting)
– T-OUT (Menu Timeout)
– ASSIST (Assistant)
The SETUP menu is entered using the “ENTER” button.
This can be seen by the
symbol.
Following confirmation using the “ENTER” button, the total
number of kilometres can be edited or other functions called
up by pressing the “NEXT” button.
The total number of kilometres can be altered by pressing the
“ENTER” button. The last number by the km flashes – Alter using
arrow button (up)
By pressing the arrow button (left) you
can navigate one step to the left (the number to be changed
flashes) – the individual places can each be altered in this way.
Once the desired number of kilometres has been entered, press
the “EXIT” button. “SAVE” / “CANC” appears in the editing
window.
GB
127
Pedelec with Lithium-ion battery
Page 32
BA_Migros_ED3EX_GB 09.02.2011 12:13 Uhr Seite 32
Probedruck
C M Y CM MY CY CMY K
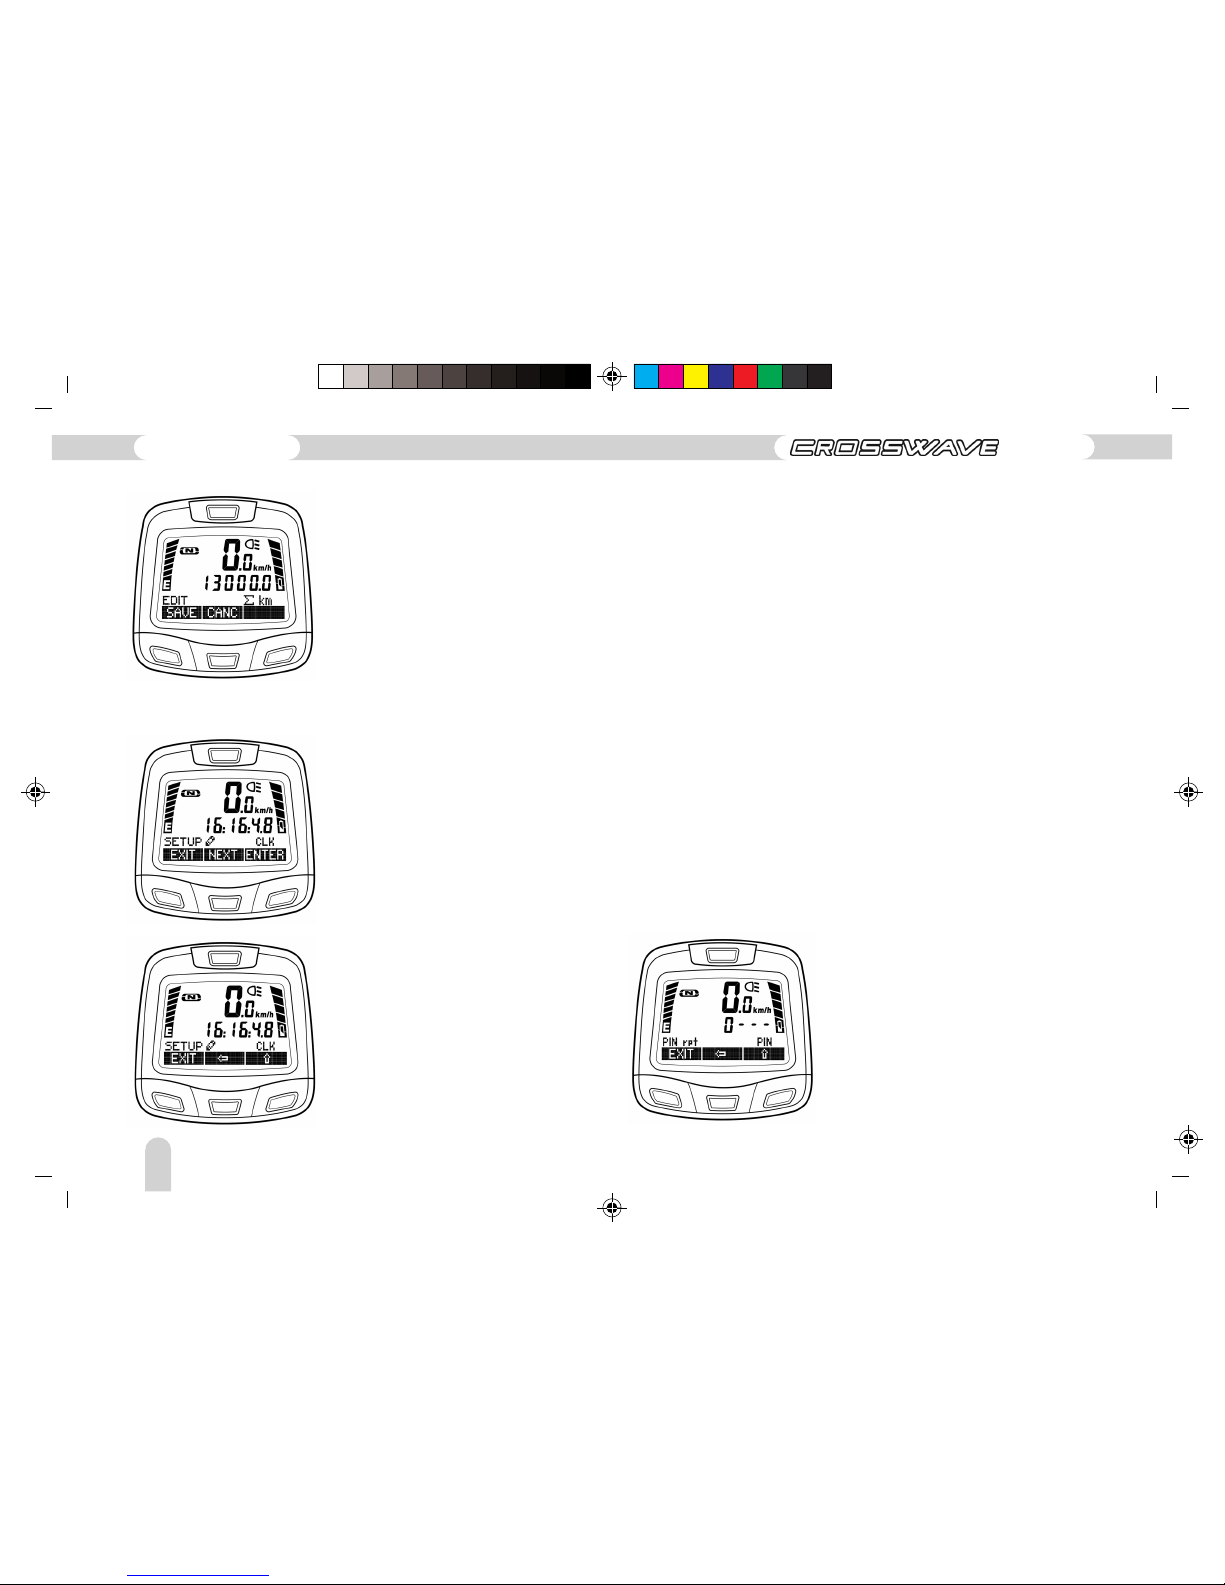
Confirm changes by pressing the
“SAVE” button or cancel them using
the “CANC” button.
Time
Once the correct time has been entered, press the EXIT button
to reach the “SAVE / CANCEL Mode” (procedure as described
under 8.2.3.2 Total Kilometres).
PIN
A PIN number can be entered in order to individually protect
your bicycle. The Pedelec can only be used after the correct PIN
number has been entered. Please make a note of your exact PIN
number as activation of a forgotten PIN can only be carried out
through the Service Centre.
The editing mode of the PIN can be entered from the SETUP•IN
display, by pressing the “ENTER” button. The individual numbers
of the PIN to be edited will flash respectively. All other PIN
figures are blocked out by a “-“ display. The PIN’s factory setting
is “0000”.
The editing mode of the clock can
be entered from the SETUP-
>LK
display, by pressing the “ENTER”
button. Individual numbers of the
time/date to be edited will flash
respectively.
The flashing numbers can be altered
by pressing the arrow button “
'd3.
Navigate one step further by
pressing the arrow button “
'd3,
alterations start with the hours and
progress to minutes, etc.
128
Operating instructions
ED-3 EX
Page 33
BA_Migros_ED3EX_GB 09.02.2011 12:13 Uhr Seite 33
Probedruck
C M Y CM MY CY CMY K
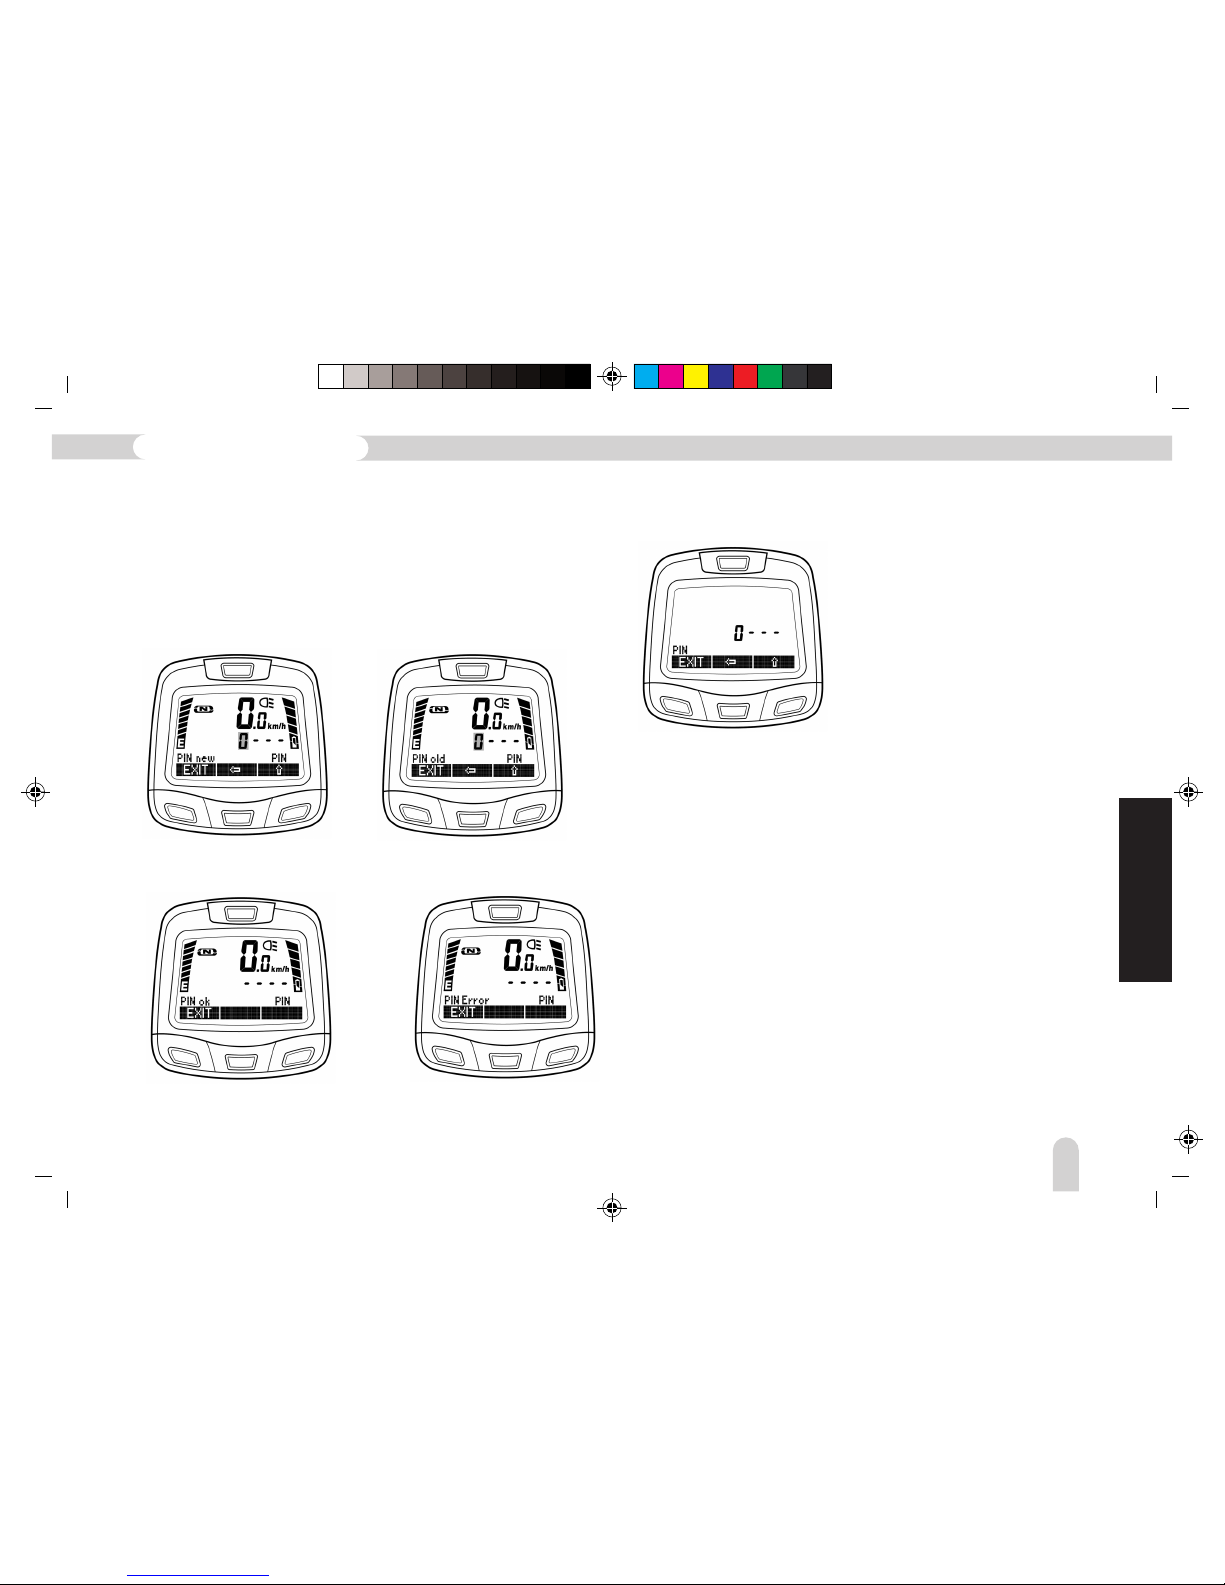
The first position flashes, starting with 0. Navigate one step
further to the right by using the arrow buttons. After entering
the currently activated PIN (old), a command is given to enter
the new PIN (new). Before the new PIN can be finally adopted,
it must be re-entered (rpt) for safety reasons.
Entering the new PIN Repeating the new PIN
After correct repeat of the PIN
Wrong PIN: Cancel using
EXIT, then re-enter
If the PIN has been altered and the display switched off, once
it has been switched on again the new PIN will be requested:
Entering the PIN is similar to SETUP. The first position flashes,
starting with 0. The flashing figure can be altered by pressing
the arrow button “' (from 0 – 9). Navigate one step further
to the right by using the arrow button “
'. Once the PIN has
been entered correctly the Main Menu appears in the display.
If a number has been incorrectly entered, the cursor returns to
the first position again so that input of the PIN can be restarted.
If you should have forgotten the number of a changed PIN, then
please contact your dealer. By entering a “Super PIN” the bicycle
can be reactivated. This “Super PIN” can only be created at the
factory.
GB
129
Pedelec with Lithium-ion battery
Page 34
BA_Migros_ED3EX_GB 09.02.2011 12:13 Uhr Seite 34
Probedruck
C M Y CM MY CY CMY K
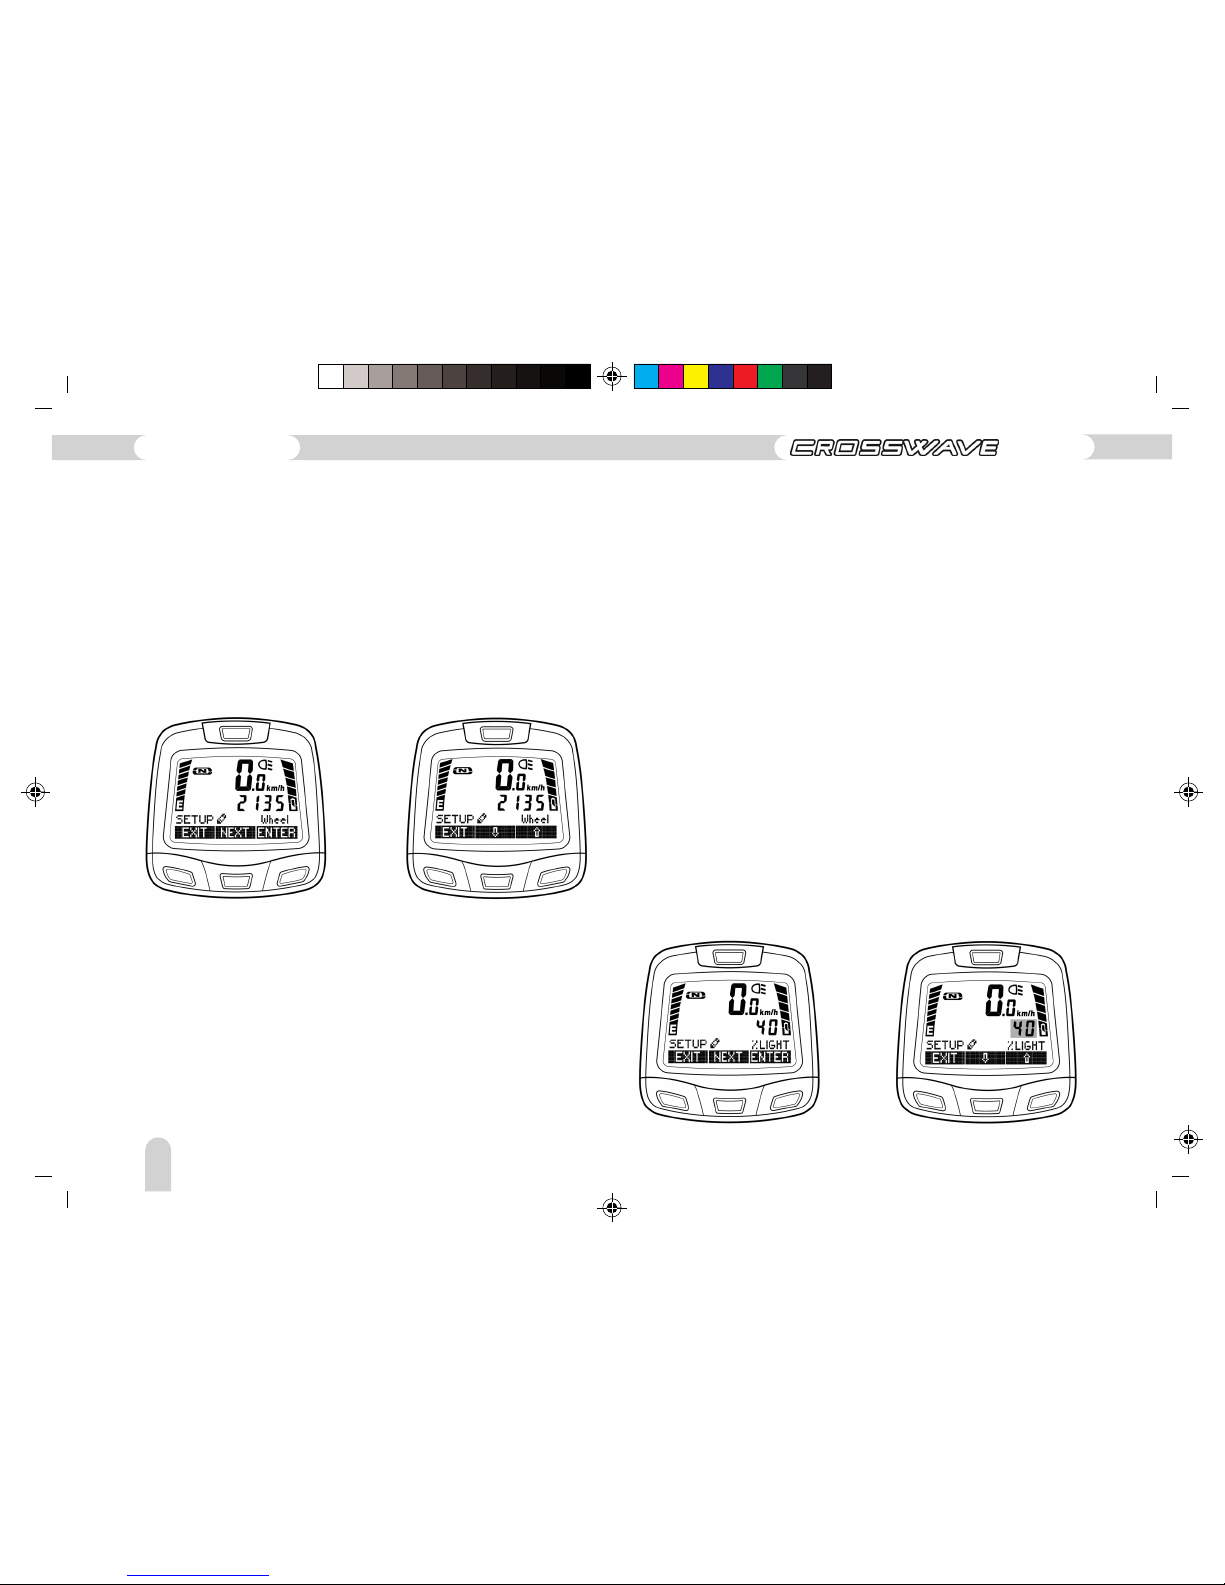
Wheel Circumference (WHEEL)
By entering the wheel circumference, the exact speed and
number of km travelled can be displayed. If, for example, you
change the outer tyre of your bicycle, you should check the
details and alter these if necessary.
The editing mode of the wheel circumference can be entered
from the SETUP•HEEL display, by pressing the “ENTER” button.
The numbers flash and the wheel circumference can be altered
using the “
' and “' buttons.
LIGHT (brightness of the background lighting)
You can adjust the brightness of the background lighting to
suit your personal preferences. Please follow the instructions
for this. The editing mode for brightness of the background
lighting can be entered from the SETUP•IGHT display, by pressing
the “ENTER” button.
The current level of display brightness flashes. The value can
be altered to between 10 and 100% using the arrow buttons.
Please note that 100% appears rather dazzling at night.
The input process can be accelerated by holding down the arrow
buttons (Repeat function). If an alteration has taken place,
then SAVE / CANC appears in the display (procedure as described
in the preceding examples).
Warning: Only 26” and 28” wheel sizes can be altered in this
framework.
The editing mode is cancelled by pressing the “EXIT” button.
If an alteration has taken place, then SAVE / CANC appears
again (procedure as described in the preceding examples).
130
Operating instructions
ED-3 EX
Page 35
BA_Migros_ED3EX_GB 09.02.2011 12:13 Uhr Seite 35
Probedruck
C M Y CM MY CY CMY K
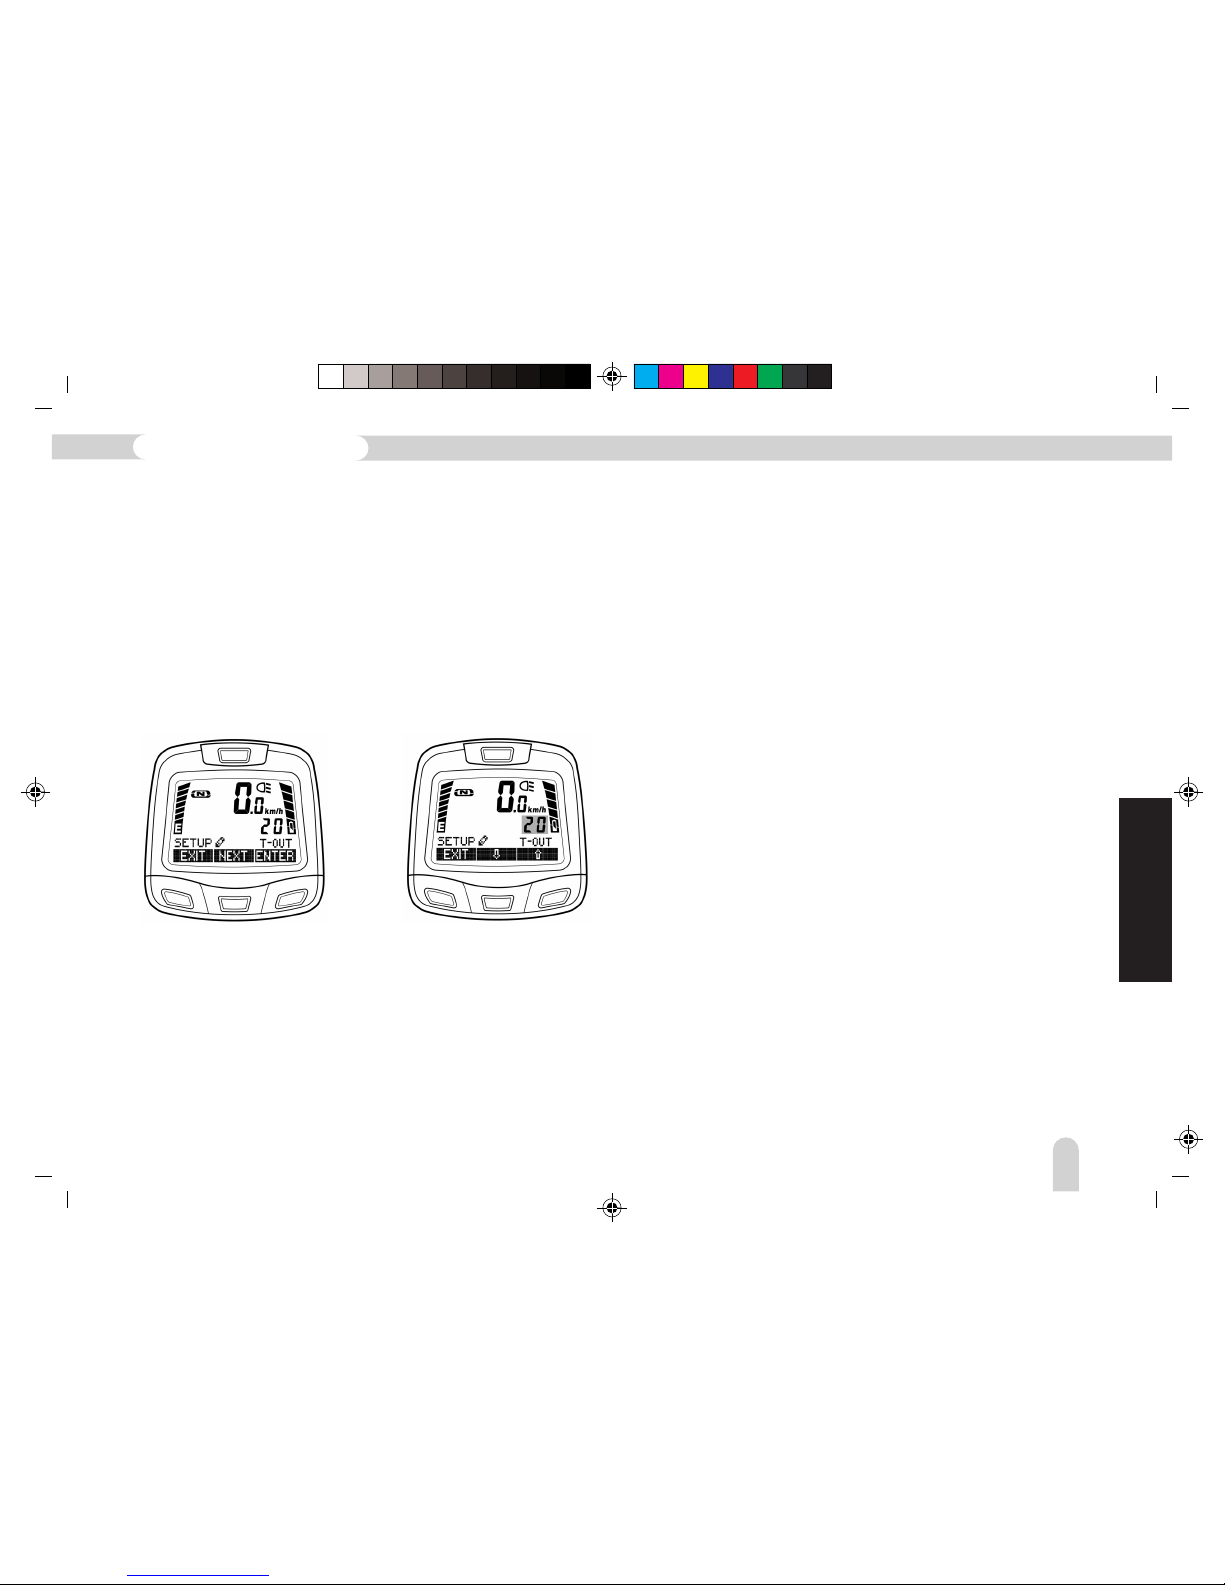
T-OUT (Timeout Menu)
The editing mode of the Timeout-Time Menu can be entered
from the SETUP•-OUT display by pressing the “ENTER” button.
The Timeout-Time can be altered using the arrow buttons from
10 to 99 seconds.
This setting gives the time available for editing in seconds
(setting 10 to 99 seconds). If processing of a menu section is
suspended, the display returns to the main menu according to
this setting. For example, if the setting is “20”, it will
automatically return to the main menu after 20 seconds.
The input process can be accelerated by holding down the arrow
buttons (Repeat function). If an alteration has taken place, then
SAVE / CANC appears again (procedure as described in the
preceding examples).
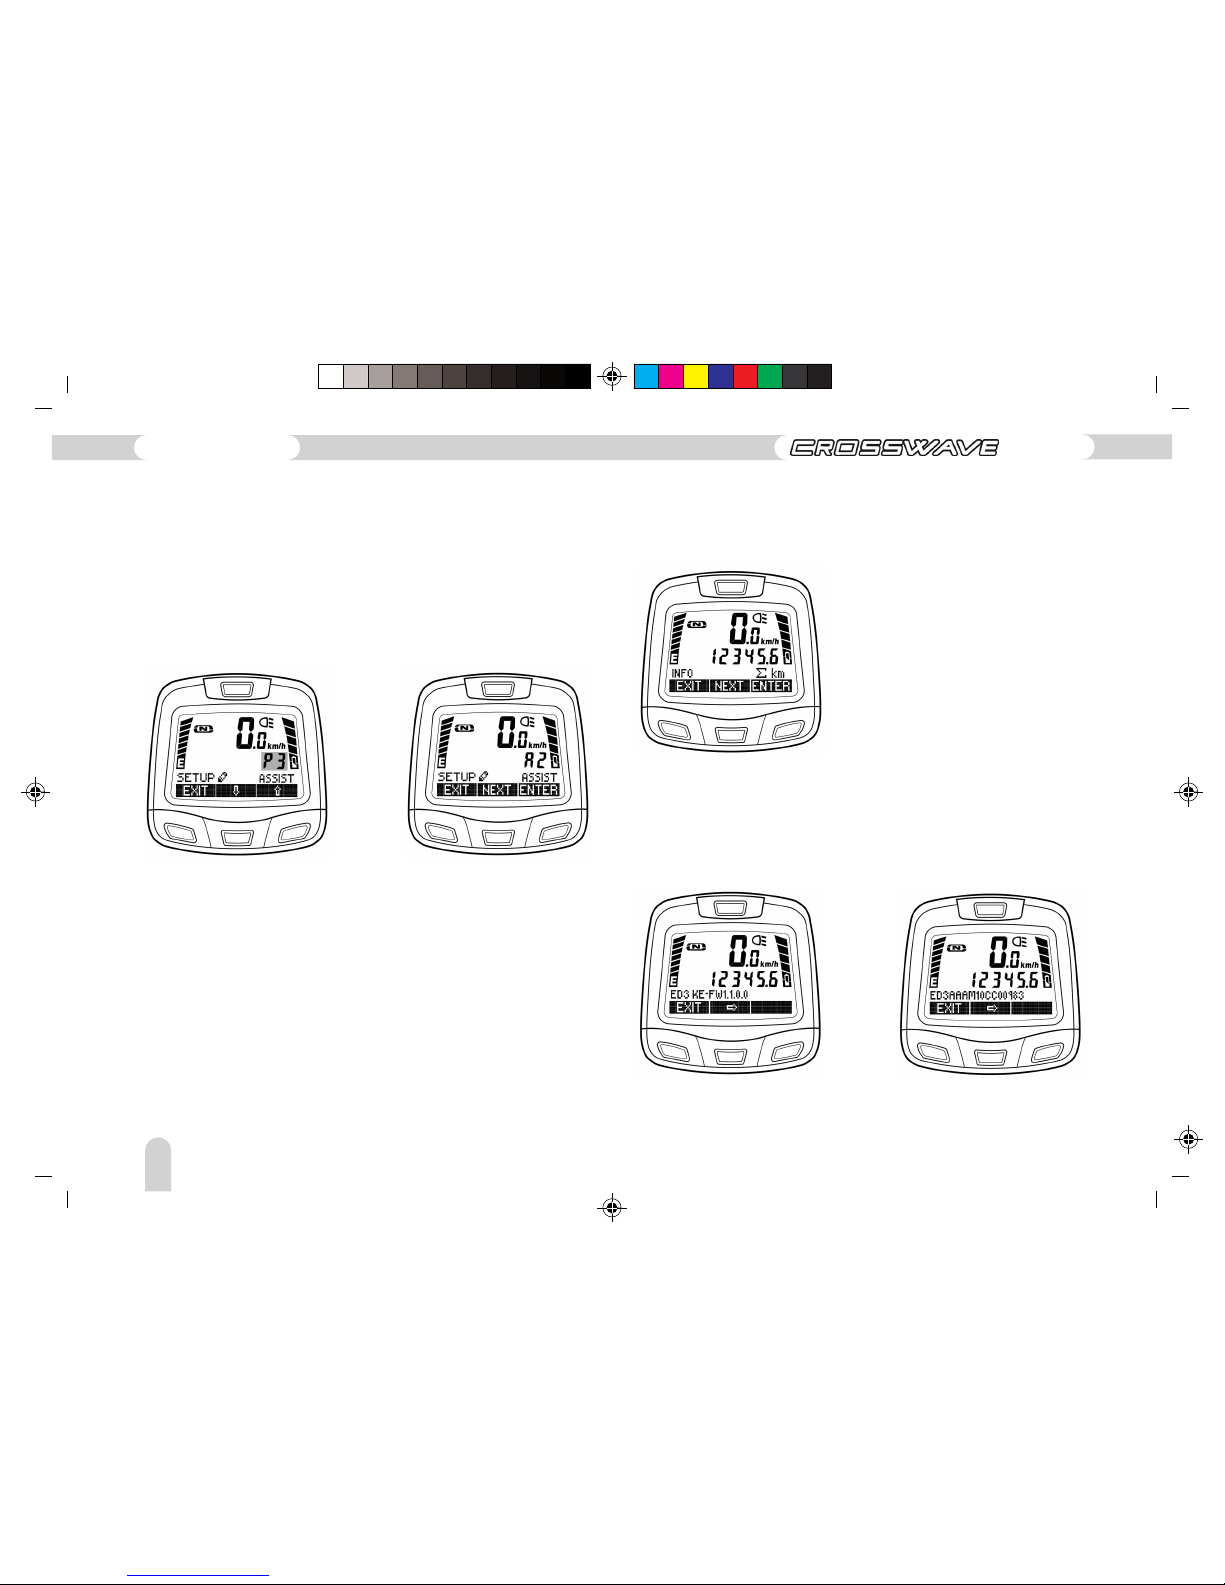
ASSIST (Geography Profile)
The assistance profiles are designed to adjust the assistance of
the Pedelec as exactly as possible to the geographical conditions.
– P1 corresponds to cycling along flat territory
– P2 corresponds to a ride with a medium level of assistance,
for example, low mountain ranges
– P3 is used when mainly a high level of assistance is required,
for example, alpine uplands.
These settings should be performed, when necessary, by your
specialised dealer.
GB
131
Pedelec with Lithium-ion battery
Page 36
BA_Migros_ED3EX_GB 09.02.2011 12:13 Uhr Seite 36
Probedruck
C M Y CM MY CY CMY K
The editing mode of the assistance level can be entered from
the SETUP•SSIST display by pressing the “ENTER” button. The
assistance profile that has been set flashes. The assistance
profile P1 to P3 can be selected using the arrow buttons. The
editing mode is exited by pressing the “EXIT” button. If an
alteration has taken place, then SAVE / CANC appear again
(procedure as described in the preceding examples).
INFO Menu
The INFO menu can be entered from the Menu Level 1->INFO
by pressing the “ENTER” button.
Additional information such as the firmware version or serial
number is displayed in this menu. Navigate one step further by
using the arrow button. The INFO menu can be cancelled by
pressing the “EXIT” button.
This information is purely of interest to your dealer and our
service centre if possible repairs are necessary.
132
Operating instructions
ED-3 EX
Page 37
BA_Migros_ED3EX_GB 09.02.2011 12:13 Uhr Seite 37
Probedruck
C M Y CM MY CY CMY K
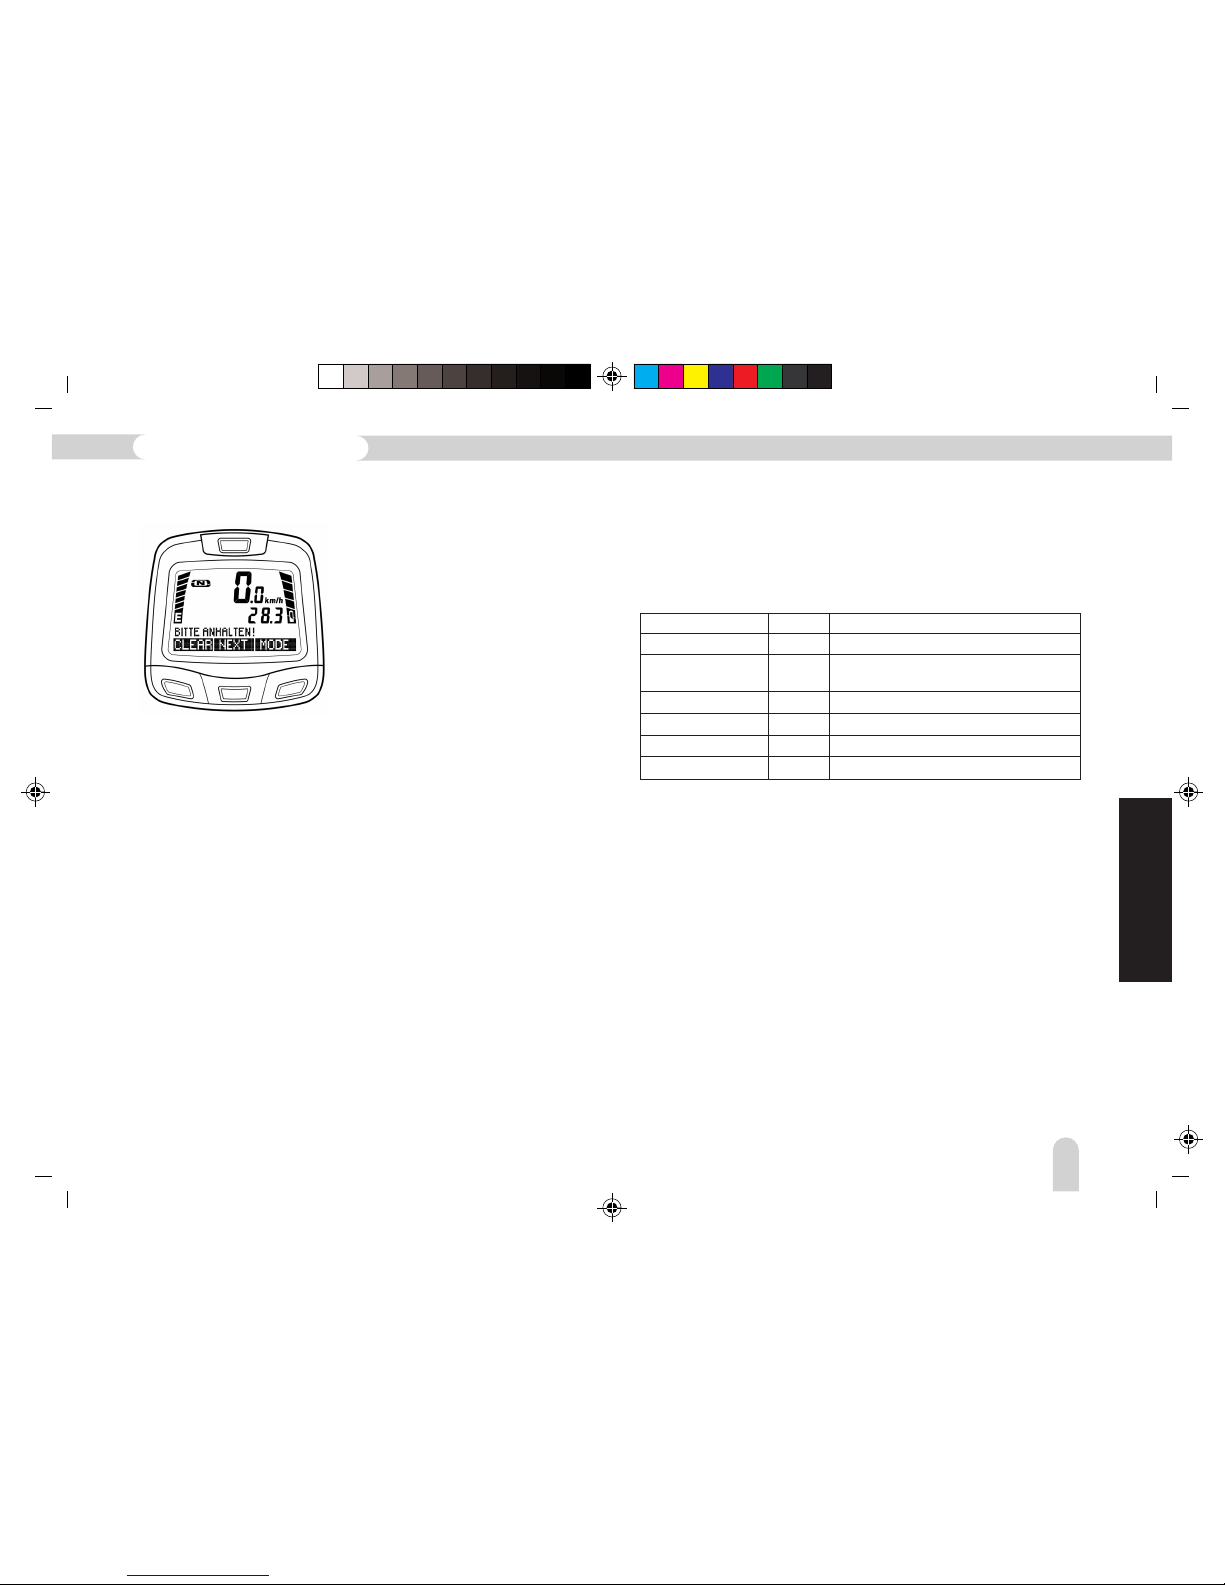
Error Messages in the Display
Error states are automatically recognised by the system and
indicated in the display. The following messages indicate the
problems described below:
Should a “Notice” signal be given in the display, please follow
the instructions in the display or the instructions given under
its meaning. Should the display indicate an ERROR signal then
you must immediately contact your local dealer for further
inspection.
Display Type Meaning
BATTERY EMPTY! Notice The battery is empty and must be recharged
BITTE ANHALTEN! Notice Please stop for recalibration of the
operating mode P1-P3.
AKKU ERR.01 Error The SMBus-connection on the battery is faulty
GESCHWSENS ERR.01 Error The external speed sensor is faulty
MOTORSTROM ERR.01 Error Excess current has been detected
HALLSENS ERR.01 Error Check motor.
GB
133
Pedelec with Lithium-ion battery
Page 38

BA_Migros_ED3EX_GB 09.02.2011 12:13 Uhr Seite 38
Probedruck
C M Y CM MY CY CMY K
With the battery’s increasing age, the maximum amount of
stored energy can sink by a third and in so doing the running
distance too. On the whole, lithium-ion batteries can experience
up to 500 full charge cycles, but through aging the capacity
will sink in due course down to 85 - 65%. Providing good
maintenance is taken, then a life expectancy of approximately
3 – 5 years is possible. The capacity will decrease slowly but
steadily.
Operational range and its factors
The range that can be attained with a fully charged battery is
dependent upon additional factors such as incline, headwind,
condition of road surface, tyre pressure, use of gears as well as
the pedal assistance and the weight of the driver.
Typical distance with an average use of pedal assistance and a
fully charged battery ranges between 40 and 80km according
to the mode selected.
It is practically impossible to provide absolute data regarding
the range as various factors influence the assistance performance.
To begin with, the battery must be optimally charged. This can
be ensured by using the original charger, through sufficient
charging time, the age of the battery as well as its continuous
maintenance. If all these factors are favourable, i.e. the operating
temperature is also between 5 and 35°C and a full charge has
taken place, then 37V x 8.8Ah = 325 Wh of stored energy should
be available to begin driving.
134
Operating instructions
ED-3 EX
Page 39
BA_Migros_ED3EX_GB 09.02.2011 12:13 Uhr Seite 39
Probedruck
C M Y CM MY CY CMY K
GB
General operation
Gear changing
If you are not yet familiar with a gear change, practice handling
your new Pedelec, braking and negotiating curves but do it
away from public roads.
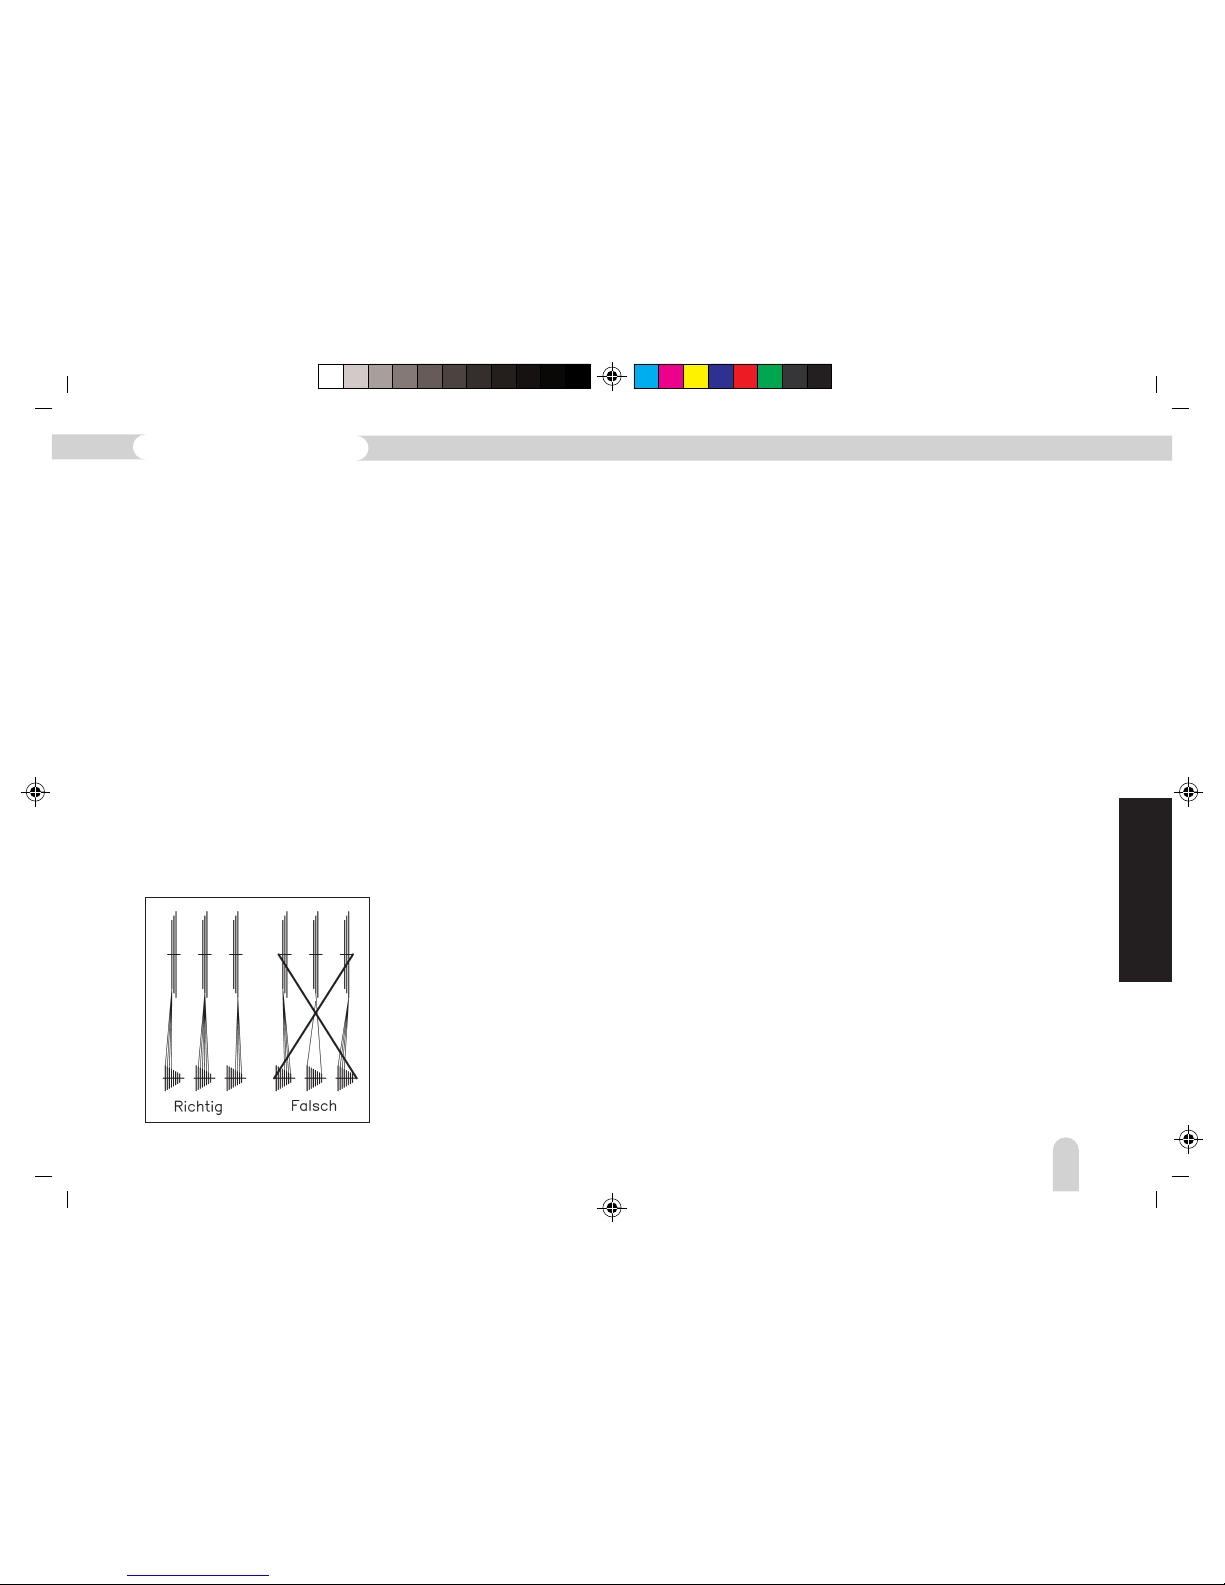
Derailleur
First switch the chain to the centre pinion at the rear. Switch
between the front chain rings. Then try the same in the reverse
direction. This way you will learn the functioning of the gear.
Do not ever change gear when the cycle is stationary or during
reverse pedalling. Select your gear transmission ratio in front
according to the terrain and exercise additional control with
the rear sprocket.
The chain should not run crosswise, i.e., with very steep
inclination, because otherwise chain and gear wheel will wear
out fast. Use the derailleur as illustrated in Figure 20.
Auxiliary gear with coaster brake hub
While using a gear hub, stop pedalling for a moment so that
the gear can switch. Due to the gear cable expansion, the gear
hub requires regular readjustment by the dealer.
Gear hubs with 3-, 4-, 5-, 7-, 8- and 9 gears offered by different
manufacturers are available at present.
Please contact your dealer to adjust your individual gear model
or follow the corresponding operating instructions of the gear
manufacturer.
Brakes
Your Pedelec is equipped with two independent brakes. The
right brake lever works on the front wheel brake, and the left
one on the rear wheel brake.
You can change this order by changing the brake wires on the
brake lever. Get this done by your dealer.
Figure 20
Gear adjustment:
The gear must be adjusted
regularly, depending on the
type of gear usage. Let your
dealer do all the gear settings.
135
Pedelec with Lithium-ion battery
Page 40
BA_Migros_ED3EX_GB 09.02.2011 12:13 Uhr Seite 40
Probedruck
C M Y CM MY CY CMY K
Due to its improved design, the V-brake achieves excellent
braking values under dry and wet conditions, but holds certain
risks, especially for inexperienced cycle riders. You can lose
control over your cycle if you apply the brake in the wrong way.
Practice applying this brake, particularly if you are a beginner.
Ride slowly at first and use the brake lever carefully to familiarize
yourself with the response of the brakes.
Coaster brake hub
The coaster brake hub is a rear wheel brake that is activated
when you pedal backwards. You must practice a little to get the
hang of when the brake is triggered.
Use the second brake, i.e., the front wheel brake alternately
during long and steep rides, so that the rear wheel brake can
cool down! Very intense heating of the back pedal hub leads to
loss of lubricant! Re-lubrication is necessary! The brake body
of a back pedal brake is also subject to wear and tear depending
on the usage and must be replaced accordingly. Let the dealer
execute such jobs.
Hand brakes
Check the smooth functioning of the brakes before each trip.
Contact the dealer if you detect slackening of the braking effect!
The brake shoe or shoes are labelled. Always use spare parts of
the same label.
V-brake
This brake is activated by pulling the brake lever at the handle
bar of your cycle. Two brake shoes act on the rim edges.
Caution!
Risk of fall and injury when applying the brake
suddenly in emergency situations!
Please contact your dealer to learn how to adjust the braking
power and study the relevant instruction leaflet of the
manufacturer.
136
Operating instructions
ED-3 EX
Page 41
BA_Migros_ED3EX_GB 09.02.2011 12:13 Uhr Seite 41
Probedruck
C M Y CM MY CY CMY K
GB
Hydraulic brake
This brake is also activated by pulling the brake lever at the
handle bar of your cycle. Two brake rubbers act on the rim
edges.
Instead of Bowden control cables, this brake has brake tubes
that are filled with hydraulic oil. Consult your dealer and read
the detailed technical instructions of the manufacturer. The
hydraulic brake is very sensitive and can be exactly calibrated.
You can test the brake response through a trial run.
Disk brake
This brake too is activated with the help of the brake lever on
the handle bar. The principle is similar to that of the rim brake,
the only difference being that this brake sits on the hub. The
brake pads act on a brake disk.
Load transportation
– When transporting loads, ensure they are fastened well. Always
observe the permissible carrying capacity of the luggage
carrier!
– Do not carry any bags or other objects on your handle bar!
This affects the driving safety. Aluminium handle bars are not
designed to support loads!
Trailer
– Observe the maximum permissible speed of 25 km/h if you
use a trailer.
– Max. permissible trailer load is 40 kg
Caution!
Risk of fall and injury when applying the brake
suddenly in emergency situations!
Roller brake
This brake too is activated with the help of the brake lever on
the handle bar. The braking mechanism acts on the wheel hub
and is well protected from bad weather.
Please note that a large frictional heat is generated, resulting
in heat accumulation, if you apply the brake for a long time
(going downhill).
Caution! Do not touch the heated hub body.
Cooling-off time after prolonged braking when
going downhill is approximately 30 minutes.
Caution!
The driving and braking behaviour of the cycle
changes. Risk of fall and injury!
137
Pedelec with Lithium-ion battery
Page 42

BA_Migros_ED3EX_GB 09.02.2011 12:13 Uhr Seite 42
Probedruck
C M Y CM MY CY CMY K
Maintenance instructions
To enjoy the comfort of the numerous functions for a long time
to come, the CROSSWAVE Pedelec should be maintained just
like a normal cycle. Besides, to guarantee riding safety, regular
checks must be performed on the brake, the tyre pressure, the
different screw joints, especially handle bar, seat and axle nuts
without fail.
Maintenance of the Pedelec drive:
When maintaining the auxiliary electrical drive system, ensure
through appropriate handling the maximum capacity of the
drive battery and protection of the other electrical components
against prolonged wet conditions.
As far as possible, the Lithium-ion battery should be recharged
only after complete discharge. Please try to avoid immediate
re-charging of a nearly full battery after a short ride.
In winter or during longer periods of non-use, the battery should
be recharged at the latest after six months. Only this way you
can ensure a long product life. If you do not use the battery
over longer periods, take the battery out of the Pedelec and
pull out the fuse so that no standby current in the electronic
circuit is unnecessary consumed.
After a ride in rain or if a lot of mud gets deposited on the
housing components, the dirt must be wiped away as thoroughly
as possible with a wet sponge. Let the CROSSWAVE Pedelec dry
afterwards.
– Use only tested trailer couplings and fix them at the
prescribed positions.
– Use only trailers that correspond to the latest safety technology.
– First try out the trailer without load.
– Follow the StVZO (Road Traffic Licensing Regulations)
requirements for the lighting equipment of the trailer.
– No liability for damages on account of trailer usage!
Front wheel luggage carrier, basket
– Follow the manufacturer specifications on the components
for loading.
– Avoid overloading!
– Do not transport any living animals!
Rear wheel luggage carrier
– Observe the manufacturer specifications on the
components for loading.
– Use the standard transportation bags, baskets and
clamping devices.
– Do not transport any persons or living animals.
138
Operating instructions
ED-3 EX
Page 43

BA_Migros_ED3EX_GB 09.02.2011 12:13 Uhr Seite 43
Probedruck
C M Y CM MY CY CMY K
GB
Never use a pressurized water jet or a steam-cleaning device.
The system is protected against water sprays and is therefore
rainproof, however, the electrical socket-plug connections are
not fully sealed. Thorough wetting of the cable harness can lead
to short-circuits that can instantly destroy the digital control
of the system.
Hence, avoid transporting the Pedelec on the luggage rack of
your car with the battery inserted when it is raining. The strong
slip stream forces water all across the frame and into the battery
housing.
If such transportation is required, do not forget to take the
battery out of the CROSSWAVE Pedelec and upon arrival, dry the
wet bicycle sufficiently before re-inserting the battery.
General maintenance instructions:
– Before using the Pedelec, it is recommended that you protect
the chrome parts and the frame with any commercial cycle
care product.
– Clean the cycle regularly from dust and dirt with a sponge or
soft cloth. Use a normal cycle cleaning product and a protective
agent .
– Never use high-pressure cleaners to clean hubs and pedal
bearing. This will damage the components.
– Ensure that the tyres and brake rubber do not come in contact
with oil.
Maintenance in winter:
The Pedelec should be carefully preserved in case of long-term
storage in the winter months. Ensure that the Pedelec is parked
in a room with constant temperature. Large temperature
fluctuations as well as humidity have a negative effect on all
Chromium and light metal components. To store it away for
winter, check the Pedelec on the whole for damages to avoid
any workshop repairs in spring. Unburden the tyres by hanging
up the Pedelec.
If you do not intend using the Pedelec for longer periods, pull
out the fuse of the battery and store it in a cool and dry room.
The recommended storage temperature for the battery is
15°C.
Pay attention to all the other assembly, servicing and
maintenance instructions mentioned in this manual as well as
to the instructions of the gear manufacturer.
139
Pedelec with Lithium-ion battery
Page 44
BA_Migros_ED3EX_GB 09.02.2011 12:13 Uhr Seite 44
Probedruck
C M Y CM MY CY CMY K
Now loosen both axle nuts.
The front wheel can now be removed just like a regular bicycle
and tyre, inner tyre or spoke damage repaired.
Assembly
Replace the front wheel and position the torque support discs
onto the hub axle within the fork again.
Removal of the Front Wheel
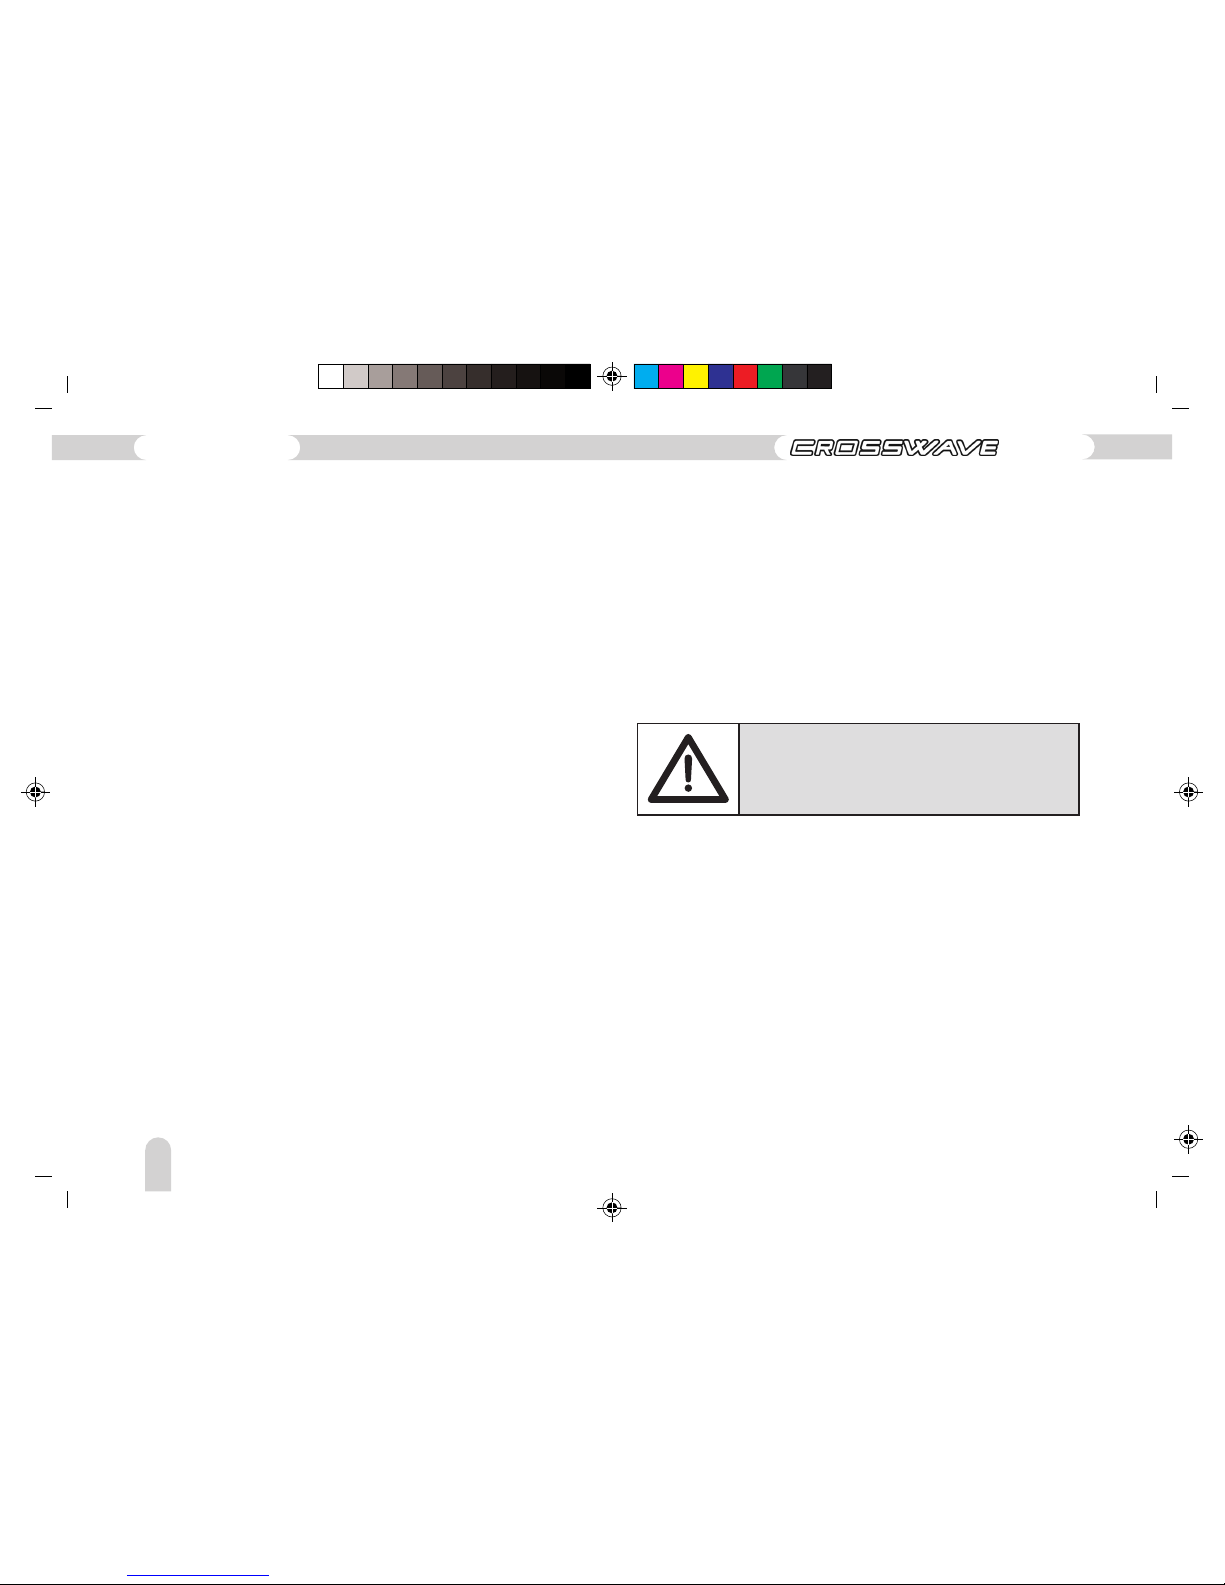
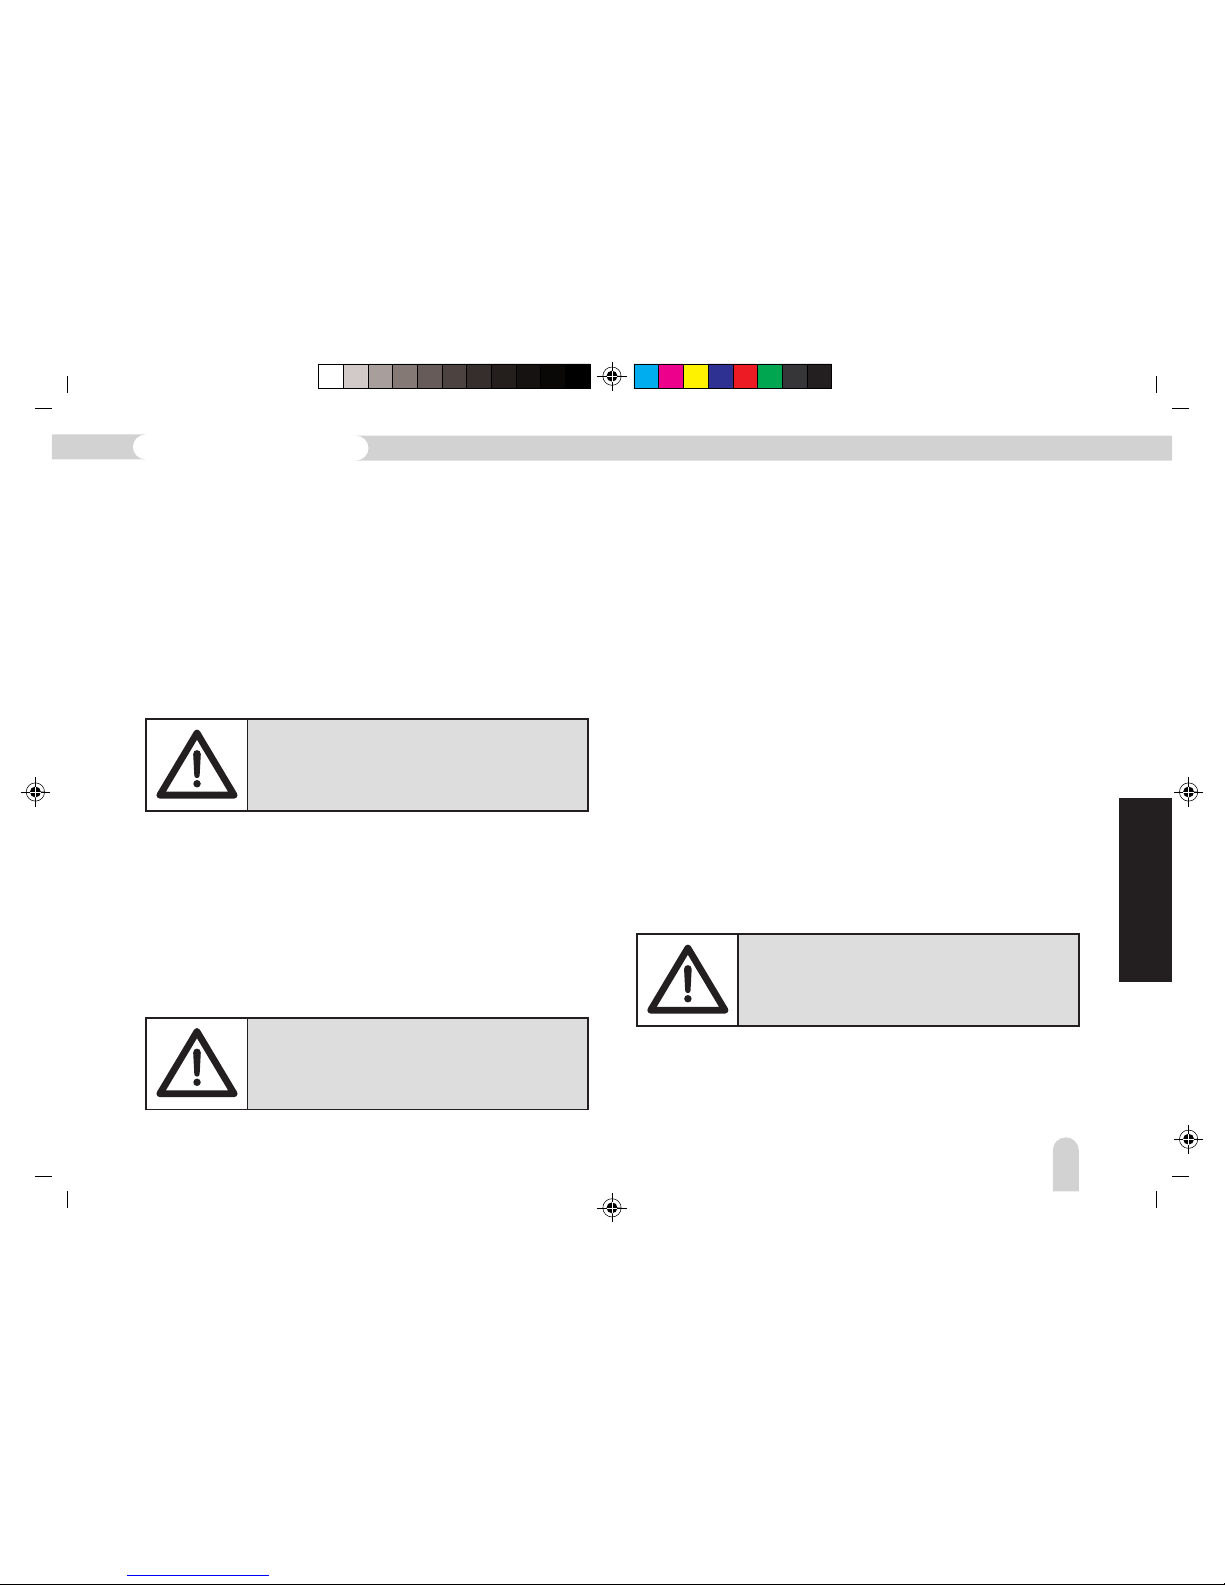
Figure 23
Figure 24
If tyre damage occurs and it is necessary to remove the front
wheel then follow the instructions given below:
Removal
Remove the battery from the Pedelec Cut both of the cable
straps which secure the motor socket to the fork.
Replace the axle nuts. Align the front wheel and tighten the axle
nuts firmly.
Figure 25
Simply pull the socket apart to open.
140
Operating instructions
ED-3 EX
Page 45
BA_Migros_ED3EX_GB 09.02.2011 12:13 Uhr Seite 45
Probedruck
C M Y CM MY CY CMY K
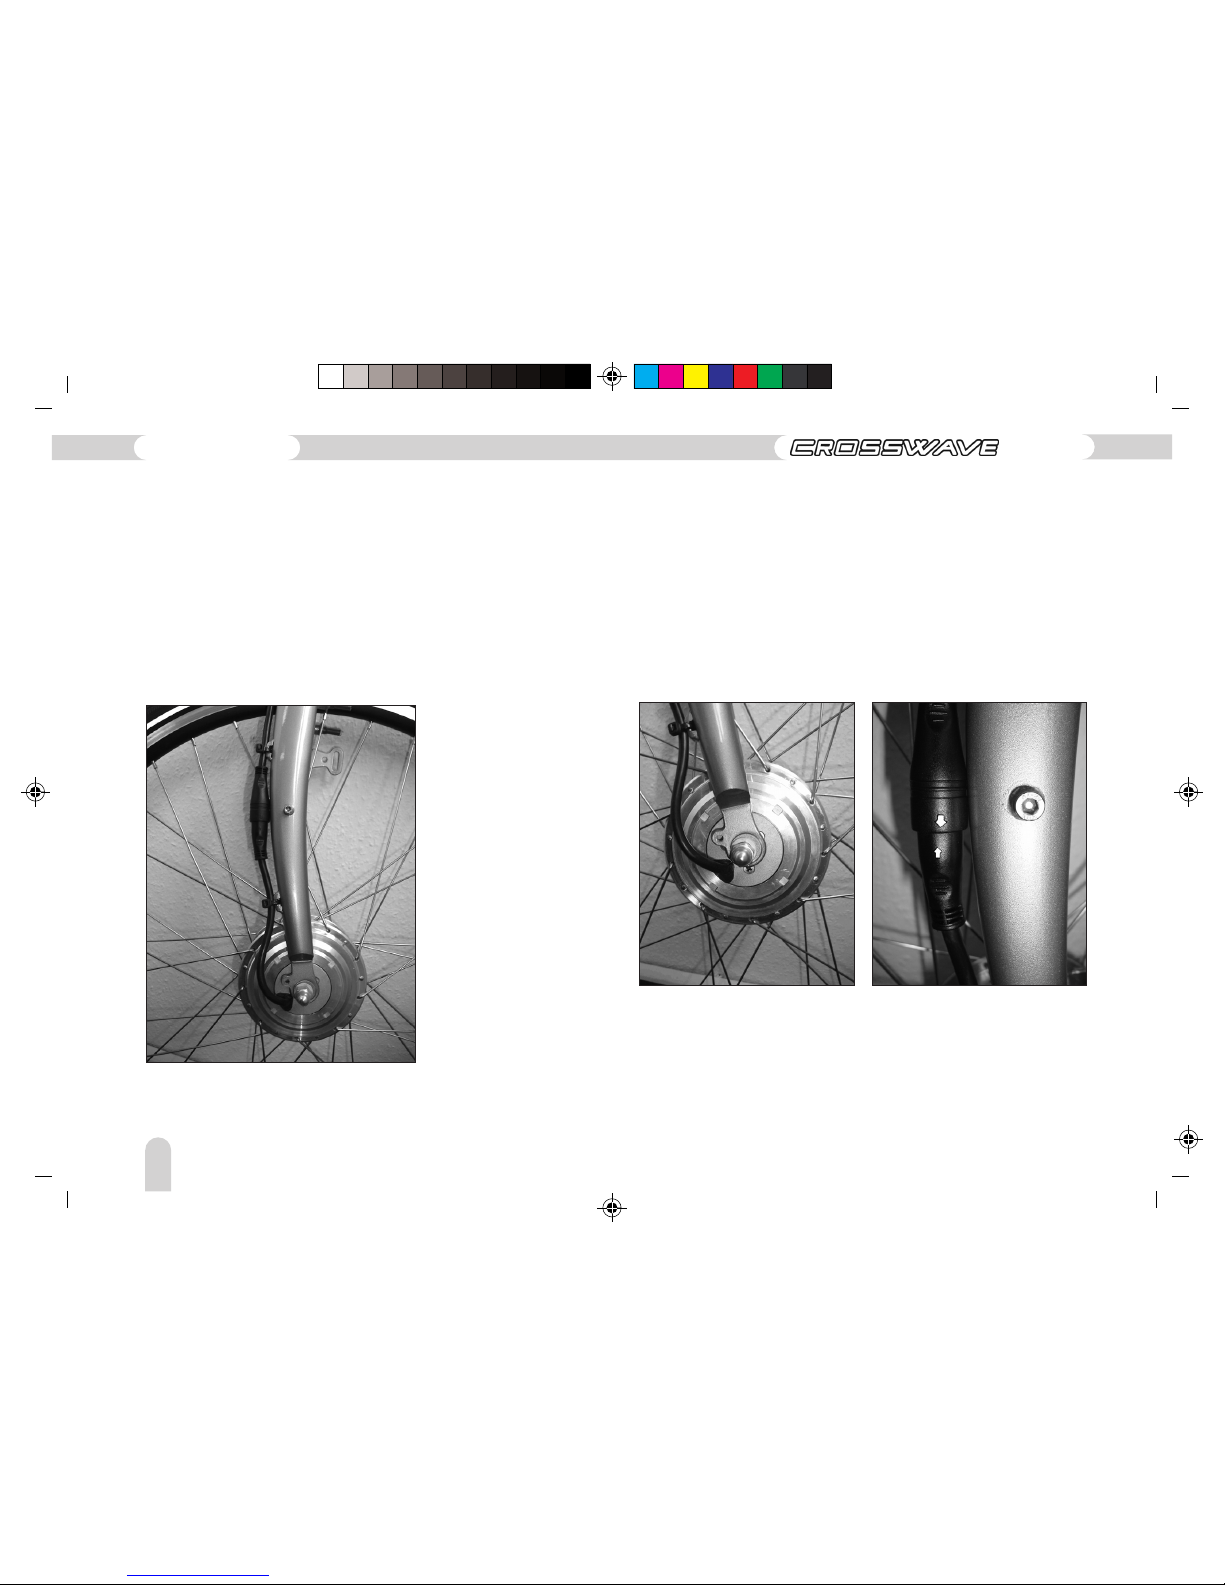
Connect the plug. To facilitate alignment arrows are located on
both plug parts which must be facing one another when
assembling.
Secure the plugs with the cable ties to the fork again.
The battery should only now be replaced in the ED-3EX in order
to avoid damage to the electronic system.
Returning the Battery/Recycling
Please do not put the battery pack into the household waste.
Containers for collecting batteries can be found wherever
batteries are sold or at local collection points. This ensures
batteries are disposed of correctly. You can also return the
battery to your specialist dealer.
5
Lithium-ion batteries are classed as dangerous goods due to the element lithium which
is very reactive. During development, required crash safety tests are performed in order
to ensure that no uncontrolled process caused by a destructive external event can occur.
It is further required that correct labelling in shipment is used in order for the fire
brigade, for example, to immediately know which particular fire extinguishing technology
must be used in the event of a vehicle accident. Furthermore, it is also ensured through
technologies in cell structure and in the protection circuit that no electrical overload
occurs even during normal operation.
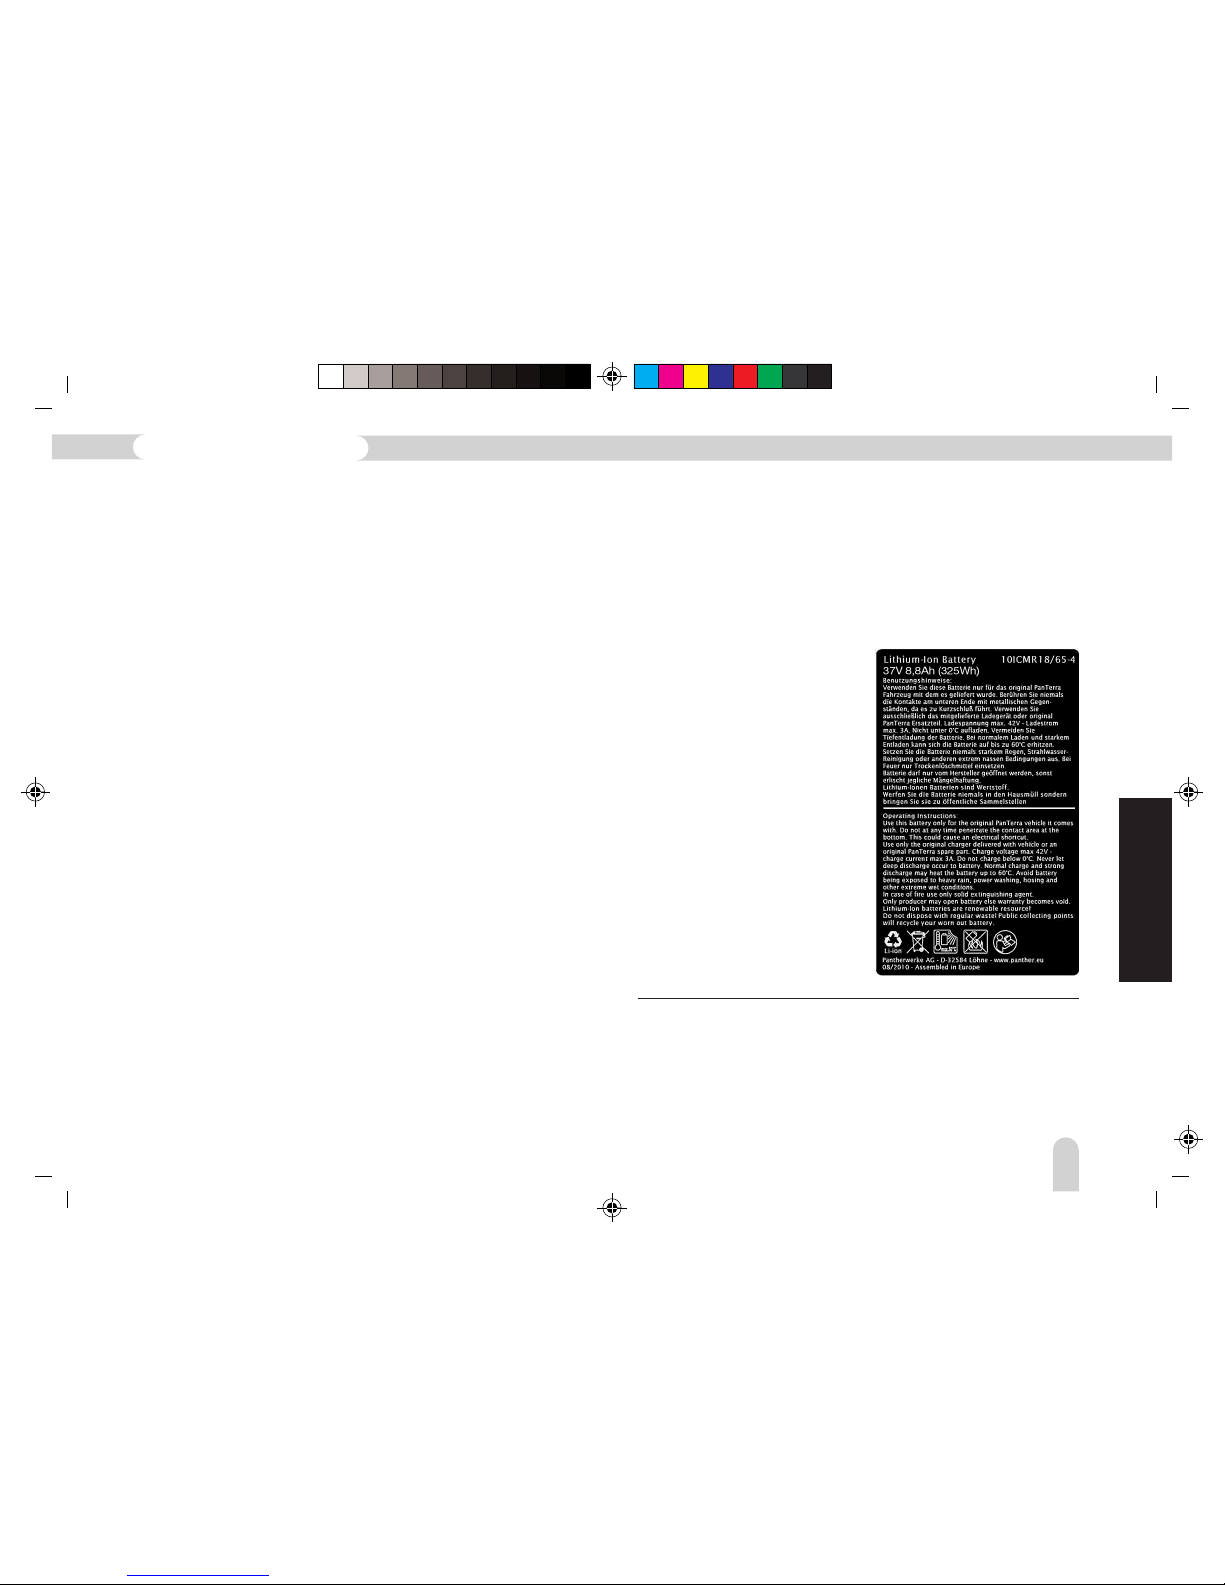
In order to send battery packs,
please consult your dealer as
lithium-ion batteries may not
be sent by parcel carriage
without being labelled. Please
also note the instructions on
the bottom of the battery:
GB
141
Pedelec with Lithium-ion battery
Page 46
BA_Migros_ED3EX_GB 09.02.2011 12:13 Uhr Seite 46
Probedruck
C M Y CM MY CY CMY K
1. Controller
1.1 The display does not light up after being switched on.
Cause: Repair:
Battery incorrectly positioned >insert the battery again
Battery defect >contact dealer
Cable/contact error >contact dealer
Electronics defect >contact dealer
1.2 The display unit switches off during the ride.
Cause: Repair:
Battery empty >completely recharge battery again
Electronics defect >contact dealer
Plug connection has loosened >contact dealer
2. Battery
2.1 No LED lights up after battery status display has been pressed.
Cause: Repair:
Battery empty >completely recharge battery again
Cells in battery pack defective >contact dealer
2.2 The operating distance of the battery has been drastically reduced.
Cause: Repair:
The battery is exhausted (aged) >exchange battery
The charger is defective >contact dealer
Charging plug/charging cable damaged >contact dealer
3. Motor
3.1 No performance from the motor but the controller and the battery still function.
Cause: Repair:
The motor cable under the cover
is disconnected >control plug
other cable/contact error >contact dealer
Pedal sensor defective >contact dealer
Electronic defective >contact dealer
4. Charging unit
See Page 17 Charging and Care of the Battery.
Malfunctions/Causes/Repair
ED-3EX Pedelec Technical Data
Pedelec/EPAC6 (Electrical Power Assist Cycle)
icycle auxiliary actuator with 250W motor, up to
25 km/h, activated through pedal sensor.
BLDC gear motor BLDC stands for Brushless-DC,
i.e., a brushless, electronically commutated 3phase direct current motor with a maximum
continuous rated power of 250W.
BLDC motor controller with digital programme
control in accordance with the European standard.
Three different driving modes: ECO, NORMAL &
SPORT. In addition, three geographic profiles P1P3. The auxiliary actuator is automatically activated
when the pedals are used, providing assistance up
to 25 km/h. The auxiliary actuator is automatically
cut off when the brakes are applied.
37V 8.8A h (320 Wh) lithium ion battery made in
Europe with 5 LED capacity display, weight 2.4 kg,
up to 500 charge cycles or 3 – 4 years life expectancy
by optimum usage.
CC-CV charging unit with 2A charging current
full charge of the 9Ah battery lasts approximately
8.8 h.
Highly dependent on the selected operating mode,
personal mode of operation and other factors.
See Page 134 “ Operating range and its Factors”
Drive System
Motor
Controller
Battery
Charging Unit
Operating
Distance
6
EPAC = Pedelec
142
Operating instructions
ED-3 EX
Page 47

BA_Migros_ED3EX_GB 09.02.2011 12:13 Uhr Seite 47
Probedruck
C M Y CM MY CY CMY K
GB
143
Pedelec with Lithium-ion battery
Page 48

BA_Migros_ED3EX_GB 09.02.2011 12:32 Uhr Seite 48
Probedruck
C M Y CM MY CY CMY K
144
 Loading...