

Page 1
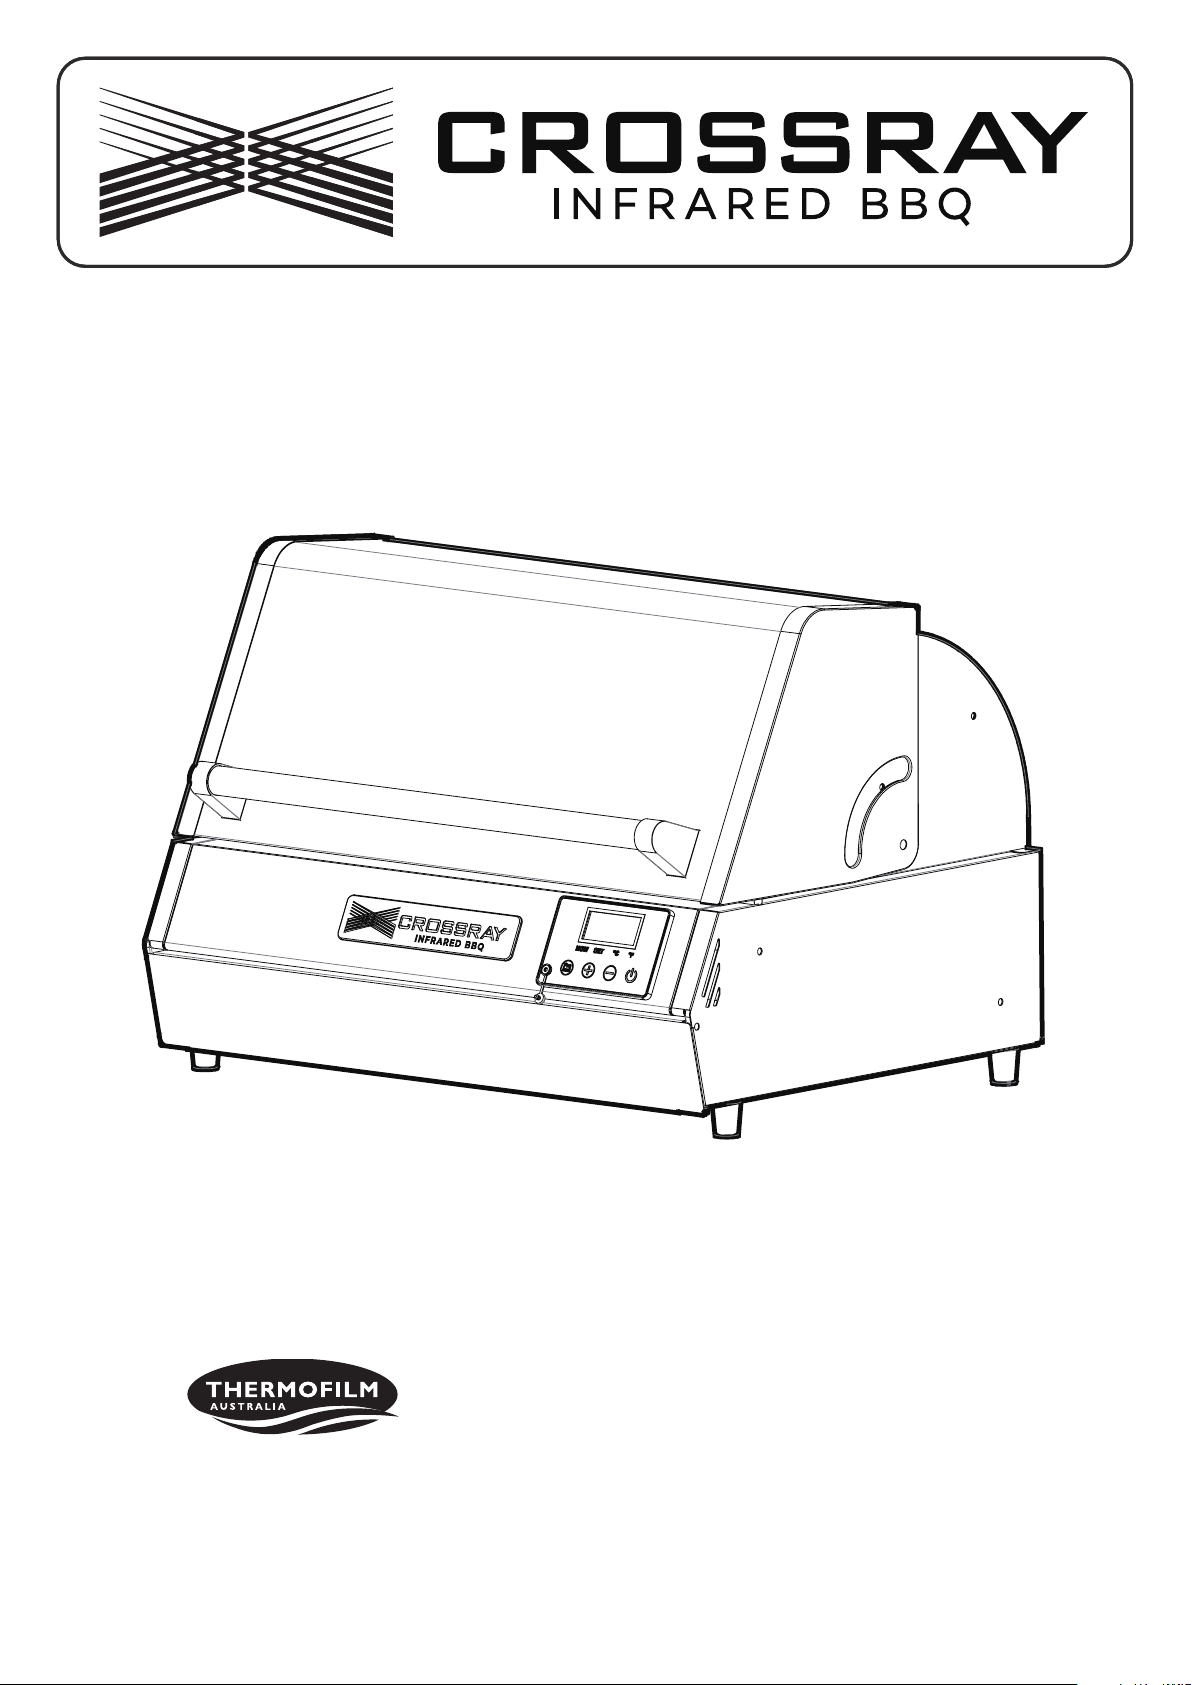
OWNER’S MANUAL
Model:TCE22HT
220-240V~, 2200w
Thermolm Australia Pty Ltd
8 Lakeview Drive Scoresby
Victoria 3179, Australia
Telephone: (03) 9562 3455
Email: [email protected]
CONTACT INFORMATION
For spare parts order or service warranty and Natural
Gas Conversion queries call (03) 9562 3455 or email
[email protected] Your purchase receipt is
required for all warranty claims.
Retain manual for future reference.
MANUAL # P80196023A - DATE: 25.Sep.2024
Page 2
GENERAL INFORMATION / SAFETY
TABLE OF CONTENTS
General Information / Safety 2-4
Assembly 5-6
Operation 7
Cleaning and Maintenance 8
Guide to Grilling 9
Troubleshooting 10-11
Parts Diagram / List 12
Warranty 13
IMPORTANT SAFEGUARDS
WHEN USING THIS GRILL OR ANY
ELECTRICAL APPLIANCES, BASIC SAFETY
PRECAUTIONS SHOULD ALWAYS BE
FOLLOWED INCLUDING THE FOLLOWING:
• Do not use the appliance for any purposes other than its
intended use.Do not alter this appliance in any way.
• Do not use the appliance as a heater.
• Never line the bottom of the grill housing with aluminium foil
oranysubstancethatwillrestricttheowofgreaseintothe
grease tray.
• Grease tray must be installed during grill use.
• Do not leave grill unattended when it is in use
• Use only on dedicated, properly ground outlet
•
If an extension cord is used:
1. The marked electrical rating of the extension cord
should be at least as great as the electrical rating of the
appliance.
2. The extension cord should be arranged so that it will
not drop over the counter top or tabletop where it can be
pulled on by children or tripped over unintentionally.
3. The appliance must be properly grounded. The extension
cord should be a grounding-type 3 wire cord.
• Store this unit indoors out of the reach of children when not
in use
• Do not clean this product when it is in use or plugged into a
power source.
• This appliance is not intended to be operated by an external
timer or separate romote-control system.
• Read all instructions.
• Use grill on a level, stable surface
• Do not touch hot surfaces. Use handles or knobs.
• To protect against electrical shock do not immerse cord,
plugs, or this grill in water or any other liquid.
• Close supervision is necessary when any appliance is used
by or near children and/or pets.
• Unplug from outlet when not in use and before cleaning.
• Allowtocoolbeforeputtingonortakingoparts.
• Do not operate any appliance with a damaged cord or plug.
Do not operate any appliance if it cannot be operated safely
or if it was been damaged in any manner. Return appliance
to the nearest authorized service facility for examination,
repair, or adjustment.
• The use of any accessory attachments unauthorized by
thermolmmaycauseinjuries,propertydamage,ordeath.
• Do not let cord(s) hang over table or counter edges. Secure
cord(s) and place cord(s) so that it can not be tripped over or
easily pulled.
• Do not let cord(s) touch hot surfaces.
• Do not place on or near a hot gas or electrical burner, or in a
heated oven.
• Do not move the appliance when it is in use. Allow the
appliance to cool before moving or storing.
• Useameretardantbbqmittswhenhandlinganyreceptacle
containing hot oil or liquids.
• Todisconnect,turnthegrillto‘o’,thenremovetheplugfrom
the wall outlet.
SAVE THESE INSTRUCTIONS.
THE GREASE TRAY MUST BE VISUALLY
INSPECTED BEFORE EACH GRILL USE.
REMOVE ANY GREASE AND WASH
GREASE TRAY WITH A MILD SOAP AND
WARM WATER SOLUTION.
PRE-ASSEMBLY
Read and perform the following pre-assembly instructions:
• Open lid of shipping carton and remove unit and packing
materials. Open the grill lid and unpack parts inside. Remove and
discard all packing materials from unit and parts.
• Do not assemble or operate the grill if it appears damaged.
If there are damaged or missing parts when you unpack the
shipping box or you have questions during the assembly process.
Refer to back for service details.
2
Page 3
GENERALINFORMATION / SAFETY
DANGER:
ELECTRIC SHOCK CAN KILL OR RESULT
IN SERIOUS INJURY.
TO PREVENT ELECTRICAL SHOCK:
• Connect Cord To Properly Grounded Outlet Only
• This Appliance Should Be Supplied Through A Residual
Current Device (Rcd) Having A Rated Residual Operating
Current Not Exceeding 30 mA
• The Supply Cord Should Be Regularly Examined For Signs
Of Damage And The Appliance Should Not Be Used If The
Cord Is Damaged
• if the supply cord is damaged, it must be replaced by
thermoim,orourserviceagentorsimilarlyqualiedpersons
in order to avoid a hazard.
• Never Operate Your Electric Grill When It Is Raining
• AlwaysKeepCordDryAndOTheGround
• Keep Electrical Supply Cord Away From Any Heated Surfaces
• Never Put The Cord Or Heating Element In Water Or Any Liquid
• To Prevent Your Grill From Being Splashed By Water Or
Falling Into Water, Do Not Use Grill Within 3 Metres Of A
Pool, Spa, Pond, Water Faucet Or Any Body Of Water
• Unplug Your Grill When Not In Use Or Before Moving The Grill
• Do Not Unplug Your Grill By Pulling The Cord
• Keep Cord Away From Hot Grill Surfaces
• Never Operate Your Grill If The Cord Or Plug Appears Damaged
• Never Remove The Grounding Plug Or Use With An Adapter
To Two Prongs.
• Unplug The Cord Before Using Water Or Any Liquid To Clean
Your Grill.
WARNING:
CHARCOAL OR SIMILAR COMBUSTIBLE
FUELS MUST NOT BE USED WITH THIS
APPLIANCE
WARNING:
ACCESSIBLE PARTS MAY BECOME
HOT DURING AND AFTER USE. YOUNG
CHILDREN SHOULD BE KEPT AWAY.
NOT FOR COMMERCIAL USE.
FOR OUTDOOR HOUSEHOLD USE ONLY.
DO NOT IMMERSE IN WATER.
DO NOT EXPOSE TO RAIN.
YOUR GRILL WILL GET VERY HOT. DO
NOT TOUCH COOKING SURFACES, LID,
GRILL HOUSING OR OTHER PARTS
WHILE GRILL IS IN OPERATION, UNTIL
THE GRILL HAS COOLED DOWN AFTER
USE.
THIS APPLIANCE CAN BE USED BY
CHILDREN AGED FROM 8 YEARS
AND ABOVE AND PERSONS WITH
REDUCED PHYSICAL, SENSORY OR
MENTAL CAPABILITIES OR LACK OF
EXPERIENCE AND KNOWLEDGE IF
THEY HAVE BEEN GIVEN SUPERVISION
OR INSTRUCTION CONCERNING USE
OF THE APPLIANCE IN A SAFE WAY
AND UNDERSTAND THE HAZARDS
INVOLVED. CHILDREN SHALL NOT
PLAY WITH THE APPLIANCE. CLEANING
AND USER MAINTENANCE SHALL NOT
BE MADE BY CHILDREN WITHOUT
SUPERVISION.
NEVER COVER OR WRAP THE COOKING
GRID, BOTTOM OF THE GRILL BOWL,
OR GREASE TRAY WITH ALUMINUM
FOIL OR ANY OTHER MATERIAL THAT
WILL ABSORB GREASE.
WARNING:
ONLY USE THE SUPPLY UNIT PROVIDED
WITH THIS APPLIANCE.
WARNING:
DO NOT USE THE BARBECUE NEAR
COMBUSTIBLE MATERIALS
Correct Disposal of this product:
This marking indicates that this product should
not be disposed with other household wastes
throughout the EU. To prevent possible harm to the
environment or human health from uncontrolled
waste disposal, recycle it responsibly to promote the
sustainable reuse of material resources. To return
your used device, please use the return and collection systems
or contact the retailer where the product was purchased. They
can take this product for environmental safe recycling.
3
Page 4
GENERAL INFORMATION / SAFETY
• Failure to comply with these instructions could
resultinareorexplosionthatcouldcause
serious bodily injury, death or property damage.
• Keepamulti-purposereextinguisherreadily
accessible.Intheeventofare,unpluggrill
fromoutlet.Neverusewatertoputoutarein
this or any other electrical appliance.
• This grill is not intended to be installed in or on
recreational vehicles and/or boats.
• Never line the bottom of the grill housing with
charcoal, aluminium foil, sand or any substance
thatwillrestricttheowofgreaseintothe
grease tray.
• Before each use of your grill pull out the grease
tray and remove all grease and food debris to
preventgreaserehazard.
• Use your grill at least 200 mm away from
combustible objects that can melt or catch
re(suchasvinylorwoodsiding,fencesand
overhangs) or sources of ignition including
pilot lights on water heaters and live electrical
appliances.
GROUNDING
This appliance must be grounded while in use to protect the
operator from electrical shock. The appliance is equipped with
a3-conductorcordand3pronggrounding-typeplugtotthe
proper grounding type receptacle.
EXTENSION CORDS
1. Only use a 3-wire extension cord that has a 3-prong
grounding type plug and 3-prong cord connector that
accepts the plug from the appliance.
2. Only use extension cords that have an electrical rating no
less than the rating of the appliance.
3. Do not use damaged extension cords. Examine cord
before using and replace if damaged. Do not abuse
extension cord.
4. Do not tug on the cord to disconnect it from appliance or
power source.
5. Keep cord away from heat and sharp edges.
6. Keepconnectiontoextensioncorddryandotheground.
7. Never use more than one extension cord to plug
appliance to power source.
CARBON FIBER LAMPS AND GRILL
SURFACES MAY STILL BE HOT EVEN IF
HEAT ON LAMP IS OFF.
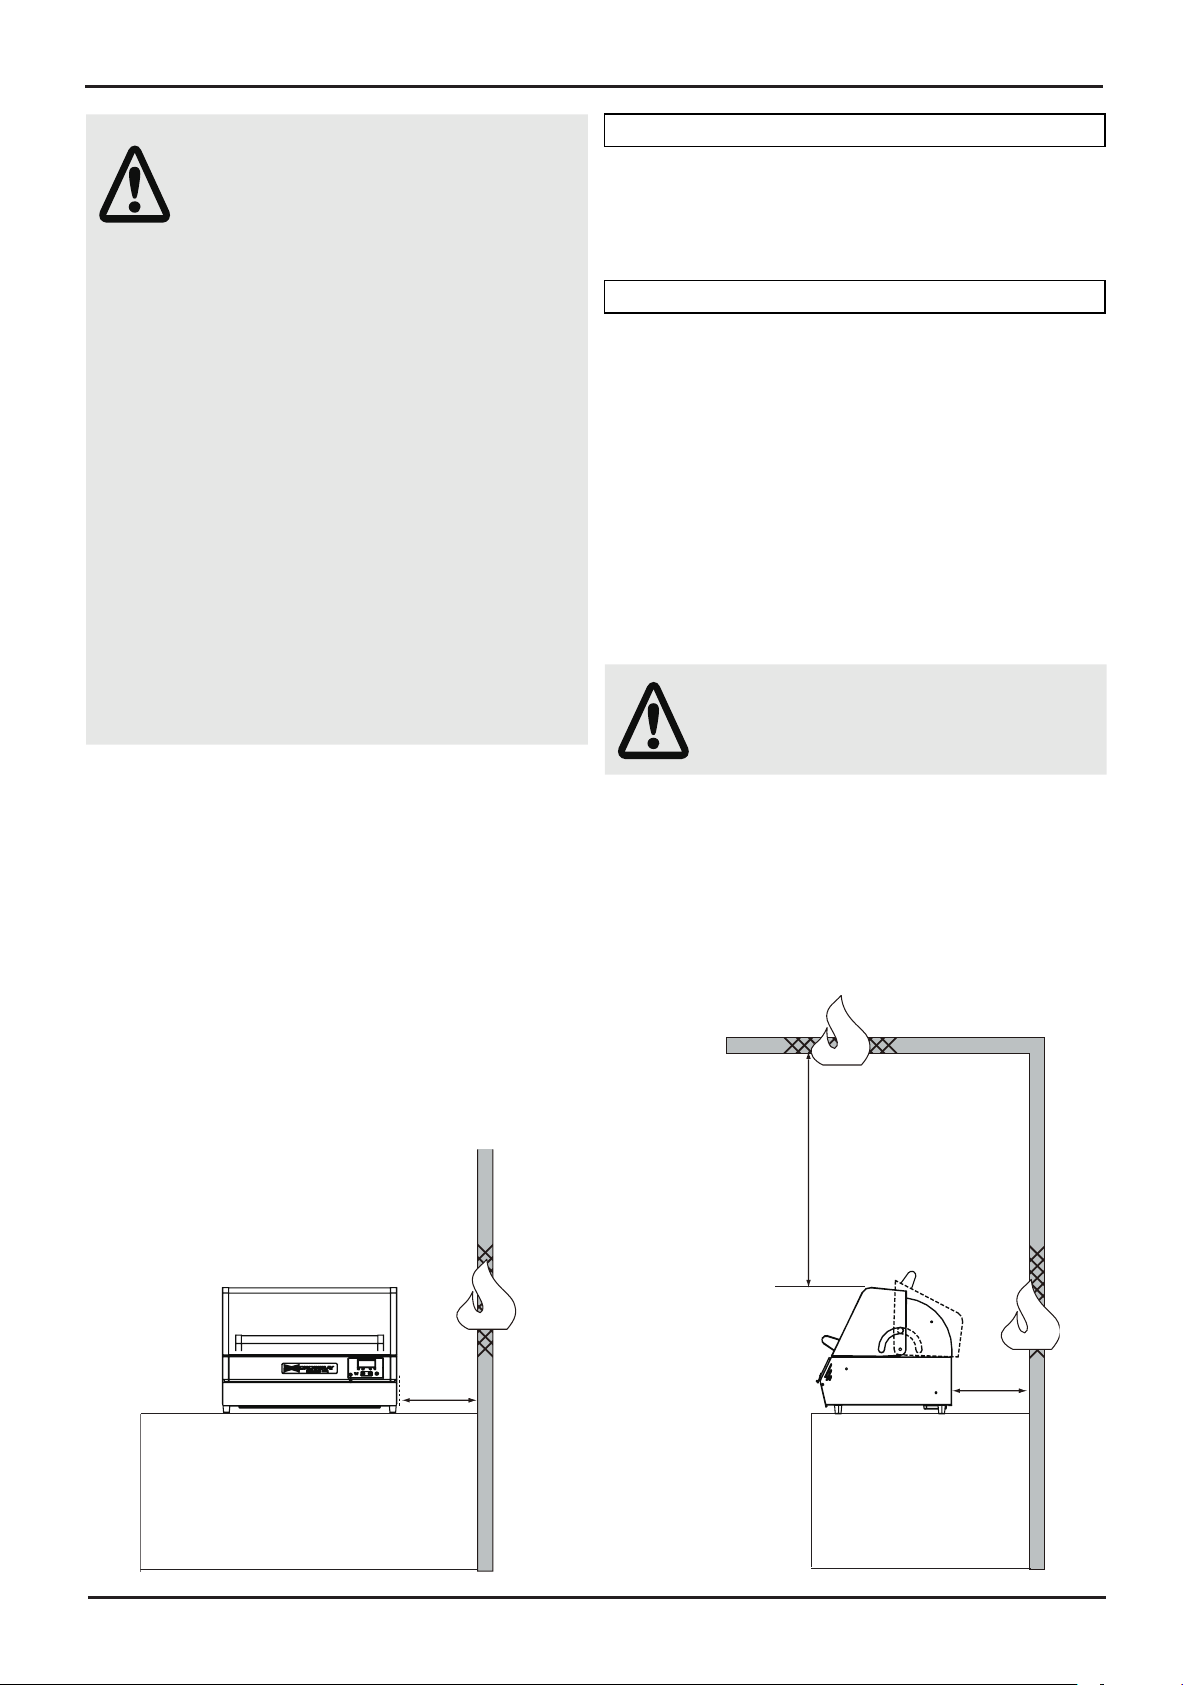
MINIMUM CLEARANCES FROM COMBUSTIBLE MATERIALS MUST BE:
REAR – 200 mm
SIDES – 200 mm
TOP – 1000 mm
CAUTION: Remove the grease tray before moving
grill. Use caution when handling tray or serious
injury may occur. Grease tray must be installed for
grill operation.
1000mm
200mm
200mm
4
Page 5
ASSEMBLY
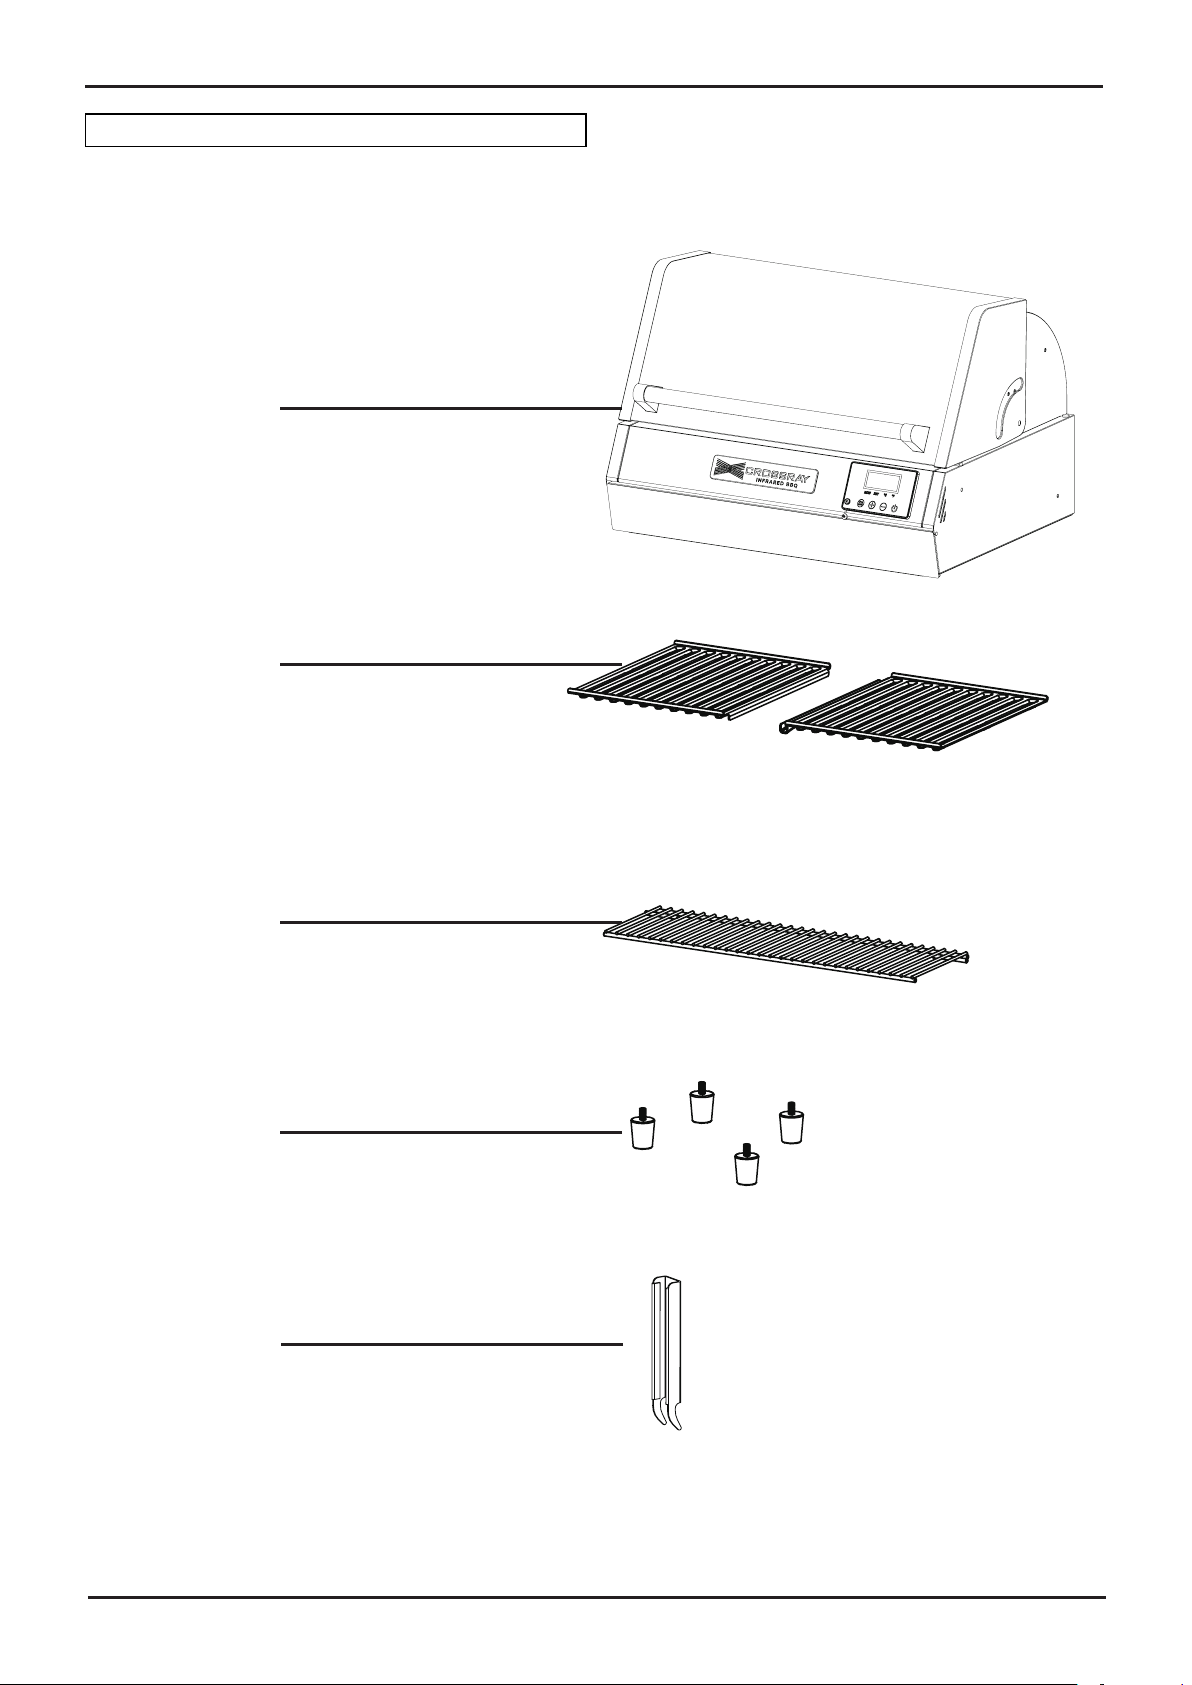
CARTON CONTENTS LIST
Grill x 1
Cooking Grid x 2
Warming Rack x 1
Leg x 4
Cooking Grid Hook x 1
5
Page 6
ASSEMBLY
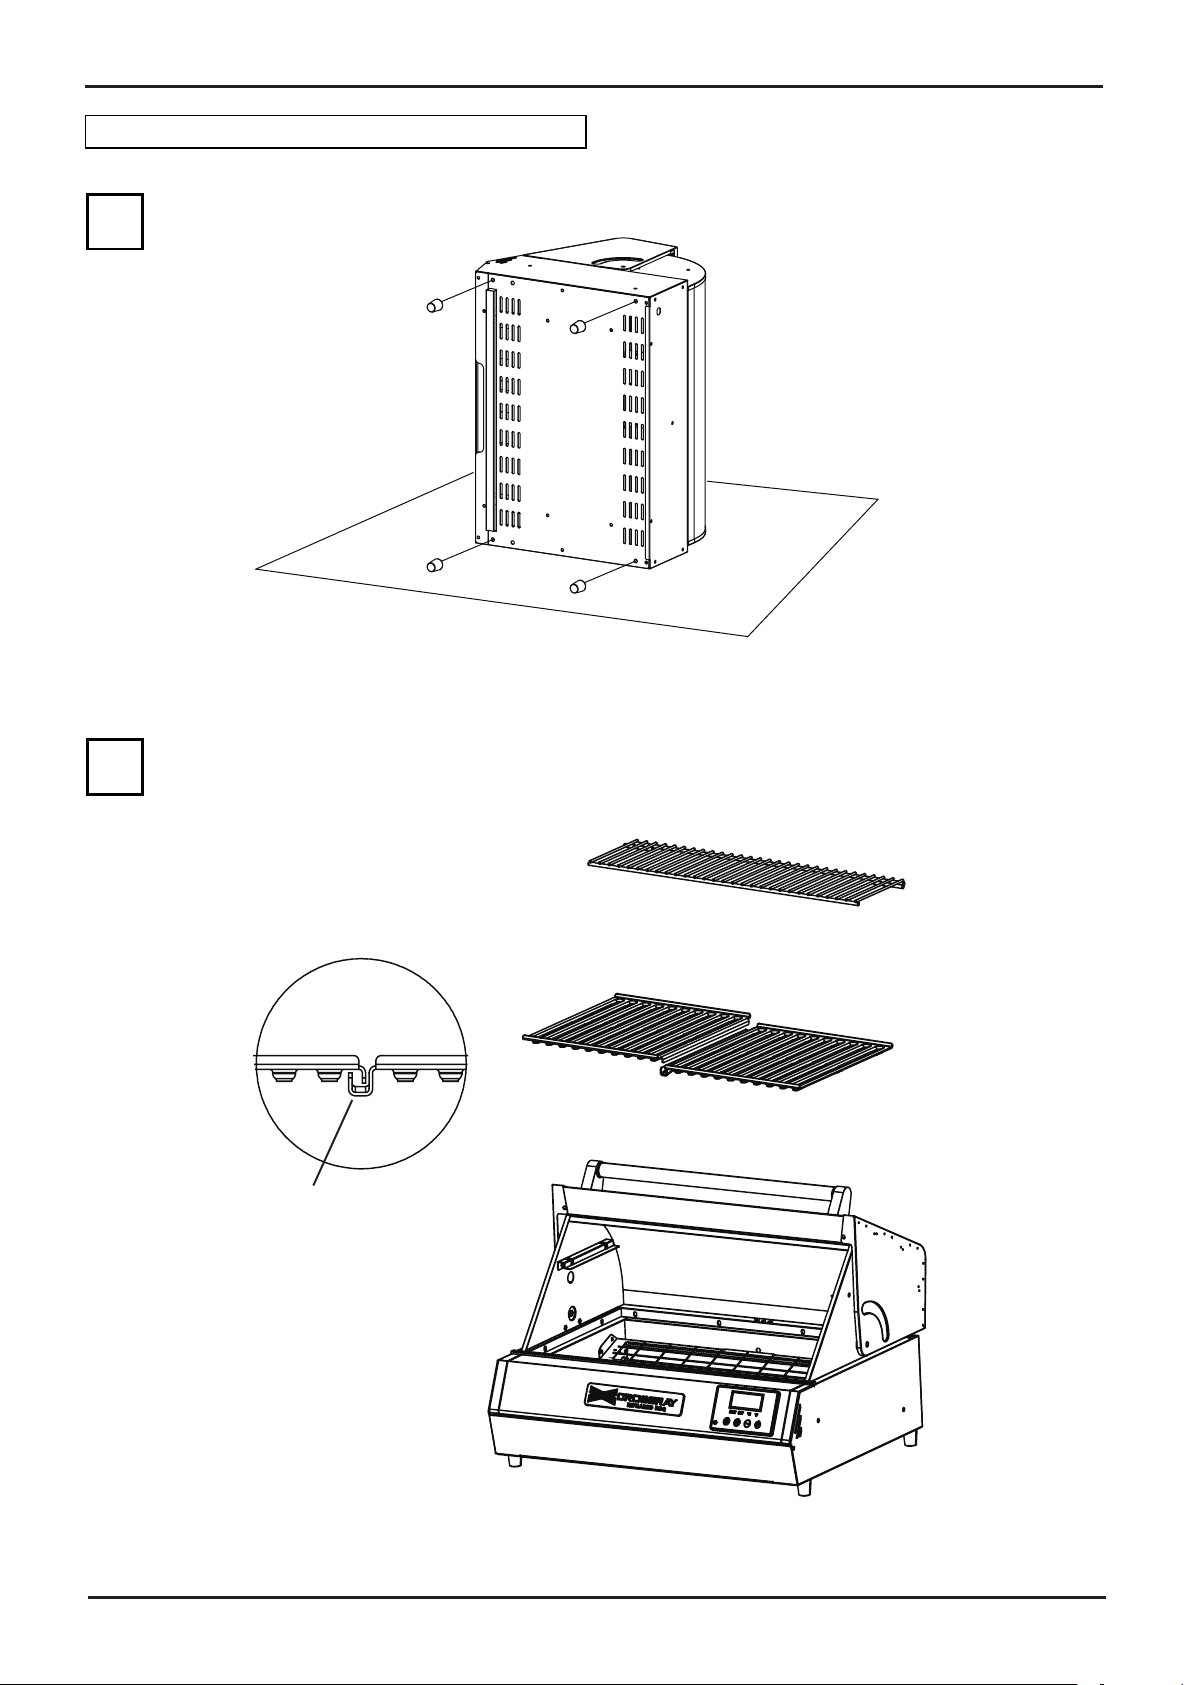
Assembly Instruciton
1
2
Note: Two cooking grids edge
should be hand in hand.
6
Page 7
OPERATION
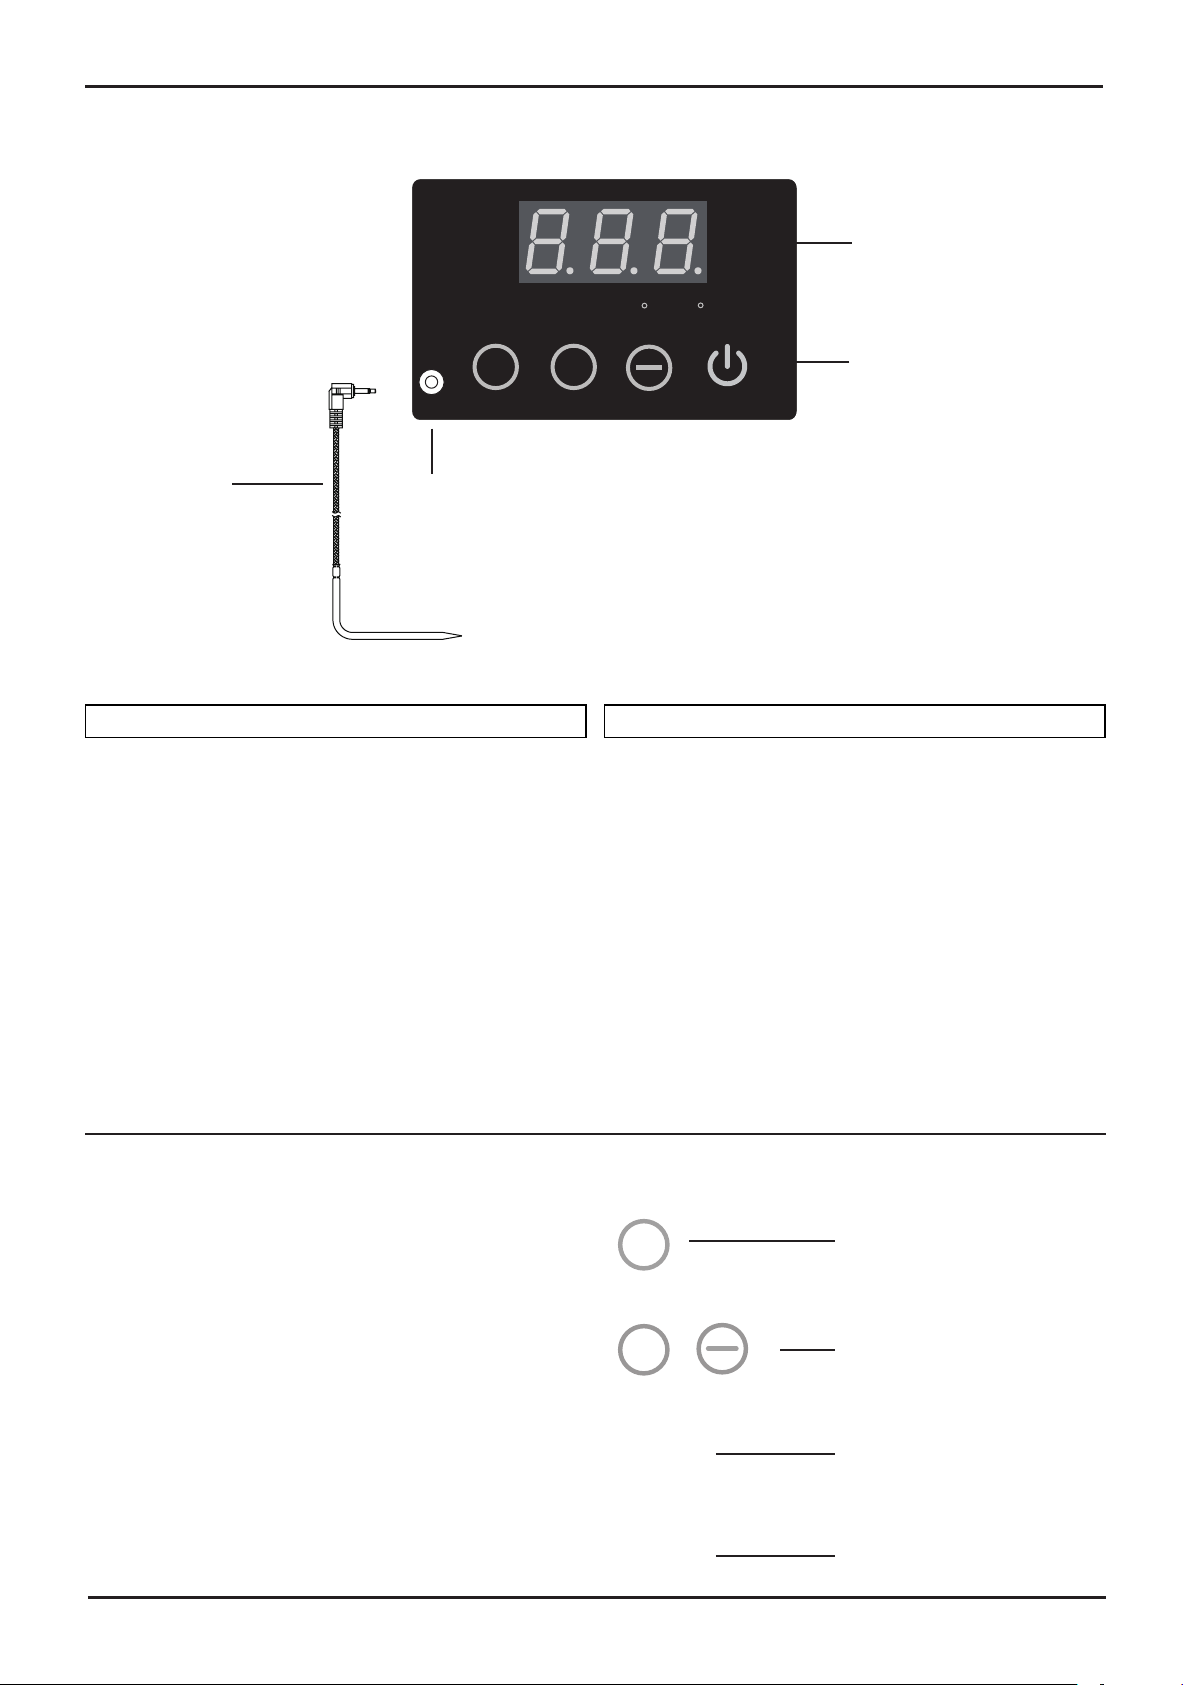
Temperature display
(Present/Set)
NOW
Pre
heat
Meat probe
Meat probe socket
TURNING ON
Check the grease tray for any grease. If it has
grease, remove the tray and clean with a warm
soap and water solution. Reinstall the tray after it
has been thoroughly cleaned and dried.
1. Plug grill into properly grounded outlet.
2. Press the power button for 2 seconds to turn on
the grill, and the light turns to green.
3. Press the pre-heat button to heat on the grill, the
internal temperature will rise to 500°F(250°C). or
press "+","-" to adjust cooking temperature setting
100°C~300°C(212°F~572°F).
4. Open lid and place food on the cooking grid once
preheatingisnished.
SET
+
TURNING OFF
• Press the power button for 2 seconds and its
• Press power button to activate the grill.
C
F
Power Button
(Green light: ON; Red light: OFF)
light turns to red, the display shows "HOT" while
the grill internal temperature is higher than 50°C.
After 30 seconds all button lights and display turn
oifthegrillinternaltemperatureislower50°C.
NOTE:
• Pre-heat mode:
Temperature set 250°C(500°F), and "beep" 2
times when the temperature is reach.
(Press "Pre heat" 3 seconds to switch°C/ °F)
• Grill mode:
Press "+" or "-" to set the grill temperature,
Temperature range 100~300°C(212~572°F).
• Grill with meat probe mode:
1. Plug the meat probe into the display, it turns
to meat probe mode, starting temperature
100°C, set temperature 45°C~100°C.
2. when the setting temperature is reach, the
display shown "RES" after 3 times "beep"
sound,andturnsothegrill.
NOW
SET
7
Pre
heat
+
Pre Heat button
(Green light: ON; Red light: OFF)
Temperature setting button
Present Temperature
Setting Temperature
Page 8
CLEANING AND MAINTENANCE
Proper care and maintenance will keep your grill in
top operating condition and prolong its life. Follow
these cleaning procedures on a timely basis and
your grill will stay clean and operate with minimum
eort.
CAUTION: Be sure your grill is OFF, unplugged,
and cool before cleaning.
CLEANING THE COOKING GRID
Before initial use and periodically after, wash the cooking grid
in a mild soap and warm water solution. You can use a wash
cloth or nylon/bristle brush to clean your cooking grid. Dry the
cooking grid thoroughly before reinstalling back in the grill.
NOTE.
Dishwasher cleaning not recommended, detergents and
caustic cleaners can cause degradation to the porcelain
enamelnish.
CLEANING THE GREASE TRAY
Toreducethechanceofre,thegreasetraymustbevisually
inspected before each grill use. Remove the grease tray from
the grill. Remove any grease and wash the grease tray with
a mild soap and warm water solution. Dry the tray thoroughly
before reinstalling
CLEANING THE COOKING GRID
Grease can build up on the inside of the Grill. Visually
inspect the inside of the Grill before each Use. Unplug the
unit and remove the cooking grid. Wipe the inside of the grill
clean with hot soapy water and a soft cloth. Be careful not to
damage the elements.
Dry with a clean cloth. To ensure completely dry, switch the
grill on with the hood down for 4 - 5 minutes.
CLEANING THE COOKING GRID
Grease can build up on the inside of the lid. Visually inspect
the inside of the grill lid before each grill use. Unplug the unit
and use a wet washcloth to remove any grease. Leave the lid
open and let the grill dry before using it again.
CLEANING EXTERIOR STAINLESS STEEL
SURFACES
Before initial use and periodically thereafter, we suggest you
spotcleanyourgrill’sexteriorusingamildsoapandwarm
water solution. (Do not immerse the grill or cord in water.)
You can use a wash cloth or sponge for this process. Do not
useastiwireorbrassbrush.Thesewillscratchstainless
steel during the cleaning process. Unplug the unit (grill must
be completely cool) before cleaning exterior surfaces. Let the
unit completely dry before cookingl.
8
Page 9
GUIDE TO GRILLING
GRILLING STEAK
Preheat the grill. Open lid and place the meat on the Cooking
Grid. Cook the meat on both sides until seared. Cook until
done. Grilling times will vary according to meat thickness.
GRILLING HAMBURGERS
Preheat the grill. Open lid and place the meat on the Cooking
Grid. Cook the meat on both sides until seared. Cook until
done. Grilling times will vary according to meat thickness.
GRILLING POULTRY
Preheat the grill. Open lid and place the poultry on the
Cooking Grid. Cook the poultry on both sides until seared.
Cook until done. Grilling times will vary according to poultry
thickness.
Poultryskinisfattysoyoushouldexpectsomeare-ups.
You can choose to remove the skin or excess fat to prevent
theseareups.
GRILLING PORK
Preheat the grill. Open lid and place the meat on the Cooking
Grid. Cook the meat on both sides until seared.
Cook until done. Grilling times will vary according to meat
thickness.
GRILLING FISH
Preheatthegrill.Openlidandplacesh(skindown)onthe
GookingGrid.Cooktheshonbothsidesuntilseared.Cook
untilshisopaquebutstillmoist.
VEGETABLES AND FRUIT
Preheat the grill. Open lid and place food on the Cooking
Grid. Vegetables and fruit that work best on the grill are
relatively soft and require a short cooking time: mushrooms,
zucchini, tomatoes and skewered fruit such as apricots,
peaches and pineapple.
Forveryrmvegetables-particularlypotatoes-we
recommend that you partially boil until almost cooked, before
placing them on thegrill. Cooking times will be comparable to
normal pan frying.
9
Page 10
TROUBLE SHOOTING
IF THE GRILL FAILS TO PRODUCE ANY
HEAT
1. Be sure there is power to the grill. Try the following:
• Plug cord into properly grounded outlet.
• Outlet may be faulty. Try another outlet.
• Make sure the grill is on a dedicated outlet. The grill
cannot be used if there is another device plugged into
the outlet.
2. Press the power botton for more than 2 seconds.
3. Heating Element may need replacing. Call (03) 9562
3455toorderreplacementpartsandonlyuseThermolm
certiedreplacementparts.
4. The internal heating element will automatically shut itself
OFF after the set time limit has been reached. open the
lid to release some heat, the heating element will work
automatically, or set a higher temperature.
CIRCUIT BREAKER CONTINUES TO TRIP
1. Circuit may be overloaded with appliances.
• Disconnect other appliances from the circuit when
using your grill.
2. Electrical connections may be damp or wet.
• Alwayskeepcorddryandotheground.
• Never put the cord or heating element in water or any
liquid.
• Do not use this grill when it is raining.
• If the grill is being used in a humid area, it may take
a day or more for electrical circuits to thoroughly dry
before the breaker will reset. This is not a defect of the
product.
3. Electrical Cord may be damaged. Never operate your grill
if the cord or plug appears to be damaged. Call (03) 9562
3455toorderThermolmProductsreplacementparts.
IF THE GRILL COOKS TOO SLOWLY
• Always preheat the grill with the Lid closed before putting
food into the grill.
• Ifitiswindy,repositionthegrilltoreduceitseects.
AMBIENT CONDITIONS
Grilling in a colder climate or at a higher altitude will
extend your cooking time. Sustained wind will lower the
grill’sinternaltemperature.Placegrillsowindblows
against the front of the grill.
IF YOU HAVE EXCESSIVE FLARE-UPS
WHEN COOKING:
1. The fats and juices dripping from grilled food can cause
areups.Tominimiseare-upstrythefollowing:
• Trim excess fat from meat before grilling.
• Consider choosing leaner cuts of meat for cooking
2. Grease and food build up inside your grill and grease tray.
• Besureyourgrillisturnedo,unplugged,and
completely cool. Follow the Cleaning and Maintenance
steps found in this manual to clean the Cooking Grid,
grease Tray, and inside of bowl and lid.
10
Page 11
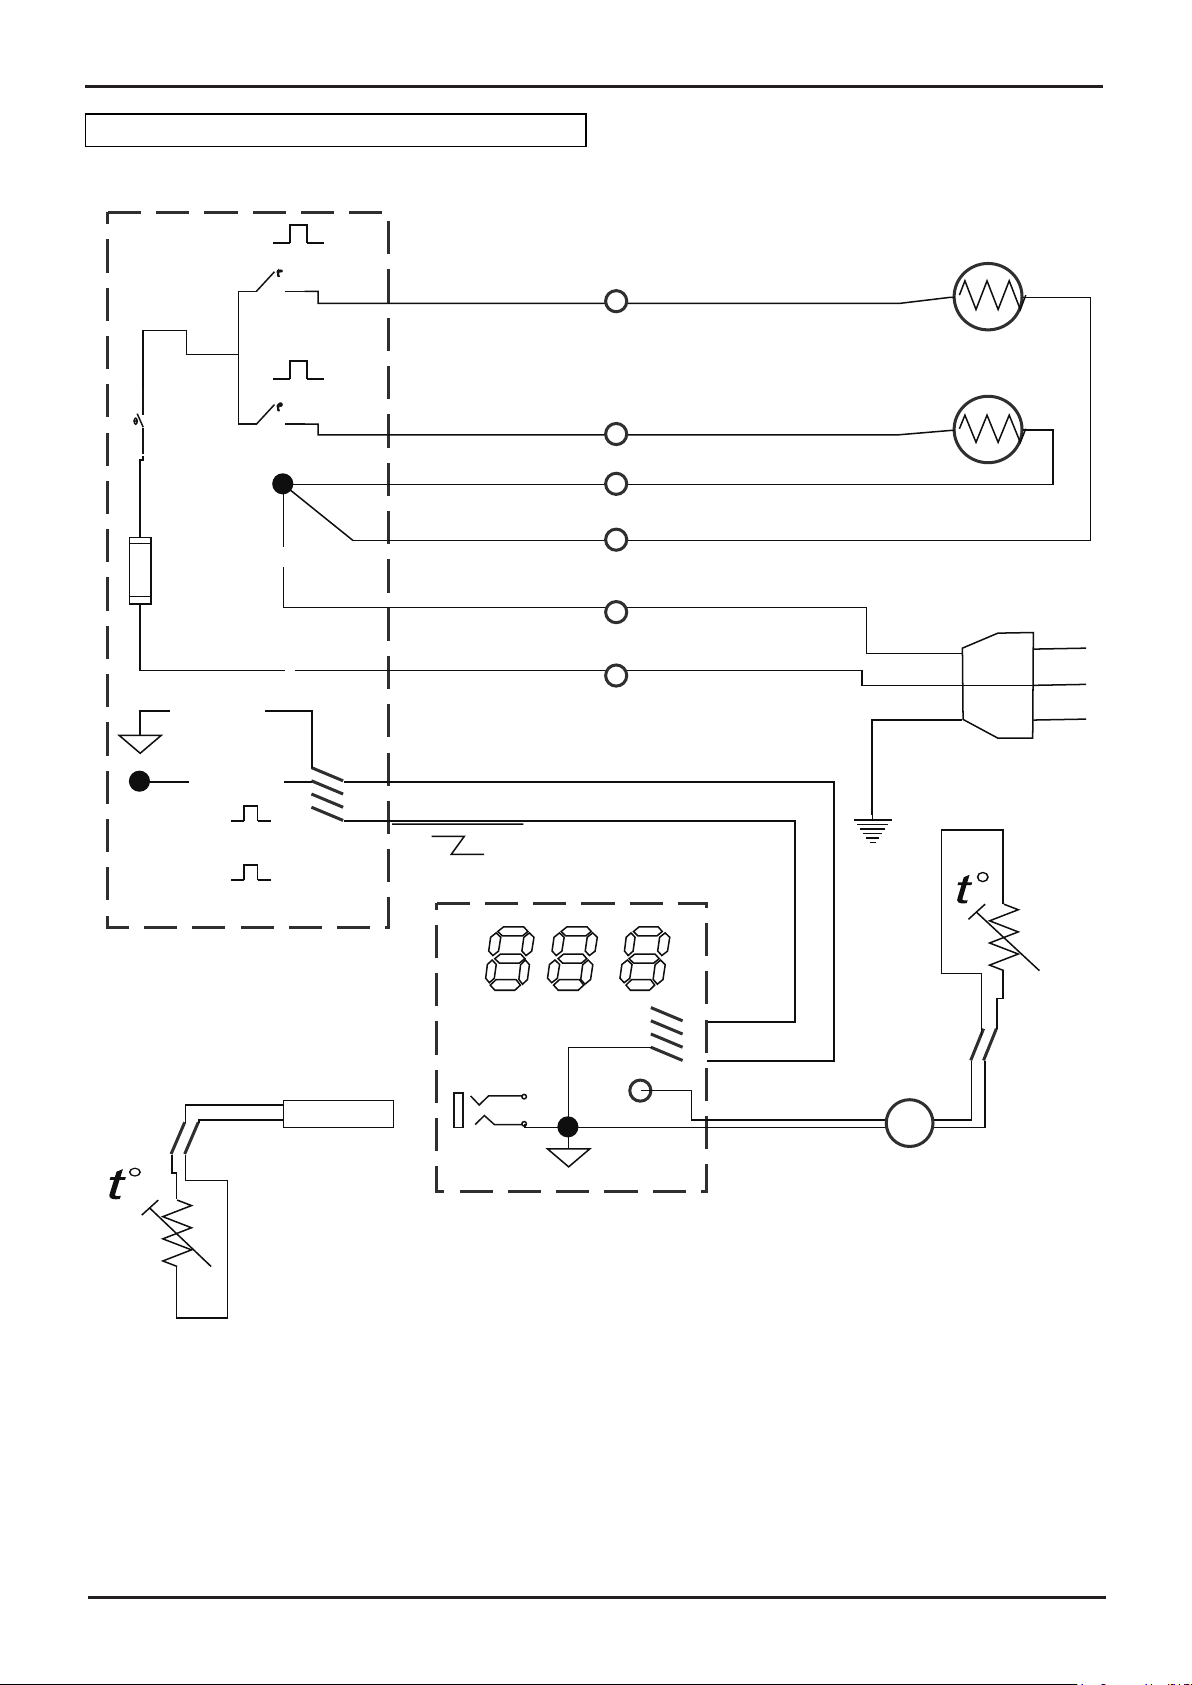
TROUBLE SHOOTING
Yellow/Green/1.0mm290°C
fuse
Temperature
controller
240V1100W
240V1100W
Black/14awg 200°C brown/1.0mm290°C
L
Red/14awg 200°C
White/18awg 200°C
250 terminals
White/14awg 200°C Blue/1.0mm290°C
N
Blue/14awg 200°C
White/18awg 200°
C
Blue/14awg 200°C White/18awg 200°C
yellow/relay1
Red/relay2
Black/White/yellow/Red/4p/24awg/200°C
Black/GND
White/+5V
White/18awg 200
°C
Red/14awg 200°C
power box
Furnace thermometer
PT1000/resistance
temperature
detector
Black
Red
Display box
PT1000/resistance
temperature
detector
Meat Thermometer
2p terminals
SPECIFICATION AND WIRING DIAGRAM
11
Page 12
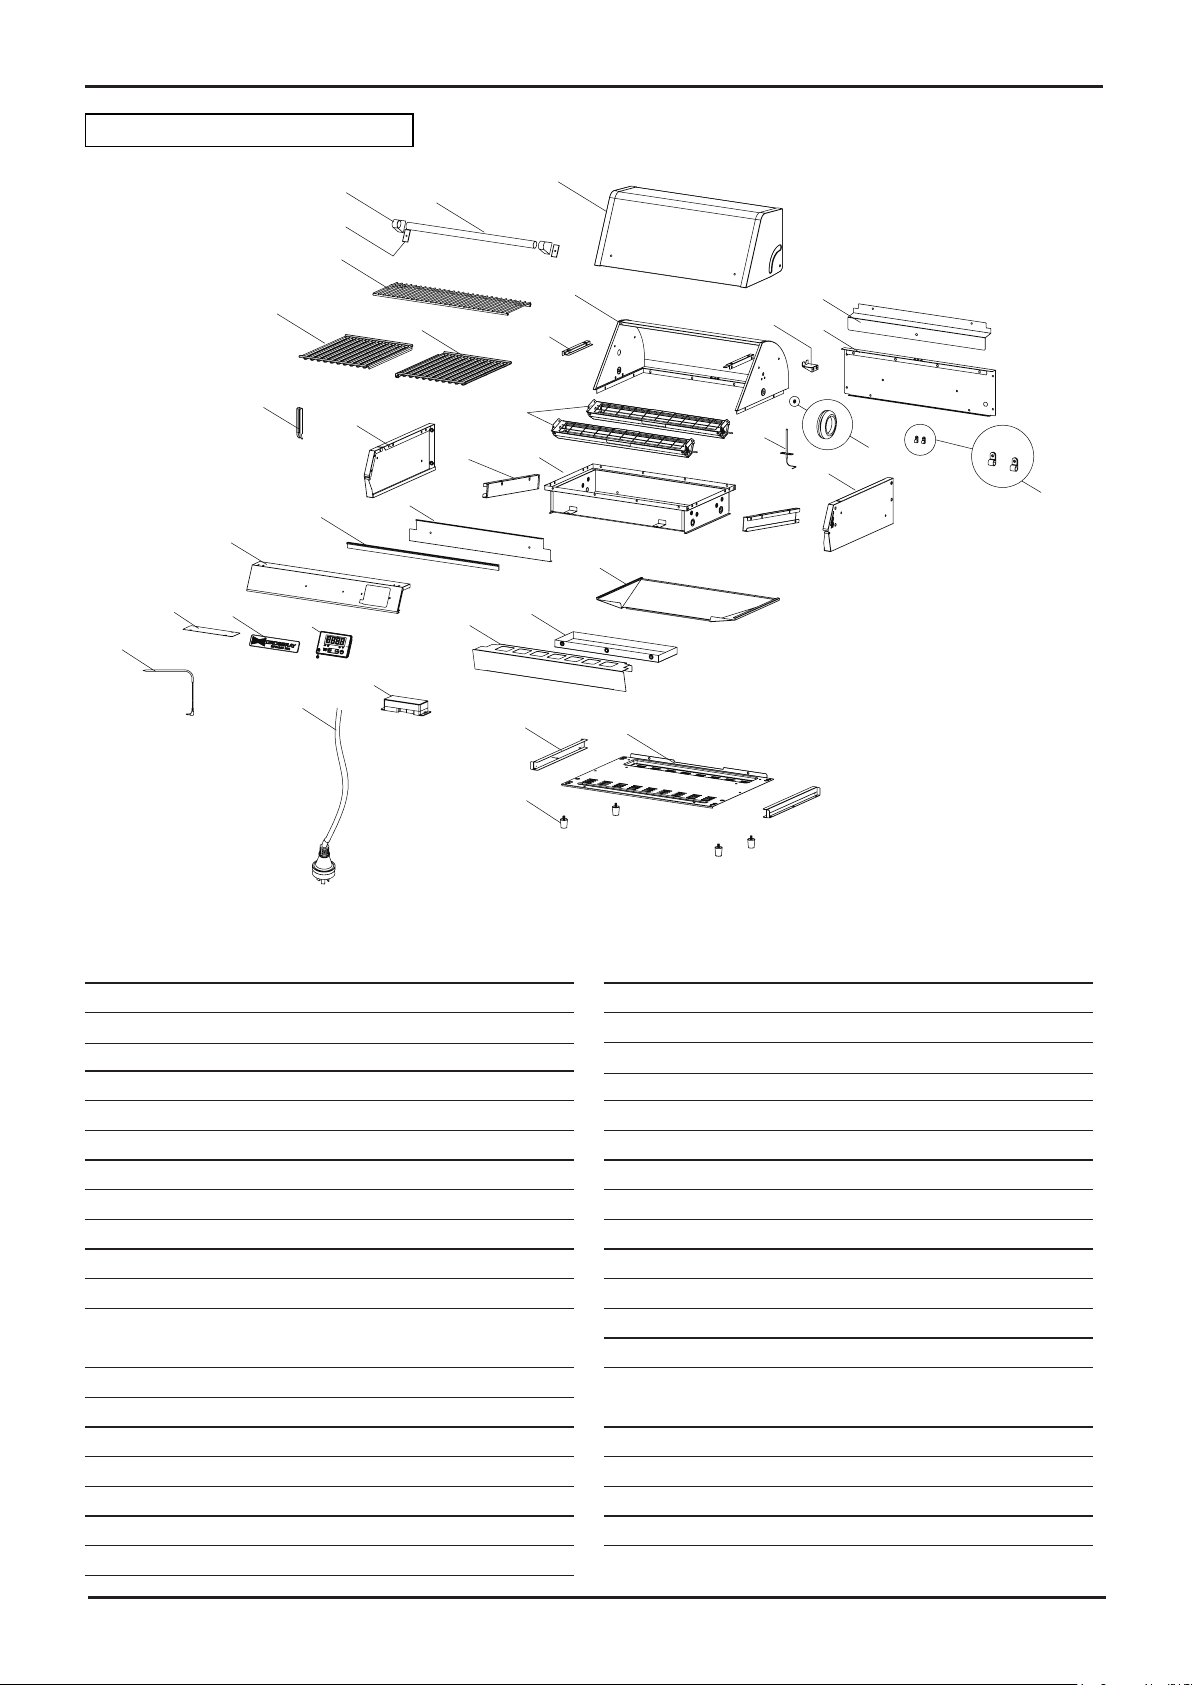
PARTS LIST AND DIAGRAM
Part List
34
23
22
32
36
12
29
27
11
10
1
13
18
16
9
15
17
35
2
26
30
4
5
6
7
14
21
24
25
33
3
8
19
20
28
31
KEY DESCRIPTION PART# QTY
1 Lid Assembly PD01010053 1
2 Grill Bowl, Rear Upper PD04010073 1
3 Lid Handle PD02010065 1
4 Lid Handle Seat PD02010077 2
5 Lid Handle Seat Pad P06802014G 2
6 Warming Rack PD07010021 1
7 Cooking Grid P01609002H 1
8 Cooking Grid P01609003H 1
9 Rotisserie Rod Bracket P033280944 1
10 Warming Rack Bracket P033280954 2
11 Grill Bowl PD04020025 1
12 Lamp Assembly
13 Grill Temperture Probe P05385002B 1
14 Grill Bowl Panel, Left PD04010085 1
15 Grill Bowl Panel, Right PD04010095 1
16 Grill Bowl Panel, Rear PD04010105 1
17 Protective Pad P05518115K 2
18 Grill Bowl Heat Shield, Rear P06923010B 1
19 Wires Cover P05377003G 2
- 240v PD05020010
- 220v PD05020030
2
KEY DESCRIPTION PART# QTY
20 Grill Bowl Heat Shield, Front P06923010B 1
21 Control Panel Strip P06804010G 1
22 Grill Panel, Front PD09010063 1
23 Control Panel Cover PD09010073 1
24 Control Panel PD10010020 1
25 Power Box PD10010030 1
26 Grease Tray P0271797C4 1
27 Grease Receptacle P0270145D4 1
28 Grease Receptacle Handle P02720212B 1
29 Grease Receptacle Bracket P033190094 2
30 Grill Panel, Bottom PD20010032 1
31 Grill Leg P05391024P 4
32 Name Plate P00403010D 1
33 Cord
34 Meat Probe P05385004B 1
35 Cable Clip PD06020020 2
36 Cooking Grid Hook P05709005B 1
Operator Manual P80196023A 1
-240v PD06010050
-220v PD06010080
1
12
Page 13

WARRANTY
WARRANTY PROVISIONS
Thermolmhasgreatcondenceinitsproductsandoersexcellentwarrantyprovisionsinadditiontoallrightsandremediesto
whichyoumaybeentitledbylaw.For‘Crossray’barbecues,ouradditionalwarrantyperiodappliesfor2yearsfromthedateof
purchase. If a manufacturing defect covered by our additional warranty becomes apparent within this period of 2 years then we
guarantee that the defective component will be replaced or repaired at no charge.
Subjecttothebelowexclusions,ouradditionalwarrantyoers:
• 2 year guarantee against damage to stainless steel components from rust-through
• 2yearguaranteeagainstrust-throughforpartsnishedinenamel
• 2 year guarantee against rust-through for coated parts
Thesebenetsoperatealongside,andinadditionto,theconsumerguaranteestowhichyouareentitledundertheAustralian
Consumer Law. Our goods come with guarantees that cannot be excluded under Australian Consumer Law. You are entitled to
a replacement or refund for a major failure and for compensation for any other reasonably foreseeable loss or damage. You are
also entitled to have the goods repaired or replaced if the goods fail to be of acceptable quality and the failure does not amount
to a major failure.
ALL RIGHTS UNDER OUR ADDITIONAL WARRANTY BECOME NULL AND VOID IF:
• The product is not assembled and installed in accordance with the instructions
• The product is used improperly
• Scratches, dents, damage, discolouration etc. occur due to heat and aggressive cleansing agents
• The product is used for commercial purposes and / or is rented out
• Theproductsuersdamagefromtheforcesofnature
• Burn spots occur due to improper maintenance and / or cleaning of the grill
(for example due to grease / fat remaining behind and burning)
• The product is not being used in Australia.
• Damage is caused by a third party
THE FOLLOWING ARE EXCLUDED FROM OUR ADDITIONAL WARRANTY:
• Peeling / separation of the coating as a result of grease / fat being burned in
• Peeling / separation of the paint / enamel and coating
• Lightrustsuchasash-rust
• Normal wear and tear resulting from usage
• Faultswhichdonotnoticeablyaecttheoperationorvalueoftheappliance
All warranty coverage excludes grill paint loss or rusting (except rust-through) which are either expendable parts that can wear
out from normal use in less than 2 years, or are conditions that can be the result of normal use, accident or improper installation
or maintenance.
SPARE PARTS
Thermolmkeepalargenumberofsparepartsinstockinordertodealwithclaimsquicklyandeectively.However,ifaspare
partisnotinstockThermolmreservestherighttosendasimilarparttoresolvetheproblem.
Model of BBQ Part that requires replacement
Year of purchase
Your Contact Details
FOR CUSTOMER REFERENCE
(Recordandleinasafeplace)
Purchased from Receipt Number
Date purchased Serial No.
Model Name and Number
13
 Loading...