

Page 1
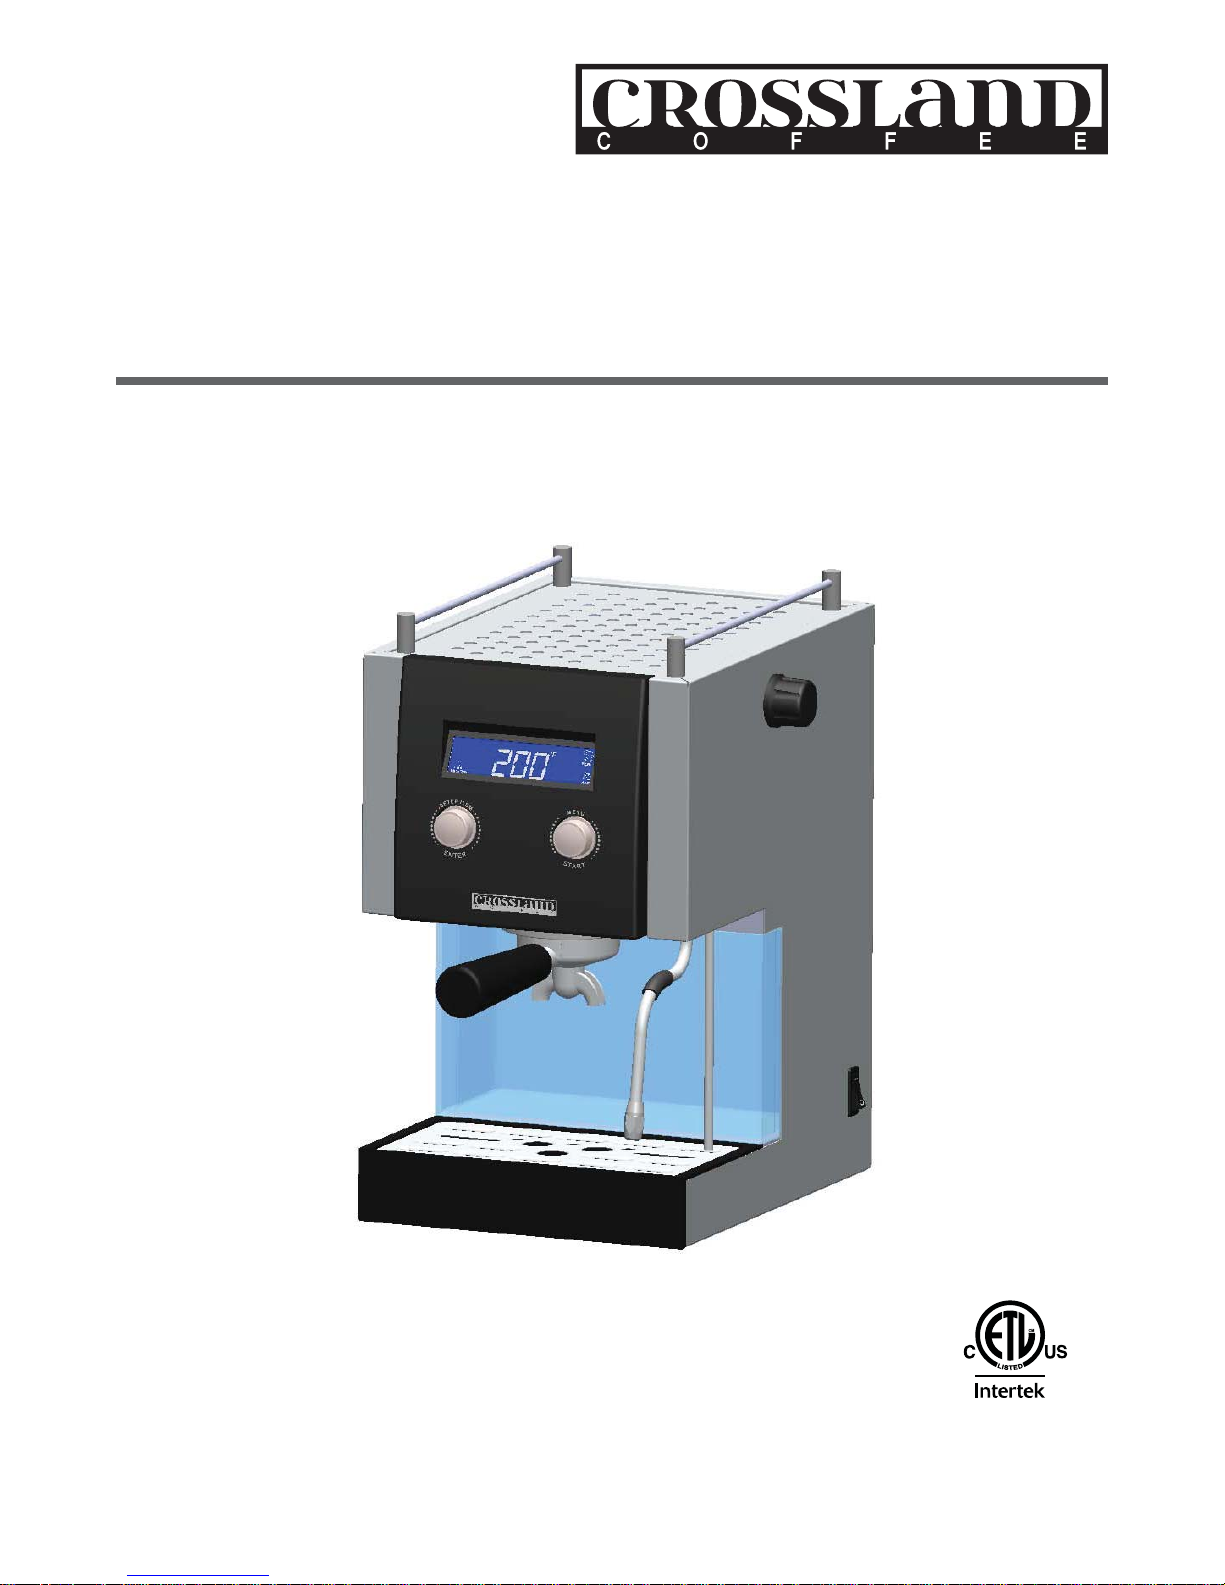
Home Espresso Machine
Model CC1
User Manual
4003058
CONFORMS TO ANSI/ULSTD. 1082
CERTIFIED TO
CAN/CSA STD. C22.2 No. 64
Version 1.0
Page 2
English
Crossland Co ee - Seattle, WashingtonCrossland Co ee - Seattle, Washington
Page 3
User Manual
Safety
IMPORTANT SAFEGUARDS ............................................................ 2
General Warnings and Safety Speci cations ................................. 2
Installation
Unpack ......................................................................................... 4
Technical Data .............................................................................. 4
Check Contents ............................................................................. 4
Component Description ................................................................. 5
LCD Display .................................................................................. 5
Installation Instructions ............................................................... 6
Maintenance
Maintenance Instructions ............................................................. 9
Troubleshooting
Troubleshooting Instructions ........................................................ 9
Schematics
Hydraulic Schematic ................................................................... 10
Electrical Schematic .................................................................... 11
Software Errors
Software Error Codes .................................................................. 11
Exploded Diagrams
Exploded Parts Diagram 1 ........................................................... 12
Exploded Parts Diagram 2 ........................................................... 13
CC1
English
1
www.crosslandco ee.com
Page 4
User Manual
1. IMPORTANT SAFEGUARDS
When using electrical appliances, basic
safety precautions should always be
followed, including the following:
1.1 Read all Instructions.
1.2 Do not touch hot surfaces. Use
handles or knobs.
1.3 To protect against re, electric shock
and injury to persons do not immerse
cord, plugs, in water or other liquid.
1.4 Close supervision is necessary when
any appliance is used by or near children.
1.5 Unplug from outlet when not in use
and before cleaning. Allow to cool before
putting on or taking off parts, and before
cleaning the appliance.
1.6 Do not operate any appliance with
a damaged cord or plug or after the
appliance malfunctions, or has been
damaged in any manner. Return appliance
to the nearest authorized service facility
for examination, repair or adjustment.
1.7 The use of accessory attachments
is not recommended by the appliance
manufacturer may result in re, electric
shock or injury to persons.
1.8 Do not use outdoors.
1.9 Do not let cord hang over edge of
table or counter, or touch hot surfaces.
1.10 Do not place on or near a hot gas or
electric burner, or in a heated oven.
1.11 Always attach plug to appliance rst,
then plug cord into the wall outlet. To
disconnect, turn any control to “off,” then
remove plug from wall outlet
1.12 Do not use appliance for other than
intended use.
SAVE THESE INSTRUCTIONS
2. General Warnings and Safety
Speci cations
2.1 Warning symbols. Instructions
in this manual which refer to this symbol
must be followed with great care to avoid
accidents to persons or damage to the
machine.
2.2 This manual must be kept in a safe
place and be available for consultation to
new and experienced users alike.
2.3 The packing elements (plastic bags,
expanded polystyrene, nails, cardboard,
etc.) must not be left within the reach of
children, as they are potential sources of
danger.
2.4 Ensure the data on the machine
corresponds to those of the mains
electrical supply before connecting the
equipment.
2.5 A short power-supply cord is provided
to reduce risks resulting from becomming
entangled in ir tripping over a longer
cord.
2.6 Longer detachable power-supply
cords or extension cords are available and
may be used if care is exercised in their
use.
2.7 If a long detachable power-supply
cord or extension cord is used:
• The marked rating of the detachable
power-supply cord or extension cord
should be at least as great as the
electrical rating of the appliance.
• If the appliance is of the grounded
type, the extension cord should be a
grounding-type 3-wire cord.
• The longer cord should be arranged so
that it will not drape over the counter
English
2
Crossland Co ee - Seattle, Washington
Page 5

User Manual
top or table top where it can be pulled
on by children or tripped over.
2.8 If in doubt, request an inspection
of all electrical connections by quali ed
personnel. The mains electrical supply
must have proper grounding
2.9 Using any electrical device requires
that certain fundamental rules be
observed. In particular:
• do not touch the device with wet or
humid hands and feet
• do not use the device while having no
shoes on your feet
• do not use extension cords in bath or
shower rooms
• do not unplug the device from the
power outlet by pulling on the power
supply cable
• do not expose the device to
atmospheric agents (rain, sun, etc.)
• do not allow children or untrained
people to use this device.
The manufacturer shall not be held
responsible for any damages caused
by improper and irrational use.
2.10 Never use warm or hot water to ll
the water reservoir. Use cold water only.
To avoid scale build up, use puri ed or
bottled water.
2.11 Use extreme caution when using hot
water or steam.
2.12 Before carrying out any maintenance
and/or cleaning operations, turn the main
switch, which is located on the machine,
to the “0” position, and disconnect the
machine from the electrical network
by unplugging the cord or by switching
off the relative circuit breaker. For any
cleaning operation, follow exclusively the
instructions contained in this manual.
2.13 Grounding this appliance is
mandatory. The manufacturer
declines all responsibility in the
event of improper grounding.
2.14 Disposal of the packing material.
The transport and protective packing has
been selected from materials which are
environmentally friendly for disposal and
can normally be recycled. The packing
elements (plastic bags,expanded polystyr
ene,nails,cardboard,etc.) must not be left
within the reach of children,as they are
potential sources of danger.
2.15 Disposal of your old appliance or
machine.
Electrical and electronic appliances/
machines often contain materials which, if
handled or disposed of incorrectly, could
be potentially hazardous to human health
and to the environment. However, they
are essential for the correct functioning
of your appliance or machine. Therefore,
please do not dispose of it with your
waste.
Please dispose of it at your local
community waste collection / recycling
center and ensure that it presents no
danger to children while being stored for
disposal.
CC1
English
3
www.crosslandco ee.com
Page 6
User Manual
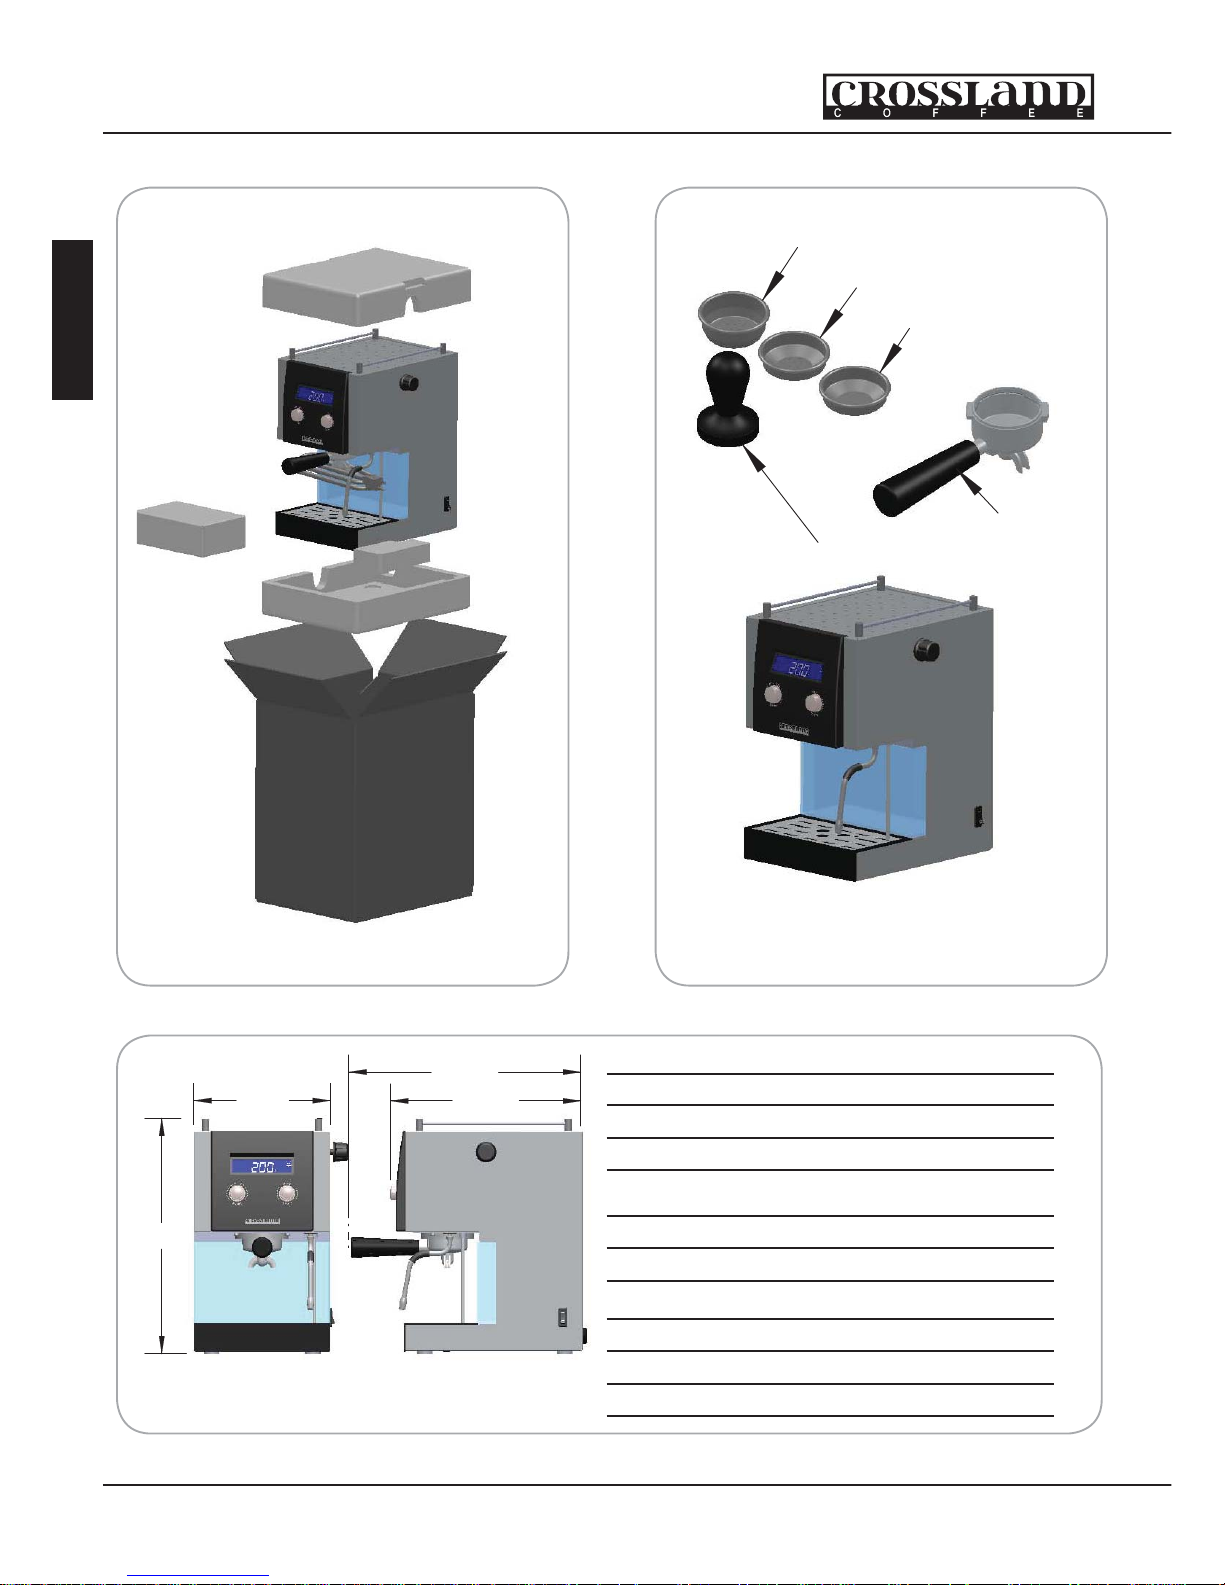
Portafilter
Blind Filter Basket
Double Filter Basket
Single Filter Basket
Coffee Tamper
Unpack Check Contents
15.6
15.4
9.1
12.6
Electrical
AC Power 110-120 VAC
Coffee Boiler 1150 Watts
Steam Boiler 700 Watts
Mechanical
Boiler Material Stainless Steel
Boiler Volume ~500cc/mL
Water Reservoir ~2 Liter
Net Weight 8.5/19 Kg/lb
Gross Weight 9.5/21 Kg/lb
Packing Dimensions 14 X 11 X 17 In.
Technical Data
English
4
Crossland Co ee - Seattle, Washington
Page 7
User Manual
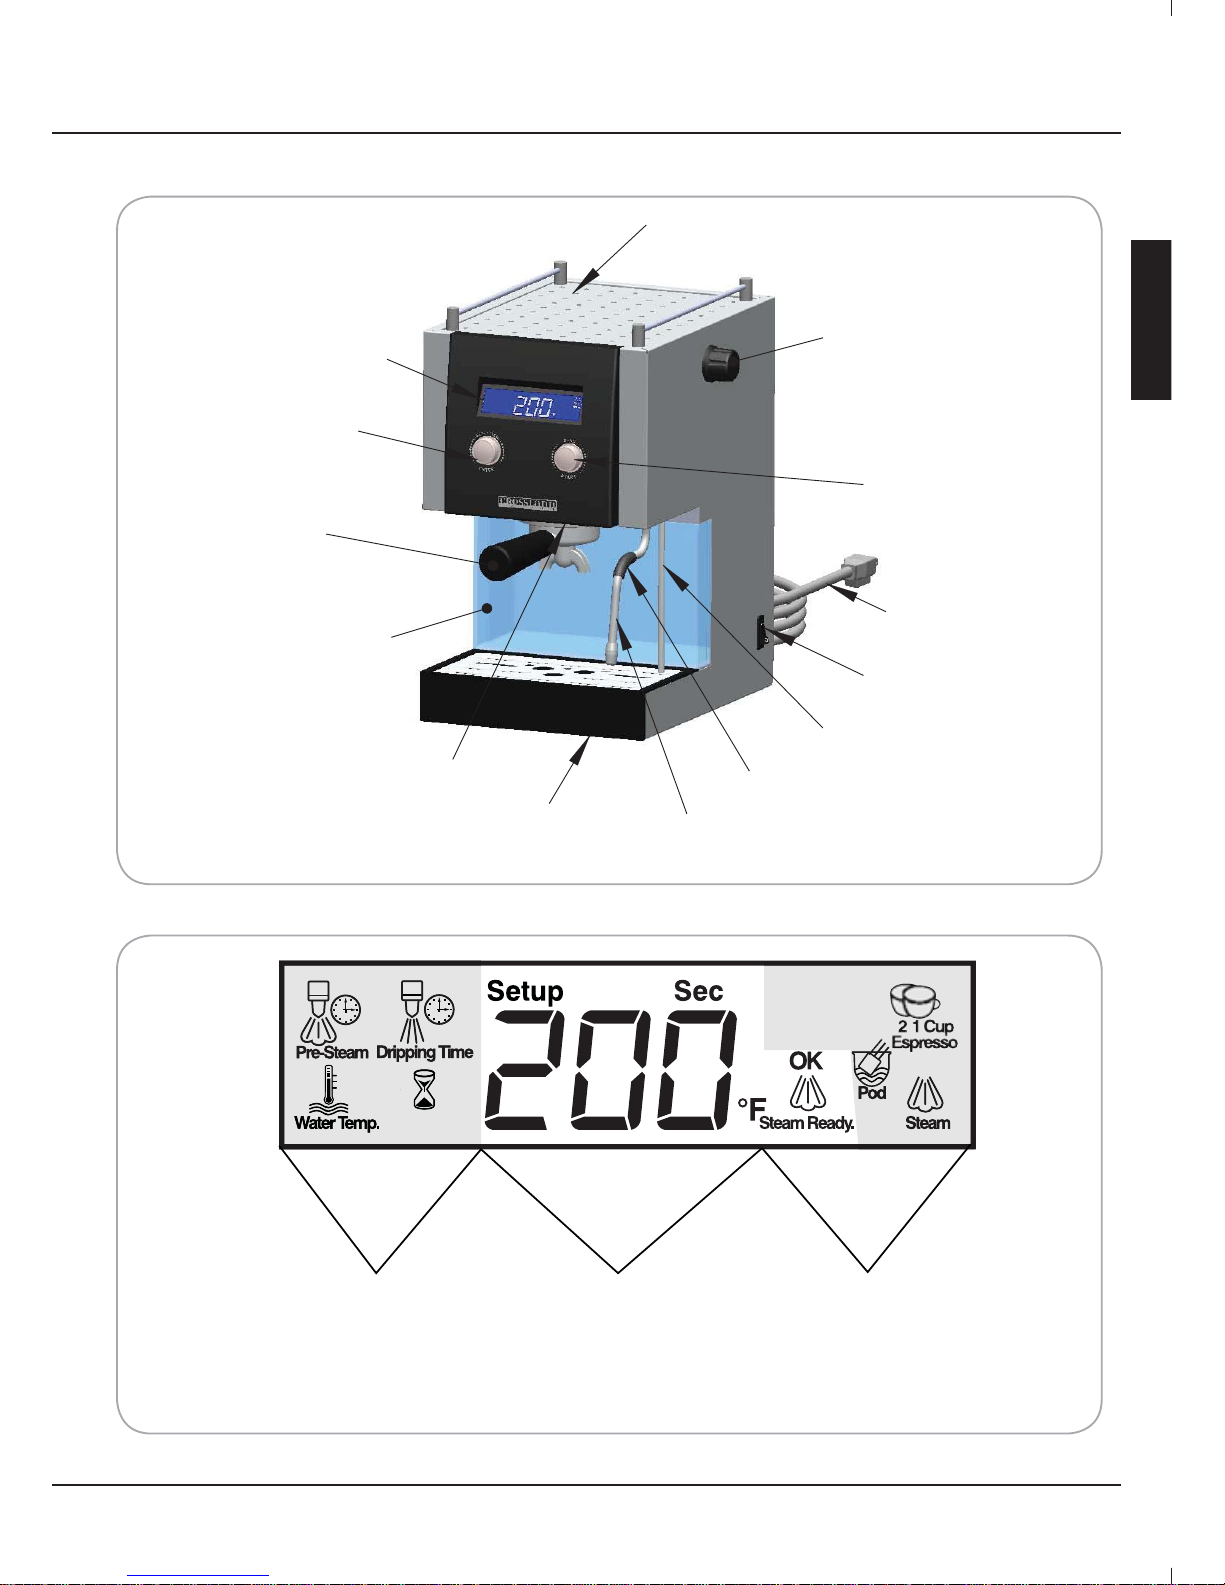
Brew Head
Steam Wand
Steam Valve
Power Switch
Relief Tube
Cup Tray
Drain Tray
Portafilter
Anti-Burn Protection
Water Reservoir
Power Cord
Menu Button
Setup Button
LCD Display
Waiting Time
Pod
Waiti
ng Tim
e
Pod
Programmable
Parameters
Menu
Items
Temperature
and mode
LCD Display
Component Description
CC1
English
5
www.crosslandco ee.com
Page 8
User Manual
Installation Instructions
This espresso machine comes ready to
be installed in accordance with the data
printed on the identi cation label.
Ensure the mains electrical supply
has an equal or greater rating than
required by this espresso machine.
Grounding this appliance is
mandatory. The manufacturer declines
all responsibility in the event of improper
grounding.
1.1. Filling Water Reservoir
Fill the water reservoir before using this
machine, after a long period of inactivity,
or when the tank is empty.
• Pull the water reservoir toward you
slightly, then shift the tank to left side.
• Pour about 2 liters of water into the
tank(use drinking water, softened if
possible).
• You can also remove the water
reservoir completely to re ll directly.
Never operate machine without
water as damage to the pump may occur.
Damage to pump from this cause is not
covered under warranty.
1.2. Power Connection
Connect the espresso machine to the
mains electrical supply at your location.
1.3. Machine ON
Check to ensure steam valve is closed.
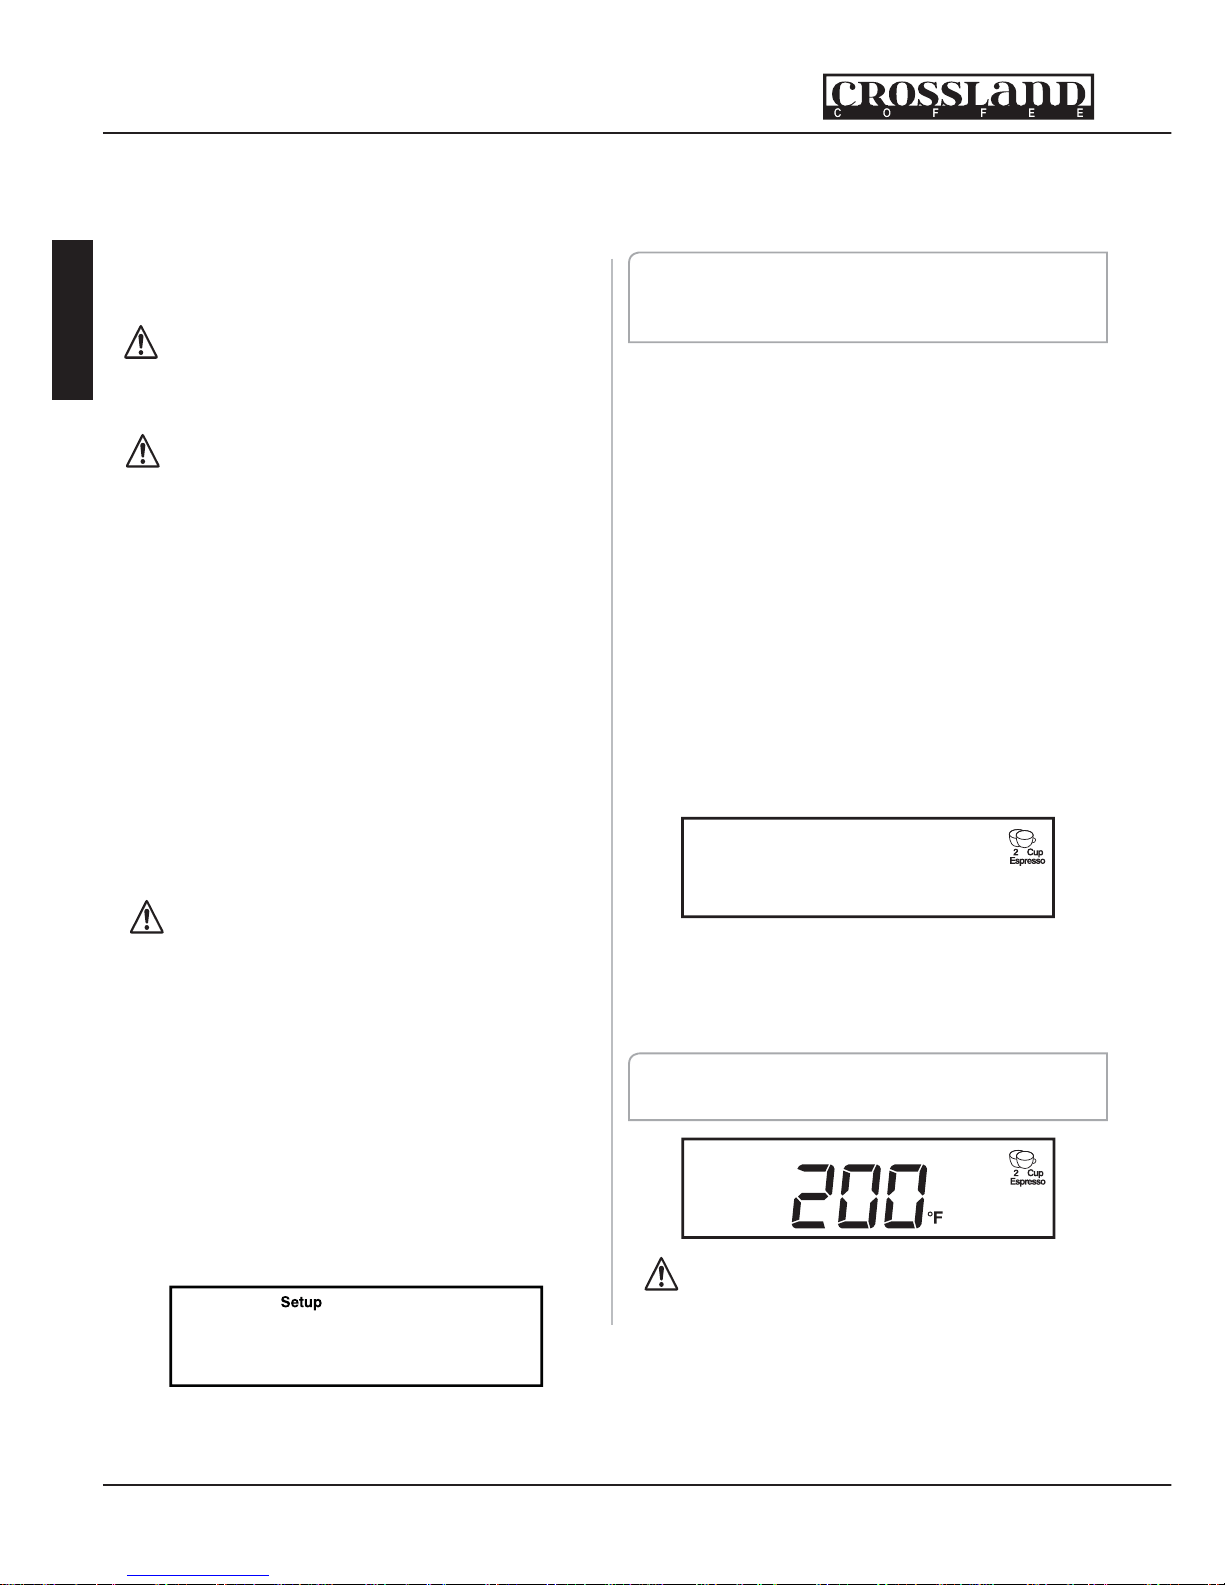
Turn on the power switch. The LCD
display will light and display the
following:
Press the <menu> button to activate the
boiler lling process.
Note: If the Menu button is not pressed
after the power is turned on, the machine
will automatically turn on after 60
seconds.
You will hear the sound of the operating
pump and after few moments, water will
begin to exit from the brew head (initial
lling takes about 1 minute). Push the
<menu> button again, the pump stops
and the heater is turned on
Upon initial installation it is good to
activate this process again, by pressing
the <menu> button, to ow water
through the machine. This helps to rinse
all internal components.
During the heating process the display
will ash 3 bars (see below) while heating
to 165°F. Above 165°F the measured
temperature will will be displayed.
- - -
The boiler temperature indicated on LCD
display will rise until reaching the Set
Temperature. Once the Set Temperature
is reached, the machine is ready for use.
Note: The menu item icon will ash
until heating is complete.
During the initial installation, the
boiler ll process will take about 1 (one)
minute. Incorrect boiler ll process may
damage the heating element. The boiler
is full when water exits from the brew
head.
English
6
Crossland Co ee - Seattle, Washington
Page 9
User Manual
1.4. Making Coffee
Detach the porta lter from the brew head
Place the desired amount of coffee into
the lter and press the coffee using the
tamper
Re-connect and tighten the porta lter in
brew head
Position espresso cup under the exit
outlets of the porta lter
Turn the <menu> button to select the
desired menu item
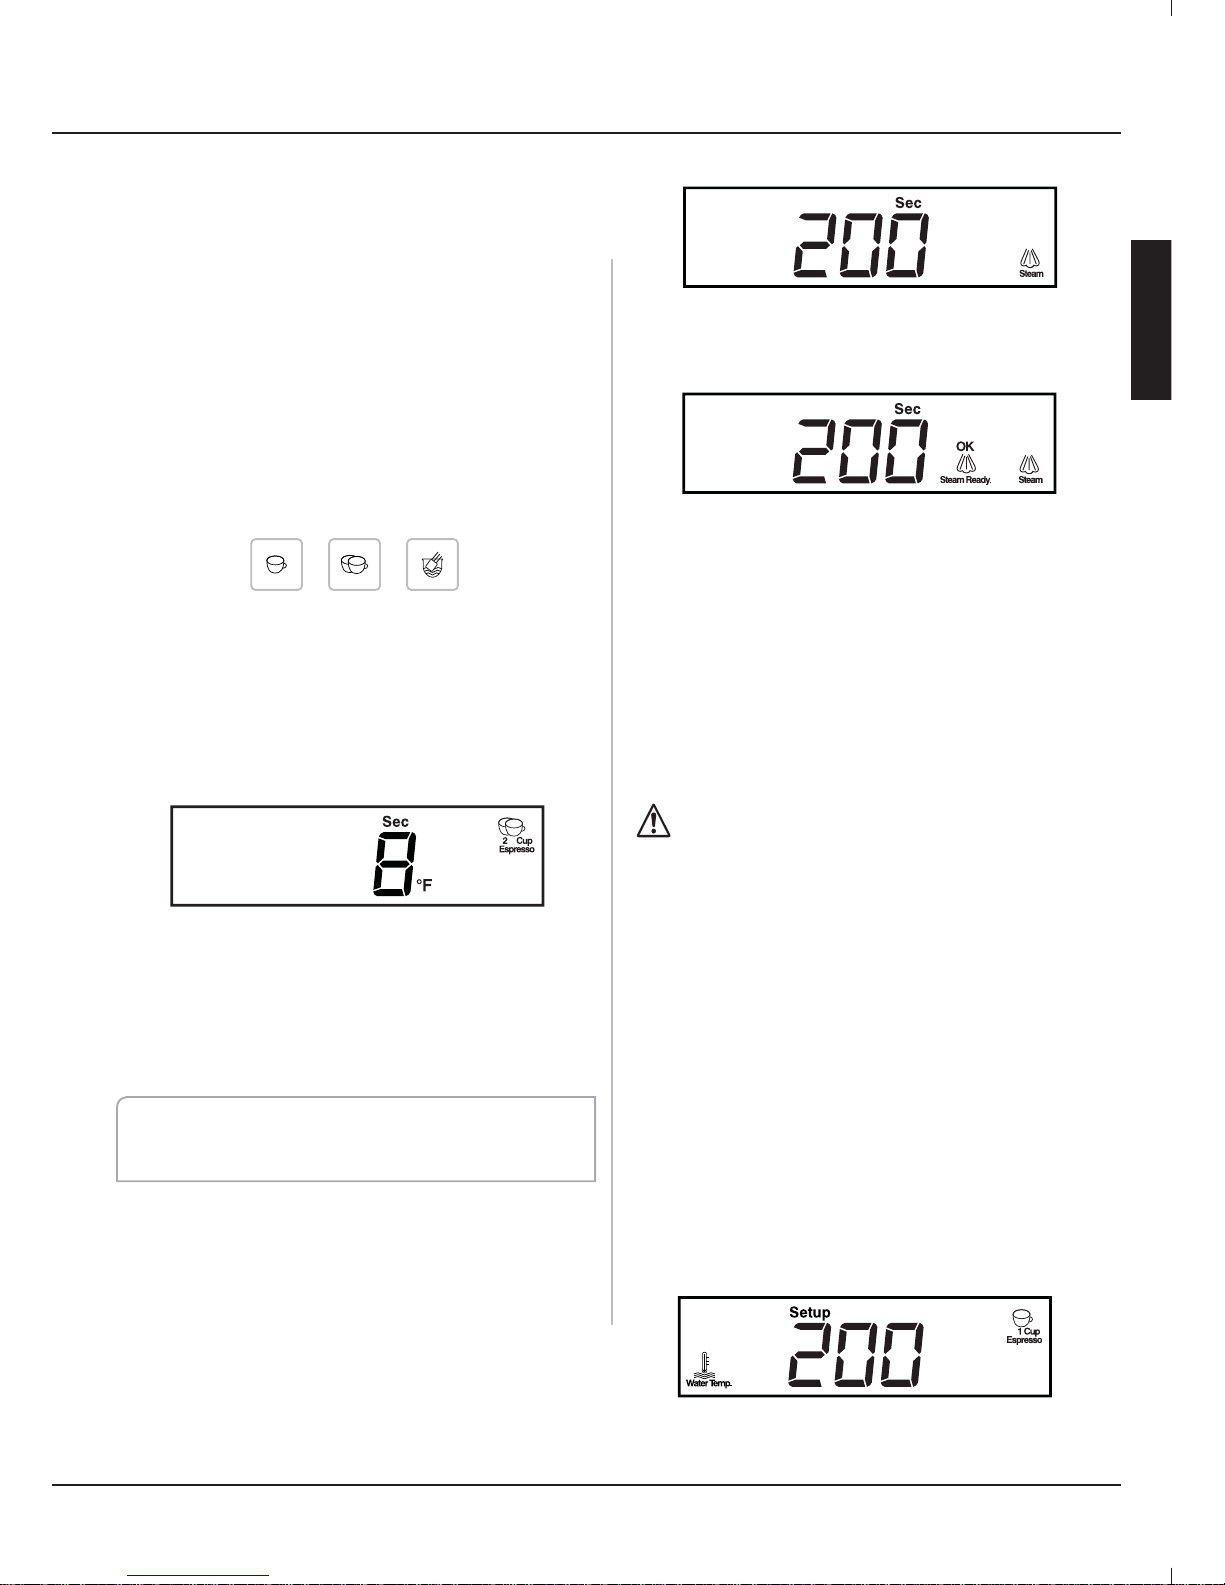
There are 3 selections:
1 cup Espresso, 2 Cup Espresso and Pod
(Please see the programming section to
change parameters of the menu items)
After the desired menu item is selected,
press the <menu> button. The brew
process starts and the machine will
execute the selected menu item process.
The display will show elapsed brew time.
When the brew process is complete the
internal 3 way valve will release the
remaining pressure in the porta lter
through the relief tube into the drain tray.
Then the porta lter may be removed for
cleaning and another use.
Note: Pressing the <menu> button at any
time during any process will stop the process
immediately
.
1.5. Steam Function
Rotate the <menu> button and select
the <Steam> menu item, then press the
<menu> button to enter steam mode.
The Steam Icon will ash until ready.
The machine will begin to heat the steam
boiler and will display the <OK Steam
Ready> icon when steam mode is ready.
Slowly rotate the steam knob. The steam
will come out from steam nozzle and heat
the liquid to the desired temperature.
When nished clean the steam nozzle
with damp cloth.
Discharge a little steam to clean out the
discharge hole in steam nozzle.
Press the <menu> button again to exit
steam mode. Then rotate the <menu>
button to desired menu selection.
The steam and steam nozzle can be
very hot. Use care when handling.
1.6. Hot Water
Open the steam knob to deliver hot water
from the steam wand. This may be done
at any time the machine is in the ready
status.
1.7. Programming
All menu items have independent
parameters. You can easily setup
personal parameters to suit your exact
requirments.
Press the setup button for few seconds to
enter the programing menu. The “Setup”
icon will display on the LCD display.
CC1
English
7
www.crosslandco ee.com
Page 10
User Manual
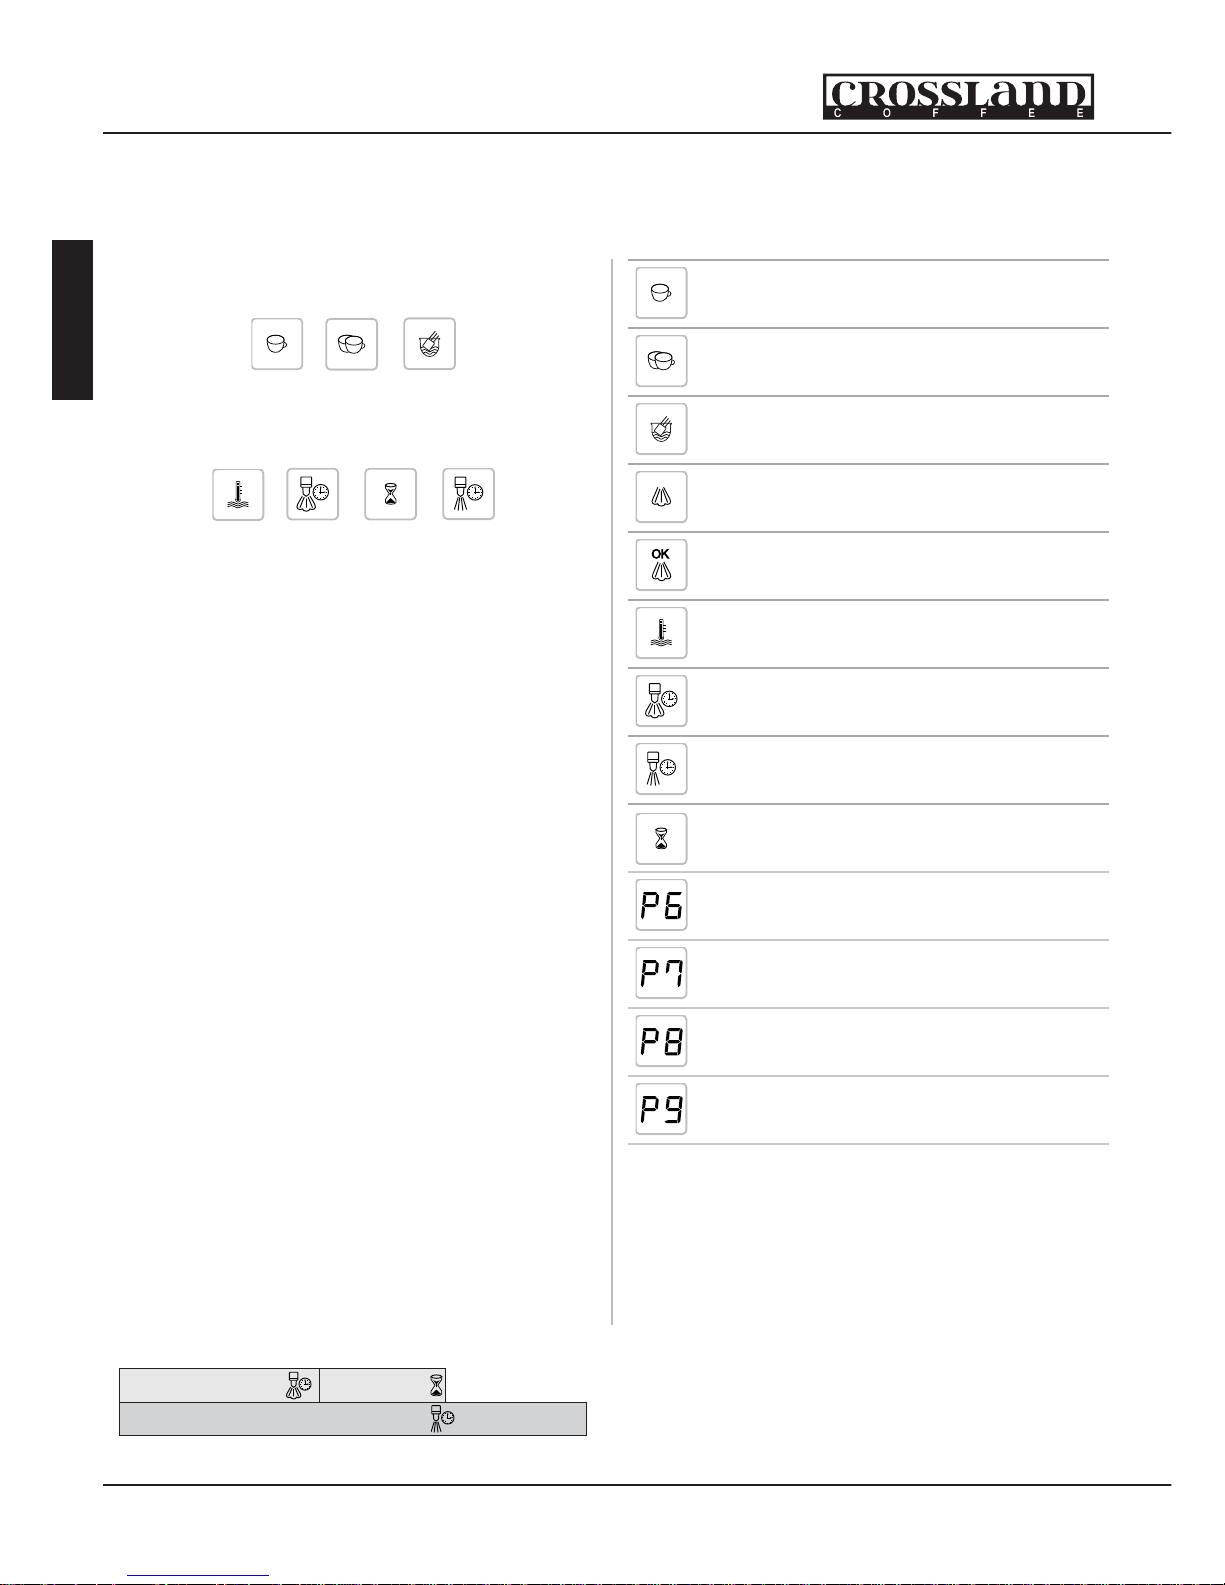
Icon Name Description
1 Cup
Espresso
Programmable
Menu Item #1
2 Cup
Espresso
Programmable
Menu Item #2
Pod
Programmable
Menu Item #3
Steam
Steam
Menu Item
OK Steam
Ready
Lights When
Steam is Ready
Water Temp.
Set Temperature
of Brew Water
Pre-Steam
0-15 Sec.
Seconds of
Pre-Infusion
Dripping Time
20-100 Sec.
Total Coffee Brew
Time
Waiting Time
0-5 Sec.
Time to let water
soak into coffee
P - PID
Parameter
Adjust the P
Parameter
I - PID
Parameter
Adjust the I
Parameter
D - PID
Parameter
Adjust the D
Parameter
Temp Offset
Adjust the Display
Temp. Offset
While in the programming mode you are
able to display and change parameters for
each menu item. Rotating the <menu>
button changes between the 3 menu
items.
Rotating the <setup> button changes
between the parameters for the selected
menu item.
Rotate the <setup> button to select the
desired parameter. Press the <setup>
button and the parameter value begins
ashing. Rotate the <setup> button
to change the parameter value. Once
the correct value is displayed, allow the
parameter value to ash 3 times with out
any button movement. After 3 ashes
the value is automatically set. Repeat the
last procedure to setup all parameters for
all 3 menu items.
When all parameters are correct,
press the <menu> button to exit the
programming menu. See gure at right
to identify the display icons.
1.8. Pre-Infusion
This espresso machine has the capability
to perform electronic pre-infusion. This
function wets the coffee and allows
the water to soak into the coffee
before applying full pressure. When
this process begins, water is infused
into the coffee for a speci c amount
of time. Then the water stops and
the machine waits a speci c amount
of time. Then the machine continues
with the remainder of the brew process.
The process is further explained in the
following gure.
Total Brewing Time
Pre-Infusion Time
Waiting Time
English
8
Crossland Co ee - Seattle, Washington
Page 11
User Manual
Maintenance
Prior to performing any maintenance
operations allow the machine to cool. All
maintenance operations must be carried
out with the machine off and the power
supply cord disconnected.
Daily:
Clean the body of machine, the steam
nozzle, and the brewing head with a
damp cloth
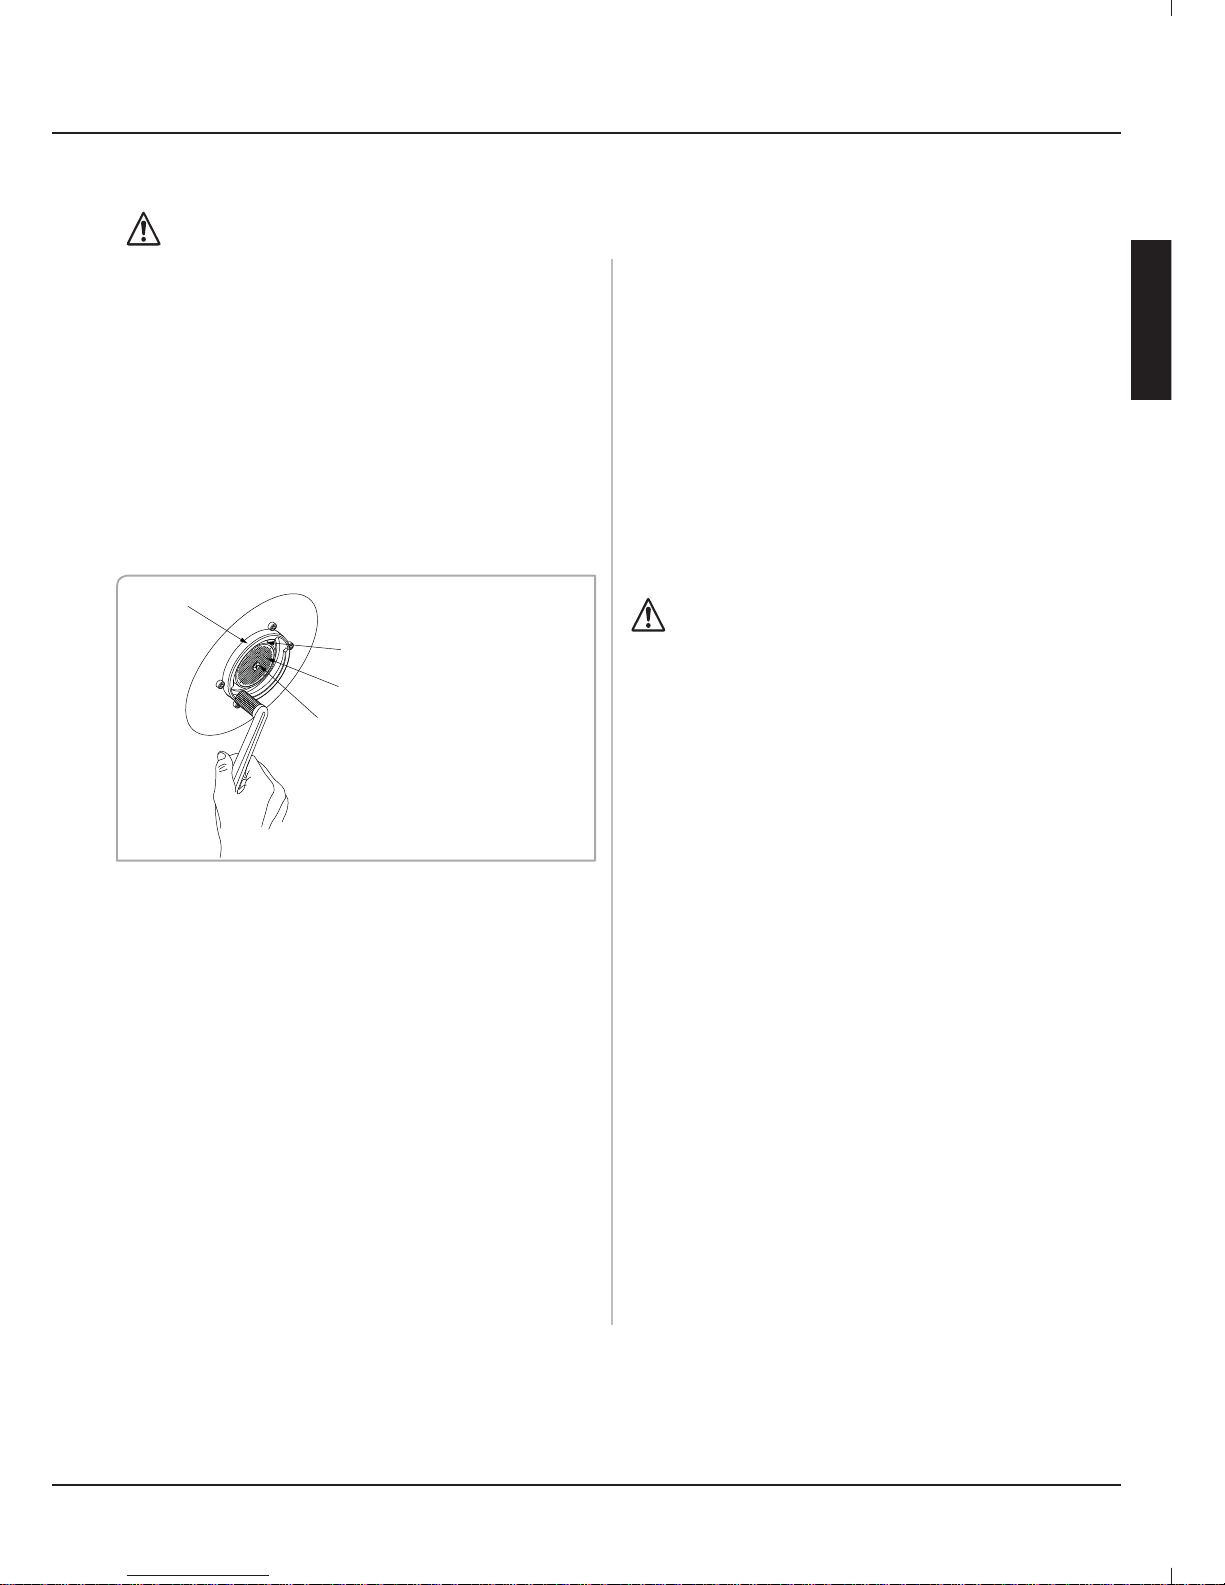
Scrub the brewing head area where the
porta lter engages and wipe clean.
Portafilter
Gasket
Shower Screen
Screw
Shower Screen
Brewing
Head
Rinse the lter basket and porta lter with
hot water and wipe clean
Rinse the drip tray and grate in warm
soapy water
The steam nozzle should be cleaned after
each use in order to avoid build up of milk
deposits. Clean the steam nozzle with a
damp cloth, as well as discharging any
milk residue from the nozzle by opening
the steam knob, then closing again.
Periodically:
(or after a period of intensive machine
use) Immerse coffee lters, shower
screen, and the porta lter in boiling water
(or descaling cleaning solution) for a few
minutes to allow the coffee oil to dissolve,
then rinse and wipe clean using a cloth or
sponge.
Descaling :
In hard water areas, minerals found in
the water will accumulate and affect
operation of the unit. Approximately
every two months (depending on use and
water condition), clean the boilers with
coffee machine descaler:
• Remove shower screen and clean
• Pour pre mixed descaler cleaning
solution into water reservoir
• Turn on machine and run the starting
procedure for approximately 60
seconds.
(Ensure water reservoir does not
fall below safe level)
• Wait until the machine heats to the set
temperature
• Rotate the steam knob to discharge
hot water out of the steam wand (this
process allows the cleaning solution to
enter the steam boiler)
• Fill the water reservoir with clean
water and press the menu button to
ow water through the machine
• Continue to ow water through the
machine until all cleaning solution has
been removed from the system.
• Replace the shower screen
Troubleshooting
1. The machine fails to start:
• Check whether the power plug is
connected properly
• Check the power is on and the ground
fault interrupt or the main switch is
engaged
• Check the condition of the plug and
the power cable
CC1
English
9
www.crosslandco ee.com
Page 12
User Manual
2. Machine fails to deliver coffee:
• The water tank is empty
• Filter clogged because coffee powder is
too ne or pressed too rmly
• Shower Screen is clogged with coffee
• Rinse the lter
3. Coffee ows too quickly:
• The coffee ground too coarsely
• The coffee is not pressed down with
tamper
4. Pump makes loud noise:
• Water tank is empty
• The coffee ground too coarse
5. Pump remains on:
• Steam Valve not closed completely
6. Water leaking from lter group holder:
• Porta lter not properly inserted in
brewing head
• Porta lter gasket in brewing head is
dirty or worn.
• Coffee grounds not cleaned off the rim
of porta lter
7. Espresso has little crema:
• The coffee ground too coarsely
• The coffee is not pressed down with
tamper
• The coffee bean has overdue or dried
out
8. Espresso is too cold:
• The porta lter or brewing head is not
warmed up
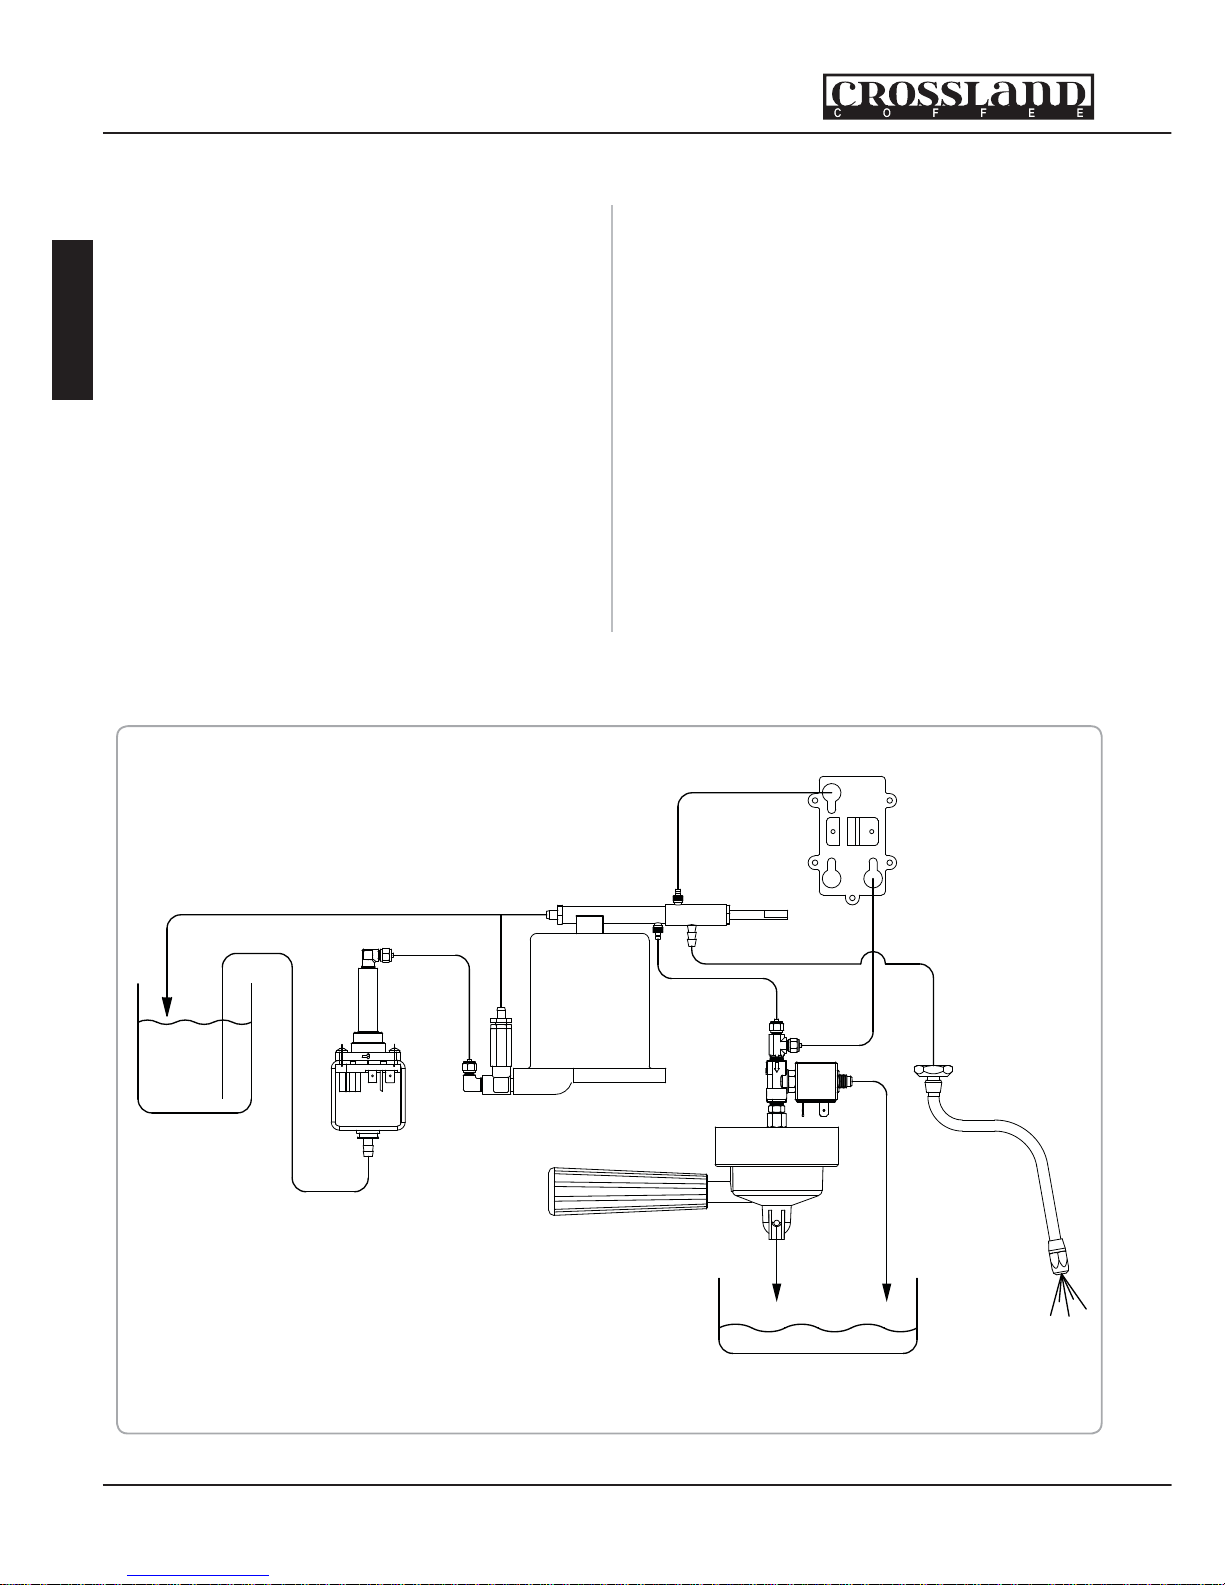
Hydraulic Schematic
Water
Pump
Coffee
Boiler
Steam
Boiler
3 Way
Valve
Steam
Valve
Steam
Wand
Drain Box
Over Pressure
Valve (OPV)Water
Reservoir
Air Relief
Valve
English
10
Crossland Co ee - Seattle, Washington
Page 13
User ManualUser Manual
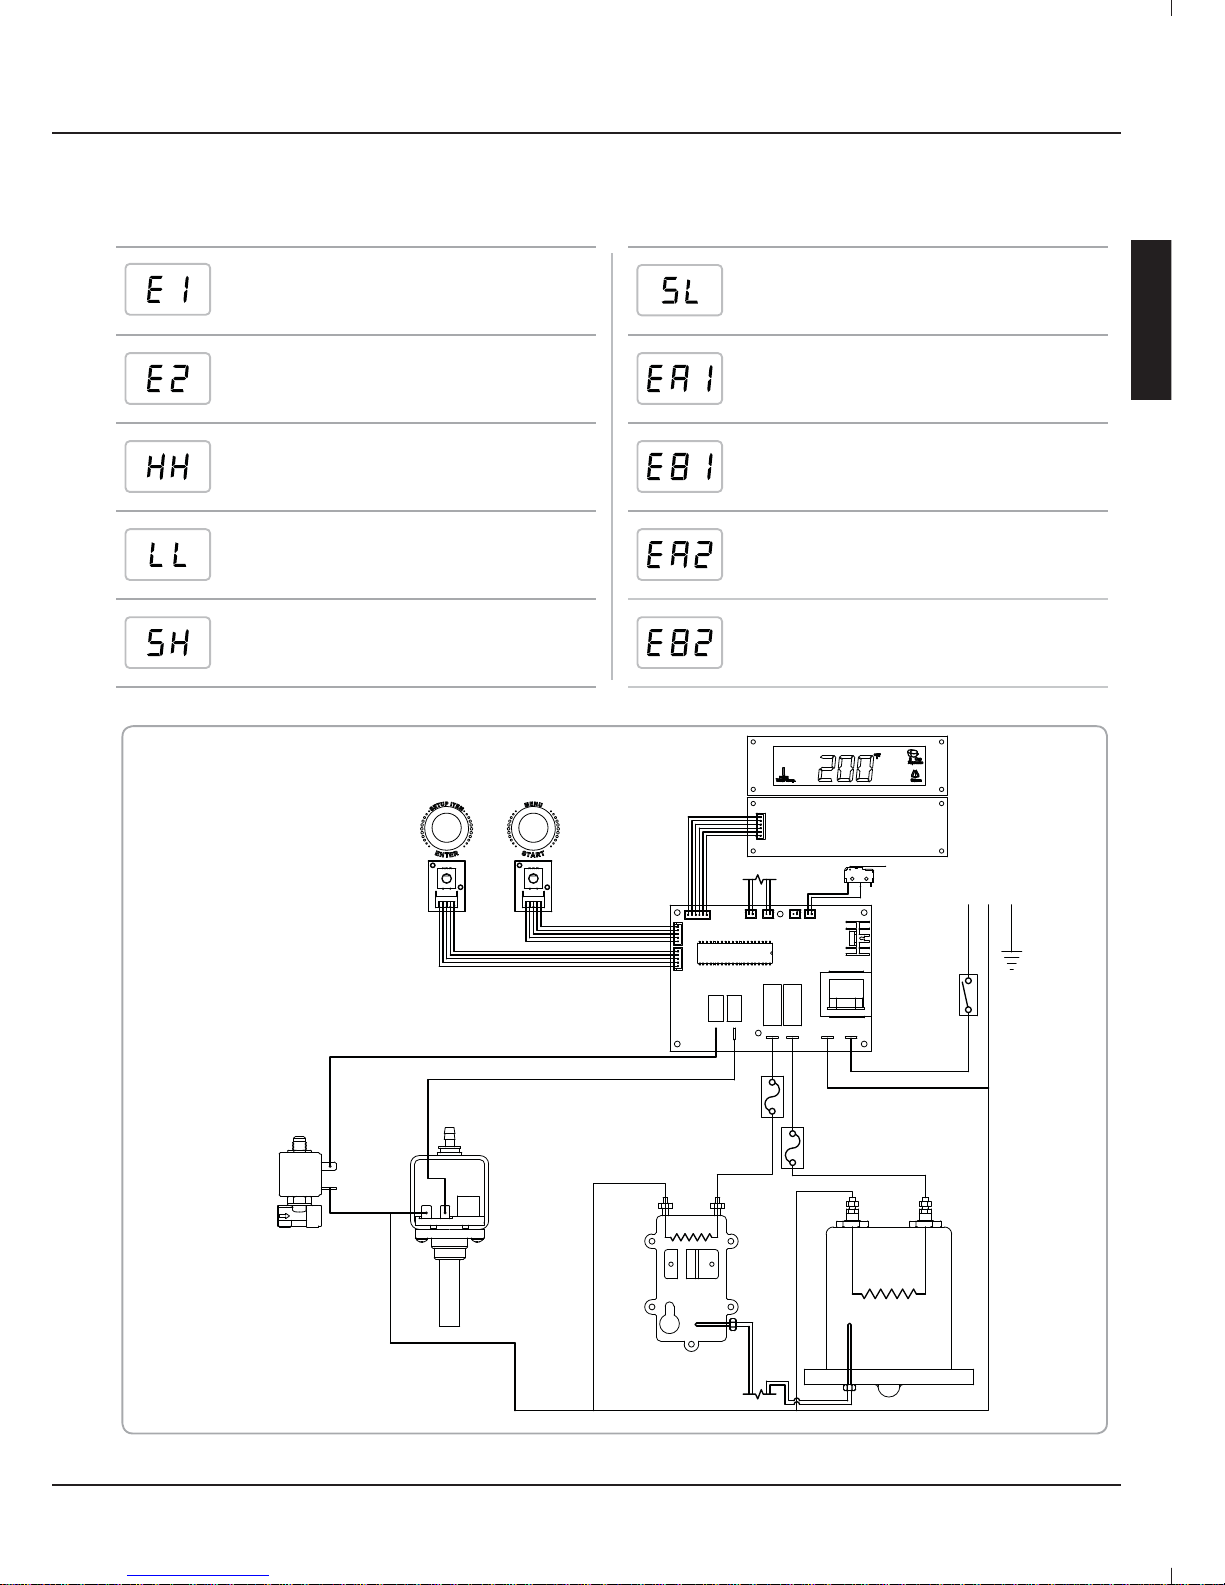
3 Way
Valve
Water
Pump
Coffee
Boiler
Steam
Boiler
Steam
Valve
Switch
Main
Power
Switch
Line
Neutral
Ground
Electrical Schematic
Display Error Description
Coffee boiler heating error:
Water temperature does not reach
set temp. within 1 hr.
Steam boiler heating error:
Steam boiler temperature does
not reach set temp. within 3 min.
The temperature of coffee boiler is
more than 230°F or temperature
sensor short.
The temperature of coffee boiler
is under 149°F or temperature
sensor open.
The temperature of steam boiler
is over 392°F or temperature
sensor short.
Display Error Description
The temperature of steam boiler
is under 32°F or temperature
sensor open.
Menu button circuit A open
Menu button circuit B open..
Setup button circuit A open.
Setup button circuit B open.
Software Error Codes
CC1
English
11
www.crosslandco ee.com
CC1
11
www.crosslandco ee.com
Page 14
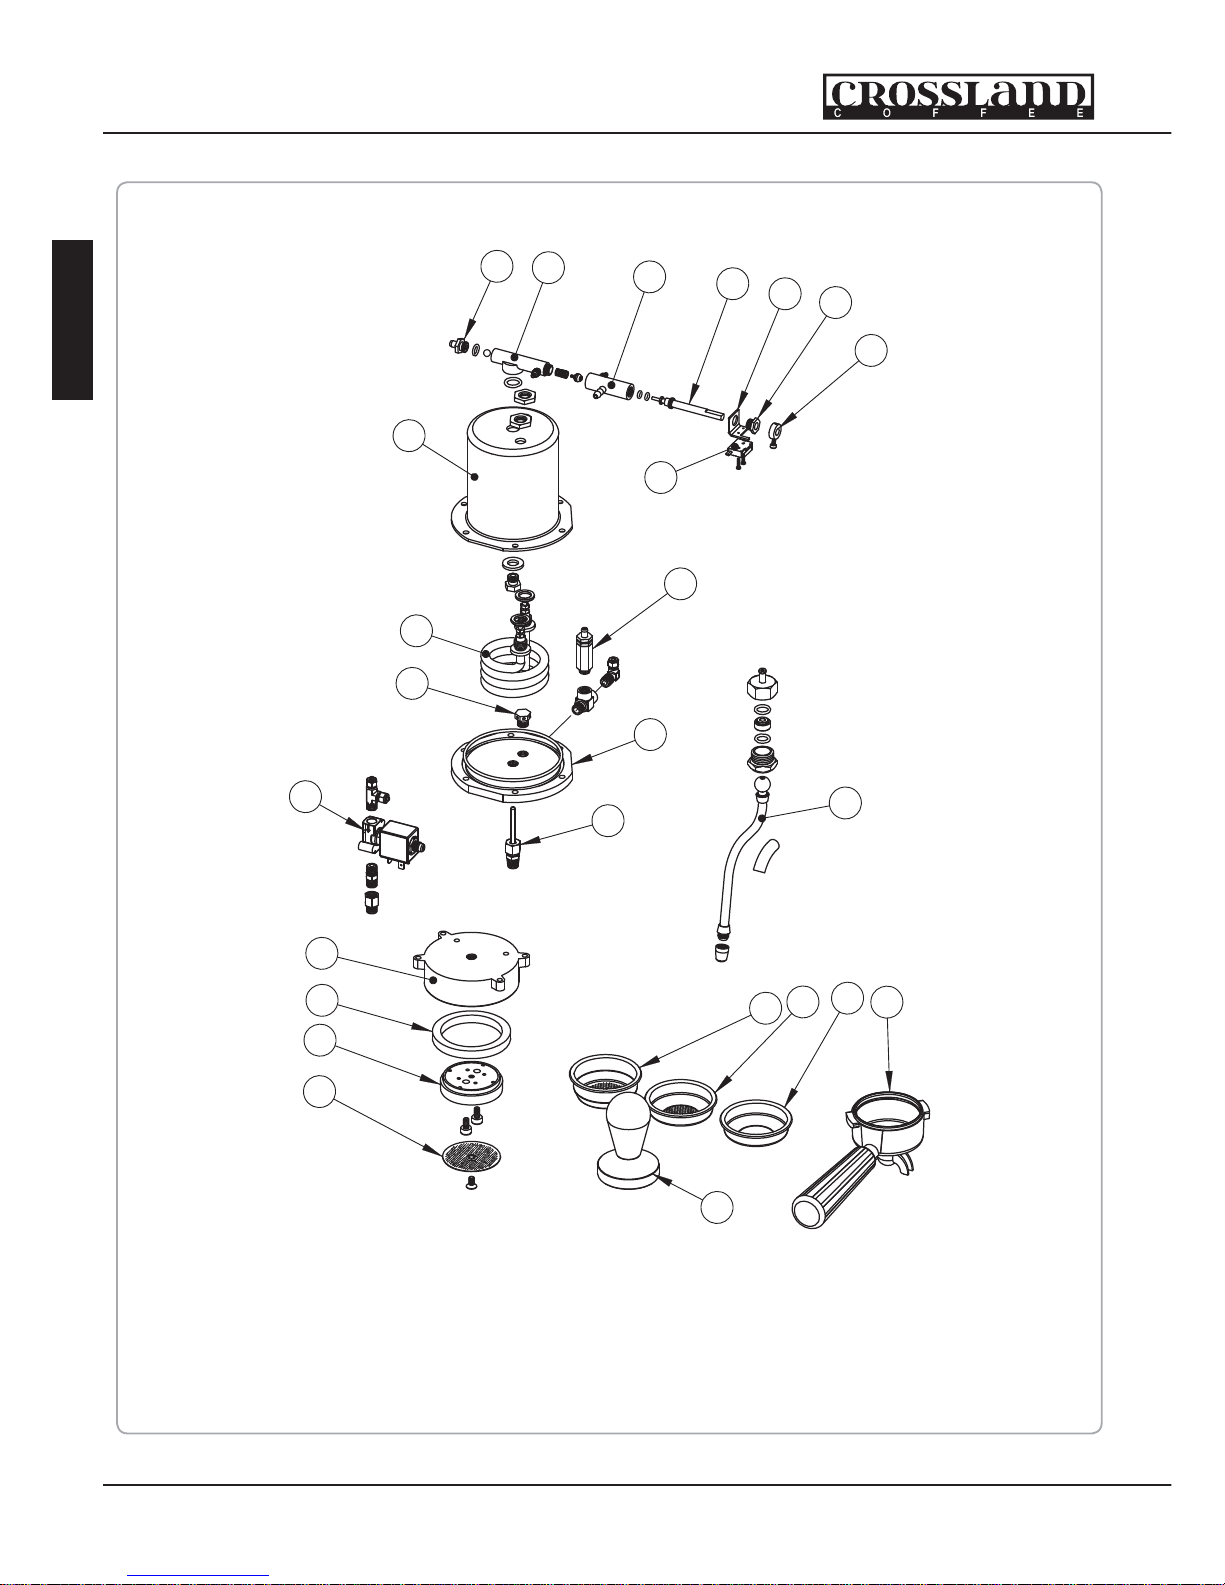
User Manual
13
25
26
21
17
22
20
16
42
11
12
15
14
18
6
9
43
8
10
27
30
45
44
46
47
Exploded Parts Diagram 1
English
12
Crossland Co ee - Seattle, Washington
Page 15
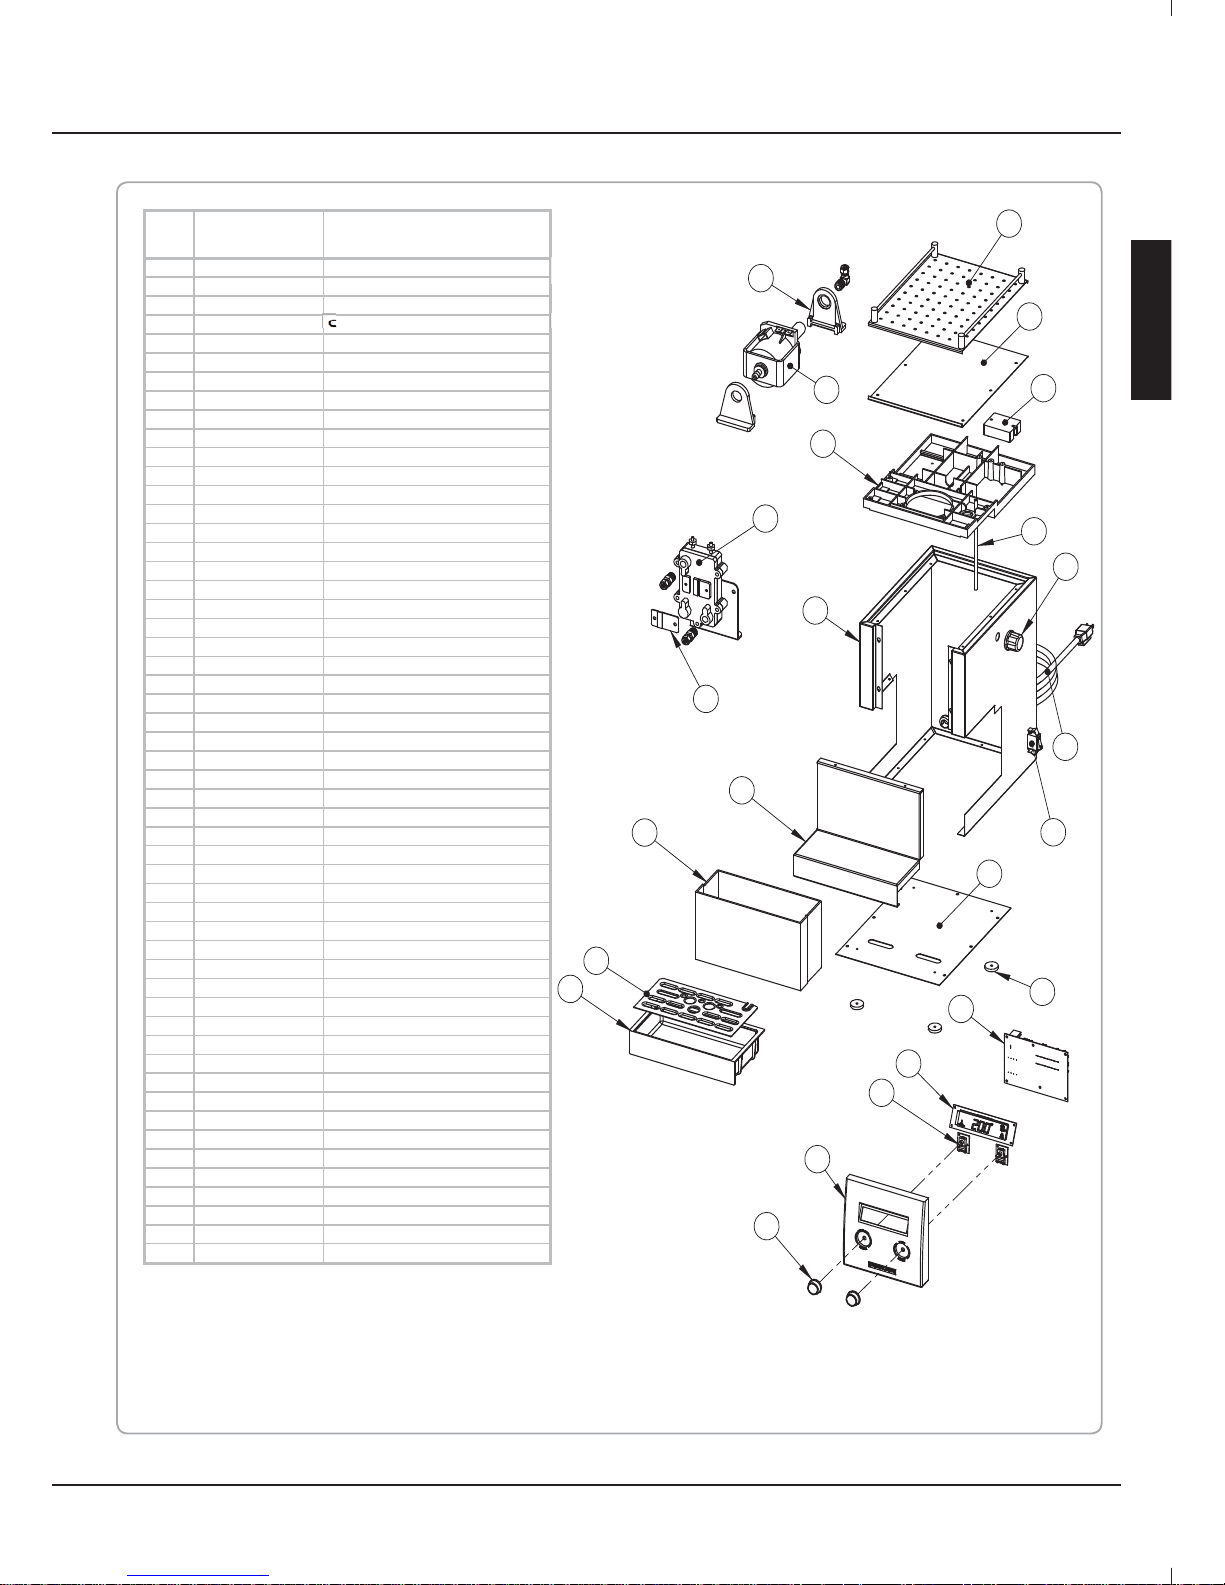
User Manual
Exploded Parts Diagram 2
31
35
34
32
33
49
38
36
39
4
7
37
5
24
23
3
19
2
1
48
29
28
40
41
Item Part Number Description
1 20500301 Rubber Foot
2 10200801 Bottom Cove
r
3 30500201 Main Power Switch
4 10200101 Sheet Metal Bod
y
5 B110 Relief Tube
6 B115 Steam Wand
7 21000101 Middle Cove
r
8 10401401 Group Head
9 20500201 Grou
p
Head Gasket
10 10401402 Shower Head
11 30100106 Tem
p
erature probe
12 10400101 Coffee Boiler End Plate
13 10400301 Water Inlet Diverte
r
14 30200104 Heating Element
15 10200201 Coffee Boile
r
16 30500101 Limit Switch
17 10100401 Limit Switch Bracket
18 Limit Switch Cola
r
19 20100101 Steam Knob
20 10401001 Steam Valve Shaft Sleeve
21 10400701 Steam Valve Shaft
22 10400601 Steam Valve Bod
y
Steam Valve Seal
Steam Valve Shaft O-Rin
g
Steam Valve Sprin
g
23 10200701 Top Cove
r
24 B114 Cup Warming Tra
y
25 10400401 Air Exit Nozzle
Air Exit Nozzle Seal
26 10400201 Water Outler Manifold
27 30600102 Solenoid Valve
,
3 Wa
y
28 31000101 Vibration Pum
p
29 20500101 Vibration Pump Holde
r
30 B10402 Portafilte
r
31 30100107 Electronic Control Board
32 30100101 LCD Dis
play
33 30100103 Rotary Encode
r
34 B116 Front panel
35 20100301 Rotar
y
Encoder knob
36 20100501 Water Reservoi
r
37 10200601 Drain Tray Grate
38 20100401 Drain Tra
y
39 10200301 Reservoir Base
40 B106 Steam Boile
r
41 10100301 Sensor Cover plate
42 B105 Over Pressure Valve
43 10200501 Shower Screen
44 10200504 Filter Basket
,
Single
45 10200503 Filter basket
,
Double
46 10400201 Filter Basket
,
Blind
47 Tam
per
48 30300804 Main Power Cord
49 30000301 Solid State Rela
y
CC1
English
13
www.crosslandco ee.com
Page 16

Seattle, Washington
email: info@crosslandco ee.com
www.crosslandco ee.com
 Loading...