

Page 1
TOP-LOADING
WASHER
USE AND CARE GUIDE
Para una versi6n de estas instrucciones en espa_ol, visite www.whirlpool.com
LAVEUSE A CHARGEMENT
PAR LE DESSUS
GUIDE D'UTILISATION ET
D'ENTRETIEN
Table of Contents
WASHER SAFETY ......................................................... 2
CONTROL PANEL AND FEATURES ............................ 3
CYCLE GUIDE ............................................................... 5
USING YOUR WASHER ................................................ 6
WASHER MAINTENANCE ............................................ 9
TROUBLESHOOTING ................................................. 11
WARRANTY ................................................................. 15
ASSISTANCE OR SERVICE ........................ Back Cover
Table des matibres
SI_CURITF: DE LA LAVEUSE ...................................... 16
TABLEAU DE COMMANDE ET
CARACTi_RISTIQUES ................................................. 17
GUIDE DE PROGRAMMES ........................................ 19
UTILISATION DE LA LAVEUSE .................................. 20
ENTRETIEN DE LA LAVEUSE .................................... 23
DF:PANNAGE ............................................................... 25
GARANTIE ................................................................... 31
ASSISTANCE OU SERVICE ............ Couverture artiste
W10338608B
W10338612B - SP
Page 2

WASHER SAFETY
Your safety and the safety of others are very important.
We have provided many important safety messages in this manual and on your appliance. Always read and obey all
safety messages.
This is the safety alert symbol.
This symbol alerts you to potential hazards that can kill or hurt you and others.
All safety messages will follow the safety alert symbol and either the word "DANGER" or
"WARNING." These words mean:
You can be killed or seriously injured if you don't
immediately follow instructions.
You can be killed or seriously injured if you don't
follow instructions.
All safety messages will tell you what the potential hazard is, tell you how to reduce the chance of injury, and tell you
what can happen if the instructions are not followed.
IMPORTANT SAFETY INSTRUCTIONS
WARNING: To reduce the risk of fire, electric shock, or injuryto persons when using the washer, follow basic precautions,
including the following:
[] Read all instructions before using the washer.
[] Do not wash articles that have been previously cleaned
in, washed in, soaked in, or spotted with gasoline,
dry-cleaning solvents, other flammable, or explosive
substances as they give off vapors that could ignite or
explode.
[] Do not add gasoline, dry=cleaning solvents, or other
flammable, or explosive substances to the wash water.
These substances give off vapors that could ignite or
explode.
[]
Under certain conditions, hydrogen gas may be
produced in a hot water system that has not been used
for 2 weeks or more. HYDROGEN GAS IS
EXPLOSIVE. If the hot water system has not been
used for such a period, before using the washing
machine, turn on all hot water faucets and let the water
flow from each for several minutes. This will release
any accumulated hydrogen gas. As the gas is
flammable, do not smoke or use an open flame during
this time.
SAVE THESE INSTRUCTIONS
Do not allow children to play on or in the washer. Close
supervision of children is necessary when the washer is used
near children.
Before the washer is removed from service or discarded,
remove the door or lid.
[] Do not reach into the washer if the drum, tub or agitator is
moving.
[] Do not install or store the washer where it will be exposed to
the weather.
[] Do not tamper with controls.
[] Do not repair or replace any part of the washer or attempt any
servicing unless specifically recommended in this manual or in
published user=repair instructions that you understand and
have the skills to carry out.
[] See "Electrical Requirements" located in the installation
instructions for grounding instructions.
State of California Proposition 65 Warnings:
WARNING: This product contains one or more chemicals known to the State of California to cause cancer.
WARNING: This product contains one or more chemicals known to the State of California to cause birth defects or other
reproductive harm.
2
Page 3

CONTROL P EL FEATURES
..........?...............?........Y
HEAVY DUTY
SUPER CAPAGTY
HEAVY
EXTRA HEAVY _ '
DEL,CATE
9
NORMAL
REGULAR
|
CASUAL
4il_iiiiiiii,REGULAR
"iii;i:;;ij_iiiiii_,
LIG.,
WATER LEVEL WASH TEMPERATURE OPTIONS
k.
WATER LEVEL
Select the setting most suitable for your load. Small will
add a low amount of water for smaller loads and Super
will add the most amount of water for large or bulky loads.
Items need to move freely. Tightly packing can lead to poor
cleaning performance, and may increase wrinkling and
tangling.
WASH TEMPERATURE
Wash Temperature senses and maintains uniform
water temperatures by regulating incoming hot and
cold water.
Select a wash temperature based on the type of fabric
and soils being washed. For best results and following
the garment label instructions, use the warmest wash
water safe for your fabric.
• Warm and hot water will be cooler than what your
previous washer provided.
• Even in a cold and cool water wash, some warm water
may be added to the washer to maintain a minimum
temperature.
ALL COLD F_NS 5
Not all features and options are available on all models.
OPTIONS
Thefollowing options may be added to most cycles.
ONE RINSE
This option is used to limit a cycle to one rinse.
2ND RINSE
This option can be used to automatically add a second
rinse to most cycles.
FABRIC SOFTENER ADDED - ONE RINSE
This option must be selected if using fabric softener
during a cycle. It ensures that fabric softener is added
at the correct time in the rinse for even distribution.
FABRIC SOFTENER ADDED - 2ND RINSE
This option turns on both the Fabric Softener and
the 2rid Rinse options.
Appearance may vary.
WASH CYCLE KNOB
O
Use the Wash Cycle knob to select available cycles on your
washer. Turn the knob to select a cycle for your laundry load.
See "Cycle Guide" for detailed descriptions of cycles.
START/PAUSE BUTTON
O
Press to start the selected cycle; press again to pause the
cycle and unlock the lid.
NOTE: If the washer is spinning, it may take several
minutes to unlock the lid. Press and hold for 3 seconds
to cancel a cycle.
CYCLE STATUS LIGHTS
O
CYCLESTATUS
The Cycle Status Lights show the progress of a cycle.
At each stage of the process, you may notice sounds or
pauses that are different from traditional washers.
DRAIN & SP#4_
CYCLE STATUS O
Fill Wash Rinse Spin Done
FILL
CYCLESTATUS
Fill Wash Rinse Spin Done
When the START/PAUSE button is pressed, the washer
will first perform a self-test on the lid lock mechanism.
You will hear a click, and the lid will unlock briefly before
locking again. The washer will use spins to check for load
balance. These spins may take several minutes before
water is added to the washer. You may hear the hum
of the spins before filling. This is normal.
WASH
CYCLESTATUS
Fill Wash Rinse Spin Done
You will hear the agitator moving the load. The motor
sounds may change at different stages in the cycle.
The wash time is determined by the selected soil level.
_ill Wash RJ_e SpL_
iN START
J
Page 4
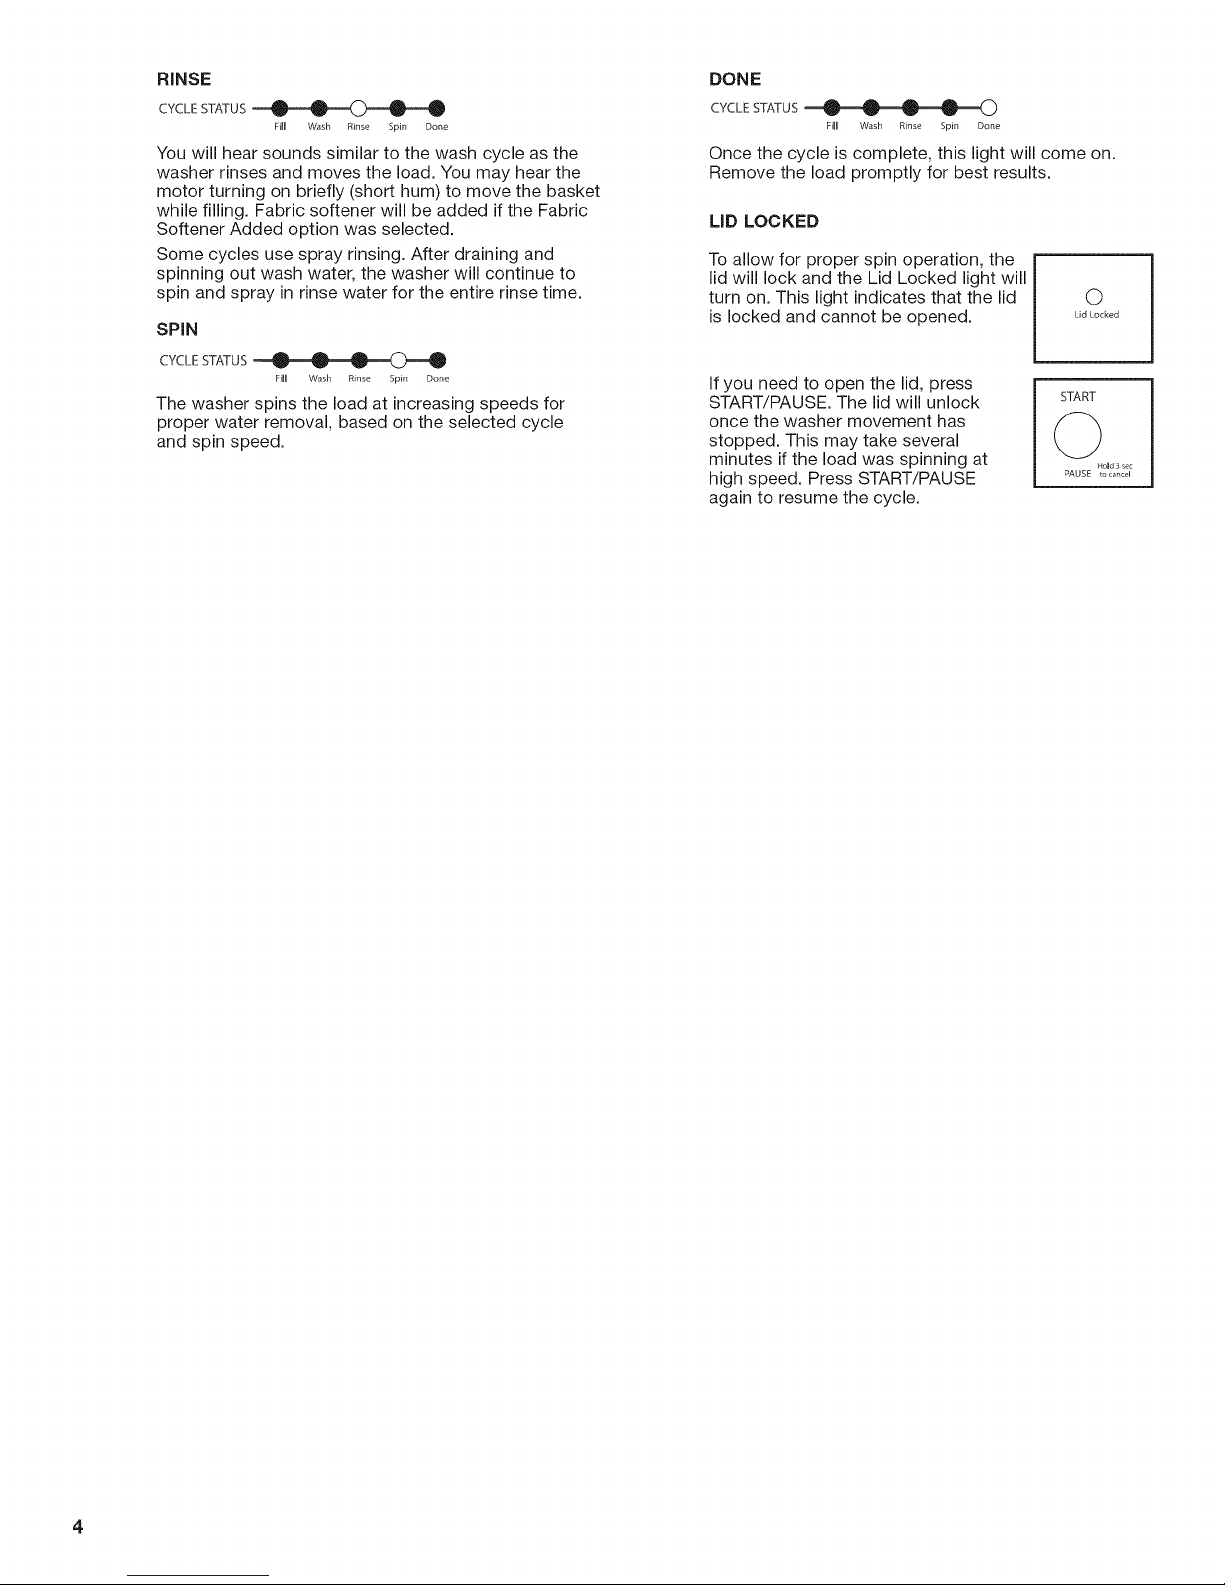
RINSE
CYCLESTATUS .......................
Fill Wash Rinse Spin Done
You will hear sounds similar to the wash cycle as the
washer rinses and moves the load. You may hear the
motor turning on briefly (short hum) to move the basket
while filling. Fabric softener will be added if the Fabric
Softener Added option was selected.
Some cycles use spray rinsing. After draining and
spinning out wash water, the washer will continue to
spin and spray in rinse water for the entire rinse time.
SPiN
CYCLE STATUS
Fill Wash Rinse Spin Done
The washer spins the load at increasing speeds for
proper water removal, based on the selected cycle
and spin speed.
DONE
CYCLESTATUS
Fill Wash Rinse Spin Done
Once the cycle is complete, this light will come on.
Remove the load promptly for best results.
LID LOCKED
To allow for proper spin operation, the
lid will lock and the Lid Locked light will
turn on. This light indicates that the lid
is locked and cannot be opened.
If you need to open the lid, press
START/PAUSE. The lid will unlock
Lid Locked
START
O
once the washer movement has
stopped. This may take several
minutes if the load was spinning at
high speed. Press START/PAUSE
ftoHd 3 sec
PAUSE to cancel
again to resume the cycle.
4
Page 5

CYCLE GUIDE
For best fabric care, choose the cycle that best fits the load being washed.
Not all cycles and options are available on all models.
Sturdy fabrics,
colorfast items,
towels, jeans
Sturdy fabrics,
colorfast items,
towels, jeans
Cottons, linens,
sheets, and mixed
garment loads
Light-weight
cotton fabrics
No-iron fabrics,
cottons, perm.
press, linens,
synthetics
Lightly-soiled
no-iron fabrics
and synthetics
Machine-wash
silks, lingerie,
washable wools
Swimsuits and
items requiring
rinsing without
detergent
Dripping wet or
hand-washed
items
NOTE: Be sure to select Fabric Softener Added option, if adding fabric softener to load.
*All rinses are cold.
Normal
Extra
Heaw
Normal
Heaw
Normal
Regular
Normal
Light
Casual
Regular
Casual
Light
Delicate
Rinse &
Spin
Drain &
Spin
Hot
Warm
Cool
Cold
Hot
Warm
Cool
Cold
Hot
Warm
Cool
Cold
Hot
Warm
Cool
Cold
Hot
Warm
Cool
Cold
Hot
Warm
Cool
Cold
Hot
Warm
Cool
Cold
Cold rinse only
N/A
High
High
High
High
Low
Low
Low
High
High
Provides maximum wash time and action for tough stains
and soils. Use this cycle for heavily soiled or sturdy items.
Use this cycle for heavily soiled or sturdy items. This cycle
uses spray rinses only. Select Fabric Softener Added
option if using fabric softener.
Use this cycle for normally soiled cottons and mixed
fabric loads. This cycle uses spray rinses only. Select Fabric
Softener Added option if using fabric softener.
Use this cycle for lightly soiled mixed loads. This cycle
uses spray rinses only. Select Fabric Softener Added
option if using fabric softener.
Use this cycle to wash loads of no-iron fabrics such as
sport shirts, blouses, casual business clothes, permanent
press, and blends. Select Fabric Softener Added option if
using fabric softener.
Use this cycle to wash lightly-soiled loads of no-iron fabrics
such as sport shirts, blouses, casual business clothes,
permanent press, and blends. Select Fabric Softener
Added option if using fabric softener.
Use this cycle to wash lightly soiled garments indicating
"Machine Washable Silks" or "Gentle" cycle on the care
label. Place small items in mesh garment bags before
washing. Select Fabric Softener Added option if using
fabric softener.
Combines a rinse and high-speed spin for loads requiring
an additional rinse cycle or to complete a load after power
interruption. Also use for loads that require rinsing only.
This cycle uses a spin to shorten drying times for heavy
fabrics or special-care items washed by hand. Use this
cycle to drain washer after cancelling a cycle or completing
a cycle after a power failure.
J
Page 6
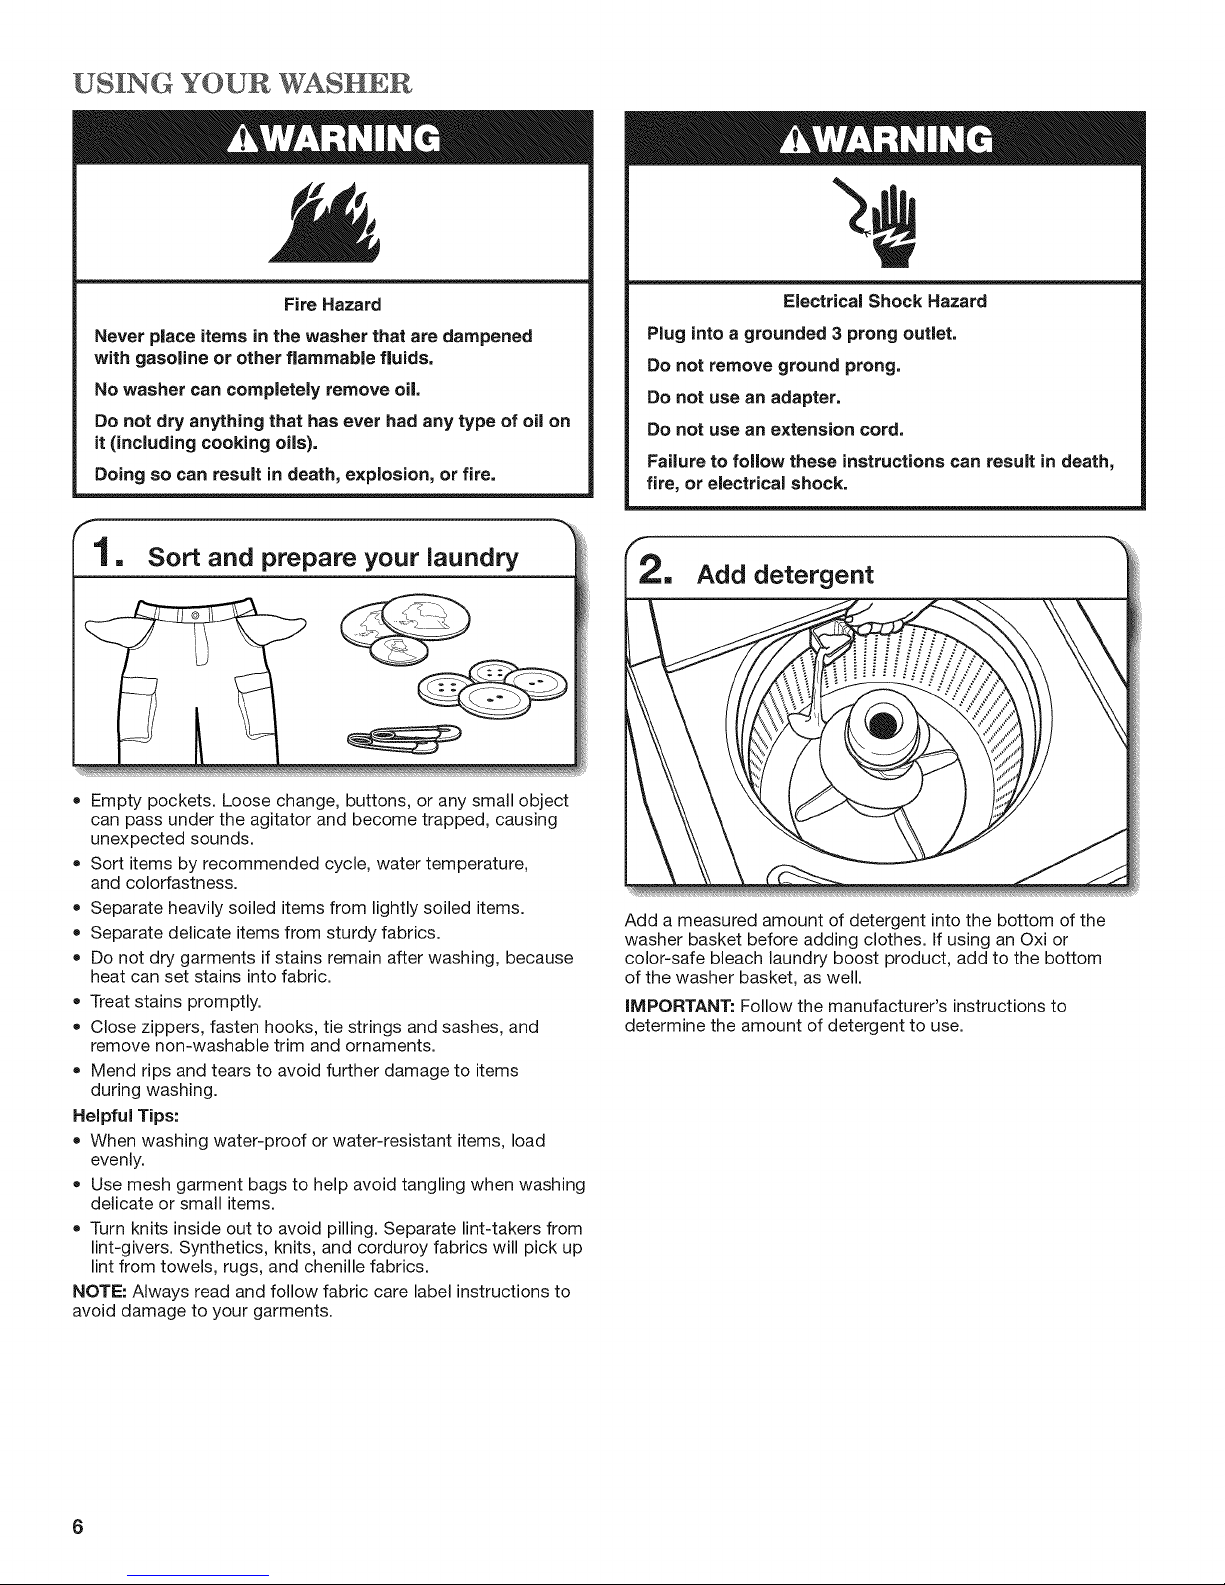
USING YOUR WASHER
Fire Hazard
Never place items in the washer that are dampened
with gasoline or other flammable fluids.
No washer can completely remove oil.
Do not dry anything that has ever had any type of oil on
it (including cooking oils).
Doing so can result in death, explosion, or fire.
• Empty pockets. Loose change, buttons, or any small object
can pass under the agitator and become trapped, causing
unexpected sounds.
• Sort items by recommended cycle, water temperature,
and colorfastness.
• Separate heavily soiled items from lightly soiled items.
• Separate delicate items from sturdy fabrics.
• Do not dry garments if stains remain after washing, because
heat can set stains into fabric.
• Treat stains promptly.
• Close zippers, fasten hooks, tie strings and sashes, and
remove non-washable trim and ornaments.
• Mend rips and tears to avoid further damage to items
during washing.
Helpful Tips:
= When washing water-proof or water-resistant items, load
evenly.
• Use mesh garment bags to help avoid tangling when washing
delicate or small items.
• Turn knits inside out to avoid pilling. Separate lint-takers from
lint-givers. Synthetics, knits, and corduroy fabrics will pick up
lint from towels, rugs, and chenille fabrics.
NOTE: Always read and follow fabric care label instructions to
avoid damage to your garments.
Electrical Shock Hazard
Plug into a grounded 3 prong outlet.
Do not remove ground prong.
Do not use an adapter.
Do not use an extension cord.
Failure to follow these instructions can result in death,
fire, or electrical shock.
Add detergent
Add a measured amount of detergent into the bottom of the
washer basket before adding clothes. If using an Oxi or
color-safe bleach laundry boost product, add to the bottom
of the washer basket, as well.
IMPORTANT: Follow the manufacturer's instructions to
determine the amount of detergent to use.
6
Page 7
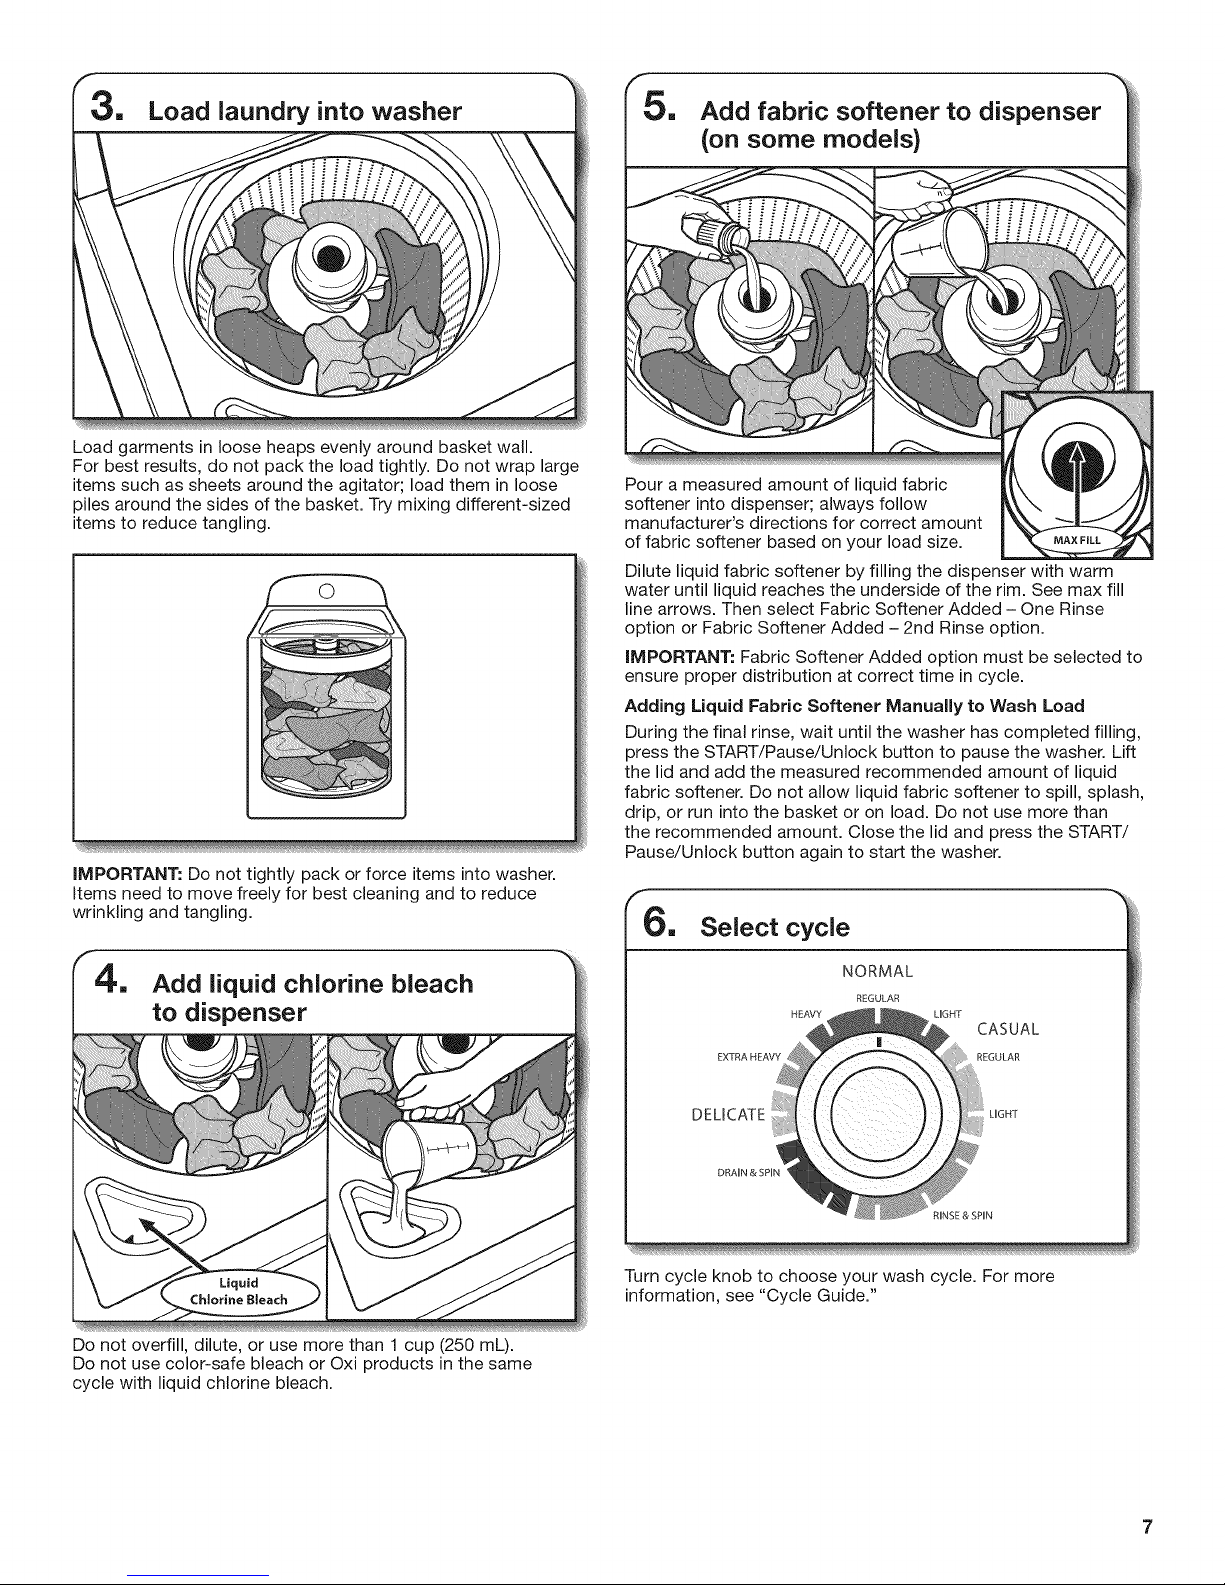
Load laundry into washer
Load garments in loose heaps evenly around basket wall.
For best results, do not pack the load tightly. Do not wrap large
items such as sheets around the agitator; load them in loose
piles around the sides of the basket. Try mixing different-sized
items to reduce tangling.
IMPORTANT: Do not tightly pack or force items into washer.
Items need to move freely for best cleaning and to reduce
wrinkling and tangling.
(on some models)
Pour a measured amount of liquid fabric
softener into dispenser; always follow
manufacturer's directions for correct amount
of fabric softener based on your load size.
Dilute liquid fabric softener by filling the dispenser with warm
water until liquid reaches the underside of the rim. See max fill
line arrows. Then select Fabric Softener Added - One Rinse
option or Fabric Softener Added - 2nd Rinse option.
IMPORTANT: Fabric Softener Added option must be selected to
ensure proper distribution at correct time in cycle.
Adding Liquid Fabric Softener Manually to Wash Load
During the final rinse, wait until the washer has completed filling,
press the START/Pause/Unlock button to pause the washer. Lift
the lid and add the measured recommended amount of liquid
fabric softener. Do not allow liquid fabric softener to spill, splash,
drip, or run into the basket or on load. Do not use more than
the recommended amount. Close the lid and press the START/
Pause/Unlock button again to start the washer.
Select cycle
Add liquid chlorine bleach
to dispenser
Do not overfill, dilute, or use more than 1 cup (250 mL).
Do not use color-safe bleach or Oxi products in the same
cycle with liquid chlorine bleach.
NORMAL
REGULAR
HEAVY LIGHT
CASUAL
EXTRA HEAVY REGULAR
DELICATE UGHT
DRAIN & SPIN
Turn cycle knob to choose your wash cycle. For more
information, see "Cycle Guide."
Page 8
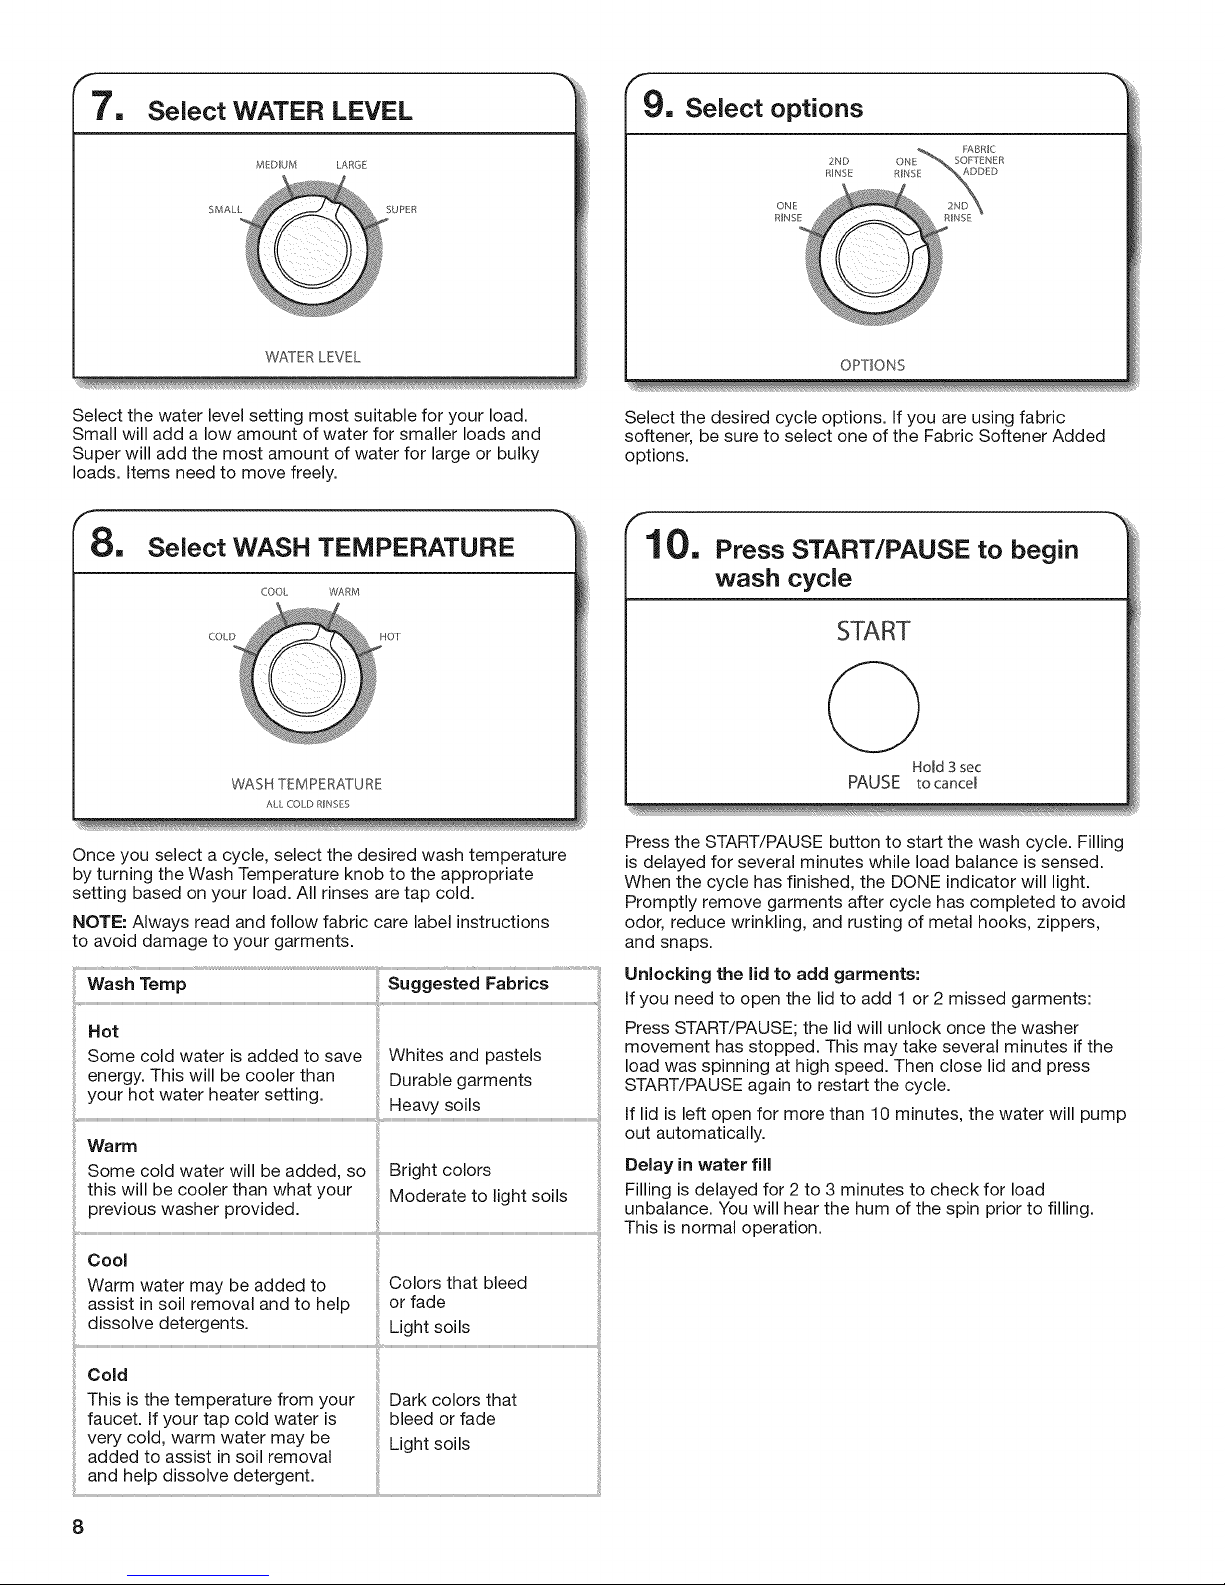
7, Select WATER LEVEL
MDBJM LARGE
9, Select options
WATER LEVEL
Select the water level setting most suitable for your load.
Small will add a low amount of water for smaller loads and
Super will add the most amount of water for large or bulky
loads. Items need to move freely.
O, Select WASH TEMPERATURE
COOL WARM
WASHTEMPERATURE
ALL COLD RI_'¢SES
Once you select a cycle, select the desired wash temperature
by turning the Wash Temperature knob to the appropriate
setting based on your load. All rinses are tap cold.
NOTE: Always read and follow fabric care label instructions
to avoid damage to your garments.
Not
Some cold water is added to save Whites and pastels
energy. This will be cooler than Durable garments
your hot water heater setting. Heavy soils
Warm
Some cold water will be added, so Bright colors
this will be cooler than what your Moderate to light soils
Cool
Warm water may be added to
assist in soil removal and to help
dissolve detergents.
Colors that bleed
or fade
OPTIONS
Select the desired cycle options. If you are using fabric
softener, be sure to select one of the Fabric Softener Added
options.
10.
Press START/PAUSE to begin
wash cycle
START
Q
PAUSE to cancel
Press the START/PAUSE button to start the wash cycle. Filling
is delayed for several minutes while load balance is sensed.
When the cycle has finished, the DONE indicator will light.
Promptly remove garments after cycle has completed to avoid
odor, reduce wrinkling, and rusting of metal hooks, zippers,
and snaps.
Unlocking the lid to add garments:
If you need to open the lid to add 1 or 2 missed garments:
Press START/PAUSE; the lid will unlock once the washer
movement has stopped. This may take several minutes if the
load was spinning at high speed. Then close lid and press
START/PAUSE again to restart the cycle.
If lid is left open for more than 10 minutes, the water will pump
out automatically.
Delay in water fill
Filling is delayed for 2 to 3 minutes to check for load
unbalance. You will hear the hum of the spin prior to filling.
This is normal operation.
Hold3 sec
Cold
This is the temperature from your Dark colors that
faucet. If your tap cold water is bleed or fade
very cold, warm water may be Light soils
added to assist in soil removal
and help dissolve detergent.
8
Page 9

WASHER MAINTENANCE
WATER iNLET HOSES
Replace inlet hoses after 5 years of use to reduce the risk
of hose failure. Periodically inspect and replace inlet hoses
if bulges, kinks, cuts, wear, or leaks are found.
When replacing your inlet hoses, mark the date of replacement
on the label with a permanent marker.
f CLEANING YOUR WASHER
Keep your washer as clean and fresh as your clothes. To keep
washer interior odor-free, follow this recommended monthly
cleaning procedure:
1. Make sure the washer is empty.
2. Using recommended AFFRESH e_washer cleaner,
add one tablet to washer basket
OR
If using liquid chlorine bleach, add 1 cup (250 mL) to
liquid chlorine bleach dispenser.
NON=USE AND VACATION CARE
Operate your washer only when you are home. If moving, or
not using your washer for a period of time, follow these steps:
1. Unplug or disconnect power to washer.
2. Turn off water supply to washer, to avoid flooding due
to water pressure surge.
f WINTER STORAGE CARE
IMPORTANT: To avoid damage, install and store washer
where it will not freeze. Because some water may stay in
hoses, freezing can damage washer. If storing or moving
during freezing weather, winterize your washer.
To winterize washer:
1. Shut off both water faucets; disconnect and drain water
inlet hoses.
2. Put 1 qt. (1 L) of R._,L-type antifreeze in basket and run
washer on RINSE & SPIN cycle for about 30 seconds
to mix antifreeze and remaining water.
3. Unplug washer or disconnect power.
IMPORTANT: Do not add detergent. Do not use more than
recommended amount of bleach to avoid damaging product
over time.
3. Close washer lid.
4. Select Normal Heavy cycle, Hot Temperature, and Large
Water Level.
5. Press START/PAUSE. Water will pour into washer for
a moment and pause, lid will lock, then cycle will continue.
NOTE: For best results, do not interrupt cycle. If cycle must
be interrupted, press START/PAUSE twice and run a RINSE
& SPIN cycle to ensure bleach has been rinsed from washer.
Press and hold START/PAUSE for 3 seconds to cancel the
cycle.
Cleaning the liquid fabric softener dispenser
1. Remove dispenser by grasping top with both hands and
squeezing, while pushing upward with thumbs.
2. Rinse dispenser under warm water, then replace it.
NOTE: To avoid damage to the washer or clothing, do not
wash clothes with the liquid fabric softener dispenser removed.
Cleaning the bleach dispenser
Wipe the inside of the bleach dispenser with a clean, damp
cloth.
To clean exterior:
1. Use a soft, damp cloth or sponge to wipe up any spills.
2. Use all-purpose surface cleaner, if needed.
IMPORTANT: To avoid damaging the washer's finish, do not
use abrasive products.
Page 10
TRANSPORTING YOUR WASHER
r
RE! NSTALLING/USI NG WASHER AGAI N
1. Shut off both water faucets. Disconnect and drain water
inlet hoses.
2. If washer will be moved during freezing weather, follow
"Winter Storage Care" directions before moving.
3. Disconnect drain from drain system and drain any
remaining water into a pan or bucket. Disconnect drain
hose from back of washer.
4. Unplug power cord.
5. Place inlet hoses and drain hose inside washer basket.
6. Drape power cord over edge and into washer basket.
7. Place packing tray from original shipping materials back
inside washer. If you do not have packing tray, place heavy
blankets or towels into basket opening. Close lid and place
tape over lid and down front of washer. Keep lid taped until
washer is placed in new location.
To reinstall washer after non-use, vacation, winter storage,
or moving:
1. Refer to "installation Instructions" to locate, level, and
connect washer.
2. Before using again, run washer through the following
recommended procedure:
To use washer again:
1. Flush water pipes and hoses. Reconnect water inlet hoses.
Turn on both water faucets.
Electrical Shock Hazard
Plug into a grounded 3 prong outlet.
Do not remove ground prong.
Do not use an adapter.
Do not use an extension cord.
Failure to follow these instructions can result in death,
fire, or electrical shock.
2. Plug in washer or reconnect power.
3. Run washer through Casual Regular cycle to clean washer
and remove antifreeze, if used. Use half the manufacturer's
recommended amount of detergent for a medium-size load.
10
Page 11

TROUBLESHOOTING
First try the solutions suggested here or visit our website and reference FAQs (Frequently Asked Questions)
to possibly avoid the cost of a service call.
If you experience Possible Causes Solution
Check the following for Feet may not be in contact with the Front and rear feet must be in firm contact with floor, and
proper installation or floor and locked, washer must be level to operate properly. Jam nuts must be
see "Using Your tight against the bottom of the cabinet.
Washer" section.
Washer may not be level.
Load could be unbalanced.
Check floor for flexing or sagging, if flooring is uneven, a 3/4"
(19 mm) piece of plywood under your washer will reduce sound.
See "Level the Washer" in "installation instructions."
Load dry items in loose heaps evenly around basket wall.
Adding wet items to washer or adding more water to basket
could unbalance washer.
Wash smaller loads to reduce imbalance.
Do not tightly pack. Avoid washing single items.
Use Normal Regular cycle and Super or Large water level for
oversized, non=absorbent items such as comforters or poly=filled
jackets.
See "Cycle Guide" and "Using Your Washer" in this "Use and
Care Guide."
Clicking or metNlic
noises
Gurgling or humming Washer may be draining water, it is normal to hear the pump making a continuous humming
Humming The fill light is on.
Check the following for
proper installation:
Objects caught in washer drain
system.
Washer not level.
Fill hoses not attached tightly.
Fill hose washers.
Drain hose connection.
Check household plumbing for leaks Water can back up out of a clogged sink or drainpipe. Check
or clogged sink or drain, all household plumbing for leaks (laundry tubs, drain pipe,
Washer not loaded as
recommended.
Empty pockets before washing. Loose items such as coins
could fall between basket and tub or may block pump.
it may be necessary to call for service to remove items.
it is normal to hear metal items on clothing such as metN snaps,
buckles, or zippers touch against the stainless steel basket.
sound with periodic gurgling or surging as final amounts of
water are removed during the Drain & Spin cycles.
You may hear the hum of the sensing spins after you have
started the washer. This is normal. Sensing spins will take
several minutes before water is added to the washer.
Water may splash off basket if washer is not level. Check that
load is not unbalanced or tightly packed.
Tighten fill=hose connection.
Make sure all four fill hose fiat washers are properly seated.
Pull drain hose from washer cabinet and properly secure it to
drainpipe or laundry tub.
Do not place tape over drain opening.
water pipes, and faucets.)
Improper loading can cause basket to be out of alignment
and cause water to splash off tub. See "Using Your Washer"
for loading instructions.
Washer won't run
or fill, washer stops
working or wash light
remains on (indicating
that the washer was
unable to fill
appropriately)
Check for proper water supply.
Both hoses must be attached and have water flowing to
inlet valve.
Both hot and cold water faucets must be turned on.
Check that inlet valve screens have not become clogged.
Check for any kinks in inlet hoses, which can restrict water flow.
11
Page 12

TROUBLESHOOTING
Electrical Shock Hazard
Plug into a grounded 3 prong outlet.
Do not remove ground prong.
Do not use an adapter.
Do not use an extension cord.
Failure to follow these instructions can result in death,
fire, or electrical shock.
f
Washer won't run
or fill, washer stops
working or wash light
remains on (indicating
that the washer was
unable to fill
appropriately) (cont.)
Washer not draining/
spinning, loads
are still wet, or spin
light remains on
(indicating that the
washer was unable to
pump out water within
10 minutes)
First try the solutions suggested here or visit our website and reference FAQs (Frequently Asked Questions)
to possibly avoid the cost of a service call.
Check proper electrical supply.
Normal washer operation.
Washer may be tightly packed.
Empty pockets and use garment
bags for small items.
Use a cycle with a low spin speed.
The washer may be tightly packed or
unbalanced.
Check plumbing for correct drain hose
installation. Drain hose extends into
standpipe farther than 4.5" (114 mm).
Too much detergent causing suds to Always measure and follow detergent directions for your load=
slow or stop draining and spinning. To remove extra suds, select Rinse & Spin. Do not add detergent.
Plug power cord into a grounded 3=prong outlet.
Do not use an extension cord.
Ensure there is power to outlet.
Reset a tripped circuit breaker. Replace any blown fuses.
NOTE: Hfproblems continue, contact an electrician.
Lid must be closed for washer to run.
Washer will pause during certain phases of cycle. Do not
interrupt cycle.
Washer spins the dry load for severn minutes before filling to
determine if load is balanced. You may hear the hum of the
spins. This isnormal.
Remove several items, rearrange load evenly in basket, and add
detergent. Close lid and press START/PAUSE.
Do not add more than 1 or 2 additional items after cycle has
started to avoid tightly packing or unbalancing.
SmNI items may have been caught in pump or between basket
and tub, which can slow draining.
Cycles wil:_'llower spin speeds remove less water than cycles ........................
with high spin speeds. Use the recommended cycle/speed spin
for your garment. To remove extra water in the load, select Drain
& Spin. Load may need to be rearranged to allow even
distribution of the load in the basket.
Tightly packed or unbalanced loads may not allow the washer
to spin correctly, leaving the load wetter than normal= Evenly
arrange the wet load for balanced spinning. Select the Drain
& Spin cycle to remove excess water. See "Using Your Washer"
for loading recommendations.
Check drain hose for proper installation. Use drain hose form
and securely attach to drainpipe or tub. Do not tape over drain
opening= Lower drain hose if the end is higher than 96" (2.4 m)
above the floor. Remove any dogs from drain hose.
12
Page 13

TROUBLESHOOTING
First try the solutions suggested here or visit our website and reference FAQs (Frequently Asked Questions)
If you experience
to possibly avoid the cost of a service call.
Dry spots on load
after cycle
Uncorrect or wrong
wash or rinse
temperatures
Load not rinsed
Sand, pet hair, lint, Heavy sand, pet hair, lint, and
etc. on load after detergent or bleach residues may
washing require additional rinsing.
Load is tangling Washer not loaded as recommended. See "Using Your Washer" section.
Not cleaning or
removing stains
High speed spins extract more
moisture than traditional topqoad
washers.
Check for proper water supply.
Energy-saving controlled
wash temperatures.
Check for proper water supply.
Using too much detergent.
Washer not loaded as recommended.
Using too low a water level selection.
Washer not loaded as recommended.
Adding detergent on top of load.
Using too low a water level selection.
The high spin speeds combined with airflow during the final
spin can cause items near the top of the load to develop dry
spots during the final spin. This is normal.
Check that hot and cold inlet hoses are not reversed.
Both hoses must be attached to both washer and faucet, and
have both hot and cold water flowing to inlet valve.
Check that inlet valve screens are not clogged.
Remove any kinks in hoses.
This washer uses cooler wash and rinse water temperatures
than your previous washer. This includes cooler hot and warm
washes.
Check that hot and cold inlet hoses are not reversed.
Both hoses must be attached and have water flowing to the
inlet valve.
Both hot and cold water faucets must be on.
hlet valve screens on washer may be clogged.
Remove any kinks in the inlet hose.
The suds from too much detergent can keep washer from
operating correctly. Always measure detergent and follow
detergent directions based on load size and soil level.
The washer is less efficient at rinsing when load is tightly packed.
Load garments in loose heaps evenly around the basket wall.
Load with dry items only.
Use cycle designed for the fabrics being washed.
Add only 1 or 2 garments after washer has started.
Choose a water level that matches the load being washed.
Add a 2rid Rinse to the selected cycle.
Select a cycle with a slower wash action and spin speed;
however, items will be wetter than those using a higher speed
spin. See the "Cycle Guide" to match your load with the best
cycle.
Load garments in loose heaps evenly around the basket wall.
Reduce tangling by mixing types of load items. Use the
recommended cycle for the type of garments being washed.
Washer is less efficient at cleaning when load is tightly packed.
Load garments in loose heaps evenly around the basket wall.
Load with dry items only.
Add only 1 or 2 garments after washer has started.
Add detergent, oxi products, and color-safe bleach to the
bottom of the basket before adding the load items.
Choose a water level that matches the load being washed.
13
Page 14

TROUBLESHOOTING
First try the solutions suggested here or visit our website and reference FAQs (Frequently Asked Questions)
to possibly avoid the cost of a service call.
Not cleaning or
removing stains (cont.)
Incorrect dispenser Clogged dispenser. Use only liquid chlorine bleach in the bleach dispenser. Use only
operation fabric softener in the fabric softener dispenser.
Fabric damage Sharp items were in pockets during Empty pockets, zip zippers, and snap or hook fasteners before
Odors Monthly maintenance not done as
Using too much detergent.
Not using correct cycle for fabric type.
Not using dispensers.
Not washing like colors together.
wash cycle, washing to avoid snags and tears.
Strings and straps could have tangled.
Items may have been damaged before
washing.
Fabric damage can occur if load is
tightly packed.
Liquid chlorine bleach may have been
added incorrectly.
Garment care instructions may not
have been followed.
recommended.
Using too much detergent.
The suds from too much detergent can keep washer from
operating correctly. Always measure detergent and follow
manufacturer's directions based on load size and soil level.
Use a higher soil level cycle option and warmer wash
temperature to improve cleaning.
Use Heavy cycle for tough cleaning. See the "Cycle Guide" to
match your load with the best cycle.
Use dispensers to avoid chlorine bleach and fabric softener
staining.
Load dispensers before starting a cycle. Select Fabric Softener
Added option when using fabric softener.
Do not add products directly onto load.
Wash like colors together and remove promptly after the cycle
is complete to avoid dye transfer.
Tie all strings and straps before starting wash load.
Mend rips and broken threads in seams before washing.
Load garments in loose heaps evenly around the basket wall.
Load with dry items only.
Use cycle designed for the fabrics being washed.
Add only 1 or 2 garments after washer is started.
Do not pour liquid chlorine bleach directly onto load. Wipe up
bleach spills.
Undiluted bleach will damage fabrics. Do not use more than
recommended by manufacturer.
Do not place load items on top of bleach dispenser when
loading and unloading washer.
Always read and follow garment manufacturer's care label
instructions. See the "Cycle Guide" to match your load with the
best cycle.
See "Cleaning Your Washer" in "Washer Maintenance."
Unload washer as soon as cycle is complete.
Be sure to measure correctly. Always follow the manufacturer's
directions.
See "Cleaning your Washer" section.
Lid locked light is The lid is not closed.
flashing A cycle was stopped or paused
using the Start!Pause button.
14
Close the lid. The washer will not start or fill with the lid open.
The washer may still be spinning. The lid will not unlock until the
basket has stopped spinning. This may take several minutes if
washing large loads or heavy fabrics.
J
Page 15

CROSLEY®CORPORATIONLAUNDRYWARRANTY
LIMITED WARRANTY
For one year from the date of purchase, when this major appliance is operated and maintained according to instructions attached to or
furnished with the product, Whirlpool Corporation or Whirlpool Canada LP (hereafter "Whirlpool") will pay for factory specified parts and
repair labor to correct defects in materials or workmanship that existed when this major appliance was purchased. Service must be
provided by a Whirlpool designated service company. YOUR SOLE AND EXCLUSIVE REMEDY UNDER THIS LIMITED WARRANTY
SHALL BE PRODUCT REPAIR AS PROVIDED HEREIN. This limited warranty is valid only in the United States or Canada and applies
only when the major appliance is used in the country in which it was purchased. Proof of original purchase date is required to obtain
service under this limited warranty.
ITEMS EXCLUDED FROM WARRANTY
This limited warranty does not cover:
1. Replacement parts or repair labor if this major appliance is used for other than normal, single-family household use or when it is
used in a manner that is inconsistent to published user or operator instructions and/or installation instructions.
2. Service calls to correct the installation of your major appliance, to instruct you on how to use your major appliance, to replace or
repair house fuses, or to correct house wiring or plumbing.
3. Service calls to repair or replace appliance light bulbs, air filters or water filters. Consumable parts are excluded from warranty
coverage.
4. Damage resulting from accident, alteration, misuse, abuse, fire, flood, acts of God, improper installation, installation not in
accordance with electrical or plumbing codes, or use of products not approved by Whirlpool.
5. Cosmetic damage, including scratches, dents, chips or other damage to the finish of your major appliance, unless such damage
results from defects in materials or workmanship and is reported to Whirlpool within 30 days from the date of purchase.
6. Pick up and delivery. This major appliance is intended to be repaired in your home.
7. Repairs to parts or systems resulting from unauthorized modifications made to the appliance.
8. Expenses for travel and transportation for product service if your major appliance is located in a remote area where service by an
authorized Whirlpool servicer is not available.
9. The removal and reinstallation of your major appliance if it is installed in an inaccessible location or is not installed in accordance
with Whirlpool's published installation instructions.
10. Replacement parts or repair labor on major appliances with original model/serial numbers that have been removed, altered, or
cannot be easily determined.
DISCLAIMER OF IMPLIED WARRANTIES
IMPLIED WARRANTIES, INCLUDING ANY IMPLIED WARRANTY OF MERCHANTABILITY OR IMPLIED WARRANTY OF FITNESS FOR
A PARTICULAR PURPOSE, ARE LIMITED TO ONE YEAR OR THE SHORTEST PERIOD ALLOWED BY LAW. Some states and provinces
do not allow limitations on the duration of implied warranties of merchantability or fitness, so this limitation may not apply to you. This
warranty gives you specific legal rights, and you also may have other rights that vary from state to state or province to province.
LIMITATION OF REMEDIES; EXCLUSION OF INCIDENTAL AND CONSEQUENTIAL DAMAGES
YOUR SOLE AND EXCLUSIVE REMEDY UNDER THIS LIMITED WARRANTY SHALL BE PRODUCT REPAIR AS PROVIDED HEREIN.
WHIRLPOOL SHALL NOT BE LIABLE FOR INCIDENTAL OR CONSEQUENTIAL DAMAGES. Some states and provinces do not allow
the exclusion or limitation of incidental or consequential damages, so these limitations and exclusions may not apply to you. This
warranty gives you specific legal rights, and you also may have other rights that vary from state to state or province to province.
If outside the 50 United States and Canada, contact your authorized Crosley ®dealer to determine if another warranty applies.
Ifyou think you need repair service, first see the "Troubleshooting" section of the Use & Care Guide. If you are unable to resolve the
problem after checking "Troubleshooting," additional help can be found by checking the "Assistance or Service" section or by calling
Whirlpool. In the U.S.A., call 1-800-253-1301. In Canada, call 1-800-807-6777. 9/08
15
Page 16

p p
$ECURXTE DE LA LA USE
Votre s_curit_ et celle des autres est tr_s importante,
Nous donnons de nombreux messages de securit6 importants dans ce manuel et sur votre appareil menager.
Assurez=vous de toujours lire tousles messages de securit6 et de vous y conformer.
Voici le symbole d'alerte de s6curit6.
Ce symbole d'alerte de securit6 vous signale les dangers potentiels de deces et de blessures graves
vous et & d'autres.
Tousles messages de securit6 suivront le symbole d'alerte de s6curit6 et le mot "DANGER" ou
"AVERTISSEMENT". Ces mots signifient :
Risque possible de d_ces ou de blessure grave si
vous ne suivez pas irnm6diaternent les instructions,
Risque possible de d_c_s ou de blessure grave
si vous ne suivez pas les instructions.
Tousles messages de s_curit6 vous diront quel est le danger potentiel et vous disent comment r6duire le risque de
blessure et ce qui peut se produire en cas de non-respect des instructions.
IMPORTANTES INSTRUCTIONS DE SECURITI _-
AVERTISSEMENT : Pour r6duire les risques d'incendie, de choc electrique ou de blessures Iors de I'utilisation de la
laveuse, suivre les precautions fondamentales dont les suivantes :
[] Lire toutes les instructions avant d'utiliser la laveuse.
[] Ne pas laver des articles qui ont et6 nettoyes ou
laves avec de I'essence ou imbibes d'essence,
solvants de nettoyage & sec, ou autres substances
inflammables ou explosives; ces substances
peuvent emettre des vapeurs susceptibles de
s'enflammer ou d'exploser.
[] Ne pas ajouter d'essence, solvant de nettoyage &
sec ou autre produit inflammable ou explosif dans
I'eau de lavage. Ces substances peuvent 6mettre
des vapeurs susceptibles de s'enflammer ou
d'exploser.
[] Dans certaines conditions, de I'hydrogene gazeux
peut se former dans un circuit d'eau chaude qui n'a
pas et6 utilise pendant 2 semaines ou plus. LE GAZ
HYDROGENE EST EXPLOSIBLE. Si le circuit d'eau
chaude n'a pas 6t6 utilise pendant une telle p6riode,
avant d'utiliser la laveuse, ouvrir tousles robinets
d'eau chaude et laisser I'eau s'ecouler pendant
plusieurs minutes par chaque robinet. Ceci
permettra 1'6vacuation de I'hydrogene gazeux
accumul6. Comme ce gaz est inflammable, ne pas
fumer ou utiliser une flamme hue au cours de cette
periode.
[] Ne pas laisser des enfants jouer sur ou & I'interieur de la
laveuse. Bien surveiller les enfants Iorsque la laveuse est
utilisee & proximite d'enfants.
[] Avant de mettre la laveuse au rebut ou hors de service,
enlever la porte ou le couvercle.
[] Ne pas tenter d'atteindre un article & I'interieur de la cuve de
la laveuse Iorsque le tambour, la cuve ou I'agitateur est en
mouvement.
[] Ne pas installer ou remiser cette laveuse & un endroit o_ elle
serait expos6e aux intemperies.
[] Ne pas modifier les organes de commande.
[] Ne pas r6parer ou remplacer un composant quelconque de
la laveuse, ni entreprendre une op6ration de service, si ce
n'est specifiquement recommande darts ce manuel ou dans
un manuel d'instructions de r6parations destine & I'utilisateur;
il est alors essentiel que la personne concern6e comprenne
ces instructions et soit competente pour les ex6cuter.
[] Pour les instructions de liaison & la terre, voir "Specifications
electriques" dans les instructions d'installation.
CONSERVEZ CES INSTRUCTIONS
Avertissements de la proposition 65 de I'(=tat de Californie :
AVERTISSEMENT : Ce produit contient au moins un produit chimique connu par I'Etat de Californie pour 6tre & I'origine de
cancers.
AVERTISSEMENT : Ce produit contient au moins un produit chimique connu par I't'=tat de Californie pour 6tre b,I'origine de
malformations et autres d6ficiences de naissance.
16
Page 17

LE,AU DE COM DE ET C, CTERISTIQUE$
.......?..............?.......
HEAVY DUTY
SUPER ( APACITY
EXTRA HEA_
DEUCATE_
O
NORMAL
REGULAR
HEAVY 1_
_ CASUAL
LIGHT
| ....
REGULAR
WATER .EVEL WASH TEMPERATURE OPTIONS
Certains programmes et options ne sont pas disponibles sur certains modeles.
L'apparence des appareils peut varier.
O WATER LEVEL (NIVEAU D'EAU}
S61ectionner le r6glage le plus adapt6 a votre charge.
Small (petite) ajoute une faible quantit6 d'eau pour les
charges plus petites et Super (grande) ajoute la quantit6
d'eau la plus importante pour les grandes charges ou
les charges volumineuses. Les articles doivent pouvoir
se d6placer librement. Trop tasser le linge peut entraTner
une mauvaise performance de lavage et augmenter
le froissement et I'emm_lement.
WASH TEMPERATURE
(TEMPI_RATURE DE LAVAGE)
La fonction de contr61e de temp@ature d6tecte et
maintient une temp@ature uniforme de I'eau en r6gulant
le d6bit d'arriv6e d'eau chaude et d'eau froide.
S61ectionner une temp@ature de lavage en fonction du type
de tissu et de salet6 a laver. Pour des r6sultats optimaux,
suJvre les instructions sur 1'6tiquette du v_tement et utiliser
la temp@ature d'eau de lavage la plus chaude possible qui
reste sans danger pour le tissu.
• Les temp6ratures de I'eau tiede et de I'eau chaude
seront inf@ieures a celles de votre pr6c6dente laveuse.
• M_me pour les lavages dont la temp@ature a 6t6 r6gl6e
sur Cool (frais) ou Cold (froid), il est possible que de
I'eau tiede soit ajout6e a la laveuse pour maintenir une
temp@ature minimale.
OPTIONS
II est possible d'ajouter les options suivantes a la plupart
des programmes.
ONE RINSE (UN RIN(_AGE)
On peut utiliser cette option pour limiter le programme
& un ringage.
2ND RINSE (DEUXI_=ME RIN(_AGE)
On peut utiliser cette option pour ajouter
automatiquement un deuxieme ringage & la plupart
des programmes.
DRAIN & SPIN _
CYCLESTATUS ..... O O
_ill Wash _Jr,se Spin Ooze _id_o_ked PAUSE_oca_e_l
FABRIC SOFTENER ADDED - ONE RINSE
(AJOUT D'ASSOUPLISSANT POUR TISSU AVEC
UN RIN(_AGE)
Cette option dolt _tre s61ectionn_e si I'on utilise de
I'assouplissant pour tissu durant un programme. Ceci
garantit que I'assouplissant pour tissu est ajout6 au bon
moment lots du ringage pour @trecorrectement distribu&
FABRIC SOFTENER ADDED - 2ND RINSE
(AJOUT D'ASSOUPLISSANT POUR TISSU AVEC
UN DEUXIEME RIN(_AGE)
Cette option active les options Fabric Softener
(assouplissant pour tissu) et 2nd Rinse (deuxieme
ringage).
BOUTON DE PROGRAMME DE LAVAGE
0
Utiliser le bouton de programme de lavage pour s61ectionner
un programme disponJble sur la laveuse. Tourner le bouton
de programme de lavage pour s61ectionner un programme
correspondant a la charge de linge. Voir "Guide de
programmes" pour des descriptions de programmes
d6taill6es.
BOUTON START/PAUSE
O
(MISE EN MARCHE/PAUSE}
Appuyer sur ce bouton pour d6marrer le programme
s61ectionn_, puis appuyer de nouveau pour suspendre
le programme et d_verrouJller le couvercle.
REMARQUE : Si la laveuse tourne, le couvercle peut
mettre quelques minutes & se d_verrouiller. Appuyer
pendant 3 secondes pour annuler un programme.
iN START
17
Page 18

O CYCLESTATUSLIGHTS
(TleMOINS LUMINEUX DES PROGRAMMES}
CYCLE STATUS
Fill Wash Rinse Spin Done
Les t6moins lumineux indiquent la progression du
programme. _, chaque 6tape du processus, il est possible
que I'on remarque des pauses ou des sons diff6rents de
ceux des laveuses ordinaires.
SPIN (ESSORAGE)
CYCLESTATUS
Fill Wash Rinse Spin Done
La laveuse essore la charge a des vitesses augmentant
graduellement pour une bonne extraction de I'eau, en
fonction du programme et de la vitesse d'essorage
s61ectionn6s.
FILL (REMPLISSAGE)
CYCLESTATUS
Fill Wash Rinse Spin Done
Lorsqu'on appuie sur le bouton START/PAUSE
(mise en marche/pause), la laveuse effectue un test
automatique sur le m6canisme de verrouillage du
couvercle. On entend un d6clic et le couvercle se
d6verrouille brievement avant de se verrouiller
nouveau. La laveuse procede a des essorages pour
v6rifier 1'6quilibrage de la charge. Ces essorages
peuvent prendre plusieurs minutes avant que I'eau ne
soit admise dans la laveuse. Les essorages peuvent
6mettre un bourdonnement avant le remplissage.
Ceci est normal.
WASH (LAVAG E)
CYCLESTATUS ..................
FiIU Wash Rinse Spin Done
On entend I'impulseur d6placer la charge. Les
bruits 6mis par le moteur peuvent changer Iors des
diff6rentes 6tapes du programme. La dur6e de lavage
est d6termin6e par le niveau de salet6 s61ectionn6.
RINSE (RIN(_AGE)
CYCLESTATUS
Fill Wash Rinse Spin Done
On entend des sons similaires a ceux entendu Iors du
programme de lavage a mesure que la laveuse rince
et d6place la charge. On peut entendre le moteur se
mettre en marche brievement (court bourdonnement)
pour faire bouger le panier Iors du remplissage.
Uassouplissant pour tissu sera ajout6 si I'option Fabric
Softener Added (ajout d'assouplissant pour tissu) a 6t6
s61ectionn6e.
Certains programmes utilisent un ringage avec
vaporisation. Apres avoir effectu6 la vidange et
I'extraction de I'eau, la laveuse poursuit I'essorage
et la vaporisation d'eau de ringage pendant toute
la dur6e de ringage.
DONE (TERMINI "=)
CYCLESTATUS
Fill Wash Rinse Spin Done
Une fois le programme termin6, ce t6moin s'allume.
Retirer la charge rapidement pour un r6sultat optimal.
LID LOCKED (VERROUILLAGE DU COUVERCLE)
Pour permettre le fonctionnement
correct de I'essorage, le couvercle se
verrouille et le t6moin de verrouillage
du couvercle s'allume. Ce t6moin
O
Lid Locked
lumineux indique que le couvercle est
verrouill6 et qu'il ne peut _.tre ouvert.
Si I'on doit ouvrir le couvercle, appuyer
sur START/PAUSE (mise en marche/
START
pause). Le couvercle se d6verrouille
une fois que le mouvement de la
laveuse a cess6. IIse peut que cela
prenne plusieurs minutes si la laveuse
Hold 3 sec
PAUSE to cancel
essorait la charge a grande vitesse.
Appuyer de nouveau sur START/PAUSE
(mise en marche/pause) pour suivre
le programme.
18
Page 19

GUIDE DE PROGR MES
Pour un meilleur soin des tissus, choisir le programme qui convient le mieux a la charge a laver.
Certains programmes et options ne sont pas disponibles sur certains modeles.
Tissus
r6sistants,
articles
grand-teint,
serviettes,
jeans
Tissus
r6sistants,
articles
grand-teint,
serviettes,
jeans
Articles en
coton, linge de
maison, draps
et charges
mixtes
Tissus 16gets
en coton
Articles non
repassables,
articles en
coton, de
pressage
permanent,
linge de
maison, tissus
synth6tiques
Tissus
synth_tiques
et non
repassables
peu sales
Articles en
sole ou en laine
lavables en
machine,
lingerie et
laines lavables
Maillots
et articles
n6cessitant un
ringage sans
detergent
Articles tr_s
humides
et articles
laves a la main
REIVlARQUE : Si I'on utilise de I'assouplissant pour tissu, veiller a s_lectionner I'option Fabric Softener Added (ajout d'assouplissant
pour tissu).
*Tousles rin(_ages se font a I'eau froide.
Normal (normal)
Extra
(suppl6mentaire)
Heavy (intense)
Normal (normal)
Heavy (intense)
Normal (normal)
Regular
(r6gulier)
Normal (normal)
Light (16get)
Casual
(Tout-aller)
Regular
(r6gulier)
Casual
(Tout-aller)
Light (16ger)
Delicate
(Articles
d61icat)
Rinse & Spin
(Ringage et
essorage)
Drain & Spin
(Vidange
et essorage)
Hot (Chaude)
Warm (Tiede)
Cool (FraTche)
Cold (Froide)
Hot (Chaude)
Warm (Tiede)
Cool (Frafche)
Cold (Froide)
Hot (Chaude)
Warm (Tiede)
Cool (FraTche)
Cold (Froide)
Hot (Chaude)
Warm (Tiede)
Cool (FraTche)
Cold (Froide)
Hot (Chaude)
Warm (Tiede)
Cool (Frafche)
Cold (Froide)
Hot (Chaude)
Warm (Tiede)
Cool (Frafche)
Cold (Froide)
Hot (Chaude)
Warm (Tiede)
Cool (Frafche)
Cold (Froide)
Ringage a I'eau
froide uniquement
N/A
High (Elev6e)
High (Elev6e)
High (Elev6e)
High (Elev6e)
Low (Basse)
Low (Basse)
Low (Basse)
High (Elev6e)
High (Elev6e)
Utilise le temps de lavage maximal et I'action la plus
intense pour 61iminer les taches et les salet6s les plus
difficiles. Utiliser ce programme pour les articles tr_s sales
ou robustes.
Utiliser ce programme pour les articles tr_s sales ou
robustes. Ce programme utilise uniquement des ringages
par vaporisation. R6gler I'option Fabric Softener Added
(ajout d'assouplissant pour tissu) si I'on utilise un
assouplissant pour tissu.
Utiliser ce programme pour les articles en coton et les
charges de tissus mixtes pr6sentant un degr6 de salet6
normal. Ce programme utilise uniquement des rin(_ages par
vaporisation. R6gler I'option Fabric Softener Added (ajout
d'assouplissant pour tissu) si I'on utilise un assouplissant
oour tissu.
Utiliser ce programme pour laver des charges mixtes
de v_tements peu sales. Ce programme utilise
uniquement des ringages par vaporisation. R6gler I'option
Fabric Softener Added (ajout d'assouplissant pour tissu)
si I'on utilise un assouplissant pour tissu.
Utiliser ce programme pour laver des charges
de v_tements qui ne se repassent pas tels que chemises
de sport, chemisiers, v_tements de travail tout-aller,
articles a pressage permanent et m61anges de tissus.
R6gler I'option Fabric Softener Added (ajout d'assouplissant
pour tissu) si I'on utilise un assouplissant pour tissu.
Utiliser ce programme pour laver des charges peu sales
de v_tements non repassables tels que chemises de
sport, chemisiers, v_tements de travail tout-aller, articles
pressage permanent et melanges de tissus. R6gler
I'option Fabric Softener Added (ajout d'assouplissant pour
tissu) si I'on utilise un assouplissant pour tissu.
Utiliser ce programme pour laver des v_tements
16g_rement sales dont 1'6tiquette de soin indique "Sole
lavable en machine" ou "Programme d61icat". Placer les
oetits articles dans des sacs en filet avant le lavage. R6gler
I'option Fabric Softener Added (ajout d'assouplissant pour
tissu) si I'on utilise un assouplissant pour tissu.
Combine un ringage et un essorage rapide pour les charges
n6cessitant un programme de rin(_age suppl6mentaire ou
oour finir de prendre soin d'une charge apr_s une coupure
de courant. Utiliser 6galement pour les charges n6cessitant
uniquement un rin(_age.
Ce programme utilise un essorage pour r6duire les dur6es
de s6chage pour les tissus Iourds et les articles lav6s & la
main n_cessitant un soin special. Utiliser ce programme
oour vidanger la laveuse apr_s avoir annul_ un programme
ou avoir termin_ un programme apr_s une coupure de
courant, j
19
Page 20

UTILISATION DE LA LAVEUSE
Risque d'incendie
Ne jamais mettre des articles humect_s d'essence ou
d'autres fluides inflammables dans la laveuse.
Aucune laveuse ne peut complbtement enlever I'huile.
Ne pas faire s_cher des articles qui ont _t_ salis par
tout genre d'huile (y compris les huiles de cuisson).
Le non=respect de ces instructions peut causer un
d_cbs, une explosion ou un incendie.
• Vider les poches. Des pieces de monnaie, des boutons
ou objets de petite taille sont susceptibles de glisser sous
I'impulseur et de s'y coincer, ce qui peut entraTne des bruits
inattendus.
• Trier les articles en fonction du programme et de
la temp@ature d'eau recommand6s, ainsi que de
la solidit6 des teintures.
• S6parer les articles tr_s sales des articles peu sales.
• S6parer les articles d61icats des tissus r6sistants.
• Ne pas s6cher les v_tements si les taches sont toujours
pr6sentes apr_s le lavage car la chaleur pourrait fixer
les taches sur le tissu.
• Traiter les taches sans d61ai.
• Fermer les fermetures & glissiere, attacher les crochets,
cordons et ceJntures en tissu. Oter les garnitures et les
ornements non lavables.
• R6parer les d6chirures pour 6viter que les articles
ne s'endommagent encore davantage lots du lavage.
Conseils utiles :
= Lots du lavage d'articles imperm6ables ou r6sistants
I'eau, charger la laveuse de fag;on uniforme.
• Utiliser des sacs en filet pour aider a emp_cher I'emm_lement
lots du lavage d'articles d61icats ou de petits articles.
Risque de choc diectrique
Brancher sur une prise b 3 alv_oles reii_e b la terre.
Ne pas enlever la broche de liaison _ la terre.
Ne pas utiliser un adaptateur.
Ne pas utiliser un c&ble de rallonge.
Le non=respect de ces instructions peut causer
un d_cbs, un incendie ou un choc dlectrique.
• Retourner les tricots pour 6viter le boulochage. S6parer
les articles qui forment la charpie de ceux qui la retiennent.
Les articles synth6tiques, tricots et articles en velours
retiennent la charpie provenant des serviettes, des tapis
et des tissus chenille.
REMARQUE : Toujours life et suivre les instructions des
6tiquettes de soin des tissus pour 6viter d'endommager
les v_tements.
Ajouter le d tergent
Ajouter une mesure de d6tergent dans le fond du panier de
la laveuse avant d'ajouter les v_tements. Si I'on utilise un
agent activateur de d6tergent Oxi ou un agent de blanchiment
activateur de d6tergent sans danger pour les couleurs, I'ajouter
6galement dans le fond du panier de la laveuse.
IMPORTANT : Suivre les instructions du fabricant pour
d6terminer la quantit6 de d6tergent a utiliser.
2O
Page 21

Charger les v_tements darts
ia machine
Charger les v_tements sans les tasser et de fagon uniforme
le long de la paroi du panier. Pour de meilleurs r6sultats,
ne pas remplir au-dela de la hauteur maximale de charge
recommand6e. Ne pas enrouler de grands articles tels des
draps autour de I'agitateur; les charger sans les tasser le long
de la paroi du panier. Essayer de m61anger diff6rents types
d'articles pour r6duire I'emmelement.
__ __ m
IMPORTANT : Ne pas tasser les articles ou les pousser dans
la laveuse. Les articles doivent pouvoir se d6placer librement
pour un nettoyage optimal et pour r6duire le froissement et
I'emm_lement.
Ajouter I'agent de blanchiment
iiquide darts ie distributeur
Verser une mesure d'assouplissant
pour tissu liquide dans le distributeur
(sur certains mod_les)
Verser une mesure d'assouplissant pour tissu
liquide dans le distributeur - toujours suivre
les instructions du fabricant concernant la
dose d'assouplissant pour tissu _ utiliser en
fonction de la taille de la charge.
Diluer I'assouplissant pour tissu liquide en remplissant le
distributeur d'eau tiLde jusqu'a ce quele liquide atteigne
la pattie inf6rieure de I'anneau. Voir les fleches du repute de
remplissage maximum. R6gler ensuite I'option Fabric Softener
Added (ajout d'assouplissant liquide pour tissu) sur One Rinse
(un ringage) ou I'option Fabric Softener Added 2nd Rinse option
(ajout d'assouplissant liquide pour tissu avec un deuxieme
ringage).
IMPORTANT : L'option Fabric Softener Added (ajout
d'assouplissant pour tissu) doit etre r6gl6e pour quele
produit soit distribue correctement et au moment ad6quat
du programme.
Ajouter manueUement I'assouplissant liquide pour tissu
la charge & laver
Au cours du ringage final, attendre le remplissage complet
de la laveuse puis appuyer sur le bouton START/PAUSE/Unlock
(raise en marche/pause/d6verrouillage) pour suspendre le
programme de la laveuse. Soulever le couvercle et verser
la mesure recommand6e d'assouplissant pour tissu. Ne pas
renverser, faire 6clabousser, 6goutter ou couler de I'assouplissant
pour tissu liquide dans le panier ou sur la charge de linge. Ne pas
utiliser plus quela quantit6 recommand6e. Fermer le couvercle et
appuyer de nouveau sur START/PAUSE/Unlock (raise en marche/
pause/d6verrouillage) pour mettre la laveuse en marche.
6, S_lectionner ie programme
au chlore
Ne pas remplir excessivement le distributeur ni utiliser plus
d'une tasse (250 mL) d'agent de blanchiment liquide au
chlore. Ne pas utiliser d'agent de blanchiment sans danger
pour les couleurs ni de produit Oxi avec un programme
utilisant de I'agent de blanchiment au chlore liquide.
NORMAL
REGULAR
HEAVY_ _ L,GHr
_ .... CASUAL
REGULAR
DELICATE
UGHT
RINSE&SPIN
Tourner le bouton de programme pour choisir un programme
de lavage. Pour plus de renseignements, voir "Guide de
programmes".
21
Page 22

7, S61ectionner ie NIVEAU D'EAU
MEDIUM LAR(
WATER LEVEL
S61ectionner le niveau d'eau le plus adapt6 & votre charge.
Small (petite) ajoute une faible quantit6 d'eau pour les charges
plus petites et Super (grande) ajoute la quantit6 d'eau la plus
importante pour les grandes charges ou les charges
volumineuses. Les articles doivent pouvoir se d6placer
librement.
C'est la temp@ature de votre :: Couleurs fonc6es
robinet. Si I'eau froide qui coule qui d6teignent ou
votre robinet est tr_s froide, on :::s'att6nuent
peut ajouter de I'eau tiede pour :
aider a 61iminer la salet6 et faciliter :::Salet6 16g_re
la dissolution du d6tergent. :::
................... }
9, S61ectionner ies options
S61ectionner la temp6rature
de iavage
COOL WARM
WASHTEMPERATURE
ALL COLD R_NSES
Apr_s avoir s61ectionn6 un programme, s61ectionner la
temp@ature de lavage d6sir6e en tournant le bouton de
temp6rature sur le r6glage adapt6 a la charge a laver. Tous
les ringages se font a la temp6rature de I'eau froide du robinet.
REMARQUE : Toujours lire et suivre les instructions des
6tiquettes de soin des tissus pour 6viter d'endommager les
v6tements.
:::Wash Temp Tissus sugg6r6s
(ternp6rature de lavage}
Chaude (Hot}
ii ii
De I'eau froide est ajout6e pour Blancs et couleurs
: 6conomiser de 1'6nergie. Ceci claires
sera plus froid que le r6glage du V6tements durables
chauffe-eau pour I'eau chaude de
votre domicile. Salet6 intense
Tiede (Warm}
De I'eau froide sera ajout6e; il est Couleurs vives
donc possible que I'eau soit plus Salet6 mod@6e
froide que celle que fournissait 16gere
votre laveuse pr6c6dente.
Fraiche (Cool}
De I'eau chaude est ajout6e Couleurs qui
pour favoriser 1'61imination de la d6teignent ou
salet6 et aider a dissoudre les s'att6nuent
d6tergents. Salet6 16g_re
22
OPTIONS
S61ectionnerlesoptions d6sir6es. Si I'on utiJisede I'assouplissant pour
tissu,veiller &s61ectionnerI'une des options Fabric Softener Added
(ajoutd'assouplissant pour tissu).
Appuyer sur START/PAUSE
(MISE EN MARCHE/PAUSE)
pour d6marrer ie programme
de iavage
START
Q
Hold 3 sec
PAUSE to cancel
Appuyer sur le bouton START/PAUSE(miseen marche/pause) pour
d6marrerle programme de lavage. Leremplissage est retard6 de
plusieurs minutes pendant que le nJveaud'6quilibre de la charge
est d6tect6. Lorsque le programme est termin6, le t6moJnlumineux
DONE(termin6)s'allume. Retirerrapidement les v6tements unefoJs
le programme termin6 pour 6vJterla formation d'odeurs, r6duire le
froissement,et emp6cher les crochets m6talliques, fermetures
glissi@e,et boutons-pression de rouiller.
D6verrouJller le couvercle pour ajouter des v6tements :
Si I'on dolt ouvrir le couvercle pour ajouter 1ou 2 v6tements oubli6s:
Appuyer sur START/PAUSE(miseen marche/pause);le couvercle se
d6verrouJlleunefois que le mouvement de la laveuseacess6. CecJ
peut prendre plusieurs minutes si la laveuse essorait la charge & grande
vitesse. Fermerensuite le couvercle et appuyer de nouveausur START/
PAUSE(miseen marche/pause)pour red6marrer le programme.
Si on laJsselecouvercle ouvert pendant plus de 10 minutes, I'eau est
vidang6eautomatJquement.
Retard dans le remplissage
Le remplissage est retard6 de 2&3minutes pendant que la machine
d6tecte tout d6s6quilibre 6ventuel de la charge. Les essorages
6mettent un bourdonnement avant le remplissage. Ceci correspond
aufonctionnement normal de la machine.
Page 23

ENTRETIEN DE LA LAVEUSE
f
TUYAUX D'ARRIVEE D'EAU
Remplacer les tuyaux d'arriv6e d'eau apr_s 5 ans d'utilisation
pour r6duire le risque de d6faillance intempestive. Inspecter
p6riodiquement les tuyaux; les remplacer en cas de
renflement, de d6formation, de coupure et d'usure,
ou si une fuite se manifeste.
Lorsque vous remplacez les tuyaux d'arriv6e d'eau, noter la
date de remplacement au marqueur ind616bile sur 1'6tiquette.
r
NETTOYAGE DE LA LAVEUSE
Votre laveuse doit rester aussi propre et frafche que vos
v_tements. Pour que I'int6rieur de la laveuse reste libre
de toute odeur, suivre la proc6dure mensuelle de nettoyage
recommand6e suivante :
1. S'assurer que la laveuse est vide.
2. Ajouter une pastille de nettoyant pour laveuse
recommand6 AFFRESH ®dans le tambour de la laveuse.
OU
Si I'on utilise un agent de blanchiment liquide, ajouter
1 tasse (250 mL) dans le distributeur d'agent de
blanchiment liquide.
f NETTOYAGE DE LA LAVEUSE (suite} "_
Nettoyage du distributeur d'assouplissant liquide pour
tissu
1. Retirer le distributeur en le saisissant par le dessus _.
deux mains et en le serrant, tout en poussant vers le haut
avec les pouces.
2. Rincer le distributeur _.I'eau tiede, puis le remettre en
place.
REMARQUE : Afin d'6viter d'endommager la laveuse ou
les v_tements, ne pas laver les v_tements si le distributeur
d'assouplissant liquide pour tissu a 6t6 retir6.
Nettoyage du distributeur d'agent de blanchiment
Essuyer I'int6rieur du distributeur d'agent de blanchiment
avec un chiffon propre et humide.
Nettoyage de Pext6rieur :
1. Utiliser une 6ponge ou un chiffon doux et humide pour
essuyer les renversements.
2. Utiliser un nettoyant de surface tout usage si n6cessaire.
IMPORTANT :Afin d'6viter d'endommager le rev_tement de
la laveuse, ne pas utiliser de produits abrasifs.
f NON-UTILISATION ET ENTRETIEN
EN PERIODE DE VACANCES
IMPORTANT • Ne pas ajouter de d6tergent. Pour 6viter tout
dommage a long terme, ne pas utiliser plus que la quantit6
d'agent de blanchiment recommand6e.
3. Rabattre le couvercle de la laveuse.
4. S61ectionner le programme Normal Heavy (normal
intense), le r6glage eau chaude et le niveau d'eau 61ev6.
5. Appuyer sur START/PAUSE (mise en marche/pause).
De I'eau coule dans la laveuse pendant un moment,
puis s'arr_te de couler, le couvercle se verrouille et
le programme reprend.
REMARQUE : Pour de meilleurs r6sultats, ne pas
interrompre le programme. Si I'on dolt interrompre le
programme, appuyer deux fois sur START/PAUSE (mise en
marche/pause) et d6marrer un programme RINSE AND SPIN
(ringage et essorage) pour s'assurer que le nettoyant ou
I'agent de blanchiment ont 6t6 rinc6s de la laveuse. Appuyer
pendant 3 secondes sur START/PAUSE (mise en marche/
pause) pour annuler le programme.
Faire fonctionner la laveuse seulement Iorsqu'on est pr6sent.
En cas de d6m6nagement ou si I'on n'utilise pas la laveuse
pendant un certain temps, suivre les 6tapes suivantes :
1. D6brancher la laveuse ou d6connecter la source
de courant 61ectrique.
2. Fermer I'alimentation en eau/_ la laveuse pour 6viter toute
inondation due a une surpression.
FENTRETIEN POUR ENTREPOSAGE HIVERNAL-'
iMPORTANT : Pour 6viter tout dommage, installer
et remiser la laveuse/_ I'abri du gel. L'eau qui peut rester
dans les tuyaux risque d'aMmer la laveuse en temps
de gel. Si la laveuse dolt faire I'objet d'un d6m6nagement
ou d'entreposage au cours d'une p6riode de gel, hiv6riser
la laveuse.
Hiv_risation de la laveuse :
1. Fermer les deux robinets d'eau; d6connecter et vidanger
les tuyaux d'arriv6e d'eau.
2. Placer 1 pinte (1 L) d'antigel pour v6hicule r6cr6atif dans
le panier et faire fonctionner la laveuse sur un programme
RINSE & SPiN (rin?age et essorage) pendant environ
30 secondes pour m61anger I'antigel et I'eau restante.
3. D6brancher la laveuse ou d6connecter la source de
courant 61ectrique.
23
Page 24

TRANSPORT DE LA LAVEUSE
1. Fermer les deux robinets d'eau. D6brancher et vidanger
les tuyaux d'arriv6e d'eau.
2. Si I'on d6place la laveuse pendant une p6riode de gel,
suivre les instructions de la section "Entretien pour
entreposage hivernal" avant de la d6placer.
3. D6connecter le tuyau de vidange du systeme de vidange
et vidanger I'eau restante dans un plat ou un seau.
D6connecter le tuyau de vidange & I'arriere de la laveuse.
4. D6brancher le cordon d'alimentation.
5. Placer les tuyaux d'arriv6e d'eau dans le panier de
la laveuse.
6. Faire passer le cordon d'alimentation par dessus
la console et I'enrouler dans le panier de la laveuse.
7. Replacer I'emballage en polystyrene circulaire des
mat6riaux d'exp6dition d'origine & I'int6rieur de la laveuse.
Si vous n'avez plus I'emballage circulaire, placer des
couvertures Iourdes ou des serviettes dans I'ouverture
du panier. Fermer le couvercle et placer du ruban adh6sif
sur le couvercle et jusqu'& la partie inf6rieure avant de la
laveuse. Laisser le couvercle ferm6 par I'adh6sif jusqu'&
ce que la laveuse soit install6e & son nouvel emplacement.
r
RE!NSTALLATION/RI UTILISATION
DE LA LAVEUSE
Pour r6installer la laveuse en cas de non-utilisation,
d'entreposage pour I'hiver, de d6m6nagement ou en p6riode
de vacances :
1. Consulter les "Instructions d'installation" pour choisir
I'emplacement, r6gler I'aplomb de la laveuse et la raccorder.
2. Avant de r6utiliser la laveuse, ex6cuter la proc6dure
recommand6e suivante :
Remise en marche de la laveuse :
1. Vidanger les canalisations d'eau et les tuyaux. Reconnecter
les tuyaux d'arriv6e d'eau. Ouvrir les deux robinets d'eau.
Risque de choc _lectrique
Brancher sur une prise &3 alv_oles reli_e & la terre.
Ne pas enlever la broche de liaison & la terre.
Ne pas utiliser un adaptateur.
Ne pas utiliser un c_ble de rallonge.
Le non=respect de ces instructions peut causer
un d_cbs, un incendie ou un choc _lectrique.
2. Brancher la laveuse ou reconnecter la source de courant
61ectrique.
3. Faire ex6cuter & la laveuse le programme Casual Regular
(tout-aller r6gulier) pour nettoyer la laveuse et 61iminer
I'antigel, le cas 6ch6ant. Utiliser la moiti6 de la quantit6 de
d6tergent recommand6e par le fabricant pour une charge
de taille moyenne.
24
Page 25

Essayer d'abord les solutions sugg6r6es ici ou consulter notre site Web et la FAQ (Foire aux questions) pour tenter d'6viter -_
le coot d'une visite de service.
Causes possibles SolutionSi les ph6nom_nes
suivants se produisent
V6rifier ce qui suit pour
que I'installation soit
correcte ou voir la
section "Utilisation
de la laveuse".
Cliquetis ou bruits
m6talliques
Gargouillement
ou bourdonnement
Bourdonnement
Les pJeds ne sont peut-_tre pas
en contact avec le plancher ou
peut-_tre qu'ils ne sont pas
verrouill6s.
La laveuse n'est peut-6tre
pas d'aplomb.
La charge est peut-6tre
d6s6quilibr6e.
Des objets sont coinc6s dans
le syst6me de vidange de la laveuse.
La laveuse est peut-6tre en train
d'6vacuer de I'eau.
Le t6moin de d6tection est allum6.
Les pieds avant et arri6re doivent 6tre en contact ferme avec
le plancher et la laveuse doit 6tre d'aplomb pour fonctionner
correctement. Les contre-6crous doivent 6tre bJen serr6s contre
le bas de la caisse.
V6rifier que le plancher n'est pas incurv6 ou qu'il ne s'affaisse
pas. Si le plancher est Jrr6gulier, un morceau de contreplaqu6 de
3/4" (19 mm) plac6 sous la laveuse permettra de r6duire le bruit.
Voir "R6glage de I'aplomb de la laveuse" dans les "hstructions
d'instailation".
Charger les v6tements secs sans les tasser et de fagon
uniforme le long de la paroJ du panier. Le fait d'ajouter des
articles mouill6s ou de rajouter de I'eau dans le panJer pourrait
d6s6quilJbrer la laveuse.
Laver des charges plus petites pour dimJnuer les d6s6quilibres.
Ne pas trop tasser le linge. Eviter de laver un article seul.
Utiliser le programme Normal Regular (r6gulier normal) et
niveau d'eau Super (superbe) ou Large (grande) pour les
articles surdimensionn6s et non absorbants tels que les
couettes ou les vestes avec rembourrage en polyester.
Voir "Guide de programmes" et "Utilisation de la laveuse" dans
ce "Guide d'utilisation et d'entretien".
Vider les poches avant le lavage. Les articles mobiles tels
des pi6ces de monnaie sont susceptibles de tomber entre
le panier et la cuve; ils peuvent aussi obstruer la pompe. Un
appel pour intervention de d6pannage s'av6rera peut-6tre
n6cessaire pour retirer ces objets.
II est normal d'entendre les articles m6talliques des v6tements
comme les boutons-pression m6talliques, boucles ou
fermetures a glissi6re toucher le panier en acier inoxydable.
II est normal d'entendre la pompe produire un bourdonnement
continu accompagn6 de gargouillements ou de bruits de
pompage p6rJodiques Iorsque les quantit6s d'eau restantes sont
61Jmin6esau cours des programmes d'essorage/de vidange.
II est possible que les essorages 6mettent un bruit de
ronronnement apr6s la mise en marche de la laveuse. Ceci est
normal. Les essorages de d6tection prennent quelques minutes
avant que I'eau ne soit ajout6e a la laveuse.
Wrifier ce qui suit pour
que I'instailation soit
correcte :
La laveuse n'est pas d'aplomb.
Les tuyaux de remplissage ne sont
pas solidement fix6s.
Rondelles d'6tanch6it6
des tuyaux de remplissage.
Raccord du tuyau de vidange.
Inspecter le circuit de plomberie du
domicile pour v6rifier qu'il n'y a pas
de fuites ou que 1'6vier ou le tuyau
de vidange n'est pas obstru6.
II est possible que de I'eau 6clabousse en dehors du panier
si la laveuse n'est pas d'aplomb. V6rJfier que la charge n'est pas
d6s6quilibr6e ou trop tass6e.
Setter le raccord du tuyau de remplissage.
V6rJfier que les quatre rondelles d'6tanch6it6 plates des tuyaux
de remplissage d'eau sont correctement Jnstail6es.
Tirer le tuyau de vidange de la caisse de la laveuse et le fixer
correctement dans le tuyau de rejet a 1'6gout ou 1'6vier
de buanderie.
Ne pas placer de ruban adh6sif sur I'ouverture du syst_me de
vidange.
De I'eau pourrait refouler de I'_vier ou du tuyau de rejet
I'_gout obstru_. Inspecter tout le circuit de plomberie du
domicile (_viers de buanderie, tuyau de vidange, conduites
d'eau, et robinets) pour v_rifier qu'il n'y a aucune fuite.
,.)
25
Page 26

r
Essayer d'abord les solutions sugg6r6es ici ou consulter notre site Web et la FAQ (Foire aux questions) pour tenter d'6viter
le coot d'une visite de service.
Si ruesph6nom_nes Causes possibmes Somution
suivants se produisent
V6rifier ce qui suit pour
que I'instailation soit
La laveuse n'a pas 6t6 charg6e tel
que recommand6.
correcte : (suite)
k,
Risque de choc dlectrique
Brancher sur une prise b 3 alv_oles reli_e b la terre.
Ne pas enlever la broche de liaison & la terre.
Ne pas utiliser un adaptateur.
Ne pas utiliser un c_ble de rallonge.
Le non=respect de ces instructions peut causer
un d_cbs, un incendie ou un choc _lectrique.
La laveuse ne fonctionne
pas ou ne se remplit pas;
V6rifier que la laveuse est
correctement aliment6e en eau.
elle cesse de fonctionner
ou le t6moin lumineux
de lavage reste allum_
(indiquant que la laveuse
n'a pas pu se remplir
correctement)
V6rifier que I'alimentation 61ectrique
est correcte.
Fonctionnement normal
de la laveuse.
Une charge d6s6quilibr6e peut entraTner une d6viation
du panier et de I'eau pourrait alors 6clabousser en dehors
de la cuve. Voir "Utilisation de la laveuse" pour des instructions
sur le chargement, j
Les deux tuyaux doivent etre fix6s et I'eau dolt pen6trer dans
la valve d'arrivee.
Les robinets d'eau chaude et d'eau froide doivent etre ouverts
tousles deux.
Verifier que les tamis des valves d'arrivee ne sont pas obstru6s.
V6rifier que les tuyaux d'arrivee d'eau ne sont pas deform6s;
ceci peut reduire le d6bit.
Brancher le cordon d'alimentation dans une prise a 3 alveoles
reliee a la terre.
Ne pas utiliser de cable de rallonge.
Verifier que la prise est alimentee.
Remettre en marche un disjoncteur qui serait ouvert. Remplacer
tout fusible grille.
REMARQUE : Si le probleme persiste, appeler un _lectricien.
Le couvercle doit etre ferm6 pour que la laveuse puisse
fonctionner.
La laveuse fait des pauses durant certaines etapes du
programme. Ne pas interrompre le programme.
26
La laveuse detecte la charge s_che en proc6dant a de courts
essorages qui peuvent prendre plusieurs minutes avant de se
remplir pour v6rifier 1'6quilibrage de la charge. Les essorages
peuvent emettre un bourdonnement avant le remplissage.
Ceci est normal.
J
Page 27

Essayer d'abord les solutions sugg6r6es ici ou consulter notre site Web et la FAQ (Foire aux questions) pour tenter d'@iter
le coot d'une visite de service.
Si Jes ph_nom_nes
suivants se produisent
La laveuse ne fonctionne
pas ou ne se remplit pas;
elle cesse de fonctionner
ou le t6moin lumineux
de Javage reste allum6
(indiquant que la laveuse
n'a pas pu se remplir
correctement) (suite)
La laveuse ne se
vidangein'essore pas;
les charges restent
mouill@s, ou le t6moin
hmineux d'essorage
reste allum6 (indiquant
que la laveuse n'6tait
pas en mesure d'extraire
l'eau [par pompage]
en 10 minutes)
Causes possibJes SoJution
Les v_tements sont peut-_tre tass6s
dans la hveuse.
Vider les poches et utiliser des sacs
linge pour les petits articles.
Utiliser des programmes comportant
une vitesse d'essorage inf@ieure.
La charge de la hveuse est peut-_tre
tass@ ou d6s@uilibr@.
Retirer phsieurs articles, r@artir uniform6ment la charge
dans le panier, et ajouter du d6tergent. Fermer le couvercle
et appuyer sur START/PAUSE (mise en marcheipause).
Ne pas ajouter phs de I ou 2 articles suppl6mentaires
apr_s le d6but du programme pour @iter un tassement excessif
de la charge ou un d@@uilibre.
Des petits articles sont peut-_tre coinc@ dans la pompe
ou entre le panier et la cuve, ce qui peut ralentir ta vidange.
Les programmes avec vitesses d'essorage r6duites 61iminent
moins d'eau que les programmes qui comportent des
vitesses d'essorage sup@Jeures. Utiiiser la vitesse d'essorage
appropri@ile programme recommand6 pour le v_tement. Pour
61iminer I'eau restant dans la charge, s61ectionner Drain & Spin
(vidange et essorage). On peut avoir a r@rranger la charge pour
en assurer une distribution uniforme dans le panier.
Des charges tr_s tass@s ou d6s@uilibr@s peuvent emp@her
la laveuse d'essorer correctement : les charges ressortent phs
mouill@s qu'elles ne devraient I'_tre. R@artir uniform6ment la
charge mouill@ pour que Fessorage soit @uilibr6. S61ectionner
le programme Drain & Spin (vidange et essorage) pour enlever
toute eau rest@ dans la machine. Voir "Utilisation de la laveuse"
pour des recommandations sur la fagon de charger la machine.
Endroits secs sur la
charge apr_s un
programme
Temp@atures de lavage
ou de ringage incorrectes
hspecter le circuit de pJomberie
pour v@ifier que le tuyau de vidange
est correctement install6. Le tuyau
de vidange se prolonge dans le tuyau
rJgidede rejet &1'6gout au-dela
@4,5" (114 mm).
Un ex@s de mousse caus6 par une
utilisation excessive de d6tergent
peut ralentir ou arr6ter ia vidange ou
I'essorage.
Un essorage a vitesse 61ev@
extrait davantage d'humidit6 que
les laveuses traditionnelles
chargement par le dessus.
Wrifier que la laveuse est
correctement aliment@ en eau.
Temp@atures de lavage contr61@s
pour effectuer des @onomies
d'@ergie.
Wrifier que le tuyau de vidange est correctement install6. Utiliser
la bride de retenue pour tuyau de vidange et h fixer solidement
au tuyau de rejet a 1'6gout ou a I'@ier de buanderie. Ne pas
placer de ruban adh@if sur I'ouverture du syst_me de vidange.
Abaisser letuyau de vidange si I'extr6mit6 se trouve a plus de 96"
(2,4 m) au-dessus du plancher. Retirer toute obstruction du tuyau
de vidange.
Toujours mesurer les quantit6s et suivre les instructions figurant
sur le d6tergent en fonction de la charge. Pour 61iminer tout
exc_s de mousse, s61ectionner RINSE & SPIN (rin¢2ageet
essorage). Ne pas ajouter de d6tergent.
Un essorage a vitesse 61ev@ associ6 a une circulation d'air
@rant I'essorage final peut entrainer I'apparition de portions
@ches sur le linge plac6 sur le haut de ta charge au cours de
I'essorage finaL Ceci est normal.
V@Jfierque les tuyaux d'arriv@ d'eau chaude et froide n'ont
pas 6t6 invers6s.
Les deux tuyaux doivent _tre raccord@ a la Dis a la laveuse
et au robinet, et la valve d'arriv@ doit recevoir a la Dis de I'eau
chaude et de I'eau froide.
V@ifier que les tamis des valves d'arriv@ ne sont pas obstru6s.
Eliminer toute d_formation des tuyaux.
Cette laveuse utiJise des temp@atures de lavage et de ringage
inf@ieures a celles qu'utiJisait votre hveuse pr@_dente. Cela
signifie _galement des temp@atures inf@ieures de lavage
I'eau chaude et a I'eau tilde.
J
27
Page 28

DEP NAGE
Essayer d'abord les solutions sugg@6es ici ou consulter notre site Web et la FAQ (Foire aux questions) pour tenter d'6viter
Causes possibJes SoJutionSi Jes ph6nom_nes
le coot d'une visite de service.
suivants se produisent
Charge non rinc6e
V@Jfierque la laveuse est
correctement aliment6e en eau.
Utilisation excessive de d6tergent.
La laveuse n'a pas 6t6 charg6e
tel que recommand6.
Utiiisation d'un r6glage de niveau
d'eau insuffisant.
V@Jfierque les tuyaux d'arriv6e d'eau chaude et froide n'ont
pas 6t6 invers6s.
Les deux tuyaux doivent _tre fix6s et I'eau doit p6n6trer dans
la valve d'arriv6e.
Les robinets d'eau chaude et d'eau froide doivent _tre ouverts
tous les deux.
Les tamis de la valve d'arriv6e d'eau de la laveuse sont
peut-_tre obstru6s.
Eliminer toute d6formation du tuyau d'arriv6e.
La mousse produite par un exc6s de d6tergent peut emp_cher
la laveuse de fonctionner correctement. Toujours mesurer la
quantit6 de d6tergent et toujours suivre les instructions du
d6tergent en fonction de la tailJe et du niveau de salet6 de
la charge.
La laveuse effectuera un ringage moins performant si la charge
est excessivement tass6e.
Charger les v_tements sans les tasser et de fad}on uniforme
le long de la paroi du panier. Charger la laveuse uniquement
avec des articles secs.
Utiliser le programme congu pour les tissus a laver.
Si I'on souhaite ajouter des v_tements une fois que la laveuse
a d6marr6, n'en rajouter qu'un ou deux.
Choisir un niveau d'eau adapt6 a la charge de lavage.
Sable, poils d'animaux,
charpie, etc. sur la
charge apr_s le lavage
La charge est emm_16e
Des r6sidus Iourds de sable,
de poiis d'animaux, de charpie,
et de d6tergent ou d'agent
de blanchiment peuvent n6cessiter
un ringage suppl6mentaire.
La laveuse n'a pas 6t6 charg6e
tel que recommand6.
Ajouter un deuxi_me ringage au programme s61ectionn6.
Voir la section "Utilisation de la laveuse".
S61ectionner un programme comportant un lavage plus
lent et une vitesse d'essorage inf@ieure. Noter que les articles
seront plus mouili6s que si I'on utiJise une vitesse d'essorage
sup@ieure. Voir le "Guide de programmes" pour utiliser
le programme qui correspond le mieux a la charge utiiis6e.
Charger les v_tements sans les tasser et de fagon uniforme
le long de la paroi du panier.
R6duire I'emm_lement en m61angeant plusieurs types
d'articles dans la charge. Utiliser le programme recommand6
correspondant aux types de v_tements a laver.
J
28
Page 29

f Essayer d'abord les solutions sugg6r6es ici ou consulter notre site Web et la FAQ (Foire aux questions) pour tenter d'6viter "
le coot d'une visite de service.
Causes possibles SolutionSi les ph6nom_nes
suivants se produisent
Ne nettoie ou ne
d6tache pas
Fonctionnement incorrect
du distributeur
k.
La laveuse n'a pas 6t6 charg6e tel
que recommand6.
Ajout de d6tergent sur le dessus Ajouter le d6tergent, les produits oxi, et I'agent de blanchiment
de la charge, sans danger pour les couleurs au fond du panier avant de
Utilisation d'un r6glage de niveau Choisir un niveau d'eau adapt6 a la charge de lavage.
d'eau insuffisant.
Utilisation excessive de d6tergent.
Programme utilis6 incorrect par
rapport au type de tissu.
Distributeurs non utilis6s.
Les couleurs similaires ne sont
pas lav6es ensemble.
Distributeur obstru6.
La laveuse effectue un nettoyage moins performant si la charge
est trop tass6e.
Charger les v_tements sans les tasser et de fagon uniforme
le long de la paroi du panier. Charger la machine uniquement
avec des articles secs.
SJI'on souhaite ajouter des v6tements une fois que la laveuse
a d6marr6, n'en rajouter qu'un ou deux.
charger les articles dans la laveuse.
La mousse produite par un exc_s de d6tergent peut emp_cher
la laveuse de fonctionner correctement. Toujours mesurer la
quantit6 de d6tergent et toujours suivre les instructions du
d6tergent en fonction de la taille et du niveau de salet6 de la
charge.
Utiliser une option de programme de niveau de salet6
plus 61ev6e et une temp6rature de lavage plus chaude pour
am61iorer le nettoyage.
Utiliser le programme Heavy (intense) pour un nettoyage
puissant. Voir le "Guide de programmes" pour utiliser le
programme qui correspond le mieux a la charge utilis6e.
Utiliser les distributeurs pour 6viter que I'agent de blanchiment au
chlore et la boule de lavage ne tachent les v_tements.
Remplir les distrJbuteurs avant de d6marrer un programme.
S61ectionner I'option Fabric Softener Added (ajout
d'assouplissant pour tissu) en employant un assouplissant
pour tissu.
Ne pas verser de produits directement sur la charge.
Laver ensemble les couleurs semblables et les retJrer
rapidement une fois le programme termin6 pour 6viter tout
transfert de teinture.
Utiliser seulement un agent de blanchiment liquide dans
le distributeur d'agent de blanchiment. Utiliser uniquement un
assouplissant pour tissu darts le distributeur d'assouplissant
pour tissu.
J
29
Page 30

DEP N, AGE
Essayer d'abord les solutions sugg6r6es ici ou consulter notre site Web et la FAQ (Foire aux questions) pour tenter d'6viter
Si les ph6norn_nes
Causes possibles Solution
le coQt d'une visite de service.
suivants se produisent
Dommages aux tissus
Odeurs
Le t6moin lumineux Le couvercle n'est pas verrouill& Rabattre le couvercle. La laveuse ne d6marrera et ne se remplira
Lid Locked (couvercle pas si le couvercle est ouvert.
verrouil% clignote Un programme a 6t6 Jnterrompu ou La laveuse est peut-_tre toujours en phase d'essorage. Le
Des objets pointus se trouvaient
dans les poches au moment
du programme de lavage.
Les cordons et les ceintures se sont
peut-_tre emm_16s.
Les articles 6taient peut-_tre
endommag6s avant le lavage.
Des dommages au tissu peuvent se
produire si la charge est trop tass6e.
Uagent de blanchiment au chlore
n'a pas 6t6 ajout6 correctement.
Les instructions de soin des
v_tements n'ont peut-_tre pas 6t6
suivies.
Uentretien mensuel n'est pas effectu6
tel que recommand&
Utilisation excessive de d6tergent.
suspendu a I'aide du bouton Start! couvercle ne se d6verrouiJlera pas avant que le panier ne cesse
Pause (mise en marcheipause), de tourner. Si on lave des charges de grande taille ou des tissus
Vider les poches, fermer les fermetures a glissi6re, les boutons
pression, et les agrafes avant le lavage pour 6viter d'accrocher
et de d6chirer le linge.
Attacher tous les cordons et les ceintures avant de d6marrer
le nettoyage de la charge.
Raccommoder les d6chirures et repriser les ills cass6s des
coutures avant le lavage.
Charger les v_tements sans les tasser et de fagon uniforme
le long de la paroi du panier. Charger la machine uniquement
avec des articles secs.
Utiliser le programme congu pour les tissus a laver.
SJI'on souhaite ajouter des v6tements une fois que la laveuse
a d6marr6, n'en rajouter qu'un ou deux.
Ne pas verser d'agent de blanchiment au chlore liquide
directement sur la charge. Essuyer tousles renversements
d'agent de blanchiment.
Un agent de blanchiment non dilu6 endommagera les tissus.
Ne pas utiiiser plus que la quantit6 recommand6e par
le fabricant.
Ne pas placer d'articles sur le dessus du distributeur d'agent
de blanchiment Iorsqu'on charge et d6charge la laveuse.
Toujours lire et suivre les instructions d'entretien du fabricant
indiqu6es sur 1'6tiquette du v_tement. Voir le "Guide de
programmes" pour utiliser le programme qui correspond le mieux
&la charge utilJs6e.
Voir "Nettoyage de la laveuse" dans la section "Entretien
de la laveuse".
D6charger la laveuse d_s que le programme est termin&
Veiller a mesurer correctement. Toujours suivre les instructions
du fabrJcant.
Voir la section "Nettoyage de la laveuse".
Iourds, ceci peut prendre quelques minutes.
J
30
Page 31

GARANTIEDESAPPAREILSDEBUANDERIEDECROSLEY®CORPORATION
GARANTIE LIMITI_E
Pendant un an a compter de la date d'achat, Iorsque ce gros appareil menager est utilise et entretenu conformement aux instructions
jointes a ou fournies avec le produit, Whirlpool Corporation ou Whirlpool Canada LP (ci-apres design6es "Whirlpool") paiera pour les
pieces specifi6es par I'usine et la main-d'ceuvre pour corriger les vices de materiaux ou de fabrication qui existaient deja Iorsque ce
gros appareil menager a 6te achete. Le service doit _tre fourni par une compagnie de serv.ice design6e par Whirlp.ool. LE SEUL ET
EXCLUSlF RECOURS DU CLIENT DANS LE CADRE DE LA PRESENTE GARANTIE LIMITEE CONSlSTE EN LA REPARATION PRI_VUE
CI-DESSUS. Cette garantie limitee est valide uniquement aux I_tats-Unis ou au Canada et s'applique exclusivement Iorsque le gros
appareil menager est utilise dans le pays oQ il a et6 achete. Une preuve de la date d'achat d'origine est exigee pour obtenir un service
dans le cadre de la presente garantie limitee.
I_LI_MENTS EXCLUS DE LA GARANTIE
La pr_sente garantie limit_e ne couvre pas :
1. Les pieces de rechange ou la main d'ceuvre Iorsque ce gros appareil menager est utilise a des fins autres que I'usage unifamilial
normal ou Iorsque les instructions d'installation et/ou les instructions de I'operateur ou de I'utilisateur fournies ne sont pas
respectees.
2. Les visites de service pour rectifier I'installation du gros appareil menager, montrer a I'utilisateur comment utiliser I'appareil,
remplacer ou reparer des fusibles ou rectifier le c&blage ou la plomberie du domicile.
3. Les visites de service pour reparer ou remplacer les ampoules electriques, les filtres a air ou les filtres a eau de I'appareil. Les pieces
consomptibles ne sont pas couvertes par la garantie.
4. Les dommages imputables a : accident, modification, usage impropre ou abusif, incendie, inondation, actes de Dieu, installation
fautive ou installation non conforme aux codes d'electricit6 ou de plomberie, ou I'utilisation de produits non approuves par
Whirlpool.
5. Les defauts apparents, notamment les eraflures, les bosses, fissures ou tout autre dommage au fini du gros appareil menager,
moins que ces dommages soient dus a des vices de materiaux ou de fabrication et soient signales a Whirlpool dans les 30 jours
suivant la date d'achat.
6. L'enlevement et la livraison. Ce gros appareil menager est con£;u pour _tre r6pare a domicile.
7. Les reparations aux pieces ou systemes resultant d'une modification non autorisee faite a I'appareil.
8. Les frais de deplacement et de transport pour le service d'un produit si votre gros appareil menager est situ6 dans une region
eloign6e oQun service d'entretien Whirlpool autorise n'est pas disponible.
9. La depose et la reinstallation de votre gros appareil menager si celui-ci est installe dans un endroit inaccessible ou n'est pas installe
conformement aux instructions d'installation fournies par Whirlpool.
10. Les pieces de rechange ou la main-d'oeuvre pour les gros appareils menagers dont les numeros de serie et de modele originaux
ont et6 enleves, modifies ou qui ne peuvent pas _tre facilement identifies.
CLAUSE D'EXONI_RATION DE RESPONSABILITI_ AU TITRE DES GARANTIES IMPLICITES
LES GARANTIES IMPLIClTES, Y COMPRIS LES GARANTIES APPLICABLES DE QUALITI_ MARCHANDE OU D'APTITUDE _, UN
USAGE PARTICULIER, SONT LIMITI_ES _, UN AN OU _, LA PLUS COURTE PI_RIODE AUTORISI_E PAR LA LOI. Certains I_tats et
certaines provinces ne permettent pas de limitation sur la duree de garanties implicites de qualite marchande ou d'aptitude a un usage
particulier, de sorte que la limitation ci-dessus peut ne pas _tre applicable dans votre cas. Cette garantie vous confere des droits
juridiques specifiques, et vous pouvez egalement jouir d'autres droits qui peuvent varier d'une juridiction a I'autre.
LIMITATION DES RECOURS, EXCLUSION DES DOMMAGES FORTUlTS OU INDIRECTS
LE SEUL ET EXCLUSlF RECOURS DU CLIENT DANS LE CADRE DE LA PRI_SENTE GARANTIE LIMITI_E CONSlSTE EN LA
RI_PARATION PRI_VUE CI-DESSUS. WHIRLPOOL N'ASSUME AUCUNE RESPONSABILITI_ POUR LES DOMMAGES FORTUITS OU
INDIRECTS. Certains I_tats et certaines provinces ne permettent pas I'exclusion ou la limitation des dommages fortuits ou indirects de
sorte que ces limitations et exclusions peuvent ne pas _tre applicables dans votre cas. Cette garantie vous confere des droits juridiques
specifiques, et vous pouvez egalement jouir d'autres droits qui peuvent varier d'une juridiction a I'autre.
Si vous residez a I'exterieur du Canada et des 50 I_tats des I_tats-Unis, contactez votre marchand Crosley ®autorise pour determiner si
une autre garantie s'applique.
Si vous avez besoin d'un service de reparation, voir d'abord la section "Depannage" du Guide d'utilisation et d'entretien. Si vous n'_tes
pas en mesure de resoudre le probleme apres avoir consulte la section "Depa.nnage", vous pouvez trouver de I'aide supplementaire en
consultant la section "Assistance ou Service" ou en appelant Whirlpool. Aux E.-U., composer le 1-800-253-1301. Au Canada,
composer le 1-800-807-6777. 7/o8
31
Page 32

Before calling for assistance or service, please check "Troubleshooting" or visit www.whirlpool.com/help.
It may save you the cost of a service call. If you still need help, follow the instructions below.
When calling, please know the purchase date and the complete model and serial number of your appliance.
This information will help us to better respond to your request.
If you need replacement parts or to order accessories
These parts will fit right and work right because they are made with the same precision
To locate FSP ® replacement parts, assistance in your area, or accessories:
Whirlpool Corporation Customer eXperience Center Whirlpool Canada LP
1=800=253=1301 www.whirlpool.com Customer eXperience Centre
1-800-442-9991 (Accessories) www.whirlpool.ca
www.whirlpool.com/accessories
or call your nearest designated service center or refer to your Yellow Pages telephone directory.
We recommend that you use only FSPe>Factory Specified Parts.
used to build every new WHIRLPOOL _'_appliance.
1-800-807-6777
Our consultants provide assistance with
In the U.S.A.
m Features and specifications on our full line of appliances, m
m Installation information, m
m Specialized customer assistance (Spanish speaking, m
hearing impaired, limited vision, etc.).
You can write with any questions or concerns at:
Whirlpool Corporation Customer eXperience Centre
Customer eXperience Center Whirlpool Canada LP
553 Benson Road Unit 200-6750 Century Ave
Benton Harbor, MI 49022-2692 Mississauga, Ontario L5N 0B7
Please include a daytime phone number in your correspondence.
in the U.S.A. and Canada
Use and maintenance procedures.
Accessory and repair parts sales.
Referrals to local dealers, repair parts distributors,
and service companies. Whirlpool designated service
technicians are trained to fulfill the product warranty
and provide after-warranty service, anywhere in the
United States and Canada.
ASSISTANCEOUSERVICE
Avant de faire un appel pour assistance ou service, veuillez v6rifier la section "D6pannage" ou consulter
www.whirlpool.com/help. Cette v_rification peut vous faire _conomiser le coot d'une visite de r_paration.
Lors d'un appel, veuillez connaltre la date d'achat et les num_ros au complet de modele et de s_rie de votre appareil.
Si vous avez besoin de pi_ces de rechange ou pour commander des accessoires
Si vous avez besoin de commander des pieces de rechange, nous vous recommandons d'utiliser seulement des pieces
sp6cifi_es par I'usine FSP_'_LCes pieces conviendront et fonctionneront bien parce qu'elles sont fabriqu_es selon les m_mes
Pour trouver des pi_ces de rechange FSP ® , de I'aide ou des accessoires darts votre r_gion :
ou contacter votre centre de reparation d_signe le plus proche, ou encore consulter les Pages Jaunes.
specifications pr_cises utilis_es pour construire chaque nouvel appareil WHIRLPOOL _.
Nos consultants fournissent Pour plus d'assistance
I'assistance pour : Vous pouvez nous soumettre toute question ou probleme en
m Proc_d_s d'utilisation et d'entretien. _crivant & I'adresse ci-dessous "
m Vented accessoires et de pieces de rechange ....
[] Les references aux concesslonnalres, compagnles Unit 200 6750 Centu Ave
, Centre pour I'eXp_rience de la clientele
• . vvnlrlpool uanada LP'
de service de r_paration et distributeurs de pieces de . . . - _ . . ry
rechange Iocaux. Les techniciens de service d_sign_s
par Whirlpool sont form,s pour remplir la garantie des Dans votre correspondance veuillez indiquer un num_ro
produits et fournir un service apres la garantie, partout de t_l_phone oQ on peut vous joindre dans la journ6e.
au uanada.
Si vous avez encore besoin d'aide, suivre les instructions ci-dessous.
Ces renseignements nous aideront a mieux r_pondre a votre demande.
Whirlpool Canada LP Centre pour I'eXp_rience de la clientele
1=800=807-6777 www.whirlpool.ca
Misslssauga umario L5N 0B7
W10338608B
W10338612B-SP 12/10
® 2010 All rights reserved ® Registered Trademark of The Crosley Group, Inc. Printed in U.S.A.
Tous droits r&serv6s ® Marque depos&e du Groupe Crosley, Inc. Imprim& aux E.-U.
 Loading...