

Page 1
installation & Operation
instructions
ARCTIC AIR
An Important Message for Installers and Operators
These instructions include information which is
intended to assure the operator of correct
installation, operation and service. Before
attempting installation, adjustment or
maintenance, be certain of the following:
1. That you have read and fully understand
the instructions.
2. That you have all tools required and are
trained to use them.
3. That you have met all installation and
usage restrictions and are familiar with the
functions and operation of the unit.
4. That you follow all instructions exactly as
given.
All fittings, measurements, procedures and
recommendations are significant. Substitutions
and approximations must be avoided. Improper
handling, maintenance, installation and
adjustment, or service attempted by anyone
other than a qualified technician, may void the
future warranty claims and cause damage to the
unit and/or result in injury to the operator and/or
bystanders.
BE SURE TO INSPECT THE CABINET FOR SHIPPING DAMAGE
BEFORE AND AFTER UNCRATING IT.
R CT I C AIR
RecordofService
Model No.
Serial No.
Installation Date
Invoice Date
Start-up Date
Telephone for Service
BROICH ENTERPRISES, INC
6440 City West Parkway.
Eden Prarie, MN 55344
Phone: 952-941-2270
Fax: 952-941-3066
297028700A (0511)
Page 2
Proper Disposal of Your
Refrigerator/Freezer
Read All instructions Before Using This Freezer.
r'!_i'*v-'_:_`'lt_[eFOR YOUR SAFETY
r'y,,,v-,_:;_nn_[_Risk of child
entrapment. Child entrapment
and suffocation are not problems
of the past. Junked or abandoned
refrigerators or freezers are still
dangerous J even if they will sit
for "just a few days." If you are
getting rid of your old refrigerator
or freezer, please follow the
instructions below to help prevent
accidents.
BEFORE YOU THROW AWAY
YOUR OLD REFRIGERATOR/
FREEZER:
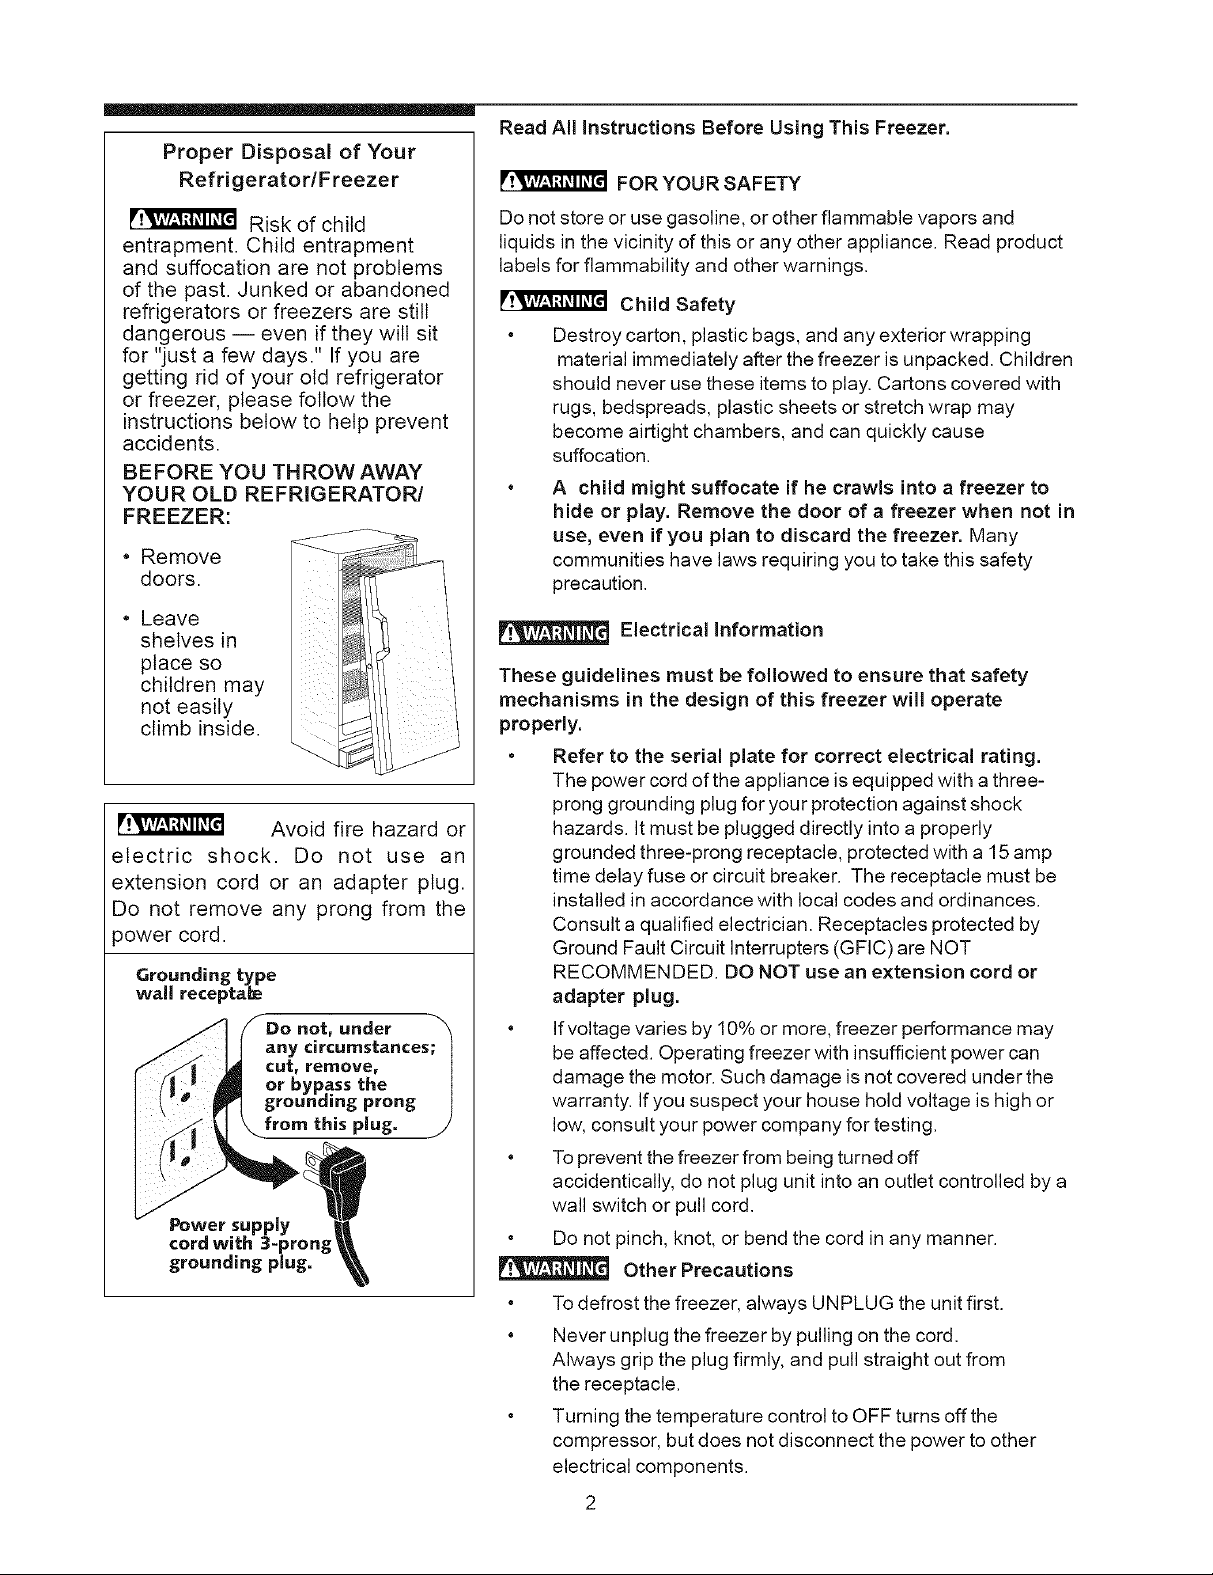
• Remove
doors.
• Leave
shelves in
place so
children may
not easily
climb inside.
r!_krlv/_,!fl_ll_B
Avoid fire hazard or
electric shock. Do not use an
extension cord or an adapter plug.
Do not remove any prong from the
3ower cord.
Grounding type
wall recepta_e
nOt_ under
Power supply
cord with 3-pron I
grounding plug.
Do not store or use gasoline, or other flammable vapors and
liquids in the vicinity of this or any other appliance. Read product
labels for flammability and other warnings.
_'!,w_,_:t,,u_[_ Child Safety
• Destroy carton, plastic bags, and any exterior wrapping
material immediately after the freezer is unpacked. Children
should never use these items to play. Cartons covered with
rugs, bedspreads, plastic sheets or stretch wrap may
become airtight chambers, and can quickly cause
suffocation.
A child might suffocate if he crawls into a freezer to
hide or play. Remove the door of a freezer when not in
use, even if you plan to discard the freezer. Many
communities have laws requiring you to take this safety
precaution.
Electrical information
These guidelines must be followed to ensure that safety
mechanisms in the design of this freezer will operate
properly.
• Refer to the serial plate for correct electrical rating.
The power cord of the appliance isequipped with a three-
prong grounding plug for your protection against shock
hazards. It must be plugged directly into a properly
grounded three-prong receptacle, protected with a 15 amp
time delay fuse or circuit breaker. The receptacle must be
installed in accordance with local codes and ordinances.
Consult a qualified electrician. Receptacles protected by
Ground Fault Circuit Interrupters (GFIC) are NOT
RECOMMENDED. DO NOT use an extension cord or
adapter plug.
• If voltage varies by 10% or more, freezer performance may
be affected. Operating freezer with insufficient power can
damage the motor. Such damage is not covered under the
warranty. If you suspect your house hold voltage is high or
low, consult your power company for testing.
• Toprevent the freezer from being turned off
accidentically, do not plug unit into an outlet controlled by a
wall switch or pull cord.
• Do not pinch, knot, or bend the cord in any manner.
Other Precautions
• Todefrost the freezer, always UNPLUG the unit first.
• Never unplug the freezer by pulling on the cord.
Always grip the plug firmly, and pull straight out from
the receptacle.
• Turning the temperature control to OFF turns off the
compressor, but does not disconnect the power to other
electrical components.
Page 3
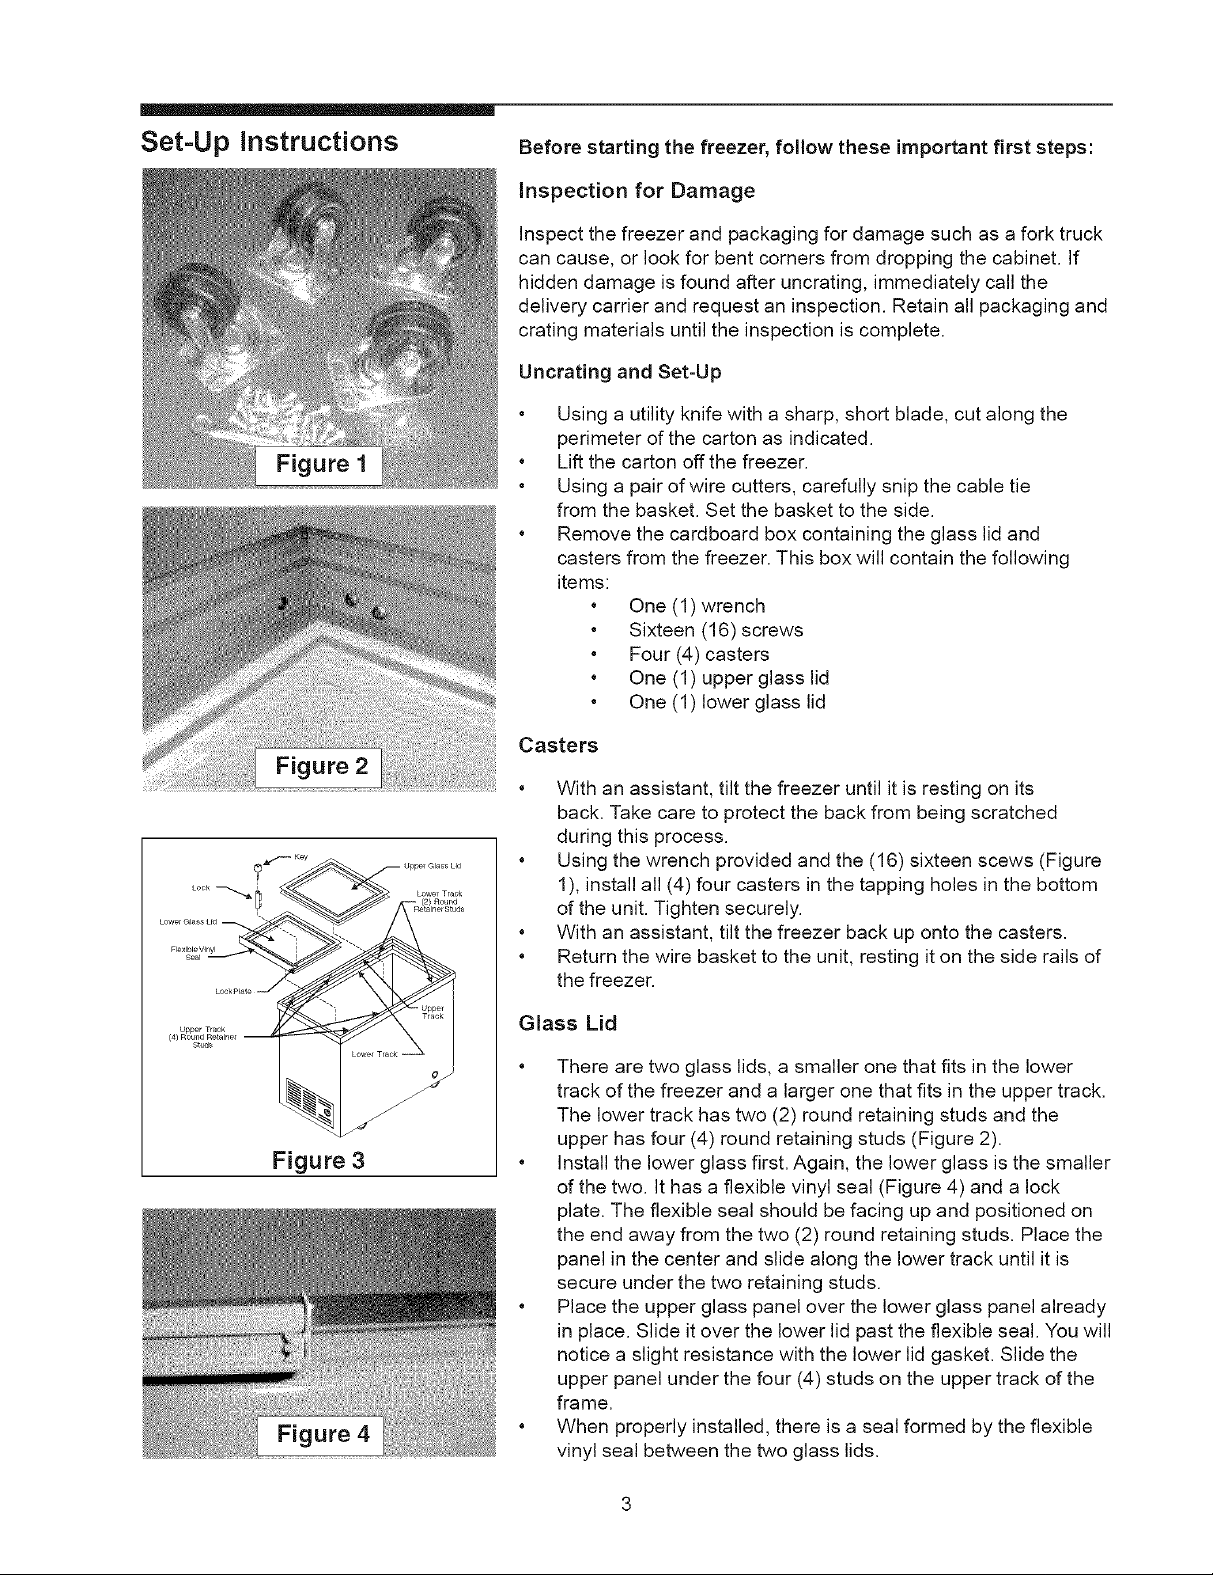
Set=Up instructions
Figure 1
Before starting the freezer, follow these important first steps:
Inspection forDamage
Inspect the freezer and packaging for damage such as a fork truck
can cause, or look for bent corners from dropping the cabinet. If
hidden damage is found after uncrating, immediately call the
delivery carrier and request an inspection. Retain all packaging and
crating materials until the inspection is complete.
Uncrating and Set=Up
o
Using a utility knife with a sharp, short blade, cut along the
perimeter of the carton as indicated.
o
Lift the carton off the freezer.
o
Using a pair of wire cutters, carefully snip the cable tie
from the basket. Set the basket to the side.
o
Remove the cardboard box containing the glass lid and
casters from the freezer. This box will contain the following
items:
• One (1) wrench
• Sixteen (16) screws
• Four (4) casters
• One (1) upper glass lid
• One (1) lower glass lid
FlexibleWnyl
Seal
Figure 2
Figure 3
Figure 4
Casters
• With an assistant, tilt the freezer until it is resting on its
back. Take care to protect the back from being scratched
during this process.
• Using the wrench provided and the (16) sixteen scews (Figure
1), install all (4) four casters in the tapping holes in the bottom
of the unit. Tighten securely.
• With an assistant, tilt the freezer back up onto the casters.
• Return the wire basket to the unit, resting it on the side rails of
the freezer.
Glass Lid
* There are two glass lids, a smaller one that fits in the lower
track of the freezer and a larger one that fits in the upper track.
The lower track has two (2) round retaining studs and the
upper has four (4) round retaining studs (Figure 2).
, Install the lower glass first. Again, the lower glass is the smaller
of the two. It has a flexible vinyl seal (Figure 4) and a lock
plate. The flexible seal should be facing up and positioned on
the end away from the two (2) round retaining studs. Place the
panel in the center and slide along the lower track until it is
secure under the two retaining studs.
, Place the upper glass panel over the lower glass panel already
in place. Slide it over the lower lid past the flexible seal. You will
notice a slight resistance with the lower lid gasket. Slide the
upper panel under the four (4) studs on the upper track of the
frame.
, When properly installed, there is a seal formed by the flexible
vinyl seal between the two glass lids.
Page 4

Set-Up instructions
(continued)
Lock
* To lock the glass lid, simply insert the key and lock into the
lock plate. Turn key clockwise. Remove key and store in safe
place.
Installation
* Roll the unit to the place where it will be installed. If the floor is
not flat and level, the unit may tip from side to side. If it does
tip, take the time to level the unit.
* Choose a place that is near a grounded electrical outlet.
For the most efficient operation, the freezer should be located
where surrounding temperatures will not exceed 110°F (43°C).
Temperatures of 32°F (0°C) and below will NOT affect freezer
operation. Additional compressor heaters are not
recommended.
Locate the freezer out of direct sunlight.
* Allow space around the unit for good air circulation. Leave
a 3 inch (75 mm) space on all sides of the freezer for adequate
circulation.
Cleaning
Wash any removable parts, the freezer interior, and exterior
with mild detergent. Wipe Dry. DO NOT USE HARSH
CLEANERS ON THESE SURFACES. DO NOT WASH
REMOVABLE PARTS IN DISHWASHER.
Do not use razor blades or other sharp instruments, which can
scatch the appliance surface when removing adhesive labels.
Any glue left from the tape can be removed with a mixture of
warm water and mild detergent, or touch the residue with the
sticky side of the tape already removed. DO NOT REMOVE
THE SERIAL PLATE.
Please Note
_J
For maximum cooling efficiency DO NOT store product about the
height of the basket installed in the unit (approximately 5 inches
down from the top of the frame).
4
Page 5

Setting the Temperature
Control
Cool Down Period
Once the appliance has been located in its permanent location,
check to be sure the proper power and grounding have been
provided. For safe storage, allow 4 hours for freezer to cool down
completely. The freezer will run continuously for the first several
hours.
Temperature Control
Temperature Control
Freezer Features
The temperature control is located inside the freezer on upright
models, and on the left outside wall on chest models. The
temperature is factory preset to provide satisfactory food storage
temperatures. However, the temperature control is adjustable to
provide a range of temperatures for your personal satisfaction. If a
colder temperature is desired, turn the temperature control knob
toward COLDEST and allow several hours for temperatures to
stabilize between adjustments.
Defrost Drain
The defrost drain provides a method of draining water during
defrosting and cleaning. See "Defrosting" in the Care and Cleaning
Section.
Sliding Basket (Some Models)
Makes locating and retrieving stored items easier. Helps segregate
food items into groups. Baskets are epoxy powder coated. This
finish is extremely durable and will not chip, crack or discolor in
freezing temperatures. Won't stain and can be easily cleaned
(Figure 5).
Figure 5
I
Lock
Lock Plate
Figure 6
Lock
Allows the unit to be locked for safety and protection (Figure 6).
Casters
Allows the unit to be easily rolled out of the way for cleaning or
moving.
Page 6

Care and Cleaning
Between Defrostings
To avoid frequent defrosting, occasionally use a plastic scraper to
remove frost. Scrape with a pulling motion. Never use a metal
instrument to remove frost.
Defrosting
CAUTION
Freezer must be unplugged (to avoid electrical hazard) from
power source when defrosting unit.
DEFROST
DRAIN PLUG
Figure 7
Figure 8
PAN
It is important to defrost and clean freezer when 4¼to ½ inch of frost
has accumulated. Frost may tend to accumulate faster on upper
part of the freeze due to warm, moist air entering the freezer when
the door is opened. Remove food and leave the door open when
defrosting the freezer.
To use the defrost drain, place a shallow pan beneath the drain
outlet (Figure 7). Pull out the drain plug inside the freezer, and pull
off the outside defrost drain plug (Figure 8). Defrost water will drain
out. Check pan occasionally so water does not overflow. Replace
the drain plugs when defrosting is completed.
If the frost is soft, remove it by using a plastic scraper. If the frost is
glazed and hard, fill deep pans with hot water and place them on
the freezer bottom. Close the freezer door. Frost should soften in
about 15 minutes. Repeat this procedure if necessary.
Cleaning
After defrosting, wash inside and outside surfaces of the freezer
with a solution of two tablespoons of baking soda in one quart or
one liter of warm water. Rinse and dry. Wring excess water out of
the sponge or cloth when cleaning in the area of the controls, or
any electrical parts.
Wash the removable parts with the baking soda solution mentioned
above, or mild detergent and warm water. Rinse and dry. Never
use metallic scouring pads, brushes, abrasive cleaners, or alkaline
solutions on any surface. DO NOT wash removable parts in a
dishwasher. Replace parts and food.
Power Failure
Do not open freezer lid
unnecessarily iffreezer is offfor
several hours.
Energy Saving idea
If a power failure occurs, pack seven or eight pounds of dry ice
into the freezer every 24 hours. Look in the Yellow Pages under
"Dry Ice", "Dairies", or "Ice Cream Manufacturers" for local dry ice
suppliers. Always wear gloves and use caution when handling dry
ice.
The freezer should be located in the coolest area in the room, away
from heat producing appliances or heating ducts, and out of direct
sunlight.
Page 7

IMPORTANT SAFETY NOTICE
The information provided herein is designed to assist qualified repair personnel only. Untrained
persons should not attempt to make repairs due to the possibility of electrical shock. Disconnect
the power cord before servicing.
ELECTRICAL CIRCUIT
C9
BIk
4
Control
Cold
WIRING DIAGRAM
c10
Power _T
See D'agray_ _ _Wh
Compressor
kYel
Compressor Fan
(OPTIONAL)
OPTIONAL PLUG
WIRING DIAGRAM
_Wh
C28
WIRING DIAGRAM
029
Page 8

Dimensional Drawings
31.25"
36,50,
11.1_1 28, _8"
I
36.00'
--30.00,--
7 cu. ft.
|1,12L [ 28.88"
ZZIIIIZIZIZIZ
I0_00,
I
--42.00"
36.00"
FOR PROPER AIR CIRCULATION,
ALLOW 3" AT EACH END AND BACK
SIDE OF FREEZER.
| 2.7s"
OO
SIDE
36.75"
FRONT
STO5G
4335"
I -- 37.50"-
13cu. ft.
9.38" I 29.13"
FRONT
STO7G
9.38 _
15 cu, ft,
29.13"
FRONT
STOgG
20 CU, ft,
29.13"
SIDE
2.50,
10.38"
I
e.. _.
FRONT
ST13G
10.38"
I
FRONT
ST15G
]0.38"
I
FRONT
ST20G
Page 9

ARCTIC AIR COMMERCIAL REFRIGERATOR/FREEZER
WARRANTY
ARCTICAIR (Division of Broich Enterprises, Inc.) warrants everynew refrigerator and freezer to be
free from defects in material orworkmanship for a period of one (1)year (except asnoted in the Special
Mobile UseWarranty below) from the earliestof either: 1) the date of original purchase or; 2)fifteen (15)
months after the manufacturer's ship date of the product (wa_'rantyperiod ).
This warranty provides:
A.
B,
PART,_ WARRANTY
ARCTIC AIR will, at iitsOption, repair or replace any part(s), that are found defective d_Jring the warranty
period. In addition, ARCTIC AIR warrants that the compressor shall be free from defects for an additional
four (4) years beyond the expiration of the warranty period or for a total period of five (5) years.
Warranty replacemer_t parts must be arranged by calling the Customer Service Center at 1-800-490-9574
( in the United States and Puerto Rico ) and 1-866-284-9911 ( in Canada ).
LABOR. ARRANTY
ARCTICAIR will, at itsoption, provide or pay for the labor to repair or replacethe part(s) or product defect
during the warranty period. Warranty labormust be arranged by calling the Customer Service Center at
1-800490-_9574 ( in the United Statesand PuertoRico) and 1-866-294-9911 ( in Canada,).
C.
SPECIALMOBILE USE WARRANTY
ARCTICAIR warrants everynew refrigerator and freezer operated bya concessionaireor vendor in a
trailer, motorized vehicteor at vary;ng locationsfor a periodof one (1) year for the part(s) and ninety
(90) days for labor to repairor replace, at Arctic Air's opt,ion, the warranty part(s).In addition, ARCTIC
AIR warrants that the compressor shaft be free from defectsfor atotal period of five ( 5 ) years. This
warranty will be effective with the earliest of either: 1)the date of original purchase or ; 2) fifteen (15 )
months after the manufacturer's ship date of the product. Any laborto removeor expose or make the
refrigerator or freezer availablefor service under this warranty shall be at _heuser's expense.
D,
Service under this warranty must be performed by a preferred service company arranged by the
Customer Service Center at 1-B00-490-9574 ( in the United States and Puerto Rico ) and
1-B66-294-9911 ( in Canada ). The user must give the preferred service company prompt notice and
access to the product when service is needed.
E.
LIMITATIONS AND EXCLUSIVE WARRANTY
Normal wear and tear and gradual deterioration is excluded from this warranty, This parts and labor
warranty is the sore and exclusive warranty remedy offered by ARCTIC AIR, ALL OTHER WARRAN.
TIES, EITHER EXPRESSOR IMPLIED, ARISING UNDER LAW OR EQUITY OR CUSTOM OF THE TRADE
INCLUDING BUT NOT LIMITED TO WARRANTIES OR MERCHANTABILITY OR FITNESS FOR A
PARTICULAR PURPOSE ARE EXCLUDED. NEITHER ARCTIC AIR NOR ITS SERVICING AGENT SHALL
BELIABLE FOR ANY INCIDENTAL OR CONSEQUENTIAL LOSS OR DAMAGES (INCLUDING BUT NOT
LIMITED TO FOOD OR PRODUCT LOSS, PERSONAL INJURY OR PROPERTY DAMAGE)WHETHER
BASED ON CONTRACT OR TORT (INCLUDING NEGLIGENCE AND STRICT LIABILITY) ARISING OUT
OFTHE EQUIPMENT OR SERVICE PROVIDED HEREUNDER. THIS WARRANTY DOES NOT APPLYTO
ARCTIC AIR PRODUCTS SOLD ou'rSIDE THE UNITED STATES, CANADA, OR PUERTO RICO. THiS
WARRANTY DOES NOT COVER:
,' FREIGHT DAMAGE
° FOOD LOSS
• NON-FACTORYAPPROVED REVISIONSOR MODIFICATIONS
 Loading...