

Crosley CUD6710XQ1, TUD8700XQ0, CUD6710XB0, CUD6710XQ0, TUD8700XB0 Installation Instructions Manual
...Page 1
INSTALLATION iNSTRUCTiONS
UNDERCOUNTER DISHWASHER
PLASTIC GIANT TUBMODELS
iNSTRUCTiONS D'INSTALLATION
LAVE--VAISSELLEENCASTRE
MODELES A TRESGRANDE CUVE EN PLASTIQUE
Table of Contents ................................... 2
Table des matieres .................................. 21
W10142914
Page 2
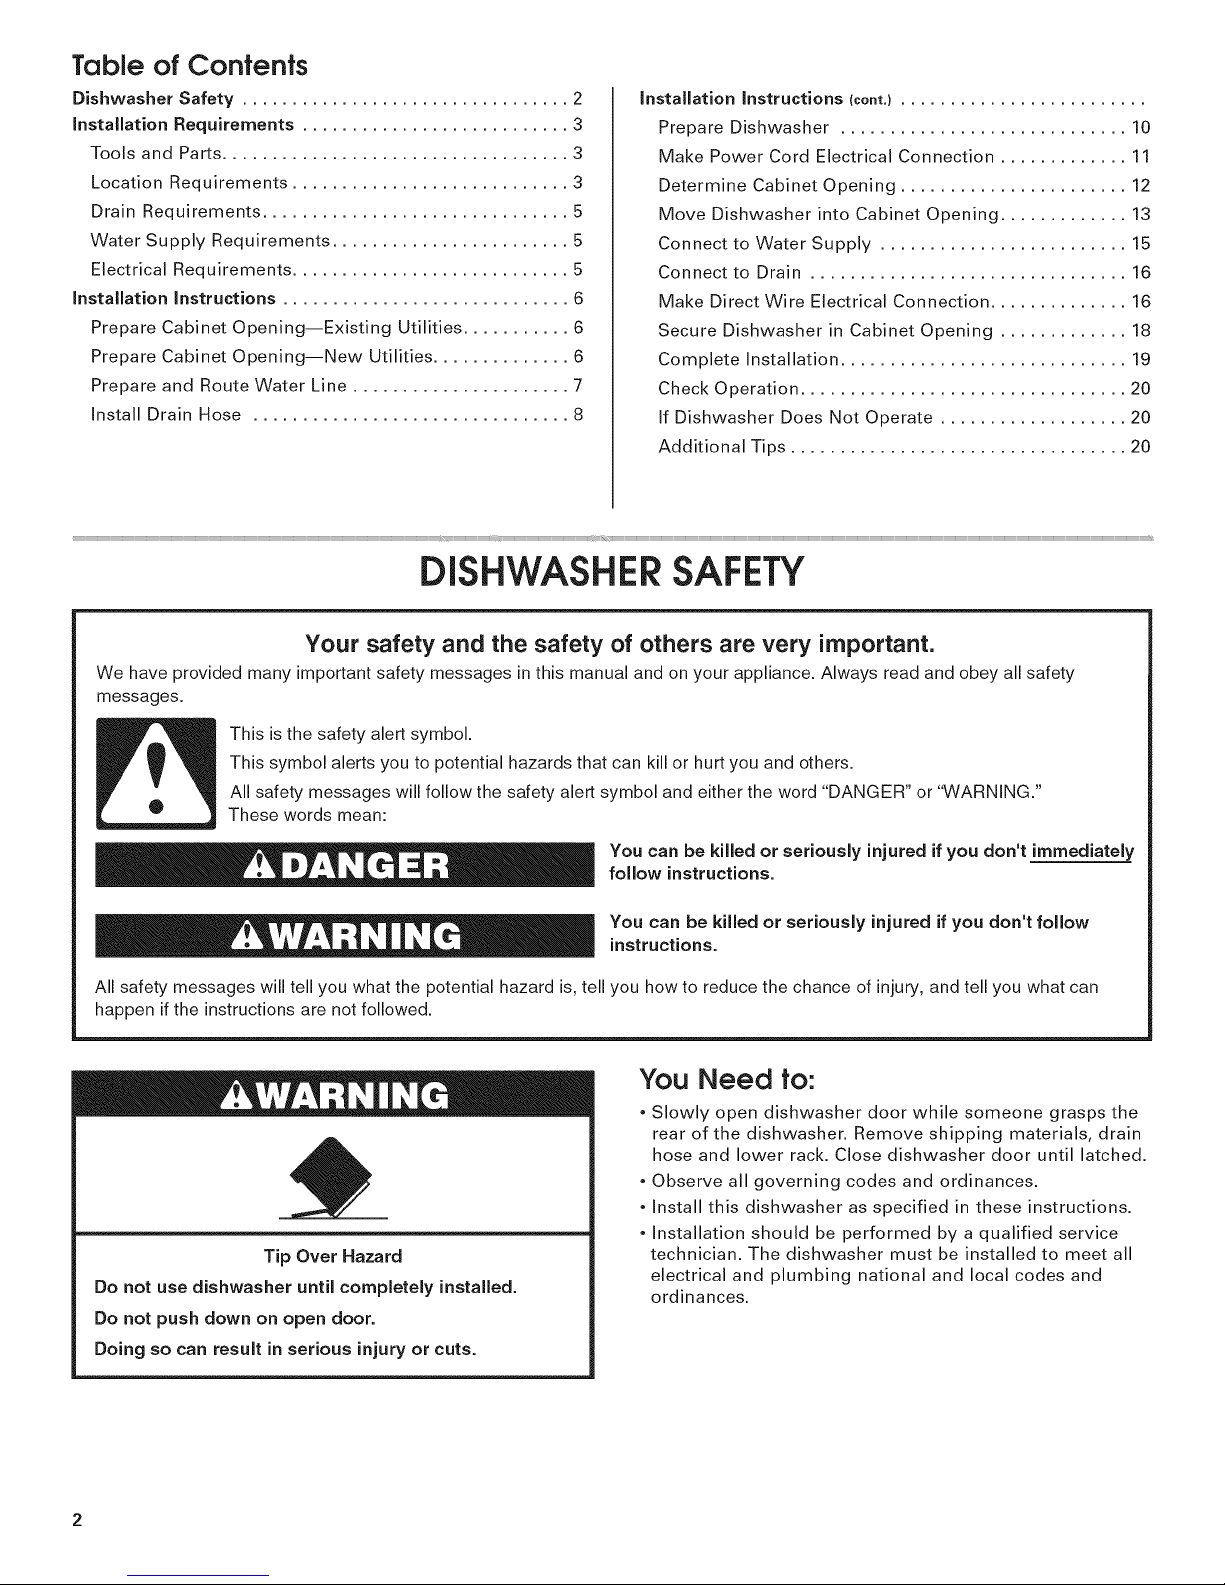
Table of Contents
Dishwasher Safety ................................. 2
Installation Requirements ........................... 3
Tools and Parts ................................... 3
Location Requirements ............................ 3
Drain Requirements ............................... 5
Water Supply Requirements ........................ 5
Electrical Requirements ............................ 5
Installation Instructions ............................. 6
Prepare Cabinet Opening--Existing Utilities ........... 6
Prepare Cabinet Opening--New Utilities .............. 6
Prepare and Route Water Line ...................... 7
Install Drain Hose ................................ 8
Installation Instructions (cont.).........................
Prepare Dishwasher ............................. 10
Make Power Cord Electrical Connection ............. 11
Determine Cabinet Opening ....................... 12
Move Dishwasher into Cabinet Opening ............. 13
Connect to Water Supply ......................... 15
Connect to Drain ................................ 16
Make Direct Wire Electrical Connection .............. 16
Secure Dishwasher in Cabinet Opening ............. 18
Complete Installation ............................. 19
Check Operation ................................. 20
If Dishwasher Does Not Operate ................... 20
Additional Tips .................................. 20
DISHWASHERSAFETY
Your safety and the safety of others are very important.
We have provided many important safety messages in this manual and on your appliance. Always read and obey all safety
messages.
This is the safety alert symbol.
This symbol alerts you to potential hazards that can kill or hurt you and others.
All safety messages will follow the safety alert symbol and either the word "DANGER" or "WARNING."
These words mean:
You can be killed or seriously injured ifyou don't immediately
follow instructions.
You can be killed or seriously injured if you don't follow
instructions.
All safety messages will tell you what the potential hazard is, tell you how to reduce the chance of injury, and tell you what can
happen if the instructions are not followed.
You Need to:
Slowly open dishwasher door while someone grasps the
rear of the dishwasher. Remove shipping materials, drain
hose and lower rack. Close dishwasher door until latched.
Observe all governing codes and ordinances.
Install this dishwasher as specified in these instructions.
Installation should be performed by a qualified service
Tip Over Hazard
Do not use dishwasher until completely installed.
Do not push down on open door.
Doing so can result in serious injury or cuts.
technician. The dishwasher must be installed to meet all
electrical and plumbing national and local codes and
ordinances.
2
Page 3
INSTALLATION REQUIREMENTS
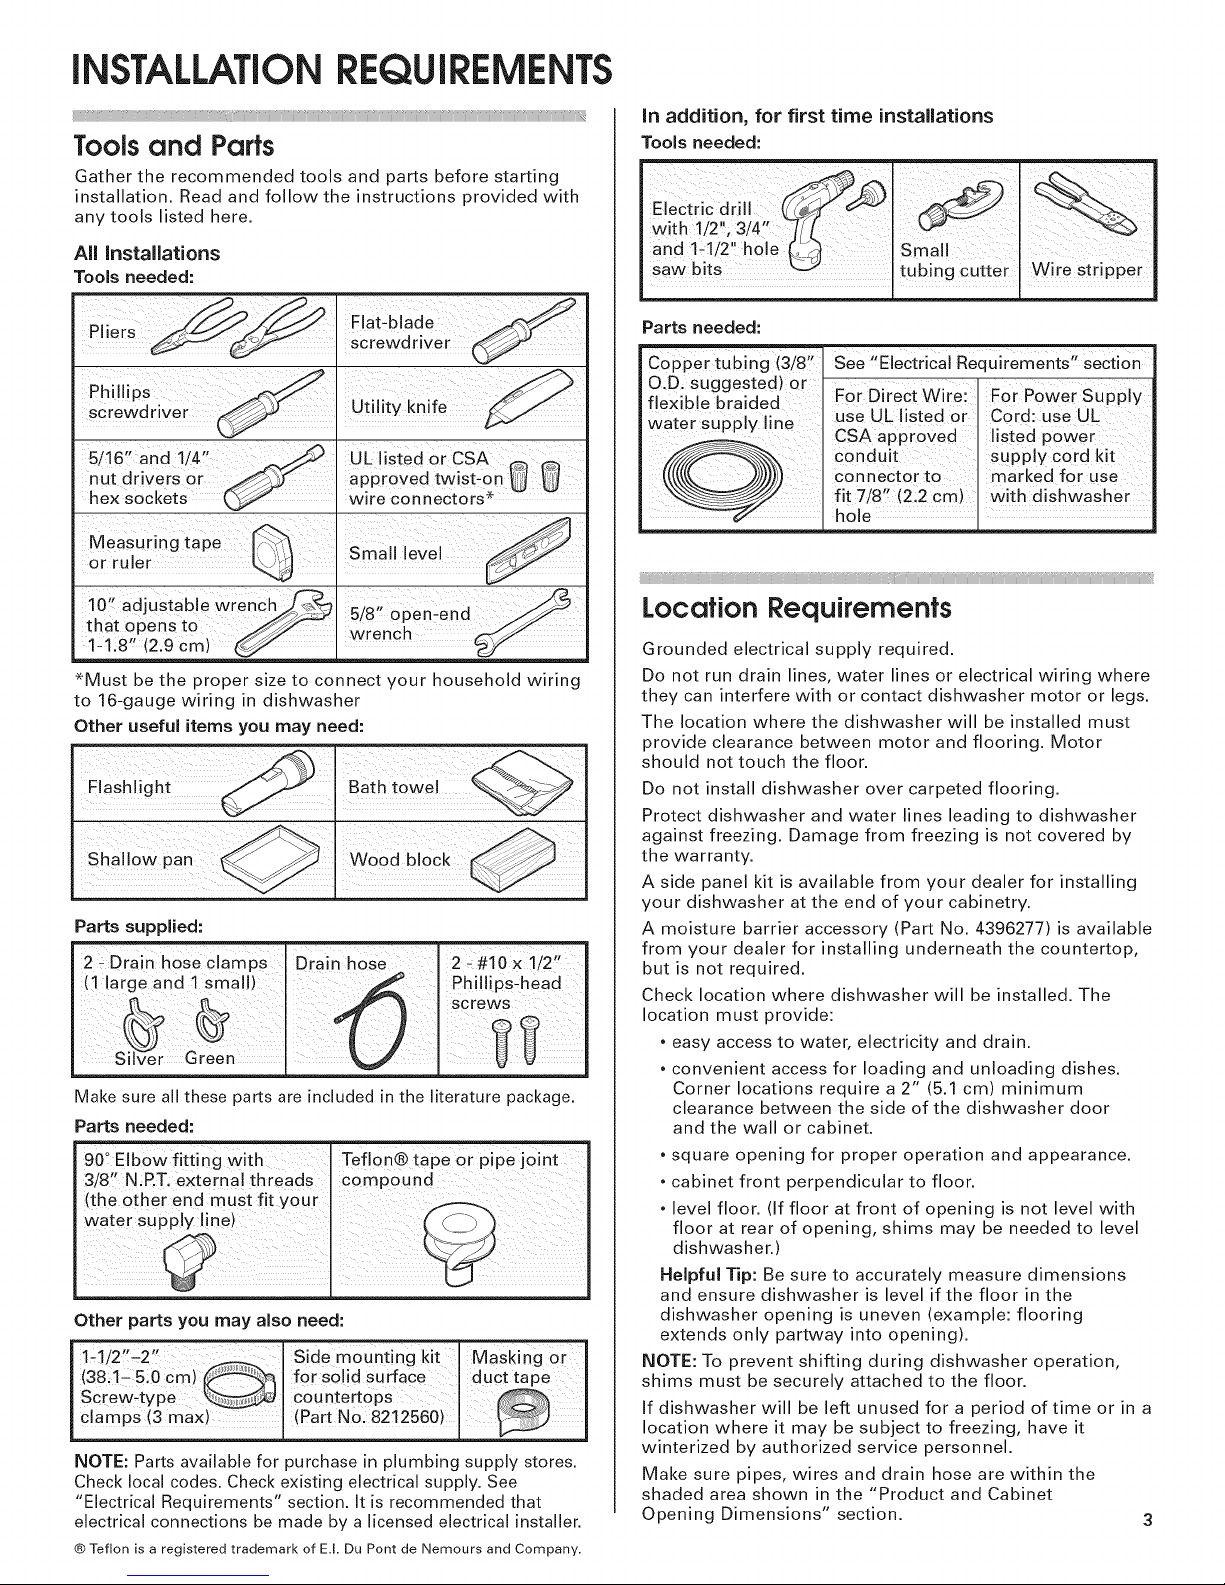
Tools and Parts
Gather the recommended tools and parts before starting
installation. Read and follow the instructions provided with
any tools listed here.
All installations
Tools needed:
In addition, for first time installations
Tools needed:
IFlat-blode
Fliers I screwdriver
5/16" and 1/4" _ UL listed or CSA _ n
nut drivers or _7" approved twist-on U U
hex sockets _,_" wire connectors*
ii -
10 adjustable wrench 5 8" o_en end
that opens to wrench _
1-1.8" (2.9 cm) U =' _ ,
*Must be the proper size to connect your household wiring
to 16-gauge wiring in dishwasher
Other useful items you may need:
/ F -
Fos,oht othtowo
Parts supplied:
(!,a,_,,d l_a 1) screws
12 !Drain hOseclamp__ Drai_ [ 2 _#10xli2.
Silver Green [
Make sure all these parts are included in the literature package.
Parts needed:
90tiEIb0w fitting with Teflon® tape or pipe joint
3/8 N:P.T. external threads compound
(the 0the[ end mus t fit you i
water suDulv line) ( _ _. "_
Other parts you may also need:
(38:1-5 0 cm) I for solid surface I du
I s,0o,,tctto e
screw4ype c0untertops @
camps{3max) J PartNo.8212560
NOTE: Parts available for purchase in plumbing supply stores.
Check local codes. Check existing electrical supply. See
"Electrical Requirements" section. It is recommended that
electrical connections be made by a licensed electrical installer.
® Teflon is a registered trademark of E.I. Du Pont de Nemours and Company.
4 ?
PhillipsLhead
j
Parts needed:
,u
Copper tubing (3/8"
O.D, suggested) or
flexible braided
water Supply line
..................................................................................................................................................................................................................................................................iiiiiiiii;i;il,i,,,i,i,i,,,,,i_iil,iii¸;ii,lii¸;ii,lii¸;ii,lii¸;ii,lii¸;ii,lii¸;ii,lii¸;ii,lii¸;ii,lii¸;il,i,i_;ii;ii¸;i;ii¸;i;ii¸;i;ii¸;i;ii¸;i;ii¸;i;ii¸;i;ii¸;i;ii¸;i;ii¸;i;ii¸;i;ii¸;i;ii¸;i;ii¸;i;ii¸;i;ii¸;i;ii¸;i;ii¸;i;ii¸;i;ii¸;i;ii¸;i;ii¸;i;ii¸;i;ii¸;i;ii¸;i;ii¸;i;ii¸;i;ii¸;i;ii¸;i;ii¸;i;i
See "Electrical Requirements" section
Foi Direct Wire: For P0we i Supply
use UL listed or I Cord: use UL
CSA approved I l!sted power
condu t sUpp!y cord kit
c°nnect°r t0 I marked fo r use
fit 7/8(2:2 Cm) with d!shwashe r
hoe
Location Requirements
Grounded electrical supply required.
Do not run drain lines, water lines or electrical wiring where
they can interfere with or contact dishwasher motor or legs.
The location where the dishwasher will be installed must
provide clearance between motor and flooring. Motor
should not touch the floor.
Do not install dishwasher over carpeted flooring.
Protect dishwasher and water lines leading to dishwasher
against freezing. Damage from freezing is not covered by
the warranty.
A side panel kit is available from your dealer for installing
your dishwasher at the end of your cabinetry.
A moisture barrier accessory (Part No. 4396277) is available
from your dealer for installing underneath the countertop,
but is not required.
Check location where dishwasher will be installed. The
location must provide:
, easy access to water, electricity and drain.
, convenient access for loading and unloading dishes.
Corner locations require a 2" (5.1 cm) minimum
clearance between the side of the dishwasher door
and the wall or cabinet.
, square opening for proper operation and appearance.
, cabinet front perpendicular to floor.
, level floor. (If floor at front of opening is not level with
floor at rear of opening, shims may be needed to level
dishwasher.)
Helpful Tip: Be sure to accurately measure dimensions
and ensure dishwasher is level if the floor in the
dishwasher opening is uneven (example: flooring
extends only partway into opening).
NOTE: To prevent shifting during dishwasher operation,
shims must be securely attached to the floor.
If dishwasher will be left unused for a period of time or in a
location where it may be subject to freezing, have it
winterized by authorized service personnel.
Make sure pipes, wires and drain hose are within the
shaded area shown in the "Product and Cabinet
Opening Dimensions" section. 3
Page 4
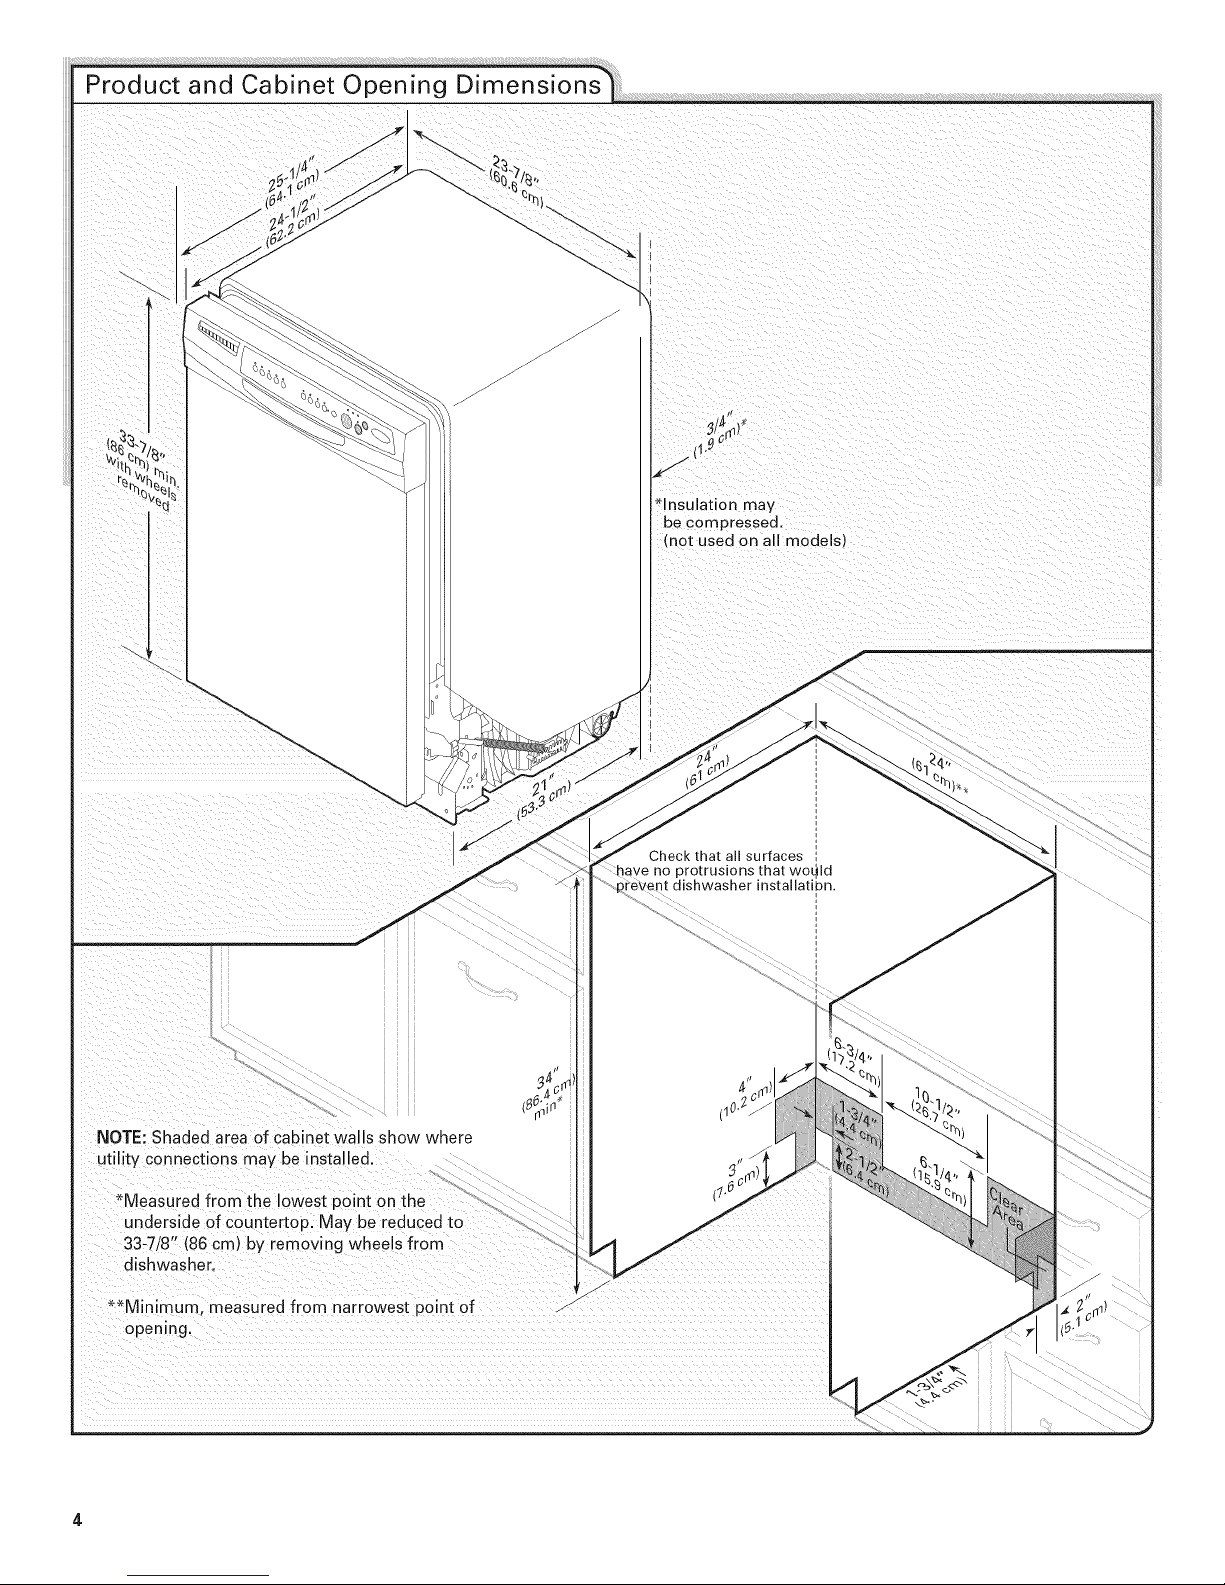
*Insulation may
be compressed.
(not used on all models)
Check that all surfaces
have no protrusions that would
prevent dishwasher installatibn
NOTE: Shaded area of cabinet walls show where
utility connections may be installed.
*Measured from the lowest point on the
underside of countertop. May be reduced to
33-7/8" (86 cm) by removing wheels from
dishwasher,
**Minimum, measured from narrowest point of
opening.
4
Page 5
Drain Requirements
ElectricalRequirements
, A new drain hose is supplied with your dishwasher.
If this is not long enough, use a new drain hose with a
maximum length of 12' (3.7 m) (Part No. 3385556) that
meets all current AHAM/IAPMO test standards, is resistant
to heat and detergent, and fits the 1" (2.5 cm) drain
connector of the dishwasher.
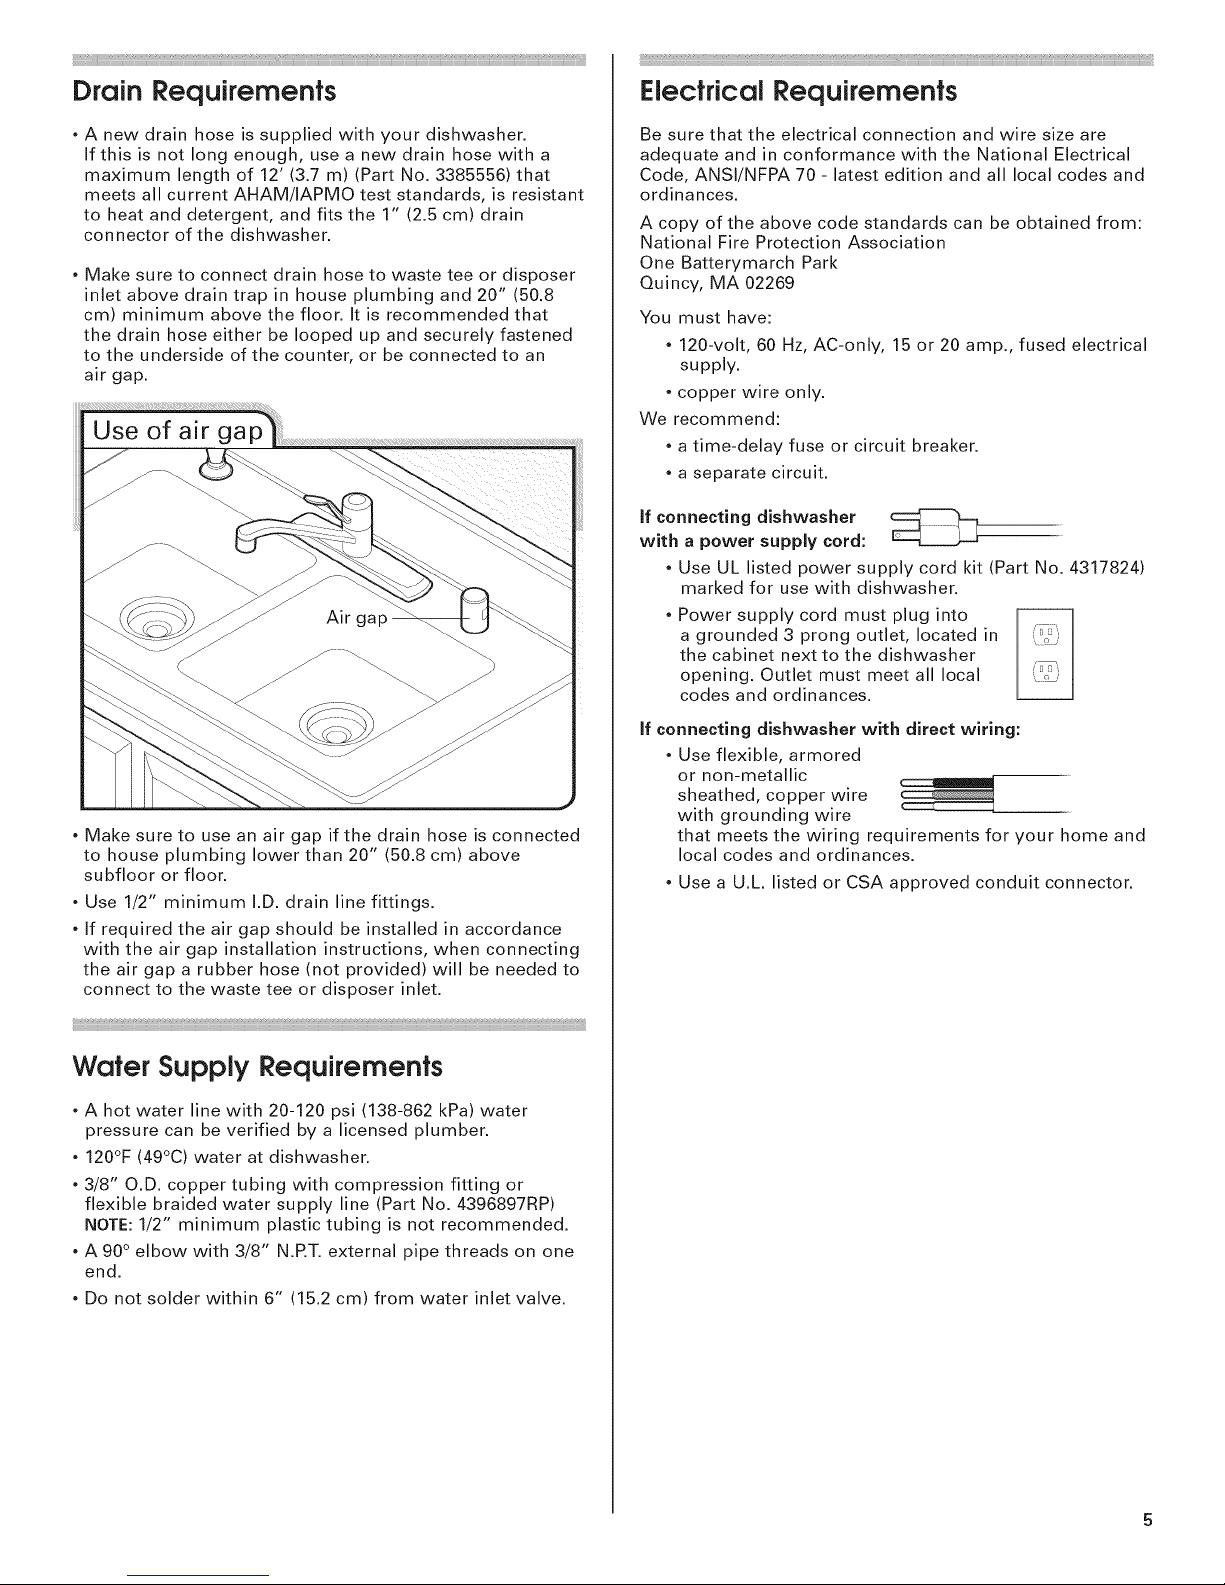
, Make sure to connect drain hose to waste tee or disposer
inlet above drain trap in house plumbing and 20" (50.8
cm) minimum above the floor. It is recommended that
the drain hose either be looped up and securely fastened
to the underside of the counter, or be connected to an
air gap.
Be sure that the electrical connection and wire size are
adequate and in conformance with the National Electrical
Code, ANSl/NFPA 70 - latest edition and all local codes and
ordinances.
A copy of the above code standards can be obtained from:
National Fire Protection Association
One Batterymarch Park
Quincy, MA 02269
You must have:
, 120-volt, 60 Hz, AC-only, 15 or 20 amp., fused electrical
supply.
, copper wire only.
We recommend:
, a time-delay fuse or circuit breaker.
, a separate circuit.
if connecting dishwasher
with a power supply cord:
, Use UL listed power supply cord kit (Part No. 4317824)
marked for use with dishwasher.
, Power supply cord must plug into
a grounded 3 prong outlet, located in
the cabinet next to the dishwasher
opening. Outlet must meet all local
codes and ordinances.
, Make sure to use an air gap if the drain hose is connected
to house plumbing lower than 20" (50.8 cm) above
subfloor or floor.
, Use 1/2" minimum I.D. drain line fittings.
, If required the air gap should be installed in accordance
with the air gap installation instructions, when connecting
the air gap a rubber hose (not provided) will be needed to
connect to the waste tee or disposer inlet.
Wafer Supply Requirements
, A hot water line with 20-120 psi (138-862 kPa) water
pressure can be verified by a licensed plumber.
, 120°F (49°C) water at dishwasher.
,3/8" O.D. copper tubing with compression fitting or
flexible braided water supply line (Part No. 4396897RP)
NOTE: 1/2" minimum plastic tubing is not recommended.
, A 90° elbow with 3/8" N.RT. external pipe threads on one
end.
, Do not solder within 6" (15.2 cm) from water inlet valve.
if connecting dishwasher with direct wiring:
, Use flexible, armored
or non-metallic
sheathed, copper wire
with grounding wire
that meets the wiring requirements for your home and
local codes and ordinances.
, Use a U.L. listed or CSA approved conduit connector.
Page 6
Electrical Shock Hazard
Disconnect electrical power at the fuse box or circuit
breaker box before installing dishwasher.
Failure to do so can resuR in death or electrical shock.
oa ....
Disconnec t electrical power at the fuS e boxor drCU!t
breaker box before instal!ing dishwasher,
LShoiofiihe tOihodish a hei:
Prepare Cabinet OpeningmExisting
Utilities
Cable
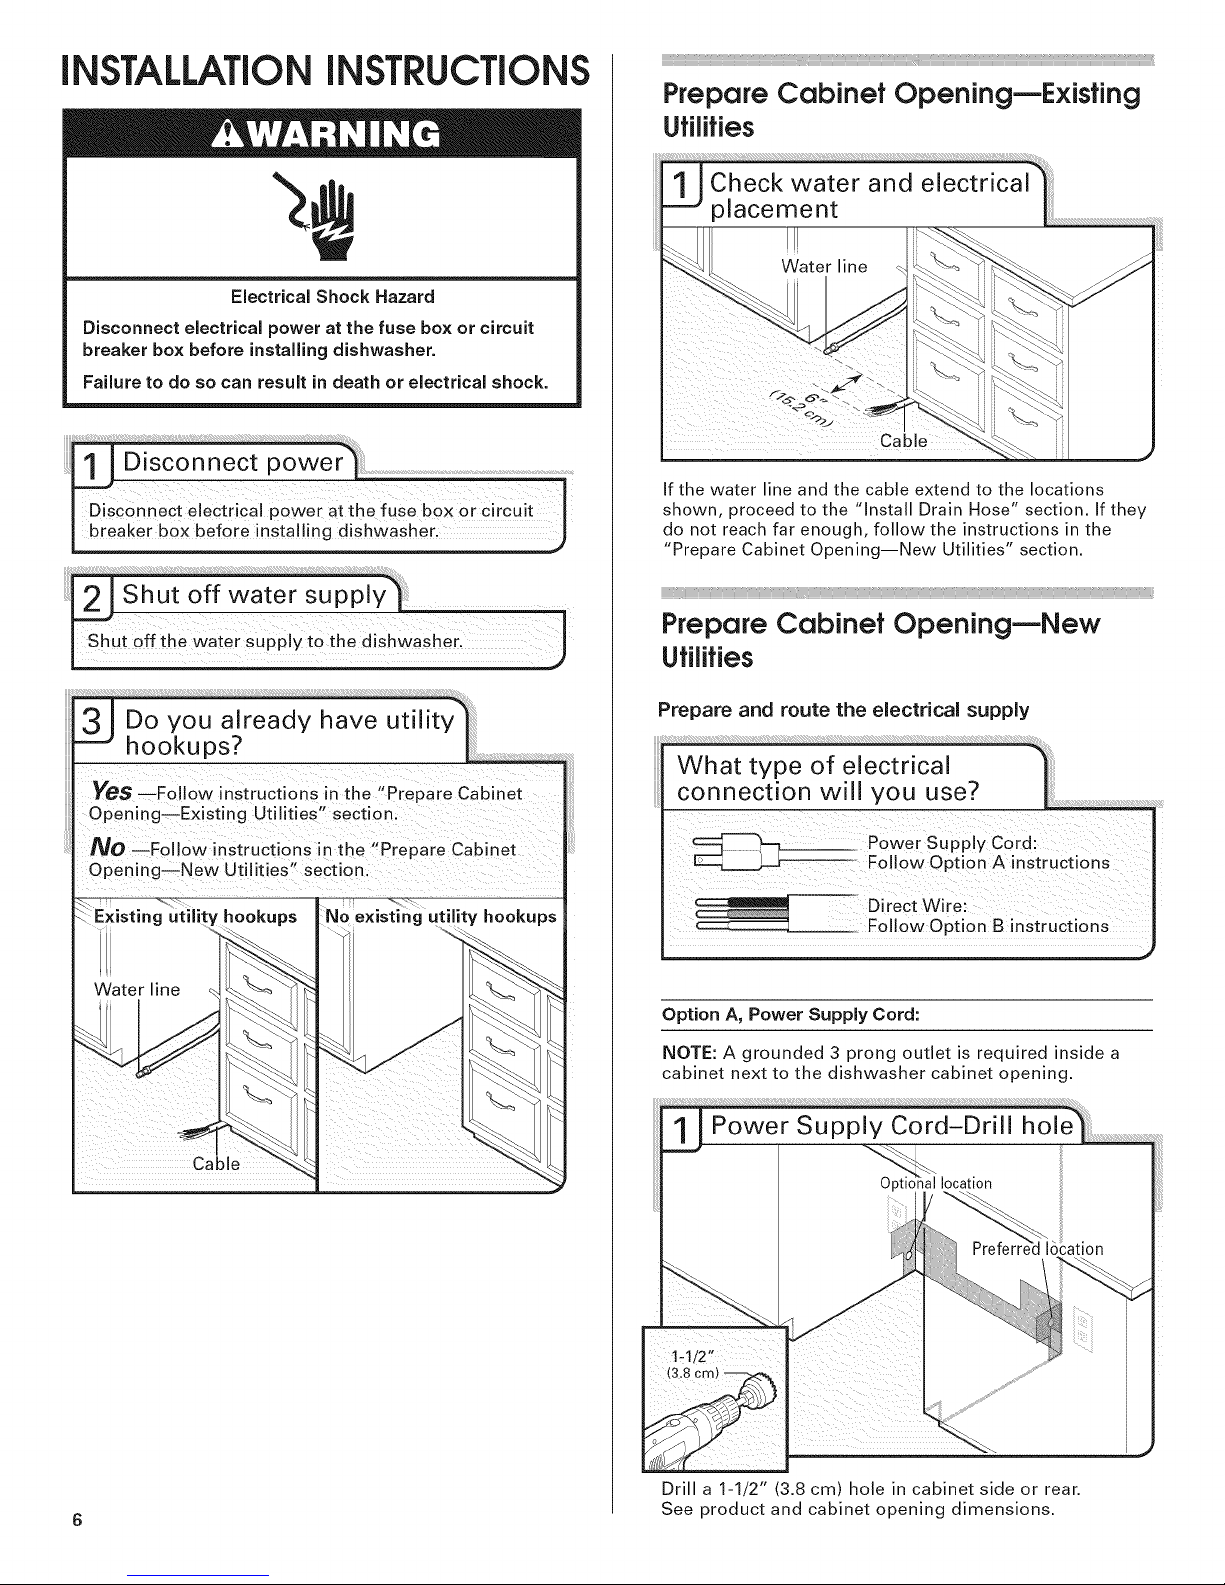
If the water line and the cable extend to the locations
shown, proceed to the "Install Drain Hose" section. If they
do not reach far enough, follow the instructions in the
"Prepare Cabinet Opening--New Utilities" section.
_;_;_;_;_;_????_:_??_1_?_1_?_1_?_1_?_1_?_1_?_11_1_??_:_??_1_?_1_?_1_?_1_?_1_?_;1_{{_;_;;_;_;_;__:_ii_i;i_i_i;i;;ii;_;i;;ii;_;_;i_ii_:_ii_ii_:_ii_i{_ii,:,i:_i_i;;ii;_;i;;ii;_;i;;ii;_;i;;ii;_;i;;ii;_;i;;ii;_;i;;ii;_;i;;ii;_;i;;ii;_;i;;i;i:_ii_ii;;i;i:_ii_ii;;i;i:_ii_ii;;i;i:_ii_ii;;i;i:_ii_ii{_:_ii_i;_;i{_i;_;_;i_ii_ii_i{_ii,i:_i_i;;ii;_;i;;ii;_;i;;ii;_;i;;ii;_;i;;ii;_;i;;ii;_;i;;ii;_;i;;ii;_;i;;ii;_;i;;ii;_;i;;ii;_;i;;ii;_;i;;ii;_;i;;ii;_;_;i_ii;i_i;i;;i;i:_i_i;;ii;_;i;;ii;_;i;;ii;_;i;;ii;_;i;;ii;_;i;;ii;_;i;;ii;_;i;;ii;_;i;;ii;_;i;;ii;_;i;;ii;_;i;;ii;_;i;;ii;_;i;;
Prepare Cabinet OpeningmNew
Utilities
Yes _EO!low instructions in the "P[ePare Cabinet
Opening_Exist!ng Utilities" Secti0nl
NO _FoHow inStruCtions in the !'Prepare Cabinet
Opening_New Utilities" Sectionl
hookups ity hookups
Prepare and route the electrical supply
_ _ Follow Option B instructions
Option A, Power Supply Cord:
NOTE: A grounded 3 prong outlet is required inside a
cabinet next to the dishwasher cabinet opening.
Direct Wire:
6
Drill a 1-1/2" (3.8 cm) hole in cabinet side or rear.
See product and cabinet opening dimensions.
Page 7
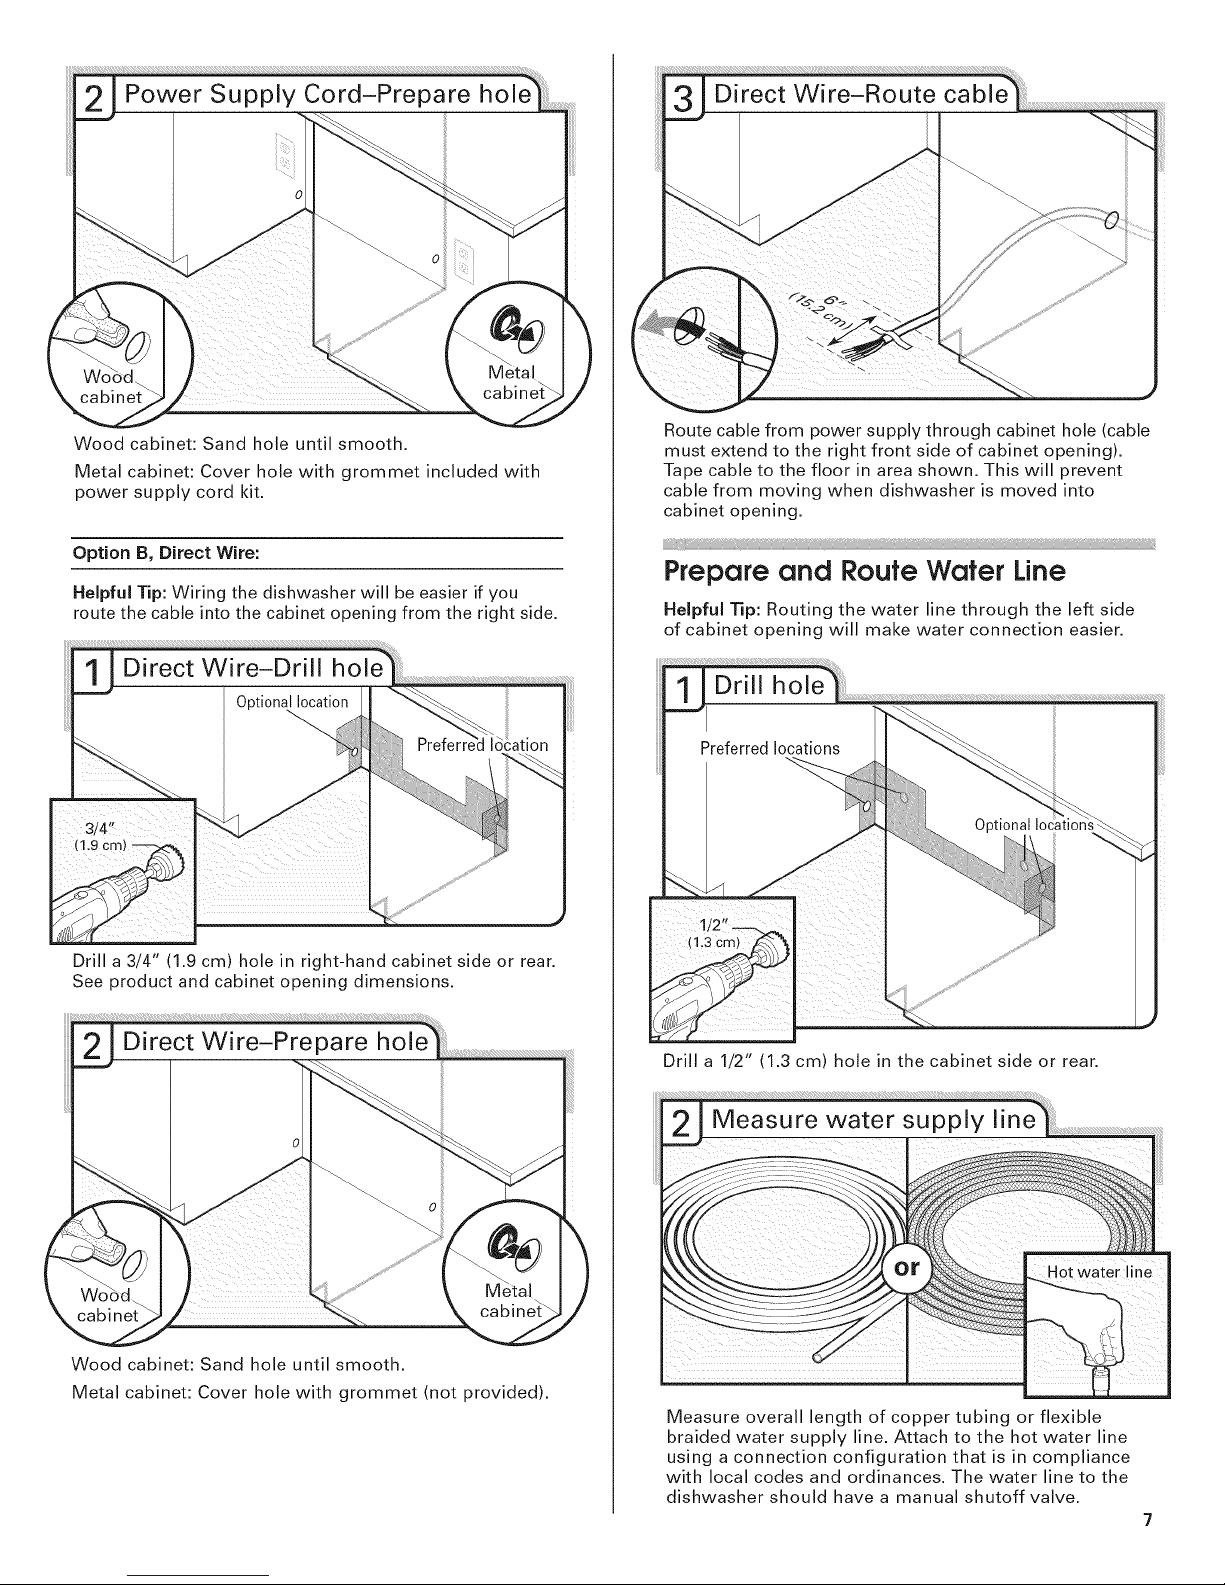
Woodcabinet:Sandholeuntilsmooth.
Metalcabinet:Coverholewithgrommetincludedwith
powersupplycordkit.
OptionB, Direct Wire:
Helpful Tip: Wiring the dishwasher will be easier if you
route the cable into the cabinet opening from the right side.
Drill a 3/4" (1.9 cm) hole in right-hand cabinet side or rear.
See product and cabinet opening dimensions.
Route cable from power supply through cabinet hole (cable
must extend to the right front side of cabinet opening).
Tape cable to the floor in area shown. This will prevent
cable from moving when dishwasher is moved into
cabinet opening.
Prepare and Route Wafer Line
Helpful Tip: Routing the water line through the left side
of cabinet opening will make water connection easier.
Wood cabinet: Sand hole until smooth.
Metal cabinet: Cover hole with grommet (not provided).
Drill a 1/2" (1.3 cm) hole in the cabinet side or rear.
Measure overall length of copper tubing or flexible
braided water supply line. Attach to the hot water line
using a connection configuration that is in compliance
with local codes and ordinances. The water line to the
dishwasher should have a manual shutoff valve.
Page 8
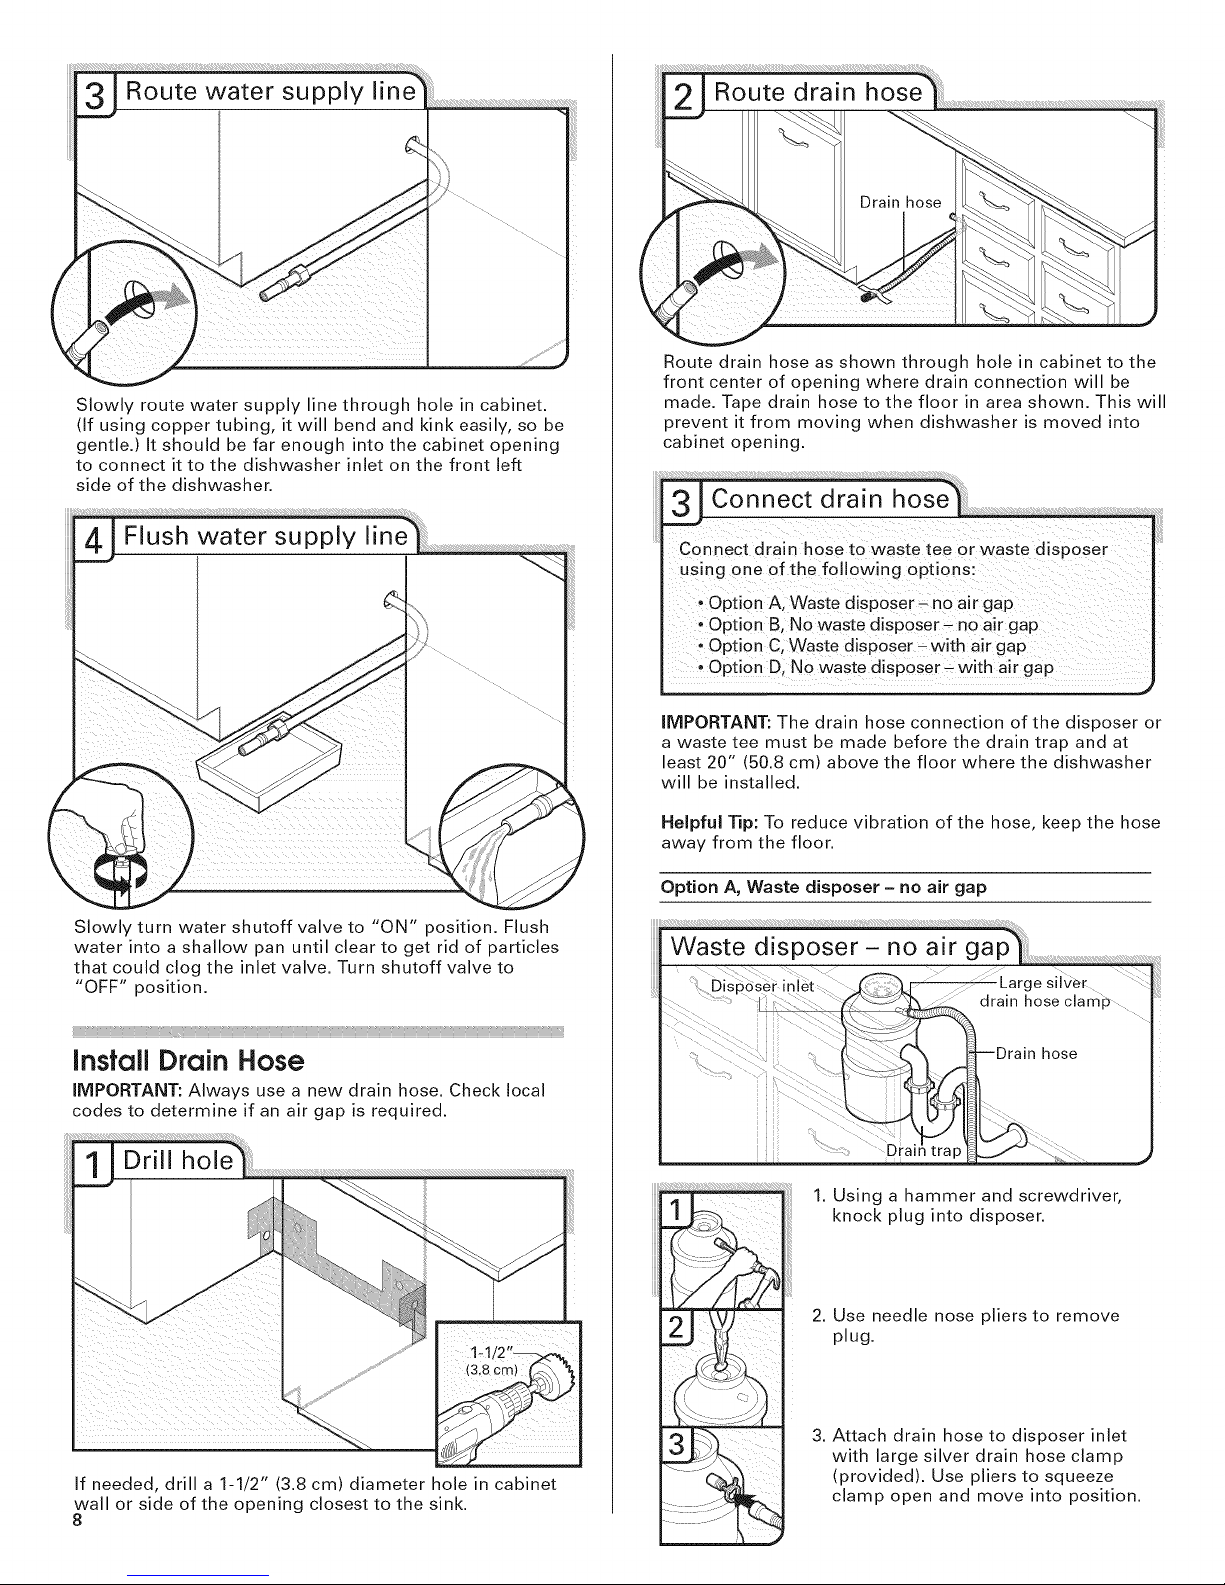
Slowlyroutewatersupplylinethroughholeincabinet.
(Ifusingcoppertubing,itwillbendandkinkeasily,sobe
gentle.)Itshouldbefarenoughintothecabinetopening
toconnectittothedishwasherinletonthefrontleft
sideofthedishwasher.
Slowlyturnwatershutoffvalveto "ON"position.Flush
waterintoashallowpanuntilcleartogetridofparticles
thatcouldclogtheinletvalve.Turnshutoffvalveto
"OFF"position.
Routedrainhoseasshownthroughholeincabinetto the
frontcenterofopeningwheredrainconnectionwillbe
made.Tapedrainhosetothefloorinareashown.Thiswill
preventitfrommovingwhendishwasherismovedinto
cabinetopening.
_Opti0nB,Nowastedisposer_noairgap
,OptionCtWastedisposer-withairgap
' opti0nD_NowastediSP0se[_Withairgap
IMPORTANT:Thedrainhoseconnectionofthedisposeror
awasteteemustbemadebeforethedraintrapandat
least20"(50.8cm)abovethefloorwherethedishwasher
willbeinstalled.
HelpfulTip:Toreducevibrationofthehose,keepthehose
awayfromthefloor.
OptionA,Wastedisposer- no air gap
Ifneeded,drilla1-1/2"(3.8cm)diameterholeincabinet
wallorsideoftheopeningclosestto thesink.
8
__;_i!{_;;_j__i__<_ i_;;?;;;;;¢_;{_i: $; _
1. Using a hammer and screwdriver,
knock plug into disposer.
2. Use needle nose pliers to remove
plug.
3. Attach drain hose to disposer inlet
with large silver drain hose clamp
(provided). Use pliers to squeeze
clamp open and move into position.
Page 9
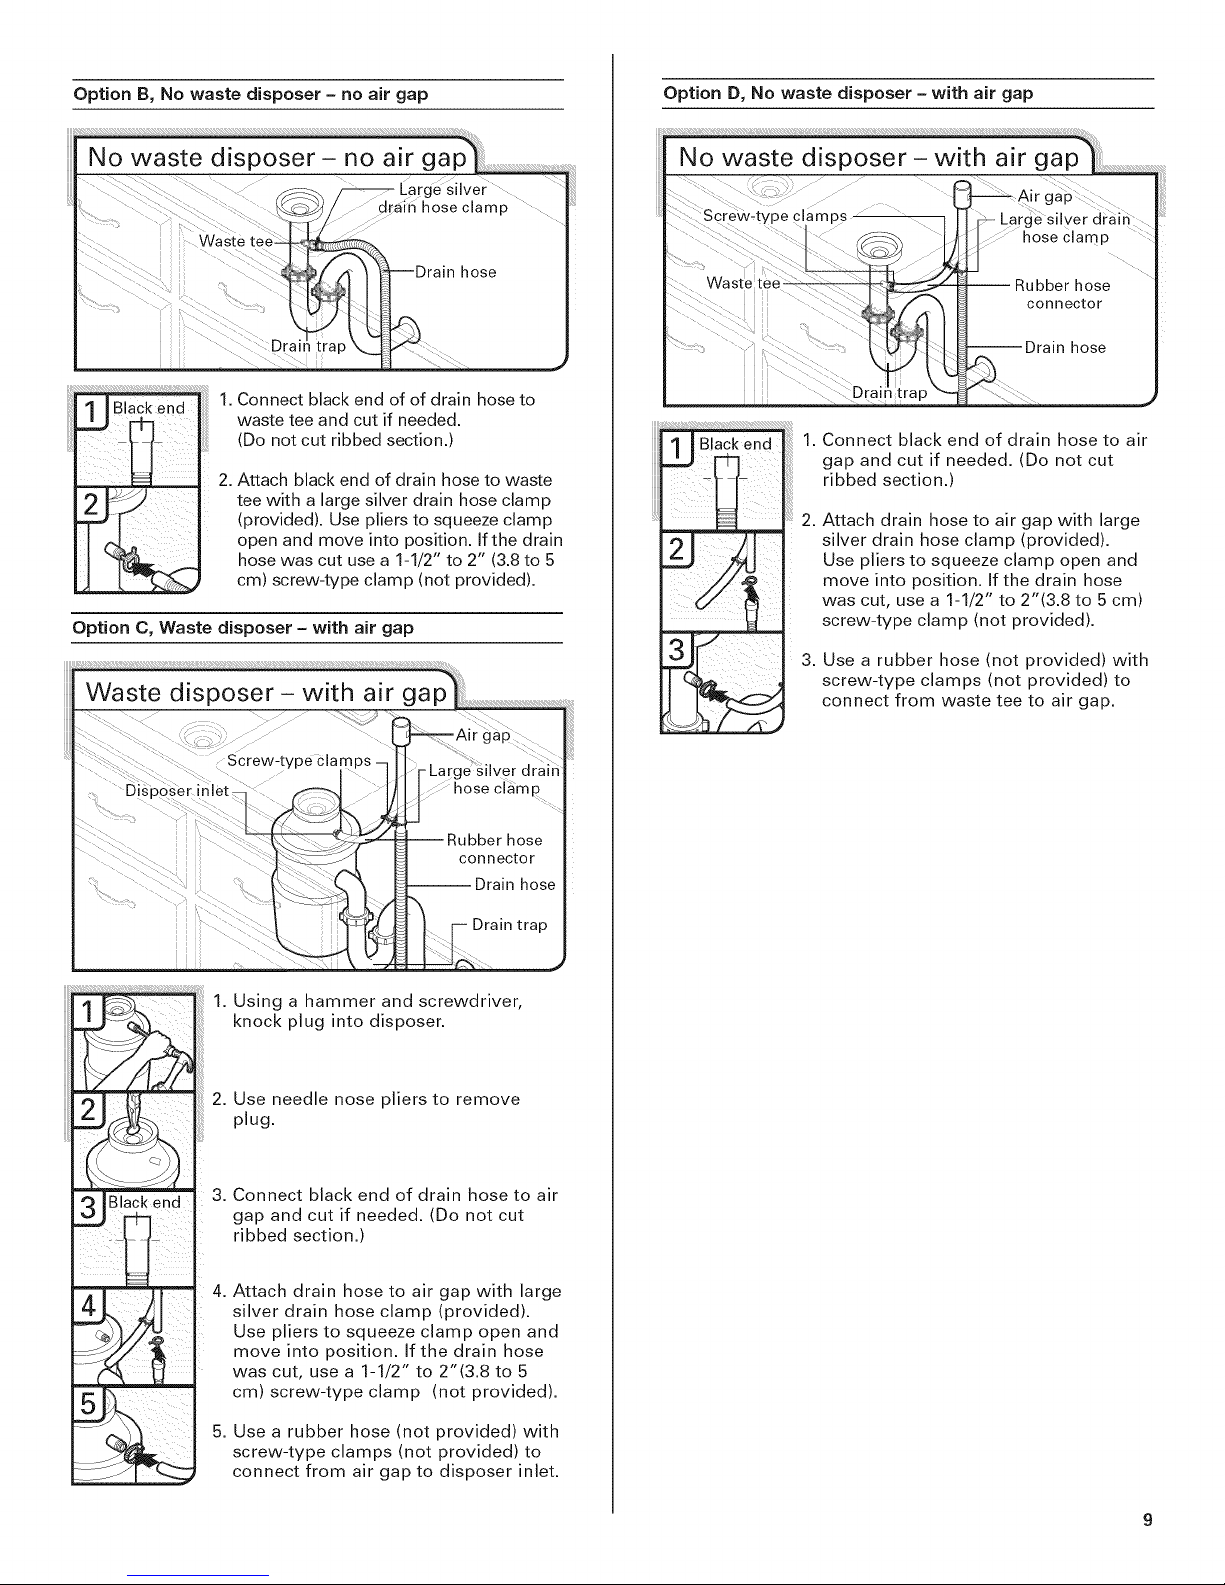
Option B, No waste disposer - no air gap
1.Connect black end of of drain hose to
waste tee and cut if needed.
(Do not cut ribbed section.)
2. Attach black end of drain hose to waste
tee with a large silver drain hose clamp
(provided). Use pliers to squeeze clamp
open and move into position. If the drain
hose was cut use a 1-1/2" to 2" (3.8 to 5
cm) screw-type clamp (not provided).
Option C, Waste disposer - with air gap
Option D, No waste disposer - with air gap
Connect black end of drain hose to air
gap and cut if needed. (Do not cut
ribbed section.)
2,
Attach drain hose to air gap with large
silver drain hose clamp (provided).
Use pliers to squeeze clamp open and
move into position. If the drain hose
was cut, use a 1-1/2" to 2"(3.8 to 5 cm)
screw-type clamp (not provided).
3.
Use a rubber hose (not provided) with
screw-type clamps (not provided) to
connect from waste tee to air gap.
Drain trap
1. Using a hammer and screwdriver,
knock plug into disposer.
2. Use needle nose pliers to remove
plug.
3. Connect black end of drain hose to air
gap and cut if needed. (Do not cut
ribbed section.)
4,
Attach drain hose to air gap with large
silver drain hose clamp (provided).
Use pliers to squeeze clamp open and
move into position. If the drain hose
was cut, use a 1-1/2" to 2"(3.8 to 5
cm) screw-type clamp (not provided).
5.
Use a rubber hose (not provided) with
screw-type clamps (not provided) to
connect from air gap to disposer inlet.
Page 10
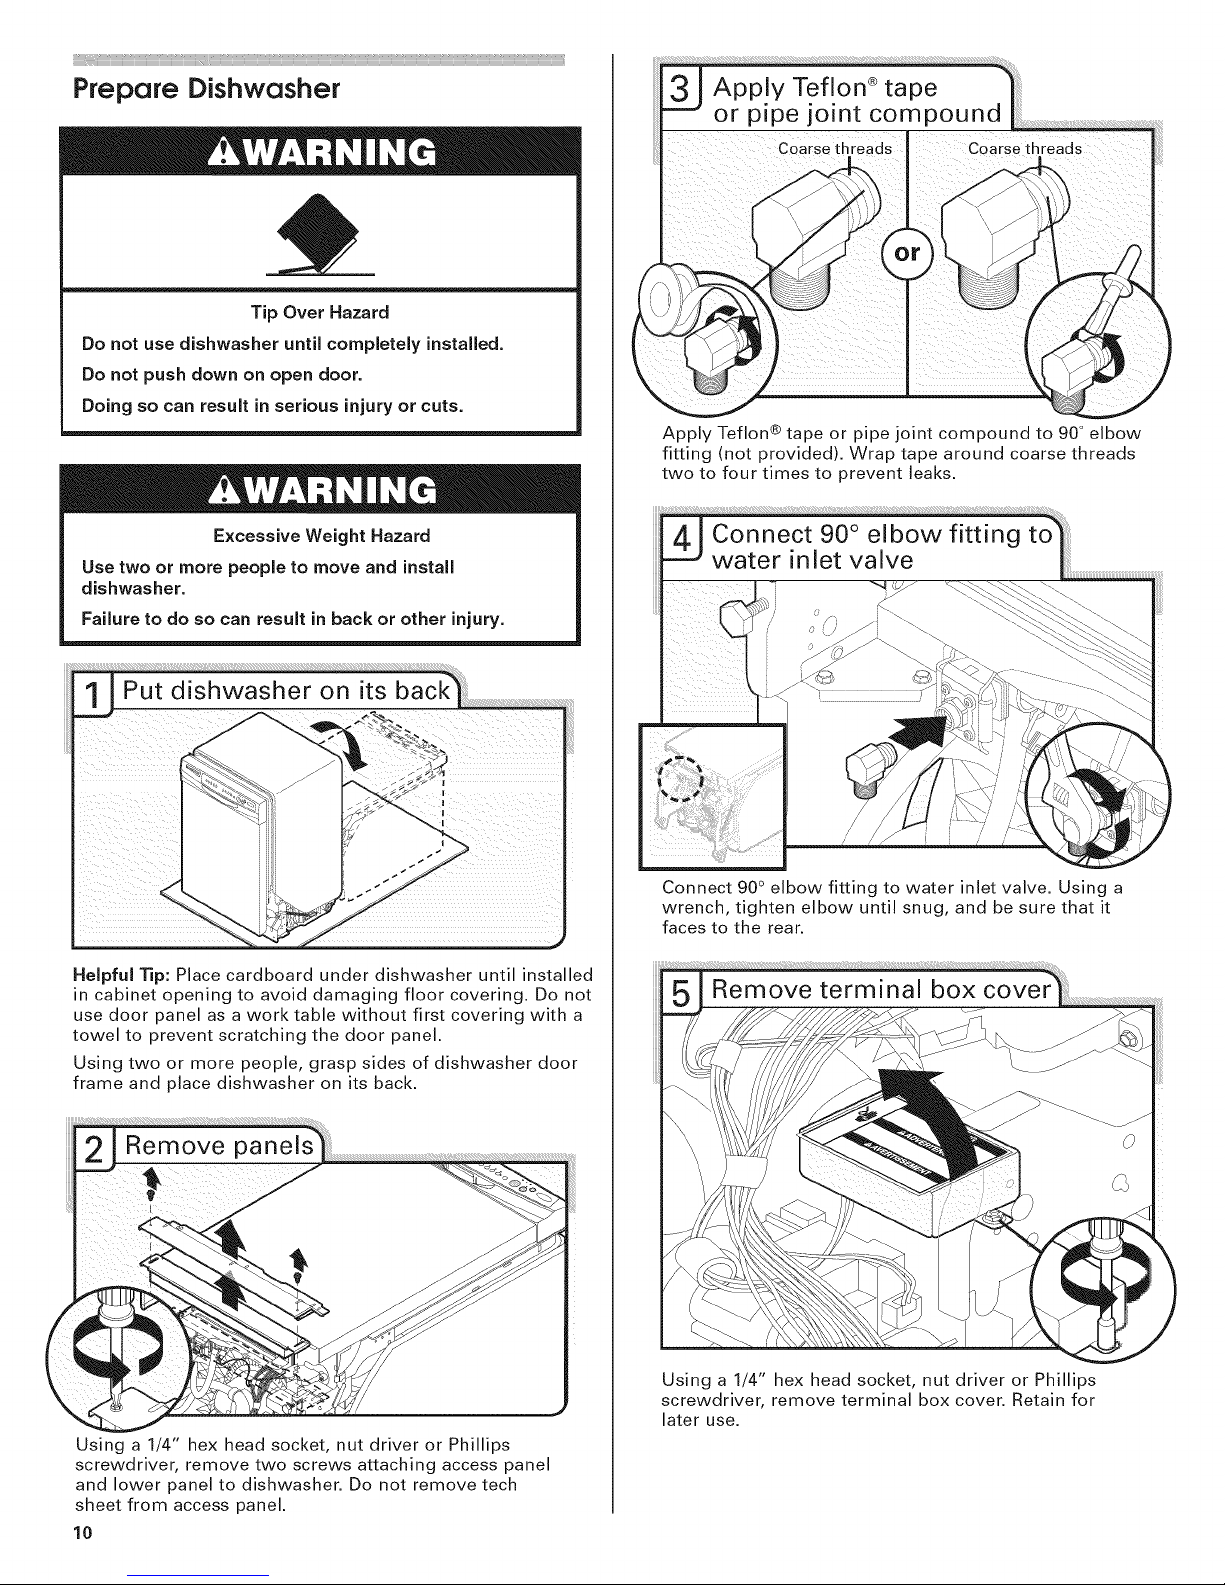
Prepare Dishwasher
Tip Over Hazard
Do not use dishwasher until completely installed.
Do not push down on open door.
Doing so can result in serious injury or cuts.
Excessive Weight Hazard
Use two or more people to move and install
dishwasher.
Failure to do so can result in back or other injury.
Apply Teflon ® tape or pipe joint compound to 90 ° elbow
fitting (not provided). Wrap tape around coarse threads
two to four times to prevent leaks.
Put dishwasher on its back
Helpful Tip: Place cardboard under dishwasher until installed
in cabinet opening to avoid damaging floor covering. Do not
use door panel as a work table without first covering with a
towel to prevent scratching the door panel.
Using two or more people, grasp sides of dishwasher door
frame and place dishwasher on its back.
Connect 90° elbow fitting to water inlet valve. Using a
wrench, tighten elbow until snug, and be sure that it
faces to the rear.
Using a 1/4" hex head socket, nut driver or Phillips
screwdriver, remove two screws attaching access panel
and lower panel to dishwasher. Do not remove tech
sheet from access panel.
10
Using a 1/4" hex head socket, nut driver or Phillips
screwdriver, remove terminal box cover. Retain for
later use.
Page 11
0
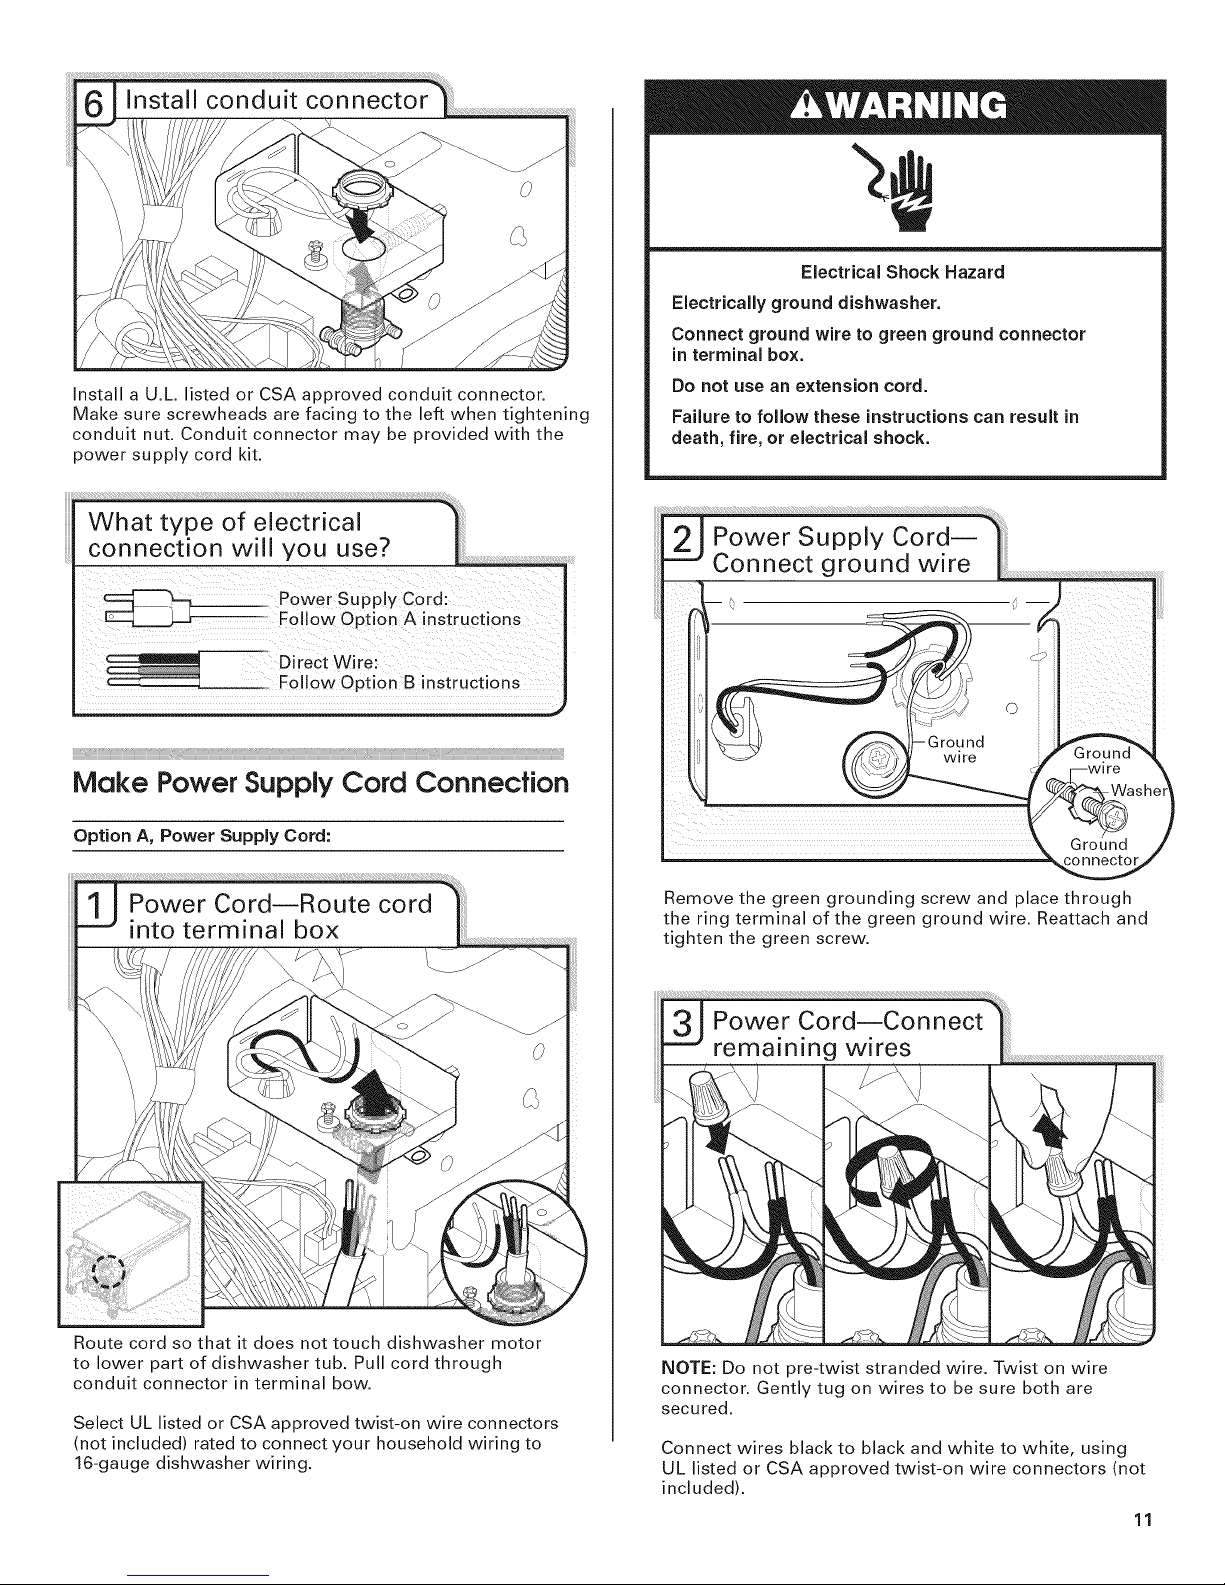
Install a U.L. listed or CSA approved conduit connector.
Make sure screwheads are facing to the left when tightening
conduit nut. Conduit connector may be provided with the
power supply cord kit.
What type of electrical
connection will you use?
Power Supply Cord:
Follow Option A instructions
Direct Wi re:
Follow Option B instructions
Electrical Shock Hazard
Electrically ground dishwasher.
Connect ground wire to green ground connector
in terminal box.
Do not use an extension cord.
Failure to follow these instructions can result in
death, fire, or electrical shock.
Make Power Supply Cord Connection
Option A, Power Supply Cord:
Route cord so that it does not touch dishwasher motor
to lower part of dishwasher tub. Pull cord through
conduit connector in terminal bow.
Select UL listed or CSA approved twist-on wire connectors
(not included) rated to connect your household wiring to
16-gauge dishwasher wiring.
Remove the green grounding screw and place through
the ring terminal of the green ground wire. Reattach and
tighten the green screw.
NOTE: Do not pre-twist stranded wire. Twist on wire
connector. Gently tug on wires to be sure both are
secured.
Connect wires black to black and white to white, using
UL listed or CSA approved twist-on wire connectors (not
included).
11
Page 12
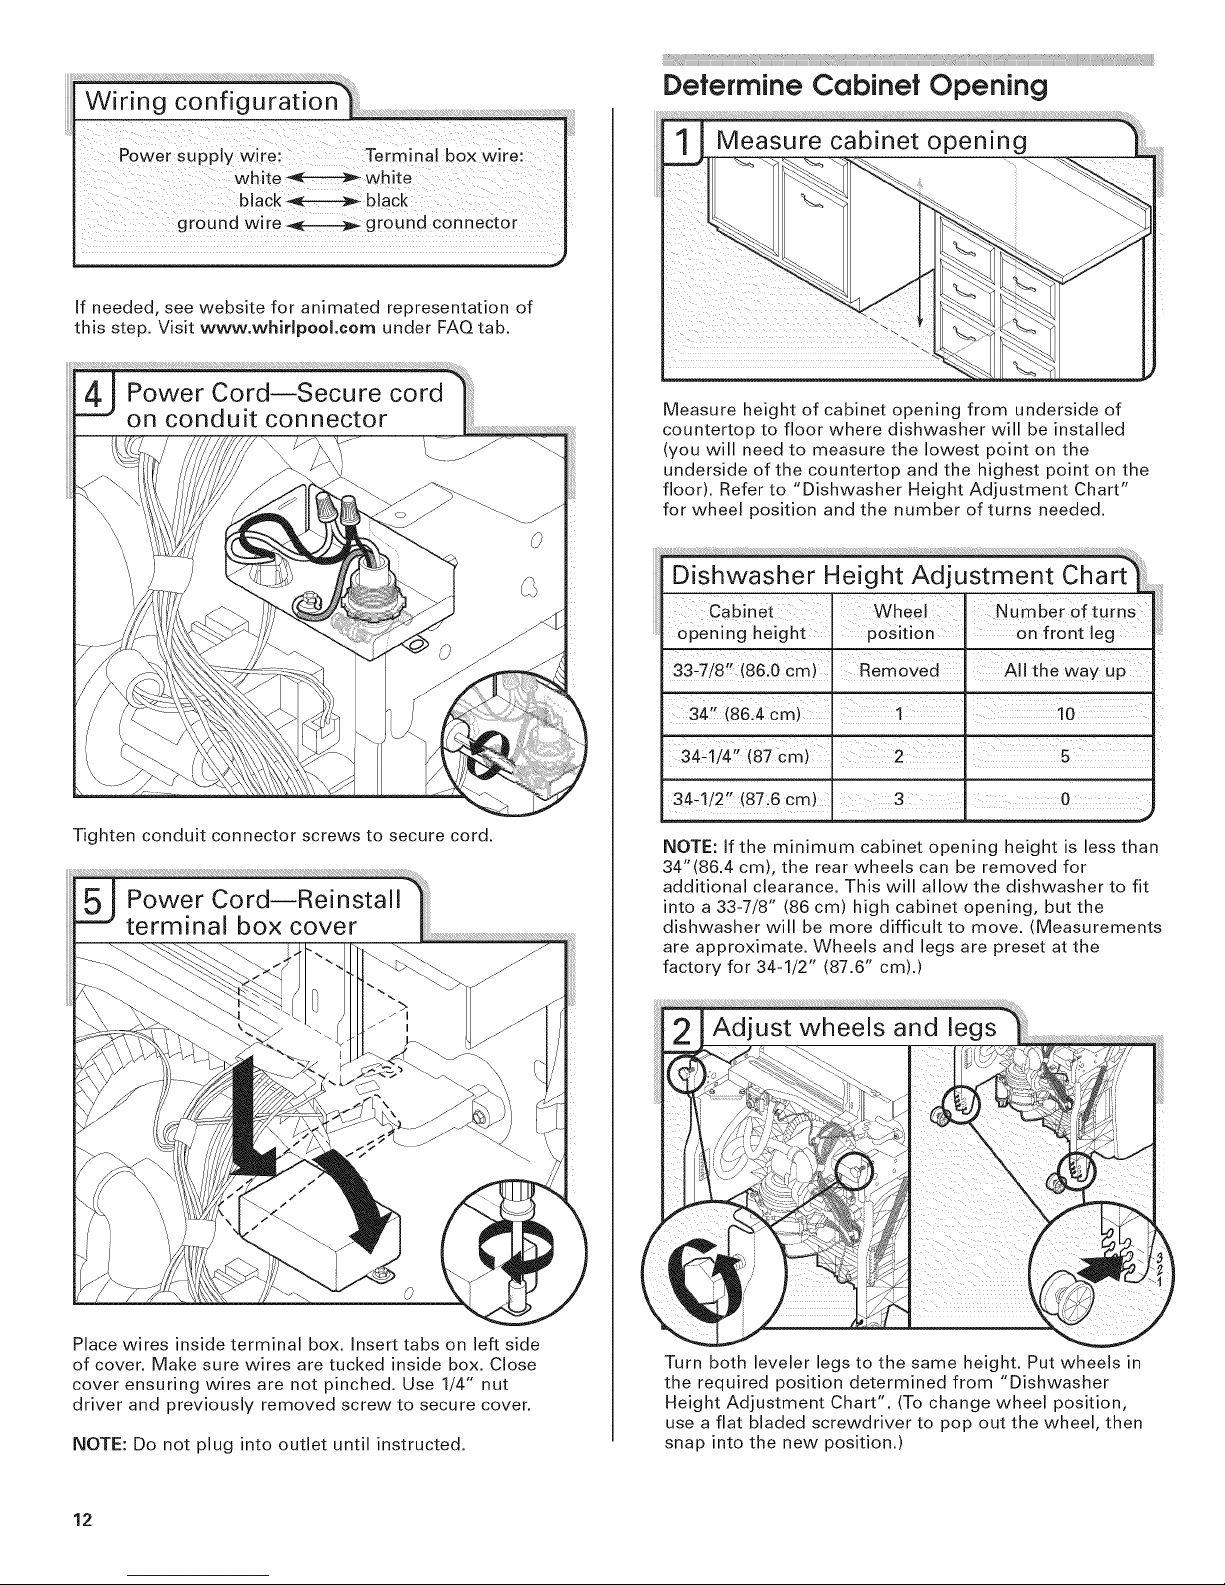
ground wire _ ground connector
If needed, see website for animated representation of
this step. Visit www.whiHpooLcom under FAQ tab.
iiii_ii_i_iiiii_ii`_i_i_ii_iiii1iiiii1iiii1i_iiiiiii_iiiiii11iiiii_iiiiiiii_iiiiiiii_iiiiif_i_iiii_`_`_i_ii1ii_iiii_i_i_iiiiii1ti_ii_ii1ii_ii1ii_ii1ii_ii1ii_i_i_ii1iii_iii1tiiiiii_i````````````````````````````````````````````````````````````````````````````````````````i`_iii_!i`i!_i!_!i_ii_iiii_iiiiiiiii_iiiiiiii_iiiiiiiiii_i_¸il¸ii_iiiii1i_i_iiiiiiiiiiii11i_ii_ii1ii_i_iiiiiiiiiiiiii_iiiiii11i_ii1iiiiiiiiiiiiiii_iiiiiiiiIiIiiii_ii_Iiti_ii_Iiti_ii_Iiti_ii_Iiti_ii_11iiiiiiiiii
Defermine Cabinef Opening
Measure height of cabinet opening from underside of
countertop to floor where dishwasher will be installed
(you will need to measure the lowest point on the
underside of the countertop and the highest point on the
floor). Refer to "Dishwasher Height Adjustment Chart"
for wheel position and the number of turns needed.
Dishwasher Height Adjustment Cha
• i
Cabinet Wheel Number of turns
opening height position i on front leg
33;7/8" (86.0 cm) Removed A!l the way up
t,"
34 (8&4cm) : 1 ! 10
I
Tighten conduit connector screws to secure cord.
34-'1/4 (87 cm) 2 5
34-1/2" (87.6 cm) 3 , 0
,.#
NOTE: If the minimum cabinet opening height is less than
34"(86.4 cm), the rear wheels can be removed for
additional clearance. This will allow the dishwasher to fit
into a 33-7/8" (86 cm) high cabinet opening, but the
dishwasher will be more difficult to move. (Measurements
are approximate. Wheels and legs are preset at the
factory for 34-1/2" (87.6" cm).)
Adjust wheels and legs
i_I ixiiiiiiiiiiiiiiiiiiiiiii'
Place wires inside terminal box. Insert tabs on left side
of cover. Make sure wires are tucked inside box. Close
cover ensuring wires are not pinched. Use 1/4" nut
driver and previously removed screw to secure cover.
NOTE: Do not plug into outlet until instructed.
12
Turn both leveler legs to the same height. Put wheels in
the required position determined from "Dishwasher
Height Adjustment Chart". (To change wheel position,
use a flat bladed screwdriver to pop out the wheel, then
snap into the new position.)
Page 13

Move dishwasher close to
cabinet opening
Built-upfloors(Kitchenfloorheightishigherthan
cabinetopening.)Example:Kitchenfloortiledoesnot
extendintocabinetopening.Addshimsasneededinthe
areashowntobringthedishwasherupto34"(86.4cm)
belowthecountertop.
NOTE:Shimsmustbesecurelyattachedto floorto
preventmovementwhenthedishwasherisinuse.
Move Dishwasher into Cabinet
Opening
IMPORTANT: Double check correct placement of utilities.
Grasp the sides of the dishwasher at the edges of the
door panel. Tilt dishwasher backwards on wheels and
move dishwasher close to cabinet opening.
NOTE: Do not push on the front of the panel or on the
console-they may dent.
Helpful Tip: Temporarily tape utilities to the floor in the
locations shown to prevent them from moving when
dishwasher is moved into the cabinet opening.
Using two or more people, stand dishwasher upright.
NOTE: Do not install kickplate until instructed.
Check that water line is on the left side of opening and
drain hose is near the center of the cabinet opening,
With another person holding the dishwasher to prevent
it from tipping, open and close the door a few times. If
the door closes or falls open under its own weight, the
door tension will need to be adjusted. 13
Page 14

Ifthedoorclosestooquickly,decreasethespring
tensionbymovingthespringendtowardthefrontof
thedishwasher.
NOTE:Springsshouldbeinthesamenotchesonleft
andrightsides.
Move dishwasher into
cabinet opening
IMPORTANT: If wheels were removed, protect the floor
when moving the dishwasher. Slowly move dishwasher
completely into cabinet opening. Do not kink or pinch
water line, drain hose, power supply cord or direct wire
between dishwasher and cabinet. Remove cardboard
from under dishwasher.
NOTE: It is all right if dishwasher fits tightly into cabinet
opening. Do not remove insulation blanket- the blanket
reduces the sound level.
NOTE: If using power cord, make sure to route end
through hole in cutout before sliding into cabinet opening.
Ifthedoorfallsopen,increasethespringtensionby
movingthespringendtowardthebackofthe
dishwasher.
NOTE:Springsshouldbeinthesamenotchesonleft
andrightsides.
14
Align front of dishwasher door panel with front of
cabinet doors. You may need to adjust alignment to be
even with your cabinets.
Check that leveling legs are firmly against the floor.
Close and latch the door, and place level against the
front panel. Check that dishwasher is centered from front
to back in the opening. If needed, adjust leveling leg until
dishwasher is plumb. Repeat for other side of dishwasher.
Page 15

HelpfulTip:Pushuponfrontofdishwashertoraise
dishwasheroffthegroundtoadjustfrontlegs.With
someinstallations,it maybeeasiertoadjustthefrontleg
usingthe3/16"hexheadsocketoradjustablewrench.
Coppertubingonly:Putthetubingintothe90°elbow
fittingasfarasitwillgo(thecoppertubingbendsand
kinkseasily).Slidethenutandferruleforwardandstart
thenutontotheelbowthreads.
Flexiblebraidedconnection:Securenuttoelbowusing
5/8"openendedwrenchoradjustablewrench.
NOTE:DonotuseTeflon®tapewithcompressionfittings.
Placelevelagainsttopfrontopeningoftub.Checkthat
dishwasherislevelfromsidetoside.Ifdishwasherisnot
level,adjustfrontlegsupordownuntildishwasheris
level.
Coppertubingonly:Slidenutthenferruleontocopper
tubingabout1"(2.5cm).
NOTE:Topreventvibrationduringoperation,routethe
watersupplylinesothatitdoesnottouchthe
dishwasherbase,frameormotor.
Holdthe90°elbowfittingstillwithoneadjustablewrench
andtightenthenutwithsecondadjustablewrench.
Helpful Tip: Use a 5/8 open ended wrench for easier
access to tighten connection.
Place paper towel under 90 ° elbow fitting. Turn on water
supply and check for leaks. If leak occurs, repeat
previous step.
If needed, see website for animated representation
of this step. Visit www.whirlpool.eom/watersupply
under FAQ tab.
15
Page 16

iiiiif_i_if_i_if_i_if_i_ii_i_iii_i_iii_i_i_i_iiii_i_iii_i_iii_i_iii_i_iii_i_iii_i_iii_i_iii_i_iii_i_iii_i_ii_i_ii_iii_i_iii_ii_iiiiiii_ii_iii_ii_iii_i_ii_i_ii_i_iiiii_i_iiiIiiiii:;i;;ii;:;i;;ii_ii;;ii;:;i;;i;;ii;;;i;;ii;ii_ii;;ii;:;i;;ii;:;:;i;;ii_i_iiii11iii_tiiiiiiiiiii_i}iiii_;_ii}iiii_;_ii}iiii_;_ii}iiii_;_ii}iiii_;_ii}iiii_;_ii}iiii_;_ii}iiii_;_ii}iiii_;_ii}iiii_;_ii}iiii_;_ii}iiii_;_ii}iiii_;_ii}iiii_;_ii}iiii_;_ii}iiii_;_ii}iiii_;_ii}iiii_;_ii}iiii_;_ii}iiii_;_ii}iiii_;_ii}ii}iiiiii_;i_iiiiiiiiiiiiiB
Connect to Drain
Make DirectWire Electrical
Connection
NOTE: If the power supply cord was connected earlier
Green clam
proceed to Secure Dishwasher in Cabinet Opening
section.
Black drain hose
Drain hose stop
Sto p
Place towel under drain hose to catch any water in drain
hose. Place the small green drain hose clamp onto the
small end of the drain hose. Push the new drain hose
into the black drain hose connector up to the drain hose
stop.
Drain hose
Option B, Direct Wire:
Route cable so that it does not touch dishwasher motor
or lower part of dishwasher tub. Pull cable through cable
clamp in terminal box.
Using pliers, squeeze open the small green drain hose
clamp and slide onto connector between stops.
Once connected, remove towel.
If needed, see website for animated representation of
this step. Visit www.whirlpool.com/drain under FAQ tab.
Select UL listed or CSA approved twist-on wire connectors
(not included) rated to connect your household wiring to
16-gauge dishwasher wiring.
16
Page 17

ElectricalShock Hazard
Electrically ground dishwasher.
Connect ground wire to green ground connector
in terminal box.
Do not use an extension cord.
Failure to follow these instructions can result in
death, fire, or electrical shock.
I !7i\ +
I 1%-C-LI) f-r_.."_ll--Oround i
ILl wire c # L_/_lr7 d TM
If needed, see website for animated representation
of this step. Visit www.whirlpool.eom/eleetrical under
FAQ tab.
Tighten conduit connector screws to secure cable.
=sh
Ground
Form bare ground wire into a U-shaped hook. Wrap
ground wire hook clockwise around ground connector
screw and under the washer. Securely tighten ground
connector.
NOTE: Twist on UL listed or CSA approved wire
connector. Gently tug on wires to be sure both are
secured.
)
Place wires inside terminal box. Insert tabs on left side
of cover. Make sure wires are tucked inside box. Close
cover ensuring wires are not pinched. Use 1/4" nut
driver and previously removed screw to secure cover.
Connect wires black to black and white to white, using
UL listed or CSA approved twist-on wire connectors (not
included).
17
Page 18

Checkthatdishwasherisstilllevelfrontto backandside
tosideincabinetopening.
IMPORTANT: If you have solid countertops such as
corrian, granite, etc., you must use side mounting kit
(Part No. 8212560). Follow kit instructions. (Brackets
included with kit.)
NOTE: Do not drop screws into bottom of dishwasher.
Locate brackets on top of dishwasher and secure
dishwasher to countertop with two, #10 x 1/2" phillips-
head screws (included). The dishwasher must be secured
to keep it from shifting when door is opened.
Check that top of door does not contact screws,
brackets, or countertop. If it does, adjust leveling legs.
Open dishwasher door, remove lower dish rack, and
place towel over pump assembly and lower spray arm of
dishwasher. This will prevent screws from falling into
pump area when securing dishwasher to countertop.
18
Open door and check that space between dishwasher
cabinet opening and tub is equal on both sides. If
spacing is not equal, loosen bracket screws secured
and shift tub. Tighten bracket screws.
Page 19

Removetowelfromdishwasher.Reinstallthelower
dishrack.
If needed, see website for animated representation
of this step. Visit www.whirlpool.eom/anchoring under
FAQ tab.
Hold the two panels together and place them against
dishwasher leg. Using a philips or 1/4" screwdriver, reinstall
the screws through the holes in the access panel and the
slots in the lower panel.
Check that the lower edge of the lower panel contacts
the floor. Adjust if necessary.
Check that grounding clip is attached to the lower panel.
Position the lower panel behind the access panel. On some
models there is insulation on the access panel which must
fall behind the insulation on the lower panel.
Tighten access panel screws.
TEFLON is a registered trademark of E.I. Du Pont
De Nemours and Company.
19
Page 20

Check Operation
[_ Read the Dishwasher User Instructions that came
with your dishwasher.
[_ Check that all parts have been installed and no steps
were skipped. Check that you have all tools used.
Electrical Shock Hazard
Plug into a grounded 3 prong outlet.
Do not remove ground prong.
Do not use an adapter.
Do not use an extension cord.
Failure to follow these instructions can result
in death, fire, or electrical shock.
[_ Start dishwasher and allow it to complete the shortest
wash cycle. After the first 2 minutes unlatch door,
wait 5 seconds, then open door. Check to see that
there is water in the bottom of the dishwasher tub.
Check that dishwasher is working properly.
If not, disconnect power or unplug dishwasher and
see "If Dishwasher Does Not Operate" section.
Has the circuit breaker tripped or the house fuse
blown?
Is the door closed tightly and latched?
Has the cycle been set correctly to start the
dishwasher?
Is the water turned on?
If none of these work, call 1-800-253-1301, or in Canada,
call 1-800-807-6777.
For Roper models, call 1-800-447-6737, or in Canada call
1-800-807-6777.
Plug into a grounded 3 prong outlet. Check that power
supply cord does not touch dishwasher motor or lower
part of dishwasher tub.
Reconnect Power
Additional Tips
Expect longer wash times. Your new dishwasher will
average 2-3 hours per load, but use nearly 40% less
energy than older models. Designed with a low wattage,
low energy consumption motor, your dishwasher
washes longer to ensure exceptional cleaning. Certain
models are equipped with an optical water sensor so the
first cycle will run longer to calibrate to optical sensor.
Selecting certain options could increase cycle time past
3.5 hours.
Rinse Aid is necessary for good drying results:
This dishwasher is designed to be used with rinse aid for
good drying performance and controlling hard water
deposit build-up. Energy efficient dishwashers use less
water and energy so they depend on the water sheeting
action of rinse aid for good drying performance.
Start/Resume light may flash:
When pressing Start/Resume, you must make sure the
door is closed within 3 seconds. If you do not, the
Start/Resume light will flash until you press it again.
(You must also do this when adding a dish during the
middle of a cycle.)
20 © 2007 All rights reserved
Page 21

Table des rnafi@res
Securite du Jave-vaisselle ........................... 21
Exigences d'installtion ............................. 22
Outillage et pieces ............................... 22
Exigences d'emplacement ........................ 22
Dimensions - Produit et cavite d'encastrement ....... 23
Specifications de I'evacuation ..................... 24
Sp6cifications de I'alimentation en eau .............. 24
Specifications electriques ......................... 24
instructions d'installation .......................... 25
Preparation de la cavite d'encastrement -
Raccordement aux circuits existants .............. 25
Preparation de la cavite d'encastrement -
Nouveaux moyens de raccordement .............. 25
Raccordement & la canalisation d'eau -
Preparation et installation ...................... 26
Installation du tuyau d'evacuation .................. 27
S@curif@du lave-vaisselle
instructions d'installation (suite).......................
Preparation du lave-vaisselle ...................... 29
Raccordement electrique - Cordon d'alimentation ..... 30
Dimensions de la cavite d'encastrement ............. 31
Installation du lave-vaisselle dans la cavite
d'encastrement ................................ 32
Raccordement _ la canalisation d'eau ............... 34
Raccordement _ I'egout .......................... 35
Raccordement electrique - C_blage direct ........... 35
Immobilisation du lave-vaisselle dans la cavite ........
d'encastrement ................................ 37
Achever I'installation ............................. 38
Contr61e du fonctionnement ....................... 39
Si le lave-vaisselle ne fonctionne pas ............... 39
Conseils additionnels ............................ 39
Votre sdcuritd et celle des autres est tr_s importante.
Nous donnons de nombreux messages de securit6 importants dans ce manuel et sur votre appareil menager.
Assurez-vous de toujours lire tousles messages de securit6 et de vous y conformer.
Voici le symbole d'alerte de securit&
Ce symbole d'alerte de securit6 vous signale les dangers potentiels de deces et de blessures graves
vous eta d'autres.
Tousles messages de securit6 suivront le symbole d'alerte de securit6 et le mot "DANGER" ou
"AVERTISSEMENT". Ces mots signifient :
Risque possible de d_c_s ou de blessure grave si
vous ne suivez pas imm_diatement les instructions.
Risque possible de d_c_s ou de blessure grave
si vous ne suivez pas les instructions.
Tousles messages de securit6 vous diront quel est le danger potentiel et vous disent comment reduire le risque de
blessure et ce qui peut se produire en cas de non-respect des instructions.
Processus 6 appliquer •
• Ouvrir prudemment la porte du lave-vaisselle alors qu'une
autre personne saisit I'arriere de I'appareil. Retirer les
materiaux d'emballage, le tuyau d'evacuation et le panier
inferieur. Fermer la porte du lave-vaisselle, jusqu'_ la
position de verrouillage.
• Respecter/Appliquer les dispositions de tous les codes et
Risque de basculement
Ne pas utiliser le lave=vaJsselle jusqu'a ce qu'it soJt
cornpletement install&
Ne pas appuyer sur la porte ouverte.
Le non=respect de ces instructions peut causer des
blessures graves ou des coupures.
reglements en vigueur.
• Installer ce lave-vaisselle conformement aux prescriptions
presentees dans les presentes instructions.
• L'installation devrait _tre executee par un technicien
qualifi& L'installation du lave-vaisselle doit satisfaire aux
exigences de tout code national ou local regissant les
installations electriques et de plomberie, et de tousles
reglements en vigueur.
21
Page 22

EXIGENCES D'INSTALLATION
Outillage et pi@ces
Rassembler les outils et pieces necessaires avant de
commencer I'installation. Lire et observer les instructions
fournies avec chacun des outils de la liste ci-dessous.
Pour toutes les installations
Outillage n_cessaire :
..1 Tourney s _ _/
F nce . lame plat e ......
Tournevis Couteau
Phillips utilitaire _
Tourne-6cr0u
51 "e 1 "/6 t /4
Connecteurs de _
f s-homo ogat on U
UL ou CSA*
Autres articles _ventuellement n_cessaires :
Brides de tu,y,au Ensemble de Ruban de I
Visl 1/2:2 montage lateral maSquageOuwban I
(38'!- B Cm).,_-_-. I pour p!an de ladh_sif I
(max. 3)travai! massif pour I
L(Pi_ce no 8212560)U_conduits J
REMARQUE : Ces articles sont disponibJes clans les commerces
de fournkures de plombede. Consulter les codes Iocaux.
Consuker le code en vigueur r_gissant les installations
61ectriques. Voir la section "Sp6cifications 61ectriques". H est
recommand6 que I'op6ration de raccordement au circuit
6iectrique soit confi6e a un 6iectricien professionnel.
® Teflon est une marque d_pos_e de EJ. Du Pont de Nemours & Company.
Materiel additionnel pour I'installation initiale
Outillage n_cessaire :
I
J Pe ceuse
I 6!ectrique i
I avecscles a
Ci_ & molette
10", ouverture
1-1/8" (2,9 Cm) i
*De taille appropriee pour le raccordement des conducteurs
du c&blage de la maison aux conducteurs de calibre 16 du
lave-vaisselle
Autres articles utiles :
Pi_ces fournies :
, pour tuyau
d _vacuation
(1 grande et ! petite)
qt verde
V6rifier Ja pr6sence de toutes ces pi_ces dans le sachet des
documents.
Pi_ces n_cessaires :
raccord 90° avec un fi!etage RUban de Teflon® ou
m_le 3/8 N.RT. (autre sortie compos_ d'_tanchgit_ des
Correspondant aufiletag ede tuyauteries
la Canaiisation d eau)
I
tr0ude !/2",
Pi_ces n_cessaires
Tube de Cuivre
ma!16abie (dia. ext:
3/8 Sugg6r6)ou
tube de plastique
(avec tressage de
renforcement) pour
raccorHe_ent &ia de7/8 (2,2 cm) marqu_ pour
canalis_ti"n d'eaU (homologation I I'utilisation avec
U
Voir la SeCtion "sp6Cifications _leCtriques"
C_blage direc t Cordon d'
I
utiliser un alimentation :
connecteur de u!iliser un cordon
conduit pour tr0U d alimentation
ULou CSA) i un iave-va!sse!! e
__'_, j (homoIogation UL)
Exigences d'emplacement
L'appareil dolt &tre electriquement relic & la terre.
Ne pas placer de canalisation d'evacuation, canalisation
d'eau ou circuit electrique _ un endroit cO une quelconque
interference est possible (contact avec le moteur ou les
pieds du lave-vaisselle, etc.).
L'emplacement d'installation du lave-vaisselle doit fournir
le degagement de separation approprie entre le moteur et
le plancher. Le moteur ne doit pas toucher le plancher.
Ne pas installer le lave-vaisselle sur un plancher garni de
tapis.
Proteger le lave-vaisselle et les canalisations d'eau qui
I'alimentent contre le gel. La garantie ne couvre pas les
deg&ts imputables au gel.
22
Un ensemble pour panneau lateral est disponible chez les
revendeurs; on peut I'utiliser pour I'installation du lave-
vaisselle & I'extremite d'une rangee de placards.
Un accessoire pare-vapeur (piece no 4396277) est
disponible chez les revendeurs pour I'installation sous le
plan de travail; cependant, ceci n'est pas indispensable.
Page 23

Inspecter I'emplacement oQ le lave-vaisselle sera installe;
I'emplacement d'installation doit offrir "
facilite d'acc_s _ canalisation d'eau, c&blage electrique et
canalisation d'egout.
facilite d'acc_s pour chargement et dechargement de la
vaisselle; si I'appareil est installe dans un angle, on doit
prevoir un espace libre d'au moins 2" (5,1 cm) entre le c6te
de la porte du lave-vaisselle et le mur ou le placard adjacent.
bon equerrage de la cavite, pour fonctionnement correct et
aspect esthetique.
fa(_ades de placard perpendiculaires au sol.
plancher horizontal et & un niveau uniforme; (en cas de
difference de niveau entre la surface du plancher devant la
cavite d'installation et le plancher de lacavite d'installation,
il peut 6tre necessaire d'employer des cales pour rehausser
le lave-vaisselle.)
Dimensions - Produit et cavite d'encastrement
Censeil utile : Si la surface du plancher dans la cavite
d'installation de I'appareil n'est pas uniforme (exemple :
rev6tement de sol sans prolongation complete dans I'espace
de la cavite d'installation), veiller & mesurer les dimensions
avec precision pour garantir un ben aplomb du lave-vaisselle.
REMARQUE : Si des cales sont utilisees, veiller 8 solidement
ancrer les cales sur le plancher pour qu'elle ne puisse se
deplacer durant I'utilisation du lave-vaisselle.
Si le lave-vaisselle ne sera pas utilise pendant une periode
prolongee, ou s'il est installe en un endroit o_ il pourrait 6tre
expose au gel, fake executer le processus de preparation
appropriee avant I'hiver par un technicien agre&
Veiller _ ce que les moyens de raccordement _ canalisation
d'eau, c&blage electrique et canalisation d'egout soient situes
dans la zone marquee en gris sur I'illustration de la section
"Dimensions - Produit et cavite d'installation".
REMARQUE : Placer les points d'arriv6e du
circuit _lectrique et des canalisations dans la
zone marquee en gris sur les parois de la cavit6
d'encastrement.
*Mesur_ depuis le point le plus bas de face
inf6rieure du plan de travail. Possibilit_ de
r6duction a 33-7/8" (86 cm) apr_s d_pose des
roues.
**Minimum - _ I'endroit le plus _troit de la
cavit&
*L'isolant peut
_trecom prim&
(pas utilis_ sur
tous les mod61es)
Verifier sur chaque surface
I'absence de protuberance
I;introduction
dans la cavit&
23
Page 24

Sp@cificationsde r@vacuation
Specifications lecfriques
* Un nouveau tuyau d'evacuation est fourni avec le lave-
vaisselle; s'il n'est pas suffisamment long, utiliser un tuyau
neuf plus long de Iongueur maximale 12' (3,7 m) (piece no
3385556) conforme aux criteres de test en vigueur de
AHAM/IAPMO, resistant & la chaleur et aux detergents, qui
peut 6tre connecte sur le raccord de 1" (2,5 cm) du lave-
vaisselle.
Ne pas oublier de connecter le tuyau d'evacuation au
raccord T d'evacuation ou _ entree du broyeur _ dechets
au-dessus du piege/siphon du circuit de plomberie de la
maison, et & 20" (50,8 cm) ou plus au-dessus du sol. II est
recommande de former une boucle avec le tuyau
d'evacuation (qui sera solidement attachee sur la face
inferieure du plan de travail), ou d'incorporer au circuit un
composant brise-vide.
Si le tuyau d'evacuation est connecte au circuit
d'evacuation de la maison & une hauteur inferieure & 20"
(50,8 cm) au-dessus du plancher, il est indispensable
d'utiliser un brise-vide.
Pour le circuit d'evacuation, utiliser des raccords de dia.
int. 1/2" ou plus.
Si un brise-vide est necessaire, il doit &tre installe
conformement aux instructions d'installation fournies avec
le produit; un tuyau de caoutchouc (pas fourni) sera
necessaire pour le raccordement au raccord T du circuit
d'evacuation ou & I'entree du broyeur & dechets.
Pour le raccordement des conducteurs electriques et la
taille des conducteurs, veiller _ respecter les prescriptions
de I'edition la plus recente du Code national de I'electricite
ANSI/NFPA 70 - et de tout code ou reglement local en
vigueur.
On peut obtenir un exemplaire des normes mentionnees ci-
dessus _ I'adresse suivante :
National Fire Protection Association
One Batterymarch Park
Quincy, MA 02269
Caracteristiques du circuit d'alimentation :
120 volts, 60 Hz, CA seulement, avec fusible 15 A ou 20 A.
• conducteur de cuivre seulement.
Nous recommandons :
fusible temporise ou disjoncteur.
alimentation par un circuit independant.
Raccordement du
lave-vaisselle par cordon
d'alimentation :
Utiliser un cordon d'alimentation marque pour
I'utilisation avec un lave-vaisselle (homologation UL)
(piece no 4317824).
Brancher la fiche du cordon I-----7
d'alimentation sur une prise de
courant reliee & la terre & 3 alveoles,
installee dans le placard adjacent & la
cavite d'encastrement du lave-
vaisselle; la prise de courant doit 6tre
conforme aux prescriptions des codes et reglements
en vigueur.
Raccordement direct du lave-vaisselle :
* Utiliser un c_ble flexible
conducteurs de cuivre
et conducteur de liaison
la terre, avec blindage ou gaine non metallique,
conforme aux prescriptions des codes et r_glements
en vigueur regissant les installations electriques.
Utiliser un connecteur de conduit (homologation
UL ou CSA).
Sp6cificalions de I'alimenlalion en eau
* Une source d'eau chaude est necessaire, avec pression de
distribution de 20 _ 120 Ib/po2 (138-862 kPa); un plombier
professionnel devrait verifier que la pression est suffisante.
, Temperature de 120°F (49°C) _ I'entree du lave-vaisselle.
* Raccordement entre I'appareil et la canalisation d'eau par
tube de cuivre dia. int. 3/8" avec raccord _ compression,
ou tube de plastique (avec tressage de renforcement)
(piece no 4396897RP).
REMARQUE : On d6conseille I'emploi de tube de plastique
ordinaire (dia. min. 1/2").
* Un raccord 90 ° avec filetage m_le 3/8" N.RT. _ une extremite.
* Ne pas effectuer une operation de soudure _ moins de
6" (15,2 cm) de I'electrovanne d'admission d'eau.
24
Page 25

INSTRUCTIONSD'INSTALLATION
Risque de choc _lectrique
Interrompre I'alimentation _lectrique avant d'installer
le lave-vaisselle (au niveau du tableau de distribution -
fusible ou disjoncteur).
Le non-respect de cette instruction peut causer
un d_c_s ou on choc _lectrique.
::::::::::::::::::::::::::::::::::::::::::::::::::::::::::::::::::::::::::::::::::::::::::::::::::::::::::::::::::::::::::::::::::::::::::::::::::::::::::::::::::::::::::::::::::::::::::::::::::::::::::::::::::::::::::::::::::::::::::::::::::::::::::::::::::::::::::::::::::::::::::::::::::::::::::::::::::::::::::::::::::::::::::::::::::::::::::::::::::::::::::::::::::::::::::::::::::::::::::::::::::::::::::::::::::::::::::::::::::::::::::::::::::::::::::::::::::::::::::::::::::::::::::::::::::::::::::....
Pr@paration de la cavit@
d'encasfrement- Raccordemenf
aux circuifs existants
C&ble
l_J deDeC°courantnneCteelect riquerla so urce
Avant d'entre, prendre !'installation du !ave_vaisse!!e,
interromPre ! alimentation du circuit au niveau du ......
bohier de distribution(fusib!e ou disjoncteur): j
_ Moyens de raccordement au
divers circuits deja existants?
Oui _Voir les instructions & la
de la cavit_ d'encastrement _ Raccordement aux
Circuits existants, i
Non--vOlt les inst[uctions &la section -Pr6paration
dela car!t6 d encastrement _ Nouveaux moyens de
raccordement _,
Moyens de raccordement
e×istants
Si la canalisation d'eau et le c_ble disponibles satisfont les
crit_res indiqu6s sur rillustration (Iongueur et position),
passer a la section "Installation du tuyau d'6vacuation'; si
ces 616ments ne sont pas assez longs, voir les instructions
la section "Pr6paration de la cavit6 d'encastrement -
Nouveaux moyens de raccordement".
Pr_parafion de la cavif_ d'encasfremenf -
Nouveaux moyens de raccordemenf
Preparer et installer le c_blage _lectrique
Option A - Cordon d'alimentation :
REMARQUE : On dolt disposer d'une prise de courant
3 alveoles, reliee & la terre, _ rinterieur du placard
adjacent au lave-vaisselle.
)refere
Percer un trou de 1-1/2" (3,8 cm) dans le panneau 25
lateral ou & I'arriere du placard.
Voir Dimensions - Produit et cavite d'encastrement.
Page 26

....2i Cordon d'a imentatio
_J Preparation du trou
Placard en bois : Poncer pour produire une surface lisse
dans le trou.
Placard metallique : Installer sur le trou le passe-fil fourni
avec le cordon d'alimentation.
Option B =C_blage direct :
Conseil : II sera plus facile d'effectuer des raccordements
sur le lave-vaisselle si le c_ble d'alimentation de I'appareil
passe par le placard du c6t6 droit.
Installer un c&ble depuis le tableau de distribution
jusqu'& la cavite d'encastrement du lave-vaisselle,
travers le trou perce dans la paroi (la Iongueur du c&ble
doit _tre suffisante pour que les conducteurs atteignent
I'emplacement indique sur I'illustration). Fixer le c&ble
sur le sol avec du ruban adhesif & I'emplacement
indique, pour qu'il ne puisse bouger Iors de I'insertion
du lave-vaisselle dans la cavit&
i / iiii
Raccordemenf a la canalisalion
d'eau - Pr@parafion el insfallalion
Conseil : II sera plus facile d'effectuer le raccordement
sur le lave-vaisselle si la canalisation d'eau passe par le
placard du c6te gauche.
Percer un trou de 3/4" (1,9 cm) dans le panneau lateral du
placard de droite ou _ I'arri_re.
Voir Dimensions - Produit et cavite d'encastrement.
Placard en bois : Poncer pour produire une surface lisse
dans le trou.
Placard metallique : Installer le passe-fil (pas fourni) sur
le trou.
26
Percer un trou de 1/2" (1,3 cm) dans le panneau lateral
ou _ I'arriere du placard.
Mesurer la Iongueur totale necessaire de tube de cuivre
ou de tube de plastique (avec tressage de
renforcement). Effectuer le raccordement sur la
canalisation d'eau chaude avec un raccord ou autre
dispositif conforme aux prescriptions des codes et
reglements en vigueur. La canalisation d'arrivee d'eau
devrait comporter un robinet d'arr&t manuel.
Page 27

Faire passer prudemment le tube de raccordement a
travers le trou perce dans le placard. (Le tube de cuivre
peut s'ecraser/se deformer facilement Iors d'une flexion;
proceder prudemment.) II faut que la Iongueur de la
section qui depasse dans I'espace d'encastrement soit
suffisante pour le raccordement & I'entree du lave-
vaisselle sur le c6te gauche!& I'avant du lave-vaisselle.
Installer le tuyau d'evacuation comme on le volt sur
I'illustration, _ travers le trou perce dans la paroi du
placard, jusqu'au point _ I'avant/au centre de la cavite
d'encastrement oR le raccordement sera effectue sur
I'appareil. Fixer le tuyau d'evacuation sur le sol avec du
ruban adhesif _ I'emplacement indique, pour qu'il ne puisse
bouger Iors de I'insertion du lave-vaisselle dans la cavite.
3 Raccordement du tuyau d'evacuation:_]
Connectei le tuyau d 6Vacuat on sur !e raccord T du
circuit de p,lomberie 0u sur! e br0yeur _ dechets _
employer I une des options suivantes :
iMPORTANT : II est necessaire d'effectuer le raccordement
du tuyau d'evacuation sur le broyeur _ dechets ou le
raccord T du circuit de plomberie en amont du
piege!siphon, et & 20" (50,8 cm) ou plus au-dessus du
plancher de la cavite d'encastrement.
Conseil : Pour minimiser le risque de vibration du tuyau,
ne pas laisser le tuyau en contact avec le sol.
Ouvrir lentement le robinet d'arr&t. Laisser I'eau
s'ecouler dans un bac de recup6ration pour I'elimination
de toutes les particules solides qui pourraient obstruer
I'electrovanne d'admission d'eau. Refermer le robinet
d'arr&t.
m
Installation du tuyau d'@vacuation
IMPORTANT : Utiliser toujours un tuyau d'evacuation
neuf. Consulter le code de plomberie local pour
determiner si un brise-vide est necessaire.
Si necessaire, percer un trou de diametre 1-1/2" (3,8 cm)
dans la paroi du placard le plus proche de I'evier.
Option A - Broyeur _ d_chets - pas de brise-vide
d'evacuation
1
1. Arracher I'opercule arrachable du
broyeur _ dechets - utiliser un
marteau et un tournevis.
2. Retirer I'opercule arrachable -
utiliser une pince & bec effile.
3. Connecter le tuyau d'evacuation
sur I'entree du broyeur & dechets
- utiliser la grosse bride de tuyau
fournie (argent). Utiliser une pince
pour ouvrir completement la
bride et I'enfiler sous le tuyau
jusqu'& sa position finale.
27
Page 28

OptionB=Pas de broyeur _ d_chets - pas de brise=vide
Connecter I'extremite noire du tuyau
d'evacuation sur le raccord T du circuit
i i i¸¸_
de plomberie; couper si necessaire (ne
pas couper dans la section ondulee).
2.
Connecter I'extremite noire du tuyau
d'evacuation sur I'entree du broyeur
dechets - utiliser la grosse bride de
tuyau fournie (argent). Utiliser une pince
pour ouvrir completement la bride et
I'enfiler sur le tuyau jusqu'_ sa position
finale. Si le tuyau d'evacuation a ete
coup6, utiliser une bride _ vis de 1-1/2"
2" (3,8 & 5 cm) (pas fournie).
1. Arracher I'opercule arrachable du
broyeur _ dechets - utiliser un
marteau et un tournevis,
2. Retirer I'opercule arrachable - utiliser
une pince & bec effile.
3,
Connecter I'extremite noire du tuyau
d'evacuation sur le brise-vide; couper
si necessaire (ne pas couper dans la
section ondulee).
4,
Connecter le tuyau d'evacuation au
brise-vide- utiliser la grosse bride de
tuyau fournie (argent). Utiliser une
pince pour ouvrir completement la
bride et I'enfiler sur le tuyau jusqu'_ sa
position finale. Si le tuyau d'evacuation
a ete coupe, utiliser une bride _ vis de
1-1/2" & 2" (3,8 & 5 cm) (pas fournie).
5.
Installer un tuyau de caoutchouc (pas
fourni) entre le brise-vide et I'entree
du broyeur & dechets- utiliser des
brides & vis (pas fournies).
Option D = Pas de broyeur _ d_chets - avec brise=vide
Option C = Broyeur _ d_chets - avec brise=vide
d'evacuation
Connecter I'extremite noire du tuyau
d'evacuation sur le brise-vide; couper
si necessaire (he pas couper dans la
section ondulee).
2.
Connecter le tuyau d'evacuation au
brise-vide - utiliser la grosse bride de
tuyau fournie (argent). Utiliser une
pince pour ouvrir completement la
bride et I'enfiler sur le tuyau jusqu'&
sa position finale. Si le tuyau
d'evacuation a ete coupe, utiliser une
bride 8 vis de 1-1/2" & 2" (3,8 & 5 cm)
(pas fournie).
28
3.
Installer un tuyau de caoutchouc (pas
fourni) entre le brise-vide et le raccord
T d'evacuation - utiliser des brides
vis (pas fournies).
Page 29

Pr@paration du lave-vaisselle
Risque de basculement
Ne pas utiliser le lave-vaisselle jusqu'a ce qu'it soit
completement install&
Ne pas appuyer sur la porte ouverte.
Le non=respect de ces instructions peut causer des
blessures graves ou des coupures.
Risque du poids excessif
Utiliser deux personnes ou plus pour d_placer et
installer le lave-vaisselle.
Le non-respect de cette instruction peut causer une
blessure au dos ou d'autre blessure.
Appliquer du ruban de Teflon® ou un compose
d'etancheite des tuyauteries sur le filetage du raccord 90°
(pas fourni). Lors de I'emploi de ruban de Teflon, placer
deux _ quatre tours de ruban sur le filetage pour assurer
I'etancheit&
J Placer le lave-vaisselle sur le
sol en appui sur la face arriere
Conseil : Pour proteger le sol, laisser une feuille de carton
sous le lave-vaisselle jusqu'& son installation dans la cavite
d'encastrement. Ne pas utiliser le panneau de porte comme
surface de travail sans d'abord I'avoir recouvert d'une
serviette pour eviter de I'endommager.
Faire intervenir deux personnes ou plus - saisir les c6tes du
cadre de la porte du lave-vaisselle pour placer le lave-vaisselle
en appui sur la face arriere.
Connecter le raccord 90 ° sur I'electrovanne d'admission
d'eau. Serrer completement avec une cle; veiller _ ce que
la sortie soit orientee vers I'arriere.
Utiliser un tourne-ecrou de 1/4" ou un tournevis Phillips; 6ter
les deux vis fixant le panneau de I'ouverture d'acc_s et le
panneau de plinthe sur le lave-vaisselle. Ne pas enlever la
fiche technique collee sur le panneau de I'ouverture d'acc_s.
Utiliser un tourne-ecrou de 1/4" ou un tournevis Phillips;
demonter le couvercle du boftier de connexion;
conserver la vis et le couvercle pour reutilisation.
29
Page 30

Installerunconnecteurdeconduit(homologationULou
CSA).Veiller&cequelest6tesdevissoientorienteesvers
lagaucheapresleserragedeI'ecrouduconnecteurde
conduit.Leconnecteurdeconduitpourrait6trefourniavec
lecordond'alimentation.
Cordond'alimentation: ,
Voir les instructions pour I Option A
C_blage direct :
Voir les instructions pour I'Option B
J
Risque de choc _lectrique
Relier le lave=vaisselle a la terre d'une m_thode
electrique.
Brancher le fil relie a la terre au connecteur vert relic
la terre dans la boTte de la borne.
Ne pas utiliser un c_ble de rallonge.
Le non=respect de ces instructions peut causer un
d_ces, un incendie ou un choc electrique.
Conducteurde liaison a la terre ..............
_ .......:_/F._i?_ucteurO _::21ii1' C0nducteurde_&laliais°nterre
Raccordemenf @lecfrique-
Cordon d'alimenfafion
Option A - Cordon d'alimentation :
Installer le cordon d'alimentation de telle maniere qu'il
ne soit pas en contact avec le moteur du lave-vaisselle,
jusqu'& la partie inferieure de la cuve du lave-vaisselle.
Introduire le cordon dans le boftier de connexion
travers le connecteur de conduit.
Pour le raccordement des conducteurs (conducteurs du
cordon d'alimentation et conducteurs de calibre 16 du
lave-vaisselle) utiliser des connecteurs de fil
(homologation UL ou CSA).
30
I]1 _-{//_;'Y de liaison &
Vis de Connexion du \
....... Conducteur de liaison a_a terre _
Oter la vis verte; enfiler la vis dans la cosse du
conducteur vert de liaison g la terre. R6installer et serrer
la vis verte.
REMARQUE : Ne pas pre-torsader les conducteurs
toronnes. Installer chaque connecteur de fils sur les
conducteurs (mouvement de vissage). Tirer doucement
sur les conducteurs pour verifier qu'ils sont solidement
con nectes.
Utiliser des connecteurs de fils (homologation UL ou
CSA) (pas fournis) pour raccorder les conducteurs - noir
noir et blanc _ blanc.
/ Rondell:
)
Page 31

C&bled'aNmentati0n Conducteurdansle
boTtierdec0nnexion:
blanc_ blanc
C0nduCteurde_ Visdeconnexion
liaison&laterre duconduCteurde
Si necessaire, consulter le site Internet
www.whirlpool.com - onglet FAQ. On y trouve une
presentation video de cette etape.
....... ..... %
Dimensions de la cavil@
d'encasfremenf
Mesure des dimensions
Mesurer la hauteur de la cavite d'encastrement entre les
placards, entre le sol et la face inferieure du plan de travail,
I'emplacement d'installation prevu (mesurer & partir du
point le plus has de la face inferieure du plan de travail et
le point le plus haut du plancher). Pour la position des
roues et le nombre de rotations de vissage necessaire, voir
"Tableau de reglage - Hauteur du lave-vaisselle'.
Serrer les vis du connecteur de conduit pour immobiliser
le c&ble.
la cavit_ . des roues nombre de rotations
3378-- /i,
34" (86,4 cm) 1 10
34;ii4" (87 cm)2
REMARQUE : Si la hauteur minimale de la cavite
d'encastrement est inferieure _ 34" (86,4 cm), il est
possible d'enlever les roues pour disposer de plus
d'espace; ceci permettra I'installation du lave-vaisselle
dans une ouverture de 33-7/8" (86 cm), mais il sera alors
difficile de deplacer le lave-vaisselle (les dimensions sont
approximatives). Les roues et pieds ont ete preregles
I'usine pour une hauteur de 34-1/2" (87,6 cm).)
iiiiiii
Enlev_es Vissage complet
vers le haut
I I
Roues et pieds - Reglage
Placer les ills & I'interieur du bokier. Inserer les pattes du
c6te gauche du couvercle. Verifier que les conducteurs
sont bien engages I'interieur du boTtier. Fermer le
couvercle - veiller & ne pas coincer des conducteurs.
Utiliser un tourne-ecrou de 1/4" pour reinstaller la vis de
fixation du couvercle.
REMARQUE : Ne pas brancher le cordon d'alimentation
sur une prise de courant avant d'en avoir reQu I'instruction.
Ajuster (vissage) les deux pieds de reglage de I'aplomb _
la mgme hauteur. Placer les roues g la position necessaire
selon ies indications du "Tableau de reglage - Hauteur du
lave-vaisseNe'. (Pour modifier la position des roues,
utiNser un tournevis _ lame plate pour eniever la roue; 31
reinstaller la roue _ la nouvelle position choisie
(emboTtement).)
Page 32

Lorsque la surface du sol de la cuisine est plus elevee
que le plancher de la cavite d'encastrement (par ex. en
presence d'un carrelage qui ne se prolonge pas dans la
cavite d'encastrement), ajouter des cales selon le besoin
aux emplacements indiqu6s sur I'illustration pour etablir
la distance de 34" (86,4 cm) entre la surface des cales et
le plan de travail.
REMARQUE : II sera necessaire de fixer solidement les
cales sur le plancher pour qu'elles ne puissent se
deplacer apres I'installation du lave-vaisselle.
IMPORTANT : Verifier le positionnement correct des
elements de raccordement (tuyau d'evacuation, conduit
d'eau, c&ble electrique). Saisir les deux c6tes du lave-
vaisselle par les bords du panneau de porte. Incliner le
lave-vaisselle vers I'arriere (en appui sur les roues) et
rapprocher le lave-vaisselle de I'ouverture.
REMARQUE : Ne pas pousser sur I'avant du panneau ou
sur la console - ces composants pourraient se deformer.
Conseil : Immobiliser temporairement les tuyaux et
c&bles sur le sol pour qu'ils ne puissent.
Installation du leve-veisselle dens
le cevit@ d'encestrement
Faire intervenir deux personnes ou plus pour redresser
le lave-vaisselle.
REMARQUE : Ne pas installer le panneau de plinthe avant
d'en avoir re£;u I'instruction.
...... e; o
--" co nd uit d arriv6 e d eau
et du tuyau d'evacuation l:
Verifier que le conduit d'arrivee d'eau est place sur le
c6te gauche de la cavite et que le tuyau d'evacuation est
place pros du centre de la cavit&
32
Tandis qu'une autre personne maintient le lave-vaisselle
pour qu'il ne puisse basculer, effectuer plusieurs
manoeuvres d'ouverture et fermeture de la porte. Si la porte
se ferme ou s'ouvre sous I'effet de son propre poids, il sera
necessaire d'effectuer un reglage de la tension des ressorts.
Page 33

Silaportesefermetroprapidement,reduirelatension
desressorts:deplacerlepointd'ancragedeI'extremite
duressortversI'avantdulave-vaisselle.
IMPORTANT : Si les roues ont ete enlevees, proteger le
sol durant le deplacement du lave-vaisselle. Inserer
(lentement) completement le lave-vaisselle dans la cavite
d'encastrement. Veiller & ne pas deformer/ecraser ou
coincer le conduit d'arrivee d'eau, le tuyau d'evacuation
eu le c&ble d'alimentation entre le lave-vaisselle et un
placard. Retirer la feuille de carton qui avait ete placee
sous le lave-vaisselle.
REMARQUE: Utiliserlem6mepointd'ancrage(encoche)
pourchaqueressort(c6tegaucheetc6tedroit).
Silaportes'ouvresousI'effetdesonproprepoids,
augmenterlatensiondesressorts:deplacerlepoint
d'ancragedechaqueressortversI'arrieredulave-
vaisselle.
REMARQUE: Utiliserlem6mepointd'ancrage(encoche)
pourchaqueressort(c6tegaucheetc6tedroit).
REMARQUE :ll n'est pas necessaire qu'il y ait un espace
libre autour du lave-vaisselle entre I'appareil et les
surfaces de la cavite d'encastrement. Ne pas enlever
I'enveloppe d'isolation!insonorisation.
REMARQUE :Si I'appareil est alimente par un cordon
d'alimentation, ne pas oublier d'enfiler le cordon dans le
trou de passage dans le panneau du placard avant
d'inserer I'appareil dans la cavite.
Aligner le panneau avant du lave-vaisselle avec la
surface frontale des portes de placard; un ajustement
peut 6tre necessaire.
Verifier que les pieds de reglage de I'aplomb sont
fermement en contact avec le sol. Fermer et verrouiller
la porte; placer un niveau en contact avec le panneau de
fa(_ade. Verifier que le lave-vaisselle est centre dans la
cavite (avant/arriere). Si necessaire, modifier le reglage
des pieds pour etablir I'aplomb du lave-vaisselle -
effectuer ceci de chaque c6te du lave-vaisselle.
33
Page 34

Conseil:PoussersurI'avantdulave-vaissellepour
souleverlegerementlelave-vaisselleetleseparerdusol
pourlereglagedespiedsavant.Danscertaines
configurationsd'installation,il peut6treplusfacile
d'utiliserunecle_douillede3/16"ouunecle_molette
pourlereglagedespiedsavant.
--" outu be de I
Methodepreferee
Autre methode
Tube de cuivre seulement : Inserer le tube dans le raccord
90 °, aussi loin qu'il peut aller (travailler prudemment- il
est facile de deformer/ecraser le tube). Faire glisser I'ecrou
et la virole vers I'avant et fixer I'ecrou sur le filetage du
raccord _ 90°.
Tube de plastique (avec tressage de renforcement) " Visser
I'ecrou sur le raccord & 900 - utiliser une cle plate de 5/8"
ou une cle & molette.
REMARQUE : Ne pas utiliser du ruban de Teflon@ avec les
raccords & compression.
Placer un niveau contre le sommet/& I'avant de I'ouverture
de la cuve. Verifier I'aplomb transversal du lave-vaisselle.
Si I'aplomb du lave-vaisselle n'est pas correct, ajuster le
deploiement (abaissement!soulevement) des pieds avant
pour etablir le bon aplomb du lave-vaisselle.
Raccordemenf la
cenelisefion d'eeu
Tube de cuivre seulement " Placer I'ecrou et la virole
environ 1" (2,5 cm) de I'extremite du tube.
REMARQUE : Pour qu'il n'y ait pas de vibration durant le
fonctionnement, placer le conduit d'arrivee d'eau de telle
maniere qu'il ne soit pas en contact avec la base du
lave-vaisselle, le ch&ssis ou le moteur.
34
Utiliser une cle &molette pour immobiliser le raccord 90°;
serrer I'ecrou avec une seconde cle & molette.
Conseil : II est plus facile d'effectuer le serrage sur le
raccord avec une cle plate de 5/8".
Placer un essuie-tout de papier sous le raccord 90 °.
Ouvrir le robinet d'arr6t de la canalisation d'arrivee
d'eau. Inspecter pour rechercher d'eventuelles fuites. S'il
y a une fuite, repeter les etapes precedentes.
Si necessaire, consulter le site Internet
www.whirlpool.com/watersupply (onglet FAQ) qui
presente une description video de cette etape.
Page 35

Bride verte --
REMARQUE : Si un cordon d'alimentation a ete connecte
precedemment, passer _ la section Immobilisation du
lave-vaisselle dans la cavite d'encastrement.
Connecteur noir du
tuyau d'evacuation J
Butee du
tuyau d'evacuation
Butee
Placer une serviette sous le tuyau d'evacuation pour
recuperer toute quantite d'eau qui peut s'ecouler du
tuyau. Placer la bride de tuyau verte (petite bride) sur
I'extremite de petit diametre du tuyau d'evacuation.
Enfoncer le tuyau d'evacuation dans le connecteur noir
jusqu'au point de butee.
Tuyau
:l'evacuation
Option B =C_blage direct :
CSblage direct -- Acheminement
jusqu'au bokier de connexion
Installer le c_ble d'alimentation de telle maniere qu'il ne
soit pas en contact avec le moteur du lave-vaisselle,
jusqu'a la partie inferieure de la cuve du lave-vaisselle.
Introduire le c_ble dans le bo_tier de connexion _ travers
le connecteur de conduit.
Utiliser une pince pour ouvrir completement la bride
verte; faire glisser la bride sur le connecteur pour la
placer entre les butees.
Lorsque le raccordement est termine, enlever la
serviette,
Si necessaire, consulter le site Internet
www.whirlpool.com/drain (onglet FAQ) qui presente une
description video de cette etape.
Pour le raccordement des conducteurs (conducteurs du
cordon d'alimentation et conducteurs de calibre 16 du
lave-vaisselle) utiliser des connecteurs de fil
(homologation UL ou CSA).
35
Page 36

Risque de choc _lectrique
Relier le lave=vaisselle a la terre d'une m_thode
electrique.
Brancher le fil relic a la terre au connecteur vert relie
la terre dans la boTte de la borne.
Ne pas utiliser un cable de rallonge.
Le non=respect de ces instructions peut causer un
d_ces, un incendie ou un choc _lectrique.
de liaison a la terre
-
::!i-- --
Condo
Conducteur de _ Vis de connexion
!iaison _ la retie du conducteur de
Si necessaire, consulter le site Internet
www.whirlpool.com/electrical (onglet FAQ) qui
presente une description video de cette etape.
ii_' _l _:;_v} liaison _ I_terre
V'_aison_a la terre/--
I'extremite du conducteur de liaison _ la terre, former
un crochet en U; placer le crochet autour de la vis de
connexion du conducteur de liaison _ la terre, et sous la
rondelle. Bien serrer la vis de connexion.
Serrer les vis du connecteur de conduit pour immobiliser
le cSble.
)
Placer les fils & I'interieur du bohier. Inserer les pattes du
c6te gauche du couvercle. Verifier que les conducteurs
sont bien engages I'interieur du boftier. Fermer le
couvercle - veiller & ne pas coincer des conducteurs.
Utiliser un tourne-ecrou de 1/4" pour reinstaller la vis de
fixation du couvercle.
REMARQUE : Installer chaque connecteur de ills sur les
conducteurs (mouvement de vissage). Tirer doucement sur les
conducteurs pour verifier qu'ils sont solidement connectes.
Utiliser des connecteurs de fils (homologation UL ou
CSA) (pas fournis) pour raccorder les conducteurs - noir
noir et blanc & blanc.
36
Page 37

Immobilisafion du lave-vaisselle
dans la ¢avit@ d'encasffement
Verifier I'aplomb vertical et I'aplomb transversal du lave-
vaisselle installe dans la cavit&
REMARQUE : Veiller & ne pas laisser tomber une vis au
fond de la cuve du lave-vaisselle.
Identifier les brides d'arrimage au sommet du lave-
vaisselle; fixer les brides sur le plan de travail avec deux
vis Phillips no 10 x 1/2" (fournies). II faut que le lave-
vaisselle soit immobilise pour qu'il ne puisse
osciller/basculer Iors de rouverture de la porte.
IMPORTANT : Si le plan de travail est fait d'un materiau
comme le Corrian, le granit, etc., on dolt utiliser
I'ensemble de montage lateral (piece no 8212560).
Executer les instructions pour installer les brides
fournies avec I'ensemble.
Ouvrir la porte du lave-vaisselle; retirer le panier
inferieur; placer une serviette par-dessus la pompe et la
rampe d'aspersion inferieure; ceci emp&chera une vis
qui tomberait durant I'operation d'arrimage de
s'introduire dans la zone de la pompe.
Verifier que le sommet de la porte ne peut entrer en
contact avec les vis, les brides ou le plan de travail; s'il y a
une quelconque interference, modifier le reglage des pieds.
Ouvrir la porte, et verifier que le lave-vaisselle est
parfaitement centre dans la cavite d'encastrement
(espacement identique _ gauche et droite entre le
lave-vaisselle et les placards lateraux). Si I'espacement
n'est pas identique, desserrer les vis des brides de
fixation et deplacer legerement le lave-vaisselle;
resserrer les vis de fixation des brides.
37
Page 38

Retirerlaserviettedeprotectionquiavaiteteplaceeau
fonddulave-vaisselle.Reinstallerlepanierinferieur.
Sinecessaire,consulterlesiteInternet
www.whirlpool.com/anchoring(ongletFAQ)qui
presenteunedescriptionvideodecetteetape.
Achever rinsfallafion
Maintenir les deux panneaux ensemble; placer les deux
panneaux contre le pied du lave-vaisselle. Utiliser un
tournevis Phillips ou un tourne-ecrou 1/4" pour reinstaller
les vis _ travers les trous du panneau de I'ouverture d'acc&s
et du panneau de plinthe.
Verifier que la rive inferieure du panneau de plinthe est
en contact avec le sol; ajuster selon le besoin.
Verifier que I'agrafe de liaison & la terre est fixee sur le
panneau de plinthe. Positionner le panneau de plinthe
derriere le panneau de I'ouverture d'accSs. Sur certains
modeles, le panneau de I'ouverture d'acc_s comporte un
materiau isolant qui doit s'engager derriere I'isolant du
panneau de plinthe.
38
Serrer les vis de fixation du panneau de I'ouverture
d'acc_s.
Teflon est une marque deposee de E.I. Du Pont
De Nemours and Company
Page 39

Confr61e du foncfionnement
[_1 Lire attentivement le mode d'emploi du lave-vaisselle
fourni avec I'appareil.
[_1 Verifier que tousles composants ont ete installes et
qu'aucune etape n'a ete omise. Verifier la presence de
tousles outils.
Risque de choc electrique
Brancher sur une prise a 3 aIv_oles retire a la terre.
Ne pas enlever la broche de liaison a la terre.
Ne pas utiliser un adaptateur.
Ne pas utiliser un cable de rallonge.
Le non=respect de ces instructions peut causer un
d_c_s, un incendie ou un choc _lectrique.
IJ Cordon d'alimentation - Branchement
sur une prise de courant a 3 alveoles
C) Mettre le lave-vaisselle en marche; laisser I'appareil
executer le programme de lavage le plus court. Apres
la periode initiale de 2 minutes, deverrouiller la porte,
attendre 5 secondes, et ouvrir la porte; verifier la
presence d'eau au fond de la cuve du lave-vaisselle.
Verifier que le lave-vaisselle fonctionne correctement.
Si ce n'est pas le cas, deconnecter la source de courant
electrique ou debrancher le lave-vaisselle et consulter la
section de diagnostic "Si le lave-vaisselle ne fonctionne pas".
Si le Iove-voisselle ne foncfionnepas
Pour eviter le co_t d'une intervention de service, essayer
d'abord les suggestions de solution presentees ci-dessous.
* Disjoncteur ouvert ou fusible grille?
* Porte bien fermee et verrouillee?
* Selection correcte du programme pour la mise en
marche de I'appareil?
* Robinet d'arr6t ouvert?
Sil'appareilne peuttoujours pasfonctionner, contacter un
depanneur "1-800-253-1301, ou au Canada,
1-800-807-6777.
Pour un modele Roper contacterun depanneur "
1-800-447-6737, ou au Canada 1-800-807-6777.
Brancher la fiche du cordon d'alimentation sur une prise
de courant reliee _ la terre, _ 3 alveoles. Verifier que le
cordon d'alimentation n'entre pas en contact avec le
moteur du lave-vaisselle ou la partie inferieure de la
cuve.
Reconnecter la source de courant _lectrique
Reco nnect er Ia so urce
. .
1____1de courant electrlque _]
R6tablir I'alimentati0n du Circuit au niveau du tableau !
distdbuteur (fuSible ou disJonCteU[)
© 2007 Tous droits reserves
Conseils addifionnels
II convient de prevoir des temps de lavage plus longs. La
duree du lavage avec ce nouveau lave-vaisselle est en
moyenne de 2 _ 3 heures par charge, mais la
consommation d'energie est reduite de pres 40 % par
comparaison aux modeles anterieurs. Cet appareil dote
d'un moteur de basse puissance, & faible consommation
d'energie, execute des programmes de plus Iongue duree
pour produire un nettoyage exceptionnel. Certains
modeles sont dotes d'un dispositif de detection optique de
la concentration de souillures dans I'eau, et la duree du
premier programme sera plus Iongue du fait du processus
d'etalonnage du capteur optique. La selection de certaines
options peut egalement augmenter la duree d'execution
des programmes au-del& de 3,5 heures.
L'emploi d'un agent de rin(2age est necessaire pour la
production d'un sechage de qualit& Ce lave-vaisselle est
con(_u pour I'utilisation d'un agent de rin(_age pour la
production d'un sechage de qualite et la minimisation des
dep6ts de calcaire imputables _ une eau dure. Un lave-
vaisselle & basse consommation d'energie utilise moins
d'eau et d'energie et tire parti pour la production d'un bon
sechage de laformation d'un film d'eau facilitee par
I'emploi d'un agent de rin(_age.
Le temoin Start/Resume peut clignoter :
Lors d'une pression sur la touche Start/Resume, on doit veiller
fermer la porte en moins de 3 secondes; si ce n'est pas le
cas, le t_moin Start/Resume continue a clignoter et on doit
appuyer de nouveau sur le bouton. (On doit _galement
executer cette man?uvre Iors de I'addition de vaisselle 39
apres le commencement d'un programme de lavage).
 Loading...