

Page 1
Refrigerator
Refrigerator
Refrigerator
Refrigerator
Refrigerator
Refrigerator
Refrigerator
Refrigerator
Refrigerator
Refrigerator
Refrigerator
Refrigerator
Refrigerator
Refrigerator
Refrigerator
Refrigerator
Refrigerator
Refrigerator
Refrigerator
Refrigerator
Refrigerator
Refrigerator
Refrigerator
Refrigerator
Refrigerator
Refrigerator
Refrigerator
Refrigerator
Refrigerator
Refrigerator
Refrigerator
Refrigerator
Refrigerator
Refrigerator
Table of Contents
TOP FREEZER
E
Use & Care Guide
Warranty & Service ...................... 17
Troubleshooting.............................14-16
Care & Cleaning ............................12-13
Storing the Refrigerator................ 12
Food Storage Tips ........................ 9-11
Looking Inside................................ 7-8
Temperature Controls .................. 6
Installation ..................................... 3-5
Important Safety Instructions ..... 1-2
Door Removal (If required)........ 35
U.S
English
Page 2
--·
~
--~
-
Important Safety Instructions
Installer : Please leave this manual with this
appliance.
Consumer : Please read and keep this Use & Care
Guide for future reference. This manual
provides proper use and maintenance
information.
Have complete model and serial number identification
Model Number
Serial Number
Date of Purchase
In our continuing effort to improve the quality and
performance of our appliances, it may be necessary to
make changes to the appliance without revising this
guide.
What You Need to Know About Safety
Instructions
Warning and Important Safety Instructions appearing in
this manual are not meant to cover all possible
conditions and situations that may occur. Common
sense, caution and care must be exercised when
installing, maintaining or operating appliance.
Always contact your dealer, distributor, service agent or
manufacturer about problems or conditions you do not
understand.
Recognize Safety Symbols, Words,
Labels
DANGER – Immediate hazards which WILL result
in severe personal injury or death.
WARNING – Hazards or unsafe practices which
COULD result in severe personal injury or death.
CAUTION – Hazards or unsafe practices which
COULD result in minor personal injury or property
damage.
To reduce risk of injury or death, follow
basic precautions, including the following :
IMPORTANT :
Child entrapment and suffocation are
not problems of the past. Junked or abandoned
refrigerators are still dangerous – even if they sit out for
“just a few days.” If you are getting rid of your old
refrigerator, please follow the instructions below to help
prevent accidents.
Before you throw away your old
refrigerator or freezer :
• Take off the doors.
• Leave the shelves in place so
children may not easily climb
inside.
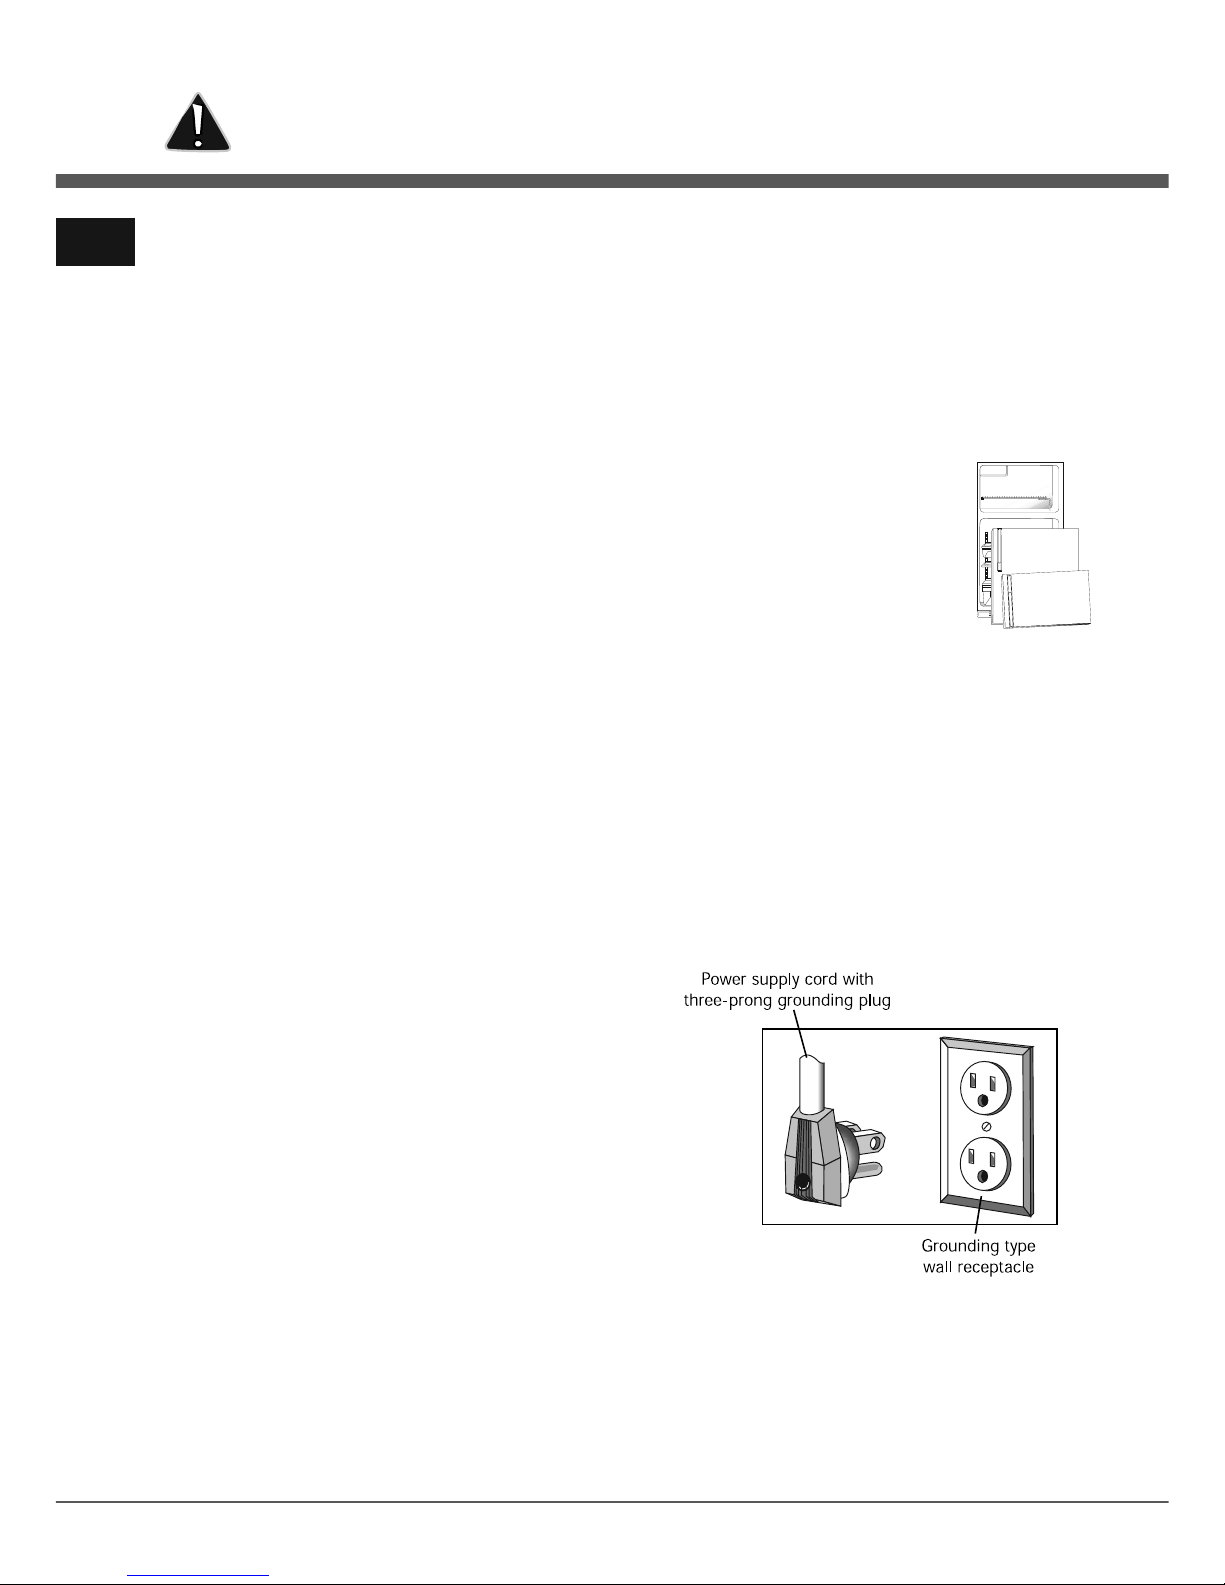
This appliance is equipped with a three-pronged
grounding plug for your protection against possible
electrical shock hazards. It must be plugged into a
grounding receptacle. Where a standard two-prong wall
receptacle is encountered, it is the personal
responsibility and obligation of the customer to have it
replaced with a properly grounded three-prong wall
receptacle.
Do not under any circumstances, cut or remove the third
(ground) prong from the power cord.
Do not use an adapter plug.
E
1
Keep your Bill of Sale, delivery slip, or some other
appropriate payment record.
of your refrigerator. This is located on a data plate inside
the refrigerator compartment, on the upper left side.
Record these numbers below for easy access.
Page 3
To reduce risk of fire, electric shock, serious injury or death
when using your refrigerator, follow these basic precautions,
including the following :
1. Read all instructions before using the refrigerator.
2. Observe all local codes and ordinances.
3. Be sure to follow grounding instructions.
4. Check with a qualified electrician if you are not sure this
appliance is properly grounded.
5. Do not ground to a gas line.
6. Do not ground to a cold-water pipe.
7. Refrigerator is designed to operate on a separate 115
8. Do not modify plug on power cord. If plug does not fit
electrical outlet, have proper outlet installed by a qualified
electrician.
9. Do not use a two-prong adapter, extension cord or
power strip.
10. Do not remove warning tag from power cord.
11. Do not tamper with refrigerator controls.
12. Do not service or replace any part of refrigerator unless
specifically recommended in Use & Care Guide or
published user-repair instructions. Do not attempt
beyond personal skill level.
13. Always disconnect refrigerator from electrical supply
before attempting any service. Disconnect power cord
by grasping the plug, not the cord.
14. Install refrigerator according to Installation Instructions.
All connections for water, electrical power and
grounding must comply with local codes and be made
by licensed personnel when required.
15. Keep your refrigerator in good condition.
Bumping or dropping refrigerator can damage
16. Replace worn power cords and/or loose plugs.
17. Always read and follow manufacturer’s storage and
ideal environment instructions for items being stored in
refrigerator.
18. Your refrigerator should not be operated in the presence
of explosive fumes.
19. Children should not climb, hang or stand on any part of
the refrigerator.
20. Clean up spills or water leakage associated with water
installation.
E
2
Important Safety Instructions
SAVE THESE INSTRUCTIONS FOR FUTURE REFERENCE
service if instructions are not under-stood or if they are
volt, 15 amp., 60 cycle line.
refrigerator or cause refrigerator to malfunction or
leak. If damage occurs, have refrigerator checked by
qualified service technician.
MODELS
WIDTH
BACKGROUND
HIGH
EXTERNAL
DIMENSIONS
FORCED CONVECTION
BY RESISTENCE, TYPE GLASS PIPE
AUTOMATIC
R-134a
115 - 127V~/60Hz
COOLING SYSTEM
DEFROST SYSTEM
DEFROST SYSTEM
REFRIGERANT
SUPPLY GVOLTA E
NET WEIGHT
SYSTEM
CARACTERISTICS
Specifications
32.9in
30.3 in
66.0 in
220.5 Lbs
FREEZER CAPACITY
FRESH FOOD CAPACITY
TOTAL CAPACITY
5.96 cu ft
15.07 cu ft
21.03 cu ft
CRD2121NW, CRD2121NB, CRD2121NS
CRDH2181NW, CRDH2181NB,CRDH2181NS
Page 4
%"
To rai
se
ca
bin
et
Tol
ower ~
"
ca
bin
et
~ J
•
Your new refrigerator was packed carefully for shipment.
Remove and discard shelf packing and tape.
Location
• Allow for a free flow of air through the front base grille.
below 55° F (13° C). With temperatures below 55° F (13° C),
proper temperature in the freezer.
• Allow a minimum
clearance on the sides, top and back
for ease of installation. If refrigerator is placed with the door
hinge side against a wall, you may want to allow additional
space so the door can be opened wider.
• Use caution when installing the unit on vinyl or hardwood
floors so as not to mark or otherwise damage the flooring.
A piece of plywood, a rug or other material should be used to
protect the floor while positioning the unit.
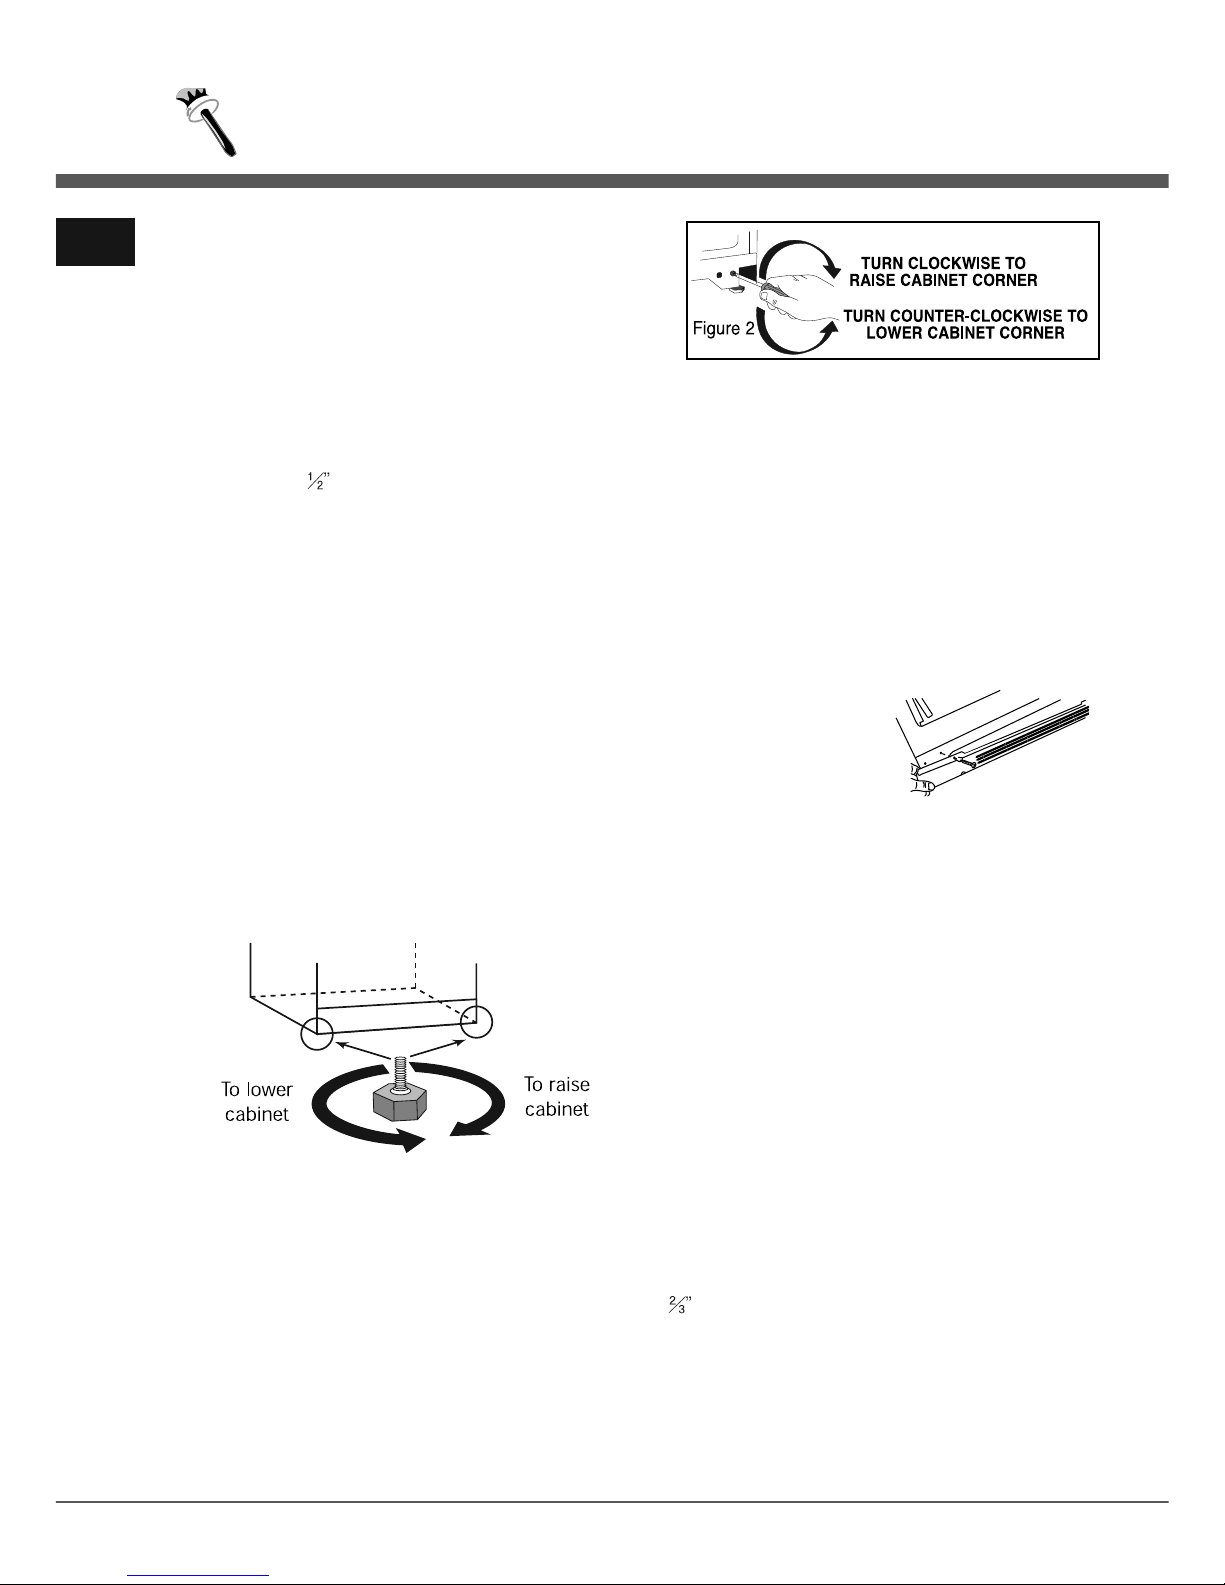
Leveling
To enhance its appearance and to maintain performance, your
refrigerator should be leveled after it has been rolled into its
final location.
• Adjust the leveling/lock screws beneath each front corner at
the base of the cabinet.
Turn these leveling / screws clockwise to raise a cabinet
corner and counterclockwise to lower a cabinet corner.
• If the floor is not level and it is necessary to raise the rear of
the cabinet, we suggest rolling the rear wheels onto a piece
of plywood or other shim material.
• Refrigerator models that have adjustable wheels can be
leveled by removing the base grille and adjusting the wheels
with a 1/4" socket or screwdriver. (See figure 2.)
Front Base Grille (on select models)
The front base grille (select models) which was packaged inside
the refrigerator for shipment and should be installed after the
refrigerator has been leveled.
“Snap on” style :
• To install, align the spring clips with the round openings in the
cabinet and push each end in until the grille locks into place.
• To remove this style of base grille, grasp both ends and pull
straight out.
“Screw on” style :
• Use a Phillips screwdriver to
remove the two Phillips head
screws at the base of the
refrigerator.
• Align the base grille to the screw holes. (The cut out side on
the base grille installs around the lower hinge of the door.)
• Secure the base grille into place by reinstalling the Phillips
screws back into their original screw holes.
• Reverse these steps to remove this style of base grille.
Energy Saving Tips
• Locate the refrigerator away from heat producing appliances
such as the range or dishwasher, heat vents and direct
sunlight.
• Level the refrigerator and do not block ventilation around the
front base grille.
• Let hot dishes cool slightly before putting into the refrigerator
or freezer.
• Cover liquids.
• Keep the freezer full to near capacity so less cold air will
escape during door openings. When the freezer is less than
full, place milk cartons half full of water in the freezer.
• Wipe moisture from the outside of containers before placing
them into the refrigerator.
• Avoid opening the doors too often.
E
3
Installation
the refrigerator will not run frequently enough to maintain
• Install the refrigerator where the room temperature will not go
Page 5
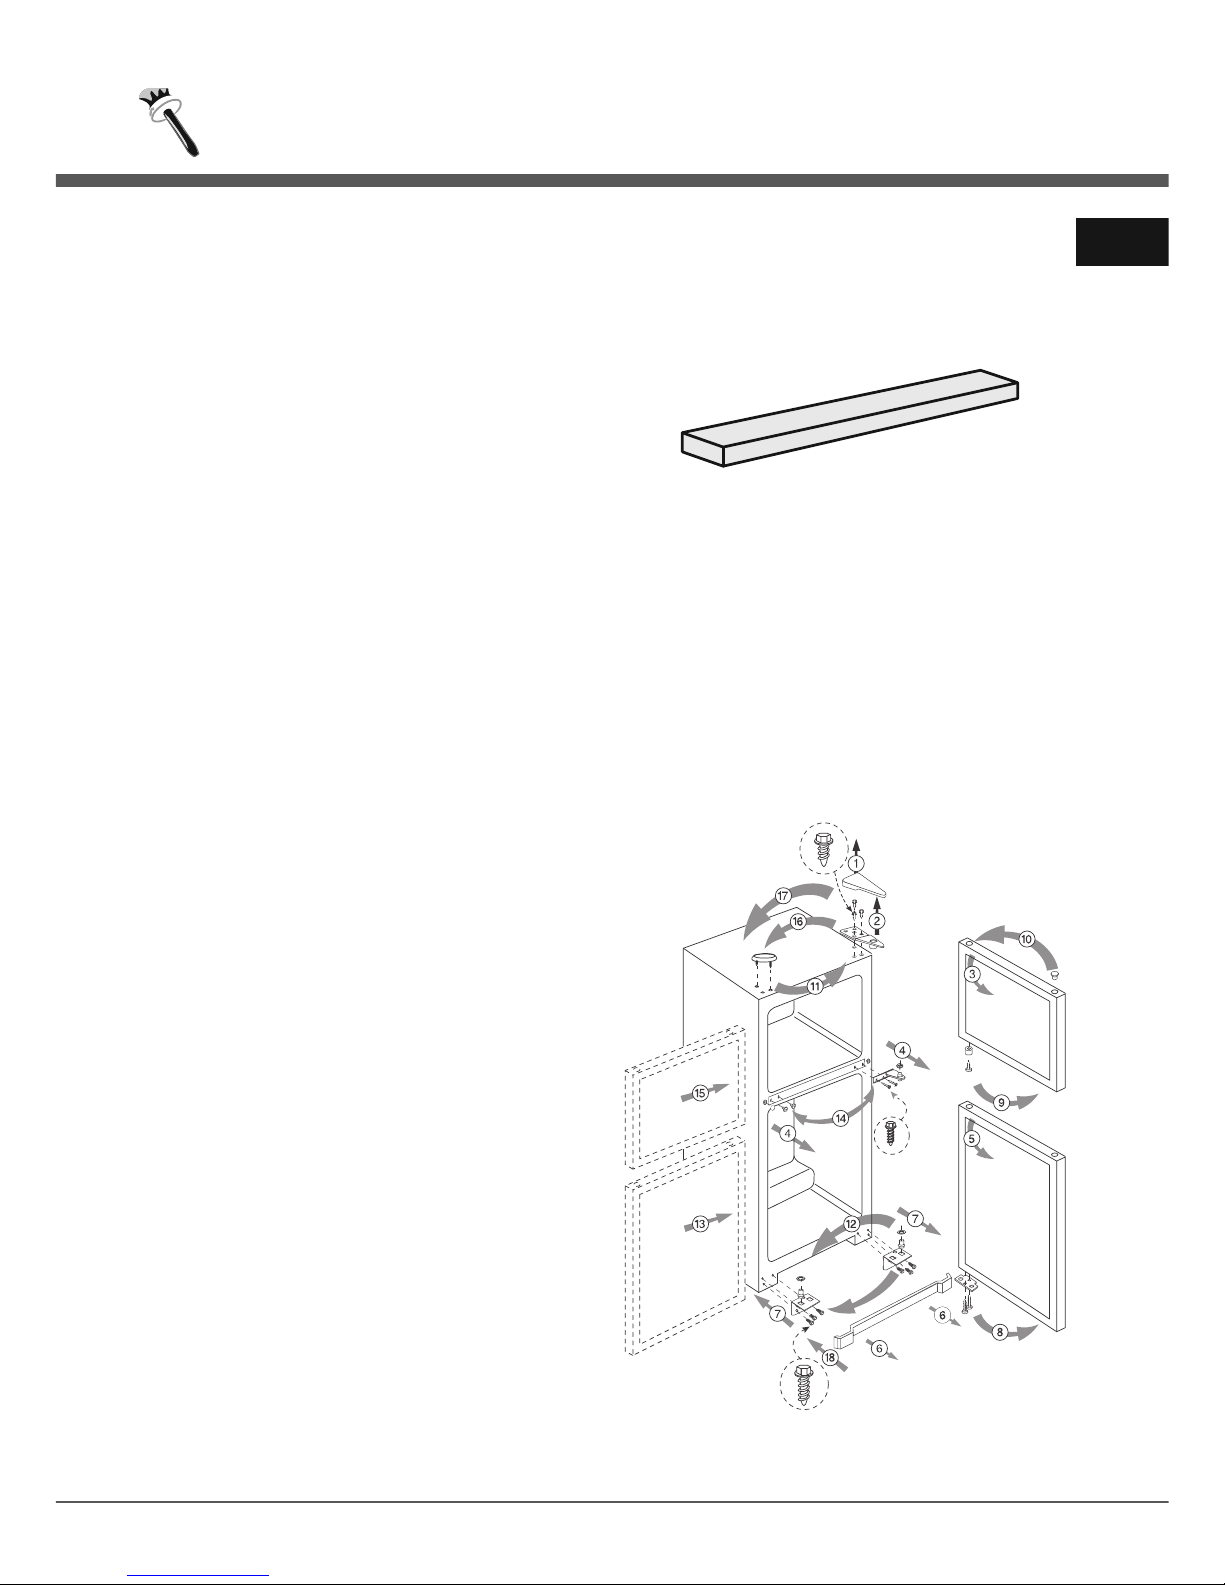
Reversing Doors
Tools Required :
• 5/16 " end wrench
• Phillips screwdriver
• Putty knife
• 5/16 " socket and ratchet
Unplug the refrigerator.
1. Pry off hinge cap with a putty knife and set aside.
2. With a 5/16 " socket and ratchet, remove screws from the
upper hinge and set aside.
3. Carefully lift and remove freezer door (including the upper
hinge) off the center hinge.
4. With a 5/16 " socket and ratchet, remove the screws and
middle hinge from the top of refrigerator door.
With a putty knife, pry out the plug buttons and replace them
on the opposite side.
5. Carefully lift and remove refrigerator door.
6. Remove front base grille and set aside (see p. 3).
14. Attach the middle hinge with the screws removed from the
opposite side and secure them using a 5/16 ” wrench.
Use foam door spacer to set gap.
Note
• Do not discard the foam door spacer.
Doors may settle with use.
16. Slide top hinge into place on freezer door and secure
screws with 5/16 " wrench.
Confirm that all screws have been tightened securely.
17. Snap hinge cap securely in place.
18. Replace front base grille (see p. 3).
Remember to plug in your refrigerator and reset the
controls to the appropriate setting(s).
15. Carefully place freezer door on top of hinge arm.
7. With a 5/16 " socket and ratchet, remove hinge plate from
lower corner of refrigerator and secure it on the opposite
side.
8. Remove plate from the underside of refrigerator door and
secure it on the opposite side with a 5/16 " socket and
ratchet.
9. With a 5/16 " socket and ratchet, remove the doorstop from
the underside of the freezer door and secure it on the
opposite side.
10. With a putty knife, pry out the plug button(s) from tops of
freezer and refrigerator doors and replace them on the
opposite side.
11. Remove screw hole plugs from top of cabinet and replace
on the opposite side.
12. With a 5/16 " socket and ratchet, remove washers and
stem from the inside of the hinge plate and place them on
the outside of the hinge plate.
13. Carefully replace refrigerator door on the hinge plate in
lower corner.
Installation
4
E
Page 6
A
E
5
Installation
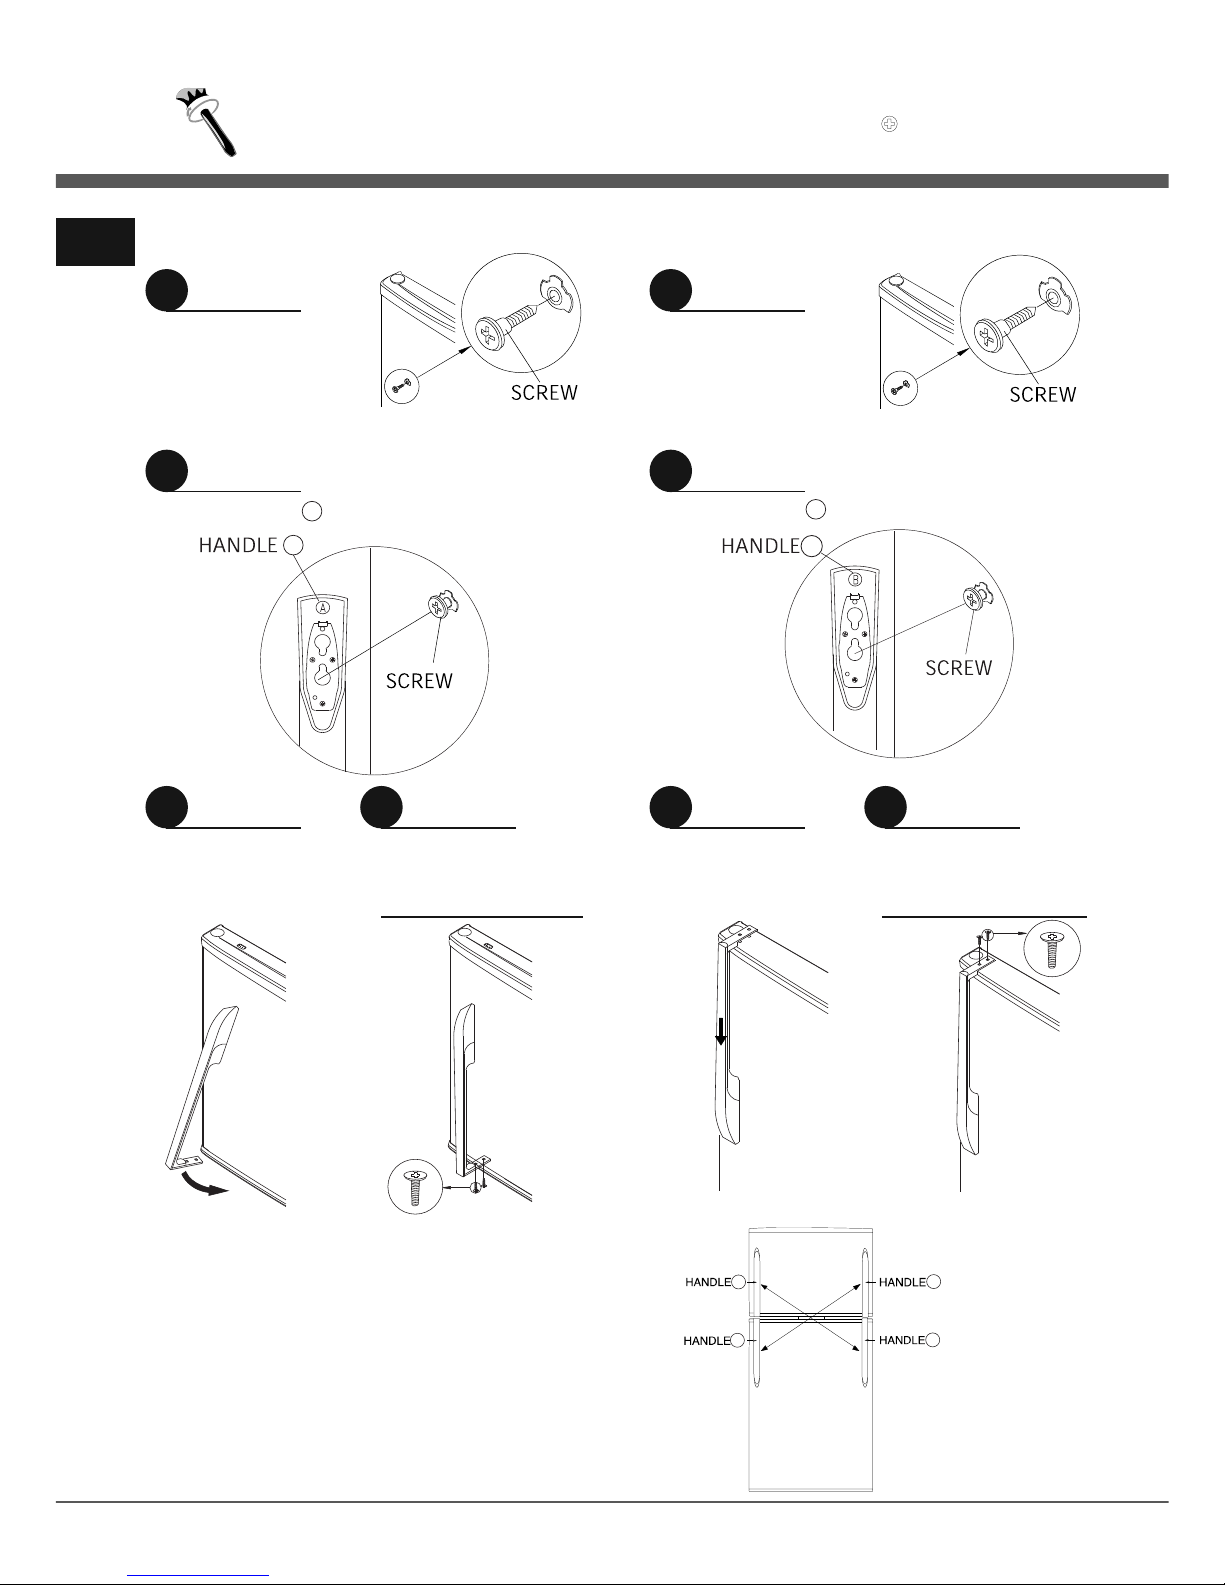
Freezer Door Handle Installation
Reversing Door Handles
To remove the handles, reverse the above steps.
Flip the handles 180° and mount them on the opposite doors.
Align handle with mounting screw
Fasten with screw Fasten with screw
Refrigerator Door Handle Installation
1
STEP
2
STEP
Rotate handle
3
STEP
Secure bottom end of
handle with two screws.
Do not over-tighten
4
STEP
Align handle with mounting screw
1
STEP
2
STEP
Push handle down
3
STEP
Secure top end of
handle with two screws
Do not over-tighten
4
STEP
Note : Phillips screw driver is required for installation.
A
B
B
A
A
B
B
Page 7
E
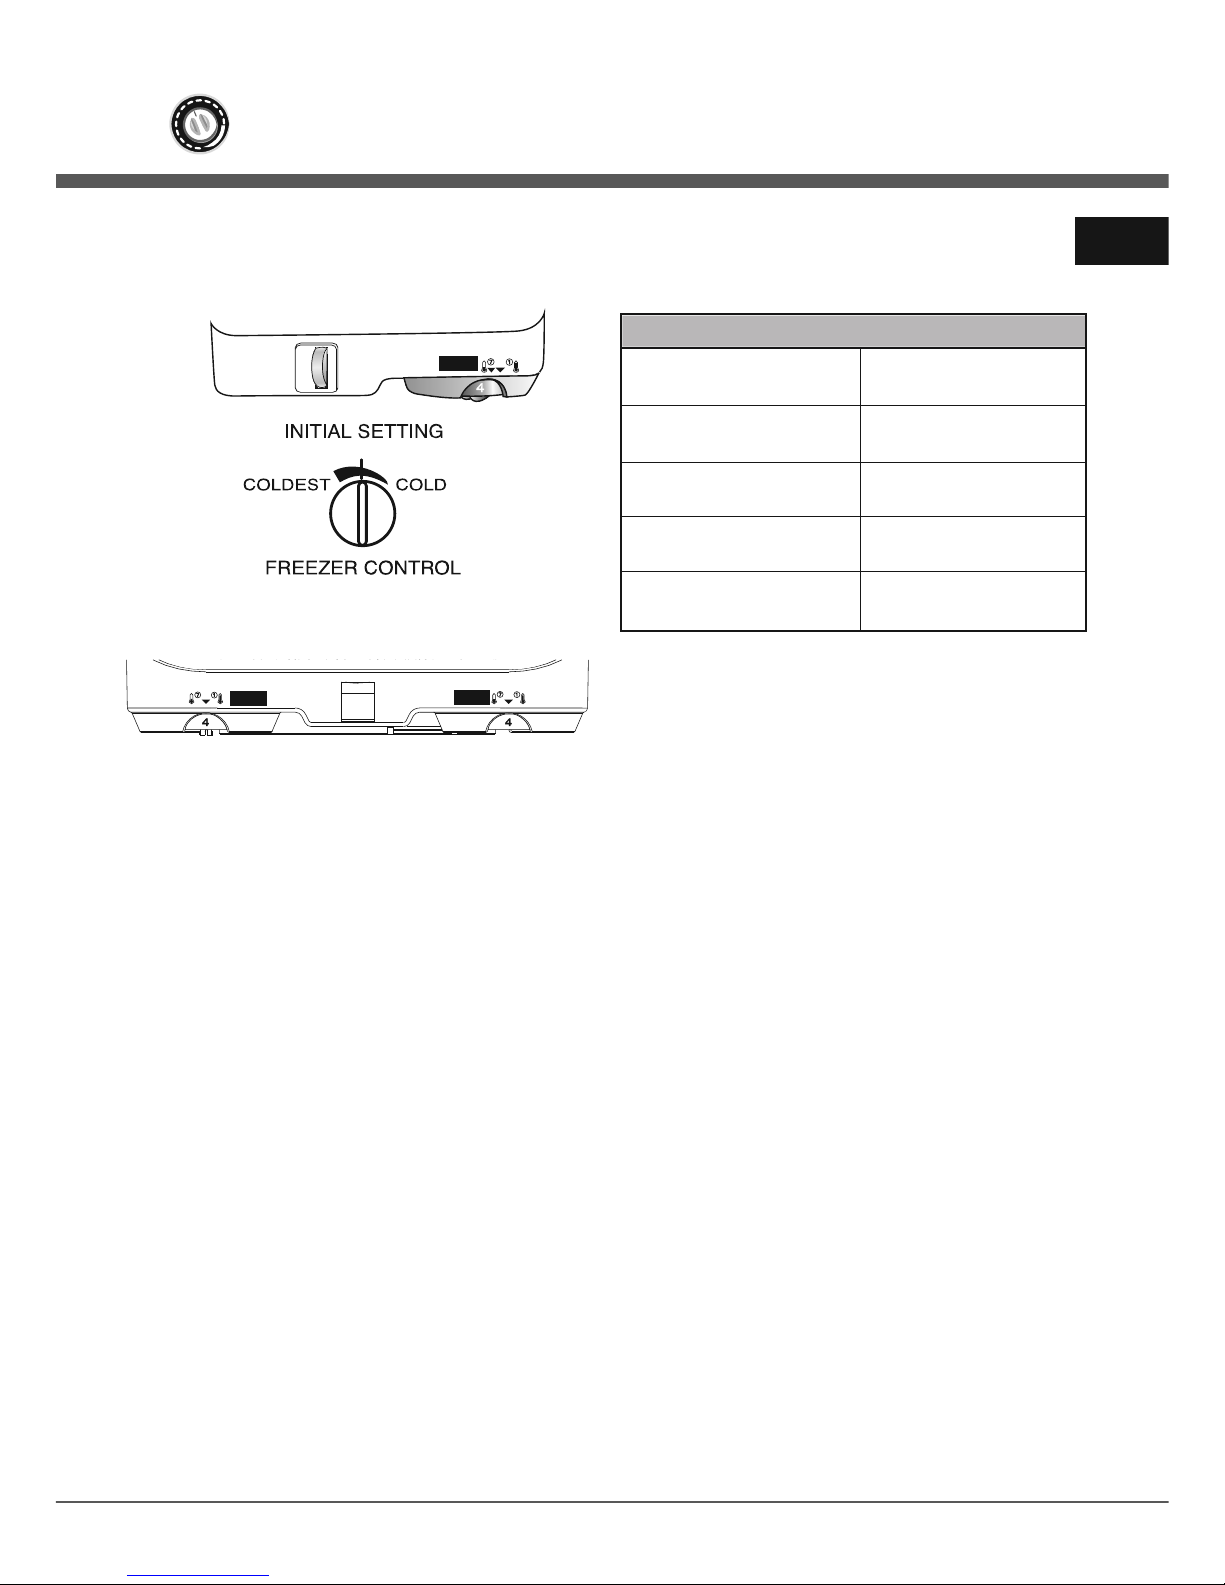
In some models the fresh food control is located at the top of
the fresh food compartment and the freezer control is located
at the back of the freezer compartment as show below :
In other models, both controls are located at the top of
the fresh food compartment as shown below :
Initial Settings
• The fresh food control has settings from 1 (cold) to 7(coldest).
Initially set this control on 4.
has settings from cold to coldest.
Initially set this control at the mid-line initial setting.
• When the freezer control is located at the top of the fresh
food compartments, it has settings from 1 (cold) to 7(coldest).
Initially set this control on 4.
Note
• Your refrigerator will run continuously for several hours when
you first start it. This is normal.
• Let the refrigerator run at least four hours before adding food.
Adjusting the Temperature Controls
• 24 hours after adding food, you may decide that one or both
compartments should be colder or warmer.
If so, adjust the control(s) as indicated in the following table.
• Except when starting the refrigerator, do not change either
control more than one number at a time.
• Allow 24 hours for temperatures to stabilize before resetting.
• Changing either control will have some effect on the
temperature of the other compartment.
* Turning the fresh food control to “OFF” stops cooling in both
compartments.
No Defrosting
Your refrigerator is designed to defrost automatically.
Note
glow/reflection in the vents on the back wall of the freezer
compartment and you may hear the sound of water droplets
coming into contact with the defrost heater.
This is normal during the defrost cycle.
Warm Cabinet Surfaces
At times, the front of the refrigerator cabinet may be warm to
the touch. This is a normal occurrence that helps prevent
moisture from condensing on the cabinet.
The condition will be more noticeable when you first start the
refrigerator, during hot weather and after excessive or lengthy
door openings.
Temperature Controls
Fresh Food Compartment
too Warm
Fresh Food Compartment
too Cold
Freezer too Cold
Turn Refrigerator “OFF”
Adjust fresh food control
to next higher setting.
Adjust fresh food control
to next lower setting.
Adjust freezer control to
next colder setting.
next warmer setting.
Set fresh food control to
“OFF”.*
FRESH FOOD TEMP CONTROL
4-MID
7-COLDEST
FRESH FOOD TEMP CONTROL
4-MID
7-COLDEST
FREEZER TEMP CONTROL
4-MID
7-COLDEST
Freezer too Warm
It does not shut off power to the refrigerator.
• The freezer control, when located at the back of the freezer,
Adjust freezer control to
• During the automatic defrost cycle, you may notice a red
6
E
TEMPERATURE CONTROL GUIDE
Page 8
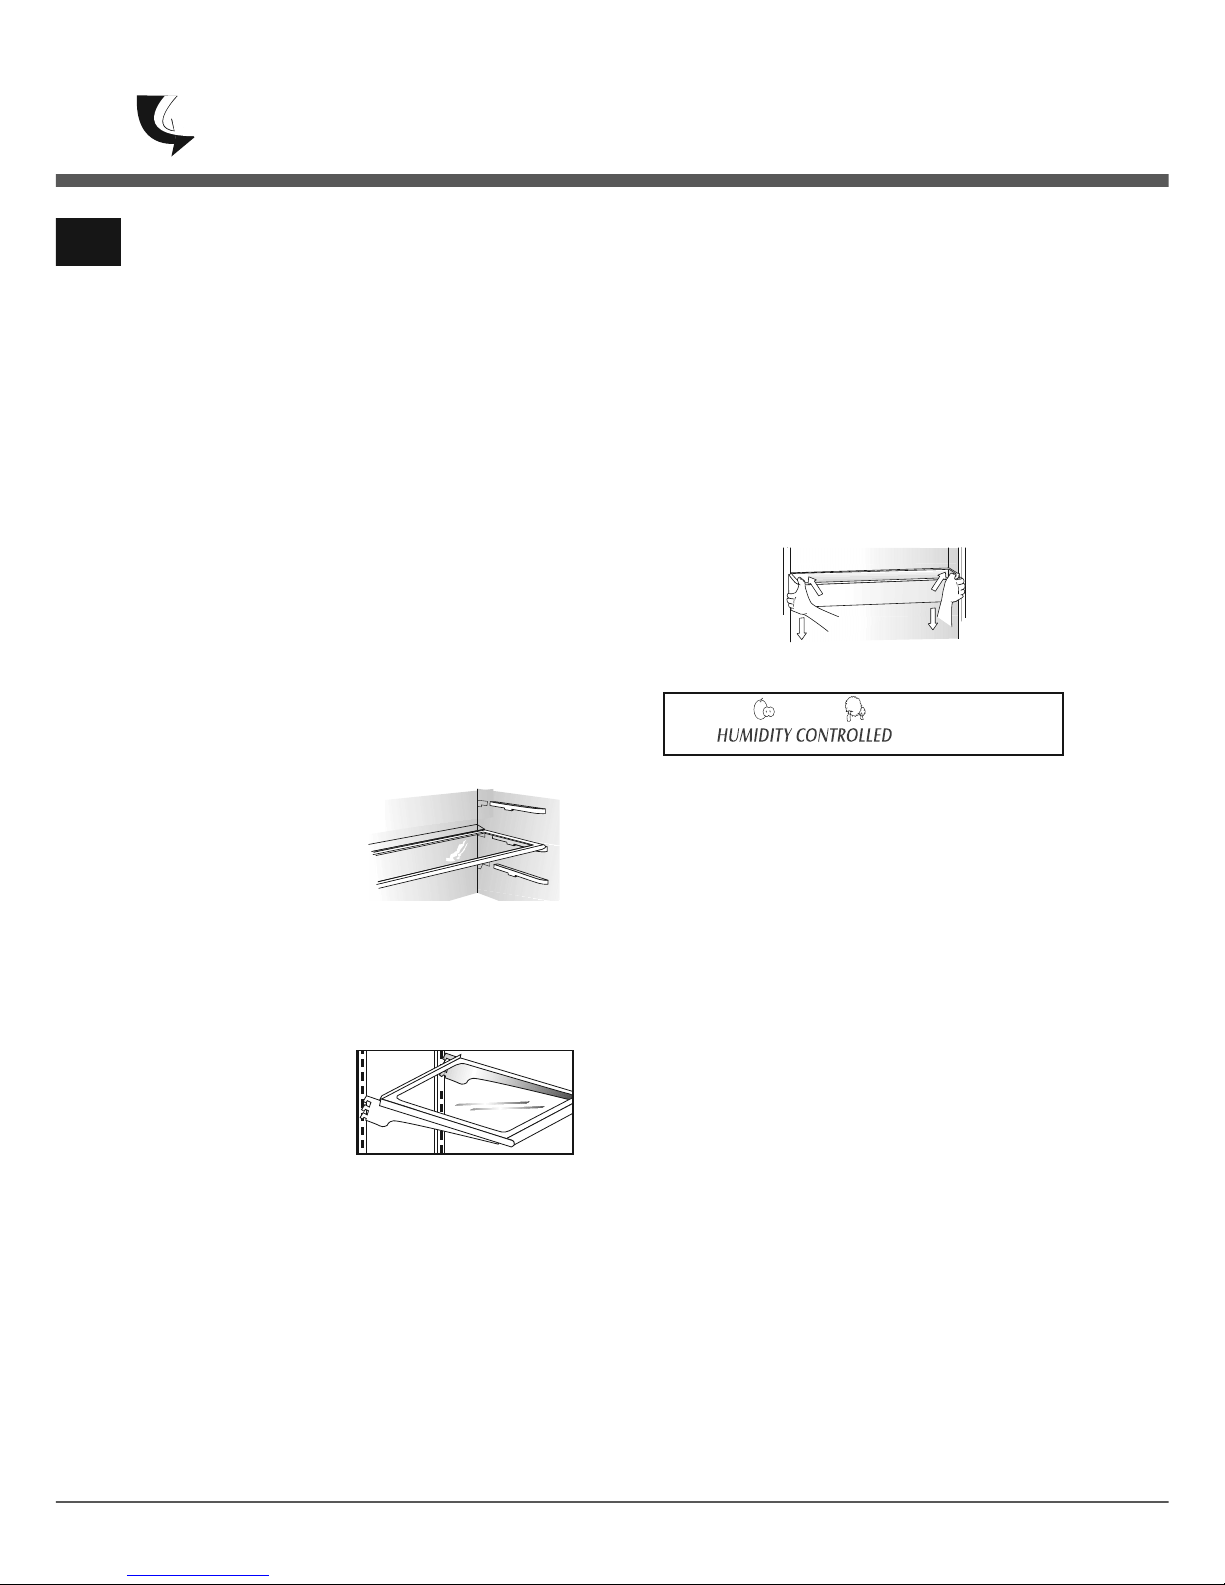
Fresh Food Compartment
Shelves (style may vary)
CAUTION
To avoid personal injury or property damage :
• Never attempt to adjust a shelf when it is loaded with food.
• Confirm that shelf is secure prior to loading items onto it.
• Handle glass shelves with care. Shelves may break suddenly
if nicked, scratched or exposed to sudden temperature
changes.
Select models are equipped with wire or glass full width
shelves that are supported by rails molded into the interior
walls of the fresh food compartment.
These shelves can easily be adjusted to alternate positions
within the compartment.
To Adjust a Full Width Shelf :
• Grasp each side of the shelf.
• Pull the shelf forward approximately 1”.
• While supporting the
shelf from underneath,
lift it up and out.
• Slide the shelf into the
desired alternate position.
Shelves in other models hook into support rails located
on the back wall of the fresh food compartment.
To Remove :
• Slightly tilt up the front
and lift up the rear of
the shelf, then pull the
shelf straight out.
To Lock Into Another Position :
• Tilt up the front edge of the shelf.
• Insert the hooks into the desired frame openings and let the
shelf settle into place.
• Be sure the shelf is securely locked at the rear.
• On certain models the outside edge of the shelf rests on rails
formed into the side of the fresh food compartment.
container sizes and shapes.
To Remove :
• Grasp the shelf on each end.
• Lift the shelf up and out.
To Reinstall :
• While holding the shelf on each end, slide the shelf in and down.
• Push down on the interior center of the shelf to snap it
completely into place.
Some crisper drawers have slide humidity controls.
For fruit storage, slide the control (select models) to the left to
provide lower humidity conditions in the drawer.
For vegetable storage, slide the control (select models) to the
right to provide higher humidity conditions in the drawer.
For best results, keep the crispers tightly closed.
To Remove :
• Pull out the crisper until it stops.
• Tilt the drawer up slightly and pull it out.
To Reinstall :
• With the drawer tilted up slightly, align the drawer in the
tracks and slide in.
The Crisper Top serves as the lower refrigerator shelf.
To Remove :
• Remove the crisper drawers.
• Slightly lift up the front of the shelf.
• Support the shelf from underneath to lift it up and then out of
the cabinet.
To Reinstall :
• With the shelf front tilted slightly upward, carefully insert the
crisper top back into the cabinet.
• Position the rear and sides of the shelf on the supports and
let the crisper top settle into place.
E
Looking Inside
FRUIT VEGETABLES
E
7
The bucket-style Door Shelves accommodate a variety of
The Crispers provide a storage area for fruit and vegetables.
Page 9
G
,
Tall Bottle Retainer/Snugger
(select models)
The Tall Bottle Retainer
prevents tall bottles from
tipping forward.
The Retainer can be placed
above any removable door bucket.
The Snugger attached to the Tall Bottle Retainer keeps
bottles and other containers in place when the door is opened
or closed. Adjust the Snugger by sliding from side to side.
Select models also feature snuggers in the door bucket itself.
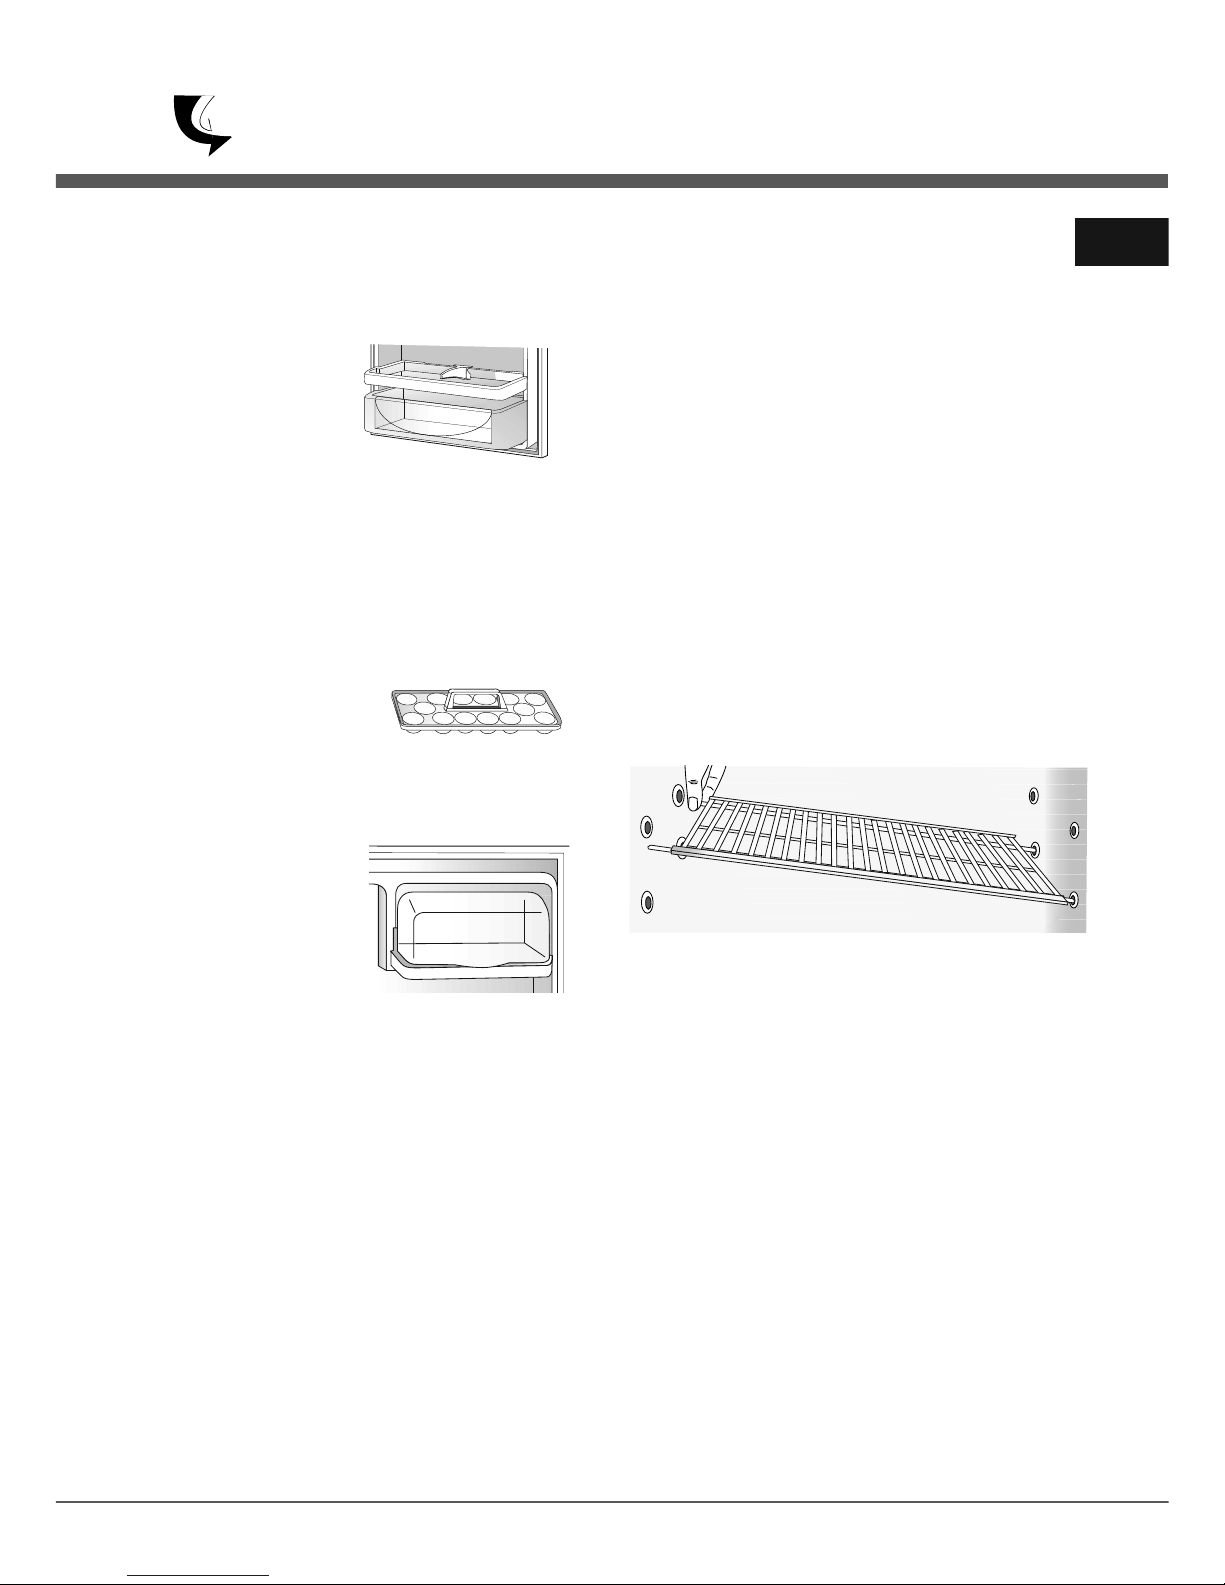
Egg Tray With Handle
(style may vary/select models)
The Egg Tray with Handle holds
a “dozen-plus” eggs.
It can be removed to carry to a work
area or to be washed.
Dairy Compartment
The Dairy Compartment is
covered and designed to store
spreadable food items such as
butter or margarine.
To use this compartment, simply
raise the lid to store or retrieve items.
This compartment can be removed for cleaning.
Rotate the cover open. Grasp the dairy compartment
from the bottom and lift out.
On select models, this compartment can be installed
on the left or right side of the door.
To avoid personal injury or property damage:
• Never attempt to adjust a shelf when it is loaded with food.
• Confirm that shelf is secure prior to loading items onto it.
Some refrigerators have a full-width shelf in the freezer
compartment. This shelf can be adjusted to accommodate a
variety of frozen food loads.
• Lift the left support bars out of the wall support cups.
• Reposition the shelf in the alternate position.
The Slide Out Freezer Basket(select models) is found in the
main freezer compartment. It is a convenient storage area,
providing easy access to items stored in the rear of the freezer.
Slide the basket out to reach or store frozen foods.
To remove the basket :
• Pull the basket until it stops.
• Lift and pull the basket out.
To replace the basket, reverse the removal procedure.
The Drop Down Freezer Basket(select models) is found on
the lower shelf of the freezer door.
This area provides space for frozen food items that tend to shift
or slide (such as bagged vegetables).
Looking Inside
8
To Adjust the Shelf : (Select models)
E
• Slide the shelf to the left.
CAUTION
Freezer Compartment
Page 10

Fresh Food Storage
• The fresh food compartment of a refrigerator should be kept
between 34° F (1° C) and 40° F (4° C) with an optimum
temperature of 37° F (3° C). To check the temperature, place
an appliance thermometer in a glass of water and place in
the center of the refrigerator. Check after 24 hours.
If the temperature is above 40° F (4° C) adjust the control as
explained on page 7.
• Avoid overcrowding the refrigerator shelves.
This reduces the circulation of air around the food and results
in uneven cooling.
Fruits and Vegetables
• Storage in the crisper drawers traps humidity to help
preserve the fruit and vegetable quality for longer time
periods (see page 8).
• Sort fruits and vegetables before storage and use bruised or
soft items first. Discard those showing signs of decay.
• Always wrap odorous foods such as onions and cabbage so
the odor does not transfer to other foods.
• While vegetables need a certain amount of humidity to
remain fresh, too much moisture can shorten storage times
(especially leafy items). Drain vegetables well before storing.
Meat and Cheese
• Raw meat and poultry should be wrapped securely so
leakage and contamination of other foods or surfaces does
not occur.
• Occasionally mold will develop on the surface of hard
cheeses (Swiss, Cheddar, Parmesan). Cut off at least an
inch around and below the moldy area.
Keep your knife or instrument out of the mold itself.
Do not try to save individual cheese slices, soft cheese,
cottage cheese, cream, sour cream or yogurt when mold
appears.
Dairy Food
• Most dairy foods such as milk, yogurt, sour cream and
cottage cheese have freshness dates on their cartons for
appropriate length of storage.
Store these foods in the original carton and refrigerate
immediately after purchasing and after each use.
Frozen Food Storage
• The freezer compartment of a refrigerator should be kept at
approximately 0° F (-18° C). To check the temperature, place
an appliance thermometer between the frozen packages and
check after 24 hours. If the temperature is above 0° F (-18° C),
adjust the control as explained on page 7.
• A freezer operates more efficiently when it is at least 2⁄3 full.
Packaging Foods for Freezing
• To minimize dehydration and quality deterioration use
aluminum foil, freezer wrap, freezer bags or airtight containers.
Force as much air out of the packages as possible and be
sure they are tightly sealed. Trapped air can cause the food to
dry out, change color and develop an off-flavor (freezer burn).
• Overwrap fresh meats and poultry with suitable freezer wrap
prior to freezing.
• Do not refreeze meat that has completely thawed.
Loading the Freezer
• Avoid adding too much warm food to the freezer at one time.
This overloads the freezer, slows the rate of freezing and can
raise the temperature of frozen foods.
• Leave a space between the packages so cold air can circulate
freely, allowing food to freeze as quickly as possible.
• Avoid storing hard-to-freeze foods such as ice cream and
orange juice on the freezer door shelves.
These foods are best stored in the freezer interior where the
temperature varies less with door openings.
E
Food Storage Tips
9
Page 11
Food Storage Tips
Food Storage Chart
Storage times are approximate and may vary depending on type of packaging, storage temperature, and the quality
of the food when purchased.
10
E
Page 12
E
Food Storage Tips
FOODS
POULTRY AND FISH
Chicken and Turkey, whole
Chicken and Turkey, pieces
Fish
MEATS
Bacon
Beef or lamb, ground
Beef or lamb, roast and steak
Ham, fully cooked, whole
half
slices
Luncheon meat
Pork, roast
Pork, chops
Sausage, ground
Sausage, smoked
Veal
Frankfurters
REFRIGERATOR
1-2 days
1-2 days
1-2 days
7 days
1-2 days
3-5 days
7 days
5 days
3 days
3-5 days
3-5 days
3-5 days
1-2 days
7 days
3-5 days
7 days
FREEZER
12 months
9 months
2-6 months
1 month
3-4 months
6-9 months
1-2 months
1-2 months
1-2 months
1-2 months
4-6 months
4 months
1-2 months
1-2 months
4-6 months
1 month
STORAGE TIPS
Keep in original packaging for
refrigeration. Place in the Meat
and Cheese Drawer. When
freezing longer than 2 weeks,
overwrap with freezer wrap.
Fresh meats can be kept in
original packaging for
refrigeration.
Place in the Meat and Cheese
Drawer. When freezing longer
than 2 weeks, overwrap with
freezer wrap.
Unopened, vacuum-packed
luncheon meat may be kept up
to 2 weeks in the Meat and
Cheese Drawer.
Processed meats should be
tightly wrapped and stored in
the Meat and Cheese Drawer.
Sources : United States Department of Agriculture; Food Marketing Institute;
Cooperative Extension Service, Iowa State University
11
Page 13

E
Storing the Refrigerator
Care & Cleaning
Vacations*
If you will be gone for a month or less, leave the controls at
the usual settings.
During longer absences :
1. Remove all food.
2. Shut off the ice maker (if installed) and the valve where you
tapped into the water line to supply the refrigerator.
3. Disconnect the refrigerator from the electrical outlet.
4. Bleed the water from the ice maker fill line and dry the ice
maker thoroughly.
* If using an automatic ice maker, discard first two or three ice harvests, when refrigerator is put back into service.
Refer to the chart on the following page for specific refrigerator
cleaning guidelines.
WARNING
To avoid electrical shock which can cause severe personal
injury or death :
• Disconnect the power cord before moving or cleaning the
refrigerator.
• Disconnect the power cord before replacing the light bulb.
CAUTION
To avoid personal injury :
• Wear gloves when changing a light bulb to protect against
possible broken glass.
A clean condenser means more efficient refrigerator operation.
there is no longer a need for routine condenser cleaning in
normal home usage surroundings.
Some operating environments may be particularly dusty or
greasy. In these situations, the condenser can be periodically
cleaned to insure maximum efficiency.
Cleaning Under the Refrigerator
1. Disconnect the power cord.
2. Raise the locking feet, if engaged (see page 3).
5. Clean and dry the refrigerator thoroughly.
6. Leave the doors open to prevent odors.
WARNING
Water damage due to improper disconnection and drainage
may cause mold/mildew growth.
Moving*
When moving, follow instructions listed in Vacations.
In addition, remove and carefully pack any items that are easily
removable. Ship the refrigerator in an upright position with the
doors taped shut.
3. To prevent an accidental spill, drain any defrost water which
may have accumulated in the defrost drain pan.
This pan is located behind the front base grille. To remove
the pan, push down on both sides and slide it out.
4. If your model has been connected to a water supply for an
automatic ice maker, turn off the water before moving the
refrigerator.
5. Pull the refrigerator out from the wall.
Replacing a Light Bulb
Always use a standard 40 watt appliance bulb.
Fresh Food Compartment
The light bulb is located under the top of the fresh food
compartment.
• Remove light shield, if present.
• Unscrew the light bulb and replace.
Freezer Compartment
The freezer light (select models) is located on the back wall,
near the upper right corner.
To remove the bulb cover:
• Grasp the top and bottom of the bulb cover. Press in the areas
of the attachment tabs, applying enough pressure to unhook
the tabs. At the same time, pivot the cover down and remove.
• Unscrew the lightbulb and replace.
• Replace the bulb cover by pivoting it back into place and
snapping the tabs into the appropriate slots.
12
No Clean Condenser
Thanks to the unique design of the No Clean Condenser,
Page 14

E
Care & Cleaning
PART
REFRIGERATOR
EXTERIOR
Front base grille
Condenser
Door handles
Painted metal surfaces:
Cabinet, doors
Defrost Drain Pan
Stainless steel doors
(select models)
Stainless look exterior
finish
REFRIGERATOR AND
FREEZER INTERIOR
Door gasket
Glass shelves
Interior and door liner
Drawers, bins,
shelves, etc.
Baking soda and warm water.
Mild detergent and warm water.
Mild detergent and warm water.
Glass cleaner.
Mild liquid sprays.
Mild detergent and warm water.
Baking soda and warm water.
Mild detergent and warm water.
Use 1-2 tablespoons baking soda per quart of water. Be
sure to wring out excess water from sponge or cloth
when cleaning around controls, lights, or electrical part s.
Allow the glass to warm up to room temperature
before immersing in warm water. Never use hot
water.
See above for baking soda solution.
Do not use abrasive cleaners, concentrated detergents,
bleaches, cleaning waxes, solvents or polish cleaners to
clean the refrigerator interior.
Dry thoroughly.
Do not wash in automatic dishwasher.
Mild detergent and warm water.
Mild liquid sprays.
Vacuum cleaner attachment.
Cleaning brush (Part No.
20001017) available from your
dealer.
Mild detergent and warm water.
Mild liquid sprays.
Mild detergent and warm water.
Mild liquid sprays.
Mild detergent and warm water.
Light cleaning: mild detergent
and warm water.
Moderate soil: Bon Ami*.
Discolorations: Cameo
Stainless Steel Cleaner*.
Wash with a clean, soft cloth or
sponge and a mild detergent in
warm water.
TIPS AND PRECAUTIONS
Remove the front base grille (see page 3).
No need for cleaning unless environment is particularly
greasy, dusty or there is significant pet traffic in the home
Dry with a clean, soft cloth.
Do not wipe the refrigerator with a soiled dishwashing
cloth or wet towel. These may leave residue that can
scratch and weaken the paint.
Do not use scouring pads, powdered cleansers, bleach or
cleaners containing bleach. These products can scratch
and erode the paint finish.
Do not wax plastic or vinyl parts.
Routine cleaning usually not necessary unless environment is particularly humid or dusty. Pan should be
drained and cleaned prior to moving the refrigerator (see
Use
a soft cloth or sponge.
Always wipe with the grain of the stainless steel.
Do not use chlorine bleach or a cleaning product that
contains chlorine bleach.
After cleaning, rinse and dry. To restore luster and
remove streaks follow with Stainless Steel Magic Spray*
(Part No.
20000008).
Do not use abrasive or harsh cleaners, or cleaners
de
signed for Stainless Steel. Dry thoroughly with a soft
cloth.
* Brand names are the trademarks of the respective manufacturer
WARNING
To avoid electrical shock which can cause severe personal
injury or death, disconnect power to refrigerator before
cleaning. After cleaning, connect power.
Care & Cleaning Refrigerator Cleaning Chart
CAUTION
To avoid personal injury or property damage, observe the
following :
• Do not touch refrigerated surfaces with wet or damp hands,
they may stick to the cold metal surfaces.
• Before cleaning the freezer, allow it to warm up.
• Allow glass shelves to warm up before immersing in warm
water.
13
(see page 12).
page 12).
Page 15

E
Normal Operating Sounds
Improvements in refrigeration design may produce sounds in your new refrigerator that are different or were not present in an older
model. These improvements were made to create a refrigerator that is better at preserving food, is more energy efficient, and is
quieter overall. Because new units run quieter, sounds may be detected that were present in older units, but were masked by
higher sound levels. Many of these sounds are normal. Please note that the surfaces adjacent to a refrigerator, such as hard walls,
floors and cabinetry may make these sounds seem even louder.
The following are some of the normal sounds that may be noticed in a new refrigerator.
DEFROST TIMER: Frost-free
refrigerators have a defrost timer
that will generate a clicking sound
when it cycles the unit into and
out of defrost cycle.
DEFROST HEATER: During the
automatic defrost cycle, a sizzling
sound may
be heard as water
droplets come into contact with
the defrost heater.
This is a normal sound heard
during defrost.
FREEZER COMPARTMENT
CONTRACTION AND EXPANSION: A popping sound may
occur in the freezer when the
unit starts up due to
c
ontraction or expansion of the
materials in the freezer area.
REFRIGERANT FLOW: The flow of the
refrigerant in your refrigerator may cause a
gurgling or rattling sound when the unit is
running or just after the unit cycles off.
The refrigerant is still flowing in the tubing.
CABINET LEVELING: An unlevel cabinet
may cause rattling or vibrating noises.
This can be fixed by adjusting the wheels
or levelers properly.
COMPRESSOR:
In order for a new refrigerator to run more
efficiently, the refrigeration system may
run longer to keep food at the desired
temperatures for freshness.
That new, high effic
iency compressor
may run longer and generate sounds
such as a higher pitched hum or pulsation.
AIRFLOW SOUNDS: Both the freezer evaporator
fan and the condenser fan at the bottom of the
cabinet will create airflow sounds. The evaporator
fan is circulating the cold air throughout the
refrigerator and freezer compartments.
The condenser fan is removing the heat
generated when the unit is cooled.
14
Troubleshooting
Page 16

E
Troubleshooting
PROBLEM
Won’t run
Runs too long,
too frequently
Light not working
Visible glow in
freezer vents
Warm air from
cabinet bottom
Cabinet vibrates
Odor in cabinet
Noise, sounds
and vibrations
F
reezer, refrigerator
too warm
F
reezer, refrigerator
too cold
POSSIBLE CAUSES
Power cord not plugged in.
No power to outlet.
Fresh food control set to
“OFF”position.
Refrigerator is in automatic defrost.
Room temperature less than 55° F
(13° C).
Today’s refrigerators st ar t and stop more
often to maintain even temperatures.
Normal at startup for new or recently
installed units.
Prolonged or frequent door openings.
Door not sealing.
Front base grille blocked.
Bulb burned out.
No power to unit.
Appearance of a red glow or reflection
is normal during the defrost cycle.
This is normal air flow for condenser
circulation.
Cabinet not level. Weak floor.
Odor producing foods not covered.
Normal noise.
Cabinet not level.
Control set too warm.
Prolonged door openings.
Room temperature less than 55° F
(13° C).
Products with high sugar content may
not harden completely when frozen.
Control set too cold.
WHAT TO DO
Push plug into outlet.
Replace fuse, reset circuit breaker.
Wait 25 minutes for defrost cycle to end.
Relocate unit to proper climate (see Installation on
page 3).
Wait 24 hours for refrigerator to completely cool down
This is normal. Minimize door openings.
Check to see if something is preventing door from closing.
Unblock to allow warm air to exit unit.
Check to see if power cord is completely plugged in
properly.
Level cabinet (see page 3).
Cover or wrap odorous foods tightly. Clean cabinet.
Level c
abinet (see page 3).
Minimize door openings.
Unit will not run often enough to maintain proper
temperatures.
GENERALOPERATIONNOISETEMPERATURE
Review this chart of troubleshooting tips first…you may not need to call for service at all.
15
Adjust temperature control (see page 6).
Set fresh food control (see page 6).
(see Temperature Controls on page 6).
Unplug refrigerator and change bulb (see page 12).
See Normal Operating Sounds (page 14).
Adjust temperature control (see page 6).
Page 17

E
Storing the Refrigerator
16
6
Page 18

REFRIGERATOR WARRANTY
Your refrigerator is protected by this warranty
WARRANTY PERIOD THROUGH OUR AUTHORIZED SERVICERS, WE WILL: THE CONSUMER WILL BE RESPONSIBLE FOR:
FULL ONE-YEAR WARRANTY One year from original
purchase date
Pay all costs for repairing or replacing any parts of this appliance
which prove to be defective in materials or workmanship. Excludes
original and replacement Ice & Water filter cartridges (if equipped).
Original and replacement cartridges are warranted for 30 days
(parts only).
Costs of service calls that are listed under NORMAL RESPONSIBILITIES
OF THE CONSUMER. *
1
2
3
4
5
6
EXCLUSIONS
This warranty does not cover the following:
1
2
3
4
IF YOU NEED
SERVICE
Rev. 01/2013
FOR WARRANTY INFORMATION
CONTACT:
844-CROSLEY (844-276-7539)
CrosleyCare Service
3 Sperry Rd.
Fairfield, NJ 07004
FOR PRODUCT INFORMATION
CONTACT:
336-761-1212
Crosley Corporation
111 Cloverleaf Dr., Suite 200
Winston-Salem, NC 27103
www.crosley.com
WARRANTY
CONSEQUENTIAL OR INCIDENTAL DAMAGES SUCH AS PROPERTY DAMAGE AND INCIDENTAL EXPENSES RESULTING FROM ANY BREACH OF
THIS WRITTEN OR ANY IMPLIED WARRANTY.
Service calls which do not involve malfunction or defects in workmanship or material, or for appliances not in ordinary household use. The
consumer shall pay for such service calls.
Damages caused by services performed by servicers other than Crosley Corporation, Crosley Canada Corp. or its authorized servicers; use
of parts other than genuine Crosley Corporation parts, obtained from persons other than such servicers; or external; causes such as abuse,
misuse, inadequate power supply or acts of God.
Products with original serial numbers that have been removed or altered and cannot be readily determined.
NOTE: Some states do not allow the exclusion or limitation of incidental or consequential damages, so this limitation or exclusion may not
apply to you.
Proper use of the appliance in accordance with instructions provided with the product.
Proper installation by an authorized servicer in accordance with instructions provided with the appliance and in accordance with all local
plumbing, electrical and/or gas codes.
Proper connection to a grounded power supply of sufficient voltage, replacement of blown fuses, repair of loose connections or defects in
house wiring.
Expenses for making the appliance accessible for servicing, such as removal of trim, cupboards, shelves,etc., which are not part of the
appliance when it was shipped from the factory.
Damages to finish after installation.
Replacement of light bulbs and/or fluorescent tubes (on models with these features).
In the U.S.A., your appliance is warranted by Crosley Corporation. We authorize no person to change or add to any of our obligations under this warranty. Our obligations for service
and parts under this warranty must be performed by an authorized Crosley Corporation servicer. In Canada your appliance is warranted by Crosley Canada Corp.
This warranty only applies in the 50 States of the U.S.A., in Puerto Rico, and in Canada. Product features or specifications as described or illustrated
are subject to change without notice. All warranties are made by Crosley Corporation. In Canada, your appliance is warranted by Crosley Canada
Corp
* In addition to warranty shown above, ask your dealer about Crosley Extended Limited Warranty that comes to you at no extra charge for the 2ND through 10 TH years.
*NORMAL
RESPONSIBILITIES
OF THE CONSUMER
This warranty applies only to products in ordinary household use, and the consumer
is responsible for the items listed below:
Keep your bill of sale, delivery slip, or some other appropriate payment record. The date on the bill establishes the warranty period should service be required. If
service is performed, it is in your best interest to obtain and keep all receipts. This written warranty gives you specific legal rights. You may also have other rights
that vary from state to state. Service under this warranty must be obtained by contacting Crosley Corporation or Crosley Canada Corp.
Disclaimer: The design and specifications are subject to change without prior notice for product improvement.
FOR WARRANTY INFORMATION
FOR CANADA CONTACT:
800-461-7700
CrosleyCare Canada
99 Bruce Crescent
Carleton Place, ON K7C 3T3, Canada
Page 19

Refrigerador
Refrigerador
Refrigerador
Refrigerador
Refrigerador
Refrigerador
Refrigerador
Refrigerador
Refrigerador
Refrigerador
Refrigerador
Refrigerador
Refrigerador
Refrigerador
Refrigerador
Refrigerador
Refrigerador
Refrigerador
Refrigerador
Refrigerador
Refrigerador
Refrigerador
Refrigerador
Refrigerador
Refrigerador
Refrigerador
Refrigerador
Refrigerador
Refrigerador
Refrigerador
Refrigerador
Refrigerador
Refrigerador
Refrigerador
Tabla de Materias
Instrucciones Importantes
Refrigerador superior
del congelador
S
Spanish
Guía de Uso y Cuidado
Remoción de las puertas . . . . . . . . .35
Garantía y Servicio . . . . . . . . . . . . . . .38
de Averías . . . . . . . . . . . . . . . . . . 32-34
Localización y Solución
Cuidado y Limpieza . . . . . . . . . . . 30-31
Refrigerador . . . . . . . . . . . . . . . . . . . 30
Almacenamiento del
los Alimentos . . . . . . . . . . . . . . . . 27-29
Sugerencias para Conservar
Vista del Interior . . . . . . . . . . . . . . 25-26
Controles de la Temperatura . . . . . . 24
Instalación . . . . . . . . . . .. . . . . . . . 21-23
sobre Seguridad . . . . . . . . . . . . . 19-20
E.U
Page 20

___
........
--~=~
-
Instrucciones Importantes sobre Seguridad
Instalador : Por favor deje esta guía junto con el
electrodoméstico.
Consumidor : Instrucciones Importantes Por favor lea
y conserve esta Guía de Uso y Cuidado para referencia
futura. Este manual contiene información sobre el uso y
mantenimiento apropiado.
Conserve el recibo de compra y/o el cheque cancelado
como comprobante de compra.
Tenga el número completo de modelo y de serie para
identificación de su refrigerador. Estos se encuentran
en una placa de datos dentro del compartimiento del
refrigerador, en el lado superior izquierdo. Anote estos
números a continuación para su fácil acceso.
Número de Modelo____________________________
Número de Serie______________________________
Fecha de Compra_____________________________
En nuestro continuo afán de mejorar la calidad de
nuestros electrodomésticos, puede que sea necesario
modificar el electrodoméstico sin actualizar esta guía.
Información sobre las
instrucciones de seguridad
Las advertencias e instrucciones importantes sobre
seguridad que aparecen en este manual no están
destinadas a cubrir todas las posibles circunstancias y
situaciones que puedan ocurrir.
Se debe ejercer sentido común, precaución y cuidado
cuando instale, efectúe mantenimiento o cuando use
este electrodoméstico.
Siempre póngase en contacto con su distribuidor,
agente de servicio o fabricante si surgen problemas o
situaciones que usted no comprenda.
Reconozca los Símbolos, Advertencias y
Etiquetas de Seguridad
PELIGRO
PELIGRO – Riesgos inmediatos que CAUSARAN
lesión personal grave o mortal.
ADVERTENCIA
ADVERTENCIA – Peligros o prácticas no seguras que
PODRIAN causar lesión personal grave o mortal.
PRECAUCIÓN
PRECAUCIÓN – Peligros o prácticas no seguras que
PODRIAN causar lesión personal menos grave o daños
materiales.
PELIGRO
A fin de reducir el riesgo de lesión o muerte, siga las
precauciones básicas incluyendo las siguientes:
IMPORTANTE : Los problemas de atrapamiento y
asfixia de los niños no han quedado relegados al
pasado. Los refrigeradores desechados o abandonados
son peligrosos - “aunque sólo se dejen unos días”. Si va
a deshacerse de su refrigerador antiguo, por favor siga
las siguientes instrucciones para ayudar a prevenir
accidentes.
Antes de deshacerse de su
refrigerador o congelador antiguo:
• Retire las puertas.
• Deje las bandejas en su lugar de
modo que los niños no puedan
entrar fácilmente.
Este electrodoméstico está equipado con un enchufe de
tres clavijas con puesta a tierra como protección contra
el posible peligro de choques eléctricos.
Se debe enchufar en un tomacorriente puesto a tierra.
Si sólo se dispone de un tomacorriente estándar para
enchufe de dos clavijas, el cliente tiene la
responsabilidad y obligación de reemplazarlo por un
tomacorriente para enchufe de tres clavijas debidamente
puesto a tierra. Por ningún motivo corte o retire la
tercera clavija (puesta a tierra) del cordón eléctrico.
No use un adaptador.
S
Cordón eléctrico con enchufe de
tres clavijas con puesta a tierra
Tomacorriente mural del
tipo con puesta a tierra
19
Page 21

Instrucciones Importantes sobre Seguridad A fin de reducir
el riesgo de incendio, choque eléctrico, lesión grave o
mortal cuando use su refrigerador, siga estas precauciones
básicas, incluyendo las siguientes:
1. Lea todas las instrucciones antes de usar el refrigerador.
2. Observe todos los códigos y reglamentos locales.
3. Asegúrese de seguir las instrucciones de puesta a tierra.
4. Consulte con un electricista calificado si no está seguro
de que el electrodoméstico está puesto a tierra en forma
correcta.
5. No use una tubería del gas para la puesta a tierra.
6. No use una tubería de agua fría para la puesta a tierra.
7. El refrigerador ha sido diseñado para funcionar con una
fuente de energía eléctrica de 115 voltios, 15 amperios,
60 Hz.
8. No modifique el enchufe del cordón eléctrico.
Si el enchufe no calza en el tomacorriente, pida a un
electricista calificado que instale un tomacorriente
apropiado.
9. No use un adaptador de dos clavijas, un cordón de
extensión ni regletas protectoras de tomas múltiples.
10. No retire la etiqueta de advertencia del cordón eléctrico.
11. No manipule indebidamente los controles del
refrigerador.
12. No repare ni reemplace ninguna pieza del refrigerador a
menos que sea específicamente recomendado en la
Guía del Usuario o en las instrucciones para
reparaciones que pueden ser efectuadas por el usuario.
No intente hacer reparaciones si no comprende las
instrucciones o si son demasiado complicadas para sus
conocimientos.
13. Siempre desenchufe el refrigerador antes de intentar
cualquier reparación. Desenchufe el cordón tomándolo
del enchufe no tirando del cordón.
14. Instale el refrigerador de acuerdo con las instrucciones
de instalación. Todas las conexiones para el agua,
energía eléctrica y puesta a tierra deben cumplir con los
códigos locales y ser realizadas por personal calificado
cuando sea necesario.
15. Mantenga su refrigerador en buen estado.
Si se golpea o deja caer se puede ocasionar daño o
malfuncionamiento o escapes. Si ocurre daño, haga
revisar el refrigerador por un técnico de servicio
calificado.
16. Reemplace los cordones eléctricos que estén gastado
y/o los enchufes sueltos.
17. Siempre lea y siga las instrucciones de conservación y
del medio ambiente ideal recomendado por el fabricante
para los alimentos que sean guardados en el
refrigerador.
18. No haga funcionar su refrigerador en presencia de
vapores explosivos.
19. Los niños no deben treparse, colgarse ni pararse en
ninguna pieza del refrigerador.
20. Limpie los derrames o escapes de agua relacionados
con la conexión del agua.
S
Instrucciones Importantes sobre Seguridad
CONSERVE ESTAS INSTRUCCIONES PARA REFERENCIA FUTURA
MODELOS
ANCHO
FONDO
ALTO
DIMENSIONES
EXTERIORES
CONVECCION FORZADA
POR RESISTENCIA, TIPO TUBO DE VIDRIO
AUTOMATICO
R-134a
115 - 127V~/60Hz
SISTEMA DE REFRIGERACION
SISTEMA DE DESHIELO
SISTEMA DE DESHIELO
REFRIGERANTE
VOLTAJE DE ALIMENTACION
PESO NETO
CARACTERISTICAS
DEL
SISTEMA
Especificaciones
32.9in
30.3 in
66.0 in
220.5 Lbs
CAPACIDAD DE CONGELADOR
CAPACIDAD DE REFRIGERADOR
CAPACIDAD TOTAL
5.96 cu ft
15.07 cu ft
21.03 cu ft
20
CRD2121NW,CRD2121NB,C
RD2121NS
CRDH2181NW,CRDH2181NB,CRDH2181NS
Page 22

Su refrigerador nuevo fue empacado cuidadosamente para el
embarque.
Retire y descarte la cinta y el empaque de las parrillas.
Ubicación
• Deje que el aire circule libremente a través de la rejilla
inferior delantera.
• Instale el refrigerador en un lugar donde la temperatura
ambiente no descenderá a menos de 13° C (55° F).
Con temperaturas inferiores a 13° C (55° F), el refrigerador
no funcionará con la suficiente frecuencia para mantener la
temperatura correcta en el congelador.
• Deje un espacio mínimo de 1,5 cm (1,2") en ambos lados,
arriba y detrás del refrigerador para facilitar la instalación.
Si el refrigerador es colocado con el lado de la bisagra de la
puerta contra una pared, es necesario dejar espacio
adicional para que la puerta pueda abrirse más.
• Tenga cuidado al instalar el refrigerador sobre pisos de vinilo
o madera para evitar que se marquen o dañen.
Se puede utilizar un pedazo de madera contrachapada, una
alfombra u otro material para proteger el piso mientras se
instala el refrigerador.
Nivelado
A fin de realzar su aspecto y mantener su rendimiento, el
refrigerador debe ser nivelado después de que sea colocado
en su lugar definitivo.
• Ajuste los tornillos niveladores/de seguridad debajo de cada
esquina delantera en la base del gabinete. Gire estos
tornillos niveladores/de seguridad a la derecha para levantar
la esquina del gabinete y a la izquierda para bajarla.
• Si el piso no está nivelado y es necesario levantar la parte
trasera del gabinete, sugerimos que coloque las ruedas
traseras sobre un pedazo de madera contrachapada u otro
material que sirva para acuñar.
• Los modelos de refrigerador que cuentan con ruedas
ajustables pueden ser nivelados retirando la rejilla inferior y
ajustando las ruedas con una llave de 1⁄4 ” o con un
destornillador. (Vea la Figura 2).
Rejilla Inferior Delantera(modelos selectos)
La rejilla inferior delantera (modelos selectos) fue empacada
dentro del refrigerador para el embarque y debe ser instalada
una vez que el refrigerador haya sido nivelado.
Rejilla con ganchos :
• Para instalar, alinee los pasadores de resorte con las
aberturas circulares en el gabinete y oprima cada extremo
hasta que la rejilla encaje en su lugar.
• Para retirar este tipo de rejilla, sostenga ambos extremos y tire
derecho hacia afuera.
Rejilla con tornillos :
• Use un destornillador Phillips para
retirar los dos tornillos de cabeza
Phillips situados en la base del
refrigerador.
• Alinee la rejilla inferior con los agujeros de los tornillos (El lado
recortado de la base de la rejilla se instala alrededor de la
bisagra inferior de la puerta.)
• Asegure la rejilla inferior en su lugar reinstalando los tornillos
Phillips en sus agujeros originales.
• Invierta estos pasos para retirar este tipo de rejilla inferior.
Sugerencias para ahorrar electricidad
• Coloque el refrigerador alejado de otros electrodomésticos
que generen calor como la estufa o el lavavajillas, las rejillas
de la calefacción y la luz solar directa.
• Nivele el refrigerador y no obstruya la ventilación alrededor de
la rejilla inferior delantera.
• Espere que los alimentos se enfríen ligeramente antes de
colocarlos en el refrigerador o congelador.
• Tape los líquidos.
• Mantenga el congelador casi lleno para que escape menos
aire frío al abrir la puerta. Cuando dos terceras partes del
congelador estén llenas, coloque envases de leche de cartón
a medio llenar con agua en el congelador.
• Limpie la humedad del exterior de los envases antes de
colocarlos en el refrigerador.
• Evite abrir las puertas con demasiada frecuencia.
S
Instalación
Para bajar
el gabinete
Para
levantar el
gabinete
21
Page 23

ADVERTENCIA
Para evitar choque eléctrico que puede causar una lesión
personal grave o mortal :
• Desenchufe el refrigerador antes de invertir las puertas.
Inversión de las puertas
Herramientas Necesarias:
• Llave de una sola boca de 5
/1 6 "
• Destornillador Phillips
• Espátula
• Llave de tubo y trinquete de 5
/16 "
Desenchufe el refrigerador.
1. Retire la tapa de la bisagra y déjela a un lado.
2. Usando una llave de tubo y trinquete de 5
/16 ", retire los
tornillos de la bisagra superior con una llave de tubo y
trinquete y déjelos a un lado.
3. Levante con cuidado y retire la puerta del congelador
(incluyendo la bisagra superior) de la bisagra central.
4. Usando una llave de tubo y trinquete de 5
/16 ", retire los
tornillos y la bisagra central de la parte superior de la puerta
del refrigerador. Usando una esp
átula, saque los tapones
de botón y colóquelos en el lado opuesto.
5. Levante con cuidado y retire la puerta del refrigerador.
6. Retire la rejilla inferior delantera y d
éjela a un lado.
(ver página 43)
7. Usando una llave de tubo y trinquete de 5
/16 ", retire la pala
de la bisagra de la esquina inferior del refrigerador e
instálela en el lado opuesto.
8. Retire la pala de la bisagra del lado inferior de la puerta del
refrigerador y col
óquela en el lado opuesto.
9. Usando una llave de tubo y trinquete de 5
/16 ", retire el tope
de puerta que se encuentra debajo de la puerta del
congelador y f
íjelo en el lado opuesto.
10. Usando una Espátula, retire el (los) tapón(es) situados en
la parte superior de las puertas del congelador y del
refrigerador y col
óquelos en el lado opuesto.
11. Retire los tapones de los agujeros de los tornillos de la
parte superior del gabinete y col
óquelos en el lado
opuesto.
12. Usando una llave de tubo y trinquete de 5
/
16 ", retire las
arandelas y virgulitas del interior de la pala de la bisagra
y colóquelas en el exterior de la pala de la bisagra.
13. Vuelva a colocar con cuidado la puerta del refrigerador en
la pala de la bisagra en la esquina inferior.
14. Instale la bisagra central con los tornillos que retir
ó
del
lado opuesto y col
óquelos usando una llave de 5
/1 6 " .
15. Coloque con cuidado la puerta del congelador sobre el
brazo de la bisagra. Use el espaciador de espuma de la
puerta para mantener el espacio.
Nota
• No descarte el espaciador de espuma de la puerta.
Las puertas se asientan con el uso.
16. Inserte la bisagra superior en su lugar en la puerta del
congelador e instale los tornillos con la llave de 5
/
16 ".
Cerciórese de que todos los tornillos est
én firmemente
asegurados.
17. Instale a presi
ón la tapa de la bisagra firmemente en su
lugar.
18. Vuelva a colocar la rejilla inferior delantera.(ver pagina 43)
Recuerde enchufar su refrigerador y volver a programar los
controles en el (los) ajuste(s) apropiado(s).
Instalación
22
S
Page 24

S
Instalación
Manija de la puerta del congelador
Inversión de las manijas de las puertas
Para retirar las manijas, invierta los pasos anteriores.
Voltee las manijas 180 grados e instálelas en las puertas opuestas.
Alinee la manija con el tornillo de instalacion
Fije con tornillo Fije con tornillo
Manija de la puerta del refrigerador
1
PASO
2
PASO
Gire la manija
3
PASO
Fije el extremo inferior de
la manija con dos tornillos
No apriete demasiado
4
PASO
Alinee la manija con el tornillo de instalacion
1
PASO
2
PASO
Empuje la manija
hacia abajo
3
PASO
Fije el extremo superior de
la manija con dos tornillos
No apriete demasiado
4
PASO
Nota : Se requiere un destornillador phillips
para la instalacion
MANIJA
MANIJA
MANIJA
MANIJA
A
A
B
B
A
A
B
B
23
Page 25

S
En algunos modelos, el control del refrigerador se encuentra
en la parte superior del refrigerador y el control del congelador
en la parte trasera del congelador como se muestra abajo :
En otros modelos, ambos controles están ubicados en la parte
superior del interior del refrigerador como se muestra abajo.
Ajustes Iniciales
• El control del refrigerador tiene ajustes que van desde el 1
(frí
o) hasta el 7 (más fío).
Coloque inicialmente este control
en el ajuste 4.
• El control del congelador, cuando se encuentra en la parte
trasera del congelador, tiene ajustes que van desde 'cold'
(frío) hasta 'coldest' (más frío).
Coloque inicialmente este
control en el ajuste medio.
• Cuando el control del congelador se encuentra en la parte
superior del refrigerador, el mismo cuenta con ajustes que
van desde el 1 (frío) hasta el 7 (más frío).
Coloque inicialmente este control en el ajuste 4.
Nota
• Su refrigerador funcionar
á continuamente por varias horas
cuando lo ponga en marcha por primera vez.
Esto es normal.
• Deje funcionar el refrigerador por lo menos cuatro horas
antes de colocar los alimentos.
Ajuste de los Controles de la Temperatura
• Si después de 24 horas de colocar los alimentos observa
que uno o ambos compartimientos deberían estar más fríos
o más calientes, ajuste el (los) control(es) según se indica en
la tabla siguiente.
• Con la excepci
ón de cuando se pone en funcionamiento el
refrigerador por primera vez, no cambie ninguno de los
controles más de un número a la vez.
• Cualquier cambio en uno de los controles afectar
á
la
temperatura del otro compartimiento.
* Al girar el control del refrigerador a la posición "OFF" se
detiene el enfriamiento en ambos compartimientos.
Sin embargo, no se corta la electricidad al refrigerador.
Descongelación Automática
Su refrigerador ha sido dise
ñado para descongelarse
automáticamente.
Nota
• Durante el ciclo automático de descongelación, puede
observarse un resplandor/reflejo rojo en los orificios de
ventilación en la pared posterior del compartimiento del
congelador y o
írse el sonido de gotas de agua cuando
entran en contacto con el calentador de descongelaci
ón.
Esto es normal durante el ciclo de descongelaci
ón.
Superficies Calientes del Gabinete
A veces, la parte delantera del gabinete del refrigerador puede
sentirse caliente al tacto. Esta es una situación normal que
ayuda a prevenir la condensación de la humedad en el
gabinete. Esta condición será más notoria cuando el
refrigerador se pone en marcha por primera vez, durante
tiempo caluroso y después de abrir la puerta de manera
excesiva o prolongada.
Controles de la Temperatura
FRESH FOOD TEMP CONTROL
4-MID
7-COLDEST
FRESH FOOD TEMP CONTROL
4-MID
7-COLDEST
FREEZER TEMP CONTROL
4-MID
7-COLDEST
AJUSTE INICIAL
CONTROL DEL CONGELADOR
antes
de reajustar.
• Espere 24 horas para que la temperatura se estabilice
24
GUIA DE CONTROL DE LA
TEMPERATURA
Compartimiento del Coloque el control del
refrigerador demasiado refrigerador en el siguiente
tibio ajuste m
ás frío.
Coloque el control del
refrigerador en el siguiente
ajuste menos frío.
Coloque el control del
congelador en el siguiente
ajuste más frío.
Coloque el control del
congelador en el siguiente
ajuste menos frío.
Coloque el control del
refrigerador en "OFF"
(Apagado).*
Compartimiento del
refrigerador demasiado
frío
Congelador demasiado
tibio
Congelador demasiado
frío
Para APAGAR el
refrigerador
Page 26

Compartimiento del Refrigerador
Parrillas (el estilo puede variar)
PRECAUCIÓN
A fin de evitar una lesi
ón personal o daños personales :
• Nunca intente ajustar una parrilla que tenga alimentos
sobre ella.
• Cerciórese de que la parrilla esté firme antes de colocar
artículos sobre ella.
• Manipule con cuidado las bandejas de vidrio. Las bandejas
se pueden quebrar repentinamente si son melladas, rayadas
o expuestas a cambios repentinos de temperatura.
Los modelos selectos cuentan con bandejas de metal o de
vidrio de todo el ancho apoyadas sobre rieles moldeados en
las paredes del interior del refrigerador.
Para ajustar una bandeja de todo el ancho :
• Sujete cada lado de la bandeja.
• Tire de la bandeja hacia
adelante aproximadamente
2,5 cm (1").
• A la vez que apoya la
bandeja por debajo,
levántela y ret
írela.
• Inserte la bandeja en la posición alterna deseada.
Las bandejas en otros modelos se enganchan en los rieles de
soporte que se encuentran en la pared trasera del interior del
refrigerador.
Para retirar la bandeja :
• Incline ligeramente
hacia arriba la parte
delantera de la bandeja,
levante la parte trasera
y tire de la bandeja derecho hacia afuera para sacarla.
Para bloquear la bandeja en una posición diferente:
• Levante el borde delantero de la bandeja.
• Inserte los ganchos en las aberturas deseadas en el marco
y deje que la bandeja se asiente en su posici
ón.
• Asegúrese de que la bandeja esté correctamente asegurada
en la parte trasera.
• En algunos modelos, el borde exterior de la bandeja
descansa sobre rieles moldeados en el costado del interior
del refrigerador.
En los compartimientos de la puerta se pueden colocar
una variedad de tamaños y formas de envases.
Desmontaje :
• Sujete cada extremo del compartimiento de la puerta.
• Levante el compartimiento y retírelo.
Reinstalaci
ón :
• Sujetando cada extremos del compartimiento, desl
ícelo
hacia adentro y hacia abajo.
• Oprima la parte central
interior del compartimiento
para que entre a presión en
su lugar.
Los cajones de las verduras ofrecen espacio para guardar
fruta y verduras. Algunos de estos cajones están equipados
con controles deslizables de humedad.
Para guardar frutas, deslice el control (modelos selectos) a la
izquierda a fin de proporcionar menos humedad en el caj
ón.
Para guardar verduras, deslice el control (modelos selectos) a
la derecha para proporcionar m
ás humedad en el caj
ón.
Para obtener mejores resultados, mantenga los cajones
de las verduras herméticamente cerrados
Desmontaje :
• Tire del cajón de las verduras hacia afuera hasta el tope.
• Incline levemente el cajón hacia arriba y ret
írelo.
Reinstalaci
ón :
• Teniendo el caj
ón ligeramente inclinado hacia arriba, alin
éelo
en los rieles y desl
ícelo hacia adentro.
La parte superior del cajón de las verduras sirve como la
bandeja inferior del refrigerador.
Desmontaje :
• Retire el cajón de las verduras.
• Levante levemente la parte delantera de la bandeja.
• Apoyando la bandeja por el lado inferior, lev
ántela y ret
írela
del gabinete.
Reinstalaci
ón :
• Teniendo la parte delantera de la bandeja ligeramente
inclinada hacia arriba, ins
értela con cuidado de vuelta en el
gabinete.
• Coloque la parte trasera y los costados de la bandeja en los
soportes y deje que se asiente en su lugar.
S
Vista del Interior
FRUIT VEGETABLES
S
25
Page 27

Retenedor/Soporte de Botellas Altas
(modelos selectos)
El Retenedor de Botellas Altas
evita que las botellas altas se
caigan hacia adelante.
El retenedor se puede colocar
sobre cualquier compartimiento
de la puerta.
El Soporte instalado en el retenedor de botellas altas
mantiene las botellas y otros envases en su lugar cuando se
abre o cierra la puerta. Ajuste el soporte deslizándolo de un
lado a otro. Los modelos selectos también cuentan con este
tipo de soporte en el compartimiento mismo.
Bandeja para Huevos con Manija
(el estilo puede variar/modelos selectos)
La Bandeja para Huevos con Manija tiene capacidad para
más de una docena de huevos.
La misma puede ser retirada para
llevar los huevos al área de trabajo
o para limpiarla.
Compartimiento de Productos Lácteos
El Compartimiento de
Productos Lácteos está
cubierto y fue diseñado
para almacenar alimentos
para untar tales como
la mantequilla o margarina.
Para usar este compartimiento, simplemente levante la tapa
para guardar o sacar los artículos. Este compartimiento se
puede retirar para facilitar su limpieza. Gire la tapa para
abrirla. Sostenga el compartimiento desde la parte inferior y
levántelo para sacarlo.
En los modelos selectos, este compartimiento puede ser
instalado en el lado izquierdo o derecho de la puerta.
Compartimiento del Congelador
PRECAUCIÓN
A fin de evitar una lesión personal o daños personales :
• Nunca intente ajustar una parrilla que tenga alimentos sobre
ella.
• Cerciórese de que la parrilla esté firme antes de colocar
artículos sobre ella.
Algunos refrigeradores tienen una parrilla de todo el ancho en
el compartimiento del congelador.
Esta parrilla puede ser cambiada de posición para acomodar
una variedad de alimentos congelados.
• Deslice la parrilla hacia la izquierda.
• Retire las barras de soporte izquierdas de las cavidades
murales.
• Coloque la parrilla en la posición alterna deseada.
La Cesta Deslizante del Congelador (modelos selectos) se
encuentra en el interior del congelador.
Esta cesta proporciona un área de almacenamiento
conveniente y un fácil acceso a los artículos guardados en la
parte trasera del congelador. Deslice la cesta hacia afuera para
alcanzar o guardar alimentos congelados.
Para retirar la cesta :
• Tire de la cesta hasta que se detenga.
• Levántela y tire de ella hacia afuera.
Para volver a instalar la cesta, invierta el procedimiento de
remoción.
La Cesta Elevable del Congelador (modelos selectos) se
encuentra en la bandeja inferior de la puerta del congelador.
Esta área proporciona espacio de almacenamiento para
alimentos congelados que tienden a moverse o deslizarse
(tales como las bolsas de verduras).
S
Vista del Interior
Para cambiar de posición la parrilla :
(Modelos selectos)
26
S
Page 28

Conservación de Alimentos Frescos
• La temperatura del compartimiento de alimentos frescos
del refrigerador se debe mantener entre 1° C (34° F) y 4° C
(40° F). La temperatura ideal es de 3° C (37° F). Para
verificar la temperatura, coloque un termómetro para
electrodomésticos en un vaso de agua en el centro del
refrigerador. Espere 24 horas antes de verificar la
temperatura. Si la temperatura es superior a 4° C (40° F)
ajuste los controles según se explica en la página 47.
• Evite sobrecargar las bandejas del refrigerador pues esto
reduce la circulación de aire alrededor de los alimentos y
ocasiona enfriamiento irregular.
Frutas y Verduras
• El cajón de las verduras retiene la humedad para ayudar a
preservar la frescura de las frutas y verduras por períodos
más prolongados (ver página 48).
• Clasifique las frutas y verduras antes de guardarlas y
consuma primero las que se encuentren maduras o
magulladas. Descarte aquellas que muestren señales de
descomposición.
• Siempre envuelva los alimentos que despiden olor tales
como cebollas y repollo de modo que el olor no se transfiera
a otros alimentos.
• Aunque las verduras necesitan cierta cantidad de humedad
para retener la frescura, demasiada humedad puede acortar
el tiempo de conservación (especialmente las verduras con
hojas). Seque bien las verduras antes de guardarlas.
Carnes y Quesos
• La carne cruda y de ave debe envolverse muy bien para que
no ocurran derrames ni contaminación de otros alimentos o
superficies.
• A veces se puede formar un moho en la superficie de los
quesos duros (Suizo, Cheddar y Parmesano). Corte por lo
menos 2,5 cm (1") alrededor y debajo del área afectada.
Mantenga el cuchillo o instrumento cortante alejado del
moho. No trate de conservar las rodajas individuales de
queso, el queso cremoso, el requesón, la crema, nata
cortada o yogur cuando tengan señales de moho.
Productos Lácteos
• La mayoría de los productos lácteos como la leche, yogur,
nata cortada y requesón muestran la fecha de vencimiento
en sus envases para asegurar su correcta duración.
Guarde estos alimentos en los envases originales y
refrigérelos inmediatamente después de comprarlos y
después de cada uso.
Conservación de Alimentos Congelados
• El compartimiento del congelador de un refrigerador debe ser
mantenido aproximadamente a -18° C (0° F). Para verificar la
temperatura, coloque un termómetro para electrodomésticos
entre los paquetes congelados y espere 24 horas antes de
verificarla. Si la temperatura es superior a -18° C (0° F), ajuste
el control como se indica en la página 47.
• El congelador funcionará más eficazmente si se ocupa por lo
menos dos tercios de su capacidad.
Envoltura de los Alimentos para su Congelación
• Para reducir la deshidratación y el deterioro de la calidad, use
papel de aluminio, envoltura para alimentos congelados,
bolsas especiales para alimentos congelados o envases
herméticamente cerrados. Extraiga la mayor cantidad posible
de aire del paquete y asegúrese de que esté bien sellado. El
aire atrapado puede resecar, cambiar de color o dar mal sabor
(quemadura de congelación) a los alimentos.
• Envuelva bien las carnes frescas y de ave con envoltura
especial para alimentos congelados antes de guardarlas.
• No congele nuevamente la carne que se haya descongelado
completamente.
Colocación de los Alimentos en el Congelador
• Evite guardar demasiados alimentos tibios en el congelador
de una sola vez. Esto sobrecarga el congelador, reduce la
velocidad de congelación y puede elevar la temperatura de los
alimentos congelados.
• Deje un espacio entre los paquetes de manera que el aire
pueda circular libremente para que los alimentos se congelen
lo más rápido posible.
• Evite guardar alimentos difíciles de congelar tal como helados
y jugo de naranja concentrado en los compartimientos de la
puerta del congelador.Es preferible guardar estos alimentos
en el interior del congelador donde la temperatura fluctúa
menos al abrir la puerta.
S
Sugerencias para Conservar los Alimentos
27
Page 29

S
Sugerencias para Conservar los Alimentos
Tabla de Conservación de los Alimentos
ALIMENTOS
PRODUCTOS LACTEOS
Mantequilla
Leche y crema
Queso en crema, queso en pasta y
alimentos de queso
Requesón
Nata cortada
Queso duro
(Suizo, Cheddar y Parmesano)
HUEVOS
Huevos enteros
Claras o yemas restantes
FRUTAS
Manzanas
Plátanos
Peras, ciruelas, aguacate
Fresas, cerezas, damascos
Uvas
Frutas ácidas
Piña, en trozos
VERDURAS
Espárragos
Repollitos de Bruselas,
brócoli, coliflor, chícharos,
frijoles, cebollas, pimientos
Repollo, apio
Zanahorias, pastinaca,
betarraga y nabos
Lechuga
REFRIGERADOR
1 mes
1 semana
1 a 2 semanas
3 a 5 días
10 días
1 a 2 meses
3 semanas
2 a 4 días
1 mes
2 a 4 días
3 a 4 días
2 a 3 días
3 a 5 días
1 a 2 semanas
2 a 3 días
1 a 2 días
3 a 5 días
1 a 2 semanas
7 a 10 días
7 a 10 días
CONGELADOR
6 a 9 meses
No se recomienda
No se recomienda
No se recomienda
No se recomienda
4 a 6 meses
Puede quedar migajoso
No se recomienda
9 a 12 meses
8 meses (cocinadas)
6 meses
(enteros/pelados)
No se recomienda
6 meses
1 mes (enteras)
No se recomienda
6 a 12 meses
8 a 10 meses
8 a 10 meses
10 a 12 meses
8 a 10 meses
No se recomienda
SUGERENC
IAS PARA LA CONSERVACION
Envuelva bien o cubra.
Verifique la fecha del envase. Cierre firmemente.
No vuelva a colocar las porciones no usadas en el
envase original. No congele la crema a menos que
sea batida.
Envuelva bien.
Guarde en el envase original.
Verifique la fecha del envase.
Envuelva bien.
Recorte cualquier moho.
Refrigere colocando los extremos pequeños hacia
abajo.
Por cada taza de yemas que se desee congelar,
agregue 1 cucharadita de azúcar si se van a usar
en dulces o una cucharadita de sal si es para
platillos no dulces.
También se pueden guardar manzanas verdes o
duras a una temperatura de 16 a 21°C (60 a 70°F).
Madúrelas a temperatura ambiente antes de ser
refrigeradas. Los plátanos y los aguacates se
obscurecen cuando son refrigerados.
También se pueden refrigerar a 16 - 21°C
(60 a 70°F). Si se refrigeran, guárdelas sin cubrirlas.
No madurarán después de la compra.
Use rápidamente.
No lave antes de refrigerar.
Guarde en el cajón de las verduras.
Envuelva los alimentos que producen olor.
Deje los chícharos en las vainas.
Envuelva los alimentos que producen olor y
refrigere en el cajón de las verduras.
Retire los tallos verdes. Envuelva los alimentos que
producen olor y refrigere en el cajón de las verduras.
Los tiempos de conservación son aproximados y pueden variar dependiendo del tipo de empaque, temperatura de
almacenamiento y la calidad del alimento cuando fue comprado.
28
Page 30

S
Sugerencias para Conservar los Alimentos
Fuentes : Ministerio de Agricultura de los Estados Unidos; Instituto de Mercadotecnia de Alimentos;
Servicio de Extensión Cooperativa, Universidad Estatal de Iowa
ALIMENTOS
AVES Y PESCADO
Pollo y pavo, entero
Pollo y pavo, presas
Pescado
CARNES
Tocino
Res o cordero, molida
Res o ternera, asada y bistec
Jamón, completamente cocido,
entero
mitad
rebanadas
Fiambres
Cerdo, asado
Cerdo, chuletas
Salchichas, molidas
Salchichas, ahumadas
Ternera
Salchichas
REFRIGERADOR
1 a 2 días
1 a 2 días
1 a 2 días
7 días
1 a 2 días
3 a 5 días
7 días
5 días
3 días
3 a 5 días
3 a 5 días
3 a 5 días
1 a 2 días
7 días
3 a 5 días
7 días
CONGELADOR
12 meses
9 meses
2 a 6 meses
1 mes
3 a 4 meses
6 a 9 meses
1 a 2 meses
1 a 2 meses
1 a 2 meses
1 a 2 meses
4 a 6 meses
4 meses
1 a 2 meses
1 a 2 meses
4 a 6 meses
1 mes
SUGERENC
IAS PARA LA CONSERVACION
Mantenga en el envase original para refrigeración.
Coloque en el compartimiento de la carne y
queso. Cuando congele por más de 2 semanas,
envuelva nuevamente con envoltura para
congelador.
Las carnes frescas pueden ser guardadas en el
envase original para su refrigeración.
Colóquelas en el compartimiento de la carne y
queso. Cuando congele por más de 2 semanas,
envuelva nuevamente con papel para congelador.
L
os fiambres sin abrir envasados al vacío pueden
ser guardados durante 2 semanas en el
compartimiento de la carne y queso.
L
as carnes procesadas deben ser bien envueltas y
guardadas en el compartimiento de la carne y
queso.
29
Page 31

S
Almacenamiento del Refrigerador
Cuidado y Limpieza
Vacaciones*
Si estará ausente durante un mes o menos, deje los controles
en la posición normal.
Durante ausencias más prolongadas :
1. Retire todos los alimentos.
2. Apague la máquina de hacer hielo (si está instalada) y
cierre la llave del suministro de agua al refrigerador.
3. Desenchufe el refrigerador.
4. Desagüe la tubería de llenado de la máquina de hacer hielo
y seque bien la máquina.
* Si está usando una máquina de fabricar hielo, descártelos primeros dos o tres lotes de hielo cuando el refrigerador sea puesto en
funcionamiento nuevamente.
Consulte la tabla en la página siguiente para las
instrucciones específicas de limpieza del refrigerador.
ADVERTENCIA
A fin de evitar choque eléctrico que puede causar una lesión
personal grave o mortal :
• Desenchufe el cordón eléctrico antes de la mudanza o de la
limpieza del refrigerador.
• Desenchufe el cordón eléctrico antes de reemplazar el foco.
PRECAUCIÓN
A fin de evitar una lesión personal:
• Use guantes cuando cambia un foco para protegerlo contra
posibles vidrios rotos.
Condensador 'No Clean'
Un condensador limpio significa rendimiento más eficaz del
refrigerador. Gracias al diseño único del condensador 'No
Clean', ya no hay necesidad de efectuar la limpieza rutinaria
del condensador para uso doméstico normal.
Algunos entornos pueden ser muy polvorientos o grasosos.
En tales casos, el condensador se puede limpiar
periódicamente para asegurar el máximo rendimiento.
Limpieza debajo del Refrigerador
1. Desenchufe el cordón eléctrico.
2. Levante los tornillos niveladores, si están enganchados
(ver página 43).
5. Limpie y seque el refrigerador meticulosamente.
6. Deje las puertas abiertas para evitar malos olores.
ADVERTENCIA
El daño causado por agua debido a una conexión y desagüe
inapropiado del agua puede causar crecimiento de
moho/mildiú.
Mudanza*
Cuando se mude, siga las instrucciones descritas en la sección
Vacaciones. Además, retire y empaque con cuidado todas las
piezas que se pueden desmontar fácilmente. Transporte el
refrigerador en posición vertical con las puertas cerradas y
aseguradas con cinta adhesiva.
3. A fin de evitar un derrame accidental, desagüe cualquier
agua de descongelación que se pueda haber acumulado en
la bandeja de desagüe. Esta bandeja se encuentra detrás de
la rejilla delantera inferior. Para retirar la bandeja, empuje
hacia abajo ambos lados y deslícela hacia afuera.
4. Si su modelo está conectado a un suministro de agua para
una máquina de hacer hielo automática, corte el agua antes
de mover el refrigerador.
5. Retire el refrigerador de la pared.
Reemplazo de un Foco
Siempre use un foco estándar de 40 watts.
Interior del Refrigerador
El foco se encuentra debajo de la pared superior del
interior del refrigerador.
• Quite la cubierta del foco (el algunos modelos).
• Destornille el foco y reemplácelo.
Interior del Congelador
La luz del refrigerador (modelos selectos) se encuentra
en la pared trasera cerca de la esquina superior
derecha.
Para retirar la tapa del foco :
• Sostenga la parte superior e inferior de la tapa del foco.
Oprima hacia adentro las áreas de las lengüetas de
instalación aplicando suficiente presión para
desenganchar las lengüetas. Al mismo tiempo, gire la
tapa hacia abajo y retírela.
• Desenrosque el foco y reemplácelo.
• Vuelva a colocar la tapa del foco girándola de nuevo a
su lugar y enganchando las lengüetas en los agujeros
correspondientes.
30
Page 32

S
Cuidado y Limpieza
* Los nombres de los productos son las marcas registradas de los respectivos fabricantes.
ADVERTENCIA
Para evitar choque el
é
ctrico que puede causar una lesi
ón
personal grave o mortal, desenchufe el refrigerador antes de
la limpieza. Ench
úfelo después de la limpieza.
Tabla de Limpieza del Refrigerador
ATENCION
A fin de evitar una lesi
ó
n personal o daños materiales, observe lo
siguiente :
• No toque las superficies refrigeradas con las manos h
úmedas o
mojadas pues pueden adherirse a las superficies met
álicas fr
ías.
• Antes de limpiar el congelador ,espere a que se entibie.
• Deje que las parrillas de vidrio se entibien antes de sumergirlas
en agua tibia.
PIEZA
EXTERIOR DEL
REFRIGERADOR
Rejilla inferior delantera
Condensador
Manijas de la puerta
Superficies metálicas
pintadas: gabinetes,
puertas
Bandeja de Desagüe del
Agua de Descongelación.
Puertas de acero inoxidable
(modelos selectos)
Acabado exterior de
apariencia inoxidable
Detergente suave y agua tibia.
Detergentes líquidos suaves en aerosol.
Accesorio de la aspiradora.
Escobilla de Limpieza
(Pieza No. 20001017).
Disponible de su Distribuidor.
Detergente suave y agua tibia.
Detergentes líquidos suaves en aerosol.
Detergente suave y agua tibia.
Detergentes líquidos suaves en aerosol.
Detergente suave y agua tibia.
Limpieza leve: detergente suave y
agua tibia.
Suciedad moderada: usar 'Bon Ami'*.
Descoloraciones: Limpiador de
Acero Inoxidable 'Cameo'*.
Li
mpie con un paño o esponja limpia y
suave y con detergente suave en agua
tibia.
SUGERENC
IAS Y ADVERTENCIAS
No necesita limpiarlo a menos que esté ubicado en un lugar
grasoso, polvoriento o muy transitado por animales domésticos
Seque con un paño suave y limpio.
Nunca limpie el refrigerador con un paño sucio o una toalla
mojada. Estos pueden dejar residuos que pueden rayar o
debilitar la pintura.
No use esponjas de alambre, productos de limpieza en polvo,
blanqueador o productos que contengan blanqueador. Estos
productos pueden rayar y corroer el acabado de la pintura.
No use cera en las piezas de plástico o de vinilo.
No es necesaria la limpieza periódica a menos que el medio
ambiente sea muy húmedo o polvoriento. La bandeja debe ser
desaguada y limpiada antes de mover el refrigerador (ver página 54).
Use un paño o una esponja suave.
Siempre limpie siguiendo el grano del acero inoxidable.
No use blanqueador con cloro ni un producto de limpieza que
contenga blanqueador con cloro.
Después de la limpieza, enjuague y seque. Para restaurar el
brillo y quitar las vetas use el rociador para acero inoxidable
'Stainless Steel Magic Spray'* (Pieza No. 20000008).
No use limpiadores abrasivos o ásperos o limpiadores diseñados
para acero inoxidable. Seque bien con un paño suave.
INTERIOR DEL
REFRIGERADO
R Y DEL
CONGELADOR
Junta de la puerta
Bandejas de vidrio
Pared interior y
revestimiento de
la puerta
Cajones, depósitos,
parrillas, etc.
Bicarbonato y agua tibia.
Detergente suave y agua tibia.
Detergente suave y agua tibia.
Limpiavidrios.
Detergentes líquidos suaves en aerosol.
Detergente suave y agua tibia.
Bicarbonato y agua tibia.
Detergente suave y agua tibia.
Use 1 o 2 cucharadas de bicarbonato por cada litro (cuarto de
galón) de agua.
Asegúrese de exprimir bien el paño o la esponja antes de limpiar
alrededor de los controles, luces o piezas eléctricas.
El vidrio debe estar a la temperatura ambiente antes de
sumergirlo en agua tibia. Nunca use agua caliente.
V
ea las indicaciones anteriores para la solución de bicarbonato.
No use productos de limpieza abrasivos, detergentes
concentrados, blanqueadores, ceras de limpieza, solventes ni
pulidores para limpiar el interior del refrigerador.
Seque esmeradamente. No los lave en el lavavajillas automático.
31
Retire la rejilla inferior delantera (ver página 21).
(ver página 30).
Page 33

S
Localización y Solución de Averías
Sonidos Normales de Funcionamiento
Las mejoras en el diseño de la refrigeración pueden producir sonidos en su nuevo refrigerador que son diferentes o que no
existían en el modelo antiguo. Estas mejoras fueron hechas para crear un refrigerador que sea mejor para conservar los
alimentos, que ahorre energía y que en general sea más silencioso. Debido a que los nuevos modelos funcionan más
silenciosamente, ahora es posible detectar sonidos que estaban presentes en los modelos más antiguos pero que pasaban
inadvertidos debido a los niveles de ruido más altos. Muchos de estos sonidos son normales. Por favor tome nota de que las
superficies adyacentes a un refrigerador, tales como las paredes, los pisos y la estantería pueden a veces aumentar el nivel de
estos sonidos. A continuación se indican algunos de los sonidos normales que pueden estar presentes en un refrigerador nuevo.
CALENTADOR DE DESCONGELACION :
Durante el ciclo de descongelación
automática, se puede escuchar un sonido
como chisporroteo cuando las gotas de
agua entran en contacto con el calentador
de descongelación.
Esto es un sonido normal que se escucha
durante la descongelación.
TEMPORIZADOR DE DESCONGELACION : Los refrigeradores
que no se descongelan tienen un
temporizador de descongelación
que produce un chasquido cuando
el refrigerador comienza o termina
un ciclo de descongelación. es un
sonido normal que se escucha
durante la descongelación.
CONTRACCION Y EXPANSION DEL
COMPARTIMIENTO DEL CONGELADOR :
Puede ocurrir un sonido como un estallido en el
congelador cuando el refrigerador comienza a
funcionar debido a la contracción o expansión
de los materiales en el área del congelador.
FLUJO DEL REFRIGERANTE : El flujo del
refrigerante en su refrigerador puede causar
un sonido como borboteo o golpeteo cuando
el refrigerador esté funcionando o justo
después de que el refrigerador termina el
ciclo. El refrigerante todavía está circulando
en las tuberías.
NIVELADO DEL GABINETE : Un gabinete que no
esté nivelado puede causar sonidos vibratorios o
golpeteo. Esto puede solucionarse ajustando los
tornillos o ruedecillas niveladoras en forma correcta.
COMPRESOR : Para que un refrigerador
nuevo funcione más eficientemente, el sistema
de refrigeración puede funcionar por un tiempo
más prolongado para conservar los alimentos a
la temperatura deseada para su frescura.
Este nuevo compresor de alta eficiencia puede
funcionar por períodos más largos y generar
sonidos tales como un zumbido agudo o un
sonido pulsante.
SONIDOS DE LA CIRCULACION DEL AIRE :
Tanto el ventilador del evaporador del congelador
como el ventilador del condensador en la parte inferior
del gabinete crearán sonidos de circulación del aire.
El ventilador del evaporador está circulando el aire frío
a través del compartimiento del refrigerador y
congelador. El ventilador del condensador está
extrayendo el calor generado cuando el gabinete es
enfriado.
32
Page 34

S
Localización y Solución de Averías
Consulte primero esta tabla de sugerencias para la soluci
ón de aver
ías…posiblemente no sea necesario
solicitar servicio.
PROBLEMA
No funciona
Funciona durante
mucho tiempo,
con demasiada
frecuencia
La luz no trabaja
Resplandor visible
en los respiraderos
del congelador
Aire tibio
proveniente de la
parte inferior del
gabinete
El gabinete vibra
Olor en el gabinete
Ruidos, sonidos y
vibraciones
El congelador,
refrigerador
demasiado tibios
Congelador,
refrigerador está
demasiado fríos
CAUSAS POSIBLES
El cordón eléctrico no está enchufado.
El tomacorriente no tiene electricidad.
Control del refrigerador está en la posición
"OFF" (Apagado).
El refrigerador está en descongelación
automática.
Temperatura ambiente inferior a 13°C
(55°F).
Los ciclos de los refrigeradores modernos
son más frecuentes para mantener
temperaturas uniformes.
Esto es normal cuando el refrigerador es
nuevo o ha sido recientemente instalado.
La puerta se abre durante períodos
prolongados o con mucha frecuencia.
La puerta no queda bien cerrada.
La rejilla inferior delantera está bloqueada.
El foco se quemó.
No llega energía eléctrica al refrigerador.
La aparición de un brillo o reflejo rojo es
normal durante el ciclo de descongelación.
Este es flujo de aire normal para la
circulación del condensador.
El gabinete no está nivelado.
El suelo es débil.
L
os alimentos que producen olores no están
tapados.
Ruido normal.
Control ajustado a una temperatura
demasiado tibia. Aperturas prolongadas de
la puerta.
La
temperatura ambiente es inferior a 13°C
(55°F).
L
os productos con alto contenido de azúcar
pueden que no se endurezcan completamente
cuando están congelados.
El control está en un ajuste demasiado frío.
SOLUCION
Enchufe el refrigerador en el tomacorriente.
Reemplace el fusible, vuelva a reponer el disyuntor.
Ajuste el control en el compartimiento del refrigerador (ver
Espere 25 minutos para que el ciclo de descongelación
termine.
Vuelva a ubicar el refrigerador en un clima apropiado (ver
Espere 24 horas hasta que se enfríe completamente (ver
Esto es normal. Disminuya las aperturas de la puerta.
V
erifique para ver si algo está evitando que la puerta se cierre.
Desbloquee para que el aire tibio salga del refrigerador.
Verifique si el cordón eléctrico está bien enchufado.
Cubra o envuelva los alimentos que produzcan olor. Limpie
el gabinete.
Reduzca la frecuencia de apertura de la puerta.
Refrigerador no funcionará lo suficiente como para mantener
la temperatura apropiada.
FUNCIONAMIEN
TO
GENERALRUIDOTEMPERATURA
33
página 24).
Instalación en la página 21).
Controles de la Temperaturaen la página 24).
Desenchufe el refrigerador y cambie el foco (ver página 30).
Nivele el gabinete (ver página 21).
Ver Sonidos Normales de Funcionamiento (página 32).
El gabinete no está nivelado. Nivele el gabinete (ver página 21).
Ajuste el control de la temperatura (ver página 24).
Ajuste el control de la temperatura (ver página 24).
Page 35

S
Localización y Solución de Averías
PROBLEMA
Los cubos de hielo
tienen olor/sabor
Los cubos de hielo se
pegan en la bandeja
Los cubos de hielo
se evaporan
Humedad en la
superficie del
gabinete entre las
puertas
Humedad en las
paredes interiores
del refrigerador o
en el cajón de
las verduras
Los alimentos se
secan
Humedad excesiva
en el cajón de las
verduras
CAUSAS POSIBLES
Cubos de hielo añejos.
Mala calidad del agua.
Olor/sabor transmitido de los alimentos al
hielo.
Residuo de minerales en el agua.
Uso limitado del hielo.
Es común durante períodos de alta
humedad.
Tiempo húmedo caliente.
Aperturas prolongadas o muy frecuentes
de la puerta.
La puerta no está cerrada en forma
correcta.
Los alimentos no envueltos en forma
correcta.
El cajón de las verduras no está bien
cerrado.
Los controles de la temperatura están en
un ajuste muy frío.
Los paquetes no están envueltos o
sellados en forma correcta.
Tiempo húmedo, caliente.
El control deslizante de humedad en el
cajón de las verduras necesita ser
ajustado.
Los productos frescos estaban demasiado
húmedos antes de guardarlos.
Los alimentos no fueron guardados en
forma apropiada.
SOLUCION
Descártelos; los cubos de hielo pueden absorber olores
que afectan también el sabor.
Póngase en contacto con la compañía de tratamiento de
agua de su localidad.
Envuelva bien los alimentos.
Limpie las bandejas con un paño humedecido en vinagre
hasta que queden limpias.
Descarte los cubos de hielo añejos.
Normal.
Reduzca las aperturas de la puerta.
Verifique si existe algo que evite que la puerta se cierre.
Envuelva o cubra bien todos los alimentos.
Cierre bien el cajón de las verduras.
Ajuste los controles de la temperatura
(ver página 47).
Envuelva o cubra bien todos los alimentos.
Reduzca las aperturas de la puerta.
Deslice el control al ajuste "Fruit" (Fruta) para permitir que
salga más humedad del cajón.
No lave los productos antes de refrigerarlos. Lave los
productos frescos justo antes de usarlos.
Guarde las verduras con hojas en forma suelta en una
bolsa de plástico cerrada. Guarde los productos que tienen
cáscara (por ej. manzanas, naranjas, peras, uvas, pepinos,
etc.) en una bolsa ventilada o sin envolver en el cajón.
Guarde los hongos y frutillas en sus cartones o cajas
ventiladas originales, no en bolsas plásticas.
HIELO HUMEDAD
34
Page 36

Installation Door
35
Page 37

Installation Door
36
Page 38

GARANTÍA DEL REFRIGERADOR
Su refrigerador esta protegido por esta garantía
GARANTIA COMPLETA Un año desde la fecha
de compra original.
Pagar los costos de reparación o remplazo de cualquier parte de
este aparato que se encuentren defectuosas en materiales o mano
de obra. No incluye filtros de cartucho de hielo y agua originales y
de reemplazo (si esta equipado). Los filtros de cartucho originales y
de reemplazo tienen una garantía de 30 dias (solo partes).
Costo de las llamadas de servicio que se enlistan bajo
RESPONSABILIDADES NORMALES DEL CONSUMIDOR. *
1
2
3
4
5
6
EXCLUSIONES
Está garantía no cubre lo siguiente:
1
2
3
4
SI USTED
NECESITA
Rev. 01/2013
CONTACTO PARA INFORMACIÓN
336-761-1212
Crosley Corporation
111 Cloverleaf Dr., Suite 200
CONTACTO PARA INFORMACIÓN
SOBRE LA GARANTÍA:
844-CROSLEY (844-276-7539)
CrosleyCare Service
3 Sperry Rd.
Fairfield, NJ 07004
Winston-Salem, NC 27103
www.crosley.com
GARANTÍA
DAÑOS DERIVADOS O INCIDENTALES TALES COMO DAÑOS A LA PROPIEDAD Y GASTOS INCIDENTALES OCASIONADOS POR EL
INCUMPLIMIENTO DE ESTE ESCRITO O CUALQUIER OTRA GARANTÍA.
Las llamadas que no involucren el funcionamiento defectuoso ni los defectos de fabricación o materiales, o para electrodomésticos que no
estén en uso doméstico normal, el consumidor deberá pagar por dichas visitas.
Daños causados por reparaciones realizadas por otros centros de servicio que no sean los centros de servicio autorizados por
Crosley Corporation, Crosley Canada Corp. uso de piezas que no son las partes genuinas de Crosley Corporation, obtenidas de otros centros
de servicio o externos; causas como abuso, mal uso, suministro eléctrico inadecuado o casos fortuitos.
Productos con los números de serie que han sido removidos o alterados y no pueden ser determinados facilmente.
NOTA: Algunos estados no permiten la exclusión o limitación de daños incidentales o consecuentes, por lo que esta limitación o exclusión
puede ser no aplicable en su caso.
Uso correcto del electrodoméstico de acuerdo con las instrucciones proporcionadas con el producto.
Instalación correcta por un técnico autorizado de acuerdo con las instrucciones proporcionadas con el producto y de acuerdo con todos los
códigos locales de plomería, electricidad y/o gas.
La conexión adecuada a una fuente de alimentación conectada a tierra con suficiente voltaje, reemplazo de fusibles quemados, reparación
de conexiones sueltas o defectos en el cableado de la casa.
Gastos para facilitar el acceso al electrodoméstico para el servicio, tales como la remoción de molduras, armarios, estantes, etc, que no son
parte del electrodoméstico cuando este fue embarcado de la fabrica.
Daños despues de terminar la instalación.
Reemplazo de bombillas y/o tubos fluorescentes (en los modelos con estas características).
En los EE.UU., Su electrodoméstico está garantizado por Crosley Corporation. No autorizamos a ninguna persona a cambiar o agregar ninguna de nuestras obligaciones bajo está
garantía. Nuestras obligaciones de servicio y partes bajo está garantía deben ser realizadas por un centro de servicio autorizado Crosley Corporation. En Canada su electrodoméstico
Está garantía solo se aplica en los 50 Estados de los EE.UU., en Puerto Rico, y en Canada. Las características o especificaciones descritas o
ilustradas están sujetas a cambio sin previo aviso. Todas las garantías están hechas por Crosley Corporation. En Canada, su electrodoméstico
está garantizado por Crosley Canada Corp.
* Ademas de la garantía mostrada arriba, pregunte a su distribuidor sobre la Garantía Extendida Limitada Crosley sin cargo extra para usted del 2º hasta el 10º año.
*RESPONSABILIDADES
NORMALES DEL
CONSUMIDOR
Está garantía se aplica solo a los productos de uso doméstico normal, y el
consumidor es responsable de las opciones siguientes:
Conserve la factura de compra, la boleta de entrega o cualquier otro registro de pago adecuado. La fecha en el recibo establece el periodo de garantía, si llegara a
requerir servicio. Si el servicio se lleva acabo, es de su mejor interés de obtener y conservar todos los recibos. Está garantía escrita le otorga derechos legales
específicos. Usted también puede obtener otros derechos que varían de estado a estado. El servicio realizado bajo está garantía debe ser obtenido a través de
POR UN AÑO
PERIODO DE
GARANTIA
A TRAVES DE NUESTROS CENTROS DE
SERVICIO AUTORIZADOS, HAREMOS:
EL CONSUMIDOR SERÁ RESPONSABLE DE:
es garantizado por Crosley Canada Corp.
Crosley Corporation or Crosley Canada Corp.
SERVICIO
DEL PRODUCTO:
Aviso legal: El diseño y las especificaciones están sujetas a cambios sin previo aviso para mejorar el producto.
CONTACTO PARA INFORMACIÓN
SOBRE LA GARANTÍA (Canadá):
800-461-7700
CrosleyCare Canada
99 Bruce Crescent
Carleton Place, ON K7C 3T3,
Canada
 Loading...