

Page 1
910-290901-0040-200
CR6007A
Tech Series
www.crosleyradio.com
Page 2
“
Ventilation not being impeded.”
“
Do not exposed to dripping or splashing and that no objects filled with liquids, such
as vases, shall be placed on the apparatus.”
Specification
FREQUENCY : FM 88 -108 MHz
AM 530 - 1700 KHz
USB Port 2.0 : Full Speed 512MB - 4GB
(Support FAT16, FAT32)
POWER SOURCE : AC Adaptor AC120V/DC 9V 800mA
ANTENNA : External antenna for FM
Built-in ferrite bar for AM
POWER CONSUMPTION : 15W
SPEAKER SIZE : 2" x 3" Dynamic type x 2
SPEAKER OHM : 4 ohm
SPEAKER WATT : 3-5W
POWER OUTPUT : 1.2W x 2
REPLACEMENT NEEDLE : NP1
*DESIGN AND SPECIFICATIONS SUBJECT TO CHANGE WITHOUT NOTICE.
USB Specification:
Interface
- USB 2.0 Full speed, HOST (USB HUB is not supported) Corresponding Flash memory
- Compatible with MPEG Audio 1, 2, 2.5
- Compatible with Layer 1, 2, 3
- Compatible with Bit rate: 128 – 320 Kbps
- Subfolder nest : 8 levels
- Number of track / titles max 999
- Support ID3 tag V2.0
The exclamation point
within an equilateral
triangle is intended to
alert user to the
presence of important
operating and
maintenance (servicing)
instruction in the
literature accompanying
the appliance.
RISK OF ELECTRIC SHOCK
DO NOT OPEN
CAUTION
The lighting flash with
arrowhead symbol, within
an equilateral triangle, is
intended to alert user to
the presence of uninsulated
"dangerous voltage" within
the product's enclosure
that may be of sufficient
magnitude to constitute
risk of electric shock
to persons.
CAUTION: TO REDUCE
THE RISK OF ELECTRIC
SHOCK, DO NOT REMOVE
COVER (OR BACK). NO
USER - SERVICEABLE
PARTS INSIDE. REFER
SERVICING TO QUALIFIED
SERVICE PERSONNEL.
WARNING:
TO PREVENT FIRE OR SHOCK HAZARD, DO NOT EXPOSE THIS
APPLIANCE TO RAIN OR MOISTURE. DO NOT REMOVE COVER.
PILOT LAMPS SOLDERED IN PLACE. NO USER SERVICEABLE
PARTS INSIDE. REFER SERVICING TO QUALIFIED SERVICE
PERSONNEL.
ENGLISH
37
Guía para resolver los problemas
¿No hay corriente?
1 Verifique que el aparato está conectado
correctamente.
2 Verifique que el aparato está encendido. Gire
el BOTÓN VOLUMEN – MARCHA/PARO más
allá de la posición “clic” para encender el
aparato.
¿No hay sonido?
1 Verifique el INTERRUPTOR DE ENTRADA en
la parte de atrás del aparato para confirmar
que está en la posición PARO.
2 Verifique el nivel del sonido con girar el BOTÓN
VOLUMEN – MARCHA/PARO.
3 Verifique que los aurículares no están
conectados al aparato.
4 Verifique la posición del SELECTOR DE
FUNCIÓN.
¿El Tocadiscos no funciona?
1 Verifique que el SELECTOR DE FUNCIÓN
está regulado a la posición phono [tocadiscos].
2 Trate de mover el brazo acústico hacia la
derecha hasta que Usted ecuche un “clic”.
3 Verifique que se ha quitado la tapa de protección
blanca de la aguja.
ESPA OL
Generalidades
Unidad de Memoria USB /Tarjeta SD – no
hay música cuando se presione la tecla
PLAY/PAUSE.
1 Verifique que hay ficheros de música MP3
almacenados en la unidad de memoria USB
Flash Drive / Tarjeta SD.
2 Verifique que la capacidad de la unidad de
memoria USB Flash Drive / Tarjeta SD no
excede los 4GB puesto que el límite de este
aparato es 4GB como máximo.
3 Trate de remeter la unidad de memoria USB
a cero con apagar y volver a encender la
energía al aparato.
4 Verifique a ver si los ficheros de la unidad de
memoria/tarjeta son tal vez en formato WMA.
Este aparato no toca el formato WMA, sólo el
formato MP3.
5 Todas las marcas de unidad de memoria USB/
tarjeta SD no son compatibles con este aparato
– esto no es funcionamiento erróneo del
aparato.
No se puede grabar música en la unidad
de memoria USB/ Tarjeta SD
1 Verifique que la unidad de memoria USB /
Tarjeta SD no está completamente cargada.
2 Verifique que el cerrojo en la tarjeta SD se
halla en posición descorrido.
3 Es posible que la unidad de memoria/tarjeta
no es compatible ó no tiene la capacidad
correcta (hasta 4GB como máximo) – todas
las unidades de memoria en el mercado no
son garantizadas a funcionar con este aparato
en razón de sus parametros de fabricación.
El control remoto no funciona
1 Ponga nueva batería. Véanse las
Especificaciones Técnicas para el tipo de
batería requerida.
2 Estese seguro de apuntar bien la célula de
recepción IR del aparato cuando Usted utiliza
el control remoto.
3 Quite todos los obstáculos del camino entre
el control remoto y el sensor IR del aparato
afin de dejar un camino derecho a la señal del
control remoto hacia el aparato.
Page 3
ENGLISH
1 Remove packing materials from unit.
Note: Save all packing materials.
2 Remove plastic bag covering radio.
3 Remove AC Adaptor from Packing.
4 Open lid and remove styrofoam shipping material
from turntable.
5 Remove black tie-wrap from under the tone arm.
6 Remove white protective needle cover by gently
pulling towards the front of the unit.
7 Install the top lid onto the unit.
SETUP
1 Untie the wire on the AC Adaptor.
2 Untie the FM antenna and allow it to hang down
in a straight line for optimum FM reception. If
you have trouble tuning a FM station, move the
external FM antenna for best reception. Do not
connect FM antenna to outside antenna.
1 Plug the AC Adaptor into appropriate wall outlet.
2 Plug the small end of the adaptor into the AC
ADAPTOR JACK on the back of the unit.
4
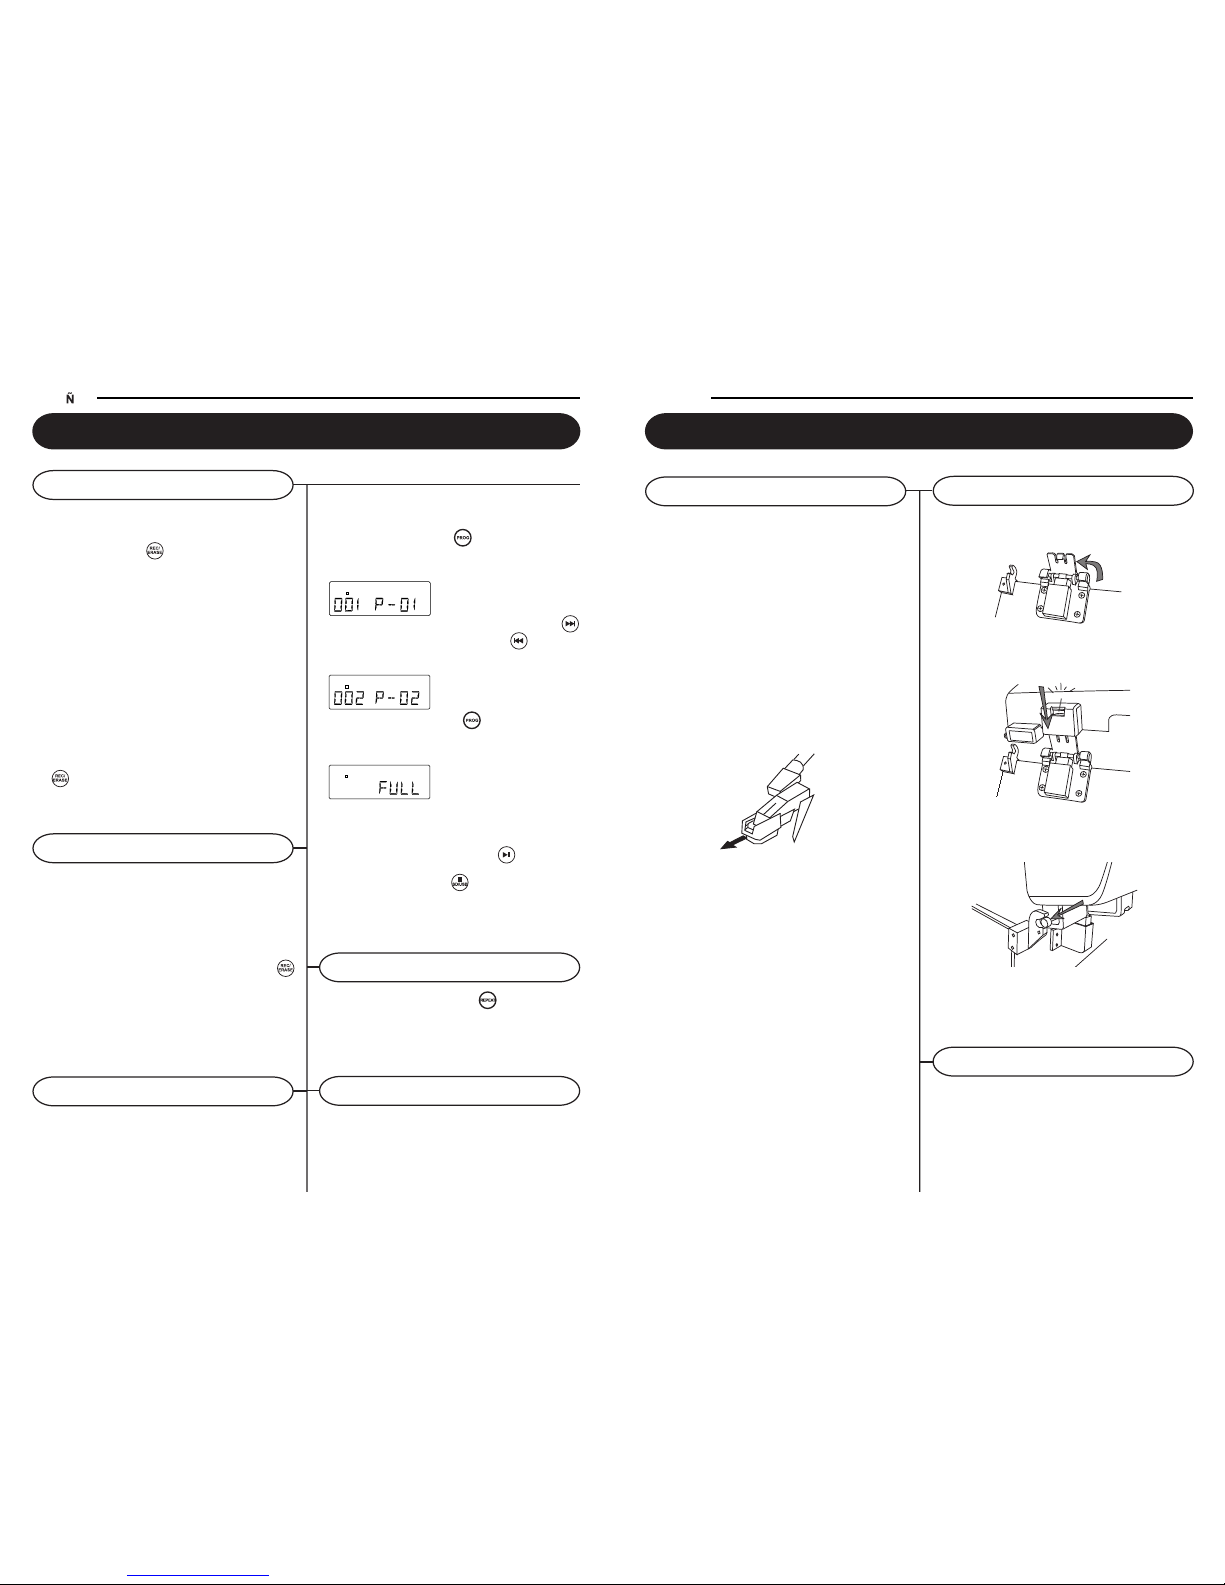
1 Flip the LID LOCK HINGE towards the back of
the unit.
2 Position LID over the turntable and press the lid
onto the LOCK HINGE as shown below.
3 As you press the lid into place, align the PIVOT
PINS on the LID with the LID PIVOT POINTS as
shown below.
4 Press the LID all the way in until the PIVOT PINS
snap into the LID PIVOT POINTS and the LOCK
HINGE clicks into place.
Getting Started
Unpacking
Power Source
Lid Installation
click
35
CD
P
Este aparato le permite borrar canciones individuales
de su tarjeta SD ó de su unidad de memoria USB
Flash Drive. Afin de borrar una canción específica,
es necesario que esta canción ésté en camino de
tocar.
1 Al modo SD/USB, seleccione la canción que Usted
quiere borrar y comience la lectura.
2 Una vez que la canción está en camino de tocar,
presione y mantenga la tecla REC/ERASE /
[GRABAR/BORRAR] durante 2 segundos
aproximadamente. La canción va a parar de tocar
y será borrada.
3 La palabra “delete" [borrar] va a mostrarse en la
pantalla brevamente.
NB:Se puede borrar solamente una canción a la
vez. No es posible borrar toda la tarjeta SD ó toda
la unidad de memoria USB de una vez.
1. Con el aparato al modo CD, USB ó SD, verifique
que la lectura de la música está parada. Presione
la tecla PROGRAMAR /
para comenzar la
programación.La pantalla va a mostrar "P" y P001 en parpadeando para indicar que Usted está
en modo de Programación.
2. Presione la tecla BUSCAR PARA ADELANTE/
ó la tecla BUSCAR PARA ATRÁS / una ó
varias veces hasta que el número de la pista
aparezca en la pantalla.
3. Presione PROGRAMAR /
para confirmar su
selección. La pantalla muestra el número de la
pista entrada en memoria y la posición siguiente
de almancenaje.
4. Repita las etapas 2-3 para seleccionar y poner
en memoria todas las pistas deseadas. La pantalla
va a mostrar “FULL“ [LLENO] en el caso que Usted
intenta programar más de 20 pistas.
5. Presione la tecla PLAY/PAUSE /
para tocar
las pistas programadas.
6. Presione la tecla STOP /
dos veces para borrar
las selecciones programadas. Las selecciones
programadas serán borradas también cuando se
apaga el aparato ó cuando se selecciona una
fonción diferente.
CD
P
P
CD
Usted puede programar hasta 20 pistas de un CD,
de una unidad de memoria USB ó de una tarjeta SD
para tocar en la secuencía que Usted ha escogido.
Siga las instrucciones abajo para programar las
pistas.
1. Para copiar una canción individual de una USB
en una SD ó de una SD en una USB, presione la
tecla REC/ERASE /
[GRABAR/BORRAR]
durante la lectura de la canción que Usted quiere
grabar para comenzar la operación de copiar. La
lectura se parará y el sistema leerá el contenido
y se preparará a copiar la canción.
2. La pantalla va a mostrar el icono “ REC ".
3. La pantalla va a mostrar “COPY” [COPIAR] tan
pronto como comienza la operación de copiar.
4. La pantalla va a mostrar el icono para la unidad
en la cual Usted está grabando la copia. “USB”
ó “CARD” va a comenzar a parpadear y se parará
una vez que la operación de copiar ha terminado.
5. La fuente de orígin, USB ó SD comenzará a tocar
desde el comienzo una vez que la operación de
copiar ha terminado.
6. Usted puede también copiar todas las canciones
al mismo tiempo de una USB en una SD ó de
una SD en una USB. Al modo USB ó SD y con
la lectura parada, presione la tecla REC/ERASE
/
. [GRABAR/BORRAR] El aparato va a
copiar todas las canciones de la USB a la SD ó
de la SD a la USB. No se puede parar el proceso
de copiar hasta que el proceso llegue al fin.
ESPA OL
Operación de Base
Borrar las Pistas MP3
Copiar los MP3
Lectura programada
X-BASS
Modo Tocar
1 Presione la tecla REPEAT / en el control
remoto en el modo Tocar.
2 La función del Modo T ocar por defecto es PARO.
3 Se puede escoger entre 3 tipos de Modo Tocar
para los MP3: REPETIR 1 / REPETIR CARPETA
/ REPETIR TODAS.
Presione la tecla X-BASS MARCHA/PARO para
activar ó desactivar el efecto X-Bass. La activación
de la capacidad X-Bass añade un tono más rico y
sonoro.
Page 4
33
Encienda el aparato con girar el SELECTOR DE
VOLÚMEN MARCHA/PARO ubicado en la parte
delantera a la posición MARCHA.
1 Regule el SELECTOR DE FUNCIÓN al modo
Tocadiscos [Phono].
2 Ponga el SELECTOR DE VELOCIDAD a la
velocidad deseada (33-1/3, 45 ó 78 rpm).
Coloque su disco en el tocadiscos.
3 Mueva el braZO ACÚSTICO lijeramente hacia
la derecha hasta que Usted escuche un clic para
activar el tocadiscos.
4 Ponga el brAZO ACÚSTICO por encima del
disco al punto donde Usted quiere que comience
la música. Regule el BOTÓN DE VOLÚMEN
MARCHA/PARO al volúmen deseado.
5 Al fin del disco, el brazo acústico va a parar
automáticamente. Hay que regresar el braZO
aCÚSTICO a su soporte manualmente.
Este adaptador le permite tocar los discos 45 rpm.
1. Ponga el ADAPTADOR (44) en el eje.
2. Coloque su disco 45 rpm suavemente en el
tocadiscos.
3. Siga las instrucciones en la sección operación
del tocadiscos para tocar su disco.
1 Regule el SELECTOR DE FUNCIÓN al modo
Tuner
2 Regule le SELECTOR MODULACIÓN para
seleccionar la banda deseada (AM/FM).
3 Selectione la estación de radio deseada con
girar el SELECTOR DE ESTACIONES.
4 Regule el BOTÓN DE VOLÚMEN -
MARCHA/PARO al volumen deseado.
Antena. Para la recepción FM, el aparato está
equipado con una ANTENA FM EN ALAMBRE.
Oriente el alambre hasta obtener una recepción
nítida sin interferencia. Para la recepción AM, el
aparato está equipado con una antena ferrita
direccional incorporada. Oriente el aparato para
hallar la posición donde se recibe la mejor recepción.
No hay que conectar la ANTENA FM EXTERNA a
una antena al exterior.
Operación del Tocadiscos Operación de la Radio
Antena
ESPA OL
Operación de Base
Accesorio:
Adaptador para
discos 45 RPM
ENGLISH
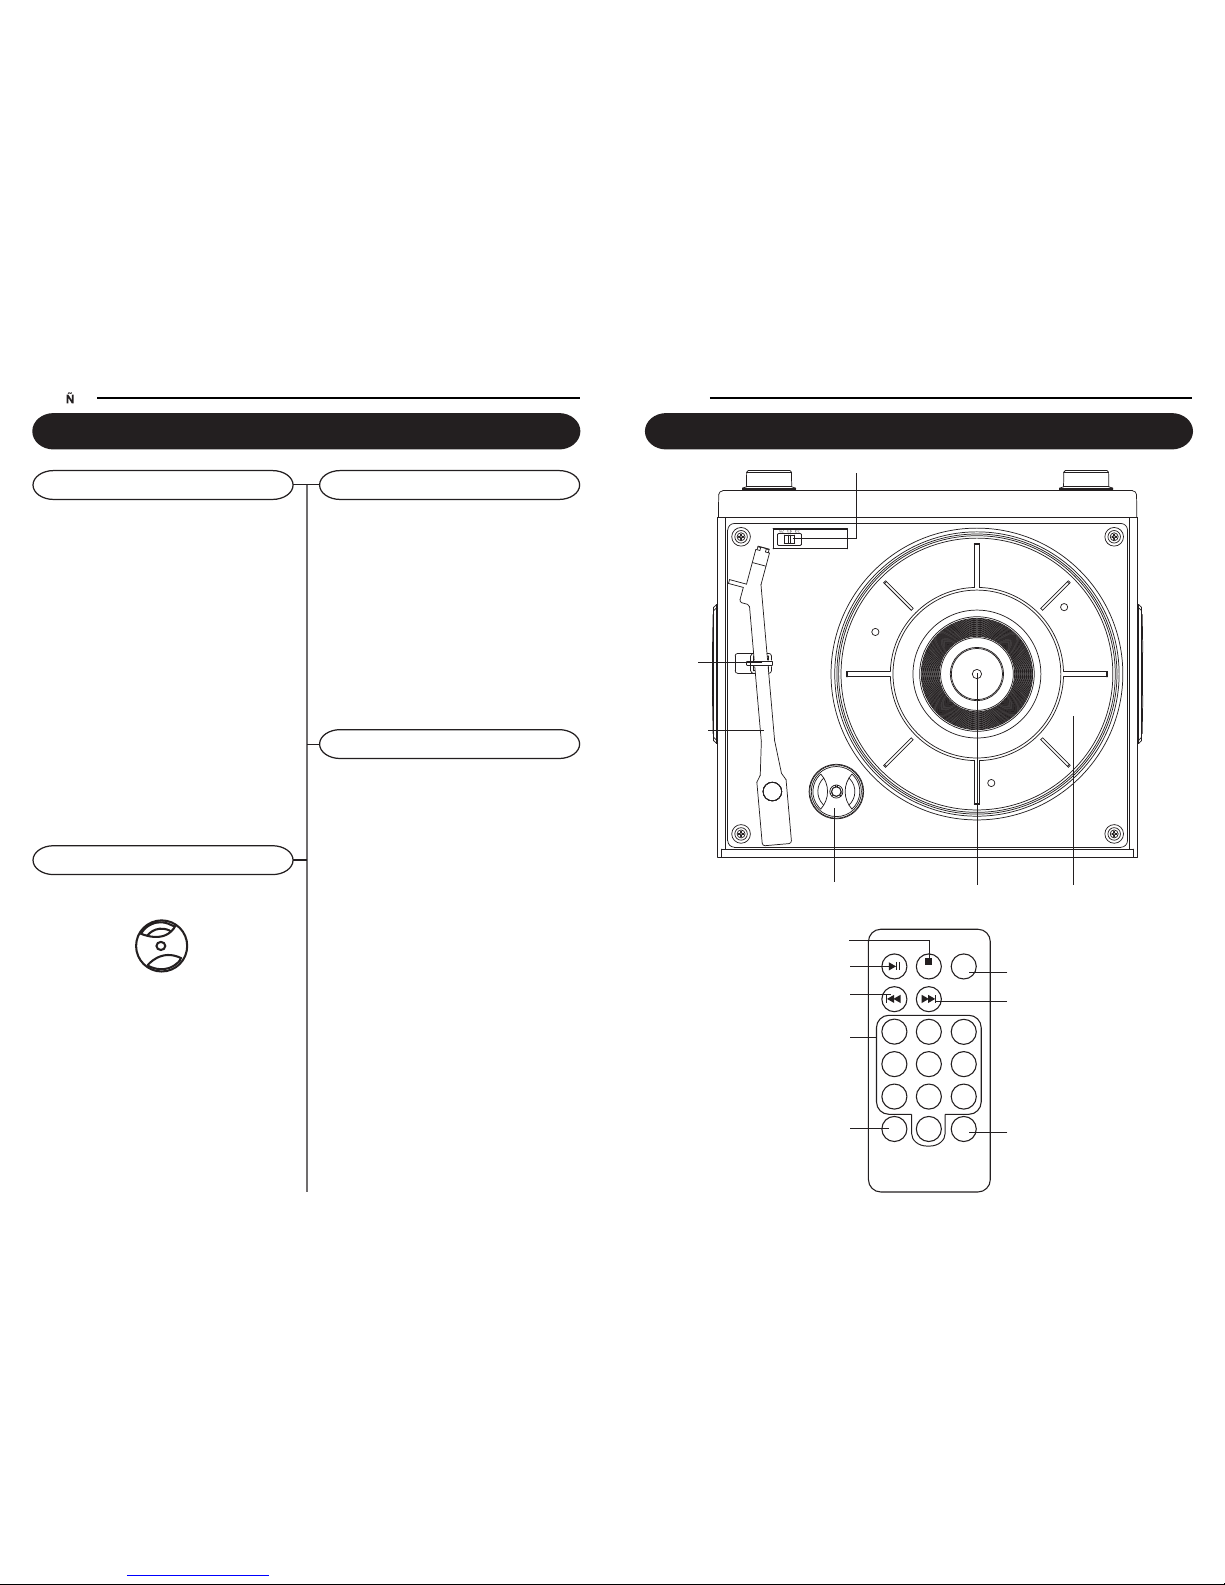
SPINDLE
TURNTABLE
ADAPTER FOR 45 RPM RECORDS
TONE ARM
TONE
ARM
REST
SPEED CONTROL SWITCH
6
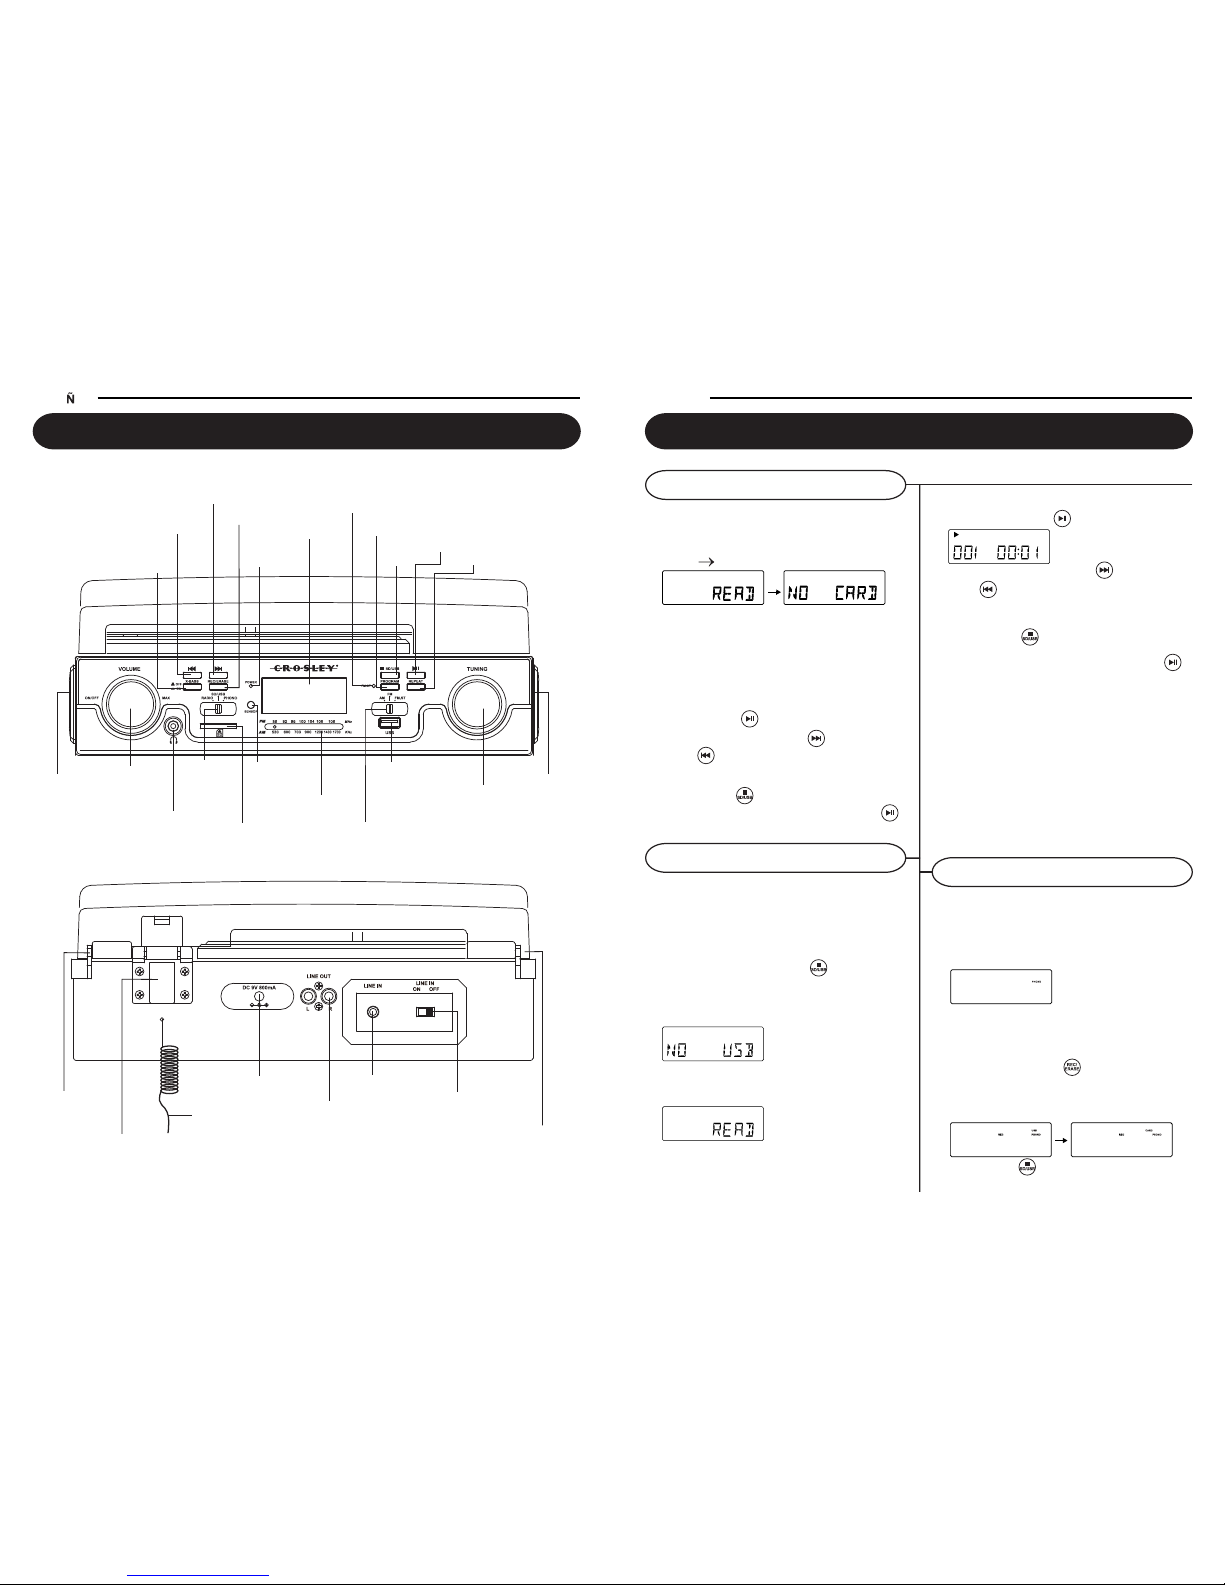
Control Locators
PLAY/PAUSE
STOP/SD/USB
BACKWARD SKIP
0-9
REC/ERASE
REPEAT
FORWARD SKIP
PROGRAM
PROG
798
3
1 2
4 5 6
0
REPEAT
REC/
ERASE
SD/USB
Page 5
ENGLISH
Basic Operation
1. Slide the FUNCTION Switch to SD/USB mode.
2. Switch the unit ON by turning the VOLUME knob
to the on Position.
3. Turn the VOLUME control to the mid-range
position.
4. In stop mode, Press STOP /
and hold for
approximately 2 seconds. The display will switch
from “SD” to “USB”.
If no USB has been detected, “ NO USB” will show
on the Display.
5. Plug-in USB mass storage device. READ is
displayed as the system scans the contents of
USB device.
6. Track no. 1 of root folder (Folder 1) will be displayed
after reading USB device contents.
USB
MP3
1. Slide THE FUNCTION Switch to SD/USB mode.
2. Switch the unit ON by turning the VOLUME knob
to the on Position. If no Card has been detected,
"Read" "No Card” will show on the Display.
3. Turn the VOLUME control to the mid-range
position.
4. Insert SD-Card into the card slot. “READ” is
displayed as the system scans the contents of
SD card.
5. Track no. 1 of root folder (Folder 1) will be
displayed after reading SD card contents. Press
PLAY/PAUSE/
to start music playback.
6. Press the
FORWARD SKIP/
/
BACKWARD
SKIP /
once or repeatedly until the desired
track number appears on the display. Playback
will begin automatically.
7. Press STOP / to stop playback.
8. To pause the music, press PLAY/PAUSE /
,
press it again to resume play.
Press PLAY/PAUSE/ to start music playback.
7. Press the
FORWARD SKIP
/
/
BACKWARD
SKIP/
once or repeatedly until the desired
track number appears on the display. Playback
will begin automatically.
8. Press STOP /
to stop playback.
9. To pause the music, press PLAY/PAUSE /
,
press it again to resume play.
Remarks:
1. USB connector does not support connection with
USB extension cable is not designed for
communication with computer directly.
2. All USB Flash Drives and SD Cards may not be
compatible with this unit.
IMPORTANT:
Do not disconnect the USB device SD card during
USB/SD card mode, as this may damage the
external device or its files. Please power off first
or press another Mode before safely
disconnecting the USB device /SD card.
This unit allows you to convert your records into
MP3 format onto either USB Flash Drive or SD
Card. To convert your records, follow the steps
below.
1. Slide the FUNCTION button to PHONO mode.
2. Start playback of the record at the point you want
to start recording. (See Turntable Operation on
Page 7 for more information on playing your
records).
3. Press REC/ERASE /
to start recording.
“ REC ” will show on the display.
4. The media that you are recording to (either USB
or SD) will begin flashing on the display once
recording begins.
5. Press STOP /
to stop the recording process.
USB
USB
SD-Card Operation
USB Operation
Phono to USB/SD
831
Control Locators
ESPA OL
ENCHUFE ADAPTADOR
DE ENERGÍA CA
ANTENA FM
EXTERNA
ENCHUFE SALIDA
INTERRUPTOR
ENTRADA
COMMUTATEUR ENTREE
BISAGRA – CERROJO DE LA TAPA
PERNOS
DE LOS EJES
PERNOS DE LOS EJES
PARLANTE
BOTÓN
VOLÚMEN MARCHA/PARO
ENCHUFE
AUDÍFONOS/
AURÍCULARES
SELECTOR
DE FUNCIÓN
HENDIDURA PARA
TARJETA SD
INDICADOR
DE ESTACIONES
SELECTOR
AM\FM\FM
ESTÉREO
PUERTA USB
SELECTOR DE
ESTACIONES
PARLANTE
X-BASS
MARCHA/
PARO
BUSCAR
PARA ATRÁS
BUSCAR
PARA ADELANTE
GRABAR/BORRAR
LUZ DE
ENCENDIDO
CÉLULA DE
RECEPCIÓN IR
PANTALLA LCD
INDICADOR
ESTACIÓN
FM ESTÉREO
PROGRAMAR/
REPETIR
PARO/
SD/USB
TOCAR/
PAUSAR
REPETIR
Ubicación de los Mandos
Page 6
ENGLISH
1 You can connect external components to your
unit by using the Auxiliary Input.
2 Plug Auxiliary cable (not supplied) into the LINE
IN JACK on the back of your unit.
3 Switch the LINE IN SWITCH to the ON position.
4 Plug the other end of the Auxililary cable into the
output jack on your desired external component.
5 Check the volume level of your external
component.
6 See operators manual for correct operation of
the external component.
Note: When not using the Auxiliary Input, make sure
the LINE IN SWITCH is in the OFF position.
10
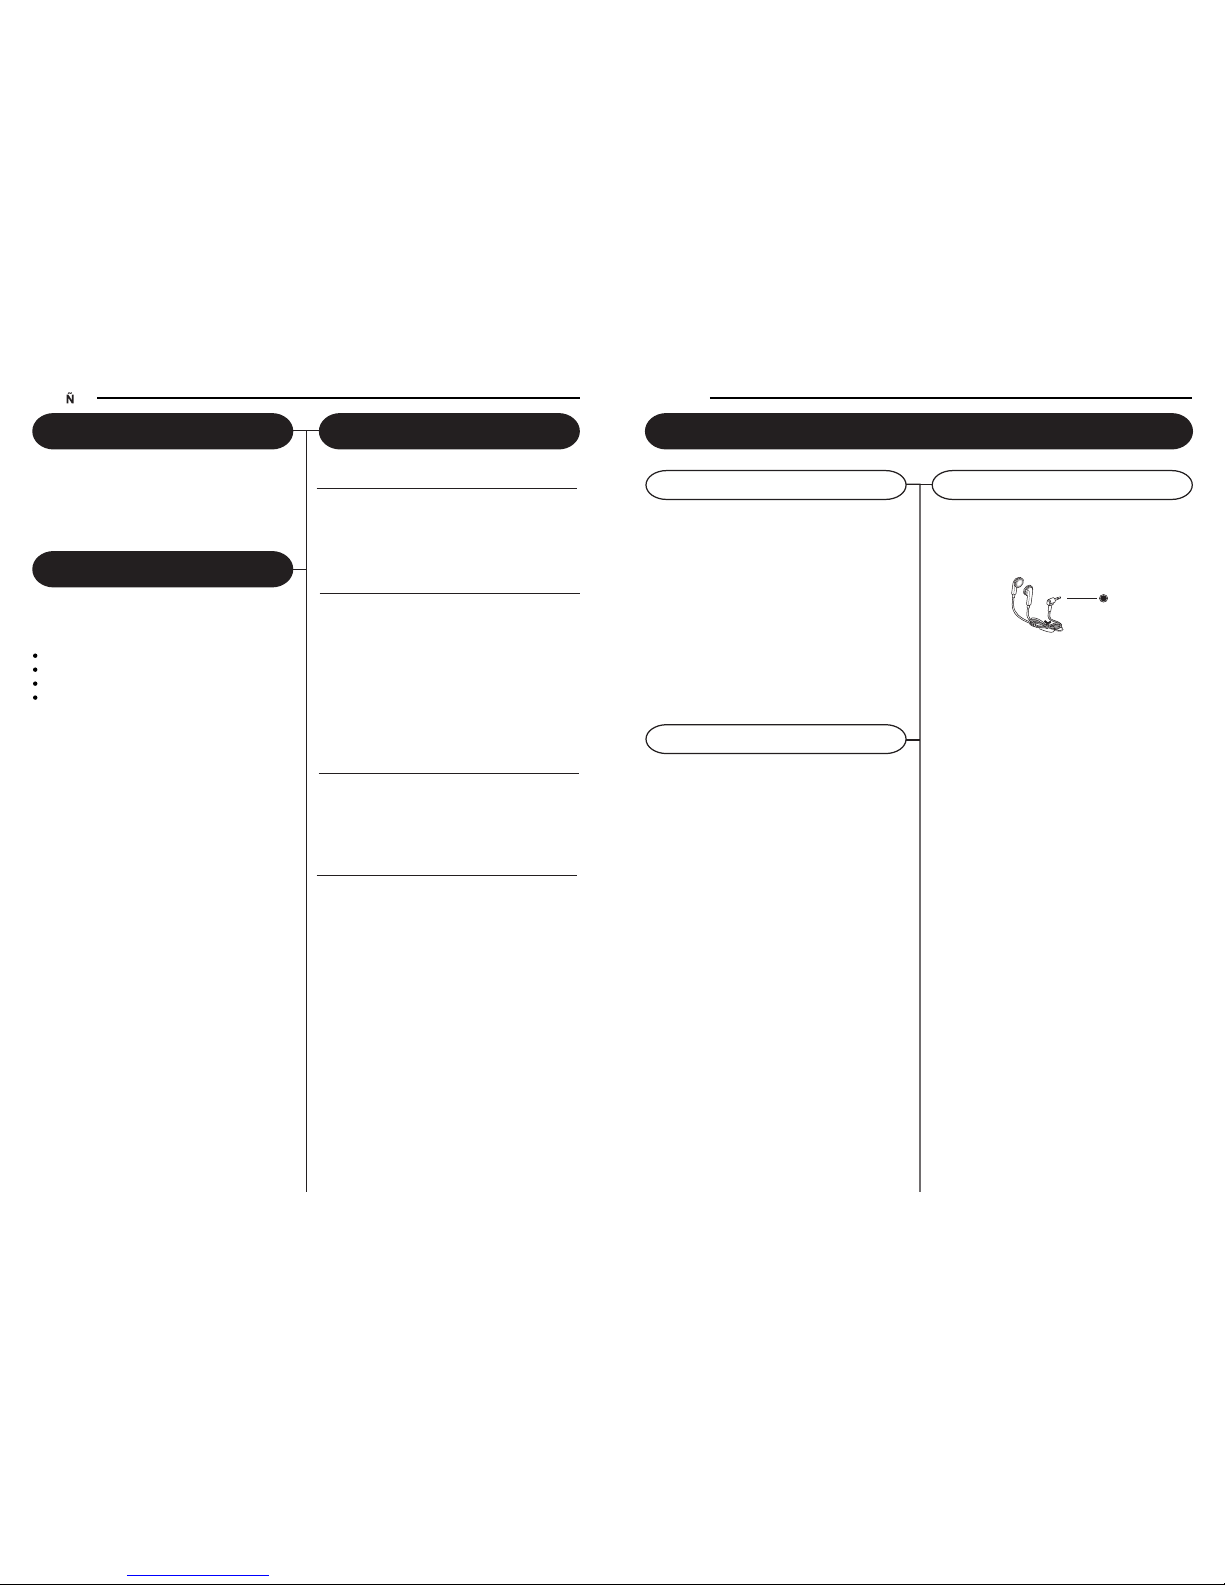
1 Connect headphones to the Headphone Jack
2 Adjust volume to the desired listening level.
Note:When using headphones, the sound to
the unit speakers will be cut off.
Note: Headphones not included with unit.
1 You can connect your radio to different sources
using the auxiliary output.
2 Plug Auxiliary cables (not supplied) into the
LINE OUT JACK.
3 Connect the other end of the Auxiliary cables
into the input on your desired component.
4 See the owners' manual for the component for
correction operation.
NOTE: The Auxiliary Output is a passive signal level
output only and will not power speakers.
Auxiliary Output
Audio / Connections
Auxiliary Input
Headphone Jack Operation
The sound from all speakers is cut off.
Headphone Jack
ESPA OL
El propósito de este manual
Bienvenido Índice de materias
Gracias por su compra de T ocadiscos Crosley Tech
Series (CR6007A). Antes de poner su aparato en
marcha, haga el favor de leer este manual
completamente y guárdelo en lugar seguro para
todo uso posterior.
Las instrucciones en este manual describen las
funciones de mando del modelo CR6007A.
Partes incluídas en el paquete:
Tocadiscos Tech Series
Control Remoto
Adaptador de Energía CA
Adaptador 45 rpm
29
Cómo comenzar
Desempacar ........................................ 30
Fuente de energía ............................... 30
Ubicación de los mandos................ 31-32
Operación de Base
Operación del T ocadiscos................... 33
Operación de la Radio......................... 33
Operación USB/SD............................... 34
Operación programada........................ 34
Grabar
Del Phono al USB/SD.......................... 34
Copiar MP3........................................... 35
Audio / Conexiones
Salida Audio.......................................... 36
Entrada Audio....................................... 36
Enchufe (Jack) Audífonos/Aurículares.36
Generalidades
Guía para resolver los problemas....... 37
Garantía................................................. 38
Page 7

27
AVISO IMPORTANTE DE SEGURIDAD
POR FAVOR LEA CON MUCHO CUIDADO LAS PRÉCAUCIONES SIGUIENTES QUE SE APLICAN À SU EQUIPO.
1. Léa las instrucciones – Hay que leer todas las instrucciones sobre la operación y los avisos de seguridad antes de poner el
aparato en marcha.
2. Guarde las instrucciones – Hay que guardar las instrucciones en lugar seguro para uso posterior.
3. Respete las advertencias – Hay que seguir todas las advertencias de seguridad impresos en el aparato y en las instrucciones escritas.
4. Siga las instrucciones – Hay que seguir todas las instrucciones para la operación del aparato.
5. Limpieza – Desenchufe el aparato del tomacorriente antes de limpiarlo. No utilice productos de limpieza líquidos ó aerosoles.
Utilice un trapo seco.
6. Accesorios – No utilice accesorios que no son autorizados por el fabricante del producto porque pueden causar riesgos.
7. Agua y humedad – No utilice este aparato en la proximidad del agua – por ejemplo, cerca de una tina, de un
fregadero, de un lavadero, en un sótano húmedo ó cerca de una piscina ó cualquier ambiente similar.
8. Hay que desplazar el aparato con precaución en el caso que se encuentra sobre una base. Las paradas
demasiado bruscas, la fuerza excesiva ó las superficies irregulares pueden causar la caída del aparato.
9. Ventilación – La caja del aparato lleva ranuras y aberturas para la ventilación, para asegurar una
operación fiable y para impedir que se sobrecaliente. No hay que tapar ni cubrir estas aberturas.
No hay que poner el aparato sobre una cama, un sofá, una alfombra ó cualquier otra superficie
que pueda tapar estas aberturas. No hay que poner el aparato en un estante ó en un muestrario
a menos de asegurar una ventilación adecuada y seguir las instrucciones del fabricante.
10. Fuentes de energía – Este aparato debe alimentarse solamente con el tipo de energía indicado en la etiqueta. En el caso de
que Usted no esté seguro del tipo de energía disponible para su casa, haga el favor de consultar a su vendedor ó a su compañía
de energía. En el caso de productos para operación con baterías u otras fuentes de energía, consulte con el manual del usuario.
11. Puesta a tierra o polarización – Este aparato está equipado de una ficha polarizada de cordón
de energía en corriente alternativa una ficha con una broca más ancha que la otra). Esta ficha
puede enchufarse en el tomacorriente en un solo sentido. Esto es un dispositivo de seguridad.
Si la ficha no entra en el tomacorriente, hay que darla media vuelta y intentar de enchufarla de
nuevo. Si aún la ficha no quiere entrar en el tomacorriente, contacte a su electricista para
cambiar su tomacorriente obsoleto. No trate de deformar el dispositivo de seguridad de la ficha polarizada.
12. Energía – Protección de los cordones – Coloque los cordones de energía de manera que no se pisen o que no se aprieten
por objetos en la proximidad ó colocados de por encima. Hay que poner una atención especial en los cordones dónde entran
en los tomacorrientes, en los tomacorrientes multiples y también dónde salen del aparato mismo.
13. Rayos – Para dar más protección a su aparato durante las tormentas con relámpagos ó cuando se encuentra sin uso durante
ratos largos, hay que desenchufarlo del tomacorriente y también desconectar la antena ó el sistema de cable. Esto evita los
daños al producto debidos a los rayos ó a los sobrecargos de energía.
14. Líneas de transmisión – No hay que colocar un sistema de antena exterior en la proximidad de líneas de transmisión eléctrica
u otros circuitos de voltaje ó de luces dónde el sistema de antena corra el riesgo de caer sobre tales líneas. Al momento de
hacer la instalación de un sistema de antena exterior hay que poner mucha atención en no venir en contacto con estas líneas,
lo que puede resultar en riesgo de muerte.
15. Sobrecargo – No sobrecargue los tomacorrientes, los cordones ó los tomacorrientes multiples. Toda falta de respetar esta
advertencia puede causar un incendio ó un choque eléctrico.
16. Introduccion de objetos ó de líquido. No introduzca jamás cualquier objeto por las ranuras ó las aberturas que pueda venir en
contacto con los puntos de voltaje ó hacer corto-circuito que puede causar un incendio ó un choque eléctrico. No derrame
jamás ningún líquido sobre el aparato.
17. Reparación – No tente de reparar este aparato usted mismo porque al abrir la caja usted corre el riesgo de venir en contacto
con el voltaje ó con otros riesgos. Confíe toda reparación al personal de servicio calificado.
18. Daños que necesitan una reparación – Desenchufe el aparato del tomacorriente y contacte al personal de servicio calificado
en las circunstancias siguientes:
a. Cuando el cordón de energía está dañado.
b. Cuando se ha derramado algún líquido ó un objecto alguno se ha caído al interior.
c. Cuando el aparato ha sido expuesto a la lluvia ó al agua.
d. Cuando el aparato no funciona normalmente con seguir las instrucciones de uso. Toque solamente los mandos que son
indicados en las instrucciones de uso, puesto que con tocar los otros mandos usted puede causar daños y muchas veces
esto puede necesitar la intervención de un técnico calificado para poner el aparato en marcha.
e. Cuando se ha dejado caer el aparato ó cuando se ha dañado de cualquier manera.
f. Cuando el aparato cambia abruptamente de funcionamiento – esto indica la necesidad de reparación.
19. Piezas de repuesto – En el caso que Usted necesita piezas de repuesto, hay que verificar que el técnico ha puesto las piezas
especificadas por el fabricante ó que estas piezas tengan las mismas características de las piezas de orígen. Las substituciones
no autorizadas pueden causar un incendio, un choque eléctrico u otros riesgos.
20. Verificación de seguridad– al momento de hacer servicio ó reparaciones en este aparato, pida al técnico de servicio de hacer
una verificación de seguridad para confirmar que el aparato está en buenas condiciones de marcha.
21. Fijación a la pared ó en el techo – El aparato debe fijarse solamente según los consejos del fabricante.
22. Calor – El aparato debe situarse a distancia de fuentes de calor tales como los radiadores, las bocas de aire caliente, cocinas
u otros aparatos (y también los amplificadores) que desprenden calor.
ADVERTENCIA: Todo cambio ó modificación a este aparato que no está especificamente aprobado por la persona responsable
puede cancelar la autoridad del usuario a usar el equipo.
AVISO: Este equipo ha sido objeto de ensayos y se ha declarado conforme a los límites de un aparato digital de Clase B, según
la Sección 15 del reglamento FCC. Estos límites son concebidos para proteger contra las emisiones perjudicales en una instalación
residencial. Este equipo genera, utiliza y puede emitir energía de frecuencia radio y puede ser la fuente de emisiones perjudicales
que enturbian las comunicaciones radio en el caso de no ser instalado y utilizado según las instrucciones. Con decir esto, no hay
garantía que la interferencia no resulta de una instalación específica. Si este equipo causa interferencia, perjudica a la radio ó a la
recepción de televisión, se puede determinar apagando y encendiendo el equipo. El usuario está alentado a corregir la interferencia
por una ó varias de las siguientes maneras:
- reorientar la antena de recepción ó cambiarla de lugar
- aumentar la distancia entre el equipo y el receptor
- conectar el equipo a un circuito diferente del que el receptor está connectado.
- consultar al vendedor ó a un técnico de televisión calificado para consejos.
AVISO: El fabricante no se hace responsable de cualquier interferencia de radio ó de televisión que resulte de modificaciones no
autorizadas a este aparato. Tales modificaciones pueden cancelar la autoridad del usuario a usar el equipo.
Ficha Polarizada CA
ESPA OL
12
ENGLISH
LIMITED MANUFACTURERS WARRANTY
Crosley Radio, Inc. warrants the product to be free from defects in material and
workmanship under normal use for a period of one year from the original date of
purchase. This warranty is not transferable. If the product is determined to be defective
during the warranty period, the unit will be repaired or replaced at Crosley Radio’s sole
discretion. This warranty covers manufacturing defects and normal consumer use and
does NOT cover damage or failure as a result of abuse, accident, alterations, misuse,
neglect, abnormal wear and tear, inadequate maintenance, commercial or unreasonable
use, damage caused by power surges, mishandling, accident, acts of God or attempted
repair by an unauthorized service agent. Also not covered are cosmetic damages,
cords and antennas.
Should this product fail to function in a satisfactory manner, it is best to first return it
to the store or retailer where it was originally purchased. If additional service is still
needed, the original purchaser must FIRST contact our offices to obtain an RA (Return
Authorization) Number.
TO OBTAIN AN RA NUMBER
CALL: 1.888.CROSLEY
(1.888.276.7539)
Send the unit prepaid to the address below in the original packaging (or reasonable
substitute to prevent damage). Clearly mark your RA number on the outside packaging
and include the original sales receipt (or a copy) indicating date of purchase, amount
paid, and place of purchase. You must also include your full name, shipping address
and daytime contact number. Please include a check or money order in the amount
of $19.95, made payable to Crosley Radio, to cover handling and return shipping
charges. Returned products will not be shipped to PO Boxes. Crosley Radio will not
be responsible for delays or unprocessed claims resulting from a purchaser’s failure
to provide any or all of the necessary information.
CROSLEY RADIO
ATTN: RETURNS DEPT
2001 PRODUCTION DRIVE
Louisville, KY 40299
For additional support: Crosley Radio Consumer Service Department
24 hours a day / 7 days a week
Telephone: 1.888.CROSLEY (1.888.276.7539)
There are no express warranties except as listed above.
The purchaser’s bill of sale is the only proof of warranty entitlement.
This warranty gives the purchaser specified legal rights in addition to any rights which
may vary from state to state.
In accordance with the “Moss-Magnuson Warranty Act” of July 10, 1975, this is termed
a “limited warranty” which in no way compromises Crosley Radio’s high standards of
quality and workmanship.
Page 8

14
AC
Polarized Plug
AVIS IMPORTANT DE SÛRETE
VEUILLEZ LIRE ATTENTIVEMENT LES PRÉCAUTIONS SUIVANTES QUI S’APPLIQUENT À VOTRE ÉQUIPEMENT.
1. Lisez les instructions – Il faut lire toutes les instructions sur l’opération et les avis de sûreté avant de mettre l’appareil en marche.
2. Conservez les instructions – Il faut garder les instructions en lieu sûr pour utilisation ultérieure.
3. Respectez les avertissements – Il faut suivre tous les avertissements de sûreté imprimés sur l’appareil et dans les instructions écrites.
4. Suivez les instructions – Il faut suivre toutes les instructions pour l’opération de l’appareil.
5. Nettoyage – Débranchez l’appareil de la prise murale avant de le nettoyer. N’employez pas de produits de nettoyage liquides
ou aérosols. Utilisez un chiffon sec.
6. Accessoires – N’utilisez pas d’accessoires qui ne sont pas autorisés par le fabricant du produit car ils peuvent provoquer
des dangers.
7. Eau et humidité – N’utilisez pas ce produit à proximité de l’eau – par exemple, près d’une baignoire, d’un lavabo, d’un évier,
d’une cuve à lessive, dans une cave humide ou près d’une piscine ou toute situation similaire.
8. Il faut déplacer l’appareil avec précaution au cas où il se trouve sur un chariot. Des arrêts trop vifs,
la force excessive ou des surfaces inégales peuvent provoquer une chute de l’appareil.
9. Ventilation – Le coffret de l’appareil est équipé de fentes et d’ouvertures pour la ventilation, pour
assurer une opération fiable et pour empêcher qu’il ne surchauffe. Il ne faut pas boucher ou couvrir
ces ouvertures. Il ne faut pas placer l’appareil sur un lit, un sofa, une moquette ou n’importe quelle
autre surface qui puisse boucher ces ouvertures. Il ne faut pas placer l’appareil sur une étagère ou
dans un rack à moins d’assurer une ventilation adéquate et suivre les instructions du fabricant.
10.Sources d’alimentation – Cet appareil doit être alimenté seulement par le type d’alimentation indiqué sur l’étiquette. Au cas
où vous ne seriez pas sûr du type d’alimentation disponible à votre domicile, veuillez consulter votre revendeur ou votre
société fournisseur d’énergie. Dans le cas de produits conçus pour opérer avec des piles ou d’autres sources d’énergie,
rapportez-vous à l’avis d’opération.
11.Mise à la terre ou polarisation – Cet appareil peut être équipé d’une fiche polarisée de cordon d’alimentation en courant
alternatif (une fiche dont une broche est plus large que l’autre). Cette fiche ne peut être
branchée sur la prise murale que dans un seul sens. Ceci est un dispositif de sûreté.
Au cas où vous ne réussiriez pas à brancher la fiche complètement sur la prise, faites
pivoter la fiche d’un demi tour et essayez de nouveau. Si la fiche ne rentre toujours pas
dans la prise, contactez votre électricien afin de remplacer votre prise désuète. Ne cherchez
pas à déjouer le dispositif de sûreté de la fiche polarisée.
12.Alimentation – Protection des cordons – Placez les cordons d’alimentation de telle façon que l’on n’y marche pas dessus
ou qu’ils ne soient pas coincés par des objets à proximité ou placés au dessous de ceux-ci. Il faut prêter une attention
particulière aux cordons là où ils rentrent dans des prises, dans des multiprises, et là d’où ils sortent du produit même.
13.Foudre – Pour donner plus de protection à votre appareil lors d’orages avec éclairs ou bien quand il se trouve sans utilisation
pendant des périodes prolongées, veuillez le débrancher du secteur et aussi débranchez l’antenne ou le système du câble.
Ceci évitera des dommages au produit dus à la foudre ou aux surcharges d’alimentation.
14.Lignes de transmission – Il ne faut pas situer un système d’antenne extérieure dans le voisinage des lignes de transmission
électriques ou d’autres circuits de tension ou de lumière ou là où le système d’antenne risque de tomber sur de telles lignes.
Lors de l’installation d’un système d’antenne extérieure il faut faire très attention à ne pas venir contacter ces lignes, ce
qui pourrait causer danger de mort.
15.Surcharge – Ne surchargez pas les prises murales, les rallonges ou les multiprises. Tout manquement à cet avertissement
peut provoquer un incendie ou un choc électrique.
16.Introduction d’objets ou de liquide. N’introduisez jamais d’objet quelconque par les fentes ou les ouvertures qui risque
d’entrer en contact avec des points de voltage ou de faire un court-circuit qui peut provoquer un incendie ou un choc
électrique. Ne déversez jamais de liquide quelconque sur l’appareil.
17.Réparation – Ne cherchez pas à réparer cet appareil vous-même car à l’ouverture du coffret vous risquez d’entrer en contact
avec le voltage ou d’autres dangers. Confiez toute réparation au personnel de service qualifié.
18.Dommages qui demandent une réparation – Débranchez l’appareil de la prise murale et adressez-vous au personnel de
service qualifié dans les circonstances suivantes:
A. Quand le cordon d’alimentation ou la fiche est endommagé.
B. Quand on a déversé du liquide ou quand des objets sont tombés à l’intérieur.
C. Quand l’appareil a été exposé à la pluie ou à l’eau.
D. Quand l’appareil ne marche pas normalement en suivant le mode d’emploi. Réglez seulement les contrôles qui sont
mentionnés dans le mode d’emploi, car tout maniement des autres contrôles peut provoquer des dommages et peut souvent
demander l’intervention d’un technicien qualifié pour remettre l’appareil en marche.
E. Quand on a fait tomber l’appareil ou quand il a été endommagé autrement.
F. Quand l’appareil change abruptement de performance – ceci indique le besoin de réparation.
19.Pièces de rechange – Au cas où vous auriez besoin de pièces de rechange, veuillez vérifier que le technicien s’est servi
de pièces spécifiées par le fabricant ou que ces pièces ont les mêmes caractéristiques que celles d’origine. Des substitutions
non autorisées peuvent provoquer un incendie, un choc électrique ou d’autres dangers.
20.Vérification de sécurité – Lors du service ou des réparations sur cet appareil, demandez au technicien de service de bien
vouloir faire une vérification de sécurité pour confirmer que l’appareil est en bon état de marche.
21.Montage sur mur ou plafond – L’appareil doit être monté seulement selon les conseils du fabricant.
22.Chaleur – L’appareil doit être situé à distance de sources de chaleur telles que radiateurs, bouches d’air chaud, cuisinières
ou autres appareils (y compris les amplificateurs) qui dégagent de la chaleur.
AVERTISSEMENT: Tout changement ou modification à cet appareil qui n’est pas spécifiquement approuvé par la personne
responsable peut annuler l’autorité de l’utilisateur à se servir de l’équipement.
AVIS: Cet équipement fait l’objet d’essais et a été déclaré conforme aux limites d’un appareil numérique de Classe B, selon
la Section 15 du règlement FCC. Ces limites sont conçues pour protéger contre les émissions parasites dans une installation
résidentielle. Cet équipement génère, utilise et peut émettre de l’énergie à fréquence radio et peut être à la source d’émissions
parasites qui brouillent les communications radio au cas où il n’est pas installé et utilisé selon les instructions. Ceci dit, aucune
garantie que des émissions parasites ne résultent d’une installation particulière. Au cas où des émissions parasites à la réception
radio ou télévision en résulteraient, on peut confirmer que l’appareil en est la source en activant le bouton marche/arrêt.
L’utilisateur peut ensuite éliminer ces émissions en choisissant une ou plusieurs des méthodes suivantes:
· Réorienter l’antenne de réception ou la changer de place
· Éloigner l’équipement du récepteur
· Brancher l’équipement sur un circuit différent de celui sur lequel le récepteur est branché
· Consulter le revendeur ou un technicien de télévision qualifié pour des conseils.
FRANÇAIS
25
FRANÇAIS
Les produits de Crosley Radio sont garantis contre les défauts de matériaux et de fabrication
sous des conditions d’utilisation normale pour une période d’un an à partir de la date de vente
à l’acheteur d’origine. Cette garantie ne peut pas être transférée.
Au cas où l’appareil cesserait de fonctionner pendant la période de garantie, l’appareil sera
réparé ou remplacé à la seule discrétion de Crosley Radio. Cette garantie couvre les défauts
de fabrication et d’utilisation normale du consommateur et NE COUVRE PAS les dommages
ou défauts survenus d’abus, d’accidents, d’alterations, de mauvaise utilisation, de négligences,
d’usure anormale, par manque d’entretien, d’utilisation commerciale ou déraisonnée, des
dommages survenus de surcharges, de mauvais maniement, d’accidents, dans les cas de force
majeure ou par suite de tentative de réparation par toute personne autre qu’un agent de service
après vente autorisée par Crosley Radio à réparer le produit. Cette garantie ne couvre pas les
dommages d’ordre cosmétique, aux cordons et aux antennes.
Au cas où l’appareil cesserait de fonctionner de façon satisfaisante, il est conseillé de le retourner
d’abord au magazin ou au détaillant où il a été acheté. Si l’appareil a besoin de service
supplémentaire, l’acheteur d’origine doit D’ABORD déposer une demande d’AUTORISATION
DE RENVOI («R.A») avant de renvoyer l’appareil.
AFIN D’OBTENIR UN NUMÉRO DE RA
APPELER AU: 1.888.CROSLEY
(1.888.276.7539)
Quand vous aurez le numéro d’autorisation de renvoi du service clients, veuillez emballer votre
appareil dans son emballage d’origine (ou un ersatz raisonnable pour éviter les dommages).
Écrivez le numéro d’autorisation de renvoi («R.A.») à l’extérieur du carton et à l’intérieur mettez
le bon d’achat d’origine (ou une copie conforme) indiquant la date d’achat, le prix d’achat et
l’adresse du vendeur. Vous devez aussi inclure votre nom, votre adresse pour renvoyer l’appareil
et votre numéro de téléphone où l’on peut vous contacter pendant les heures ouvrables. Veuillez
ajouter un chèque ou un mandat postal d’un montant de $19.95 payable à Crosley Radio pour
les frais d’emballage et de réexpédition. Les produits renvoyés ne seront pas réexpédiés aux
Boîtes Postales. Crosley Radio n’est pas redevable pour les délais ou des réclamations survenant
du manque de l’acheteur à fournir les éléments de renseignements requis.
CROSLEY RADIO
ATTN: RETURNS DEP'T
2001 PRODUCTION DRIVE
LOUISVILLE, KY 40299
Pour une assistance supplémentaire: Service aux Consommateurs Crosley Radio
24 heures par jour / 7 jours par semaine
Appeler au : 1.888.CROSLEY (1.888.276.7539)
Il n’y a pas de garantie implicite sauf comme il est décrit ci-dessus.
Le bon d’achat de l’acheteur est la seule preuve de son droit à la garantie.
Cette garantie donne à l’acheteur certains droits spécifiques outre les droits qui peuvent varier
d’état à état et de province à province.
Conforme au texte de « l’Acte de Garantie Moss-Magnuson » en date du 10 juillet 1975, la
présente garantie s’appelle « garantie limitée » mais cette appellation ne compromet en rien
les standards appréciables de Qualité et Fabrication de Crosley Radio.
GARANTIE LIMITÉE DU FABRICANT
Page 9

1 L’emploi de l’Entrée Auxiliaire vous permet de
brancher des composants externes à votre
appareil.
2 Branchez le câble auxiliaire (non fourni) sur
la prise (jack) entrée au dos de votre appareil.
3 Réglez le COMMUTATEUR D’ENTRÉE en
position MARCHE.
4 L’autre bout du câble doit se brancher sur la prise
(Jack) Sortie Audio du composant externe.
5 Verifiez le niveau de volume du composant
externe.
6 Pour plus de renseignements sur l’opération du
composant externe, veuillez vous rapporter au
manuel d’utilisateur pour ce composant.
NB:Lorsque vous ne vous servez pas de l’Entrée
Auxiliaire, vérfiez que le COMMUTATEUR
D’ENTRÉE est réglé en position ARRÊT.
23
1 Branchez les écouteurs sur la prise écouteurs.
2 Réglez le volume au niveau d’écoute désiré.
NB: Lorsque l’on se sert des écouteurs, le son
est coupé aux haut-parleurs de l’appareil.
NB: Les écouteurs ne sont pas fournis avec
l’appareil.
1 Vous pouvez brancher votre appareil sur des
sources différentes en vous servant de la sortie
auxiliaire.
2 Branchez les câbles auxiliaires (non fournis)
sur la prise (jack) sortie.
3 L’autre bout du câble doit se brancher sur la
prise (Jack) Entrée de l’appareil que vous avez
choisi.
4 Pour plus de renseignements sur comment
brancher votre appareil sur un composant
externe, veuillez vous rapporter au manuel
d’utilisateur pour ce composant.
NB: La Sortie Auxiliaire correspond à un niveau de
signal passif de sortie seulement et n’a pas de
puissance suffisante pour alimenter les
haut-parleurs.
FRANÇAIS
Sortie Auxiliaire
Audio / Connexions
Entrée Auxiliaire
Op
ération de la Prise Casque
Le son est coupé à tous les haut-parleurs.
Prise (Jack) Casque/Écouteurs
FRANÇAIS
Comment commencer
Déballage..................................... 17
Source d’alimentation.................. 17
Emplacement des contrôles..... 18-19
Opération de Base
Opération du Tourne-disque......... 20
Opération de la Radio................... 20
Opération USB/SD ....................... 21
Enregistrer
Phono au USB/SD........................ 21
Copier les MP3............................. 22
Audio / Connexions
Sortie Audio................................... 23
Entrée Audio.................................. 23
Jack Casque/Écouteurs.................. 23
Généralités
Guide pour résoudre les problèmes. 24
Garantie......................................... 25
À propos de ce manuel
Bienvenue Table des matières
Merci de votre achat de T ourne-disque Crosley Tech
Series (CR6007A). Avant de mettre votre appareil
en marche, veuillez bien lire ce manuel complètement
et gardez-le en lieu sûr pour toute utilisation
ultérieure.
Les instructions dans ce manuel décrivent les
fonctions de contrôle du modèle CR6008A.
L’ensemble comprend:
Tourne-disque Tech Series
Télécommande
Adaptateur Alimentation CA
Adaptateur 45 tours
Câble Stéréo 3,5 mm - 3,5 mm
16
Page 10

21
FRANÇAIS
Opération de Base
1 Faites glisser le SÉLECTEUR DE FONCTION au
mode SD/USB.
2 Mettez l’appareil sous tension en tournant le
BOUTON VOLUME – MARCHE / ARRÊT en
position MARCHE.
3 Réglez le volume à mi-chemin.
4 Poussez et maintenez la touche STOP /
pendant 2 secondes. L’écran va changer de
« SD » au « USB ». Au cas où l’appareil n’aurait
pas détecté d’unité USB, l’écran va afficher "No
USB” [Pas d’unité USB].
5 Mettez l’unité USB dans la fente. L’écran va afficher
“READ” pendant que le système lit le contenu de
l’unité USB.
6 La piste no. 1 du répertoire racine (Répertoire 1)
va s’afficher après lecture du contenu de l’unité
USB.
USB
MP3
Poussez la touche PLAY/P AUSE / pour lancer
la musique.
7 Poussez RECHERCHER EN AVANT /
/
RECHERCHER EN ARRIÈRE /
une ou
plusieurs fois jusqu’à ce que le numéro de la
piste souhaitée apparaisse à l’écran. La musique
commencera à jouer automatiquement.
8 Poussez la touche STOP /
pour arrêter la
musique.
9 Pour pauser la musique, poussez la touche
PLAY/PAUSE /
. Poussez-la une deuxième
fois pour relancer la musique.
NB:
1 La facilité USB ne supporte pas la connexion
moyenant une rallonge USB et n’est pas conçue
pour communiquer directement avec un ordinateur.
2 Touts les Flash Drives USB et toutes les cartes
SD ne seront pas forcemment compatibles avec
cet appareil.
AVIS IMPORTANT:
Il ne faut pas débrancher l’unité USB ou la carte SD
pendant le mode d’opération USB/SD, car ceci risque
d’endommager l’unité de mémoire externe ou les
fichiers. Veuillez d’abord couper l’alimentation ou
changer à un autre mode d‘opération avant de
débrancher l’unité USB ou la carte SD.
USB
USB
Opération Carte SD
Opération USB
Phono au USB/SD
1 Faites glisser le SÉLECTEUR DE FONCTION
au mode SD/USB.
2 Mettez l’appareil sous tension en tournant le
BOUTON VOLUME – MARCHE / ARRÊT en
position MARCHE. Au cas où l’appareil n’aurait
pas détecté de carte SD, l’écran va afficher
"Read"
"No Card” [Lecture – pas de carte].
3 Réglez le volume à mi-chemin.
4 Mettez la Carte SD dans la fente de carte. L’écran
va afficher “READ” pendant que le système lit le
contenu de la carte SD.
5 La piste no. 1 du répertoire racine (Répertoire 1)
va s’afficher après lecture du contenu de la carte
SD. Poussez la touche PLAY/PAUSE /
pour
lancer la musique.
6 Poussez RECHERCHER EN AVANT /
/
RECHERCHER EN ARRIÈRE /
une ou
plusieurs fois jusqu’à ce que le numéro de la piste
souhaitée apparaisse à l’écran. La musique
commencera à jouer automatiquement.
7 Poussez la touche STOP /
pour arrêter la
musique.
8 Pour pauser la musique, poussez la touche
PLAY/PAUSE /
. Poussez-la une deuxième
fois pour relancer la musique.
Cet appareil vous permet d’enregistrer vos disques
au format MP3 sur unité de mémoire USB Flash
Drive ou carte SD. Pour enregistrer vos disques,
suivez les instructions ci-après.
1 Faites glisser le SÉLECTEUR DE FONCTION
au mode PHONO [TOURNE-DISQUE].
2 Lancez le disque au point où vous voulez faire
commencer l’enregistrement. (Voyez la section
sur l’Opération du Tourne-disque à la page 20
pour plus d’information sur comment jouer vos
disques).
3 Poussez la touche REC/ERASE / pour
démarrer l’enregistrement. L’écran va afficher
“ REC ”.
4 La media à laquelle vous enregistrez (soit USB
ou SD) va commencer à clignoter à l’écran
lorsque l’enregistrement commence.
5 Poussez la touche STOP /
pour arrêter le
processus d’enregistrement.
18
Control Locators
FRANÇAIS
PRISE ADAPTATEUR
ALIMENTATION CA
ANTENNE FM
EXTERNE
PRISE SORTIE
PRISE ENTRÉE
COMMUTATEUR ENTREE
CHARNIÈRE – VERROU
DU COUVERCLE
PIVOT
COUVERCLE
PIVOT COUVERCLE
HAUT-PARLEUR
BOUTON VOLUME MARCHE/ARRÊT
PRISE CASQUE/
ÉCOUTEURS
SÉLECTEUR
DE FONCTION
FENTE CARTE SD
INDICATEUR DE
STATIONS
SÉLECTEUR
AM\FM\FM
STÉRÉO
PORTE USB
SÉLECTEUR
DE STATIONS
HAUT-PARLEUR
X-BASS MARCHE/ARRÊT
RECHERCHER EN ARRIÈRE
RECHERCHER EN AVANT
ENREGISTRER/EFFACER
TEMOIN SOUS
TENSION
CAPTEUR IR
ÉCRAN LCD
TEMOIN STATION FM EN STÉRÉO
PROGRAMMER
ARRÊT/
SD/USB
JOUER/
PAUSER
REPÉTÉR
Control Locators
Page 11

IMPORTANT SAFETY INSTRUCTION
PLEASE READ CAREFULLY ALL THE FOLLOWING IMPORTANT SAFEGUARDS
THAT ARE APPLICABLE TO YOUR EQUIPMENT
1. Read Instructions - All the safety and operating instructions should be read before the product is operated.
2. Retain instructions - The safety and operating instructions should be retained for future reference.
3. Heed Warnings - All warnings on the product and in the operating Instructions should be adhered to.
4. Follow Instructions - All operating and use instructions should be followed.
5. Cleaning - Unplug this product from the wall outlet before cleaning. Do not use liquid cleaners or aerosol cleaners.Use
a damp cloth for cleaning.
6. Attachments - Do not use attachments not recommended by the product manufacturer as they may cause hazards.
7. Water and Moisture - Do not use this product near water - for example, near a bath tub, wash bowl, kitchen sink, or
laundry tub; in a wet basement; or near a swimming pool; and the like.
8. A product and cart combination should be moved with care. Quick stops, excessive force, and uneven
surfaces may cause the product and cart combination to overturn.
9. Ventilation - Slots and openings in the cabinet are provided for ventilation and to ensure reliable
operation of the product and to protect it from overheating, and these openings must not be blocked
or covered, The openings should never be blocked by placing the product on a bed, sofa, rug, or
other similar surface. This product should not be placed in a built - in installation such as a bookcase
or rack unless proper ventilation is provided or the manufacturer's instructions have been adhered to.
10. Power Sources - This product should be operated only from the type of power source indicated on the marking label,
if you are not sure of the type of power supply to your home. Consult your product dealer or local power company.For
products intended to operate from battery power, or other sources, refer to the operating instructions.
11. Grounding or Polarization - This product may be equipped with a polarized alternating-current line plug (a plug having
one blade wider than the other). This plug will fit into the power outlet only one way. This is a safety feature. If you
are unable to insert the plug fully into the outlet try reversing the plug, If the plug should still fail to fit, contact your
electrician to replace your obsolete outlet. Do not defeat the safety purpose of the polarized plug.
12. Power - Cord Protection - Power - supply cords should be routed so that they are not likely to
be walked on or pinched by items placed upon or against them, paying particular attention to
cords at plugs, convenience receptacles, and the point where they exit from the product.
13. Lightning - For added protection for this product during a lightning storm, or when it is left
unattended and unused for long periods of time, unplug it from the wall outlet and disconnect
the antenna or cable system. This will prevent damage to the product due to lightning and power - line surges.
14. Power Lines - An outside antenna system should not be located in the vicinity of overhead power lines or other electric
light or power circuits, or where it can fall into such power lines or circuits. When installing an outside antenna system,
extreme care should be taken to keep from touching such power lines or circuits as contact with them might be fatal.
15. Overloading - Do not overload wall outlets, extension cords, or integral convenience receptacles as this can result
in a risk of fire or electric shock.
16. Object and Liquid Entry - Never push objects of any kind into this product through openings as they may touch
dangerous voltage points or short - out parts that could result in a fire or electric shock. Never spill liquid of any kind
on the product.
17. Servicing - Do not attempt to service this product yourself as opening or removing covers may expose you to dangerous
voltage or other hazards. Refer all servicing to qualified service personnel.
18. Damage Requiring Service - Unplug this product from the wall outlet and refer servicing to qualified service personnel
under the following conditions;
a. When the power-supply cord or plug is damaged.
b. If liquid has been spilled, or objects have fallen into the product.
c. If the product has been exposed to rain or water.
d. If the product does not operate normally by following the operating instructions. Adjust only those controls that
are covered by the operating instructions as an improper adjustment of other controls may result in damage and
will often require extensive work by a qualified technician to restore the product to its normal operation.
e. If the product has been dropped or damaged in any way.
f. When the product exhibits a distinct change in performance - this indicates a need for service.
19. Replacement Parts - When replacement parts are required, be sure the service technician has used replacement
parts specified by the manufacturer or have the same characteristics as the original part. Unauthorized substitutions
may result in fire, electric shock, or other hazards.
20. Safety Check - Upon completion of any service or repairs to this product, ask the service technician to perform safety
checks to determine that the product is in proper operating condition.
21. Wall or ceiling Mounting - The product should be mounted to a wall or ceiling only as recommended by the manufacturer.
22. Heat - The product should be situated away from heat sources such as radiators. Heat registers, stoves, or other
products (including amplifiers) that produce heat.
WARNING: Changes or modifications to this unit not expressly approved by the party responsible for compliance could
void the user’s authority to operate the equipment.
NOTE: This equipment has been tested and found to comply with the limits for a Class B digital device, pursuant to Part
15 of the FCC Rules. These limits are designed to provide reasonable protection against harmful interference in a residential
installation. This equipment generates, uses, and can radiate radio frequency energy and, if not installed and used in
accordance with the instructions, may cause harmful interference to radio communications. However, there is no guarantee
that interference will not occur in a particular installation. If this equipment does cause harmful interference to radio or
television reception, which can be determined by turning the equipment off and on , the user is encouraged to try to correct
the interference by one or more of the following measures:
- Reorient or relocate the receiving antenna.
- Increase the separation between the equipment and receiver.
- Connect the equipment into an circuit different from that to which the receiver is connected.
- Consult the dealer or an experienced radio TV technician for help.
AC
Polarized Plug
ENGLISH
38
ESPA OL
Los productos de Crosley Radio son garantizados contra los defectos de materiales y de
fabricación bajo las condiciones de uso normal por un período de un año a partir de la fecha
de venta al comprador de orígen. Esta garantía no se puede transferir.
En el caso de que el aparato deje de funcionar durante el período de garantía, el aparato será
reparado o cambiado a la sola discreción de Crosley Radio. Esta garantía cubre los defectos
de fabricación y de uso normal del usuario y NO CUBRE los daños o defectos que provienen
de abuso, de accidentes, de alteraciones, de uso equivocado, de negligencias, de gasto anormal,
resultados de una falta de entretenimiento, de uso commercial o exagerado, de los daños que
provienen de sobrecargos, de mala utilización, de accidentes, de actos de Dios ó como resultado
de una tentativa de reparación por cualquier persona que no sea un agente de servicio autorizado
por Crosley Radio para reparar el producto. Esta garantía no cubre los daños de orden cosmético,
ni los cordones y las antenas.
En el caso de que el aparato deje de funcionar de manera satisfactoria, se recomienda retornarlo
primero a la tienda o al revendedor donde se ha comparado. Si el aparato necesita servicio
suplementario, el comprador de orígen debe PRIMERO hacer una demanda de AUTORIZACIÓN
DE ENVÍO («RA») antes de enviar el aparato.
AFIN DE OBTENER UN NÚMERO DE RA
LLAMAR AL: 1.888.CROSLEY
(1.888.276.7539)
Una vez que Usted tenga el número de autorización de envío del departamento de servicio a
los clientes, haga el favor de embalar su aparato en su embalaje de orígen (ó una sustitución
razonable para evitar los daños). Escriba el número de autorización de regreso («RA») al exterior
del cartón y al interior incluya el recibo de compra de orígen (ó una copia conforme) indicando
la fecha de compra, el precio de compra y la dirección del vendedor. Usted debe incluír también
su nombre, su dirección dónde retornar el aparato y su número de teléfono para llamarle durante
las horas de trabajo. Haga el favor de incluír un cheque ó un giro postal por la cantidad de
$19.95 USD a Crosley Radio para los gastos de embalaje y reenvío. Los productos reenviados
no serán enviados a los apartados postales. Crosley Radio no se hará responsable por las
tardanzas ó los reclamos que resulten por falta del comprador de proveer los elementos de
información requeridos.
CROSLEY RADIO
ATTN: RETURNS DEP'T
2001 PRODUCTION DRIVE
LOUISVILLE, KY 40299
Para ayuda suplementaria: Servicio a los Clientes Crosley Radio
24 horas al día / 7 días por semana
Llamar al : 1.888.CROSLEY (1.888.276.7539)
No hay ninguna garantía implícita salvo como queda descrita arriba.
El recibo de compra del comprador es la sola prueba de su derecho a la garantía.
Esta garantía le da al comprador ciertos derechos específicos además de los derechos que
pueden variar de estado a estado y de provincia a provincia.
Conforme al texto del « Acto de Garantía Moss-Magnuson » en fecha del 10 julio 1975, la
presente garantía se llama « garantía limitada » pero esta apelación no compromete de ninguna
manera los niveles apreciables de Calidad y Fabricación de Crosley Radio.
GARANTÍA LIMITADA DE FABRICANTE
Page 12

ENGLISH
Getting Started
Unpacking................................. 4
Power Source........................... 4
Control Locators....................... 5,6
Basic Operation
Turntable Operation.................. 7
Radio Operation....................... 7
USB/SD Operation.................. 8
Recording
PHONO to USB/SD................. 8
MP3 copying............................ 9
Audio/Connections
Auxiliary Output ...................... 10
Auxiliary Input.......................... 10
Headphone Jack operation..... 10
General
Troubleshooting Guide.......... 11
Warranty .............................. 12
About This Manual
Welcome Table of Contents
Thank you for purchasing the Crosley Tech Series
Turntable (CR6007A). Before operating this unit,
please read this manual thoroughly and retain it for
future reference.
Instructions in this manual describe the control
functions of the CR6007A.
Included in the package:
Tech Series Turntable
Remote Control
AC Power Adaptor
45 RPM Adaptor
ESPA OL
1 El uso de la Entrada Auxiliar le permite conectar
los componentes externos a su aparato.
2 Conecte el cable auxiliar (no incluído) al enchufe
(jack) entrada en la parte de atrás de su aparato.
3 Regule el INTERRUPTOR DE ENTRADA en la
posición MARCHA.
4 El otro cabo del cable debe conectarse al enchufe
(Jack) Salida Audio del componente externo.
5 Verifique el nivel del volúmen del componente
externo.
6 Para más información sobre cómo la operación
del componente exterior, haga el favor de
consultar el manual del usuario para este aparato.
NB:Cuando Usted no quiere usar la Entrada Auxiliar,
verfique que el INTERRUPTOR DE ENTRADA
está regulado a la posición PARO.
36
1 Conecte los audífonos en el enchufe audífonos.
2 Regule el volúmen al nivel de escucha deseado.
NB: Cuando se usa los audífonos, el sonido está
cortado a los parlantes del aparato.
NB: Los audífonos no son incluídos con el aparato.
1 Usted puede conectar su aparato a fuentes
diferentes por medio de la salida auxiliar.
2 Conecte el cable auxiliar (no incluído) en el
enchufe (jack) salida.
3 El otro cabo del cable debe conectarse al enchufe
(Jack) entrada del aparato que Usted ha
escogido.
4 Para más información sobre cómo conectar su
aparato a un componente exterior, haga el favor
de consultar el manual del usuario para este
aparato.
NB:La Salida Auxiliar corresponde a un nivel de
señal pasivo de salida solamente y no tiene
poder suficiente para hacer funcionar los
parlantes.
Salida Auxiliar
Audio / Conexiones
Entrada Auxiliar
Operaci
ón del Enchufe Audífonos
El sonido está cortado a todos los parlantes.
Enchufe (Jack) Audífonos/Auriculares
Repetir la Selección
Para repetir una canción ó para repetir todas las
canciones de un CD, de una unidad de memoria USB
ó de una tarjeta SD, siga las instrucciones a
continuación.
1 Mientras que toca la música de un CD, de una
unidad de memoria USB ó de una tarjeta SD,
presione la tecla REPEAT /
en el control remoto.
2 Al modo CD ordinario, presione la tecla REPEAT /
hasta que la pantalla muestre "REPEAT 1" para
repetir la canción que está tocando una vez que
llegue al fin. Presione la tecla REPEAT /
hasta
que la pantalla muestre "REPEAT ALL" [REPETIR
TODAS] para repetir el CD todo entero desde el
comienzo tan pronto que termine.
3 Cuando Usted escucha los ficheros MP3 en CD, en
unidad de memoria USB ó en tarjeta SD, hay tres
opciones de escucha: "REPEAT 1", "REPEAT
FOLDER" y "REPEAT ALL". [REPETIR UNA,
REPETIR FICHERO y REPETIR TODAS]. Presione
la tecla REPEAT /
hasta que la pantalla muestre
el modo de escucha que Usted quiere.
NB: El reglaje por defecto para el Modo de Escucha
es parado.
Page 13

ENGLISH
SPEAKER
VOLUME
ON/OFF
KNOB
EARPHONE JACK
RADIO\
SD/USB\
PHONO
SWITCH
SD CARD
DIAL SCALE
AM\FM\
FM.ST
SWITCH
USB PORT
TUNING KNOB
SPEAKER
X-BASS
ON/OFF
BACKWARD SKIP
FORWARD SKIP
REC/ERASE
POWER
INDICATOR
SENSOR
LCD DISPLAY
FM.ST INDICATOR
PROGRAM
STOP/
SD/USB
PLAY/
PAUSE
REPEAT
5
Control Locators
AC ADAPTOR
JACK
EXTERNAL
FM ANTENNA
LINE OUT
JACK
LINE IN JACK
LINE IN SWITCH
LOCK HINGE
LID PIVOT POINT
LID PIVOT POINT
34
ESPA OL
Operación de Base
1. Deslice el SELECTOR DE FUNCIÓN al modo
SD/USB.
2. Encienda el aparato con girar el SELECTOR DE
VOLUMEN - MARCHA/PARO a la posición
MARCHA..
3. Regule el volumen a medio camino.
4. Presione y mantenga la tecla STOP /
durante
2 segundos. El aparato va a cambiar del modo
SD al modo USB. En el caso que el aparato no
detecta una unidad USB, la pantalla va a mostrar
"NO USB”.
5. Introduzca la unidad de memoria USB. La pantalla
va a mostrar “READ” [LECTURA] mientras el
sistema lee el contenido de la
unidad USB.
6. La pista número1 de la carpeta raíz (Carpeta 1)
va a aparecer en la pantalla después que el sistema
ha leído el contenido de la unidad USB.
USB
MP3
1. Deslice el SELECTOR DE FUNCIÓN al modo
SD/USB.
2. Encienda el aparato con girar el SELECTOR DE
VOLUMEN -MARCHA/PARO a la posición
MARCHA. En el caso que el aparato no detecta
una tarjeta, la pantalla va a mostrar "Read"
"No
Card” [“Lectura” - “No hay tarjeta”].
3. Regule el volumen a medio camino.
4. Introduzca la Tarjeta SD en la hendidura de tarjeta.
La pantalla va a mostrar “READ” [“Lectura”] mientras
el sistema lee el contenido de la tarjeta SD.
5. La pista número1 de la carpeta raíz (Carpeta 1)
va a aparecer en la pantalla después que el
sistema ha leído el contenido de la tarjeta SD.
Presione la tecla PLAY/P AUSE /
para comenzar
la música.
6. Presione la tecla BUSCAR PARA ADELANTE /
ó la tecla BUSCAR PARA ATRÁS / una ó varias
veces hasta que el número de la pista aparezca
en la pantalla. La música comenzará a tocar
automáticamente.
7. Presione la tecla STOP /
para parar la música.
8. Para pausar la música, presione la tecla
PLAY/P AUSE /
. Presione la tecla una segunda
vez para recomenzar la música.
Presione la tecla PLAY/P AUSE / para
comenzar la música.
7. Presione la tecla BUSCAR PARA ADELANTE /
ó la tecla BUSCAR PARA ATRÁS / una
ó varias veces hasta que el número de la pista
aparezca en la pantalla. La música comenzará
a tocar automáticamente.
8. Presione la tecla STOP /
para parar la música.
9. Para pausar la música, presione la tecla PLAY/
PAUSE /
.Presione la tecla una segunda vez
para recomenzar la música.
NB:
1. La facilidad USB no soporta la conexión por medio
de un alargador USB y no está diseñada para
comunicar directamente con una computadora.
2. Todos los Flash Drives USB y todas las tarjetas
SD no son necesariamente compatibles con este
aparato.
AVISO IMPORTANTE:
No hay que desconectar la unidad USB ó la tarjeta
SD durante el mode de operación USB/SD, puesto
que al hacer esto Usted corre el riesgo de dañar la
unidad de memoria externa ó los ficheros. Haga el
favor de cortar la energía previamente ó cambiar a
otro modo de operación antes de desconectar la unidad
USB ó la tarjeta SD.
USB
USB
Operación Tarjeta SD
Operación USB
Phono al USB/SD
Este aparato le permite grabar sus discos al formato
MP3 en una unidad de memoria USB Flash Drive
ó en una tarjeta SD. Para grabar sus discos, siga
las instrucciones a continuación.
1. Deslice el SELECTOR DE FUNCIÓN al modo
PHONO [TOCADISCOS].
2. Comience el disco al punto donde Usted quiere
comenzar la grabación. (Véa la sección sobre
la Operación del Tocadiscos en la página 33
para más información sobre cómo tocar sus discos).
3. Presione la tecla REC/ERASE /
[ GRABAR/BORRAR ] para comenzar la
grabación. La pantalla va a mostrar “ REC ”.
4. La media en la cual Usted graba (sea USB ó
SD) va a comenzar a parpadear en la pantalla
cuando comienza la grabación.
5. Presione la tecla STOP /
para parar el
proceso de grabación.
Page 14

7
Turn the unit on by rotating the VOLUME ON/OFF
KNOB located on the front panel to the ON position
1 Set the FUNCTION SWITCH to PHONO mode.
2 Set the SPEED CONTROL SWITCH to the
desired speed (33 1/3, 45 or 78 rpm). Place your
record onto the turntable.
3 Move the TONE ARM slightly to the right side
until you hear a click sound to activate the
turntable.
4 Move the TONE ARM by hand over the record
to the point you want the record to start. Adjust
the VOLUME ON/OFF KNOB to your desired
listening level.
5 At the end of the record, the TONE ARM will stop
automatically. You must return the TONE ARM
to the arm rest by hand.
This adaptor allows you to play 45 RPM records.
1 Place the 45 RPM adaptor over the spindle.
2 Gently place your 45 RPM record onto the
turntable.
3 Follow the steps under turntable operation to
play your record.
1 Set the FUNCTION SWITCH to RADIO mode.
2 Set the AM / FM / FM.ST SWITCH to the
desired Band.
3 Select the desired radio station by rotating
TUNING KNOB .
4 Adjust the VOLUME ON/OFF KNOB to the
desired sound level.
Antenna: for FM reception, the unit is provided with
a FM WIRE ANTENNA , move the wire until the
reception is clear and with no interferences. For AM
reception, the unit is provided with a directional
build-in ferrite antenna. Rotate the set to find the
position in which the best reception is obtained. Do
not connect the EXTERNAL FM ANTENNA to any
outside antenna.
Turntable Operation Radio Operation
Accessory: Adapter for 45 rpm
Antenna
ENGLISH
Basic Operation
32
ESPA OL
Control Locators
EJE TOCADISCOSADAPTADOR PARA DISCOS 45 RPM
BRAZO
ACÚSTICO
SOPORTE
BRAZO
ACÚSTICO
SELECTOR DE VELOCIDAD
TOCAR/PAUSAR
PARO/SD/USB
BUSCAR PARA ATRÁS
0-9
GRABAR/BORRAR
REPETIR
BUSCAR PARA ADELANTE
PROGRAMAR
PROG
798
3
1 2
4 5 6
0
REPEAT
REC/
ERASE
SD/USB
Ubicación de los Mandos
Page 15

9
ENGLISH
Basic Operation
CD
P
This units allows you to delete individual songs from
your SD Card or USB Flash Drive. To erase a
particular song, that song must be playing.
1 While in SD/USB mode, select the song you
would like to delete and begin playback.
2 Once the song is playing, press and hold the
REC/ERASE /
button for approximately
2 seconds. The song will stop playing and will
be deleted.
3 The display will briefly show “delete"
Note: You can only erase one song at a time. You cannot
erase the entire SD Card or USB Drive at one time.
2 Press the
FORWARD SKIP
/ /
BACKWARD
SKIP/
once or repeatedly until the desired track
number appears in the display.
3 Press PROGRAM / to confirm. The display
will show the stored track number and the next
available position.
4 Repeat step 2-3 to select and store all desired
tracks. FULL is displayed if you attempt to program
more than 20 tracks
5 Press PLAY/PAUSE /
to play the program.
6 To erase the programmed playback, press the
STOP /
button twice. Turning the unit off or
switching to a different function will also erase
the programming.
1 Press REPEAT /
on remote at Play mode.
2 Default Play Mode function is OFF.
3 REPEAT 1 / REPEAT FOLDER / REPEAT ALL .
THREE kinds of Play Mode can be chosen in MP3
type.
Press the X-BASS ON/OFF to ON or OFF the
X-BASS effect(Adjust the volume level to mid to
maximize the X-BASS effect).
CD
P
P
CD
You may program up to 20 tracks from your SD Card
or USB Drive to play in the order you choose.
1 While playback is stopped, press the PROGRAM
/
button to start programming. “P” and “P0-01
will begin flashing on the display.
MP3 copying
1. To copy an individual song from either USB to
SD or SD to USB, press REC/ERASE /
while the desired song is playing to start copying.
Playback will stop as the system scans the
contents and prepares to copy the song.
2. “ REC " icon will show on the display.
3. “COPY” will show on the display as copying
begins.
4. The icon for the device that you are copying
to, “USB” or “CARD” will begin flashing and
will stop once copying is complete.
5. Original source, USB or SD will begin playing
from the beginning once copying is complete.
6. You can also copy all songs at once from USB
to SD or SD to USB. While in either USB or
SD mode and playback is stopped, press
REC/ERASE /
. The unit will copy all songs
from the USB to SD or from the SD to USB.
You will not be able to stop the copying process
until complete.
Deleting MP3 Tracks
MP3 Copying
Programming Tracks
Play Mode
X-BASS
ESPA OL
1 Quite los materiales de embalaje del aparato.
NB. Guarde todos los materiales de embalaje
para el caso de mudanza ó devolución del
aparato.
2 Quite la funda de plástico del aparato.
3 Quite el Adaptador de Energía CA del embalaje.
4 Abra la tapa y quite el embalaje de transporte
de styrofoam del tocadiscos.
5 Quite la atadura negra por debajo del brazo.
6 Quite la tapa de protección blanca de la aguja
con jalar hacia el frente del aparato.
7 Quite el clip de retención del brazo acústico
con empujarlo lijeramente a la derecha. Esto
desbloquea el brazo acústico del soporte. Hay
que bloquear el clip de retención para el
transporte del aparato a otro lugar.
8 Ponga la tapa en el aparato.
PUESTA EN OPERACIÓN
1 Quite la atadura negra del Adaptador de Energía
CA.
2 Desenrolle la antena FM en alambre y déjela
caer derecho para abajo para la mejor recepción
FM. En el caso que Usted tiene problemas con
sincronizar una estación FM, oriente el alambre
hasta obtener una recepción nítida sin
interferencia. No hay que conectar la antena FM
a una antena al exterior.
1
Enchufe el Adaptador de energía CA en un
tomacorriente apropiado.
2
Connecte la ficha del Adaptador de energía CA
al enchufe (jack) del Adaptador de energía CA
en la parte de atrás del aparato.
30
1 Incline la BISAGRA – CERROJO DE LA TAPA
hacia la parte atrás del aparato.
2 Coloque la TAPA por encima del tocadiscos y
empuje la TAPA en la BISAGRA según la
ilustración abajo.
3 A la vez que Usted coloca la TAPA en su lugar,
ponga los pernos de los ejes de la TAP A enfrente
de su ubicación según la ilustración abajo.
4 Presione la TAP A completamente al fondo hasta
que los pernos de los ejes entren en la ubicación
de los pernos con un golpecito seco y la TAPA
entra en la BISAGRA a la vez.
Cómo Comenzar
Desempacar
Fuente de Energía
INSTALACIÓN DE LA TAPA
click
Page 16

11
Troubleshooting
There is no Power
1 Make sure radio is plugged in correctly.
2 The unit is not turned on: Rotate the VOLUME
ON/OFF KNOB from the OFF position past the
“click” to turn on the unit.
There is no Sound
1 Check the Line In Switch on the back of the
unit to make sure it is in the OFF position.
2 Check the volume level by turning the VOLUME
ON/OFF KNOB.
3 Make sure headphones are not connected to
the unit.
4 Check the position of the FUNCTION SWITCH.
Turntable will not work
1 Make sure the FUNCTION SWITCH is set to
phono.
2 Try moving the tone arm to the right until you
hear a click.
3 Make sure the protective needle cover is
removed.
ENGLISH
General
28
El símbolo de rayo con
punto de flecha al interior
del triángulo equilateral lleva
el propósito de poner al
usuario sobre aviso de la
presencia de «voltaje
peligroso» no aislado al
interior de la caja del aparato
que es suficientemente
grave para causar un riesgo
de choque eléctrico a las
personas.
El signo de admiración al
interior del triángulo
equilateral lleva el propósito
de poner al usuario sobre
aviso de la presencia de
instrucciones importantes
concernientes a la
operación y al
mantenimiento que se
encuentran en el manual
del usuario librado con el
aparato.
RIESGOS DE CHOQUE
ELÉCTRICO NO ABRIR
¡
ATENCIÓN !
¡ ATENCIÓN ! PARA REDUCIR LOS
RIESGOS DE CHOQUE ELÉCTRICO,
NO QUITE LA TAPA (Ó LA PARTE DE
ATRÁS). EL INTERIOR NO CUENTA
CON NINGÚN COMPONENTE A
REPARAR POR EL USUARIO.
CONFÍE SU AP ARATO SOLAMENTE
AL PERSONAL DE SERVICIO
CALIFICADO.
¡
ATENCIÓN !
PARA RÉDUCIR LOS RIESGOS DE CHOQUE ELÉCTRICO, NO EXPONGA
ESTE APARA T O À LA LLUVIA NI A LA HUMEDAD. NO QUITE LA TAPA. LOS
PILOTOS SON SOLDADOS EN LUGAR. EL INTERIOR NO CUENTA CON
COMPONENTES A REPARAR POR EL USUARIO. CONFÍE SU APARATO
SOLAMENTE AL PERSONAL DE SERVICIO CALIFICADO.
ESPA OL
“
No impeda la ventilación.”
“
No exponga al goteo ni a la salpicadura. No coloque ningún objeto tal como un vaso lleno de líquido sobre
el aparato.”
Especificaciones técnicas
Gama de Frecuencias : AM (PO) 530 - 1700 KHz
: FM (GO) 88 – 108 MHz
Puerta USB 2.0 : Toda Velocidad 512 MIB - 4GB
(Soporte FAT16, FAT32)
Fuente de energía : Adaptador CA 120V ~ 60Hz /12V CD
Consumo : 15W
Antenas : Antena FM (GO) externa
: Antena AM (PO) Incorporada – Barra ferrita
Velocidades : 33-1/3, 45, 78 rpm
Parlantes
Tamaño : 2 x 3 pulgadas – tipo dinámico x 2
Impedancia : 4 ohms
Consumo : 3-5W
Potencial de salida : 1,2 W x 2
Aguja de recambio : NP1
Batería para control remoto : CR2025
Especificaciones USB:
Interface
- USB 2.0 Toda Velocidad, HUESPED (HUB USB no tiene soporte) Memoria Flash Correspondiente
- Compatible con Audio MPEG 1, 2, 2.5
- Compatible con Capa 1, 2, 3
- Compatible con débito binario: 128 – 320 Kbps
- Nido carpeta segundaria : 8 niveles
- Número de pistas / títulos máximos 999
- Soporte ID3 etiqueta V2.0
* EL FABRICANTE SE RESERVA EL DERECHO DE CAMBIAR LA CONCEPCIÓN Y LAS
ESPECIFICACIONES SIN PREAVISO.
Page 17

13
CR6007A
Tech Series
www.crosleyradio.com
Manuel d’Utilisateur
26
CR6007A
Tech Series
www.crosleyradio.com
Manual del Usuario
Page 18

24
Il n’y a pas d’alimentation
1 Vérifiez que l’appareil est branché correctement.
2 Vérifiez que l’appareil est sous tension: Tournez
le BOUTON VOLUME – MARCHE/ARRÊT au
delà de la position « clic » pour mettre l’appareil
sous tension.
Il n’y a pas de son
1 Vérifiez le COMMUTATEUR D’ENTRÉE au dos
de l’appareil pour confirmer qu’il est réglé en
position ARRÊT.
2 Vérifiez le niveau du volume en tourant le
BOUTON VOLUME – MARCHE/ARRÊT.
3 Vérifiez que les écouteurs ne sont pas branchés
sur l’appareil.
4 Vérifiez la position du SÉLECTEUR DE
FONCTION.
Le Tourne-disque ne marche pas
1 Vérifiez que le SÉLECTEUR DE FONCTION
est réglé en position phono.
2 Essayez de déplacer le bras de lecture vers la
droite jusqu’à ce vous entendiez un « clic ».
3 Vérifiez que la protection a été enlevée de la
tête de lecture.
La télécommande ne fonctionne pas
1 Remplacez la pile. Voyez les Spécifications
Techniques pour le type de pile requise.
2 Soyez sûr de viser la cellule de réception de
l’appareil lorsque vous utilisez la télécommande.
3 Enlevez tous les obstacles du chemin de la
télécommande IR et le capteur ID qui est situé
à côté de l’écran LCD sur l’appareil afin de
donner une ligne droite au signal de
la télécommande vers l’appareil.
FRANÇAIS
Généralités
Guide pour résoudre les problèmes
“
Il ne faut pas empêcher la ventilation”
“
Il ne faut pas exposer l’appareil aux égouttements ni aux éclaboussures. Il ne faut pas poser d’objet rempli
de liquide tel qu’un vase sur l’appareil
Spécifications techniques
Gammes des Fréquences : FM (GO) 88 - 108 MHz
: AM (PO) 530 - 1700 KHz
Porte USB 2.0 : Pleine Vitesse 512MB - 4GB
(Support FAT16, FAT32)
Source d’alimentation : Adaptateur CA 120V ~ 60Hz / CD 9V 800mA
Consommation : 15W
Antennes : Antenne FM (GO) externe
: Antenne AM (PO) Incorporée – Barre ferrite
Vitesses : 33 1/3, 45, 78 Tours
Haut-parleur taille : 2 x 3 po Type dynamique x 2
Haut-parleur impédance : 4 ohms
Haut-parleur consommation : 3-5W
Puissance Sortie : 1,2 W x 2
Tête de lecture de rechange : NP1
Pile pour télécommande : CR2025
Spécifications USB:
Interface
- USB 2.0 Pleine vitesse, (HÔTE USB n’est pas supporté) Mémoire Flashe Correspondante
- Compatible avec MPEG Audio 1, 2, 2.5
- Compatible avec Couche 1, 2, 3
- Compatible avec débit binaire: 128 – 320 Kbps
- Nid Sousfichier : 8 niveaux
- Nombre de pistes / titres max 999
- Support ID3 étiquette V2.0
*LE FABRICANT RÉSERVE LE DROIT DE CHANGER LA CONCEPTION ET LES SPÉCIFICATIONS SANS PRÉAVIS.
15
FRANÇAIS
Le point d’exclamation à
l’intérieur d’un triangle
équilatéral a pour but
d’alerter l’utilisateur de la
présence d’instructions
importantes sur l’opération
et l’entretien dans le
manuel de l’utilisateur livré
avec l’appareil.
RISQUES DE CHOC ELECTRIQUE.
NE PAS OUVRIR.
A VERTISSEMENT :
Le symbole de l’éclair avec
la pointe de flèche à
l’intérieur d’un triangle
équilatéral a pour but
d’alerter l’utilisateur de la
présence de «voltage
dangereux» non isolé à
l’intérieur du coffret du
produit qui est suffisamment
grave pour causer un risque
de choc électrique aux
personnes.
AVERTISSEMENT:POUR RÉDUIRE
LES RISQUES DE CHOC
ÉLECTRIQUE, N’ENLEVEZ PAS
LE COUVERCLE (OU LE DOS).
L’INTÉRIEUR NE CONTIENT
AUCUN COMPOSANT À
RÉPARER PAR L’UTILISATEUR.
CONFIEZ VOTRE APPAREIL
SEULEMENT AU PERSONNEL
DE SERVICE QUALIFIÉ
AVERTISSEMENT:
POUR RÉDUIRE LES RISQUES DE CHOC ÉLECTRIQUE, N’EXPOSEZ
PAS CET APPAREIL À LA PLUIE NI À L’HUMIDITÉ. N’ENLEVEZ PAS
LE COUVERCLE. LES VOYANTS SONT SOUDÉS SUR PLACE.
L’INTÉRIEUR NE CONTIENT AUCUN COMPOSANT À RÉPARER PAR
L’UTILISATEUR. CONFIEZ VOTRE APPAREIL SEULEMENT AU
PERSONNEL DE SERVICE QUALIFIÉ.
Page 19

22
CD
P
Cet appareil vous permet d’effacer des chansons
individuelles de votre carte SD ou de votre unité de
mémoire USB Flash Drive. Afin d’effacer une chanson
spécifique, il faut que cette chanson soit en train de
jouer.
1 En mode SD/USB, sélectionnez la chanson que
vous voulez effacer et commencez la lecture.
2 Une fois que la chanson est en train de jouer,
poussez et maintenez la touche REC/ERASE /
pendant approximativement 2 secondes. La
chanson va arrêter de jouer et sera effacée.
3 Le mot “delete" [effacer] va s’afficher brièvement
à l’écran.
NB:Vous pouvez effacer seulement une chanson
à la fois. Il n’est pas possible d’effacer toute la
carte SD ou toute l’unité de mémoire USB d’un coup.
1. Pendant que la lecture de la musique est arrêtée,
poussez la touche PROGRAMMER /
pour
commencer la programmation. L’écran va afficher
"P" et P0-01 en clignotant pour indiquer que vous
êtes en mode de Programmation.
2. Poussez la touche
RECHERCHER EN AVANT
/
ou
RECHERCHER EN ARRI
ÈRE / une ou
pluisieurs fois jusqu’à ce que le numéro de la piste
apparaisse à l’écran.
3. Poussez PROGRAMMER /
pour confirmer.
L’écran affiche le numéro de la piste mise en
mémoire et la position suivante de stockage.
4. Répétez les étapes 2-3 pour sélectionner et mettre
en mémoire toutes les pistes souhaitées. L’écran
va afficher “FULL“ [PLEIN] au cas où vous
tentez de programmer plus de 20 pistes.
5. Poussez la touche PLAY/PAUSE /
pour jouer
les pistes programmées.
6. Pour effacer les pistes programmées, poussez la
touche STOP /
deux fois. Les pistes seront
effacées quand vous coupez le courant ou si vous
sélectionnez une fonction différente.
CD
P
P
CD
On peut programmer jusqu’à 20 pistes d’un CD,
d’une unité de mémoire USB ou d’une carte SD à
jouer dans la séquence de votre choix.
Copier les MP3
1. Pour copier une chanson individuelle d’une USB
sur une SD ou d’une SD sur une USB, poussez
la touche REC/ERASE /
pendant la lecture
de la chanson que vous voulez enregistrer pour
lancer l’opération de copier. La lecture s’arrêtera
et le système lira le contenu et se préparera à
copier la chanson.
2. L’écran va afficher l’icône “ REC ".
3. L’écran va afficher “COPY” lorsque l’opération
de copier commence.
4. L’écran va afficher l’icône pour l’unité sur laquelle
vous êtes en train d’enregistrer la copie. “USB”
ou “CARD” va commencer à clignoter et s’arrêtera
une fois que l’opération de copier est terminée.
5. La source d’origine, USB ou SD commencera à
jouer dès le commencement une fois que
l’opération de copier est terminée.
6. Vous pouvez aussi copier toutes les chansons
en même temps d’une USB sur une SD ou d’une
SD sur une USB. En mode USB ou SD et avec
la lecture arrêtée, poussez la touche REC/ERASE
/
. L’appareil va copier toutes les chansons
de la USB à la SD ou de la SD à la USB. Il n’est
pas possible d’arrêter le processus de copier
jusqu’à la fin du processus.
FRANÇAIS
Opération de Base
Effacer les Pistes MP3
Copier les MP3
Lecture programm
ée
Mode Jouer
X-BASS
1 Poussez la touche REPEAT / sur la
télécommande au mode Jouer.
2 La fonction par défaut du Mode Jouer est ARRÊT.
3 Il y TROIS types de Mode Jouer que l’on peut
choisir pour les sélections MP3: RÉPÉTER 1 /
RÉPÉTER RÉPERTOIRE / RÉPÉTER TOUTES
Poussez la touche X-BASS MARCHE/ARRÊT pour
activer ou désactiver l’effet X-Bass. L’activation de
la capacité X-Bass ajoute un ton plus riche et sonore.
FRANÇAIS
1 Enlevez les matériaux d’emballage de l’appareil.
NB: Gardez tous les matériaux d’emballage.
2 Enlevez la housse en plastique de l’appareil.
3 Enlevez l’Adaptateur Alimentation CA de
l’emballage.
4 Ouvrez le couvercle et enlever l’emballage de
transport en styrofoam du tourne-disque.
5 Enlevez l’attache noire du dessous du bras de
lecture.
6 Enlevez la bande et la protection blanche de la
têtede lecture en la tirant vers le devant de
l’appareil.
7 Lâchez le clip de retenue du bras de lecture en
le poussant légèrement à droite. Ceci débloque
le bras de lecteur de son repose-bras. Rebloquez
le clip de retenue lors du transport de
l’appareil à un autre endroit.
8 Installez le couvercle sur l’appareil.
Mise en opération
1
Enlevez l’attache de l’Adaptateur d’Alimentation CA.
2 Desserrez le fil d
’antenne FM et laissez-le pendre
en ligne droite pour la meilleure réception FM. Au
cas où vous auriez des problèmes à régler sur une
station FM, changez l’antenne externe FM pour
améliorer la réception. Ne
branchez pas l
’antenne
FM sur une antenne dehors.
1
Branchez l’Adaptateur CA sur une prise de courant
appropriée.
2
Branchez le petit bout de l’Adaptateur sur le
jackAdaptateur CA au dos de l’appareil.
17
1
Faites pivoter la CHARNIÈRE – VERROU du
COUVERCLE vers l’arrière de l’appareil.
2 Positionnez le COUVERCLE au-dessus du
tourne-disque et poussez le COUVERCLE sur
la CHARNIÈRE selon l’illustration ci-dessous.
3 En même temps que vous mettez le
COUVERCLE en place, faites aligner les ergots
des pivots sur le COUVERCLE ave
l’emplacement des ergots selon l’illustration cidessous.
4 Poussez le COUVERCLE complètement au fond
jusqu’à ce que les ERGOTS des PIVOTS rentrent
dans l’emplacement des ergots avec un petit
coup sec et la CHARNIÈRE fait de même.
Comment Commencer
Déballage
Source d’Alimentation
Installation du couvercle
click
Page 20

20
Mettez l’appareil sous tension en tournant le
SÉLECTEUR DE VOLUME MARCHE/ARRÊT situé
au devant en position MARCHE.
1 Réglez le SÉLECTEUR DE FONCTION au mode
Tourne-disque [Phono].
2 Mettez le SÉLECTEUR DE VITESSE à la vitesse
souhaitée (33-1/3, 45 ou 78 tours). Placez votre
disque sur la platine.
3 Faites déplacer le bras de lecture légèrement vers
le côté droit jusqu’à ce que vous entendiez un clic
pour activer la platine.
4 Faites déplacer le bras de lecture par-dessus le
disque au point où vous voulez faire démarrer le
disque. Réglez le BOUTON DE VOLUME MARCHE/ARRÊT au volume souhaité.
5 À la fin du disque, le bras de lecture va s’arrêter
automatiquement. Il vous faut faire
retourner le bras de lecture à son repose-bras
manuellement.
Cet adaptateur vous permet de jouer des disques
45 tours.
1 Mettez l’adaptateur sur l’axe.
2 Placez votre disque 45 tours doucement sur la
platine.
3 Suivez les instructions dans la section opération
du tourne-disque pour jouer votre disque.
1 Réglez le SÉLECTEUR DE FONCTION au mode
Tuner
2 Réglez le SÉLECTEUR MODULATION pour
sélectionner la bande souhaitée (AM/FM/FM
STÉRÉO).
3 Sélectionnez la station de radio souhaitée en
tournant le SÉLECTEUR DE STATIONS.
4 Réglez le BOUTON VOLUME MARCHE/ARRÊT
au niveau du volume souhaité.
Antenne. Pour la réception FM, l’appareil est équipé
d’une ANTENNE FM EN FIL . Orientez le fil jusqu’à
obtenir une réception nette sans parasites. Pour la
réception AM, l’appareil est équipé d’une antenne
ferrite directionnelle incorporée. Orientez l’appareil
pour trouver la position où on reçoit la meilleure
réception. Ne branchez pas l’ANTENNE FM
EXTERNE sur une antenne à l’extérieur.
Opération du T ourne-Disque Opération de la Radio
Accessoire:
Adaptateur pour
disques 45 tours
Antenne
FRANÇAIS
Opération de Base
19
Control Locators
FRANÇAIS
AXE PLATINEADAPTATEUR POUR DISQUES 45 TOURS
BRAS DE
LECTURE
REPOSE
BRAS DE
LECTURE
SÉLECTEUR DE VITESSE
JOUER/PAUSE
ARRÊT/SD/USB
RECHERCHER EN ARRIÈRE
0-9
ENREGISTRER/EFFACER
RÉPÉTER
RECHERCHER EN AVANT
PROGRAMMER
PROG
798
3
1 2
4 5 6
0
REPEAT
REC/
ERASE
SD/USB
Control Locators
 Loading...