

Page 1

®
HOME APPLIANCES
STANDARDCLEANING 20"GAS RANGE
Standing PilotIgnition
For questions about features, operation/performance, parts, accessories or service,
call: 1-800-253-1301 or visit our brand websites at ...
www.estatea pplia nees,eom
ESTUFAA GAS DE20"DELIMPIEZAESTANDAR
Encendido I:_r piloto fijo
Mc_t'}_Jade uso y cu_dado
Para consultas respecto de caracteristicas, funcionamiento, rendimiento, piezas, accesorios o servicio
t&cnico Ilame al: 1-800-255-1501 o visite nuestro sitio de intemet en:
www.estatea pplia nces.com
Table of Contents/[ndice .................................................... 2
To the installer: Please leave this instruction book with the unit.
To the consumer: Please read and keep this book for future reference.
Para el instalador: favor de dejar este manual de instrucciones con la unidad.
Para el consumidor: favor de leer y guardar este manual para futuras referencias.
W10173325A
Page 2
TABLEOF CONTENTS
[NDICE
RANGE SAFETY ............................................................................. 2
The Anti-Tip Bracket .................................................................... 4
COOKTOP USE .............................................................................. 5
Cooktop/Oven Temperature Controls ......................................... 5
Pilot Lights .................................................................................... 5
Surface Burners ........................................................................... 6
Surface Pilots ............................................................................... 7
Home Canning ............................................................................. 7
Coo kware ..................................................................................... 7
OVEN USE ....................................................................................... 8
Aluminum Foil............................................................................... 8
Positioning Racks and Bakeware ................................................ 8
Bakeware ...................................................................................... 8
Oven Vent ..................................................................................... 8
Baking and Roasting .................................................................... 9
Broiling .......................................................................................... 9
RANGE CARE ................................................................................. 9
Removing the Oven Bottom ........................................................ 9
General Cleaning ........................................................................ 10
Oven Door .................................................................................. 10
TROUBLESHOOTING .................................................................. 11
ASSISTANCE OR SERVlCE ......................................................... 12
WARRANTY .................................................................................. 13
SEGURIDAD DE LA ESTUFA ....................................................... 15
El soporte antivuelco .................................................................. 16
USO DE LA SUPERFICIE DE COCCION .................................... 18
Controles de temperatura de la superficie de coccion
y del horno ................................................................................. 18
Luces piloto ................................................................................ 18
Quemadores de superficie ......................................................... 19
Luces piloto de superficie .......................................................... 20
Enlatado casero .......................................................................... 20
Utensilios de cocina ................................................................... 20
USO DEL I-IORNO ......................................................................... 21
Papel de aluminio ....................................................................... 21
Posicion de las parrillas y los utensilios para hornear ............... 21
Utensilios para hornear .............................................................. 21
Ducto de escape del horno ........................................................ 22
Como hornear y asar.................................................................. 22
Como asar a la parrilla ............................................................... 22
CUIDADO DE LA ESTUFA ........................................................... 23
Como quitar el rondo del horno ................................................. 23
Limpieza general ........................................................................ 23
Puerta del horno ......................................................................... 24
SOLUCION DE PROBLEMAS ...................................................... 25
AYUDA O SERVICIO TECNICO ................................................... 26
GARANTIA .................................................................................... 27
RANGESAFETY
Your safety and the safety of others are very important.
We have provided many important safety messages in this manual and on your appliance. Always read and obey all safety
messages.
This is the safety alert symbol.
This symbol alerts you to potential hazards that can kill or hurt you and others.
All safety messages will follow the safety alert symbol and either the word "DANGER" or "WARNING."
These words mean:
You can be killed or seriously injured if you don't immediately
follow instructions.
You can be killed or seriously injured if you don't follow
instructions.
All safety messages will tell you what the potential hazard is, tell you how to reduce the chance of injury, and tell you what can
happen if the instructions are not followed.
2
Page 3
WARNING: If the information in this manual is not followed exactly, a fire or explosion
may result causing property damage, personal injury or death.
- Do not store or use gasoline or other flammable vapors and liquids in the vicinity of this
or any other appliance,
- WHAT TO DO IF YOU SMELL GAS:
• Do not try to light any appliance.
• Do not touch any electrical switch.
• Do not use any phone in your building.
• Immediately call your gas supplier from a neighbor's phone. Follow the gas supplier's
instructions.
• If you cannot reach your gas supplier, call the fire department.
- Installation and service must be performed by a qualified installer, service agency or
the gas supplier.
WARNING: Gas leaks cannot always be detected by smell.
Gas suppliers recommend that you use a gas detector approved by UL or CSA.
For more information, contact your gas supplier.
If a gas leak is detected, follow the "What to do if you smell gas" instructions.
The California Safe Drinking Water and Toxic Enforcement Act requires the Governor of California to publish a list of substances
known to the State of California to cause cancer, birth defects, or other reproductive harm, and requires businesses to warn of
potential exposure to such substances.
WARNING: This product contains a chemical known to the State of California to cause cancer, birth defects, or other
reproductive harm.
This appliance can cause low-level exposure to some of the substances listed, including benzene, formaldehyde, carbon
monoxide, toluene, and soot.
Page 4

Therangewillnottipduringnormaluse.However,therangecantipifyouapplytoomuchforceorweighttotheopendoorwithoutthe
anti-tipbracketfasteneddownproperly.
Tip Over Hazard
A child or adult can tip the range and be killed.
Connect anti-tip bracket to rear range foot.
Reconnect the anti-tip bracket, if the range is moved.
See the installation instructions for details.
Failure to follow these instructions can result in death or serious burns to children and adults.
Anti-Tip Bracket
\
Range Foot
Making sure the anti-tip bracket is installed:
• Slide range forward.
• Look for the anti-tip bracket securely attached to floor.
• Slide range back so rear range foot is under anti-tip bracket.
iMPORTANT SAFETY iNSTRUCTiONS
WARNING: To reduce the risk of fire, electrical shock,
injury to persons, or damage when using the range, follow
basic precautions, including the following:
m WARNING: TO REDUCE THE RISK OF TIPPING OF
THE RANGE, THE RANGE MUST BE SECURED BY
PROPERLY INSTALLED ANTI-TIP DEVICES. TO CHECK
IF THE DEVICES ARE INSTALLED PROPERLY, SLIDE
RANGE FORWARD, LOOK FOR ANTI-TIP BRACKET
SECURELY ATTACHED TO FLOOR, AND SLIDE RANGE
BACK SO REAR RANGE FOOT IS UNDER ANTI-TIP
BRACKET.
[] WARNING: NEVER use this appliance as a space
heater to heat or warm the room. Doing so may result in
carbon monoxide poisoning and overheating of the oven.
[] WARNING: NEVER cover any slots, holes or passages
in the oven bottom or cover an entire rack with materials
such as aluminum foil. Doing so blocks air flow through the
oven and may cause carbon monoxide poisoning.
Aluminum foil linings may also trap heat, causing a fire
hazard.
• CAUTION: Do not store items of interest to children in
cabinets above a range or on the backguard of a range -
children climbing on the range to reach items could be
seriously injured.
[] Proper Installation - The range, when installed, must be
electrically grounded in accordance with local codes or, in
the absence of local codes, with the National Electrical
Code, ANSI/NFPA 70. Be sure the range is properly
installed and grounded by a qualified technician.
[] This range is equipped with a three-prong grounding plug
for your protection against shock hazard and should be
plugged directly into a properly grounded receptacle. Do
not cut or remove the grounding prong from this plug.
[] Disconnect power before servicing.
[] Injuries may result from the misuse of appliance doors or
drawers such as stepping, leaning, or sitting on the doors
or drawers.
[] Maintenance - Keep range area clear and free from
combustible materials, gasoline, and other flammable
vapors and liquids.
[] Storage in or on the Range - Flammable materials should
not be stored in an oven or near surface units.
[] Top burner flame size should be adjusted so it does not
extend beyond the edge of the cooking utensil.
For self=cleaning ranges -
[] Before Self-Cleaning the Oven - Remove broiler pan and
other utensils. Wipe off all excessive spillage before
initiating the cleaning cycle.
SAVE THESE
iNSTRUCTiONS
Page 5

COOKTOP USE
This manual covers several different models. The range you have purchased may have some or all of the items listed. The locations and
appearances of the features shown here may not match those of your model.
A B C D E F
• 0 OFF OYFO0 &_
E_ b,w
"°@
M_d M_I 2_
p_ to turn oven te_p
A. Surface burner Iocator
B. Left rear burner control
Fire Hazard
Do not let the burner flame extend beyond the edge of
the pan.
Turn off all controls when not cooking.
Failure to follow these instructions can result in death
or fire.
C. Left front burner control
D. Oven temperature control knob
OY£
SETTING RECOMMENDED USE
HIGH
MED (Medium)
LOW
00 o_7 O0
O0 _ O0
push to to_n
E.Right rear burner control
F. Right front burner control
• Start food cooking.
• Bring liquid to a boil.
• Hold arapid boil.
• Quickly brown or sear food.
• Fry or saute foods.
• Cook soups, sauces and gravies.
• Stew or steam foods.
• Keep food warm.
• Simmer.
Before setting a control knob, place filled cookware on the grate.
Do not operate a burner using empty cookware or without
cookware on the grate.
To Set Burner Temperature:
1. Push in and turn knob counterclockwise to HIGH.
2. Turn knob to anywhere between HIGH and LOW. Use the
following chart as a guide when setting heat levels.
3. To turn off surface burners, turn knobs clockwise to the "Off"
position.
To Set Oven Temperature:
Push in and turn oven control knob to desired temperature
setting.
To Light Standing Pilot Lights:
Before using the range, the standing pilots must be lit. They will
stay lit after turning off the burners.
1. Make sure all controls are off and the oven and cooktop are
cool.
2. Remove surface grates from the cooktop.
3. Lift the cooktop by both front corners.
Page 6

4. Usingamatch,lightbothburnerpilotlights.
5. Slowlylowerthecooktopuntilitsnapsintoplace.
6. Pushinandturneachsurfaceburnercontrolknobtothe"HI"
position.Theflameshouldlightwithin4seconds.
7. Ifsurfaceburnersdonotignite,repeatsteps3to6.
8. Replacecooktopgrates.
To Light Oven Pilot Light:
1. Make sure all controls are off and the oven is cool.
2. Open the oven door to remove oven racks and the oven
bottom tray.
3. Remove the fasteners holding the flame spreader. Lift and
pull out the flame spreader.
6. Hold the oven control knob in for 10 seconds to make sure
the pilot will remain lit.
7. If the oven pilot light turns off after releasing the knob, repeat
steps 5 and 6.
8. Replace the flame spreader, oven bottom tray, and racks.
NOTE: The pilot light will stay lit after turning off the oven. The
oven burner should turn on the next time a temperature is
selected on the oven control knob. If the oven burner does not
turn on, repeat previous steps for lighting oven pilot light.
IMPORTANT: Do not obstruct the flow of combustion and
ventilation air around the burner grate edges.
Burner ports: Check burner flames occasionally for proper size
and shape as shown below. A good flame is blue in color, not
yellow. Keep this area free of soil and do not allow spills, food,
cleaning agents or any other material to enter the burner ports.
f v
A. 1-17/2'' (25-38 mm)
B. Burner ports
/f
B
i
B
A. Oven bottom tray
B. Fasteners
C. Flame spreader
4=
Locate the pilot light on the left-hand side of the oven burner.
5.
Push in oven control knob and hold, then ignite the oven pilot
light with a match.
To Clean:
IMPORTANT: Before cleaning, make sure all controls are off and
the oven and cooktop are cool. Do not use oven cleaners, bleach
or rust removers.
1. Close the manual shutoff valve for the gas supply near the
range.
2. Remove the surface burner grates.
3. Lift the cooktop by both front corners and hold it by the front
center edge.
4. Clean clogged burner ports with a straight pin as shown. Do
not enlarge or distort the port. Do not use a wooden
toothpick. If the burner needs to be adjusted, contact a
trained repair specialist.
5. Slowly lower the cooktop into place.
6. Open the manual shutoff valve for the gas supply near the
range.
7. Ignite pilot lights.
8. Replace surface grates.
6
Page 7

Check for pilot flames occasionally, for proper size and shape as
shown below. A good flame is blue in color, sometimes can have
a slight yellow tip which is normal. Do not allow spills, food,
cleaning agents or any other material to enter the pilot hole.
To Clean:
IMPORTANT: Before cleaning, make sure all controls are off and
the oven and cooktop are cool. Do not use oven cleaners, bleach
or rust removers.
1. Close the manual shutoff valve for the gas supply near the
range.
2. Remove the surface burner grates.
3. Lift the cooktop by both front corners and hold it by the front
center edge.
4. Clean clogged pilot holes with astraight pin as shown. Do not
enlarge or distort the port. Do not use a wooden toothpick. If
the burner needs to be adjusted, contact a trained repair
specialist.
IMPORTANT: Do not leave empty cookware on a hot surface
cooking area, element or surface burner.
Ideal cookware should have a flat bottom, straight sides and a
well-fitting lid, and the material should be of medium-to-heavy
thickness.
Rough finishes may scratch the cooktop or grates. Aluminum and
copper may be used as a core or base in cookware. However,
when used as a base they can leave permanent marks on the
cooktop or grates.
Cookware material is a factor in how quickly and evenly heat is
transferred, which affects cooking results. A nonstick finish has
the same characteristics as its base material. For example,
aluminum cookware with a nonstick finish will take on the
properties of aluminum.
Cookware with nonstick surfaces should not be used under the
broiler.
Use the following chart as a guide for cookware material
characteristics.
COOKWARE CHARACTERISTICS
Aluminum •
Cast iron
Heats quickly and evenly.
Suitable for all types of cooking.
Medium or heavy thickness is best for
most cooking tasks.
Heats slowly and evenly.
Good for browning and frying.
Maintains heat for slow cooking.
5. Slowly lower the cooktop into place.
6. Open the manual shutoff valve for the gas supply near the
range.
7. Ignite pilot lights.
8. Replace surface grates.
When canning for long periods, alternate the use of surface
burners between batches. This allows time for the most recently
used areas to cool.
• Center the canner on the grate.
• Do not place canner on 2 surface burners at the same time.
• For more information, contact your local agricultural
department. Companies that manufacture home canning
products can also offer assistance.
Ceramic or
Ceramic glass
Copper •
Earthenware •
Porcelain •
enamel-on-
steel or cast
iron
Stainless steel •
Follow manufacturer's instructions.
Heats slowly, but unevenly.
Ideal results on low to medium heat
settings.
Heats very quickly and evenly.
Follow manufacturer's instructions.
Use on low heat settings.
See stainless steel or cast iron.
Heats quickly, but unevenly.
A core or base of aluminum or copper
on stainless steel provides even
heating.
Page 8
OVEN USE
Odors and smoke are normal when the oven is used the first few
times, or when it is heavily soiled.
IMPORTANT" The health of some birds is extremely sensitive to
the fumes given off. Exposure to the fumes may result in death to
certain birds. Always move birds to another closed and well-
ventilated room.
The bakeware material affects cooking results. Follow
manufacturer's recommendations and use the bakeware size
recommended in the recipe. Use the following chart as a guide.
BAKEWARE/ RECOMMENDATIONS
RESULTS
IMPORTANT: To avoid permanent damage to the oven bottom
finish, do not line the oven bottom with any type of foil, liners or
cookware.
• On those models with bottom vents, do not block or cover
the oven bottom vents.
• For best cooking results, do not cover entire rack with foil
because air must be able to move freely.
• To catch spills, place foil on rack below dish. Make sure foil is
at least 1/2"(1.3 cm) larger than the dish and that it is turned
up at the edges.
IMPORTANT: To avoid permanent damage to the porcelain
finish, do not place food or bakeware directly on the oven door or
bottom.
RACKS
• Position racks before turning on the oven.
• Do not move racks with bakeware on them.
• Make sure racks are level.
For best performance, cook on one rack. Place the rack so the
top of food will be centered in the oven. To move a rack, pull it
out to the stop position, raise the front edge, then lift out.
FOOD RACK POSITION
Large roasts, turkeys, angel food, bundt 1 or 2
and tube cakes, quick breads, pies
Yeast breads, casseroles, meat and 2
poultry
Cookies, biscuits, muffins, cakes 2 or 3
Light colored • Use temperature and time
aluminum recommended in recipe.
• Light golden crusts
• Even browning
Dark aluminum and
other bakeware with
dark, dull and/or
nonstick finish
• Brown, crisp
crusts
Insulated cookie
sheets or baking
pans
• Little or no bottom
browning
Stainless steel
• Light, golden
crusts
• Uneven browning
Stoneware/Baking
stone
• Crisp crusts
Ovenproof
glassware, ceramic
glass or ceramic
• Brown, crisp
crusts
• May need to reduce baking
temperatures slightly.
• Use suggested baking time.
• For pies, breads and casseroles,
use temperature recommended in
recipe.
• Place rack in center of oven.
• Place in the bottom third of oven.
• May need to increase baking time.
• May need to increase baking time.
• Follow manufacturer's instructions.
• May need to reduce baking
temperatures slightly.
BAKEWARE
To cook food evenly, hot air must be able to circulate. Allow
2" (5 cm) of space around bakeware and oven walls. Use the
following chart as a guide.
NUMBER OF POSITION ON RACK
PAN(S)
1 Center of rack.
2 Side by side or slightly staggered.
3 or 4 Opposite corners on each rack. Make sure
that no bakeware piece is directly over
another.
8
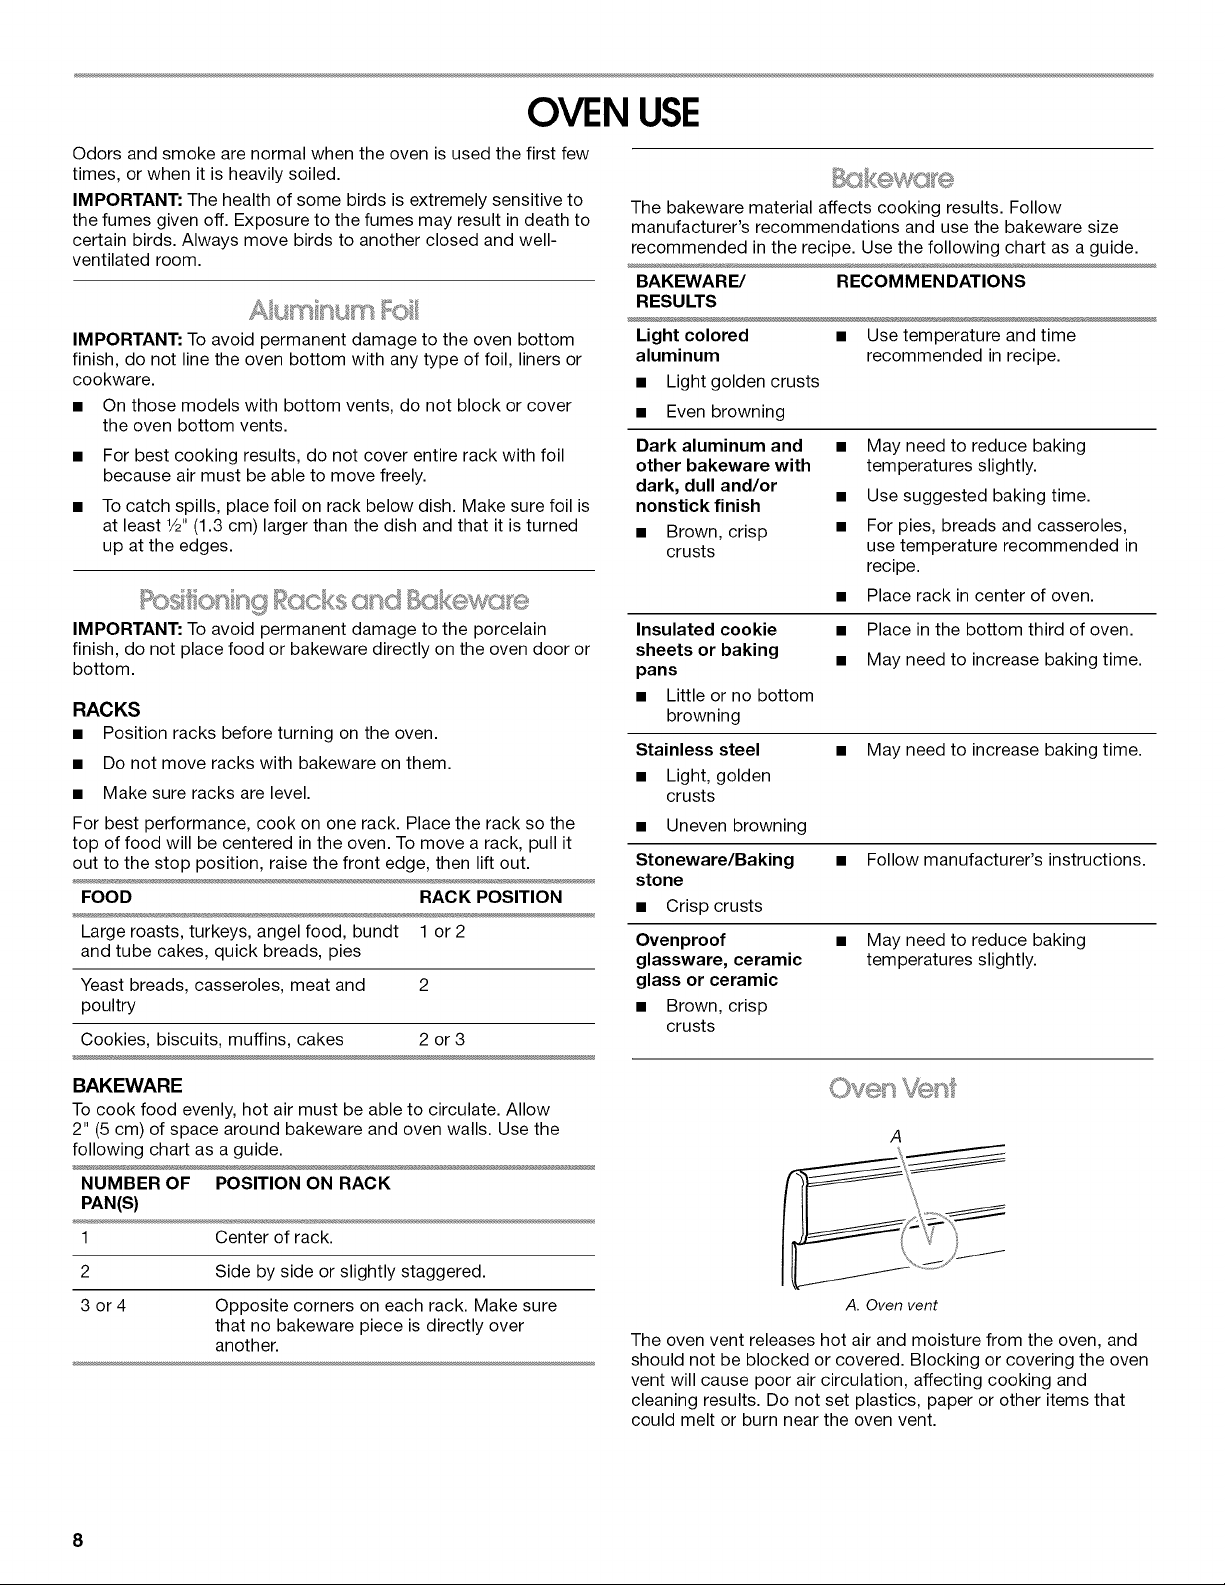
A
A. Oven vent
The oven vent releases hot air and moisture from the oven, and
should not be blocked or covered. Blocking or covering the oven
vent will cause poor air circulation, affecting cooking and
cleaning results. Do not set plastics, paper or other items that
could melt or burn near the oven vent.
Page 9
IMPORTANT: To avoid damage to the interior finish, do not place
food or cookware directly on the oven door or the oven bottom.
Before baking and roasting, position the racks according to the
"Positioning Racks and Bakeware" section. When roasting, it is
not necessary to wait for the oven to preheat before putting food
in, unless recommended in the recipe.
To Bake or Roast:
1. Push in and turn the oven control knob to the desired
temperature setting.
2. Place food in oven.
The oven burner will cycle on and off to keep the oven
temperature at the setting.
3. Check food for doneness at minimum time in recipe. Cook
longer if necessary.
4. Push in and turn oven control knob to OFF when finished.
BROILER
The broiler is located below the oven door. The broiler pan and
grid slide out for easy access. Always broil with the broiler and
oven doors closed.
• To avoid damage to the broiler, do not step on or apply
weight to the broiler door while it is open.
• Do not preheat broiler before use. Completely close broiler
door during broiling.
• It is possible to broil longer cooking foods such as chicken
pieces at a lower temperature to avoid overbrowning. Turn
the knob to 400°F or 450°F, rather than Broil, for low
temperature broiling.
• Do not use broiler cavity for storage.
• Use only the broiler pan and grid provided with the range. It is
designed to drain juices and help avert spatter and smoke.
• For proper draining, do not cover the grid with foil. The
bottom of the pan may be lined with aluminum foil for easier
cleaning.
• Trim excess fat to reduce spattering. Slit the remaining fat on
the edges to avert curling.
• Pull out oven rack to stop position before turning or removing
food. Use tongs to turn food to avoid the loss of juices. Very
thin cuts of fish, poultry or meat may not need to be turned.
• After broiling, remove the pan from the oven when removing
the food. Drippings will bake on the pan if left in the heated
oven, making cleaning more difficult.
BROILING CHART
For best results, place food 3" (7.0 cm) or more from the broil
element. Times are guidelines only and may need to be adjusted
for individual foods and tastes.
COOK TIME
(in minutes)
FOOD SIDE 1
Chicken
bone-in pieces, 15-17 15-17
boneless breasts 11-13 11-13
Fish Fillets
1/2-3/4"(1.25-1.8 cm) thick 7-8 3-4
Frankfurters 5-6 2-3
Ground meat patties*
3/4"(1.8 cm) thick, well-done* 11-13 6-7
Ham slice, precooked
1/2"(1.25 cm) thick 6-8 3-4
Lamb chops
1" (2.5 cm) thick 14-17 8-9
Pork chops
1" (2.5 cm) thick 19-21 9-10
Steak
1" (2.5 cm) thick, medium rare, 10-12
medium 12-14
well-done 16-17
*Place up to 12 patties, equally spaced, on broiler grid.
SIDE 2
5-6
6-7
8-9
RANGE CARE
The oven bottom can be removed for standard cleaning of the
oven.
Before cleaning, make sure the oven is completely cool.
To Remove:
1. Remove the oven racks.
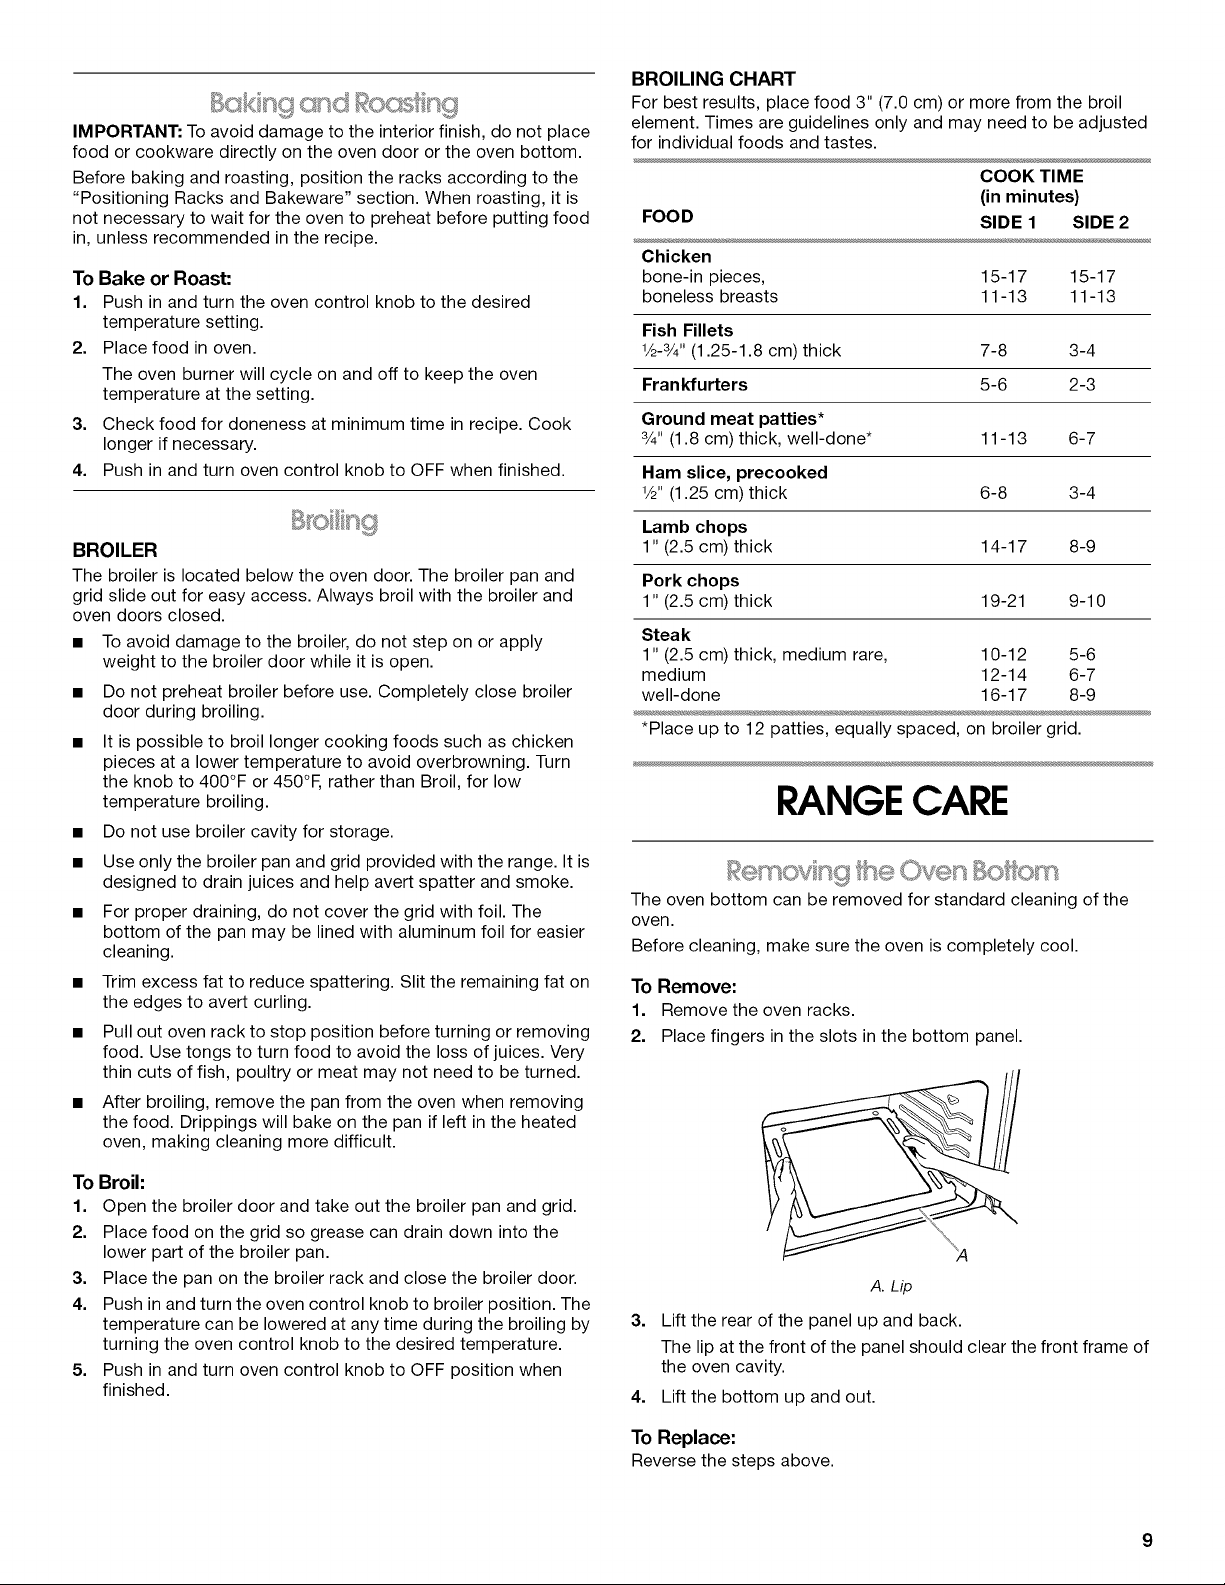
2. Place fingers in the slots in the bottom panel.
To Broil:
1. Open the broiler door and take out the broiler pan and grid.
2. Place food on the grid so grease can drain down into the
lower part of the broiler pan.
3. Place the pan on the broiler rack and close the broiler door.
4. Push in and turn the oven control knob to broiler position. The
temperature can be lowered at any time during the broiling by
turning the oven control knob to the desired temperature.
5. Push in and turn oven control knob to OFF position when
finished.
;4
A. Lip
3. Lift the rear of the panel up and back.
The lip at the front of the panel should clear the front frame of
the oven cavity.
4. Lift the bottom up and out.
To Replace:
Reversethe steps above.
Page 10

G_ _ °s_C¸' d_÷_f'_i_ _!_
IMPORTANT: Before cleaning, make sure all controls are off and
the oven and cooktop are cool. Always follow label instructions
on cleaning products. Do not wipe down any of the inside
surfaces until the oven has completely cooled down. To avoid
breaking the glass, do not apply a cool damp cloth to the inner
door glass before it has completely cooled.
Soap, water and a soft cloth or sponge are suggested first unless
otherwise noted.
OVEN DOOR EXTERIOR
Cleaning Method:
• Glass cleaner and a soft cloth or sponge:
Apply glass cleaner to soft cloth or sponge, not directly on
panel.
• All-Purpose Appliance Cleaner Part Number 31682 (not
included):
See "Assistance or Service" section to order.
EXTERIOR PORCELAIN ENAMEL SURFACES
(on some models)
Food spills containing acids, such as vinegar and tomato, should
be cleaned as soon as the entire appliance is cool. These spills
may affect the finish.
Cleaning Method:
• Glass cleaner, mild liquid cleaner or nonabrasive scrubbing
pad:
Gently clean around the model and serial number plate
because scrubbing may remove numbers.
• All-Purpose Appliance Cleaner Part Number 31682 (not
included):
See "Assistance or Service" section to order.
CONTROL PANEL
To avoid damage to the control panel, do not use steel wool,
abrasive cleansers or oven cleaner.
Do not soak knobs. When replacing knobs, make sure knobs are
in the Off position.
On some models, do not remove seals under knobs.
Cleaning Method:
• Soap and water or dishwasher:
Pull knobs straight away from control panel to remove.
PORCELAIN-COATED GRATES AND CAPS
Food spills containing acids, such as vinegar and tomato, should
be cleaned as soon as the cooktop, grates and caps are cool.
These spills may affect the finish.
To avoid chipping, do not bang grates and caps against each
other or hard surfaces such as cast iron cookware.
Do not reassemble caps on burners while they are wet.
Cleaning Method:
• Nonabrasive plastic scrubbing pad and mildly abrasive
cleanser:
Clean as soon as cooktop, grates and caps are cool.
• Dishwasher (grates only, not caps):
Use the most aggressive cycle. Cooked-on soils should be
soaked or scrubbed before going into a dishwasher.
• Gas Grate and Drip Pan Cleaner Part Number 31617:
See "Assistance or Service" section to order.
OVEN CAVITY
Food spills should be cleaned when oven cools. At high
temperatures, foods react with porcelain and staining, etching,
pitting or faint white spots can result.
On some models, the oven door can be removed. See "Oven
Door" first.
Cleaning Method:
• Steel-wool pad
OVEN RACKS AND ROASTING RACKS
Cleaning Method:
• Steel-wool pad
BROILER PAN AND GRID (on some models)
Cleaning Method:
Wash in warm sudsy water. (It is not recommended to wash the
chrome grid in a dishwasher).
A mild abrasive cleaner and a plastic scrubber can be used to
remove stubborn stains.
For heavily soiled bowls, place an ammonia soaked paper towel
on the stains and allow to soak for a short time, then gently scrub
with a plastic scrubber.
Porcelain enamel only
• Warm soapy water or dishwasher
• Oven cleaner: Follow product label instructions.
For normal range use, it is not suggested to remove the oven
door. However, if removal is necessary, make sure the oven is off
and cool. Then, follow these instructions. The oven door is heavy.
To Remove:
1. Open the oven door. Insert hinge pins, included with your
range, into both hinge hangers. Do not remove the pins while
the door is removed from the range.
SURFACE BURNERS
See "Surface Burners" section.
10
Page 11

2. Grasp the door on the sides with your fingers on the front of
the door and your thumbs on the inside surface.
3. Pull door straight up, then toward you. Do not remove hinge
pins until the door is replaced on the range.
To Replace:
1. Grasp the door on the sides with your fingers on the front of
the door and your thumbs on the inside surface.
TROUBLESHOOTING
2. Hold oven door so that the top edge of each door slot is
horizontal. Insert door hinge into the hinge slots.
3. Tilt top of door toward range. Insert bottom door hinge notch
down onto front frame edge.
4. Open the door completely and remove the hinge pins. Save
hinge pins for future use.
5. Close the door slowly to assure door side panel clearance
and proper hinge engagement.
Try the solutions suggested here first in order to avoid the cost of an unnecessary service call.
Nothing will operate
• Is the main or regulator gas shutoff valve in the off
position?
See Installation Instructions.
Is the range properly connected to the gas supply?
Contact a trained repair specialist or see Installation
Instructions.
Surface burners will not operate
• Is this the first time the surface burners have been used?
Turn on any one of the surface burner knobs to release air
from the gas lines.
• Is the control knob set correctly?
Push in knob before turning to a setting.
• Are the burner ports clogged?
See "Surface Burners" section.
Surface burner flames are uneven, yellow and/or noisy
Are the burner ports clogged?
See "Surface Burners" section.
Are the burner caps positioned properly?
See "Surface Burners" section.
Is the air/gas mixture correct?
Contact a designated service technician to check the air/gas
mixture, or see the Installation Instructions.
Is propane gas being used?
The range may have been converted improperly. Contact a
trained repair specialist.
Surface burner makes popping noises
• Is the burner wet?
Let it dry.
Cookware not level on cooktop
• Is the range level?
Level the range. See the Installation Instructions.
• Is the proper cookware being used?
Use cookware with a flat bottom. See "Cookware" section.
Excessive heat around cookware on cooktop
• Is the cookware the proper size?
Use cookware about the same size as the surface cooking
area, element or surface burner. Cookware should not extend
more than 1/2"(1.3 cm) outside the cooking area.
Oven will not operate
• Is this the first time the oven has been used?
Turn any one of the surface burner knobs on to release air
from the gas lines.
• Is the oven temperature control knob set correctly?
See "Cooktop/Oven Temperature Controls" section.
• Is the main or regulator gas shutoff in the off position?
Contact a designated service technician or see the
Installation Instructions.
Oven makes muffled ticking noise when in use
• This is normal and occurs when the oven burner cycles on
and off to hold the set oven temperature.
Oven burner flames are uneven, yellow and/or noisy
• Is propane gas being used?
The range may have been converted improperly. Contact a
trained repair specialist.
11
Page 12

• Is the air/gas mixture correct?
Contact a designated service technician to check the air/gas
mixture or see the Installation Instructions.
• Are crust edges browning early?
Use aluminum foil to cover the edge of the crust and/or
reduce baking temperature.
Cooktop cooking results not what expected
• Is the proper cookware being used?
See "Cookware" section.
• Is the control knob set to the proper heat level?
See "Cooktop/Oven Temperature Controls" section.
Baking results not what expected
• Was the oven preheated?
Wait for oven to preheat before placing food in oven.
• Are the racks positioned properly?
See "Positioning Racks and Bakeware" section.
• Is there proper air circulation around bakeware?
See "Positioning Racks and Bakeware" section.
• Is the batter evenly distributed in the pan?
Check that batter is level in the pan.
• Is the range level?
Level the range. See the Installation Instructions.
• Are baked items too brown on the bottom?
Decrease oven temperature 10° F to 30°F (5°C to 15°C).
ASSISTANCEOR SERVICE
Before calling for assistance or service, please check
"Troubleshooting." It may save you the cost of a service call. If
you still need help, follow the instructions below.
When calling, please know the purchase date and the complete
model and serial number of your appliance. This information will
help us to better respond to your request.
If you need replacement parts
If you need to order replacement parts, we recommend that you
use only FSP replacement parts. FSP replacement parts will fit
right and work right because they are made with the same
precision used to build every new ESTATE® appliance.
To locate FSP®replacement parts in your area, call our Customer
eXperience Center telephone number or your nearest designated
ESTATE service center.
Call the Whirlpool Customer eXperience Center
toll free: 1-800-253-1301.
® ®
®
Slow baking or roasting
• Was the oven preheated?
Wait for oven to preheat before placing food in oven.
• Is there proper air circulation around bakeware?
See "Positioning Racks and Bakeware" section.
• Is the proper length of time being used?
Increase baking or roasting time.
• Is the proper temperature set?
Increase temperature 25°F (15°C).
• Has the oven door been opened while cooking?
Peeking into the oven while cooking releases oven heat and
can result in longer cooking times.
Broiler burner fails to light
• Is the ignition system broken?
Contact a designated service technician to replace it.
• Is the oven pilot light lit?
See "Pilot Lights" section.
Our consultants provide assistance with:
Features and specifications on our full line of appliances.
Installation information.
Use and maintenance procedures.
Accessory and repair parts sales.
Specialized customer assistance (Spanish speaking, hearing
impaired, limited vision, etc.).
Referrals to local dealers, repair parts distributors, and
service companies. Whirlpool designated service technicians
are trained to fulfill the product warranty and provide after-
warranty service, anywhere in the United States.
To locate the Whirlpool designated service company in your
area, you can also look in your telephone directory Yellow
Pages.
For further assistance
If you need further assistance, you can write to Whirlpool
Corporation with any questions or concerns at:
Estate Brand Home Appliances
Customer eXperience Center
553 Benson Road
Benton Harbor, MI 49022-2692
Please include a daytime phone number in your correspondence.
12
Page 13

WHIRLPOOLCORPORATIONMAJOR APPLIANCEWARRANTY
LIMITED WARRANTY
For one year from the date of purchase, when this major appliance is operated and maintained according to instructions attached to or
furnished with the product, Whirlpool Corporation or Whirlpool Canada LP (hereafter "Whirlpool") will pay for Factory Specified Parts
and repair labor to correct defects in materials or workmanship. Service must be provided by a Whirlpool designated service company.
This limited warranty is valid only in the United States or Canada and applies only when the major appliance is used in the country in
which it was purchased. Outside the 50 United States and Canada, this limited warranty does not apply. Proof of original purchase date
is required to obtain service under this limited warranty.
ITEMS EXCLUDED FROM WARRANTY
This limited warranty does not cover:
1. Service calls to correct the installation of your major appliance, to instruct you on how to use your major appliance, to replace or
repair house fuses, or to correct house wiring or plumbing.
2. Service calls to repair or replace appliance light bulbs, air filters or water filters. Consumable parts are excluded from warranty
coverage.
3. Repairs when your major appliance is used for other than normal, single-family household use or when it is used in a manner that is
contrary to published user or operator instructions and/or installation instructions.
4. Damage resulting from accident, alteration, misuse, abuse, fire, flood, acts of God, improper installation, installation not in
accordance with electrical or plumbing codes, or use of consumables or cleaning products not approved by Whirlpool.
5. Cosmetic damage, including scratches, dents, chips or other damage to the finish of your major appliance, unless such damage
results from defects in materials or workmanship and is reported to Whirlpool within 30 days from the date of purchase.
6. Any food loss due to refrigerator or freezer product failures.
7. Costs associated with the removal from your home of your major appliance for repairs. This major appliance is designed to be
repaired in the home and only in-home service is covered by this warranty.
8. Repairs to parts or systems resulting from unauthorized modifications made to the appliance.
9. Expenses for travel and transportation for product service if your major appliance is located in a remote area where service by an
authorized Whirlpool servicer is not available.
10. The removal and reinstallation of your major appliance if it is installed in an inaccessible location or is not installed in accordance
with published installation instructions.
11. Major appliances with original model/serial numbers that have been removed, altered or cannot be easily determined. This warranty
is void if the factory applied serial number has been altered or removed from your major appliance.
The cost of repair or replacement under these excluded circumstances shall be borne by the customer.
DISCLAIMER OF IMPLIED WARRANTIES; LIMITATION OF REMEDIES
CUSTOMER'S SOLE AND EXCLUSIVE REMEDY UNDER THIS LIMITED WARRANTY SHALL BE PRODUCT REPAIR AS PROVIDED
HEREIN. IMPLIED WARRANTIES, INCLUDING WARRANTIES OF MERCHANTABILITY OR FITNESS FOR A PARTICULAR PURPOSE,
ARE LIMITED TO ONE YEAR OR THE SHORTEST PERIOD ALLOWED BY LAW. WHIRLPOOL SHALL NOT BE LIABLE FOR
INCIDENTAL OR CONSEQUENTIAL DAMAGES. SOME STATES AND PROVINCES DO NOT ALLOW THE EXCLUSION OR LIMITATION
OF INCIDENTAL OR CONSEQUENTIAL DAMAGES, OR LIMITATIONS ON THE DURATION OF IMPLIED WARRANTIES OF
MERCHANTABILITY OR FITNESS, SO THESE EXCLUSIONS OR LIMITATIONS MAY NOT APPLY TO YOU. THIS WARRANTY GIVES
YOU SPECIFIC LEGAL RIGHTS, AND YOU MAY ALSO HAVE OTHER RIGHTS WHICH VARY FROM STATE TO STATE OR PROVINCE
TO PROVINCE.
If outside the 50 United States and Canada, contact your authorized Whirlpool dealer to determine if another warranty applies.
If you need service, first see the "Troubleshooting" section of the Use & Care Guide. After checking "Troubleshooting," you may find
additional help by checking the "Assistance or Service" section or by calling Whirlpool. In the U.S.A., call 1-800-253-1301. In Canada,
call 1-800-807-6777. 9/07
Keep this book and your sales slip together for future
reference. You must provide proof of purchase or installation
date for in-warranty service.
Write down the following information about your major appliance
to better help you obtain assistance or service if you ever need it.
You will need to know your complete model number and serial
number. You can find this information on the model and serial
number label located on the product.
Dealer name
Address
Phone number
Model number
Serial number
Purchase date
13
Page 14

14
Page 15

SEGURIDADDELA ESTUFA
Su seguridad y la seguridad de los demos es muy importante.
Hemos incluido muchos mensajes importantes de seguridad en este manual yen su electrodomestico. Lea y obedezca siempre
todos los mensajes de seguridad.
Este es el simbolo de advertencia de seguridad.
Este simbolo le llama la atenci6n sobre peligros potenciales que pueden ocasionar la muerte o una lesi6n a
usted y a los demas.
Todos los mensajes de seguridad iran a continuaci6n del simbolo de advertencia de seguridad y de la palabra
"PELIGRO" o "ADVERTENCIA". Estas palabras significan:
Si no sigue las instrucciones de inmediato, usted puede
morir o sufrir una lesibn grave.
Si no sigue las instrucciones, usted puede morir o sufrir
una lesibn grave.
Todos los mensajes de seguridad le diran el peligro potencial, le diran c6mo reducir las posibilidades de sufrir una lesi6n y Io que
puede suceder si no se siguen las instrucciones.
ADVERTENCIA: Para su seguridad, la informacion en este manual debe ser observada
para minimizar el riesgo de incendio o explosion, o para prevenir da_os a propiedades,
heridas o la muerte.
- No almacene o use gasolina u otros liquidos y vapores inflamables cerca de este u otro
aparato electrodomestico.
- PASOS QUE USTED DEBE SEGUIR Sl HUELE A GAS:
• No trate de encender ningun aparato electrodomestico.
• No toque ningun interruptor electrico.
• No use ningun telefono en su casa o edificio.
• Llame inmediatamente a su proveedor de gas desde el telefono de un vecino.
Siga las instrucciones de su proveedor de gas.
• Si usted no puede comunicarse con su proveedor de gas, Ilame al departamento
de bomberos.
- La instalacion y el servicio deben ser efectuados por un instalador calificado, una
agencia de servicio o por el proveedor de gas.
15
Page 16

ADVERTENClA: Las perdidas de gas no siempre se pueden detectar por el olfato.
Los proveedores de gas recomiendan que usted use un detector de gas aprobado por UL (Laboratorio de normalizaci6n) o
CSA (Asociaci6n canadiense de seguridad).
Para obtener mas informaci6n, p6ngase en contacto con su proveedor de gas.
Si se detecta una fuga de gas, siga las instrucciones de "Pasos que usted debe seguir si huele a gas".
La California Safe Drinking Water and Toxic Enforcement Act (La ley de la protecci6n del agua potable y la eliminaci6n de
sustancias t6xicas de California) exige que el gobernador de California publique una lista de aquellas sustancias identificadas
por el estado de California como causantes de cancer, defectos cong6nitos o alg0n otro tipo de daSos en la funci6n reproductora
y exige a los comerciantes que adviertan de los posibles riesgos de exposici6n a tales sustancias.
ADVERTENCIA: Este producto contiene una sustancia quimica identificada por el estado de California como causante de
cancer, defectos cong6nitos o alg0n otro tipo de daSos en la funci6n reproductora.
Este electrodom6stico puede producir una exposici6n de bajo nivel a alguna de las sustancias enumeradas, incluyendo el
benceno, formaldehido, mon6xido de carbono, tolueno y hollin.
E 9c>pot;® cs ®co
La estufa no se voltearA durante el uso normal. Sin embargo, si usted aplica mucha fuerza o peso a la puerta abierta sin haber fijado
adecuadamente el soporte antivuelco, la estufa puede voltearse.
El soporte anti-vuelco
La pata trasera
Peligro de Vuelco
Un ni_o o un adulto puede volcar accidentalmente la estufa y resultar muerto.
Conecte el soporte anti-vuelco a la pata trasera de la estufa.
Si traslada de lugar la estufa, vuelva a conectar el soporte anti-vuelco.
Consulte las instrucciones de instalacion para mas detalles.
No seguir estas instrucciones puede ocasionar la muerte o quemaduras graves en ni_os
y adultos.
Aseg_rese de que el soporte anti-vuelco haya sido instalado:
• Deslice la estufa hacia adelante.
• Verifique que el soporte anti-vuelco est_ bien asegurado al piso.
• Deslice la estufa para colocarla de nuevo en su lugar asegurandose de que la pata trasera
quede debajo del soporte anti-vuelco.
16
Page 17

INSTRUCCIONES IMPORTANTES DE SEGURIDAD
ADVERTENCIA: Para reducir el riesgo de incendio, • Instalaci6n Apropiada - AI instalar la estufa de gas debe
electrocuci6n, lesiones a personas o daSos al usar la estufa
de gas, siga precauciones b&sicas, incluyendo las siguientes:
• ADVERTENClA: PARA REDUCIR EL RIESGO DE
VOLTEO DE LA ESTUFA DE GAS, €:STA DEBE
ASEGURARSE EN EL PISO MEDIANTE LA
INSTALACION DE DISPOSITIVOS DE ANTI-VUELCO.
PARA VERIFICAR SI LOS DISPOSITIVOS ESTAN
INSTALADOS ADECUADAMENTE, DESLICE LA ESTUFA
DE GAS HACIA ADELANTE, CERCIORESE QUE EL
SOPORTE ANTI-VUELCO ESTI_ BIEN FIJO EN EL PISO
Y DESLICE LA ESTUFA DE GAS HACIA ATRAS DE
MANERA QUE LA PATA TRASERA DE LA ESTUFA DE
GAS QUEDE FIJA DEBAJO DEL SOPORTE DE
ANTI-VUELCO.
• ADVERTENClA: NUNCA use este electrodom_stico
como calefactor de ambientes para calentar o entibiar la
habitaci6n. El hacerlo puede resultar en la contaminaci6n
con mon6xido de carbono y el sobrecalentamiento del
homo.
• ADVERTENClA: NUNCA cubra ranuras, orificios o
pasajes en la parte inferior del homo ni cubra una rejilla
entera con materiales tales como papel de aluminio. El
hacerlo bloquea el flujo de aire en el homo y puede causar
la contaminaci6n con mon6xido de carbono. Los forros de
papel de aluminio tambi_n pueden atrapar el calory
provocar un riesgo de incendio.
• AVISO: No almacene articulos que interesen a los ni_os
en los armarios que est&n encima de una estufa de gas o
en el respaldo de protecci6n de una estufa de gas - al
trepar los niSos encima de la estufa para alcanzar alg_n
objeto, podrian lastimarse seriamente.
hacer la conexi6n el_ctrica a tierra de acuerdo con las
normas locales o, en ausencia de normas locales, con el
Cddigo Electrico Nacional (National Electrical Code),
ANSI/NFPA 70. Cerci6rese que la instalaci6n y puesta a
tierra de la estufa de gas sean efectuadas adecuadamente
por un t_cnico competente.
• Esta estufa de gas esta equipada con un enchufe de tres
puntas con contacto a tierra para su protecci6n contra
riesgo de electrocuci6n y deberia enchufarse directamente
a un tomacorriente que tiene conexi6n a tierra. No corte ni
quite la punta para conexi6n a tierra de este enchufe.
• Desconecte el suministro de energia antes de dar
mantenimiento.
• El mal uso de las puertas o gavetas del aparato
electrodom_stico, tales como pisar, recostarse o sentarse
en las puertas o gavetas, puede ocasionar heridas.
• Mantenimiento - Mantenga el Area de la estufa de gas
despejada y libre de materiales combustibles, gasolina y
otros vapores y liquidos inflamables.
• Almacenaje dentro o encima de la estufa de gas - No se
debe almacenar materiales inflamables en el horno o cerca
de las unidades que estan en la superficie.
• El tama_o de la llama del quemador superior debe
ajustarse de manera que no se extienda mas alia de los
bordes del utensilio de estufa.
Para estufas de gas de limpieza automatica -
• Antes de efectuar la limpieza automatica del homo - quite
la charola para asar y otros utensilios. Limpie con un trapo
hemedo todo derrame excesivo antes de iniciar el ciclo de
autolimpieza.
GUARDE ESTAS INSTRUCClONES
17
Page 18

USODELASUPERFICIEDECOCCION
Este manual abarca varios modelos distintos. La estufa que usted ha adquirido puede tener algunas o todas las piezas y caracteristicas
que se enumeran. Las ubicaciones y aspecto de las caracteristicas que aqui se ilustran quizfis no coincidan con los de su modelo.
A B C D E F
i il
• 0 OFF OFY O_
A. Localizador del quemador de superficie
B. Control del quemador posterior izquierdo
O0
@0
_w
C. Control del quemador delantero izquierdo
D. Perilla de control de la temperatura del horno
Peligro de Incendio
No permita que la llama del quemador se extienda mils
allfi que la orilla de la cacerola.
Apague todas las perillas de los controles cuando no
est6 cocinando.
No seguir estas instrucciones puede ocasionar
la muerte o incendio.
OY£
O • o_ O O
O0 0 O@
E.Control del quemador posterior derecho
F. Control del quemador delantero derecho
3. Para apagar los quemadores de la superficie, gire las perillas
hacia la derecha, hacia la posicion "Off" (Apagado).
AJUSTE USO RECOMENDADO PARA
HIGH (Alto)
• Comenzar a cocinar los
alimentos.
• Hacer hervir un liquido.
MED (Medio)
• Mantener un hervor rfipido.
• Dorar los alimentos rfipidamente
o a fuego muy vivo.
• Freir o sofreir los alimentos.
• Preparar sopas y salsas.
• Guisar o cocer al vapor los
alimentos.
Antes de fijar una perilla de control, coloque el utensilio de cocina
Ileno en la parrilla. No use un quemador con recipientes vacios o
sin recipientes sobre la parrilla.
Para fijar la temperatura del quemador:
1. Empuje hacia adentro y gire la perilla hacia la izquierda hacia
HIGH (Alto).
2. Gire la perilla en cualquier posicion entre HIGH (Alto) y LOW
(Bajo). Utilice la tabla siguiente como guia cuando fije los
niveles de calor.
18
LOW (Bajo) • Mantener los alimentos calientes.
• Dejar hervir a fuego lento.
Para fijar la temperatura del horno:
Presione y gire la perilla de control del horno al ajuste de
temperatura deseado.
ces po k}
Para encender las luces piloto fijas:
Antes de usar la estufa, deberfin estar encendidas las luces
piloto fijas. Permanecerfin encendidas despu_s de que se
apaguen los quemadores.
1. AsegQrese de que todos los controles esten apagados, y que
el horno y la superficie de coccion esten frios.
2. Saque las parrillas de superficie de la superficie de coccion.
3. Levante la superficie de coccion sosteniendola por las
esquinas frontales.
Page 19

4. Encienda con un cerillo ambas luces piloto de los
quemadores.
5. Baje lentamente la superficie de coccion hasta que encaje en
su lugar.
6. Empuje hacia adentro y gire cada perilla de control del
quemador de superficie hacia la posicion "HI" (Alto). La llama
deberA encenderse en menos de 4 segundos.
7. Si no se encienden los quemadores de superficie, repita los
pasos 3 a 6.
8. Vuelva a colocar las parrillas de la superficie de coccion.
Para encender la luz piloto del horno:
1. AsegQrese de que todos los controles esten apagados, y que
el horno este frio.
2. Abra la puerta del horno para sacar las parrillas y la bandeja
inferior del mismo.
3. Saque los sujetadores que sostienen el propagador de llama.
Levante el propagador de llama y jalelo hacia afuera.
6. Sostenga hacia adentro la perilla de control del horno durante
10 segundos para asegurarse de que la luz piloto
permanecerA encendida.
7. Si la luz piloto se apaga despu6s de soltar la perilla, repita los
pasos 5 y 6.
8. Vuelva a colocar el propagador de llama, la bandeja inferior
del horno y las parrillas.
NOTA: La luz piloto permanecerA encendida despues de que se
apague el horno. El quemador del horno debera encenderse la
proxima vez que se seleccione la temperatura en la perilla de
control del horno. Si no se enciende el quemador del horno,
repita los pasos previos para encender la luz piloto.
IMPORTANTE: No obstruya el flujo de aire de combustion y
ventilacion alrededor de los bordes de la parrilla del quemador.
Orificios del quemador" Revise las llamas del quemador
ocasionalmente para fijarse que tengan el tamafio y la forma
adecuados, como se muestra abajo. Una buena llama es de
color azul, no amarillo. Mantenga esta Area libre de suciedad y no
deje que entren derrames, comida, agentes de limpieza ni otro
material en los orificios del quemador.
B
4. Ubique la luz piloto en el lado izquierdo del quemador del
horno.
5. Empuje y sostenga la perilla de control del homo; luego
encienda la luz piloto del horno con un cerillo.
A. 1 a 1Y2" (25 a 38 mm)
B. Orificios del quemador
Para limpiar:
IMPORTANTE: Antes de la limpieza, asegQrese de que todos los
controles esten apagados, y que el horno y la superficie de
coccion esten frios. No use limpiadores para horno, blanqueador
ni productos para quitar oxido.
1. Cierre la valvula de cierre manual para la linea de suministro
de gas que esta cerca de la estufa.
2. Quite las parrillas de los quemadores de superficie.
3. Levante la superficie de coccion por ambas esquinas
frontales y sostengala por el borde delantero central.
4. Limpie los orificios del quemador obstruidos con un alfiler
recto, segOn se muestra. No agrande ni deforme el orificio.
No use un palillo de dientes de madera. Si se debe ajustar el
quemador, pongase en contacto con un especialista en
reparacion competente.
5. Baje lentamente la superficie de coccion a su lugar.
6. Abra la valvula de cierre manual para la linea de suministro de
gas que esta cerca de la estufa.
7. Encienda las luces piloto.
8. Vuelva a colocar las parrillas de superficie.
19
Page 20

Revise las llamas piloto ocasionalmente para fijarse que tengan
el tama_o y la forma adecuados, como se muestra abajo. Una
buena llama es de color azul y puede a veces tener una peque_a
punta amarilla, Io cual es normal. No deje que entren derrames,
comida, agentes de limpieza ni otro material en el orificio piloto.
Para limpiar:
IMPORTANTE: Antes de la limpieza, asegQrese de que todos los
controles esten apagados, y que el horno y la superficie de
coccion esten frios. No use limpiadores para horno, blanqueador
ni productos para quitar oxido.
1. Cierre la valvula de cierre manual para la linea de suministro
de gas que esta cerca de la estufa.
2. Quite las parrillas de los quemadores de la superficie.
3. Levante la superficie de coccion por ambas esquinas
frontales y sostengala por el borde delantero central.
4. Limpie los orificios piloto obstruidos con un alfiler recto,
como se muestra. No agrande ni deforme el orificio. No use
un palillo de dientes de madera. Si se debe ajustar el
quemador, pongase en contacto con un especialista en
reparacion competente.
/
IMPORTANTE: No deje utensilios de cocina vacios encima de un
Area de cocci6n de superficie, elemento o quemador de
superficie caliente.
Los utensilios de cocina ideales deben tener un fondo piano,
lados rectos, una tapa que encaje bien y el material debe ser de
un espesor mediano a grueso.
Las superficies asperas pueden rayar la superficie de cocci6n o
las parrillas. El aluminio y el cobre pueden emplearse como
nOcleo o base en los utensilios de cocina. Sin embargo, al ser
usados como base, pueden dejar marcas permanentes en la
superficie de coccion o las parrillas.
El material de los utensilios de cocina es un factor que repercute
en la rapidez y uniformidad en que se transmite el calor, Io cual
afecta los resultados de coccion. Un acabado antiadherente
tiene las mismas caracteristicas de su material base. Por
ejemplo, utensilios de aluminio con un acabado antiadherente
tendrAn las propiedades del aluminio.
No deben usarse utensilios de cocina con superficies
antiadherentes debajo del asador.
Use el siguiente cuadro como guia respecto alas caracteristicas
del material de los utensilios de cocina.
UTENSILIO DE CARACTERiSTICAS
COCINA
Aluminio •
Calienta rapida y uniformemente.
Adecuado para todo tipo de coccion.
Espesor mediano o grueso es mejor
para la mayoria de las tareas
culinarias.
\
/
5. Baje lentamente la superficie de coccion a su lugar.
6. Abra la valvula de cierre manual para la linea de suministro de
gas que esta cerca de la estufa.
7. Encienda las luces piloto.
8. Vuelva a colocar las parrillas de superficie.
E1/@ IQ@O C(]5eF}
AI preparar enlatados durante periodos prolongados, alterne el
uso de los quemadores de superficie entre cada Iote. Esto da
tiempo para que las _£reasusadas recientemente se enfrien.
• Centre el envasador en la parrilla.
• No coloque el envasador sobre 2 Areas de quemadores de
superficie a la vez.
• Para obtener m_s informaci6n, p6ngase en contacto con el
departamento de agricultura de su Iocalidad. Tambien
pueden ofrecer ayuda las compa_ias que fabrican productos
para enlatado casero.
Hierro fundido
• Calienta lenta y uniformemente.
• Bueno para dorar y freir.
• Mantiene el calor para una cocci6n
lenta.
Ceramica o • Siga las instrucciones del fabricante.
ceramica
vitrificada • Calienta lentamente pero no
uniformemente.
• Resultados ideales en ajustes de
fuego bajo a mediano.
Cobre • Calienta muy rapida y uniformemente.
Loza de barro • Siga las instrucciones del fabricante.
• Use en ajustes de calor bajo.
Acero o hierro • Vea acero inoxidable o hierro fundido.
fundido
esmaltado de
porcelana
Acero • Calienta rapidamente pero no
inoxidable uniformemente.
• Un centro o base de aluminio o cobre
sobre el acero inoxidable proporciona
un calor uniforme.
20
Page 21

USODELHORNO
Los olores y el humo son normales cuando el horno se usa las
primeras veces o cuando este tiene suciedad pesada.
IMPORTANTE. La salud de algunas aves es sumamente sensible
a los gases emanados. La exposicion a los gases puede
ocasionar la muerte de ciertas aves. Mude siempre las aves a
otro cuarto cerrado y bien ventilado.
=,e,,".... Jill,, I I0
IMPORTANTE: No forre el fondo del horno con ningOn tipo de
papel de aluminio, revestimiento o utensilio de cocina ya que
da_aria permanentemente el acabado del fondo del horno.
• En aquellos modelos con ductos de escape inferiores, no
obstruya ni tape los ductos de escape inferiores del horno.
• Para obtener optimos resultados de coccion, no cubra toda
la parrilla con papel de aluminio, ya que el aire debe circular
con libertad.
Para recoger los derrames, coloque papel de aluminio en la
parrilla que esta debajo del recipiente de hornear. AsegOrese
de que el forro sea por Io menos 1/2"(1,3 cm) mas grande que
el recipiente de hornear y que los bordes esten doblados
hacia arriba.
IMPORTANTE: Para evitar da_os permanentes en el acabado de
porcelana, no coloque alimentos ni utensilios de hornear
directamente sobre la puerta o la base del horno.
PARRILLAS
• Ubique las parrillas antes de encender el horno.
• No mueva las parrillas con los utensilios para hornear sobre
elias.
• Cerci6rese de que las parrillas esten niveladas.
Para un mejor resultado, hornee sobre una parrilla. Coloque la
parrilla de tal manera que la parte mas alta del alimento a hornear
quede en el centro del horno. Para mover una parrilla, jalela hasta
la posicion de tope, levante el borde delantero y luego sAquela.
ALIMENTO POSICION DE LA
PARRILLA
Asados grandes, pavos, pasteles de Angel, 1 6 2
roscas Bundt y pasteles en forma de rosca,
panes rapidos, pays
Panes de levadura, guisados, carney aves 2
Galletas, pastelillos, panecillos, pasteles 2 6 3
UTENSILIOS PARA HORNEAR
Para la coccion uniforme, el aire caliente debe poder circular.
Deje 2" (5 cm) de espacio alrededor del utensilio para hornear y
las paredes del horno. Use el siguiente cuadro como guia.
NUMERO DE UBICACION EN LA PARRILLA
CACEROLA(S)
1 Centro de la parrilla.
2 Lado a lado o ligeramente en zigzag.
3 6 4 En esquinas opuestas en cada parrilla.
Cerciorese de que ningOn utensilio para
hornear este directamente encima del
otro.
Ule s/os '.....
El material de los utensilios para hornear afecta los resulados de
cocci6n. 8iga las recomendaciones del fabricante y emplee el
tamaio de utensilio para hornear recomendado en la receta de
cocina. Use el siguiente cuadro como guJa.
UTENSILIO PARA RECOMENDACIONES
HORNEAR/
RESULTADOS
Aluminio de color claro • Use latemperatura y el tiempo
• Cortezas doradas recomendados en la receta.
claras
• Dorado uniforme
Aluminio oscuro y
otros utensilios para
hornear con acabado
oscuro, mate y/o
antiadherente
• Cortezas bien
doradas, crujientes
Moldes o bandejas
para hornear
termoaislados
• Poco o nada de
dorado en el fondo
Acero inoxidable
• Cortezas doradas,
claras
• Dorado desigual
Ceramica de gres/
Piedra para hornear
• Cortezas crujientes
Utensilios de vidrio
resistentes al homo,
ceramica vitrificada o
ceramica
• Cortezas doradas,
crujientes
• Puede necesitar reducir un poco
la temperatura para hornear.
• Use el tiempo recomendado de
horneado.
• Para pays, panes y guisados,
use la temperatura
recomendada en la receta.
Coloque la parrilla en el centro
del horno.
• Col6quelos en latercera
posici6n inferior del horno.
• Puede necesitar aumentar el
tiempo de horneado.
• Puede necesitar aumentar el
tiempo de horneado.
• Siga las instrucciones del
fabricante.
• Puede necesitar reducir un poco
la temperatura para hornear.
21
Page 22

_° ......_ d@ _c_"'_ _ d®l/_O_[_O
A
A. Ducto de escape del homo
El ducto de escape del horno libera aire caliente y humedad del
horno y no debe bloquearse ni taparse. El hacerlo dara lugar a
una circulacion de aire insatisfactoria, afectando los resultados
de coccion y de limpieza. No coloque objetos de plastico, papel
u otros articulos que podrian derretirse o quemarse cerca del
ducto de escape del horno.
Como IsO[['_ _v CJ
IMPORTANTE" Para evitar da_os permanentes en el acabado
del interior, no coloque alimentos ni utensilios de coccion
directamente sobre la puerta o la base del horno.
Antes de hornear o asar, coloque las parrillas segQn la seccion
"Posicion de las parrillas y los utensilios para hornear". AI asar,
no es necesario esperar a que el horno se precaliente antes de
colocar los alimentos en 61,a menos que la receta culinaria Io
recomiende.
• Para Iograr un drenado adecuado, no forre la rejilla con papel
de aluminio. Se puede forrar el fondo de la charola con papel
de aluminio para facilitar la limpieza.
• Quite el exceso de grasa para reducir las salpicaduras. Corte
la grasa restante de los bordes para evitar que se ondulen.
• Jale la parrilla del horno hasta su posicion de tope antes de
dar vuelta o sacar los alimentos. Use tenazas para dar vuelta
la carne a fin de evitar que se pierdan los jugos. Quizas no
sea necesario dar vuelta los cortes delgados de pescado,
aves o carne.
Despu6s de asar, saque la charola del horno al retirar los
alimentos. Los goteos que queden en lacharola se hornearAn
si se dejan en el horno caliente, dificultando aQn m_s la
limpieza.
C6mo asar a la parrilla:
1. Abra la puerta del asador y saque la charola para asar y la
parrilla.
2. Coloque el alimento en la parrilla de manera que la grasa
pueda drenarse en la parte inferior de la charola para asar.
3. Coloque la charola sobre la rejilla para asar y cierre la puerta
del asador.
4. Empuje hacia adentro y gire la perilla de control del homo
hacia la posicion para asar. Puede bajarse la temperatura en
cualquier momento durante el asado girando la perilla de
control del homo hacia la temperatura deseada.
5. Cuando haya terminado, oprima y gire la perilla de control del
homo a la posicion de OFF (Apagado).
Para hornear o asar:
1. Oprima y gire la perilla de control del horno hacia el ajuste de
temperatura deseado.
2. Ponga la comida en el homo.
El quemador del horno entrara en un ciclo de encendido y
apagado para mantener el ajuste de la temperatura del
homo.
3. Verifique el punto de coccion de los alimentos cuando haya
pasado el minimo de tiempo recomendado en la receta. Si es
necesario, permita que se cocine por mas tiempo.
4. Cuando haya terminado, oprimay gire la perilla de control del
horno a OFF (Apagado).
,,.,,,OI'Y_0 (;];J:_,(i]l'(1]I(];II])C;I[[I ;SI
ASADOR
El asador esta ubicado debajo de la puerta del horno. La charola
y la rejilla del asador se deslizan hacia afuera, Io cual facilita el
acceso alas mismas. Para asar, siempre tenga las puertas del
asador y del horno cerradas.
• Para evitar da_os en el asador, no se apoye en la puerta del
mismo ni aplique peso mientras este abierta.
• No precaliente el asador antes de usarlo. Mantenga bien
cerrada la puerta del asador cuando este asando.
• Es posible asar alimentos que requieren mas tiempo de
coccion, tales como piezas de polio, a una temperatura m_s
baja para evitar que se doren demasiado. Para asar a
temperatura baja, gire la perilla a 400°F 6 450°E en lugar de
girarla hacia Broil (Asar).
• No use la cavidad del asador para almacenaje.
• Use Qnicamente la charola y la rejilla del asador que vienen
con el electrodomestico. €:stas han sido dise_adas para
drenar los jugos de la carney evitar salpicaduras y humo.
CUADRO PARA ASAR
Para obtener mejores resultados, coloque la comida a 3" (7 cm)
o mas del elemento asador. Los tiempos son solamente una guia
y pueden necesitar ajustarse para los alimentos y gustos
individuales.
ALIMENTO TIEMPO DE
COCCI(_N
Minutos
LADO 1 LADO 2
Trozos de polio
con hueso 15-17 15-17
pechugas deshuesadas 11-13 11-13
Filetes de pescado
de _/2- 3A,,(1,25-1,8 cm) de grosor 7-8 3-4
Salchichas Frankfurt 5-6 2-3
Hamburguesas de carne molida*
de 3A,,(1,8 cm) de grosor, bien cocidas* 11-13 6-7
Trozo de jam6n, precocido
de W' (1,25 cm) de grosor 6-8 3-4
Chuletas de cordero
de 1" (2,5 cm) de grosor 14-17 8-9
Chuletas de cerdo
de 1" (2,5 cm) de grosor 19-21 9-10
Bistec
de 1" (2,5 cm) de grosor, medio crudo, 10-12
termino medio 12-14
bien cocido 16-17
*Coloque hasta 12 hamburguesas, separadas uniformemente,
en la rejilla del asador.
5-6
6-7
8-9
22
Page 23

CUIDADO DELAESTUFA
PANEL DE CONTROL
Se puede quitar el fondo del horno para efectuar una limpieza
regular del horno.
Antes de limpiar, cerciorese de que el horno este completamente
frio.
Para quitar:
1. Retire las parrillas del horno.
2. Coloque los dedos en las ranuras del panel del fondo.
A. Borde
3. Levante la parte posterior del panel hacia arriba y hacia atrAs.
El borde de la parte delantera del panel deberA liberarse del
marco frontal de la cavidad del horno.
4. Levante el fondo hacia arriba y hacia fuera.
Para volver a colocar:
Siga los pasos arriba indicados en orden inverso.
k _'_p ®£C _...vs,'.,
IMPORTANTE: Antes de limpiar, aseg0rese de que todos los
controles esten apagados y que el homo y lasuperficie de
coccion esten frJos. $iga siempre las instrucciones que vienen en
las etiquetas de los productos de limpieza. No limpie ninguna de
las superficies del interior hasta que el homo se haya enfriado
por completo. Para evitar romper el vidrio, no aplique un paso
h0medo y frio al vidrio interior de la puerta antes de que se haya
enfriado por completo.
A menos que se indique Io contrario, se sugiere primero jab6n,
agua y un paso suave o una esponja.
SUPERFICIES EXTERIORES DE ESMALTE DE
PORCELANA
(en algunos modelos)
Los derrames que contienen acidos, tales como vinagre y
tomate, deben ser limpiados tan pronto como se enfrie el
electrodomestico. Es posible que estos derrames da_en el
acabado.
M_todo de limpieza:
• Producto para limpiar vidrios, producto de limpieza liquido
suave o estropajo no abrasivo:
Limpie cuidadosamente alrededor de la placa con el nOmero
de modelo y de serie porque el refregar puede borrar los
nOmeros.
• Limpiador multiuso para electrodomesticos, Pieza nOmero
31682 (no incluido):
Vea la seccion "Ayuda o servicio tecnico" para encargarlo.
Para evitar da_os en el panel de control, no use estopa de acero,
productos de limpieza abrasivos ni limpiador de horno.
No remoje las perillas. Cuando vuelva a colocar las perillas,
asegOrese de que las mismas esten en la posicion de apagado.
En algunos modelos, no quite los obturadores que estan debajo
de las perillas.
M_todo de limpieza:
• Agua y jabon o lavavajillas:
Jale las perillas en sentido recto para quitarlas del panel de
control.
TAPAS Y REJILLAS CON REVESTIMIENTO DE
PORCELANA
Los derrames que contienen acidos, tales como vinagre y
tomate, deben ser limpiados tan pronto como se enfrien la
superficie de coccion, las rejillas y las tapas. Es posible que
estos derrames da_en el acabado.
Para evitar las desportilladuras, no golpee las rejillas y las tapas
una contra la otra o contra superficies tales como utensilios de
cocina de hierro fundido.
No vuelva a armar las tapas o los quemadores mientras esten
hOmedos.
M_todo de limpieza:
• Estropajo de plastico no abrasivo y limpiador abrasivo suave:
Limpielos tan pronto como la superficie de cocci6n, las
rejillas y las tapas se hayan enfriado.
• En la lavavajillas (solo las rejillas, no las tapas):
Use el ciclo que sea mas poderoso. Los restos de alimentos
cocidos deben ponerse en remojo o fregarse antes de
ponerlos en una lavavajillas.
• Limpiador para rejilla a gas y bandeja de goteo, pieza nOmero
31617:
Vea la seccion "Ayuda o servicio tecnico" para encargarlo.
QUEMADORES DE SUPERFICIE
Veala seccion "Quemadores de superficie".
EXTERIOR DE LA PUERTA DEL HORNO
M6todo de limpieza:
• Producto para limpiar vidrios y un paso suave o esponja:
Aplique el producto para limpiar vidrios en una esponja o
paso suave, no Io haga directamente sobre el panel.
• Limpiador multiuso para electrodomesticos, pieza nOmero
31682 (no incluido):
Vea la seccion "Ayuda o servicio tecnico" para encargarlo.
23
Page 24

CAVIDAD DEL HORNO
Los derrames de alimentos deberan limpiarse cuando el horno se
enfrie. A altas temperaturas, lareaccion quimica de los alimentos
con la porcelana puede dar lugar a manchas, corrosion,
picaduras o tenues puntos blancos.
En algunos modelos, se puede quitar la puerta del horno. Vea
primero "Puerta del horno".
M_todo de limpieza:
• Esponja de fibra metalica.
PARRILLAS DEL HORNO Y PARA ASAR
M6todo de limpieza:
• Esponja de fibra metalica
CHAROLA PARA ASAR Y REJILLA
M_todo de limpieza:
Lave en agua tibia jabonosa. (No se recomienda lavar la rejilla de
cromo en la lavavajillas.)
Pueden usarse un limpiador abrasivo suave y un estropajo de
plastico para quitar las manchas rebeldes.
Para los tazones que tengan suciedad profunda, coloque una
toalla de papel en las manchas y deje que se remojen por un
periodo corto; luego refriegue suavemente con un estropajo de
plastico.
Esmalte de porcelana solamente
• Agua tibia jabonosa o lavavajillas
• Limpiador para horno: Siga las instrucciones de la etiqueta
del producto.
2. Sujete ambos lados de la parte delantera de la puerta con
sus dedos en el frente de la puerta y sus pulgares en la
superficie interior.
3. Jale la puerta hacia arriba y luego hacia usted. No quite los
pasadores de la bisagra hasta que la puerta haya sido
colocada de nuevo en la estufa.
Para volver a colocarla:
1. Sujete ambos lados de la parte delantera de la puerta con
sus dedos en el frente de la puerta y sus pulgares en la
superficie interior.
2. Sostenga la puerta del horno de modo que el borde superior
de cada ranura de la puerta este en posicion horizontal.
Introduzca la bisagra de la puerta en las ranuras de la
bisagra.
3. Incline la parte superior de la puerta hacia la estufa. Inserte la
bisagra inferior de la puerta, con la muesca hacia abajo, en el
borde del marco frontal.
de/'somo
Para un uso normal de la estufa, no se aconseja quitar la puerta
del homo. Sin embargo, sJes necesario quitarla, aseg@rese de
que el homo este apagado y frio. Despu6s, siga estas
instrucciones. La puerta del homo es pesada.
Para quitarla:
1. Abra la puerta del horno. Introduzca los pernos de la bisagra
que se incluyen con su estufa, en ambos ganchos de
suspension de la bisagra. No quite los pernos mientras este
sacando la puerta de la estufa.
4. Abra la puerta completamente y quite los pasadores de la
bisagra. Guarde los pasadores para uso futuro.
5. Cierre la puerta lentamente para asegurarse de que la puerta
tenga el espacio apropiado a los lados y que las bisagras
hayan encajado adecuadamente.
24
Page 25

SOLUCION DEPROBLEMAS
Pruebe primero las soluciones aqui sugeridas para evitar el costo de una visita de servicio t_cnico innecesaria.
Nada funciona
• &Esta la valvula principal o la valvula reguladora de cierre
del gas en la posicibn de apagado?
Vea las instrucciones de instalacion.
&Esta la estufa debidamente conectada al suministro de
gas?
Pongase en contacto con un especialista de reparaciones
competente o vea las instrucciones de instalacion.
Los quemadores de superficie no funcionan
&Es _sta la primera vez que se usan los quemadores de
superficie?
Encienda cualquiera de las perillas de los quemadores de
superficie para liberar el aire proveniente de la tuberia del
gas.
&Se ha fijado correctamente la perilla de control?
Oprima la perilla antes de girar a un ajuste.
&Estan obstruidos los orificios del quemador?
Yea la seccion "Quemadores de superficie".
Las llamas del quemador de superficie est&n desiguales,
amarillas y/o ruidosas
• &Estan obstruidos los orificios del quemador?
Yea la seccion "Quemadores de superficie".
• &Estan las tapas del quemador colocadas
adecuadamente?
Yea la seccion "Quemadores de superficie".
• &Esta correcta la mezcla de aire/gas?
Pongase en contacto con un tecnico autorizado para verificar
la mezcla de aire/gas, o vea las Instrucciones de instalacion.
• &Se esta usando gas propano?
La estufa puede haber sido convertida incorrectamente.
Pongase en contacto con un especialista de reparacion
competente.
El quemador de superficie hace estallidos
• &Esta mojadoel quemador?
Dejelosecar.
El utensilio de cocina est& desnivelado en la superficie
de cocci6n
&Esta nivelada la estufa?
Nivele la estufa. Yea las Instrucciones de Instalacion.
&Se ha utilizado el utensilio de cocina apropiado?
Use utensilios de cocina con fondo liso. Vea la seccion
"Utensilios de cocina".
Calor excesivo alrededor del utensilio de cocina en la
superficie de coccibn
&Es el utensilio de cocina del tamaho apropiado?
Use el utensilio de cocina de tama_o similar al Area, elemento
de coccion de superficie o quemador de superficie. El
utensilio de cocina no debe extenderse mas de 1/2"(1,3 cm)
fuera del Area de coccion.
El horno no funciona
• &Es _sta la primera vez que usa el homo?
Encienda cualquiera de las perillas del quemador de
superficie para liberar el aire proveniente de la tuberia de gas.
• _,Se ha fijado correctamente la perilla de control de la
temperatura del homo?
Vea la seccion "Controles de temperatura de la superficie de
coccion/del horno".
&Esta la valvula principal o la valvula reguladora de cierre
del gas en la posici6n de apagado?
Pongase en contacto con un tecnico autorizado o vea las
Instrucciones de instalacion.
El horno hace un ruido sordo acompasado cuando est&
en uso
• Esto es normal y ocurre cuando el quemador del horno
cambia de ciclo para mantener la temperatura fijada del
horno.
Las llamas del quemador del horno est&n desiguales,
amarillas y/o ruidosas
• &Se esta usando gas propano?
La estufa puede haber sido convertida incorrectamente.
Pongase en contacto con un especialista de reparacion
competente.
• &Esta correcta la mezcla de aire/gas?
Pongase en contacto con un tecnico de servicio autorizado
para verificar la mezcla de aire/gas, o vea las Instrucciones
de instalacion.
Los resultados de cocci6n de la superficie de cocci6n
no son los que se esperaba
&Se esta usando el utensilio de cocina apropiado?
Vea la seccion "Utensilios de cocina".
&Se ha fijado la perilla de control en el nivel apropiado de
calor?
Vea la seccion "Controles de temperatura de la superficie de
coccion/del horno".
25
Page 26

Los resultados del horneado no son los que se esperaba
Horneado o asado lento
&Se ha precalentado el horno?
Espere a que el horno se precaliente antes de colocar los
alimentos en 61.
&Se han ubicado las parrillas adecuadamente?
Vea la seccion "Posicion de las parrillas y los utensilios para
hornear".
&Hay circulacibn de aire apropiada alrededor del utensilio
para hornear?
Vea la seccion "Posicion de las parrillas y los utensilios para
hornear".
_,Se ha distribuido la masa en forma pareja en la bandeja
para hornear?
Revise para asegurarse de que la masa este nivelada en la
bandeja para hornear.
&Esta nivelada la estufa?
Nivele la estufa. Vea las Instrucciones de instalacion.
&Estan los articulos horneados demasiado dorados en el
rondo?
Disminuya la temperatura del horno de 10°F a 30°F (5°C
a 15°C).
&Se estan dorando los bordes de las cortezas antes de
tiempe?
Use papel de aluminio para cubrir el borde de la corteza y/o
reduzca la temperatura de horneado.
&Se ha precalentado el horno?
Espere a que el horno se precaliente antes de colocar los
alimentos en 61.
&Hay circulacibn de aire apropiada alrededor del utensilio
para hornear?
Vea la seccion "Posicion de las parrillas y los utensilios para
hornear".
• &Se esta usando un lapse de tiempo apropiado?
Aumente el tiempo para hornear o asar.
• &Se ha fijado la temperatura apropiada?
Aumente la temperatura 25°F (15°C).
• &Se ha abierto la puerta del homo durante la coccibn?
Abrir el horno para mirar los alimentos disminuye el calor del
horno y puede prolongar los tiempos de coccion.
El quemador del asador no se enciende
&Esta averiado el sistema de encendido?
Pongase en contacto con un tecnico autorizado para
cambiarlo.
&Esta encendida la luz piloto?
Vea la seccion "Luces piloto".
AYUDA O SERVIClOTECNICO
Antes de solicitar ayuda o servicio tecnico, por favor consulte la
seccion "Solucion de problemas." Esto le podria ahorrar el costo
de una visita de servicio tecnico. Si considera que aOnnecesita
ayuda, siga las instrucciones que aparecen a continuacion.
Cuando Ilame, tenga a mano la fecha de compra y el nOmero
completo del modelo y de la serie de su electrodomestico. Esta
informacion nos ayudarA a atender mejor a su pedido.
Si necesita piezas de repuesto
Si necesita pedir piezas de repuesto, recomendamos que use
Onicamente piezas especificadas de fabrica FSP®. Estas piezas
encajaran bien y funcionaran bien ya que estan confeccionadas
con la misma precision empleada en la fabricacion de cada
electrodomestico nuevo de ESTATE®.
Para encontrar piezas de repuesto FSP® en su Iocalidad, Ilame a
nuestro Centro para la eXperiencia del cliente o al centro de
servicio designado por ESTATE®mAs cercano a su Iocalidad.
Llame al Centro para la eXperiencia del cliente de Whirlpool
sin costo alguno al: 1-800-253-1301.
Nuestros consultores ofrecen asistencia con respecto a:
• Caracteristicas y especificaciones de nuestra linea completa
de electrodomesticos.
• Informacion sobre instalacion.
• Procedimiento para el uso y mantenimiento.
Accesorios y venta de piezas para reparacion.
Asistencia especializada para el consumidor (habla hispana,
problemas de audicion, vision limitada, etc.).
Recomendaciones con distribuidores locales, compa_ias que
dan servicio y distribuidores de partes para reparacion. Los
tecnicos de servicio designados por Whirlpool estan
entrenados para cumplir con la garantia de producto y
ofrecer servicio una vez que la garantia termine, en cualquier
lugar de los Estados Unidos.
Para Iocalizar a una compa_ia de servicio designada por
Whirlpool en su Area, tambien puede consultar las paginas
amarillas de su guia telefonica.
Para obtener m&s asistencia
Si necesita asistencia adicional, puede escribir a Whirlpool
Corporation con sus preguntas o dudas a:
Estate Brand Home Appliances
Customer eXperience Center
553 Benson Road
Benton Harbor, MI 49022-2692
Favor de incluir un nOmero telefonico de dia en su
correspondencia.
26
Page 27

GARANTIADELOSELECTRODOMESTICOSPRINCIPALESDE
WHIRLPOOLCORPORATION
GARANTIA LIMITADA
Durante un afio a partir de la fecha de compra, siempre y cuando se de a este electrodomestico principal un uso y mantenimiento de
conformidad con las instrucciones adjuntas o provistas con el producto, Whirlpool Corporation o Whirlpool Canada LP (en Io sucesivo
denominado "Whirlpool") se hara cargo del costo de las piezas especificadas de fabrica y del trabajo de reparacion para corregir
defectos en los materiales o en la mano de obra. El servicio debera ser suministrado por una compafiia de servicio designada por
Whirlpool. Esta garantia limitada es valida solamente en Estados Unidos o en CanadA, y se aplica solamente cuando el
electrodomestico principal se use en el pals en el que se ha comprado. Esta garantia limitada no tiene vigor fuera de los cincuenta
Estados Unidos y CanadA. Se requiere una prueba de la fecha de compra original para obtener servicio bajo esta garantia limitada.
EXCLUSIONES DE LA GARANTIA
Esta garantia limitada no cubre:
1. Visitas de servicio tecnico para corregir la instalacion de su electrodomestico principal, para ensefiarle a usar su electrodomestico
principal, para cambiar o reparar fusibles domesticos o para corregir la instalacion electrica o de la tuberia de la casa.
2. Visitas de servicio tecnico para reparar o reemplazar focos para electrodomesticos, filtros de aire o filtros de agua. Estas piezas de
consumo estan excluidas de la cobertura de la garantia.
3. Reparaciones cuando su electrodomestico principal se use de un modo diferente al domestico normal de una familia, o cuando se
use de un modo contrario alas instrucciones publicadas para el usuario u operador y/o las instrucciones de instalacion.
4. Dafios causados por accidente, alteracion, uso indebido, abuso, incendio, inundacion, actos fortuitos, instalacion incorrecta,
instalacion que no este de acuerdo con los codigos electricos o de plomeria, o el empleo de articulos de consumo o productos de
limpieza no aprobados por Whirlpool.
5. Dafios esteticos, incluyendo rayaduras, abolladuras, desportilladuras u otro dafio al acabado de su electrodomestico principal, a
menos que el mismo sea debido a defectos en los materiales o la mano de obra y se le informe a Whirlpool en un lapso de 30 dias
a partir de la fecha de compra.
6. Cualquier perdida de comida debido a fallas del refrigerador o del congelador.
7. Costos relativos a la remocion de su electrodomestico principal desde su hogar para obtener reparaciones. Este electrodomestico
principal esta disefiado para ser reparado en el hogar y Qnicamente el servicio de reparacion en el hogar esta cubierto bajo esta
garantia.
8. Reparaciones de piezas o sistemas como resultado de modificaciones no autorizadas que se hayan efectuado en el
electrodomestico.
9. Gastos de viaje y transporte para obtener servicio para el producto, si su electrodomestico principal esta ubicado en un lugar
remoto en el cual no haya disponible un tecnico de servicio autorizado por Whirlpool.
10. La remocion y reinstalacion de su electrodomestico principal, si estuviera instalado en un lugar inaccesible o si no estuviera
instalado de conformidad con las instrucciones de instalacion publicadas.
11. Electrodomesticos principales con nQmeros de modelo/serie que se hayan removido, alterado o que no puedan ser identificados
con facilidad. Esta garantia se anularA si el nQmero de serie aplicado en la fabrica ha sido alterado o removido de su
electrodomestico principal.
El costo de la reparacion o el reemplazo bajo estas circunstancias excluidas, correrA por cuenta del cliente.
EL UNICO Y EXCLUSIVO RECURSO DEL CLIENTE SEGON LOS TI2RMINOS DE ESTA GARANT[A LIMITADA SERA EL DE REPARAR
EL PRODUCTO SEGON SE ESTIPULA EN LA PRESENTE. LAS GARANT[AS IMPL[CITAS, INCLUYENDO LAS GARANT[AS DE
COMERCIABILIDAD O DE CAPACIDAD PARA UN PROPOSlTO PARTICULAR, SERAN LIMITADAS A UN ANO O AL PER[ODO M/_,S
CORTO PERMITIDO POR LEY. WHIRLPOOL NO SE RESPONSABILIZARA POR DANOS INCIDENTALES O CONSECUENTES.
ALGUNOS ESTADOS Y PROVlNCIAS NO PERMITEN LAS EXCLUSlONES O LIMITACIONES POR DANOS INCIDENTALES O
CONSECUENTES, O LIMITACIONES ACERCA DE CUANTO DEBE DURAR UNA GARANT[A IMPL[CITA DE COMERCIABILIDAD O
CAPACIDAD, DE MODO QUE LAS LIMITACIONES O EXCLUSlONES ARRIBA MENCIONADAS PUEDEN NO APLICARSE EN SU CASO.
ESTA GARANT[A LE OTORGA DERECHOS LEGALES ESPEC[FICOS Y ES POSlBLE QUE USTED TENGA TAMBII2N OTROS
DERECHOS QUE PUEDEN VARIAR DE UN ESTADO A OTRO O DE UNA PROVlNCIA A OTRA.
Si usted se encuentra fuera de los cincuenta Estados Unidos y CanadA, pongase en contacto con su distribuidor autorizado de
Whirlpool para determinar si corresponde otra garantia.
Si necesita servicio, consulte primero la seccion "Solucion de problemas" del Manual de uso y cuidado. Despu6s de consultar la
seccion "Solucion de problemas", puede encontrar ayuda adicional en laseccion "Ayuda o servicio tecnico," o Ilamando a Whirlpool.
En los EE.UU., Ilame al 1-800-253-1301. En CanadA, Ilame al 1-800-807-6777. 9/07
Guarde este libro y su comprobante de compra juntos para
referencia futura. Usted deberb proporcionar el comprobante
de la compra o una fecha de instalacibn para obtener
servicio bajo la garantia.
Escriba la siguiente informacion acerca de su electrodomestico
principal para ayudarle mejor a obtener asistencia o servicio
tecnico si alguna vez Ilegara a necesitarlo. Debera tener a mano
el nQmero completo del modelo y de la serie. Usted puede
encontrar esta informacion en la etiqueta con el nQmero de
modelo y de serie ubicada en el producto.
EXCLUSION DE GARANTIAS IMPLICITAS; LIMITACION DE RECURSOS
Nombre del distribuidor
Direccibn
Nt_mero de telefono
Nt_mero de modelo
Nt_mero de serie
Fecha de compra
27
Page 28

W10173325A
© 2008 Whirlpool Corporation.
All rights reserved.
Todos los derechos reservados.
® Registered Trademark/TM Trademark of Whirlpool, U.S.A.
® Marca registrada/TM Marca de comercio de Whirlpool, U.S.A.
Printed in Mexico
Impreso en Mexico
1/08
 Loading...