

Page 1
High-Efficiency
Washer
Use & Care Guide
CAH-1
Table of Contents
Important Safety
Instructions . . . . . . . . . . . . . . . .1-2
Operating Instructions . . . . . . 3-5
Care & Cleaning . . . . . . . . . . . 5-6
Special Features . . . . . . . . . . . 7-8
Storing the Washer . . . . . . . . . . . 9
Reversing the Door . . . . . . . . . . . 9
Troubleshooting . . . . . . . . . 10-14
Service & Warranty . . . . . . . . . . 15
Guide d’utilisation
et d’entretien . . . . . . . . . . . . . . . 16
Guía de uso y cuidado . . . . . . . 32
Form No. Y81922 A Part No. 2206690 Litho U.S.A. ©2006 Maytag Appliances Sales Co.
Page 2

Important Safety Instructions
Installer: Please leave this guide with this
appliance.
Consumer: Please read and keep this guide for
future reference. Keep sales receipt and/or canceled
check as proof of purchase.
Model Number _______________________________
Serial Number ________________________________
Date of Purchase______________________________
If you have questions, call:
Customer Assistance
1-800-688-9900 U.S.A.
1-800-688-2002 Canada
Internet: http://www.maytag.com
U.S. Customers using TTY for deaf, hearing impaired
or speech impaired, c
In our continuing effort to improve the quality and
formance of our appliances, it may be necessary
per
to make changes to the appliance without revising
this guide.
For service information, see page 15.
all 1-800-688-2080.
WARNING! FIRE HAZARD
Do not add gasoline, dry-cleaning solvents, or other
flammable or explosive substances to the wash
water. These substances give off vapors that could
ignite or explode.
Do not wash articles which have been previously
cleaned, washed, soaked, or spotted with gasoline,
dry-cleaning solvents, oil, waxes, chemical solvents,
alcohol, turpentine, or other flammable or explosive
materials. These substances will be retained in
articles, and articles which still contain these
flammable or explosive substances give off vapors
that could ignite or explode.
Observe these precautions when using cleaning
fluids, spot or st
should be labeled “nonflammable.
manufacturers directions in a well ventilated area or
outdoors. Thoroughly rinse ar
placing them in the washer. Some of these products
– rust removers for example – will damage
components and the finish of the washer.
Keep area around and underneath washer free from
the accumulation of combustible materials, such as
lint, paper, rags, gasoline, and all other flammable
vapors and liquids.
ain removers, etc. These products
” Use according to
ticles by hand before
What You Need to Know About
Safety Instructions
Warning and Important Safety Instructions appearing in
this guide are not meant to cover all possible
conditions and situations that may occur
sense, caution and care must be exercised when
installing, maintaining or operating appliance.
Always contact the manufacturer about problems or
conditions you do not understand.
Recognize Safety Symbols, Words,
Labels
WARNING
WARNING – Hazards or unsafe practices which COULD
result in severe personal injury or death.
CAUTION
CAUTION – Hazards or unsafe practices which COULD
result in minor personal injury.
. Common
HYDROGEN GAS I
conditions, hydrogen gas may be produced in a hot
water system that has not been used for two weeks
or more. If the hot water system has not been used
for such a period, before using the washer, turn on
all the hot water faucets and let the water flow from
each faucet for several minutes. This will release any
accumulated hydrogen gas. As this gas is
flammable,
during this time.
Recent studie
contaminated materials are incompletely washed, a
carry-over and buildup of the oil may contribute to a
chemical reaction (spontaneous combustion) that
could cause a load to catch fire by itself. This would
be more likely to happen if the load were left in the
dryer after tumbling stopped or if items were folded
and stacked while warm.
do not smoke or use an open flame
s have shown that if veget
S EXPLOSIVE!
Under certain
able oil
1
Page 3

Important Safety Instructions
WARNING
To reduce the risk of fire, explosion, electric shock,
or personal injury when using your washer, follow
basic safety precautions, including the following:
1. Read all instructions before using the appliance.
2. As with any equipment using electricity and having
moving parts, there are potential hazards. To use this
appliance safely, the operator should become familiar
with the instructions for operation of the appliance
and always exercise care when using it.
3.
Do not install or store this appliance where it will be
exposed to the weather.
4. Install and level washer on a floor that can support
the weight.
5. This appliance must be properly grounded.
plug the appliance cord into a receptacle which is not
grounded adequately and in accordance with local
and national codes. See installation instructions for
grounding this appliance.
6. To avoid the possibility of fire or explosion:
Do not wash items that have been previously
a.
cleaned in, washed in, soaked in, or spotted with
gasoline, dry-cleaning solvents, other flammable or
explosive substances as they give off vapors that
could ignite or explode. Hand wash and line dry
any items containing these substances.
Any material on which you have used a cleaning
solvent, or which is saturated with flammable
liquids or solids, should not be placed in the
washer until all traces of these liquids or solids
and their fumes have been removed.
se items include acetone, denatured alcohol,
he
T
gasoline, kerosene, some liquid household
cleaners, some spot removers, turpentine, waxe
and wax removers.
b.
Do not add gasoline, dry-cleaning solvents, or
other flammable or explosive substances to the
wash water. These substances give off vapors that
could ignite or explode.
c. Under certain conditions, hydrogen gas may be
produced in a hot water system that has not been
used for two weeks or more. HYD
EXPLOSIVE. If the hot water system has not been
used for such a period, before using a washer or
combination washer-dryer, turn on all hot water
s and let the water flow from each for
faucet
several minute
s. This will release any accumulated
R
Never
EN GAS IS
G
O
hydrogen gas. As the gas is flammable, do not
smoke or use an open flame during this time.
Do not wash or dry items that are soiled with
d.
vegetable or cooking oil. These items may contain
some oil after laundering. Due to the remaining oil,
the fabric may smoke or catch fire by itself.
7. Do not reach into the appliance if the tumbler is
moving.
8. Do not allow children or pets to play on, in, or in
front of the appliance. Close supervision is necessary
when the appliance is used near children and pets.
9. Do not tamper with controls.
10.
Do not repair or replace any par
attempt any servicing unless specifically
recommended in published user-repair instructions
that you understand and have the skills to carry out.
11. Unplug power supply cord before attempting to
service your washer. Service is to be done only by
qualified service personnel.
12. Keep all laundry aids such as detergents, bleach, etc.,
out of the reach of children, preferably in a locked
cabinet. Use laundry aids only as directed by the
manufacturer. Observe all warnings on container labels.
13. Keep the area around and underneath washer free
from the accumulation of combustible materials, such
as lint, paper, rags, gasoline, and all other flammable
vapors and liquids.
14.
Do not use chlorine bleach and ammonia or acids
(such as vinegar or rust remover) in the same wash.
Hazardous fumes can form.
15.
Do not machine wash fiberglass materials. Small
particles can stick to fabrics washed in following
loads and cause skin irritation.
s
16. For flame resistant finishes - follow garment
manufacturer’s instructions c
laundering could remove the finish.
17. Before the appliance is removed from service or
discarded, remove the door to the washing compartment.
18. Inlet hoses are subject to damage and deterioration
over time. Check the hose
cuts, wear or leaks and replace them every five years.
s periodic
t of the appliance or
arefully
. Improper
ally for bulge
s, kinks,
SAVE THESE INSTRUCTIONS
2
Page 4
Operating Instructions
STEP 1
Load the Washer
• The tub can be loaded completely full with dry,
unfolded clothe
tightly.
• Overloading may reduce washing efficiency and
possibly cause creasing or wrinkling of the load.
• When washing big, bulky items or a couple of small
items that do not fill the tub completely, such as a
rug or two sweaters, a few towels should be added
for improved tumbling and spin performance.
• When washing heavily soiled loads, it is very
ant to avoid overloading the washer to assure
t
impor
good cleaning re
• To load a forgotten item, press the
add the item, close the door and press the
Start/Pause pad again. After a 15 to 30 second
pause, the c
Note: To assure that your additional items get clean,
do not wait more than five minutes after the cycle
has started to add the item.
s. However,
s.
sult
ycle will re
do not pack the tub
Start/Pause pad,
sume.
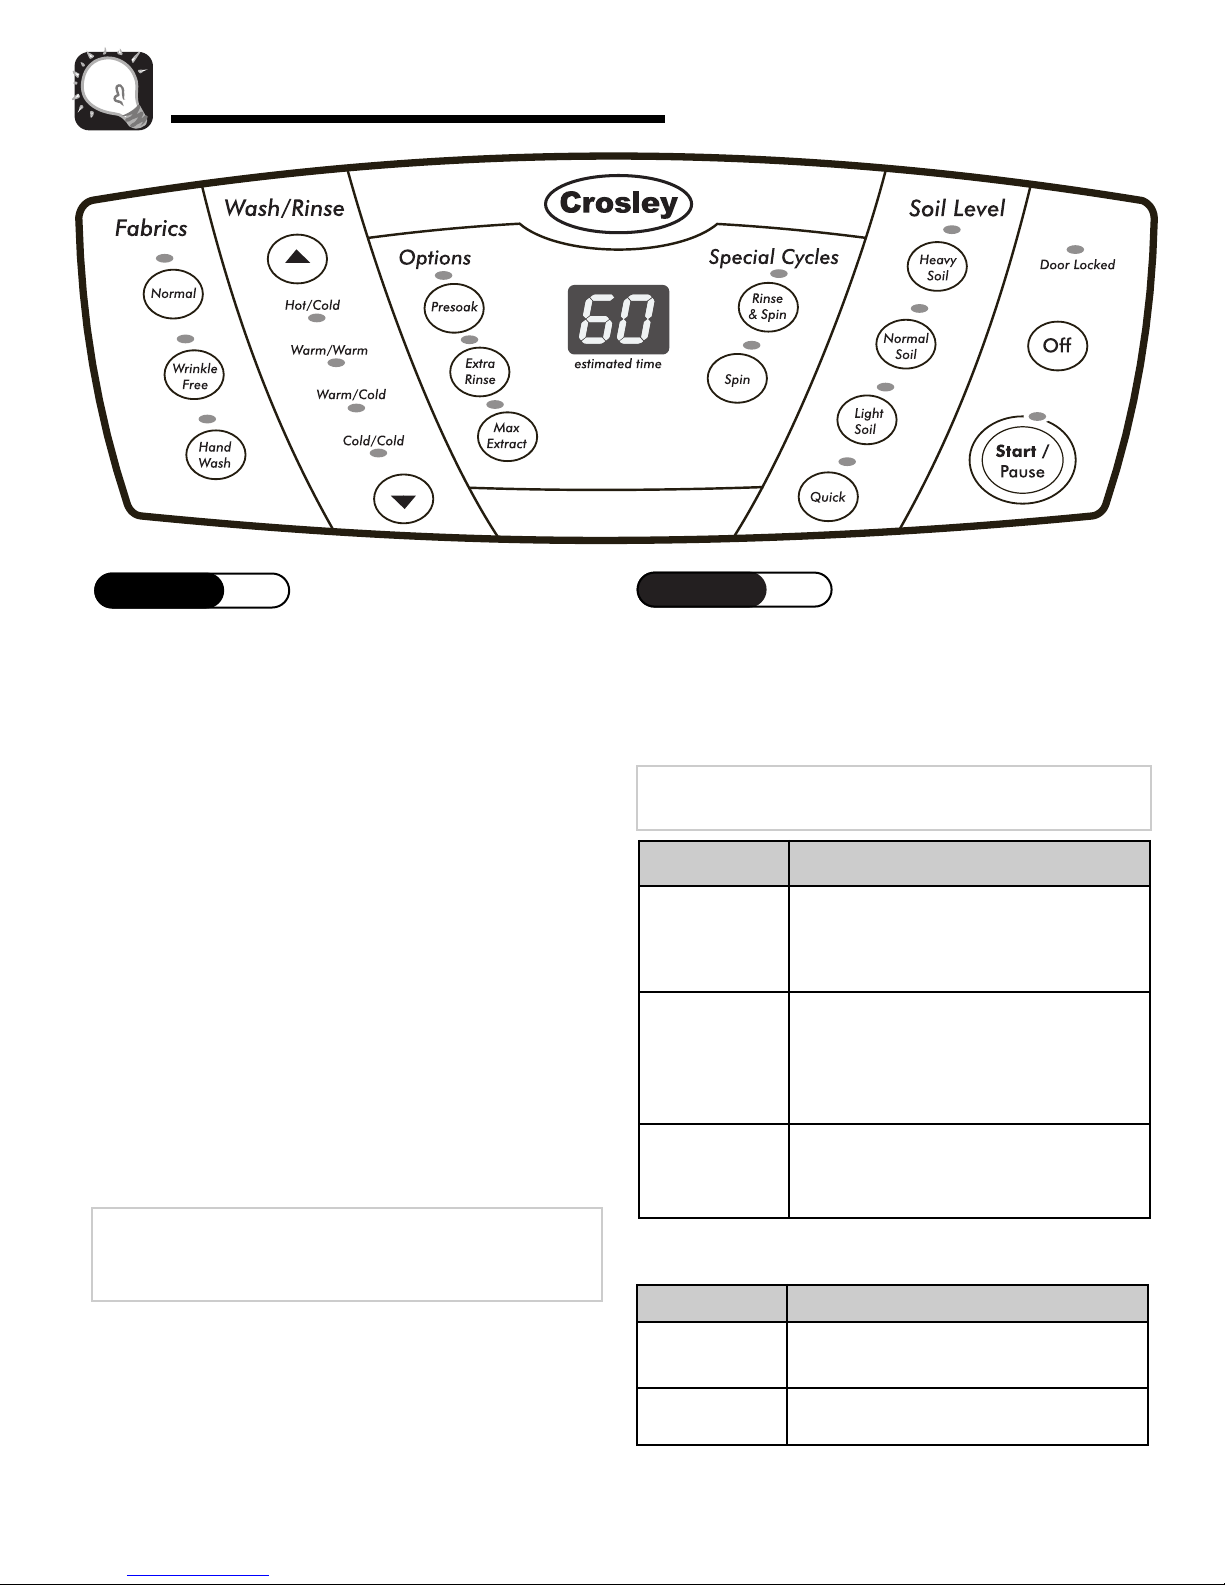
STEP 2
Select Fabrics
Press the appropriate pad for the type of load. This will
determine the tumble/pause pattern and spin speed
for the cycle.
Note: To minimize wrinkling of loads, select Wrinkle
Free setting.
Fabrics Description
Normal tumble pattern and high
Normal
Wrinkle Free
Hand W
speed spin. Use for towels, jeans,
s, linens, underwear, and
sheet
s.
t
t-shir
Reduced tumble pattern and spin
speed to reduce wrinkling. Use for
dress shirts/pants, wrinkle-free
clothing, and poly/cotton blend
clothing.
Alternating periods of shor
ash
long soak and gentle spin speed.
Use for items labeled “hand wash”.
t and
Special Cycles
Cycles Description
Water Use
The amount of water used will vary with each load.
The washer uses an adaptive fill valve to provide the
appropriate amount of water for efficient cleaning
performance and conservation of water and energy.
Fill time will vary depending upon water pre
3
ssure.
Rinse & Spin
Spin Spins only.
Choose this setting to rinse only and
then spin.
Page 5
Operating Instructions
STEP 3
Select Wash/Rinse
Water Temperatures
Press the appropriate or pad to select the wash
and rinse water temperatures. Follow the garment care
label and chart below for best results.
Temp Description
Hot/Cold
arm/Warm
W
Warm/Cold
Cold/Cold
Whites and heavily-soiled, color-fast
items.
Color-fast items. When Warm rinse is
selected, only the third rinse will be
warm. T
will be cold to conserve energy.
Moderately-soiled, color-fast items;
most wrinkle-free items.
Brightly-colored, lightly-soiled items;
washable woolens.
he first and second rinses
STEP 4
Select Soil Level
Press the appropriate pad to select the soil level.
Soil Level Description
STEP 5
Select Options
Press the appropriate pad(s) to select one or more options.
Presoak – Adds 15 minutes of mostly soaking with
minimal tumbling before the regular cycle. Can be
selected with any cycle.
Extra Rinse – A fourth rinse at the end of the cycle to
more completely remove laundry additives and perfumes.
Max Extract – Use for jeans, towels, and bedding.
Removes more water from loads during spin.
Note: To minimize wrinkling of wrinkle-free fabrics,
the Max Extract option is
overload the washer
not recommended. Do not
.
STEP 6
Start Your Washer
1. Close the door.
2. Add detergent and additive
pages 7 and 8).
3. Push the
• When the washer is started after a pause, there
• Pressing
Start/Pause pad.
will be a 30-second delay before continuing
the cycle.
Off cancels the cycle and stops
the washer.
s to the dispenser (See
Heavy Soil Use for cleaning heavily-soiled loads.
Use for cleaning moderately-soiled
Normal Soil
Light Soil Use for cleaning lightly-soiled loads.
Quick
loads. This setting will be appropriate
for most loads.
he Quick setting offers a quick
T
cycle time. Suggested uses include
freshening newly-purchased clothes,
or clothing that has been packed
away.
Note: When the cycle is complete, a signal will
sound and the Door Locked light will go out. The
door will open easily.
washer door when the Door Locked light is
illuminated. To add a forgotten item, see pg. 3.
Do not attempt to open the
4
Page 6
Operating Instructions
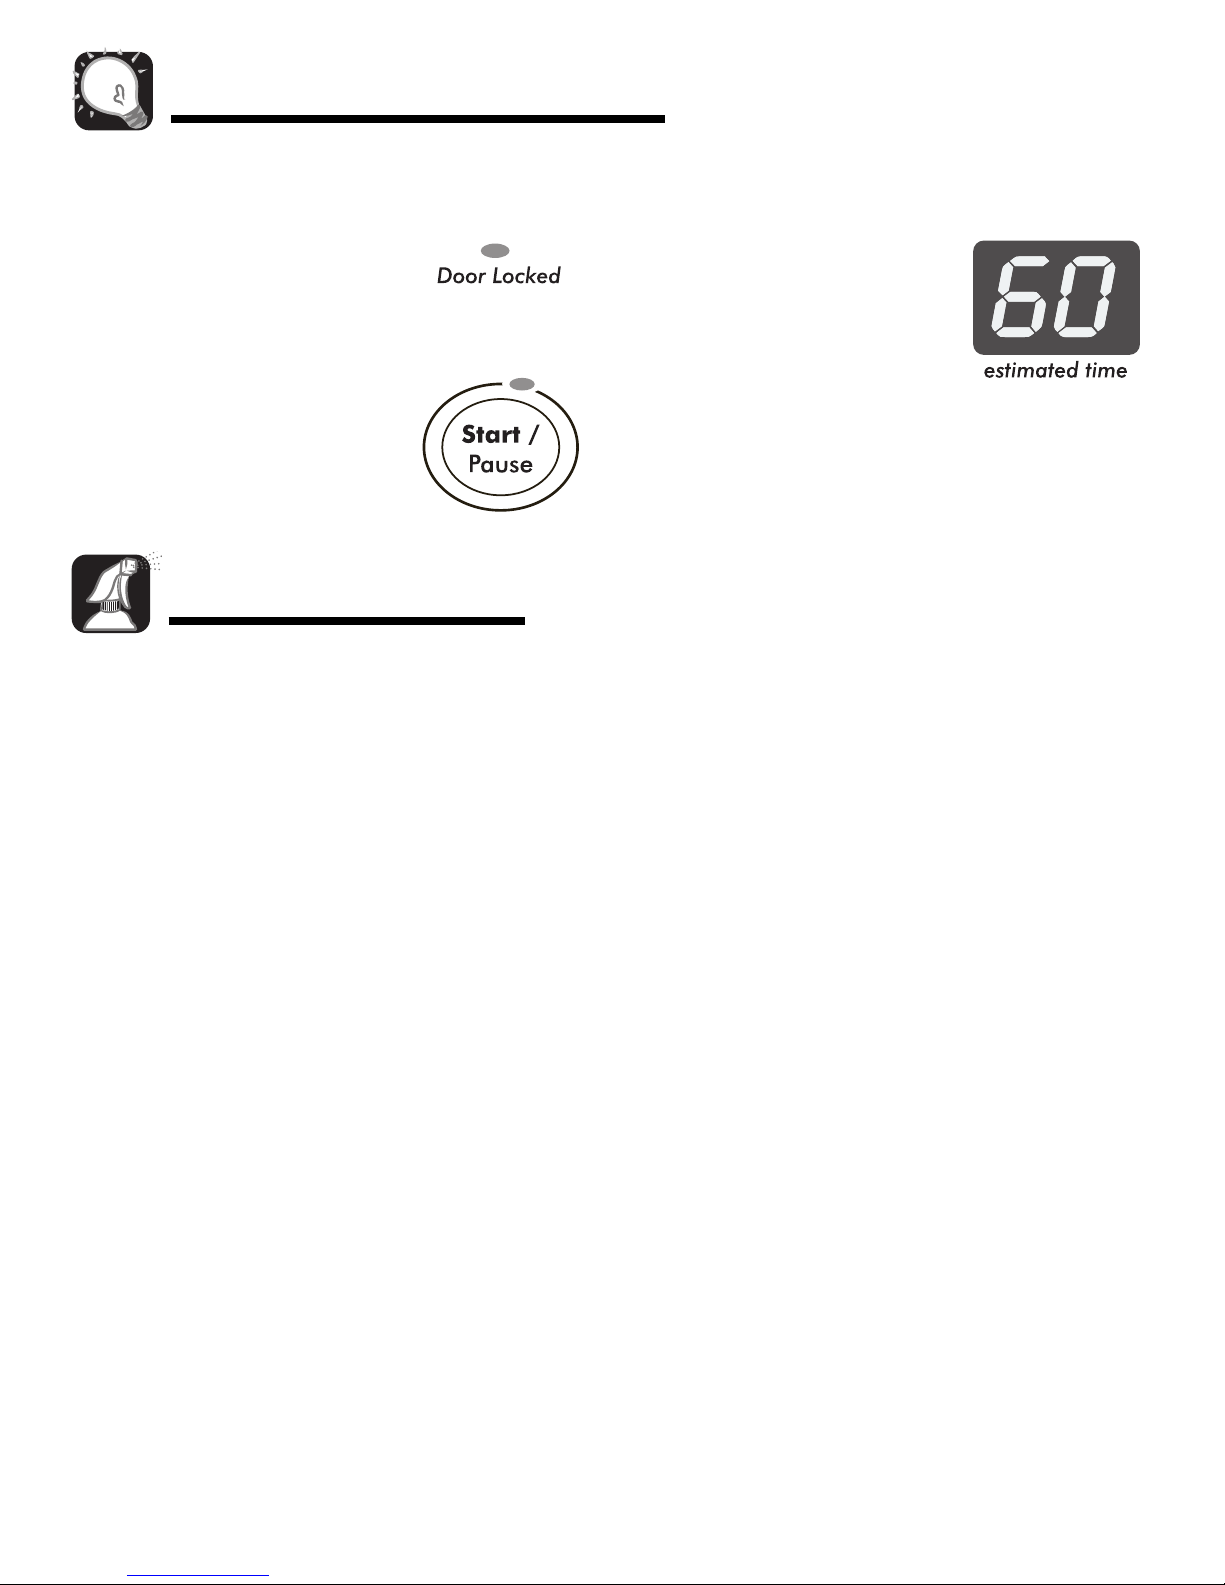
Indicator Lights
Door Locked – Lights whenever the
door of the washer is locked. The
door can be unlocked by pressing the
Start/Pause pad to stop the washer.
Pad Indicator Lights – The
indicator lights above or below the
pads will illuminate when the pad is
selected.
Care & Cleaning
Cleaning the Exterior
1. Turn off the water faucets after finishing the
day’s w
to the washer and prevent the unlikely possibility of
damage from escaping water. Leave the door open
to allow the inside of the washer to dry out.
2. Bleach, detergent, solvents, etc. spilled on the top of
your washer that are allowed to remain will remove
the glossy finish. Remove all spills with a damp, soft
cloth as they occur
3. Check hoses to be sure there are not kinks or
knots.
4. Clean the following as recommended:
Control panel - Clean with a soft, damp cloth. Do
not use abrasive powders or cleaning pads. Do not
spray cleaners directly on the panel.
Cabinet - Clean with soap and water.
5. Lifetime lubrication is done at the factory, so your
washer never needs to be oiled or greased.
6.
Do not lay heavy or sharp objects on top of your
washer
7. The top of the washer
removing st
removers, such as rust remover, will mar the finish.
8. Remove pins, buckles or other sharp objects from
clothes to prevent scratching interior parts.
9. Clothes
10.If you close your home for the winter, have a service
technician drain the washer
electric
ashing.
.
should not be stored in the washer.
al outlet and disconnect hose
This will shut off the water supply
.
should not be used for
ains from garment
s. Some st
. Unplug the cord from
s from faucet
ain
s.
Estimated Time Display
After pressing Start/Pause, this
display will show the estimated
time remaining in the cycle. The
estimated time remaining may
fluctuate to better indicate the
wash time left in the cycle.
Cleaning the Interior
Clean the interior of the washer periodically to remove
any dirt, soil, odor, mold, mildew or bacteria re
that may remain in the washer as a result of washing
clothes. We recommend taking the following steps
every 60 to 120 days to clean and freshen your washer
interior. The frequency with which the washer should
be cleaned and freshened depends on factors such as
age, the amount of dirt, soil or bacteria being run
us
through your washer, or the use of cold water. Failure
to follow these instructions may result in unsatisfactory
conditions, including unpleasant odor and/or
permanent stains on the washer or wash load.
To clean and freshen the washer interior:
1. Make a solution of one cup chlorine bleach and two
cups warm water. Be careful not to spill or splash
the bleach solution.
2. Wipe the lower portion of gray door seal with bleach
solution and soft cloth.
3. Fill the bleach dispenser with chlorine bleach.
Run the washer through a complete c
4.
water.
5. Repeat the wash cycle if necessary.
Hard water deposit
a recommended cleaner labeled washer safe.
s may be removed, if needed, using
sidue
ycle using hot
5
Page 7
Care & Cleaning
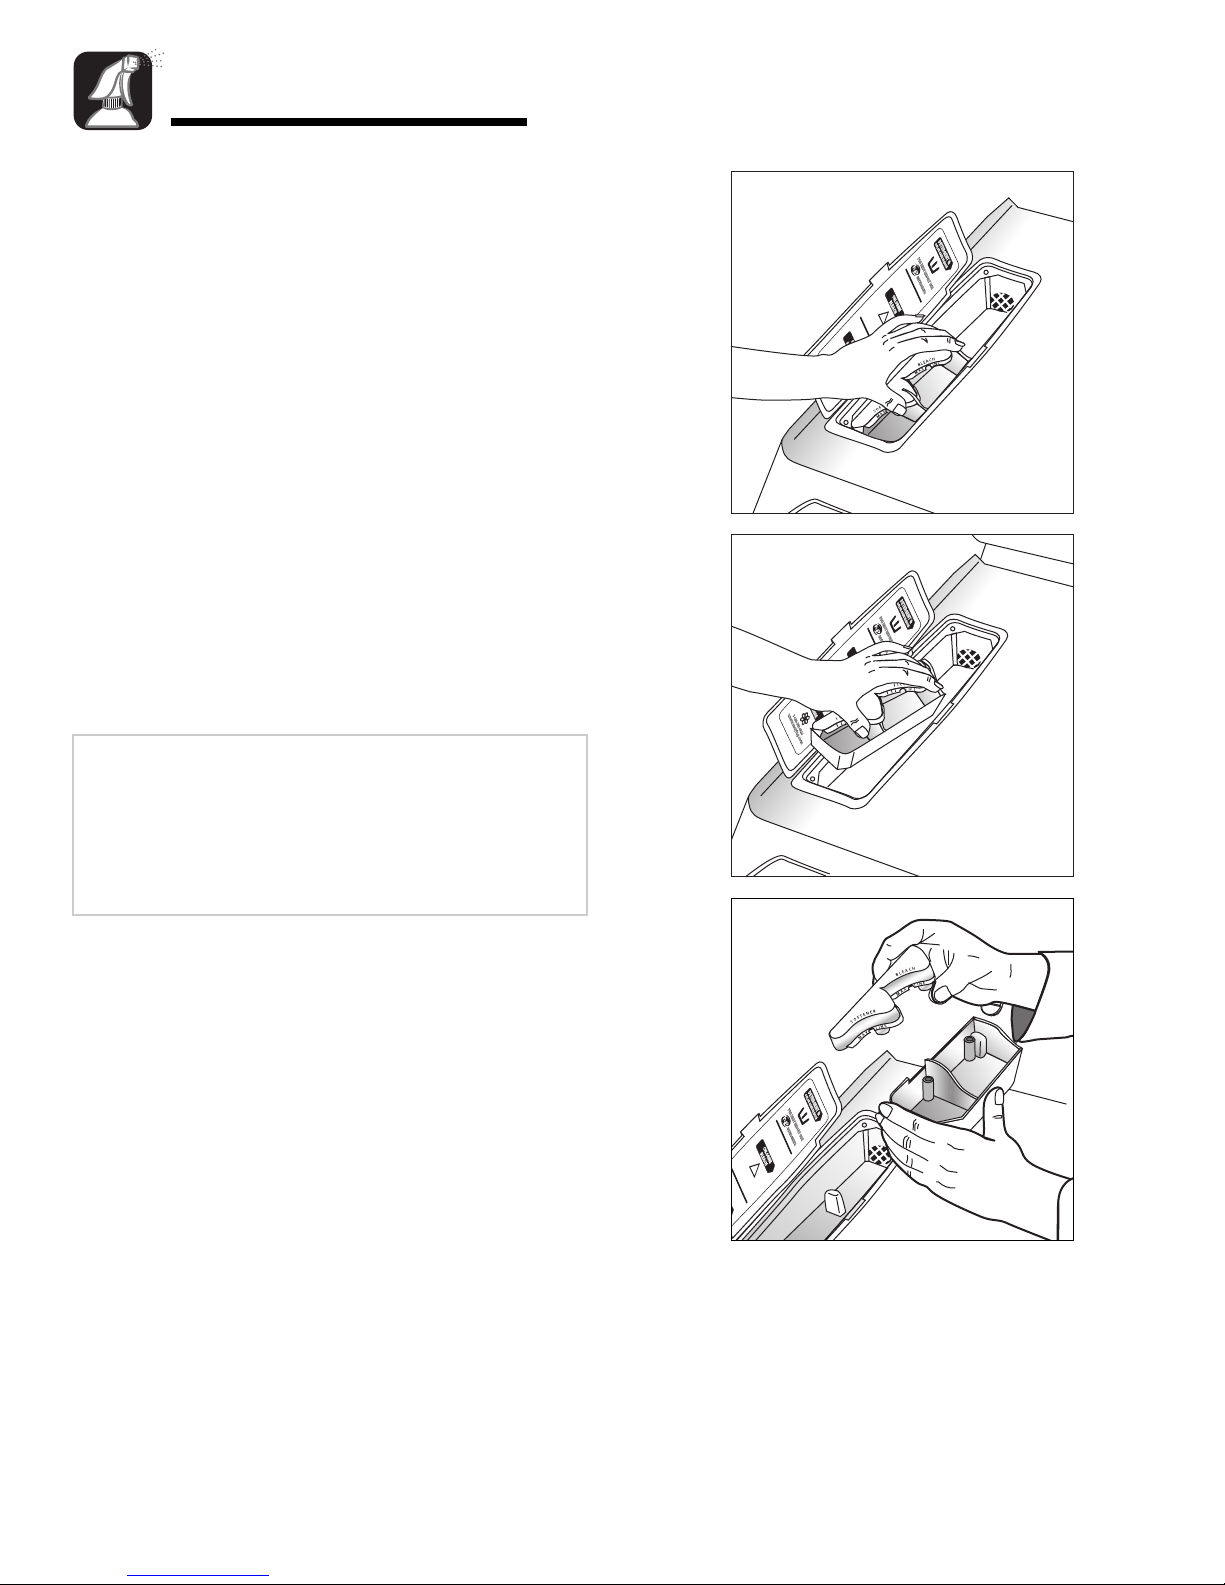
Cleaning the Dispenser
The dispenser may need to be cleaned periodically
due to laundry additive build-up. For easy clean-up of
the dispenser, grasp the removable two-compartment
container (for bleach and softener) as shown in
illustration 1. As you begin to lift the two-compartment
container, tilt slightly inward, according to illustration 2
and remove from the main dispenser.
Once the two-compartment container is removed from
the main dispenser, take it to a sink. Follow illustration
3 to remove the cap covering the siphon tube for the
bleach and softener. Run warm water and a soft brush
or cloth over the two parts to remove any excess
laundry additives.
Clean the main dispenser area using water and a soft
cloth. Once the main dispenser is clean, follow the
illustrations in reverse order to replace the two
compartment container to its original location.
Note: Do not use any cleaning substance but
water in the main dispenser. It is possible for
cleaning substances to drain into the tub. If this
should happen, set the washer for a rinse and
spin cycle to remove any cleaning substance from
the washer before doing a load of laundry
.
1
2
3
6
Page 8
Special Features
Detergent
Your washer is designed to use either
high-efficiency (HE) detergents or
regular detergents normally used with
top-loading washers.
• For best cleaning results, use a high-efficiency
detergent such as Tide HE or Wisk HE*. Highefficiency detergents contain suds suppressors
which reduce or eliminate suds. When less suds
are produced, the load tumbles more efficiently
and cleaning results are maximized.
• When using regular detergent formulated for toploading washers, it is impor
attention to the soil level of the load, load size, and
water hardness**.
the amount of detergent used with soft water
or with small or lightly soiled loads.
* Brand names are trademarks of the respective
manufacturers.
To avoid over-sudsing, reduce
tant to pay close
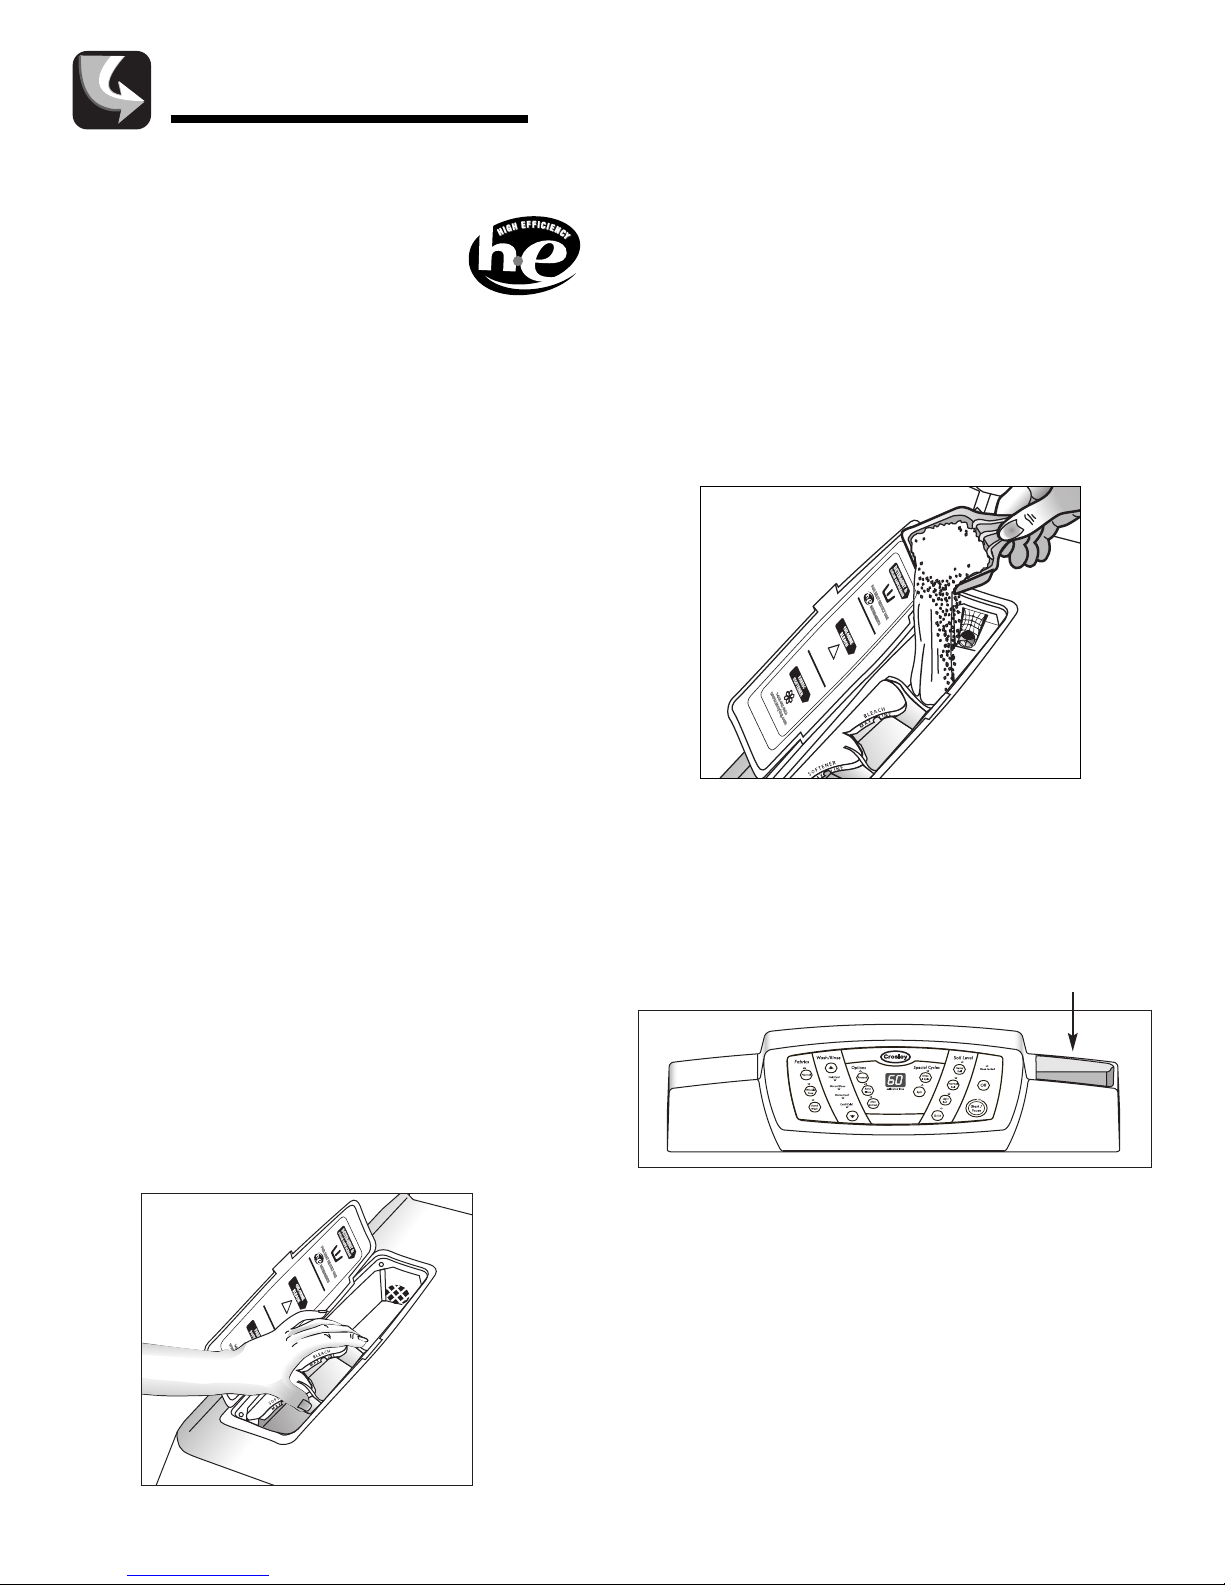
Detergent Compartment
1. Pour the recommended amount of laundry detergent
directly into the detergent compartment before
starting the washer or as it is filling.
2. If color-safe bleach is to be used, it should be added
with detergent to the detergent compartment for
best results.
• When adding color-safe bleach with detergent, it
is best if
form; granular or liquid.
both laundry products are in the same
** To determine water hardness in your area, contact your local
water utility or State University Extension office in your area.
Automatic Dispenser
The automatic dispenser consists of three
compartments which hold 1) liquid or granular
detergent and color safe bleach, 2) liquid chlorine
bleach and 3) liquid fabric softener. All laundry
products can be added at once in their respective
dispenser compartments. They will be dispensed at the
appropriate time for most effective cleaning.
After loading the laundry additive
close the dispenser lid.
s into the dispenser
,
Odds and Ends Tray
A tray for small items is conveniently built into the right
side of the console. It c
spray bottles for easy access.
an also hold some pretreat
Tra y
7
Page 9
Special Features
B
L
E
A
C
H
S
O
F
T
E
N
E
R
M
A
X
L
I
N
E
M
A
X
L
I
N
E
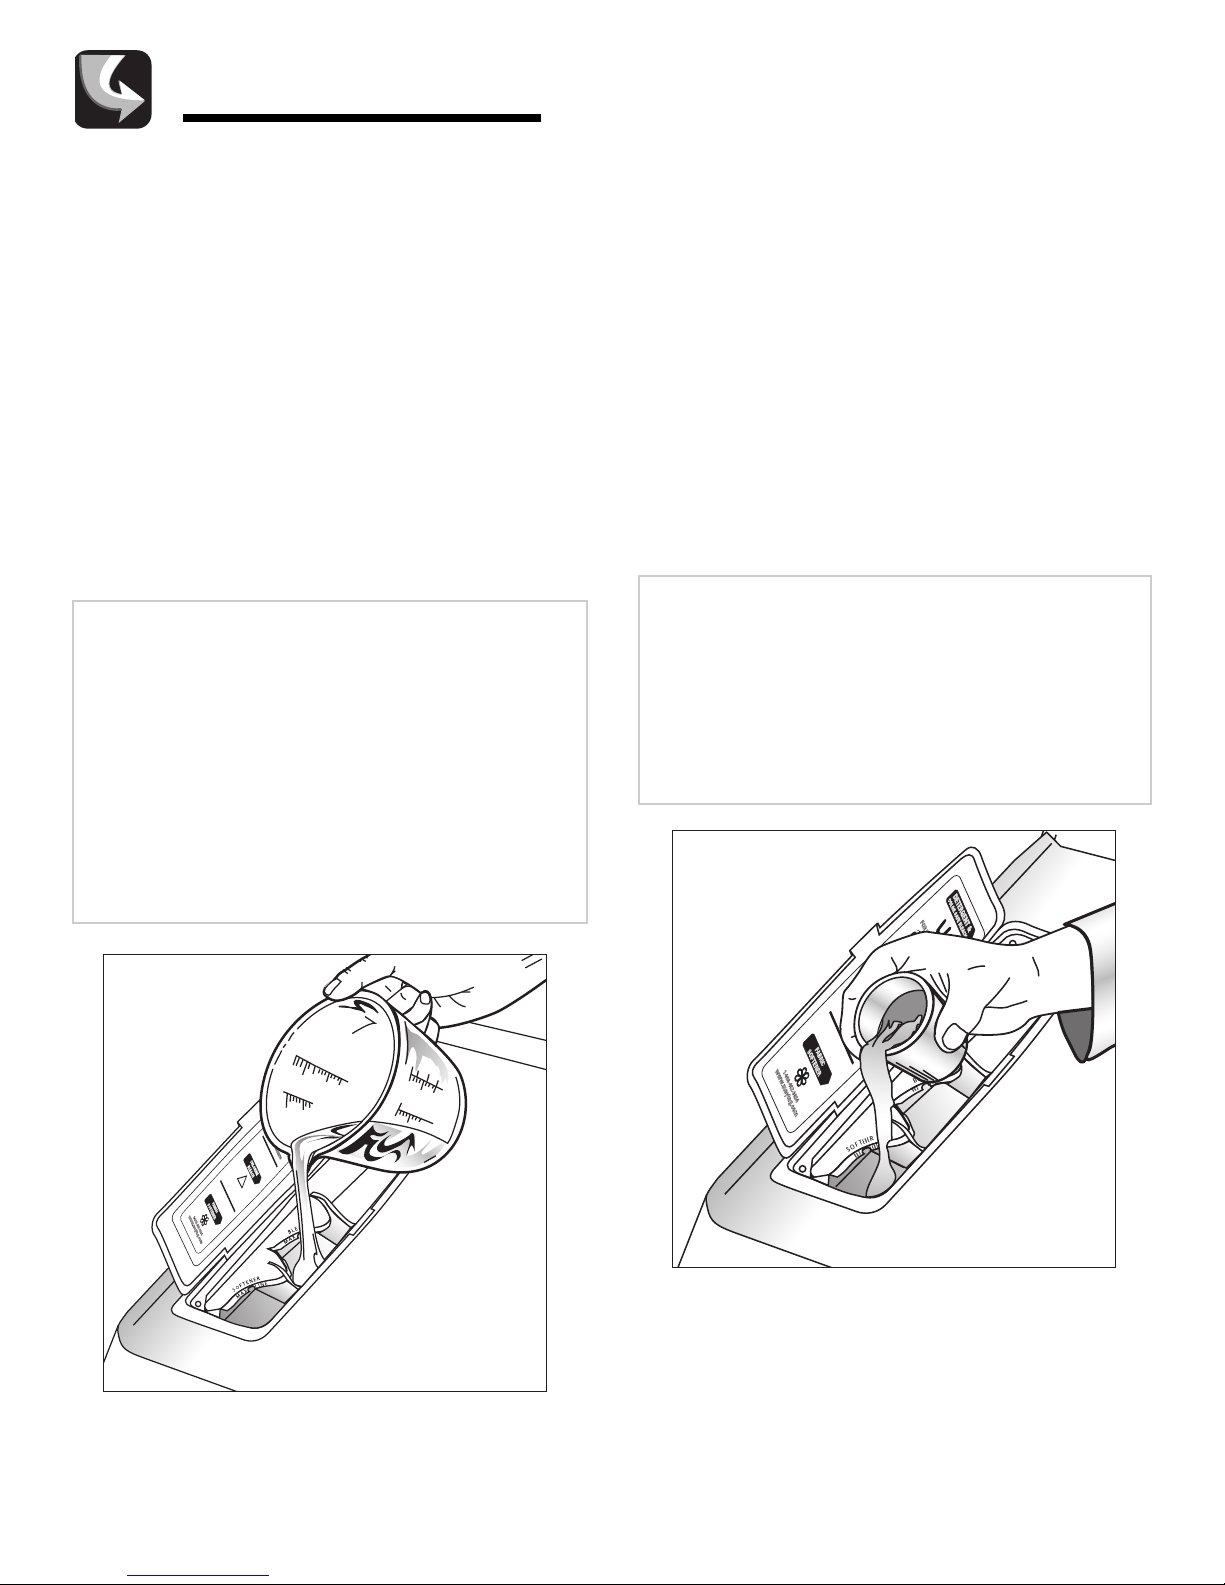
Bleach Compartment
(Liquid Chlorine Bleach Only)
1. Add chlorine bleach to the bleach compartment. Do
not
exceed the MAX FILL line. The liquid chlorine
bleach compartment will hold 3/4 of a cup.
2. Avoid splashing or over-filling the compartment.
Over-filling the compartment will release the
liquid chlorine bleach into the washer too
early.
3. The washer automatically dispenses bleach into the
tub at the appropriate time in the wash cycle.
4. The dispenser automatically dilutes liquid chlorine
bleach before it reaches the wash load.
Notes:
• Neverpour undiluted liquid chlorine bleach
directly onto the load or into the tub. It is a
powerful chemical and can cause fabric damage,
such as weakening of the fibers or color loss, if
not used properly.
• If you prefer to use color-safe, non-chlorine
bleach, add it to the detergent compartment.
not pour color-safe bleach into the bleach
compartment.
Do
Softener Compartment
1. Pour the recommended amount of liquid fabric
softener into the softener compartment. For smaller
loads use less than one capful.
2. Fabric softener should be diluted with warm water
until it reaches the MAX FILL line on the
compartment.
line. If the compartment is filled above the MAX
FILL line, fabric softener will enter the washer
too early.
3. This compartment automatically releases liquid
fabric softener at the proper time during the rinse
cycle.
Notes:
• Use the softener compartment only for liquid
fabric softeners.
• Using the Downy Ball* is not recommended
with this washer. It will not add fabric softener
at the appropriate time. Use the dispenser on
top of the washer
Do not fill above the MAX FILL
.
* Brand names are trademarks of the respective manufacturers.
8
Page 10
Storing the Washer
Washers can be damaged if water is not removed from
hoses and internal components before storage.
Prepare the washer for storage as follows:
•
If the washer has been stored in below-freezing
temperatures, allow time for any water left over in
the washer to thaw out prior to use.
• Select the
cup of bleach to the detergent dispenser without
clothes in the tumbler. Run the washer through a
complete cycle.
• Turn the water faucets off and disconnect the inlet
hoses.
• Disconnect the washer from the electrical supply
and leave the washer door open to let air circulate
inside the tumbler.
Normal and Quick setting and add one
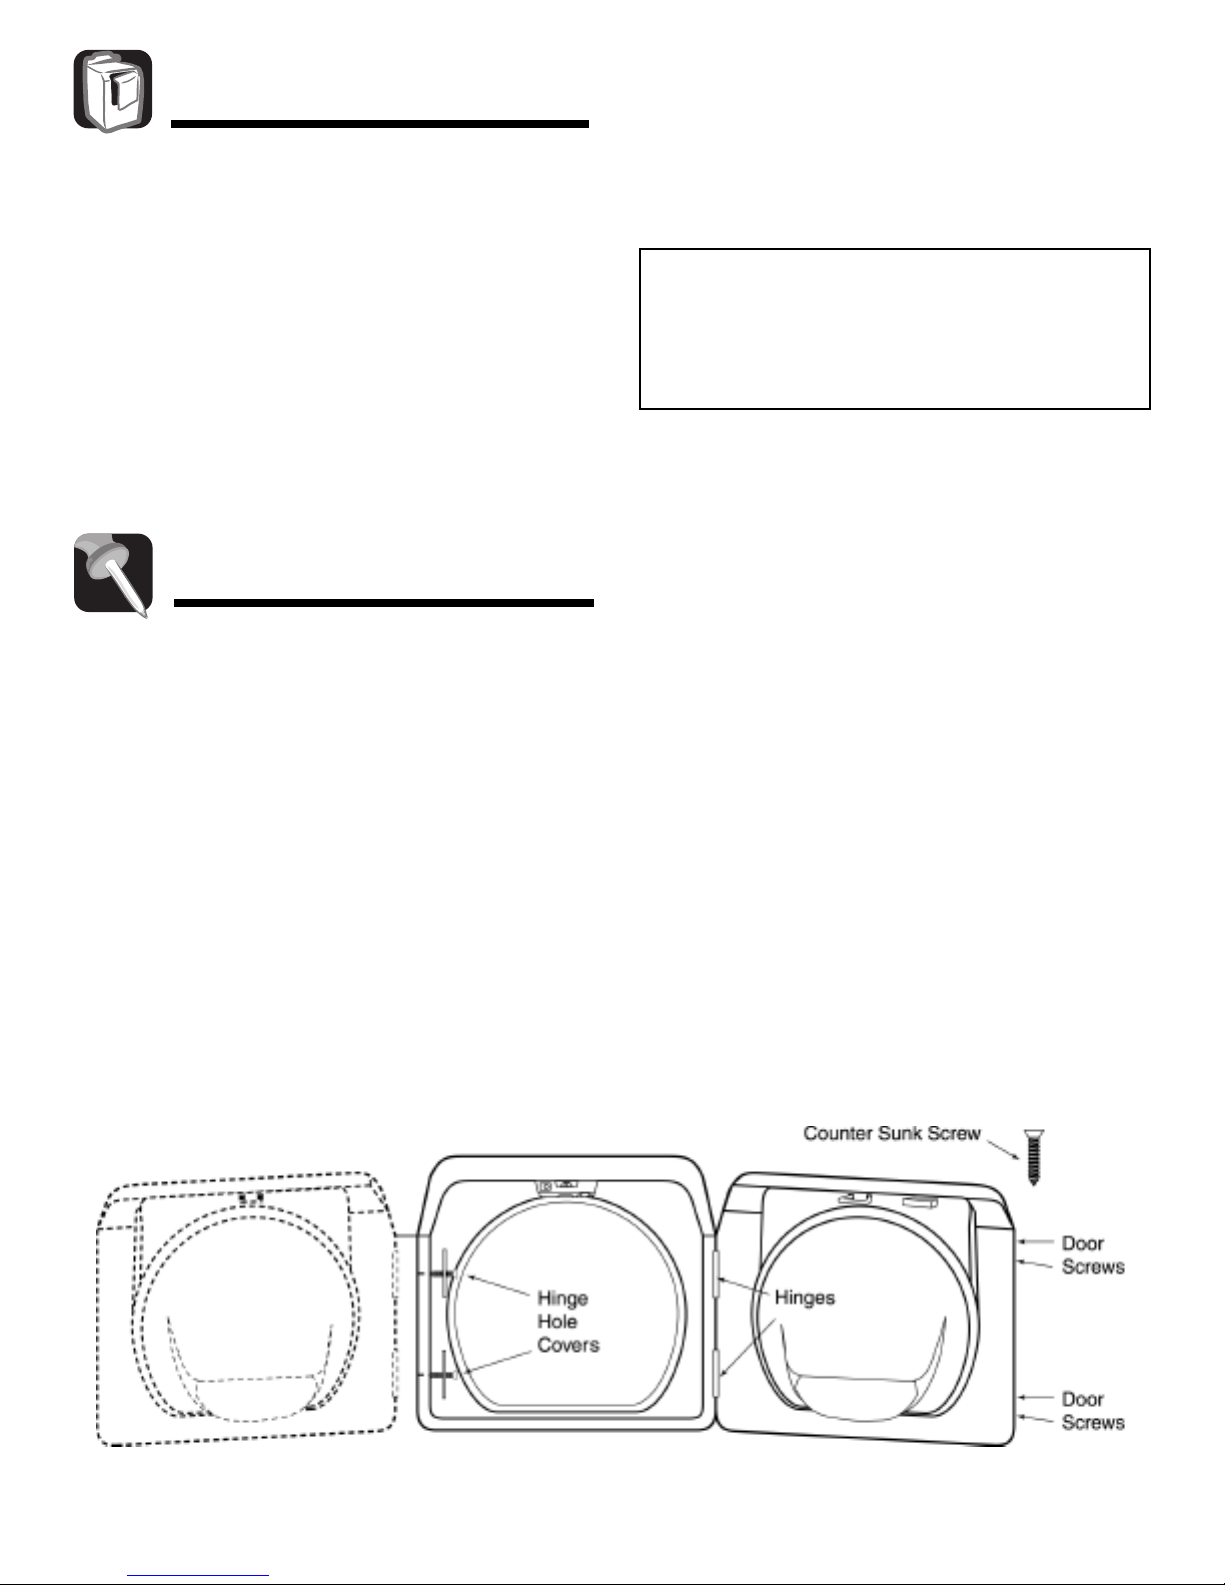
Reversing the Door
Washer door swing direction can be changed
using the following procedure:
1. Swing door fully open and support it while
removing four hinge screws (which hold hinges to
door assembly).
2. Move the door to a work surface and transfer four
door screws to the opposite side of the door
assembly.
3. Remove one screw holding top hinge to cabinet
and one screw holding top hinge cover to cabinet
(opposite side).
4. Remove hinge and bracket from cabinet by moving
them up and down to a position where they are
released.
or information on long-term storage or storage of
F
your washer during extreme cold temperatures,
call Customer Assistance toll-free at
1-800-688-9900 USA or 1-800-688-2002 Canada.
U.S. customers using TTY for deaf, hearing impaired
or speech impaired, call 1-800-688-2080.
5. Install hinge and bracket in swapped locations and
drive screws to attach them securely to the cabinet.
6. Compare top hinge and top bracket to bottom
hinge and bottom bracket for correct hinge
assembly position.
7. Repeat procedures 4 through 6 for bottom hinge to
cabinet and bottom bracket to cabinet.
8. Support door in fully open position on hinge side
and drive four screws to securely att
door assembly.
9. Close door and check to see that washer operates
properly.
ach hinges to
9
Page 11

Troubleshooting
Load is Too Wet at
End of Cycle
Leaks Water
Won’t Spin or
Drain
Stops
• Use Max Extract option.
• Try using a high-efficiency detergent to reduce sudsing.
• Load is too small. Very small loads (one or two items) may become unbalanced
and not spin out completely.
• Make sure door is firmly closed.
• Make sure hose connections are tight.
• Make sure end of drain hose is correctly inserted and secured to drain facility.
• Avoid overloading.
• Use high-efficiency detergent to prevent over-sudsing.
• Check fuse or reset circuit breaker.
• Straighten drain hoses. Eliminate kinked hoses. If there is a drain restriction, call
for service.
• Close the door and push the
tumble or spin unless the door is closed.
• After pressing the Start/Pause pad, it will take 30 seconds before the washer
begins to spin. The door must lock before spin can be achieved.
• See “Tub is Completely Full of Suds” below.
• Plug cord into live electrical outlet.
• Check fuse or re
• Close door and push the
washer will not tumble or spin unless door is closed.
This may be a pause or soak period in the cycle. Wait briefly and it may start.
•
• Check screens on inlet hose
periodically.
set circuit breaker
Start/Pause pad. For your safety, washer will not
.
Start/Pause pad to start the washer. For your safety,
s at the faucets for obstructions. Clean screens
Tub is Completely
Full of Suds
Fills with the
Wrong
e
emper
T
Water
atur
• Run the washer through another complete cycle using cold water
• Reduce detergent amount for that specific load size, soil level and water
hardness.
• Use high-efficiency or low-sudsing detergent specially formulated for front load
washers.
• Turn both faucets on fully.
• Make sure temperature selection is correct.
Make sure hoses are connected to correct faucets. Flush water lines.
•
• Check the water heater. It should be set to deliver a minimum of 120° F (49° C)
hot water at the t
• Disconnect hoses and clean screens. Hose filter screens may be plugged.
• When warm rinse is selected, only the final rinse will be warm. The first two
s will be cold.
rinse
• As the washer is filling, the water temperature may change as the automatic
temperature control feature checks incoming water temperature. This is normal.
hile the washer is filling, you may notice just hot and/or just cold water going
W
•
through the dispenser when cold or warm wash temperatures are selected. This
is a normal function of the automatic temperature control feature as the washer
determines the temperature of the water.
ap. Also check water heater c
apacity and recovery rate.
.
10
Page 12
Troubleshooting
Won’t Fill
• Be sure the door is tightly closed.
• Plug cord into a live electrical outlet.
• Check fuse or reset circuit breaker.
• Press the
• Turn both faucets on fully.
• Straighten inlet hoses.
• Disconnect hoses and clean screens. Hose filter screens may be plugged.
• Open and close the door, then push the
Start/Pause pad.
Start/Pause pad.
Won’t Tumble
Door Locked Shut;
Will Not Open
reshening
F
Your Washer
Is Noisy
U.S. customers using TTY for deaf, hearing impaired or speech impaired, call 1-800-688-2080.
• Check fuse or reset circuit breaker.
• Close the door and press the
not tumble or spin unless the door is closed.
• Press the
• It may take a few moments for the door lock mechanism to disengage.
• See Cleaning the Interior, page 5.
• Washer should be leveled properly as outlined in installation instructions.
• Check that the leveling leg lock nuts are tightened.
• Be sure rubber feet are installed on leveling legs.
• Weak floors c
• For information on normal operating sounds, see page 13.
For further assistance, call Customer Assistance toll-fr
1-800-688-9900 USA or 1-800-688-2002 Canada.
Start/Pause pad to stop the machine.
ause vibration and walking.
an c
Start/Pause pad. For your safety, the washer will
ee at
11
Page 13
Troubleshooting
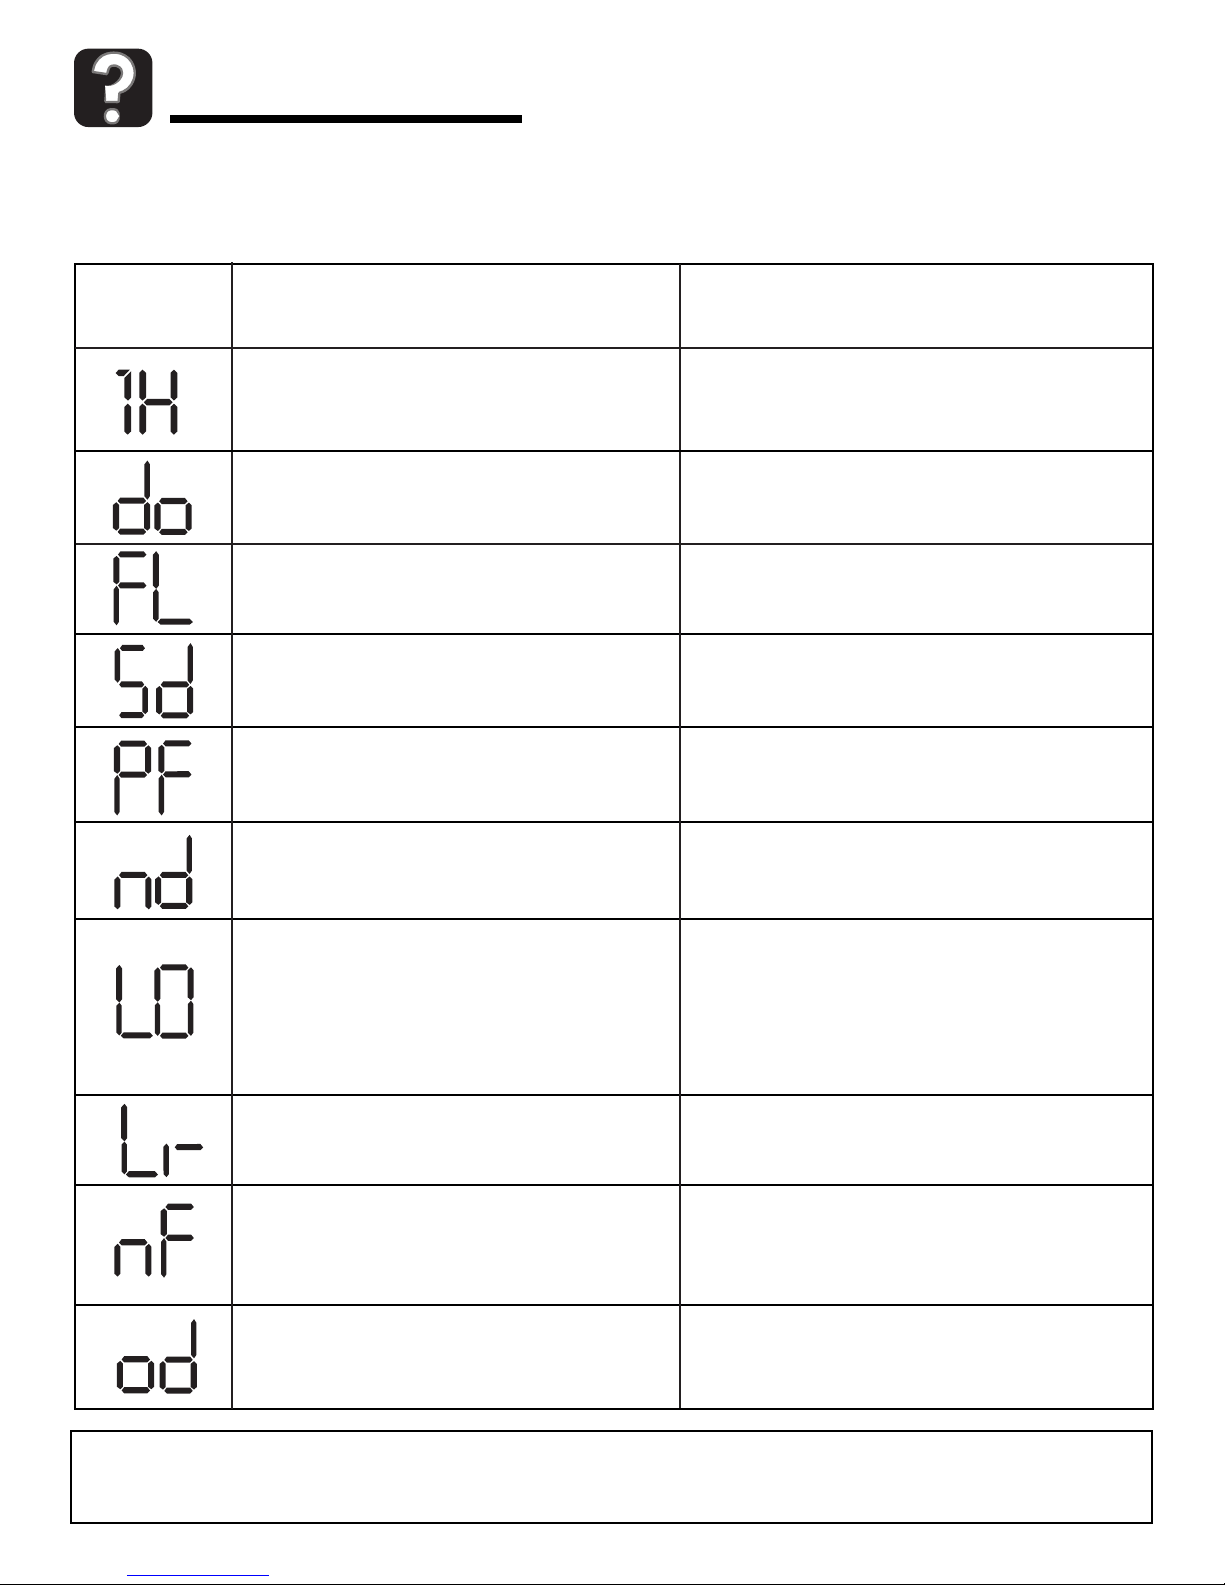
Help Codes
Help codes may be displayed to help you better understand what is occurring with the washer.
Code
Symbol Meaning Solution
Service Diagnostic Mode
The washer detects that the door is open
when starting a cycle or the door is not
locking.
The washer failed to lock the door.
Oversudsing has occurred. If this code
disappears, the suds recovery cycle was
successful.
The washer experienced a power failure.
The washer experienced difficulty draining.
he washer has repeatedly tried to unlock
T
the door but has been unsuccessful.
Push the
Close the door tightly and restart the cycle.
Close the door tightly and restart the cycle.
Reduce the amount of detergent used for
that specific load.
Restart the cycle. If code is still displayed,
check to make sure power cord is securely
plugged in.
Check for a kinked drain hose.
Check for a plugged stand pipe.
Make sure door is tightly closed. Push the
Off button and then wait two minutes for the
door to unlock.
OR
Unplug the washer for two minutes and plug
back in.
Off button and restart the cycle.
Motor not running properly.
The washer has tried to fill, but has not
reached the proper level.
he washer door must be opened.
T
For further assistance, call Customer Assistance toll-free at
1-800-688-9900 USA or 1-800-688-2002 Canada.
U.S. customers using TTY for deaf, hearing impaired or speech impaired, call 1-800-688-2080.
Call for service. See below.
Make sure the water faucet
the way.
Check for kinked hoses.
Check inlet screens on fill hoses.
his is a s
T
opened before another c
afety feature. T
s are open all
he door must be
ycle is st
ar
ted.
12
Page 14

Troubleshooting
Operating Sounds
High-pitched sound during a spin
cycle.
Flushing water sound coming
from the dispenser area.
Sloshing or gurgling water
sound when washer is off and the
tub is rot
Whirring or sloshing sound
follow
throughout the wash cycle.
Washer maintains a
spin speed after achieving a higher
spin speed.
ated.
ed by a pause,
slightly reduced
repeated
The motor increases speed to spin the tub to remove moisture
from the load.
Detergent is dispensed at the start of the cycle. Bleach is
dispensed at the appropriate time in the wash cycle. Fabric
softener is dispensed during the third rinse while the washer is
filling.
The sealed balance ring around the tub contains a liquid and is
designed to make the washer spin smoothly.
The tub rotates one direction followed by a pause. The tub
reverses direction and pauses. This action continues throughout
the cycle.
After reaching the maximum spin speed, the machine may reduce
spin speed slightly for maximum performance.
The spin speed slows down
dramatically when it sounds like
an out-of-balance load.
Water is added after the
washer has been tumbling
while.
Clicking/draining sounds when
washer is started.
for a
The tumbler will begin to accelerate to speed, then slows back
down to redistribute the load more evenly when an unbalanced
load occurs.
The washer uses a true adaptive fill and adds more water during
the wash cycle as it is needed.
OR
Water flows through the dispenser to dilute and add bleach or
fabric softener at the appropriate time. T
bleach and fabric softener are not used.
Before the washer starts to fill, it will make a series of clicking
s to check the door lock and do a quick drain.
noise
his will occur even if
13
Page 15

Troubleshooting
Questions and Answers
Q. What’s the best cycle to use if I have stains on my laundry?
A.
Select the Presoak option pad and Heavy Soil (see page 4) setting. Pretreat the stains with a laundry pretreat product.
Q. How large of a load can I wash in my washer?
A.
The tub can be loaded completely full with dry, unfolded clothes. However, do not pack the tub tightly. If the
load is heavily soiled it is very important not to overload the washer.
Q. At the end of the cycle my load comes out wetter than normal. What causes this?
During tumble and spin the washer may have had difficulty getting to a full spin speed because the load was
A.
not evenly distributed. This can occur with small loads, heavy items or a load in which too much detergent
was used, causing over-sudsing.
Q.
My laundry items seem to be v
problem?
A. Wrinkling is caused by the combination of heat and pressure. Be sure wrinkle-free or permanent press
fabrics are washed on the
Temperature).
Q. My whites ar
A.
Wash white loads using the Normal fabric selection. Select the Hot/Cold (Wash/Rinse) temperature setting
and put 3/4 cup of chlorine bleach in the bleach dispenser. The bleach will be dispensed at the appropriate
time in the wash cycle for optimal per
recommended.
DO NOT USE MAX EXTRACT.
e not as white as I’d like. What can I do?
ery wrinkled at the end of the cycle. What can I do to correct the
Wrinkle Free cycle, and a cold rinse is used. (See pg. 4 for Wash/
formance. A hot water wash temperature of 120˚-140˚ F (49˚- 60˚ C) is
Rinse
14
Page 16

Service & Warranty
Warranty
Limited One Year Warranty Parts and Labor
For one (1) year from the original retail
purchase date, any part which fails in
normal home use will be repaired or
replaced free of charge.
Canadian Residents
The above warranties only cover an
appliance installed in Canada that has
been certified or listed by appropriate test
agencies for a compliance to a National
andard of Canada unless the appliance
St
was brought into Canada due to transfer
of residence from the United States to
Canada.
The specific warranties expressed above are
the ONLY warranties provided by the
manufacturer. These warranties give you
specific legal rights, and you may also have
other rights which vary from state to state.
CUSTOMER’S SOLE AND EXCLUSIVE
REMEDY UNDER THIS LIMITED
WARRANTY SHALL BE PRODUCT REPAIR
AS PROVIDED HEREIN. IMPLIED
WARRANTIES, INCLUDING WARRANTIES
OF MERCHANTABILITY OR FITNESS FOR
A PARTICULAR PURPOSE, ARE LIMITED
TO ONE YEAR OR THE SHORTEST
PERIOD ALLOWED BY LAW. MAYTAG
ORPORATION SHALL NOT BE LIABLE
C
NCIDENTAL OR CONSEQUENTIAL
R I
O
F
DAMAGES. SOME STATES AND
ROVINCES DO NOT ALLOW THE
P
ION OR LIMITATION OF
S
LU
XC
E
INCIDENTAL OR CONSEQUENTIAL
DAMAGES, OR LIMITATIONS ON THE
RATION OF IMPLIED WARRANTIES OF
U
D
MERCHANTABILITY OR FITNESS, SO
THESE EXCLUSIONS OR LIMITATIONS
MAY NOT APPLY TO YOU. THIS
RANTY GIVES YOU SPECIFIC LEGAL
R
A
W
RIGHTS AND YOU MAY ALSO HAVE
OTHER RIGHTS, WHICH VARY STATE TO
TE OR PROVINCE TO PROVINCE.
A
ST
What is Not Covered By These Warranties
1. Conditions and damages resulting from any of the following:
a. Improper installation, delivery, or maintenance.
b. Any repair, modification, alteration, or adjustment not authorized by the
manufacturer or an authorized servicer.
. Misuse, abuse, accidents, unreasonable use, or acts of God.
c
d. Incorrect electric current, voltage, electrical and/or gas supply.
e. Improper setting of any control.
2. Warranties are void if the original serial numbers have been removed, altered,
or cannot be readily determined.
3. Light bulbs, water filters and air filters.
4. Products purchased for commercial or industrial use.
The cost of service or service call to:
5.
a. Correct installation errors. For products requiring ventilation, rigid metal
ducting must be used.
b. Instruct the user on the proper use of the product.
c. Transport the appliance to and from the servicer.
6. Any food loss due to refrigerator or freezer product failures.
7. Expenses for travel and transportation for product service in remote locations.
8. Outside of the United States and Canada this warranty does not apply.
Contact your dealer to determine if another warranty applies.
9. Consequential or incidental damages sustained by any person as a result of
any breach of these warranties. Some states do not allow the exclusion or
limitation of consequential or incidental damages, so the above exclusion may
not apply.
If You Need Service
First see the Troubleshooting section in your Use and Care Guide or call the
dealer from whom your appliance was purchased or call Maytag Services, LLC,
Customer Assistance at 1-800-688-9900 USA and 1-800-688-2002 Canada to
locate an authorized servicer.
• Be sure to retain proof of purchase to verify warranty status. Refer to WARRANTY
for further information on owner’s responsibilities for warranty service.
• If the dealer or service company cannot resolve the problem, write to Maytag
Services, LLC, Attn: CAIR
1-800-688-9900 USA and 1-800-688-2002 Canada. U.S. customers using
TTY for deaf, hearing impaired or speech impaired, call 1-800-688-2080.
• User’s guides, service manuals and parts information are available from Maytag
C, Customer Assist
s, LL
Service
®
Center, P.O. Box 2370, Cleveland, TN 37320-2370, or call
ance.
Notes: When writing or calling about a service problem, please include:
a. Your name, address and telephone number;
b. Model number and serial number;
c. Name and address of your dealer or servicer;
d. A clear description of the problem you are having;
e. Proof of purchase (sales receipt).
15
Page 17

Haute Efficacité
Laveuse
Guide d’utilisation et d’entretien
CAH-1
Table des matières
Importantes consignes
de sécurité . . . . . . . . . . . . . . . 17-18
Fonctionnement . . . . . . . . . . . 19-21
Nettoyage et entretien . . . . . 21-22
Caractéristiques spéciales
Rangement de la laveuse . . . . . 25
. 23-24
Inversion de la
porte de la laveuse . . . . . . . . . . . .25
Recherche des pannes . . . . 26-30
Garantie et service après-vente 31
Guía de uso y cuidado . . . . . . . . 32
Page 18

Importantes consignes de sécurité
Installateur : Veuillez laisser le présent guide avec
l’appareil.
lient :Veuillez lire le présent guide et le conserver pour
C
référence future. Conservez aussi les reçus de caisse et
les chèques oblitérés à titre de preuve d’achat.
Numéro de modèle ________________________________
Numéro de série___________________________________
Date d’achat ______________________________________
Pour toute question, contacter :
Service à la clientèle
1-800-688-9900 U.S.A.
1-866-688-2002 Canada
(lundi au vendredi, 8 h à 20 h, heure de l’Est)
Internet: http://www.maytag.com
En raison de nos efforts constante d’amélioration de la
qualité de nos appareils électro-ménagers, il se peut
qu’une machine à laver soit modifée sans que le guide
soit révisé.
Pour le service après-vente, voir page 31.
Ce qu’il faut savoir à propos
des consignes de sécurité
Les consignes de sécurité et les mises en garde présentées
dans ce manuel ne couvrent pas toutes les situations
possibles. F
d’attention lors de l’installation, de l’entretien et de
l’utilisation du propriétaire.
Lorsque survient un problème ou une situation inhabituelle,
toujours communiquer avec ou le fabricant.
Reconnaissez les étiquettes, phrases
ou symboles sur la securite
AVERTISSEMENT – Risques ou pratiques non sûres, qui
POURRAIENT résulter en de graves blessures ou même
la mort.
aire preuve de jugement, de prudence et
AVERTISSEMENT
AVERTISSEMENT ! RISQUE D’INCENDIE
e pasajouter d’essence, de solvants de nettoyage à sec
N
ou toute autre substance inflammable ou explosive à
l’eau de lavage. Ces substances produisent des vapeurs
qui pourraient s’enflammer ou exploser.
Ne pas laver d’articles qui ont auparavant été nettoyés,
lavés, trempés ou détachés à l’aide d’essence, de solvants
de nettoyage à sec, d’huiles, de cires, de solvants
chimiques, d’alcool, de térébenthine ou d’autres produits
explosifs ou inflammables. Ces substances resteront
incrustées dans les articles, et ceux-ci produisent des
vapeurs qui peuvent s’enflammer ou exploser.
Suivre ces précautions lors de l’utilisation de produits
nettoyants liquides, de détachants, etc. Ces produits
doivent porter la mention ininflammable. Utiliser
conformément aux directives du fabricant dans un
endroit bien aéré ou à l’extérieur. Rincer à fond les
articles à la main avant de les mettre dans la laveuse.
Certains produits - ceux qui enlèvent la rouille par
exemple - peuvent endommager les pièces et la finition
de la laveuse.
Éviter toute accumulation de matériaux combustibles, tels
que la charpie, le papier, les chiffons, l’essence et autres
vapeurs et liquides inflammables, sous la laveuse et
autour de celle-ci.
L’HYDROGÈNE EST UN GAZ EXPLOSIF ! Dans
certaines conditions, il peut y avoir production
d’hydrogène dans un système de chauffage d’eau qui
n’est pas utilisé pendant 2 semaines ou davantage. Si le
système de chauffage d’eau n’a pas été utilisé pendant
une telle durée, ouvrir tous les robinets d’eau chaude et
laisser couler l’eau pendant plusieurs minutes avant
d’utiliser la laveuse. Ceci élimine toute accumulation
d’hydrogène. Ce gaz étant inflammable, ne pas fumer ni
utiliser de flamme vive pendant cette procédure.
Des études récentes ont démontré que si les substances
contaminées d’huile végétale ne sont pas complètement
nettoyées, une accumulation d’huile peut provoquer une
réaction chimique (combustion spontanée) qui pourrait
auser un incendie. Cela risque davant
c
lorsque les vêtements sont laissés dans la sécheuse
après que le t
s sont pliés et empilés avant que la chaleur ne se
ticle
ar
soit dissipée.
ambour ait cessé de tourner ou que les
age de survenir
ATTENTION
ATTENTION – Risques ou pratiques non sûres qui
POURRAIENT résulter en blessures mineures.
17
Page 19

Importantes consignes de sécurité
AVERTISSEMENT
Pour réduire les risques d’incendie, d’explosion,
d’électrocution ou de blessures lors de l’utilisation de cet
ppareil, suivre les précautions d’usage, dont les suivantes :
a
1. Lire toutes les instructions avant d’utiliser la laveuse.
2. Comme avec tout équipement fonctionnant à l’électricité
et comportant des pièces mobiles, il existe toujours des
possibilités de danger. Pour utiliser cette machine dans
les meilleures conditions de sécurité, l’opérateur doit se
familiariser avec les instructions de fonctionnement de
l’appareil et user de prudence pendant son utilisation.
Ne pas installer ni remiser la laveuse dans un endroit
3.
où elle e
4. Installer la laveuse et la mettre de niveau sur un
plancher pouvant supporter son poids.
5. Cet appareil doit être correctement mis à la terre.
jamais
une prise murale non mise à la terre conformément aux
codes locaux et nationaux. Voir les instructions
d’installation pour la mise à la terre de cette machine.
6. Pour éviter les risques d’incendie ou d’explosion :
a.
b.
c. Dans certaines conditions, il peut y avoir production
st exposée aux intempéries.
Ne
brancher le câble électrique d’une laveuse sur
Ne pas laver d’articles qui ont auparavant été
nettoyés ou lavés à l’aide d’essence, de solvants de
nettoyage à sec ou d’autres produits explosifs ou
inflammables, ou qui en sont imbibés ou éclaboussés,
car ces substances produisent des vapeurs qui
peuvent s’enflammer ou exploser. Laver à la main et
sécher à l’air tout article contenant ces substances.
Tout tissu sur lequel des solvants de nettoyage ont
été utilisés ou qui est s
inflammables
avant que toute trace et toute vapeur de ces liquides
ou solides ne soient complètement éliminées.
Ces produits comprennent l’acétone, l’alcool
dénaturé, l’essence, le kérosène, certains produits de
nettoyage ménagers, les détachants, la térébenthine,
les cire
Ne pas ajouter d’essence, de solvants de nettoyage à
sec ou toute autre subst
explosive à l’eau de lavage. Ces substances produisent
des vapeurs qui pourraient s’enflammer ou exploser.
d’hydrogène dans un système de chauffage d’eau qui
n’est pas utilisé pendant 2 semaines ou plus.
L’HYDROGÈNE EST UN GAZ EXPLOSIF. Si le système
de chauffage d’eau n’est pas utilisé sur une telle
durée, ouvrir tous les robinets d’eau chaude et laisser
couler l’eau pendant plusieurs minutes avant d’utiliser
la laveuse ou la ensemble laveuse-sécheuse. Ceci
ne doit pas être mis dans la laveuse
s décapants de cire.
s et le
aturé de liquides ou solides
ance inflammable ou
élimine toute accumulation d’hydrogène. Ce gaz étant
nflammable, ne pasfumer ni utiliser de flamme vive
i
pendant cette procédure.
d. Ne pas laver ou sécher d’articles tachés d’huile
égétale ou de cuisson. Ces articles pourraient être
v
encore imprégnés d’huile après la lessive. Pour cette
raison, le tissu pourrait émettre des fumées ou
prendre feu de lui-même.
Ne pas mettre la main ou le bras dans la laveuse si
7.
l’agitateur ou cuve est en mouvement.
8. Ne pas permettre aux enfants ou aux animaux familiers
de jouer sur l’appareil, à l’intérieur ou en face de celuici. Une supervision étroite est nécessaire lorsque
l’appareil est utilisé à proximité d’enfants ou d’animaux
familiers.
Ne pas modifier les mécanismes de commande.
9.
Ne pas réparer ou remplacer une pièce de la laveuse
10.
ou procéder à un dépannage, sauf si les instructions
publiées le recommandent et que la personne effectuant
la réparation les comprend et possède les
connaissances voulues pour les exécuter.
11. Débrancher le cordon d’alimentation électrique avant
d’essayer de réparer la laveuse. Les réparations ne
doivent être effectuées que par du personnel qualifié.
12. Conserver tous les produits de lessive, les détergents,
les produits de blanchiment, etc., hors de portée des
enfants, et de préférence dans une armoire fermée à
clé. N’utiliser ces produits que selon les directives du
fabricant. Observer tous les avertissements paraissant
sur les étiquettes des différents produits.
13. S’assurer que toute la zone autour de la laveuse et en
dessous, soit dégagée de toute accumulation de
matériaux combustibles comme charpie, papier, chiffons,
ssence et tout autre liquide ou vapeur inflammable.
e
Ne pas mélanger de javellisant et d’ammoniaque ou
14.
s (tels que du vinaigre ou du produit pour enlever
acide
d’
la rouille) pour une même charge de linge. Des vapeurs
nocives peuvent se former.
s en fibre de verre à la laveuse. De
ticle
15. Ne pas laver d’
petites particules peuvent se coller sur le linge lavé par
la suite et provoquer des irritations cutanées.
16. Apprêts résistants aux flammes – suivre attentivement
les instructions du fabricant du vêtement. Un vêtement
incorrectement lavé ou séché pourrait perdre son apprêt
ignifuge.
7. Avant de mettre la laveuse hors service ou au rebut,
1
retirer la porte du compartiment de lavage.
Les tuyaux d’alimentation se détériorent progressivement.
18.
Inspecter les tuyaux à intervalle régulier; rechercher
dilatations, écrasements, coupures, fuites et indices
d’usure. Remplacer les tuyaux après 5 ans de service.
ar
CONSERVER CES INSTRUCTIONS
18
Page 20

Fonctionnement
ÉTAPE 1
Chargement de la laveuse
• La cuve peut être entièrement remplie de vêtements
secs, dépliés. Cependant, il ne faut pas trop remplir
la cuve.
• La surcharge peut entraîner une réduction de
l’efficacité du lavage et le risque que le linge ne
présente des plis et ne se froisse.
• Lors du lavage d’
petits ar
la cuve, comme un tapis ou deux chandails, il faut
ajouter quelque
les per
• Lors du lavage de charges extrêmement souillées, il
est très important d’éviter de surcharger la laveuse
pour assurer de bons résultats.
• Pour ajouter un article oublié, appuyer sur la touche
Start/Pause (Mise en marche/Pause), ajouter
l’article, fermer la porte et appuyer sur la touche
Start/Pause encore. Après 15 à 30 secondes, la
laveuse reprend son fonctionnement.
Remarque : Pour que les articles ajoutés
puissent être lavés, ne pas attendre plus de cinq
minutes après le début du cycle pour les ajouter
à la charge.
ticles qui ne remplissent pas complètement
formances de culbutage et d’essorage.
articles volumineux ou de quelque
s serviettes de toilette pour améliorer
ÉTAPE 2
Sélection de textiles
Appuyer sur la touche correspondant au type de linge.
Ceci détermine le modèle du culbutage/pause et la
vitesse d’essorage du cycle.
Remarque :
choisir le réglage Wrinkle Free (Infroissables).
s
Tissus Description
Normal
(Normale)
Wrinkle Free
(Infroissables)
Hand Wash
avage manuel
L
(
Pour réduire le froissement du linge,
Mode de culbut
essorage à vite
pour les serviettes, jeans, draps, linge
de maison, sousvêtements, t-shirts.
Mode de culbut
essorage réduits, pour diminuer le
d’
froissement. Utiliser pour les
chemises/pantalons habillés,
vêtements infroissables, vêtements
de polyester/coton.
Périodes en alternance de trempage
de durée cour
vitesse d’essorage lente. Utiliser pour
)
les articles nécessitant un lavage
manuel.
age normal et
sse élevée. Utiliser
age et vitesse
te et longue et de
Utilisation d’eau
a quantité d’
L
laveuse utilise une soupape de remplissage adaptative
qui fournit la quantité d’eau appropriée pour un
nettoyage efficace et une conservation optimale d’eau
et d’énergie. La durée de remplissage varie selon la
ssion de l’
pre
19
eau utilisée varie avec chaque charge. L
eau.
Cycles spéciaux
a
Cycles Description
Rinse & Spin
(Essorage et
rinçage)
Spin (Essorage) P
Choisir ce réglage pour rincer
seulement puis essorer.
ssorage seulement.
our actions d’
e
Page 21

Fonctionnement
ÉTAPE 3
Sélection de température de
lavage/eau de rinçage
Appuyer sur la flèche appropriée ou pour
sélectionner les températures de l’eau de lavage et de
l’eau de rinçage. Suivre l’étiquette sur l’entretien du
vêtement et le tableau ci-dessous pour obtenir de
meilleurs résultats.
Temp. Description
Hot/Cold
(Chaude/Froide)
Warm/Warm
(Tiède/Tiède)
Warm/Cold
(Tiède/Froide)
Cold/Cold
(Froide/Froide)
Blancs et articles couleurs grand
teint très sales.
Articles couleurs grand teint.
Lorsque le rinçage tiède est
sélectionné, seul le troisième rinçage
sera tiède. Le premier et le second
rinçage seront à l’eau froide afin de
conserver de l’énergie.
Articles grand teint modérément
sales ; la majorité des articles
infroissables.
Articles de couleur vive, légèrement
sales ; lainages lavables.
ÉTAPE 4
Selection du niveau de salissure
Appuyer sur la touche appropriée pour obtenir l’option
niveau de saleté/durée de lavage.
eau de
Niv
salissure
Heavy Soil
(Très sale)
Normal Soil
(Normalement
sale)
Light Soil
(Peu sale)
Quick
(Rapide)
Utiliser pour le lavage du linge très
sale.
Utiliser pour le lavage de linge
modérément sale. Ce réglage convient à
la majorité du linge.
Utiliser pour le linge légèrement sale.
Ce réglage offre un c
réduit. Les emplois suggérés
comprennent le rafraîchissement de
vêtement
préalablement rangés.
Description
ycle à temps
s neufs ou de vêtement
s
ÉTAPE 5
Sélection des options
Appuyer sur la ou les touche(s) appropriée(s) pour
obtenir une ou plusieurs options.
Presoak (Prétrempage) – Ajoute 15 minutes à la plupart
des trempages avec un culbutage minimal avant de
passer au cycle normale. Peut être sélectionné avec
n’importe lequel des cycles.
Extra Rinse (Rinçage supplémentaire) – Quatrième
rinçage à la fin du cycle pour un enlèvement plus
complet des additifs et parfums.
Max Extract (Extraction maximale) – S’utilise pour les
jeans, serviettes et literie. Enlève plus d’eau du linge
pendant l’essorage.
Remarque : Pour minimiser le froissement des textiles
infroissables, il n’est pas recommandé de choisir
l’option Max Extract.
Ne pas surcharger la laveuse.
ÉTAPE 6
Mise en marche de votre
laveuse
Fermer la porte.
1.
2. Mettre détergent et additifs dans le distributeur
(voir page 23 et 24).
3. Appuyer sur
• Lorsque la laveuse redémarre après un arrêt, il y
a un délai de 3
ne continue.
En appuyant sur
•
annulé et la laveuse s’
Remarque : Une fois le cycle terminé, le témoin door
locked (porte verrouillée) s’éteint. On peut alors ouvrir
la por
te.
témoin door locked est allumé. Pour ajouter un article
oublié, voir page 19.
Start/Pause (Mise en marche/Pause).
0 seconde
Off (arrêt),
Ne
pasessayer d’ouvrir la porte quand le
s avant que le cycle
le cycle est
arrête.
20
Page 22

Fonctionnement
Témoins lumineux
Door Locked (Porter verrouillée) – Ce témoin s’allume
lorsque la porte de la laveuse est
verrouillée. La porte peut être
déverrouillée en appuyant sur
Start/Pause (Mise en
marche/Pause) pour arrêter la
laveuse.
Témoins lumineux de touches –
Les témoins lumineux se trouvant
au-dessus des touches s’allument
si l’on appuie sur les touches.
Nettoyage et entretien
Affichage de la durée de
lavage estimée
Après avoir appuyé sur
Start/Pause, l’afficheur montrera la
durée restante du cycle. La durée
estimée restante peut varier pour
mieux refléter la durée de lavage
restant dans le cycle.
Nettoyage de exterior
1. Fermer les robinets d’eau après avoir terminé la
lessive de la journée. Ceci stoppe l’arrivée d’eau à
la laveuse et empêche le risque peu probable de fuite
d’eau. Laissez la porte ouverte pour permettre à
l’intérieur de la laveuse de sécher.
2. L’agent de blanchiment, le détergent, les solvants, etc.
renversés sur le dessus de la laveuse qui ne sont pas
bien nettoyés feront disparaître le fini lustré. Essuyez
tout produit renversé avec un linge doux et humide.
3. Vérifier les boyaux pour s’assurer qu’il n’y a pas de
noeuds ou d’entortillements.
4. Nettoyer les pièces suivantes ainsi :
Tableau de commande - Nettoyer avev un linge
souple et humide. Ne pas utiliser de poudres
abrasives ni de tampons de nettoyage. Ne pas
pulvériser directement sur le tableau de commande
de produits de nettoyage.
Caisse - Nettoyer à l’
5. Une lubrification à vie est effectuée à l’usine ; la
laveuse ne nécessite donc aucune huile ou graisse.
6.
Ne pas déposer d’articles lourds ou tranchants sur le
dessus de la laveuse.
7. Le dessus de la laveuse
acher le
dét
rouille, entre autres, abîmeront le fini.
8. Enlever les épingles, les ceintures et autres objets
tranchant
égratignures sur les parties intérieures.
9. Les vêtements
laveuse.
Si vous fermez votre maison durant l’hiver, demandez
10.
à un technicien de vider l’eau de la laveuse.
Débrancher le cordon d’
21
courant et les boyaux des robinets.
s vêtement
s vêtement
s de
eau et au s
ne doit pas être utilisé pour
s. Certains détachants, pour la
s afin de prévenir les
ne doivent pas être rangés dans la
aliment
avon.
ation de la prise de
Nettoyage de l’intérieur
Nettoyez l’intérieur de la laveuse périodiquement pour
enlever la poussière, la saleté, les odeurs, la moisissure, les
résidus de moisissure ou de bactéries qui peuvent rester
dans la laveuse après le lavage des vêtements. Nous
recommandons de suivre les étapes suivantes tous les 60 à
120 jours pour nettoyer et rafraîchir l’intérieur de la laveuse.
La fréquence à laquelle la laveuse doit être nettoyée et
rafraîchie dépend de facteurs tels qu’utilisation, quantité
de saleté ou bactéries passant par la laveuse, ou encore
l’utilisation d’eau froide.
peut entraîner des conditions insatisfaisantes, incluant de
mauvaises odeurs et/ou des taches permanentes sur la
laveuse ou sur la lessive.
Nettoy
1.
2.
3. Remplir le distributeur d’agent de blanchiment avec le
4. Faire à la laveuse un cycle complet avec de l’eau très
5.
Les dépôts dus à l’eau dure peuvent être enlevés si
besoin est, à l’aide d’un produit de nettoyage
recommandé portant l’étiquette sans danger pour
laveuse.
age de l’intérieur :
réparer une solution de 25
P
ant et de 500 mL (2 tasses) d'eau tiède. Faire
javellis
attention à ne pas renverser ou éclabousser la
solution de javellis
Essuyer la par
cette solution de javellisant et un linge souple.
javellisant.
chaude.
Répéter au besoin le cycle de lavage.
tie inférieure du joint de porte gris avec
Le non-respect de ces directives
0 mL (1 t
ant.
asse) de
Page 23

Nettoyage et entretien
Nettoyage du distributeur
Le distributeur peut devoir être nettoyé de temps à
autre par suite d’accumulation de produits de lessive.
Pour faciliter ce nettoyage, saisir le contenant à deux
compartiments amovibles (pour agent de blanchiment
et assouplissant) comme il est illustré sur la figure 1.
En soulevant le contenant, le pencher légèrement vers
l’intérieur comme sur l’illustration 2 et le retirer du
distributeur principal.
Une fois que le contenant à deux compartiments est
retiré du distributeur principal, le mettre dans un évier.
Suivre l’illustration 3 pour retirer le couvercle
recouvrant le tube de siphon pour l’assouplissant et
l’agent de blanchiment. Faire couler de l’eau tiède et à
l’aide d’un linge ou d’une brosse souple, retirer les
produits de lessive des deux compartiments.
Nettoyer la zone du distributeur principal à l’aide d’eau
et d’un linge souple. Une fois le distributeur principal
propre, suivre les illustrations dans l’ordre inverse pour
remettre le contenant à deux compartiments à son
emplacement d’origine.
1
2
Remarque : Ne pas utiliser de produits de
nettoyage mais seulement de l’eau dans le
distributeur principal. Les produits de nettoyage
pourraient s’écouler dans la cuve. Si cela se
produisait, régler la laveuse pour un cycle de
rinçage et essorage afin de retirer les produits de
nettoyage de la laveuse avant de faire une lessive.
3
22
Page 24

Caractéristiques spéciales
Détergent
La laveuse est conçue pour utiliser des
détergents de grande efficacité (HE) ou
des détergents ordinaires, normalement
utilisés avec les laveuses à chargement
par le haut.
• Pour de meilleurs résultats, utiliser un détergent de
grande efficacité comme Tide HE ou Wisk HE*. Les
détergents de grande efficacité contiennent des
produits anti-mousse qui réduisent ou éliminent la
mousse. Avec moins de mousse produite, la charge
culbute de façon plus efficace et les résultats de
nettoyage sont maximisés.
• Lors de l’emploi d’un détergent ordinaire, pour
laveuses à chargement par le haut, il est important
de faire très attention au degré de saleté de la
charge, à son volume et à la dureté de l’eau**.
Pour éviter trop de mousse, réduire la quantité
de détergent utilisée avec l’eau douce ou avec
de petites charges ou charges moins sales.
Compartiment de Détergent
1. Verser la quantité recommandée le détergent à
lessive directement dans le compartiment appro
prié avant de mettre en marche la laveuse ou
lorsque la laveuse se remplit.
2. Si un agent de blanchiment sans danger pour
les couleurs est utilisé, il faut l’ajouter avec le d
étergent au compartiment du détergent pour
obtenir les meilleurs résultats.
• Lors de l’addition au détergent de produit de
blanchiment sans danger pour les couleurs, il est
préférable que
forme, en poudre ou liquide.
les deux produits aient la même
* Marques de commerce des fabricants respectifs.
** Pour déterminer la dureté de l’eau dans la région, prendre
contact avec le service local des eaux.
Distributeur Automatique
Le distributeur automatique comprend trois
compartiments qui contiennent 1) du détergent liquide
ou en poudre et de l’
danger pour les couleurs, 2) de l’agent de blanchiment
chloré liquide et 3) de l’assouplissant liquide pour
s produit
tissus. T
en même temps dans leurs compar
Ils seront libérés au moment approprié pour assurer le
nettoyage le plus efficace.
Après avoir rempli le distributeur des différents
produits, fermer le couvercle du distributeur.
ous le
agent de blanchiment s
s de le
ssive peuvent être ajoutés
timent
ans
s respectifs.
Plateau pour ustensiles variés
Un plateau très pratique pour de
trouve sur le côté droit de la console. Il peut également
accueillir des détachants en flacon pulvérisateur pour
un accès plus facile.
s petits articles se
Plateau
23
Page 25

Caractéristiques spéciales
B
L
E
A
C
H
S
O
F
T
E
N
E
R
M
A
X
L
I
N
E
M
A
X
L
I
N
E
Compartiment d’agent
de Blanchiment
(Agent de blanchiment chloré liquide seulement)
1. Ajouter l’agent de blanchiment chloré liquide dans
le compartiment approprié.
repère de remplissage maximum MAX FILL. Le
compartiment d’agent de blanchiment chloré
contient 3/4 de tasse.
2. Éviter d’éclabousser ou de trop remplir le
compartiment.
Si l’on remplit trop le
compartiment, il libérera du produit chloré
liquide dans la laveuse trop précocement.
3. La laveuse libère automatiquement de l’agent de
blanchiment dans la cuve lorsqu’il ne reste
qu’environ deux minute
cycle.
4. Le distributeur dilue automatiquement l’agent de
blanchiment chloré liquide avant qu’il atteigne
le linge.
Remarques :
• Ne jamais verser de l’
chloré liquide directement sur les vêtements ou
dans la cuve. C’est un produit chimique
puissant qui peut endommager le
affaiblir les fibres ou atténuer les couleurs s’il
n’est pas utilisé correctement.
Ne pas dépasser le
s dans la partie lavage du
agent de blanchiment
s tissus,
Compartiment d’assouplissant
1. Verser la quantité recommandée d’assouplissant
liquide dans le compartiment approprié. Pour des
charges plus petites, utiliser moins d’un capuchon.
2. L’assouplissant doit être dilué avec de l’eau tiède
jusqu’à atteindre la ligne MAX FILL du
compartiment.
ligne. Ne pas remplir le compartiment
d’assouplissant pour tissus au-dessus de la
ligne MAX FILL. Si tel était le cas,
l’assouplissant entrerait trop tôt dans la
laveuse.
3. Ce compartiment librère automatiquement
assouplissant liquide au bon moment pendant le
l’
rinçage.
Remarques :
• Utiliser le compartiment d’assouplissant
seulement avec des assouplissant
• L’utilisation d’une Downy Ball* n’
recommandée avec cette laveuse. Elle
n’ajoutera pas de l’assouplissant au bon
moment. Se servir du distributeur sur le dessus
de la laveuse.
Ne pas remplir au-dessus de cette
s liquide
s.
est pas
on préfère utiliser un agent de blanchiment
• Si l’
non chloré, s
ans danger pour le
l’ajouter au compartiment de détergent.
verser de produit de blanchiment sans
danger pour les couleurs dans le
compartiment réservé à l’agent de
blanchiment.
s couleurs,
Ne pas
* Noms de marque
s déposée
s de
s fabric
ant
s re
spectifs.
24
Page 26

Rangement de la Laveuse
Les laveuses peuvent subir des dommages si l’eau
n’est pas retirée des tuyaux et des composants
internes avant le remisage. Préparer la laveuse avant
de la ranger, comme suit :
• Choisir le réglage
(Rapide) et ajouter une tasse d’agent de
blanchiment au distributeur de détergent sans
mettre de vêtements dans la cuve. Faire faire un
cycle complet à la laveuse.
• Fermer les robinets d’eau et débrancher les tuyaux
d’arrivée.
Normal (Normale) et Quick
Inversion de la Porte de la Laveuse
Le sens d’ouverture de la porte de la laveuse peut
être changé ainsi :
1) Ouvrir grand la porte et la soutenir tout en enlevant
les quatre vis de charnière (retenant les charnières
à l’ensemble de porte).
2) Déplacer la porte sur une surface de travail et
transférer le
opposé de l’ensemble de porte.
3) Retirer une vis retenant la charnière supérieure à la
caisse et une vis retenant le couvre-charnière
supérieur à la caisse (de l’autre côté).
4) Retirer la charnière et le support de la caisse en les
déplaçant de haut en bas pour les dégager.
5) Installer la charnière et le support aux nouveaux
endroits et enfoncer des vis pour bien les fixer à la
caisse.
s quatre vis de même couleur au côté
• Débrancher la laveuse de l’alimentation électrique et
laisser la porte de la laveuse ouverte pour laisser
l’air circuler à l’intérieur.
• Si la laveuse a été remisée à des températures
inférieures au gel, attendre que l’eau congelée à
l’intérieur fonde avant d’utiliser la laveuse.
Pour obtenir des informations sur le remisage ou le
rangement à long terme de la laveuse lors de
températures extrêmement froides,
contacter le service-client au numéro
sans frais 1-800-688-2002.
6) Comparer la charnière supérieure et le suppor
supérieur à la charnière inférieure et au support
inférieur pour bien positionner l’ensemble de
charnière.
Répéter les étape
7)
inférieure à la caisse et le support inférieur à la
caisse.
Soutenir la porte en position grande ouver
8)
côté charnières et enfoncer quatre vis pour bien
fixer les charnières à l’ensemble de porte.
ermer la por
F
9)
correctement.
s 4 à 6 pour fixer la charnière
te et vérifier que la laveuse fonctionne
t
te du
25
Page 27

Recherche des pannes
Linge trop mouillé à la
fin du cycle
Fuites d’eau
Pas d’essorage ni
vidange
Utiliser l’option d’essorage extraction maximale Max Extract (Extraction maximale).
•
• Essayer un détergent à haute efficacité, qui réduit la mousse.
• La charge est trop peu volumineuse. Des charges très petites (un ou deux articles) peuvent
être déséquilibrées et ne pas s’essorer complètement.
S’assurer que la porte est parfaitement fermée.
•
• S’assurer que les raccordements de tuyau sont bien serrés.
• S’assurer que l’extrémité du tuyau de vidange est bien introduite et fixée aux installations de
vidange.
• Éviter de surcharger la laveuse.
• Utiliser un détergent à haute efficacité pour minimiser la mousse.
• Vérifier les fusibles ou réenclencher le coupe-circuit.
• Redresser les tuyaux de vidange. Éliminer les tuyaux entortillés. S’il y a engorgement,
appeler le service après-vente.
• Fermer la porte et appuyer sur la touche
raisons de sécurité, la laveuse ne culbute ni n’essore tant que la porte n’est pas fermée.
• Après avoir appuyé sur la touche
laveuse ne se mette à essorer. La porte doit être verrouillée pour que l’essorage ait lieu.
• Voir « Cuve pleine de mousse » ci-dessous.
Start/Pause, il faut attendre 30 secondes avant que la
Start/Pause (Mise en marche/Pause). Pour des
Arrêts
Cuve pleine de mousse
Remplissage av
l’eau à température
incorrecte
ec de
• Brancher le cordon dans une prise électrique sous tension.
• Vérifier les fusibles ou réenclencher le coupe-circuit.
• Fermer la porte et appuyer sur la touche
laveuse ne culbute ni n’essore tant que la porte n’est pas fermée.
• Il peut y avoir un arrêt ou une période de trempage au cours du cycle. Attendre un peu et la
laveuse se remet en marche.
• Inspecter les tamis des tuyaux d’alimentation au niveau des robinets. Nettoyer les tamis
périodiquement.
• Faire faire à la laveuse un autre cycle complet à l’eau froide.
• Réduire la quantité de détergent pour une charge de linge semblable (quantité, niveau de
salissage et dureté de l’eau).
• Utiliser un détergent à haute efficacité ou peu moussant, spécial pour les laveuses à
chargement par l’avant.
Ouvrir à fond les deux robinets.
•
• S’assurer que l’on a bien choisi la température de l’
• S’assurer que les tuyaux sont branchés aux bons robinets. Rincer la canalisation d’eau.
• Vérifier le chauffe-eau. Il doit pouvoir produire une eau chaude d’au minimum 49° C (120 °F)
au robinet. Vérifier aussi le débit du chauffe-eau et son rendement.
• Débrancher les tuyaux et nettoyer les tamis. Les tamis des tuyaux peuvent être colmatés.
• Lorsqu’on a sélectionné un rinçage à l’eau tiède, l’eau tiède n’est utilisée que pour le rinçage
final. Les deux premiers rinçages sont à l’eau froide.
• Durant le remplissage de la laveuse, la température de l’eau peut être changée par la
commande de température automatique qui vérifie la température de l’eau d’arrivée. Ceci
est normal.
• Lorsque la laveuse se remplit, on peut remarquer que seulement de l’eau froide ou trés
chaude traverse le distributeur lorsque des températures de lavage froide ou tiéde ont été
choisies. Ceci est normal pour cette commande de température automatique étant donné
que la laveuse établit la température de l’eau.
Start/Pause. Pour des raisons de sécurité, la
eau.
26
Page 28

Recherche des pannes
as de remplissage
P
S’assurer que la porte est bien fermeé
•
• Brancher le cordon électrique dans une prise sous tension.
• Vérifier les fusibles ou réenclencher le coupe-circuit.
• Appuyer sur la touche
• Ouvrir les deux robinets à fond.
Redresser les tuyaux d’entrée.
•
• Débrancher les tuyaux et nettoyer les tamis ; ils risquent d’être colmatés.
• Ouvrir et fermer la porte, puis appuyer sur la touche Start/Pause.
Start/Pause (Mise en marche/Pause).
Pas de culbutage
Porte fermée, ne
s’ouvre pas
Rafraîchissement de la
laveuse
Laveuse bruyante
• Vérifier les fusibles ou réenclencher le coupe-circuit.
• Ouvrir et fermer la porte, puis appuyer sur la touche Start/Pause. Pour des raisons de
sécurité, la laveuse ne culbute ni n’essore tant que la porte n’est pas fermée.
• Appuyer sur la touche
• Il faut attendre quelques instants pour que le mécanisme de verrouillage de la porte se
libère.
• Voir Nettoyage de l’intérieur, page 21.
• Veiller à ce que la laveuse soit parfaitement d’aplomb conformément aux instructions
d’installation.
• Vérifier que les écrous des pieds sont bien serrés.
• Vérifier que les patins de caoutchouc sont installés sous les pieds.
• Un plancher insuffisamment ferme peut provoquer des vibrations et le déplacement de la
laveuse.
• Pour obtenir des renseignements sur les bruits de fonctionnement normaux, voir page 29.
Pour toute assistance technique, communiquer avec,
Service à la clientèle : au Canada : 1-800-688-2002.
Start/Pause pour arrêter la laveuse.
27
Page 29

Recherche des pannes
Codes d’aide
Les codes d’aide peuvent être affichés pour aider à mieux comprendre ce qui se passe dans la laveuse.
Symbole
du code Signification Solution
Mode diagnostic
La laveuse détecte que la porte est ouverte
au démarrage d’un cycle ou que la porte ne
se verrouille pas.
La laveuse n’a pas verrouillé la porte.
Un excès de mousse s’est produit. Si ce code
disparaît, le cycle spécial mousse s’est
déroulé avec succès.
La laveuse a connu une panne d’électricité.
La laveuse a connu des difficultés
d’évacuation.
La laveuse a essayé à plusieurs reprises de
déverrouiller la por
te, mais sans succès.
Appuyez sur le bouton
le cycle.
Bien fermer la porte et redémarrer le cycle.
Bien fermer la porte et redémarrer le cycle.
Réduire la quantité de détergent utilisé pour
cette charge particulière.
Relancer le cycle. Si le code reste affiché,
vérifier que la fiche du cordon électrique est bien
branchée.
Vérifier qu’aucun tuyau de vidange n’est
entortillé.
Vérifier que le tuyau vertical n’est pas engorgé.
S’assurer que la porte est bien fermée. Appuyer
sur le bouton
la porte se déverrouille.
Débrancher la laveuse pendant deux minutes et
la rebrancher.
Off et attendre deux minutes que
Off (Arrêt) et redémarrez
OU
Le moteur ne fonctionne pas correctement.
La laveuse a essayé de se remplir mais le
niveau d'eau approprié n'a pas été atteint.
La porte de la laveuse doit être ouverte.
our tout code non énuméré ci-dessus,
P
Appeler le service après-vente. Voir ci-dessous.
S’assurer que les robinets d’eau sont ouverts à
fond.
Vérifier qu’il n’y a pas de tuyau entortillé.
Vérifier les tamis d'arrivée des tuyaux de
remplissage.
est une caractéristique de sécurité. La porte
C’
doit être ouver
en marche.
contacter sans fr
service-client au 1-800-688-2002.
te avant qu’un autre c
ais le
ycle soit mis
28
Page 30

Recherche des pannes
Bruits de fonctionnment
Son aigu durant un essorage.
Son d’évacuation d’eau provenant
de la zone du distributeur.
Son de clapotement d’eau lors
d’une rotation de la cuve dans la
machine arrêtée.
Bruissement de rotation ou
clapotement suivi d’une pause,
répété lors du cycle de lavage.
Légère réduction de la vitesse
d’essorage après l’atteinte d’une vitesse
plus élevée.
Accélération du moteur pour l’essorage de la charge.
Introduction du détergent dans la cuve au début du cycle. L’agent de
blanchiment est ensuite introduit durant les dernières minutes du lavage.
L’assouplissant est introduit durant le troisième rinçage, alors que la machine
se remplit.
La couronne d’équilibrage autour de la cuve contient un liquide. Ceci permet
un fonctionnement plus régulier.
La cuve tourne dans une direction, puis fait une pause. Elle tourne ensuite
dans l’autre direction, puis fait une pause. Ceci se répète pendant tout le
cycle.
Après avoir atteint la vitesse d’essorage maximale, la machine peut
légèrement réduire cette vitesse pour obtenir une performance maximale.
Réduction considérable de la vitesse
d’essorage avec une charge qui
semble déséquilibrée.
Addition d’eau
prolongée de culbutage.
Cliquetis/bruits de vidange lorsque
la laveuse a débuté son cycle.
après une période
La cuve accélère jusqu’à sa vitesse maximale, puis ralentit pour permettre
une redistribution du linge si la charge n’est pas parfaitement équilibrée.
La laveuse utilise un système de remplissage adaptatif. De l’eau est ajoutée
durant le c
De l’
et l’introduction de l’agent de blanchiment ou de l’assouplissant. Ceci se
produit même si l’on n’a pas utilisé d’agent de blanchiment ou
assouplissant.
d’
vant que la laveuse ne commence à se remplir
A
cliquetis pour vérifier le verrouillage de la porte et effectuer une brève
vidange.
ycle de lavage, selon le be
eau passe à travers le distributeur à l’inst
soin.
U
O
ant approprié pour la dilution
, elle fait une série de
29
Page 31

Recherche des pannes
Questions et réponses
. Quel est le meilleur cycle à utiliser si mon linge est taché?
Q
électionner Presoak (Prétrempage), la durée de lavage Heavy Soil (Trés sale) voir les page 20. Prétraiter les taches
R.S
avec un produit de prétraitement.
Q. Quelle est la quantité maximale de linge que je peux laver dans ma laveuse ?
R. On peut remplir complètement la cuve de linge sec non plié. Cependant, ne pas tasser. Si le linge est très sale, il est
très important de ne pas charger excessivement la laveuse.
Q. À la fin du cycle, le linge semble être plus mouillé qu’à l’habitude. Pourquoi?
R. Il est possible que la machine ait eu de la difficulté à atteindre la vitesse d’essorage et de culbutage parce que la
charge n’était pas répartie uniformément. Ceci peut se produire avec une petite charge, des articles volumineux, ou si
on a utilisé trop de détergent, ce qui a provoqué un excès de mousse.
Q. Mon linge semble très froissé à la fin du cycle. Comment éliminer le problème?
Le froissement du linge est dû à l’effet combiné de la chaleur et de la pression. Veiller à utiliser le cycle Wrinkle Free
R.
(Infroissables) avec un rinçage à l’eau froide pour les tissus à pressage permanent ou infroissables. (Voir page 20
Températures de Lavage/Rinçage.) NE PAS UTILISER MAX EXTRACT (L’EXTRACTION MAXIMALE) POUR
L’ESSORAGE
.
Q. Je ne suis pas satisfait(e) de l’éclat de mes blancs. Que puis-je faire?
R. Sélectionnez Normal (Normale) pour laver les blancs. Choisissez les températures Chaude/Froide (Lavage/Rinçage)
et versez ? tasse d’agent de blanchiment dans le distributeur. Pour une performance optimale, l’agent de blanchiment
sera distribué au moment approprié durant le cycle de lavage. Recommande le lavage à l’eau chaude, à une
température de 49 à 60° C (120 à 140° F).
30
Page 32

Garantie et service après-vente
Garantie
Garantie limitée d’un an pièces et main-d’œuvre
Durant une période d’un (1) an à
compter de la date de l’achat initial,
toute pièce qui se révélerait défectueuse
dans les conditions normales d’usage
ménager sera réparée ou remplacée
gratuitement.
Résidents du Canada
Les garanties ci-dessus couvrent un
appareil installé au Canada seulement
s’il a été agréé par les agences de test
habilitées (vérification de la conformité
à une norme nationale du Canada), sauf
si l’appareil a été introduit au Canada à
l’occasion d’un changement de
résidence des États-Unis vers le
Canada.
Les garanties spécifiques formulées
ci-dessus sont les SEULES que le
fabricant accorde. Ces garanties vous
confèrent des droits juridiques
spécifiques et vous pouvez également
jouir d’autres droits, variables d’un État à
l’autre ou d’une province à l’autre.
LE SEUL ET UNIQUE RECOURS DU CLIENT EN
VERTU DE CETTE GARANTIE LIMITÉE EST LA
RÉPARATION DU PRODUIT COMME DÉCRITE
PRÉCÉDEMMENT. LES GARANTIES
IMPLICITES, Y COMPRIS LES GARANTIES DE
QUALITÉ MARCHANDE OU D’ADAPTATION À
N USAGE PARTICULIER, SONT LIMITÉES À
U
N AN OU À LA PÉRIODE LA PLUS COURTE
U
PERMISE PAR LA LOI. MAYTAG CORPORATION
NE SERA PAS TENUE RESPONSABLE DES
MMAGES DIRECTS OU INDIRECTS.
O
D
CERTAINS ÉTATS ET CERTAINES PROVINCES
INTERDISENT L’EXCLUSION ET LA LIMITATION
DES DOMMAGES DIRECTS OU INDIRECTS
AINSI QUE LES LIMITATIONS SUR LA DURÉE
DES GARANTIES IMPLICITES DE QUALITÉ
MARCHANDE OU D’ADAPTATION À UN
USAGE PARTICULIER. IL EST DONC POSSIBLE
QUE CES LIMITATIONS NE S’APPLIQUENT PAS
À VOUS. CETTE GARANTIE VOUS CONFÈRE
DES DROITS JURIDIQUES SPÉCIFIQUES ET IL
SE PEUT QUE VOUS AYIEZ D’AUTRES DROITS,
QUI VARIENT D’UN ÉTAT À L’AUTRE OU D’UNE
PROVINCE À L’AUTRE.
Ne sont pas couverts par ces garanties
. Les problèmes et dommages résultant des situations suivantes :
1
. Mise en service, livraison ou entretien effectués incorrectement.
a
b. Toute réparation, modification, altération et tout réglage non autorisés par le
fabricant ou par un prestataire de service après-vente agréé.
c. Mauvais emploi, emploi abusif, accidents, usage non raisonnable, ou
catastrophe naturelle.
d. Courant électrique, tension, alimentation électrique ou en gaz incorrects.
e. Réglage incorrect d’une commande.
2. Les garanties ne peuvent être honorées si les numéros de série d’origine ont
été enlevés, modifiés ou ne sont pas facilement lisibles.
3. Ampoules, filtres à eau et filtres à air.
4. Les produits achetés à des fins commerciales ou industrielles.
5. Les frais de dépannage ou de visite pour :
a. Correction d’erreurs de mise en service. Pour les produits nécessitant une
ventilation, un conduit métallique rigide doit être utilisé.
b. Initiation de l’utilisateur à l’emploi de l’appareil.
c. Transport de l’appareil chez le réparateur et retour de l’appareil chez
l’utilisateur.
6. Tout aliment perdu en raison de pannes du réfrigérateur ou du congélateur.
7. Dépenses de déplacement et de transport pour la réparation du produit dans
des endroits éloignés.
8. Cette garantie n’est pas valide à l’extérieur des États-Unis et du Canada.
Communiquez avec votre détaillant pour savoir si une autre garantie
s’applique.
9. Dommages indirects ou accessoires subis par toute personne à la suite d'une
quelconque violation des garanties. Certains États ou provinces ne permettent
pas l’exclusion ou la limitation de responsabilité en ce qui
concerne les dommages directs ou indirects. L’exclusion ci-dessus peut en
conséquence ne pas s'appliquer à votre cas.
Si vous avez besoin d’aide
Consultez d’
entretien, puis appelez le détaillant de qui vous avez acheté votre appareil ou le
d’
service à la clientèle de Maytag Services, LLC au 1-800-688-9900 aux États-Unis
et au 1-800-688-2002 au Canada pour savoir où trouver un réparateur autorisé.
eillez à conserver la facture d’
• V
garantie. Pour d’
propriétaire à l’égard du service sous garantie, voir le texte de la GARANTIE.
• Si le détaillant ou l’agence de service après-vente ne peut résoudre le
problème, écrivez à Maytag Services, LLC à l’adresse suivante : CAIR
Center, P.O. Box 2370, Cleveland, TN 37320-2370 États-Unis, ou appelez au
1-800-688-9900 aux États-Unis ou au 1-800-688-2002 au Canada.
• Les guides d’utilisation, les manuels de service et les renseignements sur
les pièces sont disponibles auprès du service à la clientèle de Maytag
Services, LLC.
Remarques : Veillez à fournir l’information suivante lorsque vous communiquez
avec nous au sujet d’un problème
a.
b. Numéro de modèle et numéro de série de l’appareil;
c. Nom et adresse du détaillant avec la date l’appareil acheté;
d.
e. Preuve d’achat (facture de vente).
abord la section sur le dépannage dans le manuel d’utilisation et
achat pour justifier de la validité de la
autres renseignements concernant les responsabilités du
:
os nom, adre
V
scription dét
De
sse et numéro de téléphone;
aillée du problème observé;
®
31
Page 33

CAH-1
Alta Efucuencia
Lavadora
Guía de Uso y Cuidado
Tabla de materias
Instrucciones importantes
de seguridad . . . . . . . . . . . . . . .33-34
Sugerencias para
la operación . . . . . . . . . . . . . . . 35-3
Cuidado y limpieza . . . . . . . . . 37-38
Caracteristicas especiales . . 39-40
Almacenamiento de
la lavadora . . . . . . . . . . . . . . . . . . . 41
Inversión de la puerta
de la lavadora . . . . . . . . . . . . . . . . 41
7
Localización y solución
de averías . . . . . . . . . . . . . . . . 42-46
Garantía y servicio . . .última página
Page 34

Instrucciones importantes de seguridad
Instalador: Deje esta guía con el electrodoméstico.
Cliente: Lea y conserve esta guía para futuras
eferencias. Conserve el recibo de compra y/o el cheque
r
cancelado como comprobante de compra.
Número de modelo ________________________________
Número de serie___________________________________
Fecha de compra __________________________________
Si desea obtener más información llame a:
Asistencia al Cliente
1-800-688-9900 EE.UU.
1-800-6887-2002 Canadá
Internet: http://www.mayt
En nuestro esfuerzo continuo para mejorar la calidad y el
rendimiento de nuestros productos, puede ser necesario
hacer cambios a este electrodoméstico sin necesidad de
revisar esta guía.
Si desea obtener más información sobre el servicio,
consulte la página última.
ag.com
Ahora debe conocer las
instruccioens de seguridad
Las advertencias y las instrucciones importantes de
seguridad que aparecen en esta guía no tienen el propósito
de cubrir todas las condiciones posibles que podrían ocurrir.
Debe usarsé sentido común, precaución y cuidado cuando
se instale, se presente maintenimiemto o se opere el
electrodoméstico.
Siempre comuníquese con el fabricante para los asuntos
relacionados con problemas o condiciones que no entienda.
¡ADVERTENCIA! RIESGO DE INCENDIO
No añada al agua de lavado gasolina, solventes de
limpieza en seco, ni otras sustancias inflamables o
explosivas. Estas sustancias desprenden vapores que se
odrían inflamar o explotar.
p
No lave artículos previamente limpiados, lavados,
sumergidos o manchados con gasolina, solventes de
limpieza en seco, aceite, ceras, solventes químicos,
alcohol, trementina u otros materiales inflamables o
explosivos. Estas sustancias quedan retenidas en los
artículos y es posible que desprendan vapores que se
pueden inflamar o explotar.
Observe estas precauciones cuando utilice líquidos de
limpieza, productos para quitar manchas, etc. Estos
productos deben estar clasificados como “no
inflamables”. Utilícelos de acuerdo con las instrucciones
del fabricante en un área bien ventilada o al aire libre.
Enjuague minuciosamente a mano las prendas que
contengan estas sustancias antes de ponerlas en la
lavadora. Algunos de estos productos, por ejemplo los
productos para quitar manchas de óxido, dañarán los
componentes y el acabado de la lavadora.
Mantenga el área alrededor y debajo de la lavadora libre
de materiales combustibles tales como pelusa, papel,
trapos, gasolina y otros vapores y líquidos inflamables.
¡EL HIDRÓGENO GASEOSO ES EXPLOSIVO! Bajo
ciertas condiciones, en un sistema de agua caliente que
no se ha usado durante dos semanas o más tiempo se
puede producir hidrógeno gaseoso. Si el sistema de agua
caliente no se ha usado durante ese período, antes de
usar la lavadora abra todos los grifos de agua caliente
durante varios minutos. Esto permitirá la liberación del
hidrógeno gaseoso que se pudiese haber acumulado.
Debido a que este gas es inflamable, cuando realice este
procedimiento no fume ni use una llama abierta.
Reconozca los símbolos de seguridad,
advertencias, etiquetas
ADVERTENCIA
ADVERTENCIA – Peligros o prácticas no seguras que
PODRIAN causar lesión personal grave o mortal.
PRECAUCIÓN
PRECAUCIÓN – Peligros o prácticas no seguras que
PODRIÁN causar lesión personal menos grave.
33
En estudios recientes se ha demostrado que si los
materiales contaminados con aceite vegetal se lavan
inadecuadamente, la acumulación del aceite puede
contribuir a que ocurra una reacción química
(combustión espontánea) que podría causar la
inflamación repentina de una carga de ropa. Esto puede
suceder con más probabilidad cuando se deja la c
de ropa en la lavadora después de que termina el ciclo
de secado o cuando las prendas se doblan y apilan
mientras están calientes.
arga
Page 35

Instrucciones importantes de seguridad
ADVERTENCIA
Para reducir el riesgo de incendio, explosión, descarga
léctrica o lesiones personales al usar su lavadora, siga
e
las precauciones básicas de seguridad, entre ellas las
siguientes:
1. Lea todas las instrucciones antes de usar el
electrodoméstico.
2. Al igual que con cualquier equipo que utiliza electricidad
y que tiene piezas móviles, existen ciertos riesgos
potenciales. Para usar este electrodoméstico con
seguridad, el usuario debe familiarizarse con las
instrucciones de funcionamiento del electrodoméstico y
ejercer siempre cuidado cuando lo usa.
No instale ni almacene este electrodoméstico donde
3.
estará expuesto a las inclemencias del tiempo.
4. Instale y nivele la lavadora sobre un piso firme que pueda
soportar el peso.
5. Este electrodoméstico debe ser puesto a tierra de manera
apropiada.
electrodoméstico en un tomacorriente que no esté
debidamente puesto a tierra y de acuerdo con el código
nacional y local. Vea las instrucciones de instalación para
la puesta a tierra de este electrodoméstico.
6. Para evitar la posibilidad de incendio o explosión:
No lave artículos que han sido previamente limpiados,
a.
lavados, sumergidos o manchados con gasolina,
solventes de limpiar en seco u otras sustancias
inflamables o explosivas pues pueden emitir vapores
inflamables o producir una explosión. Lave a mano y
cuelgue en una cuerda de secar cualquier artículo que
contenga estas sustancias.
Cualquier material en el cual se haya usado un agente
de limpieza o que e
inflamables,
que todos los restos de estos líquidos o sólidos y sus
vapores hayan sido eliminados.
Estos artículos incluyen acetona, alcohol
desnaturalizado, gasolina, keroseno, algunos líquidos
de limpieza domésticos, algunos quitamanchas,
aguarrás ras, ceras y quitaceras.
b. No agregue gasolina, solventes de lavado en seco ni
otras sustancias inflamables o explosivas al agua del
lavado. Estas sustancias emiten vapores que pueden
encenderse o explot
Bajo ciert
c.
hidrógeno en un sistema de agua c
sido usado durante dos semanas o más. EL GAS
I
H
aliente no ha sido us
c
usar una lavadora o una combinación de lavadora y
sec
que el agua e
eliminará cualquier gas hidrógeno acumulado. Debido
Nunca enchufe el cordón del
aturado con líquidos o sólidos
sté s
no debe ser colocado en la lavadora hasta
.
ar
as condiciones, se puede producir gas
aliente que no ha
DRÓGENO ES EXPLOSIVO. Si el sistema del agua
ado durante t
adora, abra todas las llaves del agua caliente y deje
scurra durante varios minutos. Esto
al período, ante
s de
a que el gas es inflamable, no fume ni use una llama
bierta durante este período.
a
d.
No lave ni seque artículos que estén sucios con aceite
vegetal o de cocinar. Estos artículos pueden contener
lgo de aceite después de ser lavados. Debido al
a
aceite remanente, la tela puede echar humo o
prenderse fuego por sí sola.
No coloque la mano dentro del electrodoméstico cuando
7.
la tina o el agitador esté en movimiento.
No permita que los niños o animales domésticos jueguen
8.
encima, dentro o delante del electrodoméstico. Es
necesaria una supervisión estricta cuando el
electrodoméstico es usado cerca de los niños o animales
domésticos.
No altere los controles.
9.
10. No repare ni reemplace ninguna pieza de la lavadora ni
intente efectuar ningún servicio a menos que haya sido
recomendado específicamente en las instrucciones de
reparación por el usuario y que usted las comprenda y
tenga habilidad para efectuarlas.
11. Desenchufe el cordón eléctrico antes de intentar reparar
su lavadora. La reparación debe ser efectuada solamente
por personal de servicio calificado.
12. Mantenga todos los aditivos del lavado, tales como
detergentes, blanqueador, etc. fuera del alcance de los
niños, preferiblemente en un armario con llave. Use los
aditivos del lavado solamente de acuerdo con las
instrucciones del fabricante. Observe todas las
advertencias en las etiquetas de los envases.
13. Mantenga el área alrededor y debajo de la lavadora sin
acumulación de materiales combustibles, tales como
pelusa, papel, trapos, gasolina y todos los otros vapores y
líquidos inflamables.
No use blanqueador de cloro ni amoníaco o ácidos (tales
14.
como vinagre o desoxidantes) en el mismo lavado. Se
pueden formar vapore
No lave en la lavadora materiales de fibra de vidrio. Se
15.
pueden pegar par
lavar a continuación y c
Para acabados de telas resistentes a las llamas - siga
16.
cuidados
prenda. El lavado inapropiado puede eliminar el acabado.
Antes de que la lavadora sea puesta fuera de servicio o
.
7
1
descartada, retire la puerta del compartimiento del lavado.
as mangueras de admisión del agua están sujetas a
18. L
daño y deterioro con el paso del tiempo. Revise
periódicamente las mangueras para comprobar que no
tengan protuberancias, torceduras, cor
escapes y reemplácelas cada cinco años.
amente las instruccione
s peligrosos.
tículas en las ropas que se vayan a
ación a la piel.
ar irrit
aus
s del fabric
ante de la
tes, desgaste o
CONSERVE ESTAS INSTRUCCIONES
34
Page 36

Sugerencias para la operación
PASO 1
Colocación de la ropa en la
lavadora
• La tina puede llenarse completamente con ropa seca
desdoblada. Sin embargo,
tina quede apret
• Si se coloca demasiada ropa puede afectarse la
eficiencia y posiblemente causar pliegues o arrugas en
la ropa.
• Cuando lave artículos voluminosos o un par de
artículos pequeños que no llenan completamente la
tina, tales como una alfombra o dos suéteres, es
conveniente agregar unas pocas toallas para mejorar la
eficacia de la agitación y del centrifugado.
Cuando lave ropas que e
•
es muy importante evitar que se sobrecargue la
lavadora a fin de asegurar una buena limpieza.
• Para agregar algún artículo que se ha olvidado, oprima
la tecla
agregue el artículo, cierre la puerta y oprima la tecla
‘Start/Pause’ otra vez. El ciclo se reanudará después
de una pausa de 15 a 30 segundos.
‘Start/Pause’ (Puesta en marcha/Pausa),
ada con ropa.
no es conveniente que la
stén extremadamente sucias,
PASO 2
Selección de las telas
Oprima la tecla correspondiente al tipo de ropa de lavado.
Esto determinará el modelo de agitación/pausa y la rapidez
de centrifugado del ciclo.
Nota:
Para reducir a un mínimo las arrugas de las ropas,
seleccione ‘Wrinkle Free’ (Control de arrugas).
Telas Descripción
Modo de agitación normal y
‘Normal’
‘Wrinkle Free’
(Control de
arrugas)
‘Hand W
(Lavado a mano)
ash’
centrifugado a alta velocidad. Usar para
toallas, vaqueros, sábanas, manteles,
ropa interior, camisetas.
Modo de agitación y de centrifugado
reducidos para disminuir las arrugas.
Usar para camisas/pantalones de vestir,
ropas inarrugables, ropas de mezcla de
poliéster/algodón.
Períodos alternos de remojo largo y
corto y velocidad de centrifugado lenta.
ar para artículos que deben ser
Us
lavados a mano.
Nota: P
artículos adicionales, para agregarlos
más de cinco minutos de
comenzado el ciclo.
ara asegurar la buena limpieza de los
spués de que haya
Uso del agua
La cantidad de agua usada variará con cada carga de
ropa. L
para proveer la cantidad de agua apropiada para un
rendimiento de limpieza eficiente y conservación de agua
y energía.
presión del agua.
35
a lavadora us
El tiempo de llenado variará dependiendo de la
a una válvula adapt
no espere
adora de llenado
Ciclos especiales
Ciclos Descripción
‘Rinse & Spin’
(Enjuague y
centrifugado)
‘Spin’
(Centrifugado)
Seleccione este ajuste cuando desee
enjuagar solamente y de
centrifugar.
Para centrifugado solamente.
spués
Page 37

Sugerencias para la operación
PASO 3
Selección de las temperaturas
del agua de lavado y de
enjuague
Oprima la tecla o para seleccionar la temperatura
del agua de lavado y la temperatura del agua de
enjuague. Siga las instrucciones de la etiqueta del
artículo y la tabla siguiente para obtener los mejores
resultados.
Temp Descripción
‘Hot/Cold’
(Caliente/Frío)
‘Warm/Warm’
(Tibio/Tibio)
arm/Cold’
‘W
(Tibio/Frío)
‘Cold/Cold’
(Frío/Frío)
Ropa blanca y artículos que no
destiñen que estén muy sucios.
Artículos que no destiñen. Cuando se
selecciona enjuague tibio, solamente el
tercer enjuague será tibio. El primer y
segundo enjuague serán con agua fría a
fin de conservar energía.
Ropas que no destiñen moderadamente
sucias; la mayoría de los artículos
inarrugables.
Ropa de colores vivos, ligeramente
sucios; lanas lavables.
PASO 5
Selección de opciones
Oprima la(s) tecla(s) apropiada(s) para seleccionar una o
más opciones.
‘Presoak’ (Preremojo) – Agrega 15 minutos de
mayormente remojo con un mínimo de agitación antes
del ciclo normal. Puede ser seleccionado con cualquiera
de los ciclos.
‘Extra Rinse’ (Enjuague adicional) – Agrega un cuarto
enjuague al final del ciclo para eliminación más completa
de los aditivos del lavado y perfumes.
‘Max Extract’ (Extracción máx) – Use para vaqueros,
toallas y ropa de cama. Extrae más agua del la ropa
durante el centrifugado.
Nota: Para reducir a un mínimo las arrugas de las telas
inarrugables, no se recomienda las opciones ‘Max
Extract’.
No coloque demasiada ropa en la lavadora.
PASO 6
PASO 4
Seleccione el nivel de suciedad
Oprima la tecla correspondiente para seleccionar el Nivel de
suciedad/opción de lavado.
Nivel de
suciedad
‘Heavy Soil’
(Muy sucio)
‘Normal Soil’
(Suciedad
normal)
‘Light Soil’
(No muy sucio)
Quick’
‘
(Rápido)
Usar para lavar ropa muy sucia.
Usar para lavar ropa moderadamente
sucia. Este ajuste es apropiado para la
mayoría de la ropa.
Usar para la ropa levemente sucia.
Este ajuste ofrece un ciclo más cor
sugiere usar este ajuste para refrescar
ropas recién compradas o ropa que ha
estado guardada por mucho tiempo.
Descripción
to. Se
Encienda su lavadora
1. Cierre la puerta.
2. Agregue detergente y aditivos en el distribuidor
(Ver página 39 y 40).
3. Oprima la tecla
marcha/Pausa).
Cuando la lavadora se pone en marcha
•
después de una pausa, se producirá un retraso
de 30 segundos antes de continuar el ciclo.
• Si oprime
ancelado y la lavadora se detiene.
c
Nota: Una vez que el ciclo ha terminado, la luz
Locked’ (Puerta bloqueada) se apagará. La puerta
puede entonce
ta de la lavadora cuando la luz ‘Door Locked’ esté
puer
iluminada. Para agregar un artículo que haya olvidado,
ver página 35.
‘Start/Pause’ (Pue
‘Off’ (Apagado) el ciclo queda
s abrirse fácilmente.
sta en
‘Door
No intente abrir la
36
Page 38

Sugerencias para la operación
Luces indicadores
‘Door Locked’ (Puerta bloqueada) –
Esta luz se ilumina cuando la puerta
de la lavadora está bloqueada. La
puerta puede abrirse oprimiendo la
tecla ‘Start/Pause’ (Puesta en
marcha/Pausa) para detener la
lavadora.
Luces indicadoras de las teclas –
Las luces indicadoras que se
encuentran sobre las teclas se
iluminarán cuando las teclas son
oprimadas.
Cuidado y limpieza
Limpieza del exterior
1. Cierre las llaves del agua cuando termine el lavado
del día. Esto cerrará el suministro de agua a la lavadora
de ropa y evitará la improbable posibilidad de daño a
causa de escape de agua. Deje la puerta abierta para
permitir que el interior de la lavadora se seque.
2. El blanqueador, detergente, solventes, etc. que se
derramen sobre su lavadora y que permanezcan allí
removerán el acabado brillante. Limpie todos los
derrames con un paño suave y húmedo tan pronto
sucedan.
3. Revise las mangueras para asegurarse de que no estén
torcidas ni dobladas.
4. Limpie lo siguiente como se recomienda:
anel de Contr
P
húmedo. No use polvos abrasivos ni esponjas de limpiar.
No rocíe los limpiadores directamente en el panel
Gabinete - Limpie con agua y jabón.
5. En la fábrica se hace una lubricación que dura toda la
vida útil de la lavadora, de manera que usted nunca
necesitará aceitarla ni engrasarla.
6.
No coloque objetos pesados ni de bordes agudos sobre
la lavadora.
. Nunca debe utilizar la super
7
para quitar manchas de sus prendas. Algunos productos
para quitar manchas, como por ejemplo los que se usan
para manchas de óxido, dañarán el acabado.
8. Quite alfileres, hebillas u otros objetos de bordes
agudos de la ropa para evit
de la lavadora.
9.
No debe almacenar ropa en la lavadora.
10. Si va a desocupar su casa durante el invierno, pida a un
técnico de servicio que drene la lavadora. Desenchufe el
able eléctrico del tomacorriente y de
c
mangueras de los grifos.
37
ol -
impie con un paño suave y
L
ficie superior de la lavadora
ar raspar las par
Despliegue del tiempo
estimado de lavado
Después de oprimir ‘Start/Pause’,
este indicador mostrará el tiempo
estimado de lavado restante del
ciclo. El tiempo restante estimado
puede variar para indicar mejor el
tiempo de lavado que queda en el
ciclo
Limpieza del interior
Limpie el interior de la lavadora a menudo para remover
cualquier residuo de sucio, manchas, olores, moho o
bacterias que puedan quedar en la lavadora como resultado
del proceso de limpieza de la ropa. Le recomendamos que
siga los pasos siguientes cada 60 a 120 días para limpiar y
refrescar el interior de su lavadora. La frecuencia de la
limpieza de la lavadora depende de tales factores como el
uso, la cantidad de suciedad, tierra o bacterias que pasen por
su lavadora, o el uso de agua fría. El incumplimiento de estas
instrucciones puede resultar en condiciones insatisfactorias,
incluyendo la presencia de olores desagradables y/o
manchas permanentes en la lavadora o en la ropa.
Limpieza del interior:
1. Prepare una solución de una taza de blanqueador de
cloro y dos tazas de agua tibia. Tenga cuidado de no
derramar o salpicar la solución de cloro.
2. Limpie la parte inferior del sello gris de la puerta con un
paño suave y la solución a base de blanqueador
3. Llene el distribuidor del blanqueador con cloro.
4. Haga pasar la lavadora por un ciclo completo usando
agua caliente.
5. Repita el ciclo de lavado si es necesario.
Los depósitos de agua dura pueden ser eliminados, si es
necesario, usando un limpiador que sea recomendado para
uso en lavadoras.
tes internas
sconecte las
Page 39

Cuidado y limpieza
Limpieza del distribuidor
El distribuidor necesita ser limpiado periódicamente debido
a la acumulación de aditivos del lavado. Para una fácil
limpieza del distribuidor, sujete el contenedor removible
que consta de dos compartimientos (para blanqueador y
suavizador) como se muestra a continuación en la
ilustración 1. A medida que comienza a levantar el
contenedor de dos compartimientos, inclínelo ligeramente
hacia el interior, de acuerdo con la ilustración 2 y retírelo
del distribuidor principal.
Una vez que ha retirado el contenedor de dos
compartimientos del distribuidor principal, colóquelo en el
fregadero. Siga la ilustración 3 para quitar la tapa que
cubre el tubo eductor para el blanqueador y suavizador.
Haga correr agua tibia y limpie con una escobilla suave o
paño las dos piezas para sacar cualquier exceso de
aditivos del lavado.
Limpie el área del distribuidor principal usando agua y un
paño suave. Una vez que el distribuidor principal esté
limpio, siga las instrucciones en el orden inverso para
volver a colocar el contenedor de dos compartimientos en
su lugar original.
1
2
Nota: No use ningún limpiador en el distribuidor
principal que no sea agua. Es posible que los
agentes de limpieza se escurran hacia dentro de la
tina. Si esto sucede, antes de lavar una carga de
ropa, programe la lavadora para un ciclo de
enjuague y centrifugado para extraer cualquier
agente de limpieza de la lavadora antes de hacer un
lavado.
3
38
Page 40

Características especiales
Detergente
Su lavadora ha sido diseñada para usar ya
sea detergentes de alta eficacia (HE) o
detergentes regulares usados
normalmente en las lavadoras con carga
vertical de la ropa.
• Para obtener una mejor limpieza, use detergentes de
alta eficacia tales como ‘Tide HE’ o ‘Wisk HE’*. Los
detergentes de alta eficacia contienen supresores de
espuma que reducen o eliminan la espuma. Cuando
se produce menos espuma, la ropa se agita mejor y
se obtiene una limpieza optimizada.
• Cuando use detergentes regulares formulados para
lavadoras con carga vertical de la ropa, es importante
prestar cuidadosa atención al nivel de suciedad de la
ropa, al tamaño de la carga de ropa y a la dureza del
agua.**
espuma, reduzca la cantidad de detergente
usado cuando el agua sea blanda o con las
cargas de ropa pequeñas o ligeramente sucias.
* Los nombres de los productos son marcas registradas de los respectivos
fabricantes.
Para evitar la formación excesiva de
Compartimento del detergente
1. Vacíe la cantidad recomendada el detergente
directamente en el compartimiento del detergente
antes de poner en marcha la lavadora de ropa o a
medida que la lavadora se va llenando.
2. Si va a usar blanqueador para ropa de color, debe ser
agregado con el detergente en el compartimiento del
detergente para obtener mejores resultados.
• Cuando agregue blanqueador para ropa de color con
el detergente, es mejor que
en la misma forma: granulados o líquidos.
ambos productos estén
** Para determinar la dureza del agua en su área, póngase en contacto
con su compañía de agua potable local o con la oficina de Extensión de
la Universidad Estatal de su localidad.
Distribuidor automatico
El distribuidor automático consta de tres compartimientos
donde se coloca 1) detergente líquido o granulado y
blanqueador para ropa de color, 2) blanqueador con cloro
líquido y 3) suavizador de telas líquido. Todos los
productos del lavado pueden ser agregados al mismo
tiempo en sus respectivos compartimientos. Serán
distribuidos en el momento opor
más eficaz.
Después de colocar los aditivos del lavado en el
distribuidor
, cierre la t
apa del distribuidor
tuno para una limpieza
.
Bandeja para artículos
misceláneos
Se ha inst
pequeños en el lado derecho de la consola. La misma
también puede acomodar botellas de rociadores de
trat
alado una bandeja conveniente para artículos
amiento de manchas para facilit
ar su acce
so.
Bandeja
39
Page 41

Características especiales
B
L
E
A
C
H
S
O
F
T
E
N
E
R
M
A
X
L
I
N
E
M
A
X
L
I
N
E
Compartimiento de
blanqueador
(Blanqueador a base de cloro líquido solamente)
1. Agregue blanqueador a base de cloro líquido en el
compartimiento del blanqueador. No llene más arriba
de la línea ‘MAX FILL’. El compartimiento del
blanqueador a base de cloro tiene capacidad para 3/4
de una taza.
2. Evite las salpicaduras y sobrellenar el compartimiento.
Si se llena demasiado el compartimiento, el
blanqueador será distribuido hacia las ropas con
demasiada anticipación.
3. La lavadora distribuye automáticamente el
blanqueador en la tina cuando quedan
aproximadamente dos minutos en la porción de
lavado del ciclo. Esto optimiza la eficacia del
blanqueador.
El distribuidor diluye automáticamente el blanqueador
4.
a base de cloro líquido antes de que llegue a la ropa.
Notas:
• Nunca vacíe blanqueador a base de cloro líquido
no diluido directamente en la ropa o en la tina. Es
un producto químico fuerte y puede dañar las telas,
debilitando las fibras o causando pérdida de color,
si no se usa en forma debida.
Compartimiento del
suavizador de telas
1. Vacíe la cantidad recomendada de suavizador de telas
líquido en el compartimiento del suavizador. Para
cargas más pequeñas, use menos de una tapa llena.
2. El suavizador de telas debe ser diluido con agua tibia
hasta que llegue a la marca ‘MAX FILL’ (Llenado
máximo) en el compartimiento. No llene más arriba
de la línea ‘MAX FILL’. Si el compartimiento se
llena más arriba de la línea ‘MAX FILL’, el
suavizador de telas será enviado a la tina de la
ropa con demasiada anticipación.
3. Este compartimiento automáticamente diluye y
distribuye el suavizador de telas líquido en el momento
adecuado durante el ciclo de enjuague.
Notas:
• Use el compartimiento del suavizador de telas
solamente para suavizadores de telas líquidos.
• No se recomienda el uso de ‘Downy Ball’* con esta
lavadora. No agregará el suavizador de telas en el
momento oportuno. Use el distribuidor que se
encuentra en la parte superior de la lavadora.
• Si prefiere usar blanqueador para ropa de color, sin
cloro, agréguelo en el compar
detergente. No coloque blanqueador par
timiento del
a r
opas
de color en el compartimiento del
blanqueador.
os nombre
L
*
fabricantes
s de los productos son marcas registradas de sus respectivos
40
Page 42

Almacenamiento de la lavadora
Las lavadoras pueden dañarse si no se extrae el agua de
las mangueras y de los componentes internos antes de
guardarlas. Prepare la lavadora para su almacenamiento
de la manera siguiente:
• Seleccione el ciclo
agregue una medida de blanqueador al distribuidor de
detergente sin que haya ropas en la tina. Haga
funcionar la lavadora durante un ciclo completo.
• Cierre las llaves del agua y desconecte las mangueras
de admisión del agua.
• Desconecte la lavadora de la fuente de alimentación
eléctrica y deje la puerta de la lavadora abierta para
que circule el aire en el interior de la tina.
‘Normal’ y ‘Quick’ (Rápido) y
Inversión de la puerta de la lavadora
La dirección de apertura de la puerta de la lavadora
puede ser invertida usando el procedimiento
siguiente:
1) Abra completamente la puerta y sujétela a la vez que
retira los cuatro tornillos de la bisagra (que sostienen
las bisagras en la puer
2) Lleve la puerta a una superficie de trabajo y cambie
cuatro tornillos de color de la puerta al lado opuesto
de la puerta.
Saque un tornillo que sujeta la bisagra superior al
3)
gabinete y un tornillo que sujeta la cubierta de la
bisagra superior al gabinete (lado opuesto).
4) Retire del gabinete la bisagra y el soporte
moviéndolos hacia arriba y hacia abajo hasta que se
suelten.
ta).
• Si la lavadora ha estado guardada a temperaturas bajo
el punto de congelación, espere hasta que el agua que
quedó en la lavadora se descongele antes de usar la
lavadora.
Para información sobre almacenamiento a largo
plazo o almacenamiento de su lavadora en
temperaturas extremadamente frías, llame
gratuitamente a Customer Assistance al
1-800-688-9900 EE.UU. o
1-800-688-2002 Canada.
5) Instale la bisagra y el soporte en su nuevo lugar y
asegúrelos firmemente con los tornillos al gabinete.
Compare la bisagra superior y el soporte superior con
6)
la bisagra inferior y el soporte inferior para lograr la
correcta instalación de las bisagras.
7) Para la bisagra inferior y el soporte inferior repita
desde el punto 4 al 6.
8) Sujete la puerta en la posición totalmente abierta en
el lado de las bisagras e instale cuatro tornillos para
asegurar firmemente las bisagras en la puerta.
9) Cierre la puerta y verifique si la lavadora funciona
bien.
41
Page 43

Localización y solución de averías
Deja la ropa
demasiado húmeda al
in del ciclo
f
iene escape de agua
T
No centrifuga ni
desagua
Se detiene
La tina está
completamente llena
de espuma
Se llena con la
temperatura
equivocada del agua
• Seleccione la opción ‘Max Extract’ (Velocidad de centrifugado de extracción máxima).
• Use un detergente de alta eficacia para reducir la espuma.
• La carga de ropa es muy pequeña. Las cargas muy pequeñas (uno o dos artículos) pueden
quedar desequilibradas y no serán centrifugadas completamente.
• Asegúrese de que la puerta esté firmemente cerrada.
• Asegúrese de que las conexiones estén herméticamente selladas.
• Asegúrese de que el extremo de la manguera de desagüe esté correctamente insertado y
asegurado al medio de desagüe.
• Evite las sobrecargas de ropa.
• Use un detergente de alta eficacia para reducir la espuma.
• Verifique el fusible o reajuste el disyuntor.
• Ponga derechas las mangueras de desagüe. Descarte las mangueras torcidas. Si el
desagüe está obstruido, llame a servicio.
• Cierre la puerta y oprima la tecla
seguridad la lavadora no agitará ni centrifugará si la puerta está abierta.
• Después de oprimir la tecla
a centrifugar. La puerta debe estar bien cerrada para que la lavadora pueda centrifugar.
• Ver a continuación “La tina está completamente llena de espuma”.
• Enchufe el cordón en un tomacorriente eléctrico que tenga corriente.
• Verifique el fusible o reajuste el disyuntor.
• Cierre la puerta y oprima la tecla
seguridad la lavadora no agitará ni centrifugará si la puerta está abierta.
• Esto puede ser una pausa o período de remojo del ciclo. Espere unos momentos y puede
ponerse en marcha nuevamente.
• Revise los filtros de las mangueras de admisión en las llaves para ver si hay obstrucciones.
Limpie los filtros periódicamente.
• Haga funcionar la lavadora a través de otro ciclo completo usando agua fría.
• Reduzca la cantidad de detergente para ese tamaño específico de carga, para ese nivel de
suciedad y para esa dureza del agua.
• Use detergente de alta eficacia o de baja espuma especialmente formulado para lavadoras de
carga frontal.
• Abra completamente ambas llaves.
• Asegúrese de que haya seleccionado la temperatura correcta.
• Asegúrese de que las mangueras están conectadas a las llaves correspondientes. Lave con
chorro de agua la tubería del agua.
• Verifique el calefactor del agua. Debe estar ajustado para proveer agua caliente de por lo
menos 49° C (120° F) en la llave. También verifique la capacidad del calefactor del agua y la
velocidad de recuperación.
•
De
sconecte las mangueras y limpie las mallas filtrantes. Las malla filtrantes pueden estar
obstruidas.
• Cuando se selecciona enjuague con agua tibia, solamente el último enjuague será con agua
tibia. Los primeros dos enjuagues son con agua fría.
• A medida que la lavadora se llena, la temperatura del agua puede cambiar cuando la
característica de control automático de la temperatura verifica la temperatura del agua de
admisión. Esto es normal.
• A medida que la lavadora se está llenando con agua, usted observará que a través del
distribuidor pas
temperatura de lavado fría o c
la temperaturea yu que la lavadora estublece la temperaturea del agua.
a agua apenas c
‘Start/Pause’ (Puesta en marcha/Pausa). Para su
‘Start/Pause’, la lavadora demorará 30 segundos en comenzar
‘Start/Pause’ para poner en marcha la lavadora. Para su
aliente y/o apenas fría cuando se ha seleccionado
. Esto es una función normal del control automatico de
aliente
42
Page 44

Localización y solución de averías
No se llena con agua
No agita
Tiene la puerta
bloqueada y
no se puede abrir
Necesita ser refrescada
Hace ruidos
Asegúrese de que la puerta esté firmemente cerrada.
•
• Verifique el fusible o reajuste el disyuntor.
• Enchufe el cordón en un tomacorriente eléctrico que tenga corriente.
• Oprima la tecla ‘Start/Pause’ (Puesta en marcha/Pausa).
• Abra completamente ambas llaves.
• Ponga derechas las mangueras de admisión del agua.
• Desconecte las mangueras y limpie las mallas filtrantes. Las malla filtrantes pueden estar
obstruidas.
• Abra y cierre la puerta, luego oprima la tecla ‘Start/Pause’.
• Verifique el fusible o reajuste el disyuntor.
• Abra y cierre la puerta, luego oprima la tecla ‘Start/Pause’. Para su seguridad la lavadora
no agitará ni centrifugará si la puerta está abierta.
• Oprima la tecla ‘Start/Pause’ para detener la lavadora.
• El mecanismo de cierre de la puerta puede demorar algunos pocos momentos en
desengancharse.
• Ver la sección
• La lavadora debe estar nivelada de manera apropiada como se indica en las instrucciones de
inst
alación.
• Cerciórese de que las contratuercas de los tornillos niveladores estén apretadas.
• Asegúrese de que se hayan instalado los protectores de goma en los tornillos niveladores.
• Los pisos débiles pueden causar vibración y movimiento.
• Para información sobre los sonidos normales de funcionamiento, consulte la página 45.
Limpieza del interior, página 37.
Para mayor ayuda, llame gratuitamente a ‘Customer Assistance’
(Servicio a los clientes) al 1-800-688-9900 EE.UU. o 1-800-688-2002 Canadá.
43
Page 45

Localización y solución de averías
Códigos de ayuda
Puede que se desplieguen los códigos de ayuda para ayudarle a comprender mejor lo que está ocurriendo en la
lavadora.
Símbolo de
código
Significado Solución
Modo de diagnóstico de servicio
La lavadora detecta que la puerta está
abierta cuando se comienza un ciclo o
cuando la puer
La lavadora no ha bloqueado la puerta.
Se ha producido exceso de espuma. Si este
código desaparece, el ciclo de recuperación
de espuma tuvo éxito.
La lavadora estuvo sometida a una falla de
alimentación eléctrica.
La lavadora tuvo dificultad para desaguar.
La lavadora trató repetidamente de
desbloquear la puerta pero no pudo hacerlo.
El motor no funciona de manera correct
ta no se bloquea.
a.
Oprima el botón ‘
ciclo.
Cierre bien la puerta y vuelva a comenzar el
ciclo.
Cierre bien la puerta y vuelva a comenzar el
ciclo.
Reduzca la cantidad de detergente usado
para esa carga específica.
Vuelva a comenzar el ciclo. Si el código
todavía está desplegado, verifique si el
cordón eléctrico está firmemente enchufado.
Verifique si la manguera de desagüe está
torcida.
Verifique si el tubo vertical está obstruido.
Asegúrese de que la puerta esté firmemente
cerrada. Oprima la tecla
dos minutos para que la puerta se
desbloquee.
Desenchufe la lavadora durante dos minutos
y vuelva a enchufarla.
Solicite servicio. Ver abajo.
Off’ (Apagado) y reinicie el
‘Off’ y luego espere
O
La lavadora intenta llenarse pero no alcanza
el nivel de llenado apropiado.
Se debe abrir la puerta de la lavadora.
Para cualquier código que no aparezca en la tabla anterior, llame gratuitamente a
‘Customer Assistance’ (Servicio a los clientes)
al 1-800-688-9900 EE.UU. o 1-800-688-2002 Canadá.
Asegúrese de que los grifos del agua estén
bien abiertos.
Verifique si alguna manguera está torcida.
Verifique las mallas filtrantes en las mangueras
de llenado.
Esta es una característica de seguridad. La
puerta debe abrirse antes de comenzar otro
ciclo.
44
Page 46

Localización y solución de averías
Sonidos normales de funcionamiento
Sonido agudo durante un ciclo de
centrifugado.
Sonido de agua saliendo
proveniente del área del distribuidor.
Sonido como gorgoteo o chapoteo
de agua cuando el agua está cerrada
y la tina es girada.
Sonido como zumbido o chapoteo
seguido de una pausa, repetido a
través de todo el ciclo de lavado.
La lavadora mantiene una
ligeramente reducida después de
alcanzar una velocidad de agitación más
alta.
La velocidad de agitación
dramáticamente cuando suena
como una carga desequilibrada.
velocidad
se reduce
El motor aumenta la velocidad para agitar la tina y extraer la humedad
de la ropa.
El detergente es distribuido al comienzo del ciclo. El blanqueador es
distribuido durante los últimos minutos del lavado. El suavizador de
telas es distribuido durante el tercer enjuague cuando la lavadora se
está llenando de agua.
El anillo compensador sellado alrededor de la tina contiene un líquido y
ha sido diseñado para que la lavadora agite suavemente.
La tina gira en una dirección seguida de una pausa. La tina invierte la
dirección y hace una pausa. Esta acción continúa a través de todo el
ciclo.
Después de alcanzar la velocidad máxima de centrifugado, la lavadora
puede reducir levemente la velocidad de centrifugado para un mejor
rendimiento.
La tina comenzará a acelerar la velocidad, luego la reduce para
redistribuir la carga más uniformemente cuando se presenta una carga
desequilibrada.
Se agrega agua después de que la
lavadora ha estado agitando por
un rato.
Sonidos como
chasquidos/desagüe cuando la
lavadora se pone en marcha.
La lavadora usa una válvula adaptadora de llenado y agrega más agua
durante el ciclo de lavado según sea necesario.
O
El agua fluye a través del distribuidor para diluir y agregar blanqueador
o suavizador de telas en el momento apropiado. Esto sucederá aun si
no se usa blanqueador ni suavizador de telas.
Antes de que la lavadora comience a llenarse, hará una serie de ruidos
como chasquidos para verificar el cierre de la puerta y hacer un
desagüe rápido.
45
Page 47

Localización y solución de averías
Preguntas y respuestas
P. ¿Cuál es el mejor ciclo si tengo manchas en mi ropa de lavar?
eleccione ‘Presoak’(Preremojo), el tiempo de lavado ‘Heavy Soil’(Muy sucia) ver página 36. Trate las manchas con
R.S
un producto para pretratamiento de manchas.
P. ¿Cuán grande puede ser la carga de ropa que puedo lavar en mi lavadora?
R. La tina puede llenarse completamente con ropas secas, desdobladas. Sin embargo, no es conveniente que la tina
quede apretada con ropa.
P. Al final del ciclo la ropa sale más húmeda que lo normal. ¿Cuál es la causa?
R. Durante la agitación y centrifugación la lavadora puede haber tenido dificultad en llegar a la velocidad plena de
centrifugado porque la ropa no estaba bien distribuida. Esto puede ocurrir con cargas pequeñas, artículos pesados o
con una carga en la que se usó demasiado detergente, causando demasiada espuma.
P. La ropa parece quedar muy arrugada al final del ciclo. ¿Cómo puedo corregir este problema?
R. Las arrugas son causadas por la combinación de calor y presión. Asegúrese de que las telas etiquetadas inarrugable o
planchado permanente sean lavadas en el ciclo
página 3
6 para la Temperatura de Lavado/Enjuague).
‘Wrinkle Free’ (Control de arrugas) y que se use un enjuague frío. (Ver
NO USE EL CICLO ‘MAX EXTRACT’.
P. Mi ropa blanca no está tan blanca como me gustaría. ¿Qué puedo hacer?
R. Lave la ropa blanca usando la opción de tela Regular. Seleccione el ajuste de temperatura ‘Hot/Cold’ (Caliente/Frío)
(lavado/enjuague) y añada 3/4 de taza de blanqueador con cloro en el distribuidor de blanqueador. El blanqueador será
distribuido en el momento adecuado durante el ciclo de lavado para un rendimiento óptimo. Recomienda una
temperatura de lavado con agua caliente de 49° C a 60° C (120° F a 140° F).
46
Page 48

Garantía y servicio
Garantía
Garantía limitada de un año –
Piezas y mano de obra
Durante un (1) año a partir de la fecha
original de compra al detal, se reparará o
reemplazará gratuitamente cualquier pieza
que falle durante el uso normal en el hogar.
Residentes Canadienses
Las garantías anteriores cubren solamente
aquellos electrodomésticos instalados en
Canadá que han sido certificados o
aprobados por las agencias de prueba
correspondientes para cumplimiento con la
Norma Nacional de Canadá a menos que el
electrodoméstico haya sido traído a Canadá
sde los EE.UU. debido a un cambio de
de
residencia.
Las garantías específicas expresadas
anteriormente son las UNICAS garantías
provistas por el fabricante. Estas garantías le
otorgan derechos legales específicos y usted
puede tener además otros derechos que
varían de un estado a otro.
LA ÚNICA Y EXCLUSIVA SOLUCIÓN PARA EL
CLIENTE BAJO ESTA GARANTÍA LIMITADA ES
LA REPARACIÓN DEL PRODUCTO SEGÚN SE
INDICA AQUÍ. LAS GARANTÍAS IMPLÍCITAS,
INCLUYENDO LAS GARANTÍAS DE
COMERCIALIZACIÓN O DE APTITUD PARA UN
PROPÓSITO EN PARTICULAR ESTÁN
MITADAS A UN AÑO O AL PERÍODO DE
LI
TIEMPO MÍNIMO PERMITIDO POR LA LEY.
MAYTAG CORPORATION NO SERÁ
RESPONSABLE DE DAÑOS INCIDENTALES O
CONSECUENTES. ALGUNOS ESTADOS Y
PROVINCIAS NO PERMITEN LA EXCLUSIÓN O
LIMITACIÓN DE DAÑOS INCIDENTALES O
CONSECUENTES O LA LIMITACIÓN DE LA
URACIÓN DE LAS GARANTÍAS IMPLÍCITAS
D
DE COMERCIALIZACIÓN O APTITUD, POR LO
QUE ESTAS EXCLUSIONES O LIMITACIONES
PUEDEN NO APLICARSE EN SU CASO. ESTA
GARANTÍA LE OTORGA DERECHOS LEGALES
ESPECÍFICOS. USTED TAMBIÉN PUEDE TENER
OTROS DERECHOS QUE VARÍAN DE UN
ESTADO A OTRO O DE UNA PROVINCIA A
OTRA.
Lo que no cubren estas garantías
1. Situaciones y daños resultantes de cualquiera de las siguientes
situaciones:
a. Instalación, entrega o mantenimiento inapropiados.
. Cualquier reparación, modificación, alteración o ajuste no autorizados por
b
l fabricante o taller de servicio autorizado.
e
c. Mal uso, abuso, accidentes, uso no razonable o hechos fortuitos.
d. Corriente, voltaje, suministro eléctrico o suministro de gas incorrectos.
e. Ajuste inadecuado de cualquier
2. Las garantías quedan nulas si los números de serie originales han sido
retirados, alterados o no se pueden determinar fácilmente.
3. Bombillas, filtros de agua y filtros de aire.
4. Los productos comprados para uso comercial o industrial.
El costo del servicio o llamada de servicio para:
5.
a. Corregir errores de instalación. Para los productos que requieran
ventilación, se deben usar conductos de metal rígido.
Instruir al usuario en el uso adecuado del producto.
b.
c. Transporte del electrodoméstico al establecimiento de servicio y de regreso.
6. Cualquier pérdida de alimentos debido a fallas del refrigerador o
congelador.
7. Costos de viaje y transporte de servicio en áreas remotas.
8. Esta garantía no se aplica fuera de los Estados Unidos y Canadá. Póngase en
contacto con su distribuidor para determinar si se aplica cualquier otra
garantía.
9. Los daños consecuentes o incidentales sufridos por cualquier persona como
resultado del incumplimiento de esta garantía. En algunos
estados no se permite la exclusión o limitación de daños consecuentes o
incidentales, por lo tanto la limitación o exclusión anterior puede no aplicarse
en su caso.
Si necesita servicio
Primero revise la sección de localización y solución de averías en su guía de uso
y cuidado o llame al distribuidor donde adquirió el electrodoméstico. También
puede llamar a Mayt
EE.UU. y al 1-800-688-2002 en Canadá para ubicar a un agente de servicio
calificado.
• Asegúrese de conservar el comprobante de compra para verificar el estado de
la garantía. Consulte la sección sobre la GARANTÍA para mayor información
sobre las re
garantía.
Si el distribuidor o la compañía de servicio no pueden resolver el problema,
•
escriba a Maytag Services, LLC, Attn: CAIR
7320-23
TN 3
8-2002 en Canadá.
8
00-6
-8
1
• Las guías del propietario, manuales de servicio e información sobre las piezas
pueden solicitarse a Maytag Services, LLC, Atención al cliente.
ag Service
abilidade
spons
0 o llame al
7
s, LLC, Atención al cliente, al 1-800-688-9900 en
s del propiet
00-6
-8
1
ario para obtener servicio bajo la
®
Center, P.O. Box 2370, Cleveland,
88-9900 en EE.UU. y al
Notas: Cuando llame o escriba acerca de un problema de servicio, por
favor incluya la siguiente información:
Su nombre, dirección y número de teléfono;
a.
b. Número de modelo y número de serie;
Nombre y dirección de su distribuidor o técnico de servicio;
c.
d. Una descripción clara del problema que está experimentando;
e. Comprobante de compra (recibo de compra).
Form No. Y81922 A Part No. 2206690 Litho U.S.A. ©2006 Maytag Appliances Sales Co.
 Loading...