

Page 1
Installation Instructions
READ BEFORE INSTALLING UNIT
Compact II Window Mounting
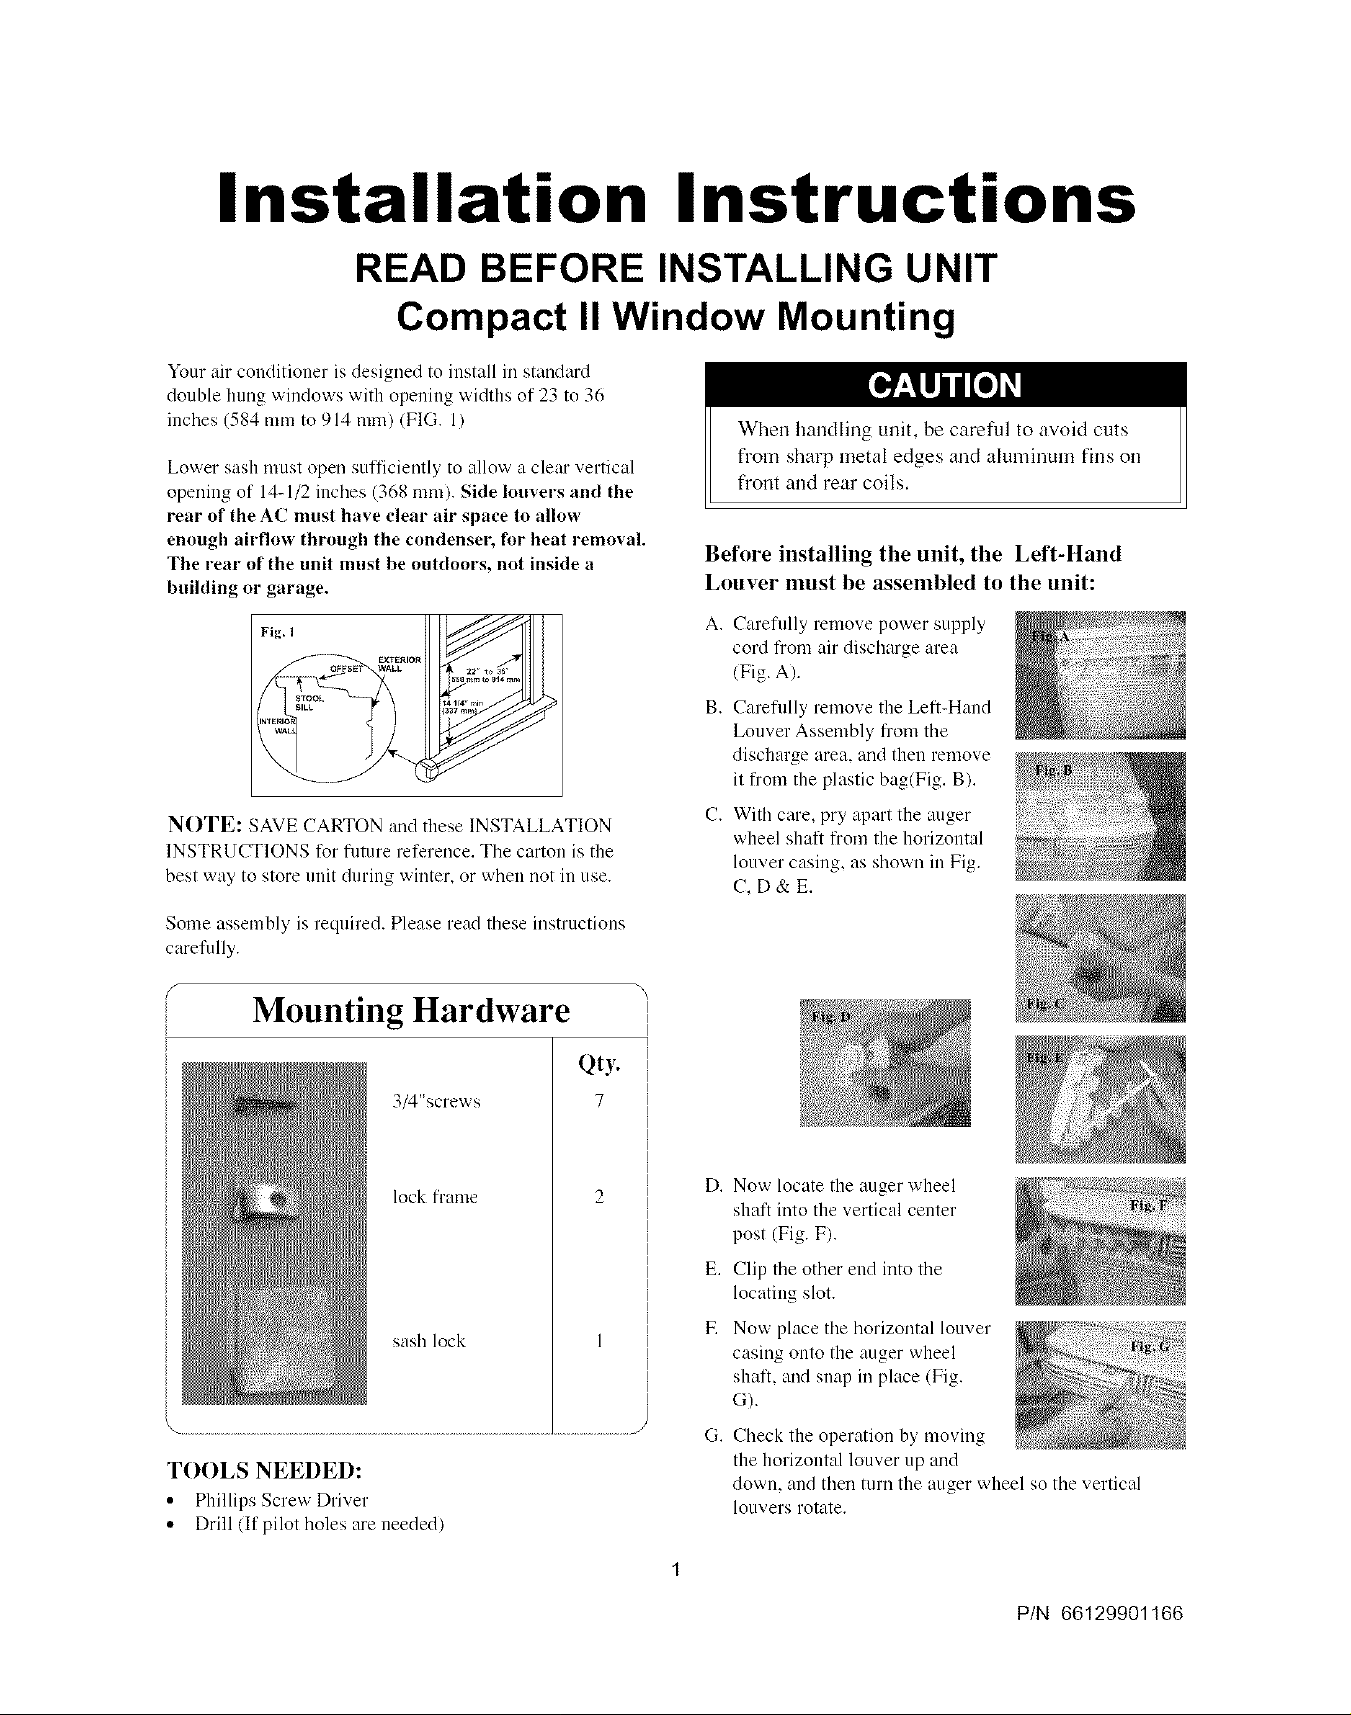
Y_ur air conditioner is designed to install ill standard
double hung windows with opening widths of 23 to 36
inches (584 mm to 914 mm) (FIG. 1)
Lower sash must opeu sufficiently to allow a clear vertical
opening of 14-1/2 inches (368 mm). Side louvers and the
rear of the AC must ha_e clear air space to allow
enough airflow through the condenser; for heat removal.
The rear of the unit must be outdoors, not inside a
building or garage.
Fig. 1
NOTE: SAVE CARTON and these INSTALLATION
INSTRUCTIONS for flmlre reference. The carton is the
best way to store unit during winter, or when not in use.
When handling unit, be careful to avoid cuts
from sharp metal edges and aluminum fins on
fl'ont and rear coils.
Before installing the unit, the Left-Hand
Louver nmst be assembled to the unit:
A,
Careflflly remove power supply
cord from air discharge area
(Fig. A/.
g.
Careflflly remove the Left-Hand
Louver Assembly from the
discharge area. and then remove
it from the plastic bag(Fig. B/.
C.
With care, pry apart the auger
wheel shaft from the horizontal
louver casing, as shown in Fig.
C,D& E.
Some assembly is required. Please read these instructions
carefally.
Mounting Hardware
Qty.
3/4"screws
lock frame
sash lock
TOOLS NEEDED:
• Phillips Screw Driver
• Drill (If pilot holes are needed/
7
.......................... j/
D.
Now locate the auger wheel
shaft into the vertical center
post (Fig. F).
E.
Clip the other end into the
locating slot.
E
Now place the horizontal louver
casing onto the auger wheel
shaft, and snap in place (Fig.
G).
O.
Check the operation by moving
the horizontal louver up and
dowm and then turn the auger wheel so the vertical
louvers rotate.
P/N 66129901166
Page 2

How to Install
NOTE: Top Rail and Sliding Panels at each side are
offset to provide the proper pitch to the rear of (5/16").
This is necessary for proper condensed water utilization
and drainage. If you are not using the Side Panels for
any reason, this pitch to tile rear must be maintained!
Place unit on flooL\ a bench or a table. There is a
Left and Right Window Filler Panel - be sure to
use the proper panel for each side.When installed
the flange for securing the panel in place to the window sill
will be facing into tile room.
A. Hold the
Accordion
Panel m one
hand and
gently pull
back the
center to free
tile open end.
See Figure 2.
C.
Once tile panel
has been
installed on tile
side of tile
cabinet, make
sure it sits
securely inside
the frame
channel by
making slight
adjustments. Slide the top and bottom ends of the frame
into the top and bottom rails of tile cabinet. Figure 5.
D. Slide the panel all tile way in and repeat on the other
side.
B. Slide the fl'ee end ('T'section/of the panel into tile
cabinet as shown in Figures 3A, 3B & 4. Slide the
panel down. Be sure to leave enough space to slip the
top and bottom of the frame into the rails on the cabinet.
NOTE: If storm window blocks AC, see FIG. 14.
Keep a filial grip on the air conditioner, carefully
place the unit into the windo_ opening so the
bottom of the air conditiouer frame is against the
window sill (FIG. 6 & FIG. 6A). Carefnlly close the
window behind the top rail of the unit.
WINDOWSILL
Extend the side panels out a_ainst the window
frame (FIG. 7).
Page 3

Place the frame lock between the frame
extensions and the window sill as shown
(Fig. 8). Drive 3/4" (19 ram) locking
screws through the frame lock and into the sill
(FIG. 9). NOTF: To prevent window sill from
splitting, drill 1/8" (3 ram) pilot holes before
driving screws.
Drive 1/2" (13 ram) locking screws
through frame holes into window sash
(FIG. 10/11).
Cut foam seal and insert in the space
between the upper and lower sashes
(FIG. 13).
IfAC is Blocked by Storm
Window
Add wood as shown in FIG. 14, or remove storm
window before air conditioner is installed.
FIG. 14 I_'
STORM WINDOW
FRAME
OR OTHER 11/2"MIN
SASH
BOARD
THICKNESS
AS REQUIRED,
FOR PROPER
PITCH TO
REAR, ALONG
ENTIRE SILL
FASTEN WITH
NAILS OR
SCREWS.
To secure lower sash in place, attach right
angle sash lock with 3/4" (19 ram) screw
as shown (FIG. 12).
If Storm Window Frame must remain, be sure the
drain holes or slots are not caulked or painted
shut. Accumulated Rain Water or Condensation
must be allowed to drain out.
Removing AC From
Window
* Turn AC off, and disconnect power cord.
* Remove sash seal from between windows.
and unscrew sash lock.
* Remove screws installed through frame and
frame lock.
* Close (slide) side panels into frame.
* Keeping a firm grip on air conditioner, raise
sash and careflllly "rock" air conditioner
backward to drain any condensate water in
base of unit. Be careflll not to spill any
remaining water while lifting unit from
window. Store parts WITH air conditioner.
 Loading...