

Page 1

LCD TELEVISION
INSTRUCTION MANUAL
C42FHDHB120
Proper use guarantees
product life.
Before using the product, be advised
that you read this owner’s manual well
and try to operate it.
Page 2

Page 3
Caution
1
2
Caution
Safety Information
TV
information
Remote
control
Menu
operation
3
3
4
5
Unit and Accessory
Product Feature
Getting Started-Front View
Getting Started-Rear View
6-7 Remote Control Key Functions
8- 10
10
10-11
11-12
13-16
16
17
18
Baisc operation
Picture menu options
Audio menu options
Setup menu options
Feature menu options
Feature menu options in VGA
Feature menu options in YPbPr
Parental Control
Troubleshooting
Specification
19
20
Simple Troubleshooting
Technical Specification
Page 4

Safety Information
2
Page 5

Unit and Accessory and Product Feature
AAA
- Input: YPbPr1(component1), YPbPr2(component2), VGA, HDMI1, HDMI2, HDMI3, AV, S-Video, RF
- Audio input: Audio R/L, PC Audio, YPbPr Audio R/L
- Support TV mode: NTSC/ATSC/QAM
- Auto-shutting down
- Program exchange and edit
- Speaker output 2 x 10W
- Power(AC 100-240V 50/60Hz)
3
Page 6
Getting Started
Getting Started
CH+
CH-
VOL+
VOL-
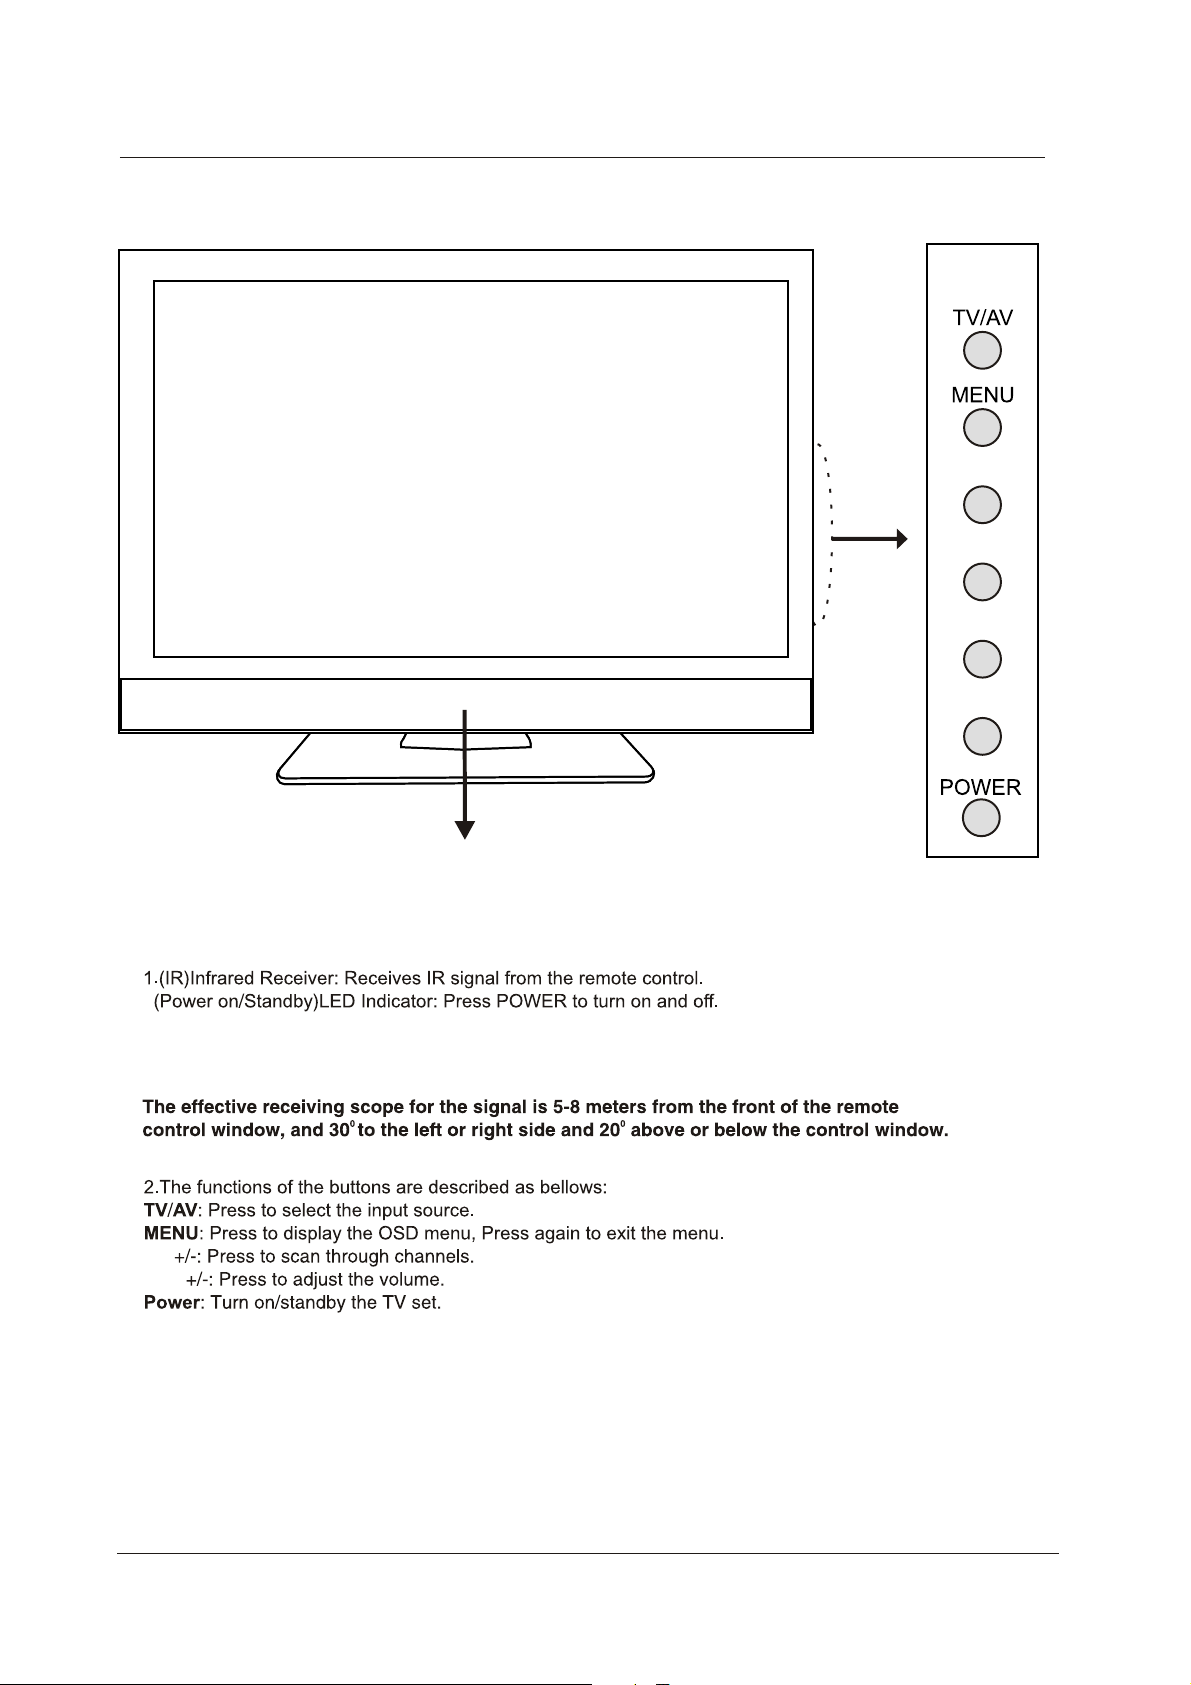
Led indicator
Remote control window(keep clear)
Indicator on(Red) Standby mode
Indicator on(Green) Power on mode
CH
VOL
4
Page 7
Caution
caution
3124140
This unit complies with FCC directive.
1
Page 8
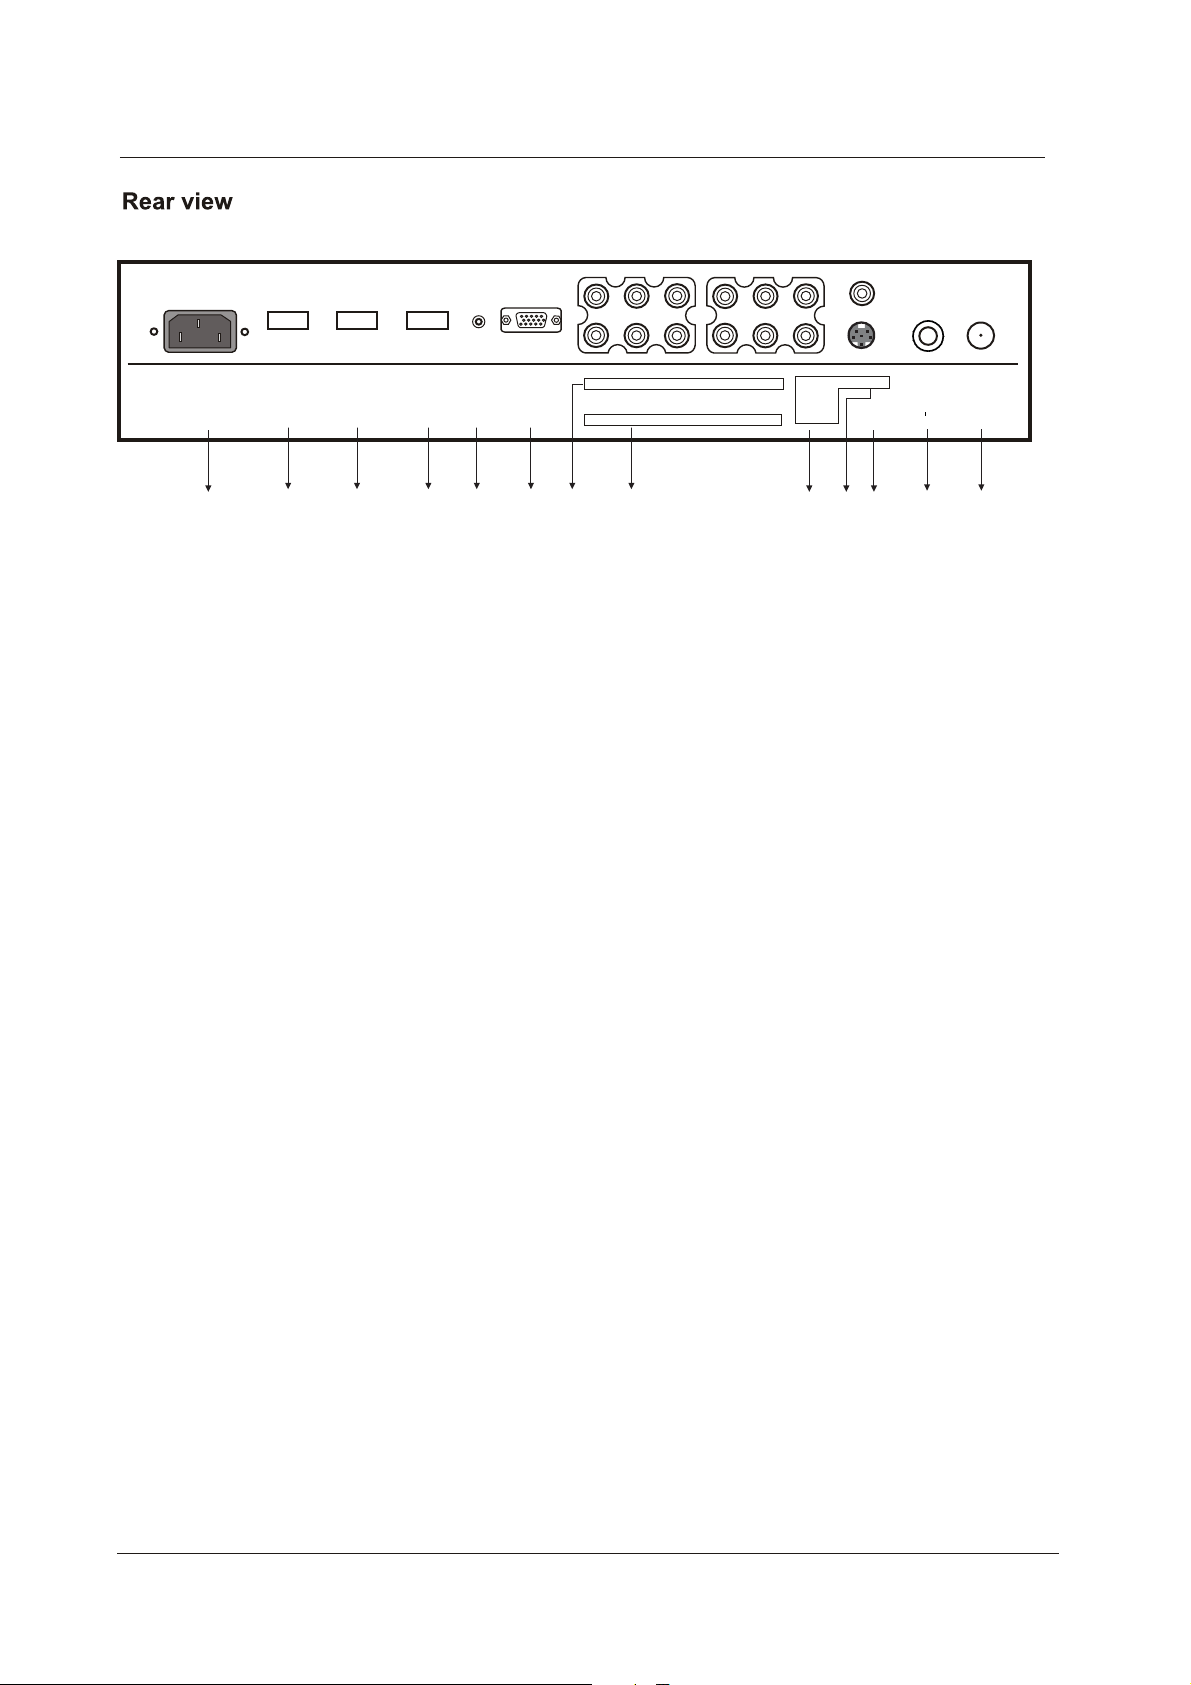
Getting Started
AC POWER IN
HDMI3
21
HDMI2 HDMI1
PC
AUDIO
IN
Y Pb Pr L in R in 1
VGA
Y Pb Pr L in R in 2
89101211 1376543
VIDEOL in
R in
COAX
out
1. AC POWER IN: Connect to an earth 100-240V, 50/60Hz AC outlet with the Power Cable.
2. HDMI3: Connect it to the HDMI of DVD or other equipment.
3. HDMI2: Connect it to the HDMI of DVD or other equipment.
4. HDMI1: Connect it to the HDMI of DVD or other equipment.
5. PC AUDIO IN: Connect it to the audio output terminal of PC.
6. VGA: For PC display. Connect it to the D-Sub 15 pins analog output connector of the PC.
7. YPbPr 1: (component1): Connect them to the video output terminal of DVD.(used in HDTV1 mode). .
L/R in 1: Connect them to the audio output terminal of DVD(with YPbPr 1).
8. YPbPr 2: Connect them to the video output terminal of DVD.(used in HDTV2 mode).
L/R in 2: Connect them to the audio output terminal of DVD(with YPbPr 2).
9. VIDEO/S-VIDEO L/R in: Connect them to audio output terminal of DVD(with VIDEO/S-VIDEO).
10. VIDEO: Connect it to video output terminal of DVD.
11. S-VIDEO: Connect it to S-Video output terminal of DVD.
12. Coax out : Digital coaxial output.
13. RF: Connect antenna or cable 75 Ohm coaxial to receive TV signal.
FROEDIV-S
5
Page 9

CLOCK
POWER
Switch on LCD TV when at standby mode or vice versa.
CLOCK
Show the current time.
123
456
789
0 -/--
TV/AV P-MODE S-MODE SLEEP
VOL+
VOL-
EXIT
MUTE
OK
DISPLAY ZOOM FREEZE
MTS CC EPG FAV
AV/SV
FAV- FAV+ C.T. NULL
YPbPr
HDMI VGA
MENU
CH+
CH-
NUMBER BUTTONS
Press 0-9 to select a TV channel directly when you are watching
TV. Then press “OK” key to confirm.
Press this button to enter a program number for multiple program
channel such as 2-1,etc.
Return to the previous channel viewed.
TV/AV
Press to cycle through the input source in following:
TV AV S-VIDEO YPBPR1 YPBPR2 VGA HDMI1 HDMI2 HDMI3
P-MODE
Select the picture mode.
S-MODE
Select the sound mode.
SLEEP
Time shutting down
MUTE
Press to mute the sound. Press again or press VOL+ to unmute.
EXIT
Clears all on-screen displays and returns to TV viewing from any
menu.
MENU
Brings up the main menu to the screen.
DISPLAY
Press to display the source and channel’s information.
ZOOM
Adjust picture size.
FREEZE
Catch the current picture.
OK
Allows you to navigate the on-screen menus and adjust the
system setting to your preference.
The OK key is equal to “Enter” on screen menus.
VOL+/-
Press to increase / decrease the sound level.
CH+/-
Press to scan through channels. To scan quickly channels, press
and hold down either +/- button.
6
Page 10

CLOCK
123
456
789
0 -/--
TV/AV P-MODE S-MODE SLEEP
VOL+
VOL-
EXIT
MUTE
OK
DISPLAY ZOOM FREEZE
MTS CC EPG FAV
AV/SV
FAV- FAV+ C.T. NULL
YPbPr
HDMI VGA
MENU
CH+
CH-
MTS
Press to select the audio channels.
CC
Press to display the closed caption.
EPG
Press to enter the EPG menu directly.
FAV
Press to add or remove favorite channel.
AV/SV
Switch to AV/S-Video source.
YPbPr
Switch to YPbPr sources.
HDMI
Switch to HDMI sources.
VGA
Switch to VGA sources.
FAV-
Press to toggle up the program which you favorite.
FAV+
Press to toggle down the program which you favorite.
C.T.
Press to select the Color Temperature from Cool/Normal/Warm.
NULL
7
Page 11

POWER
NOTE: If this is the first time you run the LCD TV, the Initial Setup Menu will appear in the picture, and
the items of this menu also exist in other menus, so you are able to change the values after you
set them up.
Initial Setup Menu
Menu Language
Tuning Band
Auto Ch Search
English
Air
Menu Language
Press
/ button to select this item, then press OK / button to select the OSD language.
Tuning Band
Press OK / to
Auto Ch Search
Press
/ button to select this item, then press OK / utton to enter the Auto Channel Search Program.
OK
ToMove ToSelect To Exit
Exit
select Tuning Band mode. (Available tuning band mode: Air, Cab le STD, Cab le HRC, Cable IRC, Cable A ut o.)
/-
8
Page 12

MENU
User
AC-3
OK Exit
OK Exit
OK Exit
Setup
Signal Level
Auto channel Search
Add On Channel Search
Manual Channel Set
Reset
OK Exit
TV/AV
, and press OK to confirm.
9
Page 13

Source List
TV
AV
S-Video
YPbPr-1
YPbPr-2
VGA
HDMI1
HDMI2
HDMI3
OK Exit
OK
OK Exit
Press button to select and press Enter / to enter, then press to adjust the contrast of the picture.
Press button to select and press Enter / to enter, then press to adjust the brightness of the picture.
Press button to select and press Enter / to enter, then press to adjust the sharpness level of the picture.
Press button to select and press Enter / to enter, then press to adjust the color saturation.
Press button to select and press Enter / to enter, then press to adjust the tint of picture. (In NTSC system)
OK
Once you adjusted to your preference, press for exit
MENU
MENU
10
Page 14

OK Exit
Audio
sound
User
AC-3
/
/
OK
/
Press button to select and press Enter / to enter, then press to adjust the bass value.
Press button to select and press Enter / to enter, then press to adjust the Treble value.
Press button to select and press Enter / to enter, then press to adjust the sound balance.
/
/
/
/
/
(COAX and OPTICAL output are not under control of this function.)
OK
/
/
/
OK
OK
Setup
Signal Level
Auto channel Search
Add On Channel Search
Manual Channel Set
Reset
/
OK
/
OK
OK Exit
Signal Level
11
Page 15

OK
OK
Auto Channel Search - Air
OK
OK
Exit
Spanish.
12
Page 16

OK
OK
OK Exit
press OK / to
OK
OK
OK
OK
the number of minutes to set your TV sleeps automatically.
Advanced Video Menu
Noise Reduction
Color Temperature
3D Y/C
Adaptive Contrast
Gradient Enable
Blue Screen
Audio Only
120Hz Mode
13
OK
To Select
Exit
Medium
Normal
On
On
On
On
On
tixEoTevoMoT
Page 17

/
OK
/
OK
/
OK
/
OK
/
OK
/
OK
Audio only
/
OK
Press button to set the video on or off. Press OK video will hide, hold down power 3 sec. to restore.
Press OK video will hide, hold down power 3 sec. to restore.
OK CANCEL
120Hz Mode
/
OK
Press button to set the 120Hz mode from ON/OFF/DEMO.
OK
OK
Off
Off
OK
14
Page 18

OK
OK
OK
OK
OK
OK
Canadian Rating Menu.
OK
OK
OK
OK
OK
AUTO CC SAMPLE
OK
OK
15
Page 19

OK Exit
OK
Exit
Press button to select and press Enter / to enter, then press to adjust the horizontal position of the picture..
Press button to select and press Enter / to enter, then press to adjust the vertical position of the picture.
Press button to select and press Enter / to enter, then press to adjust the clock of the picture.
Press button to select and press Enter / to enter, then press to adjust the phase of the picture.
OK
OK
16
Page 20

TV/AV
YPbPr Set
YPbPr Set
OK Exit
YPbPr Set
YPbPr
YPbPr
OK
YPbPr Setting Menu.
YPbPr
Press button to select and press Enter / to enter, then press to adjust the horizontal position of the picture.
Press button to select and press Enter / to enter, then press to adjust the vertical position of the picture.
Press button to select and press Enter / to enter, then press to adjust the phase of the picture.
i
Exit
OK
17
Page 21

Menu Operation
(page 14)
: 0,0,0,0.
If used, this optional feature can “block” undesirable programming from appearing on the TV. Parental Control offers the user a wide variety of options
and settings that restrict or “block” the programming that can appear on the TV. Parental control allows the user the capability of defining which program
rating they consider accept-able, to the younger or more sensitive viewer. It can be preset and turned either on or off by the user who specifies the
secret 4-number code, the password. The number of hours blocked are specified. General audience and children viewer blocks should both be
programs into the TV’s memory. Viewer ratings are specified for both TV and the motion picture industry; both rating systems should be used, for
complete coverage.
The ratings are based on the ages of children.
Overview
To insure complete coverage for all TV programs, (movies and regular TV shows) choose a rating for MPAA, from the selections below. And choose
ratings from the TV Parental Guidelines Rating System below, using the Age Block option for General Audiences, and for Children. In addition
to those, you may wish to add additional restrictions from the Content Block menu. See the Parental Control menu, and submenus example below.
Things to Consider before Setting Up Parental Control
Determine which rating you consider acceptable to the viewer. (For example, if you choose TV-PG, all more restrictive ratings will be automatically
blocked; the viewer will not be able to see: TV-PG, TV-14, or TV-MA rated programming.)
Do you want to block the auxiliary video source entirely? (Blocks the signal sent by the equipment, such as a VCR, connected to the TV Audio/Video
input jacks) Or leave unblocked, then choose allowable ratings. Block program “Content” based on individual parameters such as: Strong Dialog,
Bad Language, Sex Scenes, Violence Scenes, or Fantasy Violence Scenes; in the Content Blk option.
Select a secret password; in the Set Password option. Use the number keys on the remote. Don’t forget the password, it is the only way you can
access the Parental Control menu and change rating selections, or turn Parental Control off.
Do you want Parental Control to be active all the time? If not, you can turn it on or off with the Lock On/Off option.
* You can set different Parental Control viewing restrictions for general audiences and for children both can be active at the same time.
* Simply specifying one content block such as Sex Scenes, will not automatically block another content in the programs from appearing.
* Even if you choose
from the video sources.
* You can not disable Parental Control by disconnecting the TV from power. Block hours will automatically reset to the original block time setting
specified if power is disconnected.
to leave the Aux inputs unblocked, the ratings you specify will automatically restrict the programming that appears
Information
MOTION PICTURE ASSOCIATION OF USA (MPAA) RATING SYSTEM
Meaning
view the program.
Not for children under age 17.
Strong elements of sex and/or violence.
Strong sexual content.
Same as NC-17 rating.
MPAA Not Rated
ssecneiduAlareneG reweivtsomotevisneffotontnetnoCG
PG
PG-13
R
NC-17
X
No Rating
Grade
Parental Guidance
Suggested
Parental Strongly
Cautioned
Restricted viewing
No Children under
age 17
Hard Core Films
No Rating
Content is such that parents may not want their children to
Program is inappropriate for preteens, with a greater degree
of offensive material Suggested than a PG rated program
Not for children under age 17 under any circumstances.
TV PARENTAL GUIDELINE RATING SYSTEM
Meaning
snerdlihCgnuoY reweivtsomotevisneffotontnetnoCY-VT
Fantasy Violence Scenes.
Considered suitable for all audiences; children
may watch unattended.
Violence Scenes.
TV-Y7
TV-G
TV-PG
TV-14
TV-MA
Grade
Children 7 and over
Parental Audience
Parental Guidance
Parents Strongly
Cautioned
Mature Audience
Only
Considered suitable for children over 7, may contain
Suggested Unsuitable for younger children, may contain:
Suggestive Dialog, Bad Language, Sex, and Violence Scenes
Unsuitable for children under 14, may contain: Strong
Dialog, Bad Language, Sex, and Violence Scenes.
Adults only, may contain: Strong Dialog, Bad Language, Sex, and
Canadian Rating:
Canadian English is used throughout all of Englishspeaking Canada (E, C, C8+, G, PG, 14+, 18+).
Canadian French is used in Quebec (E, G, 8 ans +, 13 ans +, 16 ans +, 18 ans +).
The V-Chip will automatically block certain categories that are ‘more restrictive’.
If you block TV-Y category, then TV-Y7 will be automatically blocked.
Note
Similarly, if you block TV-G category, then all the categories in the ‘young adult’ will be
blocked(TV-G, TV-PG, TV-14 and TV-MA).
18
Page 22

Simple Troubleshooting
Simple Troubleshooting
Performs
SYMPTOM
NO POWER
NO PICTURE
NO SOUND
ABNORMAL COLOR
NO RESPONSE OF THE
REMOTE CONTROL
The SCREEN FLASH IN
VGA MODE
SOME INTERFERE IN THE
VGA MODE
CLEAN THE TV SET
COLOR SPOT
DEALING METHOD
Check the power connection.
Pull the plug out, wait for 60 seconds, then reconnect the power
and run the set
Check the antenna connection.
Try other TV channel due to the TV station problem.
Modify the brightness or contrast setting.
Increase the volume.
Check that if the set is on the mute state or not.
Check the voice setting condition.
Check the voice mode setting condition.
Check the antenna connection
Check the effect of the batteries, if needed, please replace the
batteries or clean the remote sensor window.
The distance between the set and the remote control should be
less than 6 meters.
The parameter is too big.
Please use safety mode when restart the PC, and set the
parameter of the monitor according to the instruction.
Please modify parameter of the monitor according to the instruction.
Please pull the plug out when clean the LCD screen. Using soft,
clean cloth to wipe it off. If need to clean further, please use dry
cloth, don’t use naphtha or other thinner liquid.
This product uses high definition LCD panel, and the panel
has its special character, there maybe existed some color
spots, so when the user find few color spots it's not a quality
problem.
The standard for inspecting this panel is the same which is
out of the scope to replace the product.
19
Page 23

Technical Specification
TV system DTV-ATSC (VSB, Clear QAM) / TV-NTSC
Technical Specification
Display
Screen size
Ratio
Definition
Brightness(cd/m )
Contrast
BROADCAST SIGNAL SYSTEM
Color
TV
Channel label
Time set
Input
Video
S-Video
VGA
2 x YPbPr&YCbCr
3 x HDMI
Output
Coax out
Speaker output
Power
Power Consumption
42inch
16:9
1920(RGB)x1080
2
500
1000:1
NTSC + ATSC + QAM
1.06 Billion
yes
yes
yes
yes
yes
Support 480i,480p,720p,1080i,1080p
Support 480i,480p,720p,1080i,1080p
yes
2x10W
AC 100-240V 50/60Hz
280W
20
Page 24

“GOLDEN WARRANTY”
Crosley Corporation warrants this product to be free from defects in material and workmanship and
agrees to repair or replace this product to remedy such defects.
This warranty covers TWO YEAR OVER-THE-COUNTER EXCHANGE from the date of the original
purchase.
This warranty applies only to product purchased from an authorized Crosley dealer and used within
the boundaries of the U.S.A. and Canada.
This warranty does not apply to product that has been improperly installed, subjected to usage for
which the product was not designed, misused or abused, damaged during transportation, or which
has been altered or repaired in any way that affects the reliability or detracts from its performance..
How you get warranty service
Warranty service can only be provided by an authorized Crosley service center. For the closest
authorized service center to you, please contact your Dealer. In order to receive warranty service you
must provide the authorized service center with a copy of proof of purchase, signifying the date of
purchase and the name of the Dealer from whom you purchased the product.
Statutory warranties
The purchaser may have rights under existing provincial or federal laws, and where any terms of this
warranty are prohibited by such laws, they are deemed null and void, but the remainder of the
warranty shall remain in effect.
If you require further assistance, please contact the Crosley dealer or go to:
www.crosley .com to locate your nearest Crosley Distributor.
Crosley Corporation
111 Cloverleaf Drive, Suite 200
Winston-Salem, NC 27103
Service Call Toll Free Number: 1-888-446-4869
Page 25

P/N : 48586900E110-R1
 Loading...