

Page 1

Proper use guarantees
product life.
Before using the product, be advised
that you read this owner’s manual well
and try to operate it.
INSTRUCTION MANUAL
LCD TELEVISION
C32HDHB
C37HDHB
C42HDHB
C42FHDHB
Page 2
WARNING : TO REDUCE THE RISK OF FIRE OR ELECTRIC SHOCK, DO NOT EXPOSE THIS
APPARATUS TO RAIN OR MOISTURE AND OBJECTS FILLED WITH LIQUIDS, SUCH
AS VASES, SHOULD NOT BE PLACED ON THIS APPARATUS.
CAUTION :
TO PREVENT ELECTRIC SHOCK, MATCH WIDE BLADE OF PLUG TO WIDE SLOT, FULLY INSERT.
CAUTION
RISK OF ELECTRIC SHOCK
DO NOT OPEN
CAUTION : TO REDUCE THE RISK OF ELECTRIC SHOCK,
DO NOT REMOVE COVER (OR BACK).
NO USER-SERVICEABLE PARTS INSIDE.
REFER SERVICING TO QUALIFIED SERVICE PERSONNEL.
The lightning flash with arrowhead symbol, within an equilateral
triangle, is intended to alert the user to the presence of uninsulated “dangerous voltage” within the product’s enclosure that may
be of sufficient magnitude to constitute a risk electric shock.
The exclamation point within an equilateral triangle is intended to
alert the user to the presence of important operating and servicing instructions in the literature accompanying the appliance.
Caution
Page 3
Caution
2
NOTE :
This equipment has been tested and found to comply with the limits for a Class B digital
device, pursuant to Part 15 of the FCC Rules. These limits are designed to provide reasonable protection against harmful interference in a residential installation.
This equipment generates, uses and can radiate radio frequency energy and, if not
installed and used in accordance with the instructions, may cause interference to radio
communications. However, there is no guarantee that interference will not occur in a particular installation.
If this equipment does cause interference to radio or television reception which can be
determined by turning the equipment off and on, the user is encouraged to try to correct
the interference by one or more of the following measures.
- Reorient or relocate the receiving antenna.
- Increase the separation between the equipment and receiver.
- Connect the equipment into an outlet on a circuit different from that to
which the receiver is connected.
- Consult authorized service centers for help.
- Only shielded interface cable should be used.
Finally, any changes or modifications to the equipment by the user not
expressly approved by the grantee or manufacturer could void the users
authority to operate such equipment,
FCC RF INTERFERENCE STATEMENT
Page 4
IMPORTANT SAFETY
INSTRUCTIONS
3
Please read the following safeguards for your TV and retain for future reference.
Always follow all warnings and instructions marked on the television.
1. Read these instructions.
2. Keep these instructions.
3. Heed all warnings.
4. Follow all instructions.
5. Do not use this apparatus near water.
6. Clean only with dry cloth.
7. Do not block any ventilation openings. Install in accordance with the manufacturer's instructions.
8. Do not install near any heat sources such as radiators, heat registers, stoves, or other apparatus
(including amplifiers) that produce heat.
9. Do not defeat the safety purpose of the polarized or grounding-type plug. A polarized plug has
two blades with one wider than the other. A grounding type plug has two blades and a third
grounding prong. The wide blade or the third prong are provided for your safety. If the
provided plug does not fit into your outlet, consult an electrician for replacement of the obsolete
outlet.
10. Protect the power cord from being walked on or pinched particularly at plugs, convenience
receptacles, and the point where they exit from the apparatus.
11. Only use attachments/accessories specified by the manufacturer.
12. Use only with the cart, stand, tripod, bracket, or table specified by the
manufacturer, or sold with the apparatus. When a cart is used, use caution
when moving the cart/apparatus combination to avoid injury from tip-over.
13. Unplug this apparatus during lightning storms or when unused for long periods of time.
14. Refer all servicing to qualified service personnel. Servicing is required when the apparatus has
been damaged in any way, such as power-supply cord or plug is damaged, liquid has been
spilled or objects have fallen into the apparatus, the apparatus has been exposed to rain or
moisture, does not operate normally, or has been dropped.
15. DISCONNECTING DEVICE FROM MAINS - Main plug is the disconnecting device. The plug
must remain readily operable.
Page 5
IMPORTANT SAFETY
INSTRUCTIONS
4
16. Wall or Ceiling Mounting
When mounting the product on a wall or ceiling, be sure to install the product using the
designated mounting tool according to the method recommended by the manufacturer.
17. Attachments and Equipment
Never add any attachment and/or equipment without approval of the manufacturer as such additions
may result in the risk of fire, electric shock or other personal injury.
18. Power Source
This TV should be operated only from the type of power source indicated on the marking label. If you
are not sure of the type of power supplied to your home, consult your appliance dealer or local power
company.
19. Power Lines
An outside antenna system should not be located in the vicinity of overhead power lines or other
electric light or power circuits, or where it can fall into such power lines or circuits. When installing an
outside antenna system, extreme care should be taken to keep from touching such power lines or
circuits as contact with them might be fatal.
20. Overloading
Do not overload wall outlets and extension cords as this can result in a risk of fire or
electric shock.
21. Object and Liquid Entry
Never push objects of any kind into this TV through openings as they may touch dangerous voltage
points or short-out parts that could result in fire or electric shock. Never spill liquid of any kind on or
into the TV.
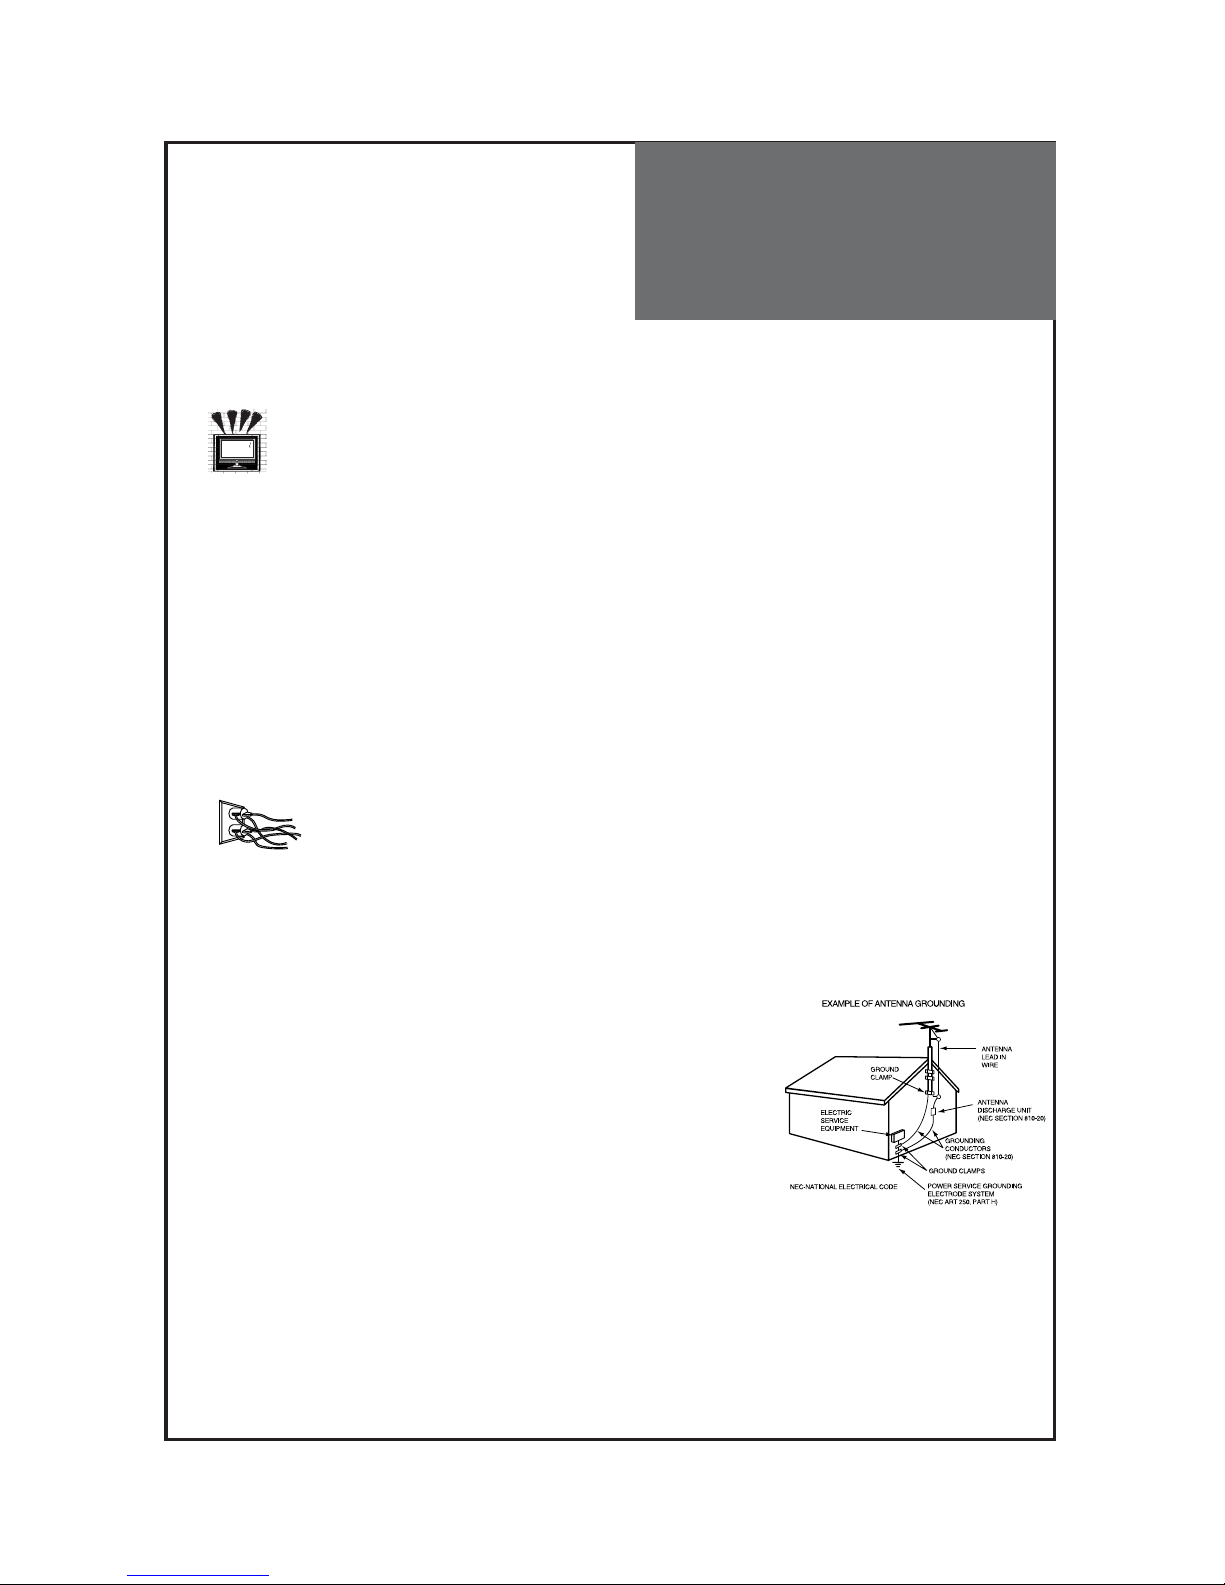
22. Outdoor Antenna Grounding
If an outside antenna or cable system is connected to the TV, be
sure the antenna or cable system is grounded so as to provide
some protection against voltage surges and built-up static charges.
Section 810 of the National Electric Code, ANSI /NFPA No. 70-1984,
provides information with respect to proper grounding of the mast
and supporting structure, grounding of the lead in wire to an antenna
discharge unit, size of grounding conductors, location of
antenna discharge unit, connection to grounding electrodes, and
requirements for the grounding electrode.
23. Safety Check
Upon completion of any service or repair to the TV, ask the service technician to perform safety checks
to determine that the TV is in safe operating condition.
Page 6
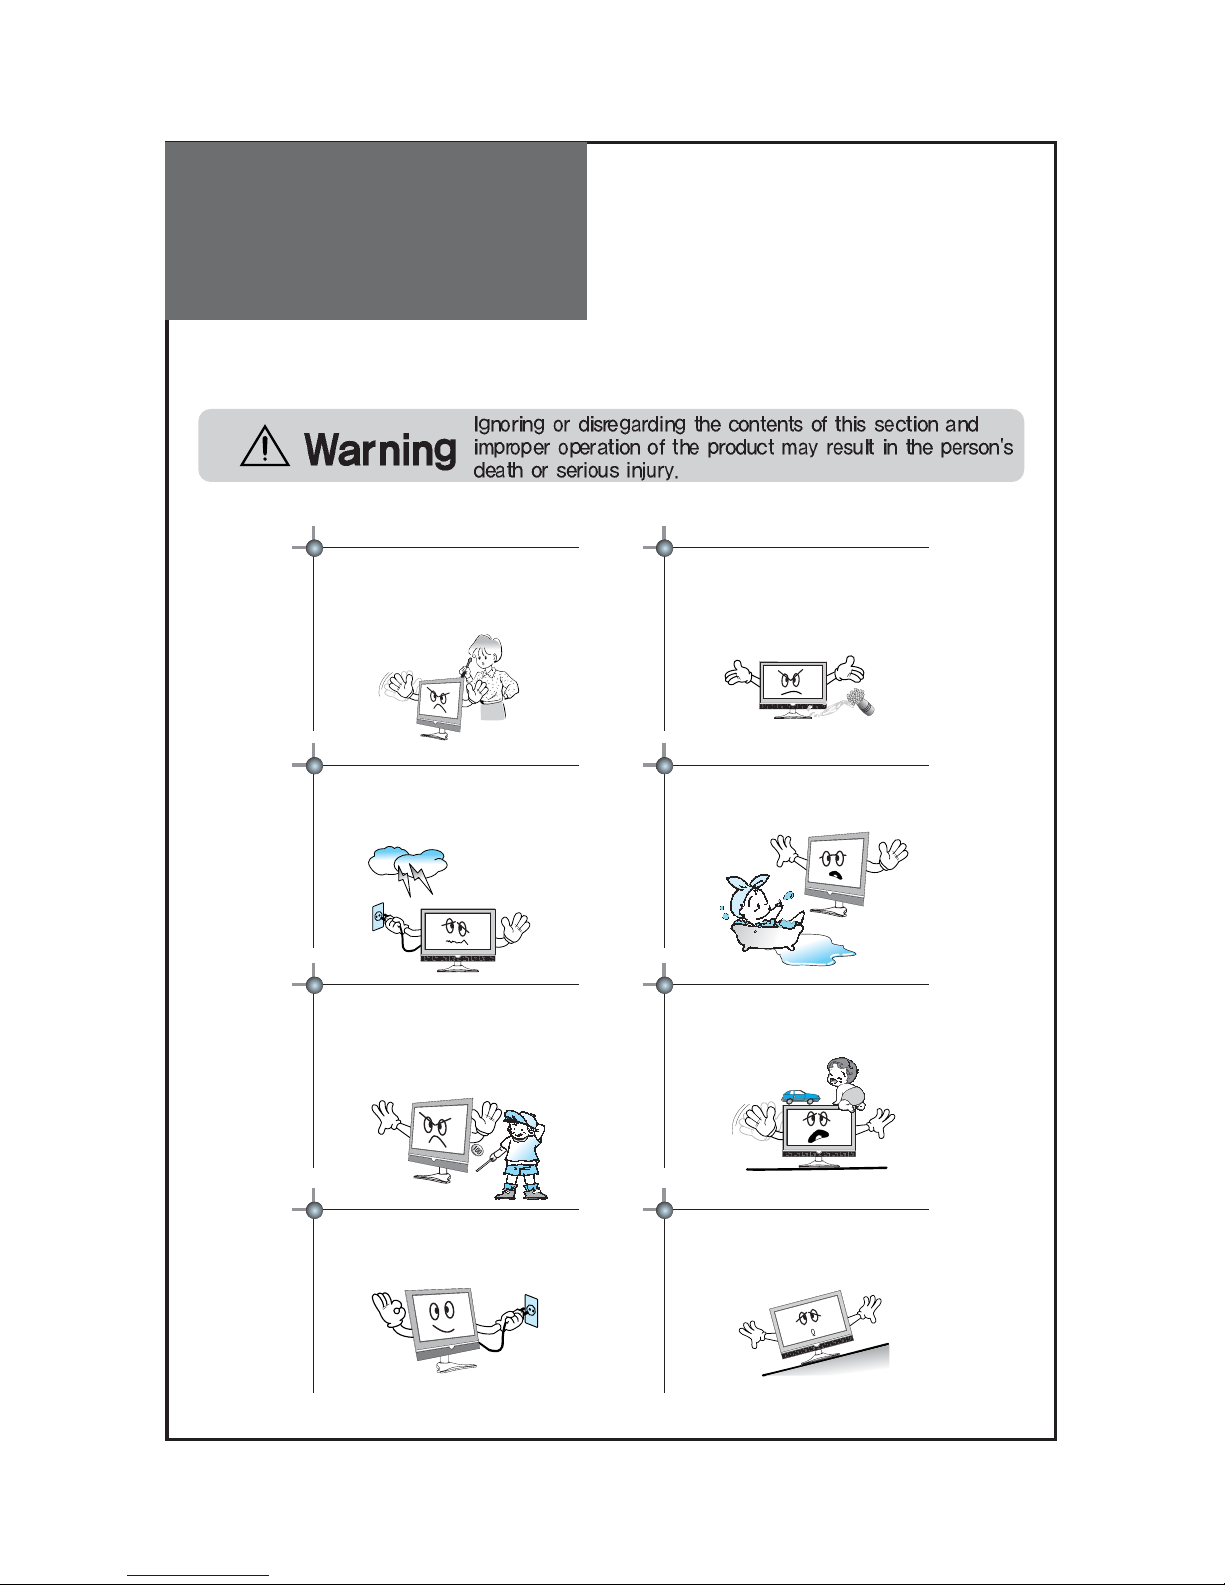
Warning
5
This section must be read carefully and followed by the user prior to the operation of the product.
The manual states important instructions for the user's own safety, and the proper operation of the product.
In case of an accident, please unplug the unit from the outlet immediately.
Hold the plug when unplugging the unit
from the outlet. The cord may cause fire or
electric shock if damaged.
Do not cause the product to lean or put it in an
unstable place since it may cause a serious
injury to a person, as well as damage to the
product if it falls.
Do not put any object that contains water such as flowerpot - near to the unit.
The water may penetrate into the unit, and be
a cause of fire or hazardous electric shock.
To reduce the risk of electric shock, do not
remove cover or back. No user -serviceable
parts inside. Refer to qualified service
personnel for repair.
Do not put on or use the product near water and
moisture-such as in a bathroom, washbowl, etc.
It may be a cause of fire and electric shock
hazards.
To prevent fire and damages to the product,
unplug the unit from the outlet during lightning
storm, or when it is left unattended and unused
for a long period of time.
Do not let children hang on or climb on the
product since it may be a cause of serious
injury.
Slots and openings in the case are provided for
ventilation to ensure reliable operation of the
product. Never put in any item-such as a coin,
paper, match- through these openings since it
may touch dangerous voltage points that could
result in fire or shock hazard.
Page 7
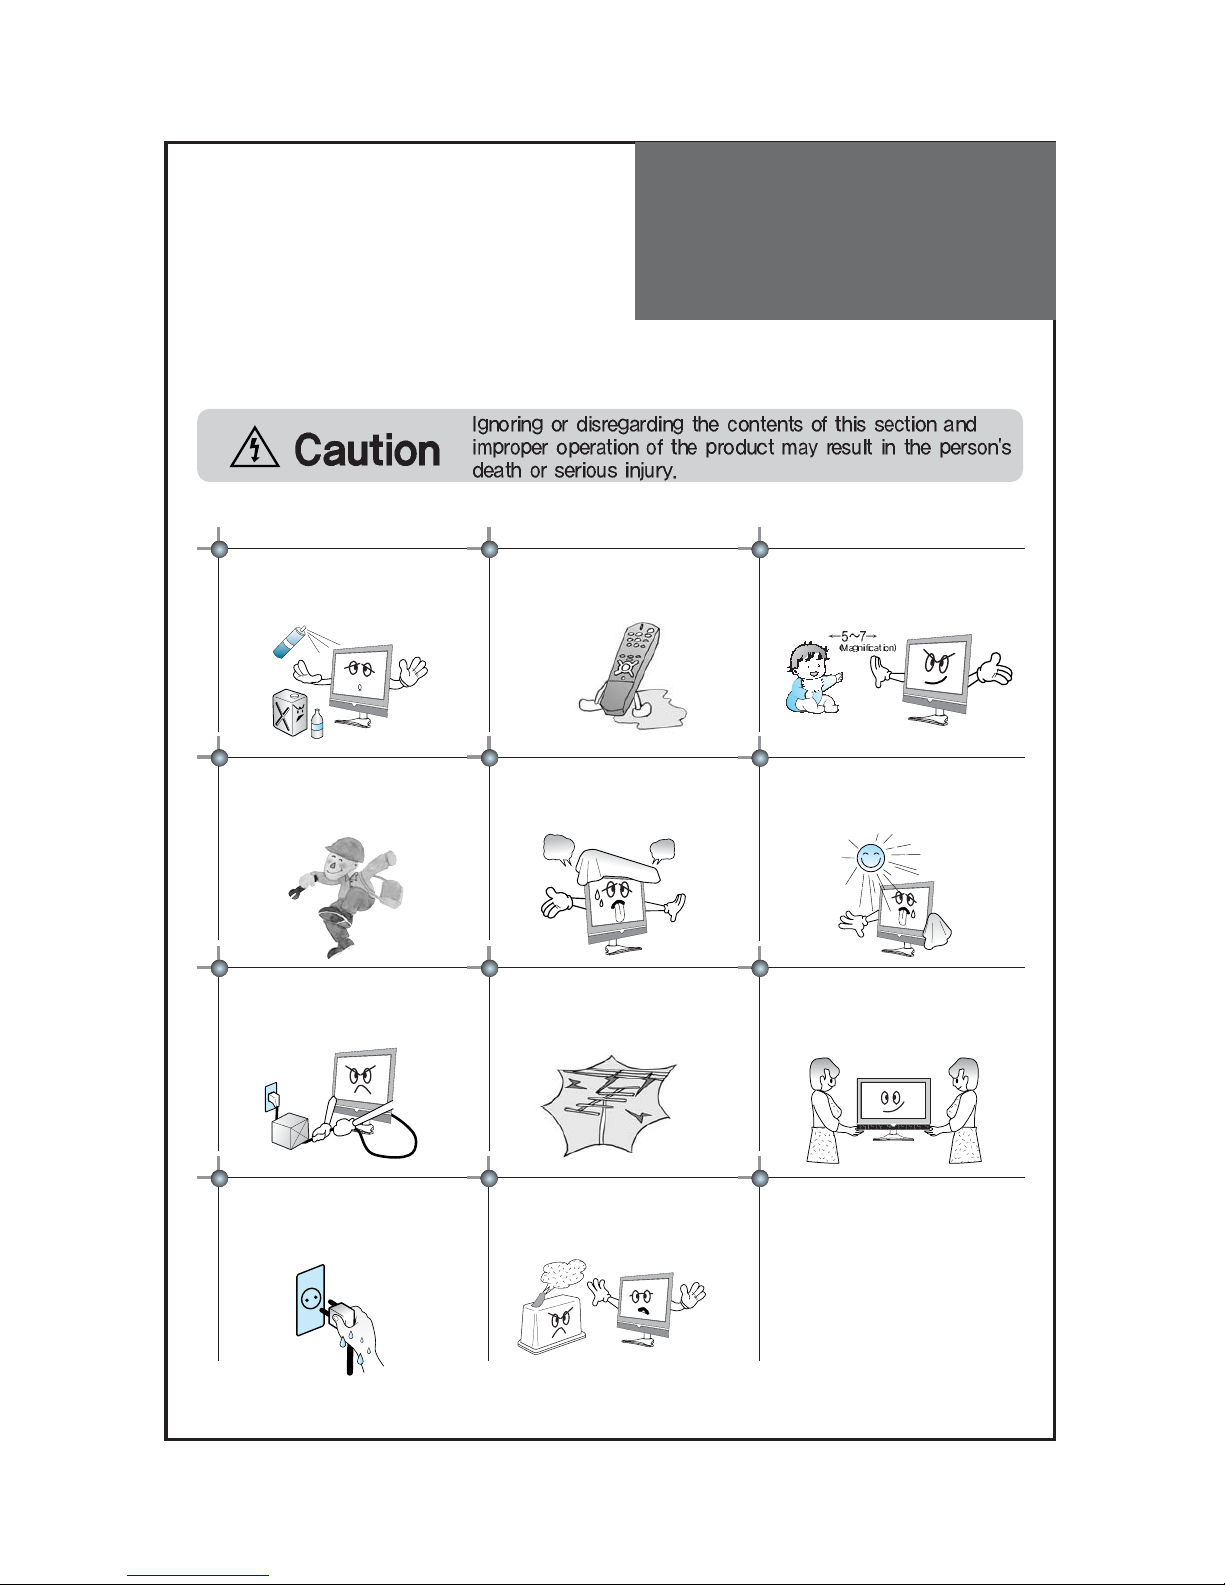
Warning
6
Do not put volatile substance-such as
benzene, naphtha- near the product since it
may cause a change in the product's color.
Do not view the TV too closely since it may
cause damage in your eyesight.
Refer servicing to qualified service
personnel for cleaning at least once a year
since dust inside the TV set may be a result
or fire and malfunctioning of the product.
The product should be situated away from
any heat source-such as radiators, heat
registers, stoves, or other products that
produce heat.
Do not put on any heavy item on the power
cord since it may result in fire or hazardous
electric shock if the cord is damaged.
Do not cover the top of the television set.
Ventilation will be prevented, and it may be
a cause of fire if the product is internally
overheated.
Unplug the power from the outlet and all the related
connections from the unit to prevent electric shock. At least
two people must work together to move the TV set when
transporting to prevent the TV from falling, and
consequently, any serious injury or damage.
Do not touch the power cord with
moisturized or wet hands when plugging to
or unplugging from the outlet since it may be
a cause of electric shock.
Please be advised of electric wires and cables when installing
the antenna. It may be a cause of hazardous electric shock and
fire if the antenna touches or falls on the electric wire; thus, it
must be installed firmly, and far away from the cables.
Do not spill water or drop the remote control
since it may be a cause of malfunctioning.
This section must be read carefully and followed by the user prior to the operation of the product.
The manual states important instructions for the user's own safety, and the proper operation of the product.
Please keep the user's manual in a safe place for future reference.
Do not expose the product to a dusty or
moisturized place since it may be a cause of
malfunctioning.
Page 8
Table of
Contents
7
Installation and Maintenance
Stand Construction 9
Antenna Connection 11
Video Connection 14
Camcorder & Video Game Connection 15
DVD Player Connection 16
STB(Set Top Box) Connection 17
PC Connection 18
USB Connection 20
Cable TV Broadcasting Connection 21
Connect with the Dolby Digital AMP 22
Name of Each Part 23
Basic Guide
Functionsa of the Remote Control 25
Method To Use Basic Menu 27
To Watch TV 28
Setting Up TV Stations 30
Selection of TV/VIDEO Input Signal 34
Selection of Multimedia Input Signal 35
Selection of Media(USB) Input Signal 37
Application Guide
Picture Adjustment 38
Sound Adjustment 42
Features - Closed Caption 46
Features - Parental Control 48
Features - ETC 53
Time Setting 54
Channel Banner 57
Troubleshooting 59
Standard of Product 61
Page 9
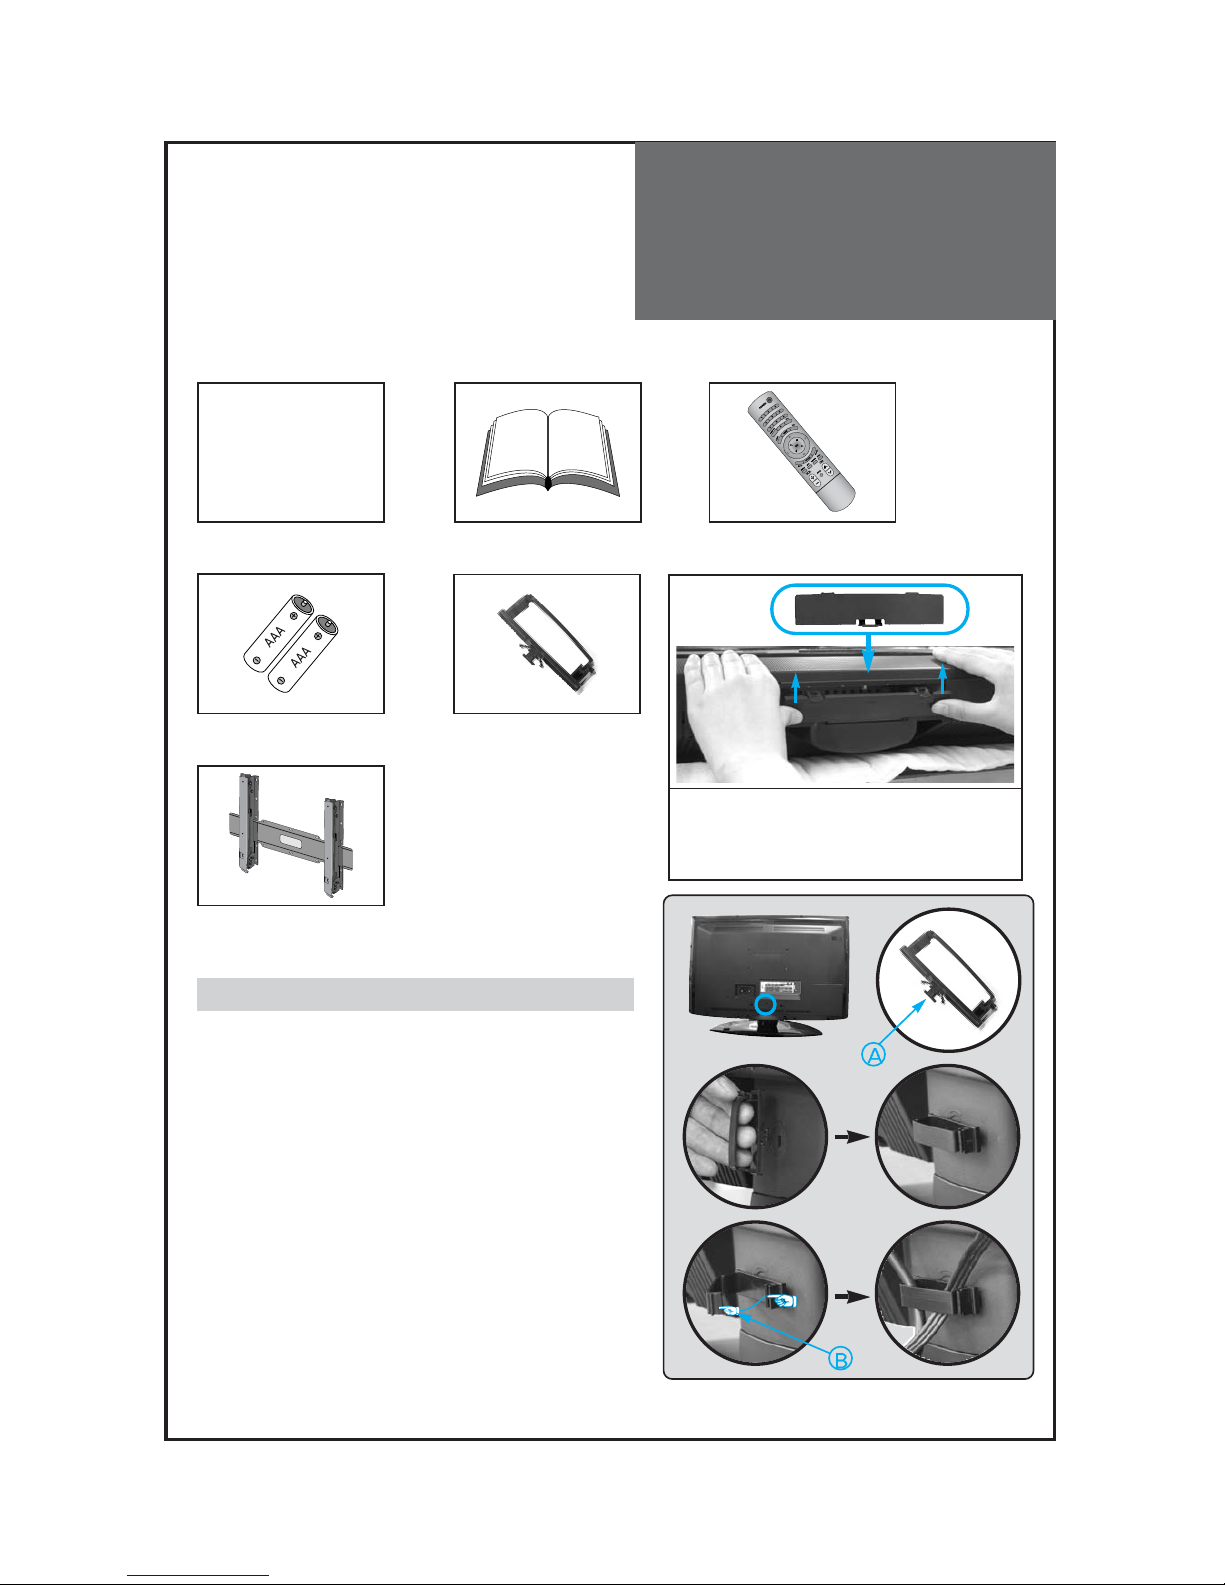
Supplied
Accessories
8
Make sure that the following accessories are provided with the product.
AC cord
AC cord Instruction manual
-
Remote control
Batteries
Cover Bottom
-When installing wall mount, set the cover
bottom as shown above
Cable holder
Wall Mounting Unit
(OPTIONAL)
1
23
The method of wire arrangement
1. Assemble the cable holder enclosed on the back
of TV. (PICTURE 1)
(ASSEMBLY METHOD: After you push the
"A"(prominence part of cable holder) in the
hole, rotate the cable holder clockwise as an
angle of 90°. You can separate in reverse order
of assembly.)
2. Open the cable holder. (PICTURE 2)
( you can open the cable holder then press and
push "B" part.)
3. After arranging cables with the cable holder,
lock "B" again. (PICTURE 3)
Page 10

Stand
Construction
9
32” Stand Assy Construction
1. Insert the cover frame stand to the stand base 2. Insert the frame stand into the stand base
3. Assemble plate stand base and frame stand
with the 4 screws supplied.
4. Assemble TV set and stand with the 3 screws supplied.
ز
ز
ز
ز
ز
ز
ز
When attaching stand to TV set, be
sure to cover the surface to protect
from accidental damage.
Page 11

Stand
Construction
10
37” Stand Assy Construction
1. Insert the TV set to the stand assy.
2. Assemble TV set and stand with screw 5EA.
ز
ز
ز
ز
ز
When attaching stand to TV set, be
sure to cover the surface to protect
from accidental damage.
Page 12

Antenna
Connection
11
Indoor Antenna Connection
1. Connect the feeder cable of the antenna to the combining adapter.
WHEN THE IMAGE IS NOT CLEAR : Unclear screen image and bad reception may be a cause of wrong
antenna connection. Be sure to check its direction and place when
installing.
2. Connect the combining adapter to the antenna input at the left side of the TV set.
WHEN USING THE COMBINING ADAPTER : You may obtain the combining adapter at your closest
Service Center.
Combining adapter
VIDEO L-AUDIO-R
MONITOR
VIDEO L-AUDIO-R
OUT
AV1
ANT
HDMI1HDMI
2
INPUT
PC
PC/HDMI 1
AUDIO
Y Pb Pr L-AUDIO-R
COMP 1
COMP 2
SERVICE
OPTICAL
DIGITAL AUDIO
S-VIDEO
Antenna Input
REAR OF THE TV SET
Page 13

Antenna
Connection
12
Antenna socket at the back of the TV set
ANT
ANT
Combining adapter
Antenna Connection
When a coaxial cable is used : Plug the coaxial cable to the antenna socket on the wall.
When a feeder cable is used : Plug the coaxial cable to the antenna socket on the wall.
Antenna socket at the back of the TV set
Page 14

Antenna
Connection
13
Outdoor Antenna Connection
Outdoor Antenna connection-such as VHF or/and UHF-may be necessary for installation at private houses
Single Antenna Connection
Separate Antenna Connection.
VIDEO L-AUDIO-R
MONITOR
VIDEO L-AUDIO-R
OUT
AV1
ANT
HDMI1HDMI
2
INPUT
PC
PC/HDMI 1
AUDIO
Y Pb Pr L-AUDIO-R
COMP 1
COMP 2
SERVICE
OPTICAL
DIGITAL AUDIO
S-VIDEO
VHF Antenna
UHF Antenna
ANT
REAR OF THE TV SET
ANT
Page 15

Video
Connection
14
INPUT
VIDEO L-AUDIO-R
MONITOR
VIDEO L-AUDIO-R
OUT
AV1
ANT
HDMI1HDMI
2
PC
PC/HDMI 1
AUDIO
Y Pb Pr L-AUDIO-R
COMP 1
COMP 2
SERVICE
OPTICAL
DIGITAL AUDIO
S-VIDEO
USB
R-AUDIO-L VIDEO
AV2
INPUT
Note : • If your AV device has both Video OUT terminal and S-Video OUT terminal, S-Video connection is
recommended for better picture quality.
• If S-Video and RCA jack are connected at the same time, the TV set will only detect the S-Video
mode.
Connecting with an External Source
You may connect S-Video1(Rear of the TV) input to enjoy clearer and brighter picture images. You can
make the connection with the AV1 or AV2 input.
REAR AND SIDE OF THE TV SET
Page 16

Camcorder & Video
Game Connection
15
Note : • If your AV device has both Video OUT terminal and S-Video OUT terminal, S-Video connection is
recommended for better picture quality.
• If S-Video and RCA jack are connected at the same time, the TV set will only detect the S-Video
mode.
Watching the Camcorder Recording or Video Game on TV
1. You can use either the S-video or the RCA connector.
2. These connectors connect to AV1/2 or S-Video1 as shown below.
3. Turn on the TV set and camcorder/video game.
4. Press "INPUT" and then You can see input menu. Select AV1, AV2 or S-Video1 mode by pressing
" " and “OK” key.
VIDEO L-AUDIO-R
MONITOR
VIDEO L-AUDIO-R
OUT
AV1
ANT
HDMI1HDMI
2
INPUT
PC
PC/HDMI 1
AUDIO
Y Pb Pr L-AUDIO-R
COMP 1
COMP 2
SERVICE
OPTICAL
DIGITAL AUDIO
S-VIDEO
USB
R-AUDIO-L VIDEO
AV2
INPUT
REAR AND SIDE OF THE TV SET
Page 17

DVD player
connection
16
VIDEO L-AUDIO-R
MONITOR
VIDEO L-AUDIO-R
OUT
AV1
ANT
HDMI1HDMI
2
INPUT
PC
PC/HDMI 1
AUDIO
Y Pb Pr L-AUDIO-R
COMP 1
COMP 2
SERVICE
OPTICAL
DIGITAL AUDIO
S-VIDEO
VIDEO L-AUDIO-R
MONITOR
VIDEO L-AUDIO-R
OUT
AV1
ANT
HDMI1HDMI
2
INPUT
PC
PC/HDMI 1
AUDIO
Y Pb Pr L-AUDIO-R
COMP 1
COMP 2
SERVICE
OPTICAL
DIGITAL AUDIO
S-VIDEO
USB
R-AUDIO-L VIDEO
AV2
INPUT
REAR OF THE TV SET
REAR AND SIDE OF THE TV SET
Note : When you connect with the component, please check the color of cable between DVD and TV set.
Note :
• If your AV device has both Video OUT terminal and S-Video OUT terminal, S-Video connection is
recommended for better picture quality.
• If S-Video and RCA jack are connected at the same time, the TV set will only detect the S-Video
mode.
When connecting with a component cable
When connecting with a S-VHS cable and RCA cable
Page 18

STB(Set Top Box)
Connection
17
VIDEO L-AUDIO-R
MONITOR
VIDEO L-AUDIO-R
OUT
AV1
ANT
HDMI1HDMI
2
INPUT
PC
PC/HDMI 1
AUDIO
Y Pb Pr L-AUDIO-R
COMP 1
COMP 2
SERVICE
OPTICAL
DIGITAL AUDIO
S-VIDEO
REAR OF THE TV SET
VIDEO L-AUDIO-R
MONITOR
VIDEO L-AUDIO-R
OUT
AV1
ANT
HDMI1HDMI
2
INPUT
PC
PC/HDMI 1
AUDIO
Y Pb Pr L-AUDIO-R
COMP 1
COMP 2
SERVICE
OPTICAL
DIGITAL AUDIO
S-VIDEO
Set Top Box
REAR OF THE TV SET
When connecting with a HDMI cable
When connecting with a component cable
Page 19

PC
Connection
18
VIDEO L-AUDIO-R
MONITOR
VIDEO L-AUDIO-R
OUT
AV1
ANT
HDMI1HDMI
2
INPUT
PC
PC/HDMI 1
AUDIO
Y Pb Pr L-AUDIO-R
COMP 1
COMP 2
SERVICE
OPTICAL
DIGITAL AUDIO
S-VIDEO
1. Adjust PC resolution to available resolution in LCD TV.
2. Connect the PC and TV set using the D-Sub and Audio cable like below the picture.
3. Turn on the PC and TV set.
4. Press "INPUT" and then You can see input menu. Select PC mode by pressing "
" or "OK" key.
VIDEO L-AUDIO-R
MONITOR
VIDEO L-AUDIO-R
OUT
AV1
ANT
HDMI1HDMI
2
INPUT
PC
PC/HDMI 1
AUDIO
Y Pb Pr L-AUDIO-R
COMP 1
COMP 2
SERVICE
OPTICAL
DIGITAL AUDIO
S-VIDEO
1. Adjust PC resolution to available resolution in LCD TV.
2. Connect the PC and TV set using the HDMI and Audio cable like below the picture.
3. Turn on the PC and TV set.
4. Press "INPUT" and then You can see input menu. Select PC mode by pressing "
" or "OK" key.
REAR OF THE TV SET
REAR OF THE TV SET
When connecting with PC(D-Sub) cable.
When connecting with a HDMI cable.
Note : If the graphic card of the PC only support DVI signal, you must connect the Audio cable as shown above.
Page 20

PC
Connection
19
PC CONNECTION NOTES:
1) If there is a [Vertical Frequency] setting menu in the [Screen] Menu of the PC, adjust the frequency to 60Hz.
2) If the PC resolution is too high, it may be hard to read letters. Select a suitable resolution.
3) HDMI input port receives only Digital Signal.
4) Depending on the graphic card when you plug & unplug the HDMI connection, the screen may not display
correctly.
Restart the computer if this happens.
Note :
1. When you connect with component, PC (D-Sub), and HDMI, you must check the input resolution of
external devices.
2. So if this mode is used at PC mode, the screen can be enlarged.
Page 21

USB
Connection
20
USB CONNECTION NOTES:
Only a USB mass storage device is recognizable.
If the USB storage device is connected through a USB hub,
the device is not recognizable.
A USB storage device using an automatic recognition
program may not be recognized.
A USB storage device which uses its own driver may not be
recognized.
The recognition speed of a USB storage device may depend
on each device.
Please do not turn off the TV or unplug the USB device when
the connected USB storage device is working. When such
device is suddenly separated or unplugged, the stored files or the USB storage device may be damaged.
Please do not connect the USB storage device which was artificially maneuvered on the PC. The device may
cause the product to malfunction or fail to be played. Never forget to use only a USB storage device which
has normal music files or image files.
Please use only a USB storage device which was formatted as a FAT or NTFS file system provided with the
Windows operating system. In case of a storage device formatted as a different utility program which is not
supported by Windows, it may not be recognized.
Please connect power to a USB storage device which requires an external power supply. If not, the device
may not be recognized.
Please connect a USB storage device with cable is offered by USB maker. If connected with cable is not
offered by USB maker or an excessively long cable, the device may not be recognized.
Some USB storage devices may not be supported or operated smoothly.
File alignment method of USB storage device is similar to Window XP and filename can recognize up to
16 English characters.
Please backup important files because data on USB device may be damaged. Data management is
consumer's responsibility and as a result, the manufacturer does not cover data damage.
USB
R-AUDIO-L VIDEO
AV2
INPUT
Momery Stick
• Connect the USB device to the USB in
jacks on the side of TV.
Page 22

Cable TV
Broadcasting
Connection
21
Watching cable television is only possible after you have subscribed to the local broadcasting company and
installed a cable receiver.
VIDEO L-AUDIO-R
MONITOR
VIDEO L-AUDIO-R
OUT
AV1
ANT
HDMI1HDMI
2
INPUT
PC
PC/HDMI 1
AUDIO
Y Pb Pr L-AUDIO-R
COMP 1
COMP 2
SERVICE
OPTICAL
DIGITAL AUDIO
S-VIDEO
External Input Connection Source
Antenna Input Connection
Watching cable television is only possible after you have subscribed to the local broadcasting company
and installed a cable receiver. You may make the connection to either the Component input, Video1 input
or Video2 input.
REAR OF THE TV SET
Page 23

Connect with the
Dolby Digital AMP.
22
VIDEO L-AUDIO-R
MONITOR
VIDEO L-AUDIO-R
OUT
AV1
ANT
HDMI1HDMI
2
INPUT
PC
PC/HDMI 1
AUDIO
Y Pb Pr L-AUDIO-R
COMP 1
COMP 2
SERVICE
OPTICAL
DIGITAL AUDIO
S-VIDEO
Surround L Surround R
RL CenterWoofer
Dolby Digital AMP
I
N
P
U
T
Optical output
If you connect the optical output to a Dolby digital AMP, you can listen to better sound.
REAR OF THE TV SET
Page 24

Name of
Each Part
23
Control Key Buttons.
INPUT Buttons : Each time you press this button, the TV will cycle through:
AIR/CABLE AV1 AV2 Component1 Component2 HDMI1 HDMI2 PC
MENU Button : Use this button to enter and exit the MENU.
VOL Buttons : Use this buttons to change your TV’s volume or to move cursor in the menu.
CH Buttons : Use this buttons to change channels on your TV or to move cursor in the menu.
POWER Button : Use this button to TV STAND-BY mode/TV ON mode.
Remote control signal receiver
The screen contains the remote control signal receiving window; therefore, point the remote control
towards the screen when using it.
Stand-by <LED Indicator>
LED BLUE - Standby
LED OFF - SET ON
Buttons on the TV set have the same functions as those of the remote control.
SIDE OF THE TV SET
Front Panel and Side
INPUT MENU VOL CH POWER
1
2
3
4
5
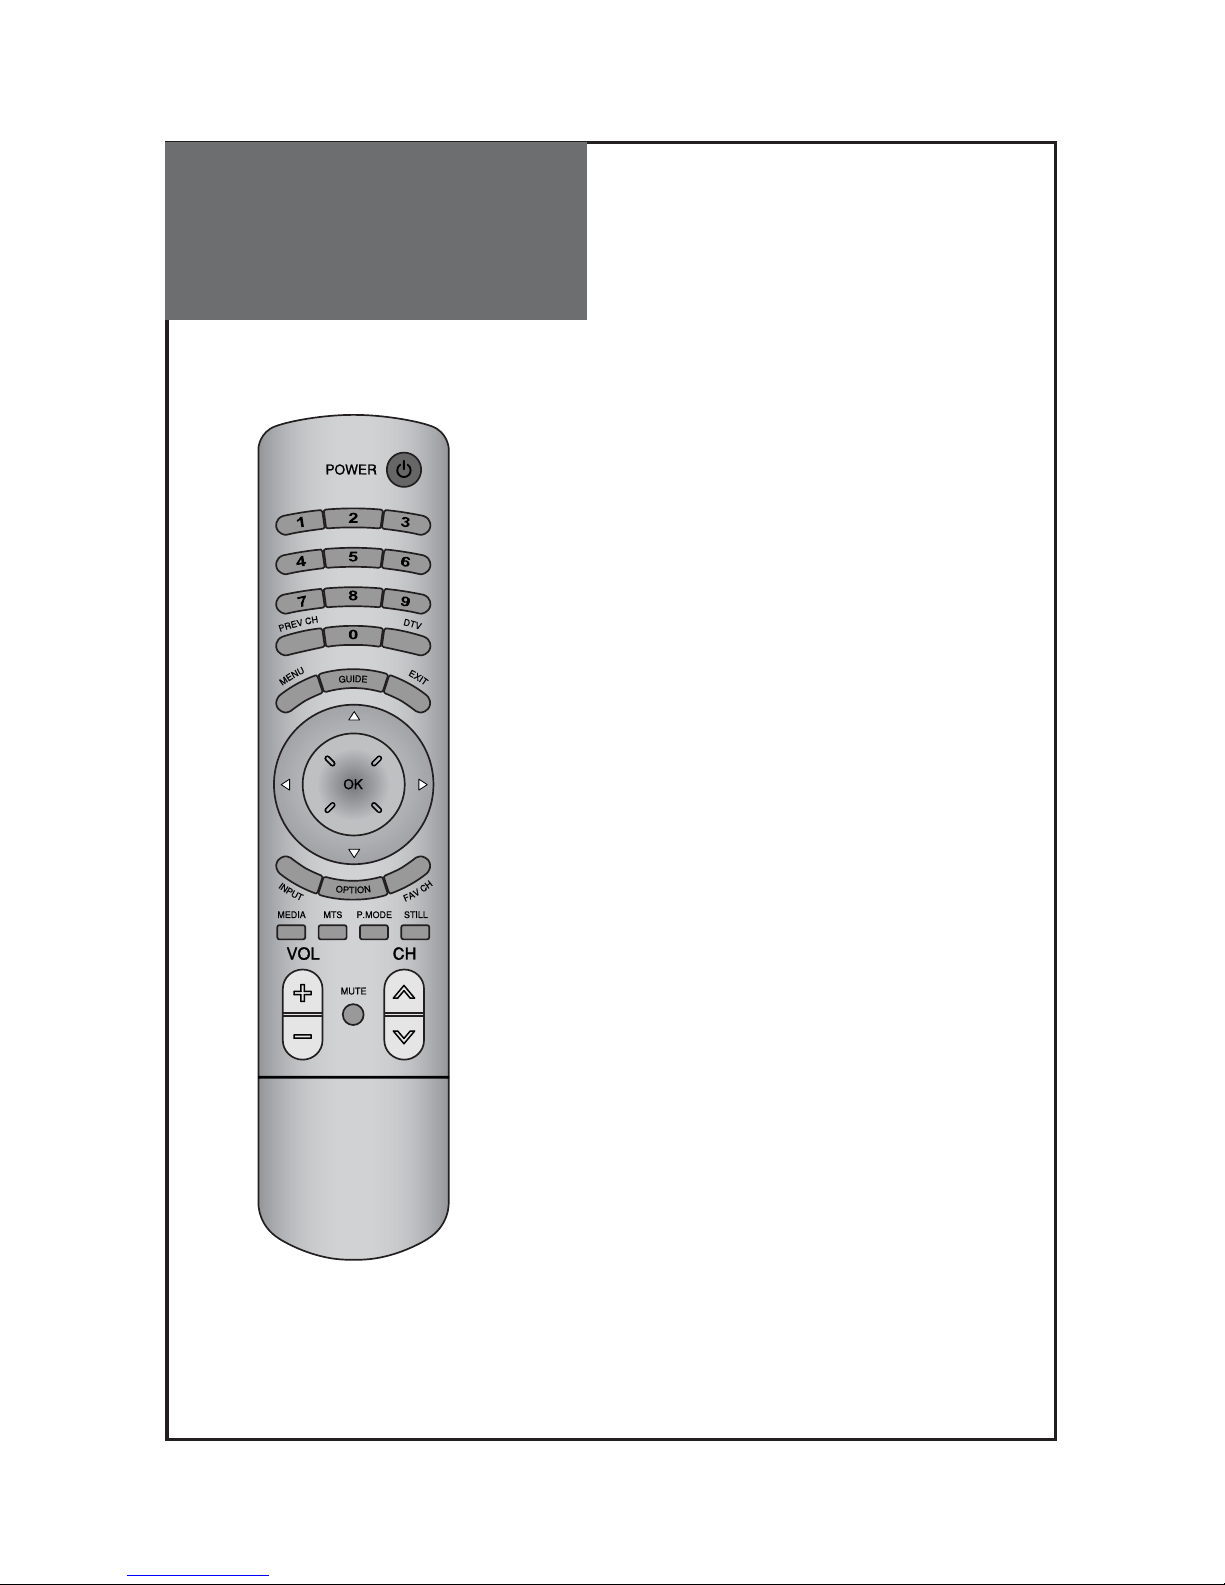
Page 25

Name of
Each Part
24
REAR OF THE TV SET
VIDEO L-AUDIO-R
MONITOR
VIDEO L-AUDIO-R
OUT
AV1
ANT
HDMI1HDMI
2
INPUT
PC
PC/HDMI 1
AUDIO
Y Pb Pr L-AUDIO-R
COMP 1
COMP 2
SERVICE
OPTICAL
DIGITAL AUDIO
S-VIDEO
Rear of the TV set
Page 26
Functionsa of the
remote control
25
1, POWER : Turns the TV on and off.
2, NUMBER : Press the numbers on this board; you can select
CH directly in TV mode.
(EX: When you want to select CH10, you should press down
"1", "0" and "OK" within 5second. If you only press down
"1", after 5second, CH1 will be selected.)
3, DTV(-) : Used to enter a program number for multiple
program channels such as 2-1, 2-2, etc.
4. PREVIOUS CH : Press this button, you can tune to the
previous channel.
5, EXIT : Exit from the MENU.
6, MENU : Displays the main on-screen menu.
Picture, Sound, Channel, Feature, Time.
7, GUIDE : Access Electronic Program Guide (EPG). It works
only in DTV mode.
8, NAVIGATION KEY : You can use Navigation Key to move in
multi mode.
9, FAVORITE CH : Press to switch to your favorite channels.
10, INPUT : Each time you press this button, the TV will cycle
Through: AIR/CABLE -> AV1/2 -> Comp.1/2
-> HDMI1/2 -> PC
11, OPTION : Use to quickly select frequently used functions.
12, STILL : Press this button to freeze the picture.
13, MEDIA : To enter the MEDIA HOME (It can be used only
when USB is connected to the TV)
14, P.MODE : Picture modes change as follows:
Normal -> User -> Dynamic -> Cinema -> Normal.
15, MTS : In Analog, you can select sound mode
(Mono/Stereo/SAP). In Digital, you can select audio
tracks (EX:English/Spanish/French).
16, CH :
Press to switch to your memorized channels in sequence.
17, VOL : Adjust the volume.
18, MUTE : Press this button, and the sound goes off. Press
again, and the sound returns.
-
Page 27

Battery Installation
26
Inserting Batteries into the Remote Control Unit
To install the batteries, turn the remote control over and open the
battery compartment. Insert the batteries (Two 1.5V, type AAA).
Make sure that the polarity matches with the (+) and (-) marks
inside of the battery compartment.
Note:
To avoid damage from possible battery leakage, remove the
batteries if you do not plan to use the remote control handset for an
extended period of time.
-
Page 28

Basic Menu
27
Adjusts Picture Mode
- Mode(Normal, User, Dynamic, Cinema), Brightness, Contrast, Color, Tint (NTSC only), Sharpness,
Noise Reduction, Color Temp, Dimming, Aspect Ration and PC Screen Mode (Only PC Mode).
Adjusts Sound Mode
- Effect(Off,Dynamic Bass,ST Voice), Mode(Normal,Movie,Music,News,User),
Equalizer,Balance, Auto Volume Control, Digital Volume and Speaker
Adjusts Channel Mode
- Auto Search, Antenna(Air/Cable) Edit Channel, Fine Tune, Singnal Strength
Adjusts Feature Mode
-
Parental Control, Language(English, Espanol, Francais), Caption, Menu Opacity,
MGDI Demonstration, Initialize
Adjusts Time Mode
- Clock Mode, Current Time Set, Time Zone, DST, Sleep Timer, On Timer, Off Timer
Color temp.
Dimming
Aspect Ratio
PC Screen Mode
Move
Off
16 : 9
RG
Noise Reduction
User
42
81
58
10
50
OK Select MENU Exit
2. Press the ” ” button.
• You may setup according to the directions on the
screen after selecting the desired item by pressing the
”
” button.
• If the setup is completed, exit from the menu by
pressing the “MENU” button.
Color temp.
Dimming
Aspect Ratio
PC Screen Mode
Move
Off
16 : 9
RG
Noise Reduction
User
42
81
58
10
50
OK Select MENU Exit
- The basic menu appears on the screen if you press the menu button of the remote control.
- There are 5 items Picture, Sound, Channel, Features, and Time in the basic menu.
- Each item has sub-items under it. If the desired item is selected, the relevant sub-items are displayed
upward.
1. Press the "MENU" button.
• The main menu appears if you press the “MENU” button.
Basic Menu
Page 29

To Watch TV
28
- Buttons with same name in the main body performs the same function.
-
When pressing the Digit Key button
• Press the "OK" button if using the number button for channel
selection. For example, to watch the No.9 channel, Press the
number button "9" and the "OK" button. If pressing only
number “9” button, it takes a longer time to select the channel.
• To watch the No.9-1 channel, Press the button "9", "
", "1"
and "OK" in sequence.
Press the “POWER” button on TV set or
Remote control.
Note:
• The buttons of the remote control and the main body
operate only when AC power turn on.
• You must pull out the plug of TV set to shut off the AC
Power
To turn sound off
• Press the “MUTE” button.
• No sound is heard if “MUTE” is displayed on the screen.
• Sound is heard again if you press the “MUTE” button once
again.
Check of TV operation status
• Pressing the “OK” button, the status of channel or clock
broadcasting being currently watched or entry status of
video component is displayed on the screen.
Power, Number, DTV, OK, Mute, Input, ,
Page 30

To Watch TV
29
30
AirAnalog
26
1. Press the “POWER” button on TV set or remote
control.
• The Stand-by LED lamp turns on in blue color.
• Press the “POWER” button on the TV set or remote
control.
• The Stand By LED lamp on the front panel begins to
flicker in blue color and the TV turns on.
2. Press the “ CH ” button.
• Select the desired program by pressing the “CH”
button or the number buttons.
3. Adjust volume.
• Sound reduces by pressing the “VOL
” button.
• Sound increases by pressing the “
VOL” button.
Note : Sound mutes by pressing the “MUTE” button.
4.Press the “POWER” button of right side of the set or
Remote control for turning the TV off.
• TV turns off and the power lamp changes to blue color.
Page 31

Setting Up TV
Stations
30
- All stations that can be received are stored by this method. It is recommended that you use Auto tuning during
installation of this set.
Move OK Select MENU Exit
A
n
te
n
n
a
E
d
it C
h
a
n
n
e
l
F
in
e
Tu
n
e
S
ig
n
a
l S
tre
n
g
th
2
Move Change MENU Return
E
d
it C
h
a
n
n
e
l
F
in
e
Tu
n
e
S
ig
n
a
l S
tre
n
g
th
2
A
n
te
n
n
a
Move Change MENU Return
Edit Channel
Fine Tune
Signal Strength
2
Antenna
Auto Search in Progress..
Channel Found : 0
Auto Search
27 %
OK Analog MENU Exit
Move Change MENU Return
Edit Channel
Fine Tune
Signal Strength
2
Antenna
This will automatically search the
channels, do you wat to preoceed?
Auto Search
OK Analog MENU Exit
Cancel OK
Move
Move Change MENU Return
E
d
it C
h
a
n
n
e
l
F
in
e
Tu
n
e
S
ig
n
a
l S
tre
n
g
th
2
A
n
te
n
n
a
1. Press the “MENU” button to select the Channel menu.
• Move the selection bar to the Channel menu with
”
” buttons.
3. Select the "Auto Search".
• Place the selection bar on Auto Search and press the
“
” button.
4. Select the "OK" selection bar pressing
by “
” button.
5. Wait until the Channel menu appears.
Auto Search to find Channels
2. Select the “Antenna”
• Place the selection bar on Antenna and select Air or
Cable with “
” buttons.
Page 32

Setting Up TV
Stations
31
1. Searching for channel finely
• Select a Channel number you want to tune finely with
the “CH”buttons.
• Press the “MENU” button and move to the Channel
menu.
• Move the selection bar to the Fine tune with ”
”
buttons.
• Press the “CB“ buttons to adjust the fine tuning.
FAV.CH Favorite Channel Add/Del
Channel Select Add
Del
MENU Return
E
d
it C
h
a
n
n
e
l
A
d
d
D
e
l
1
5
1
3
1
5
4
0
4
5
Fine tune
Edit Channel
Note:
• If you are unable to get a good picture or Sound because of a poor broadcasting signal,
adjustment of Frequency might improve it.
1. Adding the Channel
• Select a Channel number you want to add with the
“NUMBER” buttons.
•
Press MENU Button. Select Channel by pressing “ “.
• Move to Edit Channel. Then select “ADD/DEL” by
pressing
“CB“.
2. Deleting the Channel
•
Press MENU Button. Select Channel by pressing “ “.
• Move to Edit Channel. Then select “ADD/DEL” by
pressing
“CB“.
FAV.CH Favorite Channel Add/Del
Channel Select Add
Del
MENU Return
E
d
it C
h
a
n
n
e
l
A
d
d
D
e
l
1
5
1
3
1
5
4
0
4
5
Move Select MENU Return
E
d
it C
h
a
n
n
e
l
F
in
e
Tu
n
e
S
ig
n
a
l S
tre
n
g
th
2
A
n
te
n
n
a
 Loading...