

Page 1
Crosley®
LAUNDRY CENTER
Owner's Guide
LAVADORA Y SECADORA
SUPERPUESTAS
Manual Del Usuario
www.crosley.com
1
PN 134857400A (0712)
Page 2

Table of Contents
Important Safety Instructions.............................................2-4
Washing Procedures........................................................4-5
Stain Removal...................................................................6
Common Washing Problems...............................................7
Drying Procedures .............................................................8
Features ..........................................................................9
Commom Drying Problems..................................................9
Assistance or Service
If you need assistance or service, first see the "Avoid Service
Checklist" section. Additional help is available by calling
1-800-944-9044 from anywhere in the U.S.A., or write:
Crosley Corporation
111 Cloverleaf Dr.
Suite 200
Winston Salem, NC 27103
Information may also be obtained by vising our website at
www.crosley.com.
In Canada, for assistance, installation or service call:
1-800-668-4606, or write:
Crosley Corporation
111 Cloverleaf Dr.
Suite 200
Winston Salem, NC 27103
Note: The instructions appearing in this Owner's Guide are not meant to cover every possible condition and situation that may occur.
Common sense and caution must be practiced when installing, operating and maintaining any appliance.
This Owner's Guide provides general operating instructions for your laundry center. It also contains information about features for
several other models. Your laundry center may not have every feature included.
Use the laundry center only as instructed in this Owner's Guide and the Operating Instructions card included with your laundry
center .
The symbol on the product or on its packaging indicates that this product may not be treated as household waste. Instead
it shall be handed over to the applicable collection point for the recycling of electrical and electronic equipment. By ensuring this
product is disposed of correctly, you will help prevent potential negative consequences for the environment and human health,
which could otherwise be caused by inappropriate waste handling of this product. For more detailed information about recycling
of this product, please contact your local city office, your household waste disposal service or the shop where you purchased
the product.
Care and Cleaning.......................................................10-11
Avoid Service Checklist................................................11-13
Warranty and Service........................................................14
Español.....................................................................15-28
Read and Save These Instructions
Product Registration
Thank you for choosing this laundry center. This owner's
guide will explain proper operation and care.
Register Your Product
The self-addressed PRODUCT REGISTRATION CARD should be
filled in completely, signed and returned.
Record Your Model and Serial Numbers
The model and serial numbers of your laundry center are found
on the dryer serial plate located on the left side of the door
opening. Record and retain these numbers.
Model Number:___________________________________
Serial Number:____________________________________
Purchase Date:____________________________________
LAUNDRY CENTER SAFETY
Your safety and the safety of others is very important.
We have provided many important safety messages in the Use and Care Guide, Operating Instructions, Installation Instructions and
on your appliance. Always read and obey all safety messages.
This is the safety alert symbol. This symbol alerts you to hazards that can kill or hurt you or others. All safety messages will
be preceded by the safety alert symbol and the word "DANGER" or "WARNING". These words mean:
DANGER
All safety messages will identify the hazard, tell you how to reduce the chance of injury, and tell you what can happen if the
instructions are not followed.
For your safety, the information in this manual must be followed to minimize the risk of fire or explosion or to prevent
property damage, personal injury or loss of life.
- Do not store or use gasoline or other flammable vapors and liquids in the vicinity of this or any other appliance.
- WHAT TO DO IF YOU SMELL GAS:
• Do not try to light any appliance.
• Do not touch any electrical switch; do not use any phone in your building.
• Clear the room, building or area of all occupants.
• Immediately call your gas supplier from a neighbor's phone. Follow the gas supplier's instructions.
• If you cannot reach your gas supplier, call the fire department.
Installation and service must be performed by a qualified installer, service agency or the gas supplier.
You can be killed or seriously injured if you don't immediately follow instructions.
You can be killed or seriously injured if you don't follow instructions.
2
Page 3
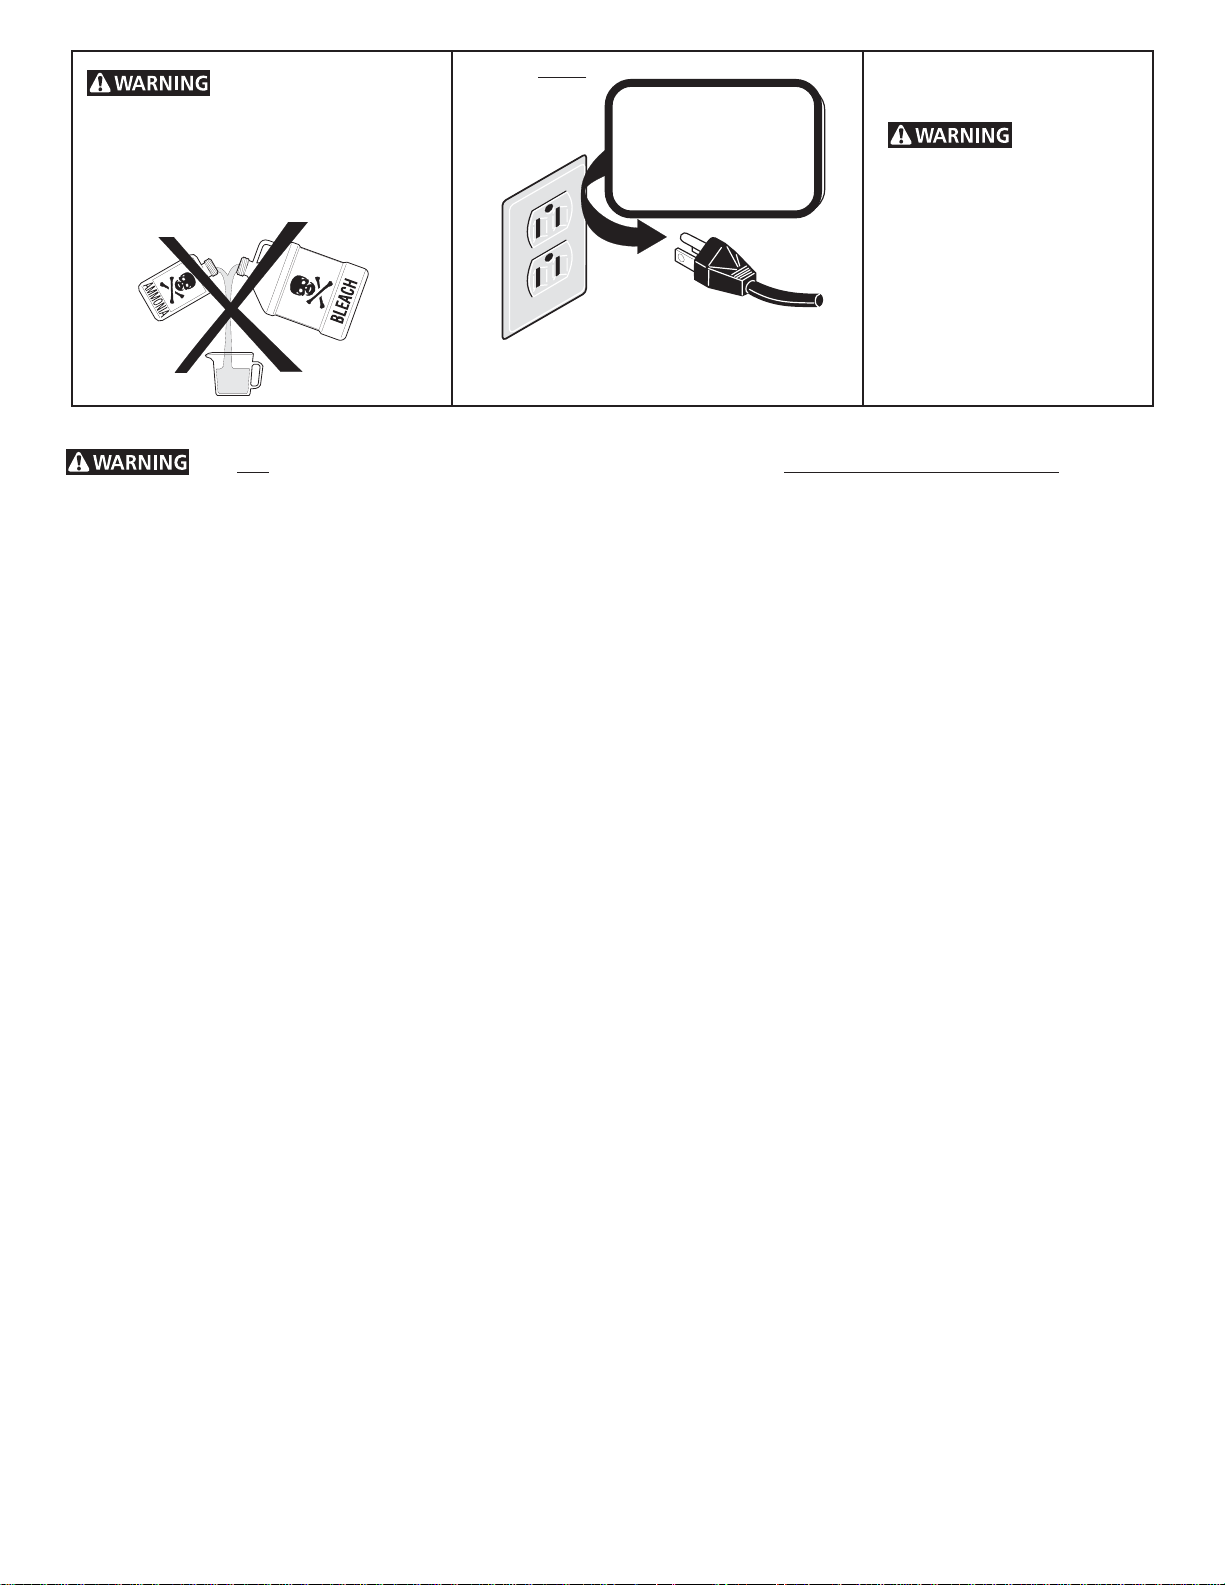
chlorine bleach with other household
Grounding type
w
grounding plug
chemicals such as toilet cleaners, rust
removers, acid or products containing
ammonia. These mixtures can produce
dangerous fumes which can cause serious
injury or death.
Important Safety Instructions Read all instructions before using this laundry center.
• To reduce the risk of fire, electrical shock, or injury to persons when using this laundry center, comply with the basic warnings
listed below.
• Failure to comply with these warnings could result in serious personal injuries.
Prevent Fire
• Do not wash or dry items that have been previously cleaned in, soaked in, or spotted with gasoline, cleaning solvents, kerosene,
waxes, etc. Do not store these items on or near the dryer. These substances give off vapors that could ignite or explode.
• Do not place items exposed to cooking oils in your dryer. Items contaminated with cooking oils may contribute to a chemical
reaction that could cause a load to catch fire.
• Do not put oily or greasy rags or clothing on top of the laundry center. These substances give off vapors that could ignite the
materials.
• Do not add gasoline, cleaning solvents, or other flammable or explosive substances to the wash water. These substances give
off vapors that could ignite or explode.
• Under certain conditions, hydrogen gas may be produced in a hot water system that has not been used for 2 weeks or more.
HYDROGEN GAS IS EXPLOSIVE. If the hot water system has not been used for such a period, before using the washer, turn
on all hot water faucets and let the water flow from each for several minutes. This will release any accumulated hydrogen gas.
Hydrogen gas is flammable; do not smoke or use an open flame during this time.
• To prevent fire, do not use heat to dry items containing plastic, foam rubber or similarly textured rubber-like materials, or items
containing feathers or down. Use Air Fluff (No Heat) only.
• Clean the dryer lint screen before or after each load. The interior of the dryer, lint screen housing and exhaust duct should be
cleaned approximately every 18 months by qualified service personnel. An excessive amount of lint build-up in these areas could
result in inefficient drying and possible fire. See Care and Cleaning.
• Do not operate the dryer if the lint screen is blocked, damaged or missing. Fire hazard, overheating and damage to fabrics can
occur. If your dryer has a drying rack, always replace the lint screen when finished using the drying rack.
• Keep area around the exhaust opening and surrounding areas free from the accumulation of lint, dust and dirt.
• Do not obstruct the flow of ventilating air. Do not stack or place laundry or throw rugs against the front or back of the laundry
center.
• Do not spray any type of aerosol into, on or near laundry center at any time.
• Do not use fabric softeners or products to eliminate static unless recommended by the manufacturer of the fabric softener or
product.
• Failure to comply with these warnings could result in fire, explosion, serious bodily injury and/or damage to the rubber or plastic
parts of the laundry center.
Protect Children
• Do not allow children to play on or in the laundry center. Close supervision of children is necessary when the laundry center is
used near children. As children grow, teach them the proper, safe use of all appliances.
• Destroy the carton, plastic bag and other packing materials after the laundry center is unpacked. Children might use them for
play. Cartons covered with rugs, bedspreads or plastic sheets can become airtight chambers.
• Keep laundry products out of children's reach. To prevent personal injury, observe all warnings on product labels.
• Before the laundry center is removed from service or discarded, remove the washer lid and dryer door to prevent accidental
entrapment.
• Failure to comply with these warnings could result in serious personal injuries.
Prevent Injury
• To prevent shock hazard and assure stability during operation, the laundry center must be installed and electrically grounded
by a qualified service person in accordance with local codes. Installation instructions are packed in the laundry center for the
installer's reference. Refer to INSTALLATION INSTRUCTIONS for detailed grounding procedures. If the laundry center is moved
to a new location, have it checked and reinstalled by a qualified service person.
• To prevent personal injury or damage to the laundry center, the electrical power cord of a gas laundry center must be plugged into
a properly grounded system. Never ground the laundry center to a gas pipe. Do not use an extension cord or an adaptor
plug.
all receptacle
GASGAS
LAUNDRY CENTERS: LAUNDRY CENTERS:
GAS
LAUNDRY CENTERS:
GASGAS
Do not use or mix liquid
Grounding type
wall receptacle
LAUNDRY CENTERS: LAUNDRY CENTERS:
Do not under
Do not under
any circumstances
any circumstances
cut, remove,
cut, remove,
or bypass
or bypass
the grounding prong
the grounding prong
from this plug
from this plug.
Avoid fire
hazard or electrical shock. Do
not use an adaptor plug or
extension cord or remove
grounding prong from electrical
power cord. Failure to follow
this warning can cause serious
Power supply
Power supply cord with
cord with 3-prong
3-prong grounding plug
injury, fire or death.
CORRECT
Use this way ONLY
You can be killed or seriously injured if you don't follow these Important Safety Instructions:
3
Printed in U.S.A.
Page 4
Important Safety Instructions Con't
• Follow package directions when using laundry products. Incorrect usage can produce poisonous gas--resulting in serious injury
or death.
- Do not combine laundry products for use in 1 load unless specified on the label.
- Do not mix chlorine bleach with ammonia or acids such as vinegar.
Washing Procedures
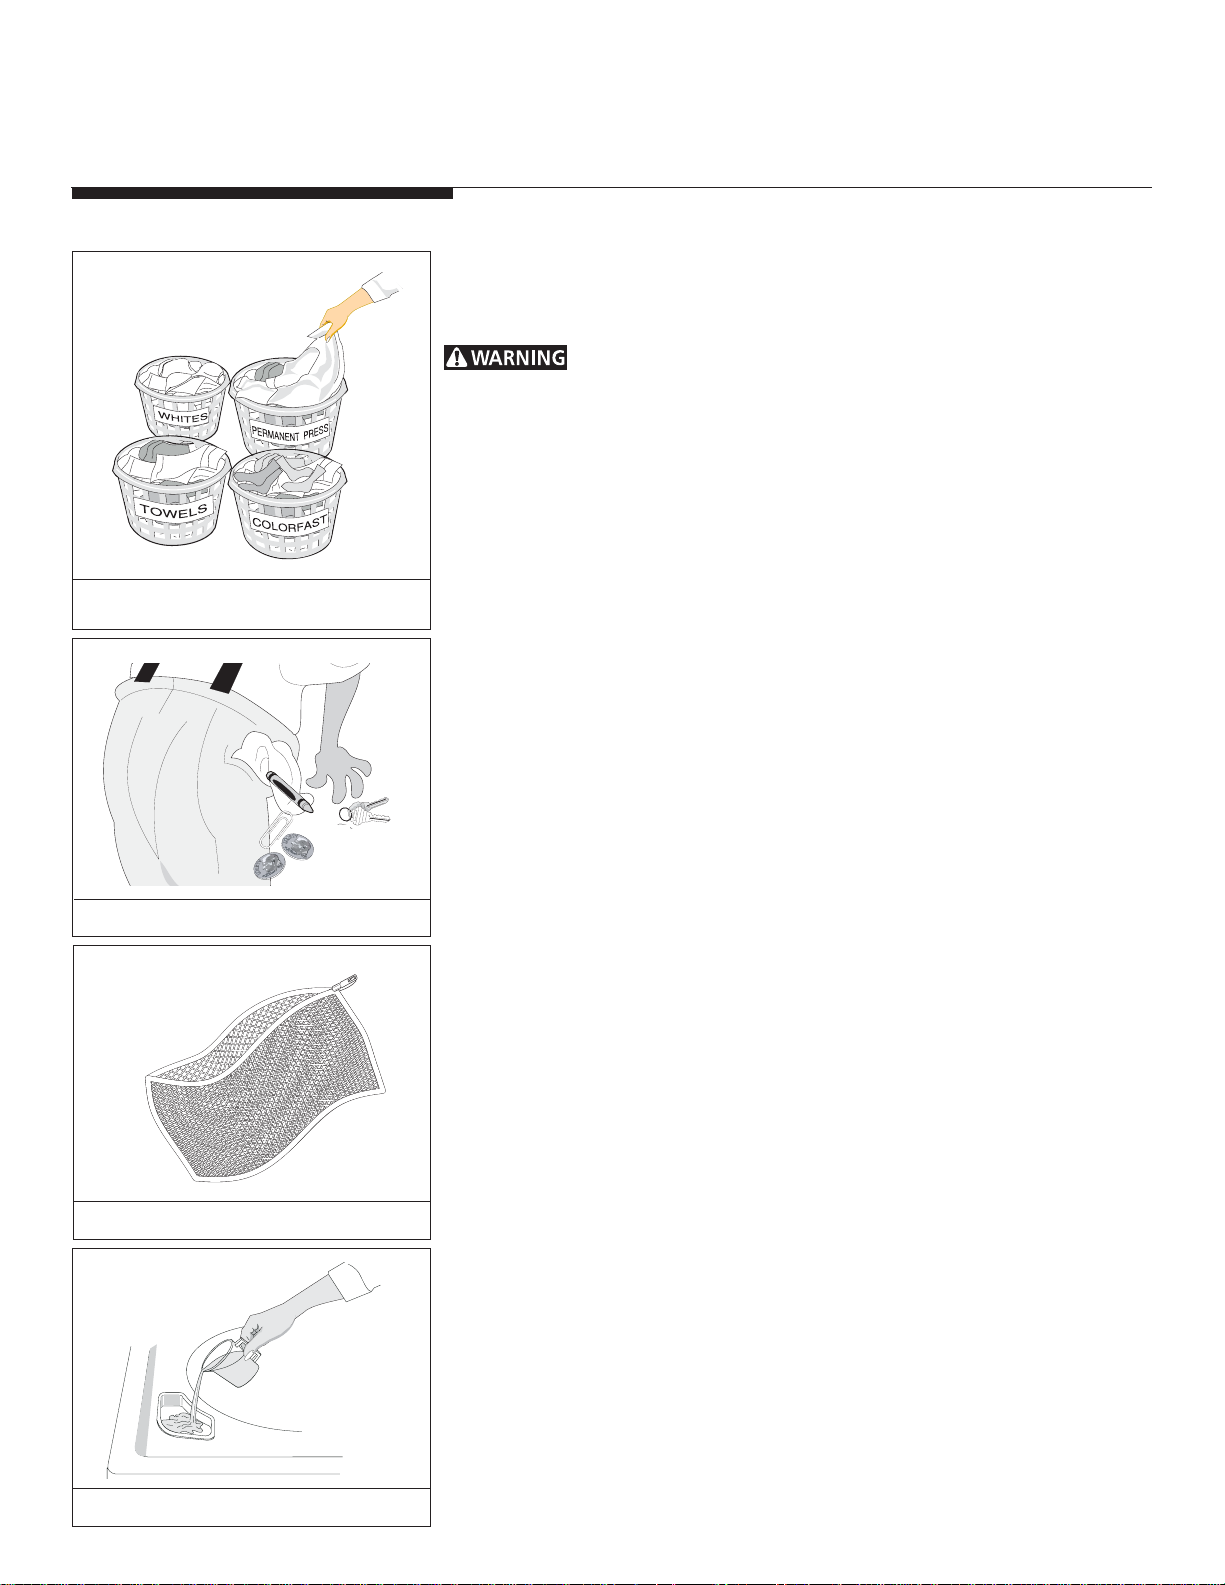
Sort laundry into loads that can be
washed together.
Empty pockets.
• Follow the guidelines below for preparing the wash load.
• Read the Washer Operating Instructions for operating your specific model.
• Always read and follow fabric care and laundry product labels.
To reduce the risk of fire, electrical shock, or injury to persons, read
Important Safety Instructions before operating this washer.
1. Sort laundry into loads that can be washed together.
Sort items by recommended water temperatures, wash time, and agitate/spin
speeds.
• Separate white, light, and colorfast items from dark and noncolorfast items.
• Separate items which shed lint from items which attract lint. Permanent press,
synthetic, knit and corduroy items will pick up lint from towels, rugs and
chenille bedspreads.
• Separate heavily soiled items from lightly soiled items.
• Separate lacy, sheer and loosely knit items from sturdy items.
2. Prepare items for washing.
• Empty pockets.
• Brush off lint and dirt. Shake out rugs and beach towels.
• Close zippers, fasten hooks, tie strings and sashes, and remove nonwashable
trims and ornaments.
• Remove pins, decorative buttons, belt buckles, and other objects which could
be damaged. This also helps protect other items in the wash load.
• Mend rips and tears to prevent further damage during washing.
• Place delicate items such as bras, shoulder pads, hosiery, and belts in a mesh
bag to prevent tangling during the wash cycle.
• Turn knit items inside out to prevent pilling.
Place delicate items in a mesh bag.
Bleach Dispenser (some models)
3. Pretreat stains and heavy soil.
See Stain Removal for details.
4. Add a measured amount of detergent to the wash tub before
adding the laundry load.
Follow detergent manufacturer's directions. The amount required depends on type
of detergent, load size and soil level, and water hardness.
5. If desired, add liquid bleach to Bleach Dispenser (available on
some models).
• Before adding the wash load, add liquid bleach to bleach dispenser located in
left front corner under the lid:
• 3/4 cup (180 ml) for small loads
• 1 cup (240 ml) for large loads
• 1-1/4 cups (300 ml) for extra-large loads.
• Then add 1 cup (240 ml) water to flush the dispenser.
• Do not use powdered bleach in the bleach dispenser. Add powdered bleach
to the empty tub.
For models without a bleach dispenser, dilute the recommended amount of
liquid chlorine bleach in 1 quart (.95 L) water. Add it to wash water after
a few minutes of agitation. Do not pour bleach directly on wash load.
4
Page 5
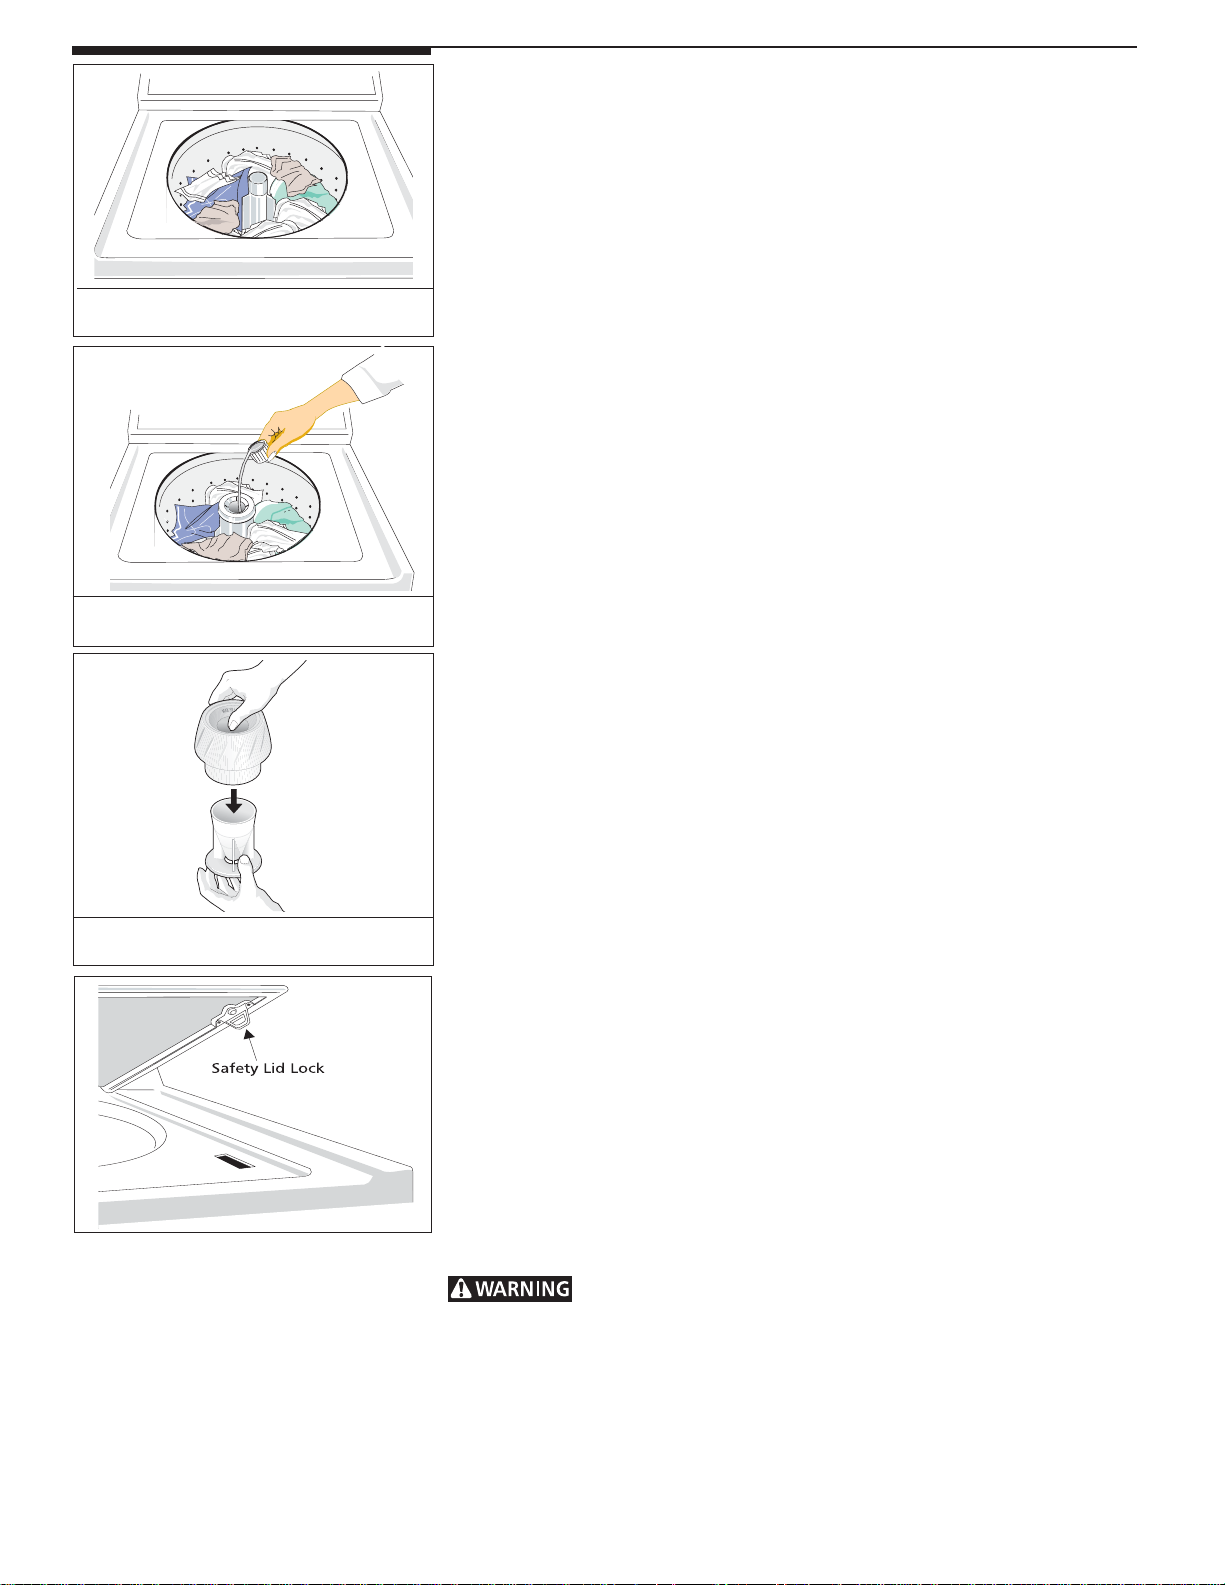
Do not load items higher than top of
agitator vanes.
Built-In Fabric Softener Dispenser
(some models)
Washing Procedures
(continued)
6. Add laundry load to washer.
• Dry load level should not be higher than the top of agitator vanes.
Do not overload the washer.
• Do not put items on top of agitator or wrap them around it. Load items evenly.
• Combine large and small items in a load. Load large items first. Large items
should not be more than half the total wash load.
• When washing a single heavy item, add 1 or 2 towels to balance the load.
7. If desired, add liquid fabric softener to Fabric Softener
Dispenser
For models with a built-in dispenser (see picture to the left):
1. Add liquid softener to the dispenser, following fabric softener label directions.
2. Add water to bring liquid level to fill line on dispenser cap.
3. Remove the dispenser from the agitator after each use. Rinse both cap and cup
with warm water. Replace dispenser in the agitator.
NOTE: To separate cap from cup, put thumb into dispenser and push against side
of cup (see picture to the left). After cleaning, push cap and cup firmly together.
Replace dispenser by lining up the ribs and grooves and snapping it into position.
If fabric softener builds up in or around the dispenser, clean the area with hot water.
DO NOT REMOVE SERVICE CAP FOUND INSIDE THE AGITATOR POST.
(available on some models).
Built-In Fabric Softener Dispenser
(some models)
For models without a fabric softener dispenser, follow fabric softener label
directions. Add diluted fabric softener to the final rinse. Do not pour fabric
softener directly on the wash load.
8. Select cycle and settings according to type, size, and soil level
of each load .
See Operating Instructions for your specific model controls.
9. Start the washer.
Close the washer lid and pull out the cycle selector knob. The washer will not
agitate or spin with the lid open.
• To stop the washer, push in the cycle selector knob.
• To change a cycle, push in the cycle selector knob. Turn it clockwise to the
desired setting. Pull out the knob to restart the washer.
10.Remove items when the cycle is completed.
For your safety, the lid locks when the tub is spinning. It will remain locked for 23 minutes after the tub stops spinning.
• To open the lid during a spin, push in the cycle selector knob and wait about
2-3 minutes for the lid lock to release. Do not force open the locked lid.
Place washed items in automatic dryer, line dry, or dry flat as directed by fabric
care label. Excess wrinkling, color transfer or odors may develop in items left in the
washer after the cycle has ended.
To avoid serious personal injury, do not operate washer if safety lid lock
is missing or damaged.
5
Page 6

Safe Stain Removal Procedures
Do not combine stain removal products.
Follow fabric care label instructions.
STAIN
Adhesive tape, chewing
gum, rubber cement
TREATMENT
Apply ice. Scrape off excess. Place stain face down on paper towels. Saturate with prewash stain remover or
nonflammable dry cleaning fluid.
To reduce the risk of fire, electrical shock, or serious injury to persons or
property, comply with the basic warnings listed in Important Safety Instructions and
those listed below.
• Read and comply with all instructions on stain removal products.
• Keep products in their original labeled containers and out of children's reach.
• Thoroughly wash any utensils used.
• Do not combine stain removal products, especially ammonia and chlorine
bleach. Dangerous fumes may result.
• Never wash items which have been previously cleaned in, washed in, soaked
in or spotted with gasoline, dry cleaning solvents or other flammable or
explosive substances because they give off vapors that could ignite or explode.
• Never use highly flammable solvents, such as gasoline, inside the home.
Vapors can explode on contact with flames or sparks.
For successful stain removal:
• Remove stains promptly.
• Determine the kind of stain, then follow recommended treatment in the stain
removal chart on the next page.
• To pretreat stains, use a prewash product, liquid detergent, or a paste made
from granular detergent and water.
• Use cold water on unknown stains because hot water can set some stains.
• Check label instructions for treatments to avoid on specific fabrics.
• Check for colorfastness by testing stain remover on an inside seam.
• Rinse and wash items after stain removal.
Stain Removal
Baby formula, dairy
products, egg
Beverages (coffee, tea,
soda,juice, alcoholic
beverages)
Blood
Candle wax, crayon
Chocolate
Collar or cuff soil, cosmetics
Dye transfer on white
fabric
Grass
Grease, oil, tar (butter, fats,
salad dressing, cooking oils,
car grease, motor oils)
Ink
Mildew, scorch
Mud
Use product containing enzymes to pretreat or soak stains. Soak for 30 minutes or more. Wash.
Pretreat stain. Wash using cold water and bleach safe for fabric.
Rinse with cold water. Rub with bar soap. Or, pretreat or soak with product containing enzymes. Wash using
bleach safe for fabric.
Scrape off surface wax. Place stain face down between paper towels. Press with warm iron until wax is
absorbed. Replace paper towels frequently. Treat remaining stain with prewash stain remover or nonflammable
dry cleaning fluid. Hand wash to remove solvent. Wash using bleach safe for fabric.
Pretreat or soak in warm water using product containing enzymes. Wash using bleach safe for fabric.
Pretreat with prewash stain remover or rub with bar soap.
Use packaged color remover. Wash using bleach safe for fabric.
Pretreat or soak in warm water using product containing enzymes. Wash using bleach safe for fabric.
Scrape residue from fabric. Pretreat. Wash using hottest water safe for fabric. For heavy stains and tar, apply
nonflammable dry cleaning fluid to back of stain. Replace towels under stain frequently. Rinse thoroughly. Wash
using hottest water safe for fabric.
Some inks may be impossible to remove. Washing may set some inks. Use prewash stain remover, denatured
alcohol or nonflammable dry cleaning fluid.
Wash with chlorine bleach if safe for fabric. Or, soak in oxygen bleach and hot water before washing. Badly
mildewed fabrics may be permanently damaged.
Brush off dry mud. Pretreat or soak with product containing enzymes.
Mustard, tomato
Nail polish
Paint, varnish
Perspiration
Rust, brown or yellow
discoloration
Shoe polish
Urine, vomit, mucus, feces
Pretreat with prewash stain remover. Wash using bleach safe for fabric.
May be impossible to remove. Place stain face down on paper towels. Apply nail polish remover to back of stain.
Repeat, replacing paper towels frequently. Do not use on acetate fabrics.
WATER BASED: Rinse fabric in cool water while stain is wet. Wash. Once paint is dry, it cannot be removed. OIL
BASED AND VARNISH: Use solvent recommended on can label. Rinse thoroughly before washing.
Use prewash stain remover or rub with bar soap. Rinse. Wash using nonchlorine bleach in hottest water safe for
fabric.
For spots, use rust remover safe for fabric. For discoloration of an entire load, use phosphate detergent and
nonchlorine bleach. Do not use chlorine bleach because it may intensify discoloration.
LIQUID: Pretreat with a paste of granular detergent and water. PASTE: Scrape residue from fabric. Pretreat
with prewash stain remover or nonflammable dry cleaning fluid. Rinse. Rub detergent into dampened area.
Wash using bleach safe for fabric.
Pretreat or soak in product containing enzymes. Wash using bleach safe for fabric.
6
Page 7

Common WCommon W
Common W
Common WCommon W
ashing Prashing Pr
ashing Pr
ashing Prashing Pr
oblemsoblems
oblems
oblemsoblems
Many washing problems involve poor soil and stain removal, residues of lint and scum, and fabric damage. For satisfactory washing
results, follow these suggestions provided by The Soap and Detergent Association.
SOLUTIONSSOLUTIONS
SOLUTIONS
PROBLEMPROBLEM
PROBLEM
PROBLEMPROBLEM
Blue stains
POSSIBLE CAUSESPOSSIBLE CAUSES
POSSIBLE CAUSES
POSSIBLE CAUSESPOSSIBLE CAUSES
•Detergent or liquid fabric softener
did not dissolve or disperse.
SOLUTIONSSOLUTIONS
•If caused by detergent, mix 1 cup (240
ml) white vinegar with 1 quart (.95 L)
water in a plastic container. Soak item 1
hour. Rinse.
•If caused by fabric softener, rub stains
with bar soap. Wash.
PREVENTIVE MEASURESPREVENTIVE MEASURES
PREVENTIVE MEASURES
PREVENTIVE MEASURESPREVENTIVE MEASURES
•Add detergent before wash load. Then
start washer.
•Dilute fabric softener with water.
•Add fabric softener to dispenser
(available on some models).
Discoloration,
graying
Greasy, oily stains
Holes, tears, or
snags
Lint
Pilling
(Fibers break off,
ball up and cling to
fabric)
•Not enough detergent.
•Wash water temperature too
low.
•Incorrect sorting.
•Not enough detergent.
•Undiluted liquid fabric softener
poured directly on fabric.
•Incorrect use of chlorine bleach.
•Unfastened zippers, hooks,
buckles.
•Rips, tears and broken threads.
•Overloading the washer.
•Degradation of fabric.
•Incorrect sorting.
•Tissues left in pocket.
•Overloading the washer.
•Not enough detergent.
•Undissolved detergent has left
residue.
•Static cling is attracting lint.
•Load washed too long
•Pilling is normal with synthetic
and permanent press fabrics.
This is due to abrasion from
normal wear.
•Rewash with correct amount of
detergent and hottest water safe for
fabric. Add bleach safe for fabric.
•Treat with prewash stain remover or
liquid detergent.
•Increase detergent and water
temperature. Rewash.
•Rub fabric softener stains with bar
soap.
•May be irreversible if rips, tears and
seams cannot be mended.
•Reduce load size. Rewash using correct
water temperature, water level, and
amount of detergent.
•Add nonprecipitating water conditioner
to wash water.
•Add liquid fabric softener to final rinse.
•Dry load in dryer.
•Remove lint with lint brush or roller.
•Use a lint brush or shaver to remove
pills.
•Sort items by soil level and color.
•Use correct amount of detergent, hottest
water and bleach safe for fabric
•Use correct amount of detergent and
hottest water safe for fabric.
•Do not pour liquid fabric softener
directly on fabric. See package
directions or Washing Procedures for
proper diluting.
•Never pour chlorine bleach directly on
fabric.
•Check condition of items before washing.
See Washing Procedures for preparing
and loading the wash load.
•See Washing Procedures for sorting
and preparing the wash load.
•Do not overload washer.
•Use correct cycle, amount of detergent,
water temperature and water level.
•Use fabric softener in the washer to
lubricate fibers.
•When ironing, use spray starch or fabric
finish on collars and cuffs.
•Turn items inside out to reduce abrasion.
Residue or powder
on dark items;
Stiff, harsh fabrics.
Wrinkling
Yellow buildup of
body soil on
synthetic fabrics
Yellow or brown
rust stains
•Undissolved detergent.
•Some granular detergents can
combine with hard water
minerals to form a residue.
•Overloading the washer.
•Agitation time too short.
•Wash water temperature too
low.
•Not enough detergent.
•Iron or manganese in water
supply, water pipes, or water
heater.
•Reduce load size.
•Add dissolved detergent to tub . Rewash
load.
•Mix 1 cup (240 ml) white vinegar to 1
gallon (3.8 L) warm water in plastic
container. Soak item. Rinse and rewash.
•Reduce load size.
•Rinse in cold water with liquid fabric
softener.
•Soak in detergent booster or product
containing enzymes.
•Wash in hot water using full permanent
press cycle.
•Increase detergent dosage.
•Add bleach safe for fabric.
•Or, treat with color remover.
•To restore discolored load of whites,
use rust remover safe for fabric.
Do not use chlorine bleach to remove
rust stains. It may intensify
discoloration.
7
•Increase water temperature using hottest
water safe for fabric.
•Do not overload washer.
•Use liquid detergent or use
nonprecipitating water conditioner with
granular detergent.
•Do not overload washer.
•Remove items from washer as soon as
cycle is completed.
•Use liquid fabric softener.
•Wash synthetics frequently using water
at least 100°F (37°C ) and correct water
level.
•Use nonprecipitating water softener.
•Before washing, run hot water for a few
minutes to clear lines.
•Drain water heater occasionally.
•For an ongoing problem, install an iron
filter in your water supply system.
Page 8

Drying Procedures
• Follow the guidelines below for preparing the load for drying.
• Read the Dryer Operating Instructions for operating your specific model.
• Always read and follow fabric care labels and laundry product labels.
To reduce the risk of fire, electrical shock, or serious injury to persons
or property, comply with the basic warnings listed in Important Safety Instructions
and those listed below.
1. Prepare items for drying.
• Dry items of similar fabric, weight and construction in the same load.
• Separate dark items from light-colored items. Separate items that shed lint
from those that attract lint. If an item sheds lint, turn it inside out.
• Be sure buckles, buttons and trim are heatproof and won't damage the drum
finish. Close zippers, fasten hooks and Velcro®-like fasteners. Tie strings and
sashes to prevent snagging and tangling.
• If possible, turn pockets inside out for even drying.
Follow fabric care label instructions.
Place small items in a mesh bag.
• Check for stains which may not have been removed in washing. Dryer heat
may permanently set some stains. Repeat stain removal process before
drying.
• Place small items in a mesh bag to prevent tangling and for easy removal.
2. Check that lint screen is clean and in place.
3. Load the dryer.
• The average load will fill the drum 1/3 to 1/2 full. Items need room to tumble
freely for even drying and less wrinkling. Do not overload dryer.
• When drying large items, dry only 2 or 3 at a time. Fill out the load with small
and medium sized items.
• For delicate or very small loads, add 2 lint-free towels for better drying, less
wrinkling, and to prevent grease stains caused by fabric softener sheets.
• Do not overdry items. Overdrying can cause wrinkling, shrinkage, harshness,
and a build-up of static electricity, which can produce more lint.
• If desired, add a dryer fabric softener sheet.
4. Close the dryer door and set dryer controls (some models).
See Dryer Operating Instructions card for your specific model controls.
Fill dryer drum 1/3 to 1/2 full.
5. Turn cycle selector clockwise to the desired setting.
6. Start the dryer.
• Turn Start control clockwise to ON. Hold for 1-2 seconds and release.
• To add or remove items when the dryer is running, open the door. The dryer
will always stop when the door is opened.
• Allow the drum to come to a complete stop before reaching inside.
7. When the cycle ends, remove items immediately and hang
or fold. If load is removed before the cycle ends, turn cycle selector to OFF.
8
Page 9

Features
Use the drying rack to dry items which should
not be tumbled.
Cycle Signal Control (some models)
When the Cycle Signal Control is ON, a signal will sound at the end of each cycle and
during the Press Saver setting (some models). The volume is adjustable on some
models.
Drum Light (some models)
A drum light will come on whenever the door is opened to illuminate the dryer drum
during loading and unloading. Closing the door turns off the light.
Drying Rack (some models)
Use the drying rack to dry items which should not be tumble dried.
1. Open the dryer door and remove the lint screen.
2. Insert drying rack into the dryer drum. Place the front bar under the lip of the lint
screen opening.
3. Place items to be dried on top of rack. Weight should not exceed 10 lbs. Leave
space between items, but do not let items hang over the sides or through the
grids. Do not tumble other items when using the drying rack.
4. Select a timed dry setting best suited for items being dried. Use only the Air Fluff
(no heat) temperature setting for items containing plastic, foam rubber, rubberlike materials, feathers or down.
5. When items are dry, remove the rack and replace the lint screen. If lint screen
is not in place, tumbling items could enter the exhaust system and cause damage
to the dryer.
Common Drying Problems
Many drying problems involve poor cleaning results, poor soil and stain removal, residues of lint and scum, and fabric damage.
For satisfactory drying results, follow these suggestions provided by The Soap and Detergent Association.
PROBLEM
Greasy, oily
stains
Lint
Pilling
(Fibers break off,
ball up and cling
to fabric.)
Shrinking
POSSIBLE CAUSES
•Fabric softener sheet.
•Overloading.
•Overdrying causes static
electricity.
•Lint screen not clean
when cycle began.
•Lint is attached to "pills."
•Pilling is normal with
synthetic and permanent
press fabrics. This is due to
abrasion from normal
wear.
•Overdrying.
SOLUTIONS
•Rub fabric softener stains with bar soap.
Rinse and rewash.
•Reduce load size and rewash using
liquid fabric softener in the final rinse.
•Or, add a fabric softener sheet and
tumble without heat.
•Use lint brush or roller to remove lint.
•Use a lint brush or shaver to remove pills.
•Irreversible condition.
PREVENTIVE MEASURES
•Add a few bath towels to small loads for proper
tumbling.
•Some "silk-like" fabrics should be air dried.
•Use proper drying temperature.
•Place fabric softener sheet on top of load before
starting the dryer.
•Do not overload dryer.
•Use fabric softener in washer or dryer to reduce
static electricity.
•Remove items when they are slightly damp to
avoid overdrying.
•Check that lint screen is clean and in place.
•Use fabric softener to lubricate fibers.
•When ironing, use spray starch or fabric finish on
collars and cuffs.
•Turn items inside out to reduce abrasion.
•Follow fabric care label directions.
•If shrinking is a concern, check load often.
•Remove items while slightly damp.
•Block knits into shape.
•Lay flat to complete drying.
Wrinkling
•Overloading.
•Leaving items in dryer
after cycle ends.
•Reduce load size and tumble at medium
or low heat for 5-10 minutes.
•Remove items immediately. Hang or fold.
9
•Do not overload dryer.
•Remove items as soon as cycle ends.
Page 10

Care and Cleaning
To reduce risk of fire or serious injury to persons or property, comply
with the basic warnings listed in Important Safety Instructions, page 2, and those
listed below.
• Before cleaning the washer or dryer interior, unplug the electrical power cord
to avoid electrical shock hazards.
• Do not use any type spray cleanser when cleaning dryer interior. Hazardous
fumes or electrical shock could occur.
Inside the Washer
• Remove items from the washer as soon as the cycle ends. Excess wrinkling, color
transfer, and odors may develop in items left in the washer.
• Dry the washer top, the area around the lid opening, and the underside of the
lid. These areas should always be dry before the lid is closed.
• Before cleaning the washer interior, unplug the electrical power cord to avoid
electrical shock hazards.
Clean lint screen after every load.
Wash lint screen occasionally.
Use care with laundry
products. They can damage finish on
the laundry center.
• When extremely soiled items have been washed, a dirty residue may remain on
the tub. Remove this by wiping the tub with a nonabrasive household cleanser.
Rinse thoroughly with water.
• The agitator or tub may become stained from fabric dye. Clean these parts with
a nonabrasive household cleanser. This prevents dye transfer to future loads.
Inside the Dryer
• Clean the dryer lint screen after every load. Lint build-up in the screen restricts
air flow, which causes longer drying times. The screen is located at the bottom
of the door opening. Remove by pulling straight up. Remove the lint and replace
the screen.
• Occasionally a waxy build-up may form on the lint screen from using dryer-added
fabric softener sheets. To remove this build-up, wash the lint screen in warm,
soapy water. Dry thoroughly and replace. Do not operate the dryer without the
lint screen in place.
• If the dryer drum becomes stained from noncolorfast fabrics, clean the drum with
a damp cloth and a mild liquid household cleanser. Remove cleanser residue
before drying the next load.
• Every 18 months an authorized servicer should clean the dryer cabinet interior
and exhaust duct. These areas can collect lint and dust over time. An excessive
amount of lint build-up could result in inefficient drying and possible fire hazard.
Outside
• When laundering is completed, wipe cabinet with a damp cloth. Turn water
faucets off to prevent pressure build-up in the hoses.
• Clean the cabinet with mild soap and water. Never use harsh, gritty or
abrasive cleansers. If the cabinet becomes stained, clean with diluted chlorine
bleach [1/2 cup (120 ml) in 1 quart (.95 L) water]. Rinse several times with clear
water.
• Remove glue residue from tape or labels with a mixture of warm water and mild
detergent. Or, touch residue with the sticky side of the tape or label.
• Before moving the laundry center, place a strip of cardboard or thin fiberboard
under the front leveling legs to prevent floor damage.
10
Page 11
Winterizing Instructions
If the laundry center is stored in an area where freezing can occur or moved in freezing
temperatures, follow these winterizing instructions to prevent damage to the laundry
center:
Follow Winterizing
Instructions for cold
weather care.
1. Turn off water supply faucets.
2. Disconnect hoses from water supply and drain water from hoses.
3. Plug electrical cord into a properly grounded electrical outlet.
4. Add 1 gallon nontoxic recreational vehicle (RV) antifreeze to empty wash tub.
Close lid.
5. Set cycle selector knob at a spin setting. Pull out knob and let washer spin for 1
minute to drain out all water. Not all of the RV antifreeze will be expelled.
6. Push in knob, unplug electrical power cord, dry tub interior, and close lid.
7. Store washer in an upright position.
8. To remove antifreeze from washer after storage, run empty washer through a
complete cycle using detergent. Do not add wash load.
Avoid Service Checklist
Before calling for service, review this list. It may save both time and expense. The list includes common concerns that are not the
result of defective workmanship or materials in this laundry center.
OCCURRENCE
WASHER - NOISE
"Clunking" or gear sounds.
POSSIBLE CAUSE
A certain amount of "clunking" or gear
sounds are normal in a heavy-duty
washer.
SOLUTION
This is normal.
Rattling and clanking noise.
Squealing sound or hot
rubber odor.
Thumping sound.
Vibrating noise.
WASHER - OPERATINGWASHER - OPERATING
WASHER - OPERATING
WASHER - OPERATINGWASHER - OPERATING
Washer does not start.
Foreign objects such as coins or safety
pins may be in tub or pump.
Belt buckles and metal fasteners are
hitting wash tub.
Washer is overloaded.
Heavy wash loads may produce a
thumping sound.
Laundry center is not resting on a solid,
firm floor.
Shipping bolt and block have not been
removed during installation.
Wash load unevenly distributed in tub.
Washer lid is open
Electrical power cord may not be plugged
in or connection may be loose.
Stop washer and check tub. If noise continues after
washer is restarted, objects may be in pump. Call your
authorized servicer.
To prevent unnecessary noise and damage to tub, fasten
fasteners and turn items inside out.
Do not overload washer. Stop washer and reduce load.
This is usually normal. If sound continues, washer is probably
out of balance. Stop washer and redistribute wash load.
Move laundry center so it rests firmly on solid floor. Additional
floor bracing may be needed. Adjust leveling legs. See
INSTALLATION INSTRUCTIONS for details.
See INSTALLATION INSTRUCTIONS for removing shipping
bolt and block.
Stop washer and rearrange wash load.
Close washer lid
Make sure plug fits tightly in wall outlet.
House fuse blown, circuit breaker tripped,
or a power outage has occurred.
Water supply faucets are not turned on.
11
Reset circuit breaker or replace fuse. Do not increase fuse
capacity. If problem is a circuit overload, have it corrected
by a qualified electrician. If problem is a power outage,
call local electric company.
Turn on water supply faucets.
Page 12

OCCURRENCE POSSIBLE CAUSE
WASHER - OPERATING
(continued)
SOLUTION
Washer does not start
(continued).
Washer won't spin.
Residue left in tub.
WASHER - WATERWASHER - WATER
WASHER - WATER
WASHER - WATERWASHER - WATER
Wash load too wet after
spin.
Water does not enter
washer or it enters slowly.
Cycle selector is not in correct position.
Motor is overheated.
Lid is not completely closed.
Heavily soiled items.
Washer is overloaded.
Load is out of balance.
Drain hose is kinked.
Water supply is not adequate in area.
Water supply faucets are not completely open.
Water is being used elsewhere in the house.
Move indicator clockwise slightly. Pull out knob.
Washer motor will stop if it becomes overheated. It will
automatically restart after a cool down period of up to
30 minutes (if washer has not been manually turned
off).
Close lid completely. Safety lid lock must not be broken.
Wipe tub with a nonabrasive household cleanser, then
rinse. Shake or brush excess dirt and sand from items
before washing.
Do not overload washer. See Washing Procedures.
Rearrange load to allow proper spinning.
Straighten drain hose.
Check another faucet in the house. Wait until water
supply and pressure increase.
Fully open hot and cold faucets.
Water pressure must be at least 30 psi (260 kPa). Avoid
running water elsewhere while washer is filling.
Water level does not cover
load.
Warm or hot water is not
hot enough.
Water in washer does not
drain or drains slowly.
Water leaks.
Water inlet hoses are kinked.
Washer is overloaded.
Hot water heater is set too low or is a
distance from laundry center.
Hot water is being used elsewhere in
the house.
To conserve energy, the temperature of
the cold and hot wash are regulated.
Drain hose is kinked or clogged.
Loose fill hose connection at faucet or
washer.
House drain pipes are clogged.
Straighten hoses.
Do not overload washer. When control is set at highest
fill level, dry load level should not be higher than top row
of circular holes in wash tub.
Measure hot water temperature at nearby faucet with
candy or meat thermometer. Water temperature should
be at least 120°F (49°C). Adjust water heater as
necessary.
Avoid using hot water elsewhere before or during
washer use. There may not be enough hot water
available for proper cleaning. If problem persists, your
hot water system may be unable to support more than
1 use at a time.
See Operating Instructions for your washer
Clean and straighten the drain hose.
Check and tighten hose connections. Install rubber
sealing washers provided.
Unclog drain pipes. Contact plumber if necessary.
Incorrect wash and rinse
temperatures.
Water is entering washer
but tub does not fill.
Oversudsing.
Hot and cold water hoses are connected
to wrong supply faucets.
Drain hose standpipe is incorrect height.
12
Use less detergent.
Connect hot water hose to hot water faucet and cold
water hose to cold water faucet.
Standpipe must be a minimum of 33" (83.82 cm) high
to prevent siphoning. See INSTALLATION
INSTRUCTIONS.
Page 13

OCCURRENCE
DRYER
POSSIBLE CAUSE
SOLUTION
Dryer does not start.
Dryer runs but won't
heat.
Drying cycle takes too
long, outside of the dryer
feels too hot or smells
hot.
Electrical power cord is not securely
plugged in or plug may be loose.
House fuse blown or circuit breaker
tripped.
Thermal limiter tripped.
There are 2 house fuses in the dryer
circuit. If 1 of the 2 fuses is blown, the
drum may turn but the heater will not
operate.
Gas supply valve is not open (gas models).
Dryer does not have enough air supply to
support the burner flame (gas models).
LP gas supply tank is empty or there has
been a utility interruption of natural gas
(gas models).
Lint screen is clogged with lint.
Exhaust duct requirements have not been
met.
Make sure the plug fits tightly in wall outlet.
Reset circuit breaker or replace fuse.
Make sure electrical line is not overloaded and the dryer
is on a separate circuit.
Call authorized service person for replacement.
Replace fuse.
Check to make sure supply valve is open. See
INSTALLATION INSTRUCTIONS for procedure.
See INSTALLATION INSTRUCTIONS.
Refill or replace tank.
Dryer should heat when utility service is restored.
Make sure all lint has been removed from the dryer lint
screen before starting each cycle.
Exhaust duct must be at least 4 inches in diameter and
made of rigid or flexible metal.
Excessive wrinkling.
Electric dryer is connected to a 208 volt
circuit.
Drying procedures have not been
followed.
Outside exhaust hood or exhaust duct
may be clogged or restricted.
High humidity.
Dryer is overloaded.
Items left in dryer too long.
Insufficient sorting of items.
Drying temperature too high.
When in place, the duct must have no more than two
90° bends and must not exceed length listed in
INSTALLATION INSTRUCTIONS.
Drying time will be 20% longer than drying on a 240 volt
circuit.
See Drying Procedures .
Clean out any obstruction.
Use a dehumidifier near the dryer.
Do not overload. See Drying Procedures .
Remove items as soon as cycle ends.
See Drying Procedures .
Follow fabric care label instructions.
13
Page 14

®
CROSLEY WARRANTY
Your appliance is covered by a one year limited warranty. For one year from your original date of purchase, Electrolux will pay
all costs for repairing or replacing any parts of this appliance that prove to be defective in materials or workmanship when such
appliance is installed, used and maintained inaccordance with the provided instructions.
Exclusions This warranty does not cover the following:
1. Products with original serial numbers that have been removed, altered or cannot be readily determined.
2. Product that has been transferred from its original owner to another party or removed outside the USA or
Canada.
3. Rust on the interior or exterior of the unit.
4. Products purchased "as-is" are not covered by this warranty.
5. Food loss due to any refrigerator or freezer failures.
6. Products used in a commercial setting.
7. Service calls which do not involve malfunction or defects in materials or workmanship, or for appliances not
in ordinary household use or used other than in accordance with the provided instructions.
8. Service calls to correct the installation of your appliance or to instruct you how to use your appliance.
9. Expenses for making the appliance accessible for servicing, such as removal of trim, cupboards, shelves,
etc.,which are not a part of the appliance when it is shipped from the factory.
10. Service calls to repair or replace appliance light bulbs, air filters, water filters, other consumables, or knobs,
handles, or other cosmetic parts.
11. Surcharges including, but not limited to, any after hour, weekend, or holiday service calls, tolls, ferry trip
charges, or mileage expense for service calls to remote areas, including the state of Alaska.
12. Damages to the finish of appliance or home incurred during installation, including but not limited to
floors,cabinets, walls, etc.
13. Damages caused by: services performed by unauthorized service companies; use of parts other
than genuine Electrolux parts or parts obtained from persons other than authorized service companies;
or external causes such as abuse, misuse, inadequate power supply, accidents, fires, or acts of God.
DISCLAIMER OF IMPLIED WARRANTIES; LIMITATION OF REMEDIES
CUSTOMER’S SOLE AND EXCLUSIVE REMEDY UNDER THIS LIMITED WARRANTY SHALL BE
PRODUCTREPAIR OR REPLACEMENT AS PROVIDED HEREIN. CLAIMS BASED ON IMPLIED
WARRANTIES,INCLUDING WARRANTIES OF MERCHANTABILITY OR FITNESS FOR A PARTICULAR
PURPOSE, ARELIMITED TO ONE YEAR OR THE SHORTEST PERIOD ALLOWED BY LAW, BUT NOT
LESS THAN ONE YEAR.ELECTROLUX SHALL NOT BE LIABLE FOR CONSEQUENTIAL OR INCIDENTAL
DAMAGES SUCH ASPROPERTY DAMAGE AND INCIDENTAL EXPENSES RESULTING FROM ANY
BREACH OF THIS WRITTENLIMITED WARRANTY OR ANY IMPLIED WARRANTY. SOME STATES AND
PROVINCES DO NOT ALLOW THEEXCLUSION OR LIMITATION OF INCIDENTAL OR CONSEQUENTIAL
DAMAGES, OR LIMITATIONS ON THEDURATION OF IMPLIED WARRANTIES, SO THESE LIMITATIONS
OR EXCLUSIONS MAY NOT APPLY TO YOU. THIS WRITTEN WARRANTY GIVES YOU SPECIFIC LEGAL
RIGHTS. YOU MAY ALSO HAVE OTHER RIGHTS THAT VARY FROM STATE TO STATE.
If You Need
Service
This warranty only applies in the USA and Canada. In the USA, your appliance is warranted by Electrolux Major Appliances
North America, a division of Electrolux Home Products, Inc. In Canada, your appliance is warranted by Electrolux Canada Corp.
Electrolux authorizes no person to change or add to any obligations under this warranty. Obligations for service and parts under
this warranty must be performed by Electrolux or an authorized service company. Product features or specifications as described
or illustrated are subject to change without notice.
Replacement parts
If you need to order replacement parts, we recommend that you only use the factory specified parts. These parts will fit right
and work right because they are made with the same precision used to build every new Crosley ® appliance.
To locate factory specified replacement parts in you area call:
USA, 1-800-944-9044, or your nearest designated service center. In Canada call 1-800-668-4606.
For information on how to contact Crosley Corporation, please see page 2 of this document.
Keep your receipt, delivery slip, or some other appropriate payment record to establish the warranty
periodshould service be required. If service is performed, it is in your best interest to obtain and keep all
receipts.Service under this warranty must be obtained by contacting Electrolux at the addresses or
phone numbers below.
14
 Loading...