

Page 1

This is
Crompton Controls
Crompton Controls
Installation and Maintenance
Instructions
S10 & Smooth-BRAKE
DC Injection Brake Modules
LT011 Issue 1
Tel: +44 (0)1924 368251
Page 2

DC Injection Brake Module
Installation and Maintenance Document
S10 and Smooth-BRAKE
Warranty
All goods are guaranteed for one year from the date of purchase. This does not affect the
statutory rights of the user.
Safety warning
Important Safety Information
All electrical equipment for operating on low voltages contain devices which are capable of
causing serious or fatal injuries.
Any person involved in installation or maintenance of this equipment should be ful ly
competent to conduct the work.
Such persons should be familiar with the Health and Safety at Work Act, Electricity at
Work Regulations and have a working knowledge of the IEE Wiring Regulations.
If in doubt please contact,
Crompton Controls Ltd Tel: +44 (0)1924 368 251
General Description of the equipment
Crompton Controls DC injection Braking starters are suitable for controlled
stopping of induction motors.
When the machine starter is de energised the brake timer senses the break in supply and
applies a DC voltage to the motor windings to provide a controlled braking force for a
timed duration.
NOTE:
DC injection braking is a PUWER
motors and requires the mains supply to be present to operate correctly.
98 approved method of stopping AC electric
Induction motors
Induction motors can be braked to standstill, by injecting a DC current into the winding,
this creates a stationary field and any shaft rotation will produce a braking torque.
Braking from full speed an induction motor behaves as a twice speed generator, the
generated currents help to stop the motor and full load braking torque requires a DC
current of approx 2 to 2.5 times motor full load current. The DC is produced using a
thyristor with controlled half rectification and a diode is connected across the motor to
rectify the generated current, without the diode the motor would not brake. The externally
applied dc current will rise as the machine brakes to a halt. Motor noise is normal when
using phase angle control due to the nature of the unsmoothed dc waveform.
The DC current produces magnetic flux in the motor air gap, current can increase but
there is a saturation effect that means flux and braking torque will increase with current
up to saturation after which high currents will not produce much extra braking.
Most braking systems provide a voltage to apply to the windings, at standstill the current
will be determined by ohms law, current=voltage/winding resistance.
Part Numbers Rated operational voltages
BR011 S10/400 400 volt 50Hz 25 Amp brake module
BR016 S10/240 240 volt 50Hz 25 Amp brake module
BR021 S10/110 110 volt 50Hz 25 Amp brake module
BR025 Smooth-Brake 400 volt 50Hz 60 Amp brake assembly
BR026 Smooth-Brake 400 volt 50Hz 90 Amp brake assembly
BR024 Smooth-Brake Control Module
2
Page 3

Electrical Specification
Conforming to Standards BS/EN60947
DC CURRENT: S10 25A nominal current flows through L1, L2, M1 & M2
Smooth-BRAKE 60 Amp or 90 Amp high current connections directly
to thyristor diode module.
FREQUENCY: The unit is for rated 50 Hz.
DWELL TIME: From operating main contactor to closing DC contactor:
S10 0.5 seconds
Smooth-BRAKE 1 second
TIME RANGE: S10 braking time range is 0.1 to 12.7 seconds
(270° rotation linear potentiometer)
Smooth-BRAKE 0.2 to 50 seconds
(270° rotation linear potentiometer)
DC VOLTAGE: The voltage range is up to approx. 160 volts, with the minimum
oltage dependent on thyristor latching current.
v
DUTY CYCLE: S10 Limited by software to 10%. For every second of braking 10 is
added to a register. For every second not braking 1 is subtracted.
Restart is inhibited if the register is above a value of 250.
Note: if the unit will not start it will be waiting for this register to count
down below 250. The maximum dela
y is approx. 2 minutes.
Smooth-BRAKE No software limitation of duty cycle. Heat sink rated
for 10 off equally spaced 35 second stops per hour maximum at stated
current.
DIMENSIONS: S10 81H x 45W x 121D (mm) - DIN Rail mounting
TERMINALS: S10 2 times 2.5mm
Smooth-BRAKE 100H x 160W x 125D (mm)
2
max
Smooth-BRAKE main terminals M5 screw
control terminals 2 times 2.5mm2max
WEIGHT: S10 200g
Smooth-BRAKE 1.0kg
HUMIDITY: 85% non condensing
AMBIENT TEMP: Operating -10 to +40C Storage -20 to +70C
PROTECTION: IP code IP20
RELAYS: RL1 Internal 8A rated contacts, 440Vac max breaking voltage.
RL2 The relay terminals 17 18 28 are volt free and can be wired in a control
circuit at lower voltage.
The rela
y contacts can be protected with a 4 Amp Control fuse.
BRAKE FUSE: Semiconductor fuse
S10
30A (10mm x 38mm) FL078 740 A
2
sec
Ferraz 660gRB10-30 A070gRB30T13 ref M330015 or equivalent.
Diode 40EPS12 800 A2sec
Thyristor 40TPS12 1250 A
2
sec
Smooth-BRAKE
60 Amp SKNH56 or IRKN56 8000 A2sec
FE100 semiconductor fuse 1800A
2
sec
NSD 32 3000 A2sec approx 60A 100 sec trip point
NSD 40 6000 A2sec approx 100A 100 sec trip point
90 Amp SKNH91 or IRKN91 15000 A2sec
FE120 semiconductor fuse 1900A
2
sec
ESD 50 8700 A2sec approx 120A 100 sec trip point
ESD 63 13300 A2sec approx 150A 100 sec trip point
3
Page 4
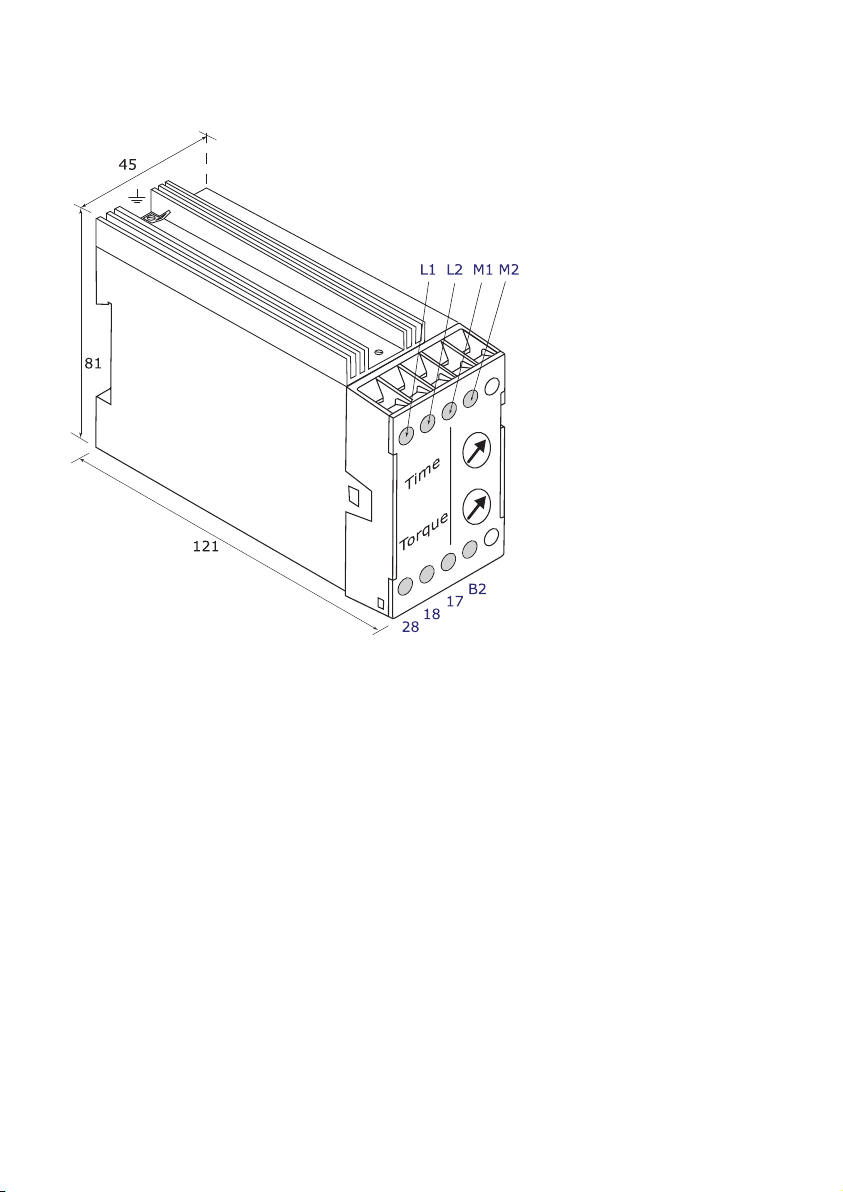
S10 Module Terminals Identification and marking
Part Numbers
BR011 400v
BR016 240v
BR021 110v
L1 Common phase connection
L2 Phase connection - connected to M2
M1 Motor connection
M2 Motor connection - connected directly to L2
B2 Voltage sense input
17 Relay input - common to RL1 and RL2
18 RL1 Rela
28 RL2 Relay output connects to brake contactor
The B2 terminal to signal the unit to brake requires the full operating voltage of the
module applied.
L1 is common internally so a normally open auxiliary contact on the main contactor is
used to pro
y output - motor contactor via stop start circuit
vide a signal on B2 from L2.
4
Page 5
Smooth-BRAKE Module Terminals Identification and marking
Outline and Mounting Dimensions
Part Numbers
BR025 400v 60A
BR026 400v 90A
Terminal Description
L1 Common phase connection to thyristor terminal 2
L2 Phase connection to thyristor terminal 3
M1 Motor connection to thyristor terminal 1
M2 Motor connection also to thyristor terminal 3
M3 Motor connection - generated voltage
B2 Voltage sense input relative to L1
17 Relay input common to RL1 and RL2
18 RL1 Relay output - motor contactor via stop start circuit
28 RL2 Relay output connects to brake contactor
G Gate to connect to external thyristor
NOTE: A V
oltage Dependant Resistor – VDR is fitted across the M1 M2 motor terminals
to protect the diode.
Terminal covers not shown - MUST be fitted.
PCB fuse rating - 500V, 1A, quick blow, 6.3mm x 32mm ceramic tube, eg SIBA
ref: 70-065-63 1 Amp or equivalent.
5
Page 6

Description of operation
Both S10 and Smooth-BRAKE units are powered at operational voltage on L1 and L2. L1
is connected internally to the PCB OV common. A secure connection to the incoming supply
must be made at all termination and switching points. The voltage sensing input to B2 is
measured relative to L1. At power on there is a short initial delay and RL1, one of the two
internal relays, is energized giving an output on terminal 18, provided terminal 17 has a
supply. This output is wired to the main start contactor which can be energized to start
the motor; an auxiliary terminal on this contactor is used to connect a voltage to the B2
sensing input. When voltage is applied to B2 nothing happens, until on removal of this
oltage when the timing sequence starts:-
v
1 25mS dwell, then re-check no voltage on B2 – to prevent the startup voltage drop
causing dc injection
2 RL1 opens removing the feed to 18 preventing the main contactor from operating
3 500mS dwell period to allow the contactor arcs and motor EMF to decay – the setting
potentiometers are also read at this time.
4 RL2 is then energized to bring in the external brake contactor, connecting terminals
M1 and M2 directly to the motor
5 This enables DC to be injected for the time and voltage as set on the potentiometers.
(Smooth brake without M3 connected).
The DC is increased progressively to the set value to avoid mechanical shock.
6 RL2 is then de-energized after turning off the DC
7 Dwell period to allow the DC to decay
8 RL1 is then re-energized to allow the motor to be started again.
.
NOTE:
DC injection braking is a PUWER
motors and requires the mains supply to be present to operate correctly.
98 approved method of stopping AC electric
S10 and Smooth-BRAKE (without M3 connection)
Basic setting procedure
A Braking Time Setting (0-100% S10 0.1- 12.7 sec Smooth Brake 0.2 to 50 sec)
1. From minimum, turn the Braking Time Pot slightly clockwise.
2. Start the motor.
3. Stop the motor and check the time the brake contactor energises for.
4. Repeat steps 1 – 3 until the required time is reached (10 seconds or less).
B Braking Torque Setting (0-100% - approx 160v dc)
1. From minimum, turn the Braking Torque Pot slightly clockwise.
2. Start the motor.
3. Stop the motor and measure the time tak
4. If the motor continues to rotate after the Braking Time (contactor) has lapsed repeat
steps 1 – 3 until there is sufficient braking to stop the motor within the required time.
en to stop.
6
Page 7

Description of operation
100%
20%
0%
Speed
Reducing
Voltage &
Braking
100%
50%
25%
Voltage from motor
100%
20%
0%
Speed
Reducing
Voltage &
Braking
100%
50%
25%
100%
50%
Stage 1
Stage 2
Stage 3
Time set on pot
Timeout
Stage 2
Stage 3
Voltage from motor
Smooth-BRAKE with M3 connected
Controlled Stopping with feedback from motor
The M3 terminal provides voltage feedback from the motor during braking. The basic
setting is as page 6 but the braking torque setting will become the main adjustment and
switch the unit off a few seconds after coming to rest. The time setting needs to be long
enough to allow this to happen. Removal of the wire from the M3 terminal will remove the
voltage signal and braking will be to the torque and time settings only.
Operation with voltage feedback i.e. M3 connected
A three stage stop utilizing the v
oltage generated by the motor during braking as a speed
signal. The amount of voltage varies with the speed and amount of DC injection. With
high levels of DC and the motor spinning fast there is a strong signal.
Stage 1 The unit brakes at full until this signal reduces to approx 18%.
Stage 2 Then the braking strength is reduced.
There is an increase in v
oltage as standstill is approached to trigger the switch
to stage 3.
After this the voltage is too low to provide an accurate signal.
Stage 3 A low lev
NOTE: The Time potentiometer provides an ov
el of DC for a time is then used to bring the shaft to rest.
erriding switch off point adjustment from
0.2 to 50 sec.
Stages 2 and 3 have inbuilt timeouts dependent on the length of time in stage 1.
Stage 2 timeout equals two times the stage one time plus 2 sec.
Stage 3 timeout equals one times the stage one time plus 3.5 sec.
Braking Strength
7
Page 8

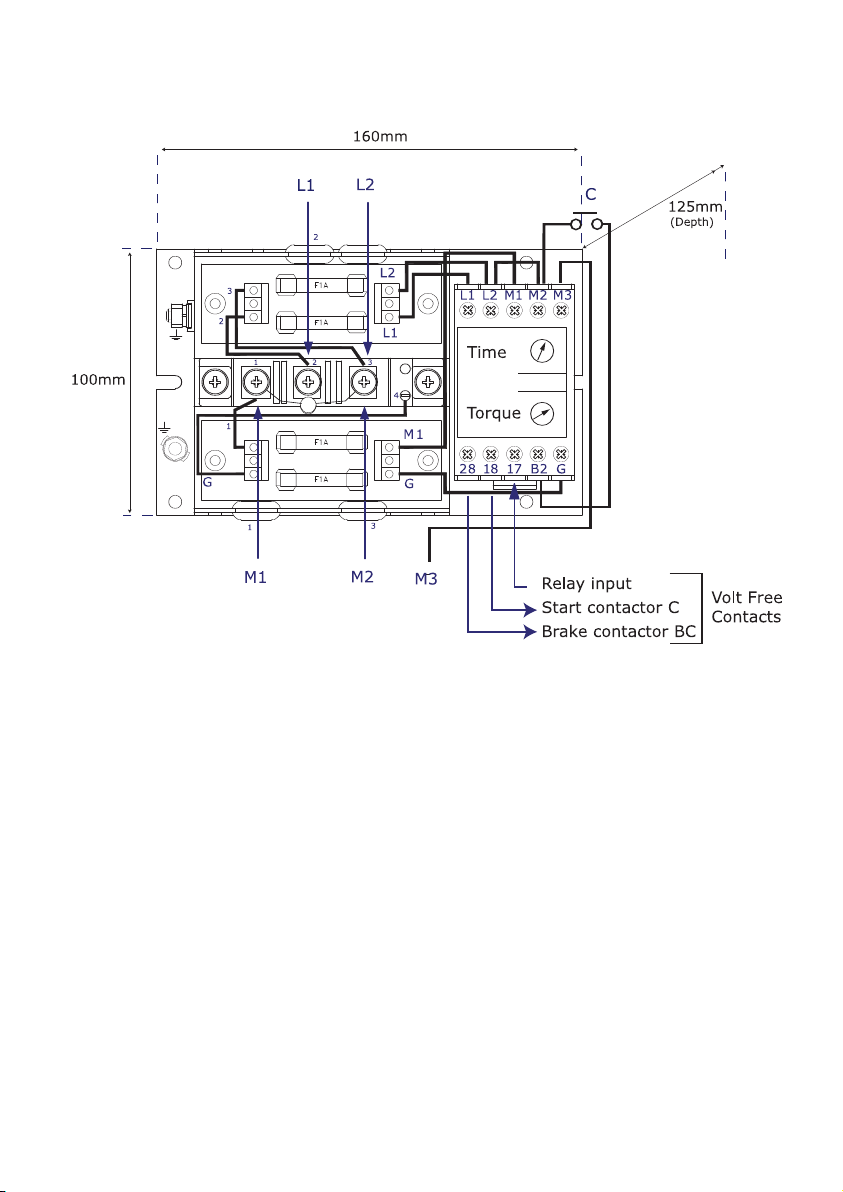
Typical Direct on Line DC brake retro fit
NOTE: M3 connection only applies to Smooth-BRAKE modules.
See page 3 for BF1 and BF2 Brake Fuse rating.
The Brake Contactor, ‘BC’ should be sized to cover the relative braking current.
8
Page 9

Direct on Line starter with S10 Brake Module
3 phase
9
Page 10

Direct on Line starter with S10 Brake Module
1 phase
NOTE: On braking there is a diode in the brake circuit connected directly across the motor.
Single phase induction motors have capacitors, permanent capacitors can be dc injected
and the diode needs to be rated for the discharge currents of the motor capacitors this
current can also produce a torque pulse on the shaft.
The capacitance in circuit prolongs the decay of electrical energy in the motor so a longer
dwell time is required from pressing the stop button to connecting the brake.
Capacitors can be short time rated and if so it is better to remove them from circuit
during braking.To remove the capacitors during braking use a normally closed auxiliary
contact on the brake contactor.
Aux contacts normally carry a 10 Amp rating and this may not be sufficient for the start
winding current for some single phase motors. The normally closed contact allows the
capacitor energy to discharge through the motor wining as normal otherwise a bleed
resistor would be needed.
10
Page 11

Separate control supply version
11
Page 12

Star Delta starter with S10 Brake Module
12
Page 13

Star Delta Starter with Smooth-BRAKE Assembly
13
Page 14

Fault finding
Initially check for loose connections and physical damage
Not Starting
Brake contactor
not operating
Brake Contactor
operating
but not braking
Module tracks
can be damaged
Check power to L1 L2 supply to module - volt meter check 1.
Supply to terminal 17 control fuses and wiring - volt meter check 2.
Relay closed internally linking 17 to 18 module fault if doesn’t close
- volt meter check 3.
Check voltage signal to B2 – fed from auxiliary contact block on the
main contactor - volt meter check 4.
Application of voltage causes no change however removal of voltage
triggers the braking.
Check voltage on 28 to ensure internal relay operating - volt meter
check 5.
Wiring from M1 M2 to motor – Isolate supply test with meter on
resistance across M1 M2 when operating the BC brake contactor by
hand should be able to measure the winding resistance - resistance
check 6.
Motor connections for star delta.
DC injection fuse.
Faulty contactor.
Wiring fault.
Module fault.
If semiconductor fuses are not fitted and high currents result from
earth faults.
If voltage setting is too large for the motor impedance.
If Interlocks incorrectly wired and AC and DC contactors operate at
the same time.
14
Page 15

Interlocks
The two internal relays controlling the starting (RL1) and braking (RL2) provide in initial
degree of interlocking. The normally closed on the first relay feeds the common on the
second so the outputs 18 and 28 cannot be on at the same time. Electrical interlocks are
also used on the main and DC contactors. However if the interlocking is bypassed for
some reason then the AC and DC contactors energised together put a direct short circuit
across two phases and supply fuse size will determine the amount of damage.
If several brake modules are used with a common control circuit it is important to
maintain interlocks across all the units. Use volt free relay contacts in the common circuit
from relays connected to terminal 18 on each module.
General Notes
• Star Delta run up times of approx 15 sec or more could result in the overload tripping.
• Star Delta connections are important easy to have the motor start and run but not dc
inject if the 6 leads are not correctly marked or wired.
• Inertia can result in the need to increase the amount of dc current. E.g. Disc sanders,
band saws, and high-speed routers.
• Mechanical damage can occur with very high levels of dc injection.
• The motor resistance will change with temp up to 30% from cold to hot, reducing
braking as the motor warms.
• Bad connections can cause severe damage to contactors –old machines have old
motors, wiring and starters. Sawdust and woodchips inside contacts is a prime cause of
bad connections.
• More than one motor can be dc injected using the same thyristor/diode power assembly
if all can be stopped together.
• Multi motor machines (tennoners) can have individual start buttons but one common
stop which will dc inject all motors running or stationary.
• Aux block on the main contactor has to be moved to allow the starter to be wired. If
not put back in place this may result in no braking i.e. the brake contactor doesn’t
operate.
• Check connections to the motor if the brake contactor is operating but the motor is not
braking.
This can be quickly done by measuring the winding resistance across the diode M1 to
M2 while operating the brake contactor by hand to make the circuit.
15
Page 16

BS EN ISO 9001:2000
All information contained in this publication is, as far
as possible, correct at the time of going to print.
However, due to our policy of continued improvement,
we reserve the right to alter specifications and prices
without prior notice.© 2008 Crompton Controls Ltd.
All rights reserved.
AUTOMATION
INSTRUMENTATION & CONTROL
LABORATORY TECHNOLOGY
Crompton Controls Ltd
Monckton Road,
Wakefield,
West Yorkshire WF2 7AL UK
Tel: +44 (0)1924 368251
Fax: +44 (0)1924 367274
E-mail: sales@cromptoncontrols.co.uk
www.cromptoncontrols.co.uk
Printed in England j4design.co.uk Part No: LT011 PC/A/10/08
 Loading...