

Page 1
Universal LCD Remote Control
With Touchscreen & Learning Function
User’s Guide
Page 2

The UC-525 User’s Guide
PrefacePreface
About this User’s Guide
This user’s guide is designed to assist you in setting up your
UCommand-525 Universal LCD Remote Control. Information in this document has been carefully checked for accuracy; however, no guarantee is
given as to the correctness of the contents. The information contained in this
document is subject to change without notice.
Edition
First Edition, May 2001
Copyright
2001 Crisp Solutions LLC, all rights reserved. No part of this publication
may be reproduced, stored in a retrieval system, or transmitted in any form
or by any means (electronic, mechanical, photocopying, recording, or otherwise), without the prior written permission of the publisher.
Trademarks
Trademarks and registered trademarks of products referred to in this user’s
guide are the properties of their respective holders.
Radio Frequency Interference
This device complies with Part 15 of the FCC Rules. Operation is subject to
the following two conditions:
This device may not cause harmful interference
This device must accept any Interference received, including interference
that may cause undesired operation.
ii
Page 3

Preface
Table of Contents
PREFACE.............................................................................................II
CHAPTER 1..........................................................................................1
Unpacking the UC-525..........................................................2
UC-525 Features....................................................................2
Identifying Components .......................................................3
CHAPTER 2..........................................................................................4
Power Supply ........................................................................4
Battery low icon ................................................................. 5
Power supply tips and precautions.....................................5
LCD Touch Screen Buttons ................................................. 7
Turning the LCD on............................................................7
Touch screen precautions..................................................8
UC-525 Buttons.....................................................................9
CHAPTER 3........................................................................................10
Before using the Learning Function.................................. 10
Using the Learning Function ............................................. 11
Using the Delete Function..................................................15
Deleting a command button.............................................16
Changing the LCD Layout..................................................19
Changing the AUX Device Layout...................................... 21
Macro Function...................................................................21
Macro setup..................................................................... 22
Adjusting the LCD Backlight..............................................27
Toggling the Beep Signal On/Off....................................... 31
Recalling the Original LCD Layout....................................31
APPENDIX A.......................................................................................33
UC-525 Specifications ........................................................33
APPENDIX B.......................................................................................34
Troubleshooting.................................................................34
APPENDIX C.......................................................................................37
iii
Page 4

The UC-525 User’s Guide
Frequently Asked Questions.............................................. 37
APPENDIX D.......................................................................................39
Pre-configured X10 Codes ................................................. 39
APPENDIX E.......................................................................................40
Application Note: Applying Sound Field (DSP) commands
from SONY® Amplifiers.......................................................40
iv
Page 5
— Introducing the UC-525
Chapter 1Chapter 1
Introducing the UC-525
Congratulations on the purchase of the UC-525, the easy to use and
configure digital remote control.
UC-525 lets you manage all your infrared-controlled devices, eliminating the need to search for all your device remotes. All you need is
the UC-525. This remote control does it all for you!
UC-525’s operating concept is based on the combination of a userfriendly touch screen panel and easy-to-access hard buttons. The display buttons change automatically to accommodate the various
devices you wish to control. This unique concept reduces the number
of buttons for each device, which makes it easy to find the function
you want.
The UC-525 features eight pre-defined, customizable button layouts
for TVs, DSS/Satellite/Cable sources, Tape/Tuner, CD/DVD players,
Surround Sound Amplifiers, LD/VCDs, VCRs, and other devices. In
addition, it utilizes a multi-macro function that allows you to initiate
a chain of up to 25 commands with the touch of a button.
This user’s guide will help you learn how to use all the
advanced features of the UC-525. It does not explain
how to use the functions for your devices. Please
refer to your devices’ user’s guide for information related to your TV, VCR, DVD, etc.
Page 6

The UC-525 User’s Guide
Unpacking the UC-525
After you have unpacked the UC-525, check the contents to make
sure the following items are included.
• UC-525
• This User’s Guide
• Registration Card
If any of the above items are missing or appear damaged, contact
your dealer immediately. Do not throw the shipping carton away in
case you need to return your UC-525 to your place of purchase.
UC-525 Features
This section provides an overview of the key features of the UC-525.
For more information on getting the most from these features, refer to
Chapter 2.
• Touch screen panel with automatic backlighting for visibility
in dim lighting.
• Macro function—any command button can hold a macro of
up to 25 commands.
• Controls eight customizable device layers including TV,
DSS/Satellite/Cable, Tape/Tuner, CD/DVD, Amplifier,
LD/VCD, VCR
• Learns the IR codes from your existing remote controls to
quickly set up devices.
• Adjustable backlight with four levels of ambient light sensi-
tivity.
• Direct access buttons for accessing frequently used functions
such as volume, channel, play, mute, power and stop.
• Intelligent power saving modes.
• Settings held in non-volatile flash memory. Keeps your con-
figuration even when batteries fail or are replaced.
2
Page 7
— Introducing the UC-525
Battery Cover
Learning Eye
Identifying Components
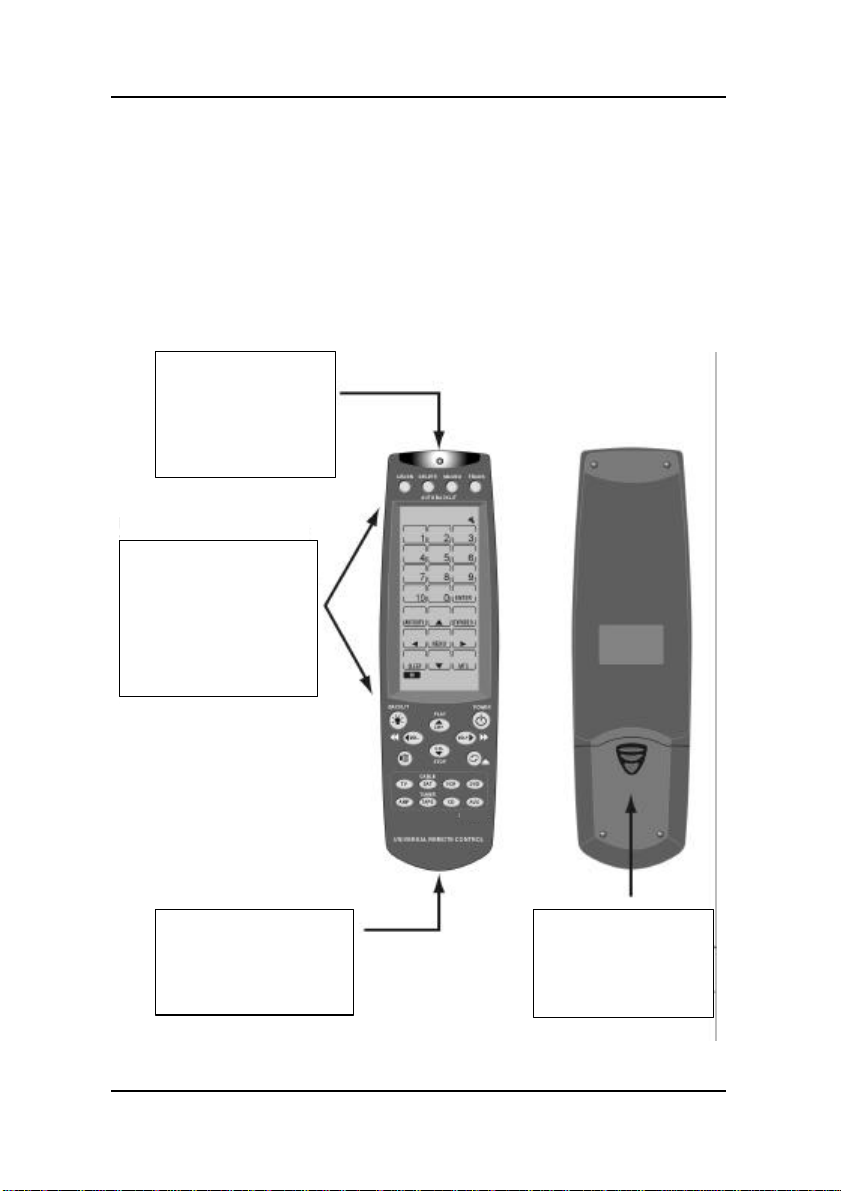
This section provides an overview of the UC-525’s features and controls. Please refer to the following illustrations to identify the
components of the UC-525. (Refer to Chapter 3 for details on using
the LCD panel and controls.)
IR Port
Point the IR port
at the IR receiver
of the device you
wish to operate
LCD & Keypad
The LCD panel & hard
buttons let you
configure and operate
your devices. Tap
either once to activate
the UCommand-525
UC-525
Point your original
remote control to
this eye for learning.
Remove this cover
to replace the four
AAA batteries.
3
Page 8
The UC-525 User’s Guide
Figure 1Figure 1--1: Front and rear viewChapter 21: Front and rear viewChapter 2
Getting Started
This chapter will guide you through the steps for inserting the batteries and using the many features.
Power Supply
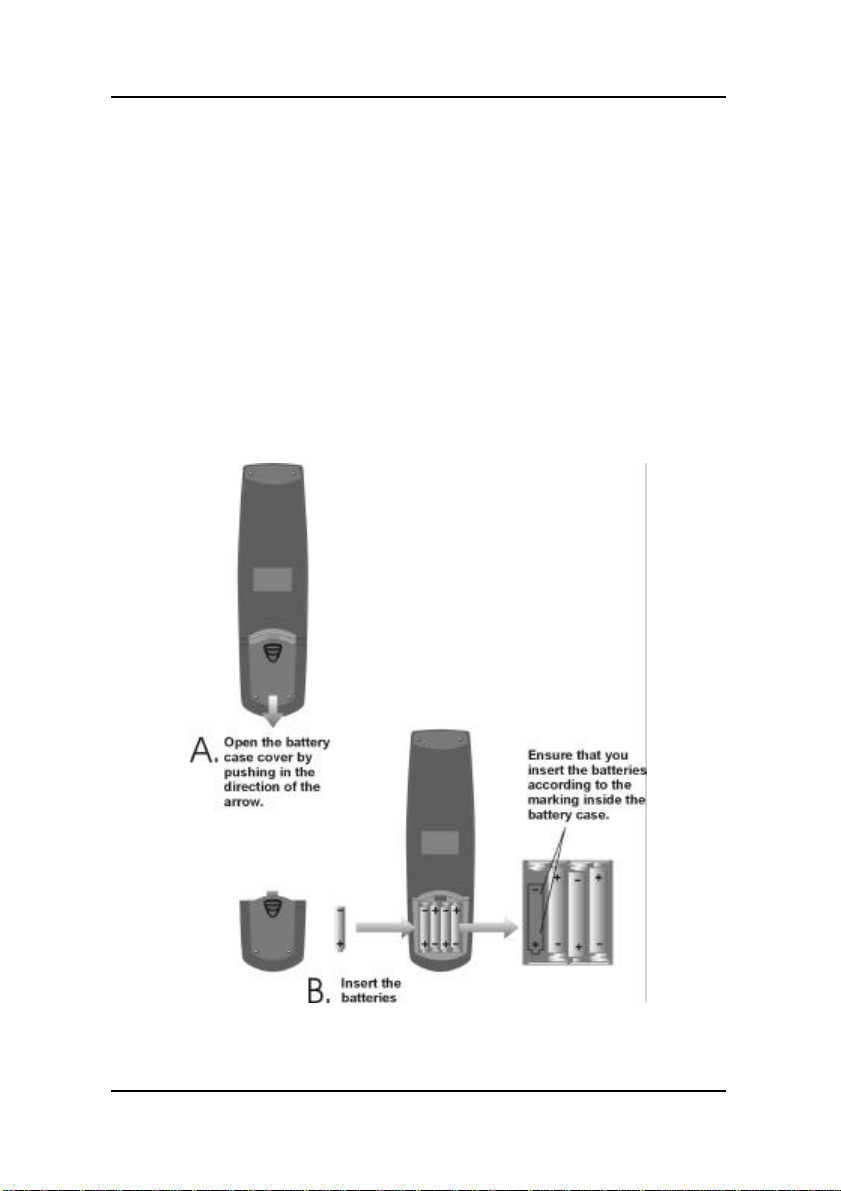
The UC-525 operates on four AAA batteries. Batteries must be inserted before you can operate the UC-525. To insert the batteries,
refer to the following illustration:
4
Figure 2-1: Inserting the batteries
Page 9
— Getting Started
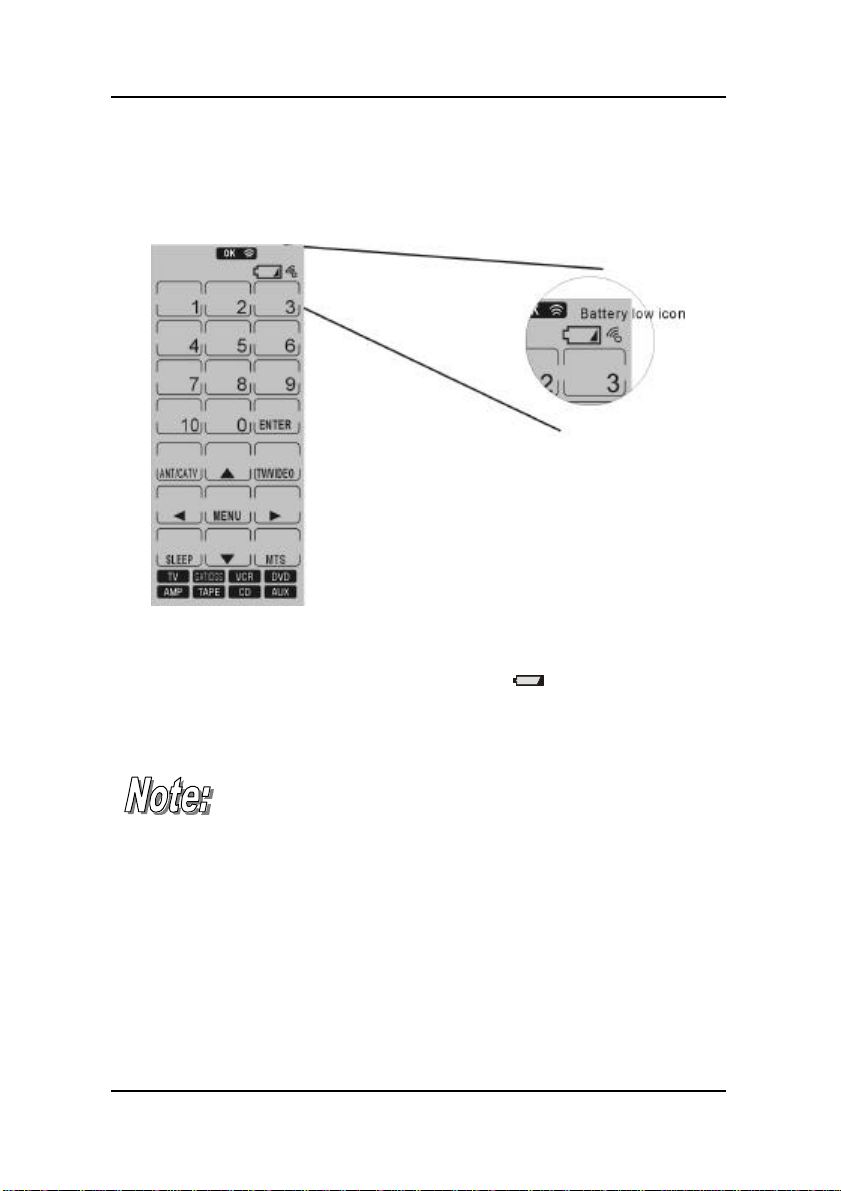
Battery low icon
When the battery charge is low, the battery low icon will be displayed
on screen:
Figure 2-2: The battery low icon
When the battery low-power warning icon
batteries with new ones as soon as possible.
Don’t worry: When the batteries fail or are being replaced, the UC-525 does not lose its configuration,
thanks to its non-volatile memory.
appears, replace the
Power supply tips and precautions
• Be sure that the positive (+) and negative (-) polarities of
each battery match the polarities indicated in the compartment.
• Do not expose the batteries to excessive heat or flame.
5
Page 10

The UC-525 User’s Guide
• Keep batteries out of reach of children.
• When the batteries are weak, it will be harder to control
devices from a distance.
• Replace the batteries as soon as possible when the battery
low-power warning icon appears in the information
screen.
• Be sure to replace the batteries if they have been used for
longer than two years; there might be a danger of leakage.
• Device configuration data is automatically saved when batter-
ies are being replaced.
• Always dispose of used batteries in an environmentally-
friendly way.
The settings of the backlight have a big impact on battery life. For longest battery life, set the backlight
duration to “short” and the ambient light sensitivity to
“least” sensitive. See “Adjusting the LCD Backlight”.
6
Page 11
— Getting Started
LCD Touch Screen Buttons
The LCD (liquid crystal display) touch screen enables you to configure
and operate your UC-525 with the touch of a finger.
The touch screen buttons enable you to control your devices as you
would with your original remote control. Quickly set up macros, and
configure your LCD panel the way you want.
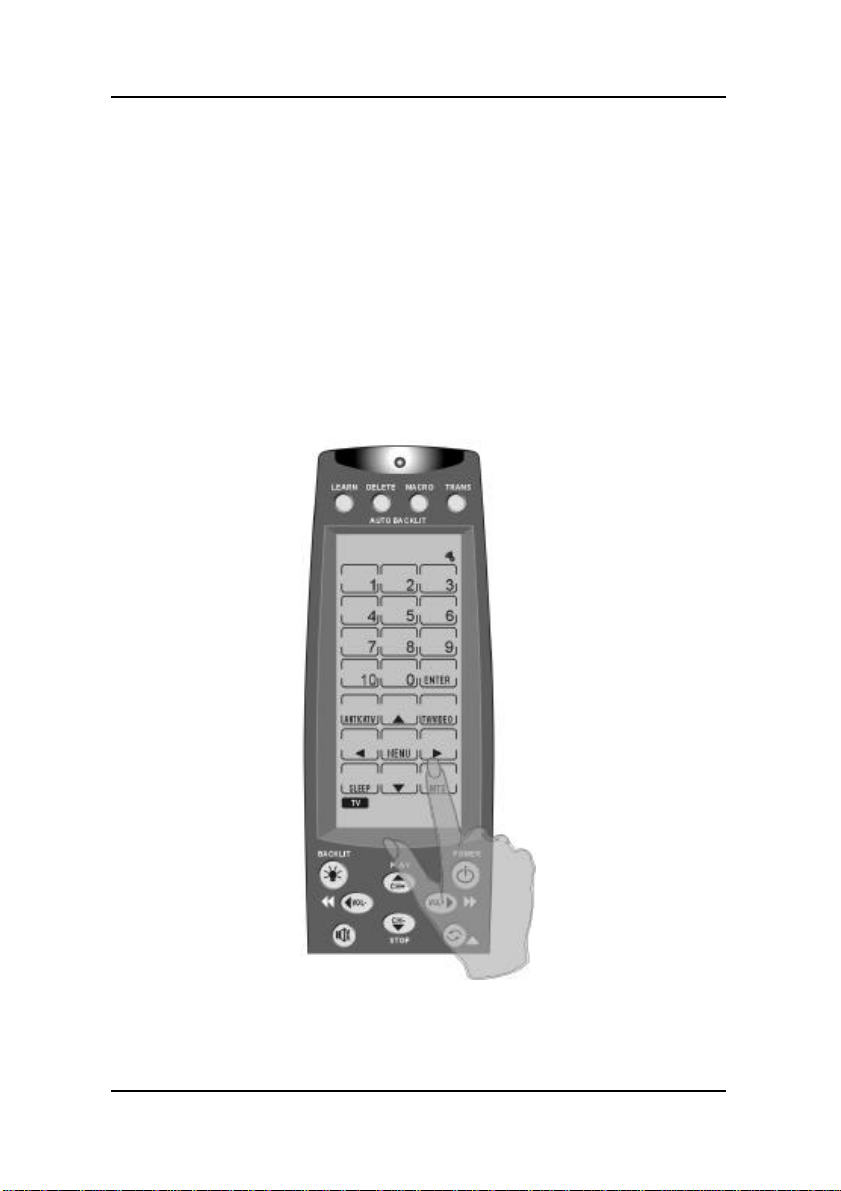
Turning the LCD on
To turn the LCD panel on, simply tap the screen with your finger or
press any button:
Figure 2-3: Turning the LCD on
7
Page 12
The UC-525 User’s Guide
Touch screen precautions
Please read the following instructions carefully:
• Tap the LCD touch screen gently; never use force.
• Do not use a pen or any sharp object to tap the screen; this
might damage the surface. You can use a blunt object such as
a pencil eraser or the cap of a pen.
• Keep the touch screen dry. Wipe off any spills immediately.
The UC-525 is not waterproof; never immerse it in liquid.
• Don’t expose the UC-525 to extreme temperatures. Keep it
away from heat sources.
• Avoid dropping the UC-525.
• Don’t drop anything on the touch screen.
• Clean the LCD touch screen with a soft cloth. If needed,
dampen the cloth slightly before cleaning. Never use abrasives
or cleaning solutions.
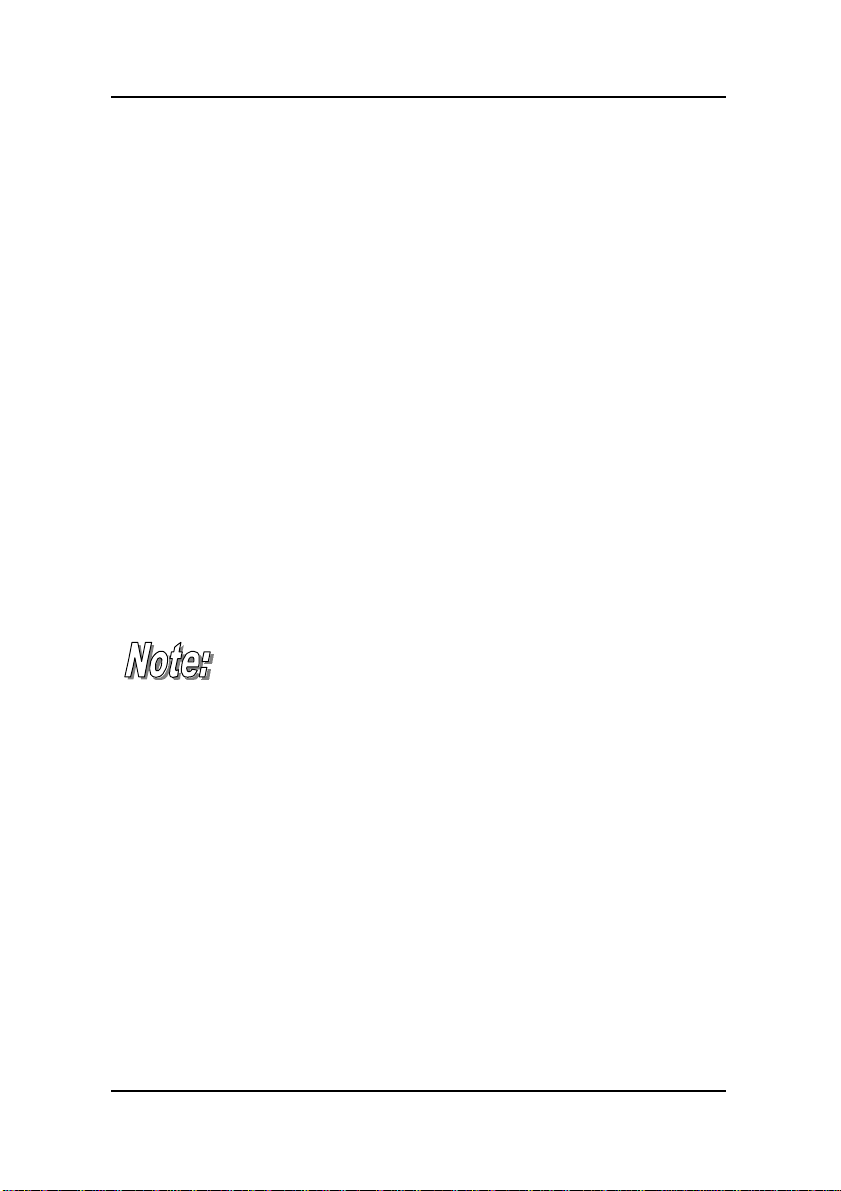
To activate the recording function, press and hold the
“REC” icon for three seconds. This is a safety feature
to prevent unintended recording with your Tape Deck
or VCR. This time delay is only active when the “REC”
icon is present.
8
Page 13
— Getting Started
UC-525
UC-525 Buttons
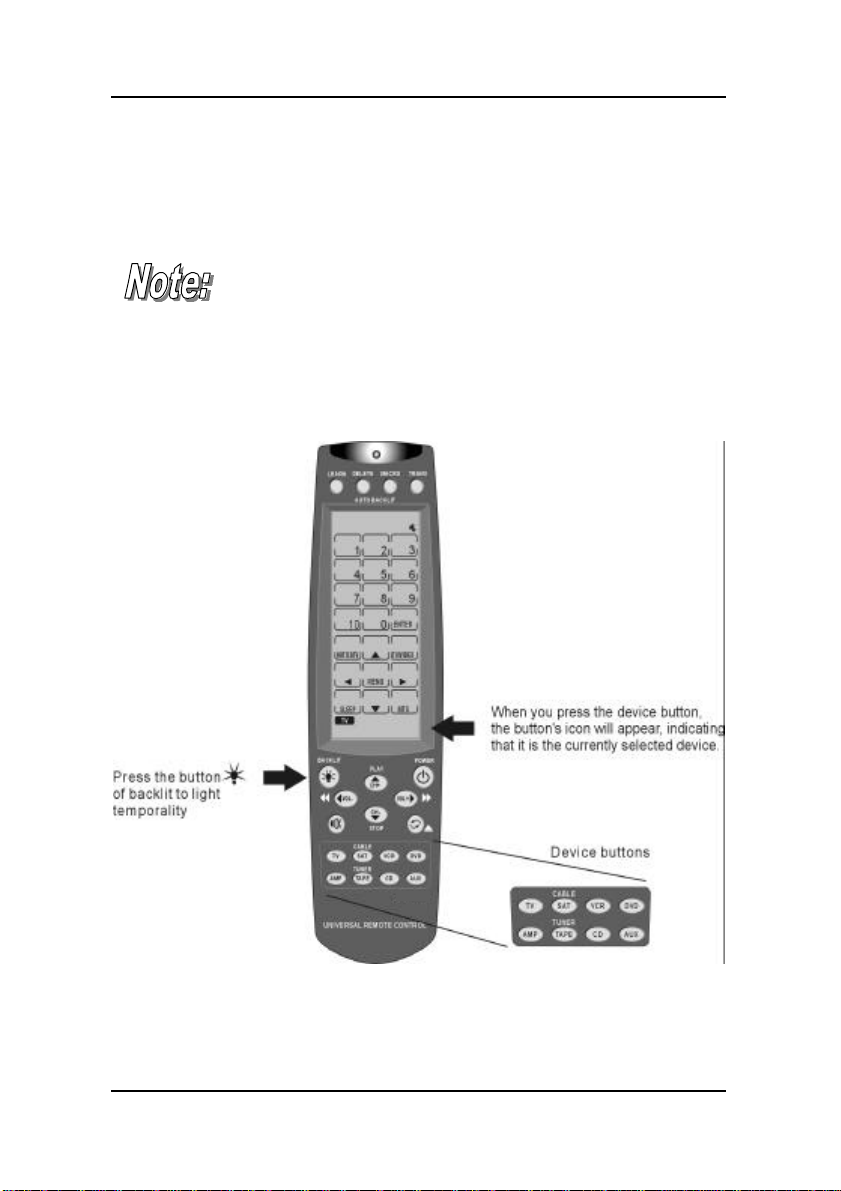
Simply press the screen to activate a function. You will hear a beep
(if activated) when you press the button.
If you don’t hear a beep when you press the screen,
you may have deactivated the beep. Press any
DEVICE button twice to activate the beep function. If
you still don’t hear a beep, press the button a little
more firmly.
.
Figure 2-4: UC-525 LCD panel layout
9
Page 14

— Operating the UC-525
Chapter 3Chapter 3
Operating the UC-525
This chapter tells you how to set up the UC-525, automatically configure devices, and use advanced features such as macros.
Before using the Learning Function
Before you start configuring your remote controls using the learning
function, please note the following:
• You may map multiple devices to the same device layer. This
can be very useful, for example, if you wish to control the
TV’s volume using your amplifier without having to change
between the two device screens. In this case, you learn the
regular TV functions from the TV remote and the volume
functions from the amplifier remote. In rare cases this might
fail, although no corruption of data or other damage will occur. If this happens, delete the learned code for the device
layer and learn only one remote to the device screen.
• To reconfigure a device layer for a different device, first
DELETE all the commands for the device. Refer to the chapter ”Using the delete function”.
• When using the learning function, you must press each but-
ton within 120 seconds. Otherwise, the UC-525 will exit
learning mode and return to normal operation mode.
Page 15
— Operating the UC-525
Using the Learning Function
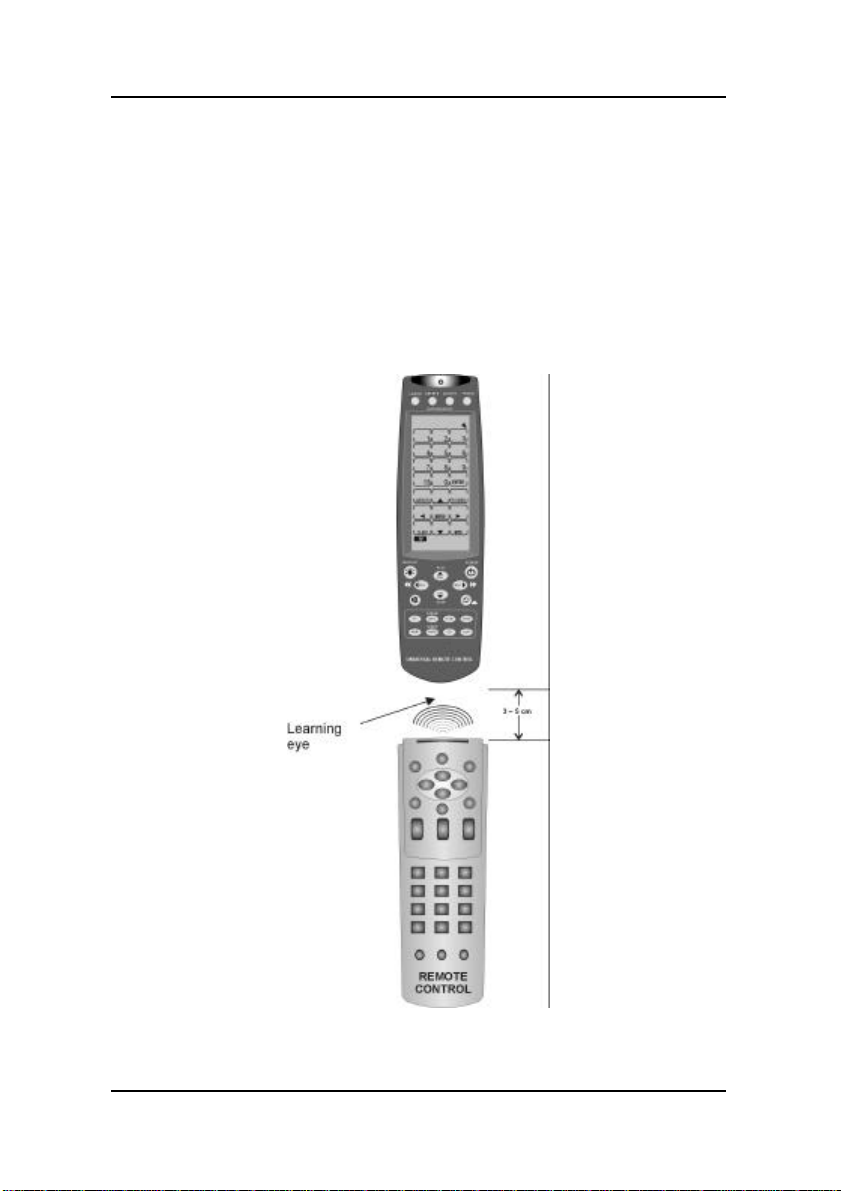
When using the learning function, point your device remote control
at the UC-525’s learning eye. No need to power on the device.
Note: It is helpful to customize the screen layout before learning the keys (see “Changing the device layout”). This way you
don’t have to delete and relearn buttons repeatedly in case you
decide to change the layout.
UC-525
Figure 3-1: Using the learning eye
11
Page 16
The UC-525 User’s Guide
After you have lined up your remote control with the UC-525 learning
eye, you can use the learning function. Follow these instructions:
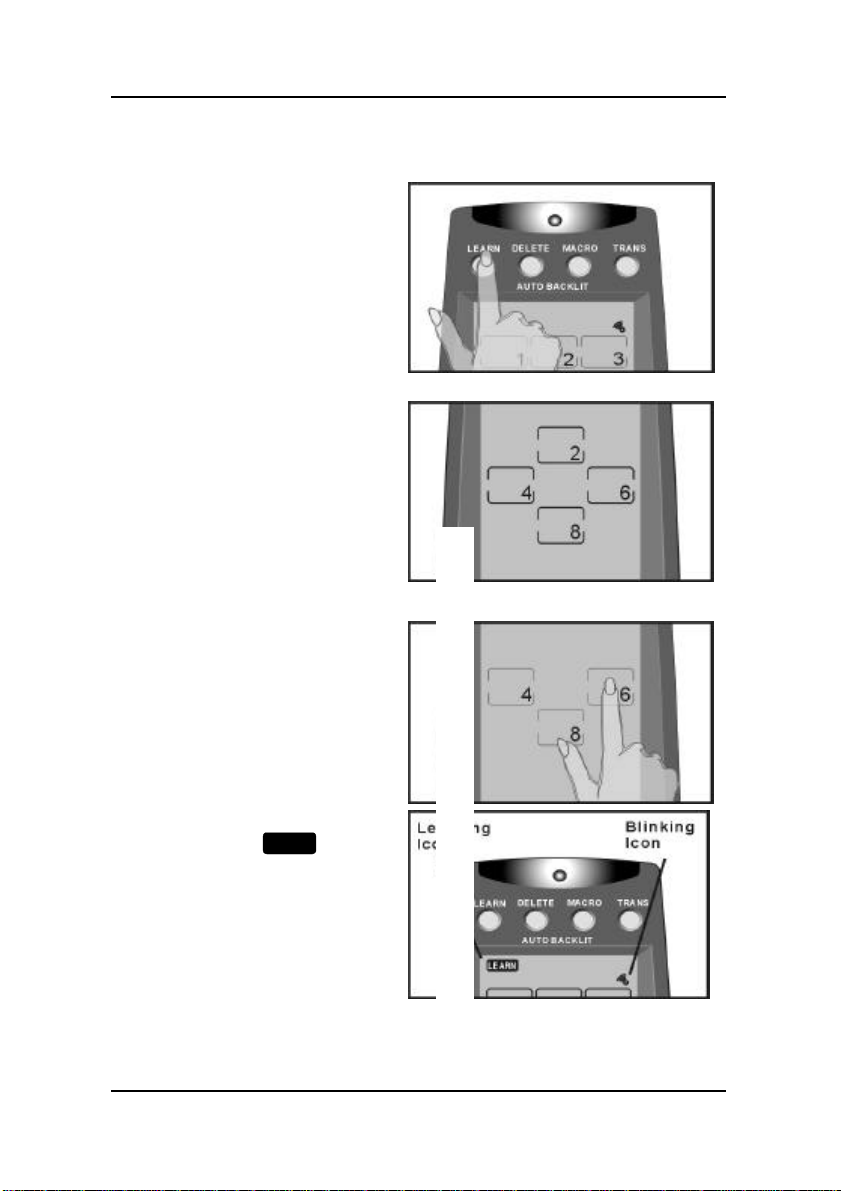
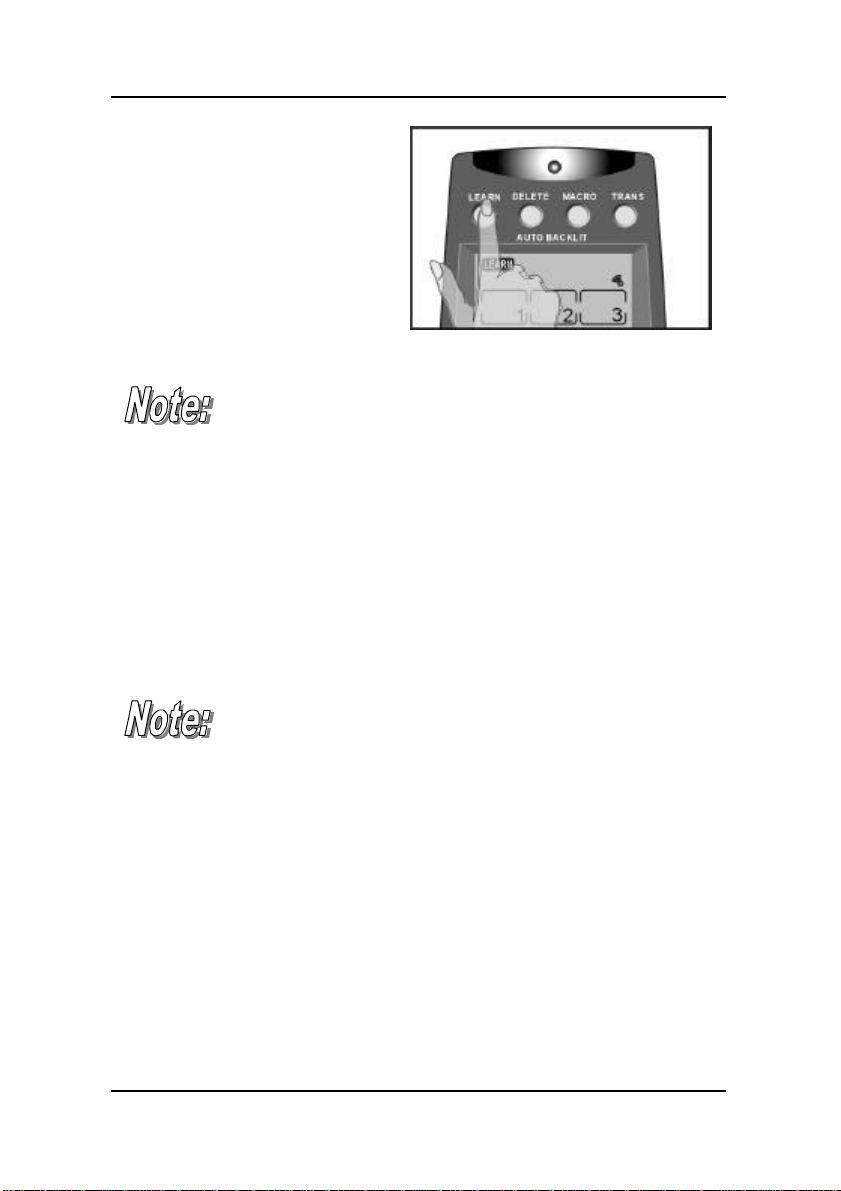
Press the LEARN button for
three seconds.
You hear a beep and then you
see the unlock screen to the
right.
Note: This screen prevents
you from unintentionally modifying the UC-525.
Press each number button in
any order until it disappears.
The device screen appears
again, with the
under the LEARN button and
the “beep icon” starts blinking. The UC-525 is awaiting a
signal from your device’s remote control.
LEARN
12
icon
.
.
Page 17
— Operating the UC-525
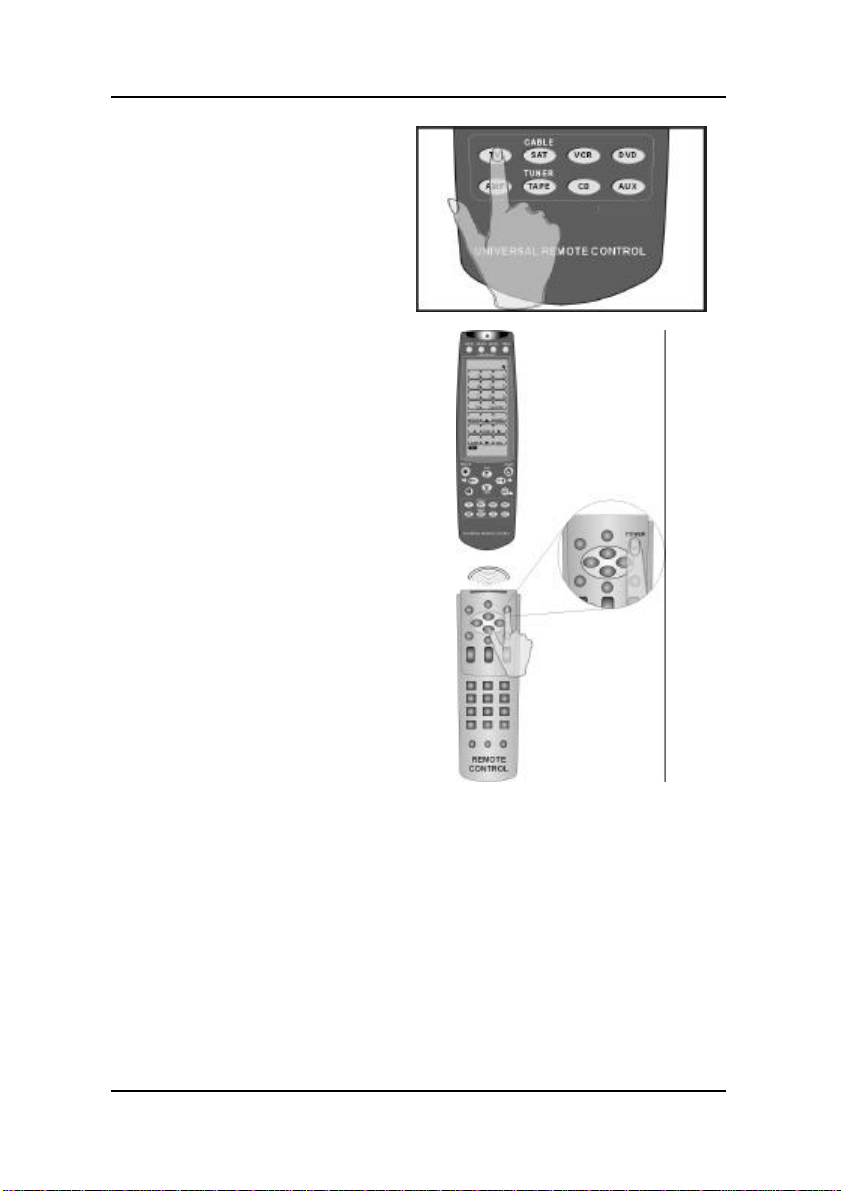
Press the button for the device
you wish to program.
You can now start mapping
your device’s remote control
buttons to the UC-525 LCD
buttons.
The power button is the first
button to be mapped.
While pointing your device’s
remote control at the UC-525
learning eye, press the device’s power button.
Note: The hard buttons don’t
have corresponding symbols
that flash to indicate that they
are ready for learning. Thus
press the hard button you
wish to program and then the
corresponding button on the
original remote control.
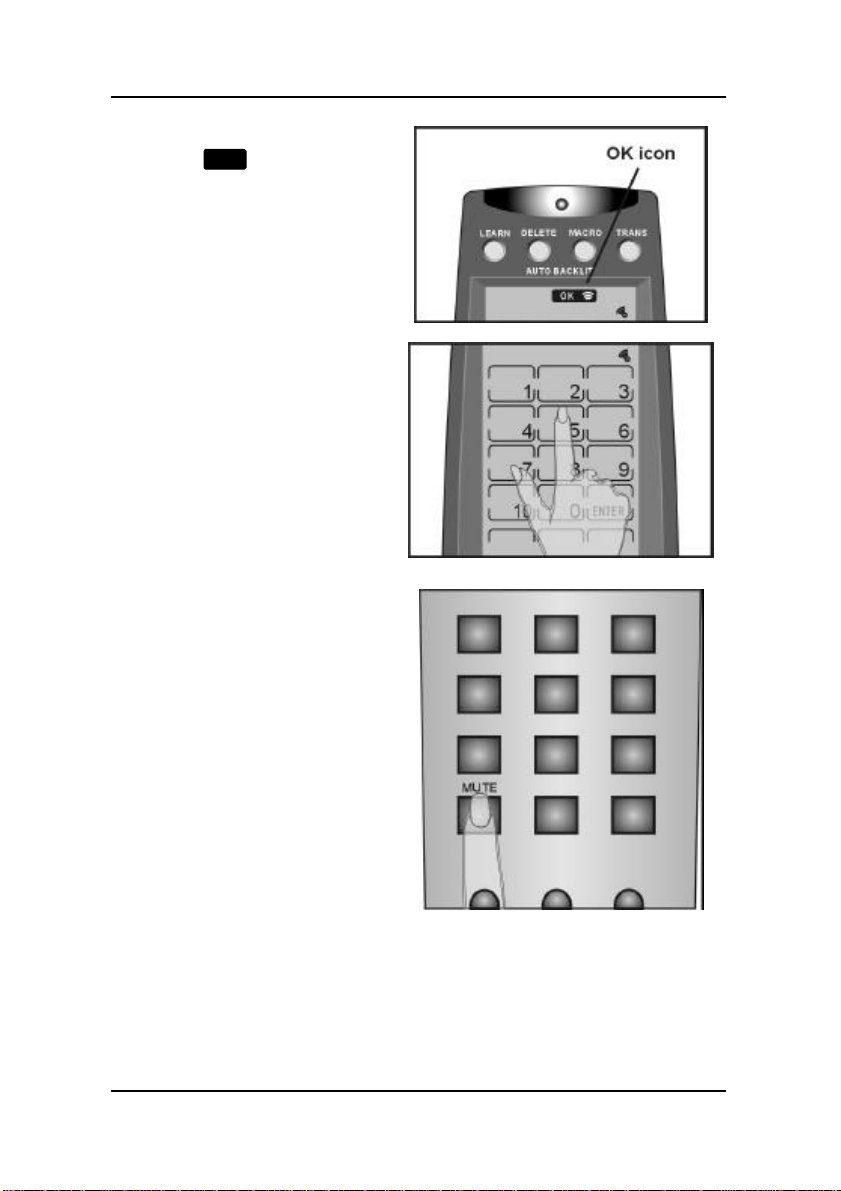
First,
uTouch the hard button you
wish to program on the UC525 and then press the corresponding button of your
devices remote; you will
hear a beep and see the OK
icon. Release the remote
control button of your device. Press the next hard
button until you have programmed all hard buttons.
UC-525
UC-525
vTouch the upper left button
on the screen and press the
corresponding button of
your device’s remote control.
13
Page 18
The UC-525 User’s Guide
When you hear a beep and
see the
OK
icon, release
the button. The next button to
be mapped will start blinking.
Continue to press the buttons
on your device remote control
that correspond to the blinking
buttons on the UC-525.
You can skip to any button by
pressing the button you wish
to learn next on the UC-525
LCD panel and …
… by pressing the corresponding button on your
device remote control.
Or, you can press a different
device button and configure it
with a different remote control.
14
Page 19
— Operating the UC-525
When you have finished mapping all the desired buttons
from your device remote control to the UC-525, press the
LEARN button. You hear
three beeps, and the UC-525
exits the learning function.
If you see an “error” message when mapping a button
or have trouble with the learning function, refer to the
troubleshooting section in Appendix B.
Using the Delete Function
The delete function enables you to:
• Delete the IR commands for selected buttons for a device
• Delete IR commands for all buttons for a device
• Delete the IR commands for all devices.
The delete function only deletes the mapped data; it
does not remove buttons. To learn how to remove
buttons, refer to “Changing the LCD Layout”
15
Page 20
The UC-525 User’s Guide
Deleting a command button
The clear device function enables you to erase the commands for buttons on a particular device. Follow these instructions:
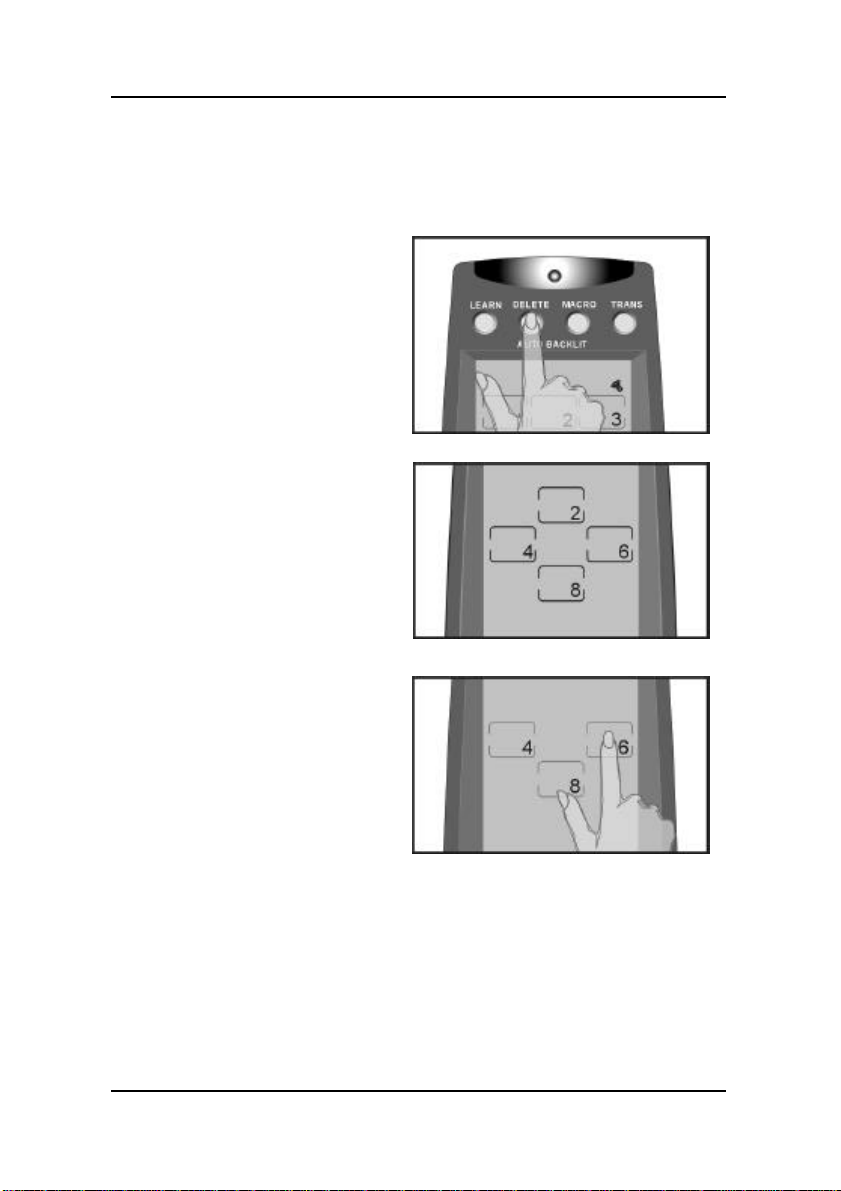
Press the DELETE button
for three seconds.
You hear a beep and then
you see the unlock screen
to the right.
Note: This screen prevents you from
accidentally modifying
your UC-525.
Press each number button
in any order until it disappears.
16
Page 21
— Operating the UC-525
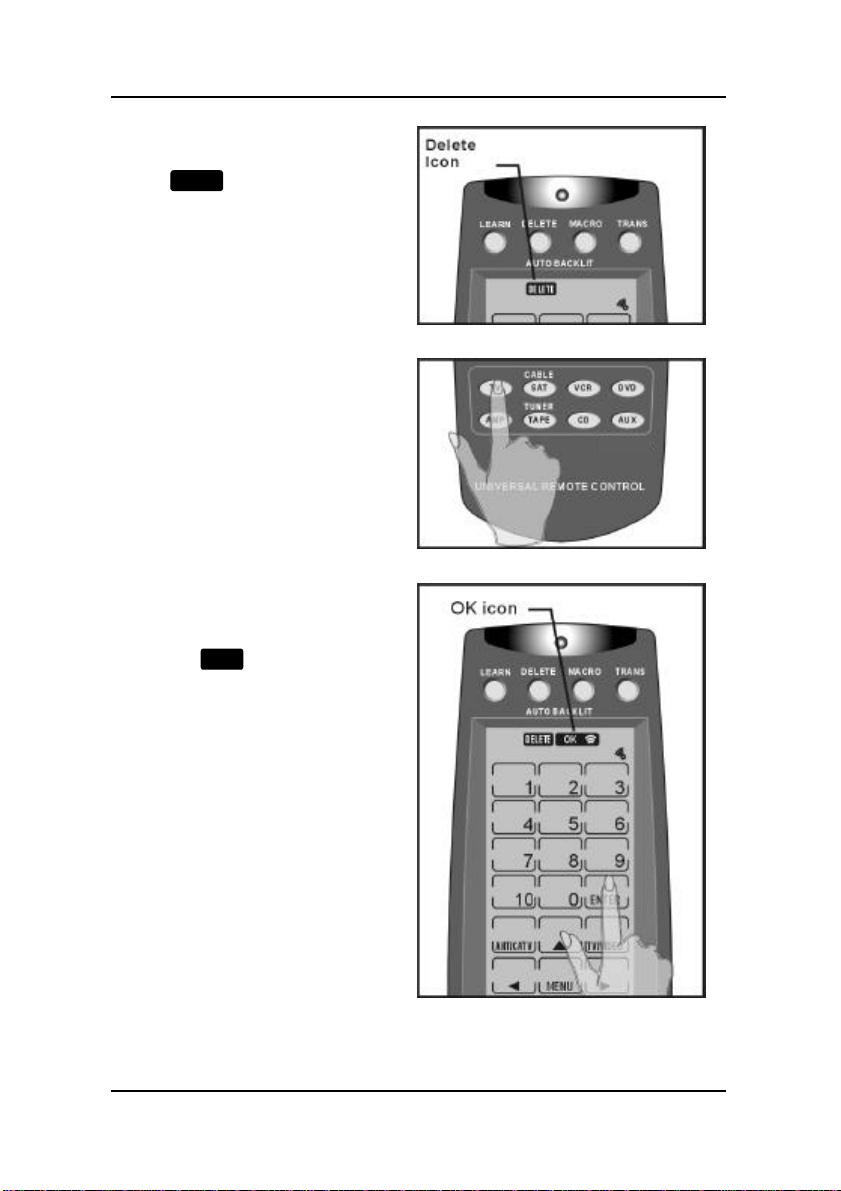
The device screen appears again, with the
DELETE
icon under the
DELETE button.
Press the button for the
device that you want to
configure.
UC-525
Press the button whose
data you want to delete.
You hear a beep and see
OK
the
ton’s data has been
deleted.
Note: Pressing the button
only deletes the mapped
data; it does not remove
the button. To learn how
to remove buttons, refer to
chapter “Changing the LCD
Layout”.
Continue to push buttons
whose data you want to
delete. When finished,
press the LEARN button to
exit Delete mode.
icon. The but-
17
Page 22
The UC-525 User’s Guide
Bank delete
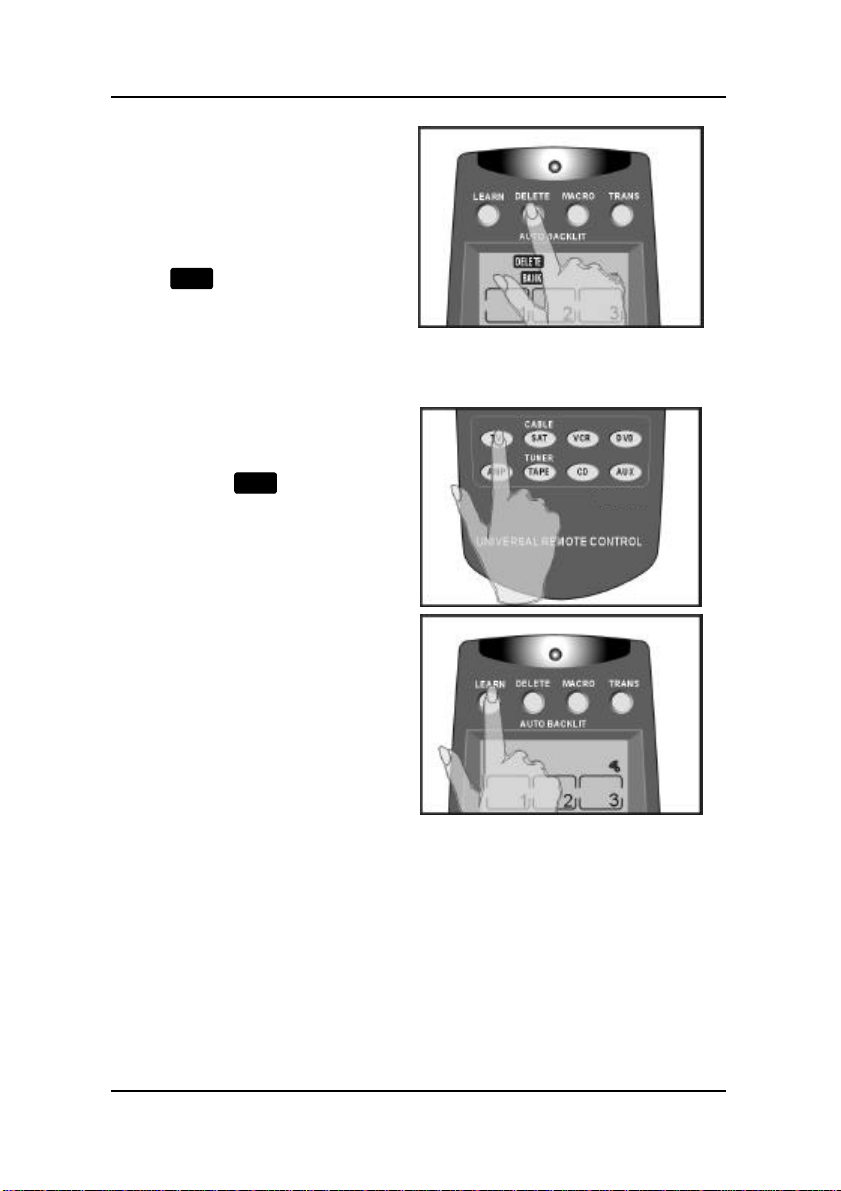
If you wish to delete the
data for all buttons of a
device, press the DELETE
button again while in delete mode. The
BANK
icon appears under
the DELETE button.
Press the device whose
data you want to delete.
You hear two beeps and
see the
OK
icon.
UC-525
All data for the device has
been deleted.
Delete all devices
To delete the data for all
the devices, press the
DELETE button for three
seconds. The display will
flash and you will hear six
beeps. All data has been
erased.
Exit Delete Function
To exit the delete function,
press the LEARN button.
18
Page 23
— Operating the UC-525
Changing the LCD Layout
The device edit mode enables you to delete buttons or change the
icons on buttons in the device menus. Follow these instructions:
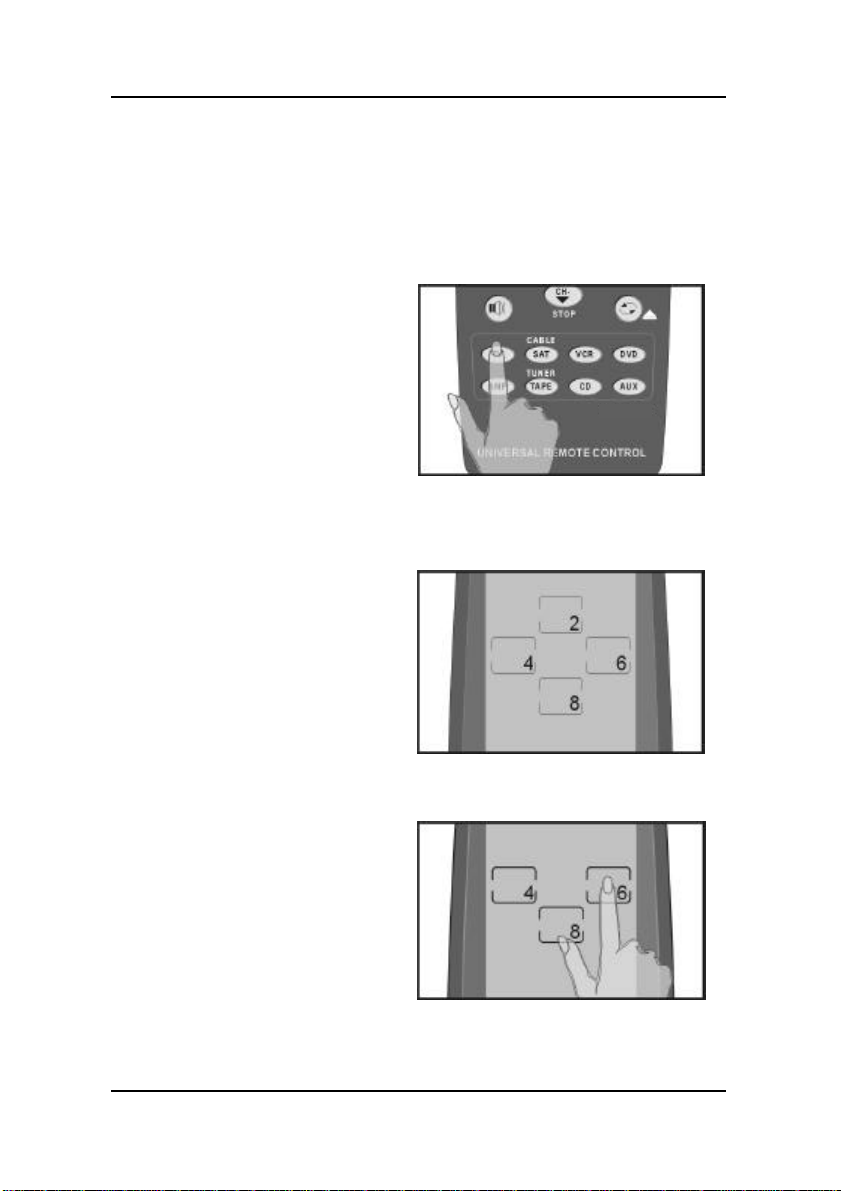
Press the button of the
device that you want to
configure, for three seconds. The display will
start flashing.
You hear a beep and then
you see the unlock screen
to the right.
Note: This screen prevents you from
accidentally modifying
your UC-525.
Press each number button
in any order until it disappears.
Tap the screen once. The
display stops flashing.
UC-525
19
Page 24
The UC-525 User’s Guide
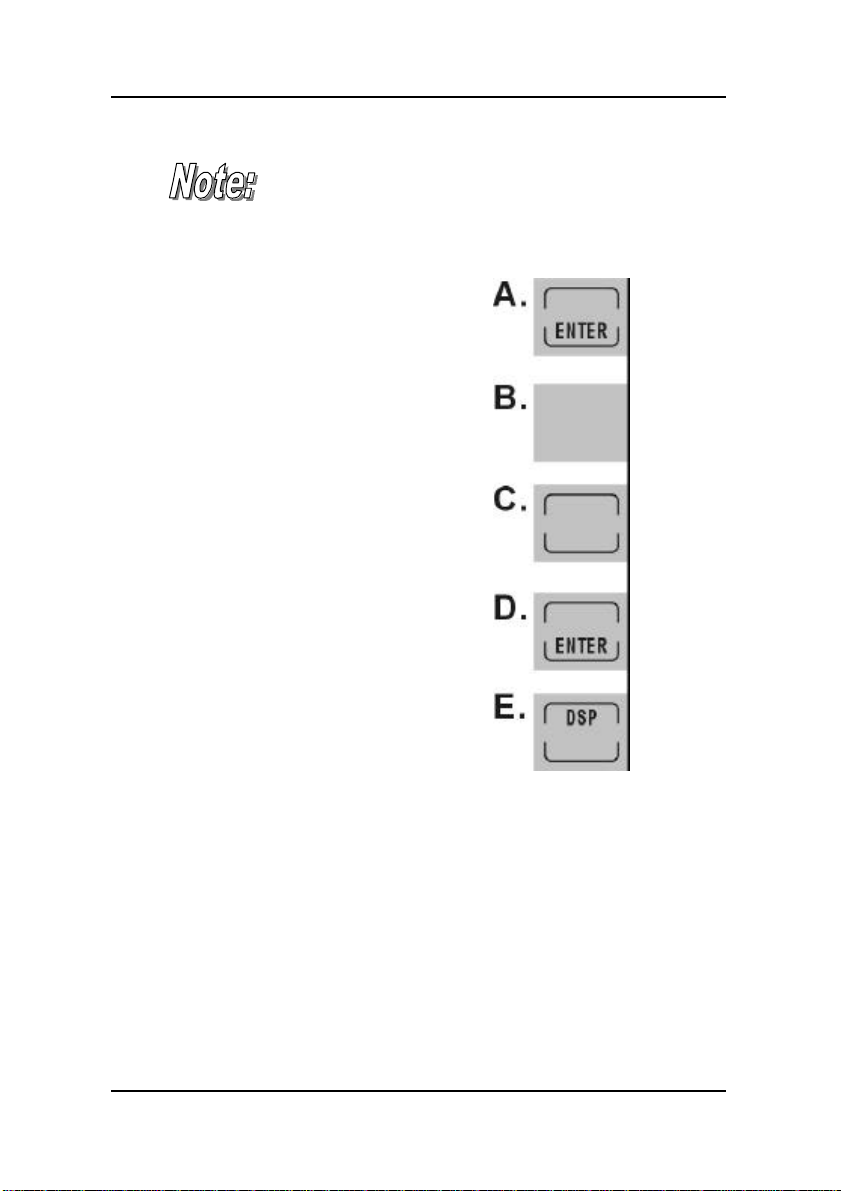
To see all available icons, press &
hold the power button while in
device edit mode.
Keep pressing the button
to scroll through the options. You can delete the
button, or choose one of
the available icon layouts.
Note: If you don’t find the
right icon to represent
your device function, you
may use an empty button
(figure C.) to represent the
function.
After you have made your
changes, press the
DEVICE button again.
You hear three beeps and
the UC-525 goes back to
normal mode.
20
Page 25

— Operating the UC-525
Changing the AUX Device Layout
The AUX Device screen layout can be made identical to any of the
other device buttons.
• Enter the “LCD layout edit mode” for the AUX Device but-
ton by pressing the AUX button for three seconds (this
function is activated the same way as described in the previous chapter “Changing the LCD Layout”).
• When the screen flashes, press the device button of the de-
vice you want to copy. This device layout is copied to the
AUX button.
• Press the AUX button again. You will hear three beeps and
UC-525 will return to normal operating mode.
Macro Function
The macro feature enables you to store up to 25 commands on any
command button. When you have created a macro, you will be able to
run a chain of commands by pushing only one button. You can assign
macros to any regular button but not to device buttons.
When you assign a macro to a command button, the
original function of the button will be lost. Therefore
you should choose a button that you do not use in
normal operation.
Do not use a device button as your macro run button.
Using a device button will remove the button’s function from the layout. For example, if you use the TV
device button for the macro run key, you will not be
able to use the UC-525 to control your TV set.
21
Page 26
The UC-525 User’s Guide
Macro setup
Follow these instructions to set up a macro:
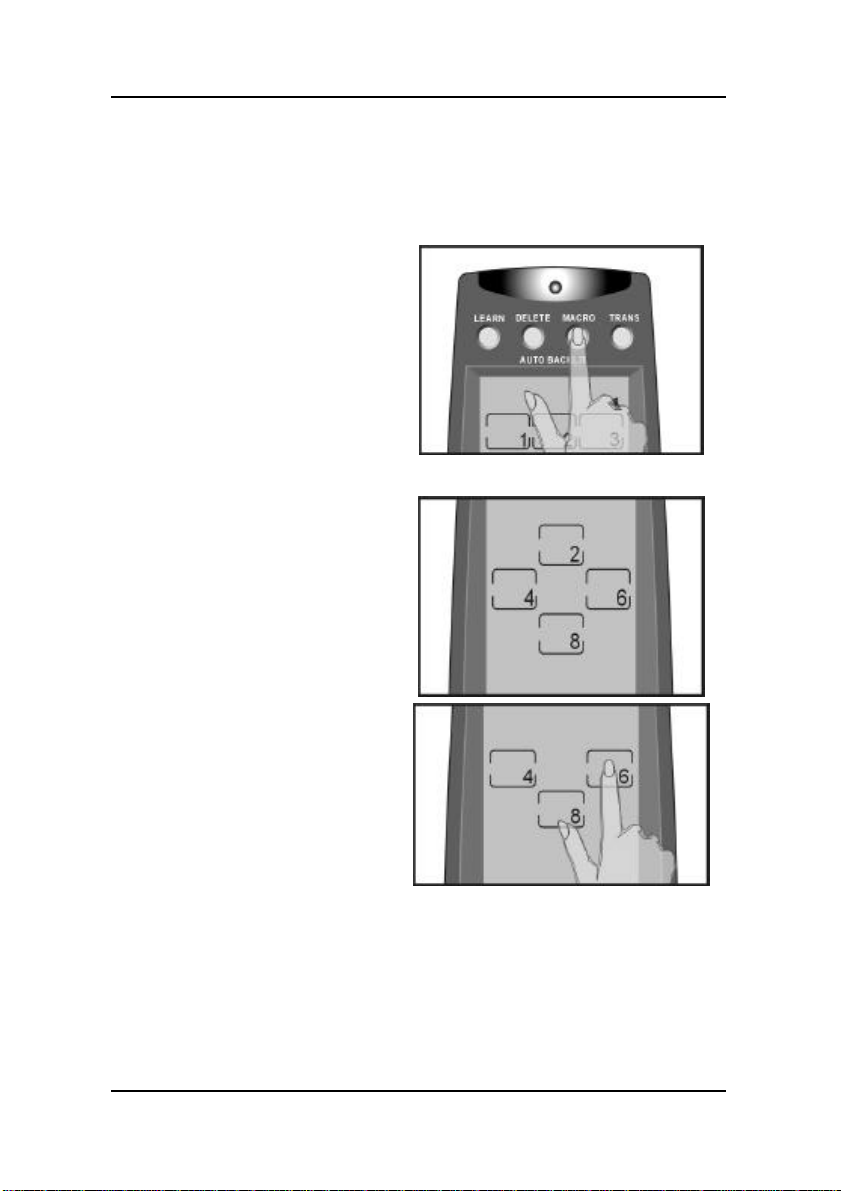
Press the MACRO button
for three seconds.
You hear a beep and then
you see the unlock screen
to the right.
Note: This screen prevents you from
accidentally modifying
your UC-525.
Press each number button
in any order until it disappears.
22
Page 27
— Operating the UC-525
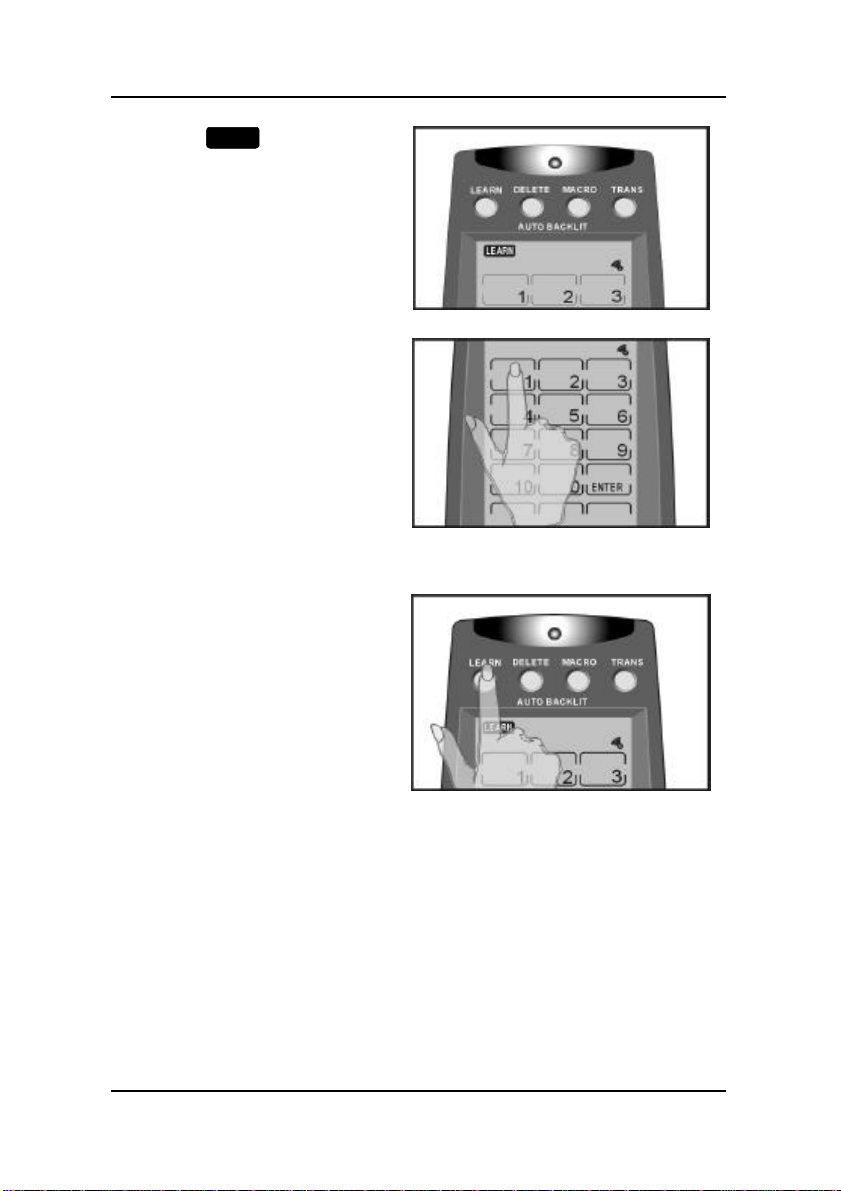
LEARN
The
under the LEARN button.
First, press the button that
you want to become the
macro button. You can
choose a button from any
device screen.
Then record the macro by
pressing the desired
command buttons. For
details, refer to the next
section: Macro example
Press the LEARN button
to end the macro recording for this macro.
If you want to record another macro, press a
different macro run key
and record the macro.
To exit, press the LEARN
button.
icon appears
Time Delays between macro commands
A chain of macro commands is usually played back quite quickly. If
necessary, you can set a time delay between each macro command.
Time delays are useful if your device needs time between two IR
commands. For example, after powering up your TV, it might take a
few seconds before it can recognize an Input command. For setting
time delays, refer to the next section, “Macro example”.
23
Page 28
The UC-525 User’s Guide
Macro example
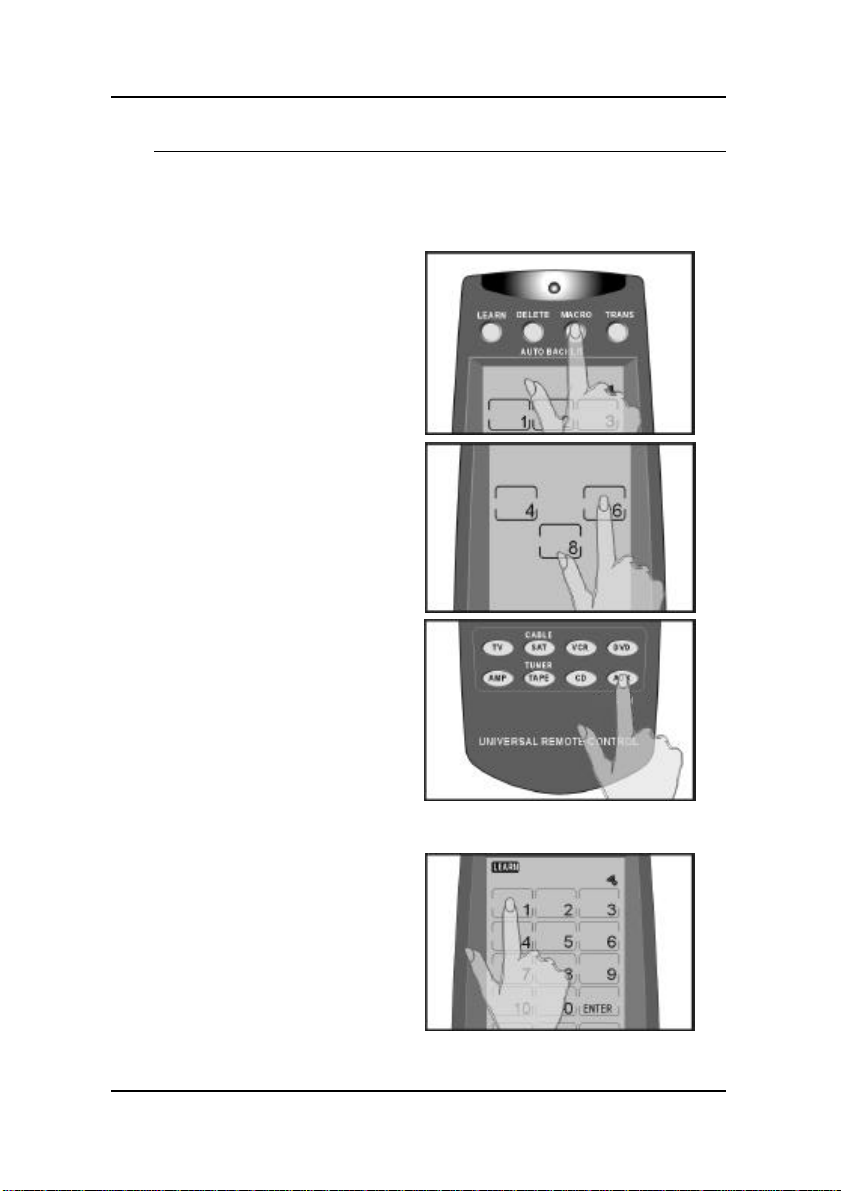
The following example will help you to better understand recording a
macro. This example macro would be used to turn on your TV,
switch to VCR input, and start playing a tape:
Press the MACRO button
for three seconds to enter
macro setup mode.
Press each number button
until it disappears.
Press the AUX button to
open the AUX screen.
Then press 1. You hear
three beeps.
The 1 button in the AUX
screen will be used to start
the macro during normal
operation mode.
Note: Do not use a device
button as your macro run
button. Using a device
button will remove the
button’s function from the
layout. For example, if you
use the TV device button
for the macro run key, you
will not be able to use the
UC-525 to control your TV
set.
A. Press AUX to open the AUX
screen
B. Press 1 to assign the macro start
24
Page 29
— Operating the UC-525
UC-525
button
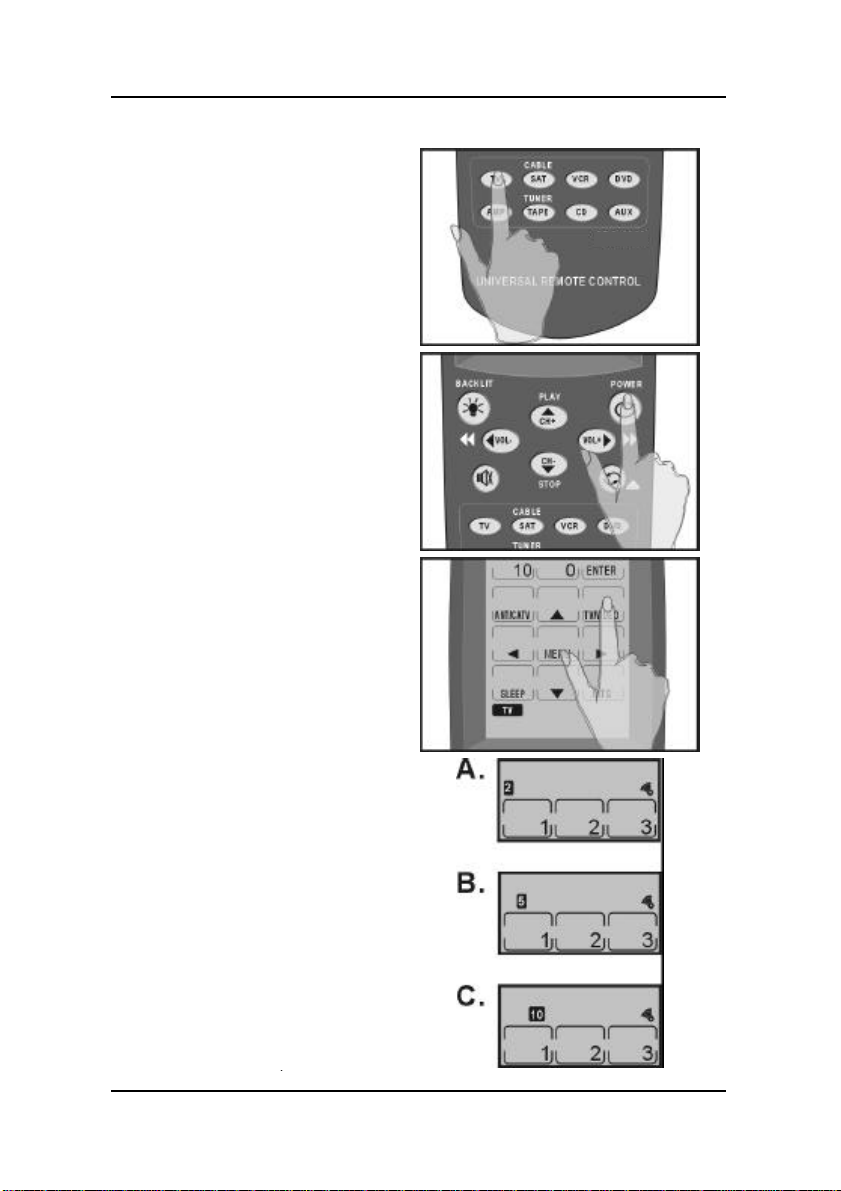
Press the TV button.
Press the power button.
This will power the TV on.
Press TV/Video. This
command will switch the
TV mode to Video mode
so that you can watch the
VCR.
You may need to set a
time delay between turning your TV on and turning
the VCR on. Push the
MACRO button to scroll
through the three options:
(A) two seconds;
(B) five seconds; and
(C) ten seconds.
Push the MACRO button
until the ten-second delay
(C) appears.
Note: You can set this
time delay between any
25
Page 30
The UC-525 User’s Guide
two commands.
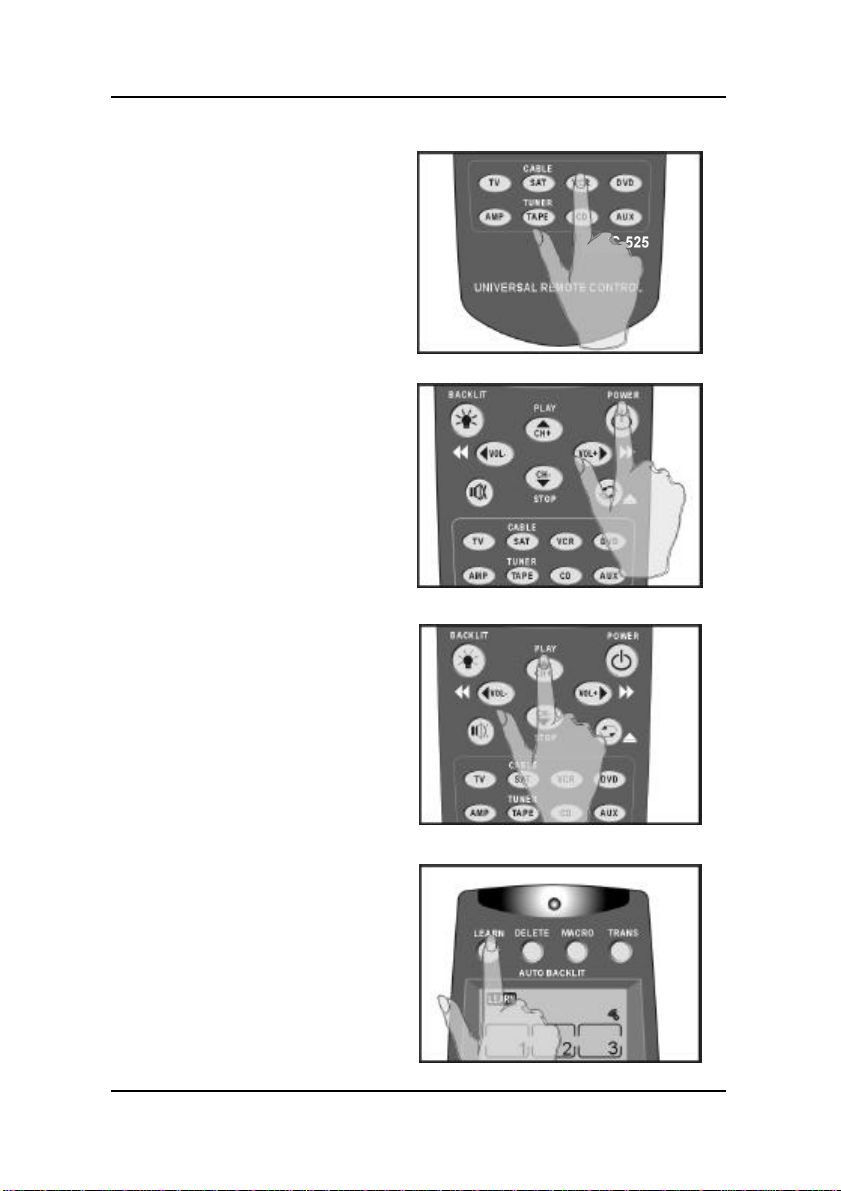
Press VCR to switch to the
VCR device menu.
Press power. This powers
your VCR on.
Press play. This command will start playing the
tape in your VCR.
Press the LEARN button
again to complete the current macro setup.
You can continue to setup
another macro function or
press LEARN twice to exit
the macro setup.
26
Page 31
— Operating the UC-525
Running the macro
To run the macro, press the button that you assigned when you recorded the macro. In the preceding example the following events
will happen when you press 1 in the AUX device screen:
1. TV turns on
2. TV switches to video mode
3. Ten second delay
4. VCR turns on
5. VCR starts playing tape
The macro button’s original function will not work unless you delete
the macro using the DELETE button function. Refer to “Using the
Delete Function”.
Adjusting the LCD Backlight
You can adjust the ambient light sensitivity and the length of time
that the backlight stays on. Extensive backlight use affects the battery life. See “Power supply tips and precautions”.
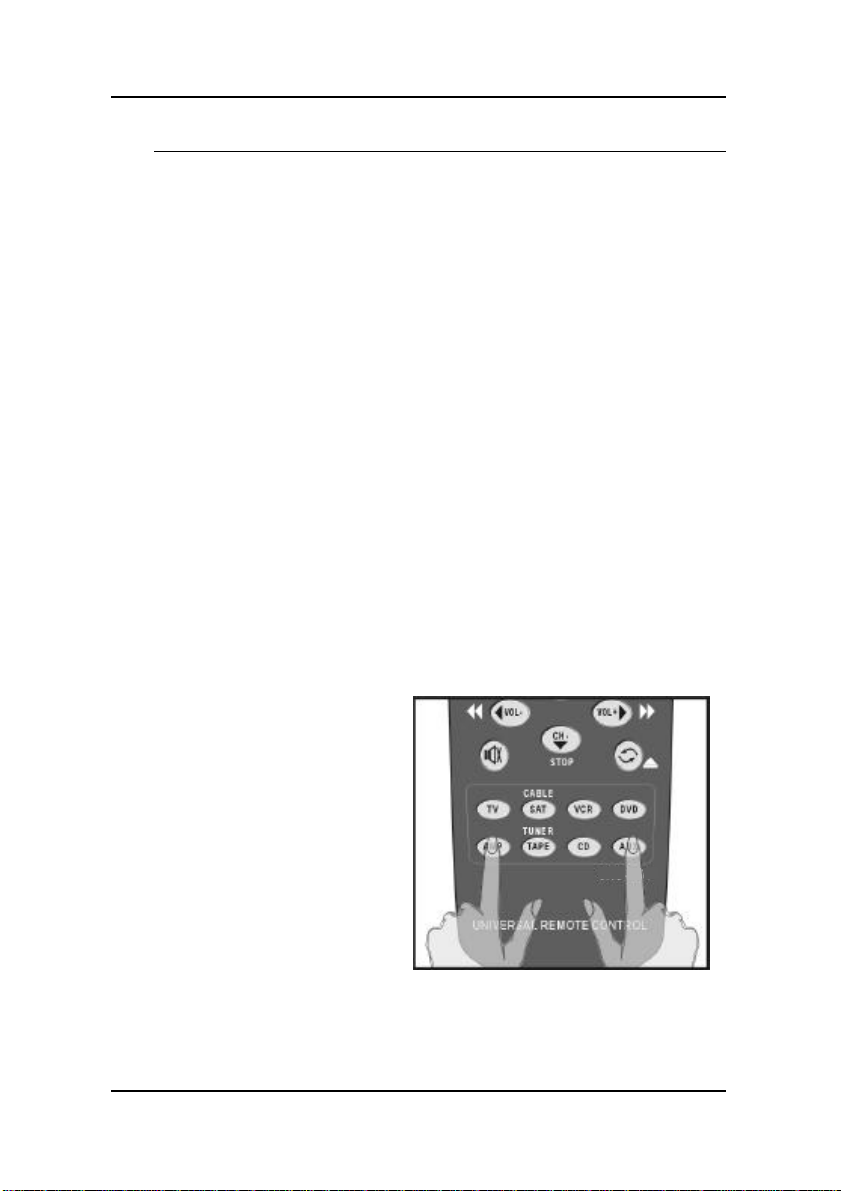
Press the AMP and the
AUX button at the same
time for three seconds to
enter the LCD backlight
configuration mode.
Note: Do not confuse this
button combination with
the combination for recalling the original LCD layout
(TV and DVD). Otherwise
your configuration will
be deleted.
27
Page 32
The UC-525 User’s Guide
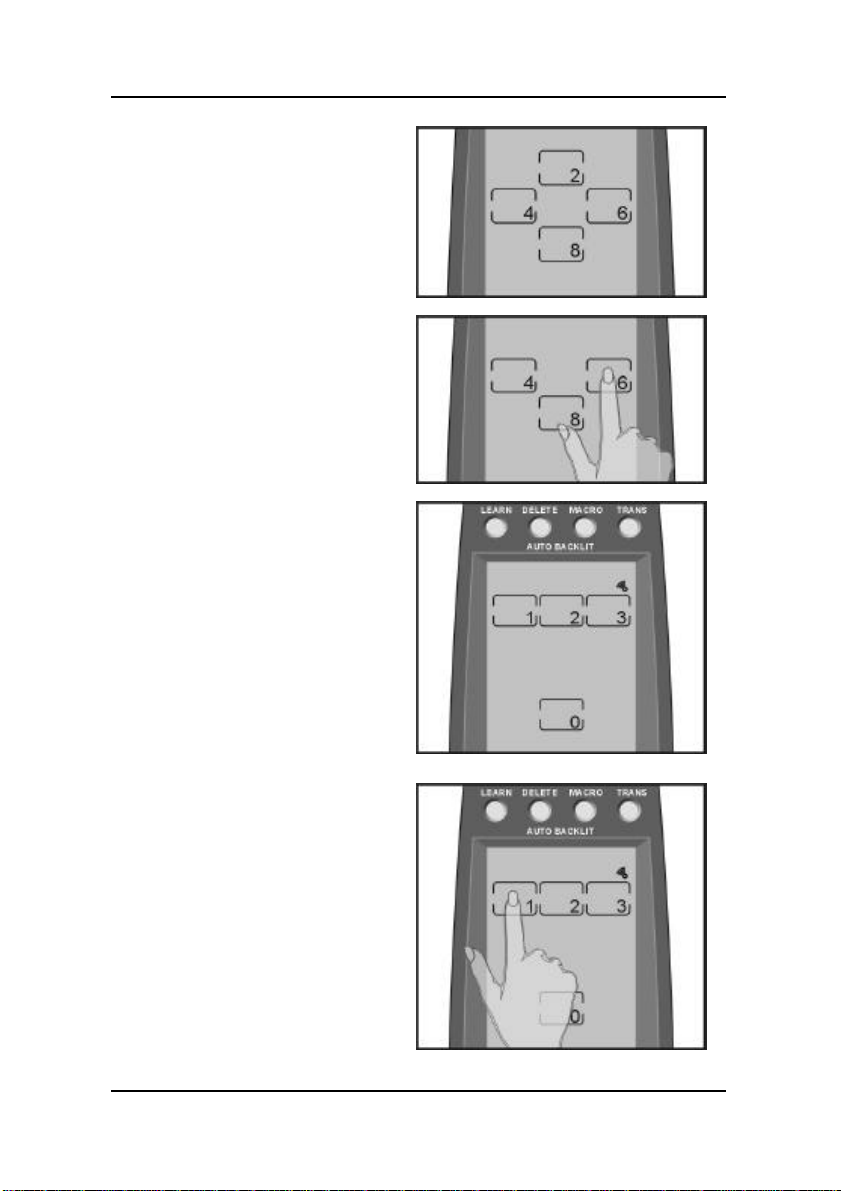
You hear a beep and then
you see the unlock screen
to the right.
Note: This screen prevents you from
accidentally modifying
your UC-525.
Press each number button
in any order until it disappears.
You see the screen to the
right. You can now set the
time duration that the LCD
backlight stays on after
you touch the LCD panel.
Press 1 for a 10-second
delay.
Press 2 for a 20-second
delay.
Press 3 for a 30-second
delay.
28
Page 33
— Operating the UC-525
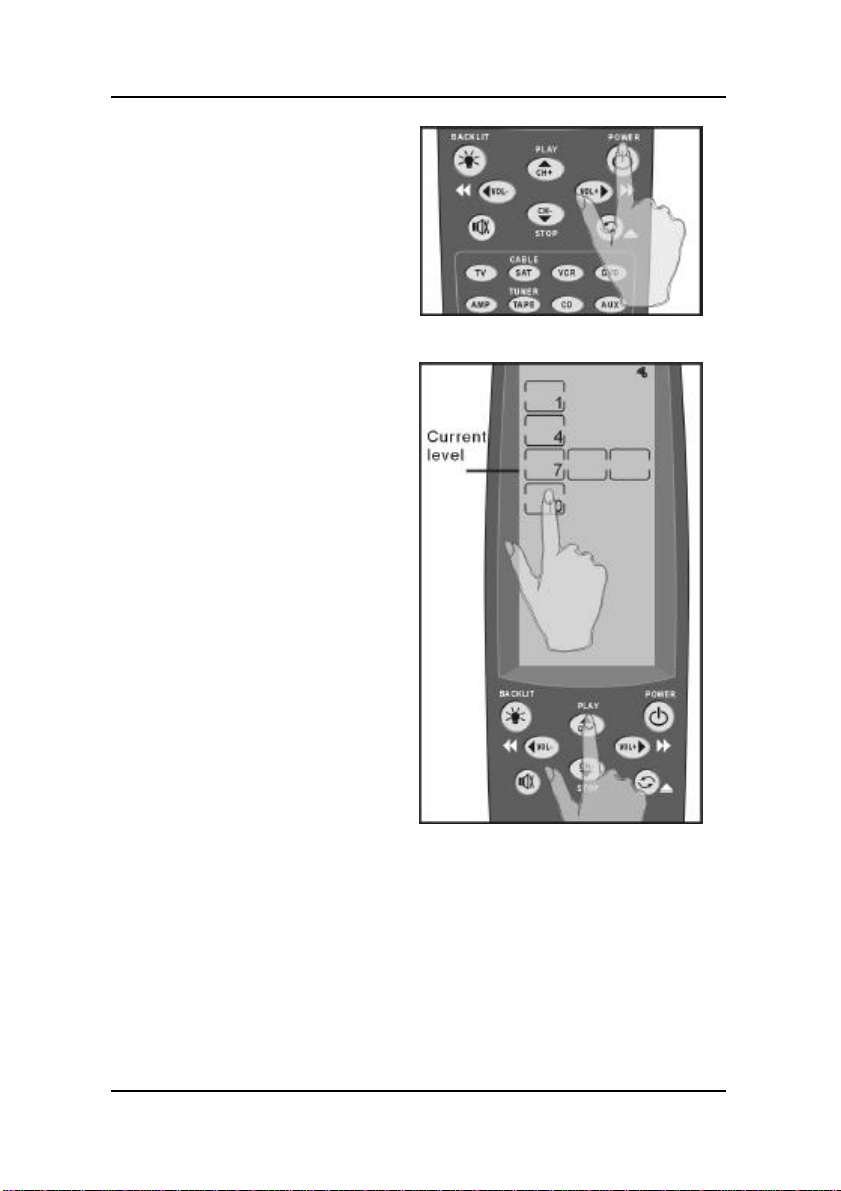
After you have made your
adjustment, press the
POWER button to move to
the next screen.
The UC-525 detects the
ambient lighting and will
turn the backlight on according to the setting in
this screen.
1 = most sensitive
10 = least sensitive
Press the up arrow key to
increase the sensitivity of
the backlight to the ambient lighting.
When set to 1, the backlight
will automatically switch on
after a small decrease in the
ambient light brightness.
Press the down arrow key
to decrease the sensitivity
of the backlight to the ambient lighting.
When set to 10, the backlight will automatically
switch on after a large
decrease in the ambient
light brightness.
29
Page 34
The UC-525 User’s Guide
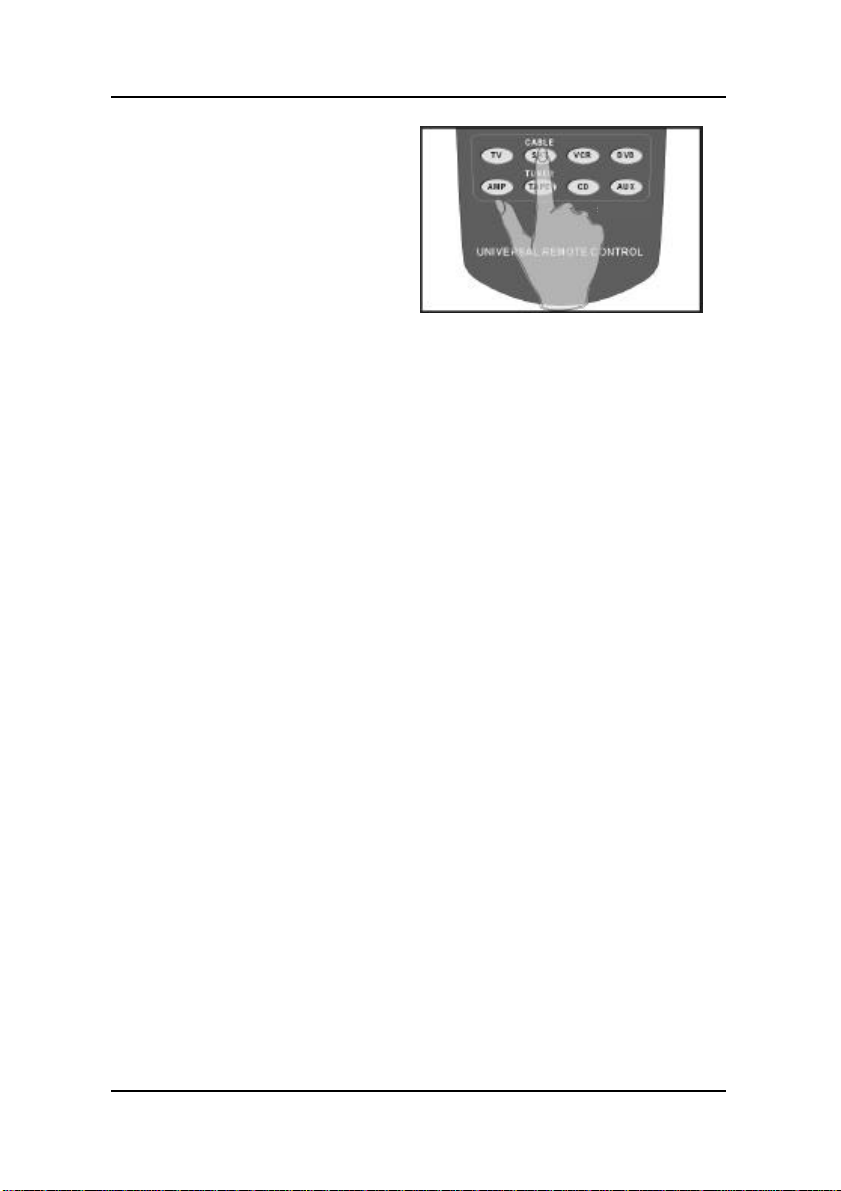
When you have finished
making your adjustment,
press any of the DEVICE
buttons to exit.
UC-525
30
Page 35
— Operating the UC-525
UC-525
Toggling the Beep Signal On/Off
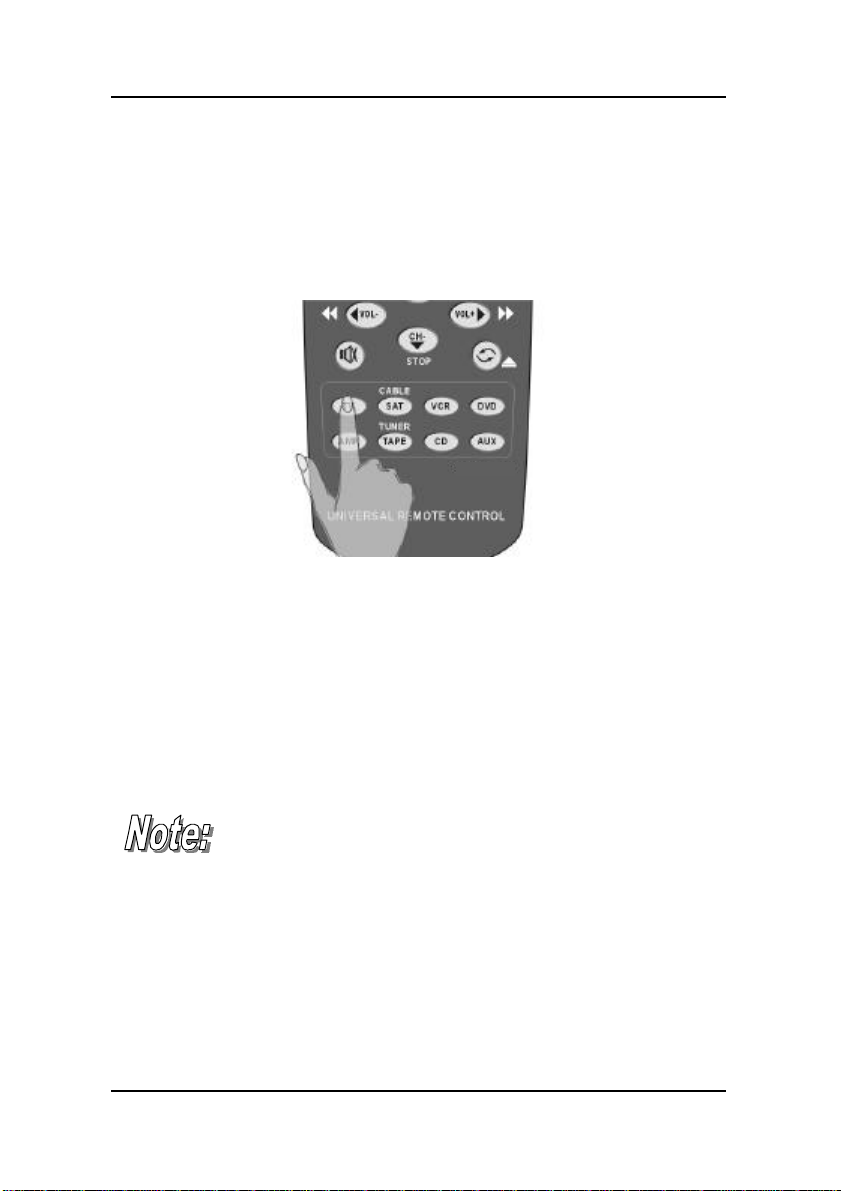
This function toggles the beep signal off and on. To turn off the beep
signal, press the active device button (or press any device button
twice). To turn it back on, press the active device button again.
Figure 3-2: Turning off the beep signal
Recalling the Original LCD Layout
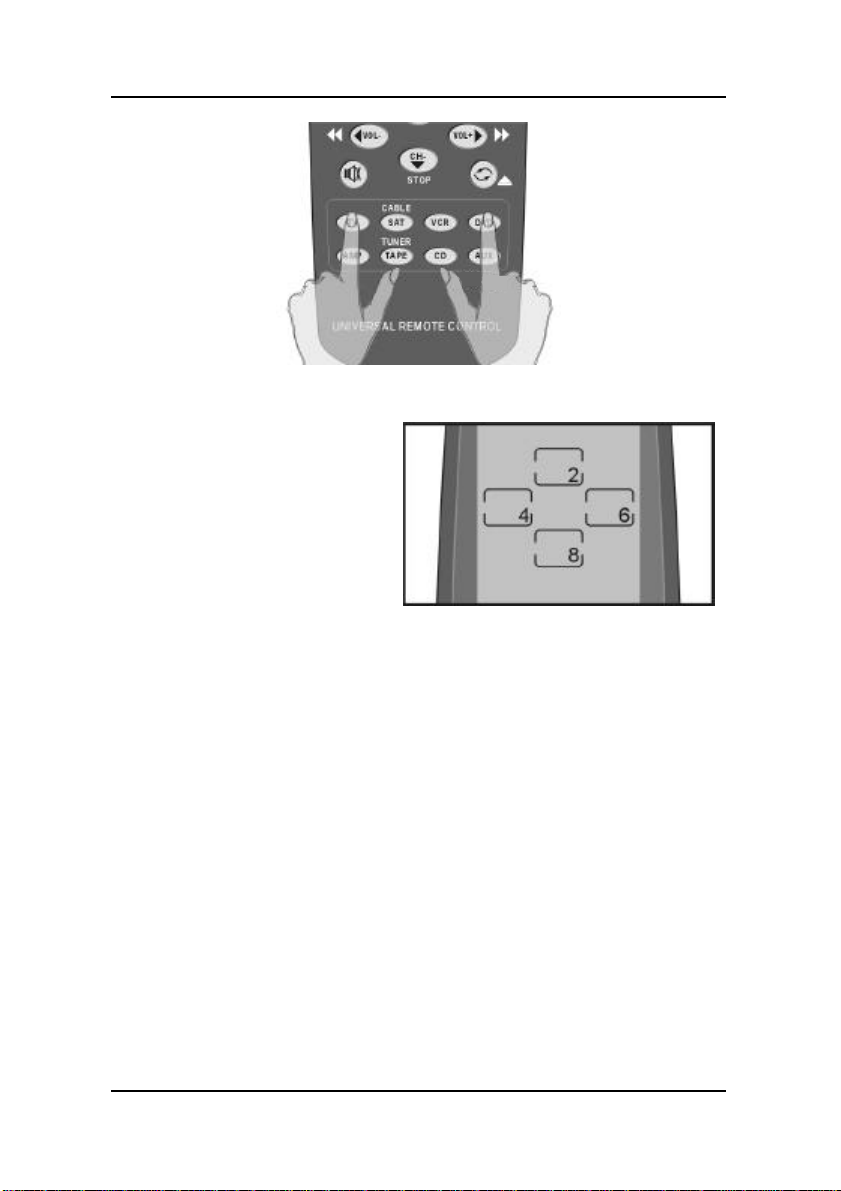
You can reset the LCD panel buttons to their original factory configuration. Any configuration changes you have made will be lost.
The learned codes are not deleted; to delete those,
To recall the original LCD layout, press the TV and DVD device buttons at the same time for five seconds:
31
refer to “‘Using the Delete Function”
Page 36
The UC-525 User’s Guide
Figure 3-3: Recalling the original LCD panel configuration
You hear a beep and then
you see the unlock screen to
the right.
Note: This screen prevents
you from accidentally modifying your UC-525.
The UC-525 beeps several
times and returns to normal
view. The original LCD
panel configuration has been
recalled.
32
Page 37
— Appendix A
Appendix AAppendix A
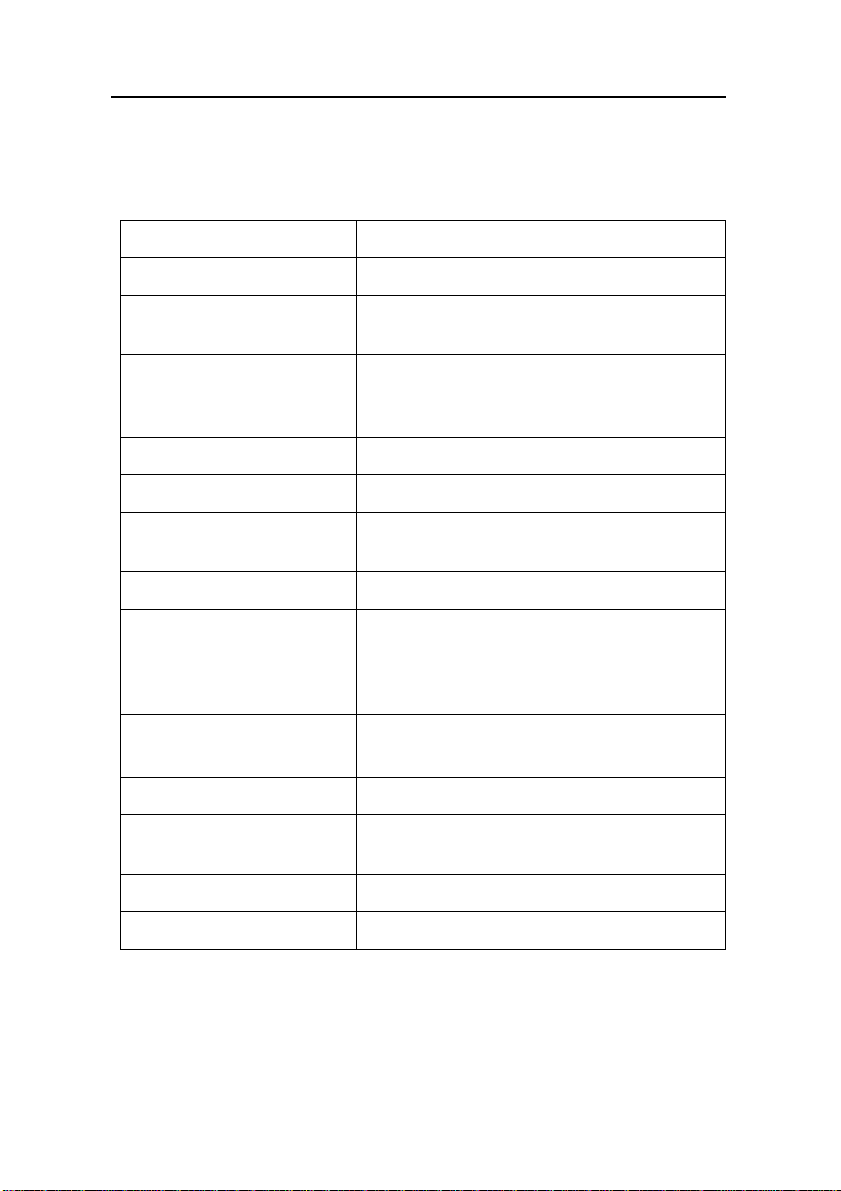
UC-525 Specifications
Model
Display
Typical device types
Remote capability
Learning frequency
Macro capability
Operating range
Memory
Power saving
Power consumption
Battery type
UC-525
Touch LCD with EL-backlight
TV, DSS/SAT/Cable, VCR, DVD,
AMP, Tape/Tuner, CD, AUX
8 Displays x 28 keys = 224 keys
(21 soft- and 7 hard buttons per device)
Up to 125 kHz
25 commands per command key
Approx. 30 ft. under typical conditions;
30 – 45 degrees effective angle
128KB Flash memory, non-volatile
LCD turns off 20 minutes after last
operation, reactivates automatically.
Backlight turns off 10 to 30 seconds
after last operation
In use: 50mA; Standby: 130µA;
LCD off: 30µA
4 AAA alkaline batteries
Dimensions
Weight
Safety Approvals
8.26” x 2.36” x 1” (210 x 60 x 26 mm)
L x W x H
5.4 oz. (157g) (without batteries)
CE, FCC
Page 38
— Appendix B
Appendix BAppendix B
Troubleshooting
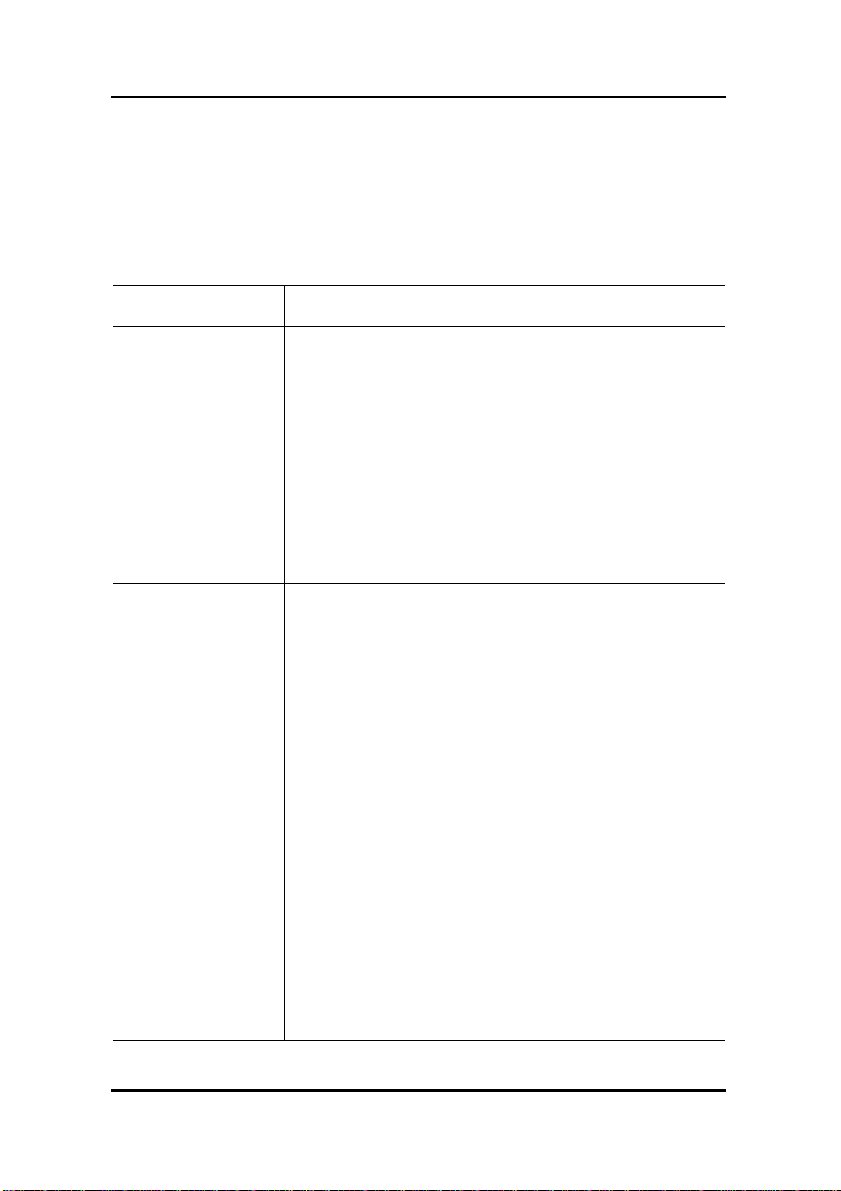
If you have trouble configuring or operating the UC-525, first check that
you have inserted the batteries correctly. Then check the items below.
Symptom Remedy
The UC-525 does
not operate your
device.
• Move closer to the device. The maximum operating distance is approximately 30 feet
(10m).
• Ensure that you are aiming the UC-525 directly
at the device and that there are no obstructions
between the UC-525 and the device.
• Ensure that you have used the learning function to configure the device.
• Make sure that the desired device on the UC525 LCD panel has been selected.
You cannot operate a device even
after configuring
the device using
the learning function.
34
• Make sure that you have correctly “mapped”
your device’s remote control to the UC-525.
• Clear the device data from the UC-525 (bank
delete) and carry out the learning function
again.
• Some original remotes have unstable timing or
complex IR signals which cannot be learned.
Try learning the commands from a different
remote control, such as a universal remote,
configured to control the respective device.
• Don’t assign too many different remotes to the
same device layer (page 11).
• A very few original remotes use an IR signal
that is out of the range of the UC-525’s capability.
• Some original remotes mix more than one
command to perform a function; UC-525 may
not be able to accurately record these layered
commands.
Page 39
— Appendix BB
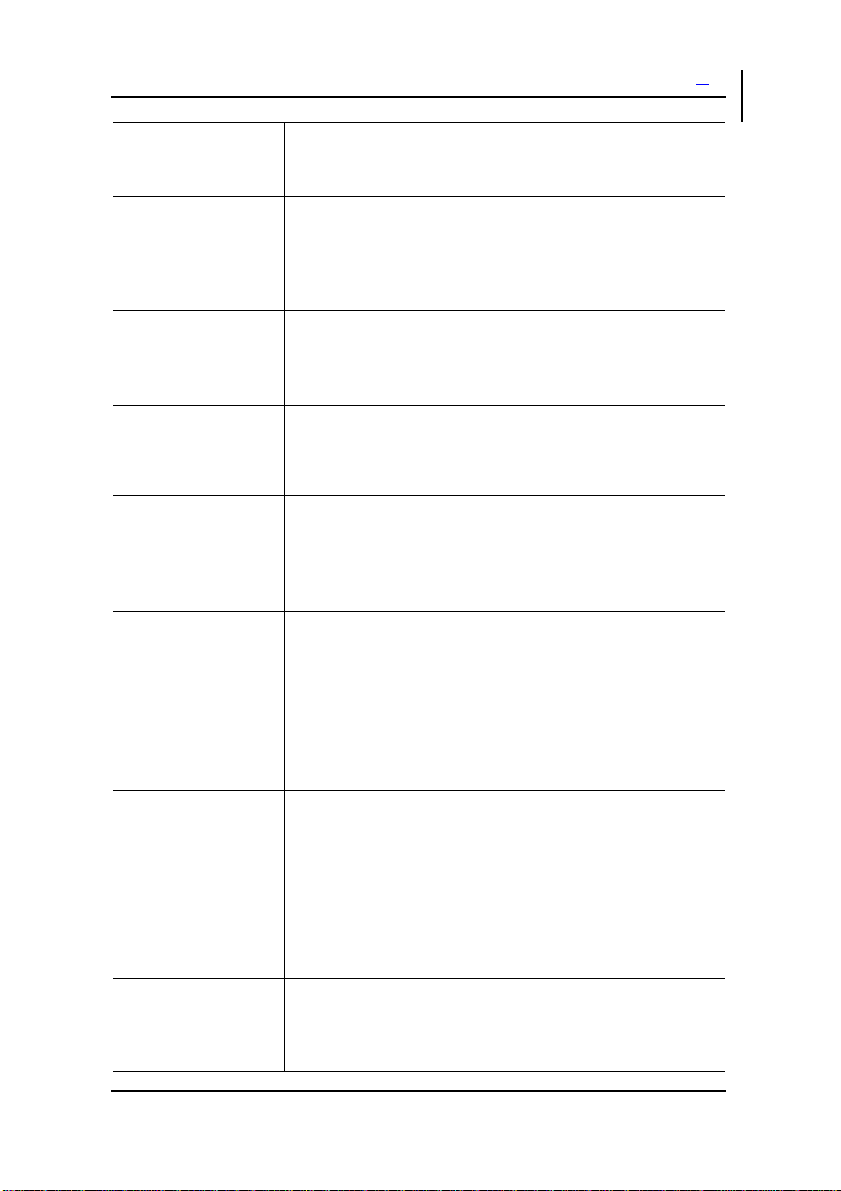
• Make sure you have fresh batteries. With weak
batteries the UC-525 may have learning problems.
The UC-525 does
not react to button
presses of the
original remote in
learning mode
You see an “error”
display during the
learning procedure.
You see an “error”
display during
operation.
• Point the original remote to the bottom of the
UC-525. The learning eye is at its bottom.
• Try the learning procedure again. Repeated
“error” messages probably indicate that the
UC-525 does not recognize the particular IR
code.
• The button that you pressed has not been configured. Configure the button using the
learning procedure.
The RECORD
button does not
work
Problems learning
from 2-way remotes
Problems learning
repetitive commands, such as
Volume Control
Problems learning
sound field commands from
SONY Amplifiers
• A feature of the UC-525 prevents the record
function of your Tape or VCR from starting unintentionally. Hold the RECORD button for
about 2-3 seconds for the command to be sent
to the VCR.
• Some remotes return a confirmation signal
from the device, which can confuse the learning capability. The device should be prevented
from sending this signal during the learning
procedure. Turn off the device while programming, or go to another room. Alternately, move
The UC-525 out of the line-of-sight of the device immediately after programming a button.
• Delete the IR code for the respective button
and try learning it again by holding the volume
button on the original remote until you see the
“OK” icon.
• Delete the IR code for the respective button
and try learning it again by pushing the volume
button on the original remote control only
briefly.
• See Appendix E
35
Page 40

The UC-525 User’s Guide
The LCD screen
turns off.
• The UC-525 is preset at the factory to automatically switch the LCD off after 20 minutes if
left unused. Just tap the LCD screen to turn
the UC-525 back on again.
36
Page 41
— Appendix BC
Appendix CAppendix C
Frequently Asked Questions
Can I control X10
devices?
How can I see all
available icons on
the UC-525
screen?
Can I configure
more than one
device per device
screen?
How can I configure “Punch
Through” volume
control?
The TRANS Button is not
described in the
User's Guide,
what is it used
for?
What is that little
round connector
on the front for?
Does the UC-525
have a built in
timer?
• See Appendix D
• Holding the Power button while in Edit Mode
will display all icons.
• Yes, you can map multiple devices to the same
device layer. This can be very useful; for example, if you wish to control the TV's volume
using your amplifier, without having to change
between the two device screens. In this case,
you learn the regular TV functions from the TV
remote, but the volume functions from your
amplifier remote. In some rare cases, if you
assign too many different remotes to the same
device layer, this might fail, although no corruption of data or other damage will occur.
• Refer to ”Can I configure more than one device per device screen?” above.
• It controls the Duplicating Function, which is
designed for resellers. This function allows you
to transfer learned or pre-configured data between two UC-525 remote controls via
interface cable.
• It is used for the transfer interface cable. See
“TRANS Button” above.
• No
37
Page 42

The UC-525 User’s Guide
During battery
change, does the
UC-525 lose its
data?
• No, the non-volatile memory keeps the data
during battery change or failure
38
Page 43
Appendix DAppendix D
Pre-configured X10 Codes
The SR-525 comes with pre-defined device codes for X10 compatible
infrared transceivers for light and appliance control. Such transceivers are available from different vendors. These IR codes cannot be
learned during the normal learning procedure. Follow this procedure
to activate X10 codes on the device screen of your choice:
The device button that you configure with the X10
• Press the “Learn” button for 3 seconds
• Unlock learn function by pressing the 4 displayed buttons
• Hold the device button you want to map the X10 functions to for 5s.
• Press the 4 displayed buttons
• Enter learning set code 01 by pressing: ‘0’ – ‘1’
codes will be overwritten and your current configuration will be lost.
• The remote beeps and exits into normal mode
This configuration can be deleted and recalled any time, see the
chapters for deleting IR codes and recalling original buttons.
Button X10 Function
Number Buttons 1-9 Channel number 1-9
Power All lights On
Mute All lights Off
Volume Up Channel Bright
Volume Down Channel Dim
Channel Up Channel On
Channel Down Channel Off
39
Page 44

— Appendix BE
Appendix EAppendix E
Application Note:
Applying Sound Field (DSP)
commands from SONY® Amplifiers
There are general problems learning Sound Field commands from
remote controls that come with SONY A/V receivers. This is due to a
dual IR-command method that Sony uses to access the receiver DSP
chip after the device has been notified of an incoming code activation.
Even though we cannot guarantee it, this procedure works with many
SONY Receivers with a 2-way remote control:
1. Push "SET UP" on the Sony remote
2. Enter "IR SET"
3. Scroll down to "MACRO 1" and push ENTER
4. Enter “MACRO1-1"
5. Under Category, enter "RECEIVER"
6. Enter "SONY" as maker
7. Scroll down to "2CH" and press ENTER.
Your macro 1 is now set to 2ch, and you will be able to teach the UC525 to access the 2ch sound field directly by:
• Setting up the UC-515 to learn a command
• Pushing the function on the Sony remote, and
• Scrolling down to Macro1 and pushing Enter on the Sony
remote while you have the UC-525 set to receive the signal.
Next, go through steps 1-6 as listed above, but for step 7, enter A.F.D.
Then you can designate a button on the UC-525 to access the A.F.D.
sound field directly.
40
Page 45

Then follow steps 1-6, and enter "ANLG DIRECT" ...; finally, repeat
and enter "SF MODE".
What you end up with is one button on the UC-525 for 2ch mode and
one button for AFD Mode. These are direct inputs. The other two
buttons (ANLG direct and SF mode) are not direct input buttons, but
will get you to the rest of the 25 or so sound fields. From there you
can use your arrow keys or +/- keys, whatever you have assigned to
move around with, to access the other DSP settings.
UC-525
Universal LCD Remote Control
User’s Guide
27-04-01/UC-525a
Printed in Taiwan
41
 Loading...