

Crimestopper CS-2014.DP.TW2 Operator's Manual

rt 15. Operation is subject
to the following two conditions: 1) This device may not cause
interference, and (2) this device must accept any interference that
may be received, including interference that may cause undesired
ot responsible for any radio or TV
interference caused by unauthorized modification to this
equipment. Such modification could void the user's authority to
CS-2014DP-TW2 Super Page ™
2-Way AM/FM LCD Paging Alarm & Remote Engine Starting System
OPERATION INSTRUCTIONS
INTRODUCTION
CONGRATULATIONS on your choice of the SuperPage V™ by Crimestopper Security Products Inc. This booklet
contains the information necessary for operating your system. If any questions arise, contact your installation dealer or
Crimestopper Security Products Inc.
*IMPORTANT INFORMATION: Primary and Optional Features
-PRIMARY: These features must be connected in order for the system to operate properly i.e. Power, Ground, LED,
etc.
-OPTIONAL: Optional features are connected only if desired or agreed upon by the installing dealer i.e. Horn Honk,
Dome light illumination, Door Locks, Trunk Pop, etc. These features may require additional parts and labor charges.
Consult with your installer about these features BEFORE installation!
CONTACT INFORMATION:
TECHNICAL SUPPORT (800)-998-6880
Monday - Friday 8:00am - 4:30pm Pacific
Website: www.crimestopper.com
E-mail: tech-support@crimestopper.com
CRIMESTOPPER
SECURITY PRODUCTS, INC.
1770 S. TAPO STREET
SIMI VALLEY, CA. 93063 REV. A1 1.31.2006
This device complies with FCC Rules pa
operation. The manufacturer is n
operate the equipment.

2
TABLE OF CONTENTS
Operation Cautions & Warnings……..…………..……………………………………………………………………2
Transceiver / Pager-Remote……….....…………..……………………………………………………………………3
1-Way Sidekick Remote Control………………………….…………………………………………………..…...…..4
Operating Instructions - Alarm……………………………………………………….………..……………..……..5-8
Remote Engine Control………………………...……………………………………………….…….………...….9-12
Anti-Carjack Protection...……………………………………….………….……..………………..………..………..13
LED Diagnostics………………..……………………………………………………………………….………..….…14
Transceiver / Remote Control Programming……………………………………………………..……………14-15
2 Vehicle Operation……...………………………….……………………………….………….…………….….……16
Troubleshooting / FAQ Section……………….…………………………………………………………..……..17-18
Low Battery Warning – LCD Remote / Setting Clock – LCD Remote……………………………….….……..19
OPERATION CAUTIONS & WARNINGS
CRIMESTOPPER SECURITY PRODUCTS, INC. and its VENDORS shall not be liable for any accident
resulting from the use of this equipment. This system is designed to be professionally installed into a car or
vehicle in good running order. Items, such as parking brake, door switches, and all engine safety features,
must be in perfect working condition.
DAMAGE resulting from misuse or negligence is NOT covered under warranty and will be subject to
repair and / or replacement charges.
IT IS ABSOLUTELY THE OWNER’S SOLE RESPONSIBILITY TO: A) Understand the operation of this
system and its safety features. B) Check for proper operation of these safety features prior to accepting
delivery of the vehicle from the installation facility. C) Check and maintain the condition of the vehicle and all
items relative to the proper operation of this system and its safety features.
DO NOT remote start the vehicle in a closed garage. Make sure that the vehicle is outdoors, a garage door
is open, or there is adequate exhaust ventilation. Failure to observe this rule could result in injury or death
from poisonous Carbon Monoxide fumes. This is especially important when using the Timed Self-Start feature
of the unit
3
TRANSCEIVER / PAGER-REMOTE
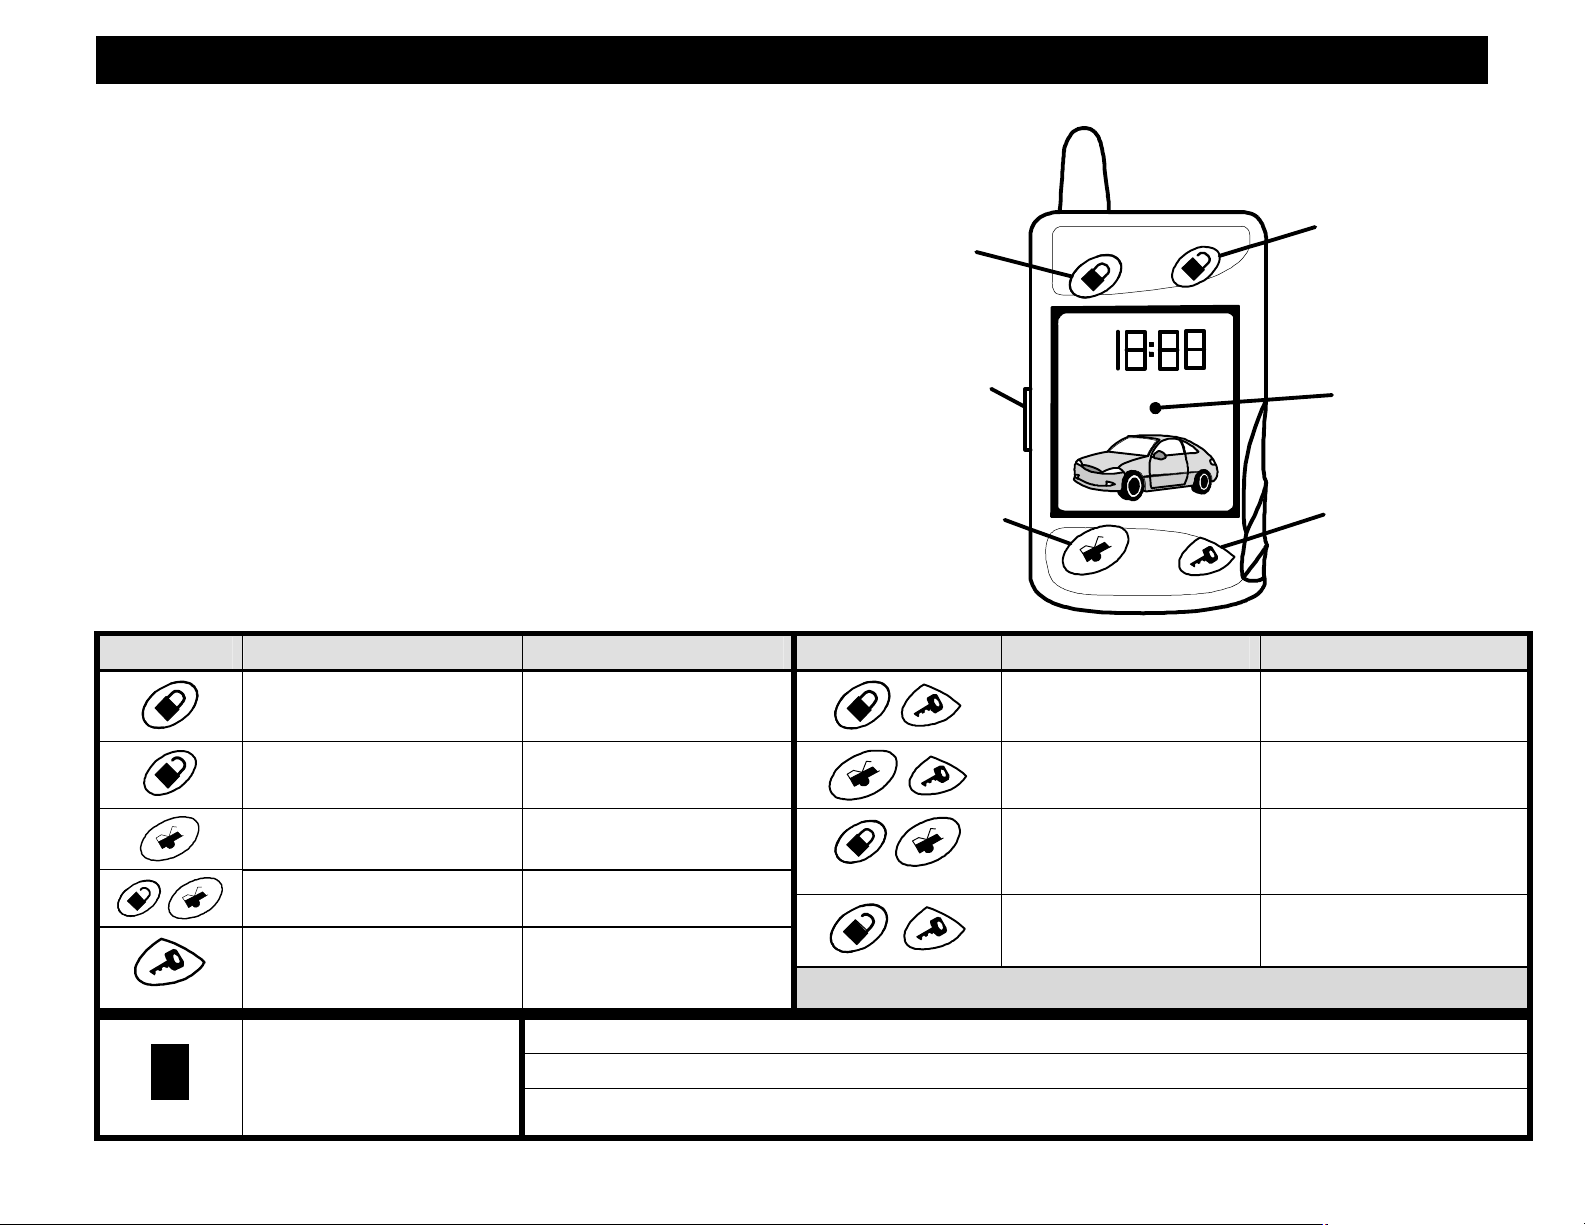
PAGER / REMOTE TRANSCEIVER:
The hand-held remote transceiver is used to send and
receive information from the vehicle. The Control Module
transmits High Frequency AM/FM signals from the vehicle
to your over long distances. Your range will vary
depending on location, terrain, and local RF
noise/interference. This system is not guaranteed to page
you if you are behind concrete walls, underground, in a
large structure, or in an area with high levels of electronic
interference. Handle the pager/remote with care if the
LCD display and/or the electronics may be damaged if
subjected to abuse. The AAA Cell 1.5V alkaline battery
can easily be replaced by sliding open the battery access
door on the back of the remote. Battery life will vary
depending on usage. The LCD screen will display a low
battery icon when the battery is low. For more see
“Range Questions” on page 17.
#1 ARM
LOCK
#5 RECALL
CAR I or II
#3 TRUNK
FIXED
ANTENNA
#2 DISARM
UNLOCK
AM
LCD
SCREEN
#4 ENGINE
START/STOP
Button Button Functions Button Options Buttons Button Functions
Lock Doors & Arm System Press and Hold for 3
seconds
Unlock Doors & Disarm
System
Trunk Release (Aux # 1) Press and Release for Aux
Aux #2 Press and Hold button #2 &
Start or Stop engine
2-car operation (Side Button)
Press and Hold two seconds
to change from Car 1 to Car
2
Activate “Panic” feature
Press twice for second door
unlock
#1
#3 for 3 sec.
Press and Hold for 3
seconds
Press and release to light up the LCD screen.
Press and release twice to recall the last message from the LCD screen.
Press 5 times to change the Time and Disable or Enable Beep on the remote. See page 19 for details.
Aux#3 Press Button #1 and #4 at
Aux #4 Press Button #3 and #4 at
Car Jack
(See page 14)
Silent Arm/Disarm
Button Options
the same time
the same time
Press Button #1 and #3 at
the same time
Press Button #2 and #4 at
the same time
4
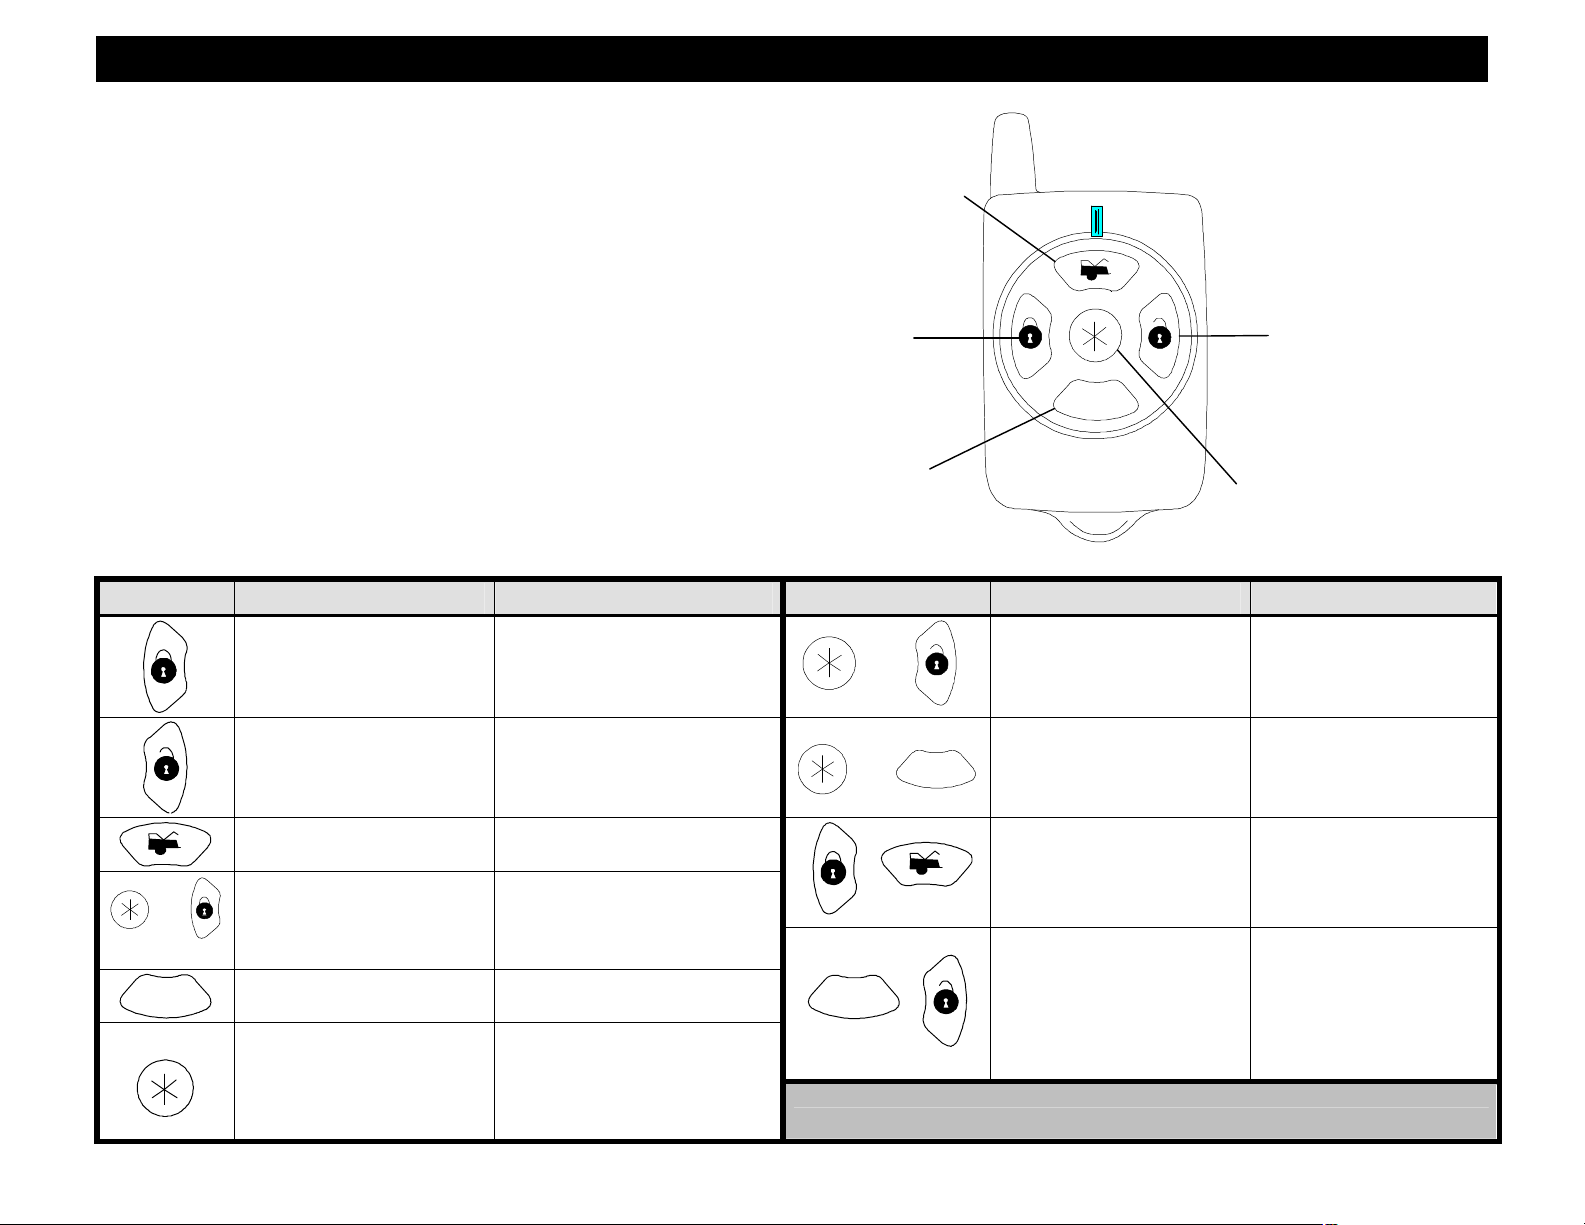
1-WAY SIDEKICK REMOTE
1-Way sidekick remote adds flexibility to your
CS-2014DP-TW2. You can have the convenience
of operating your system without needing to carry
the larger pager remote. The Sidekick remote has
less range and offers all of the same operation
features except for page-back confirmation. See
diagram below for Sidekick 1-Way remote
operation.
LOCK
(AUX#2)
REMOTE
STARTER
(AUX#4)
QUICK CHART
Button Button Functions Button Options Buttons Button Functions Button options
Lock Doors & Arm System Press and Hold for 3 seconds
Activate “Panic” feature
#3
TRUNK
#1
#4
then
#2
UNLOCK
(AUX#3)
START
CRIMESTOPPER
#5
2ND VEHICLE
(2ND FUNCTION)
Activates Aux #3 Press Button #5 then
Button #2
Unlock Doors & Disarm
System
Trunk Release (Aux # 1) Press and Release for Aux
Activates Aux #2
then
START
Start or Stop engine Press and Hold for 3 seconds
2-car operation (Center
Button)
(Change from Car 1 to Car
2) or Car 2 to Car 1.
2nd Function Button
Press twice for second door
unlock
#1
Press button #5, Then press
& hold button #1 for 3 Sec.
Press and Hold for 2 seconds
While in Car 2 mode you
have 3 seconds to press a
function or remote will return
to Car 1.
then
START
START
Activates Aux #4 Press Button #5 then
Button #4
Activates Car Jack
(See page 14)
Silent Arm/Disarm Press Button #4 and #2
Press Button #1 and #3
at the same time.
at the same time.

5
OPERATING INSTRUCTIONS - ALARM
SHOCK SENSOR
DOOR TRIGGER
IGNITION TRIGGER
TRIGGER
DISARM
-
UNLOCK
6
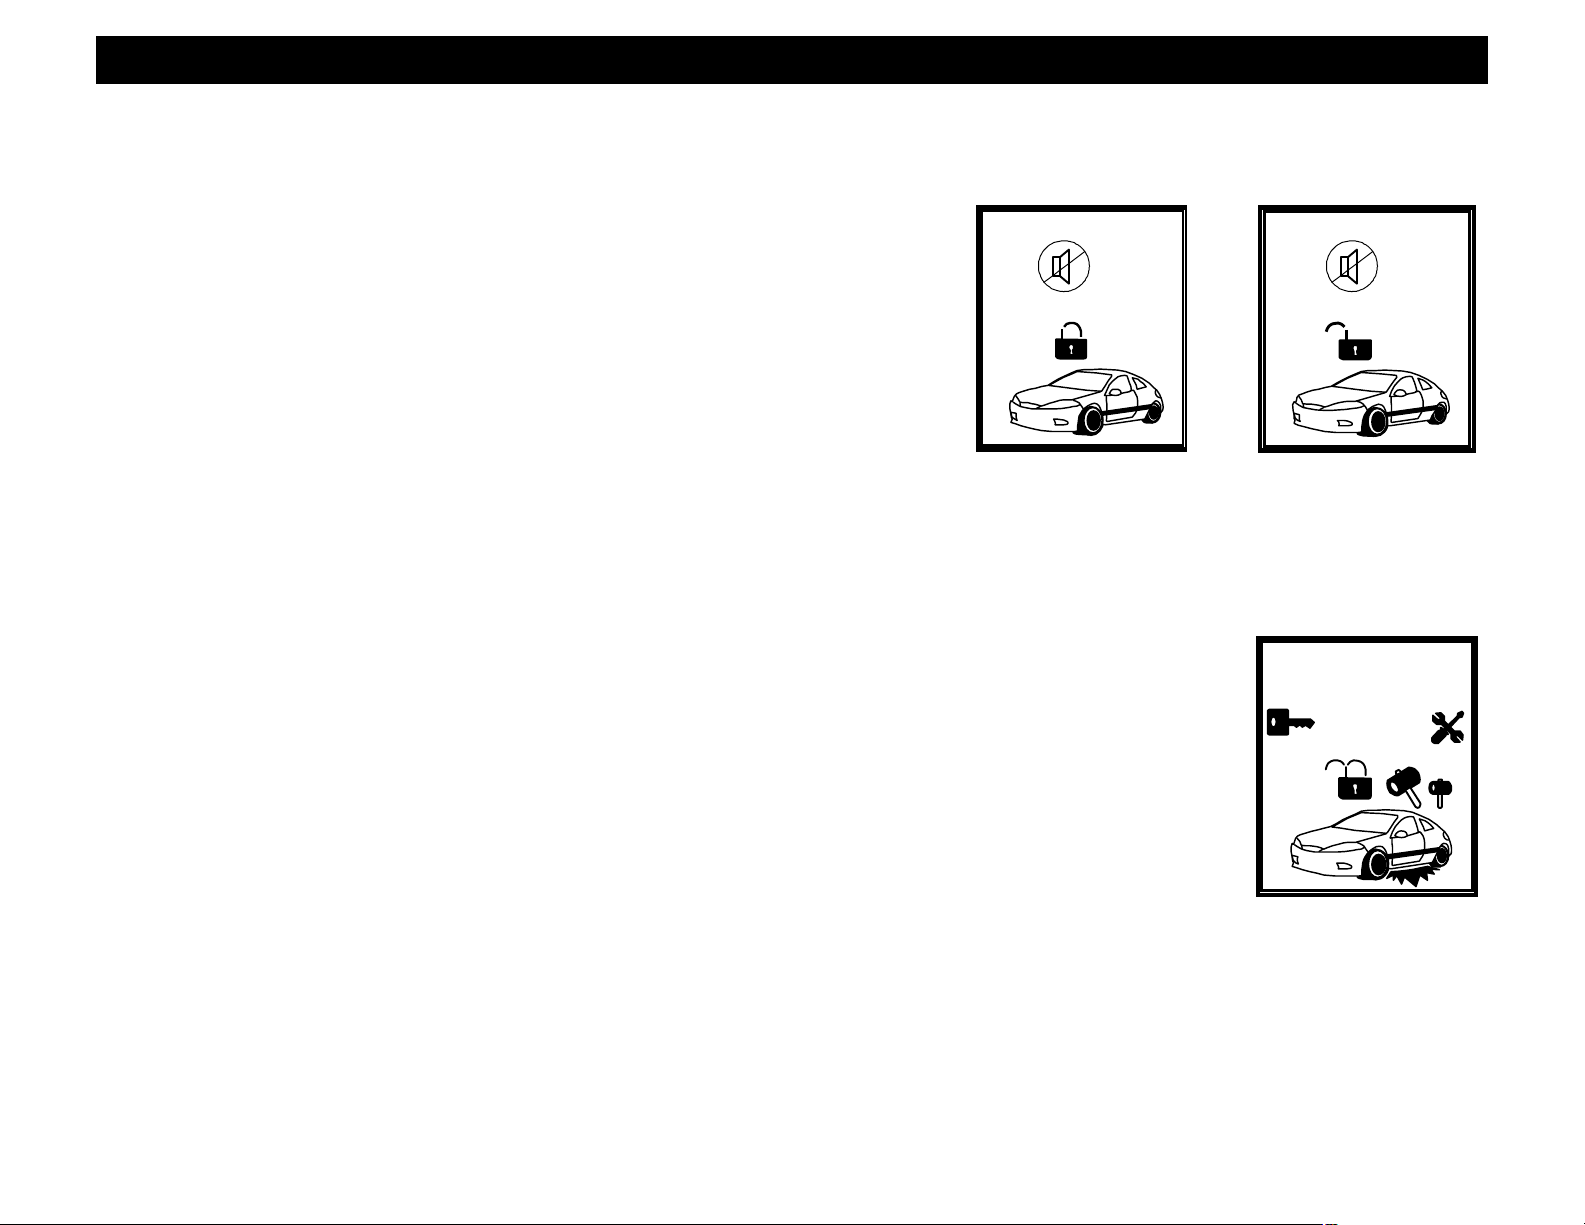
Active Arming / Locking:
Press button #1 (Lock symbol) on the transceiver. The System will arm emit one siren chirp,
one light flash, and the LED will begin to flash. Power locks will lock (if equipped). Starter
disable circuit will turn on. LCD Pager will beep once while displaying a Locking symbol. After
a short delay to allow the vehicle and electronics to settle, the system will be completely
armed.
Disarming: / Unlocking
Press button #2 (Unlock symbol) on the transceiver. System will disarm and confirm with two
siren chirps, two light flashes, and the LED will turn off. Power locks will unlock and Interior
Dome light will turn on (if installed with these optional features). LCD Pager will beep twice
while displaying an Unlock symbol.
Alarm Triggers:
If there is an intrusion into the vehicle, a hard impact to the body or the ignition is turned on,
the alarm will sound and flash the lights for 1 minute. After 1 minute, the trigger cycle will
automatically stop and alarm will remain armed to continue protecting the vehicle. If a door is
left open after an intrusion then the unit will cycle a maximum of 2 minutes and continue to
protect the other un-tampered or unopened zones.
LCD Remote Paging / Zone Violations:
When the system is triggered, the alarm sends a paging signal to the remote. If you are within
range, you will receive a violation paging signal that consists of a vibration followed by 5
audible beeps to notify you the vehicle has been tampered with.
ARM-LOCK
HOOD/TRUNK
OPERATING INSTRUCTIONS - ALARM
Disarming While Tripped (Triggered):
Disarming the System while it is triggering requires TWO presses of the #2 Unlock Button. The first press of
Button #2 Resets the alarm cycle only (system still armed) while a second press will disarm/unlock the system.
Selective Silent Arming/Disarming:
To Arm or Disarm the system without siren chirps, press and
release both Buttons #2 (Unlock) and #4 (Start) at the same time.
System will Arm or Disarm without siren chirps. Flashing lights and
LED will be the only indicators of Arm/Disarm status. The LCD will
Display a musical note with an “X” when the system is armed or
disarmed without a chirp
Prior intrusion Alert
SILENT ARM
This system will notify you if the alarm was triggered while you
where away. Upon disarming, there will be four additional siren chirps after the two normal disarm chirps.
Check your vehicle for any signs of a break in or tampering. Also, see LED Diagnostics Section to determine
the cause of the trigger.
Remote Panic Protection
To sound the alarm in an emergency situation or to draw attention to your vehicle, press
and hold Button #1 (Lock) for at least 3 seconds until the siren sounds. Press Button #2
(Unlock) to reset panic mode. The LCD display will flash all the icons and emit 10 beeps
when the panic mode is triggered.
Selective Shock Sensor Disable
To arm the alarm and bypass shock sensor protection, press Button #1 as normal then
press and release Button #1 and #2 together within 2 seconds. You will hear 3 extra
siren chirps indicating shock sensor bypass for this arming cycle only. This feature useful
when parking near railroad tracks, airports, or area with excessive loud machinery or
noise to prevent the nuisance of unnecessary false alarms.
Open Door Alert / Bypass
Upon arming, this system will warn you if a door is left open. The LCD pager will vibrate and beep (15X’s)
along with displaying the open zone on your LCD screen. This zone will automatically be bypassed until
closed; otherwise, the alarm will continue to protect all other zones.
SILENT DISARM
PANIC MODE
All Icons Flash
 Loading...