

Crighton Engineering Magnum P300, JAYLINE CS600 Installation & Operation Manual
Installation & Operation Manual
100 Neilson Street, Onehunga, Auckland, New Zealand
Tel: 09 634 1483 Fax: 09 634 6804

PRE-ASSEMBLY
Having removed the outer packaging from your stove, familiarise yourself with the various
components and discard packing material.
1. Pedestal (Bolted to Pallet)
2. Top Grill (In position)
3. Top Baffle (Fitted inside firebox)
4. Rear Cast Iron Baffle (Packaged inside firebox)
5. Plastic Bag packaged containing:
Installation and Operation Manual
Specification Sheet
Please Note:
The Rear Baffle will require fitting into position. Ensure the patterned surface is facing forward and
the words “Top Front” are at the top of the baffle.

INSTALLATION
Please follow carefully, all dimensions and recommendations provided on the individual
specification sheet for your model of heater. These dimensions comply with the required
standards of New Zealand (AS/NZS 2918:2001)
A permit is required for any installation of a solid fuel space heater (wood burner) and is obtained
through your local council.
* * * * * * * * * * * * * * * * * * * * * *
Inspect the outside of the building to ascertain the point of roof penetration for the flue system.
If a flue system is built and installed to the correct height it will normally prevent down draught
problems during windy weather and eliminate smoke spillage problems due to lack of draught.
Check suitable position for appliance and size of floor protector. Ensure position of the flue pipe
and, if possible, enter the ceiling space to check that no major structural members will be affected
by the flue pipe path.
Check that the sub-structure is capable of carrying the heater (i.e. weight consideration on the
floor).
Check measurements of the heater to combustibles or shield.
Locate the heater in the required position.
Using a plumb line, mark the flue penetration hole in the ceiling using a thin nail, driven through
the ceiling.
Cut the square ceiling hole to the required size and frame out.
Install the flue system (see flue installation instructions supplied with flue system). Remember:
• The flue system should rise vertically from the appliance with as few offsets as possible.
Offsets should be avoided where possible as each change in direction creates a
resistance to airflow.
• The flue system must be well sealed with a minimum of 3 fixings at each joint.
• The flue pipe penetrating the chimney must continue to the minimum length of 4.6m
from the top of the floor protector to the cowl.
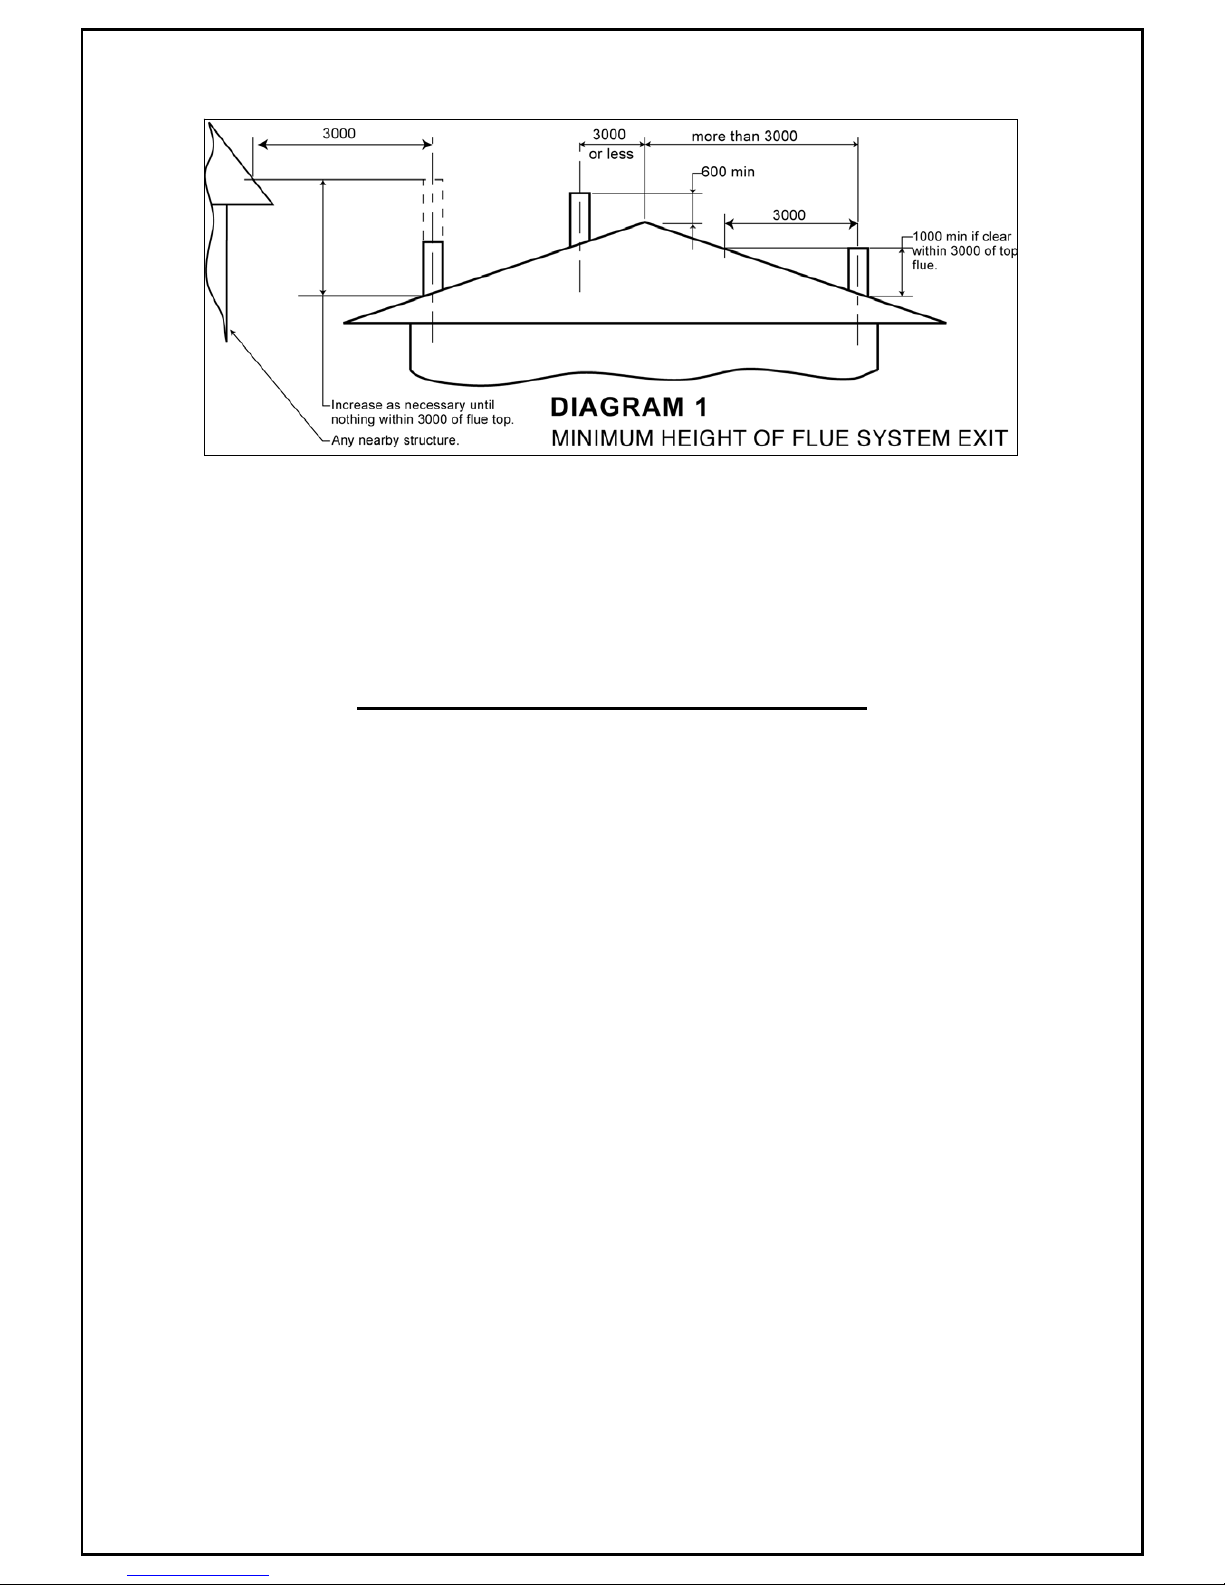
• Flue exiting more than 3 metres from the ridgeline must not terminate less than 1 metre
above the roof penetration (see diagram 1 below).
• Where the top of the flue pipe is more than 2 metres above its highest fixing point, it
must be stayed against high winds.
See Diagram on following page:
Drill and fix flue system into flue spigot with one stainless steel self-tapping screw.
Drill and secure the appliance to the floor protector using the two rear holes behind the pedestal.
HEARTH (OR FLOOR PROTECTOR)
In conjunction with the Emissions & Efficiency test report applicable to the Magnum P300 (AS/NZS
4012/2 Rep. No. 07/1650), this wood burner model requires a non insulated floor protector
(or Hearth).
Please note:
If the Magnum P300 is being installed into a property over 5 acres in size, whereby a “wetback or
water booster” is permissible and being fitted, an insulated floor protector is then required. With
any water heating device installed into a wood burner, the wood burner must be operated at a
higher temperature, in order for the flames to be able to heat efficiently both the water and the
room (or area) where the fire has been installed. In this instance the fire is performing a dual
function and without being operated at a sufficiently higher temperature, “smoking” and “fly ash”
can emit from the fire into the room and creosote can form easily inside the fire box, thus causing
damage internally.
With properties less than 5 acres in size, this model complies with the New Zealand clean air
regulations and was tested without a water heating device, therefore those properties are not
permitted to install a “wetback or water booster” into the Magnum P300 wood burner.
The floor protector must be mechanically fixed to the floor by bolting or screwing.
Please note:
The floor protector must be fixed by a non flammable adhesive to a concrete floor where the floor
may have water pipes or electrical wires positioned underneath. The wood burning appliance can
then be bolted to the floor protector with two 8mm x 50mm dynabolts.

WARNING
1. WARNING: ANY MODIFICATION OF THE APPLIANCE THAT HAS NOT BEEN
APPROVED IN WRITING BY THE TESTING AUTHORITY IS CONSIDERED AS
BREACHING AS/NZS 4013.
2. WARNING: DO NOT USE FLAMMABLE LIQUIDS OR AEROSOLS TO START OR
REKINDLE THE FIRE.
3. WARNING: DO NOT USE FLAMMABLE LIQUIDS OR AEROSOLS IN THE VICINITY OF
THIS APPLIANCE WHEN IT IS OPERATING.
4. WARNING: DO NOT STORE FUEL WITHIN HEATER INSTALLATION CLEARANCES.
5. WARNING: OPEN AIR CONTROL (AND DAMPER WHEN FITTED) BEFORE OPENING
FIRING DOOR.
6. CAUTION: THIS APPLIANCE SHOULD NOT BE OPERATED WITH A CRACKED GLASS.
7. CAUTION: THIS APPLIANCE SHOULD BE MAINTAINED AND OPERATED AT ALL TIMES
IN ACCORDANCE WITH THESE INSTRUCTIONS.
8. CAUTION: THE USE OF SOME TYPES OF CHEMICALLY TREATED WOOD AS A FUEL
CAN BE HAZARDOUS.
9. USE ONLY DRY WOOD WHEN OPERATING THE FIRE.
Any variation from these installation instructions or any doubts about them must be checked
against the requirements of the AS/NZS 2918:2001.
OPERATION OF THE
MAGNUM P300
Simply by burning your Magnum heater correctly, you can improve efficiency, reduce fuel
consumption and minimise air pollution.
Please Note:
PLEASE LOAD YOUR “Magnum P300” CLEAN AIR FIRE, FROM FRONT TO REAR ONLY.
Do not burn wet timber or chemically treated timber, as this causes flue blockage, has low heat
output and blackens the door glass with creosote. Burn dry seasoned timber and remember:
The dryer the wood, the hotter it burns;
The harder the wood, the longer it burns.
STARTING A NEW FIRE:
When lighting the heater for the first time dust heater, glass, trim and flue before firing to avoid
particles sticking or discolouring. Once fired, some smoke and vapour will be released as the VHT
painted surfaces enter the final curing process. Open all windows and doors while running the fire
on high for up to 3 hours. People with respiratory, heart or other relevant medical conditions
should avoid inhaling vapours during the curing process. All VHT paint will cure at the highest
temperature achieved and will produce smoke again if this temperature is exceeded.
To start and maintain a good fire you will need the following ingredients:
1. A small quantity of newspaper (do not use coloured or coated paper);
2. A packet of firelighters (optional);
3. A quantity of finely split, dry soft wood kindling in a variety of sizes; and
4. Seasoned firewood split into a range of piece sizes.
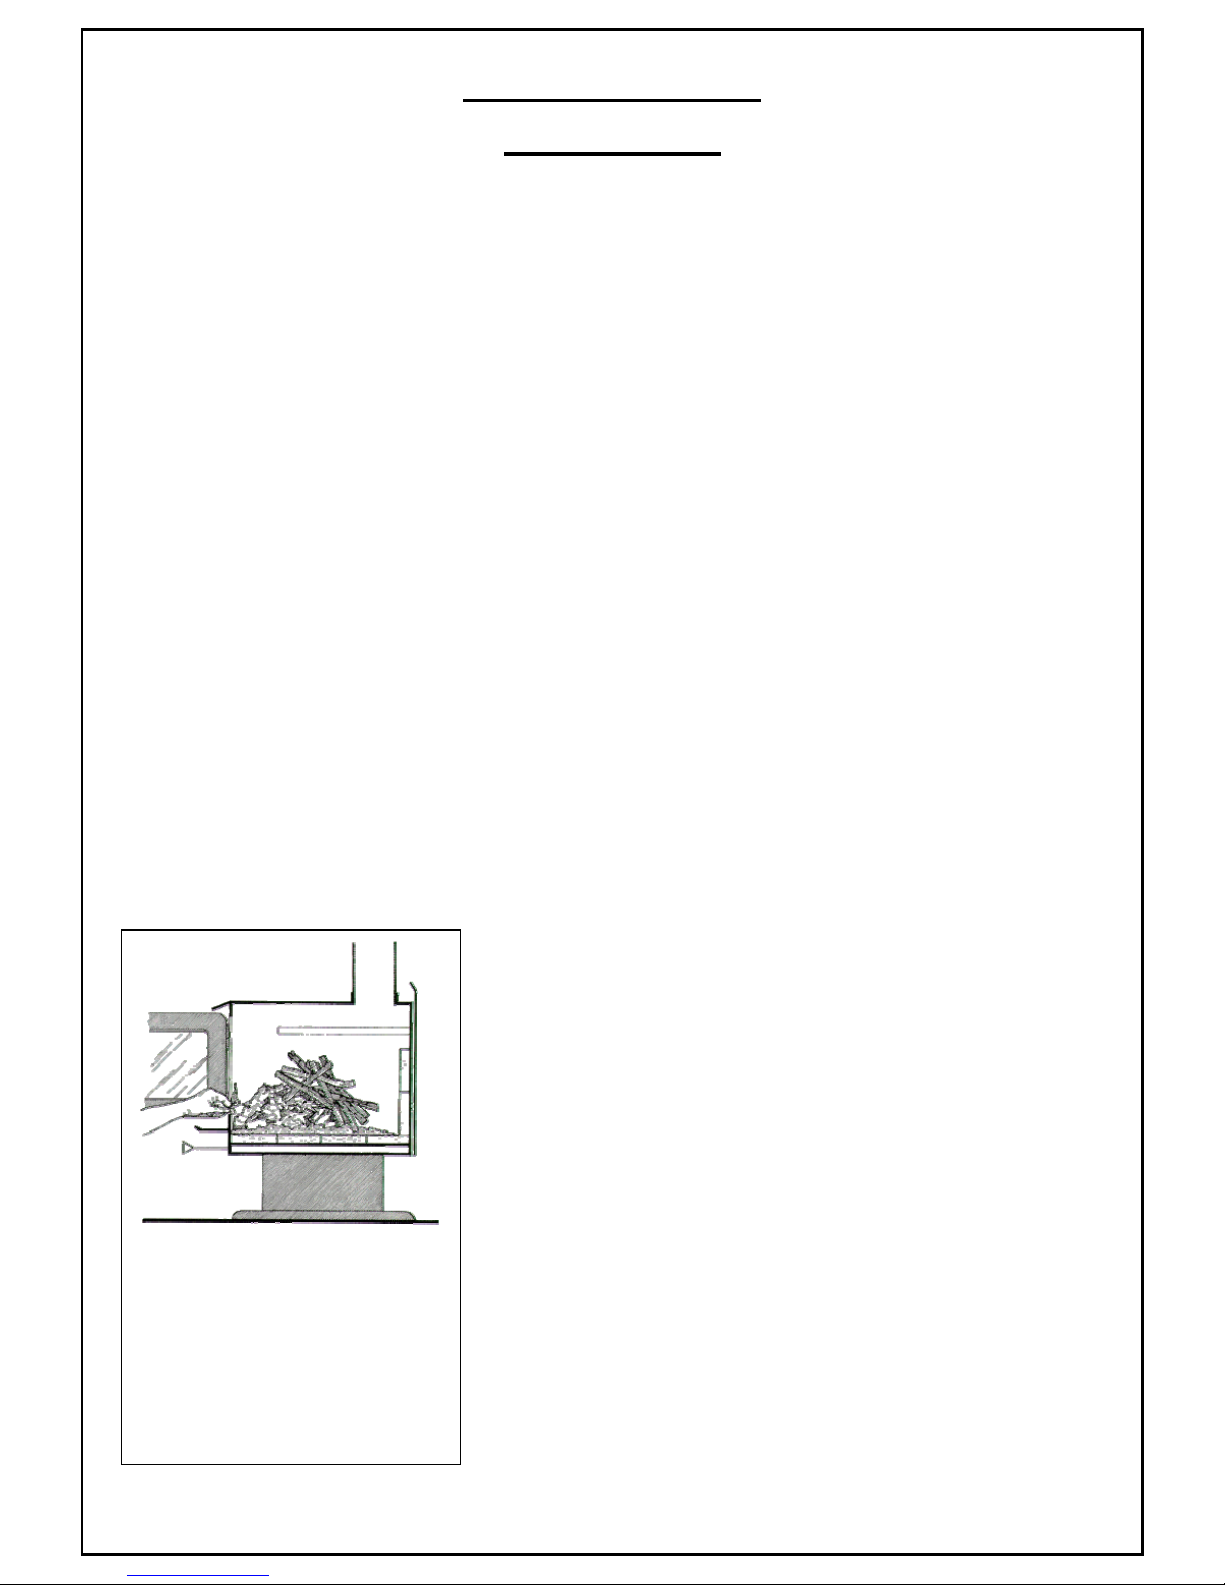
The first step is to crumple half a dozen sheets of newspaper
and put them just inside the firebox. The amount of
newspaper you need, will depend on the firebox size and the
dryness and fineness of the kindling you are using. The drier
and finer the kindling, the less newspaper you need. Many
people make the mistake of using too little newspaper. Be
generous with the newspaper and you will have more success.
Putting some firelighter halves under the newspaper can also
help sustain firebox temperature until the wood is burning.
On top of the paper place 10 to 15 pieces of finely split, dry
kindling. Soft woods such as cedar or pine, make good
kindling. Ideally, the kindling should be placed on and behind
the newspaper so that the combustion air reaches the
newspaper fast where you ignite it. It is also a good idea to
add two or three very small pieces of firewood to the kindling
load before lighting.
Set the air control to fully open, light the firelighters or the
newspaper and close but do not latch the door.
TO BUILD A QUICK, HOT FIRE
Use plenty of crumpled newspaper and dry,
f
inely-split kindling. Set the air control fully
open. Light the newspaper near where the
combustion air enters the firebox. When a
kindling fire is built properly, you shoul
d
expect instant ignition and no smouldering.
 Loading...