

Page 1
Page 2

This model phone meets the government’s requirements for exposure to radio waves.
This phone is designed and manufactured not to exceed the emission limits for exposure to
radio frequency (RF) energy set by the Federal Communications
Commission of the U.S. Government.
The exposure standard for wireless mobile phones employs a unit of measurement known as
the Specific Absorption Rate, or SAR. The SAR limit set by the
FCC is 1.6W/kg. *Tests for SAR are conducted using standard operating positions accepted
by the FCC with the phone transmitting at its highest certified
power level in all tested frequency bands. Although the SAR is determined at the highest
certified power level, the actual SAR level of the phone while
operating can be well below the maximum value. This is because the phone is designed to
operate at multiple power levels so as to use only the poser
required to reach the network. In general, the closer you are to a wireless base station
antenna, the lower the power output.
The highest SAR value for the model phone as reported to the FCC when tested for use at
the ear are:
on the 800MHz: 0.568/ 10g, 0.846/ 1g, on the 1900MHz: 0.446/ 10g, 0.869/ 1g, and when
worn on the body, as described in this user guide, are:
on the 800MHz: 0.362/ 10g, 0.520/ 1g, on the 1900MHz: 0.252/ 10g, 0.424/ 1g
(Body-worn measurements differ among phone models, depending
upon available enhancements and FCC requirements.)
While there may be differences between the SAR levels of various phones and at various
positions, they all meet the government requirement.
The FCC has granted an Equipment Authorization for this model phone with all reported SAR
levels evaluated as in compliance with the FCC RF exposure guidelines. SAR information on
this model phone is on file with the FCC and can be found under the Display Grant section of
http://www.fcc.gov/oet/fccid
For body worn operation, this phone has been tested and meets the FCC RF exposure
guidelines for use with an accessory that contains no metal and the
positions the handset a minimum of 1.5 cm from the body. Use of other enhancements may
not ensure compli ance with FCC RF ex posure guidelines . If you
do no t use a body-worn accessory and are not holding the phone at the ear, position the
handset a minimum of 1.5 cm from your body when the phone is
switched on.
after searching on VR2J88.
- 1 -
Page 3

CONTENTS
INTRODUCTION…………………………………………………………………..…………P.2
PHONE COMPONENTS
…………………………………………………….……………P.3
INSERTING BATTERY AND USING THE CHARGER………………………..P.5
Inserting and Removing the Battery
Charging the Battery
Battery Charge Level
………………………………………………………………..……P.6
………………………………………………………….………….P.6
………………………………………………P.5
BASIC FUNCTIONS
Turning the Phone On and Off
On Screen Icons
Making a Call
Receiving Calls
……………………………………………………….………………P.7
………………………………….……………….……P.7
…………………………………………………………………………….P.8
…………………………………………………………………………………P.8
……………………………………………………………………………….P.8
MENU TREE
………………………………………………………………………………….P.9
EDITING INFORMATION
……………………………………………………………….P.10
QUICK FUNCTION GUIDE
SAFETY INFORMATION
……………………………………………………………P.12
………………………………………….……………………P.15
- 2 -
Page 4

Congratulations on your purchase of the Reliance cellular phone what
has been designed to operate with the latest digital mobile
communication technology, Code Division Multiple Access (CDMA). The
CDMA system has greatly enhanced voice clarity and can provide various
types of advanced features.
This is an advanced and compact phone which has diverse features as
following:
Messaging, Voice Mail, and Caller ID.
21-key keypad (10 number keys / 2 function keys / 2 Soft keys / 1
Ok key / 4 way navigation key / 1 Call key / 1 End key).
Long battery stand-by and talk time.
Menu-driven interface with prompt for easy operation and
configuration.
Voice Privacy inherent with CDMA encoding.
Any key Answer, Auto Redial, Speed Dial up to 99 memory
locations.
Optional accessories with greater convenience and enhanced
functionality.
SMS, Group SMS.
- 3 -
Page 5
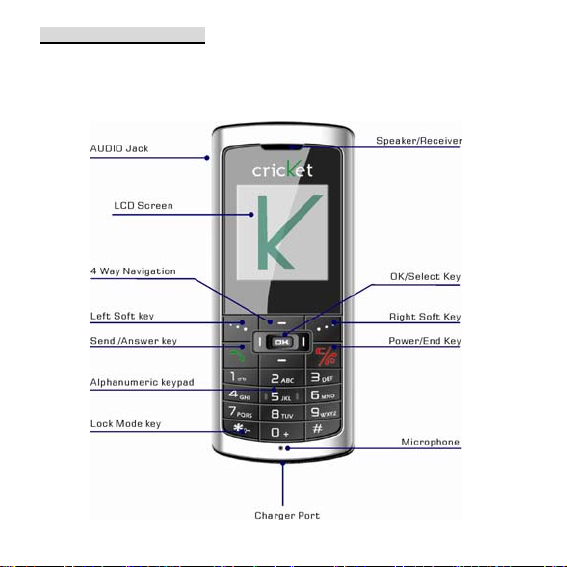
PHONE COMPONENTS
The following shows key
components of your mobile phone
- 4 -
Page 6

Speaker/Receiver Listens to voice from the phone.
LCD Screen Displays messages & indicator icons.
Soft Keys The names of the functions of these keys appear at the
bottom of the screen.
※ Left/Right Soft key
Used to display the menu of function setting and accept the highlighted
choice when navigating the menu.
Send/Answer Key Allows users to place or answer calls, refer, and,
redial a call from call history.
Alphanumeric Keypad These keys enable you to enter numbers and
characters and choose menu items.
* Lock Mode Key Enable you to lock or unlock the keypad by pressing and
holding this key for 2 seconds. To input “*” in input, you can select from
symbol table by pressing “1” key. In Input dialog, “*” key is used to switch
input mode
OK Key Selects highlighted options in menu.
4 Way Navigation Key This Navigation key allows you to quick access
Messages, alarm, Calculator and Schedule.
PWR/End Key To turn power On/Off and end a call. By using this key you
can return to the idle screen. When you press once, when a call is
received, the phone stops ringing depending on the mode it is in. Press
twice to reject the call.
Microphone Speaks to the phone.
Charger port Uses to charge the phone.
- 5 -
Page 7
INSERTING BATTERY AND USING THE CHARGER
The phone comes with a rechargeable battery. Keep
the battery fully charged while not in use in order to
maximize talk and standby time when using the
phone.
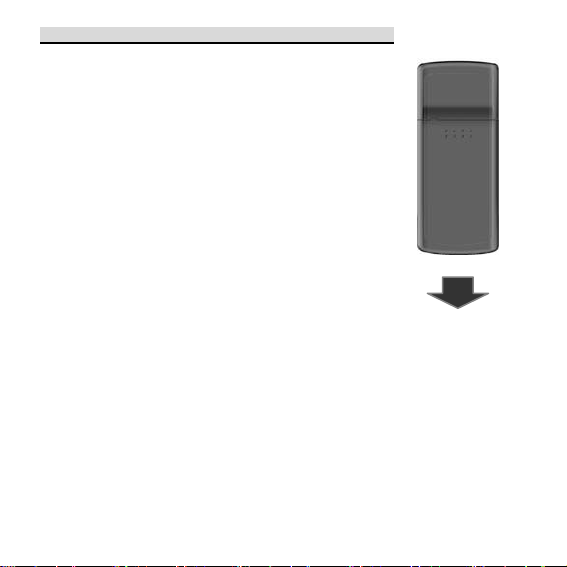
Inserting and Removing the Battery
※ To insert the battery, open the battery cover on
the back of the phone, and insert the bottom of
battery into groove at the bottom of the handset.
Gently press down the cover until the latch snaps
into place.
※ To remove the battery, Turn the power off.
Push the back cover down. Push the tab with
one hand and lift the top of the battery.
Charging the Battery
To use the AC adapter provided with your phone:
1. Plug the AC adapter into the electrical outlet.
2. Insert the round end of the adapter into the AC adapter jack on the
bottom of the bottom of the phone. (Make sure the battery is inserted.)
※ When the phone is charging, the battery icon continually displays a
progression from empty to full. It takes about three hours to fully
recharge a completely rundown battery. When fully charged, battery
icon indicates charging by twinkling.
- 6 -
Page 8

Battery Charge Level
The battery charge level is shown at the top right of the LCD screen.
When the battery charge level becomes low, the low battery sensor will
alert you in three ways: sounding an audible tone, blinking the battery
icon outline, and displaying recharge the battery. If the battery charge
level becomes exceedingly low, the phone will automatically switch off and
any function in progress will not be saved.
- 7 -
Page 9
BASIC FUNCTIONS
Turning the Phone On and Off
Press and hold [END/PWR] Key for 2 seconds until the LCD screen
flashes.
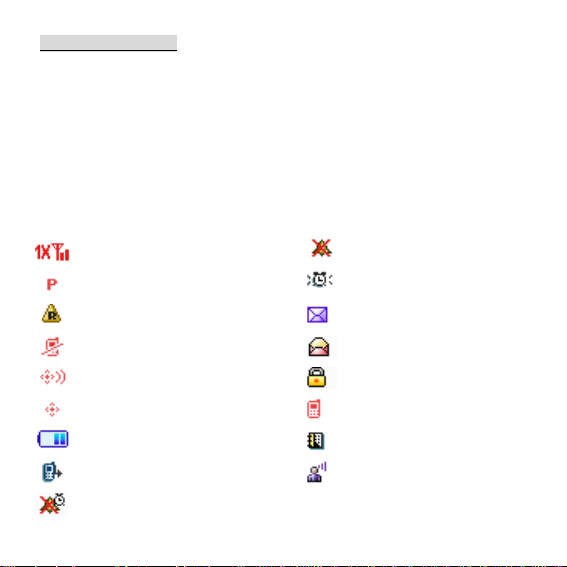
On Screen Icons
The phone screen displays several onscreen icons to indicate different
phone function status.
“1X”Signal Strength
Voice Privacy
Roaming
No Service
Location On
E911
Battery Level
Missed Call
Alarm Only
- 8 -
All Sounds Off
Alarm On
New/Unread message
Opened/Read Message
Message Locked
Conversation
Calendar Appointment
Voicemail
Page 10

Making a Call
Follow these steps to make a call,
1. Make sure that the phone is turned on. If not, press and hold
[END/PWR] Key for 2 seconds.
2. Enter the phone number and then press [CALL] Key.
※ If the phone is locked, press the [Unlock] key.
3. To end the call, press [END/PWR] Key.
Receiving Calls
1. When the phone rings , press CALL Key or any key (if any key answer
is set).
※When pressing once [CALL] Key or any key (if any key answer is set) or
when a call is received, the phone stops ringing.
2. To end an answered call, press [END/PWR] Key.
- 9 -
Page 11

MENU TREE
1 Media Gallery
1.1 Sounds
1.2 Images
2 Recent Calls
2.1 Missed
2.2 Received
2.3 Dialed
2.4 All
2.5 View Timers
3 Phone Settings
3.1 Language
3.2 Set Shortcut Key
3.3 Location
3.4 Security
3.5 System Select
4 Settings
4.1 Display
4.2 Calls
4.3 Sounds
5 Contacts
5.1 New Contact
5.2 Contact List
5.3 Groups
5.4 Speed Dials
6 Tools
6.1 Calculator
6.2 Calendar
6.3 Alarm Clock
7 Phone Info
7.1 My Number
7.2 SW Version
Icon Glossary
7.3
7.4 Status
7.5 Warranty Date Code
7.6 Refurbish Indicator
8 Message
8.1 New TXT Msg
8.2 Inbox
8.3 Sent
8.4 Drafts
8.5 Voicemail
9 Emergency
9.1 Emergency
Contact 1
9.2 Emergency
Contact 2
9.3 Emergency
Contact 3
- 10 -
Page 12

EDITING INFORMATION
In the text input field. You can select the input modes by pressing [Left]
key and choose: Word, Abc, ABC, 123. And press [1] key to enter Symbol
mode. turns on/off English capitalization using [*] key.
Typ i n g I n Sm a r t Mod e
support a predictive text input mode. You can complete the words without input
complete letters.
For example, to write “Call me”, follow these steps:
1. Press [#] to change to ‘Word’ mode.
2. Press [2] [2] [5] [5]
3. Press [#] to enter select mode and select “C all”.
4. “Call” will be displayed on the screen with a space.
5. Press [6] [3] and then press [#] to select “me”.
6. Complete the word “Call me”.
Typing In Abc (Multi-tap)Mode
For example, to type “Call”, follow these steps:
1. Press [Left] to change letter case to Abc m ode .
2. Press [2] thrice
3. Press [2] once
4. Press [5] thrice
5. Press [5] thrice
Typing In abc (Multi-tap)Mode
For example, to type “call”, follow these steps:
1. Press [Left] to change letter case to Abc mode .
2. Press [*] twice
3. Press [2] thrice.
4. Press [2] once.
5. Press [5] thrice.
6. Press [5] thrice.
- 11 -
Page 13

123(Numbers)Mode
Type numbers using one key stroke per number.
Changing to 123 mode in a text entry field by pressing [Left] to choose.
Symbol Mode
Press [1] key to enter Symbol mode and select the Symbol you want, like ‘*’, ‘?’, ‘!’,
and etc.
Messages
Write Text
allows users to send a message up to 150 characters at a time.
1. Press Ok Key to enter Main menu and select message.
2. Select New TXT Msg.
3. Choose the input mode.
4. Enter number. (You can enter number or select the receiver from contacts.)
5. Enter text.
Options:
※ Send
Use to send the message.
※ Save As Draft
Save this message to draft box
※ Quick Text
Select a sample message.
※ Priority
This function allows you to give the priority to message. Normal or high.
※ Cancel Msg
Cancel this message.
- 12 -
Page 14

QUICK FUNCTION GUIDE
Media Gallery
Menu 1.1 Sounds
Users can preview all the music on phone here, and set one as call
ringtone.
Menu 1.2 Images
Users can preview all the images on phone here, and set one as
wallpaper.
Recent Calls
Menu 2.1 Missed
Allows you to view list of all Missed Calls.(Maximum 90 number are
possible including Missed, Received, Dialed )
Menu 2.2 Received
Allows you to view list of all Received Calls.(Maximum 90 number are
possible including Missed, Received, Dialed )
Menu 2.3 Dialed
Allows you to view list of all Dialed Calls.(Maximum 90 number are
possible including Missed, Received, Dialed )
Menu 2.4 All
Allows you to view list of all Calls.
Menu 2.5 View Timers
View the duration and number of recent calls you have dialed & received.
- 13 -
Page 15

Phone Settings
Menu 3.1 Language
You can switch the Language, English or Spanish.
Menu 3.2 Set Shortcut Key
To set four Navigation keys to quick launch keys for some units in idle
state.
Menu 3.3 Location
Users can choose Location on or E911 only.
Menu 3.4 Security
Users must enter a password to enter the function. Then you can
operate restore settings, erase all contacts and edit code.
Menu 3.5 Security
Users can choose Automatic B, Automatic A or Home only.
Settings
Menu 4.1 Display
Users can set Banner, Backlight, Wallpaper, Number on startup and
Contrast.
Menu 4.2 Calls
Users can set In-Call Sounds, Answer Options, Dial Fonts and Auto
Retry.
- 14 -
Page 16

Menu 4.3 Sounds
Users can set Call Ringtone, Alert Sounds, Master Volume, Keypad
Volume, Power On/Off, Roaming Indicator.
Contacts
Menu 5.1 New Contact
Store up to 500 contacts, adding 4 phone numbers + 2 E-mails + Fax
number + Group +Ring Tone.
Menu 5.2 Contact List
List the contact in phone book.
Menu 5.3 Groups
Group enable user to sort the records into many groups in contact.
There are two preset groups in it : family and business, every group can
have at most 10 records in it.
Menu 5.4 Speed dial
Speed Dial allows you to make a call faster by just pressing a
corresponding number.
Tools
Menu 6.1 Calculator
Allows you to calculate simple mathematical computations.
Menu 6.2 Calendar
Simply store your appointments and your phone alerts with a reminder of
your appointment.
- 15 -
Page 17

Menu 6.3 Alarm clock
Set an event alarm time.
Phone Info
Menu 7.1 My Number
Users can view phone number.
Menu 7.2 SW Version
Users can view SW version information.
Menu 7.3 Icon Glossary
Users can view the meaning of icon.
Menu 7.4 Status
Users can view Status information.
Menu 7.5 Warranty Date Code
Users can view warranty date code.
Message
Menu 8.1 New TXT Msg
Write and send a message. This function allows you to send a message
up to 150 characters at a time.
Menu 8.2 Inbox
Store received messages.
.
- 16 -
Page 18

Menu 8.3 Sent
Sent messages can be stored in the box.
Menu 8.4 Drafts
Store unsent or incomplete message and users can continue composing
incomplete message any time he/she wants.
Menu 8.5 Voice mail
Allows you to view new voice
messages recorded in the voice mail box.
Emergency
User can select 3 records from contact to the Emergency contact, that
means these three contacts are very important to this user, if he/she
has any emergency case, but others don't know how to contact his family,
maybe they can find them in the Emergency menu.
- 17 -
Page 19

SAFETY INFORMATION
Please read and observe the following information for safe and proper
use of your phone and to prevent damage. Also, keep the user guide in an
accessible place at all the times after reading it.
Charger and Adapter Safety
※ Charger and adapter are designed for indoor use only.
Battery Information and Care
※ Please dispose of your battery properly.
※ Do not disassemble or short-circuit the battery.
※ Keep the battery’s metal contacts clean.
※ Recharge the battery after long periods of non-use to maximize
battery life.
※ Battery life will vary due to usage patterns and environmental
conditions.
※ The self-protection function of the battery cuts the power of the
phone when its operation is in an abnormal status. In this case, remove
the battery from the phone, reinsert it, and turn the phone on.
General Notice
※ Using a damaged battery or placing a battery in your mouth may
cause serious injury.
※ Do not place items containing magnetic components such as a credit
card, phone card, bank book, or subway ticket near your phone. The
magnetism of the phone may damage the data stored in the magnetic
strip.
※ Talking on your phone for long period of time may reduce call quality due
- 18 -
Page 20

to heat generated during use.
※ When the phone is not used for a long period time, store it in a safe
place with the power cord unplugged.
※ Using the phone in proximity to receiving equipment (i.e. TV or Radio)
may cause interference to the phone.
※ Do not immerse your phone in water. If this happens, remove the
battery and take it to Reliance Authorized Service Center.
※ Do not paint your phone.
※ The data saved in your phone might be deleted due to careless use,
repair of the phone, or upgrade of the software. Please backup your
important phone numbers. (Ring tones, text messages, voice messages,
picture, and videos could also be deleted.) The manufacturer is not liable
for damage due to the loss of data.
※ Do not turn your phone on or off when the phone is close to your ear.
- 19 -
 Loading...