

Cricket CST17 Owner's Manual
1
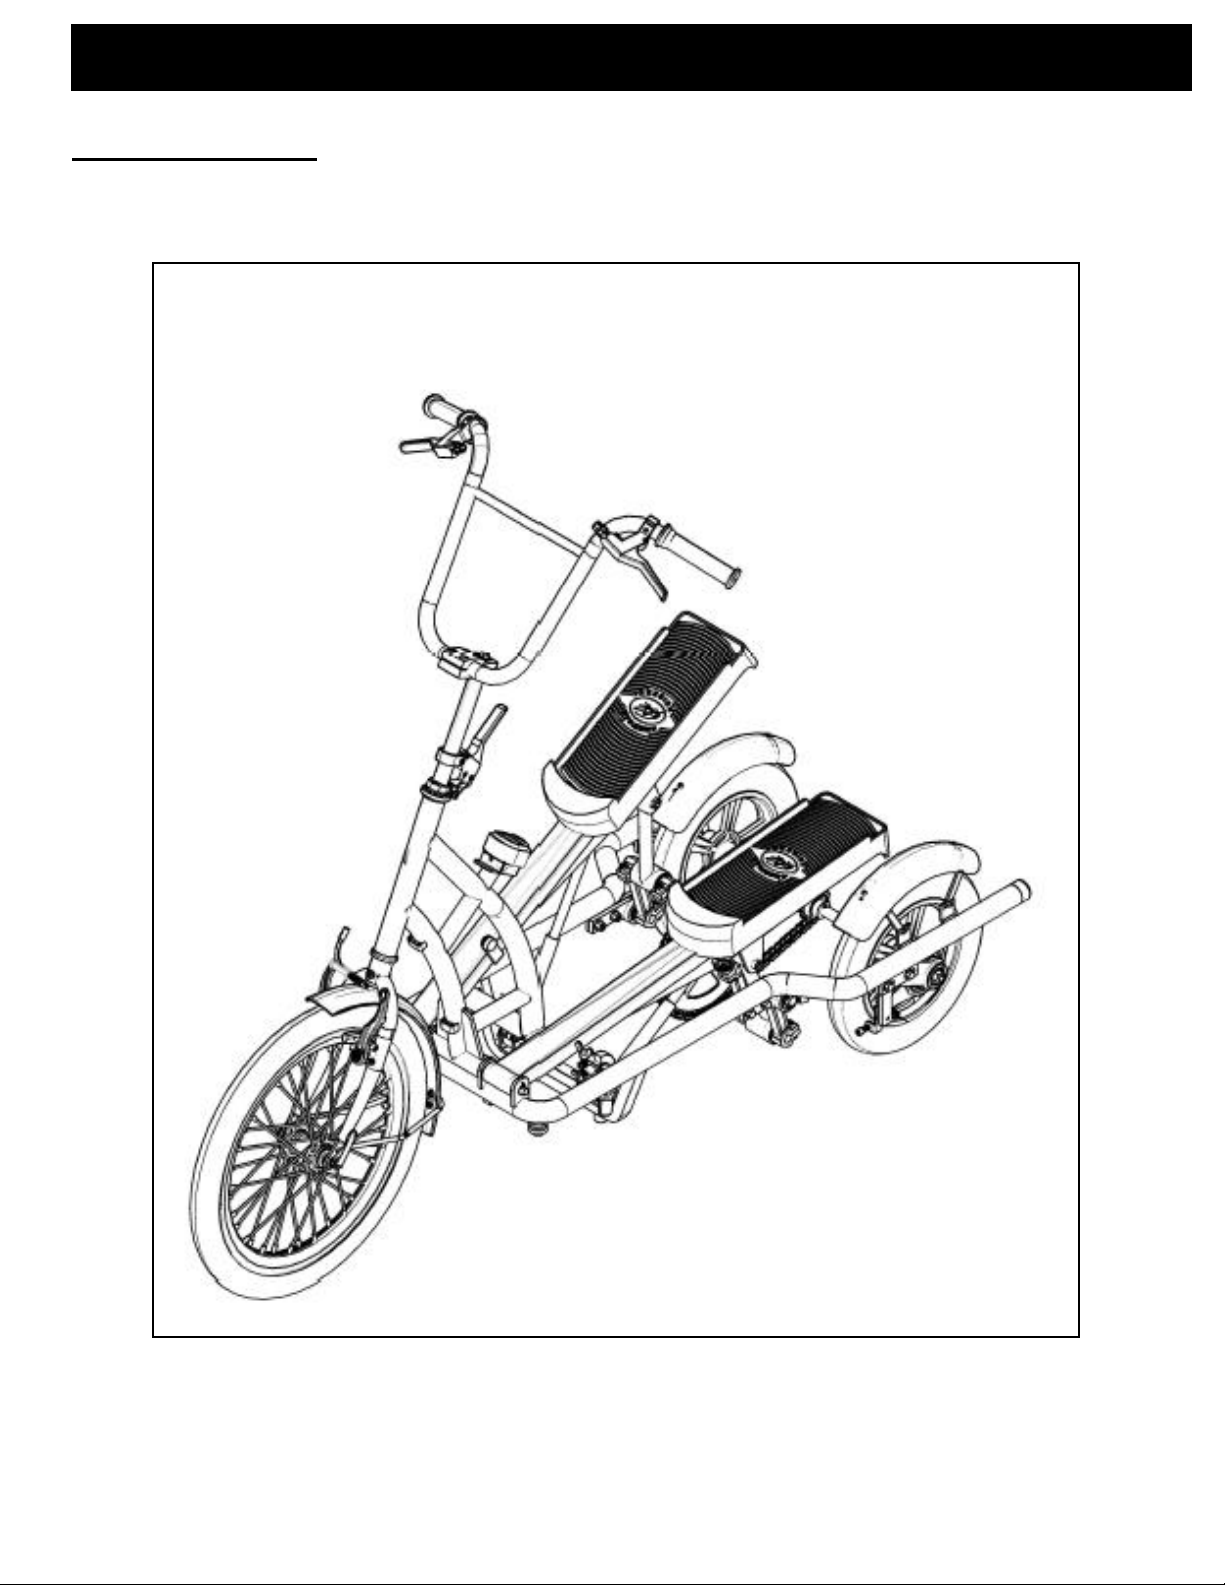
CRICKET STEPPER OWNER’S MANUAL
MODEL CST17

2
CRICKET STEPPER OWNER’S MANUAL
• TABLE OF CONTENTS FOR MODEL CST17 ----------------------------------------------------------------------------------------2
• SAFETY----------------------------------------------------------------------------------------------------------------------------------------3-5
• RESPONSIBILITY OF THE OWNER-----------------------------------------------------------------------------------------------------6
• MECHANICAL FUNCTION------------------------------------------------------------------------------------------------------------------7
• HOW TO RIDE CRICKET STEPPER FOR BEGINNERS-----------------------------------------------------------------------8-10
Learning how to ride The Cricket Stepper. Information for beginners.
• HANDLE BAR ADJUSTMENT-------------------------------------------------------------------------------------------------------------11
• STEM ADJUSTMENT------------------------------------------------------------------------------------------------------------------------12
• IMPORTANT NOTE: REFER TO PAGES 13 TO 15 FOR FIRST STEPS TO FOLLOW FOR FACTORY
RECOMMENDED ASSEMBLY AFTER CRICKET STEPPER DELIVERY. INCLUDING FACTORY
RECOMMENDED HANDLE BAR STEM HEIGHT.
• FACTORY RECOMMENDED ASSEMBLY AFTER DELIVERY -------------------------------------------------------------13-16
Factory recommended handlebar stem adjustment.
• INFLATING AND ALIGNING THE TIRES WITH THE RIM-------------------------------------------------------------------17-18
• FOLDING PROCEDURE EXPLANATION-------------------------------------------------------------------------------------------19-21
How to fold Cricket Stepper steps 1-3.
• V-BRAKE FUNCTION EXPLANATION -------------------------------------------------------------------------------------------------22
• QUICK RELEASE FUNCTION EXPLANATION---------------------------------------------------------------------------------------23
• FRONT WHEEL REMOVAL INSTRUCTIONS-------------------------------------------------------------------------------------24-25
• FRONT WHEEL INSTALLATION INSTRUCTIONS------------------------------------------------------------------------------26-29
• V-BRAKE FUNCTION AND ADJUSTMENTS------------------------------------------------------------------------------------------30
• REAR BRAKE FUNCTION AND ADJUSTMENT---------------------------------------------------------------------------------31-32
Adjusting the rear brake cable steps 1-3.
• UNFOLDING PROCEDURE EXPLANATION--------------------------------------------------------------------------------------33-34
How to unfold The Cricket Stepper to riding position steps 1-4.
• OIL CYLINDER FUNCTION------------------------------------------------------------------------------------------------------------------35
• OIL CYLINDER REMOVAL FOLLOWING 8 EASY STEPS----------------------------------------------------------------------36-37
• OIL CYLINDER INSTALLATION FOLLOWING 4 EASY STEPS-------------------------------------------------------------------38
• CRICKET STEPPER COMPUTER FUNCTION AND INSTALLATION INSTRUCTIONS--------------------------------39-46
Cycle computer features.
• INSPECTION, MAINTANENCE AND SERVICE------------------------------------------------------------------------------------47-48
Basic inspections
Service
• RETURN POLICY---------------------------------------------------------------------------------------------------------------------------49-50
• LIMITED WARRANTY--------------------------------------------------------------------------------------------------------------------51-52
Covered.
Not covered.
• CONTACT INFORMATION------------------------------------------------------------------------------------------------------------------53
This manual contains important information about CRICKET
STEPPER. Keep it handy for future reference.
3
CRICKET STEPPER OWNER’S MANUAL
READ AND FOLLOW THE COMPLETE INFORMATION
AND INSTRUCTIONS IN THIS MANUAL BEFORE ATTEMPTING
TO TAKE YOUR FIRST RIDE ON YOUR NEW CRICKET STEPPER.
The safety alert symbol means ATTENTION! Your safety is involved!!
SAFETY
• CRICKET STEPPER is intended to be used by average (small to medium) size people. Weighing
from 100 lbs to 250 lbs. Average height 4ft to 6ft. Older people with balance problems should
not use CRICKET STEPPER.
• This product is intended for people with good health. People with health issues should consult a
doctor before attempting to ride CRICKET STEPPER.
• CRICKET STEPPER is designed to be ridden by one rider at a time.
• This CRICKET STEPPER model CST17 is not intended for children under 12 years old.
• CRICKET STEPPER is not designed for hills. It is meant to be used on flat and smooth surfaces.
Like sidewalks, asphalt, concrete, pavers, etc.
• It is recommended to wear protective gear, like state approved helmets, elbow pads, knee pads,
eye gear, etc, when riding CRICKET STEPPER.
• It is not safe to ride CRICKET STEPPER at night. If riding at night is absolutely necessary, don’t
ride without lights or reflectors on the rear and on the front.
• It is recommended to use a reflective jacket or vest if you are riding at night.
• Always wear appropriate clothing when riding. Don’t wear loose clothing that can get caught in
the moving parts.
WARNING:
• CRICKET STEPPER is intended to use step motion for exercise purposes at your own
pace, not to speed or do acrobatics. Acrobatics can result in a serious accident or worse.
Acrobatics can also cause damage to CRICKET STEPPER body and mechanical parts.
• Don’t do sharp turns at high speeds. This can result in the tricycle rolling over. User
always needs to be aware when turning left or right to reduce speed to avoid falling. Any
fall can result in serious injury or worse.
4
CRICKET STEPPER OWNER’S MANUAL
SAFETY (cont.)
WARNING:
• If user is riding, CRICKET STEPPER downhill, user must maintain the speed at no more than
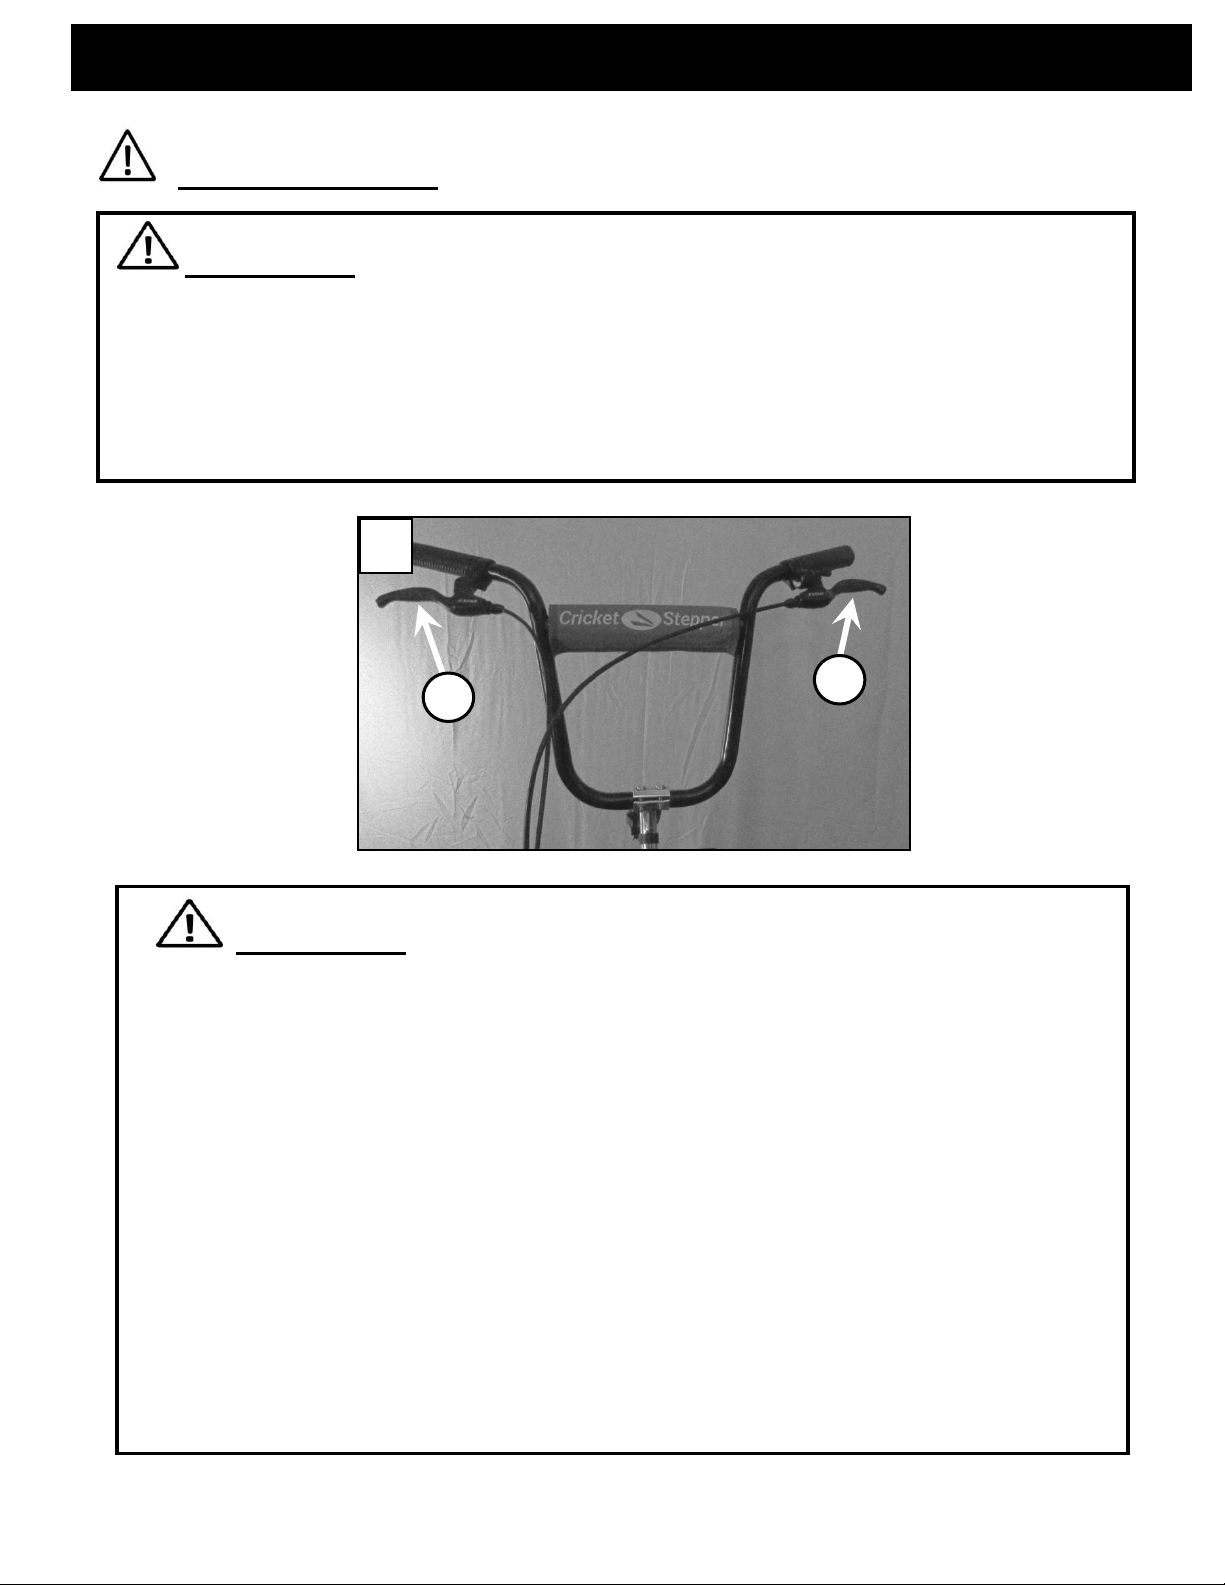
5 mph, by pressing the brake levers located on the left and right side of the handle bar.
If CRICKET STEPPER exceeds the speed of 5 mph going downhill and makes a sharp turn,
you might lose control of the tricycle, this can cause the tricycle to roll over, and this can
result in serious injuries or worse. SEE IMAGE BELOW (A) ITEMS 1 AND 2. FOR BRAKE
LEVERS LOCATION.
A
WARNING:
• When riding CRICKET STEPPER, NEVER LET YOUR BODY WEIGHT REST AT THE END
TIP OF THE PLATFORM SHOE. This can make the tricycle flip backwards. It can result
in serious injury or worse. Always try to keep your entire foot placed in the center or
towards the front of the foot platform. (Your foot should never be outside the foot
platform).
• Never ride barefoot, with sandals, flip flops, or high heels. Always wear athletic shoes
that will grip the pedal shoes.
• Always STOP CRICKET STEPPER completely before attempting to step down from the
tricycle.
• CRICKET STEPPER provides a folding mechanism intended to make the tricycle occupy
less space when not in use. User/Owner is responsible for manual locking the folding
mechanism before attempting to ride CRICKET STEPPER. SEE IMAGE (B) ITEMS 1 AND 2
FOR QUICK RELEASE HAND LOCK LOCATION AND IMAGE (C) ITEM 1, FOR QUICK
RELEASE HAND LOCK IN THE LOCKED POSITION ON PAGE 5. (Unfolding Procedure
Reference page 33-34).

5
CRICKET STEPPER OWNER’S MANUAL
SAFETY (cont.)
• User of CRICKET STEPPER must follow local bicycle laws and regulations. Go With the Traffic
Flow. Ride on the right side, in the same direction as other vehicles, Obey All Traffic Laws, Look
left and right twice at street intersections, the tricycle is a vehicle and you're the driver, Yield
to Traffic When Appropriate, Look for vehicles slowing or turning in front of you, Be aware of
traffic signals and lights, Watch for children playing in the area and pedestrians passing in front
of you, Be aware of unusual road conditions, (street bumpers, sidewalk construction, sewer caps,
holes, railroad tracks, etc) Stay Alert at All Times, Watch for Parked Cars, watch for parked cars
where driver might still be inside the car and open doors.
• Stop CRICKET STEPPER completely and step down from the tricycle when crossing a busy
intersection.
• Don’t drive CRICKET STEPPER under the influence of any drug or alcohol including Prescription
drugs that can cause you to feel drowsy and may slow your reaction time.
• Use extra CAUTION if riding CRICKET STEPPER in wet weather conditions.
HAND LOCK LOCATION
B
C
It is impossible for this manual to list all safety information.
It is the responsibility of the Owner/User to be alert
and predictable at all times when riding CRICKET STEPPER.
IMPORTAT NOTE:
6
CRICKET STEPPER OWNER’S MANUAL
RESPONSIBILITY OF THE OWNER/USER!
• Like any sport, riding involves risk of serious injury death and damage. By choosing to ride
CRICKET STEPPER you assume the responsibility for the risk. Not the inventor, not the people
who sold you the bike. Not the people who made it. Not the people who distribute it. Not the
people who manage or maintain the roads or trails, where you ride on. So you need to know and
practice the rules of safe and responsible riding.
• The area in which you ride may require specific safety devices. It is your responsibility to
familiarize yourself with the laws of the area where you ride and to comply with all applicable
laws, including properly equipping yourself and your bike as the law requires. Observe all local
bicycle laws and regulations. Observe regulations about bicycle lighting, licensing of bicycles,
riding on sidewalks, laws regulating bike paths and trails used, helmet laws, child carrier laws,
special bicycle traffic laws. It’s your responsibility to know and obey the laws.
WARNING:
• Any adjustments you make are entirely at your own risk. Do NOT use your CRICKET
STEPPER for freestyle and stunt riding, jumping or competitive events. You should know that
off-road use or any similar activities can be dangerous, and you are warned that you assume
the risk for personal injury, damages or losses incurred from such use. Do not ride your
CRICKET STEPPER when any part is damaged or not working properly. If you are unsure how
to carry out repairs or maintenance on your tricycle, it is vital that you consult a local bike
mechanic for professional assistance and support.
• It is the responsibility of the user to use EXTRA CAUTION if riding CRICKET STEPPER in wet
weather conditions.
• It is the responsibility of the owner NOT to allow children under 12 years old to ride or use this
CRICKET STEPPER model CST17.
• It is the responsibility of the user to perform a mechanical check each time before attempting to
ride CRICKET STEPPER. For example, check the brakes; Tires air pressure, loose nuts or bolts,
check for unusual sounds, Check for cracks or bends on the body of the Tricycle or any other
part, Check that the lock mechanism is appropriately fastened, etc.
• It is your responsibility as the owner, if you allow anyone else to ride your CRICKET STEPPER,
to have him/her comply with all safety, and cautions listed in this manual.
• CRICKET STEPPER comes partially assembled. It is the owner’s responsibility to follow all
assembly and adjustment instructions exactly as shown in this manual.
• If CRICKET STEPPER was purchased assembled, it is the owner’s or user’s responsibility, before
riding the tricycle for the first time, to make sure the tricycle has been assembled and adjusted
appropriately.

7
CRICKET STEPPER OWNER’S MANUAL
MECHANICAL FUNCTION
THE MECHANICAL ASPECTS OF CRICKET STEPPER
• The user applies force on to the foot platform,
which is attached to the paddle levers. As force
pushes down from the starting upper position,
the hinge levers, hinged at the hinge joint, and
in turn, the force is transmitted both to the
hydraulic piston through the piston bar and to
the crankshaft at the same time. The force is
therefore divided and shared between the
hydraulic piston and the crankshaft through
the piston bar. Because of this configuration,
the user is able to move forward since the
interlocked crankshaft rotates the chain
assembly, which is further interlocked with the
rear axle, and in turn, turns the back wheels to
create the forward motion. The crankshaft
also, pushes the other piston up to starting
position in order for the cycle to start over and
continue again.

8
CRICKET STEPPER OWNER’S MANUAL
HOW TO RIDE CRICKET STEPPER FOR BEGINNERS
LEANING HOW TO RIDE CRICKET STEPPER. INFORMATION FOR BEGGINERS.
WARNING: Before you use CRICKET STEPPER, it is recommended you have a
CPSC (Consumer Product Safety Commission) approved cycling helmet or other helmet
to protect your head, and all other safety gear for your protection mentioned in this
manual. Reference on SAFETY section (pg 3-5). If you have any health issues, check
with your doctor to make sure you are physically healthy enough to exercise.
• It is always recommended for your safety, to start the learning process of riding your CRICKET
STEPPER, by doing a practice run in a controlled environment. Pick a large spot, with no
obstacles, traffic, or pedestrians. Ride your CRICKET STEPPER until you feel comfortable
enough to go on a “real ride”, make sure that you make several starts and stops and right and
left turns.
• When you attempt to ride CRICKET STEPPER, start by standing in the back of the tricycle
facing the front wheel; grab the handle grips with the corresponding hands, (left and right). Look
for the crank shaft position under each pedal. Always step up on the pedal on the side where
the crank shaft is facing nearest to the rear side of the tricycle, (can be the left or the right
pedal). Place the corresponding foot on the correct pedal and press down until it reaches its
lowest limit. Then give a push forward with the other foot on the ground surface to propel the
tricycle forward. Once the tricycle starts moving forward, proceed to place the corresponding
foot on the upper pedal. Press the upper pedal all the way down until your leg is completely
straight. Do not press the opposite pedal until the leg you are pushing down is completely
straight. Every time you press the upper pedal down you need to wait until your leg is straight
before pushing the opposite pedal. This procedure allows the crank shaft to rotate 360 degrees
automatically to continue moving forward every time you press the upper pedal FULL STRIDE.
• When you need extra power to move the tricycle forward, press the pedal where the crank shaft
is nearer to the back of the tricycle about half way or 3 quarters of the way. The crank shaft will
rotate backwards. This procedure allows the crank shaft to readjust automatically; and the
opposite pedal will go up simultaneously ready to press down and continue pedaling forward
giving you extra power when you need it. Always press the upper pedal all the way down until
your leg is completely straight before pressing the opposite pedal.
• Once you have both feet securely on top of both pedal shoes, position your feet near the middle
of the pedal platform. You can always move your foot position while riding to find the ideal spot
for your riding style. Always try to keep your entire foot placed in the center or towards the
front of the foot platform. Your foot should never be outside the foot platform.
WARNING: NEVER LET YOUR BODY WEIGHT REST AT THE END TIP OF THE
PLATFORM SHOE. This can make the tricycle to flip backwards. IT CAN RESULT IN
SERIOUS INJURY OR WORSE.
9
CRICKET STEPPER OWNER’S MANUAL
HOW TO RIDE CRICKET STEPPER FOR BEGINNERS (Cont).
• The handle bar helps balance your body while riding. The Handle bar and Stem can be adjusted
according to the height of the owner/ user for a comfortable ride. (Reference on pages 11-12 ).
• CRICKET STEPPER step motion is similar to a stair stepper. Turning left and right and braking
on CRICKET STEPPER is similar to a regular bicycle. Always reduce the speed when turning.
WARNING
• DON’T MAKE SHARP TURNS AT HIGH SPEEDS. Sharp turns can cause the tricycle
to roll over, and THIS CAN RESULT IN SERIOUS INJURIES OR WORSE.
• To start pedaling, press the upper pedal ALL THE WAY DOWN until your leg is completely
straight, when the upper pedal is going down, you will feel the opposite pedal going up, you need
to let your feet move with the motion of the pedals, ALWAYS WITH FULL STRIDES.
IMPORTANT
NOTE:
WARNING: NEVER LET YOUR BODY WEIGHT FULLY REST AGAINST THE HANDLE BAR OR
STEM. They can bend and break. IT CAN RESULT IN SERIOUS INJURY OR WORSE.
For the correct propulsion function mechanism, Make sure, when riding
CRICKET STEPPER, you allow the Crank Shaft mechanism to complete the
360 degrees rotating cycle by pressing the pedals all the way down ON EVERY
STEP. CRICKET STEPPER Crank Shaft mechanism is designed to rotate
forward every time you press the upper pedal ALL THE WAY DOWN, with
FULL STRIDES. If the user presses the upper pedal only half way, and then
presses the other pedal, the Crank Shaft will rotate backwards freely
automatically, and the highest pedal will automatically re adjust to the upper
position, then by pressing the upper pedal ALL THE WAY DOWN FULL
STRIDE, until your leg is completely straight, you can continue with the
rotating movement forward.
10
CRICKET STEPPER OWNER’S MANUAL
HOW TO RIDE CRICKET STEPPER FOR BEGINNERS(Cont).
• Once you learn how to ride properly, you will benefit from cardio workout, toning, and firming
your entire lower body. All this outdoors!! In your favorite park, beach, or around your
neighborhood.
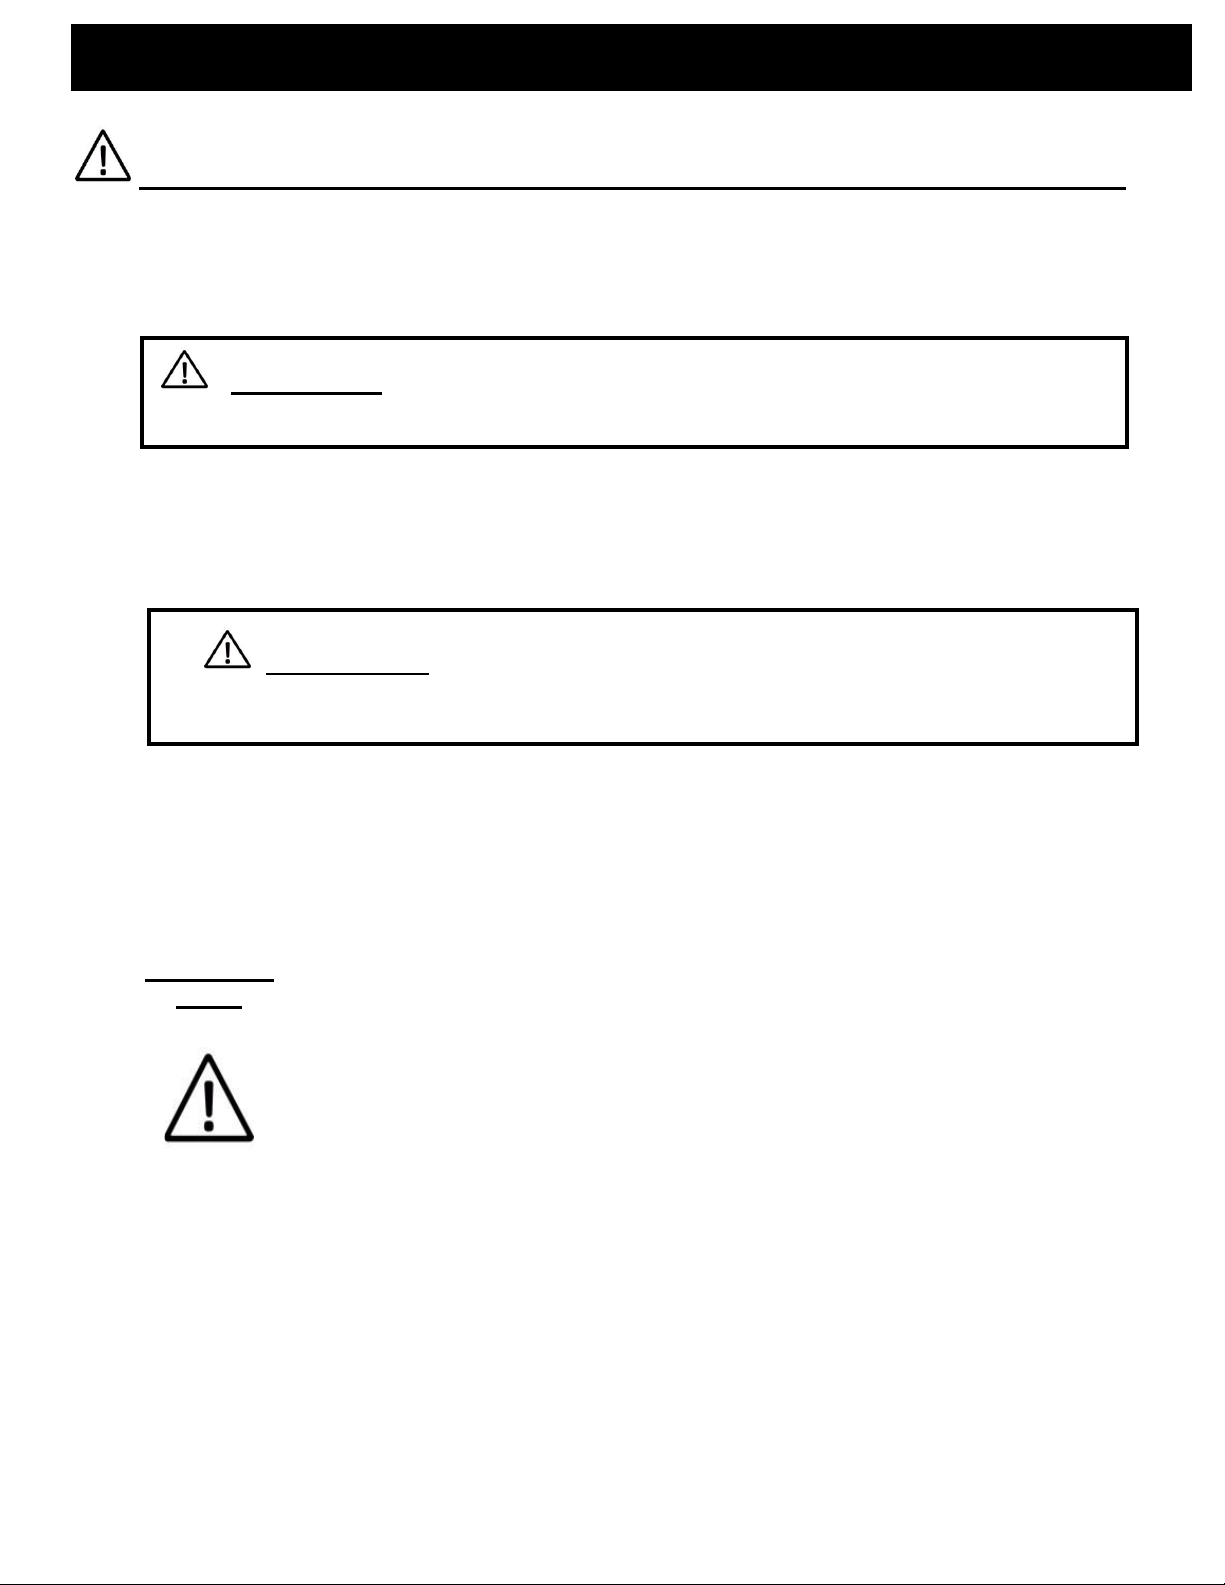
(WRONG) POSITION OF THE CRAN SHAFT
TO CONTINUE MOVING FORWARD
(RIGHT) POSITION OF THE CRANK SHAFT
TO CONTINUE MOVING FORWARD
B
• Sometimes, during the learning period, when you stop CRICKET STEPPER completely, and you
want to restart pedaling to move forward, you might experience the crankshaft gets stuck in a
position where it does not move neither forward or backward, or the crankshaft rotates
backwards freely when you press the upper pedal. This happens because the crankshaft did not
reach the right automatic adjustment when you pressed the lowest pedal. All you have to do to
restart moving forward is, leave your foot on the pedal nearest to the ground (lowest pedal), (it
can be the left or the right foot), and use your other foot to push on the ground surface to propel
the tricycle forward. This small and quick push will make the tricycle move forward enough to
allow the crankshaft to automatically re adjust the highest pedal to reach the upper position,
once the highest pedal reaches the upper position, you can continue moving forward, by pressing
the upper pedal ALL THE WAY DOWN until your leg is completely straight (Wait for this leg to be
completely straight before you press the opposite pedal). Every time you press down the pedals
must be with FULL STRIDES. SEE REFERENCE IMAGES BELOW ( A ) ITEM 1 FOR THE RIGHT
POSITION OF THE CRANK SHAFT TO CONTINUE MOVING FORWARD AND ( B ) ITEM 1 FOR THE
WRONG POSITION OF THE CRANK SHAFT TO CONTINUE MOVING FORWARD. This learning
process will only be needed until you practice enough and learn how to ride CRICKET STEPPER.
It will take a couple of tries before you get the hang of riding it.
A
1
1
11
CRICKET STEPPER OWNER’S MANUAL
HANDLE BAR ADJUSTMENT
• CRICKET STEPPER’S handle bar can be adjusted according to the height of the
user. The angle of the handle bar can be adjusted forward or rearward according to the need of
the rider. By following the next steps 1 to 3.
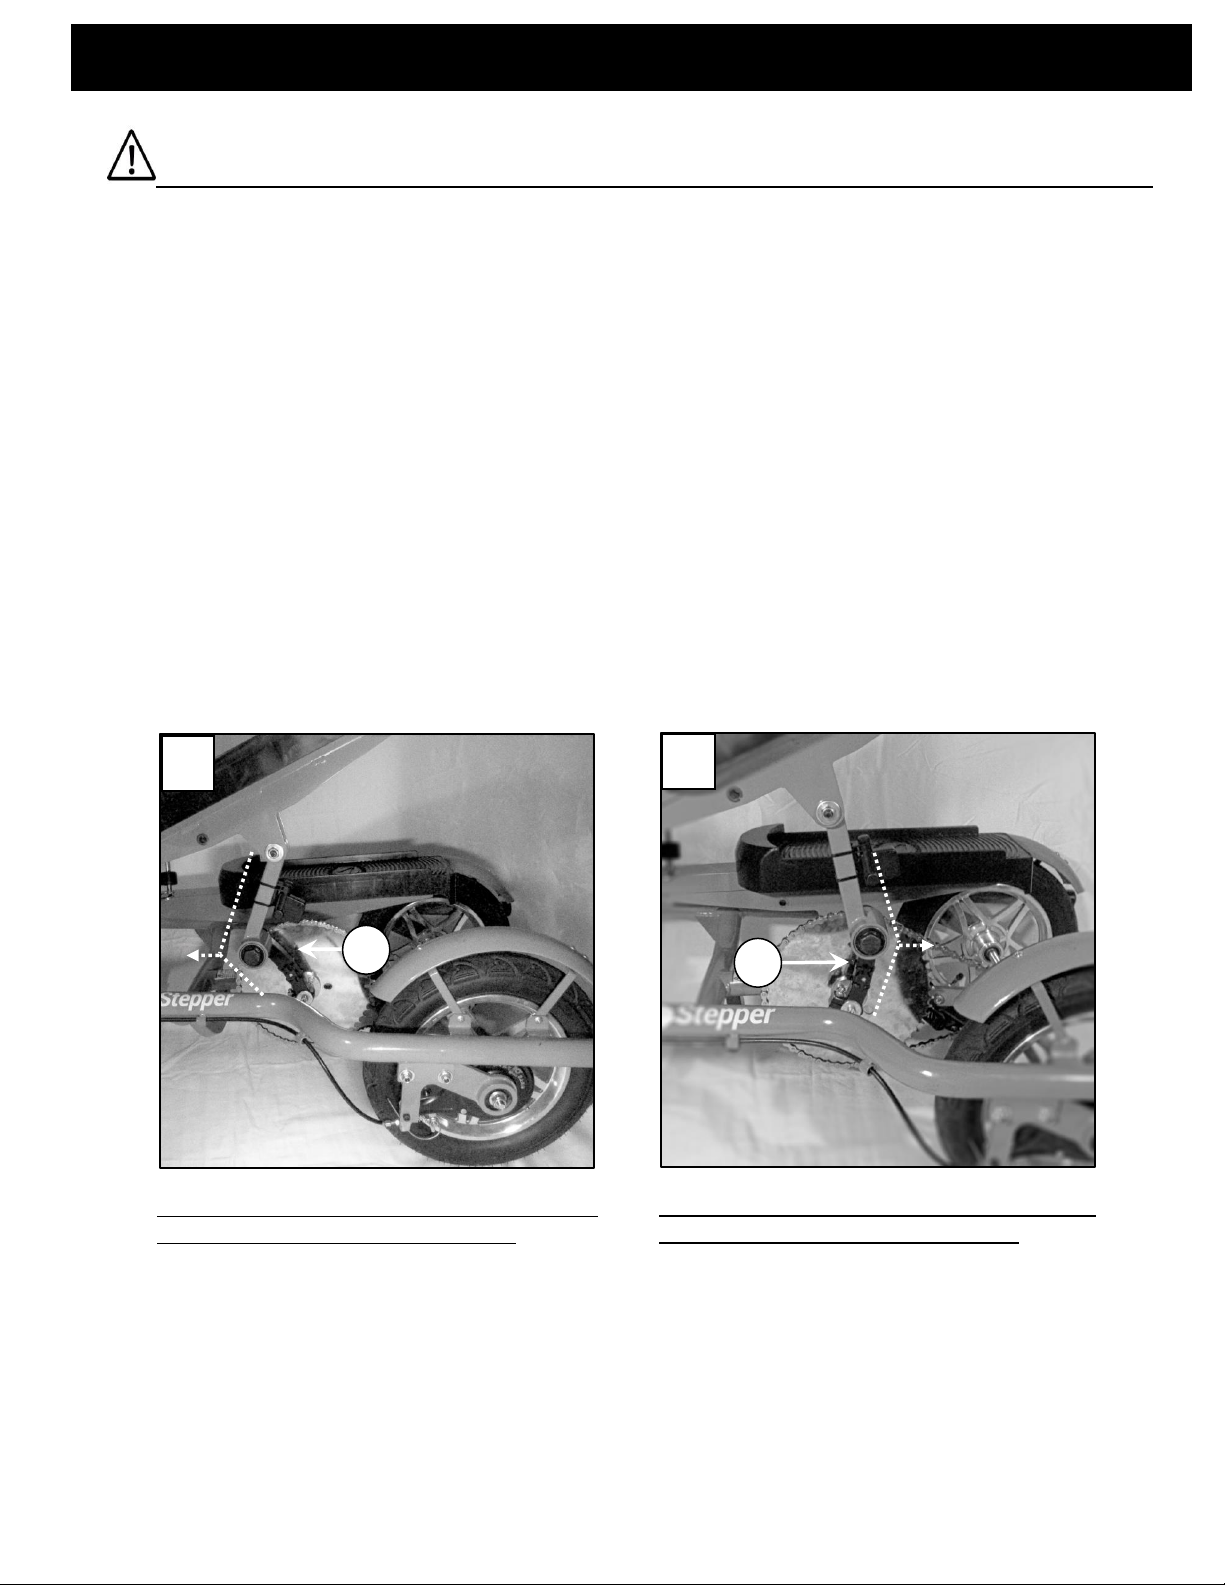
• STEP 1: Use a 6mm Allen key, to loosen the 4 bolts located on the top of the stem. SEE IMAGE
BELOW (A) ITEMS 1, 2, 3, AND 4.
• STEP 2. Grab the handle grips IMAGE BELOW (B) ITEM 1. Move the handle bar forward or
rearward to the position you feel most comfortable. SEE IMAGE BELOW (B) ITEM 2. FACTORY
SETTING RECOMMENDED (about 42 degrees related to main frame).
• STEP 3. Tighten the 4 bolts to keep the handle bar at your desired angled position. (When
tightening the bolts, don’t tie just one bolt at a time, you have to tighten each one in a random
pattern until you get the handle bar firm in the appropriate angle adjustment).
After the handle bar has been properly adjusted, owner/user
must further test for the correct adjustment. Stand in front
of your Tricycle, clamp the front wheel between your legs,
and Place your hands on the corresponding handle bar grips,
(right and left). Apply force back and forth on the handle bar
to make sure it is appropriately tightened. If there is any
movement from the final adjustment, retighten the bolts. You
need the bolts to be tight enough so that the handle bar
doesn’t move when you ride. However, you do not want it to
be so tight that you cannot remove the bolts later or the
thread of the bolts becomes stripped.
IMPORTANT NOTE:
A
B
1
12
CRICKET STEPPER OWNER’S MANUAL
STEM ADJUSTMENT.
• CRICKET STEPPER’S handle bar stem can be adjusted according to the height of the user. The
height of the handle bar stem can be adjusted up or down according to the need of the rider
By following the next steps 1-4.
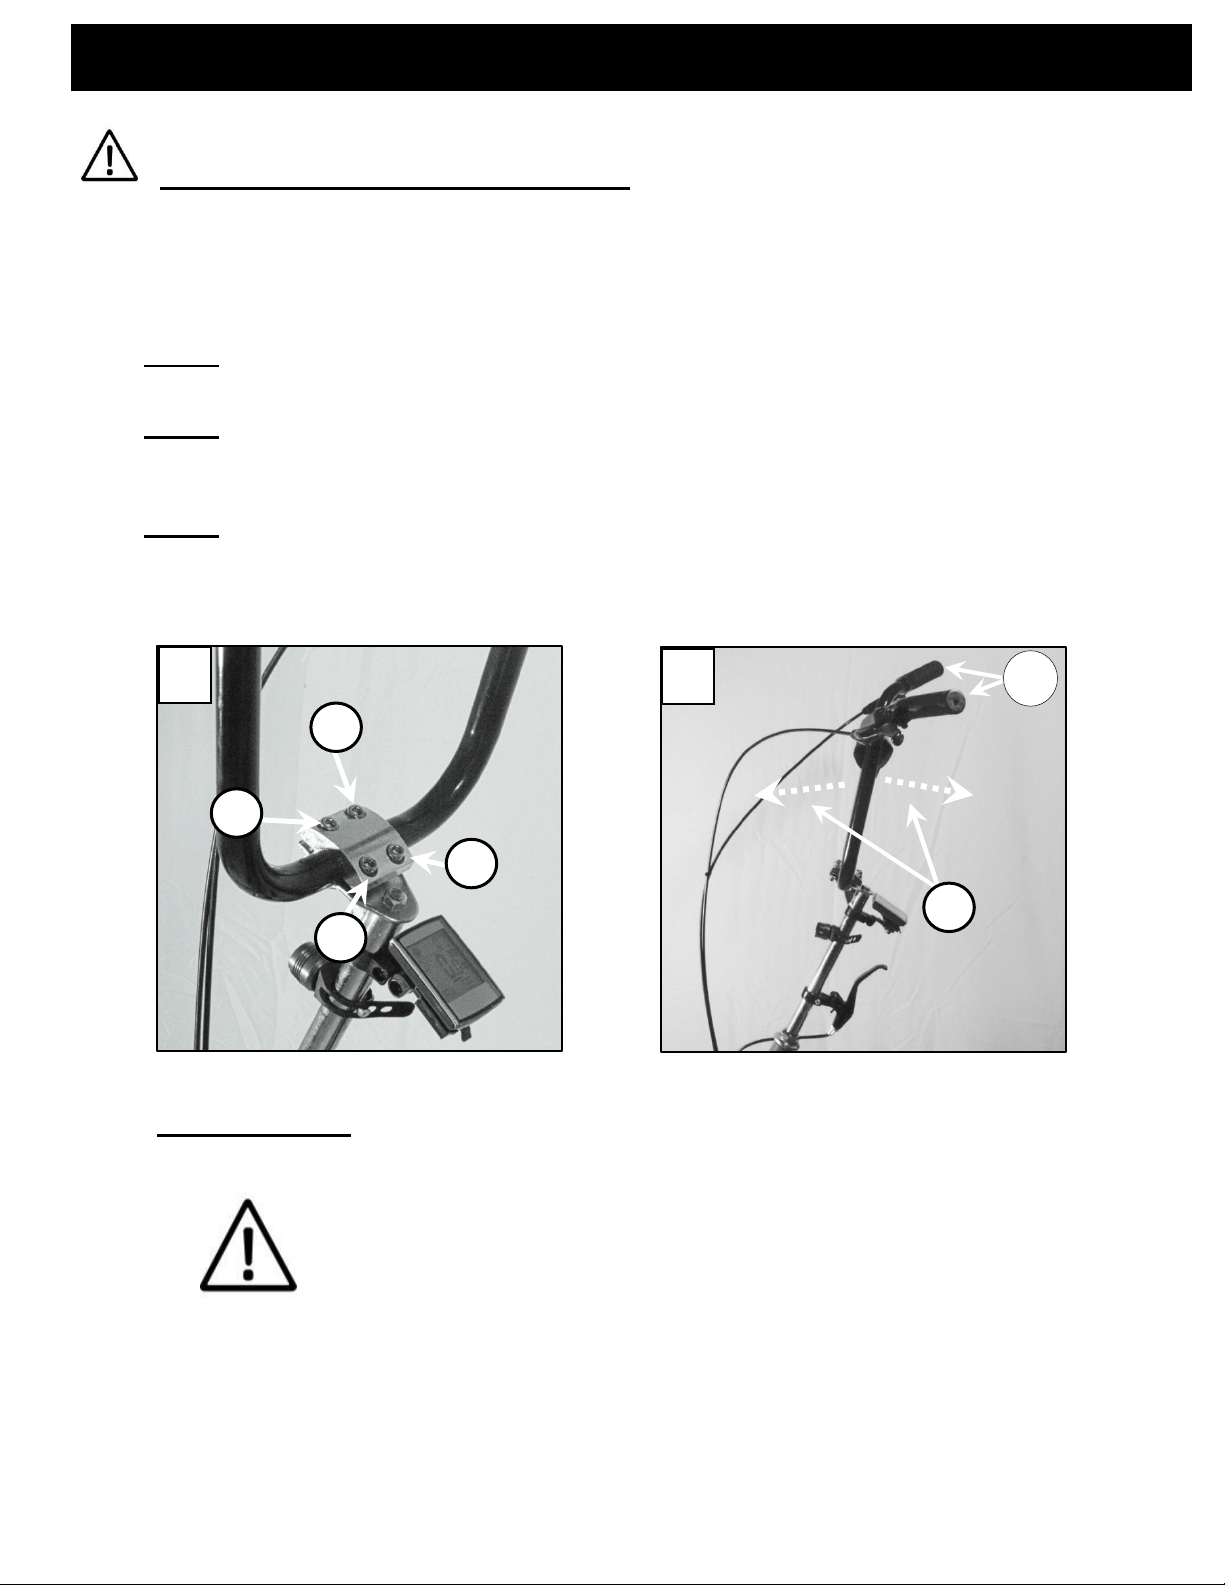
• STEP 1: Using a 13 mm wrench, loosen the stem bolt located at the top of the stem. SEE IMAGE
REFERENCE BELOW (C) ITEM 1.
• STEP 2: Loosening the bolt takes about 5 to 6 turns counter clockwise. Gently hit the head of
the bolt with a rigid object. By doing this, the stem locking mechanism gets loose and the stem
will be free to move up or down.
• STEP 3: Move the stem up or down to the position you feel most comfortable. SEE IMAGE
BELOW (D).
WARNING: DON’T RAISE THE STEM ABOVE THE STOP LINE MARK AT THE LOWER
END OF THE POLE.
• STEP 4: Make sure the handle bar is aligned with the front wheel. Tighten the stem bolt clock
wise until you get the stem firm in the desired height adjustment.
IMPORTANT NOTE: REFER TO PAGES 13 TO 16 FOR FIRST STEPS TO FOLLOW FOR
FACTORY RECOMMENDED ASSEMBLY AFTER CRICKET STEPPER DELIVERY. INCLUDING
HANDLE BAR STEM HEIGHT.
C
D
1
WARNING: When the user attempts to adjust the height of the handle bar stem, user
must pay attention to the strain of the brake cables. If the height needed for the handle bar
stem, is higher than the length of the brake cables, user must change the brake cable
according to the final adjusted height of the handle bar stem, to avoid malfunctioning of the
brakes.
13
CRICKET STEPPER OWNER’S MANUAL
FACTORY RECOMMENDED ASSEMBLY AFTER DELIVERY
HANDLE BAR STEM HEIGHT RECOMMENDED ADJUSTMENT
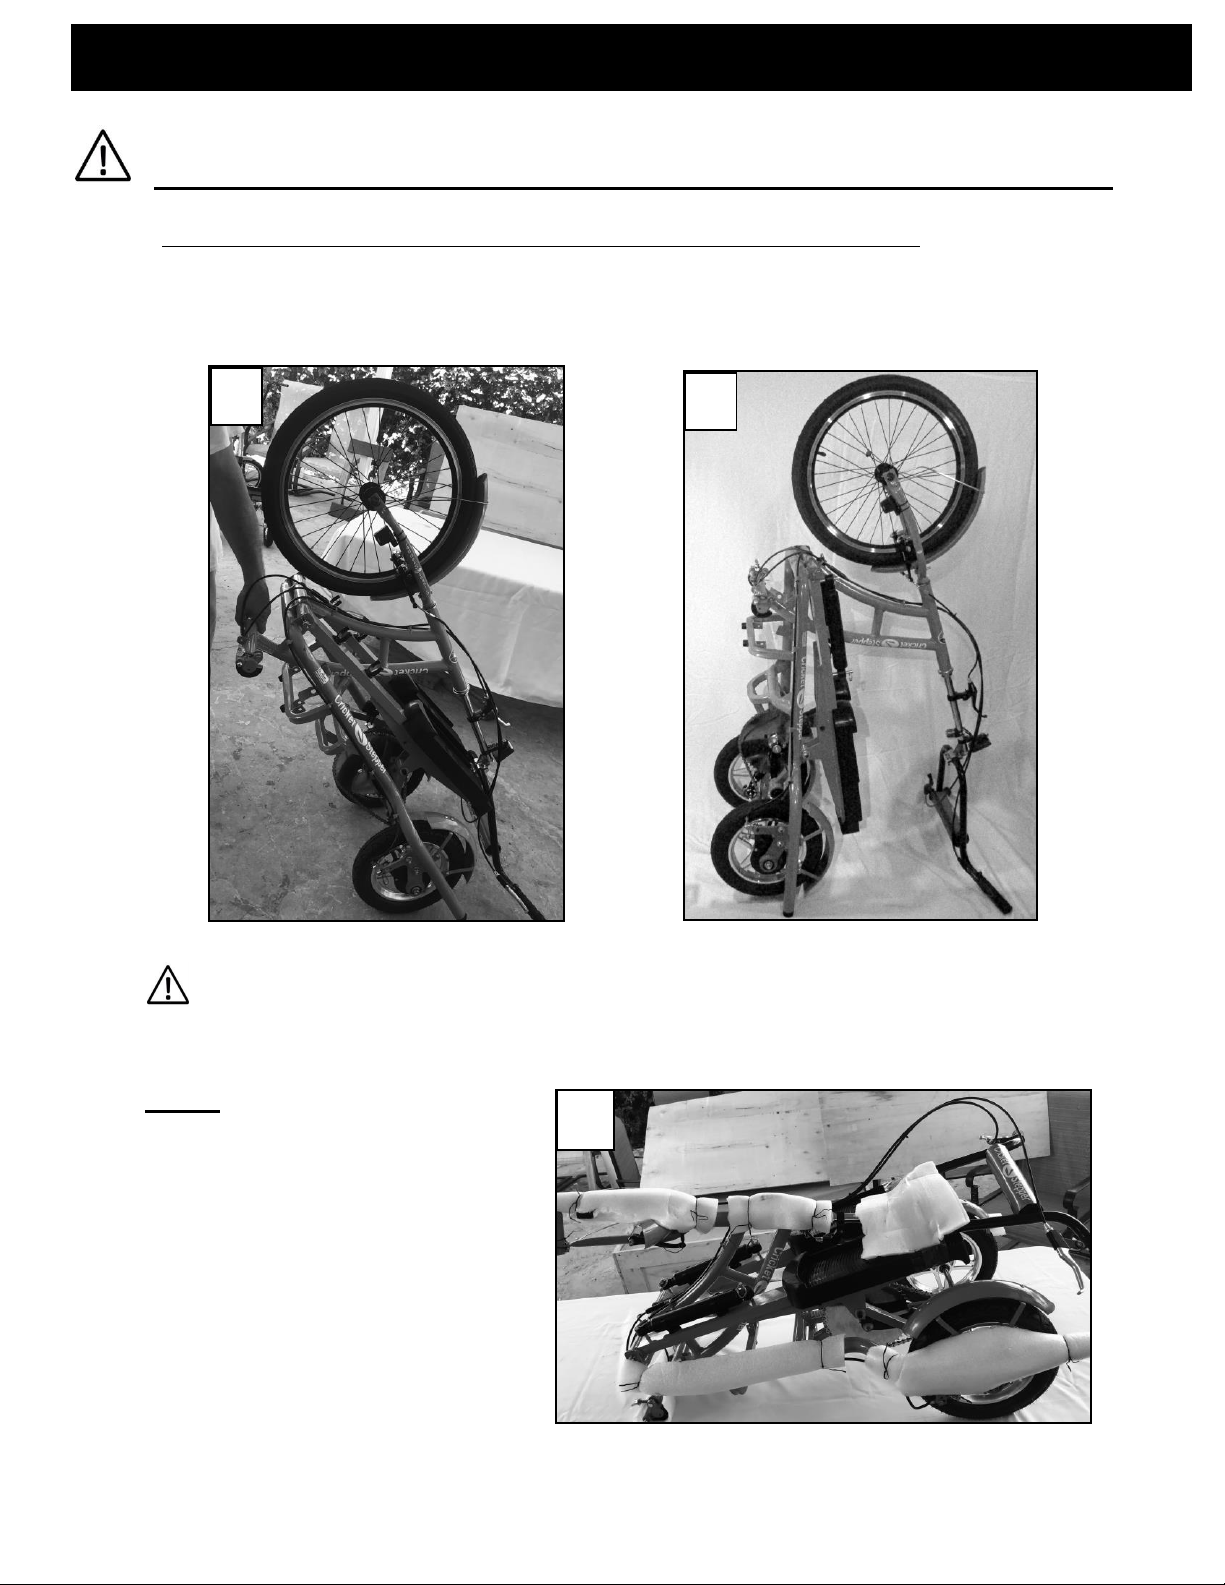
1. In order to roll the folded tricycle to transport from point A to point B, grab by the crossbar.
SEE IMAGE BELOW (A), and in order to stand up the tricycle vertically when it is folded SEE
IMAGE BELOW (B). You must follow the factory recommended handle bar stem height.
2. HOW TO ADJUST THE HANDLE BAR STEM TO THE FACTORY
RECOMMENDED HEIGHT. Follow steps 1 to 7.
A
C
B
STEP 1. After CRICKET STEPPER
is out of the box, it is
recommended to place the
tricycle on top of a table if
possible. Remove all protective
material. IMAGE (C).
14
CRICKET STEPPER OWNER’S MANUAL
FACTORY RECOMMENDED ASSEMBLY AFTER DELIVERY(Cont).
HANDLE BAR STEM HEIGHT RECOMMENDED ADJUSTMENT (Cont).
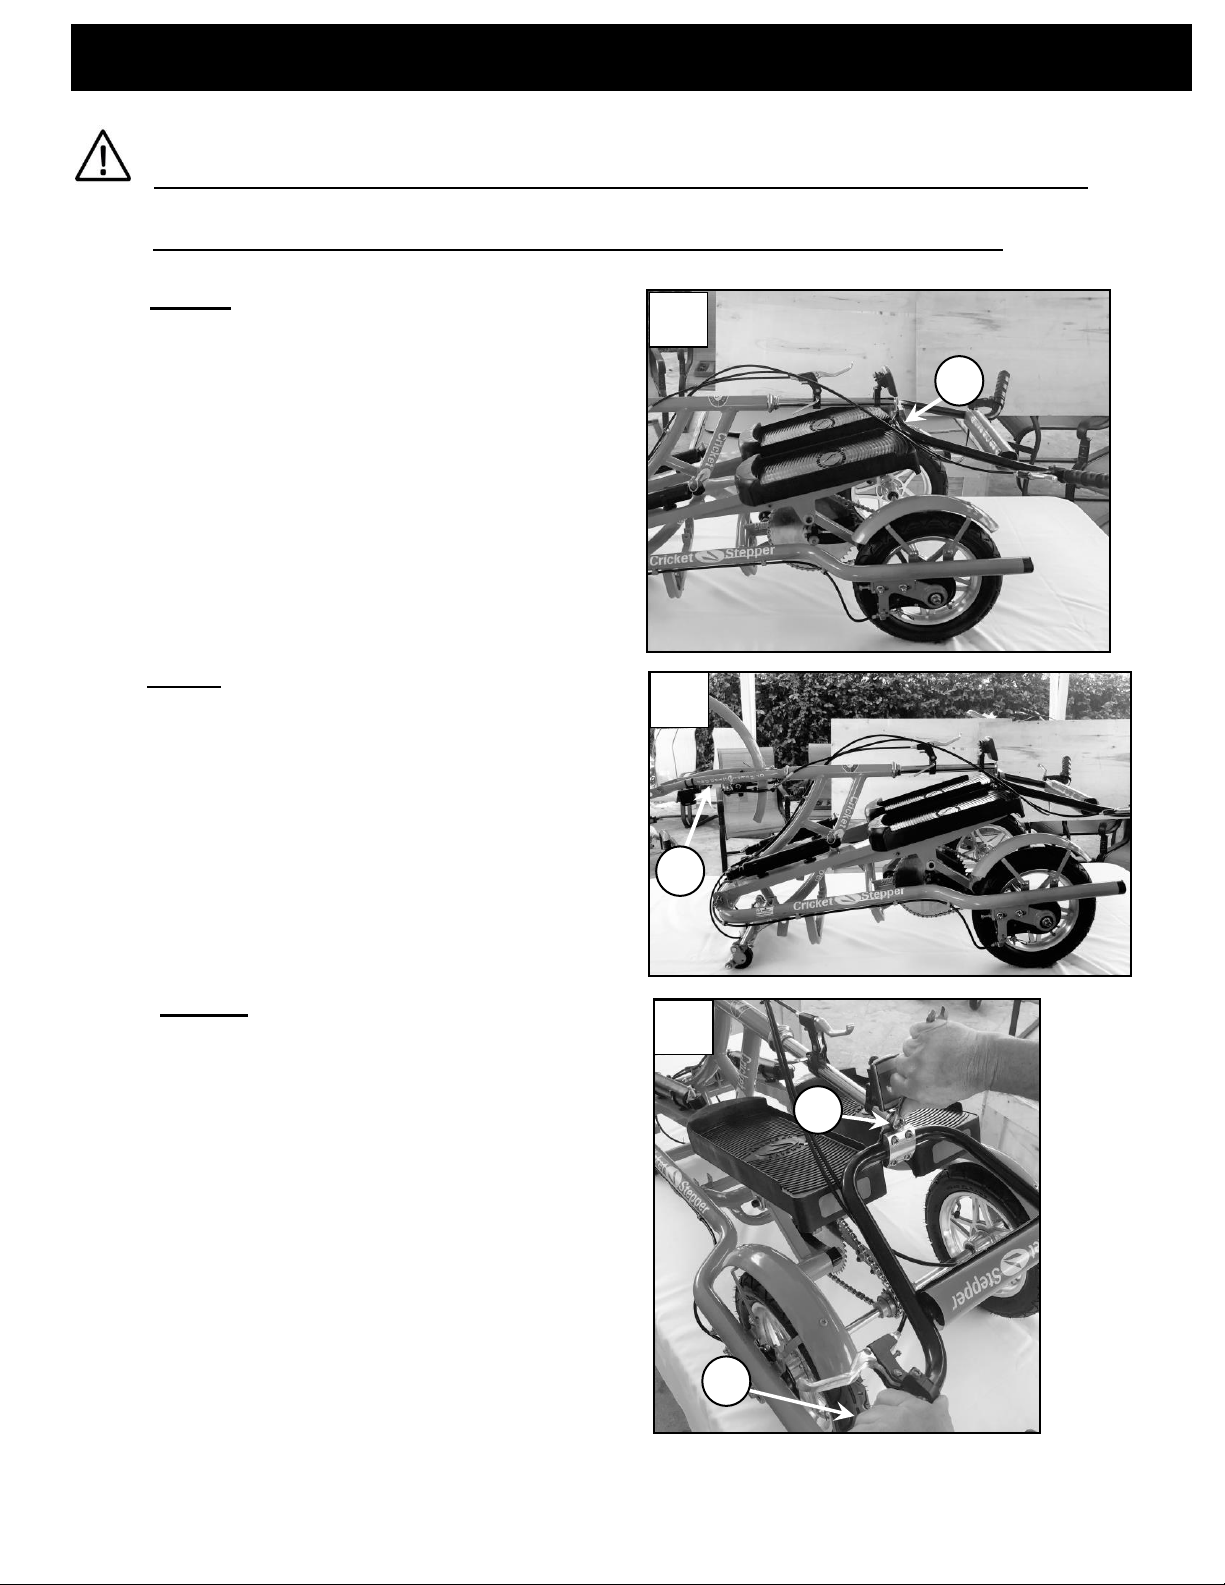
D
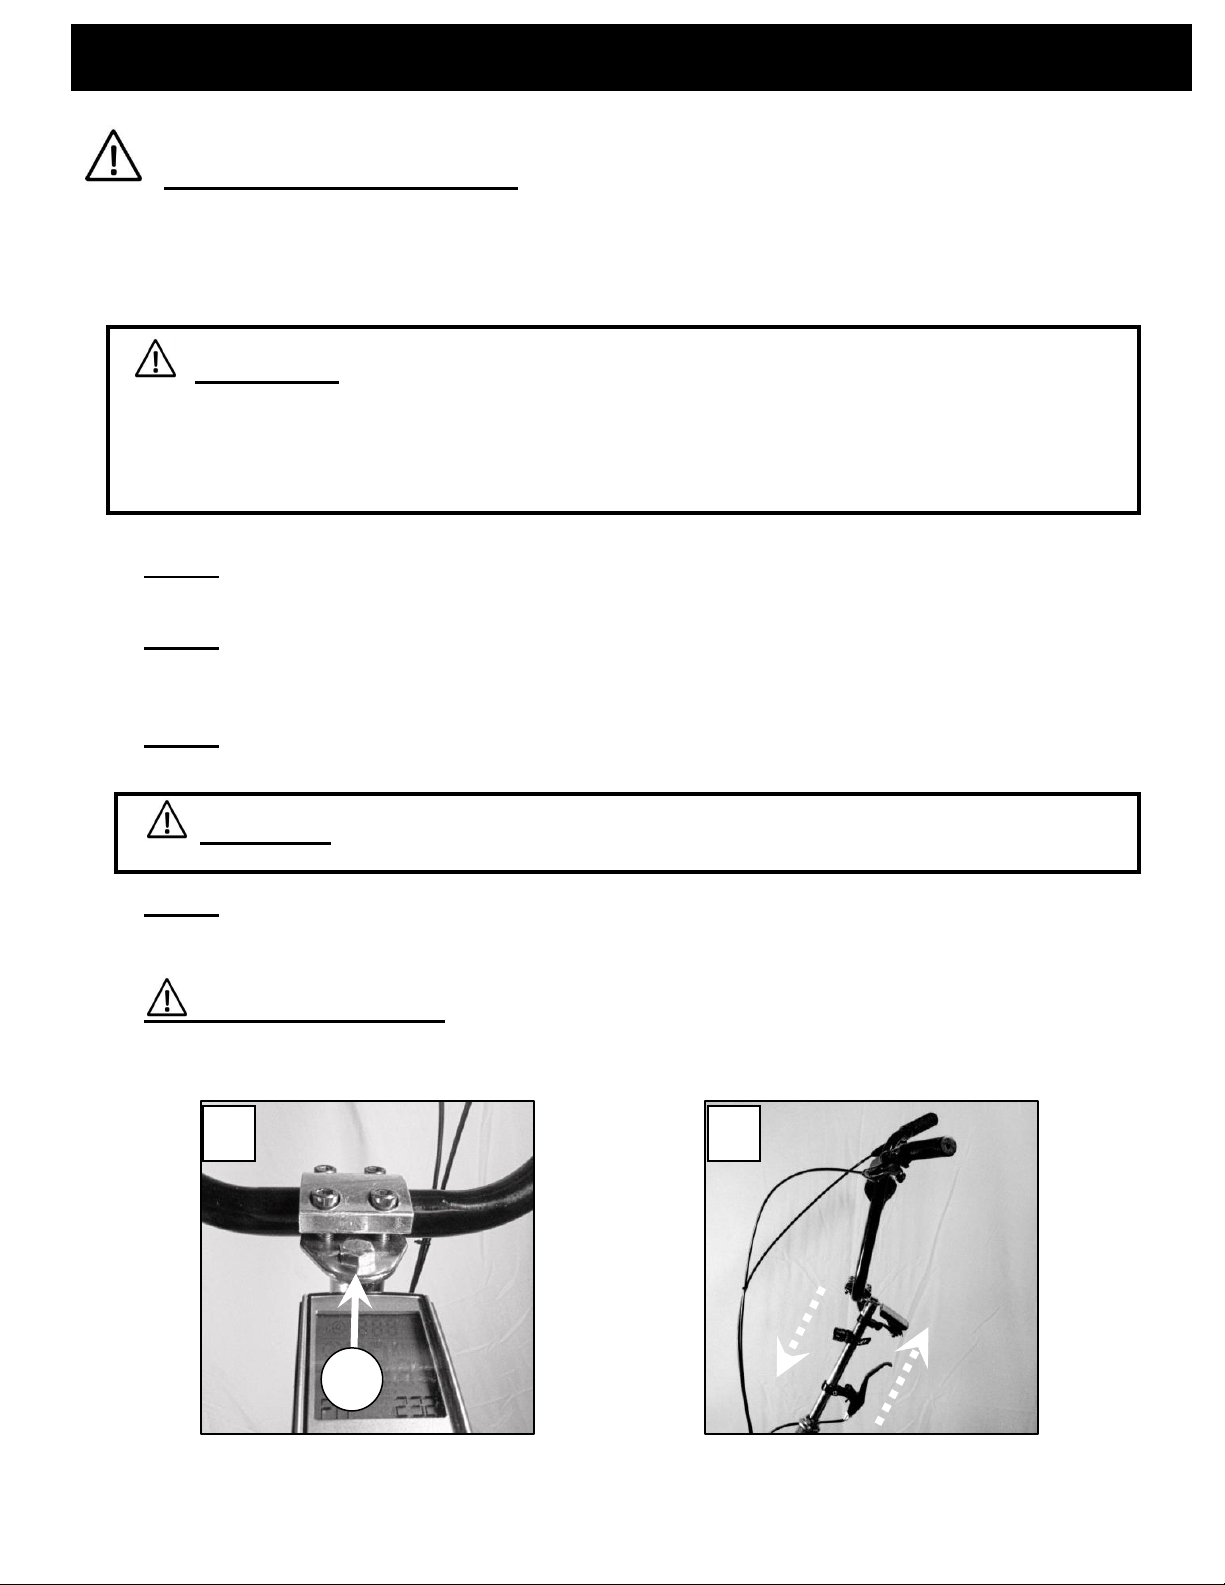
STEP 2. Make sure the handlebar
stem bolt is loose. Turn the
handle bar to the left 180 degrees
(standing in the back of the
tricycle). With both pedals at the
same level, extend the handlebar
to the point where the bottom of
the handlebar rests at the end tip
of the pedals. SEE IMAGE (D)
ITEM 1.
STEP 3. Looking at the tricycle
from the back side, turn the fork
to the left 90 degrees to align the
fork with the handlebar. SEE
IMAGE (E) ITEM 1.
1 E 1
STEP 4. Grab the handle bar
with one hand; SEE IMAGE (F)
ITEM 1. With a 13mm wrench
tighten the stem bolt enough
that the handle bar and the
fork stay in the desirable
aligned position. SEE IMAGE
(F) ITEM 2.
1
2
F

15
CRICKET STEPPER OWNER’S MANUAL
FACTORY RECOMMENDED ASSEMBLY AFTER DELIVERY(Cont).
STEP 5. Stand the tricycle on the ground vertically
SEE IMAGE (G). Install the front wheel and engage
the V brake. SEE IMAGE (H). REFER TO PAGES 26
to 29 for wheel installation and engaging V-brake
instructions.
STEP 6. After installing the front wheel and
engaging the V brake. Place the tricycle on
the ground in the horizontal position.
Looking at the tricycle from the back side,
turn the handle bar 180 degrees to the right
(riding position) Proceed to unfold the
tricycle to riding position. SEE IMAGE (I).
REFER TO PAGES 33-34 FOR UNFOLDING
INSTRUCTIONS.
I
IMPORTANT NOTE: If your Cricket Stepper came with desinflated tires, it is very
important you know how to inflate and align the rear tires with the rim. If the back wheels
are not aligned properly they will lose the center of the rotation. Because the tricycle has
two wheels on the rear, the frame will follow the uneven rotation of the wheels; this
uneven movement is transferred from the frame to the handlebar when riding. This
uneven rotation will feel like you are riding on a bumpy surface. If you get a flat tire, and
you are not sure how to align the tires with the rims, It is very important you take the
cricket to a local bike mechanic to inflate the tires properly and align with the rim.
Otherwise you will experience an uncomfortable ride. REFER TO PAGES 17-18 FOR
INSTRUCTIONS ON INFLATING AND ALIGNING THE TIRES WITH THE RIM.
G
H
16
CRICKET STEPPER OWNER’S MANUAL
FACTORY RECOMMENDED ASSEMBLY AFTER DELIVERY (Cont).
WARNING:
• IF THE OWNER/ USER IS NOT COMPLETELY SURE HOW TO RAISE THE STEM
IT IS VITAL THAT YOU CONSULT A LOCAL BIKE MECHANIC FOR PROFESSIONAL
ASSISTANCE. Improper adjustments can result in serious injuries or worse.
After the stem has been properly adjusted, owner/user
must further test the correct adjustment. Stand in front of
your Tricycle; clamp the front wheel between your legs, to
lock the entire steering system. Place your hands on the
corresponding side of the handle bar (right and left). Apply
force by pulling and pushing the left and the right sides of
the handlebar to make sure it is appropriately tightened.
If there is any movement from the final adjustment,
retighten the stem bolt. It needs to be tight enough so the
stem does not lose adjustment when riding. However, you
do not want it to be so tight that you cannot remove the
screw later or the thread of the screw becomes stripped.
IMPORTANT NOTE:
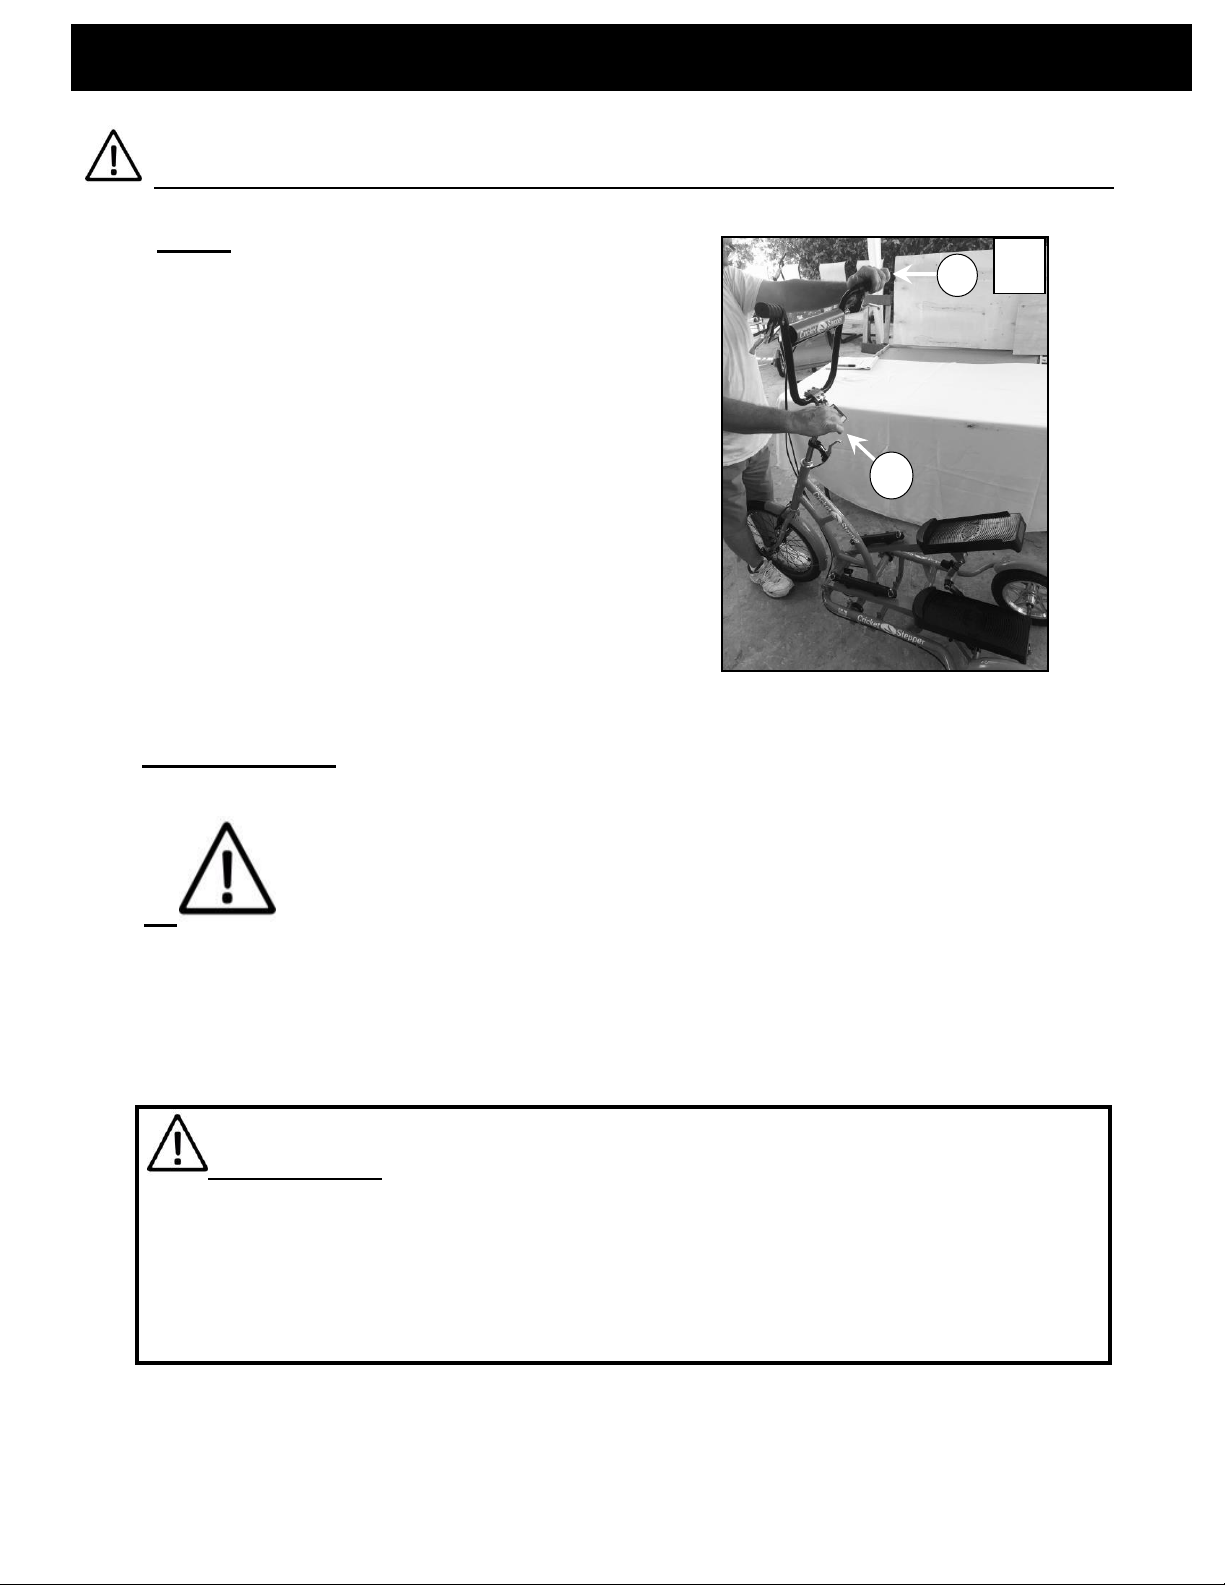
STEP 7. After the tricycle is in the riding
position. Stand in front of your Tricycle;
clamp the front wheel between your legs,
to lock the entire steering system and
hold the handle bar with one hand SEE
IMAGE (J) ITEM 1. Make sure the front
wheel and the handle bar stem are
appropriately aligned. Re tighten the
handle bar stem bolt using a 13mm
wrench turning clockwise SEE IMAGE (J)
ITEM 2. The bolt needs to be tight
enough so the stem does not lose
adjustment when riding. However, you do
not want it to be so tight that you cannot
remove the screw later or the thread of
the screw becomes stripped.
J
2
 Loading...