

Page 1
Clear and Simple
Quick Start Guide
Alcatel IDOL
™
5
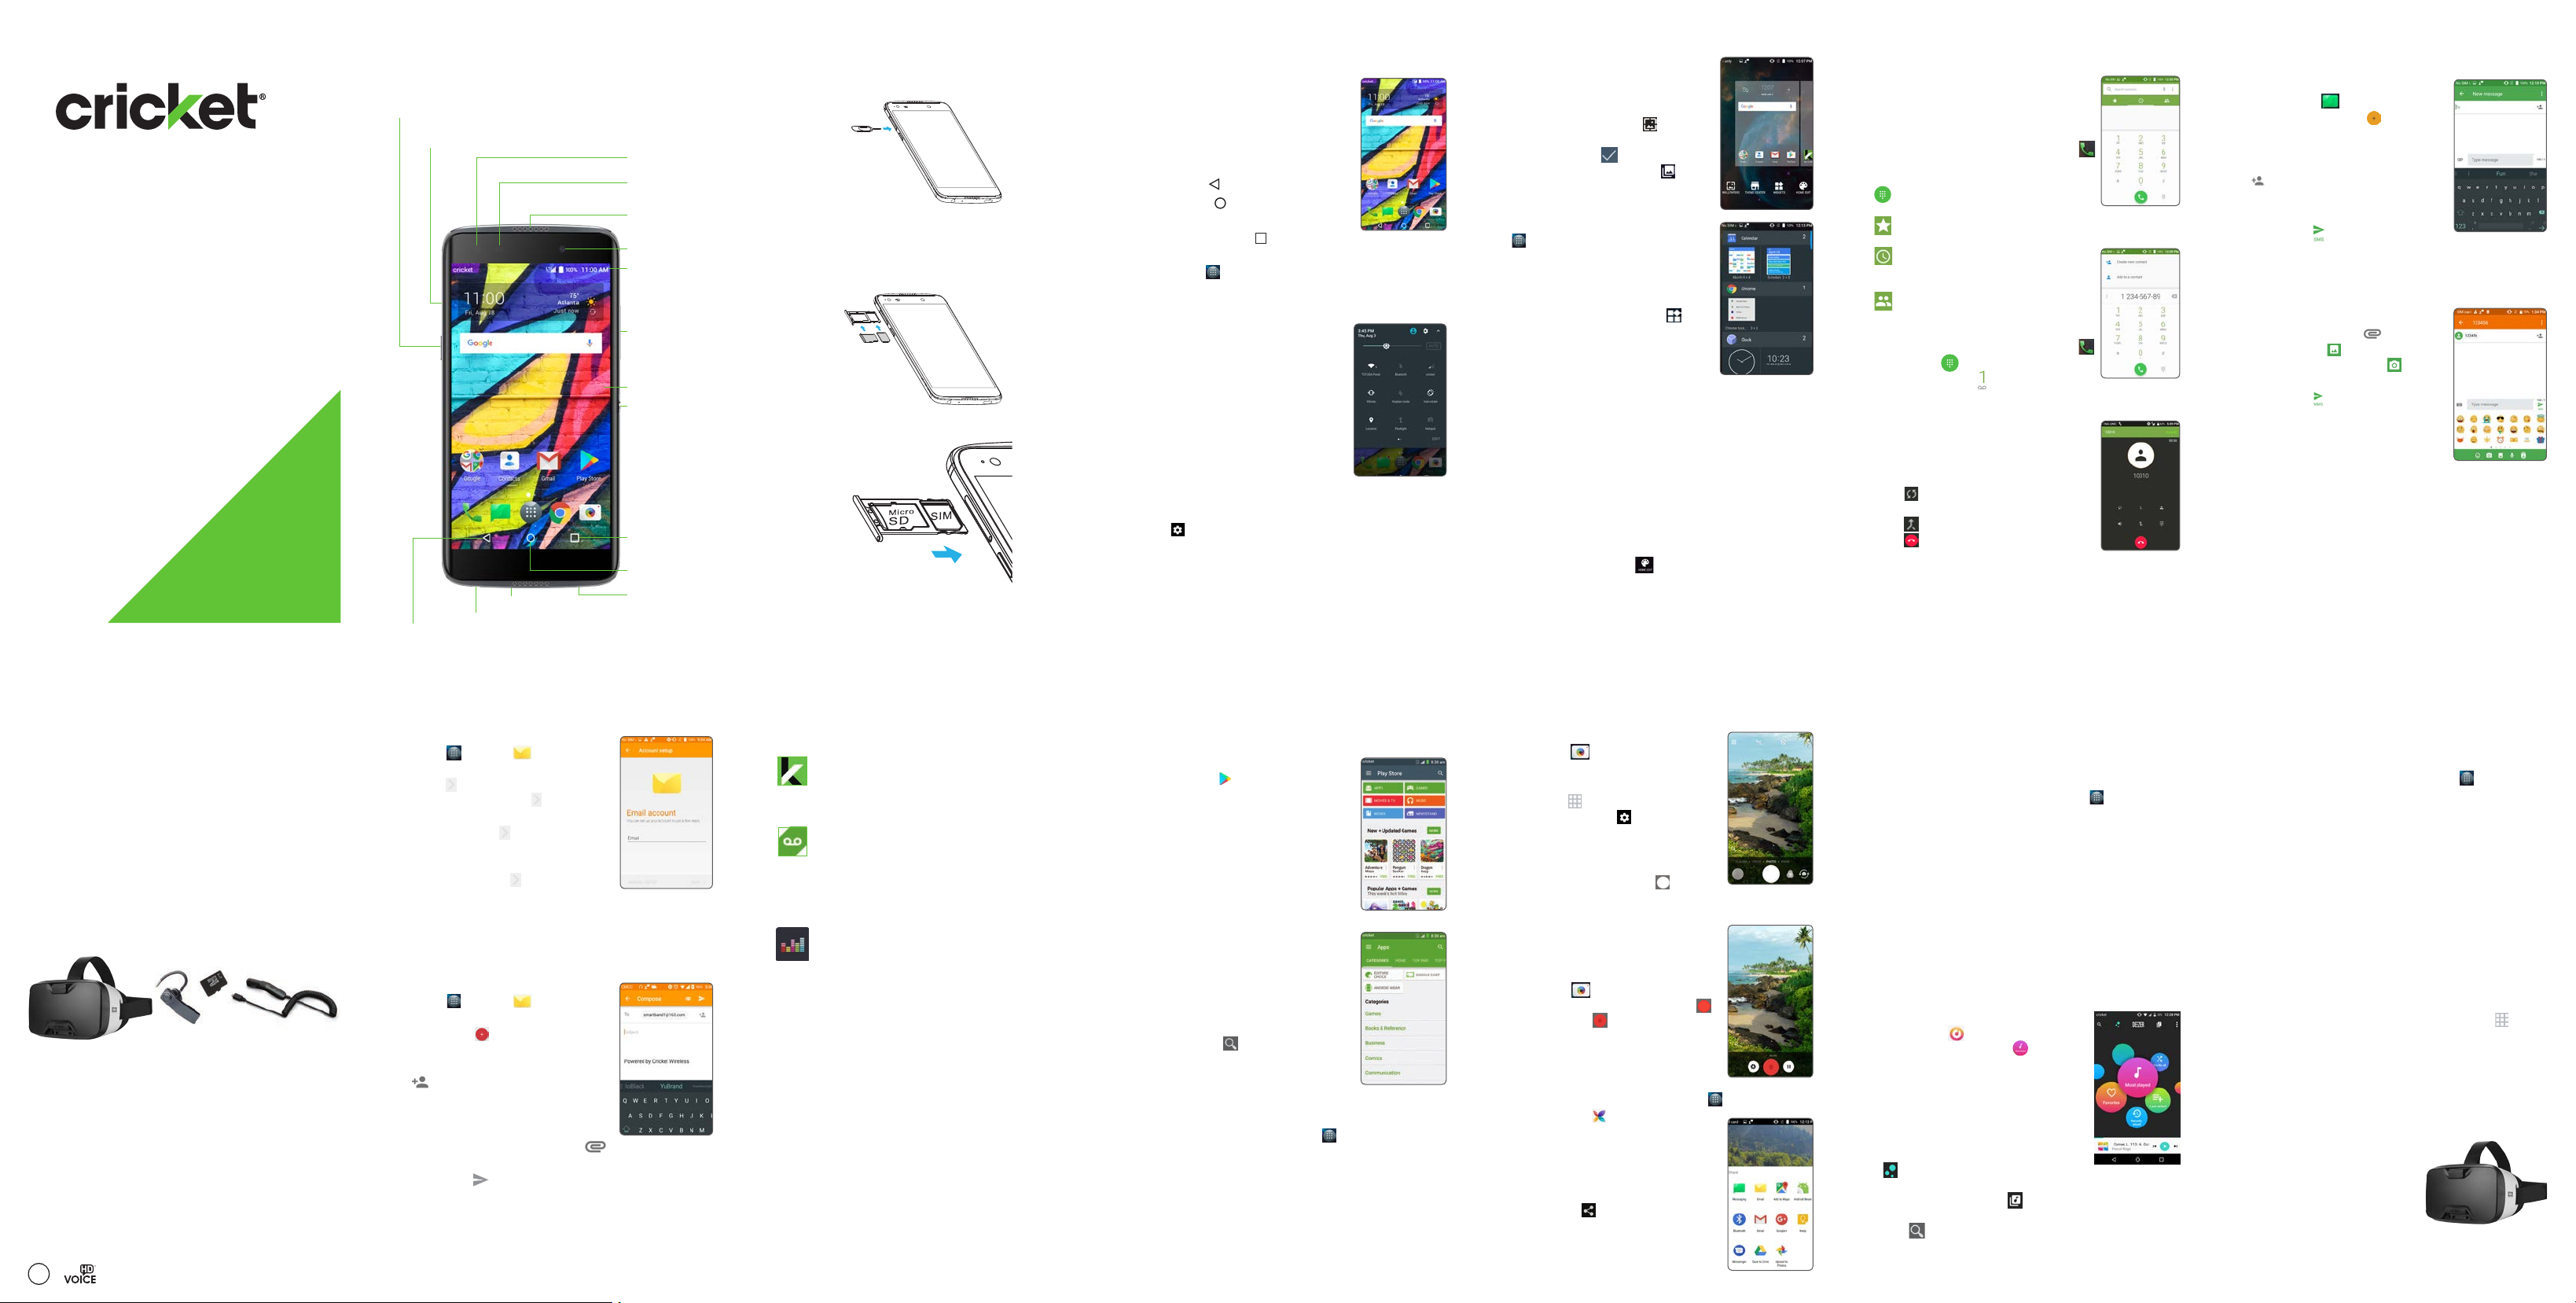
Getting to Know your
Alcatel IDOL
Power key
SIM tray
Microphone
Back key
Headset port
™
5
Indicator light
Camera flash
Speaker
Camera lens
Status and
notification bar
Volume keys
Touch screen
Now key
Recent apps
key
Home key
USB Type C
Charging Port
Phone Setup
1. Place the SIM tool in the hole next to the SIM/
microSD tray and push until the SIM tray pops out.
2. Hold the nano-SIM card with the cut corner to
the bottom right and insert into tray. If applicable,
hold microSD card (not included) with ridge to
the left and insert it into the tray.
3. Carefully close the SIM tray.
WARNING: Only use a standard nano SIM card
from your service provider.
Touch screen
Navigating your phone
• Use your finger tip to tap the
screen.
• Use quick flicks of your finger on
the touch screen to swipe up,
down, left, and right.
• To return to the previous screen,
tap Back .
• Tap Home at any time to return
to the main home screen.
• Tap Recent apps to access
recently viewed apps.
• Tap Apps to access applications on your
phone.
Notifications panel
To access alerts, including new
messages, emails, and software
updates:
• Tap the top of the home screen
and drag your finger down to
view the Notifications panel.
• Swipe right or left to clear
individual notifications or tap
CLEAR ALL to clear all.
• With the Notifications panel
open, tap the top of the screen again and drag
down to see the Quick Settings menu.
• Tap to access the complete Settings menu.
Personalize
Set wallpaper
• To change your home or lock
screen wallpaper, press and hold
a blank part of the home screen
and tap WALLPAPERS
• Select a wallpaper and tap
Set wallpaper
can also tap My photos for
additional options.
Add to home screen
• To add app shortcuts, tap Apps
, press and hold the desired
app, and drag it to the home
screen.
• To add widgets, press and hold
on a blank section of the home
screen and tap WIDGETS , press
and hold the desired widget and
drag it to the desired location on
the home screen.
Organize home screens
• To move widget or app shortcut, press and hold
it and then drag it to a new location. To delete
it, drag it to "X Remove".
• To create a folder, press and hold an app
shortcut and drag it on top of another and
release.
• To rename a folder, press the folder title to type
a new name.
• To make additional changes to home screen,
e.g. changing grid view, icon size, and text, press
and hold a blank section of the home screen
and tap HOME EDIT
.
to set it. You
.
Calls and Voicemail
HD voice
Enjoy clearer conversations and
reduced background noise with HD
Voice*.
Make a call
1. From the home screen, tap Call .
2. Enter a name or phone number by
using one of the following options:
: To manually enter a phone
number.
: To choose from frequently
called contacts.
: To choose from a list of people
who you have recently called
or have called you.
: To make a call from your
contacts list.
Check voicemail
1. From the home screen, tap Call ,
then tap .
2. Press and hold .
Call waiting
Call waiting allows you answer a
second call while you are on an
existing call. While on a call, you will
hear a tone if another call comes in.
• Tap the incoming call to answer.
• Tap to switch between active
calls.
• Tap to merge calls.
• Tap to end a call.
*To experience Cricket HD Voice, both callers must have a
compatible HD Voice capable smartphone and make the call
over Cricket’s LTE Network or a compatible network. Cricket’s LTE
coverage is not equivalent to its overall network coverage. HD
Voice calls made on a compatible device and on the LTE network
may not experience an HD Voice connection at times of network
congestion. Other carriers’ networks may interoperate with
Cricket’s LTE network to support an HD Voice call.
Text and picture messaging
Send a text message
1. From the home screen, tap
Messaging .
2. Tap New message to start a
new text message.
3
. In the To field, enter a number or
a contact name or tap Contacts
to access your contacts.
4. Tap the Type message field and
enter your message.
. Tap Send to send the
5
message.
Send a picture message
1. Follow steps 1-4 above.
2
. Tap the Paperclip .
3. Tap Pictures and select
desired picture or tap to take
a picture to attach.
4
. Tap Send to send the
message.
WARNING: Please don’t text and drive.
More information
On the web
Detailed support information including device
specifications and troubleshooting are available at
www.cricketwireless.com/support/devices.
On the phone
• Call Customer Care at 1-855-246-2461 or
• Dial 611 from your cell phone
Accessories
For more information about accessories,
please visit your local Cricket store or go to
www.cricketwireless.com/shop/accessories.
Note: Store and online inventories may vary.
Product meets FCC Radio Frequency Exposure Guidelines--FCC ID
2ACCJA021. This device complies with Part 15 of the FCC Rules. Operation
is subject to the following two conditions: (1) this device may not cause
harmful interference, and (2) this device must accept any interference
received, including interference that may cause undesired operation.
© 2017 Cricket Wireless LLC. All rights reserved. Cricket and the Cricket
logo are registered trademarks under license to Cricket Wireless LLC. Other
marks are the property of their respective owners. microSDHC logo is a
trademark of SD-3C, LLC.
Alcatel is a trademark of Alcatel-Lucent and is used under license by TCL
Communication Ltd. © Copyright 2017 TCL Communication Ltd. All rights
reserved. TCL Communication Ltd. reserves the right to alter material or
technical specification without prior notice.
IDOL 5 is a trademark of TCL Communication LTD. © 2017 TCT Mobile
Limited. All rights reserved.
All "Signature" ringtones embedded in this phone have been composed,
arranged and mixed by NU TROPIC (Amar Kabouche).
BC
CJB37JC01AAA
Printed in China
Email
Email setup (Gmail™, Yahoo!®, etc.)
1. From the home screen, tap
Apps > Email .
2. Enter your email address and tap
3
. Confirm email account settings
4
. Enter your name which will be
Note: To set up corporate email, contact your IT
administrator.
Create and send an email message
1. From the home screen, tap
2. To compose a new message, tap
3
. Tap the To field and enter email
4. Enter a subject and email
5
. To attach files to the email
6
. Tap Send to send the message.
and enter your password
NEXT
and then tap NEXT again.
and tap NEXT .
displayed on outgoing mails, and
then tap FINISH .
Apps > Email .
Compose
address or name or tap Contacts
to access your contacts.
message.
message, tap the Paperclip
and make your selection.
.
Cricket Apps & Services
These services make using Cricket even better
and easier.
myCricket: Check account balance,
make a quick payment, view usage
and access support from the palm of
your hand.
Visual Voicemail: Quickly view, access
and play back of your voicemail
messages. Easily save important
numbers to your Favorites list and
respond to messages by calling back
or texting.
Deezer: Listen on-the-go with ad-free
streaming music, download your
favorites to your phone, and get
customized playlists based on your
preferences.
Apps on Google Play
You can install apps from Google Play Store.
™
Access Google Play
1. From the home screen, tap
Play Store .
2. Enter your existing Google
account or create one following
the steps on the screen.
Navigate Google Play
From Play Store, there are multiple
ways to find apps, games, and
more:
1
. Tap a category to browse
popular apps, games, movies,
and music organized by
popularity or category.
2
. Tap Search to search the Play
Store for a specific game or app.
3
. To install, tap the app and follow
instructions. Once installed,
you will see a notification in the Notifications
panel. Open the app from this notification or by
locating the app in App list .
Note: A Google Wallet TM payment method is
required to purchase apps.
Camera and video
Take a picture
1. From the home screen, tap
Camera .
2
. Swipe the screen to select
different modes.
3
. Tap the in the upper left
corner and tap Settings to
display camera settings.
4
. Zoom in and out by pinching with
your fingers.
5
. Tap the Shutter button or press
the Volume Keys to take a photo.
Take a video
1. From the home screen, tap
Camera . Swipe the screen
and select Video mode. Tap
to start and
View pictures
1. From the home screen, tap Apps .
2
. Tap Gallery .
Send a picture
1. In Gallery, tap a picture and then
tap Share .
2
. Choose to send via text
messaging or email, and more.
to stop recording.
Unique Alcatel Features
Now Key
Instantly launch commonly-used tasks, or
customize to launch your favorite app, with one
press of the Alcatel-exclusive NOW key located
conveniently on the right side of your IDOL 5.
1. From the home screen, tap Apps .
2. Tap Settings, then tap Now Key.
3. Tap Trigger App to choose an application to
quick launch.
4. Tap Trigger Func to choose the 3 common tasks
you would like the Now Key to present when
pushed.
5. Tap Do Nothing to turn off the Now Key.
Alcatel Music App with Deezer™ from Cricket
Play your favorite tunes, create playlists, stream
up to 40 million tracks and sing along to your
favorite song with Music and Deezer from Cricket
integration.
1. From the home screen, scroll right.
2. Tap Music .
3. Tap a Playlist bubble to quickly
open your favorites, most played,
recently played and other
playlists.
4. Tap DEEZER and then MY MUSIC
to log into your Deezer from
Cricket Account*.
5. At the top of the screen, tap
to see your Playlist bubbles,
tap DEEZER to access your music and featured
Deezer playlists, tap to view your online and
offline music library.
6. Tap to search for music on your phone. If
you are logged into Deezer, tap SEARCH ONLINE
to extend your search to Deezer content.
*Deezer account and subscription required.
Unique Alcatel Features
Reversible Display
Activate reversible display so your IDOL 5 is
always right side up no matter how you pull it out
of your pocket or purse.
1. From the home screen, tap Apps .
2. Tap Settings, then Display.
3. Tap Reversible Rotate toggle to slide it to the
right.
Advanced Camera Features
Take the perfect picture the first time, every time,
with the IDOL 5 and features like:
• Enhanced sensors and extra-large pixels for
richer pics.
• Image stabilization so your snaps are not blurry.
• LED flash on both front and back cameras for
the best pics and selfies in low light.
Exciting new camera modes let you add your
personality.
To access camera modes:
1. From the Camera application, tap the
the upper left corner.
2. Select desired camera or video mode.
Fast-charging with Pump Express™ Plus 2.0
cuts the time it takes to charge your Idol 5 in
half!*
Virtual Reality (VR) Ready
The Alcatel IDOL 5 is
optimized for VR with a
fully-immersive Alcatel
VR launcher, high-end VR
content from Littlstar, and
pre-loaded VR sociable
network vTime. Enjoy this full VR experience with
Alcatel UNI360 goggles (sold separately).
* As compared to conventional charging without Pump Express
compatibility.
in
Page 2
Guía práctica
de inicio
clara y sencilla
Alcatel IDOL
™
5
Conoce tu
Alcatel IDOL
Botón de encendido
Bandeja SIM
Micrófono
Tecla atrás
Puerto para audífonos
™
5
Luz indicadora
Flash de la
cámara
Altavoz
Lente de la
cámara
Barra de estado
y notificaciones
Teclas de
volumen
Pantalla táctil
Tecla Ahora
Tecla de
aplicaciones
recientes
Tecla de inicio
Puerto de carga
USB Tipo C
Configuración del teléfono
1. Coloca la herramienta para extraer la tarjeta SIM
en el orificio junto a la bandeja SIM o microSD y
empuja hasta que la bandeja SIM salga.
2. Sostén la tarjeta nano-SIM con la esquina
recortada hacia abajo y a la derecha e insértala
en la bandeja. Si corresponde, sostén la tarjeta
microSD (no está incluida) con la protuberancia
a la izquierda e insértala en la bandeja.
3. Cierra con cuidado la bandeja SIM.
ADVERTENCIA: Usa solo una tarjeta nano-SIM
estándar de tu proveedor de servicio.
Pantalla táctil
Para explorar tu teléfono
• Usa la punta del dedo para tocar
la pantalla.
• Haz movimientos rápidos sobre
la pantalla para desplazarte de
forma horizontal o vertical.
• Para volver a la pantalla anterior,
toca Atrás
• Toca Inicio en cualquier
momento para volver a la
pantalla principal.
• Toca Aplicaciones recientes
para ver las aplicaciones que usaste
recientemente.
• Toca Aplicaciones para tener acceso a las
aplicaciones de tu teléfono.
Panel de notificaciones
Para ver avisos de nuevos mensajes,
correos y actualizaciones de
software, entre otros:
• Toca la parte superior de la
pantalla principal y arrastra el
dedo hacia abajo para ver el
panel de notificaciones.
• Desliza el dedo horizontalmente
hacia la derecha o la izquierda
para borrar cada notificación
individualmente, o bien toca
BORRAR TODO para borrar todas
las notificaciones.
• Con el panel de notificaciones abierto, toca
nuevamente la parte superior de la pantalla y
desliza el dedo hacia abajo para ver el menú
de configuración rápida.
• Toca para ingresar al menú de ajustes
completo.
.
Personalización
Para establecer el fondo de pantalla
• Para cambiar el fondo de la
pantalla principal o de bloqueo,
mantén oprimido un sector libre
de la pantalla principal y toca
FONDOS DE PANTALLA .
• Elige una imagen y toca Fijar
fondo de pantalla para
seleccionarla. También puedes
tocar Mis fotos para ver
opciones adicionales.
Para añadir elementos a la
pantalla principal
• Para añadir accesos directos
de las aplicaciones, toca
Aplicaciones , mantén
oprimida la aplicación que
quieres añadir y deslízala hacia
la pantalla principal.
• Para añadir miniaplicaciones,
mantén oprimido un sector libre
de la pantalla principal y toca
WIDGETS ; mantén oprimida
la miniaplicación que quieres
añadir y deslízala hacia
el lugar de la pantalla principal
que prefieras.
Para organizar las pantallas principales
• Para mover el acceso directo de una aplicación
o miniaplicación, mantenlo oprimido y luego
deslízalo hacia la nueva ubicación. Para
eliminarlo, deslízalo hacia la opción "X Eliminar”.
• Para crear una carpeta, mantén oprimido el
acceso directo de una aplicación, deslízalo
encima de otro y luego suéltalo.
• Para cambiar el nombre de una carpeta,
oprime el título de la carpeta y escribe el
nombre nuevo.
• Para hacer otros cambios en la pantalla
principal, por ejemplo, cambiar la vista de la
cuadrícula o el tamaño de los íconos y del texto,
mantén oprimido un sector libre de la pantalla
principal y toca EDICIÓN DE INICIO .
Llamadas y correo de voz
HD Voice
Disfruta conversaciones más claras
y nítidas con menos ruido de fondo
con HD Voice*.
Para hacer una llamada
1. Desde la pantalla principal, toca
Llamar .
2. Ingresa un nombre o número
de teléfono usando una de las
siguientes opciones:
: para ingresar un número de
teléfono manualmente.
: para seleccionar entre los
contactos a los que llamas
habitualmente.
: para elegir de una lista de
personas a quienes llamaste o
te llamaron últimamente.
: para hacer una llamada desde
tu lista de contactos.
Para revisar el correo de voz
1. Desde la pantalla principal, toca
Llamar ; luego toca .
2. Oprime por unos segundos .
Llamada en espera
La llamada en espera te permite
contestar una segunda llamada
mientras tienes otra llamada en
curso. Si estás hablando y recibes
otra llamada, oirás un tono.
• Toca el indicador de la llamada
entrante para contestar.
• Toca para alternar entre las
llamadas activas.
• Toca para combinar las
llamadas.
• Toca para terminar una llamada.
*Para utilizar HD Voice, tanto la persona que llama como la que recibe la
llamada deben tener smartphones compatibles con esta función y la llamada
debe realizarse mediante la red LTE de Cricket u otra red compatible. La
cobertura LTE de Cricket no es equivalente a su cobertura de red total. Es
posible que, en ocasiones en que la red esté congestionada, las llamadas
realizadas con HD Voice mediante equipos compatibles y la red LTE no puedan
utilizar dicha función. Es posible que las redes de otros proveedores de servicio
interactúen con la red LTE de Cricket para realizar llamadas mediante HD Voice.
Mensajes de texto y con
fotos
Para enviar un mensaje de texto
1. Desde la pantalla principal,
toca Mensajes
2. Toca Mensaje nuevo para
escribir un nuevo mensaje de
texto.
3. En el campo Ingrese nombre
o número escribe un número o
un nombre de contacto o toca
Contactos para ver tu lista de
contactos.
4. Toca el campo Escriba el
mensaje y escribe tu mensaje.
5. Toca Enviar para enviar el mensaje.
Para enviar un mensaje con fotos
1. Sigue los pasos 1 a 4.
2. Toca el Clip .
3. Toca Imágenes y elige la que
prefieras, o toca para tomar
una foto y adjuntarla.
4. Toca Enviar para enviar el
mensaje.
ADVERTENCIA: No envíes mensajes de texto
mientras conduces.
.
Más información
Por Internet
Puedes obtener información detallada de
ayuda, como las especificaciones de tu equipo
o información de diagnóstico y solución de
problemas, en
www.cricketwireless.com/support/devices.
Por teléfono
• Llama al servicio al cliente al 1-855-246-2461 o
• Marca 611 desde tu teléfono móvil
Accesorios
Para obtener más información sobre los accesorios,
ve a la tienda de Cricket más cercana o visita
www.cricketwireless.com/shop/accessories.
Importante: los inventarios de las tiendas y por
Internet pueden variar.
El producto cumple con las normas sobre límites de exposición de radio
frecuencia de la Comisión Federal de Comunicaciones, FCC ID 2ACCJA021. Este
equipo cumple con la sección 15 de las normas de la FCC. Su funcionamiento
está sujeto a las siguientes dos condiciones: (1) este equipo no puede causar
interferencias perjudiciales y (2) este equipo debe aceptar todas las interferencias
que reciba, incluso las que puedan causar un funcionamiento no deseado.
© 2017 Cricket Wireless LLC. Todos los derechos reservados. Cricket y el logotipo
de Cricket son marcas comerciales registradas con licencia de Cricket Wireless
LLC. Las demás marcas son propiedad de sus respectivos dueños. El logotipo
microSDHC es una marca comercial de SD-3C, LLC.
ALCATEL es una marca comercial de Alcatel-Lucent y se usa con licencia
otorgada por TCL Communication Ltd. © Copyright 2017 TCL Communication Ltd.
Todos los derechos reservados. TCL Communication Ltd. se reserva el derecho
de modificar el material o las especificaciones técnicas sin notificación previa.
IDOL 5 es una marca comercial de TCL Communication LTD. © 2017 TCT Mobile
Limited. Todos los derechos reservados.
Todos los tonos de llamada exclusivos que se incluyen en este teléfono han sido
compuestos, arreglados y mezclados por NU TROPIC (Amar Kabouche).
BC
CJB37JC01AAA
Impreso en China
Correo electrónico
Configuración del correo electrónico
™
(Gmail
1. Desde la pantalla principal toca
2. Ingresa tu dirección de correo
3. Confirma la configuración de la
4. Ingresa el nombre que quieres que aparezca en
Importante: para configurar el correo electrónico
empresarial, comunícate con tu departamento de
informática.
Para crear y enviar un mensaje de correo
electrónico
1. Desde la pantalla principal toca
2. Para escribir un mensaje nuevo
3. Toca el campo Para e ingresa la
4. Escribe el asunto y el texto del
5. Para adjuntar archivos al mensaje de correo
6. Toca Enviar para enviar el mensaje.
, Yahoo!®, etc.)
Aplicaciones
electrónico
electrónico y toca
SIGUIENTE
contraseña y luego toca
SIGUIENTE
cuenta de correo electrónico y
toca SIGUIENTE
los correos que envías y luego toca
TERMINAR
Aplicaciones
electrónico
toca Redactar .
dirección de correo electrónico
o el nombre, o bien toca
Contactos
contactos.
mensaje.
electrónico, toca el Clip y elige el archivo.
> Correo
.
e ingresa tu
nuevamente.
.
.
> Correo
.
para ver tu lista de
Aplicaciones y servicios de
Cricket
Con estos servicios, usar Cricket es aún mejor y
más fácil.
myCricket: Consulta el saldo de tu
cuenta, haz pagos rápidos, consulta tu
uso y recibe ayuda desde la palma de
tu mano.
Visual Voicemail: Consulta, ten
acceso y reproduce tus mensajes del
correo de voz rápidamente. Guarda
fácilmente los números importantes
en tu lista de favoritos, y responde
los mensajes mediante llamadas o
mensajes de texto.
Deezer: Escucha música por streaming
y sin comerciales mientras vas de
un lado a otro, descarga tus temas
favoritos a tu teléfono y obtén listas de
reproducción personalizadas según tus
preferencias.
Aplicaciones en Google
™
Play
Puedes instalar aplicaciones desde la tienda
Google Play.
Para tener acceso a Google
Play
1. Desde la pantalla principal, toca
Play Store
2. Ingresa tu cuenta actual de
Google o crea una siguiendo
los pasos que se muestran en la
pantalla.
Para explorar Google Play
Desde Play Store puedes buscar
aplicaciones, juegos y más de
varias maneras:
1. Toca una categoría para
explorar las aplicaciones,
juegos, películas y música
más populares, organizados
por categoría o nivel de
popularidad.
2. Toca Buscar para buscar un
juego o aplicación en particular.
3. Para instalarla, toca la aplicación y sigue las
instrucciones. Una vez instalada, verás una
notificación en el panel de notificaciones. Abre
la aplicación desde la notificación o búscala
en la Lista de aplicaciones .
Importante: para comprar aplicaciones se
requiere una forma de pago, como por ejemplo
Google WalletTM.
.
Cámara y video
Para tomar una foto
1. Desde la pantalla principal toca
Cámara
2. Desliza el dedo por la pantalla
para elegir entre los distintos
modos.
3. Toca en la esquina superior
izquierda y toca
para ver la configuración de la
cámara.
4. Amplía o reduce la imagen
pellizcando o estirando la
imagen con los dedos.
5. Toca el botón disparador o oprime las
teclas de volumen para tomar una foto.
Para grabar un video
1. Desde la pantalla principal toca
Cámara
pantalla y selecciona el modo
Video. Toca
para detener la grabación.
Para ver las fotos
1. Desde la pantalla principal, toca
Aplicaciones .
2. Toca Galería .
Para enviar una foto
1. Desde la galería, toca una foto y
luego toca Compartir .
2. Elige si quieres enviarla por
mensaje de texto, correo
electrónico o de otro modo.
.
Ajustes
. Deslízate por la
para comenzar y
Funciones exclusivas de
Alcatel
Tecla Ahora
Inicia al instante tareas de uso frecuente, o
personalízala para iniciar tu aplicación favorita, con
solo oprimir la tecla AHORA exclusiva de Alcatel,
ubicada cómodamente en el lado derecho de tu
IDOL 5.
1. Desde la pantalla principal, toca
Aplicaciones .
2. Pulsa Ajustes, luego toca Now Key (la tecla Ahora).
3. Toca Activar aplicación y escoge una aplicación
para iniciar al instante.
4. Toca Activar accesso directo para escoger las
tres tareas frecuentas que te gustaría que la tecla
Ahora te presente cuando la oprimes.
5. Toca No hacer nada para apagar Now Key (la
tecla Ahora).
Aplicación de música de Alcatel con
Deezer™ de Cricket
Toca tus canciones favoritas, crea listas de
reproducción, escucha por streaming hasta 40
millones de pistas y canta tus canciones favoritas
con la aplicación Music con Deezer
de Cricket.
1. Desde la pantalla principal,
desplázate a la derecha.
2. Toca Música .
3. Toca la burbuja de una lista
de reproducción para abrir
rápidamente tus favoritas, más
escuchadas, recientemente
escuchadas y otras listas de
reproducción.
4. Toca para buscar música en
tu teléfono. Si iniciaste sesión en
Deezer, pulsa BUSCAR EN LÍNEA
para extender tu búsqueda al contenido de
Deezer.
*Se requiere una cuenta y suscripción en Deezer.
Funciones exclusivas de
Alcatel
Pantalla reversible
Activa la pantalla reversible para que tu IDOL 5
esté siempre con el lado correcto hacia arriba
sin importar cómo lo sacas de tu bolsillo o bolso.
1. Desde la pantalla principal, toca
Aplicaciones
2. Pulsa Ajustes, luego Pantalla.
3. Toca el interruptor Rotación reversible para
deslizarlo a la derecha.
Funciones de cámara avanzadas
• Sensores optimizados y píxeles extragrandes
para obtener fotos más intensas.
• Estabilización de imagen para que tus fotos no
queden borrosas.
• Flash LED tanto en la cámara delantera como
trasera para tener las mejores fotos y selfies con
poca luz.
Los emocionantes nuevos modos de cámara te
dejan agregar tu personalidad.
Para acceder a los modos de la cámara:
1. Desde la aplicación Cámara, toca
esquina superior izquierda.
2. Selecciona la cámara o modo de video que
desees.
¡La carga rápida con Pump Express™ Plus 2.0
reduce a la mitad el tiempo de carga de tu Idol 5!*
Listo para Realidad Virtual (VR)
Tu Alcatel IDOL 5 está
optimizado para VR con
un lanzador VR Alcatel
de inmersión completa,
contenido de VR de gran
calidad de Littlstar, y
vTime de red social de VR
precargado. Disfruta esta
experiencia de VR completa con los lentes
Alcatel UNI360 (se venden por separado).
* En comparación con la carga convencional sin Pump Express.
.
en la
 Loading...