

Cricket A605 EVDO User Manual
User Manual
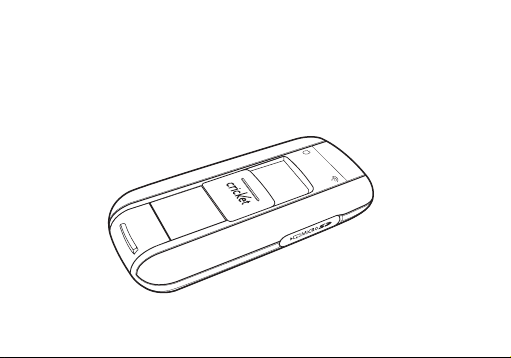
Cricket A605 EVDO USB Modem

2
1. BEFORE USING CRICKET A605 .........................3
About This User’s Manual .......................................3
Product Overview ......................................................3
Product Package Contents.....................................3
Introduction to Cricket A605 USB Modem.......5
Product Features ........................................................5
Product Handling .......................................................6
Configuration ...............................................................6
2. INSTALLATION AND SETUP FOR
CRICKET BROADBAND ......................................7
Installing Software...................................................... 7
Setup Program - Windows ......................................8
Setup Program - Mac OS X ....................................11
3. USING CRICKET BROADBAND ........................14
Features....................................................................... 14
Getting Started .......................................................... 15
Connecting ................................................................. 16
Text Messaging ..........................................................17
4. CRICKET BROADBAND PREFERENCES ........19
General Preferences ...............................................19
WWAN Specific Settings ......................................20
VPN Settings .............................................................. 21
Text Message Settings ...........................................21
Update settings .......................................................22
Additional Features ................................................ 23
5. INSTALLING CRICKET A605 ............................ 27
Recommended System Requirements ...........27
Using the Modem ..................................................28
Remove the Modem from your Computer....28
Using the USB Modem Extension
Y Cable ......................................................................29
TROUBLESHOOTING .............................................31
CARE AND MAINTENANCE ................................ 32
WARRANTY ............................................................. 33
SAR INFORMATION ..............................................39
SAFETY INFORMATION ........................................ 41
FCC COMPLIANCE INFORMATION ...................42
U.S.A. U.S.FEDERAL COMMUNICATIONS
COMMISSION RADIO FREQUENCY
INTERFERENCE STATEMENT.............................. 42
CONTENTS
3
1. BEFORE USING CRICKET A605
About This User’s Manual
You will find all the information you need to
install and use the Cricket A605 in this user
manual. Before using the Cricket A605, you
must properly install the modem by closely
following the installation instructions.
Instructions
• Install the Cricket Broadband software by
inserting the Cricket A605 USB Device
into your PC. The installation software
is included in the Cricket A605 modem
memory. When you insert the Cricket A605
into your computer, the installation process
will automatically begin.
• It is highly recommended that you read the
safety precautions described in this manual
before using the Cricket A605.
Documents Included on Your Modem
Memory
• Broadband Usage Conditions, Terms &
Conditions
• User Manual
Product Overview
Thank you for purchasing Cricket A605
USB Modem.
The Cricket A605 is a high-speed wireless
device that enables your computer to
connect to Cricket’s high-speed wireless
network.
The Cricket A605 is simple to install and
use.
Product Package Contents
The following items are included in the
product package. If any of the items listed
below are missing, please contact the retail
location where you purchased the product.

4
1. BEFORE USING CRICKET A605
5
1. BEFORE USING CRICKET A605
Cricket A605 Wireless
USB Modem
USB Modem Extension
Y Cable
Quick Start Guide Cricket Broadband
Warranty Exchange
Information
Introduction to Cricket A605
USB Modem
The Cricket A605 is designed for the USB
port on your computer, which is available
in most PC models. The Cricket A605 can
be used to access the Internet, send and
receive e-mail and text messages. It is
extremely useful when you are away from
home, on the road, or wherever wired
Internet access is not readily available.
Product Features
- Power management: The Cricket A605
utilizes power management and system
overhead reduction functions provided
by the USB interface for maximum power
savings.
- Antenna design: Ecient, innovative design
optimizes data transfer rate and sensitivity
to network signals.
- Extension Y Cable connector: Connect the
Y cable to two separate USB ports of your
computer to deliver sucient power when
needed to increase RF performance, and to
solve clearance issues.
- USB Modem that supports Type A USB
Port interface.
- Supports North American PCS (1900 MHz),
Cellular (800 MHz) and AWS
(Tx 1700MHZ, Rx 2100MHZ) bands.
- Utilizes Qualcomm QSC6085 chipset.
- Supports high-speed network
technologies.
- Supports Windows 2000, XP, Vista, 7 and
Apple Macintosh systems with installed
Cricket Broadband software and driver.

6
1. BEFORE USING CRICKET A605
7
Product Handling
- Do not place any adhesive labels on
the USB connector. It may leave a sticky
residue that can cause problems inside the
PC USB port.
- The Cricket A605 USB device should
easily slide into the USB port. Do not force
the Cricket A605 into the USB port as it
may cause damage to the modem and/
or the port.
- Keep the Cricket A605 in a dry and clean
place. (Storage temperature: -22°F to 149°F
[- 30°C to 65°C]). Keep your device away
from liquids, dust and excessive heat.
Configuration
To use the Cricket A605, you should install
the Cricket Broadband software included
in the modem memory and configure the
Cricket A605 USB device. See the next
section for more information on software
installation and USB device configuration.
2. INSTALLATION AND SETUP FOR CRICKET BROADBAND
This section will guide you through the
installation and setup process for
Cricket Broadband. Before getting started,
you should become familiar with the
documentation that came with your USB
Modem.
Installing Software
Warnings
• Make sure to complete the unplugging/
ejection process before removing the
Cricket A605. If you remove the device
improperly, the modem may be damaged.
Notes
• If you have inserted the device properly,
Windows will inform you of the new
hardware. Wait until Windows completes
the “Found New Hardware” task.
Note: In Windows 2000, several windows
similar to “Found New Hardware” window
can appear and disappear automatically.
In Windows XP, several tool tips similar to
the “Found New Hardware” function will
appear and disappear in the system tray
automatically. In Windows Vista, several tool
tips similar to the “Installing device driver
software” function will appear and
disappear in the system tray automatically.
Once hardware detection is complete, you
will be prompted to start activation.
• It is normal to hear a short beep sound
each time you insert or remove the Cricket
A605. It is an audible notification that your
PC recognizes the new hardware.
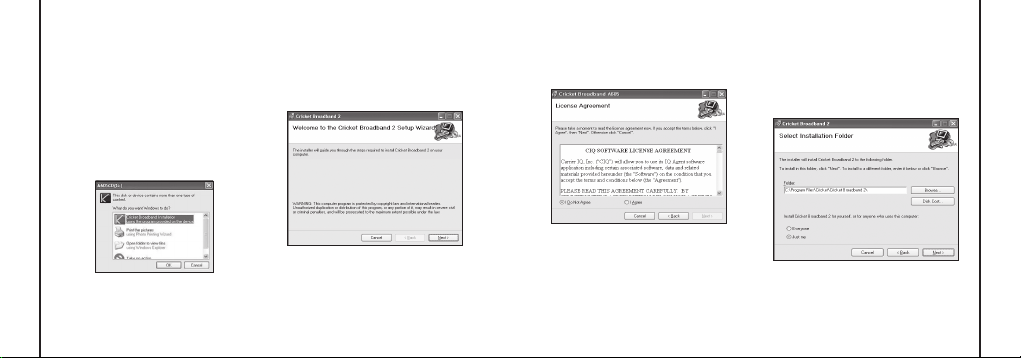
Getting Started (Windows)
To install the Cricket Broadband software:
1. Turn on your computer then close all
applications.
8
9
2. INSTALLATION AND SETUP FOR CRICKET BROADBAND
2. INSTALLATION AND SETUP FOR CRICKET BROADBAND
S TEP 2:
Please take a moment to read
license agreement now. If you accept the
term, click “I Agree”, then [Next] button
to continue.
S TEP 3:
You are now ready to select the
location on your computer where
Cricket Broadband should be installed. It is
recommended that you do not modify the
default destination folder. Click the [Next]
button to continue.
2. Insert the Cricket A605 modem into your
USB port.
3. Your computer will recognize Cricket
A605 modem and start the installation
sequence automatically. Below pop-up
screen is shown if your OS is Windows
Vista or Windows 7. If the program does
not launch automatically, go to my
computer and select the ‘A605CD’ drive
and double click ‘start.exe’ program.
4. Follow the steps in the next section.
Setup Program - Windows
S TEP 1:
The “Welcome to the Cricket
Broadband Setup Wizard” screen appears.
Click the [Next] button to continue with the
installation process.
10
2. INSTALLATION AND SETUP FOR CRICKET BROADBAND
11
S TEP 4:
During this step the components
of Cricket Broadband product are being
installed onto your computer. Installation
will occur to the destination folder
specified in Step 2.
S TEP 5:
Installation of Cricket Broadband is
now complete. Click the [Close] button to
leave the Cricket Broadband setup
program and begin using your new
software.
2. INSTALLATION AND SETUP FOR CRICKET BROADBAND
*
The setup program will automatically
create a Cricket Broadband shortcut on
your desktop.
S TEP 6:
Please wait while Cricket A605 is
installed and ready to use.
Setup Program - Mac OS X
S TEP 1:
Insert A605 into the PC, then
A605CD disk drive should be automatically
mounted. Double click A605CD icon on the
Desktop. Double click the Cricket
Broadband Setup icon to launch the
installer.
12
13
2. INSTALLATION AND SETUP FOR CRICKET BROADBAND
2. INSTALLATION AND SETUP FOR CRICKET BROADBAND
S TEP 4:
Click [Install] to begin the standard
installation on system volume.
S TEP 5:
Finally, the Setup Wizard shows
confirm window, click the [OK] button to
continue.
Enter the Name/Password used to log into
the computer then click [OK].
S TEP 6:
Cricket Broadband installation
begins.
S TEP 2:
Click [Continue] button in the
welcome window to proceed with the
installation.
S TEP 3:
The Read Me file appears. Click the
[Continue] button.
14
15
3. USING CRICKET BROADBAND
3. USING CRICKET BROADBAND
*
A WWAN capable device is required to
use the WWAN features. Individual WWAN
features are also device dependent as
described in the WWAN section above.
Other Features:
• Logs connections used, duration and bytes
sent and received.
• It also supports text messaging.
• See the section “Additional Features” for
more information about the features of
Cricket Broadband.
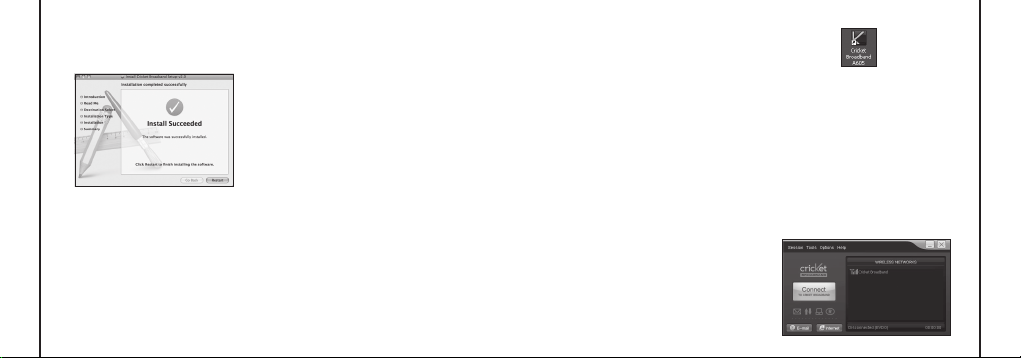
Getting Started
Double click on the Cricket Broadband icon
on your desktop or click on the Windows
Start menu and select Cricket Broadband
from the list of programs.
About the Wireless Networks View
Cricket Broadband will open the Broadband
Networks window by default. This view is
where you manage your Broadband
connections. The Broadband Networks
window displays all currently available
network connections.
At a glance you can see the signal strength.
Your current connection state and the
elapsed time of the connection are
displayed along the bottom of the status bar.
S TEP 7:
Installation is now complete.
Click the [Restart] button to close the setup
wizard. Then OS is restarted.
Today’s online world oers more services
everyday and Wireless gives you the tools
you need to take advantage of the best in
connectivity solutions. With Cricket
Broadband, enjoy the freedom and
convenience of wireless Internet
connectivity from your laptop computer!
Features
WWAN (Wireless Wide Area Network,
1xEV-DO/1xRTT/CDMA) Specific Features:
• Congures your PC to use your USB
Modem.
• Creates a Data Connection if using an
EVDO capable USB Modem.
• Copies utility to create wireless copies of
your dial-up connections, if supported by
your device.
• Test function for WWAN device.

16
17
3. USING CRICKET BROADBAND
3. USING CRICKET BROADBAND
Connecting
Once your device is properly configured,
connecting to the Internet is as simple as
clicking the “Connect” button.
Once connected, the “Connect” button will
change to “Disconnect”.
Simply click this to end your current
connection. To connect to any other network
shown, select it, and then select “Connect”.
The Status Bar
Information regarding your current network
connection can be seen in the status bar
along the bottom of Cricket Broadband
interface. For more information on this status
bar, see the section “The Status Bar” in the
“Additional Features” section.
Cricket Broadband will display status
information at the bottom during the
connection process as well as while
connected.
When not connected, the status text in the
lower left corner will display “Not
connected” for the currently selected
network. The timer will display “00:00:00”.
Once connected, the status text will display
“Connected” and the timer will begin to run.
Right clicking on the tray icon provides
various options and double clicking on it will
always show the application. Placing your
cursor on it will display the current
connection status.
Based on your preferences, your browser,
e-mail, or program of your choice can be
launched automatically upon connection.
At any time during your connection you can
check your current connection speed and
throughput stats in the Statistics window. To
see this window, select “Statistics” from the
“Session” menu.
Using the “Data” connection:
By default Cricket Broadband enables the
software for data connections.
If your connection fails when you try to
connect, please try to reconnect.
Dormancy:
The data session becomes dormant if you
are not sending or receiving any data. As
soon as you resume sending or receiving
data, the data session will return to an
active state.
Text Messaging
Cricket Broadband supports text messaging
for the Cricket A605.
Receiving Text Messages
• All of your text messages will appear in the
list box at the top of the text messaging
view. By default, all sent and received
messages will appear.

18
3. USING CRICKET BROADBAND
19
4. CRICKET BROADBAND PREFERENCES
• To view only certain messages, click on
the message and select “All”, “Inbox” or
“Outbox”.
• If you are in the text messaging view and
a new message arrives, the message will
automatically appear in the list and
formatted in bold.
• To view a long text message, select the
message in the list view. The details of the
message will appear above the list.
• To reply to an incoming message, select
the message and press the [Reply] button.
The phone number of the sender will auto
populate in your new message. Enter your
new message and press the [Send] button
to send the message.
• To forward an incoming message, select
the message and press [Forward] button.
The message will auto populate in the send
area below prefixed with “FW:.” Press the
[Send] button to send the message.
Sending Text Messages
• The Cricket A605 is capable of sending
text messages to:
— A US-based wireless number, enter:
1, then the wireless number.
— A wireless number outside the US, enter:
011, the country code, then the wireless
number.
— An email account, enter: an email
address.
• To send a text message to one or more
subscribers, enter their 10-digit mobile
numbers separated by semi-colons
in the “To...” field. (Ex: 5555555555;
5555555556).
• With some devices that support text
messaging contact lists, you may be able
to click on the [To] button to open your
contact list.
• The phone number and the message elds
are required.
• The character counter allows from 0 to 150
and counts all of the characters typed in
the message field. (Spanish: 0~130)
• Click the [Send] button.
General Preferences
Click on [Options], then [Preferences].
General Tab
Run Connection Manager at Startup:
If this
option is checked the Cricket Broadband
starts automatically when Windows starts.
Show Splash Window:
Display splash
window when Cricket Broadband starts.
20
4. CRICKET BROADBAND PREFERENCES
21
4. CRICKET BROADBAND PREFERENCES
Minimize Application into Tray:
When you
minimize the application it will now appear in
the Windows task bar. To restore the
application click on Cricket Broadband tray
icon, and select [Open].
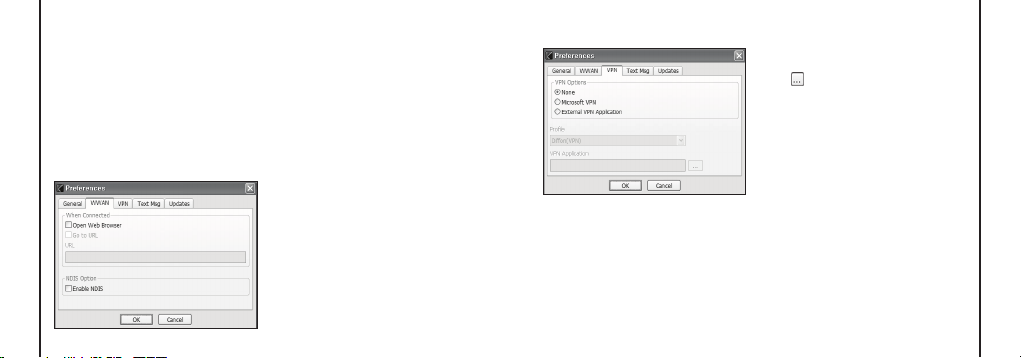
WWAN Specific Settings
WWAN preferences
This is used to set various WWAN
connection settings.
Open Web Browser:
When data
connection is established successfully,
Cricket Broadband executes default
web-browser automatically.
Go to URL:
To enable web-browser go to
web site you defined using URL field below.
URL:
Website URL for starting page of web
browser started automatically upon
connecting to the Cricket Broadband
network.
NDIS Option:
When enabled, NDIS
provides a internet connection always.
• Click the [Ok] button.
VPN Settings
VPN Options
• None: Do not use VPN.
• Microsoft VPN: Use VPN client of
Microsoft Windows.
• External VPN Application: Use other VPN
client application provided another vendor.
Profile (Microsoft VPN only)
Select Microsoft VPN Profile.
External VPN Application
Specify other VPN client application. To
choose the application from your local disk,
click “ ” button.
• Click the [Ok] button.
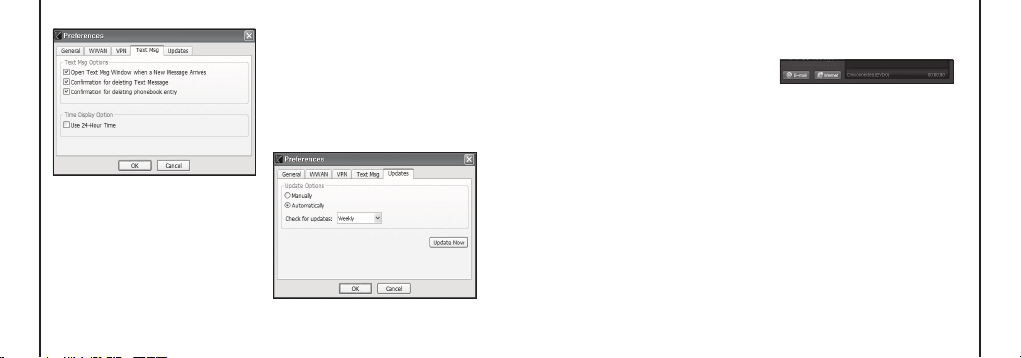
Text Message Settings
Text Message is a messaging application
for your wireless device which allows you to
compose and send text messages to other
wireless phones.
The Text Msg tab in the preferences dialog
allows you to configure certain text message
delivery options. These options include:
22
4. CRICKET BROADBAND PREFERENCES
23
4. CRICKET BROADBAND PREFERENCES
• Open Text Msg Window when a new text
message arrives: Enable/disable automatic
opening of the Text Msg window on arrival
of new text messages.
• Conrmation for deleting a text message:
Confirm deletion of text messages.
• Conrmation for deleting a phonebook
entry: Confirm deletion of phonebook
entries.
• Use 24-Hour Time: Select 24-Hour or
12-Hour clock used for Text Message.
• Click the [Ok] button.
Update settings
This feature allows Cricket Broadband
software to check for software updates and
it can be updated manually or automatically.
• Manually: If you choose this option, the
software will only check for update when
you select “Update Now” button or select
“Help”, then “Check for updates” from
main screen.
• Automatically: You can allow the software
to automatically check for updates, daily,
weekly, or monthly. It only checks when
the application is running and when it
detects that you are connected and able to
access the Internet.
Additional Features
In addition to the basic features mentioned
in previous sections, Cricket Broadband has
the additional features listed below.
Status Bar
The details of your current connection can
be seen in the status bar at the bottom of
Cricket Broadband interface. This status bar
is always visible when the interface is fully
expanded.
Connection Status
The text on the status bar reflects your
current state. During an active connection,
this text will change to “Connected”.
If you are not connected, it will display
“Disconnected”.
WWAN USB Modem Status Area
The text can change to the following:
• No Device:
Your WWAN USB Modem is
removed from the laptop.
• Device not activated:
Your USB Modem
needs to be activated. Select “Activation”
from the Tools menu.

24
4. CRICKET BROADBAND PREFERENCES
25
4. CRICKET BROADBAND PREFERENCES
Throughput
The amount of data that you have sent and
received since the current network
connection was initiated can be seen by
holding the mouse over the green up and
down arrows on the left side of the status
bar.
Elapsed Time
The amount of time that has elapsed since
the current network connection was
initiated is tracked on the lower left side of
the status bar.
The Session Menu
Connect / Disconnect:
You can connect or
disconnect the wireless networks.
The Tools Menu
Log
: This provides a concise session log
of your network activity. Click on a column
heading to sort the log. This window also
displays the total number of sessions as well
as the total time connected.
The information displayed in the Usage log
can be customized using the controls that
appear just below the list.
To view only the connection history of a
specific network type, check the “Selected
connection” checkbox and select the
desired type from the drop-down list.
To view only the connections made during
a specific interval, check the “Date range”
checkbox and specify the date in the “From:”
and “To:” fields.
To clear the log, press the Clear button.
Note that clearing the log cannot be undone.
Close:
Close the log window.
The Options Menu
Activation:
Programs the activation code,
phone number, and IMSI(MIN) to the USB
Modem.
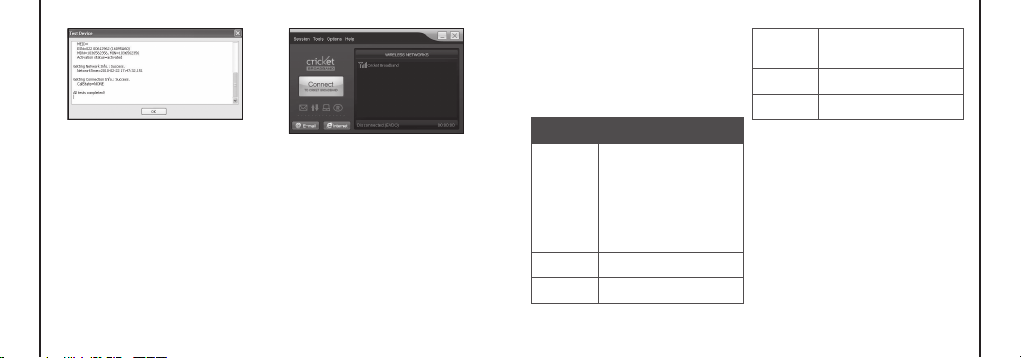
Find Device:
Find your modem device again.
This is useful if you need to reconfigure
Cricket Broadband to use a new USB
Modem.
Test WWAN Device:
Retrieve and display
detailed information about your WWAN
device (1xEV-DO/1xRTT/CDMA USB
Modem) such as manufacturer, model,
version, etc. This information can be
valuable when troubleshooting a problem.
26
27
4. CRICKET BROADBAND PREFERENCES
5. INSTALLING CRICKET A605
Preferences: This is used to select
preferences for connection settings.
The “Internet” button
Launches the default web browser on your
computer.
The “Email” button
Launches the default email application on
your computer.
The Help Menu
The Cricket Broadband has a Help section.
Please see the Help section for additional
questions.
Recommended System
Requirements
To successfully install and use the Cricket
A605 USB device in your PC, the following
system specifications are required.
Item Required Specification
Operating
system
Windows® 2000 SP4
Windows® XP SP1 to SP3
Windows Vista™
(32 bit & 64 bit)
Windows® 7 (32 bit & 64 bit)
Mac OS® X 10.4.11 to 10.6.3
(32 bit & 64 bit)
CPU 150MHz or faster
Port Type A USB port 2.0
Dial-up
networking
DUN bound to TCP/IP
Memory 128 MB
Disk Space
32 MB
*
The Cricket A605 is useful for computers
that include a USB port. Voice service is
not supported.
 Loading...