

Page 1
Konnect-Wi
Quick Reference Guide
Version: 1.1
Date: 1 December 2017
Page 2

Crevavi Confidential Page 2 of 25
Document Template V1.1
Contents
1. Introduction .............................................................................................................................................................. 3
2. Product Overview...................................................................................................................................................... 3
3. Technical Specification .............................................................................................................................................. 4
4. Operation .................................................................................................................................................................. 5
4.1. Connecting Digital inputs .................................................................................................................................. 5
4.2. Connecting Analog inputs ................................................................................................................................. 5
4.3. Connecting Digital Outputs ............................................................................................................................... 5
4.4. Install SAM-BA ................................................................................................................................................... 6
4.5. Program using SAM-BA ..................................................................................................................................... 7
1. Application References ............................................................................................................................................. 8
1.1. Programming Environment ............................................................................................................................... 8
1.2. API References .................................................................................................................................................. 9
1.2.1. Check / Set / Clear Konnect Status Flag .............................................................................................. 11
1.2.2. Wi-Fi Connection Operations .............................................................................................................. 11
1.2.3. TCP Operations.................................................................................................................................... 12
1.2.4. GPIO Operations ................................................................................................................................. 13
1.2.4.1. Configure/Enable input ports ......................................................................................................... 13
1.2.4.2. Configure/EnablRead all input port’s current status ...................................................................... 15
1.2.4.3. Read all input port statistics (Average, Frequency) ........................................................................ 15
1.2.4.4. Write output port ............................................................................................................................ 16
1.2.5. UART Operations ................................................................................................................................. 16
1.2.5.1. Configure COM Port ........................................................................................................................ 16
1.2.5.2. Read Data from COM port .............................................................................................................. 17
1.2.5.3. Write data to COM Port .................................................................................................................. 18
1.2.6. Schedule a function callback ............................................................................................................... 18
1.2.7. String operations ................................................................................................................................. 19
1.2.8. MQTT Operations ................................................................................................................................ 20
1.2.9. Modbus Operations ............................................................................................................................ 21
1.2.10. JSON Write .......................................................................................................................................... 22
1.1. Important Variable Configurations ................................................................................................................. 24
Page 3
Crevavi Confidential Page 3 of 25
Document Template V1.1
1. Introduction
Konnect-Wi is a device to Monitor/control machines from a central server over Wi-Fi to implement IOT/M2M
applications.
It connects to smart machines via RS232/RS485 port, and also has direct Digital and Analog inputs of wide
voltage range that can read sensors inputs and voltages from the machine. Konnect-Wi also has Signal/power
output to trigger external device or control the machines.
Built-in RTC helps user to schedule tasks to monitor and control the machines at defined time / interval.
User can write customized program using the development environment provided for Konnect-Wi, and program
the device through an USB port. User friendly, and easy to understand APIs provided to access all the input data
from Digital, Analog ports, read and write to communication ports, and to trigger digital signal outputs. APIs
provide easy access to the Wi-Fi modem to connect to desired network, request access and connect to server,
send/receive data to server, and schedule tasks.
2. Product Overview
Konnect-Wi device consists of following functionalities:
• Communication with Server
o Connects to Local Area Network through Wi-Fi
o Sends periodic packet data parsed as per custom program to server
o Server may send command to fetch data, and perform GPO (General Purpose Output) task
• Machine interface
o 4 Analog inputs to measure input voltage level configurable using jumpers (0-5V / 0-12V)
o 4 Digital inputs to measure input signal (up-to 12V)
o 2 Digital outputs to send signal / trigger (5V / Unregulated Supply Voltage)
o RS232/RS485 interface to fetch data from smart machines
o USB interface for programming
• User interface
o Power ON/OFF
o LED indication for Power, data connection, data publish
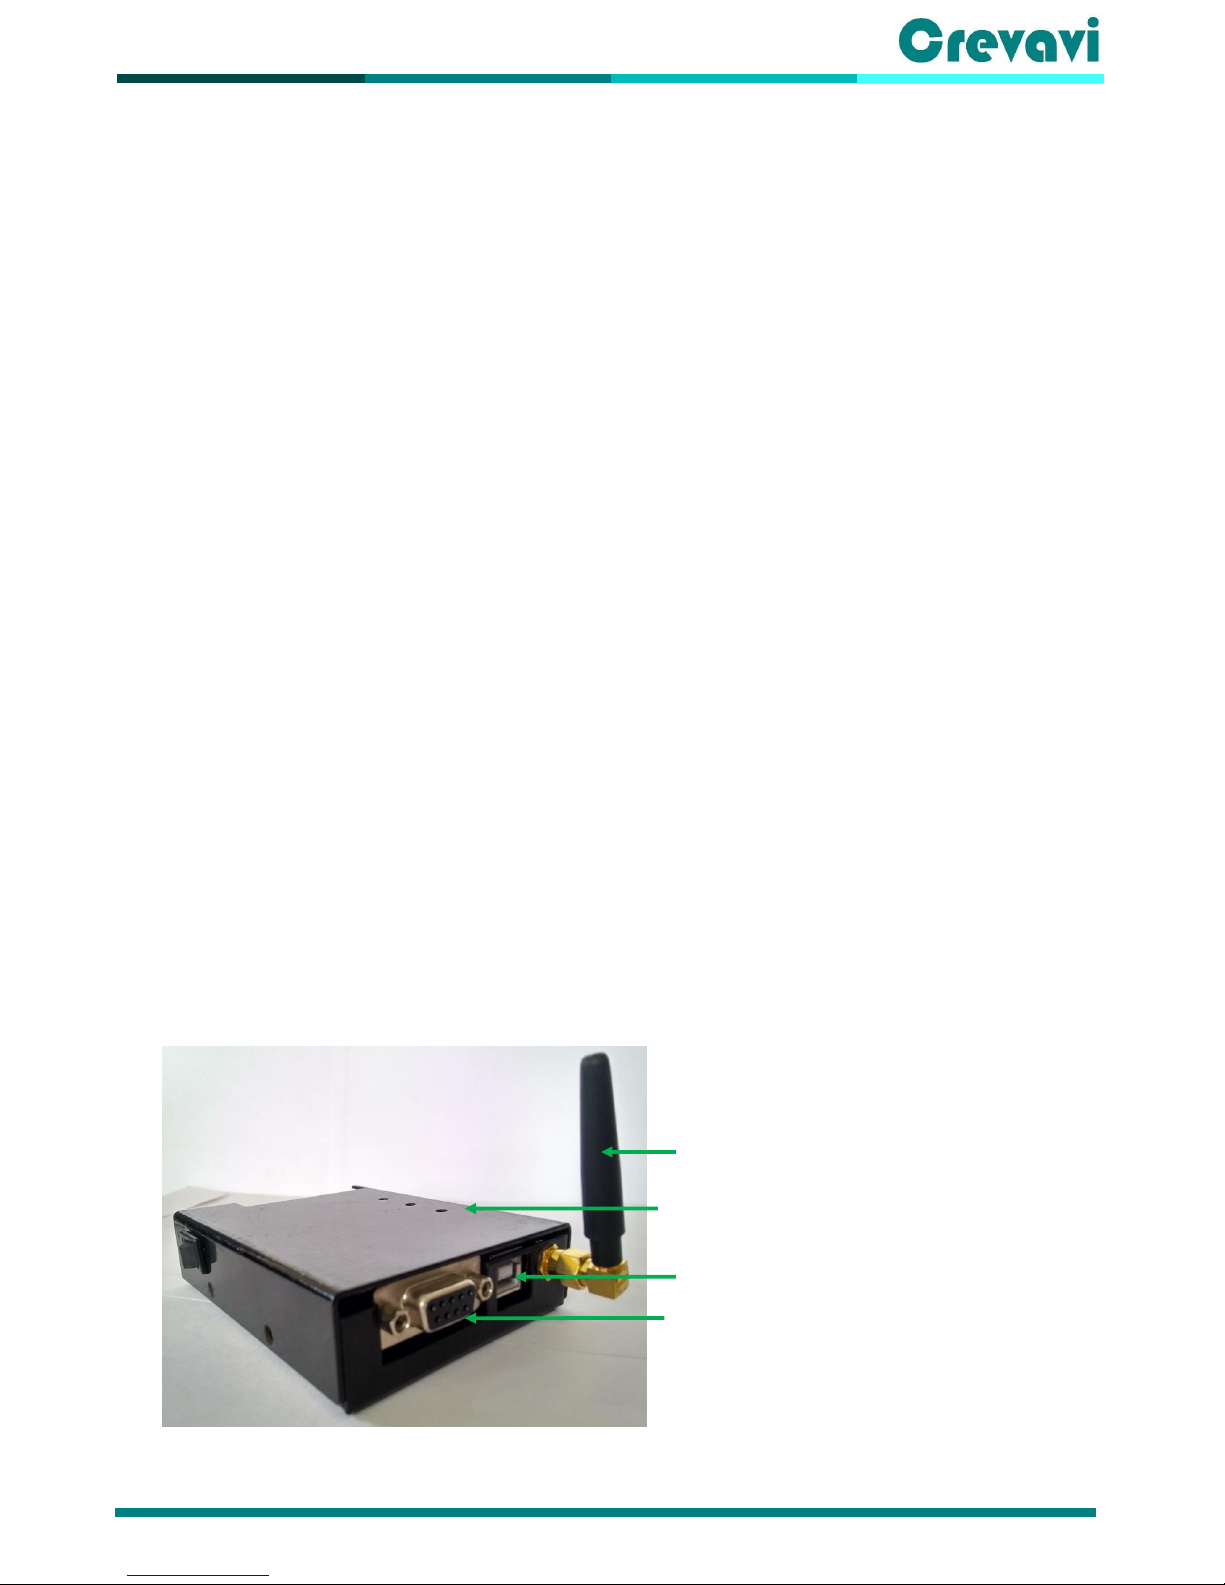
Figure 1
Wi-Fi Antenna
LED Indication for Power, Network and Data
publish
USB Connectivity for Programming the device
RS232/RS485 port for data interface with Smart
Machines
Page 4
Crevavi Confidential Page 4 of 25
Document Template V1.1
Benefits to client:
• M2M / IOT using smart device with Digital/Analog inputs to monitor and control non-smart machines
• Wi-Fi network without the need of having wired connectivity
• Programmable device, which can be customized to interface/control any device, unlike off-the-shelf
products
• Enables clients to cost-optimize field service operations, personnel and fleet expenses
• Reduces down-time of devices and enables clients to make informed decisions with alerts and validation
by deploying analytics of collected data
• Device IP can be used for variety of IOT/M2M applications to monitor/control mobile tower
infrastructure, POS, water and electric meters, heavy equipment, medical devices, vending machines,
vehicles, and more.
3. Technical Specification
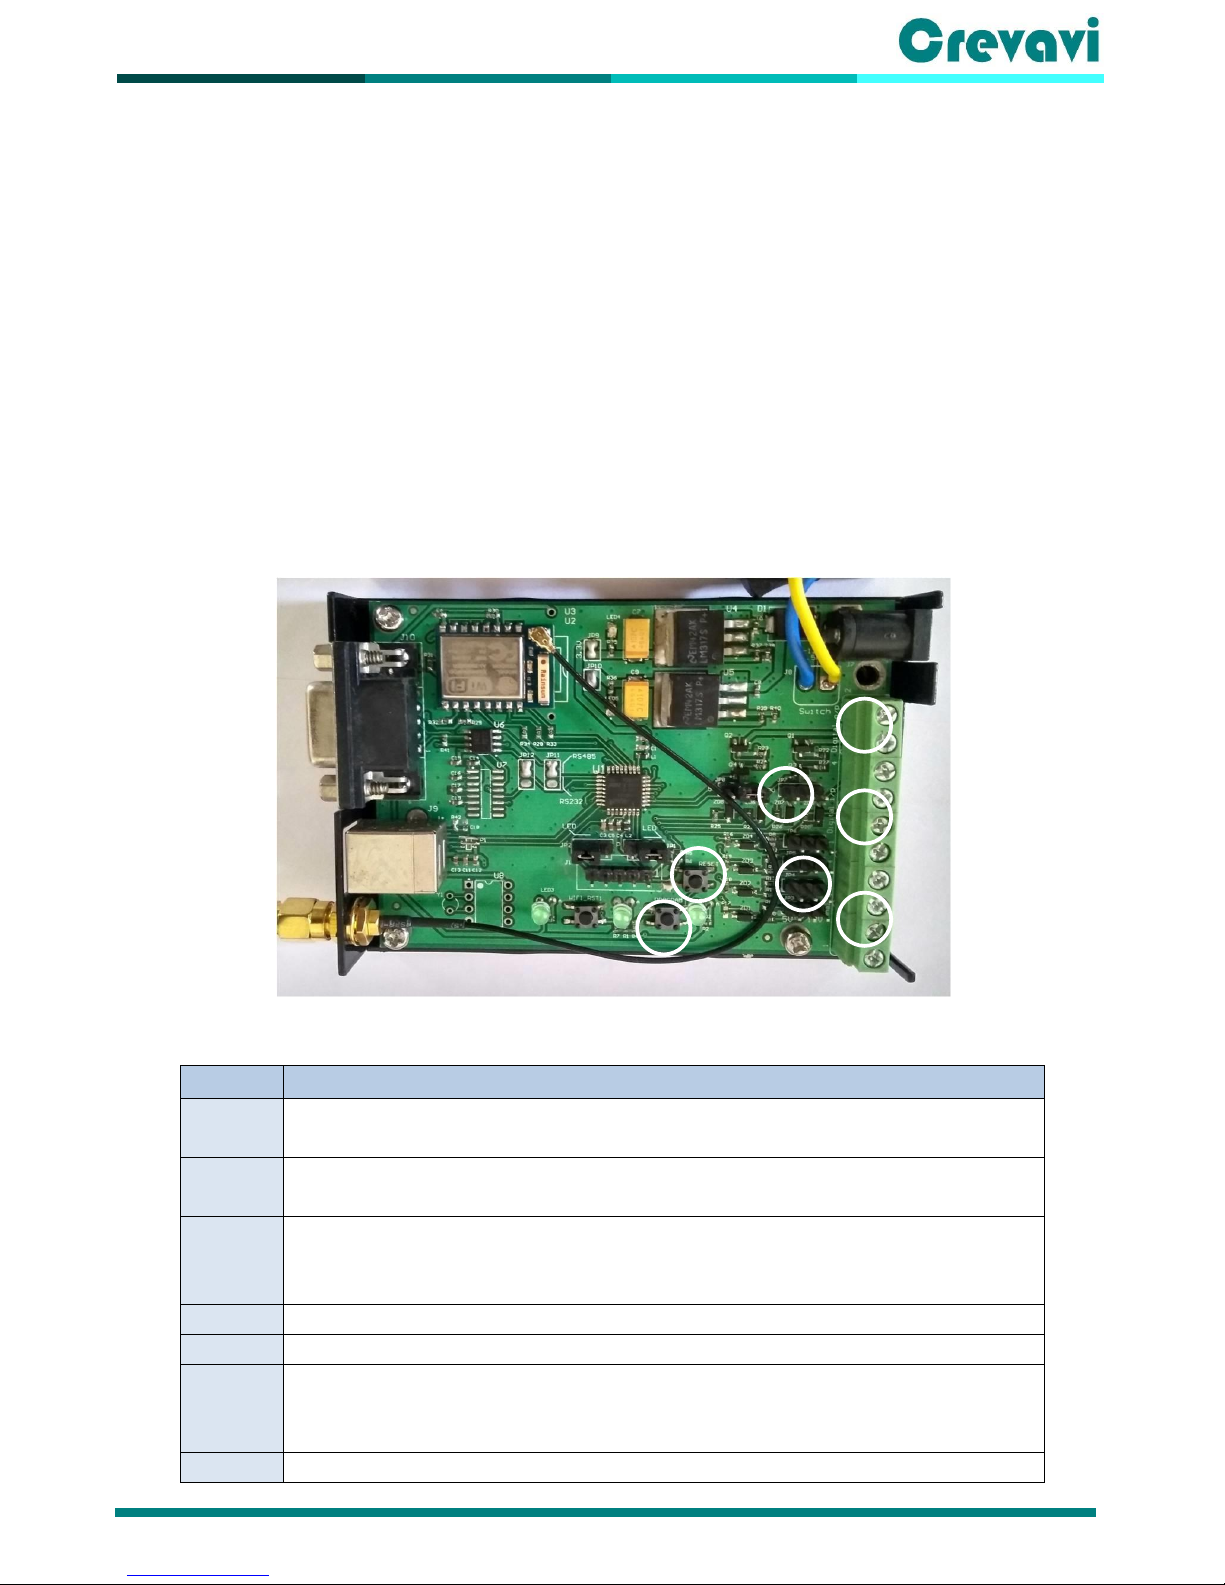
1
Sl. No.
Particular
1
4 Analog inputs with input protection circuit
Selectable range of 0-5V or 0-12V using jumpers (indicated as ‘8’)
2
4 Digital inputs
Wide range of input voltage (1.6-12V) with input protection circuit
3
2 Digital signal outputs
Selectable output voltage of 5V or 12V using jumpers (indicated as ‘9’)
Maximum supply capacity of 0.5A
4
Jumpers for selecting range of Analog inputs
5
Jumpers for selecting voltage for digital outputs
6
Button for initiating SAMD21 microcontroller programming mode
Press the button and power on the device to enter programming mode
Boots from the SAM-BA boot-loader, and enables USB interface to program
7
Microcontroller RESET
Figure 2
5
1 2 3 4 6
7
Page 5
Crevavi Confidential Page 5 of 25
Document Template V1.1
4. Operation
4.1. Connecting Digital inputs
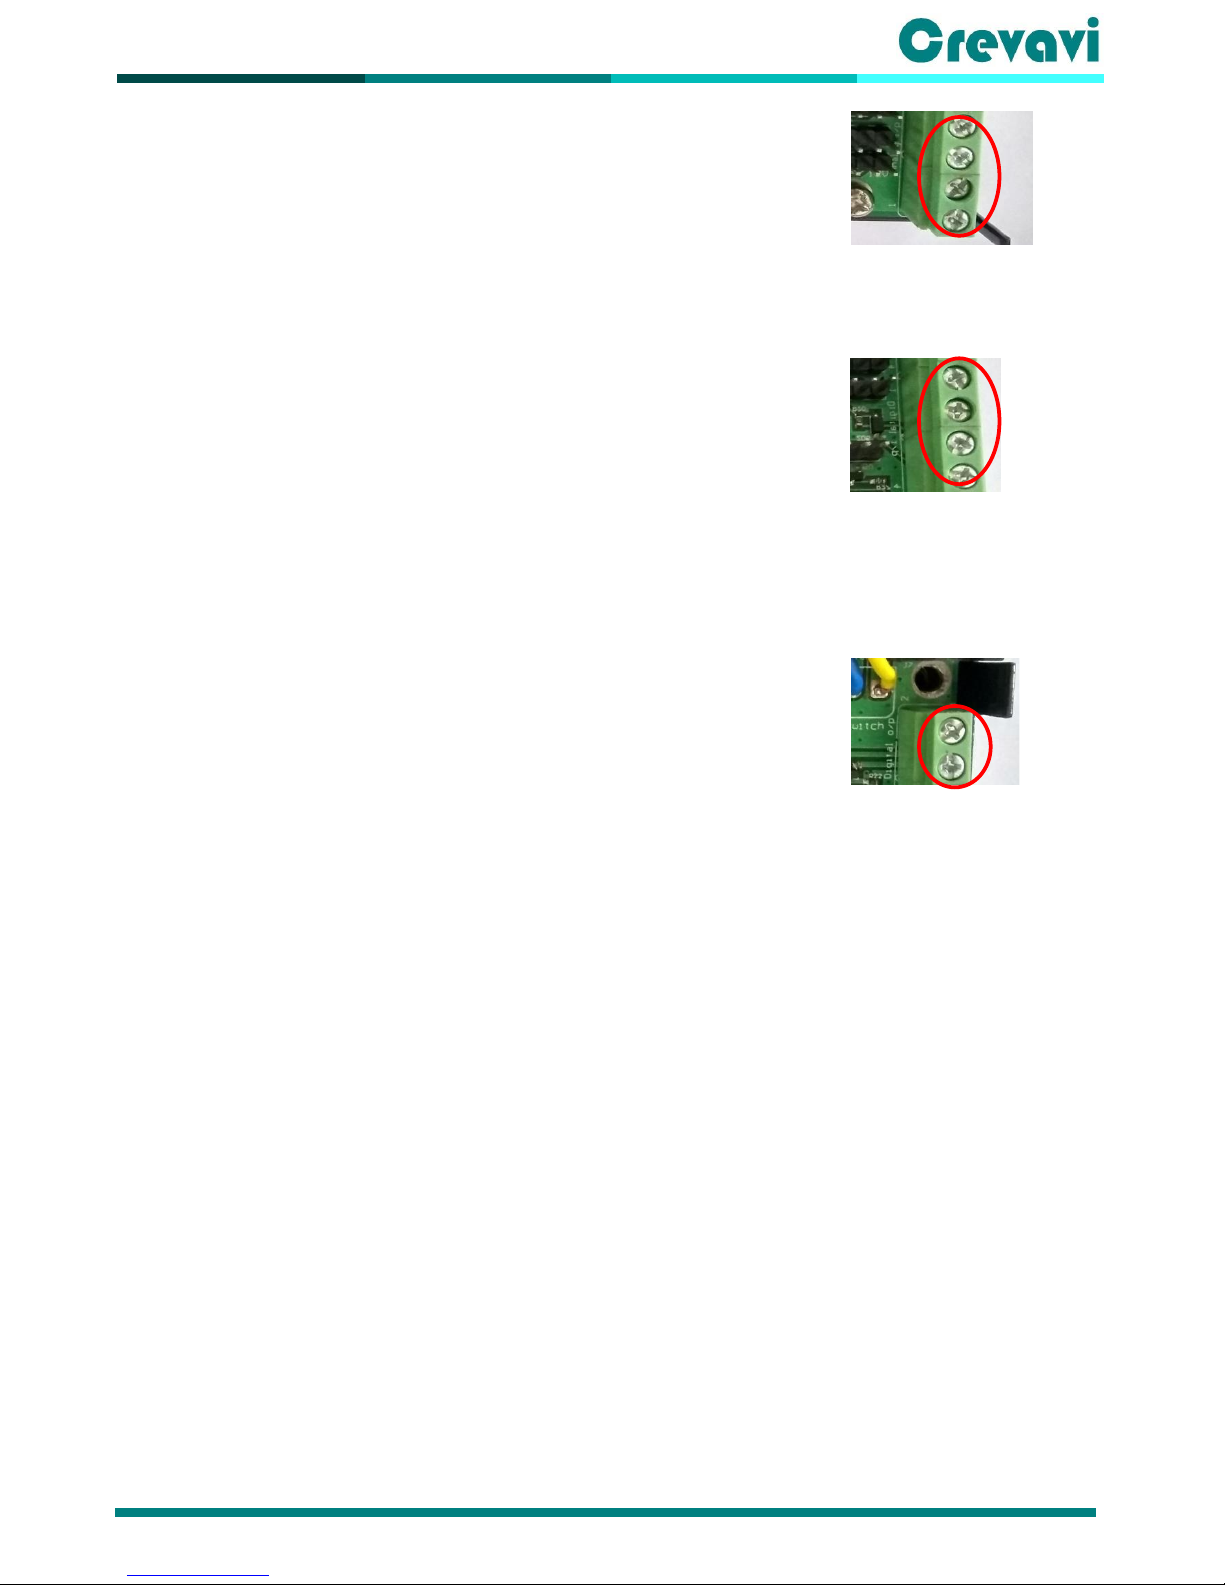
Connect digital inputs to any of the 4 ports marked in Figure-3
Also marked “1” in Figure-2
Please note that the input voltage in the port should not cross 12V DC.
4.2. Connecting Analog inputs
Connect analogue inputs to any of the 4 ports marked in Figure-4
Also, marked “2” in Figure-2
- There are two ranges of voltage configurable using the jumpers beside it, marked “4”.
- If maximum voltage is 5V, put the corresponding jumper at 5V side to get optimum resolution.
- If maximum voltage is 12V, put the corresponding jumper at 12V side.
Please note that the input voltage in the port should not cross 12V DC.
4.3. Connecting Digital Outputs
Connect digital outputs to any of the 2 ports marked in Figure-5
Also, marked “3” in Figure-4
- There are two ranges of output voltage configurable using the jumpers beside it, marked “5”
- If output voltage requirement is 5V, put the corresponding jumper at 5V side
- If output voltage requirement is 12V, put the corresponding jumper at 12V side
Please note that the maximum outputcurrent capacity is 500mA.
Figure 3
Figure 4
Figure 5
Page 6
Crevavi Confidential Page 6 of 25
Document Template V1.1
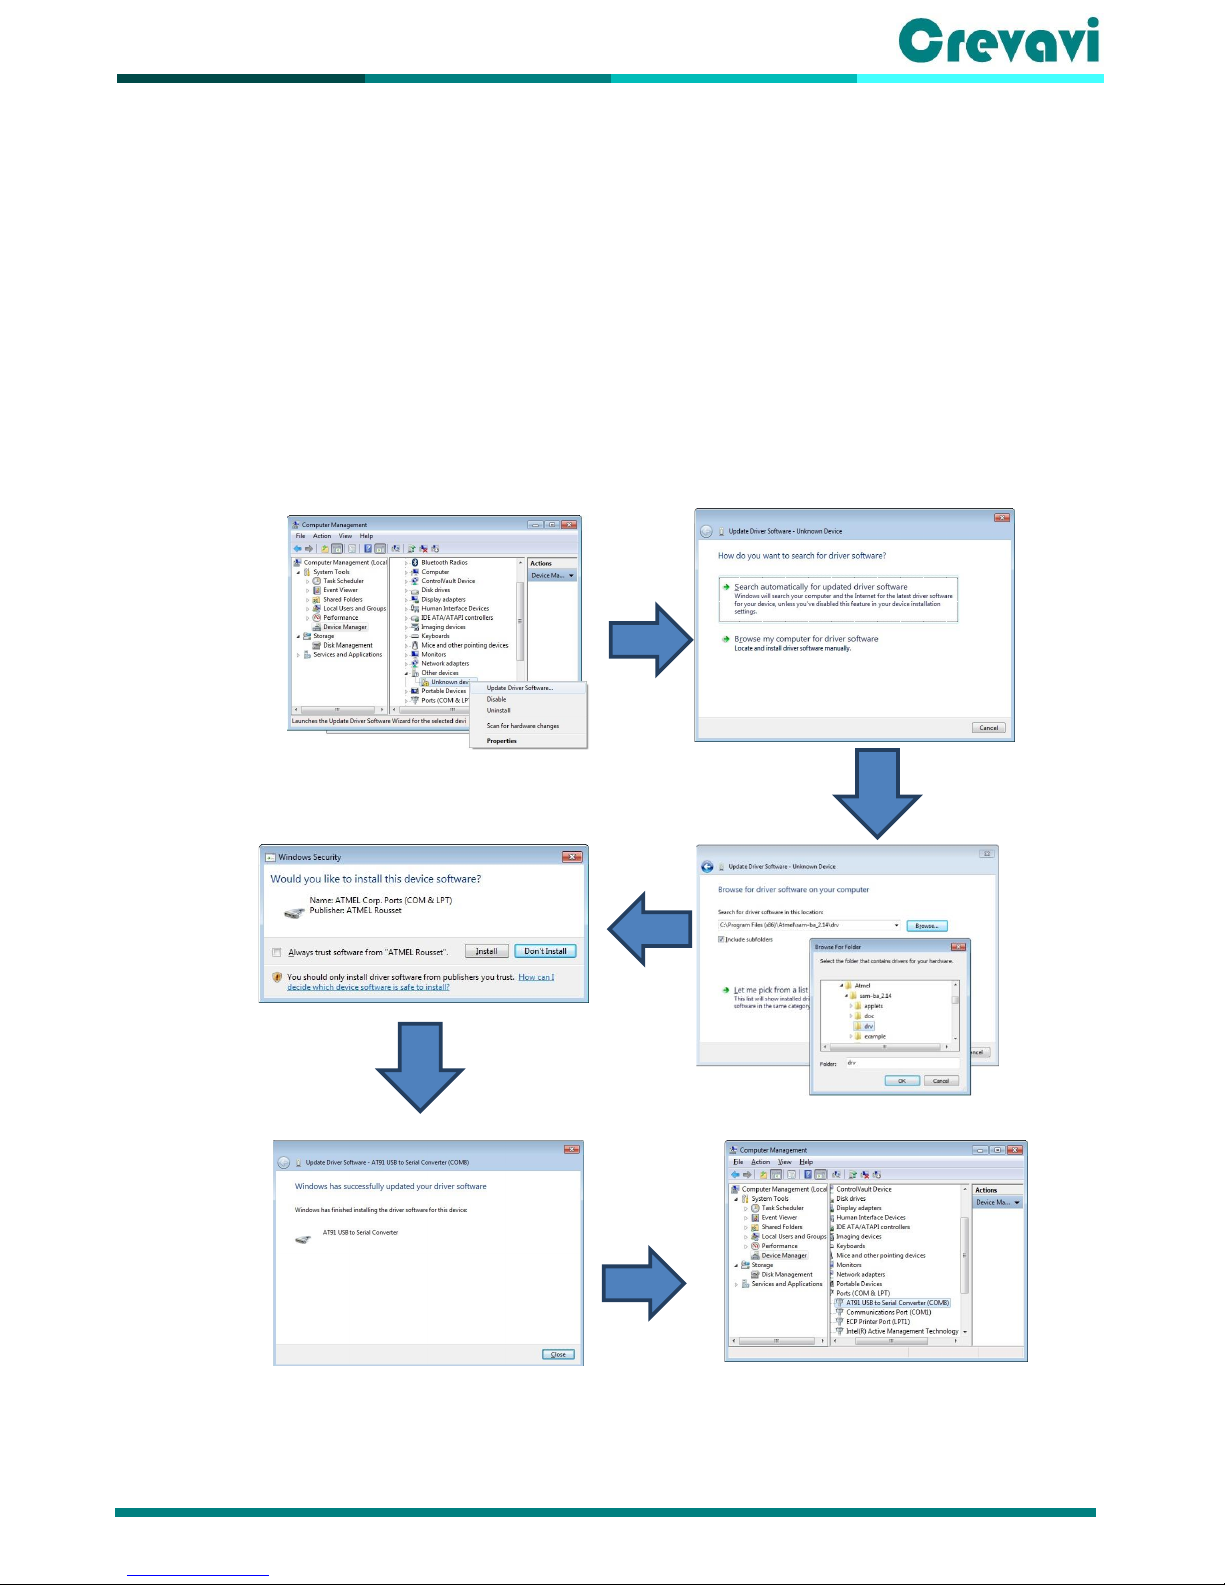
4.4. Install SAM-BA
SAM-BA (SAM Boot Assistant) tool is used for programming applications in Konnect-Wi
• Install SAM-BA in development/programming PC
• Interface USB programming cable between device and PC
• It may show as “unknown device” in device manager
• Right click on the device and select "Update Driver Software"
• You may select "Browse my computer for driver software"
• Navigate to the sam-ba install folder that contains the sam-ba driver
• Install the driver
• You may have to repeat the process if you connect to a different USB port
Page 7
Crevavi Confidential Page 7 of 25
Document Template V1.1
4.5. Program using SAM-BA
• Press “Program” button on PCB and Power ON the device while the button is still pressed
• You may also press and hold “Program” button, and press “Reset” while the button is still pressed
• Program button marked in Figure-6, also marked “6” in Figure-2
• Interface PC and Konnect-Wi using USB cable
• Once device is enumerated, a COM port will be assigned
• It may show as “AT91 UAB to Serial Converter (COMx)”
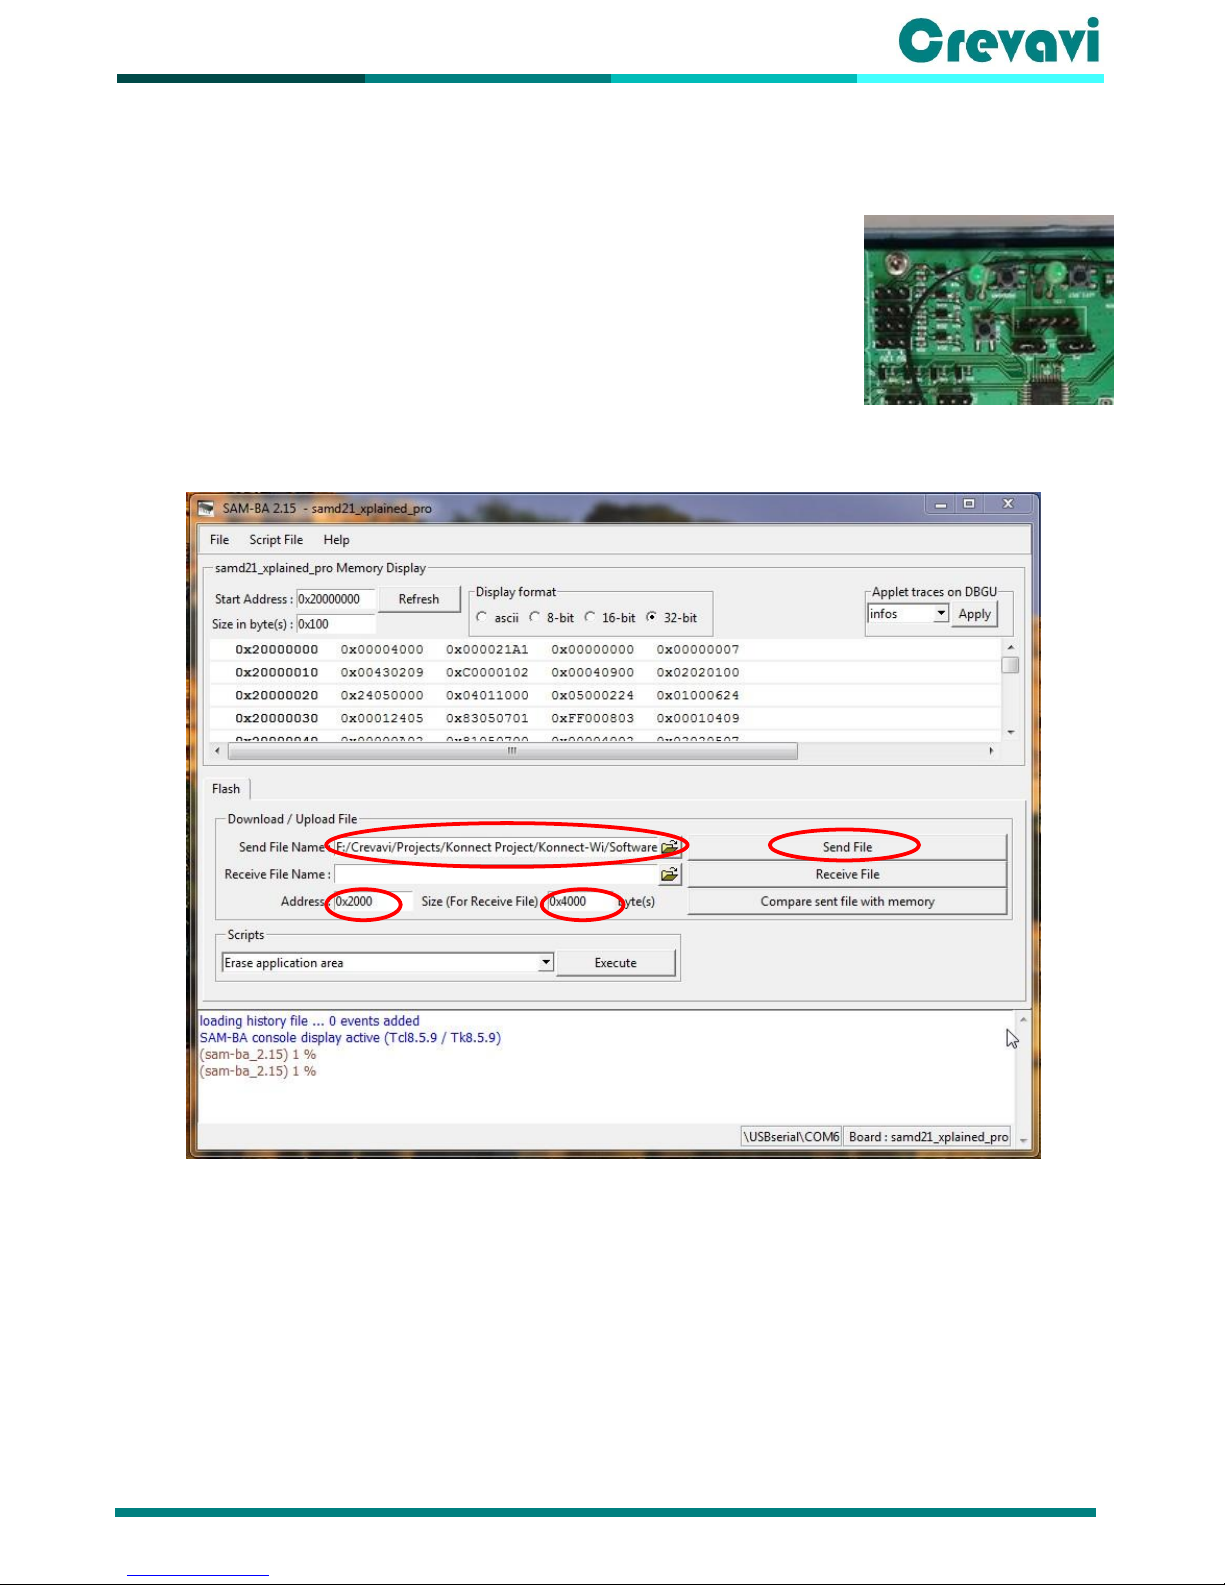
• Start SAM-BA utility
• Select correct COM port, select the board as “samd21_xplained_pro”
• Click Connect
Figure 7
• Select the built .bin file from your working directory
• Give starting address as 0x2000
• Give ending address as 0x4000 (may vary based on code size)
• Click send
• You may also click “Compare sent file with memory” to verify the data
• Disconnect USB cable and Restart the device by switching off and on
• Close and restart SAM-BA application each time device is powered off or USB port is removed
Figure 6
Page 8
Crevavi Confidential Page 8 of 25
Document Template V1.1
1. Application References
1.1. Programming Environment
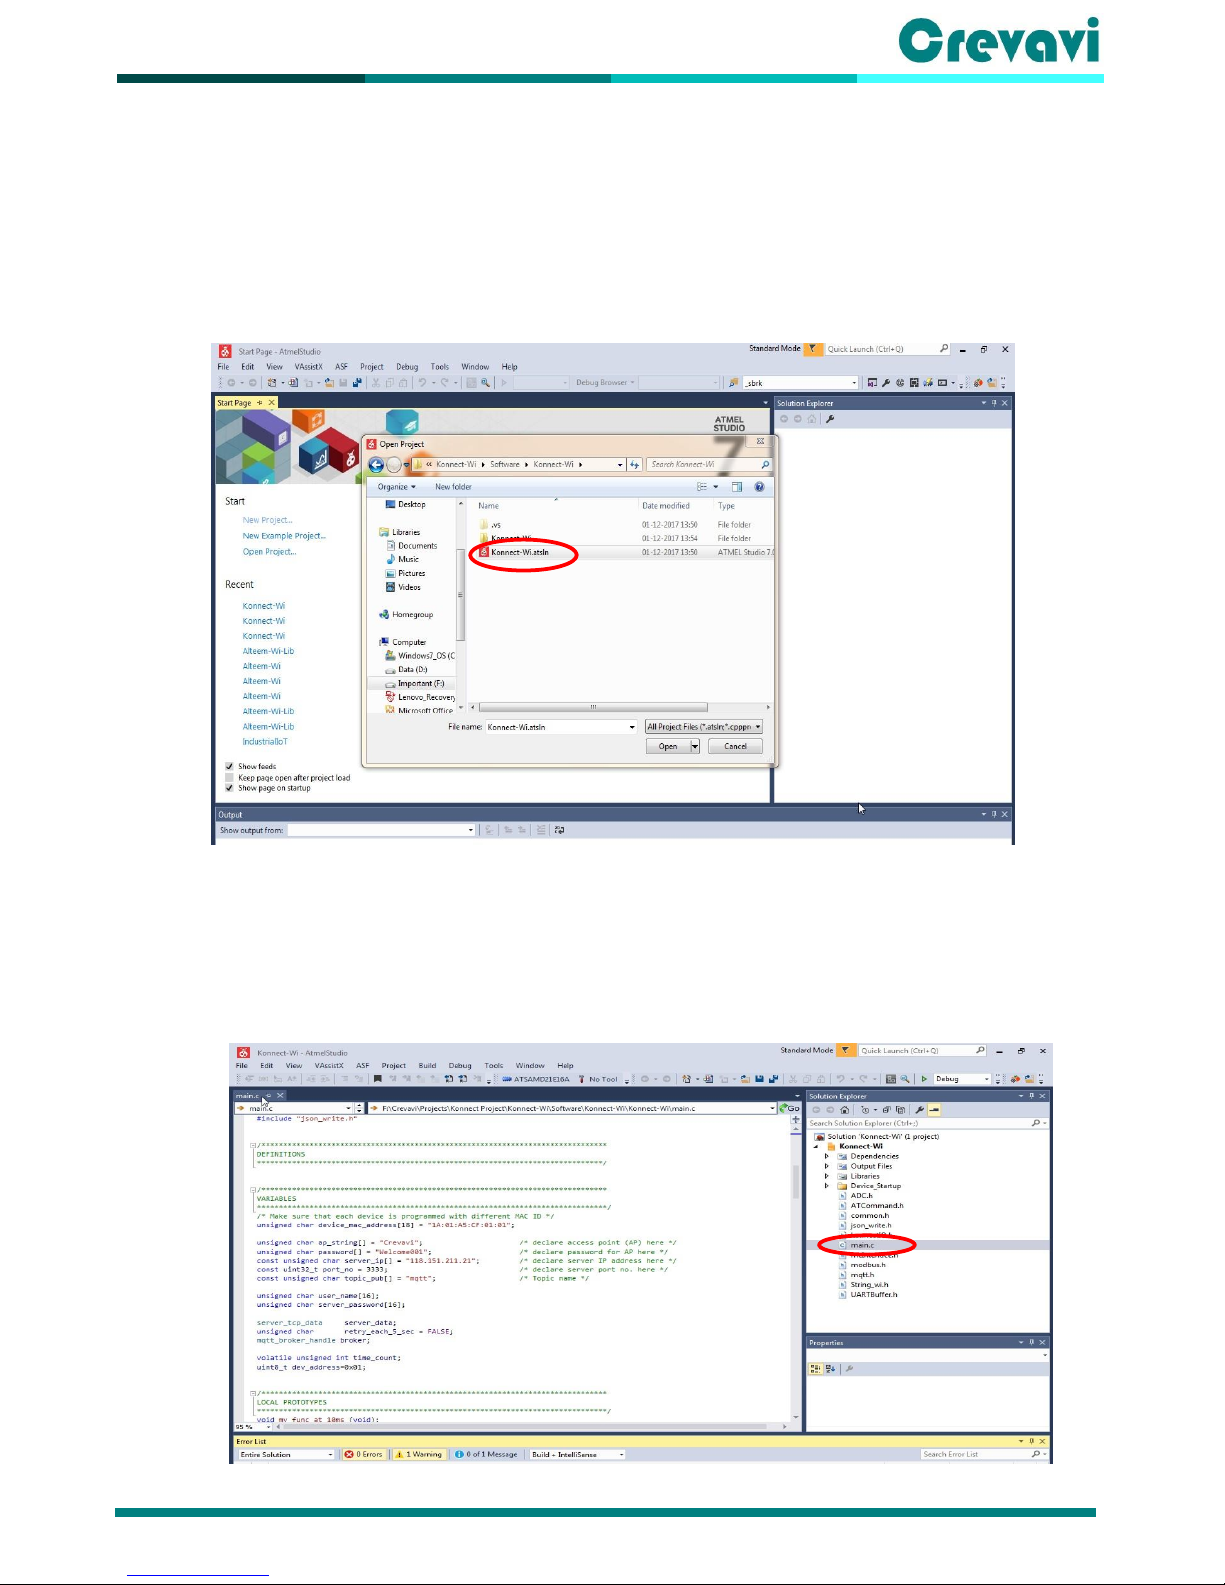
The development environment (IDE) for Application program is Atmel Studio 7
• Install Atmel Studio 7 in development PC
• Open Konnect-Wi project provided by Crevavi in the IDE
Figure 8
• The Sample main.c code in the project can be modified to read/write the ports, send/receive
Wi-Fi data to server and schedule new tasks
• Refer API references for easy access to the ports and scheduler for various operation
Figure 9
Page 9

Crevavi Confidential Page 9 of 25
Document Template V1.1
1.2. API References
Following are list of APIs provided to access all required controller and peripheral functions. Explanation
of each API provided, with example code below.
Sl. No.
Purpose
Function
1
Check / Set / Clear Konnect Status Flag
check_konnect_status
set_konnect_status
clear_konnect_status
2
Wi-Fi Connection Operation
at_check_access_point
at_join_access_point
3
TCP Operations
at_tcp_connect
at_connect_to_server
at_send_tcp_data
at_receive_tcp_data
at_close_server
4
GPIO Operations
app_config_konnect_ports
app_read_input_port_curr
app_read_input_port_stats
app_set_output_port
5
UART Operations
app_config_ext_com_port
app_read_com_data
app_write_com_data
6
Schedule Function Callbacks
app_schedule_function_callback
7
String Operations
strLen
strCopy
strCopyLen
strCat
strCmp
val2String
string2Val
strTrim
float2String
8
MQTT
mqtt_connect
mqtt_disconnect
mqtt_publish
mqtt_subscribe
mqtt_display_message
9
Modbus
crc16_compute
modbus_send_data
modbus_query
ModRTU_CRC
10
JSON Write
jwOpen
jwClose
jwErrorPos
jwObj_string
jwObj_int
jwObj_double
jwObj_bool
jwObj_null
jwObj_object
jwObj_array
jwArr_string
jwArr_int
jwArr_double
Page 10

Crevavi Confidential Page 10 of 25
Document Template V1.1
jwArr_bool
jwArr_null
jwArr_object
jwArr_array
jwEnd
jwObj_raw
jwArr_raw
Page 11
Crevavi Confidential Page 11 of 25
Document Template V1.1
1.2.1. Check / Set / Clear Konnect Status Flag
Name
check_konnect_status(<Flag>)
set_konnect_status(<Flag>)
clear_konnect_status(<Flag>)
Purpose
Checks / sets / clears Konnect status flag
These functions don’t perform any interface/communication with Wi-Fi
modem. It only handles a Flag.
This can be used for business logic writing in the application.
Input parameters
Konnect Status Flag
Bit No
Flag
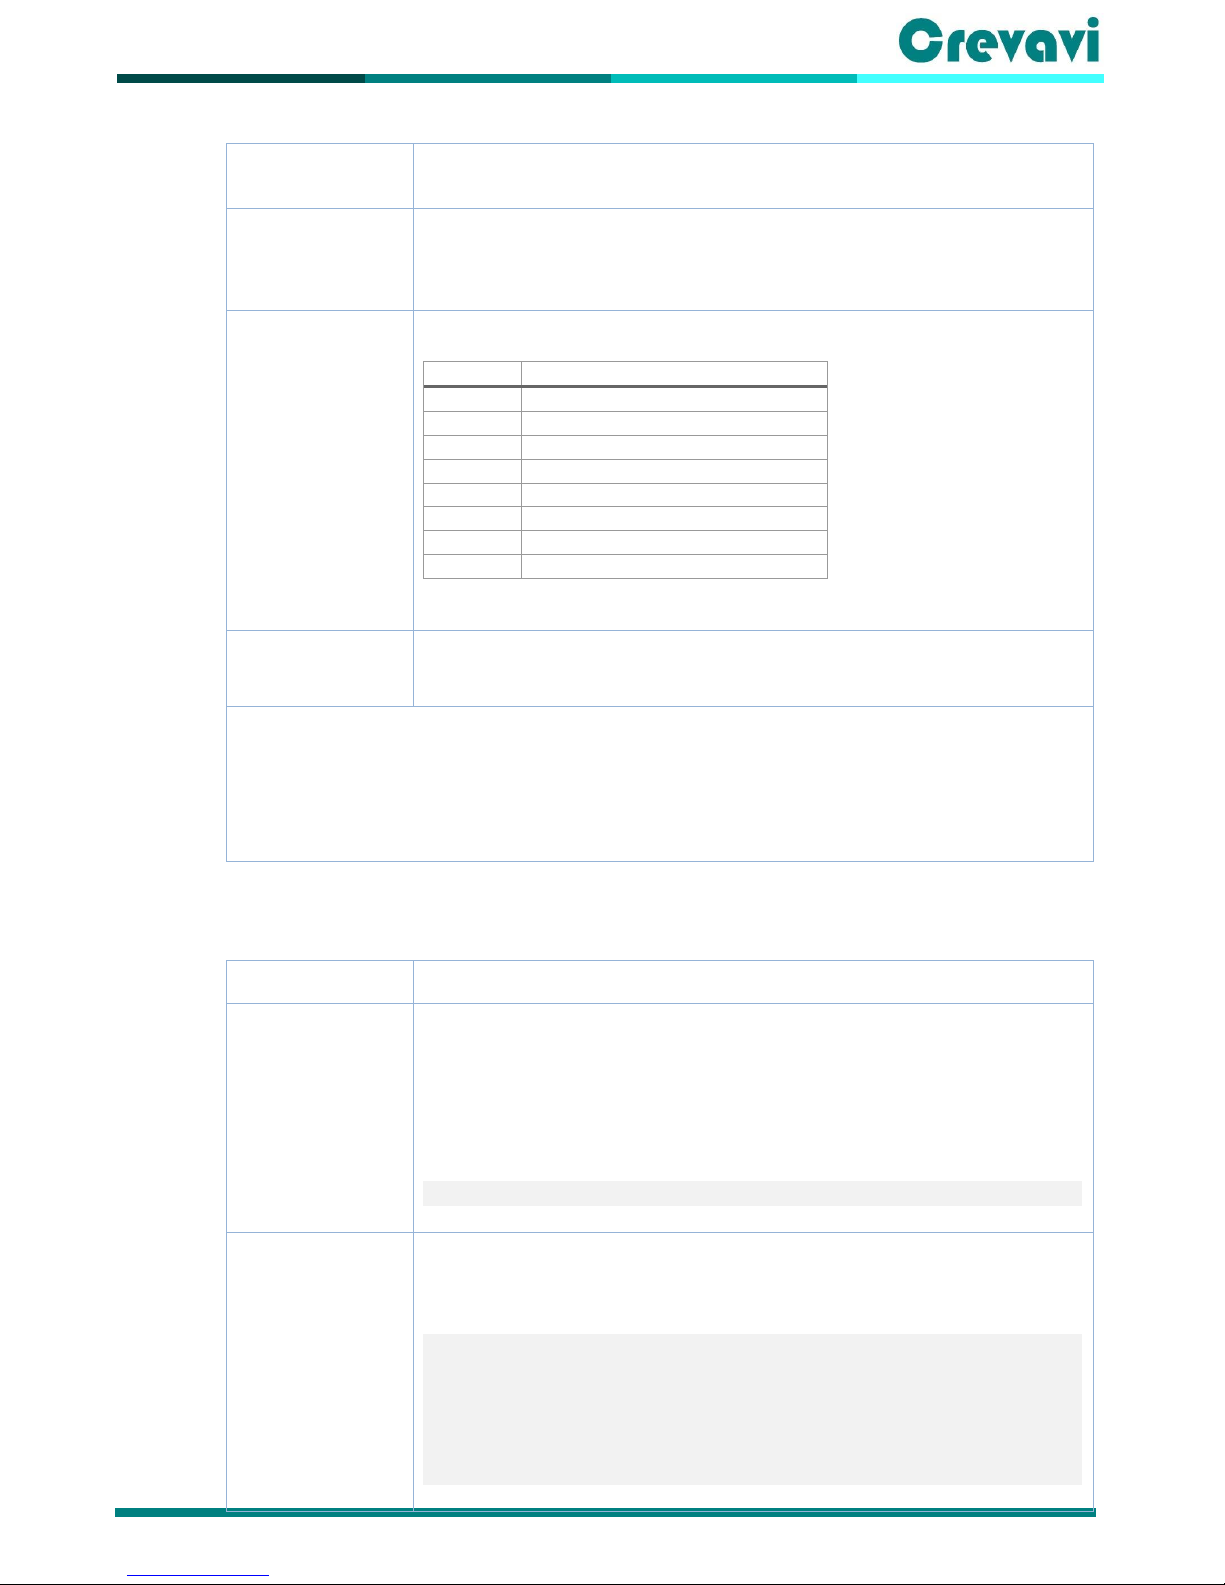
0
STATUS_AP_CONNECTED
1
STATUS_SERVER_CONNECTED
2 X 3 X 4 X 5 X 6 X 7
X
Output Parameter
For check_konnect_status
- 1: If desired flag is high
- 0: If desired flag is low
Example
/* Check if AP is already connected */
if(check_konnect_status(STATUS_AP_CONNECTED) == TRUE)
{
/* It is connected to Crevavi_AP, you can connect to server now */
}
1.2.2. Wi-Fi Connection Operations
Name
at_check_access_point
at_join_access_point
Purpose
at_check_access_point
Checks if the device is connected to the desired
Access Point (AP) based on communication with
Wi-Fi modem.
Use this in conjunction with status Flags to avoid
repeated query.
at_join_access_point
Joins a given Access Point (AP) and request for IP
Input parameters
at_check_access_point
unsigned char * ap_string
- A pointer to string containing target AP
name
at_join_access_point
unsigned char * ap_string
- A pointer to string containing target AP
name
unsigned char * password
A pointer to string containing password for the
target AP
Page 12

Crevavi Confidential Page 12 of 25
Document Template V1.1
Output Parameter
at_check_access_point
Returns unsigned character
- 1: If connected to the desired AP
- 0: if not connected
at_join_access_point
Returns unsigned character
- 1: If connection is successful
0: if not connected
Example
unsigned char ap_string[] = “Crevavi_AP”;
unsigned char password[] = “MyPassword0”;
/* Check if AP is already connected – query to Wi-Fi modem*/
if(at_check_access_point(ap_string) == TRUE)
{
set_konnect_flag(STATUS_AP_CONNECTED); /* Set the flag */
/* It is connected to Crevavi_AP, you can proceed with next task */
}
/* Check if AP is not connected – checking Flag */
if(check_konnect_flag(STATUS_AP_CONNECTED) == FALSE)
{
/* It is not connected to any AP, now you can try to connect */
if (at_join_access_point(ap_string, password)== PASS)
{
/* It is connected to Crevavi_AP, you can connect to server
now */
}
}
1.2.3. TCP Operations
Name
at_tcp_connect
at_connect_to_server
at_send_tcp_data
at_receive_tcp_data
at_close_server
Purpose
at_tcp_connect
Connect to TCP
at_connect_to_server
Requests for a connection to server
at_sent_tcp_data
Sends data to server
at_receive_tcp_data
Read data from Server
at_close_server
It is recommended to close connection to server
after data transmission / receipt is complete, for
other devices to gain connection
Input parameters
at_tcp_connect
None
at_connect_to_server
mqtt_broker_handle *broker
- A pointer to broker
unsigned char * server_ip
- A pointer to string containing server IP
address or URL
unsigned char * port_no
A pointer to string containing port number for the
server
at_sent_tcp_data
mqtt_broker_handle *broker
Page 13

Crevavi Confidential Page 13 of 25
Document Template V1.1
- A pointer to broker
unsigned char *server_data
- A pointer to a string containing server
data
unsigned int data_len
Length of data to be sent
at_receive_tcp_data
mqtt_broker_handle *broker
- A pointer to broker
unsigned char *server_data
- A pointer to a string to which server data
is received
at_close_server
None
Output Parameter
at_tcp_connect
Returns unsigned character
- 1: If connection is successful
- 0: if not connected
at_connect_to_server
Returns unsigned character
- 1: If connection is successful
- 0: if not connected
at_sent_tcp_data
Returns unsigned int
- Returns data_len if data is sent else
returns zero.
at_receive_tcp_data
Returns unsigned int
- Length of data read from server
at_close_server
Returns unsigned character
- 1: If disconnection is successful
- 0: if failed to disconnect or already
disconnected
Example
unsigned char ap_string[] = “Crevavi_AP”;
unsigned char server_ip[] = “192.168.0.150”;
unsigned char port_no[] = “8080”;
unsigned char *server_data;
unsigned char data_len;
unsigned int retVal;
data_len=stringLen(server_data);
/* Check if AP is already connected */
if(at_check_access_point(ap_string) == TRUE)
{
/* It is connected to Crevavi_AP, you can connect to server now */
if (at_connect_to_server(broker,server_ip, port_no)== PASS)
{
/* Now that it has established a connection to the server, you
can start sending and receiving data */
retVal = at_send_tcp_data(broker,server_data,data_len);
}
}be True if connection is established else False */
1.2.4. GPIO Operations
1.2.4.1. Configure/Enable input ports
Name
void app_config_konnect_ports (port_config_struct
config_data)
Page 14

Crevavi Confidential Page 14 of 25
Document Template V1.1
Purpose
Configures Digital and Analog Ports.
For each Analog input ports, following parameters are configurable:
1. Enable/disable
2. Sampling interval – Read ADC once in this interval
3. Sample count – Average of last this many ADC readings
For each Digital input ports, following parameters are configurable:
1. Enable/disable
2. Sample duration – count number of pulses during this duration
For each Digital output ports, following parameters are configurable:
1. Enable/disable
If a port is enabled, then only read/write operation can be performed on that.
Read data from a disabled port will always return 0. Writing high/low on
output port that is not enabled, will not output any result.
Input parameters
port_config_struct config_data
port_config_struct contains:
analog_in_port_conf ain_conf[4]
digital_in_port_conf dinx_conf[4]
analog_out_port_conf doutx_conf[2]
Where, analog_in_port_conf contains:
unsigned char enable;
unsigned char sampling_interval;(interval in multiple of 1.024ms)
unsigned char sample_count;
digital_in_port_conf contains:
unsigned char enable;
unsigned char sample_duration; (Duration of sampling in
multiple of 1.024ms)
digital_out_port_conf contains:
unsigned char enable;
Output Parameter
None
Example:
/* Analog input port configuration */
config_data.ain_conf[0].enable = TRUE;
/* Configure for averaging last 10 readings, each reading at 100ms
interval */
config_data.ain_conf[0].sample_count = 10;
config_data.ain_conf[0].sampling_interval = 100; /* Always multiple of
1.024ms ->1.024ms x100 = 102.4ms */
/* Digital input port configuration */
config_data.din_conf[0].enable = TRUE;
/* Configure for getting number of pulses in each ~1sec */
config_data.din_conf[0].sample_duration = 500; /* Always multiple of
1.024ms ->1.024ms x 500 = 512ms ~= 0.5sec */
/* Digital output port configuration */
config_data.dout_conf[1].enable = TRUE;
/* Call to configure the ports */
app_config_konnect_ports(config_data);
Page 15

Crevavi Confidential Page 15 of 25
Document Template V1.1
1.2.4.2. Configure/EnablRead all input port’s current status
Name
void app_read_input_port_curr (port_reading_curr *
port_data)
Purpose
Reads Digital and Analog Ports and gives the current status
Enabled Digital ports read 1/0, whereas analog ports read 10bit ADC value.
Disabled ports always read 0.
Input parameters
port_reading_curr * port_data
port_reading_curr contains:
unsigned char ain_curr[4] –reads 1/0
unsigned int dinx_curr[4] – reads 10bit ADC value
Output Parameter
None
Example:
port_reading_curr * port_data; /* Declare port i/p data structure */
/* Read input port’s current data */
app_read_input_port_curr(port_data);
if(port_data.ain_curr[0]> 500) /* Performing a check on analog data
port1 read*/
{
/*You have current ADC reading… Do business logic */
}
if(port_data.din_curr[2]==HIGH) /* Performing a check on digital data
port3 read*/
{
/* You have current 1/0 status of digital port… Do business logic */
}
1.2.4.3. Read all input port statistics (Average, Frequency)
Name
void app_read_input_port_stats (port_reading_stats *
port_data)
Purpose
Gets the cumulative statistic data of all input ports
Enabled Digital ports read the number of pulses during last sample duration,
which is configured by config_konnect_ports API.
Similarly, Enabled analog ports read the average of ADC readings based on
sampling count and sample interval configured.
Disabled ports always read 0.
Input parameters
port_reading_stats * port_data
port_reading_stats contains:
unsigned int ain_stats[4] – reads no of pulses in configured
duration
unsigned int din_stats[4] – reads average of configured no. of
ADCreadings
Output Parameter
None
Example:
Page 16

Crevavi Confidential Page 16 of 25
Document Template V1.1
port_reading_stats * port_data; /* Declare port i/p data structure */
/* Read input port’s statistics data */
app_read_input_port_stats(port_data);
if(port_data.ain_stats[0]> 500) /* Performing a check on analog data
port1 read */
{
/* You have average of ADC readings…
Do business logic */
}
if(port_data.din_stats[2]>0) /* Performing a check on digital data port3
read*/
{
/* You have number of pulses in configured duration…
Do business logic */
}
1.2.4.4. Write output port
Name
unsigned charapp_write_dout_port(unsigned char port,
unsigned char state)
Purpose
Sets the desired output port status to Low/High as per input.
The port must be enabled using app_config_konnect_portsbefore
executing this command.
Input parameters
unsigned char port
2 Ports are defined
- GPO_DOUT1
- GPO_DOUT2
unsigned char state
2 States are defined
- HIGH
- LOW
Output Parameter
PASS / FAIL
Example:
app_write_dout_port(GPO_DOUT2, HIGH);
1.2.5. UART Operations
1.2.5.1. Configure COM Port
Name
unsigned charapp_config_ext_com_port
(com_config_structcom_port_config)
Purpose
Configures external COM port for baud rate, data bits, parity, and stop bits
At initialization, default values are:
BAUD_115200, DATA_BITS_8, PARITY_NONE, STOP_BITS_1
Input parameters
com_config_structcom_port_config
com_config_struct contains:
Page 17

Crevavi Confidential Page 17 of 25
Document Template V1.1
unsigned char baud_rate
• different baud rates defined:
- BAUD_9600
- BAUD_19200
- BAUD_38400
- BAUD_57600
- BAUD_115200
unsigned char data_bits
• different data bits defined:
- DATA_BITS_8
- DATA_BITS_7
unsigned char parity
• different parity defined:
- PARITY_NONE
- PARITY_EVEN
- PARITY_ODD
unsigned char stop_bits
• different baud rates defined:
- STOP_BITS_1
- STOP_BITS_2
Output Parameter
PASS / FAIL
Example:
Com_config_datacom_port_config; /* Declare com port config data
structure */
/* Initialize external COM port*/
com_port_config.baud_rate = BAUD_9600;
com_port_config.data_bits = DATA_BITS_8;
com_port_config.parity = PARITY_NONE;
com_port_config.stop_bits = STOP_BITS_1;
app_config_ext_com_port (com_port_config);
1.2.5.2. Read Data from COM port
Name
unsigned intapp_read_com_data(unsigned char *str, unsigned
intmax_len)
Purpose
Reads data from buffer of external COM port and copies to a given buffer
Input parameters
unsigned char *str
- Pointer to the string where data to be copied
unsigned intmax_len
- Maximum length of the data to be copied
- Say, max_len is 50, and input data in 10 bytes. Only 10 bytes will be
copied. If max_len is 40, and input data is 60 bytes, only 40 bytes will
be copied.
Output Parameter
unsigned int – length of copied bytes
Example:
unsigned intchCount;
unsigned char str[24];
Page 18
Crevavi Confidential Page 18 of 25
Document Template V1.1
chCount = app_read_com_data(str, 24);
1.2.5.3. Write data to COM Port
Name
void app_write_com_data(unsigned char *str)
Purpose
Transmits a given string of data through external COM port
Input parameters
unsigned char *str
- Pointer to the string where data to be copied
Output Parameter
None
Example:
unsigned char str[] = “Hello World!”;
app_write_com_data(str);
1.2.6. Schedule a function callback
Name
unsigned char app_schedule_function_callback (unsigned
char fp_id, fpfunc_ptr, unsigned int interval)
Purpose
Schedules a repeating function callback in a given interval.
Be careful not to make the callback function as blocking one. I case of a
blocked function, the other scheduled function calls also will get blocked till
the block is removed.
Maximum 10 such callbacks can be scheduled.
Input parameters
unsigned char fp_id
An unique ID for identifying the function, can be used in future to stop/pause
scheduler. Value can be anything between 0 to 9 (maximum value limited by
the definition MAX_AP)
fpfunc_ptr
Address of the function. Please note that name of a function itself represents
the address of it.
unsigned int interval
Interval for callback in milliseconds, max value 65535;
Output Parameter
Returns 1 if scheduling is successful
Example:
void my_func1 (void)
{
/* Do business logic */
}
void my_func2 (void)
{
/* Do business logic */
}
void main (void)
{
init_konnect_wi(); /* Initializes the board */
app_schedule_function_callback(0, my_func1, 500);
Page 19

Crevavi Confidential Page 19 of 25
Document Template V1.1
app_schedule_function_callback(1, my_func2, 1000);
/* my_func1 will automatically get called in every 500ms
And my_func2 will automatically get called in every 1s */
}
1.2.7. String operations
Names
strLen
strCopy
strCat
strCmp
val2String
string2Val
strTrim
Purpose
strLen
Returns length of a given string
strCopy
Copies one string to other
strCopyLen
Copies one string to other of defined length
strCat
Concatenates one string to other
strCmp
Compares one string to other
strTrim
Trims from Source String and copies to destination
val2String
Converts value (char/int/long) to a string
string2Val
Converts a string of digits to a value (long)
float2String
Converts a float to string
Input parameters
strLen
unsigned char *str
- Pointer to the String
strCopy
unsigned char * sourceStr, unsigned char * destStr
- Pointer to the Source and Destination Strings
strCopyLen
unsigned char * destStr, const unsigned char *
sourceStr, unsigned int len
- Pointer to Destination, Source string and length of
string
strCat
unsigned char * sourceStr, unsigned char * destStr
- Pointer to the Source and Destination Strings
strCmp
unsigned char * str1, unsigned char * str2
- Pointer to 2 Strings to be compared
strTrim
unsigned char * sourceStr, unsigned char * destStr,
unsigned int startIndex, unsigned int endIndex
- Pointer to the Source and Destination Strings,
starting index and ending index for trimming
val2String
unsigned long val, unsigned char * datStr
- Value and Pointer to the Strings
string2Val
unsigned char * datStr
- Pointer to the String of digits
float2String
float val, unsigned char * datStr
- Value and Pointer to the Strings
Output Parameter
strLen
unsigned int – Length of the String
strCopy
unsigned int– Length of the copied String
strCopyLen
Unsigned int–Length of the copied String
strCat
unsigned int– Length of the concatenated String
Page 20

Crevavi Confidential Page 20 of 25
Document Template V1.1
strCmp
unsigned char – PASS / FAIL
strTrim
unsigned int– Length of the copied String
val2String
unsigned char – Length of the converted String
string2Val
unsigned long – converted value
float2String
unsigned char– PASS / FAIL
Example
unsigned char tempStr[10];
unsigned int charCount;
port_reading_stats port_data;
server_tcp_data server_data;
/* Read port statistical data */
app_read_input_port_stats(&port_data);
/* Converting the first reading value to a string */
val2String(port_data.ain_stats[0], tempStr);
/* Copying the source string to another stringtcp_data */
strCopy(tempStr, server_data.tcp_data[0])
/* Getting string length */
charCount = strLen(tempStr);
1.2.8. MQTT Operations
Names
mqtt_connect
mqtt_disconnect
mqtt_publish
mqtt_subscribe
mqtt_display_message
Purpose
mqtt_connect
Connects to the MQTT server
mqtt_disconnect
Disconnects from MQTT server
mqtt_publish
Publish a topic to MQTT server
mqtt_subscribe
Subscribe to the topic in MQTT server
mqtt_display_message
Display the message in MQTT server
Input parameters
mqtt_connect
mqtt_broker_handle *broker, const unsigned char
* server_ip, uint32_t port
- Pointer to the Broker, Server IP address
and Port number
mqtt_disconnect
mqtt_broker_handle *broker
- Pointer to the broker
mqtt_publish
mqtt_broker_handle *broker, const
unsigned char *topic, const unsigned
char *msg, QoS qos
- Pointer to Broker, Topic, Message and
Quality of Service
mqtt_subscribe
mqtt_broker_handle *broker, const
unsigned char *topic, QoS qos
- Pointer to Broker, Topic and Quality of
Service
mqtt_display_message
mqtt_broker_handle *broker, int
(*print)(int)
Page 21

Crevavi Confidential Page 21 of 25
Document Template V1.1
- Pointer to the Broker and Message
Output Parameter
mqtt_connect
int – PASS/FAIL
mqtt_disconnect
void –No return value
mqtt_publish
int – PASS/FAIL
mqtt_subscribe
int – PASS/FAIL
mqtt_display_message
void –No return value
Example
const unsigned char server_ip[] = "117.214.51.87"; // server IP address
const uint32_t port_no = 5151; // Port number of the server
if(broker.socket == FALSE)
{
/* Connecting to MQTT server*/
mqtt_connect(&broker, server_ip, port_no);
}
if(broker.connected == TRUE)
{
/* Publishing the data to server */
mqtt_publish(&broker, topic_pub,buffer, QoS0);
}
1.2.9. Modbus Operations
Names
modbus_send_data
modbus_query
ModRTU_CRC
Purpose
modbus_send_data
Sending data using RS485
modbus_query
Receiving data from RS485
ModRTU_CRC
Computes Cyclic Redundancy Check
Input parameters
modbus_send_data
modbus_write_struct *modbus_data
- Pointer to modbus data
modbus_query
modbus_write_struct *write_data, unsigned char
* read_data
- Pointer to Write and Read data
ModRTU_CRC
uint8_t *buf, uint8_t len
- Pointer to Buffer and Data length
Output Parameter
modbus_send_data
void –No return value
modbus_query
unsigned int –data length
ModRTU_CRC
uint16_t – Cyclic Redundancy Check of 16 bit
Example
modbus_write_struct *temp_data;
modbus_write_struct *write_data;
/*Send data to slave using modbus*/
modbus_send_data(temp_data);
/*Verifies the data received data from the slave*/
modbus_query(write_data, temp_data);
Page 22

Crevavi Confidential Page 22 of 25
Document Template V1.1
1.2.10. JSON Write
Names
jwOpen
jwClose
jwErrorPos
jwObj_string
jwObj_int
jwObj_double
jwObj_bool
jwObj_null
jwObj_object
jwObj_array
jwArr_string
jwArr_int
jwArr_double
jwArr_bool
jwArr_null
jwArr_object
jwArr_array
jwEnd
jwObj_raw
jwArr_raw
Purpose
jwOpen
Initializes JSON write operation
jwClose
Closes all elements opened by jwOpen()
jwErrorPos
If jwClose() returned an error, this function
returns the number of the jWrite function call
which caused that error
jwObj_string
Object insertion function for string
- Used to insert "key":"value" pairs into an
object
jwObj_int
Object insertion function for integer
- Used to insert "key":"value" pairs into an
object
jwObj_double
Object insertion function for double
- Used to insert "key":"value" pairs into an
object
jwObj_bool
Object insertion function for boolean
- Used to insert "key":"value" pairs into an
object
jwObj_null
Object insertion function for null
- Used to insert "key":"value" pairs into an
object
jwObj_object
Object insertion function for object
- Used to insert "key":"value" pairs into an
object
jwObj_array
Object insertion function for array
- Used to insert "key":"value" pairs into an
object
jwArr_string
Array insertion function for string
- Used to insert "value" elements into an
array
jwArr_int
Array insertion function for integer
- Used to insert "value" elements into an
array
Page 23

Crevavi Confidential Page 23 of 25
Document Template V1.1
jwArr_double
Array insertion function for double
- Used to insert "value" elements into an
array
jwArr_bool
Array insertion function for boolean
- Used to insert "value" elements into an
array
jwArr_null
Array insertion function for null
- Used to insert "value" elements into an
array
jwArr_object
Array insertion function for object
- Used to insert "value" elements into an
array
jwArr_array
Array insertion function for array
- Used to insert "value" elements into an
array
jwEnd
Defines the end of Object or Array definition
jwObj_raw
Writes the JSON value as the contents of rawtext
jwArr_raw
Writes the JSON value as the contents of rawtext
Input parameters
jwOpen
char *buffer, unsigned int buflen, enum
jwNodeType rootType, int isPretty
- Pointer to Buffer and buffer length
- rootType is the base JSON type:
JW_OBJECT or JW_ARRAY
- isPretty controls 'prettifying' the output:
JW_PRETTY or JW_COMPACT
jwClose
None
jwErrorPos
None
jwObj_string
char *key, char *value
- Pointer to Key and Value
jwObj_int
char *key, int value
- Pointer to Key and Value
jwObj_double
char *key, double value
- Pointer to Key and Value
jwObj_bool
char *key, int oneorZero
- Pointer to Key and Value
jwObj_null
char *key
- Pointer to Key
jwObj_object
char *key
- Pointer to Key
jwObj_array
char *key
- Pointer to Key
jwArr_string
char *value
- Pointer to Value
jwArr_int
int value
- Input Integer value
jwArr_double
double value
- Input Double value
jwArr_bool
int oneorZero
- Input Boolean value
jwArr_null
None
jwArr_object
None
jwArr_array
None
jwEnd
None
jwObj_raw
char *key, char *rawtext
- Pointer to Key and rawtext
Page 24

Crevavi Confidential Page 24 of 25
Document Template V1.1
jwArr_raw
char *rawtext
- Pointer to Key and rawtext
Output Parameter
jwOpen
void –No return value
jwClose
int – returns error code (0 = JWRITE_OK)
jwErrorPos
int –if jwClose returned an error, this function
returns the number of the jWrite function call
which caused that error
jwObj_string
void –No return value
jwObj_int
void –No return value
jwObj_double
void –No return value
jwObj_bool
void –No return value
jwObj_null
void –No return value
jwObj_object
void –No return value
jwObj_array
void –No return value
jwArr_string
void –No return value
jwArr_int
void –No return value
jwArr_double
void –No return value
jwArr_bool
void –No return value
jwArr_null
void –No return value
jwArr_object
void –No return value
jwArr_array
void –No return value
jwEnd
void –No return value
jwObj_raw
void –No return value
jwArr_raw
void –No return value
Example
jwOpen( buffer, buflen, JW_OBJECT, JW_PRETTY ); // open root node as
object
jwObj_string( "key", "value" );
jwObj_int( "int", 1 );
jwObj_array( "anArray");
jwArr_int( 0 );
jwArr_int( 1 );
jwArr_int( 2 );
jwEnd();
err= jwClose(); // close
root object
Result
{
"key": "value",
"int": 1,
"anArray": [
0,
1,
2
]
}
1.1. Important Variable Configurations
Following are list of variables that need to be modified to configure the devices for different access
point and servers. The variables are declared in main.c.
Page 25

Crevavi Confidential Page 25 of 25
Document Template V1.1
Sl. No.
Variable
Purpose
1
ap_string
Name of access point
2
password
Password for joining Access Point
3
server_ip
IP address of the Server
4
port_no
Port no of the Server
5
device_mac_address
Machine ID of the device, this is preferable to be unique for
each device...
In future version of software, this parameter will be
programmable through serial / USB port
6
topic_pub
Topic to publish data to the server
7
user_name
User name of server
8
server_password
Password of the server
---------------------------: END OF DOCUMENT :---------------------------
 Loading...