

Page 1
HTT-B10EX
TableTop Keypad with inNET EX
Operations & Installation Guide
®
Description
The HTT-B10EX provides a simple, convenient wireless controller for lighting, home
automation, and entertainment in the home or ofce. Two-way inNET EX
operation supports true feedback, allowing lighting and security settings to be checked
and changed with condence from any room. A clean array of 10 backlit push buttons with
individual feedback LEDs affords easy, tactile control of any custom function. The
HTT-B10EX is a fully programmable controller designed to operate as part of a complete
Crestron® automation system, communicating via the inNET EX wireless control network.
®
wireless
Additional Resources
Visit the product page on the Crestron website (www.crestron.com) or
scan the QR code to the right for additional information and the latest
rmware updates.
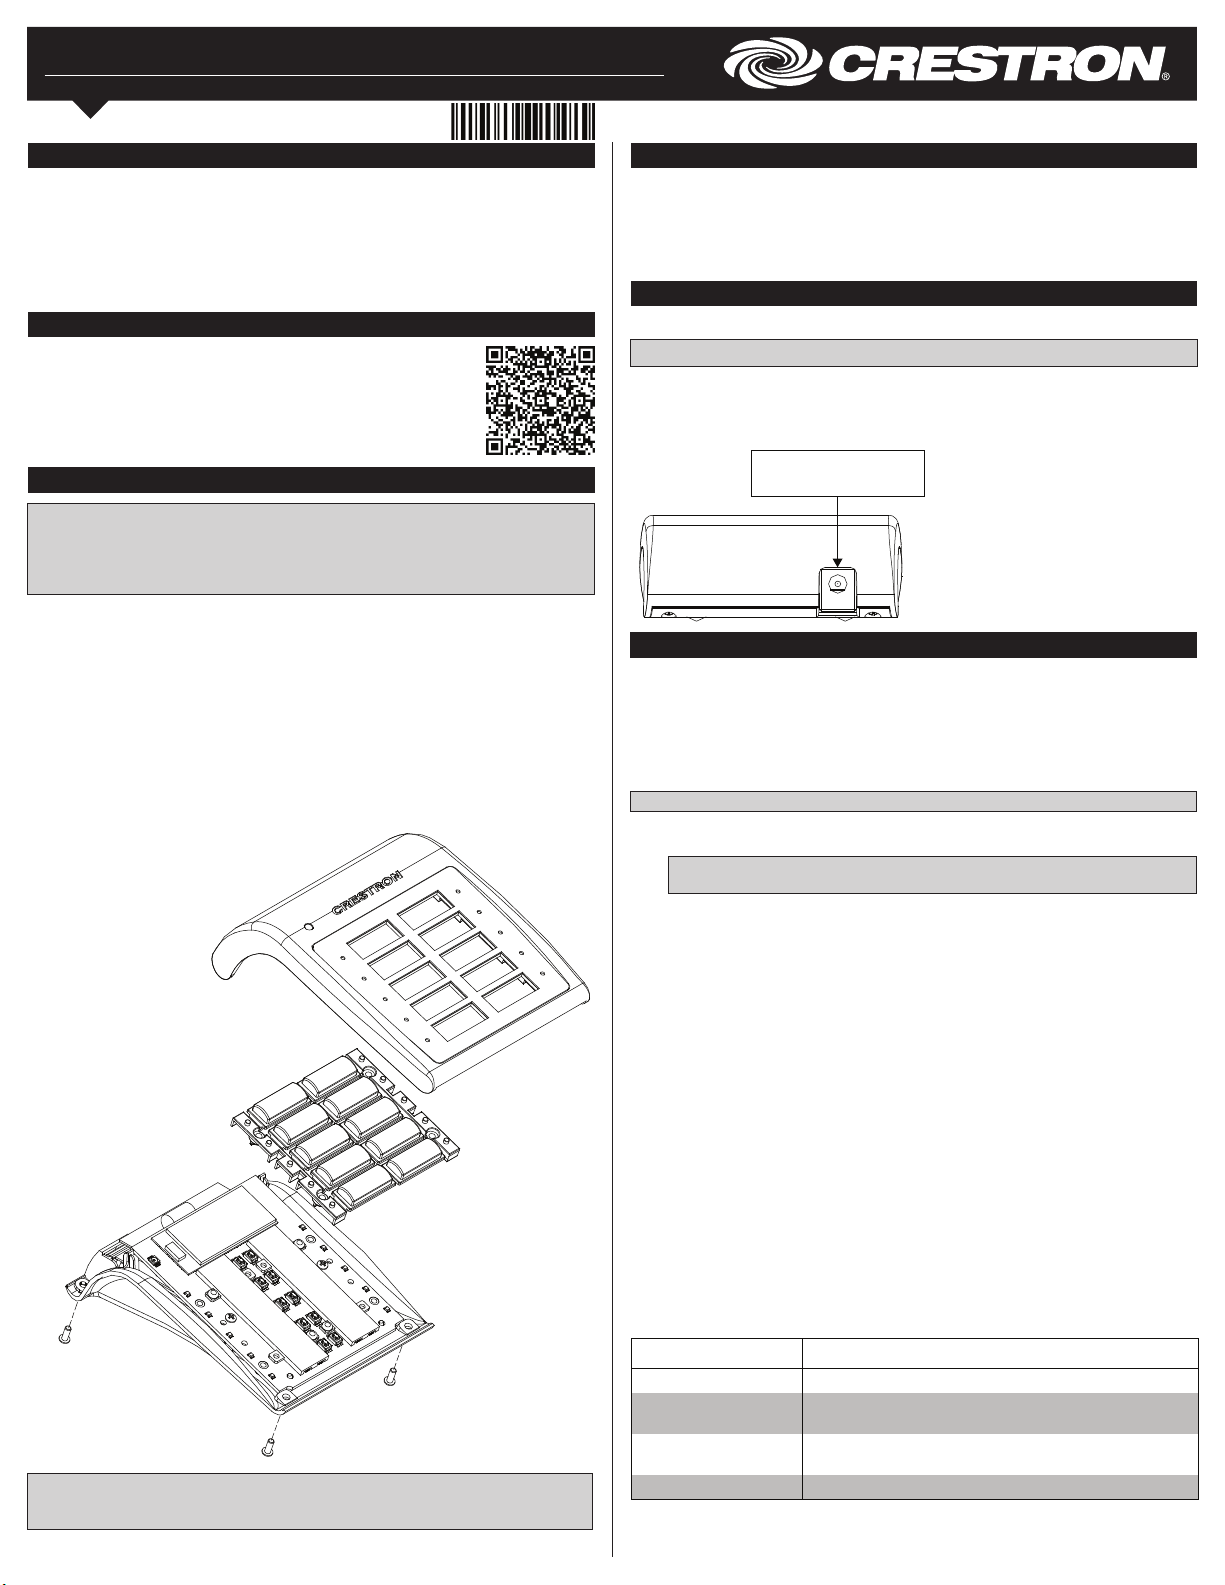
Button Installation
NOTES: Observe the following points.
• This product should be installed and used in accordance with appropriate electrical
codes and regulations.
• This product should be installed by a qualied electrician.
The HTT-B10EX is shipped with 10 blank buttons (two columns of ve buttons). To replace
one or both button columns, follow this procedure:
1. Disconnect the 12 volt power pack and remove the batteries.
2. Remove the four Phillips screws from the four corners on the bottom of the unit.
3. Remove the faceplate from the front of the unit.
4. Remove the old button column(s) and replace it with the new one(s). Make sure the
column is seated in the two small holes on the side. No screws are required.
5. Replace the faceplate on the front of the unit.
6. Replace the four Phillips screws on the bottom of the unit.
7. Reinstall the batteries or reconnect the 12 volt power pack.
HTT-B10EX Button Installation
NOTE: The HTT-B10EX comes from the factory with a protective plastic overlay
installed to prevent scratches on the metal face. Remember to remove this overlay prior
to handing the product over to the customer.
Local Button Feedback
Local button feedback provides positive conrmation for a button press. When enabled,
the LED next to the pressed button lights for as long as the button is pressed. Use SIMPL
Windows to enable or disable local button feedback.
When local button feedback is disabled (default) in SIMPL Windows, all button feedback is
governed by the control system program.
Hardware Hookup
The only connection to the HTT-B10EX is for the included 12 volt power pack.
NOTE: The HTT-B10EX cannot charge rechargeable AA batteries.
When connecting the HTT-B10EX, consider the following:
• Use Crestron power supplies for Crestron equipment.
• The included cable cannot be extended.
Hardware Connections for the HTT-B10EX
12V 0.5A:
AC Power Pack
Wireless Communications
The device connects to the Crestron network via the inNET EX communications protocol.
Use the procedures outlined below to join or leave an inNET EX network and to verify
communications between the device and the control system.
Joining an inNET EX Network
Before a device can be used in a lighting system, it must rst join an inNET EX network
by being acquired by an inNET EX gateway.
NOTE: A device can be acquired by only one gateway.
1. Put the inNET EX gateway into Acquire mode from the unit itself or from Crestron
Toolbox™, as described in its manual at www.crestron.com/manuals.
NOTE: In an environment where multiple gateways are installed, only one
gateway should be in Acquire mode at any time.
2. Place the device into Acquire mode.
a. Tap either the left or right top buttons three times, and then press and hold it
down (tap-tap-tap-press+hold) until the corresponding LED on the device ashes
once (this can take up to 10 seconds).
b. Release the button to start the acquire process. The left or right top button LED
blinks slowly to show that the device is actively scanning the inNET EX network.
• The device is acquired when the left or right top button LED lights solid for 5
• If the acquire process fails, the left or right top button LED flashes rapidly. Tap
3. Once all devices have been acquired, take the gateway out of Acquire mode. Refer
Leaving an inNET EX Network
To leave an inNET EX network, put the device into Acquire mode, as described in
“Joining an inNET EX Network” above, when no gateway is in Acquire mode.
Verifying Communications Status
To check the communications status of the device, tap either the left or right top button
three times and then press and hold it down (tap-tap-tap-press+hold) for up to 2 seconds.
The left or right top button LED blinks to indicate the communications status. Refer to the
following table for details.
Turns on for 5 seconds Device is communicating with the control system.
Blinks three times
(12 volt operation only)
Blinks twice Device was previously joined to the network but is not
Blinks once Device is not joined to the network.
seconds and then turns off.
the left or right top button to acknowledge failure to acquire the infiNET EX
network. The LED times out automatically when under battery power. Ensure
gateway is in Acquire mode and within range before attempting the acquire
process again.
to the gateway’s operations guide for details.
LED COMMUNICATIONS STATUS
Device is communicating with the gateway but the
gateway is not communicating with the control system.
communicating with the gateway.
Page 2

Firmware Upgrade
NOTE: Before using the HTT-B10EX, ensure the device is using the latest rmware.
Check for the latest rmware for the HTT-B10EX at www.crestron.com/rmware.
Firmware is loaded onto the device using Crestron Toolbox.
Upgrade the HTT-B10EX rmware via Crestron Toolbox when powered via a 12 volt power
pack:
1. Establish communications with the HTT-B10EX and display the System Info
window.
2. Select Functions > Firmware to upgrade the HTT-B10EX rmware.
Upgrade the HTT-B10EX rmware via Crestron Toolbox (v. 2.36.216 or later) when
powered via batteries:
1. Select Tools > Network Device Tree View.
2. Right-click the gateway in the Network Device Tree View window.
3. Select Functions > Firmware Upload (Deep Sleep).
4. Click the Load Firmware File button in the Firmware Upload (Deep Sleep) window
and browse for the rmware in the Open window.
5. Once the rmware is selected, click Open to add the rmware to Firmware Images.
6. In the Assignments section, click the device (CTRL + click or SHIFT + click for
multiple devices) that the rmware should be assigned to. The row turns light gray.
NOTE: If a device is not located in the Assignments section, click Show all
Available IDs.
NOTE: If a deep sleep device has not been acquired by the gateway, assign the
rmware to an ID if the future ID number of the device is known.
7. In the Firmware Images section, click the rmware that should be assigned to the
device(s). The row turns light gray.
8. Once the device(s) and rmware are selected, click Assign Selected Image to
Selected Target(s) to assign the rmware to the device(s). The rmware is stored on
the gateway and assigned to the device(s).
9. Select a method to initiate the rmware upgrade on the HTT-B10EX:
• Allow the HTT-B10EX to automatically initiate the rmware upgrade, which occurs
every 24 hours.
• To manually initiate the rmware upgrade, enter or exit the room. The occupancy
sensor initiates the rmware upgrade once it detects occupancy or vacancy.
Operation
The behavior of the HTT-B10EX differs depending upon whether it is powered via the
included 12 volt power pack or via two AA batteries.
12 Volt Operation
When operating with a 12 volt connection, the HTT-B10EX operates in Bright and LED Off
mode.
When the HTT-B10EX enters Bright mode, the device maintains network connectivity,
provides rapid button press response time, and retrieves rapid feedback from the
gateway. It also enables the backlight control via ambient light sensors. The HTT-B10EX is
transitioned to LED Off mode if no button press or motion is detected for 30 seconds.
When the HTT-B10EX is in LED Off mode, the device maintains network connectivity. The
device disables the backlight and feedback. The HTT-B10EX reverts to Bright mode when
a button is pressed or motion is detected.
When 12 volt power is connected to the HTT B10EX, the device acts as a router and
repeater for other inNET EX devices.
Battery Power Operation
NOTE: The HTT-B10EX does not function as a repeater when using battery power.
When operating with battery power (no 12 volt connection is made), the HTT-B10EX
operates in Sleep mode, Fast Polled Wake mode, and Slow Polled Wake mode.
If no activity is present, the panel operates in Sleep mode, which disables the radio,
backlight, and feedback. The HTT-B10EX transitions to Fast Polled Wake mode when a
button is pressed or motion is detected.
When the HTT-B10EX enters Fast Polled Wake mode, the device maintains network
connectivity, provides rapid button press response time, and retrieves rapid feedback
from the gateway. It also enables backlight and button feedback. The HTT B10EX is
transitioned to Slow Polled Wake mode if no button presses are detected for 5 seconds
(motion does not keep the device awake).
When the HTT-B10EX enters Slow Polled Wake mode, the device maintains network
connectivity and responds immediately to button presses, retrieves feedback response
from the gateway every 3 seconds, enables the backlight, and enables feedback. The
device reverts to Fast Polled Wake mode on any button press. The device transitions to
Sleep mode after 10 seconds of no button activity (motion does not keep the device
awake).
As of the date of manufacture, the HTT-B10EX has been tested and found to comply with
specications for CE marking.
Federal Communications Commission (FCC) Compliance Statement
This device complies with part 15 of the FCC Rules. Operation is subject to the following conditions:
(1) This device may not cause harmful interference and (2) this device must accept any interference
received, including interference that may cause undesired operation.
CAUTION: Changes or modications not expressly approved by the manufacturer responsible for
compliance could void the user’s authority to operate the equipment.
NOTE: This equipment has been tested and found to comply with the limits for a Class B digital
device, pursuant to part 15 of the FCC Rules. These limits are designed to provide reasonable
protection against harmful interference in a residential installation. This equipment generates, uses and
can radiate radio frequency energy and, if not installed and used in accordance with the instructions,
may cause harmful interference to radio communications. However, there is no guarantee that
interference will not occur in a particular installation. If this equipment does cause harmful interference
to radio or television reception, which can be determined by turning the equipment off and on, the
user is encouraged to try to correct the interference by one or more of the following measures:
• Reorient or relocate the receiving antenna
• Increase the separation between the equipment and receiver
• Connect the equipment into an outlet on a circuit different from that to which the receiver is
connected
• Consult the dealer or an experienced radio/TV technician for help
Industry Canada (IC) Compliance Statement
This device complies with Industry Canada license-exempt RSS standard(s). Operation is subject to
the following two conditions: (1) this device may not cause interference and (2) this device must
accept any interference, including interference that may cause undesired operation of the device.
Under Industry Canada regulations, this radio transmitter may only operate using an antenna of a type
and maximum (or lesser) gain approved for the transmitter by Industry Canada. To reduce potential
radio interference to other users, the antenna type and its gain should be so chosen that the
equivalent isotropically radiated power (e.i.r.p.) is not more than that necessary for successful
communication.
Industrie Canada (IC) Déclaration de conformité
Le présent appareil est conforme aux CNR d'Industrie Canada applicables aux appareils radio
exempts de licence. L'exploitation est autorisée aux deux conditions suivantes: (1) l'appareil ne doit
pas produire de brouillage, et (2) l'utilisateur de l'appareil doit accepter tout brouillage radioélectrique
subi, même si le brouillage est susceptible d'en compromettre le fonctionnement.
Conformément à la réglementation d'Industrie Canada, le présent émetteur radio peut fonctionner
avec une antenne d'un type et d'un gain maximal (ou inférieur) approuvé pour l'émetteur par Industrie
Canada. Dans le but de réduire les risques de brouillage radioélectrique à l'intention des autres
utilisateurs, il faut choisir le type d'antenne et son gain de sorte que la puissance isotrope rayonnée
équivalente (p.i.r.e.) ne dépasse pas l'intensité nécessaire à l'établissement d'une communication
satisfaisante.
To satisfy RF exposure requirements, this device and its antenna must operate with a separation
distance of at least 20 centimeters from all persons and must not be colocated or operating in
conjunction with any other antenna or transmitter.
The product warranty can be found at www.crestron.com/warranty.
The specic patents that cover Crestron products are listed at patents.crestron.com.
Crestron, the Crestron logo, Crestron Toolbox, and inNET EX are either trademarks or registered
trademarks of Crestron Electronics, Inc. in the United States and/or other countries. Other trademarks,
registered trademarks, and trade names may be used in this document to refer to either the entities
claiming the marks and names or their products. Crestron disclaims any proprietary interest in the
marks and names of others. Crestron is not responsible for errors in typography or photography.
This document was written by the Technical Publications department at Crestron.
©2015 Crestron Electronics, Inc.
Crestron Electronics, Inc. Operations & Installation Guide - DOC. 6995B
15 Volvo Drive Rockleigh, NJ 07647 (2040502)
Tel: 888.CRESTRON 02.15
Fax: 201.767.7576 Specications subject to
www.crestron.com change without notice.
 Loading...