

Page 1
HD-RX-4K-510-C-E-SW4 and HD-RX-4K-410-C-E-SW4
The Crestron® HD-RX-4K-510-C-E-SW4 and HD-RX-4K-410-C-E-SW4
are 4K multiformat AV switches and receivers. The devices provide
enhanced HDMI® video switching and audio presentation capabilities in
areas such as conference rooms and classrooms.
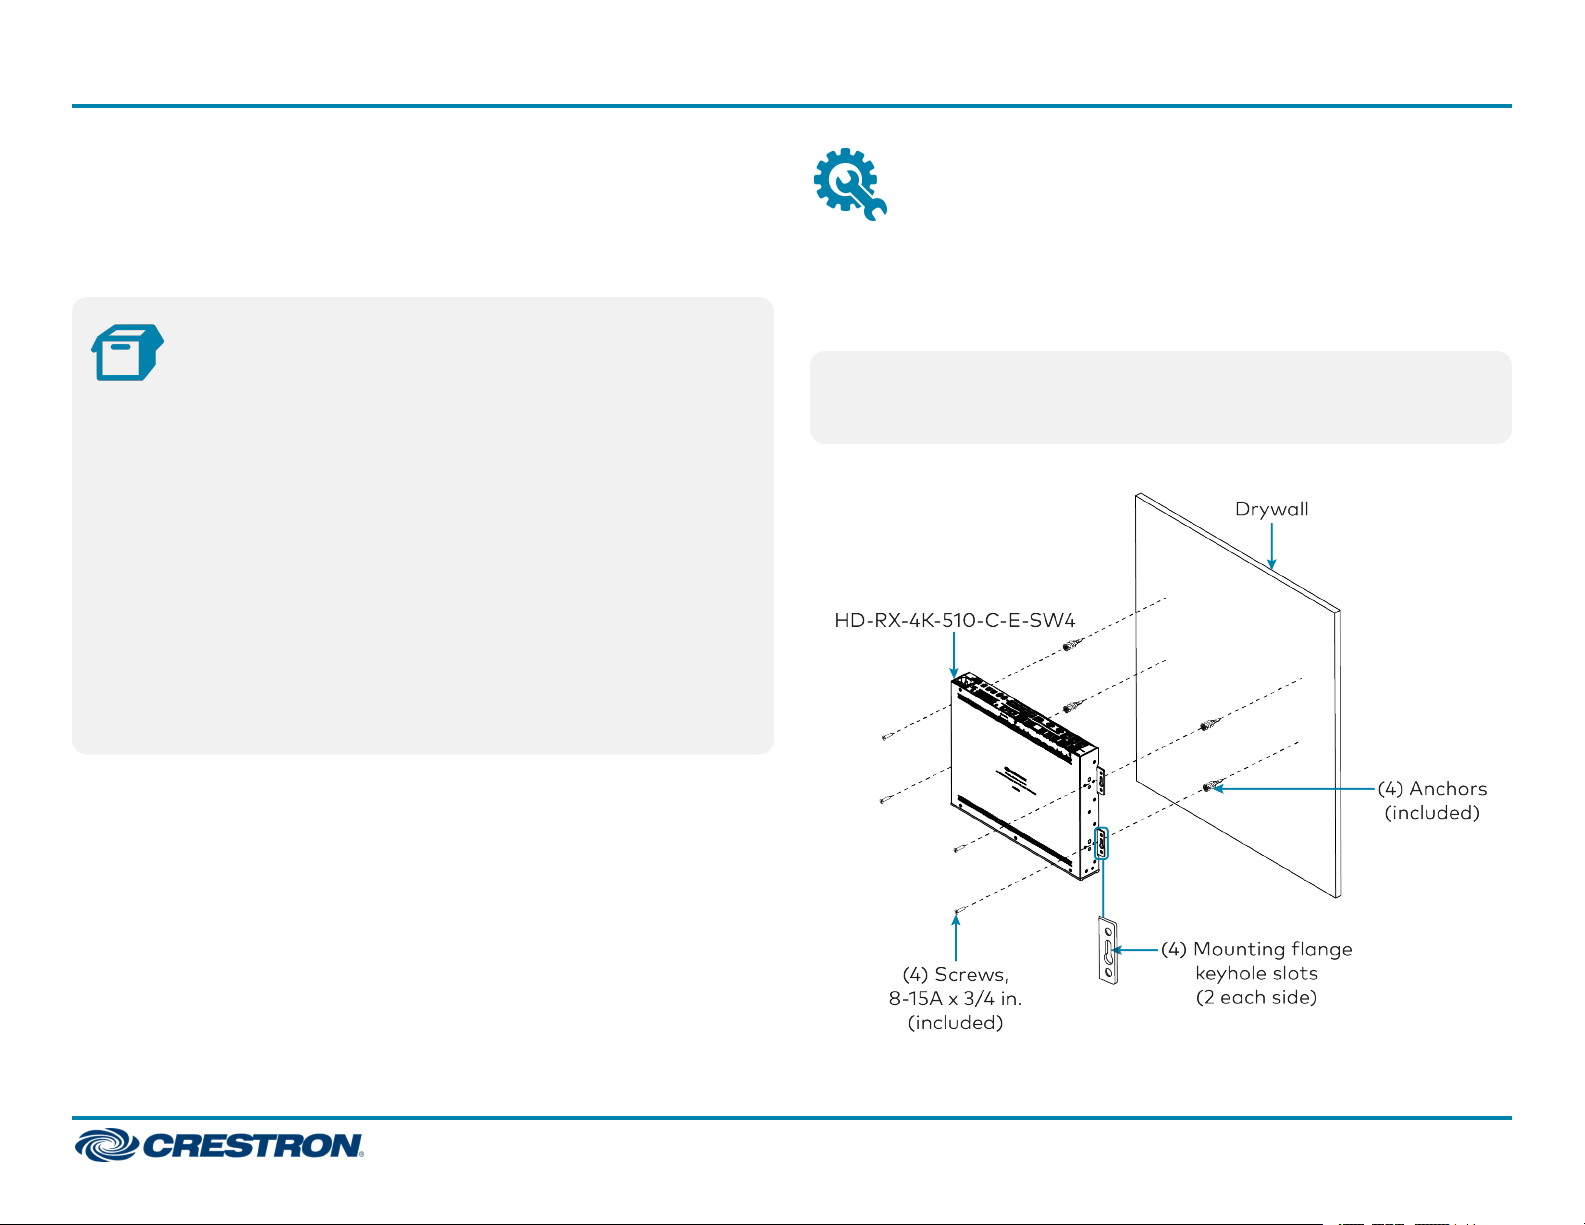
To install the device, mount it onto drywall. Use the four included drywall
anchors and the four included 8-15A x 3/4 in. flat head Phillips screws
(one screw for each keyhole slot in the four mounting flanges of the
device).
Install the Device
Quick Start
In the Box
1 HD-RX-4K-510-C-E-SW4 or HD-RX-4K-410-C-E-SW4
Multiformat AV Switch and Receiver with 4-Port Ethernet
Switch
Additional Items
4 Anchor, Drywall, Plastic (2053825)
5 Connector, 2-Pin (2003574)
2 Connector, 2-Pin (2044402)
3 Connector, 3-Pin (2003575)
5 Connector, 5-Pin (2003577)
1 Power Cord, 6 ft 7 in. (2 m) (2001134)
4 Screw, 8-15A x 3/4 in., Flat Head, Phillips (2053836)
NOTE: For safety reasons, it is recommended that the mounting
height of the device be no more than 6-1/2 ft (2 m) from the floor or
any platform above which the device is mounted.
Drywall Mounting (HD-RX-4K-510-C-E-SW4 Shown)
1
Page 2
HD-RX-4K-510-C-E-SW4 and HD-RX-4K-410-C-E-SW4
Connect the Device
Connect the device as required for the application.
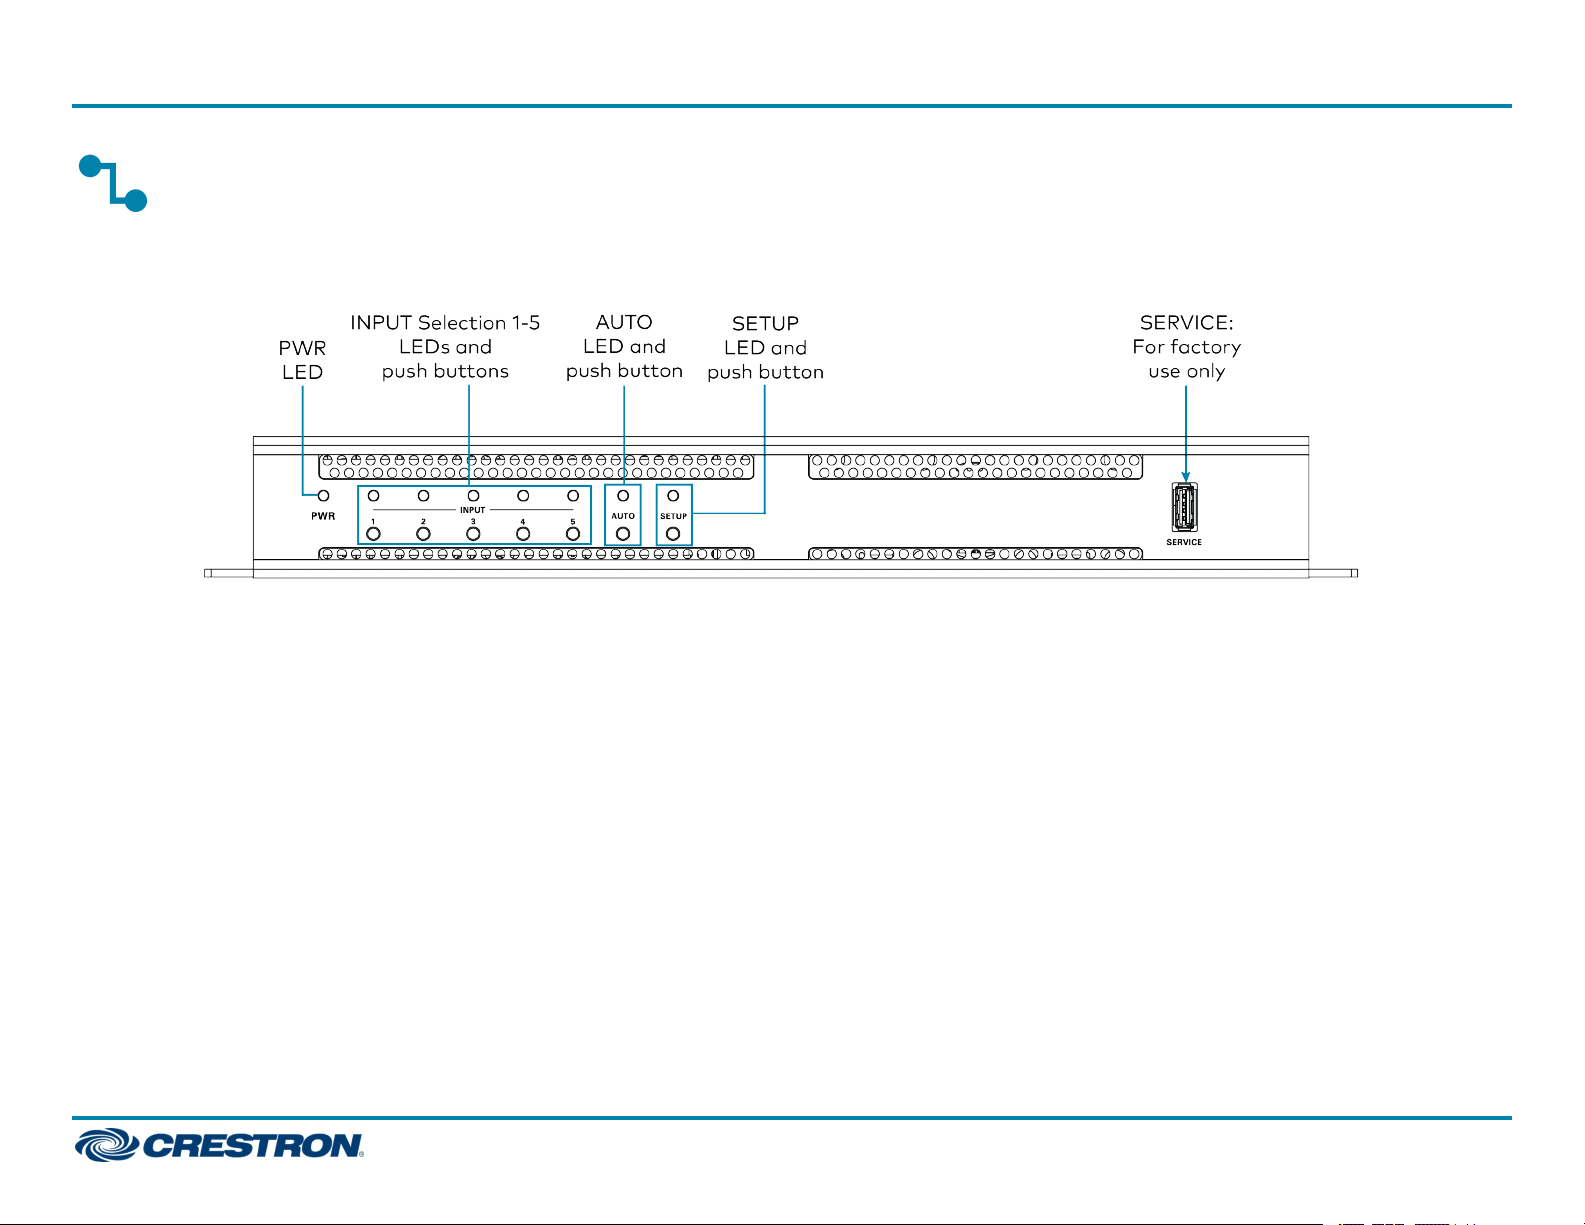
Front Panel Connection (HD-RX-4K-510-C-E-SW4 Shown)
Quick Start
2
Page 3
HD-RX-4K-510-C-E-SW4 and HD-RX-4K-410-C-E-SW4
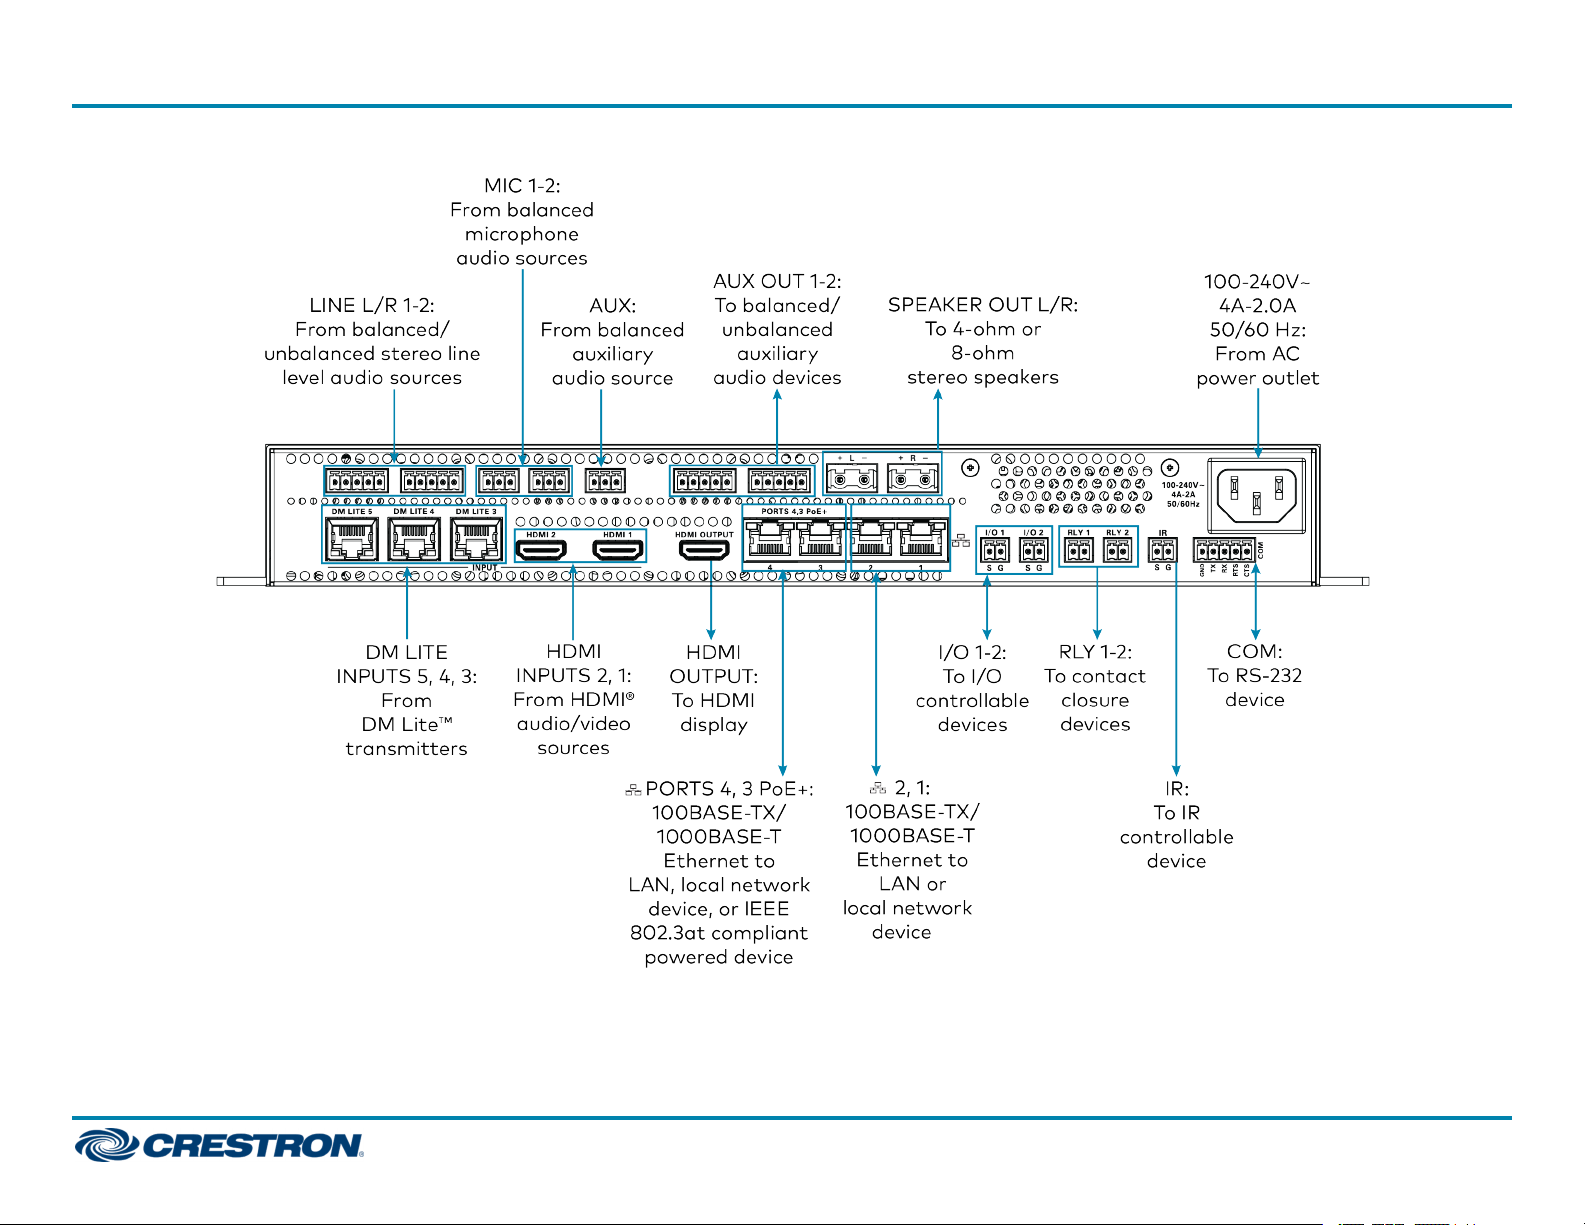
Rear Panel Connections (HD-RX-4K-510-C-E-SW4 Shown)
Quick Start
3
Page 4

HD-RX-4K-510-C-E-SW4 and HD-RX-4K-410-C-E-SW4
Quick Start
NOTES:
l Cabling that connects the device to a DM Lite™ transmitter is
designed for intrabuilding use only.
l The HD-RX-4K-510-C-E-SW4 can power three DM Lite
transmitters simultaneously. The HD-RX-4K-410-C-E-SW4 can
power two DM Lite transmitters simultaneously. Do not
connect power to DM Lite transmitters that are to be
connected to the HD-RX-4K-510-C-E-SW4 or HD-RX-4K410-C-E-SW4.
l Ethernet ports 4 and 3 can be used as PoE+ power sourcing
equipment (PSE) ports that connect to PoE+ powered devices
(PDs). Cabling that connects to PoE+ PSE ports is designed for
intrabuilding use only.
The PoE+ ports support IEEE 802.3at. The maximum power
output is 25.5 W.
l The device is grounded by connection of the included power cord
to an AC power outlet with proper grounding.
l There are no user-serviceable parts inside this device. If repair of
the device is needed, contact an authorized Crestron dealer for
return of the device to the factory.
LINE 1-2 Connector Pin Assignments
The LINE 1 and LINE 2 connectors use 5-pin terminal blocks for balanced
or unbalanced analog audio inputs.
LINE Connector
Refer to the following table and diagrams for LINE analog audio input pin
assignments and wiring information.
LINE Balanced and Unbalanced Audio Input Pin Assignments
Signal Name Balanced Audio Input Unbalanced Audio Input
+ L+ L+ In
− L− L− Signal return, jumper to GND
G Shield/ground Ground
+ R+ R+ In
− R− R− Signal return, jumper to GND
LINE Balanced and Unbalanced Audio Input Wiring
4
Page 5

HD-RX-4K-510-C-E-SW4 and HD-RX-4K-410-C-E-SW4
Quick Start
AUX OUT 1-2 Connector Pin Assignments
The AUX OUT 1 and AUX OUT 2 connectors use 5-pin terminal blocks for
balanced or unbalanced analog audio outputs.
AUX OUT 1-2 Connector
Refer to the following table and diagrams for AUXOUT analog audio
output pin assignments and wiring information.
AUX OUT Balanced and Unbalanced Audio Output Pin Assignments
Signal Name Balanced Audio Output Unbalanced Audio Output
+ L+ L+ Out
− L− Open
G Shield/ground Common ground
+ R+ R+ Out
− R− Open
AUX OUT Balanced and Unbalanced Audio Output Wiring
LED Indicators
Refer to the following table for information about the LED indicators on
the device.
LED Indicators
LED
Indicator
PWR Amber Power is being applied to the device. The device is
INPUT 1-5
or 1-4
(model
dependent)
AUTO Green Automatic routing is enabled.
SETUP Red The SETUP button is pressed.
DM LITE Green A DM Lite™ link is established.
Color Meaning
booting.
Green Power is being applied to the device. The device is
operational.
Green The corresponding input is routed to the HDMI®
output.
Amber The corresponding input is detected but is not
routed to the HDMI output.
Flashing
amber
Steady
amber
Non-HDCP video is detected.
HDCP video is detected.
LAN Green An Ethernet link is established.
Flashing
amber
Data activity is occurring on the Ethernet link.
5
Page 6

HD-RX-4K-510-C-E-SW4 and HD-RX-4K-410-C-E-SW4
Quick Start
Configure the Device
Using the web interface, configure the HD-RX-4K-510-C-E-SW4 or
HD-RX-4K-410-C-E-SW4. The device also hosts the configuration of the
connected DM Lite transmitters.
To access the web interface, open a web browser and then go to the IP
address of the HD-RX-4K-510-C-E-SW4 or HD-RX-4K-410-C-E-SW4.
By default, DHCP is enabled. To display the IP address on the connected
HDMI display, press the SETUP button on the front panel of the device. If
a transmitter has a SETUP button, pressing the button on the
transmitter will also display the IP address of the HD-RX-4K-510-CE-SW4 or HD-RX-4K-410-C-E-SW4.
To log in to the web interface, enter the user name and password.
The default user name and password are both
admin
.
Upgrade the Firmware
Before using the device, upgrade the firmware. The latest firmware can be
downloaded from the HD-RX-4K-510-C-E-SW4 and HD-RX-4K-410-CE-SW4 product pages on the Crestron website (www.crestron.com).
Connect to the Cloud
The Crestron XiO Cloud™ service allows supported Crestron devices
across an enterprise to be managed and configured from one central and
secure location in the cloud. Supported devices are preconfigured to
connect to the service. Use of the service requires a registered Crestron
XiO Cloud account.
To connect the device to the Crestron XiO Cloud service:
1. Record the MAC address and serial number that are labeled on the
shipping box or rear panel of the device. The MAC address and serial
number are required in order to add the device to the Crestron XiO
Cloud environment.
2. Do either of the following:
l If you have a Crestron XiO Cloud account, go to
https://portal.crestron.io to access the Crestron XiO Cloud service.
l If you do not have a Crestron XiO Cloud account, go to
www.crestron.com/xio-cloud-registration to register for an
account.
For detailed information about using the Crestron XiO Cloud service,
refer to the Crestron XiO Cloud Service User Guide (Doc. 8214) at
www.crestron.com/manuals.
6
Page 7

HD-RX-4K-510-C-E-SW4 and HD-RX-4K-410-C-E-SW4
Additional Information
Original Instructions
The U.S. English version of this document is the original instructions.
All other languages are a translation of the original instructions.
The product warranty can be found at www.crestron.com/warranty.
The specific patents that cover Crestron products are listed at
www.crestron.com/legal/patents.
Certain Crestron products contain open source software. For specific information, visit
www.crestron.com/opensource.
Crestron, the Crestron logo, Crestron XiO Cloud, and DM Lite are either trademarks or
registered trademarks of Crestron Electronics, Inc. in the United States and/or other
countries. HDMI and the HDMI logo are either trademarks or registered trademarks of
HDMI Licensing LLC in the United States and/or other countries. Other trademarks,
registered trademarks, and trade names may be used in this document to refer to
either the entities claiming the marks and names or their products. Crestron disclaims
any proprietary interest in the marks and names of others. Crestron is not responsible
for errors in typography or photography.
Quick Start
©2019 Crestron Electronics, Inc.
Doc ID 8497A
2054223
11/12/19
7
 Loading...