

Page 1
Page 2

Page 3

CRESTRON CNSNET PC Interface
TABLE OF CONTENTS
DESCRIPTION............................................................................................................................ 1
Functional Description.................................................................................................. 1
CNSNET.............................................................................................................. 1
VisionPC/Control Software.............................................................................. 1
Physical Description...................................................................................................... 1
LEADING SPECIFICATIONS................................................................................................... 2
CONTROLS AND INDICATORS.............................................................................................. 2
Controls.......................................................................................................................... 2
Indicators......................................................................................................................... 2
ID SEL.................................................................................................................. 3
PWR..................................................................................................................... 3
INSTALLATION/SETUP........................................................................................................... 3
Software Installation..................................................................................................... 3
Preparation for Use....................................................................................................... 4
Hardware Hookup.............................................................................................. 4
Identity Code...................................................................................................... 4
PROGRAMMING....................................................................................................................... 6
TEST/TROUBLESHOOTING.................................................................................................... 8
FURTHER INQUIRIES................................................................................................................ 8
SYNTAX..................................................................................................................................... 9
RETURN AND WARRANTY POLICIES................................................................................... 9
Merchandise Returns / Repair Service....................................................................... 9
CRESNET II Limited Warranty....................................................................................... 10
Prohibited Use of Software......................................................................................... 10
REMOTE CONTROL SYSTEMS
DOC. 8085
Page 4

Page 5
CRESTRON CNSNET PC Interface
DESCRIPTION:
Functional Description
CNSNET
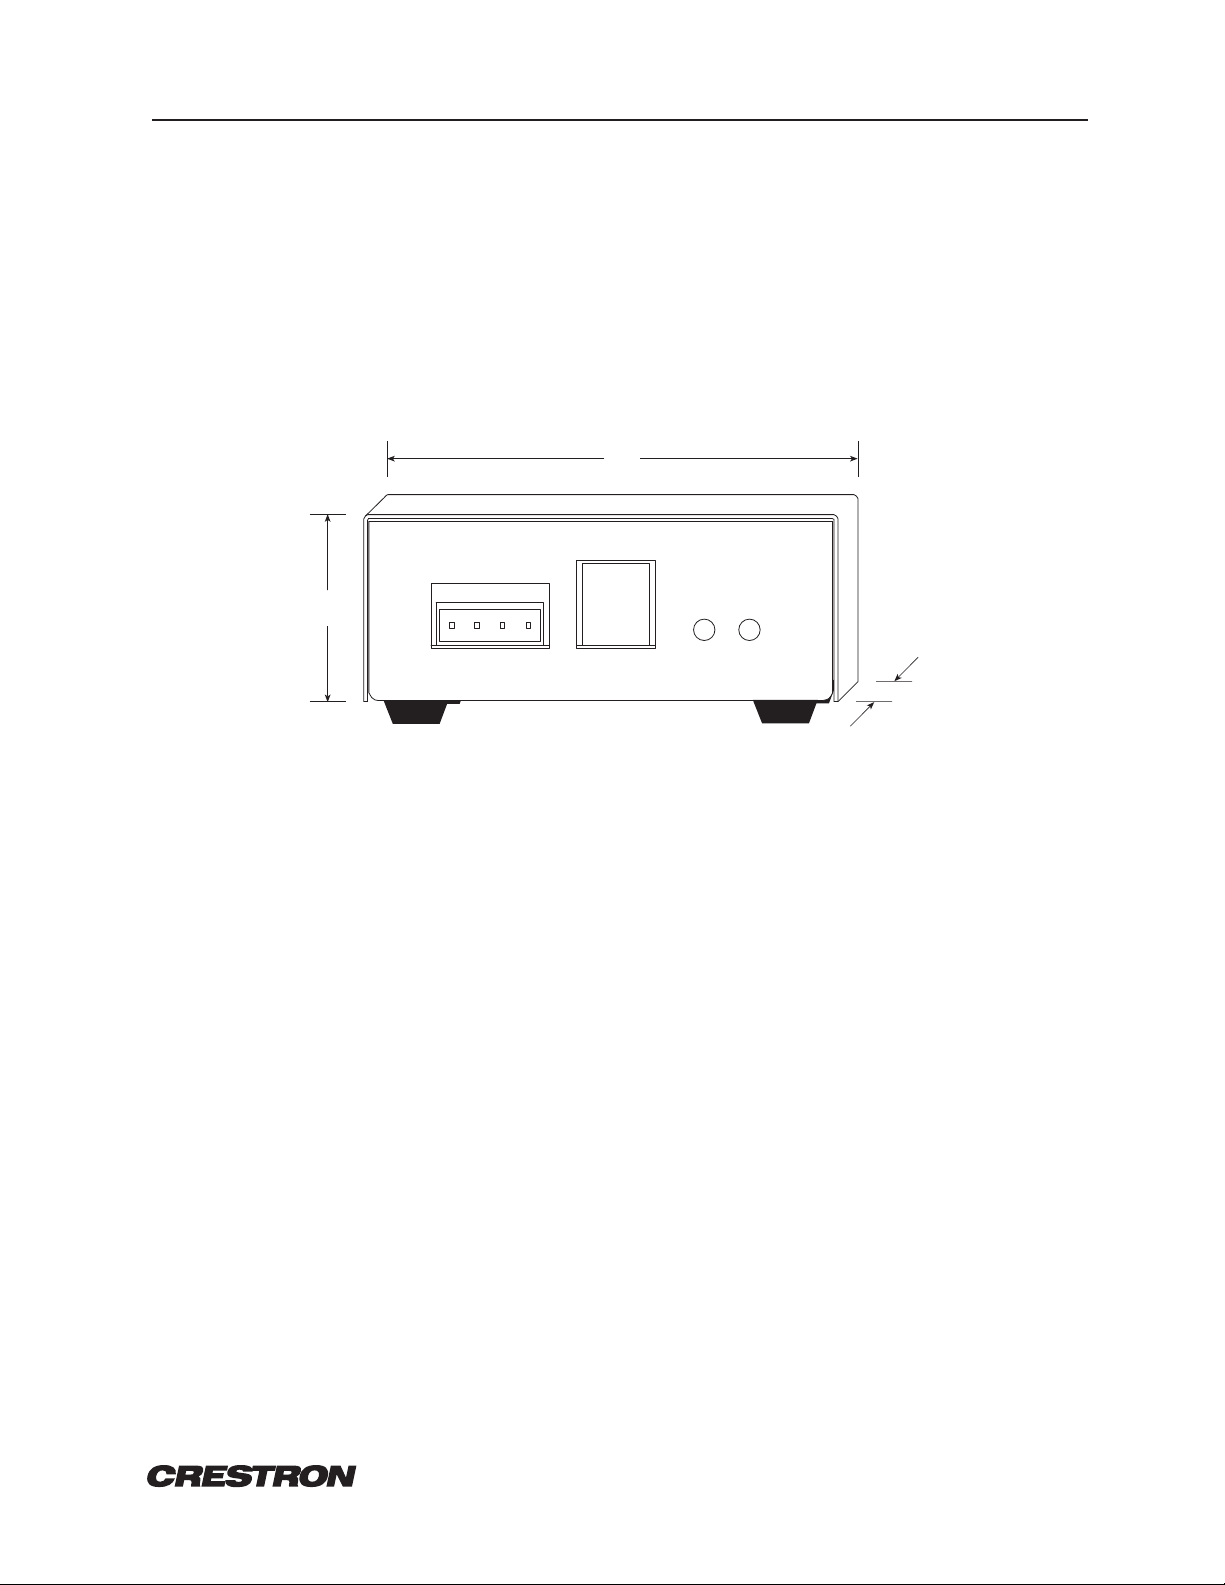
The CNSNET, illustrated in figure 1, is an RS-232 interface, designed to operate with the CRESNET II
remote control system (herein referred to as the CRESNET II system). This unit in conjunction with
VisionPC/Control
1.4 in
3.7 cm
SM
software permits a PC to functionally operate as a touchpanel.
3.6 in
9.2 cm
R S232
YZG
24
PWR
ID SEL
CRESTRON CNSNET
7.1 in
17.9 cm
Figure 1. CNSNET, RS-232 Interface
VisionPC/Control Software
VisionPC/Control software turns a project created in VisionPC/CreateSM into a run-time executable. This
software provides full control and communications to a CRESTRON control system via your PC and a
CNSNET.
Physical Description
CNSNET electronic hardware is housed in a black cold-rolled painted steel box (refer to figures 1 or 2).
Silk screening is applied to the face of one panel of the steel case. Located on this panel is a four-pin
network port (24 Y Z G), a RJ-11 port (RS-232), a red LED (ID SEL), and a green LED (NET PWR).
There are four rubber bumpers on the base of the unit for stability and to prevent slippage.
REMOTE CONTROL SYSTEMS
1 DOC. 8085
Page 6

CRESTRON CNSNET PC Interface
R S232
YZG
24
PWR
ID SEL
CRESTRON CNSNET
Figure 2. CNSNET, Panel View
LEADING SPECIFICATIONS:
Table 1 provides a summary of leading specifications for the CNSNET. Dimensions and weight are
approximations rounded to the nearest tenth unit.
Table 1. Leading Specifications
SPECIFICATION DETAILS
Power Requirements 3 Watts
CRESNET II Workshop Version 4.31 (standard released version)
CRESNET II Operating System 3.09.17 or later (standard manufacturing
Compiler 3.06.06 or later (standard release version)
Dimensions & Weight Height: 1.4 in (3.7 cm)
As of the date of manufacture, the unit has been tested and found to comply with specifications for CE
marking.
CONTROLS AND INDICATORS:
Controls
There are no user accessible control mechanisms on the CNSNET.
version)
Width: 3.6 in (9.2 cm)
Depth: 7.1 in (17.9 cm)
Weight: 1.1 lb (0.5 kg)
Indicators
There are two LED indicators located on the CNSNET, refer to figure 2.
REMOTE CONTROL SYSTEMS
2 DOC. 8085
Page 7

CRESTRON CNSNET PC Interface
ID SEL
The red LED illuminates when communication between the CRESNET II system and the CNSNET is
established. Illumination indicates that the identity code of the CNSNET matches the identity code of a
network unit in the SIMPL program currently running in the CRESNET II system.
PWR
The green LED illuminates when 24 volts is supplied to the CNSNET over the network.
INSTALLATION/SETUP:
Software Installation
After creating customized control screens for a specific project with VisionPC/Create, use the "Create
Install" utility to develop VisionPC/Control disk(s). Refer to the latest revision of the VisionPC/Create
Operations Guide (Doc. 5495) for details. The VisionPC/Control disks must be installed and used in
conjunction with the CNSNET to connect to the CRESNET II control network. Virtually any electronic or
electromechanical device or subsystem can be controlled.
Before installing VisionPC/Control software, verify that Windows is open. Complete the following steps in
the order provided to ensure proper installation.
1. Insert the VisionPC/Control disk #1 into drive A: (or B:) of the PC.
2. Close all program windows except Program Manager.
3. From the Program Manager window, select
4. At the
5. The installation program attempts to create the "c:\visionpc" directory to set up VisionPC/Control
6. CRESTRON recommends a complete installation. Therefore, select the
7. The program prompts the user for additional disks, as required.
8. The install program adds a set of icons to a particular Program Manager group, "VisionPC". If another
Command Line, type "A:INSTALL" (or "B:INSTALL") and select the "OK" button to run the
Crestron VisionPC/Control Installation program.
software. If installation is preferred on another directory and/or drive, enter or select the path.
group is preferred, enter the name of the new or existing group. Select the
group's identity.
File and Run to open the "Run" dialog box.
Full install button.
Create button to verify the
The first part of VisionPC/Control software is installed. Continue with the following steps to install
files for a specific project.
REMOTE CONTROL SYSTEMS
3 DOC. 8085
Page 8

CRESTRON CNSNET PC Interface
9. From the "Project Install" dialog box, enter or select the project directory. The suggested directory is
the same directory used earlier to install VisionPC/Control.
10. The "Project Install" dialog box also offers the opportunity for last minute verification or modification
of COM port and network ID settings.
11. The program prompts the user for additional disks, as required.
12. Installation is complete. Select the OK button to return to the Program Manager window.
Preparation for Use
Hardware Hookup
Refer to figure 3 for a typical hook-up diagram of the CNSNET. Complete the following steps in the order
provided to ensure proper installation of the unit.
1. Before making any connections, review latest revision of network interconnection drawing (Doc.
5411).
2. Connect the network female connector to the 4-pin male connector at the front of the CNSNET. The
male connector is marked 24 Y Z G. Network termination points are available at the control system
power supply. Network units may also be daisy-chained together. Refer to the latest revision of the
CRESNET II reference manual section on CNPWS power supplies for wire gauge specifications and
connection details.
3. Connect one end of the seven foot telephone cable to the CNSNET panel marked RS-232. Figure 4
illustrates a detailed drawing for the cable.
4. Attach the RJ11 to DB9S adaptor to the loose end of the telephone cable.
5. Attach the nine-pin connector to the proper COM port on the PC.
6. Apply power to the CNSNET and observe illumination of the red LED marked ID SEL and green LED
marked NET PWR on the unit's panel.
Identity Code
Each device on the CRESNET II network requires a unique identity code (ID CODE). These codes consist of
a two-digit hexadecimal number ranging from 03 to FE. The ID CODE of each unit must match the ID CODE
specified in the "NET.ID" statement of the CRESNET II SIMPL-I program in order for the device to be
addressed properly. The CNSNET ID CODE is not manually set on the unit itself. Instead, the CNSNET ID
CODE is assigned in VisionPC/Create and can be modified during installation of VisionPC/Control disk(s).
REMOTE CONTROL SYSTEMS
4 DOC. 8085
Page 9

Page 10

CRESTRON CNSNET PC Interface
RJ11 DB9F
Figure 4. CNSNET, RJ11 RS-232 Port to 9-Pin Computer Port Cable
PROGRAMMING:
A basic touchpanel SIMPL program is illustrated in figure 5. An example follows the figure to illustrate
the CRESNET II screen displays for touchpanel signal name assignment. The screen displays illustrated in
this example are accessible from the "Define Network" section of the SIMPL-I Menu in the CRESNET II
Workshop.
1
2
3
4
5
6
1
2
3
4
5
6
7
8
9
CTP-3000
NET.ID:03
REMOTE CONTROL SYSTEMS
o1
o2
o3
o4
INTERLOCK
i1
i2
i3
i4
relay1
relay2
relay3
relay4
S-1
relay1_fb
relay2_fb
relay3_fb
relay4_fb
Figure 5. CNSNET, SIMPL Program
6 DOC. 8085
Page 11

CRESTRON CNSNET PC Interface
System PF: 4.5 Net PF: 3.0
Net ID Net Device Description P.F.
03: CTP-3000
04:
05:
06:
07:
08:
09:
0A:
TAB to select entries PgUp/PgDn to find ID
F2-Detail F3-Display Signals
ESC to Def Equip Define Network F1=Help
Net ID: 03
CTP-3000
Command Center Touch Panel P.F.: 3.0
JOIN# BUTTON SIGNAL NAMES FEEDBACK SIGNAL NAMES
1: relay1
2: relay2
3: relay3
4: relay4
5:
6:
7:
8:
10.
11.
relay1_fb
relay2_fb
relay3_fb
relay4_fb
m
ESC to Def Equip Panel Detail F1=Help
REMOTE CONTROL SYSTEMS
F2-Detail F3-Display Signals F4- Auto-Increment
F6-Connect Buttons/FB F7-Define Bar Graphs TAB-Button↔FB↔Join#
7 DOC. 8085
Page 12

CRESTRON CNSNET PC Interface
TEST/TROUBLESHOOTING:
Table 2 provides corrective action for possible trouble situations. If further assistance is required, please
contact a CRESTRON technical support representative.
Table 2. Troubleshooting Guide
TROUBLE POSSIBLE CAUSE(S) CORRECTIVE ACTION
CNSNET does not function. CNSNET is not communicating to the
network.
NET PWR LED is not illuminated. CNSNET is not receiving network
power.
CNSNET is not responding. Incorrect network wiring. Verify correct wiring to the
CNSNET ID is not unique; two or more
units share same ID.
Message: "Cresnet not responding"
appears on the PC and ID SEL LED is
extinguished.
Message: "PC to CNSNET
communications error" apears on the PC
when trying to open VisionPC/Control
icon.
Message: "Communication timeout
during Poll" appears while running
VisionPC/Control.
CNSNET ID is not set to match the
SIMPL-I program ID.
Incorrect COM port selected. Confirm COM port assignment
CNSNET is not receiving network
power.
There is a problem with the PC to
CNSNET cable.
There is a problem with the PC to
CNSNET cable.
Verify network connection on
CNSNET panel. Poll network in
Performance Viewport.
Confirm power is supplied to the
network.Verify network connection.
electrovert connectors.
Verify that each ID is used once.
Enter Performance Viewport in the
CRESNET Workshop. Depress the F4
key to poll the network. Verify that
the NET ID for the CNSNET (set
during project install in the "Project
Install" dialog box) is properly set to
match the SIMPL-I program.
during installation of
VisionPC/Control disk(s).
Verify power is supplied to the
network and CNSNET.
Verify cable connections and restart
VisionPC/Control.
Verify cable connections and restart
VisionPC/Control.
FURTHER INQUIRIES:
If after reviewing this Operations Guide you still have additional questions, please contact a CRESTRON
technical support representative by dialing (800) 237-2041 or (201) 894-0660.
REMOTE CONTROL SYSTEMS
8 DOC. 8085
Page 13

CRESTRON CNSNET PC Interface
SYNTAX:
The following syntax codes are provided for compatibility purposes only.
NET.ID < 03 to FD > : CTP-3000
i15 = <signal name> \i# refers to join # of touchpanel button
o15 = <signal name>
i20, o20 = <signal name> \button and feedback combined
i21, o21 = <signal name>
i25 = <signal name> \independent button
o25 = <signal name> \independent feedback
" = " "
" = " "
AN1 = <signal name> \analog signal to bargraph
AN2 = <signal name>
" = " "
" = " "
AI1 = <signal name> \analog signal from touchpanel
AI2 = <signal name> \ex: positouch button
" = " "
" = " "
RETURN AND WARRANTY POLICIES
Merchandise Returns / Repair Service
1. No merchandise may be returned for credit, exchange, or service without prior authorization from
CRESTRON. To obtain warranty service for CRESTRON products, contact the factory and request an
RMA (Return Materials Authorization) number. Enclose a note specifying the nature of the problem,
name and phone number of contact person, RMA number, and return address.
2. Authorized returns must be shipped freight prepaid to CRESTRON ELECTRONICS, INC., 101
Broadway, Cresskill, New Jersey 07626, along with the Return Authorization Number marked on
the outside of the package. Shipments received freight collect shall be refused.
3. All credit/exchange merchandise must be in the original cartons and is subject to a restocking
charge. Soiled or damaged merchandise is subject to additional refurbishing charges. A photocopy of
CRESTRON's original invoice must accompany the return or the equipment shall be refused.
4. Return freight charges following repair of warrantied items shall be paid by CRESTRON, shipping by
standard ground carrier. In the event repairs are found to be non-warranty, return freight costs shall
be paid by the purchaser.
REMOTE CONTROL SYSTEMS
9 DOC. 8085
Page 14

CRESTRON CNSNET PC Interface
CRESNET II Limited Warranty
CRESTRON ELECTRONICS, Inc. warrants its CRESNET II products, denoted by a "CN" prefix model
number, to be free from manufacturing defects in materials and workmanship for a period of three (3)
years from the date of shipment to purchaser. Disk drives and any other moving or rotating mechanical
parts are covered for a period of one (1) year, excluding switches and pushbuttons, which are covered for
three (3) years. CRESTRON warrants all its other products in this price list for a period of one year from
the defects mentioned above, excluding touch panel displays which are covered for 90 days. Incandescent
lamps are completely excluded from Crestron's Limited Warranty. CRESTRON shall, at its option, repair or
replace any product found defective without charge for parts or labor. Repaired or replaced equipment and
parts supplied under this warranty shall be covered only by the unexpired portion of the warranty.
CRESTRON shall not be liable to honor warranty terms if the product has been used in any application
other than that for which it was intended, or if it has been subjected to misuse, accidental damage,
modification, or improper installation procedures. Furthermore, this warranty does not cover any product
that has had the serial number altered, defaced, or removed.
This warranty shall be the sole and exclusive remedy to the purchaser. In no event shall CRESTRON be
liable for incidental or consequential damages of any kind (property or economic damages inclusive)
arising from the sale or use of this equipment. CRESTRON makes no other warranties nor authorizes any
other party to offer any warranty, expressed or implied, including warranties of merchantability for this
product. This warranty statement supercedes all previous warranties.
Prohibited Use of Software
Do not modify, reverse-engineer, disassemble, decompile, or reduce software to a human perceivable form
or translate, sub-license, resell for profit, lend, rent, or lease any portion of the software or distribute it
electronically over a user network.
REMOTE CONTROL SYSTEMS
10 DOC. 8085
Page 15

Page 16

 Loading...