

Page 1
1
quickstart guide
QuickPack
™
QP-300-WSP-P
www.crestron.com
888.273.7876 201.767.3400
©2010 Specifications subject to
change without notice.
QP-300-WSP-P
QUICKSTART DOC. 7057A (2028515) 06.10
Complete Classroom AV System Package
All brand names, product names, and trademarks
are the property of their respective owners.
1
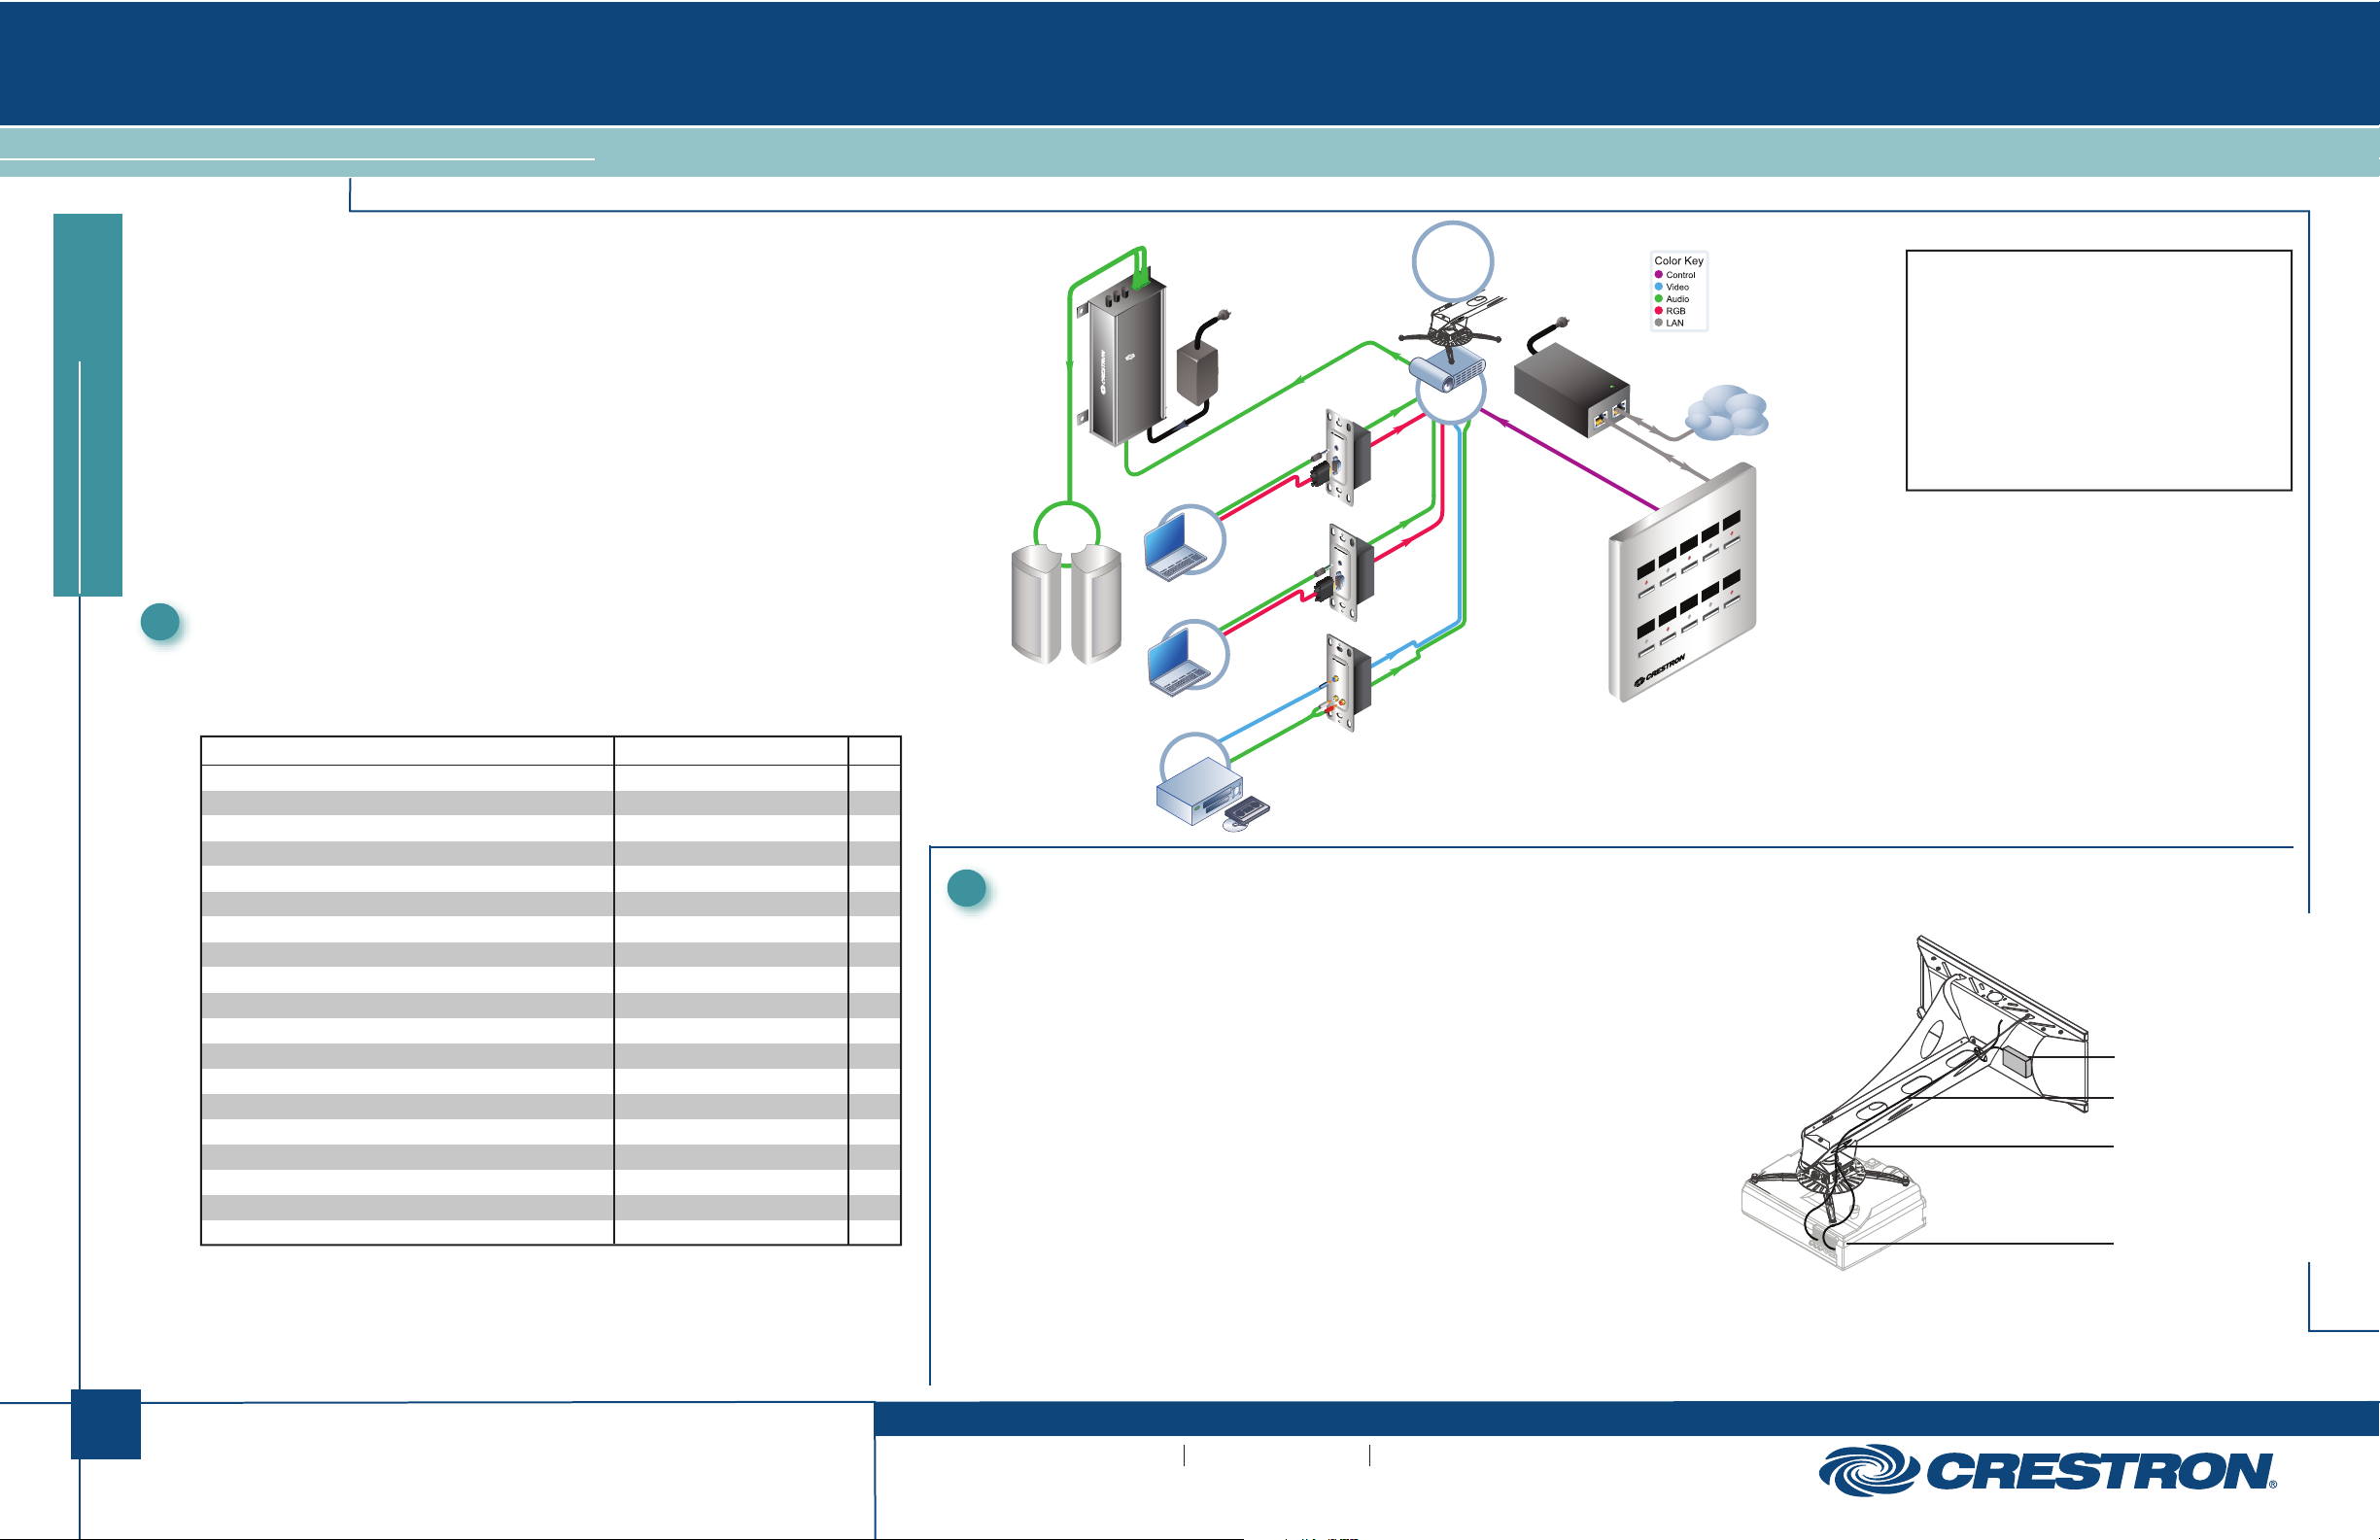
Crestron® QuickPack™ systems provide educators with a simplified, comprehensive
classroom presentation solution that saves time and money. Designed to deliver the
highest level of quality and convenience without using up your AV/IT budget, QuickPacks assemble all the vital pieces needed to outfit your classrooms for an engaging
teaching experience.
QuickPacks make it easy and affordable to install a quality projection system in every
classroom, ending the days of wheeling in the AV cart, or forcing students to squint at a
tiny TV screen. Each QP Series package includes a professional wall mount controller,
high-performance speakers and amplifier, universal projector mount, multimedia input
wall plates, and cabling. Just add your choice of video projector and screen and you
have installed a complete classroom presentation system. QuickPacks also integrate
seamlessly with interactive whiteboards and wireless microphones.
The diagram to the right shows a typical QP-300-WSP-P system arrangement.
Verify Contents
Before starting installation procedures, check the contents of your system
package. You should have received the items listed in the following table.
Retain all documents and parts supplied for use in the installation process.
DESCRIPTION PART NUMBER QTY
Media Presentation Controller™, White MPC-M5-W 1
Media Presentation Audio Amplifier MP-AMP30 1
Surface Mount Media Presentation Speakers, Pair, White FS6-W 1
Media Presentation Wall Plate, Video & Audio, White MP-WP100-W1 1
Media Presentation Wall Plate, VGA & Audio, White MP-WP131-W1 2
Universal Short-Throw Projector Wall Mount, White PMTW-50-W2 1
Power Pack for MP-AMP30 PW-2420RU 1
PoE Injector for MPC-M5 PWE-4803RU 1
RS-232 Projector Control Cable, Plenum, 50 ft (15 m) CBL-KSERIAL-DB9-L-P-503 1
Ethernet LAN Cable, Plenum, 50 ft (15 m) CBL-CAT5E-P-503 1
Speaker Cable, 16AWG, Plenum, 35 ft (11 m) CBL-SPK-P-35 2
RCA Video & Stereo Audio Cable, Plenum, 50 ft (15 m) CBL-KAV-RCAM3-L-P-50
3, 4
1
HD15 VGA Cable, Plenum, 50 ft (15 m) CBL-KVGA-L-P-50
3, 4
2
RCA Stereo Audio Cable, Plenum, 50 ft (15 m) CBL-KAUDIO-RCAM2-L-P-503 2
Projector-to-Amplifier RCA Stereo Audio Cable, 3 ft (1 m) (Supplied with MP-AMP30) 1
RCA to 3.5mm Mini-TRS Stereo Audio Adapter CBL-AUDIO-RCAF-0.53 4
1-Gang Decorator Style Faceplate, White FPL-G1-W-T 3
1-Gang Low-Voltage Trim Ring BB-G1-LV 3
2-Gang Low-Voltage Trim Ring BB-G2-LV 1
1. Each package includes a 2-gang post-construction trim ring for the MPC-M5-W, and a 1-gang post-construction
trim ring and decorator style faceplate for each wall plate.
2. The PMTW-50-W is shipped in a separate package.
3. Specified in illustration on page 2.
4. Includes uninstalled RCA and/or BNC compression connectors as required for termination at the wall plate.
Installation requires IDEAL OmniSeal™ 30-793 or equivalent compression tool (not included).
2
Installation
Tools Required - Not Supplied
Hand-Held Drill
Wire Cutter
Wire Stripper
Philips Screwdriver(s)
Flathead Screwdriver(s)
Compression Tool for supplied RCA and BNC
connectors (Refer to footnote 4 in the table
on this page.)
A. Refer to the documentation supplied with your projector to determine
the optimum mounting location.
B. Install the PMTW-50-W Universal Short-Throw Projector Wall Mount
following the instructions contained in the latest version of the Installation
Guide, Doc. 7037, supplied.
C. Mount the FS6-W speakers to the walls following the instructions
contained in the latest version of the QuickStart Guide, Doc. 6972,
supplied.
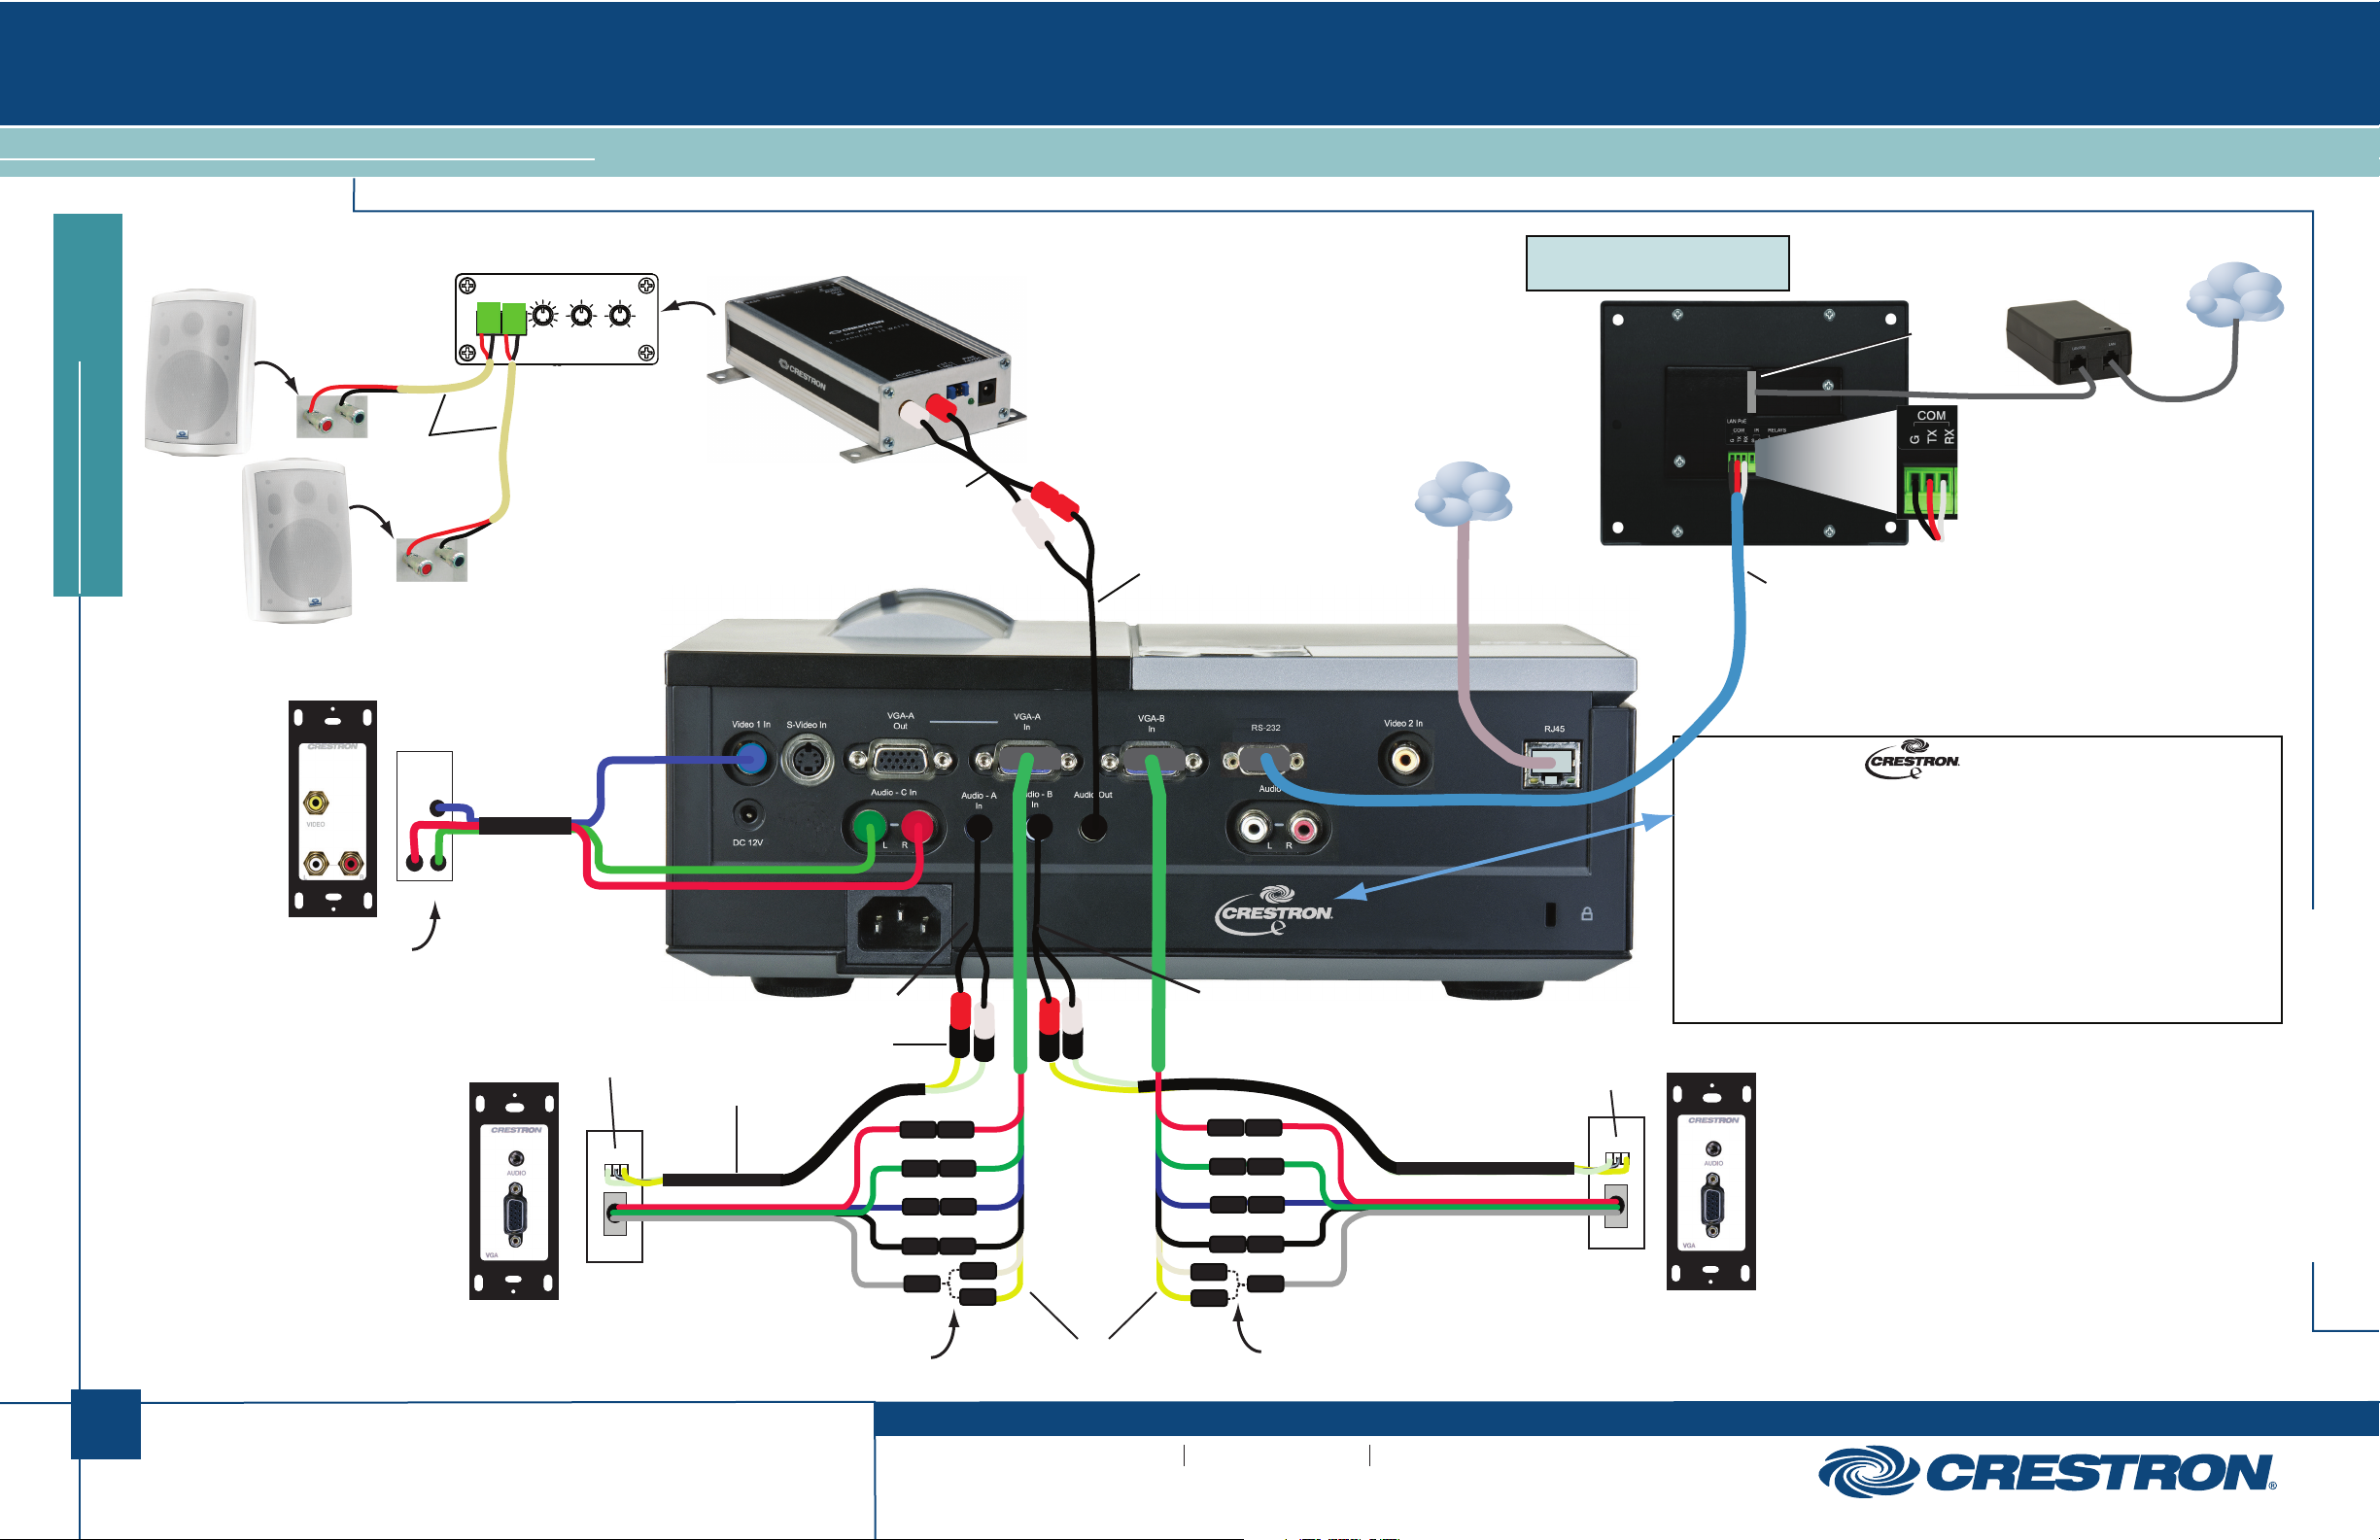
D. Run the cables for the system. The supplied cables are plenum rated
so they can be routed above the ceiling, and are already terminated for the
projector end. The opposite ends are not terminated to make it easier to
route the cables through the projector mount, the walls and ceiling.
E. Connect the cables to the MP-AMP30 Media Presentation Audio
Amplifier and place it in the storage area of the PMTW-50-W wall plate.
Refer to the diagram to the right.
F. Terminate BNC and RCA fittings as required.
G. Configure the MPC-M5 using the MPC Wizard in SystemBuilder™,
which can be obtained at the following website:
www.crestron.com/quickpacks.
LAN
LAN PoE
POWER
PWE-4803RU
AC POWER
CORD
POWER
LIGHTS
OFF
LIGHTS
ON
SCREEN
DOWN
SCREEN
UP
VOLUME
DOWN
VOLUME
UP
DVD
LAPTOP
PC
MPC-M5MPC
-
M5
PROJECTOR
MP-WP100
LAN
PW-2420RU
MP-AMP30
CRESTRON
2 CHANNELS 15 WATTS
VGA
AUDIO
CBL-VGA-AUD*
MP-WP131
MP-AMP30
AC POWER
CORD
VGA
AUDIO
CBL-VGA-AUD*
MP-WP131
MPC-M5
POWER
LIGHTS
OFF
LIGHTS
ON
SCREEN
DOWN
SCREEN
UP
VOLUME
DOWN
VOLUME
UP
DVD
LAPTOP
PC
MPC-M5MPC
-
M5
FS6-W
SPEAKERS
*These Cables Sold Separately
LAPTOP
LAPTOP
Control Cable 50’
CAT5E Cable 50’
50’ A/V Cable
50’ Video
50’ Audio
35’ (x2) CBL-SPK-P-35
3’
50’ Video
50’ Audio
VCR DVD
CBL-RCA*
CBL-RCA2*
Cables
Cable Opening
Projector
Connections
MP-AMP30
PMTW-50-W
WALL
MOUNT
PMTW-50-W
(Shown without
optional extension arm)
Page 2
2
quickstart guide
QuickPack
™
QP-300-WSP-P
www.crestron.com
888.273.7876 201.767.3400
©2010 Specifications subject to
change without notice
QP-300-WSP-P
QUICKSTART DOC. 7057A (2028515) 06.10
Complete Classroom AV System Package
All brand names, product names, and trademarks
are the property of their respective owners.
CBL-AUDIO-RCAF-0.5
LGR
Red
Green
Blue
Black
CBL-KVGA-L-P-50
WP-131
CBL-KAV-RCAM3-L-P-50
WP-100
Rear
LGR
Rear
Terminate with supplied BNC
compression fittings.
Red
Green
Blue
Black
Red
Green
Blue
Black
Gray
TYPICAL PROJECTOR
Red
Green
Blue
LAN
Strip the ends of the wire
approximately 5/8 inch (15 mm)
and twist the bared strands.
Insert the wire into the speaker
terminals, observing the correct
polarity (+ wire to + terminal and
- wire to - terminal).
L R
+ - + -
Terminate with supplied
RCA compression fittings.
CBL-KAUDIO-RCAM2-L-P-50
Twist shields together and
insert into ‘G’ terminal of
3-pin detachable
connector (supplied).
Strip the ends of the
wires approximately 3/8
inch (12 mm). Observe
the correct polarity (+ to+
terminal and - to terminal) and insert into
the two 2-pin detachable
connectors (supplied).
Terminate with
supplied RCA
compression fittings.
MPC-M5
FS6-W
MP-AMP30
PWE-4803RU
Red
Green
Blue
Black
Gray
WP-131
CBL-KAUDIO-RCAM2-L-P-50
Terminate with supplied BNC
compression fittings.
Twist shields together and
insert into ‘G’ terminal of
3-pin detachable
connector (supplied).
CBL-SPK-P-35
RCA - RCA Cable
Included w/MP-AMP30
CBL-AUDIO-RCAF-0.5
LAN PoE
CBL-KSERIAL-DB9-L-P-50
CBL-AUDIO-RCAF-0.5
NOTE: Projector volume is
controlled via the MPC-M5.
LAN
If the Crestron logo ( ) is present on your projector, then
your projector is part of the RoomView Connected Devices family,
and supports advanced direct connectivity with the MPC-M5. Utilizing
the projector’s built in LAN port, the MPC-M5 can directly interface
with the projector, offering a host of advanced monitoring and
configuration options that far exceed the capabilities of basic serial
and IR control. You will not need to use the provided
CBL-KSERIAL-DB9-L-P-50 cable if you choose to take advantage of
this great feature.
For more information, please refer to the following site:
www.crestron.com/quickpacks.
For use with projectors that are not part of
the RoomView
®
Connected Devices family.
Cable will
contain
either a
white wire
or a yellow
wire.
 Loading...