

Page 1
ATC-AUDIONET
Interwave Radio™ Tuner Card
Introduction
1
The ATC-AUDIONET is an Internet tuner card for use with card
slot-equipped devices such as the Adagio® Entertainment System
(AES), the Adagio Media System (AMS), the Adagio Media System
with Advanced Image Processing (AMS-AIP), and the Tuner Rack
(CEN-TRACK).
The ATC-AUDIONET can also be used for local audio file playback
with its built-in memory card slot.
For details, refer to the ATC-AUDIONET Installation & Operations
Guide (Doc. 6933) which can be downloaded from the Crestron Web
site (www.crestron.com/manuals).
2
quickstart guide
Installation
Required Tools/Hardware
• Small flat bladed screwdriver
• Grounding strap (recommended)
CAUTION: The ATC-AUDIONET and host system contain electrostatic
!
discharge (ESD) sensitive devices. Crestron encourages you to wear a
grounding strap to avoid damaging the card and/or the host system.
For AES, AMS, AMS-AIP Only
When inserting a card into an Adagio system that features tuner
card slots you may need to move other source connections if
designated connectors are occupied by other sources. Refer to
the respective Operations Guide for details.
CAUTION: Do not connect external sources to SOURCES
!
connectors used by tuner cards.
CAUTION: Be certain to insert tuner card before applying power
!
to the Adagio system.
Procedure
Begin the card insertion procedure with these steps:
1. Disconnect power from the host system.
2. Remove the slotted screws securing any cover plate that may
be fastened to the slot you intend to use, then set the screws
and the cover plate aside.
3. Unpack the ATC-AUDIONET card.
If the included memory card is to be used for audio playback, it
should be installed before inserting the ATC-AUDIONET into
the system. For details, refer to the ATC-AUDIONET
Installation & Operations Guide.
(Continued in next column.)
2
2
3
4
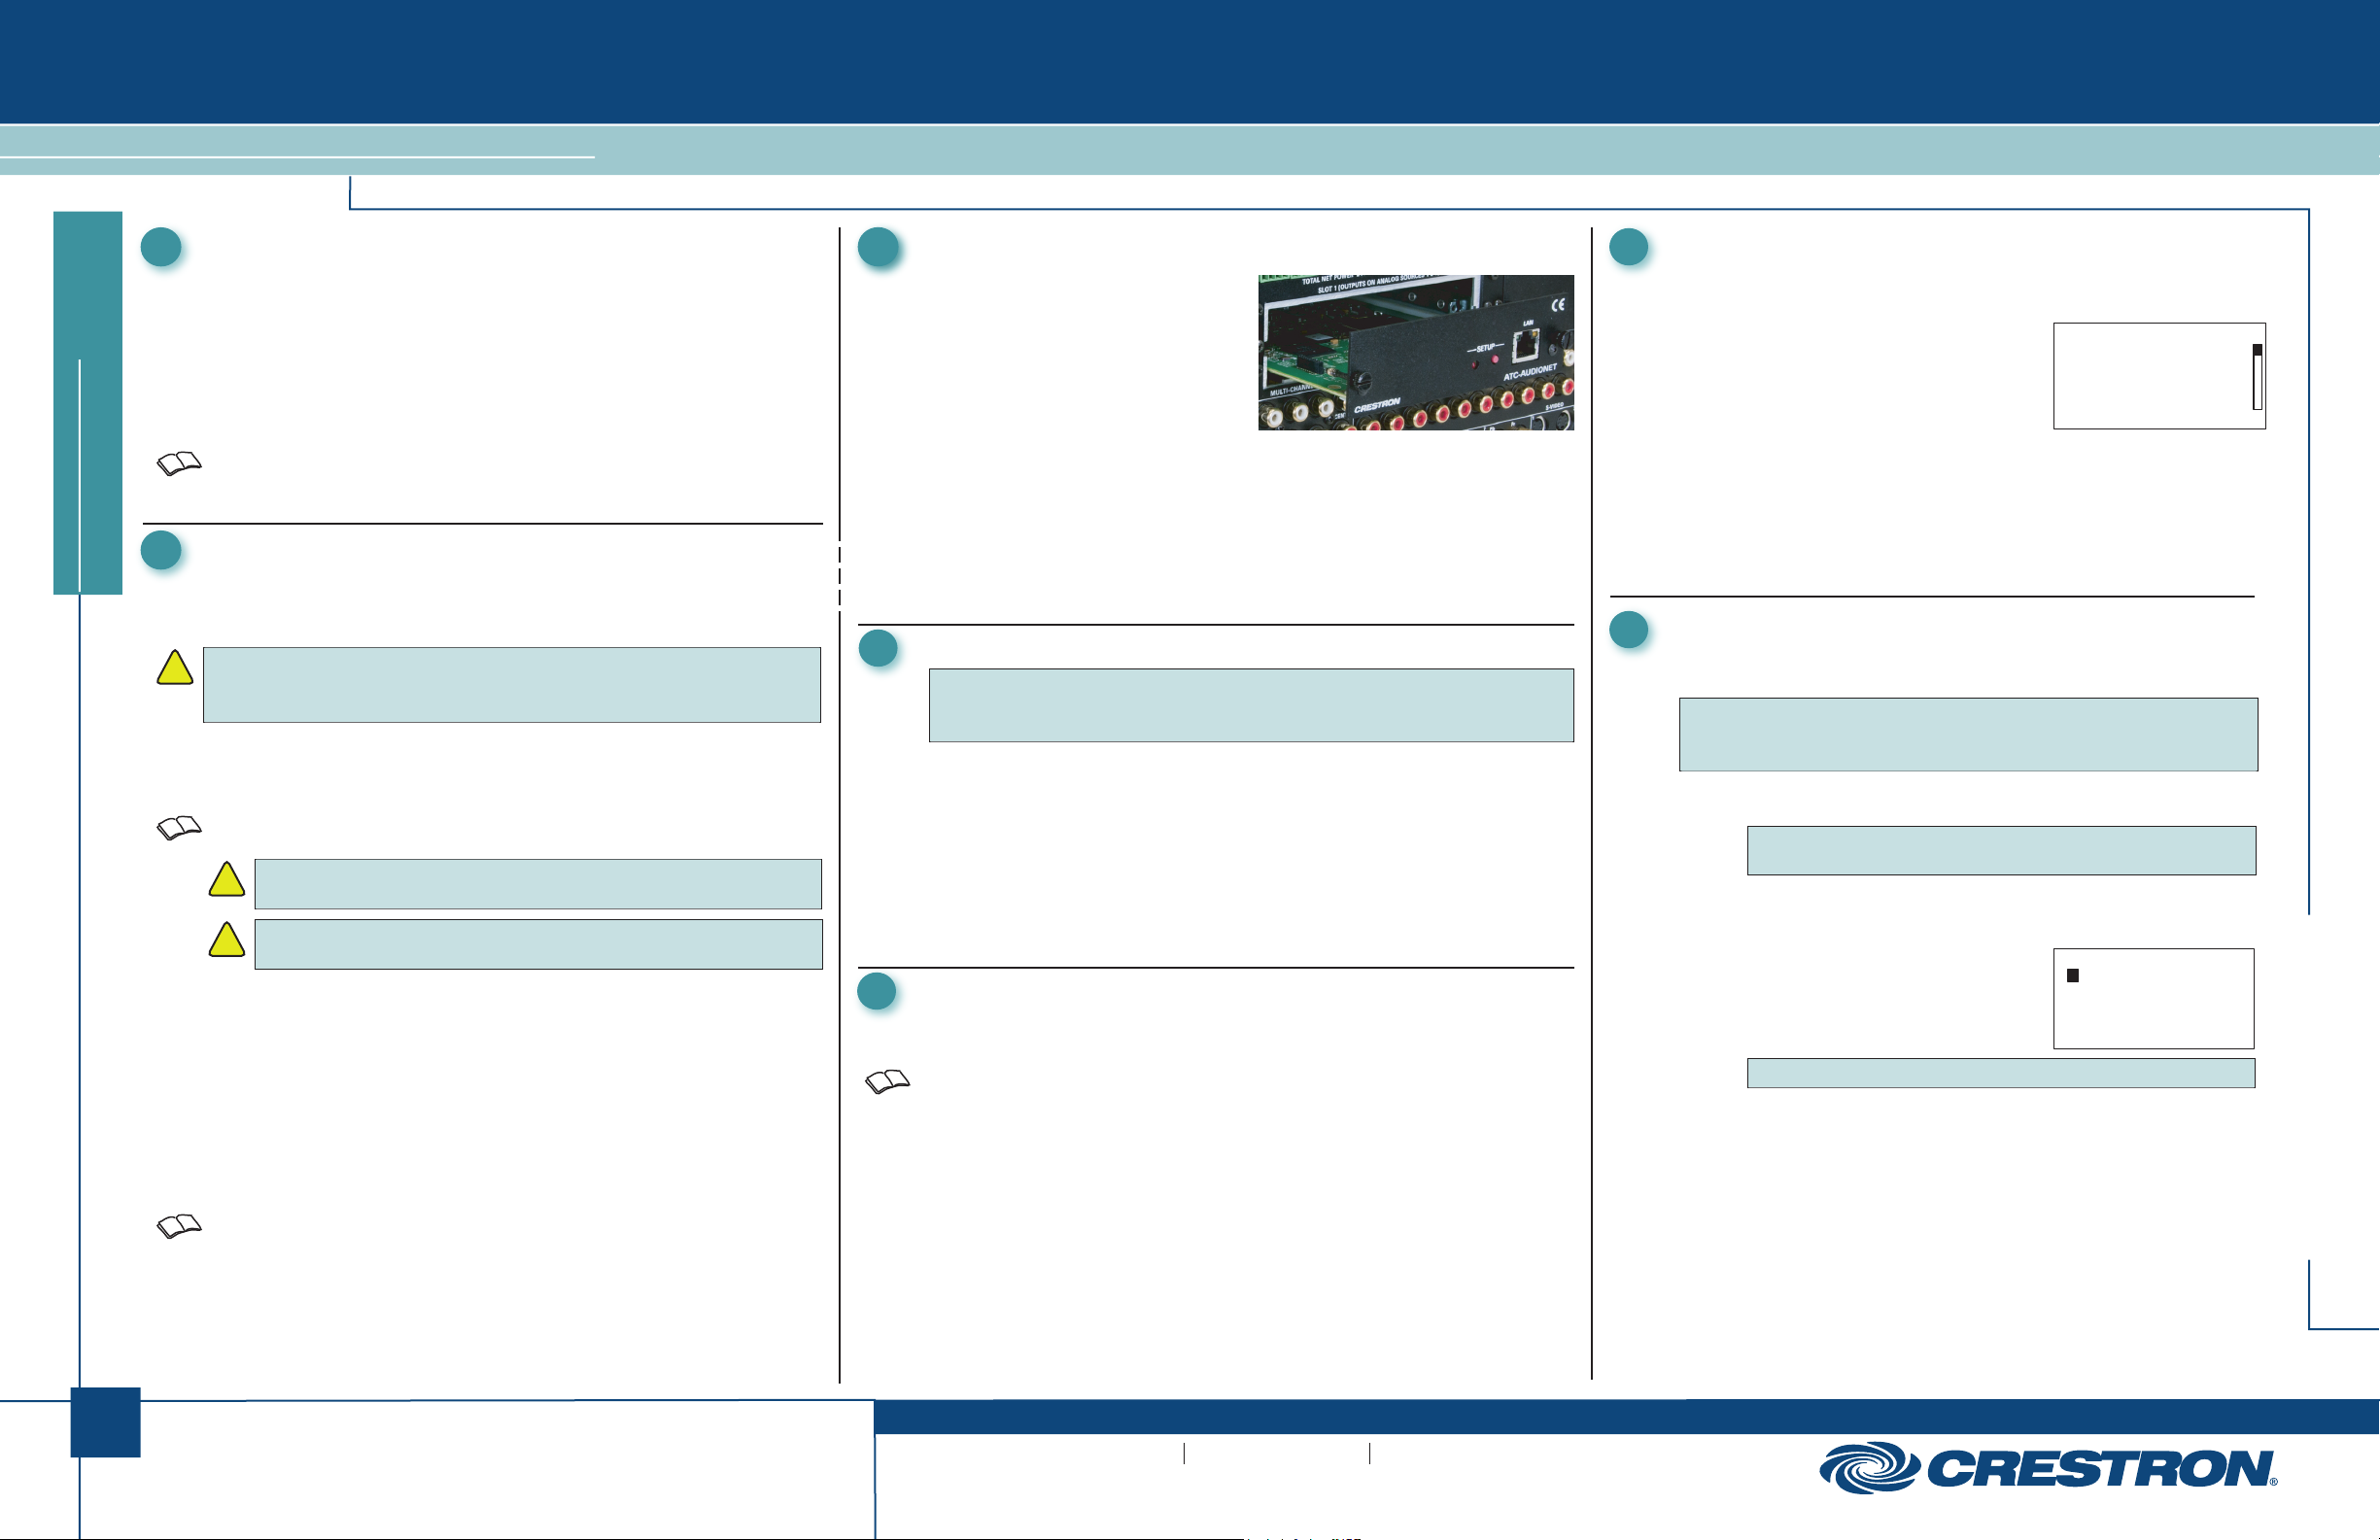
Installation (Continued)
4. As shown in the adjacent
photo, position the
ATC-AUDIONET card so the
print on the faceplate is right
side up and the side rails of
the card slide into the plastic
slots mounted on left and
right inside walls of the host system.
5. Push the ATC-AUDIONET card into the slot until it stops at the
rear connector, and then push again until the ATC-AUDIONET
snaps into place.
6. Secure the card in place by tightening the two slotted screws by
hand. The screwdriver slots are provided for removal only.
7. Connect Ethernet cable to the
8. Apply power to the the host device.
LAN port on the ATC-AUDIONET.
Front Panel Controls
NOTE: When installed in an AES, AMS, or AMS-AIP, the front panel
interface described in this guide will only be displayed when a custom
program is used.
The ATC-AUDIONET is controlled with the
CEN-TRACK or the selection knob on the AES, AMS, and AMS-AIP
(hereafter referred to as the TUNE/selection knob), the ENTER button, and
soft buttons located under the display.
• Turn the TUNE/selection knob to scroll through a list and highlight
an item.
• Press the ENTER button to select the highlighted item.
• Press a soft button to perform the action indicated above on the
display.
TUNE knob on the
Setup
IP Settings
By default, the ATC-AUDIONET uses DHCP to obtain an IP address.
To use a static address, refer to the host device’s Operations Guide.
Enable and Disable Services
Internet radio service providers (XM/SIRIUS, audiobooks, etc.) can be
enabled so they are visible to the user or disabled so they are hidden from
the user’s view. Services that the user will not use should be disabled so
they are hidden from the user’s view. To enable or disable a provider:
1. Select the ATC-AUDIONET as the source to control.
• For CEN-TRACK: Press the TUNER button for the card slot
that contains the ATC-AUDIONET.
• For AES, AMS, & AMS-AIP: Press the SOURCE button, turn
the selection knob to display ATC-AUDIONET, and press the
ENTER button.
(Continued in next column.)
4
5
Setup (Continued)
2. Press MENU.
3. Press the soft button labeled Setup.
4. Turn the TUNE/selection knob to
highlight Enable/Disable Providers
and press ENTER. The status of
each provider is displayed.
5. Turn the
enable or disable and press ENTER.
6. Turn the TUNE/selection knob to highlight Enable or
Disable and press ENTER.
7. Repeat steps 4 and 5 for every service to be enabled
or disabled.
TUNE/selection knob to highlight the service to
Enable/Disable Provider
Internet Radio is enabled
Sirius is enabled
Librivox Audiobooks is enable
SIRIUS Internet Radio (optional)
A SIRIUS streaming Internet radio account is required to configure
the ATC-AUDIONET to receive SIRIUS Internet radio.
NOTE: If the user will not use the SIRIUS online service, the
service should be disabled as described in “Enable and Disable
Services”.
1. If you do not already have a SIRIUS streaming account,
go to www.sirius.com to set up an account.
NOTE: There is a monthly charge for an account. Free
trial accounts are not supported by the ATC-AUDIONET.
2. While listening to an Internet radio station, press the soft
button labeled Setup.
3. Turn the TUNE/selection knob to highlight Setup Sirius
and press ENTER.
4. Turn the TUNE/selection knob to
highlight Set Username and press
ENTER.
NOTE: The username is case-sensitive.
a. Turn the
and press ENTER.
b. Repeat for each letter in the username. To delete a
character and move back a space, press the soft
button labeled
the cursor forward, press the soft button labeled >.
To return to the previous menu, press the soft button
labeled Back.
c. Press the soft button labeled Done to enter the name.
(Continued on following page.)
TUNE/selection knob to highlight a letter
Delete. To insert a space and/or move
Enter username:
ABCDEFGHIJKLMNOPQRS
TUVWXYZ_0123456789-,
_ Caps
Back Delete > Done
ATC-AUDIONET
1
For details, refer to the latest version of the
ATC-AUDIONET Installation & Operations Guide, Doc. 6933.
QUICKSTART DOC. 6931A (2028050, Sheet 1 of 3) 09.10
www.crestron.com
©2010 Specifications subject to
change without notice.
888.273.7876 201.767.3400
All brand names, product names, and trademarks
are the property of their respective owners.
Page 2

ATC-AUDIONET
Interwave Radio™ Tuner Card
5
quickstart guide
6
Setup (Continued)
5. Turn the TUNE/selection knob to
highlight Set Password and press
ENTER.
NOTE: The password is case-sensitive.
a. Turn the TUNE/selection knob to highlight a letter and
press ENTER.
b. Repeat for each letter in the password. To delete a
character and move back a space, press the soft button
labeled Delete. To insert a space and/or move the cursor
forward, press the soft button labeled >. To return to the
previous menu, press the soft button labeled Back.
c. Press the soft button labeled Done to store the password.
Listen to Internet Radio Feeds
1. Select the ATC-AUDIONET as the source to control.
• For CEN-TRACK: Press the TUNER button for the card
slot that contains the ATC-AUDIONET.
• For AES, AMS, & AMS-AIP: Press the SOURCE
button, turn the selection knob to display
ATC-AUDIONET, and press the ENTER button twice.
If a station has already been
selected, its information will be
displayed. Otherwise, a list of
favorite categories will be displayed.
To browse stations, press the soft button labeled
continue to step 2.
a. Turn the TUNE/selection
knob to highlight a favorite
category and press ENTER.
A list of favorite stations
within the category will be
displayed.
b. Turn the knob to highlight the station to be tuned and
press ENTER.
• Press the soft button labeled Back to return to the
previous screen.
• Press the soft button labeled Browse to browse
stations.
• Press the soft button labeled Clear to remove the
highlighted station from the list of favorites.
(Continued in next column.)
Enter password:
ABCDEFGHIJKLMNOPQRS
TUVWXYZ_0123456789-,
_ Caps
Back Delete > Done
Favorites
Classical
Rock
Browse
Browse and
Classical
Barock Music
BBC Radio 3 90 FM
Amadeus 103.7
Back Browse Clear
6
Listen to Internet Radio Feeds (Continued)
2. Press the soft button labeled
browsing options. The ATC-AUDIONET can receive Internet
radio, receive SIRIUS/XM content (if subscribed) or listen to
Librivox audiobooks.
NOTE: To display a list of favorite stations, press the soft
button labeled Favs. For details on selecting a favorite
station, refer to section 5, step 1 on page 1.
3. Turn the TUNE/selection knob to highlight the desired source
and press ENTER.
• Internet Radio:
The Internet Radio section allows you to search for
Internet radio stations and podcasts or browse
Internet radio stations. Turn the TUNE/selection knob
to highlight a browsing method and press ENTER.
Search Stations/Search
Podcasts: Select either of
these options to search for
Internet radio stations or
podcasts by name.
i. To enter a string, turn the TUNE/selection knob
to highlight a letter and press
ii. Repeat for each letter in the search string. To
delete a character and move back a space,
press the soft button labeled Delete. To insert a
space and/or move the cursor forward, press
the soft button labeled >.
iii. Press the soft button labeled Done to begin the
search. A list of stations/podcasts matching
the search string will be displayed.
iv. Turn the TUNE/selection knob to highlight the
desired station/podcast and press ENTER to
select.
Other Browse Methods: You can also browse
stations near you (local stations), recently played
stations, stations and/or podcasts in a specific location
(location), stations and/or podcasts within a specific
genre (genre), newly added stations, and the most
popular stations.
The Internet Radio section also provides the tuner’s
access code which is used to add stations and
podcasts from a web browser. For more information,
refer to “Notes on Internet Radio” on page 3.
To reset the list of favorite stations, turn the
TUNE/selection knob to highlight Reset Favorites
and press ENTER.
(Continued in next column.)
Browse to display the list of
Enter search string :
ABCDEFGHIJKLMNOPQRS
TUVWXYZ_0123456789-,
_
Back D elete > Done
ENTER.
6
7
8
Listen to Internet Radio Feeds (Continued)
• SIRIUS (subscription to online access required):
The SIRIUS section provides the online feed from
SIRIUS Satellite radio stations. For more
information, refer to section ➍.
i. Turn the TUNE/selection knob to highlight Sirius
and press ENTER.
ii. Turn the TUNE/selection knob to highlight the
desired station and press ENTER.
• Librivox Audiobooks:
The Librivox Audiobooks section allows you to listen
to audio books that were downloaded to the
ATC-AUDIONET’s memory card from the Librivox
Web site (www.librivox.org).
i. Turn the TUNE/selection knob to highlight
Librivox Audiobooks and press ENTER.
ii. Turn the TUNE/selection knob to highlight the
desired book file and press ENTER.
For more information, refer to host device’s Operations Guide.
Station Controls
While listening to a station, you can add it
to a group of favorite stations, view the list
of favorite stations, browse for another
station, or configure the ATC-AUDIONET.
• Press the soft button labeled Add to add the station to the
list of favorites.
NOTE: Favorite stations and podcasts can also be
managed online at radio.crestron.com. For details, refer to
“Manage Favorite Stations and Podcasts Online” on sheet
3.
• Press the soft button labeled Favs to display the list of
favorite stations.
• Press the soft button labeled Browse to browse through the
available stations (refer to section ➏).
• Press the soft button labeled Setup to configure the
ATC-AUDIONET.
Barock Music
Belgium
AudioNet 1 MP3 128K
Add Favs Browse Setup
Classical
End-User Sheet
After installation is complete, leave the third sheet of this Quickstart
with the end-user.
ATC-AUDIONET
2
For details, refer to the latest version of the
ATC-AUDIONET Installation & Operations Guide, Doc. 6933.
QUICKSTART DOC. 6931A (2028050, Sheet 1 of 3) 09.10
www.crestron.com
©2010 Specifications subject to
change without notice.
888.273.7876 201.767.3400
All brand names, product names, and trademarks
are the property of their respective owners.
Page 3

ATC-AUDIONET
Interwave Radio™ Tuner Card
Problem Solving
Notes on Internet Radio
• Internet radio stations can only support a limited number of listeners at any time.
If the station's servers have reached their limit of listeners, the ATC-AUDIONET
will not be able to connect. To resolve the problem try to connect again.
• Some radio station servers that have too much traffic may choose to “bump” people
off the stream. If this happens, try to connect to the station again.
• If a station stops broadcasting, it is removed from the list of available stations.
• Some stations may not appear on the list of stations if they broadcast in a format
that is not supported by the ATC-AUDIONET. For a list of supported formats, refer
to latest revision of the ATC-AUDIONET Operations and Installation Guide
(Doc. 6933).
quickstart guide
Troubleshooting
The following table provides corrective action for possible trouble situations. If further
assistance is required, please contact a Crestron customer service representative.
TROUBLE POSSIBLE CAUSE(S)
Tuner muted. Mismatched slot. Place card in proper slot.
Mute turned on. Press the Mute button to disengage
Adagio system volume is turned
down.
Cannot access
tuner card controls
from front panel.
Tuned station does
not produce sound.
Cannot receive
SIRIUS streaming
content.
Further Inquiries
If you cannot locate specific information or have questions after reviewing this guide, please
take advantage of Crestron's award winning customer service team by calling Crestron at
1-888-CRESTRON [1-888-273-7876].
You can also log onto the online help section of the Crestron Web site
(www.crestron.com/onlinehelp) to ask questions about Crestron products. First-time users
will need to establish a user account to fully benefit from all available features
Dusty contacts.
Firewall settings prevent
reception of streaming audio.
Need subscription to stream
SIRIUS content.
CORRECTIVE ACTION
muting.
Check Adagio system volume setting.
Clean contacts with cotton swab or clean
cloth. Apply isopropyl alcohol as needed for
cleaning.
Change firewall port settings or contact
network administrator.
Verify that subscription to streaming
SIRIUS content is current.
ATC-AUDIONET
3
Future Updates
As Crestron improves functions, adds new features and extends the capabilities of the
ATC-AUDIONET, additional information may be made available as manual updates. These
updates are solely electronic and serve as intermediary supplements prior to the release of
a complete technical documentation revision.
Check the Crestron Web site periodically for manual update availability and its relevance.
Updates are identified as an “Addendum” in the Download column.
For details, refer to the latest version of the
ATC-AUDIONET Installation & Operations Guide, Doc. 6933.
QUICKSTART DOC. 6931A (2028050, Sheet 2 of 3) 09.10
www.crestron.com
©2010 Specifications subject to
change without notice.
888.273.7876 201.767.3400
All brand names, product names, and trademarks
are the property of their respective owners.
Page 4

ATC-AUDIONET
Interwave Radio™ Tuner Card
Manage Favorite Stations and Podcasts Online
As an alternative to using the front panel for searching and adding favortie stations, the Crestron Internet Radio
Web site (radio.crestron.com) can be used to search and preview stations online while allowing you to manage
your favorite stations and podcasts. To use the Web site:
1. Open a browser to the Web site radio.crestron.com.
quickstart guide
2. To create a new account, click Register here. If an account has already been created, enter the e-mail
address and password and click to log in (skip to step 4).
4. Click on a group name in My Favorite Groups, a browse method, or a genre to view a list of relevant
stations.
3. Enter the ATC-AUDIONET’s
account and click Register.
NOTE: To find your access code, select the ATC-AUDIONET as a source, select Browse, select
Internet Radio, turn the knob to highlight Get Access Code, and press ENTER.
NOTE: Multiple ATC-AUDIONETs can be registered to one e-mail address. Any changes made to
favorites will propagate to all ATC-AUDIONET devices registered under the account.
(Continued in next column.)
For details, refer to the latest version of the
ATC-AUDIONET Installation & Operations Guide, Doc. 6933.
QUICKSTART DOC. 6931A (2028050, Sheet 3 of 3) 09.10
Access code, an E-mail Address and a Password to associate with the
www.crestron.com
©2010 Specifications subject to
change without notice.
5. To listen to a station in your Web browser, click . To add the station to the list of favorites, click
and follow the instructions for adding the station. If viewing a list of favorites, click to remove the
station from the list of favorites.
888.273.7876 201.767.3400
All brand names, product names, and trademarks
are the property of their respective owners.
ATC-AUDIONET
 Loading...