

Page 1

CENTURY SERIES
LMx
OWNER’S MANUAL
Page 2

Congratulations on your purchase of a Century Series console. All of us at Crest Audio in Paramus, New
Jersey, USA, support your decision, knowing your console contains the finest combination of design and
manufacture in the industry.
While your new Century Series console is one of the most feature-packed available, great effort has been
put into making it simple to operate.
This manual explains the functions of your new console, how they operate and how they relate to each
other. If properly cared for, your new console will provide you with trouble-free, sonically accurate mixing
clear into the next Century and beyond.
Please keep the following contact information on hand:
Crest Audio Customer Service Dept.
100 Eisenhower Drive
Paramus NJ 07652 USA
tel 201.909.8700 fax 201.909.8744
http://www.crestaudio.com
Crest Audio Inc.
100 Eisenhower Dr., Paramus NJ 07652 USA
TEL: 201.909.8700 FAX: 201.909.8744
http://www.crestaudio.com
Printed in USA
Page 3

TABLE OF CONTENTS
Feature Overview 2
LMx
A brief description of the LMx design, features and functions.
System Connections 3
LMx
Contains diagrams illustrating conventional system connections.
Wiring Conventions 5
LMx
Contains diagrams indicating how connectors for Crest consoles are wired.
Power Supply 6
LMx
A brief description of the rack-mountable Century Series consoles power supply.
Power Connections 7
LMx
A brief description of Crest console power connections.
Console Cooling 7
LMx
A brief description of the dual-fan cooling setup.
Input Module 8
LMx
Profiles the LMx input module.
The module and rear panel are illustrated and described.
Group Module 10
LMx
Profiles the LMx group module.
The module and rear panel are illustrated, and described.
Stereo 21R/22L Module 12
LMx
Profiles the LMx console stereo 21R/22L module.
The module and rear panel are illustrated, and described.
Master Module 14
LMx
Profiles the LMx console master module.
The module and rear panel are illustrated, and described.
Meter Bridge 16
LMx
This section profiles the LMx meter bridge.
Each type of meter is illustrated and described.
Operation 18
LMx
Describes special features: Global Level/Pan, Solo system, Monitor outputs,
Stereo Input, Channel Input Mic split, Line Inputs, Sub-grouping.
Technical Information Appendix A
LMx
Includes dimensions, specifications, console access details,
user options, console block diagram, and rear panel layout.
Glossary Appendix B
LMx
The specific details of console operation are described here, alphabetically.
Schematics Appendix C
LMx
Lists available LMx console and power supply schematics.
PAGE 1
Page 4

LMX
Feature Overview
• SSM/PMI High quality devices on balanced
microphone/line inputs and on all outputs for uncompro-
mised audio quality and reliability. All IC’s within the audio
path are socket mounted for easy upgrade or service.
• A signal path completely free of electrolytic capacitors; all
internal audio connections are gold plated.
• Pad switches on XLR inputs allow preamplifiers to accept
signals from -62 to +7 dBu on mic and -44 to +10 dBu line.
• Separate 1/4" insert send and return jacks are provided for
patching outboard equipment.
• Passive microphone splitters with ground lift switches on
every microphone input.
• Switchable 48 Volt phantom power on all microphone
inputs; optional transformers available on all microphone
inputs and primary outputs.
• EQ section includes an EQ ON switch with LED and a
100Hz High Pass filter switch. Four sweepable bands (LF-40800Hz, LMF-100Hz-2kHz, HMF-400Hz-8kHz, HF-1.5k20kHz) are supplied with bell curves, providing full frequency
control with generous overlap. The HF and LF bands are selectable between Peaking and Shelving via internal jumpers.
• 5-LED display on input modules, logically placed next to
the fader, provides accurate monitoring of pre-fader input levels.
• Input channels have level sends for the 22 output buses,
with dual concentric controls provided for buses 1-16 and single controls for buses 18-20 and 21L/22R. These controls may
function as either 11 stereo sends with level and pan, 22 discrete mono sends, or any desired combination of the two
modes. Global mono or stereo configuration for each bus is
determined by pushing a single button on the corresponding
output module.
• FET-controlled “soft” Mute switches on each input mod-
ule, which cut every selected send and output. Each input may
be assigned to any or all of the eight Mute Groups, and assignments are clearly indicated by associated status LEDs.
Engaging the Safe switch defeats the module’s group mute
function without changing the console setup.
• Output EQ - Each of the Group Output modules incorporates a dedicated stereo EQ section with three overlapping
swept bands (40Hz - 1kHz, 300Hz - 8kHz, 1kHz - 20kHz ),
odd & even EQ In/Out switching with status LEDs, and
switchable High Pass Filters with a corner frequency sweepable from 20Hz to 400Hz.
• Input for Room Ambience Microphones - Dedicated Stereo
Mic Input section (located on the upper part of the Stereo
21L/22R output module), allows routing of room ambience
microphones to in-ear monitoring systems. Includes a lownoise dual preamplifier with gain control, pad, polarity reverse
switch, phantom power switch, mic/line input switch, stereo
input EQ section with two overlapping swept bands, EQ in/out
switching, and a 100Hz roll-off High Pass Filter.
CENTURY SERIES
During quieter pauses between performances, an integrated
compressor-gate automatically opens the room ambience
microphones. When the performance resumes, the auto-control
processor gradually engages compression over a wide range,
smoothly reducing ambience level in proportion to the increase
in stage sound until mics are gated off at nominal performance
level. All eleven output modules have individual dual concentric level controls (switchable for mono or stereo mode) to feed
the Stereo Mic inputs into the Monitor outputs.
• The L/R to Group section, located on each Group Output
module, can be used to re-matrix the 21L/22R output’s mix
back into any or all of the other ten stereo or twenty mono outputs. A second subgroup feature allows any or all signals on
the first 20 mono/10 stereo buses to be assigned to the L/R
Master module, providing the flexibility required for alternate
use as an FOH console. The two subgroup modes are interlocked to prevent inadvertent feedback loops.
• Line In with Level controls, On/Off switching and Solo
switching on each of the ten Group Output modules. The line
inputs can be used as summing inputs or simple effects returns.
• Full-size meter bridge with large, sunlight-visible mechani-
cal VU meters. Metering provided for all 22 output buses plus
the stereo solo bus. Meters are solid state LED illuminated.
• Master Section provides a full bandwidth (20Hz - 20kHz)
oscillator, pink noise generator, headphone output level control, monitor on/off switch, and Talkback functions. A 100mm
fader is featured for main monitor level. Adjoining the fader
are switches to select monitor source. Source options are either
external stereo, or summing of the monitor output to mono,
and selecting a mix of all input faders for routing to the monitor output.
• A Volume Foot Pedal (and rear panel connection jack) are
provided. The foot pedal connects in series with the Monitor
Output fader.
• Comprehensive, logic-controlled Solo system.
- Normal and input priority modes
- Choice of summing and ‘last pressed’ mode
- Choice of PFL and AFL audio in stereo
• 52 and 64 module position frames, constructed of pre-plated 14-gauge steel. Any frame size may be ordered short loaded
for later expansion.
• UL/CE-approved external power supply over-designed
with ample current reserves. For the ultimate in fail-safe reliability, a back-up power supply can be linked to the primary
supply with only an inexpensive jumper cable. External
switching is not needed.
PAGE 2
Page 5
CENTURY SERIES
LEFT
MONITOR
RT
SND
INSERT
BAL
RTN
LEFT
ALT MON
RT
EVEN
LMX
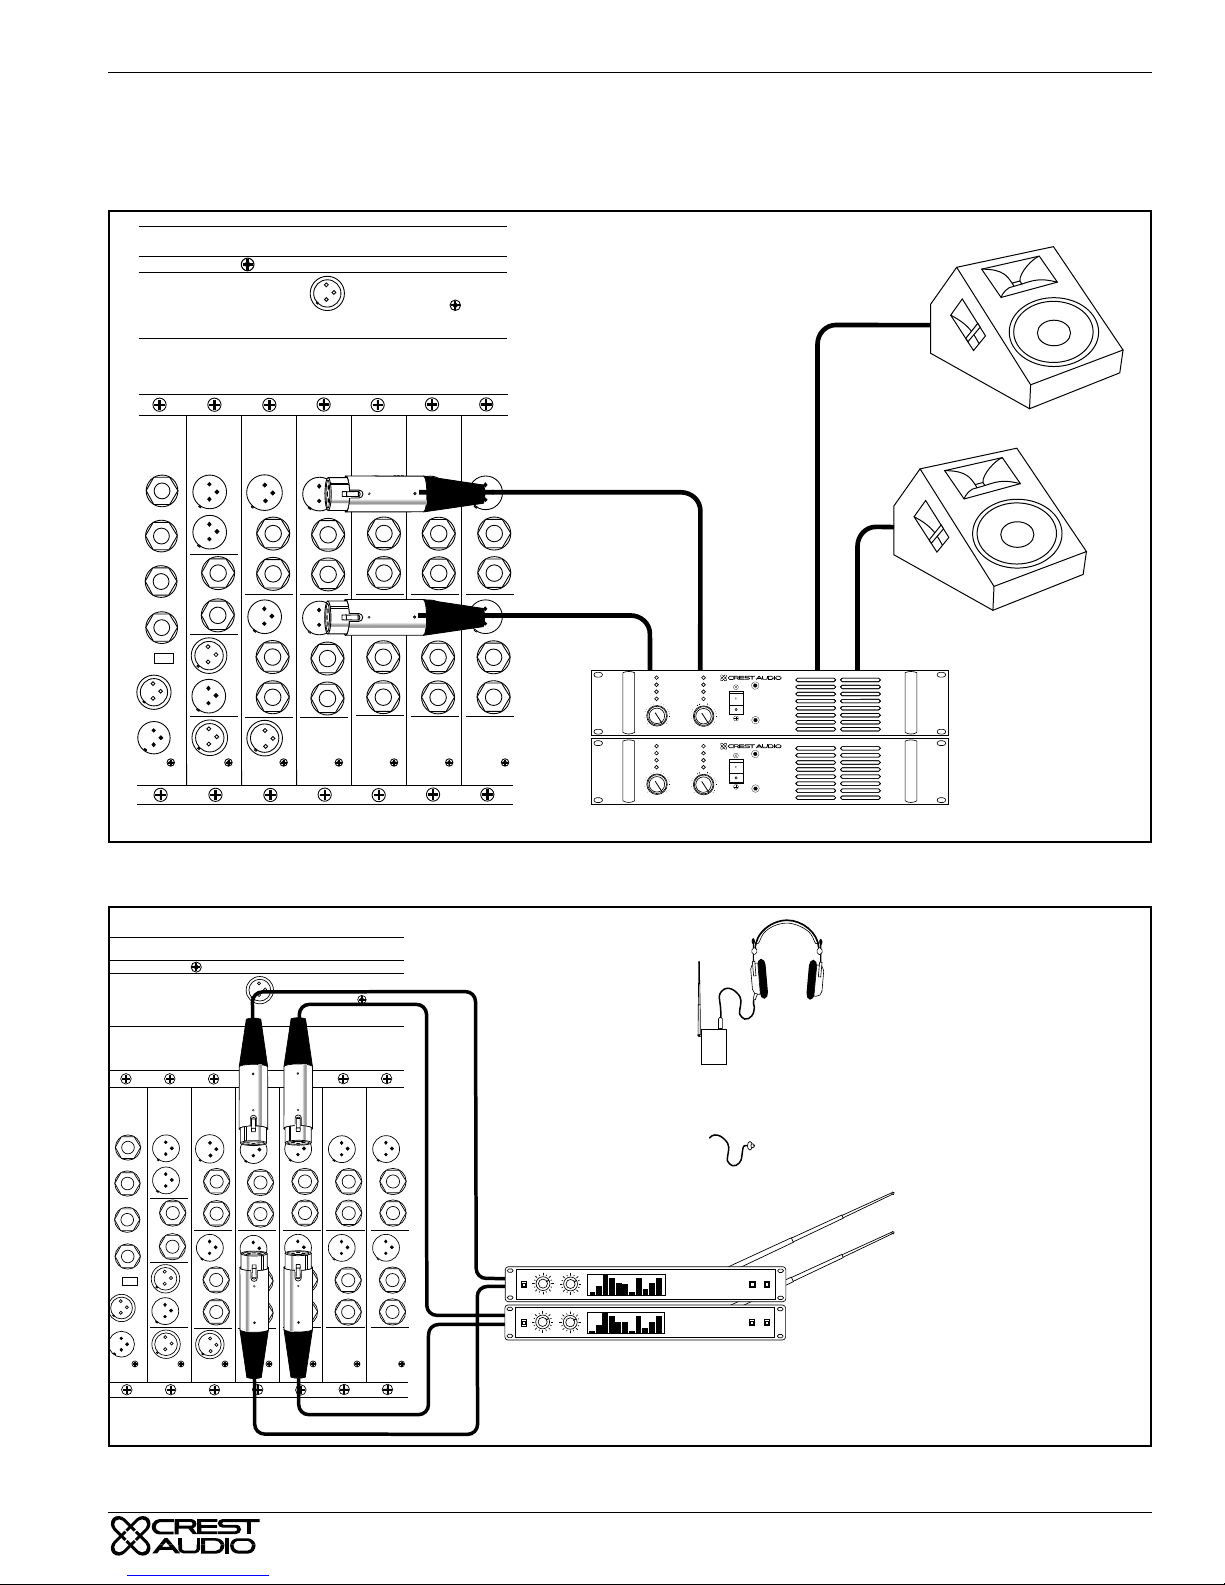
System Connections
Proper connection and component relationships are vital to
assure accurate operation and results. The following diagrams
illustrate conventional system connections.
ODD
ODD
OUT
ODD
OUT
SND
SND
INSERT
INSERT
BAL
BAL
TRN
TRN
EVEN
OUT
OUT
ODD
OUT
OUT
SND
SND
INSERT
INSERT
BAL
BAL
TRN
TRN
EVEN
EVEN
OUT
OUT
IN
BAL
MIC
OUT
EXT TB
Master
SND
IN
INSERT
OUT
BAL
RTN
STR
STR
MIC
MIC
IN
IN
L
R
L / R
SND
INSERT
BAL
RTN
SND
INSERT
BAL
RTN
SND
INSERT
BAL
RTN
Floor Wedge Connection
ODD
ODD
OUT
OUT
SND
SND
INSERT
INSERT
BAL
BAL
TRN
TRN
EVEN
EVEN
OUT
OUT
LEFT
ALT MON
RT
MONITOR
ODD
OUT
ODD
LEFT
OUT
RT
SND
INSERT
BAL
RTN
SND
SND
INSERT
INSERT
BAL
BAL
TRN
TRN
EVEN
EVEN
OUT
OUT
SND
INSERT
BAL
RTN
-6
-10
-15
-30
-80
Ch A
-6
-10
-15
-30
-80
Ch A
Receivers for
In-Ear Monitors
6001
Clip/Limit
Signal
Temp/DC
Active
-6
-3
-10
-3
-15
-1
-1
-30
0dB
-80
0dB
Ch B
Clip/Limit
Signal
Temp/DC
Active
-6
-3
-10
-3
-15
-1
-1
-30
0dB
-80
0dB
Ch B
Professional Power Amplifier
6001
Professional Power Amplifier
BAL
MIC
OUT
IN
-
-
Master
SND
IN
EXT TB
INSERT
OUT
BAL
RTN
STR
MIC
IN
L
L / R
SND
SND
INSERT
INSERT
BAL
BAL
RTN
RTN
STR
MIC
IN
R
SND
SND
INSERT
INSERT
BAL
BAL
RTN
RTN
Stereo In-Ear Monitor Connection
Transmitters for
In-Ear Monitors
PAGE 3
Page 6
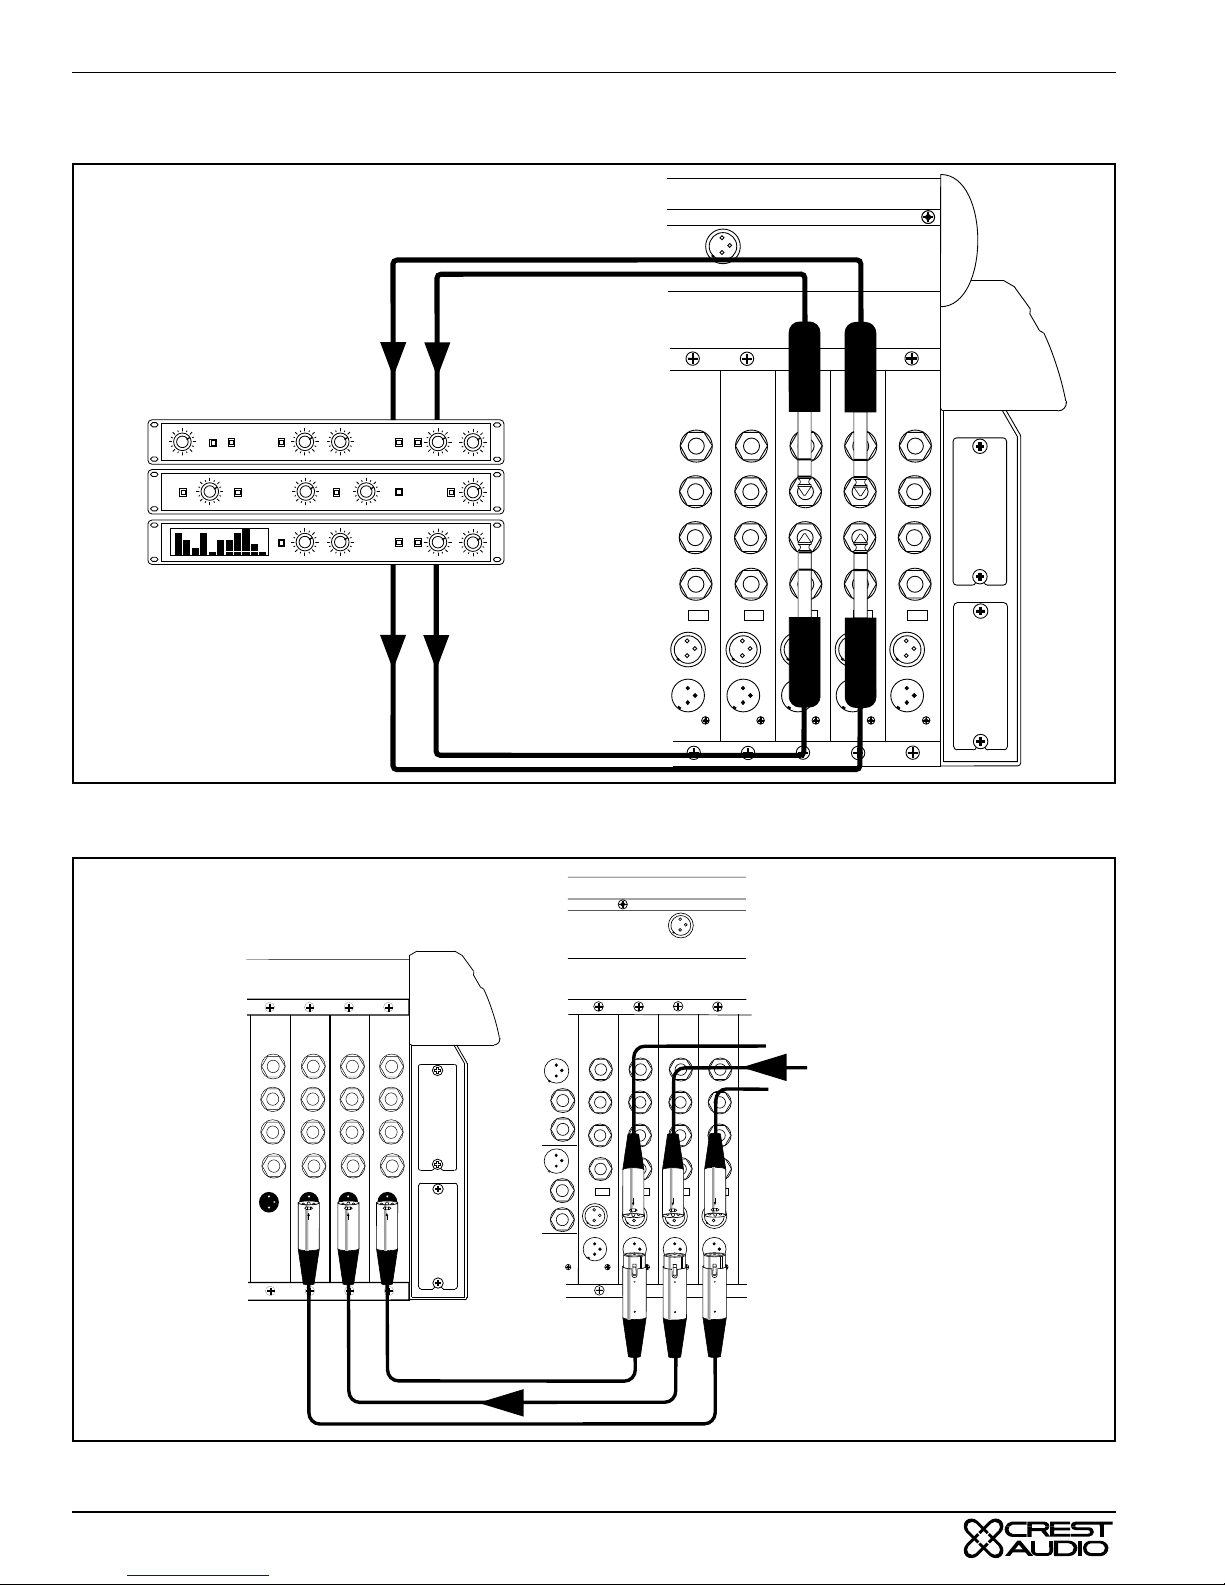
LMX
System Connections (cont'd)
In
DIR
OUT
SND
INSERT
BAL
RTN
LINE IN
BAL
DIR
OUT
SND
INSERT
BAL
RTN
LINE IN
BAL
DIR
OUT
SND
INSERT
BAL
RTN
LINE IN
BAL
DIR
OUT
SND
INSERT
BAL
RTN
LINE IN
BAL
CENTURY SERIES
DIR
OUT
SND
INSERT
BAL
RTN
LINE IN
BAL
Signal Processors
Out
Insert Send/Return Connection
Front of House
Console
DIR OUT
DIR OUT
DIR OUT
DIR OUT
INSERT SEND
INSERT SEND
INSERT SEND
INSERT SEND
BAL INSERT RTN
BAL INSERT RTN
BAL INSERT RTN
BAL INSERT RTN
BAL LINE IN
BAL LINE IN
BAL LINE IN
BAL LINE IN
BAL MIC IN
BAL MIC IN
BAL MIC IN
BAL MIC IN
PIN 1
PIN 1
PIN 1
PIN 1
LIFT
LIFT
LIFT
IN
IN
BAL
MIC
OUT
ODD
OUT
DIR
DIR
DIR
OUT
OUT
SND
SND
INSERT
BAL
TRN
SND
INSERT
BAL
RTN
SND
INSERT
INSERT
BAL
BAL
RTN
RTN
LINE IN
LINE IN
EVEN
BAL
BAL
OUT
PIN 1
PIN 1
LIFT
LIFT
IN
BAL
MIC
OUT
DIR
OUT
OUT
SND
SND
INSERT
INSERT
BAL
BAL
RTN
RTN
LINE IN
LINE IN
BAL
BAL
PIN 1
PIN 1
LIFT
LIFT
IN
IN
-
-
BAL
BAL
MIC
MIC
-
-
OUT
OUT
IN
-
-
BAL
BAL
MIC
MIC
-
-
OUT
OUT
Microphones
PIN 1
LIFT
LIFT
IN
IN
-
-
BAL
BAL
MIC
MIC
-
-
OUT
OUT
From Stage
Microphone Splitting
PAGE 4
Page 7
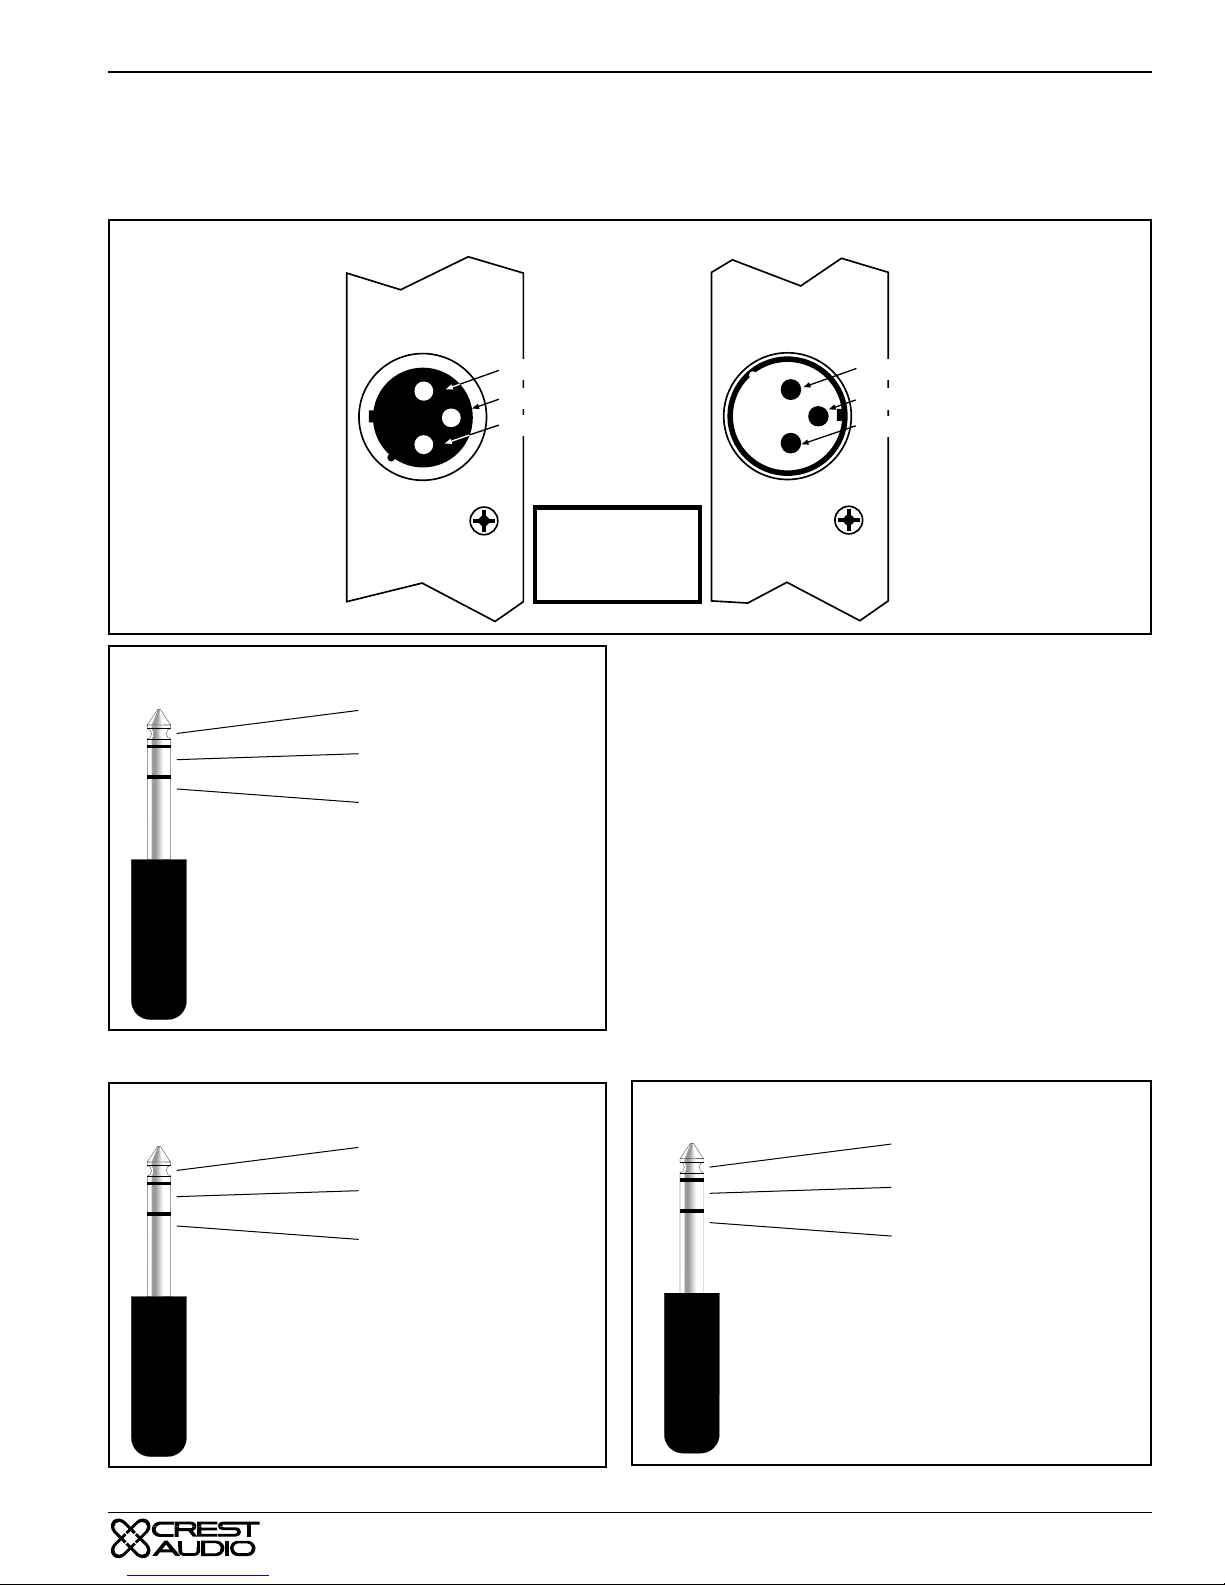
CENTURY SERIES
LMX
Wiring Conventions
Since the same connectors are used throughout the professional audio industry, it is important
to know how the connectors for Crest consoles are wired. Wiring is as follows:
INPUT XLR
PIN 1
1
PIN 3
3
PIN 2
2
PIN 1 = GROUND
PIN 2 = POSITIVE
PIN 3 = NEGATIVE
TIP - POSITIVE
RING - NEGATIVE
SLEEVE - GROUND
OUTPUT XLR
PIN 2
PIN 3
PIN 1
INPUT
Input / Return Plug Polarities
OUTPUT
Output / Send Plug Polarities
TIP - POSITIVE
RING - NEGATIVE
SLEEVE - GROUND
TIP - LEFT
RING - RIGHT
SLEEVE - COMMON
Headphone
Connector: Headphone Output
PAGE 5
Page 8
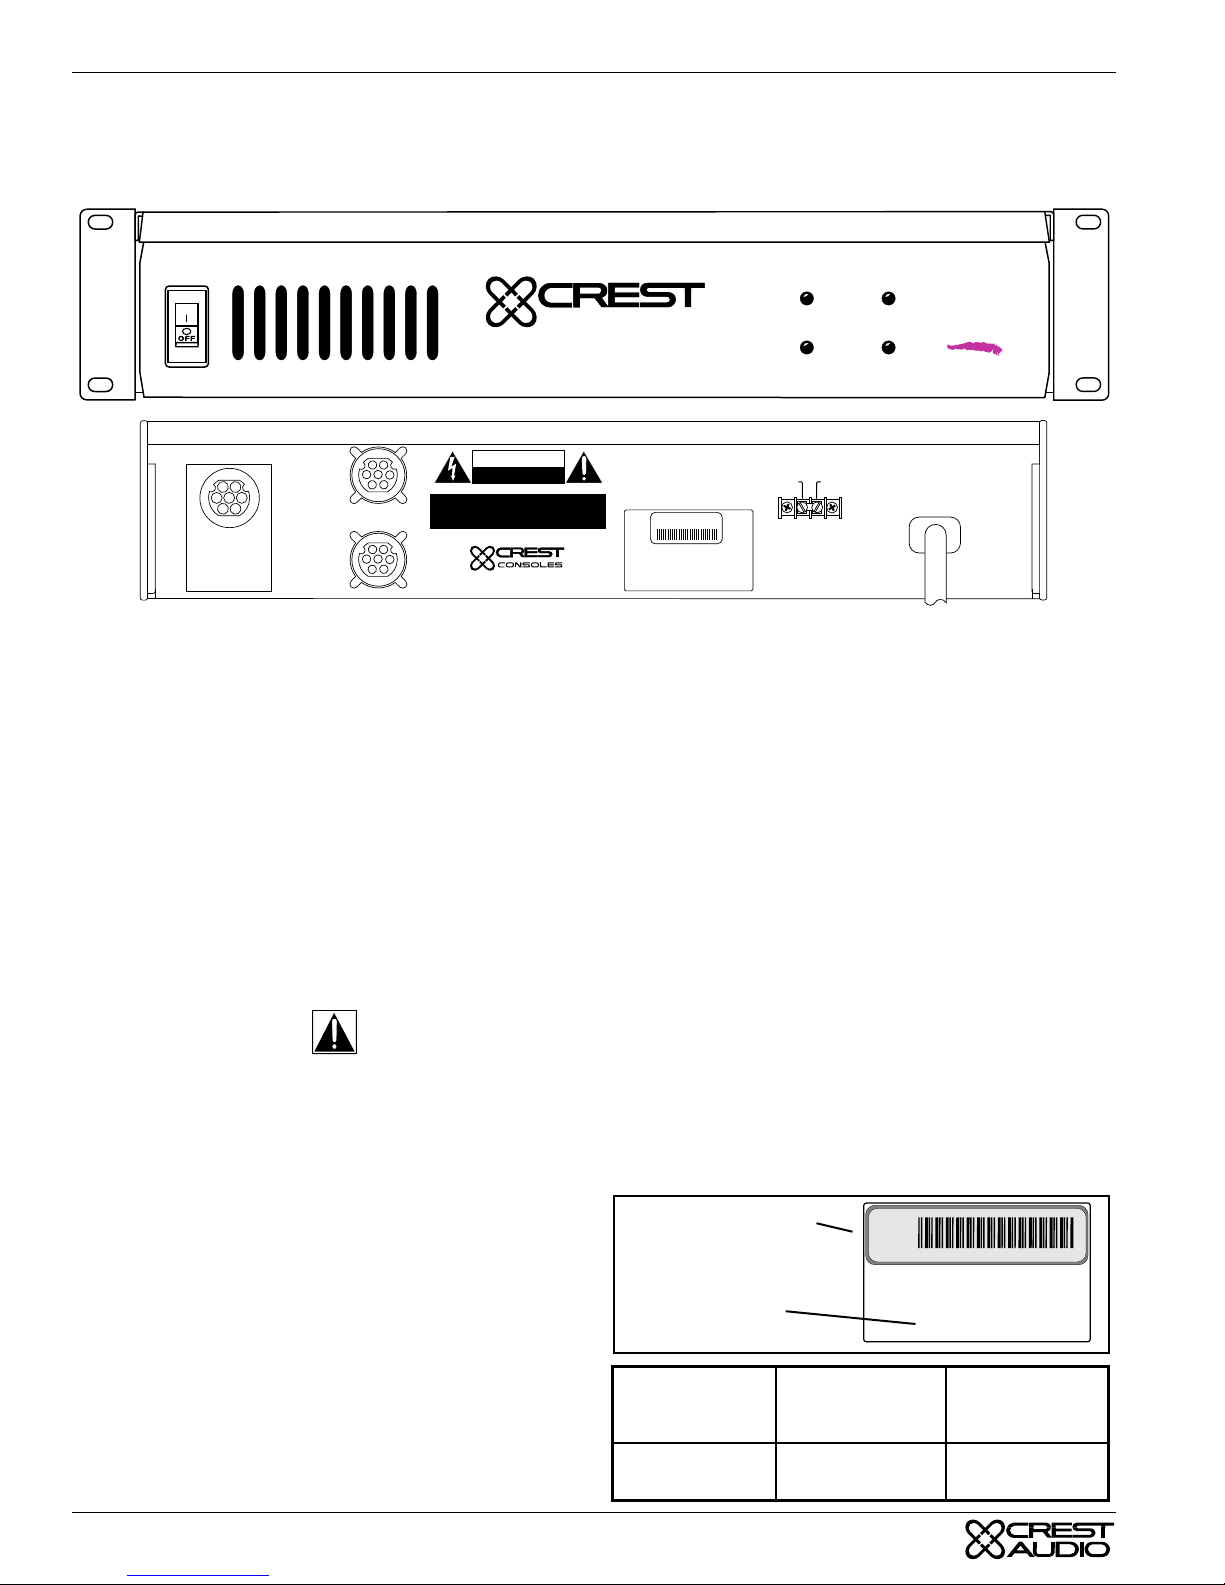
LMX
CENTURY SERIES
Century Series Console Power Supply
Century Series consoles use a separate rack-mountable power supply which provides the specific voltages used by each console.
Crest Audio’ Century Series makes use of two different power supplies. Both frame sizes (52 & 64 space) of the LMx console
should only be used with the Model XCVA06 Power Supply.
Press to Reset
ON
C O N S O L E S
Power Supply
CAUTION
RISK OF ELECTRIC SHOCK
DO NOT OPEN
AVIS : RISQUE DE CHOC ÉLECTRIQUE—NE PAS OUVRIR
WARNING TO REDUCE THE RISK OF FIRE OR ELECTRIC SHOCK DO NOT
EXPOSE THIS EQUIPMENT TO RAIN OR MOISTURE.
ATTENTION! POUR ÉVITER LE RISQUE D'INCENDIE OU DE CHOC
ÉLECTRIQUE, NE PLACEZ PAS CET APPAREIL SOUS LA PLUIE OU Á
L'HUMIDITÉ
Designed & manufactured in the USA by:
A division of Crest Audio Inc.
100 Eisenhower Dr.
Paramus, New Jersey 07652 USA
1
2
3
4
5
7
6
Pin 1 +24V
Pin 2 +20V
Pin 3 Analog
Pin 4 Analog
Pin 5 Digital
Pin 6 +48V
Pin 7 -20V
POWER OUT
POWER OUT
Supply Identification
The type of power supply can be identified by the model number shown on the back of the chassis and panel label..
Power Requirements
The Century Series power supplies have certain electrical
requirements to operate properly. If possible the power supply
should be connected to a dedicated circuit. Should any other
appliance on the same circuit draw enough current to overload
the circuit, the breaker or fuse will trip causing loss of power
to the console. Note the maximum current draw specifications
at right. Be sure that the circuit to which you connect the supply can handle the draw.
The power switch on the supply front panel is also a circuit
breaker, there is no power fuse. Should the supply ever shut
down, or trip at start up, simply push the switch to the off position and then on again.
Ground Linking
Safety Considerations - Each new power supply is shipped
with the AC third wire ground connected to the console chassis
ground. The connection is made at the rear of the power supply
unit. This is necessary for safety reasons so that exposed metal
parts are grounded. In the event of a live conductor making
contact with the console chassis or the power supply chassis
then the current will flow to ground without a safety hazard
arising. Note that when the console is disconnected from the
power supply the chassis ground connection to AC third wire
ground is broken and safety protection is lost. For uninterruptible grounding, in a fixed installation for example, make a connection directly to the console chassis from the safety ground.
Disconnect the ground link on the rear of the power supply.
This disconnects console ground from power supply AC third
wire ground which would otherwise create a hum-loop.
+20V
+48V
Model XCVA04
S/N
± 20V @ 4
+ 24V @ 4
+ 48V @ 1
+ 24V @ 6
± 20V @ 6
Model XCVA06
CONSOLE
GROUND
-20V
CHASSIS
GROUND
+24V
MAXIMUM AC IN:
XCVA04: 415 WATTS
XCVA06: 825 WATTS
6A
Twin Supply Operation
When twin supplies are in use for automatic back-up, then the
ground links on both supplies should be fitted.
In a situation where the safety ground to the console chassis
has been connected and the ground path via the power supply
is causing a hum-loop, then disconnect the ground links on
BOTH power supplies.
Console and Power Supply Grounding
Console chassis ground is electrically connected to audio
ground, pin 1 of XLR connectors and 1/4" sockets and to the
terminal 'CONSOLE GROUND' at the rear of the power supply. The AC third wire connection in the power supply cable
connects the metal chassis of the power supply to safety
ground. This connection should never be disturbed. Hazardous
voltages exist inside the power supply which require the case
to be grounded. When rack-mounted, the power supply ground
may transfer to the rack case thru the front fixing screws,
though this connection is not reliable. When a console is configured within a complete sound system the grounding requirements may call for the ground link to be disconnected. This is
permissible only when an alternative ground path has been
provided. If in doubt seek the advice of an experienced electrical engineer.
Serial Number Tag
Model Number
Power Supply
Model
Max
Current
Draw @ 120V
S/N
Model XCPS-40
±20V @ 4
+24V @ 4
+48V @ 1A
+24V @ 6A
±20V @ 6A
XCVA06
Model
Max Current
Draw @ 240V
PAGE 6
XCVA06
9 Amps
5 Amps
Page 9
CENTURY SERIES
LMX
Power Connections
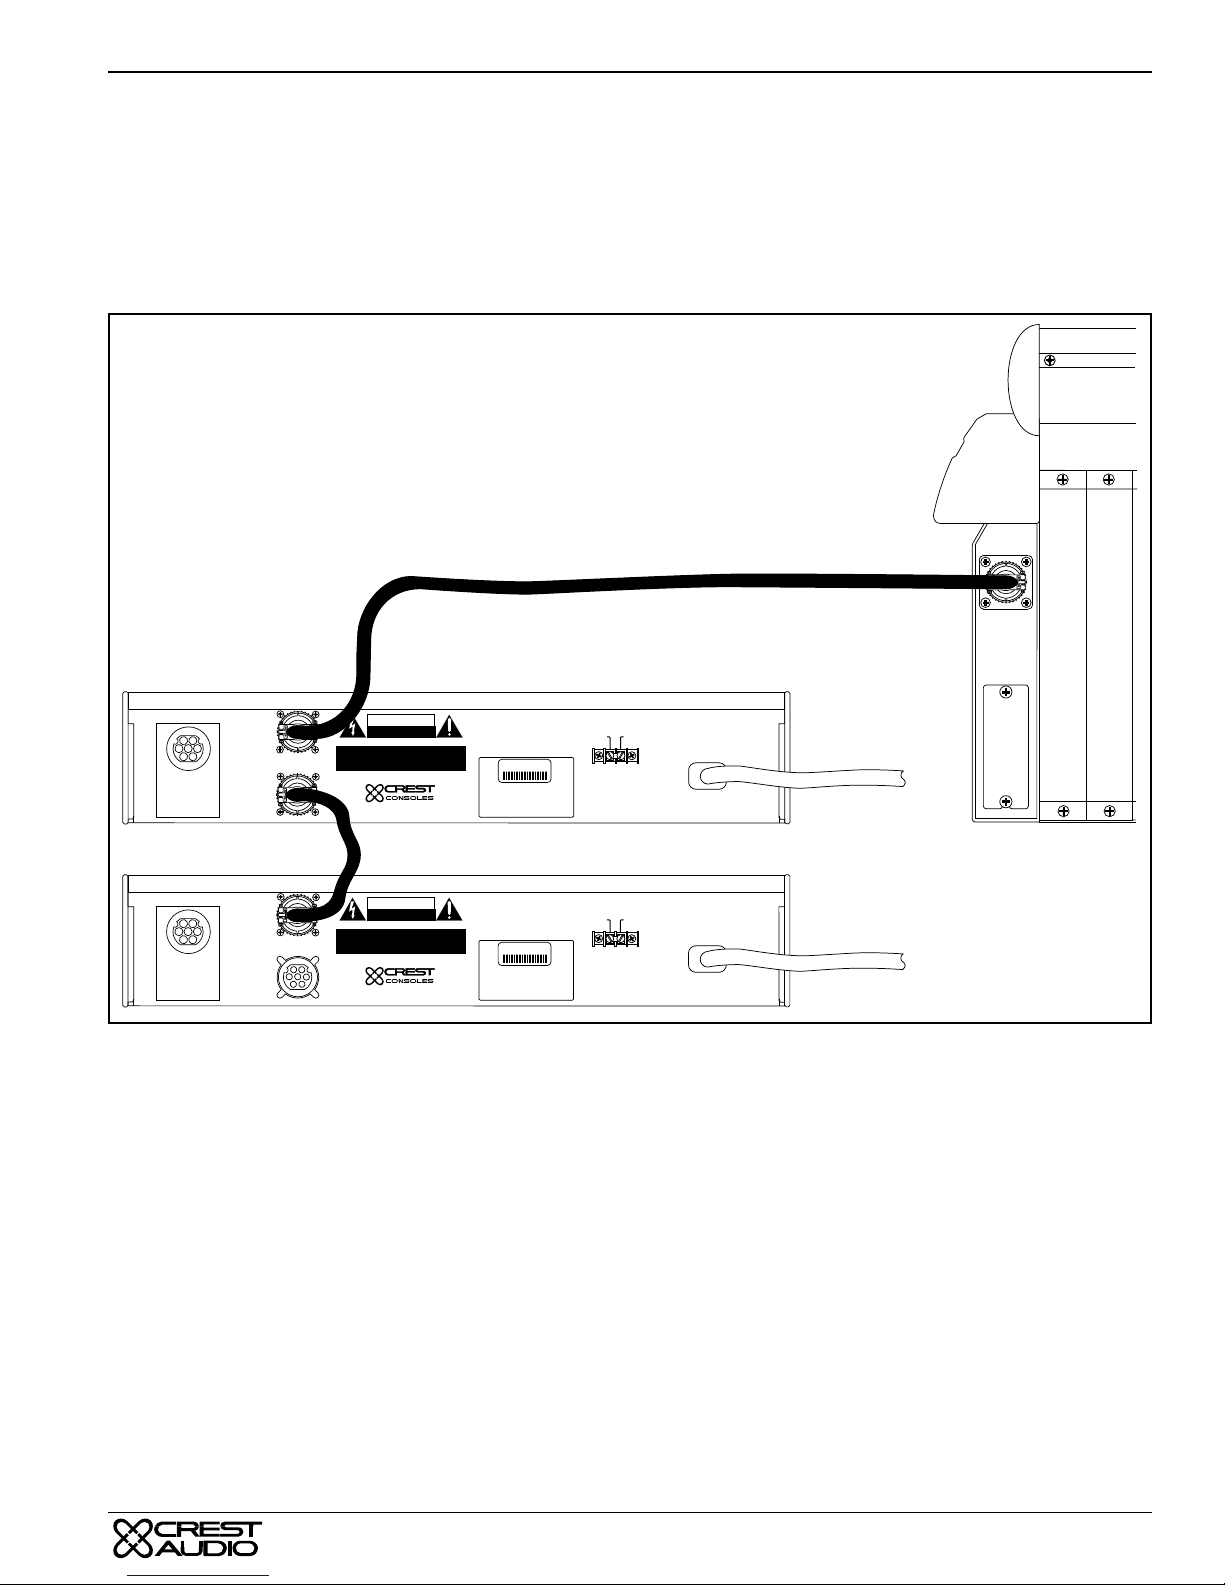
The LMx’s UL/CE-approved power supply is over-designed with ample current reserves. Multiple power supplies can be daisychained to provide fail-safe protection in the event of a supply failure. For the ultimate in fail-safe reliability, a back-up power
supply can be linked to the primary supply with only a jumper cable. External switching is not needed. Both power supplies run
all the time. In the event of supply failure, the remaining power supply(s) will take over the entire load.
Also, should a console module be accidentally disabled, the LMx power supply is designed to ignore that one module, keeping
the rest of the board fully operational.
To Console
CAUTION
RISK OF ELECTRIC SHOCK
DO NOT OPEN
AVIS : RISQUE DE CHOC ÉLECTRIQUE—NE PAS OUVRIR
WARNING TO REDUCE THE RISK OF FIRE OR ELECTRIC SHOCK DO NOT
EXPOSE THIS EQUIPMENT TO RAIN OR MOISTURE.
ATTENTION! POUR ÉVITER LE RISQUE D'INCENDIE OU DE CHOC
ÉLECTRIQUE, NE PLACEZ PAS CET APPAREIL SOUS LA PLUIE OU Á
L'HUMIDITÉ
Designed & manufactured in the USA by:
A division of Crest Audio Inc.
100 Eisenhower Dr.
Paramus, New Jersey 07652 USA
Model XCVA04
S/N
± 20V @ 4
+ 24V @ 4
+ 48V @ 1
+ 24V @ 6
± 20V @ 6
Model XCVA06
CONSOLE
GROUND
CHASSIS
GROUND
MAXIMUM AC IN:
XCVA04: 415 WATTS
XCVA06: 825 WATTS
To AC Mains
1
2
4
5
6
7
Pin 1 +24V
Pin 2 +20V
Pin 3 Analog
Pin 4 Analog
Pin 5 Digital
Pin 6 +48V
Pin 7 -20V
POWER OUT
3
POWER OUT
Interface Cable
POWER OUT
1
2
3
4
5
6
7
Pin 1 +24V
Pin 2 +20V
Pin 3 Analog
Pin 4 Analog
Pin 5 Digital
Pin 6 +48V
Pin 7 -20V
POWER OUT
Console Cooling
A cooling fan configuration is included in all LMx consoles. Two fans (one at each end of the console) draw air in through the
sides of the chassis (under the sidebars). Air is distributed through the chassis via a “vortex pan”, then proceeds up through the
console modules, where the heated air exits the console chassis.
Once the console is powered up, cooling fans remain on. A rear panel switch permits the fans to be set at low, medium or high
speeds.
CAUTION
RISK OF ELECTRIC SHOCK
DO NOT OPEN
AVIS : RISQUE DE CHOC ÉLECTRIQUE—NE PAS OUVRIR
WARNING TO REDUCE THE RISK OF FIRE OR ELECTRIC SHOCK DO NOT
EXPOSE THIS EQUIPMENT TO RAIN OR MOISTURE.
ATTENTION! POUR ÉVITER LE RISQUE D'INCENDIE OU DE CHOC
ÉLECTRIQUE, NE PLACEZ PAS CET APPAREIL SOUS LA PLUIE OU Á
L'HUMIDITÉ
Designed & manufactured in the USA by:
A division of Crest Audio Inc.
100 Eisenhower Dr.
Paramus, New Jersey 07652 USA
Model XCVA04
S/N
± 20V @ 4
+ 24V @ 4
+ 48V @ 1
+ 24V @ 6
± 20V @ 6
Model XCVA06
CONSOLE
GROUND
CHASSIS
GROUND
MAXIMUM AC IN:
XCVA04: 415 WATTS
XCVA06: 825 WATTS
To AC Mains
There are no filters to change or clean. As with any console, use in dusty/unclean environments should be avoided.
PAGE 7
Page 10
LMX
CENTURY SERIES
Ø
EQ ON
1K
250
100
L
R
L
R
PAN
1K5
400
100
2
2
2
2
2
2
2
2
30
3
400
150
40
3
1
3
1
3
1
3
1
3
1
3
1
3
1
3
1
3
2
1
3
2
1
3
2
1
LINEPAD
+48
40
GAIN
205070
100
4
10
20K
2
3K
6K
8K
1K
2K
300
600
800
PRE
5
46
7
8
9
10
0
5
46
7
8
9
10
0
5
46
7
8
9
10
0
5
46
7
8
9
10
0
PRE
5
46
7
8
9
10
0
5
46
7
8
9
10
0
5
46
7
8
9
10
0
5
46
7
8
9
10
0
PRE
5
46
7
8
9
10
0
5
46
7
8
9
10
0
5
46
7
8
9
10
0
HM
LM
10
11
12
13
14
15
16
17
18
19
9
5
46
10
7
3
1
0
5
46
3
1
0
5
46
3
1
0
5
46
3
1
0
PRE
5
46
3
2
1
10
0
5
46
3
2
1
10
0
5
46
3
2
1
10
0
5
46
3
2
1
10
0
PRE
5
46
3
2
1
10
0
5
46
3
2
1
10
0
10
10
10
10
MUTE
8
9
11
12
7
8
9
13
14
7
8
9
15
16
7
8
9
17
7
8
9
18
7
8
9
19
7
8
9
20
7
8
9
21
(L)
7
8
9
22
(R)
7
8
9
DIR
OUT
2
2
L
R
2
HF
2
LF
1
2
3
4
5
6
7
8
PAN
LEV
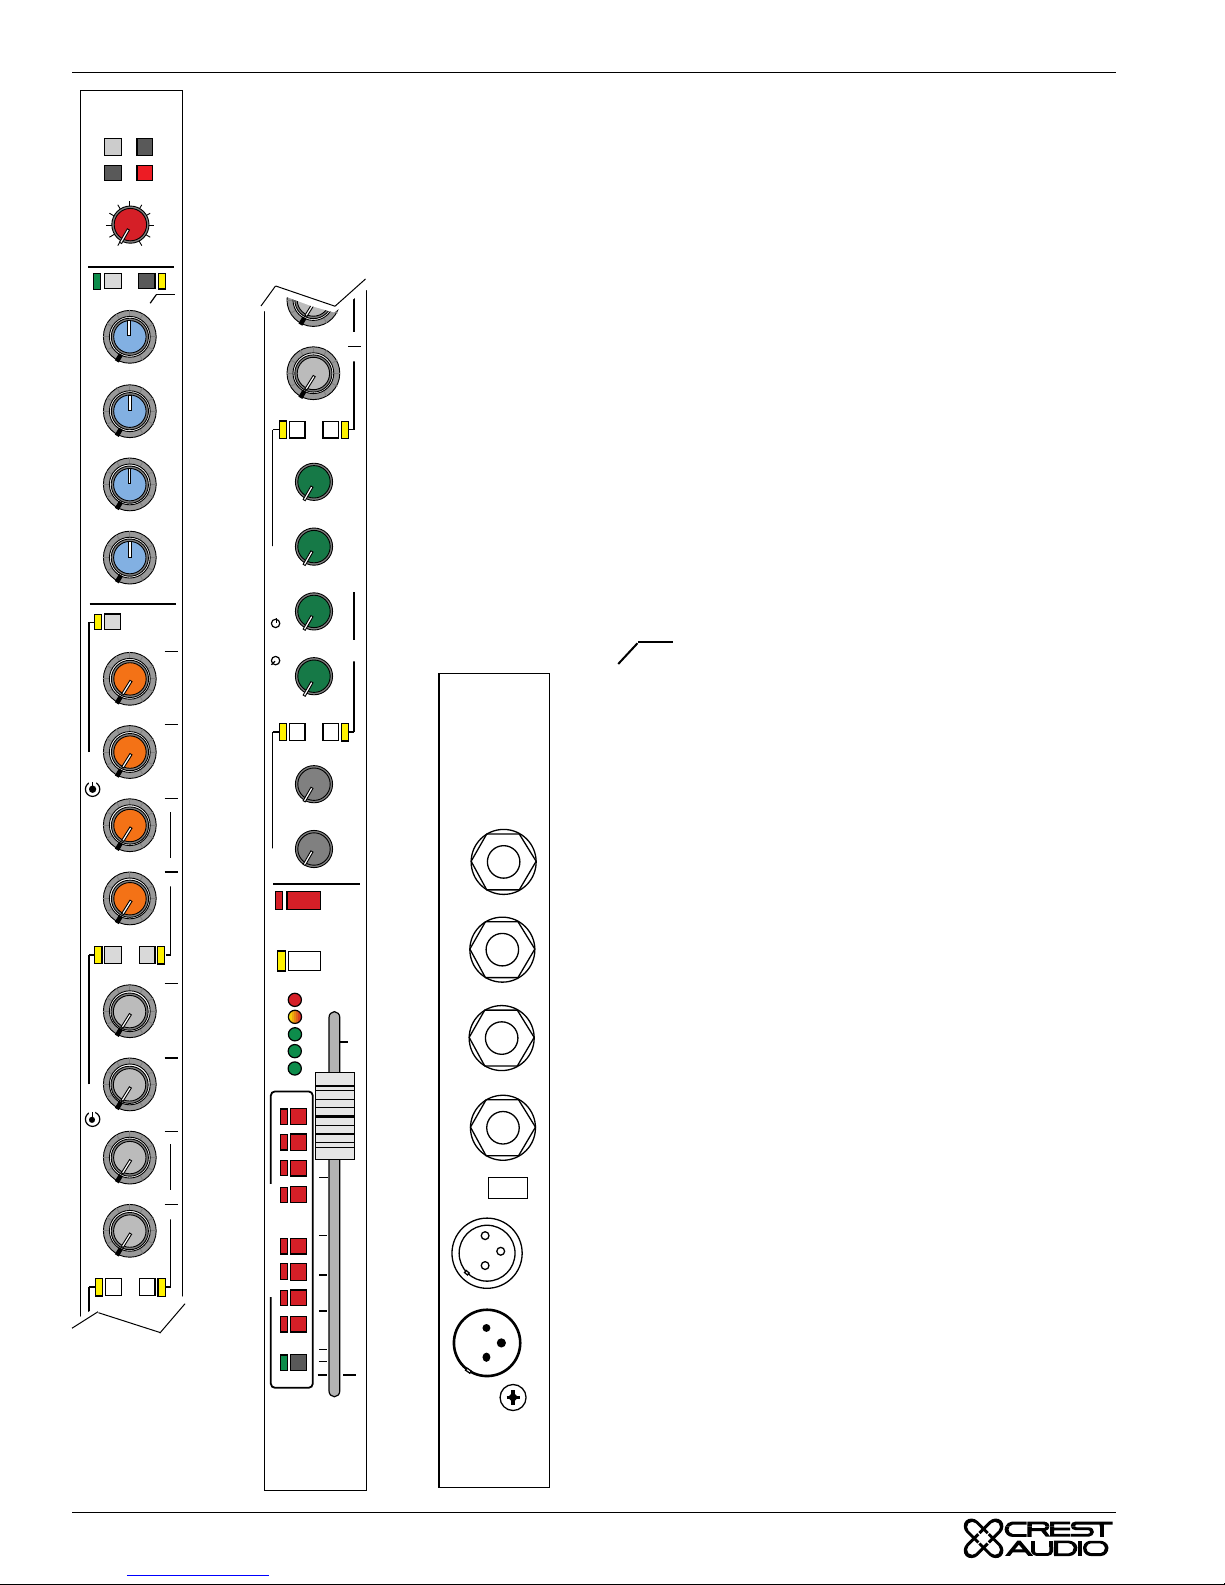
LMx Input Module
40 or 52 identical input modules are fitted.
Module features are described ‘top down’.
PAD switch
Reduces the incoming audio level, before the pre-amp, by
approximately 15dB.
LINE switch
Input select.
Default is MIC XLR.
Press for LINE 1/4” JACK
+48V switch
Press for 48V Phantom power on MIC IN & OUT XLR s.
(check also Master 48V switch)
Ø switch
Press to invert the phase of the selected input
GAIN pot
Range +20 to +70dB.
100 switch
Press for 100Hz high-pass filter
(INSERT POINT)
is located in the signal path, before the EQ section.
EQ section
Silent IN - OUT switch, with green LED indicator
The EQ section features dual-concentric pots
+/- dB adjust on inner control
Frequency adjust on outer control
HF section, bell curve type (internal shelving option)
9
SOLO
PK
+8
0
-6
SIG
10
5
1
0
BAL
SND
INSERT
BAL
RTN
LINE IN
BAL
HM section, ‘bell’ curve type (internal Q option)
LM section, ‘bell’ curve type
LF section, bell curve type (internal Q option)
Frequency range 1.5kHz to 20kHz
Frequency range 400Hz to 8kHz
Frequency range 100Hz to 2kHz
Frequency range 40Hz to 800Hz.
Refer to USER OPTIONS for EQ filter options.
5
M
U
T
E
G
R
O
U
P
S
SAFE
10
15
20
8
30
PIN 1
LIFT
MIX SEND CONTROLS
All MIX sends are with EQ. When PRE sends are desired
without EQ refer to USER OPTIONS
IN
BAL
MIC
OUT
INPUTLMX
8 dual concentric pots for mixes 1 thru 16
inner section = odd #
outer section = even #
Unity gain at about 2 o'clock position #7.
PAGE 8
Page 11

CENTURY SERIES
LMX
MIX SEND CONTROLS (cont'd)
Use the GLOBAL LEVEL/PAN switch on GROUP module to
change to stereo mix configuration. There is a LEVEL-PAN
switch for each pair of outputs. Each one changes all inputs at
the same time.
In stereo mix configuration: inner = level
outer = pan.
Start with the PAN (outer) set to center position.
PRE switch
Mix sends are normally post fader. Use the PRE switch to
select PRE FADER operation. When PRE is selected the send
includes EQ treatment. Refer to USER OPTIONS for alternatives.
MIX SENDS 17 thru 22
6 single pots for control of 6 mixes. Normally each is a level
control. Use GLOBAL LEVEL/PAN to change to stereo mix
configuration. There is a GLOBAL switch for each pair of outputs. In ‘stereo’ mode start with PAN in the center position.
MUTE switch
Channel audio mute switch with indicator. Audio off = LED
on. Normally all mix sends are muted at the same time. For
alternatives refer to USER OPTIONS.
MUTE also responds to the MUTE GROUP system.
SOLO switch
Individual audio check switch with indicator. User choice of
AFL or PFL source. Use MODE switch on Master module.
PFL = pre-fader, post EQ
AFL = post-fader, post-mute,
Headphones, SOLO meters and operator monitor stereo outputs all switch to follow any SOLO operation. SOLO PRIORITY controls are located on the MASTER module.
Input Module Rear Panel
DIRECT OUTPUT connector
1/4" unbalanced jack, +4dBu, post fader. Carries the direct output signal (post mute) from the input channel.
INSERT SEND/RETURN points
Send 1/4" - balanced jack, +4dBu
Return 1/4" - balanced jack
Insertion point is located in the signal path, before the EQ section.
LINE INPUT connector
Audio from the first twenty input modules is connected internally to the GROUP modules. Input 1 to Group 1 etc. This
connection is direct, bypassing the Input module source selection and is buffered.
PIN 1 LIFT switch
This ground lift switch may be used to isolate pin1 of the mic
XLR from console ground.
Unpressed = pin 1 grounded
Pressed = pin 1 lifted
MIC IN connector
Input to channel preamp. Electronic balanced, 4 kΩ input
impedance, +48V phantom power available.
MIC OUT connector
Split from Mic In, direct connection, for connection to a second console, or other destination.
PEAK indicator
Responds 3dB before overload. Senses preamp, EQ and postfader levels.
INPUT METER
Shows audio level from -30dB to +8dB. Source normally prefader. Refer to USER OPTIONS for alternatives.
100mm FADER
controls all outputs except those switched to PRE.
MUTE GROUPS 1 - 8.
Each switch assigns the channel mute to a common mute bus.
The indicator lights when pre-selected. Bus master switches
are on the MASTER module. The regular mute switch LED
shows the mute condition.
SAFE switch
Isolates the channel mute from ALL mute group buses.
PAGE 9
Page 12
LMX
SOLO
ODD EVEN
CENTURY SERIES
FROM INPUT MODULE
GROUP
—
5
10
3
15
20K
1K
HF
–O+
88
16 16
1K
3
600
100
40
STEREO GRP EQ
L
R
2
ODD EVEN
2
L - R TO GROUP
L
TO
2
R
TO
2
5
300
8K
MID
–O+
88
16 16
150
300
6
40
1K
LF
–O+
88
16 16
EQ ON
HPF ON
80
100
200
400
20
STEREO
5
46
3
7
8
9
1
10
0
ON
LR
SOLO
5
46
7
3
8
9
1
10
0
LINE INPUT
ODD
5
46
EVEN
7
3
8
9
1
10
0
ODD
5
46
EVEN
3
7
8
9
1
5
46
7
3
2
9
1
10
0
LINE INPUT
FROM INPUT MODULE
L - R TO GROUP
L
TO
2
R
TO
2
ODD EVEN
ODD EVEN
5
46
3
1
10
0
5
46
3
1
10
0
GROUP TO
L-R ASSIGN
L
R
INSERT SOLO
INSERT ON
LEV
TB ENB
ODD
EVEN
7
9
ODD
EVEN
7
9
PAN
Ø
DIM
MUTE
SIG
SOLO
10
5
0
5
10
15
20
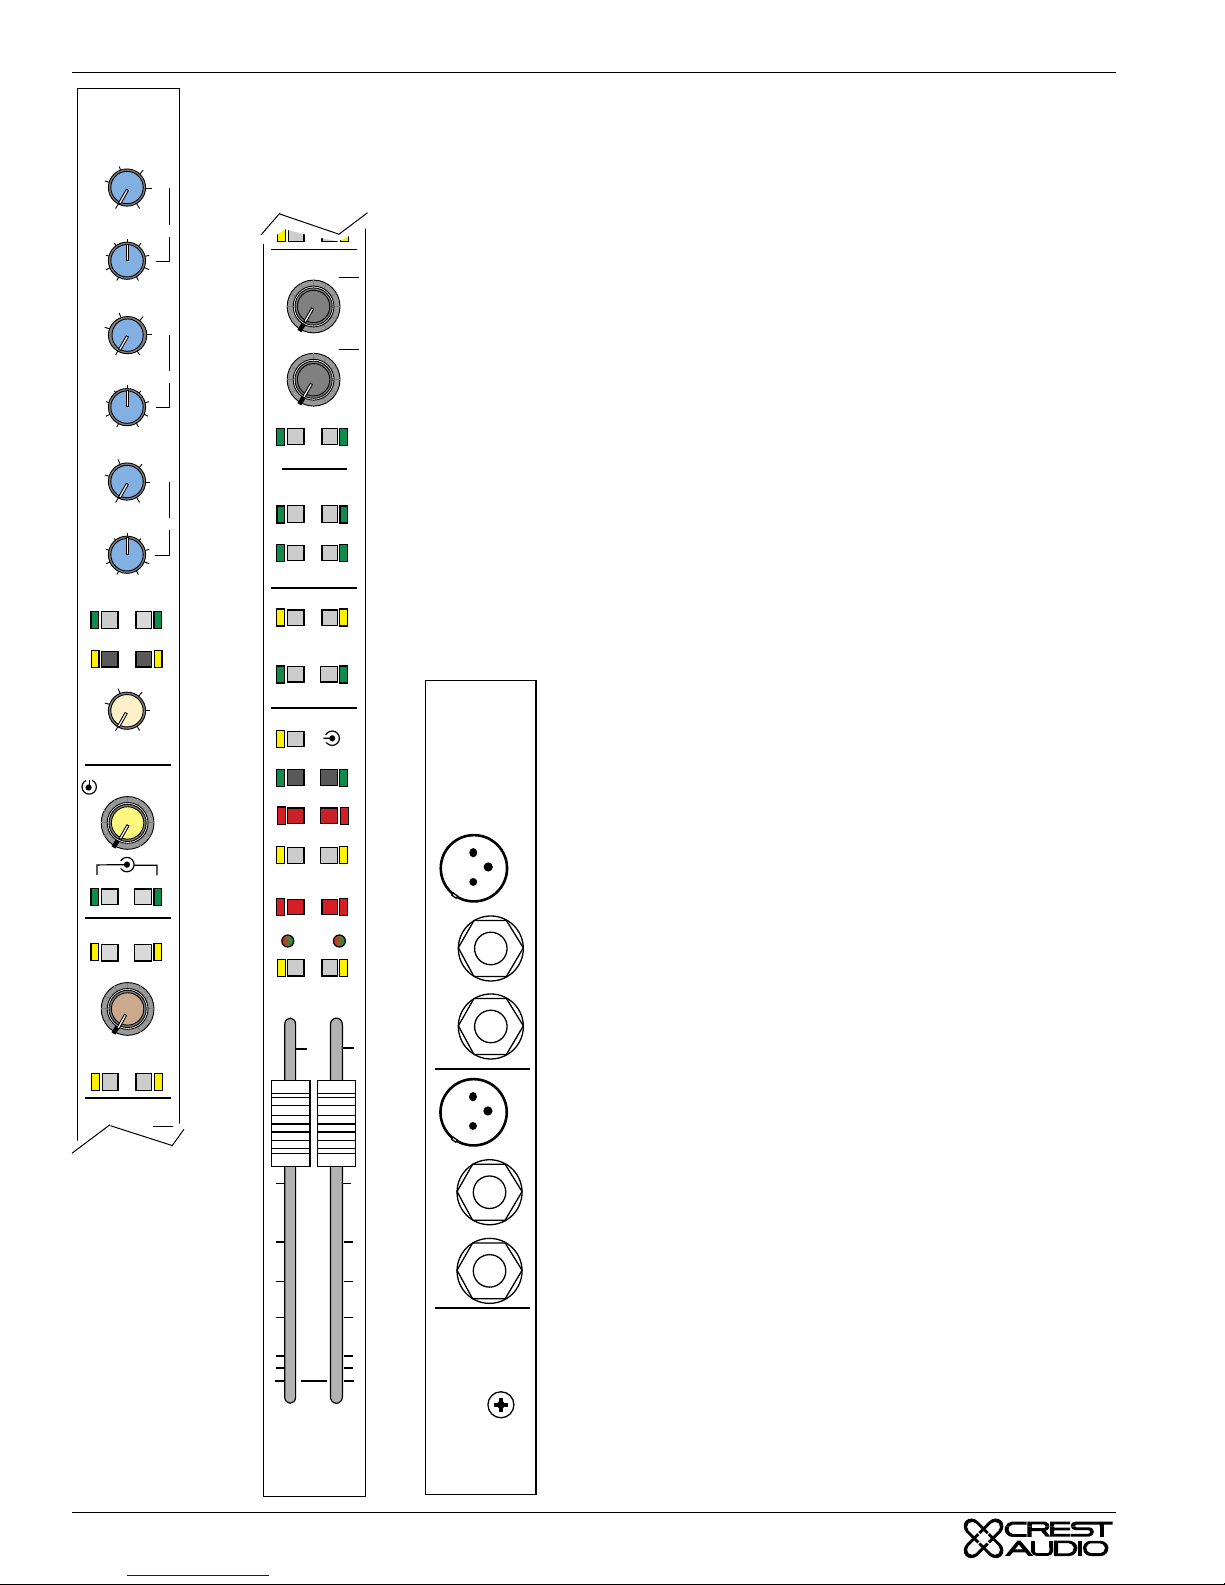
LMx Group Module
All LMx models include 10 similar GROUP modules that are
8
internally assigned to provide mix outputs 1 - 20 and associated functions. Module features are described ‘top down’.
Stereo EQ
For the mix outputs, +/- 16dB each band.
HF bell curve center frequency: range 1k to 20kHz
8
HF cut/boost with center detent
MID bell curve center freq.: range 300Hz to 8kHz
MID cut/boost with center detent
8
LF bell curve center frequency: range 40Hz to 1kHz
LF cut/boost with center detent
EQ ON switches with indicators
For odd and even group output. Allows EQ of either or both
sides.
HPF (high pass filter) switches
with indicators. For odd and even group outputs.
Stereo HPF pot
With cut off frequency range 20Hz to 400 Hz. Attenuation
12dB/octave below cut-off frequency.
STEREO FEED
Stereo input audio comes from the Stereo Master Module.
Dual concentric level controls.
Inner = STEREO INPUT to Odd # mix
Outer = STEREO INPUT to Even # mix
SND
INSERT
BAL
TRN
SND
INSERT
BAL
RTN
ODD
OUT
EVEN
OUT
A mono sum of the Stereo source is used. When the groups
are in Level-Pan mode then the source is mixed in stereo and
the controls are:
Inner = Level
Outer = Balance.
Start with balance at mid-position.
ON switches with indicators
For the odd and even side Stereo Input audio.
LINE INPUT from same # input ch.
These dual concentric level controls add audio from the corresponding # channel Line Input to the group mixes. They are
unaffected by adjustments on the channel.
Inner pot = Odd # mix, outer pot = Even # mix.
LINE INPUT ON and SOLO switches
with indicators. SOLO is PFL only. These sections are
defined as INPUT Solos for priority purposes. Refer to
OPERATIONS for more about LINE INPUT.
30
PAGE 10
L-R TO GROUP
Sub-grouping facility.
Stereo mix 21L/22R is available on each group module.
Left pots: Inner = L to Odd # mix
GROUPLMX
Right pots: Inner = R to Odd # mix
Outer = L to Even # mix
Page 13

CENTURY SERIES
LMX
Outer = R to Even # mix
Refer to OPERATIONS for examples of subgrouping.
ODD EVEN switches with indicators
Operate with the level pots immediately above. They turn on
or off the L/R audio to the Odd # and Even # groups.
GROUP TO L-R ASSIGN switches
with indicators
ODD L switch assigns the Odd # mix to 21L mix
ODD R switch assigns the Odd # mix to 22R mix
EVEN L switch assigns the Even # mix to 21L mix
EVEN R switch assigns the Even # mix to 22R mix
Refer also to STEREO module.
INSERT SOLO switches
with indicators
For the Odd & Even Group Insertion points.
Connects the Group Insert Return audio into the SOLO system.
Provides ‘preview’ monitoring of the output of an external
device such as graphic EQ before the Insert Return is activated. Use AFL mode.
INSERT ON switches with indicators
Activate the INSERT RETURN input. (Insert Send audio is
always on.)
SOLO switches with indicators
For odd and even mixes. User choice of AFL or PFL.
PFL = pre-fader, post insert, stereo paired.
AFL = post-fader, post-mute, stereo paired.
When the module is in the stereo mix configuration and both
SOLOs are pressed, then audio is assigned to the appropriate
sides.
100mm faders
For mix output level to the output connectors and the stereo
mix feed. Normal fader position is the “0” mark.
Group Module Rear Panel
Group Output XLR (Odd/Even Outs)
Balanced pin 2+. Min recommended load impedance 600Ω..
Output level nominal = +4dBu
max = +28dBu
Group Insertion Point (Odd & Even)
Send is always active; return only active when insert on.
Send 1/4", balanced, -2dBu
Return 1/4", balanced, -2dBu
Not shown:
GLOBAL LEVEL/PAN master switch
with indicator
For Odd & Even Groups. Changes all the send pots for that
Group # pair from level+level to level+pan configuration for
stereo mixing.
Refer to OPERATIONS for more about Global Level-Pan.
TB ENABLE switches with indicators
For odd and even outputs. Talkback audio from the MASTER
module is added to the group mix, after the fader, before the
mute switch.
Ø switch
Audio phase polarity inversion switches with indicators for
odd and even mixes.
DIM switches with indicators
Drop the level of the mix 6dB. This is an aid to feedback location and control.
MUTE switches with indicators
For odd and even mixes. The mute turns off all audio from the
mix to the output connector and the feed to the stereo mix.
Group Output VU meters
(Odd & Even #s)
0VU = +4dBu. Meter source is the final Group output immediately prior to the active output balancing circuit.
SIG (signal present) indicators
For the odd and even mixes showing the pre-fader levels. Bicolor LED shows normal level green and overload red.
Overload is sampled pre-fader, insert send, insert return & line
output.
PAGE 11
Page 14

LMX
ON
CENTURY SERIES
STEREO
LAMP DIM
+24
+48
PAD
LINE
30
205070
EQ ON
2K
1.6K
800
–O+
88
16 16
125
80
40
–O+
88
16 16
STEREO EQ
L
46
R
3
2
1
0
LR
STEREO INPUT
COMP GATE
-20
-30
-40
THRESH
46
3
2
1
0
MASTER SEND
—
MASTER
+48V ON
+20
DC
OK
–20
+48
Ø
GAIN
40
100
4K
8K
16K
250
500
1K
STEREO
5
7
8
9
10
ON
ON
-10
+10
+20
5
7
8
9
10
MUTE
SIG
SOLO
POST
-10
-20
+10
-30
-40
+20
THRESH
5
46
3
7
8
2
9
1
10
0
MASTER SEND
MUTE
SIG
SOLO
POST
ON
L-R TO GROUP
L-R ASSIGN
FROM GROUP
SIG
HF
ON
LMx Stereo 21L/22R Module
Each LMx console includes one STEREO output module that
provides mixes 21L & 22R and the Stereo Input. Module features are described ‘top down’.
MASTER 48V ON switch
Switch for phantom power to Input Channel modules.
LAMP DIM pot (w/ center detent)
for the rear XLR gooseneck illumination system. Use nominal 12V lamps. Pinout is the current ‘Littlite’ standard.
DC supply status indicators
For the incoming DC power.
Stereo Input controls
These accept the audio from two XLR rear panel connectors
and produces the STEREO audio for return to mix outputs 1 -
22.
PAD switch
INSERT SOLO
LF
INSERT ON
LEV
TB ENB
PAN
reduces the incoming audio level, before the pre-amp, by
approximately18dB.
LINE switch
Inserts 20dB of attenuation between the input XLRs and the
stereo preamp. Automatically defeats +48V phantom power.
+48V switch
Ø
DIM
MUTE
SIG
SOLO
10
5
0
SND
INSERT
BAL
RTN
ODD
OUT
EVEN
OUT
Press for 48V Phantom power on Stereo Input XLRs.
Defeated automatically when LINE selected.
Ø switch
Press to invert the phase of both channels.
GAIN control
Preamp gain pot.
EQ ON switch with indicator
Activates Stereo EQ on both channels of the input.
100Hz switch with indicator
Activates Stereo Input high pass filter.
Stereo EQ
5
SND
10
15
20
30
INSERT
BAL
RTN
STR
MIC
IN
R
Two band, +/- 16dB each band.
HF center frequency, range 800Hz to 16kHz
HF cut/boost with center detent
LF center frequency, range 40Hz to 1kHz
LF cut/boost with center detent
STEREO FEED controls
Dual concentric level controls for the STEREO INPUT to be
added to output mixes 21L & 22R. The master send must be
turned up.
PAGE 12
ON switches with indicators
LEFT/RTLMX
For the Stereo Input to 21L & 22R.
Page 15

CENTURY SERIES
LMX
COMPGATE switch with indicator
Activates the automatic audio processor when required for
Stereo Input ambience mic mixing.
THRESHOLD pot
For the COMPGATE. Sets the activation threshold for the
dynamics processor.Refer to OPERATIONS for more about
COMPGATE.
COMPGATE INDICATOR
unlit = no audio; green = compression; red = gating.
MASTER LEVEL pot
Sets the Stereo feed audio level for groups 1 thru 22.
MUTE switch with indicator
for the Stereo Input.
SIGNAL indicator
Bi-color signal level indicator showing audio level pre-fader
and pre-dynamics processor. Mono sum of L & R channels.
SOLO switch with indicator
for the Stereo Input. User choice of AFL/PFL, in stereo. AFL
is prior to the Master Level so that dynamics processing may
be monitored with the channel closed. This is an INPUT solo.
L-R to Group Master Controls
The L/R mix (subgroup) available to Groups 1-20 is summed
in this module. These switches control the distribution of the
stereo mix.
POST switch with indicator
Changes the source of L/R mix audio from pre output fader
21L+22R to post output fader 21L+22R.
ON switch, with indicator
For master control of mix 21L+22R output to groups 1-20.
L-R ASSIGN MASTER CONTROLS
Bi-color SIGNAL indicators show the level of the stereo submix from Groups 1-20 to Groups 21L + 22R.
Green = normal Red = overload.
ON switch, with indicator
For the GROUP-TO-L/R sub-mix into 21L+22R. The sends
from channels to 21L+22R are unaffected.
GROUP CONTROLS
INSERT SOLO switches w/indicators
For 21L & 22R Insertion points. Connects the Group Insert
Return audio into the SOLO system. Provides ‘preview’ monitoring of the output of an external device such as graphic EQ
before the Insert Return is activated. Use AFL mode.
INSERT ON switches w/indicators
Activate the INSERT RETURN input. (Insert Send audio is
always on.)
GLOBAL LEVEL/PAN master switch
with indicator; for 21L & 22R Groups. Changes the send pots
from level+level to level+pan configuration for stereo mixing.
Refer to OPERATIONS for more about GLOBAL.
TB ENABLE switches with indicators
for 21L & 22R outputs. Talkback audio from the MASTER
module is added to the mixes post fader, pre mute.
Ø switch with indicator
Audio phase polarity inversion switches for 21L &22R mixes.
DIM switches with indicators
drop level of the mix 6dB. Aids feedback location and control.
MUTE switches with indicators
for 21L &22R mixes. The mute turns off all audio from the
mix to the output connector and the feed to the groups.
SIG (signal present) indicators
for 21L &22R mixes showing the pre-fader levels. Bi-color
LED shows normal level green and overload red. Overload is
sampled pre-fader, insert send, insert return & line output.
SOLO switches with indicators
for 21L and 22R mixes. User choice of AFL or PFL. When the
module is in the stereo mix configuration and both SOLOs
pressed then audio is assigned to the appropriate sides.
PFL = pre-fader, post insert return, stereo paired.
AFL = post-fader, post-mute, stereo paired.
100mm faders
For mix output level to the output connectors and the group
mix feed. Normal fader position is the “0” mark.
Stereo Module Rear Panel
21Left (Odd) & 22Right (Even)
Output XLR
Main mix output; balanced pin 2+.
Minimum recomm.. load impedance 600 Ω
Output level nominal = +4dBu max = +28dBu
21Left (Odd) & 22Right (Even)
Insertion Points
Send 1/4" - Balanced, -2dBu
Return 1/4" - Balanced, -2dBu
Pre-fader send output is always active;
pre-fader return active only when insert on.
STEREO MIC IN R
Balanced XLR input, 4 kΩ input impedance, +48V phantom
power available.
Not shown:
Output VU meters 21 & 22
0VU = +4dBu. The meter source is the Group output audio
immediately prior to the active output balancing circuit.
PAGE 13
Page 16

LMX
CENTURY SERIES
MASTER
—
TB
MIC
ADDITIONAL JACKS
LOCATED BELOW
ARMREST
HEADPHONES
10KHz
1KHz
100Hz
FREQ
÷5
X2
5
46
3
2
1
10
0
LEV
PINK
NOISE
OSCILLATOR
VIA TB
EXT TB
EXT TB
OUT
5
46
3
2
1
10
0
TB LEV
TB ON
1
2
M
U
T
3
E
G
R
O
4
U
P
M
A
5
S
T
E
R
S
6
7
8
PHONES
5
46
3
2
1
10
0
1
2
M
U
T
3
E
G
R
O
4
U
P
M
A
5
S
T
E
R
S
6
Each LMx console includes a single module providing master control
facilities for the Headphone, Main and Alternate monitor outputs, and the
Talkback and Mute Group systems. Module features are described ‘top
down’.
TB MIC Input connector
For balanced mic with 48V phantom power available. Second socket under
armrest is in parallel.
HEADPHONES output
Stereo 1/4" connector (regular musical instrument type). Internal high gain
high power amplifier suits most impedances and sensitivities. Second connector beneath armrest is in parallel.
OSCILLATOR controls
LMx Master Module
7
7
8
9
ON
IN
7
8
9
7
8
9
8
PHONES
5
46
3
2
1
10
0
5
46
3
2
1
10
0
ALT
MAIN
MONITOR
INPUT
OUTPUT
SOLO ACTIVE
LAST
PRESSED
INPUT
PRIORITY
SOLO CONTROL
CLEAR
AFL
PFL
MODE
ALT
SLAVE
MODE
SUM
MONO
EXT INP
FDR MIX
MONTR
SOURCE
PHONES
7
8
9
LEV
7
8
9
LEFT
MONITOR
RT
10
LEFT
ALT MON
5
RT
0
5
IN
10
15
20
30
EXT TB
OUT
MASTERLMX
STR
MIC
IN
L
For internal test generator. 10kHz, 1kHz, 100Hz sine wave oscillator
nominal frequencies. FREQUENCY pot acts with the switches above.
Provides range from x0.2 to x2 the nominal frequency ie 20Hz to 20kHz.
LEVEL pot for adjustment of the output level of the oscillator or Pink
noise source. Available range; off to +10dBu.
PINK NOISE switch and indicator
Changes the test signal from sine wave to pink noise.
ON switch with indicator
Controls the output from this section.
TB ON switch with indicator.
Master switch for talkback and oscillator outputs to the Group modules.
This is a 'smart-switch'; Press+hold for momentary use; tap to lock on, tap
again to cancel.
TB LEVEL pot
Adjusts the audio level of talkback and oscillator to the Group modules.
EXT TB IN switch with indicator
Mixes incoming audio into the talkback route via the level pot. The XLR
input is suitable for high level balanced audio lines. Ext TB In is active all
the time that EXT is switched on. This path bypasses the local TB ON
switch.
EXT TB OUT switch with indicator
Connects local TB/Osc audio to the rear output connector. Ext TB Out is
active only when the master TB is ON. TB/Osc output XLR provides balanced audio at about -20VU.
MUTE GROUP MASTERS 1 - 8
Eight illuminated mechanically-latched switches, each controlling one of
the common mute group buses.
To enable a mute group press the switch, which then lights up. Now any
channels assigned to that mute group number will mute. (cont'd)
Channels may be un-muted three ways: 1) Cancel the master mute (press
the switch again); 2) Deselect the channel from the mute group; 3) press
the channel SAFE switch.
Mute Groups work on the active bus principle. Channels pre-selected to
the bus only mute when the master mute is on (switch lit). While the bus is
PAGE 14
Page 17

CENTURY SERIES
LMX
active channels can be added or removed freely and the appropriate muting is immediate.
Operator Monitor Section
PHONES control
Level pot for control of both stereo headphone output sockets.
(One is located on the master module, and another is underneath the front right end of the console armrest.) Internal high
power amps to suit all headphone types.
Headphone outputs are solo, or follow the monitor source
selectors (Ext source, Fader mix, Sum Mono) and are independent of all other monitor pots and switches. Note the PHONES
ON/OFF switch below. OPTION: Phones follow Monitor
fader. Refer to OPTIONS section.
ALT MONITOR level pot and switch
With bi-color indicator. Control the secondary stereo 1/4" balanced operator monitor output. Normally output is a duplicate
of MAIN monitor, unaffected by Monitor fader movements.
Alt Monitor may be configured several ways, refer to OPERATIONS and OPTIONS.
MAIN MONITOR
output on-off switch with indicator
Controls audio output from rear panel balanced XLR connectors. Monitor audio source is SOLO with a choice of background-default audio when no SOLO is active. See Monitor
Source below.
SOLO ACTIVE indicators
Identify the location of active SOLO selections. OUTPUT
refers to SOLOs on the 22 group mix sections. INPUT refers
to all Input Channels, plus Line In sections of Group modules
and Stereo Input section of the Stereo module.
SOLO CONTROL switches
with indicators
LAST PRESSED: choice of normal additive solos or auto-cancelling operation (new cancels old).
INPUT PRIORITY: choice of either:
Normal Operation: equal priority everywhere
Input Priority: Input Solo overrides Group
CLEAR: cancels all solo selections. Console automatically
clears on power-up.
SOLO TYPE switch and indicators
PFL=pre-fader, stereo paired. AFL = post-fader, stereo paired.
ALT SLAVE MODE switch & indicator
Puts Alternate monitor output under monitor fader control. In
this mode Main Monitor On-Off switch cuts both the Main &
Alt outputs.
Monitor Sources
[audio default when Solo inactive]
SUM MONO switch and indicator
Sums L&R audio (incl. SOLO) together for Main, Alt & HP
outputs.
EXT switch and indicator
Connects the EXT Input to all monitor circuits. Use EXT Input
for an In-Ear system receiver or other monitor source as
required.
FADER MIX switch with indicator
Connects the Input Fader mix (mono unity gain mix) to all
monitor circuits.
PHONES ON/OFF switch
For the headphone outputs.
100mm Monitor fader
Controls the Main stereo monitor outputs. Normal position is
the unity gain ‘0’ mark.
FOOTPEDAL monitor control
The main fader and Crest-supplied footpedal both control the
monitor outputs. Footpedal range is from normal level to full
attenuation. Normal level is adjusted by the main fader; the
footpedal provides hands-free downward changes in level.
Connect the footpedal included with the console to the 1/4inch jack below the power connector at the rear. The footpedal
is a custom design, having a passive 20k pot connected as a
potential divider between tip (cw) ring (wiper) and sleeve
(ccw) at the 1/4" jack. Use only the Crest-supplied footpedal.
Master Module Rear Panel
Monitor Left & Right
Balanced XLR outputs, +4dBu.
Alternate Monitor Left & Right
Balanced 1/4 inch TRS jack outputs, +4dBu.
EXT TB Out EXT TB In -
Balanced XLR output, -20dBu.
Balanced XLR input, +4dBu.
STEREO MIC IN L
Balanced XLR input, 4 kΩ input impedance, +48V phantom
power available.
Not shown:
EXT IN
Monitor source (via Input Channel Line In 1/4" connectors):
LMx40 Ext In L & R = Line In # 21 & 22
LMx52 Ext In L & R = Line In # 27 & 28
SOLO L & R VU meters
Display the level of the current Monitor source: Ext In, Fader
Mix, SOLO. 0VU = +4dBu.
FOOTPEDAL 1/4" Socket
(On chassis below power connector) Potentiometer in pedal is
wired to a ’stereo‘ jack plug. Use only the pedal provided.
PAGE 15
Page 18

LMX
LMX Meter Bridge
22 electro-mechanical VU meters are provided for the mix
audio output levels. They are arranged in a single row. Two
central larger meters show the selected SOLO L & R audio
levels.All meters are illuminated by long-life LEDs.
Meters are calibrated for 0VU = +4dBu and do not normally
require adjustment. There is provision for internal re-calibration if required.
Normal Operation
In normal use, indicated audio levels of between -10 and 0VU
give the best performance. The console has a considerable
overload margin and occasional peaks to +3 or more will usually be undistorted. However, as with all solid state audio, the
change from clean to distorted sound occurs abruptly.
Audio levels persistently below -10VU waste the clean highlevel capability of the console, and contribute unnecessary
noise to the system.
Illumination
Four XLR type sockets are provided at the rear of the meterbridge and accept gooseneck type plug in lamps. The 18" long
right-angle type is preferred. The connections are to the current
Littlite standard (DC on pins 2 & 3, pin 1 NC).
Use 12 volt lamps, each 5 watts maximum. The voltages at the
lamp sockets are controlled from the central lamp dimmer pot.
CENTURY SERIES
Cleaning
Use non-abrasive materials to clean the meterbridge window.
The meterbridge window is polycarbonate, selected for its
strength. However, the material is relatively soft. The exposed
face is coated to increase abrasion resistance.
PAGE 16
Page 19

CENTURY SERIES
-3
-3
-1
-5
0
-7
+1
-10
-20
1
-3
-1
-5
0
-7
+1
-10
+2
-20
+3
Level
1
-3
-1
-5
-1
-5
0
-7
0
-7
+1
+1
-10
-10
+2
+2
+2
-20
-20
+3
+3
Level
+3
Level
Level
3456 879101112
2
-3
-3
-1
-5
-1
-5
0
-7
0
-7
+1
+1
-10
-10
+2
+2
-20
-20
+3
+3
Level
Level
3456 8
2
LMx Meter Bridge - 52 input channels
-3
-3
-1
-1
-5
-5
0
0
-7
-3
-1
-3
-5
-1
-5
0
-7
0
+1
-7
+1
-10
-10
+2
-20
-20
+3
Level
-3
-3
-1
-5
0
-7
+1
-10
+2
-20
+3
Level
-3
-1
-5
0
-7
+1
-10
+2
+2
-20
+3
Level
GROUPS
-3
-1
-5
-1
-5
0
-7
0
-7
+1
+1
-10
-10
+2
+2
-20
-20
+3
+3
Level
Level
-3
-3
-1
-5
0
-7
-10
-20
+3
Level
-3
-1
-5
-1
-5
0
-7
0
-7
+1
+1
+2
+3
Level
+1
-10
-10
+2
+2
-20
-20
+3
+3
Level
Level
+1
-10
+2
-20
+3
Level
SOLO L SOLO R
-7
+1
-10
+2
-20
LMx Meter Bridge - 40 input channels
-3
-3
-1
-5
-1
-5
0
-7
0
-3
-3
-1
-5
-1
-5
0
-7
0
-7
+1
+1
-10
-10
+2
+2
-20
-20
+3
+3
Level
Level
-3
-1
-5
-3
-1
0
-7
-5
+1
0
-7
-10
+1
-10
+2
+2
-20
+3
-20
+3
Level
Level
7
GROUPS
-3
-3
-1
-5
-1
-5
0
-7
0
-7
+1
+1
-10
-10
+2
+2
-20
-20
+3
+3
Level
Level
-3
-3
-1
-5
-1
-5
0
-7
0
-7
+1
+1
-10
-10
+2
+2
-20
-20
+3
+3
Level
Level
-7
-3
-1
-5
-10
0
-7
+1
-10
+2
-20
-20
+3
Level
SOLO L SOLO R
+1
+1
-10
+2
+2
-20
+3
Level
LMX
0
-7
+1
-10
+2
-20
+3
Level
-3
-1
-5
0
+1
+2
+3
Level
14
-3
-1
-3
-5
-1
-5
0
-7
0
+1
+1
-10
+2
+2
-20
+3
Level
15 16 17
14
-3
-1
-5
0
-7
+1
-10
-10
+2
-20
-20
+3
Level
15 16 17
Level
+3
Level
13
-3
-1
-5
0
-7
-7
+1
-10
-10
+2
-20
-20
+3
Level
13
-3
-1
-5
-7
-10
-20
+3
-3
-3
-1
-5
0
-7
+1
-10
-20
+3
Level
-3
-1
-5
0
-7
+1
+2
+3
Level
-3
-1
-5
-7
-10
+2
-20
+3
Level
18
GROUPS
-3
-1
-5
0
-7
+1
-10
+2
-20
+3
Level
18
-3
-1
-5
0
-7
+1
-10
+2
-20
+3
Level
19 20 21 22
-3
-1
-5
0
-7
+1
-10
+2
-20
+3
Level
19 209101112 2221
-1
-5
0
-7
+1
-10
+2
-20
+3
Level
-3
-1
-5
0
-7
+1
-10
+2
-20
+3
Level
GROUPS
-3
-3
-1
-5
0
0
-7
+1
+1
-10
+2
-20
+3
Level
-3
-1
-5
0
-7
+1
-10
+2
-20
+3
Level
-3
-1
-5
-1
-5
0
-7
0
-7
+1
+1
-10
-10
+2
+2
+3
Level
+2
-20
-20
+3
+3
Level
Level
-3
-3
-1
-5
-1
-5
0
-7
0
-7
+1
+1
-10
-10
+2
+2
-20
-20
+3
+3
Level
Level
LMx
LMx
SOLO L & SOLO R Meters
Indicate level of any signal selected for Solo.
GROUP Meters
Indicate the post-fader output of Group buses.
PAGE 17
Page 20

LMX
CENTURY SERIES
Operation
Special Features
1) Global Level/Pan
2) Solo system
3) Monitor outputs
4) Stereo Input
5) Channel Input Mic split
6) Line Inputs
7) Sub-grouping
GLOBAL LEVEL/PAN
Concept
In live show monitor-mix production the work load is unpredictable. Sometimes you need a console with the maximum
number of mono mix outputs. Sometimes you need a console
having a combination of stereo mixes and mono mixes, sometimes the customers wants in-ear monitoring, sometimes wedges
and fills.
The LMx is easily configured, without module removal, to be
any combination of straight mono mixes and stereo mixes, with
in-ear monitoring, ambience input and user friendly features.
One key to stereo mixing is input sends on level+pan controls,
because sorting out separate level pots for the L & R sides
demands too much effort.
All the Input channel sends on LMX are re-configurable as
either level pots or level and pan pot pairs for stereo mixing.
Sixteen sends are presented as dual concentric pots in eight
pairs, 1/2.........15/16. The remaining six sends are each single
pots, ideal for straight mono mixing, and that may be reconfig-
ured as three more stereo mixes 17/18.......21/22.
When in ‘mono’ mode the dual concentric pots work as separate
level controls to two mixes.
In ‘stereo’ mode the inner control works as the send level, the
outer control is the pan. Start with this control set at 50% rotation (center position).
Operation
Changing from mono to stereo configuration is controlled by a
single switch on each group module ‘GLOBAL LEVEL/PAN’.
In normal operation, for 22 mono mixes, all the global switches
are out.
Whenever a stereo mix with level and pan is wanted simply
select GLOBAL on the pair of mixes you want to be in stereo.
Two changes occur.
First, on all the sends to those groups, the internal pot configurations are switched to create level+pan pairs.
Second, the output module group mix sections are internally
stereo-paired so that use of both group SOLOs at the same time
gives a stereo mix to the operator monitor outputs.
The send pot configurations are engineered to be transparent in
use. The level control 'taper' is the same for the inner and outer
sections, which permits settings to be copied. In 'stereo' mode,
the center pan gain is -3dB.
Start with the “pan” pot at 50% rotation.
STEREO INPUT
The Stereo Input feed to group mixes is also under Global
control for the same reason. In mono (not Global level/pan)
mode the Stereo Feed pots on a group module receive a mono
sum of the L & R sides of the Stereo Input . This allows each
of the two mono mixes to hear both sides of the stereo input.
When a pair of groups are put into Level/Pan mode, the
Stereo Feed pots are reconfigured to Level+Balance, allowing easy adjustment of the stereo feed to the stereo mix.
SOLO SYSTEM
Solo Types
Selection of PFL or AFL source is made by remote switching
from the MASTER module. One stereo solo mix is summed
in the MASTER module.
PFL is pre-fader audio. Mono sources are reproduced in both
sides, Stereo sources are automatically assigned in stereo.
AFL is post-fader, post-mute. Mono sources are reproduced
in both sides, Stereo sources are automatically assigned in
stereo.
The SOLO TYPE switch (Master module) controls the selection of AFL or PFL source.
Solo Response
Starting with a clear console, when the first SOLO is selected
three things occur at the same time:
1. Audio from Solo source(s) is added to the Solo audio mix buses.
2. The Solo control bus is activated and switches over the stereo
monitor output section from the user selected default source,
Silence, External Input or Fader Mix, to Solo audio. The system
recognizes the location of the active Solo(s) and lights the appropriate INPUT or OUTPUT indicators.
3. The SOLO meters are also switched and show the Solo audio
level instead of the default source level.
When all Solos are cleared then the system reverts to default
audio.
Solo Priorities
MASTER SOLO SOLO SOLO
CONTROL RESPONSE PRIORITY
‘Last Pressed’ ‘Input Priority’
no no Solos add none
yes no New cancels old none
no yes Solos add Input overrides
Output
yes yes New cancels old Input overrides
Output
Solo Active
Indicators show SOLO ACTIVE and identify the location of
the Solo.
INPUT is indicated for: Input Channel SOLO
Group Line Input SOLO 1-20
Stereo Input SOLO
OUTPUT is indicated for: Group Mix SOLO 1-22
Group Insert SOLO 1-22
PAGE 18
Page 21

CENTURY SERIES
LMX
METER CALIBRATION
& SIGNAL LEVELS
SOLO meters show the audio level at that point. The console
gain structure is calibrated for optimum performance when
faders are set at the nominal ‘0’ points and level pots are set
to about 2/3 rotation, 2 o’clock. When these conditions are
true then the console output level and the Solo meter level
agree.
Meter levels
NORMAL INDICATIONS QUIET SHOW LEVEL PEAKS
Input Signal LEDs flickering steady green red
Group mix Signal LEDs flickering steady green red
Input LED meter flickering steady ‘0’ yellow/red
Solo meter Input PFL -20 to -10VU -10 to 0VU > +3
Solo meter AFL depends on fader setting
Monitor Outputs
Main, Alternate and Headphone outputs each receive the
same high quality stereo audio program. Facilities have been
provided to allow the user freedom of choice about the way
the outputs are used.
Starting from the factory standard product these are the facilities and variations available.
Headphones: Internal high power stereo amplifiers, two outputs in
OPTION phones level controlled by Main fader.
Main Monitor: Stereo balanced XLR line output for operator’s amp +
OPTION foot-pedal volume control in addition to fader.
Alt Monitor: Stereo balanced 1/4" line output for second amp +
OPTIONS In SLAVE MODE
(a) Alt on-off switch normal (in series with Main on-off)
(b) Alt on-off switch becomes Main/Alt output toggle
Refer to OPTIONS for the procedure to change internal options.
parallel, one level control, one on-off switch.
Independent from Main and Alternate outputs.
loudspeaker. On-off switch. Level control by full
length fader.
Use only the Crest-supplied footpedal
loudspeaker, spectrum analyzer, etc. Same audio
source as Main. On-off switch. Level control pot, with
user choice of independent level control or slaved to
Main fader (Alt Slave mode)..
switch, only one being on at a time, the other silent.
The Alt On-Off LED is controlled intelligently to
show the audio status.
When in SLAVE mode:
LED
OFF OFF, local switch off.
GREEN ON, local switch on.
RED ON, but muted by Main On-Off
switch
When in SLAVE mode AND option (b) is used:
LED Alt Monitor audio
OFF OFF, Main output ON
GREEN ON, Main output muted
RED ON, but muted by Main On-Off
switch
Alt Monitor audio
STEREO INPUT
This special section of the Master module provides input and
stereo control for mic or line level audio such as music playback, echo return, or ambience audio for ‘in-ear monitoring’
system operation. The Stereo Input is provided with a full set of
channel controls with the benefit of stereo adjustment on single
controls for gain, EQ, solo, mute, and master level.
In-Ear Ambience mixing
Unique controls are included that make the engineers job a little
easier. In particular, the engineer has the choice to allow automatic compressor-gate audio control take over the ambience
audio fade in and out between show segments. The auto system
(COMP-GATE) fades the ambience audio in when the sound
level in the room falls, then fades it out when the sound level
rises again. Threshold sensitivity for the fades is adjustable and
the system can be switched back to manual control at any time.
Comp-Gate
The principal of operation is that the ambience audio is
processed by a variable gain stage (a VCA) and the control signal is the ambience audio itself. There are two thresholds: the
first is preset manually and the second is 12dB above the first.
Incoming audio starts to be compressed as it exceeds the first
threshold, and the indicator lights green.
When the uncompressed input has increased about 12dB, the
circuit becomes an inverse-gate or ducker. The increasing control voltage is used to decrease gain, ambience audio level is cut
and drops in level further and further as the input level increases. The indicator shows red during this process. When the ambience input starts to fall, the second threshold is reached again
(control voltage decreasing) and ambience audio is faded back
up.
Translated into show terms, the ambience audio is a mixture of
show sound and audience sound. The automatic system presumes that the show sound is louder than the audience and uses
the swell in level when the show resumes to duck the audience
sound out of the mix. When the show fades down, the audience
sound fades up again.
Compgate SOLO
Compgate SOLO PFL is pre-dynamics. AFL is post dynamics,
but before the master level pot, so that the dynamics can be
checked with the Master Level closed.
Ambience Set Up & Operation
The ambience mic input XLR’s should be treated exactly the
same as regular input channels. Note that when LINE is selected
the +48V is automatically defeated. Gain should be preset to
about 40dB with high output mics at a loud show and about
60dB with low output mics at a quiet show. It is important that
the input gain is adjusted so that there is normal level signal in
the ambience channel during performance. Use SOLO and
adjust gain for -10VU to 0VU at full show level. (cont'd)
PAGE 19
Page 22

LMX
Ambience Set Up & Operation
(cont'd)
The Compgate circuit introduces no gain. It operates solely by
attenuation. Gain and level setting should be made with
Compgate OFF, using the Master Stereo Level pot and group
Stereo Feed pots. At soundcheck with the COMPGATE off, set
the threshold maximum clockwise. Verify that ambience audio
is available at the Stereo Input SOLO PFL and can be added to
the output mixes as required.
Select COMPGATE.
Experiment with the THRESHOLD setting, turn it counter-
clockwise, while the performance is in progress and being
amplified by the house system. At a certain setting (depending
on local conditions) the first threshold will be signalled by the
Compgate indicator showing green and compression being
applied to the ambience audio. With Master Level closed use
AFL to check the effect of compression and gating on the audio.
Back-off the threshold further counter-clockwise, and note the
second threshold, ambience audio is cut from the mix, the indicator shows red.
This setting can be used as a starting point. When the show
sound level drops between numbers, the Compgate will automatically fade up the ambience input.
(The threshold setting used for the show will depend on the
show dynamics and should be found by experiment.)
Now turn up the master level and use the 'STEREO' pots on
each group to add ambience audio to individual mix outputs.
Override
In the course of a show there may be occasions when only manual ambience control will give the balance that the performers
want. Simply cancel the COMPGATE by releasing the switch,
use the master level pot, or the local STEREO FEED pots to
balance the ambience in the mix.
CENTURY SERIES
Deliberate unbalanced operation or accidental shorting of pin
2 or 3 to ground with phantom power on may cause a temporary fault condition and cause full modulation of the console
input channel and any split from it. The local isolation resistors limit the effect to only the channel directly affected. The
console will not be harmed; however, low frequency loudspeakers in particular are vulnerable to the full output levels
that phantom power mismanagement can produce. If problems occur turn down the output and check all connections.
Temporary damage can occur to any audio transformers in
the line when phantom power is disturbed by grounding one
phase. While the short persists, the sound is grossly distorted.
After removal of the short circuit, sound quality may be
affected by residual magnetization of the transformer core,
especially noticeable on high levels. If the sound quality does
not return to normal replace the transformer and have it
demagnetized.
GROUP LINE INPUTS
The audio for the LINE IN sections of the group modules
comes from the 1/4" connectors for channel line inputs. The
audio is buffered and split internally on each input channel.
Channel Line Input 1 is split to Group Line In 1 .......etc to
Channel Line Input 20 and Group Line In 20.
Line Input Mixing
The LINE INPUT dual concentric level pot on each output
module controls the level of incoming audio to the Odd and
Even number mixes in the module. Inputs 1 & 2 are available
to group mixes 1 & 2. Inputs 3 & 4 to mixes 3 & 4....etc.
The pots are arranged as follows:
Odd# = top/inner section, Even# = lower/outer section.
Line Input SOLO is provided separately for Odd and Even
inputs, and is signalled as Input Solo.
SUBGROUPING
CHANNEL MIC INPUT SPLIT
The twin XLRs provided on every input channel provide a passive mic split to another part of the system.
The XLRs are hard-wired pin-to-pin, including pin 1. The
ground lift switch isolates XLR pins 1 from the console audio
ground. Isolation of Output XLR pin 1 from the input pin 1 is
possible by internal modification of the module rear connector
board.
The input impedance of the channel preamp is about 4kΩ, sufficiently high that the loading effect of the console input on the
source mic is negligible. The input is electronically balanced
and the input capacitor DC rating is 100V.
PHANTOM POWER
+48V phantom power is available for each input and is switched
locally at the module and in the center control area for all channels. This phantom +48V supply is distributed to pins 2 and 3 of
the XLRs via 6.8kΩ resistors locally. Phantom voltage is present on both the IN and OUT XLRs.
PAGE 20
A.) Introduction
There are sub-grouping paths from Groups to L-R, and from
L-R to Groups. The potential for inadvertent feedback is
minimized by the interlock on each Group section. Priority is
given to the forward path 'Group to L-R'. When this is in use
then the 'L-R to Group' path is interrupted.
B.) Bringing audio into Group Mixes
The Line Input on each Group can be used to bring audio
into group mixes. (For example, signals from an external
sub-mixer, an effects device, or another mix patched from
insert send etc). Hard-patch the signals into Line Inputs as
required.
Page 23

CENTURY SERIES
C.) Return of a mix to any number
of mixes.
Create the master mix, eg drum mix, on groups 21L & 22R
either in stereo (select Global Level/Pan) or separate mono
mixes:
In the center of 21/22 module select ‘L-R TO GROUP ON’.
On the mixes that want the drum mix, use the level pots ‘L-R
TO GROUP’ to fade up the complete mix from 21/22 into the
individual monitor mixes. For example, stereo mix 3/4 wants
the drum submix from 21L/22R.
On Group module 3/4, select ‘L-R to GROUP’ ‘ODD’ and
‘EVEN’. This turns the audio path on.
On mix 3, turn up ‘L to ODD’ (inner pot section), leave the
outer pot closed.
On mix 4, turn up ‘R to EVEN’ (outer pot section), leave the
inner pot closed.
Now, there is stereo copy of mix 21L/22R in stereo mix 3/4.
D.) Adding Group Mixes to the L-R
mix
Mixes 21 and 22 are configured to receive a sub-mix from
the groups.
To add group mixes to 21L/22R, use the switches on each
group ‘GROUP ASSIGN TO L-R’
For example to add mix 5 in mono to the stereo mix
21L/22R, select ‘ODD L & R’
To add stereo mix 7/8 in stereo to the stereo mix, select
‘ODD L’ only and ‘EVEN R’ only. Leave Odd R and Even L
unassigned.
To add stereo mix 11/12 in mono to mix 21L, select only
‘ODD L’ and ‘EVEN L’; leave Odd R and Even R unassigned.
Use the On-Off switch to control the Group submix added to
the L-R mix. With this switch OFF, the Group submix is
turned off; only the sends from channels to 21L and 22R are
heard.
LMX
PAGE 21
Page 24

Page 25

LMx
Appendix A
Technical
Information
Page 26

LMX
CENTURY SERIES
General Specifications LMx Console
The following are the technical specifications for the Century
LMx console.
Frequency Response
(referenced to 1kHz) +0.0, -0.5dB, 20Hz to 20 kHz
Total Harmonic Distortion
(Mic input to Group output)
20Hz to 20 kHz at +15dBu <0.01%
Phase Response
20Hz to 20 kHz +20°, -20°
Noise
(22Hz to 22kHz)
Mic EIN (150Ω, 60dB gain) -129 dBu
Group Output Noise (40 inputs) - 80 dBu
Crosstalk
(Measured at 1kHz)
Channel Mute >100 dB
Channel Fader Attenuation > 85 dB
Input/Output Impedances
Mic Input 4kΩ balanced
Line Input >10kΩ balanced
Outputs 120Ωbalanced
Input/Output Levels
(0VU = +4 dBu, 1.23V RMS)
Mic Input Sensitivity + 4 to -62 dBu
Line Input Sensitivity + 12 to -38 dBu
Input Insertion Point Level + 4 dBu
Output Insertion Point Level + 4 dBu
Nominal Output Level 4 dBu
Maximum Balanced Output Level +28 dBu
Overall Dimensions
The following table contains net dimensions
for all Century LMx consoles. (L x W x H)
Frame Size Imperial Metric
52 67" x 30.2" x12.7" 1700 x 767 x 322mm
64 82" x 30.2" x12.7" 2070 x 767 x 322mm
Configurations
The Century LMx Console is available in the following configurations:
Century LMx Consoles feature 10 dual group modules,
1 left/right module, 1 master module,
available in the following input configurations:
40 MONO INPUTS (52 FRAME)
52 MONO INPUTS (64 FRAME)
Architect’s & Engineer’s
Specifications - LMx Console
The following text should be used when specifying a Century
LMx console in a bid or proposal.
The sound mixing console shall be constructed in two sizes and be suitable for both fixed
installation and touring operations. Audio modules shall be individual for service and
addition purposes. Audio connections shall be accessible from the console rear. Mic In
and Group Out connections shall be XLR 3-pin balanced types. Insertion points shall be
accessible via separate Send & Return 1/4 inch TRS connectors. Primary Inputs &
Outputs may be transformer isolated as a chargeable option. The nominal audio level
shall be +4dBu, and the maximum output level +28dBu. The console shall operate from
AC mains via the external rack mount power unit included. Optional connection of a second power supply for automatic back-up shall require only a link cable. The 40 channel
console shall measure 67x30.2x12.7 inches (1700x767x322mm). The 52 channel console
shall measure 82x30.2x12.7inches (2070x750x322mm). Input Channels shall accept Mic
(XLR) or Line (1/4inch) input by selector switch. The Mic Input shall be passively split
with output XLR connector provided. There shall be a ground lift switch and +48v phantom power control for each channel. Input Gain shall be continuously adjustable between
20dB and 70dB by gain pot and -15dB by Pad switch. There shall be a phase invert
switch active on Mic or Line Input. Each channel shall include switches with indicators
for: 100Hz high pass filter; EQ On ; Mute (solid-state soft turn-on); Solo; Mute Scene
select 1-8; Mute Scene Safe. There shall be 4-band EQ, each band having +/- 15dB variable gain and adjustable filter center-frequency. The ranges shall be: LF 40-800Hz; LM
100Hz-2kHz; HM 400Hz-8kHz; HF 1.5k-20kHz. Five segment channel signal level LED
indicators and overload indicator shall be provided. Each channel shall have a total of 22
independent sends to the Group Outputs; eight being dual concentric rotary controls
(sends1-2,3-4,....15-16) and six single rotary controls (sends 17-22). Seven Pre switches
with indicators shall control the choice of Pre or Post fader audio source. These switches
shall be grouped as follows: sends 1-4, 5-8, 9-12, 13-16, 17-18, 19-20, and 21L-22L.
Each send level pair may be configured dual mono or stereo operation by a single global
Level/Pan switch associated with each output pair. Channel output level shall be controlled by a 100mm travel slide fader. The output section shall contain ten Group
Modules, each providing two Group Outputs, each output including: mix Insertion send
and Return connections; 100mm fader; balanced output with XLR connector; bi-color
signal indicator and electro-mechanical VU meter. Each Group shall have switches with
indicators for Solo; Mute; Dim; Phase Reverse; Talkback Enable; Insert Solo; Insert OnOff. Each pair of Group Outputs (an individual Group module) shall include: the Global
Level-Pan master selector, with indicator; three bands of stereo output EQ with variable
frequency and gain; independent EQ In-Out selectors with indicators; high pass filter with
variable frequency from 20Hz to 400Hz and independent In-Out selectors for each output. For each Group there shall be independent Level controls and On-Off switches from
L and R to each Group. Any or all signals on the 20 Group buses shall be assignable to
the L-R Stereo mix. These two subgroup modes shall be interlocked to prevent inadvertent feedback loops. In addition each Group module shall include Level, Pan and On-Off
controls from the Master Stereo Input. Each Group shall include Level, Solo and On-Off
switches with indicators from the corresponding Channel Line Input. One Stereo Output
module shall provide Group Outputs 21L and 22R, each with Insertion Send and Return
connections; 100mm fader; balanced output with XLR connector; bi-color signal indicator and electro-mechanical VU meter. Each Group shall have switches with indicators for
Solo; Mute; Dim; Phase Reverse; Talkback Enable; Insert Solo; Insert On-Off; and there
shall be one Global Level-Pan master selector for sends 21L & 22R. A Master On-Off
switch shall be included for the sum of the Group signals assigned to L-R, which shall not
affect the channel send L-R mix. The L-R output to the Group sections shall have an OnOff switch, and normally be pre L-R fader. There shall be a switch with indicator to connect this output Post fader. Within the Stereo Output module a dedicated Stereo Input
channel shall be provided for stereo mic or line sources with stereo two-band sweep EQ.
Switches with indicators shall be provided for EQ In-Out, High pass filter In-Out, Mute
and Solo. The channel output shall be available to all Groups via the Stereo sections.
Dynamics processing shall be available for in-ear monitor mixing. Above the user-set
threshold, audio shall be compressed. When compression exceeds 12dB the audio output
level automatically drops, such that the manual function of riding a room-ambience mic
between numbers is achieved hands-free. One Master module shall provide Main,
Alternate and Headphone monitor outputs. All outputs shall be stereo. The audio source
for all outputs shall be the Solo bus, defaulting to the operator's choice of silence or an
External stereo input or a mono straight-line Input Fader mix. A Mono switch shall convert stereo sources to dual channel mono. The Solo system shall normally sum multiple
Solos, with the option to hear only the last selected Solo. It shall be possible to engage the
Solo Priority system so that Input Solo overrides Output Solo. The Solo bus audio shall
be either PFL or AFL of any Input or Output, as selected by the Solo Mode switch.
Groups in 'Stereo Level-Pan' mode, and the dedicated Stereo Input, shall be monitored in
stereo. Each output shall have an independent level control and On-Off switch with indicator. The Main level control shall be a 100mm slide fader with parallel footpedal (supplied) operation. The Main fader may be switched to affect the Alternate output also. The
Main and Alternate outputs shall have the option to be switched exclusively. The
Headphone output shall include two sockets and be unaffected by the Main and Alternate
channels. There shall be eight illuminated Mute Group master switches, one for each
Scene Mute bus. There shall be facilities to generate sine wave and pink noise test signals, and a dedicated input and preamp for Talkback mic operation. The sum of speech
and test-tone shall pass to the Groups (postfader) via the Main Talkback On-Off switch
and Group Talkback Enable switches. The Main TB switch shall be touch sensitive and
either latch-on for test-tone or press-hold-release for speech. A dedicated switch shall
control the connection of an External Talkback source to the Groups, which shall not be
affected by the Main TB On-Off switch. Indicators shall be provided for the system DC
power supply status. There shall be a dimming control for the optional rear mounted
lamps. A Master 48V phantom power switch shall be provided. The console shall have a
full-size meter bridge with sunlight-visible mechanical VU meters provided for all 22
output buses and the stereo Solo bus. Meter illumination shall be LED. The live monitor
console shall be the Crest Audio Century LMx40 (LMx52).
APPENDIX A
Page 27

CENTURY SERIES
LMX
SOLO
INSERT
PFLAFL
&
SOLO
AUDIO
CONTROL
SOLO AUDIO
SOLO CONTROL
20 - 400HZ
HPF
HPF
1 / 2 TO 19 / 20
LMx GROUP MODULE
ODD
SOLO
GROUP
&
SOLO
AUDIO
CONTROL
PFL AFL
∑
ODD
GROUP
MIX AMP
ODD
SOLO AUDIO
SOLO CONTROL
GROUP SELECT
EQ IN
INSERT
SIGNAL
ODD
SEND
Ø
PRESENT
ODD
INSERT
RETURN
OPTION
XFORMER
ON
INSERT
ODD
FADER AMP
GROUP
THREE BAND EQ - ODD
LF MF HF
THREE BAND EQ - EVEN
PEAK
GLOBAL
LEV/PAN
GR
ODD
EVEN
STEREO IN
(FROM L / R)
LEFT
G
DIM
FADER
TB
GROUP OUT
TO METER MUX
DIM
RIGHT
FADER
PEAK
R
L / R ASSIGN
∑
OUT
RIGHT
XFORMER
+10
RIGHT
M
RIGHT
TB
FROM GROUP
∑
OPTION
FADER AMP
MUTE
SIGNAL
PRESENT
INSERT
RETURN
RIGHT PRE
RIGHT POST
PEAK
G
R
RIGHT
Ø
R
PEAK
TB FROM MASTER
INSERT
G
INSERT
ON
SEND
SIGNAL
RIGHT
PRESENT
∑
ISSUE 1.1
+48V ON
DIMMER
+20
DC
LEDS
STATUS
+24
LEFT POST
LEFT PRE
POST
L / R TO GROUPS
ON
-20
+48
RIGHT POST
RIGHT PRE
21 NOV 96
LEFT
RIGHT
STEREO IN
STEREO IN
SOLO
INSERT
&
SOLO
AUDIO
CONTROL
PFL AFL
P LØ2-BAND EQ
PLØ2-BAND EQ
PAD +48 LINEHPFØ GAIN
SOLO AUDIO
SOLO CONTROL
EQ
SOLO
RIGHT
&
SOLO
AUDIO
PFL AFL
GROUP
MIX AMP
R (EVEN)
SOLO AUDIO
CONTROL
DYNAMICS LEFT
SOLO CONTROL
PEAK
GR
SIGNAL
PRESENT
THRESHON
SEND
MASTER
MUTE
DYNAMICS RIGHT
PFLAFL
STEREO IN
TO GROUPS
SOLO
STEREO
SOLO
AUDIO
AUDIO
&
CONTROL
CONTROL
MASTER
LAMP
POWER
OUT
ODD
GROUP
ODD
+10
M
MUTE
DIM
ODD
FADER
TB
ODD
AFL
SOLO
SOLO
CONTROL
PFL
GROUP OUT
TO METER MUX
GROUP TO
L / R ASSIGN
L / R MIX
TO GROUP
LINE
INPUT
OUT
EVEN
GROUP
OPTION
XFORMER
EVEN
+10
EVEN
FADER AMP
M
MUTE
GROUP
DIM
EVEN
FADER
TB
EVEN
ODD
SOLO
SOLO
CONTROL
PFL AFL
1-20
FROM
INPUT
MODULES
TB FROM MASTER
SEND
EVEN
EVEN
INSERT
INSERT
RETURN
SOLO
INSERT
SOLO
INSERT
&
&
SOLO
SOLO
AUDIO
AUDIO
CONTROL
CONTROL
(SHOWN ABOVE)
HPF
SIGNAL
PRESENT
GROUP
HPF
(SHOWN ABOVE)
∑
PFL AFL
SOLO AUDIO
GROUP
SOLO
AUDIO
PFL AFL
EVEN
GROUP
MIX AMP
EVEN
SOLO AUDIO
GROUP SELECT
SOLO CONTROL
EVEN
SOLO
&
CONTROL
SOLO CONTROL
SOLO AUDIO
SOLO CONTROL
( GROUPS 21 / 22 )
LMx L / R MODULE
LEFT
SOLO
&
SOLO
AUDIO
CONTROL
SOLO AUDIO
SOLO CONTROL
ON
INSERT
THREE BAND EQ
EQ IN
Ø
R
PEAK
G
EVEN
L / R TO
LEFT
RIGHT
LEFT
SEND
INSERT
PFLAFL
ON
INSERT
Ø
SIGNAL
PRESENT
GR
PFL AFL
L (ODD)
GROUP
MIX AMP
L
∑
STEREO IN
(FROM L / R)
INSERT
RETURN
LEFT PRE
PEAK
LEFT
LEFT POST
GLOBAL
R
XFORMER
LEFT
LEFT
LEV/PAN
OPTION
FADER AMP
MUTE
SIGNAL
OUT
LEFT
+10
M
PRESENT
RIBBON CABLES
5678
1234
SAFE MUTE SCENES
SOLO AUDIO
SOLO CONTROL
&
SOLO
AUDIO
CONTROL
PFL AFL
SOLO
LEVEL
LMx INPUT MODULE
Ø
TO PEAK
100
GAIN
LINE
PAD
15dB
OPTION
XFORMER
+48V
BAL MIC IN
LIFT
PIN 1
MUTE
POST
FADER
PRE
FADER
EQ IN
FREQ
LF L MID H MID HF
P
1/2
SENDS
LEVEL
MUTE CONTROL
OR
LEV
ODD
+10
FADER AMP
M
SHELFSHELF
QQ
FOUR BAND EQ
HPF
INPUT
PREAMP
S
P
BAL LINE IN
BAL MIC OUT
PAN
LEV
PRE
ODD
EVEN
1-4
YES
TO GROUP
SELECT
EVEN
GLOBAL CONTROL
LEV/PAN
SWITCHING
PRE
MUTE ?
NO
EQ FDR
PEAK
PRE
PRE
AMP
LINE-INS
INPUTS 1-20
TO MON EXT INPUT
1 OF 20
SELECT
INPUTS 1 THRU 20
INSERT SEND
3/4
SENDS
OR
LEV
M
PRE SOURCE AMP
PRE
SOURCE
0
-6
+8
POST
FADER
FADER
OR
INPUTS 21-22
INPUTS 27-28
(40 CHAN LMx)
OR
1 OF 2
(40 CHAN LMx)
INPUTS 21 AND 22
INSERT RETURN
ODD
PAN
LEVEL
LEV/PAN
LEV
ODD
EVEN
SELECT
SIGNAL
PRESENT
METER
SOURCE
(52 CHAN LMx)
(52 CHAN LMx)
INPUTS 27 AND 28
DIRECT OUT
EVEN
GLOBAL CONTROL
SWITCHING
SENDS 5/6 - 7/8
REPEATED FOR
SENDS 9/10 - 11/12
17/18
SENDS
LEV
EVEN
OR
LEV
ODD
SENDS 21/22
SENDS 19/20 &
REPEATED FOR
SENDS 13/14 - 15/16
D
M
P
∑
LEVELPAN
ODD
LEV/PAN
PRE
17-18
ELVIS
FET DIM
FET MUTE
FADER
PANEL
SWITCH
DRIVER
BALANCED
SUM
AMP
POT
DUAL-CON
POT PADLED AMP
ROTARY
EVEN
SWITCHING
GLOBAL CONTROL
XLR
MALE
XLR
FEMALE
JACK
1/4” TRS
METER
RECTIFIER
SHUNT DIP SW
INPUT FADER MIX
LEGENDS
PIN 2 HOT ON ALL XLRS
USER OPTIONS
∑
SOLO DC
SOLO MIX L
SW
SOLO
LEVEL
FADER
∑
SUM
MONO
VCA
SOLO L / R
TO METER MUX
MONITOR
M
LMx MASTER MODULE
MAIN
LEFT
MONITOR
VOLUME
MONITOR
OPTIONAL
FOOT-PEDAL
∑
SOLO MIX R
VCA
M
MAIN
MONITOR
INPUT
MONITOR
EXCLUSIVE
ON/OFF
ALT SLAVED
RIGHT
∑
MIX
FADER
MIX
FADER
IN
EXT
CONTROL LOGIC
MONITOR ON/OFF
MONITOR ON
ALT MAIN
L
L & R
EXT INPUT
M
MONITOR
ALTERNATE
LEFT
MODULES
FROM INPUT
21-22 (40 CHAN LMx) OR27-28 (52 CHAN LMx)
MODE
SLAVE
R
ALT
MON
LEVEL
M
MONITOR
ALTERNATE
MODE
SOLO
MODE
AFL PFL
SOLO
ACTIVE
INPUT OUTPUT
CLEAR
INPUT
PRIORITY
SOLO CONTROL
LAST
PRESSED
INDEPENDENT
L
RIGHT
M
PHONES
SELECT
PHONES
SOURCE
LEVEL
PHONES
(TOP PANEL)
SOLO
SOLO
MASTER
R
M
MODE
SENSE
SOLO
FOLLOW
(FRONT)
PHONES
LOGIC
LOGIC
LOGIC
1
10K1K100
RANGE
FREQ
LEVEL
FADER
POWER
DISTIBUTION TO
MUTE GROUP CONTROL
AND
SWITCHING
POWER FILTERING
MASTER PHANTOM
SOLO CONTROL AND SENSE LINES
2
3
4
GEN
NOISE
20-20K
OSCILLATOR
X2
PINK
FILTER
÷5
PINK
NOISE
ON
OSC
M
ON
PHONES
GAIN
TB MIC
20 30 40DB
MIC PRE
ON
+48V
TB MIC
(TOP PANEL)
MUTE
RIBBON
GROUP
LATCH
TB MIC
LOGIC
(FRONT)
CONNECTION
MAIN DC POWER
5
MASTERS
TALK
BALK
TB
LEVEL
POWER FEED TO
POWER DIST
6
7
TB FEED TO GROUPS
M
∑
M
IN
EXT TB
EXT TB IN
RIBBON ENDS
BOARD
DIMMER / MUX
CONSOLE
8
EXT TB OUT
METER
CIRCUITRY
MULTIPLEXING
ILLUM
METER
CIRCUITRY
LAMP DIMMER
SUPPLY
POWER
CONNECTOR
OUT
EXT TB
FILTERING
REAR OF
METERBRIDGE
METERBRIDGE
( 4 )
OPTIONAL
LITTLE-LITES
3-PIN XLR
LAMP SOCKETS
METER
DEMUX
CIRCUITRY
17 18 19 20
LEFT SOLO RIGHT
GROUPS GROUPS
2 3 4 5 6 7 8 9 10 11 12 13 14 15 16 17 18 19 20 21 22
1
APPENDIX A
Page 28

LMX
4.8125"
122mm
4.5625"
116mm
2.25"/57mm
CENTURY SERIES
Side Dimensions
1.30"/ 33mm
35°
29.5625" / 751mm
28.0" / 711mm
SUPPORT ACROSS THIS DIMENSION IS RECOMMENDED
24.75" / 629mm
2.375"/ 60mm
SUPPORT ACROSS
THIS AREA IS
RECOMMENDED
Crest Consoles Engineering,
May 5, 1997
KNOB HEIGHT, .75"/19mm & 1.25"/32mm
19" / 483mm
All information per
31.14" / 791mm
30.21"/767mm
APPENDIX A
DO NOT APPLY ANY
LOADS TO METER
BRIDGE ASSEMBL Y
.65"/17mm
10°
130mm
5.125"
12.5625"
319mm
12.6875"
322mm
Page 29

CENTURY SERIES
LMX
Rear Views & Dimensions
Inputs
Master
L / R
Groups
Inputs
LINE IN
BAL
PIN 1
SND
INSERT
BAL
RTN
DIR
LIFT
OUT
BAL
MIC
IN
-
PIN 1
LIFT
OUT
BAL
MIC
IN
-
PIN 1
LIFT
OUT
BAL
MIC
IN
-
PIN 1
LIFT
OUT
BAL
MIC
IN
-
-
PIN 1
LIFT
OUT
BAL
MIC
IN
-
PIN 1
LIFT
OUT
BAL
MIC
IN
-
-
PIN 1
LIFT
OUT
BAL
MIC
IN
-
-
PIN 1
LIFT
OUT
BAL
MIC
IN
-
-
PIN 1
LIFT
OUT
BAL
MIC
IN
-
-
PIN 1
LIFT
OUT
BAL
MIC
IN
-
-
EXT TB
OUT
STR
MIC
IN
L
IN
SND
INSERT
BAL
RTN
STR
MIC
IN
R
SND
INSERT
BAL
RTN
SND
INSERT
BAL
RTN
SND
INSERT
BAL
RTN
SND
INSERT
BAL
RTN
SND
INSERT
BAL
RTN
SND
INSERT
BAL
RTN
SND
INSERT
BAL
RTN
SND
INSERT
BAL
RTN
SND
INSERT
BAL
RTN
SND
INSERT
BAL
RTN
PIN 1
LIFT
OUT
BAL
MIC
IN
-
PIN 1
LIFT
OUT
BAL
MIC
IN
-
-
PIN 1
LIFT
OUT
BAL
MIC
IN
-
PIN 1
LIFT
OUT
BAL
MIC
IN
-
-
PIN 1
LIFT
OUT
BAL
MIC
IN
-
PIN 1
LIFT
OUT
BAL
MIC
IN
-
PIN 1
LIFT
OUT
BAL
MIC
IN
-
PIN 1
LIFT
OUT
BAL
MIC
IN
-
PIN 1
LIFT
OUT
BAL
MIC
IN
-
-
PIN 1
LIFT
OUT
BAL
MIC
IN
-
PIN 1
LIFT
OUT
BAL
MIC
IN
-
PIN 1
LIFT
OUT
BAL
MIC
IN
-
PIN 1
LIFT
OUT
BAL
MIC
IN
-
PIN 1
LIFT
OUT
BAL
MIC
IN
-
PIN 1
LIFT
OUT
BAL
MIC
IN
-
PIN 1
LIFT
OUT
BAL
MIC
IN
-
PIN 1
LIFT
OUT
BAL
MIC
IN
-
PIN 1
LIFT
OUT
BAL
MIC
IN
-
PIN 1
LIFT
OUT
BAL
MIC
IN
-
PIN 1
LIFT
OUT
BAL
MIC
IN
-
-
OUT
LINE IN
BAL
SND
INSERT
BAL
RTN
DIR
OUT
LINE IN
BAL
SND
INSERT
BAL
RTN
DIR
OUT
LINE IN
BAL
SND
INSERT
BAL
RTN
DIR
OUT
LINE IN
BAL
SND
INSERT
BAL
RTN
DIR
OUT
LINE IN
BAL
SND
INSERT
BAL
RTN
DIR
OUT
.75in.
LINE IN
BAL
SND
INSERT
BAL
RTN
DIR
OUT
LINE IN
BAL
SND
INSERT
BAL
RTN
DIR
OUT
LINE IN
BAL
SND
INSERT
BAL
RTN
DIR
OUT
LINE IN
BAL
SND
INSERT
BAL
RTN
DIR
OUT
LEFT
ALT MON
RT
MONITOR
LEFT
RT
INSERT
BAL
RTN
SND
EVEN
ODD
OUT
OUT
SND
INSERT
BAL
TRN
EVEN
OUT
EVEN
OUT
EVEN
OUT
EVEN
OUT
EVEN
OUT
EVEN
OUT
EVEN
OUT
EVEN
OUT
EVEN
OUT
EVEN
OUT
LINE IN
BAL
LINE IN
BAL
LINE IN
BAL
LINE IN
BAL
LINE IN
BAL
LINE IN
BAL
LINE IN
BAL
LINE IN
BAL
LINE IN
BAL
LINE IN
BAL
LINE IN
BAL
LINE IN
BAL
LINE IN
BAL
LINE IN
BAL
LINE IN
BAL
LINE IN
BAL
LINE IN
BAL
LINE IN
BAL
LINE IN
BAL
LINE IN
BAL
ODD
OUT
SND
INSERT
BAL
TRN
ODD
OUT
SND
INSERT
BAL
TRN
ODD
OUT
SND
INSERT
BAL
TRN
ODD
OUT
SND
INSERT
BAL
TRN
ODD
OUT
SND
INSERT
BAL
TRN
ODD
OUT
SND
INSERT
BAL
TRN
ODD
OUT
SND
INSERT
BAL
TRN
ODD
OUT
SND
INSERT
BAL
TRN
ODD
OUT
SND
INSERT
BAL
TRN
ODD
OUT
SND
INSERT
BAL
RTN
DIR
OUT
SND
INSERT
BAL
RTN
DIR
OUT
SND
INSERT
BAL
RTN
DIR
OUT
SND
INSERT
BAL
RTN
DIR
OUT
SND
INSERT
BAL
RTN
DIR
OUT
SND
INSERT
BAL
RTN
DIR
OUT
SND
INSERT
BAL
RTN
DIR
OUT
SND
INSERT
BAL
RTN
DIR
OUT
SND
INSERT
BAL
RTN
DIR
OUT
SND
INSERT
BAL
RTN
DIR
OUT
SND
INSERT
BAL
RTN
DIR
OUT
SND
INSERT
BAL
RTN
DIR
OUT
SND
INSERT
BAL
RTN
DIR
OUT
SND
INSERT
BAL
RTN
DIR
OUT
SND
INSERT
BAL
RTN
DIR
OUT
SND
INSERT
BAL
RTN
DIR
OUT
SND
INSERT
BAL
RTN
DIR
OUT
SND
INSERT
BAL
RTN
DIR
OUT
SND
INSERT
BAL
RTN
DIR
OUT
SND
INSERT
BAL
RTN
DIR
OUT
19mm
C
A
Size A B C
44 57.55" 55.80" 54.25"
52 67.15" 65.40" 63.85"
64 81.55" 79.80" 78.25"
Size A B C
44 1462mm 1417mm 1378mm
52 1706mm 1661mm 1622mm
64 2071mm 2027mm 1988mm
Crest Consoles Engineering,
May 5, 1997
1.5in./38mm
B
APPENDIX A
Page 30

LMX
CENTURY SERIES
LMX User Options
LMX consoles are shipped having standard configuration unless specified at time of order. These are ways that the console configuration may be varied after manufacture. The items listed are internal options selected by gold jumper links or using pcb DIP
switches.Jumper link default is marked on the board with a line and is usually pins 1&2 of the three pin header. Please note that
Group Outputs and Stereo Master have no user options.
In addition, there are links for module function assignment. Take care to not disturb these when using USER OPTION links.
DIP switches: switch ON is 'down', switch OFF is 'up' when viewing the switch body numbers.
MODULE LOCATION OPTION TITLE FUNCTION
[M=Main board Shipped with
C=Connector] option underlined
Input C OPT 1 EQ HF select Peak or Shelf curve
Input C OPT 2 EQ HM (high mid) select Q high or low
Input C OPT 3 EQ LM (low mid) select Q high or low
Input C OPT 4 EQ LF select Peak or Shelf curve
Input M switch 16/1 GRP1/2, force Level/Pan mode ON or OFF
Input M switch 16/2 GRP3/4, force Level/Pan mode ON or OFF
Input M etc etc
Input M switch 16/8 GRP15/16, force Level/Pan mode ON or OFF
Input M switch 17/1 GRP17/18, force Level/Pan mode ON or OFF
Input M switch 17/2 GRP19/20, force Level/Pan mode ON or OFF
Input M switch 17/3 Left/Right, force Level/Pan mode ON or OFF
Input* M switch 17/4 Pre-source to Groups: with EQ ON *
Input* M switch 17/5 Pre-source to Groups: pre EQ OFF *
Input M switch 17/6 Pre source to Groups: Mutable ON or OFF
Input*. M switch 17/7 Pre-fader to Channel meter: ON *
Input* M switch 17/8 Post-fader to Channel meter: OFF *
Master M SEL1(R)+SEL2(L) HP level follows Mon Fader YES or NO
Master C SEL1 TB Phantom Power ON or OFF
Master C SEL2 TB Gain select 20, 30, 40dB
Master† M SEL3 'Exclusive Monitor' Alt Monitor ON-OFF switch option.
Default = Alt ON-OFF switch normal.
Master† M SEL4 'Alt Slave ON-OFF' Alt Monitor ON-OFF switch option.
Default = Normal, Alt ON-OFF switch independent.
* these switches operate in pairs to select either of two possible choices. Change both switches.
†These two jumper links should be changed as a pair. Other combinations are not meaningful.
Consoles are shipped with SEL3 & 4 in the default settings. Alternate and Main outputs have independent ON-OFF switches.
When in SLAVE mode the Alt output level is controlled by the Main monitor output fader.
When SEL3 & 4 are BOTH selected then when Alt SLAVE mode is selected the Alt level is controlled by the fader, the Main
ON-OFF switch controls both the Main and Alternate outputs, and the Alt ON-OFF switch becomes an exclusive either-or switch
for the 1/4" (Alt) and XLR (Main) outputs. The Alternate LED indicator is intelligently controlled by the Main switch to show
'OFF' (no light) or 'ON+mute' (red) or 'ON' (green).
Output modules are pre-assigned at the Crest factory
These modules must always be installed in the correct positions. They are NOT interchangeable without being properly re-
assigned. Please contact the Crest Audio Service Department for more information.
APPENDIX A
IMPORTANT
Page 31

T
CENTURY SERIES
LMX
Console Disassembly
Though you shouldn’t have to disassemble the console, it is necessary to remove modules to change the jumper and switch settings associated with the internally selectable options. The following steps detail the tasks involved when taking the console
apart.
ONE • Open the armrest.
To properly remove one or many modules, the black painted
armrest must first be opened. To do this, the two thumb-screws
(see diagram at right) must be loosened from below. Once these
screws are loose, slide both of them a few inches to the side
(they will only move in one direction). Once the screws have
been moved the armrest will easily roll back exposing the module screws beneath.
Opening the
Armrest
TWO • Remove front module screw
Once the armrest has been opened, there will be a single screw at
the front edge of the module panel holding each module in place.
Remove the screw from the module(s) you want to remove.
Thumbscrews
THREE • Remove rear screws
On the back panel of the console there are two screws holding
each module in place (see diagram at right) Remove both screws
from each module you wish to remove.
FOUR • Lift the module(s) out
As you lift the module out of the chassis three wires must be
detached before the module can be completely removed: 2
flat-wires (ribbon cables) and one ground wire.
The flat-wires are removed by flipping the latches on the ends
of the connectors. Once the tabs have been flipped the connector should pull off easily.
Lower Screw
The ground wire (green) is a spade lug which pulls off.
Upper Screw
BAL OUT
BAL OUT
INSERT SEND
INSERT SEND
INSERT RETURN
INSERT RETURN
MONITOR A LEFT
MONITOR B LEFT
MONITOR B RIGHT
MONITOR A RIGHT
OSC IN
EXT TB IN
EXT TB OUT
BAL OUT
INSERT SEND
INSERT RETURN
RETURN 1
RETURN 2
BAL OUT
INSERT SEND
INSERT RETURN
Light Bar
BAL OUT LEFT
BAL OUT LEFT
INSERT SEND
INSERT SEND
INSERT RETURN
INSERT RETURN
BAL OUT RIGHT
BAL OUT RIGHT
INSERT SEND
INSERT SEND
INSERT RETURN
INSERT RETURN
FIVE • Putting it all back together
Re-assembling a Century Series console is as easy as taking it apart, but only if you know where everything goes. If you are
going to be removing a number of modules, consider replacing the first before removing the second. Reversing the above steps
should result in the console being as well put together as it was when it left the factory.
DIR OUT
INSRT SND
BAL INSRT R
BAL LINE IN
LIFT
PIN 1
BAL MIC IN
BAL MIC OUT
These modules must always be installed in the correct positions. They are NOT interchangeable without being properly re-
assigned. Please contact the Crest Audio Service Department for more information.
IMPORTANT
Output modules are pre-assigned at the Crest factory
APPENDIX A
Page 32

Page 33

LMx
Appendix B
Glossary
Page 34

LMX
CENTURY SERIES
Balanced
Symmetrical audio input with three connections: signal +, signal -, and screen ground.
Balanced Insert Return
See Insert Return
Balanced Line In
See Line Input
Balanced Mic In
See Microphone Input
Balanced Mic Out
See Microphone Output
Balanced Out
See Outputs
DIM Switch
Introduces a -6dB drop to the output signal. This is a push
on/push off switch, and allows the operator to temporarily drop
the level of a monitor without actually changing any settings.
Direct Out
This jack carries the direct output signal (post fader & post
mute) from each input channel. This signal can be used for
connection to recording devices or routing of the post fader
signal.
EQ IN Switch
Inserts the EQ section into the input/output channel signal.
An associated LED illuminates when the switch is down.
Equalizer Controls (Input)
There are two knobs for each of the four bands. The inner knob
controls the boost or cut; while the outer knob controls the center frequency adjusted by the inner knob. These center frequencies are printed on the chassis around the outer knob. This EQ
is active only when the EQ In switch is depressed.
Equalizer Controls (Output)
Controls the equalization of the output mix signal through
three bands, via six controls. The upper knob of each band
determines the center frequency (high-1kHz-20kHz, mid300Hz-8kHz, low-40Hz-1kHz), while the lower knob adjusts
the amount of boost or cut.
External Talkback Input
In addition to the mic connections on the console surface, an
additional Talkback input connection is provided on the rear of
the master section. Signal connected to this jack appears on the
Talkback bus whenever the External TB Input switch is
depressed.
External Talkback Output
This allows the TB signals from the local mic only to be routed
to an external destination such as a link to the FOH console.
Signal appears on this jack when both the External TB Output
switch and talkback master switches are depressed.
Fader
Used for final output control of an input/output channel except
those sends selected pre fader. (Insert Output levels are not
affected by the fader position.)
Gain Control
Adjusts input gain for proper signal level on the input. To set
the gain to the best position, make sure there is signal present
at the input. Depress the PFL switch on that input channel and
make sure that no other PFL switches are depressed. Adjust the
gain control until the SOLO meter is peaking no more than +3
level.
Headphone Jack
Allows for connection of headphones via a 1/4" TRS plug.
There are two headphone jacks: one on master module, and
one underneath the armrest on the right front corner of the console. Suitable for all headphone impedances.
Headphone Level Control
Controls the output level of both headphone jacks.
High Pass Filter Switch
This switch inserts the High Pass Filter into the output signal.
The output HPF is adjustable via the HPF frequency control.
HPF Frequency Control
This knob adjusts the high pass filter frequency from 20Hz to
400Hz. The filter operates at a -12 dB per octave rate.
100 Hz High Pass Filter (Input)
Reduces all Input signal low frequency content at a 12db per
octave rate referenced to 100Hz (-3db point).
Insert
All LMx inputs and outputs have insert loops which facilitate
the patching of external processing equipment into the input or
output signal.
On the inputs, signal is always present at the Insert Send connection and the loop is complete when the proper connector is
plugged into the Insert Return. The Insert Return can also be
used as a line input when by-passing the preamp is desired.
On the outputs, signal is always present at the Insert Send connection; the loop is controlled by the Insert On switch.
Depressing this switch inserts the loop into the output signal.
Since this a true insert, if an incomplete loop exists, depressing
the switch will mute the output.
APPENDIX B
Page 35

CENTURY SERIES
LMX
Input/Output Solo Indicators
These LEDs indicate what type of signal (input or output) is
SOLO'd at any given time.
Lamp Dim Control
Controls the brightness of any 12 volt lighting devices attached
to the XLR connectors on the meter bridge.
LINE Switch
Selects the input signal connected to the Balanced Line Input
1/4" TRS connector. When the switch is released the source is
the XLR mic input.
Line Input
This jack accepts balanced and unbalanced line level inputs
and delivers it into the associated input channel. The input
impedance is high, typically 10kΩ or more, so that the load on
sources is negligible.
Microphone Input
This connector accepts balanced microphone inputs for the
associated input channel. Suitable for low output impedance
dynamic and condenser microphones.
Microphone Output
This connector is in parallel with the Balanced Mic In connector, and allows easy connection of the monitor board to the
FOH console.
Phantom Master Switch w/LED
Switches +48V phantom power on and off for the entire console.
Power Indicators
Shows the status of the four voltages (+24, +48, +20, -20) used
by the console.
Polarity Reverse Switch
Electrically inverts the polarity of associated signal.
Pre
Connects before the associated control. (For example: prefader - before the fader and therefore unaffected by fader
movements.)
Scene Mute Assignments
Assign the input channel to any of the eight scene mute groups.
Scene mute combines with the module’s local mute button, and
actuates the local mute LED.
Scene Mute Masters
These eight switches turn the eight scene mutes on and off for
the entire console.
Scene Mute Safe Switch
Disables any selected scene mute assignments. An associated
green LED indicates the channel is in a safe state.
Monitor
These are stereo local monitor outputs. Level is controlled via
the Monitor Level control and the signal is found on balanced
output connectors (two per monitor) on the rear of the master
section. Each Monitor can be muted with the Monitor Mute
switch..
MUTE Switch with LED
On all inputs and outputs where this switch is present, depressing it will mute all sends. The LED illuminates when the channel is muted either from the switch or via the scene mute system.
Output Insert - See Insert
Output EQ - See Equalizer Controls (Output)
PAD Switch
Introduces a -15 dB drop to the mic input signal.
PEAK LED Indicator
Illuminates RED when any of the points monitored come within 3db of the clipping point. Signal is sampled after the input
preamplifier stage, after the EQ section, and after the fader.
Phantom Power Switch
Turns on 48V Phantom Power as required by some condenser
microphones for proper operation. This switch delivers +48V
only when the Phantom Power Master Switch is engaged.
Signal Present LED
This green LED constantly displays level activity of the
input/output channel by varying in intensity.
Solo
Monitoring function, combines audio with level meter checking.
Talkback Master On/Off
Switches the internal Talkback system on and off
TB Enable Switch
Injects the talkback signal from the master section into the
associated output.
Talkback Level Control
Adjusts the final level of all Talkback signals.
Talkback Mic Input
Allows for connection of a gooseneck or other XLR type
microphone to the Talkback system.
APPENDIX B
Page 36

Page 37

LMx
Appendix C
Schematics
LOCATION DESCRIPTION SCHEMATIC # DWG # REV #
INPUT MODULE INPUT CONNECTOR / MIC PRE SUB 1 76D274 6/7 01
INPUT MAIN (1 OF 2) 2 76D2744 02
INPUT MAIN (2 OF 2) 3 76D2744 02
INPUT MAIN SUB BOARD 4 76D2745 02
GROUP MODULE GROUP CONNECTOR / SUB (1 OF 2) 5 76D275 0/1 01
GROUP CONNECTOR / SUB (2 OF 2) 6 76D275 0/1 01
GROUP MAIN (1 OF 2) 7 76D2748 02
GROUP MAIN (2 0F 2) 8 76D2748 02
GROUP MAIN SUB (1 OF 2) 9 76D2749 01
GROUP MAIN SUB (2 OF 2) 10 76D2749 01
LEFT / RIGHT MODULE L R CONNECTOR 11 76D2754 01
L R CONNECTOR SUB 12 76D2755 01
L R MAIN (1 OF 2) 13 76D2752 01
L R MAIN (2 OF 2) 14 76D2752 01
DYNAMICS SUB BOARD 15 76D2891 00
L R MAIN SUB (1 OF 2) 16 76D2753 01
L R MAIN SUB (2 OF2) 17 76D2753 01
MASTER MODULE MASTER CONNECTOR (1 OF 2) 18 76D2757 01
MASTER CONNECTOR (2 OF 2) 19 76D2757 01
MASTER MAIN (1 OF 2) 20 76D2756 01
MASTER MAIN (2 OF 2) 21 76D2756 01
METER BRIDGE DIMMER BOARD 22 N/A N/A
LMX METER DEMUX 23 76D2758 01
TWO GROUP LED 24 76D2817 00
TWO SOLO LED 25 76D2818 00
FIVE GROUP LED 26 76D2816 00
REMOTE VOLUME CONTROL BOARD 27 76B2942 00
RIBBON CABLE RIBBON PIN OUTS 28 N/A N/A
PINOUT DIAGRAMS
Page 38

Crest Audio Inc.
100 Eisenhower Dr., Paramus NJ 07652 USA
TEL: 201.909.8700 FAX: 201.909.8744
http://www.crestaudio.com
Printed in USA
*D7000005*
LMx Owner's Manual
Copyright © 1997 Crest Audio Inc.
v 2.5 11/3/97 D7000005
 Loading...