

Cressi-sub 2nd Stage Ellipse Balanced Repair And Maintenance Instructions

2nd stage Ellipse
Regulators repair and maintenance
Balanced
January 2009 Rev. ELL.BAL/B Ed. C /12 1
2nd stage Ellipse
Regulators repair and maintenance
Balanced
WARNING!
• This manual is intended for use by expert technicians who have already received
training in equipment repairs and maintenance from Cressi-sub.
• This manual is intended for use by expert technicians who have already received
training in equipment repairs and maintenance from Cressi-sub.
• Avoid performing maintenance and/or repair operations on the equipment without
the proper training required to conduct these operations.
• Users must never perform maintenance themselves; all maintenance must be
performed EXCLUSIVELY by an authorized Cressi-Sub center.
• If the information provided in this document is unclear or not fully intelligible,
please contact Cressi-sub before proceeding with any disassembly or maintenance
procedures.
• Before proceeding, Cressi-sub recommends that you read the following document
carefully to familiarize yourself with all the tools and techniques needed to
perform proper equipment maintenance and/or repair.
• Use this document as a guide during the various steps of maintaining and/or
repairing the equipment.
January 2009 Rev. ELL.BAL/B Ed. C /12 2
2nd stage Ellipse
Regulators repair and maintenance
Balanced
WARNING!
• All operations must be done strictly in the order provided in this document. Failure
to do so could cause the equipment to function poorly, or worse, result in an
accident.
• To prevent any assembly errors when performing maintenance and/or repairs, we
recommend using all the replacement parts provided by Cressi-Sub in every
operation.
• Pay special attention to the recommendations provided in the margin of the figures
that show the various sequences of equipment maintenance and/or repair in order
to avoid any problems that could result in an accident.
• The document below in no way replaces the equipment's instruction manual.
• The procedures described in this document are pertinent to and intended only for
the disassembly, maintenance, and assembly of equipment meant for use with air
(21% oxygen, 79% nitrogen).
• The instructions provided in this document are based on information referring to the
most update equipment available. Cressi Sub reserves the right to make changes at
any time.
January 2009 Rev. ELL.BAL/B Ed. C /12 3
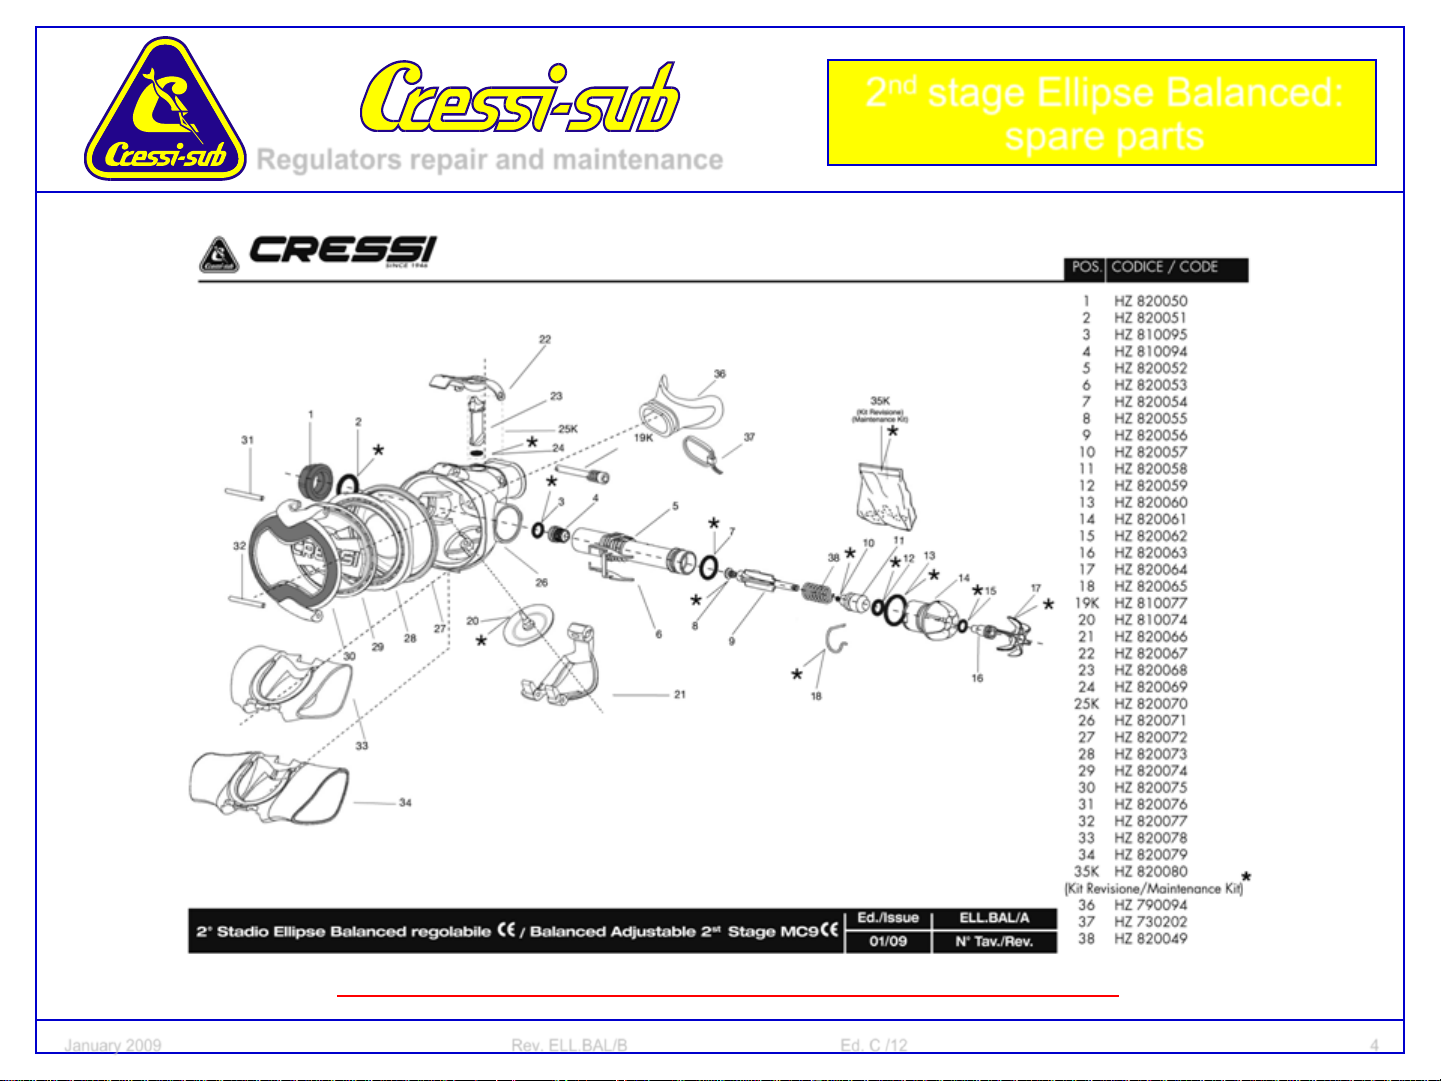
2nd stage Ellipse Balanced:
Regulators repair and maintenance
spare parts
Ellipse Balanced 2° stage (HZ 820080) ANNUAL REPLACEMENT KIT CHART (Real Size)
January 2009 Rev. ELL.BAL/B Ed. C /12 4
2nd stage Ellipse
Regulators repair and maintenance
Balanced
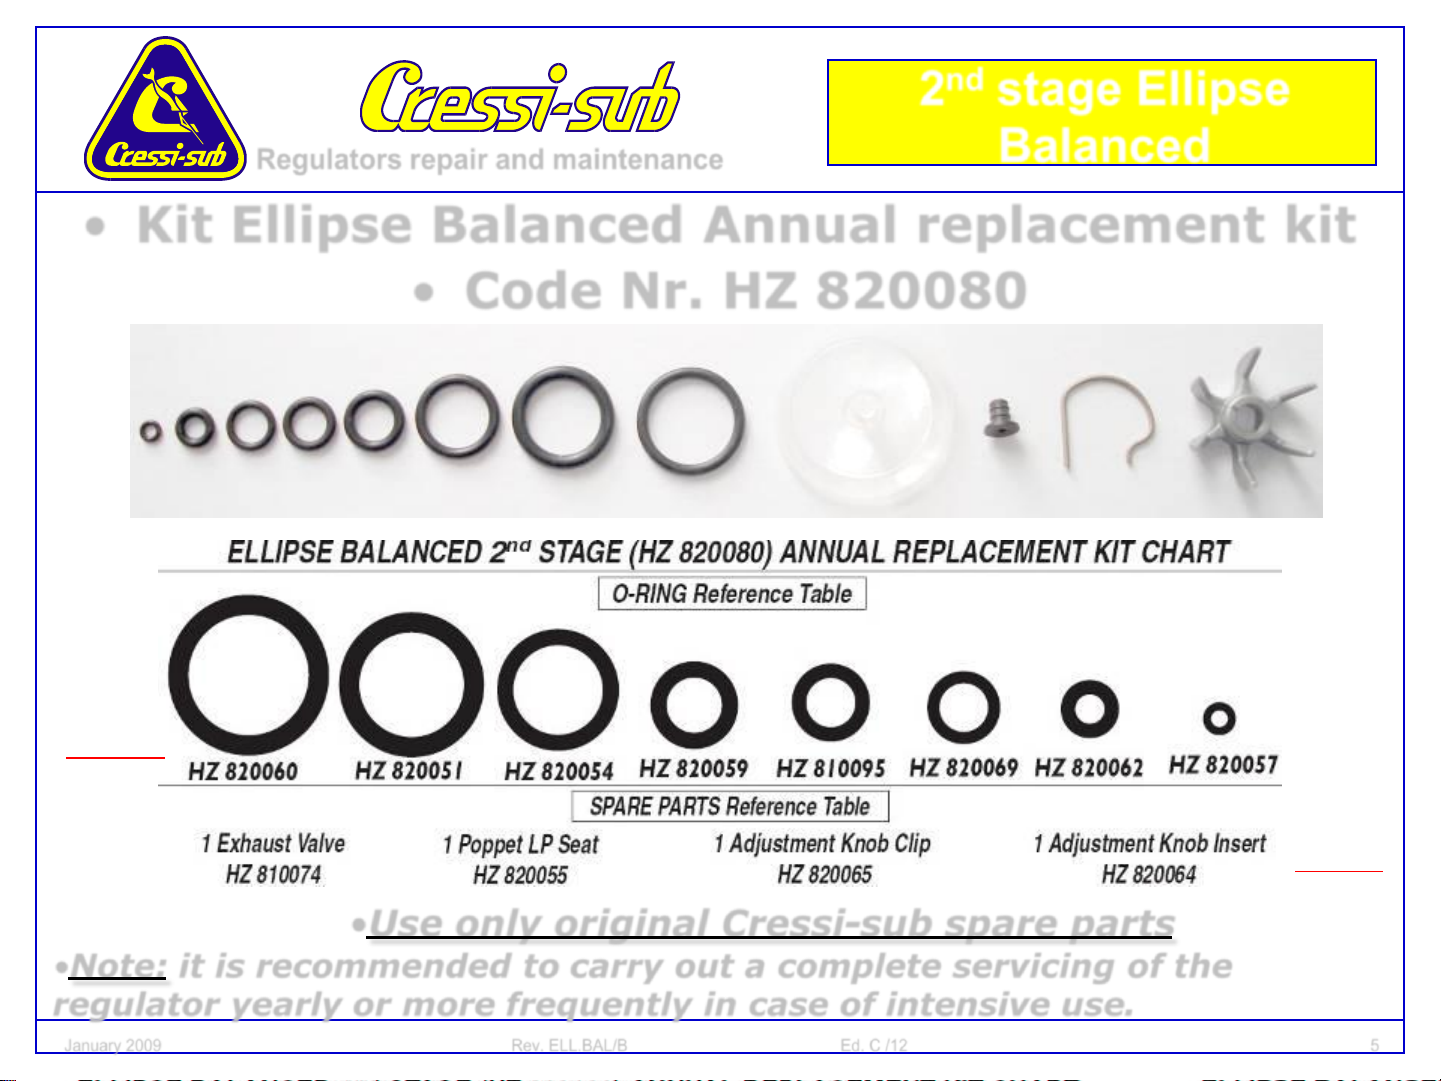
• Kit Ellipse Balanced Annual replacement kit
• Code Nr. HZ 820080
(Real Size)
Go back to
•Use only original Cressi-sub spare parts
•Note: it is recommended to carry out a complete servicing of the
regulator yearly or more frequently in case of intensive use.
January 2009 Rev. ELL.BAL/B Ed. C /12 5
2nd stage Ellipse
Regulators repair and maintenance
Balanced
• Annual replacement
• Cressi-Sub recommends complete regulator maintenance at least once a year,
or more frequently in the case of particularly intense use.
• Maintenance must include replacement of all components provided in the
annual equipment maintenance kit.
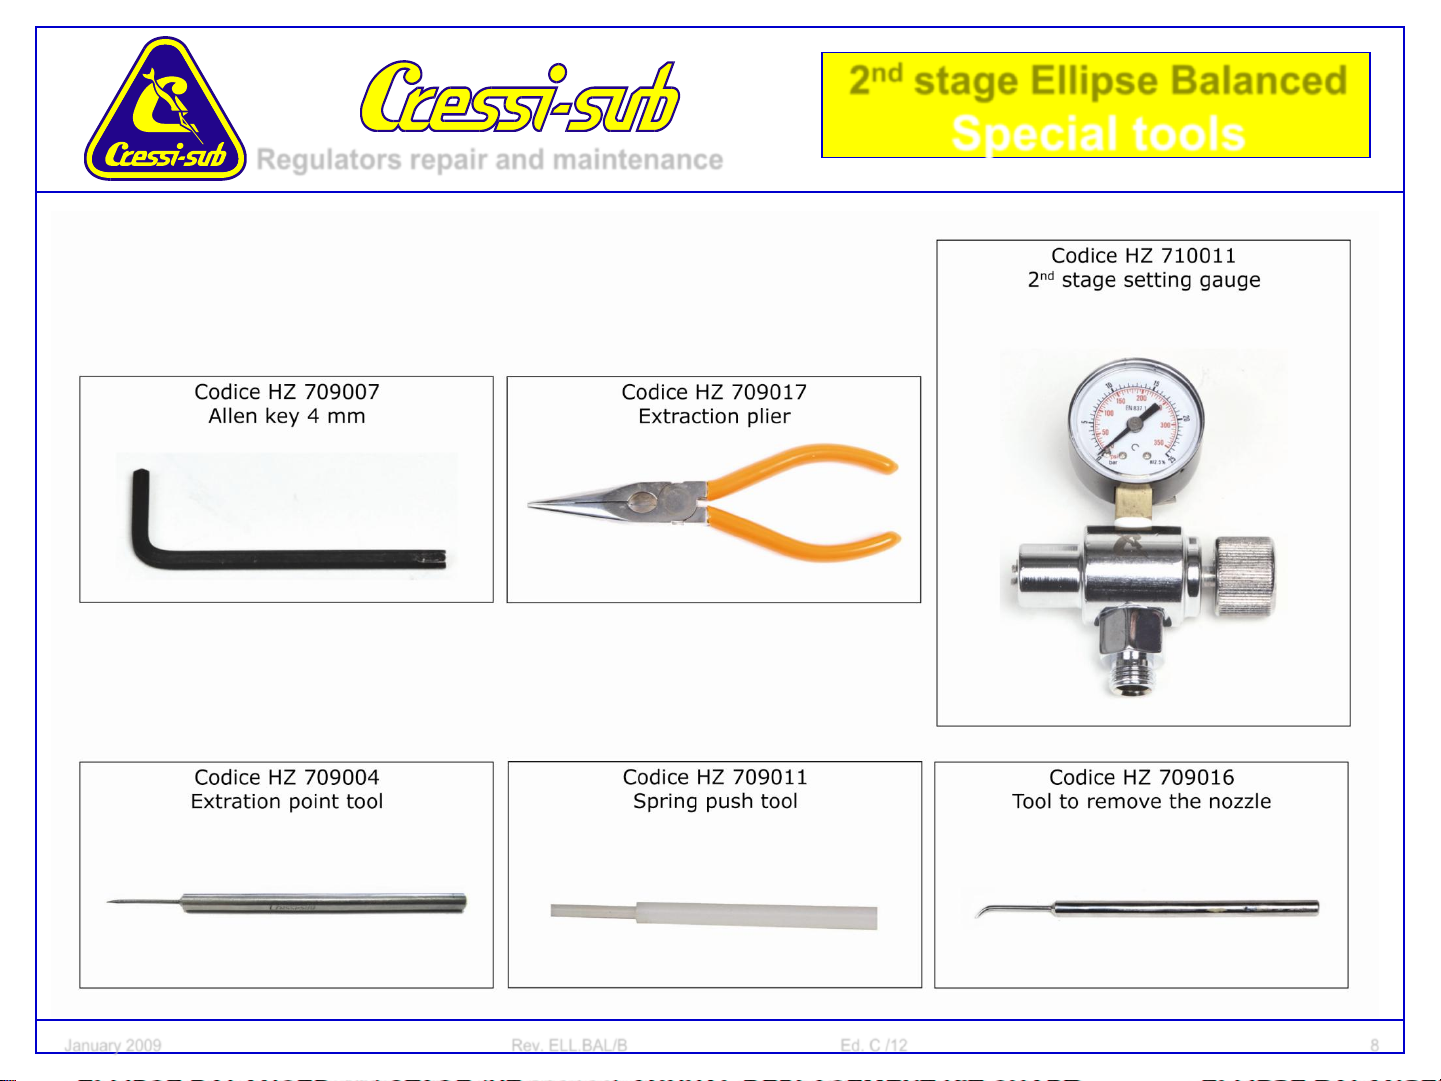
• The special tools for maintenance of this equipment are illustrated in a section
of this document on page 8.
• Metal parts must be washed with hot water and neutral detergent and rinsed
in fresh water. Any concretions must be removed using ultrasound cleaning or
with diluted acid solutions, always followed by long and thorough rinsing
under running water.
• Do not use acids or solvents on rubber components.
• The new ORs must be greased with a thin layer of silicon grease: this
procedure reduces to a minimum the risk of damage during assembly.
• The metal threading can be lubricated with grease on the first two rings of
threading.
January 2009 Rev. ELL.BAL/B Ed. C /12 6
2nd stage Ellipse
Regulators repair and maintenance
Balanced
• Annual replacement
• The procedures described in this document are pertinent to and
intended only for the disassembly, maintenance, and assembly of
equipment meant for use with air (21% oxygen, 79% nitrogen).
• Users must never perform maintenance themselves; all
maintenance must be performed EXCLUSIVELY by an authorized
Cressi-Sub center.
• You can find your authorized Cressi-Sub center by asking your
dealer, or Cressi Sub S.p.A. itself by sending an e-mail to:
info@cressi-sub.it
•Use only original Cressi-sub spare parts
January 2009 Rev. ELL.BAL/B Ed. C /12 7
2nd stage Ellipse Balanced
Regulators repair and maintenance
Special tools
January 2009 Rev. ELL.BAL/B Ed. C /12 8
2nd stage Ellipse Balanced:
Regulators repair and maintenance
disassembling
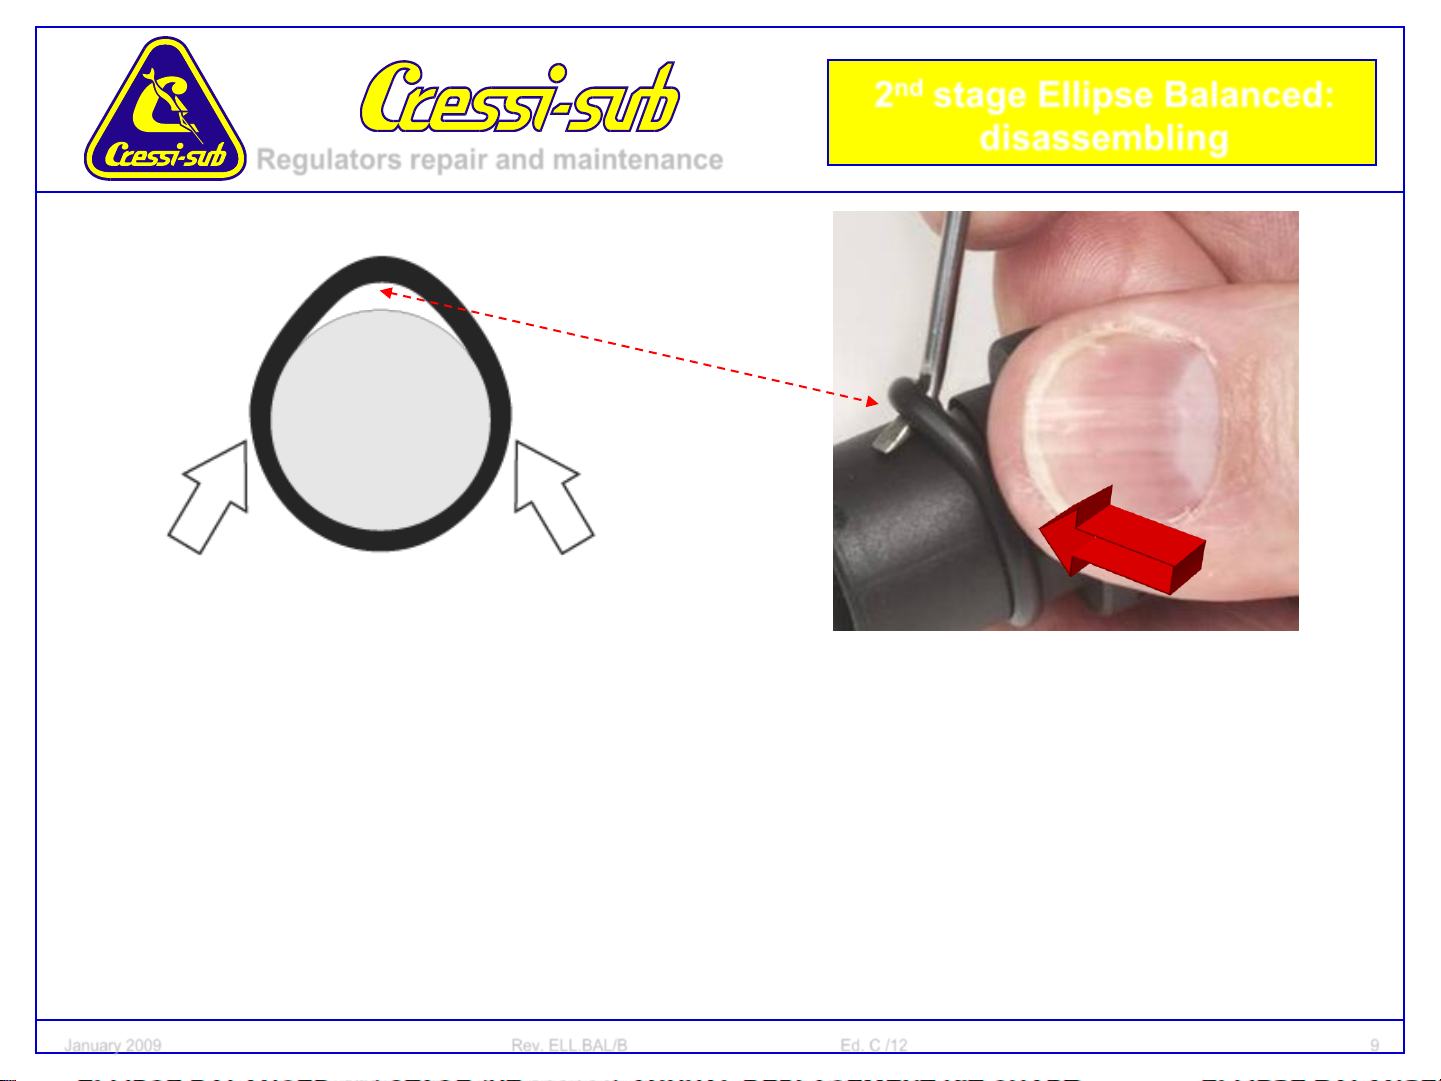
• Remove and replace all O-rings;
• Use a plastic tool or a round pointed metal one in order not to damage the
O-ring seat;
• To replace the O-ring correctly, press its sides to create a bulge inside which
to insert the round pointed tool, as shown in the pictures;
• Attention: USE ONLY ORIGINAL CRESSI-SUB SPARE PARTS
January 2009 Rev. ELL.BAL/B Ed. C /12 9

2nd stage Ellipse
Regulators repair and maintenance
• Remove the low pressure hose
• Use a 0,75 in. and a 0,67 in.
spanner to remove the low
pressure hose, holding the lock
nut steady with the former and
unscrewing the hose with the
latter;
• By annual replacement it is
necessary to replace the O-
rings inside the hose;
Balanced
• Check the low pressure hose
for visible signs of wear, cuts or
abrasions, especially next to
the threaded connecting parts.
January 2009 Rev. ELL.BAL/B Ed. C /12 10
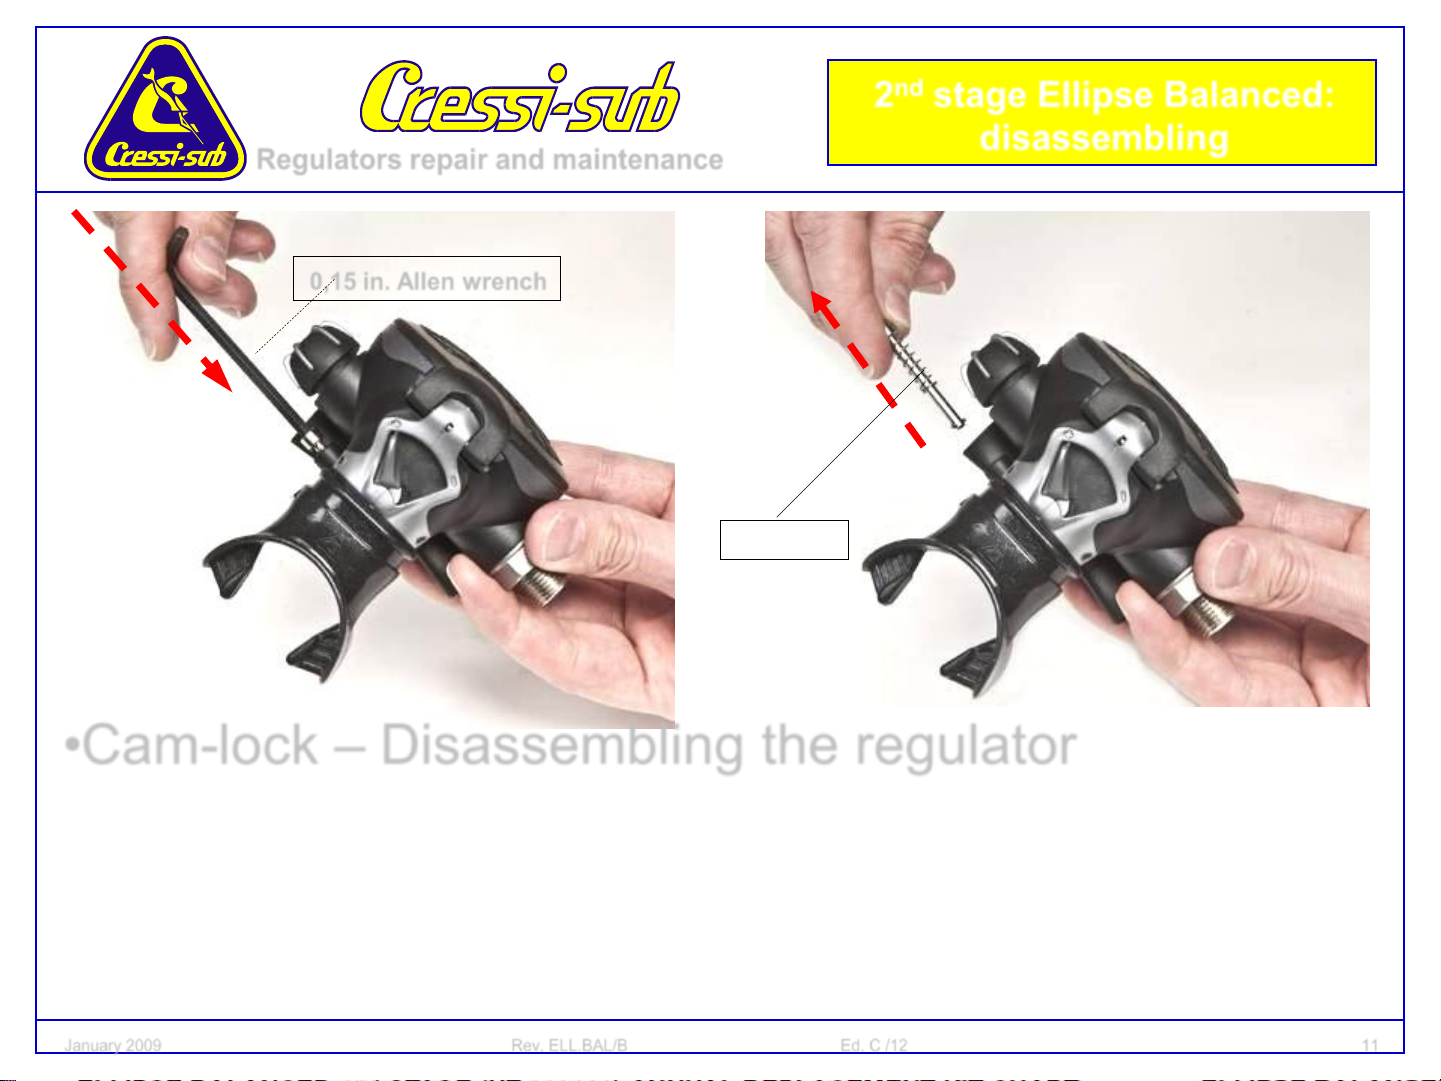
2nd stage Ellipse Balanced:
Regulators repair and maintenance
0,15 in. Allen wrench
disassembling
HZ 810077
•Cam-lock – Disassembling the regulator
• Insert a 0,15 in. Allen wrench into the cam-lock seat, press
gently and turn by 90 degrees anticlockwise. The inner spring
will push the key outwards, and you will be able to take it out
easily.
January 2009 Rev. ELL.BAL/B Ed. C /12 11
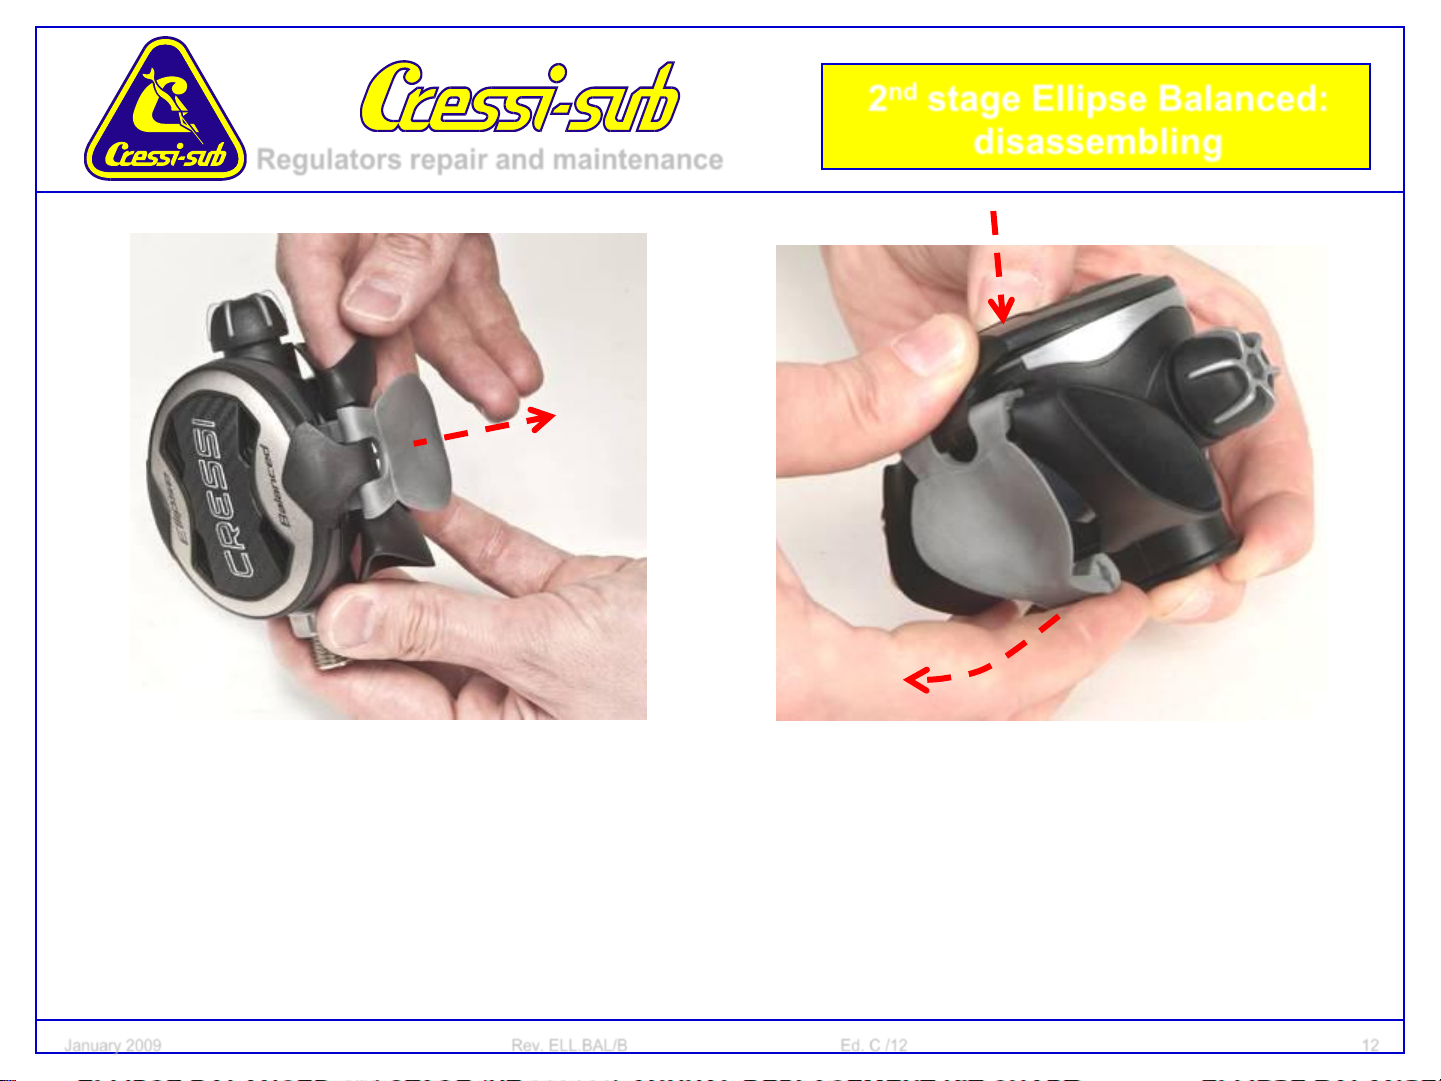
2nd stage Ellipse Balanced:
Regulators repair and maintenance
disassembling
• After removing the cam-lock key, press with your fingers the
main cap of the baffle, and open it outwards as shown in the
picture.
January 2009 Rev. ELL.BAL/B Ed. C /12 12
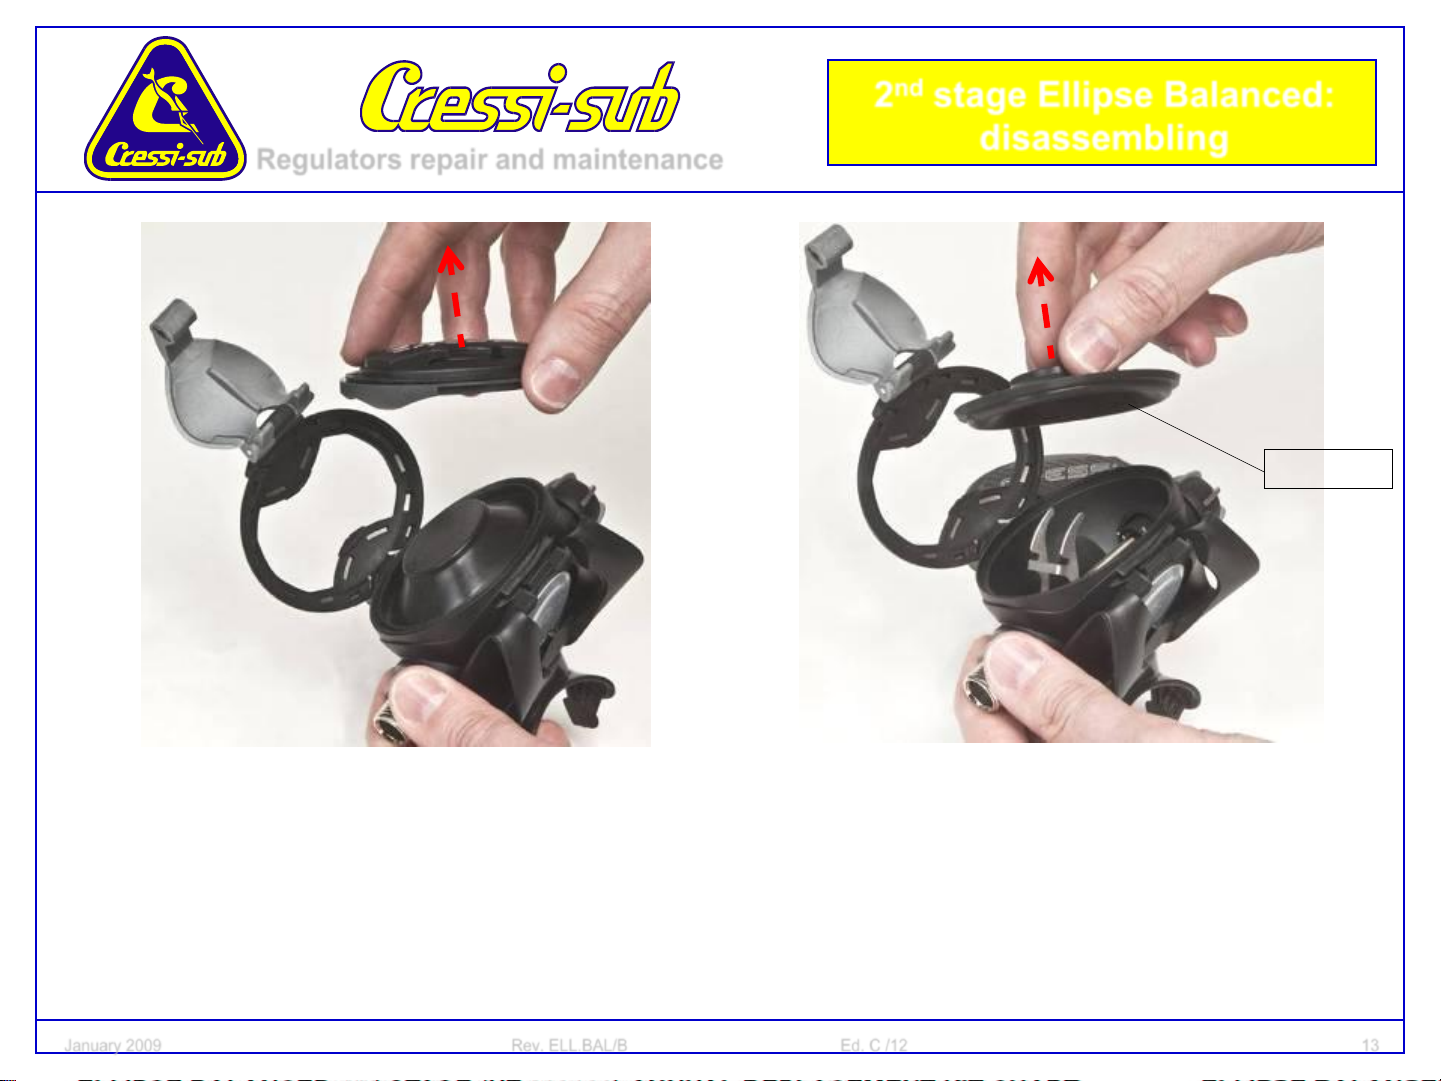
2nd stage Ellipse Balanced:
Regulators repair and maintenance
disassembling
HZ 820072
• Open the cap, holding the regulator casing in your hand, and
remove the soft cap (button), the diaphragm ring and the
diaphragm.
January 2009 Rev. ELL.BAL/B Ed. C /12 13
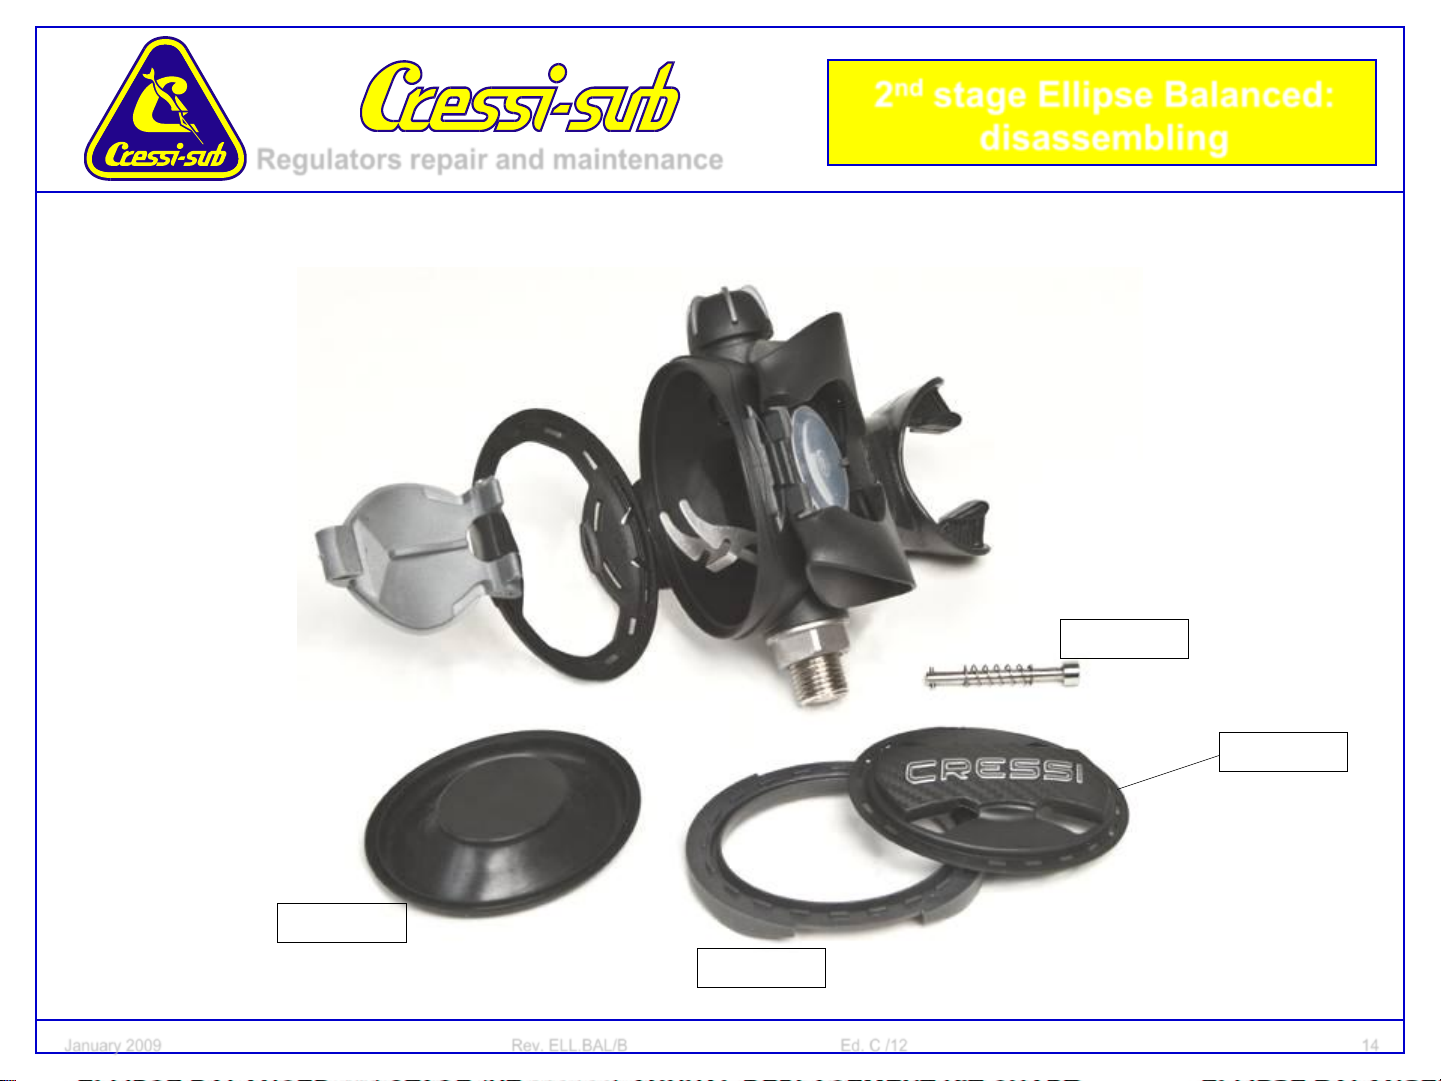
2nd stage Ellipse Balanced:
Regulators repair and maintenance
disassembling
HZ 810077
HZ 820074
HZ 820072
HZ 820073
January 2009 Rev. ELL.BAL/B Ed. C /12 14
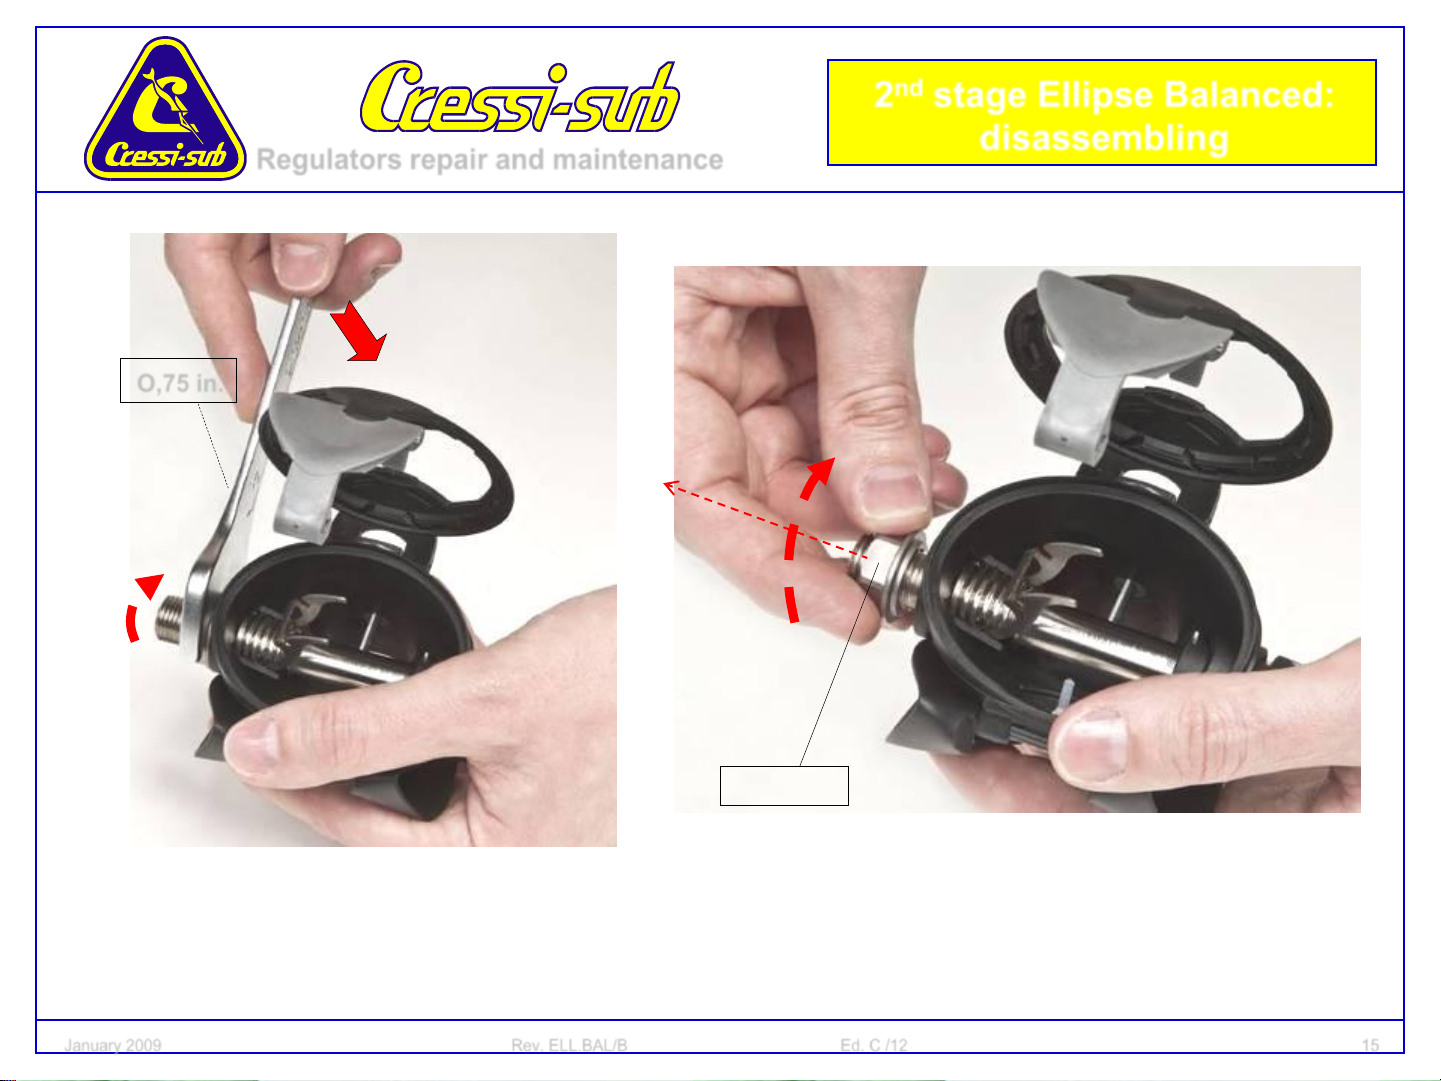
2nd stage Ellipse Balanced:
O,75 in.
Regulators repair and maintenance
disassembling
HZ 820050
• Use a 0,75 in. spanner to remove the regulator lock nut.
January 2009 Rev. ELL.BAL/B Ed. C /12 15

2nd stage Ellipse Balanced:
2
Regulators repair and maintenance
disassembling
1
• Lower the lever (phase 1), then take out the 2nd stage whole
device out of the regulator casing (phase 2), as shown in the
picture.
January 2009 Rev. ELL.BAL/B Ed. C /12 16
2nd stage Ellipse Balanced:
Regulators repair and maintenance
OR = HZ 820051
disassembling
• Remove the valve O-ring out of its seat.
January 2009 Rev. ELL.BAL/B Ed. C /12 17
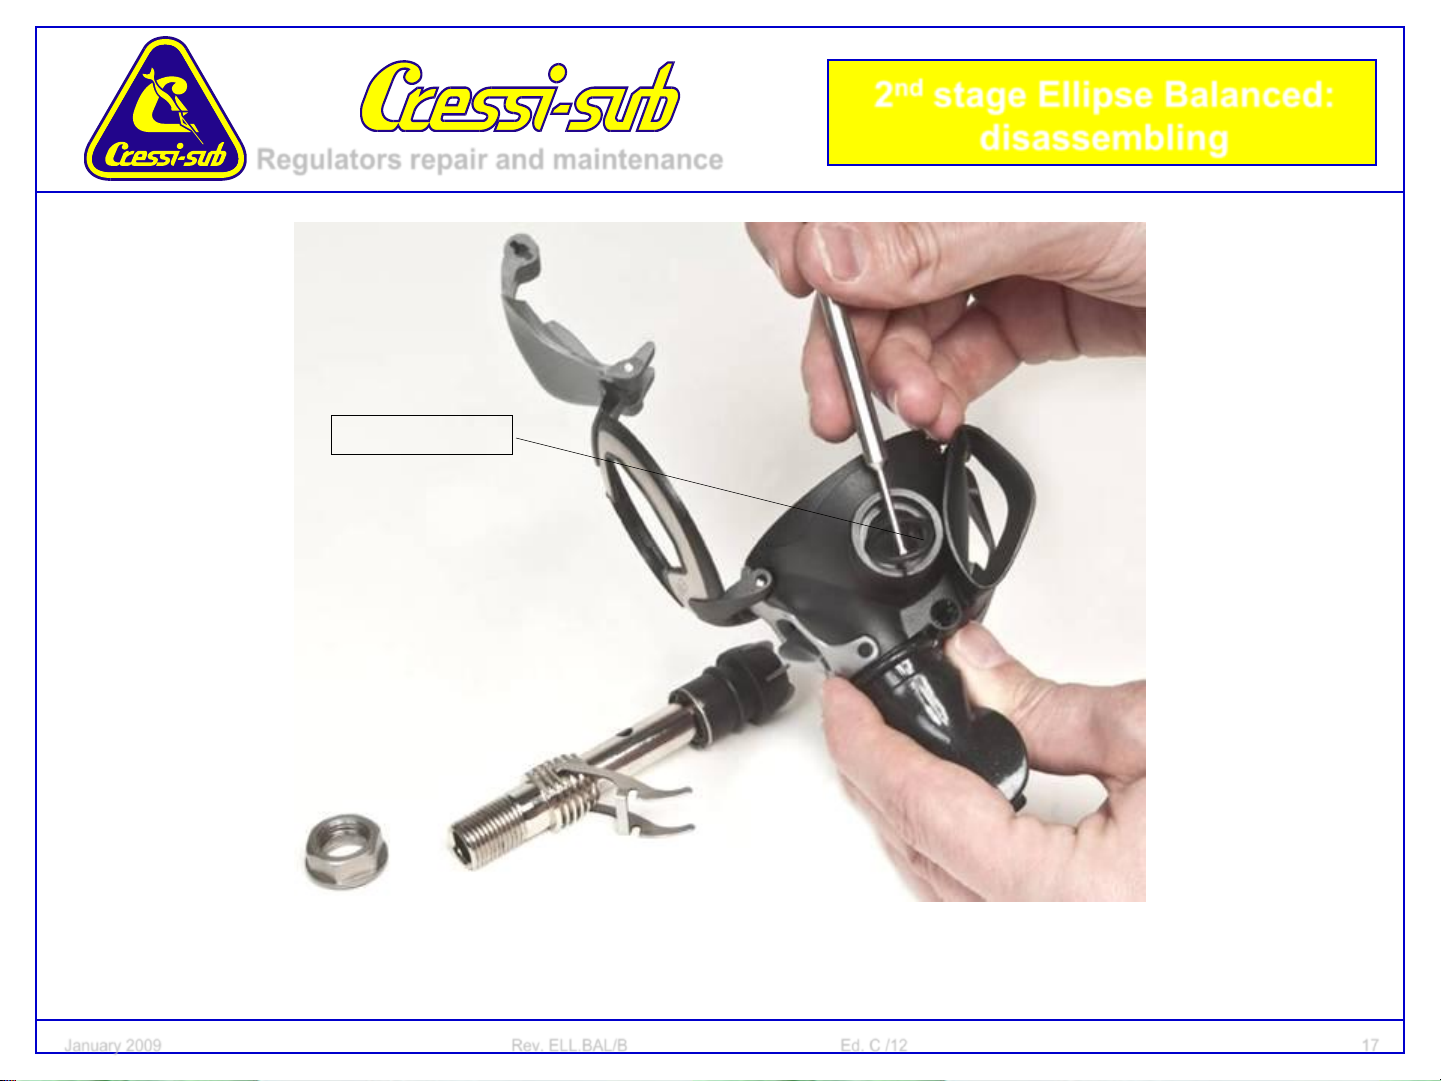
2nd stage Ellipse Balanced:
Regulators repair and maintenance
HZ 820078
disassembling
• Remove the baffle out of the regulator casing, pressing its sides as
shown in the picture.
January 2009 Rev. ELL.BAL/B Ed. C /12 18
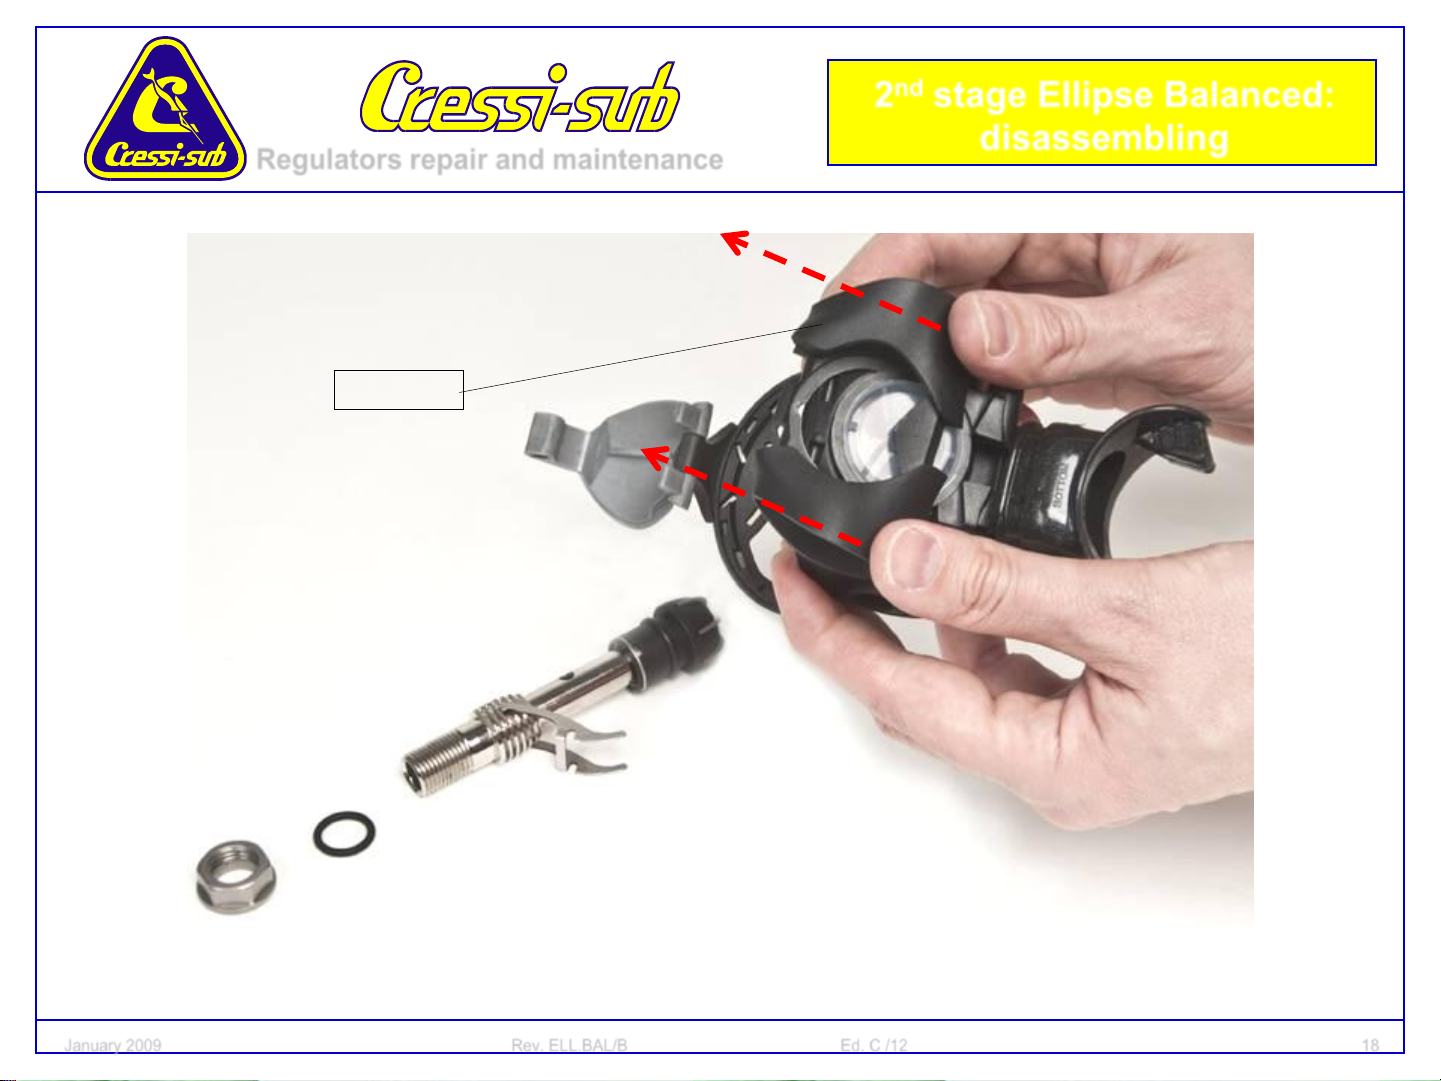
2nd stage Ellipse Balanced:
Regulators repair and maintenance
HZ 810074
disassembling
• Remove the exhaust valve out of its seat.
January 2009 Rev. ELL.BAL/B Ed. C /12 19
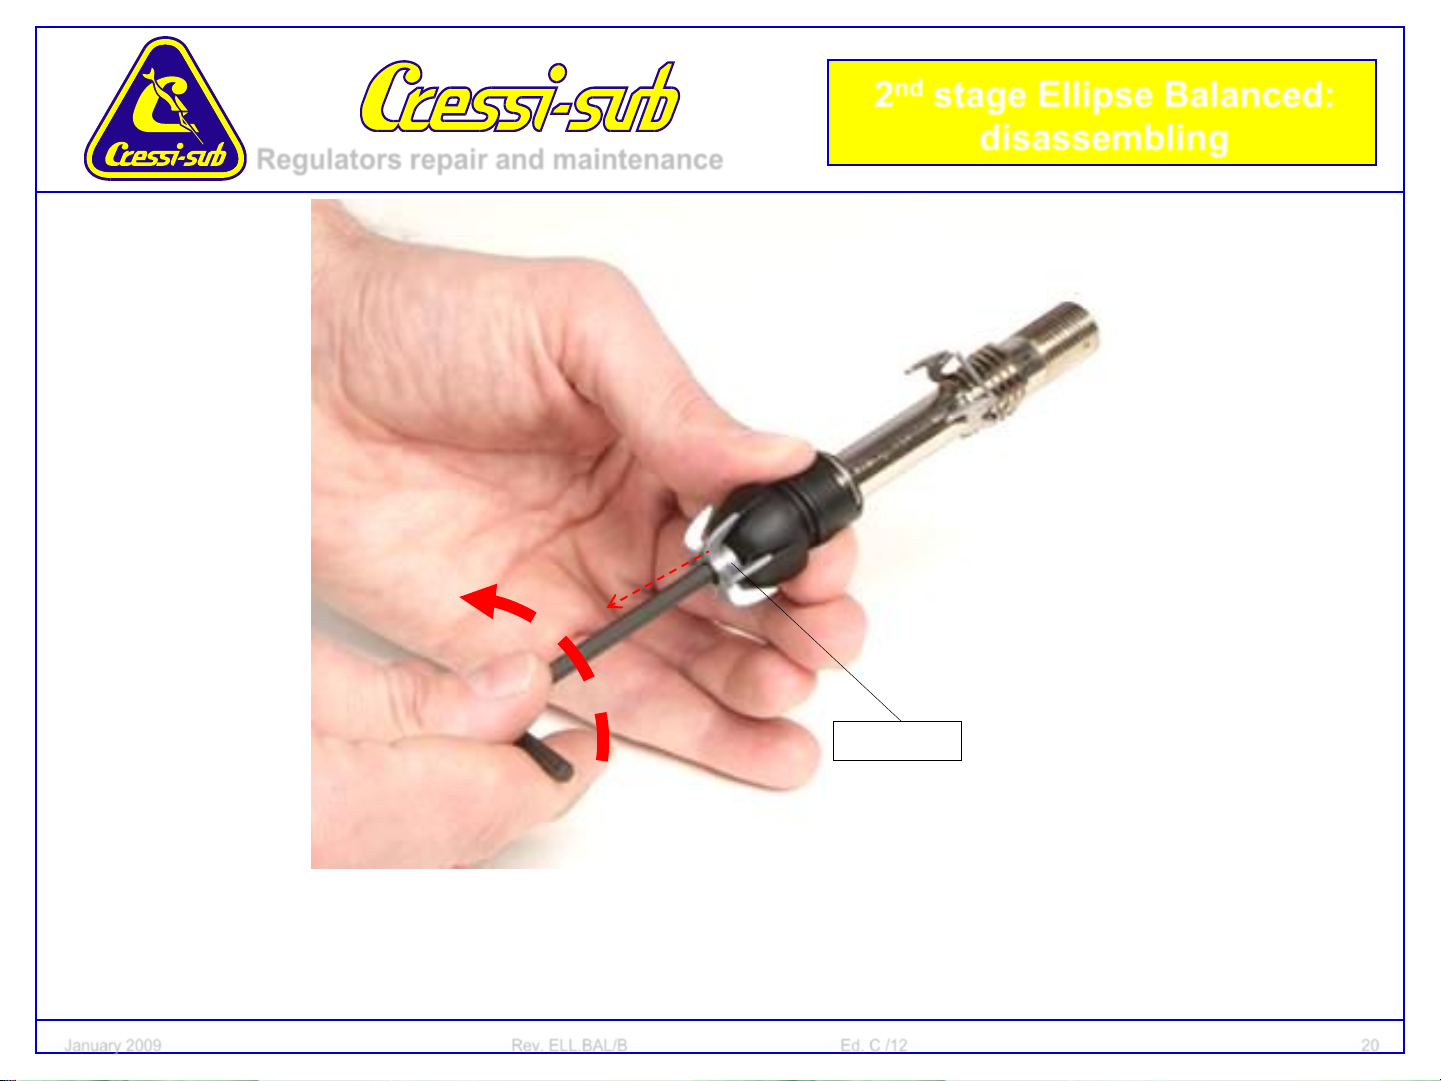
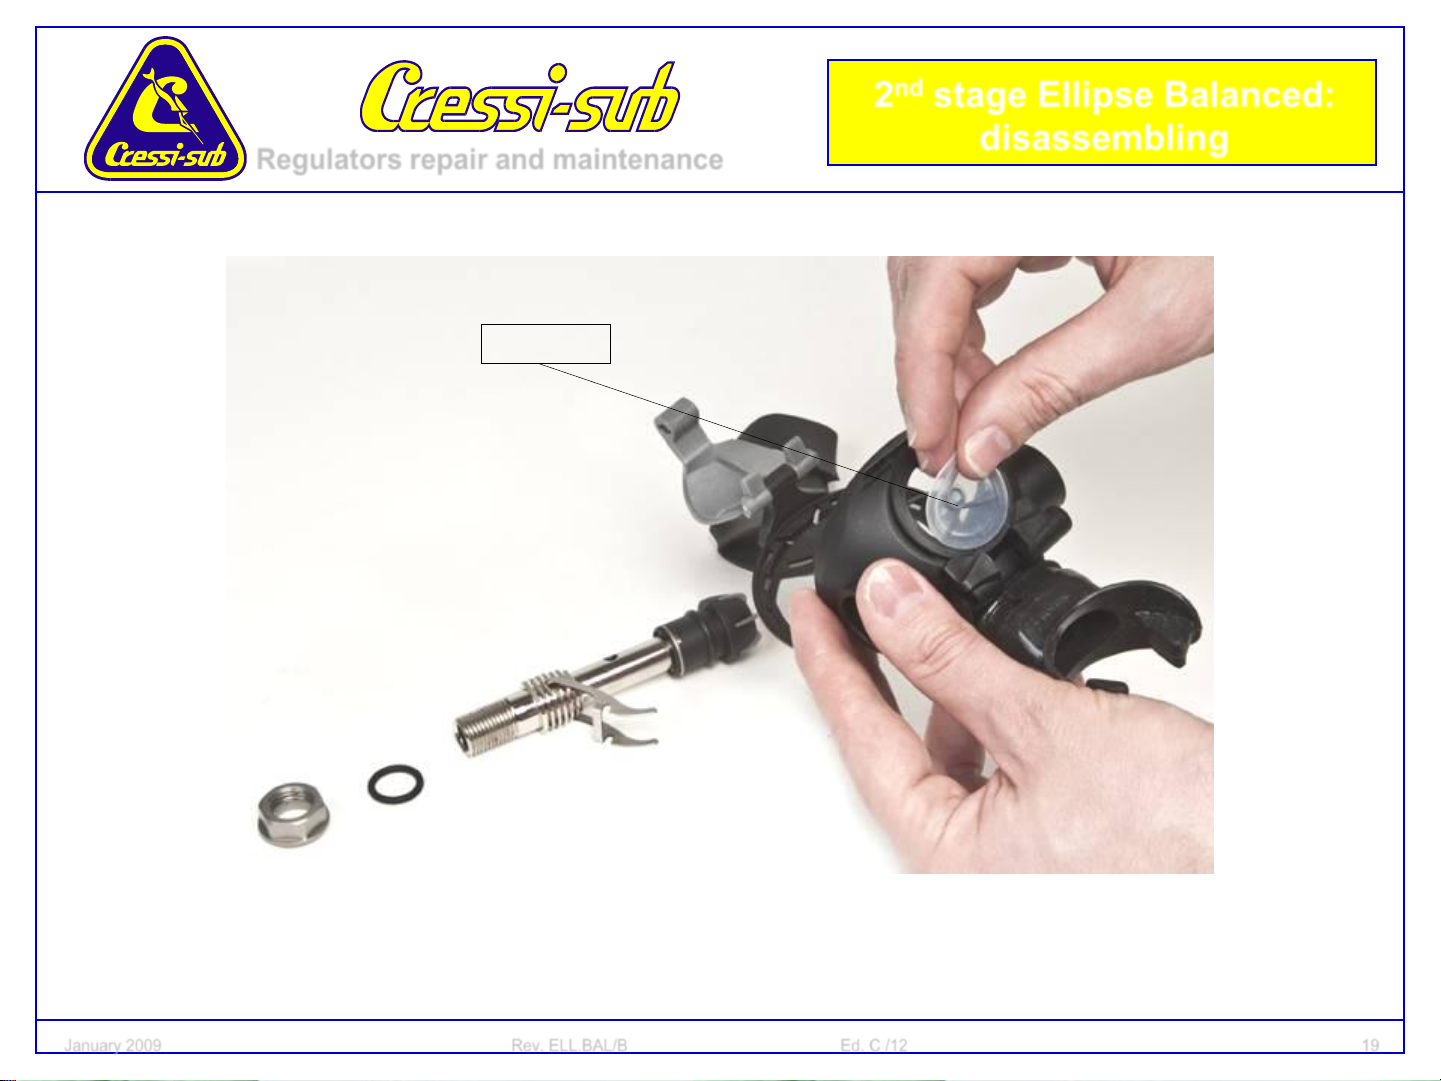
2nd stage Ellipse Balanced:
Regulators repair and maintenance
disassembling
HZ 820064
• Use a 0,15 in. Allen wrench to unscrew the setting white
screw placed inside the adjustment knob, and remove the
metal knob cover, as shown in the picture.
January 2009 Rev. ELL.BAL/B Ed. C /12 20
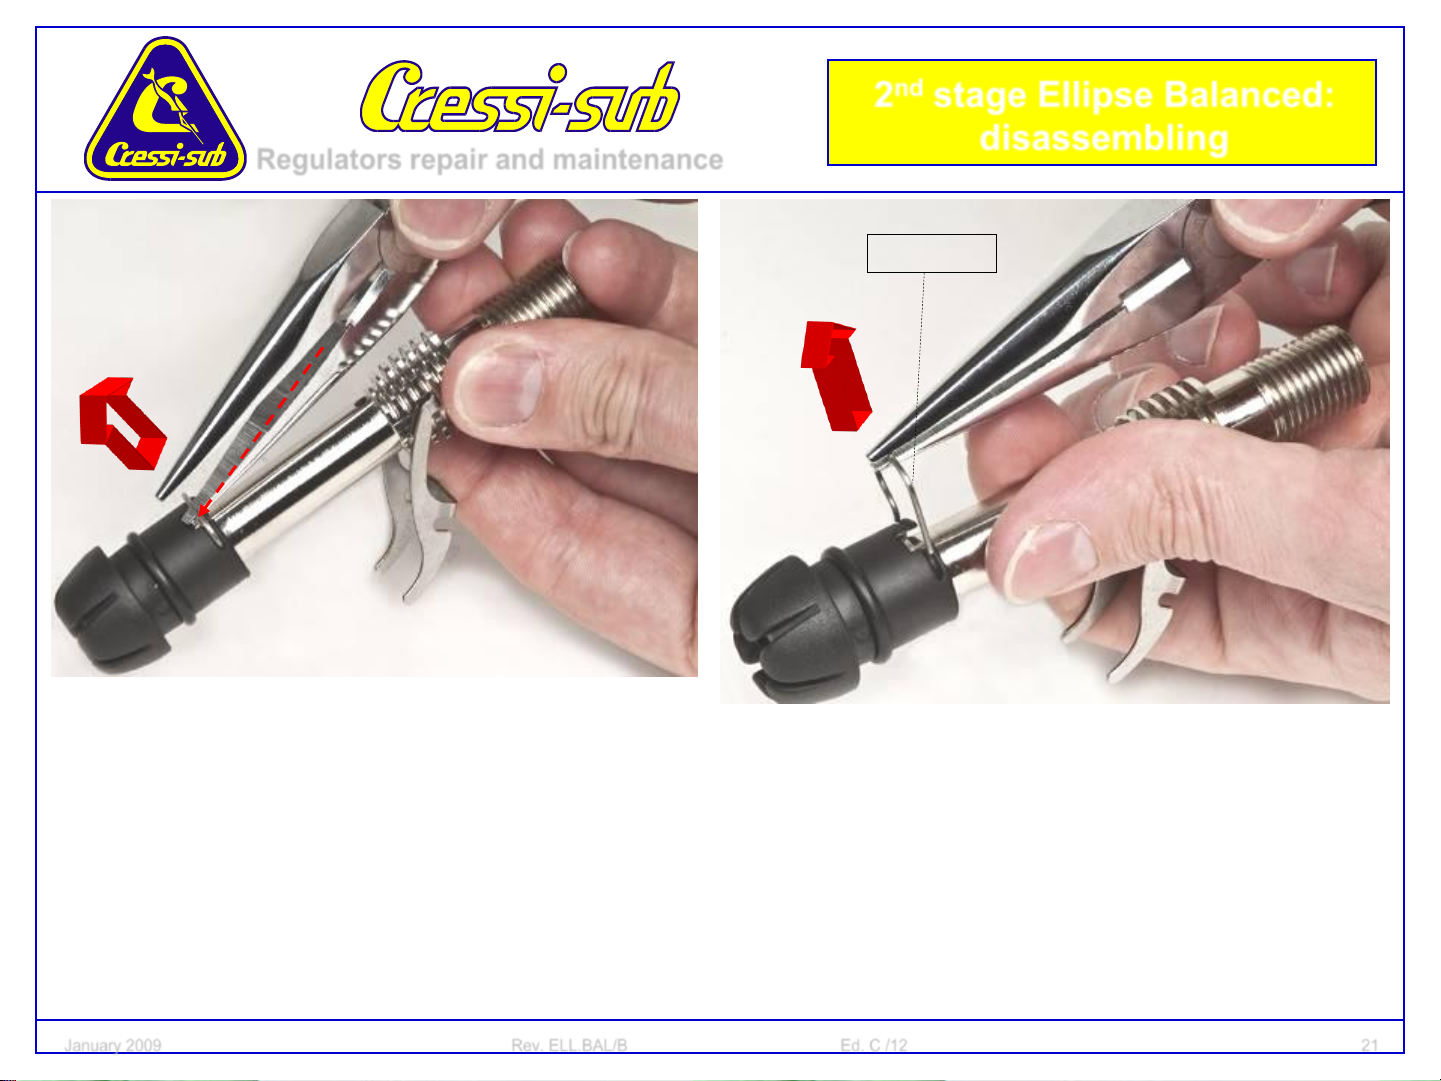
2nd stage Ellipse Balanced:
Regulators repair and maintenance
disassembling
HZ 820065
• Insert bird beak pliers into the knob opening and remove
the clip out of its seat, as shown in the picture.
January 2009 Rev. ELL.BAL/B Ed. C /12 21
 Loading...