

Page 1
DE EN KO
C
M
Y
K
COMP ACT
MANUAL
Coffee experience engineered in Switzerland
Page 2

cremesso Compact Manual operating instructions
Cleaning
Contents
1
Quick guide Page 2
Safety precautions 4
Notes on this operating manual 5
Unpacking 5
Overview of machine parts and controls
Starting up 8
– Before using for the first time 8
– Intended utilization 8
– Installation / Power connection 8
– Filling / Refilling the water tank 9
– Starting up 10
– Flushing out the machine/internal piping 11
– Making coffee or tea 11
– After making coffee or tea 13
– Energy saving mode 13
– Emptying the capsule container/drip tray 14
6
Decalcification / Maintenance 16
Steaming out /
Troubleshooting guide 18
Final disposal 20
Technical data 20
Index 1
Storage /
Transport
Page 14
17
English
Index
After making coffee or tea Page 13
Before using for the first time 8
Capsules 11
Capsule container emptying 14
Capsule insertion 11
Cleaning 14
Decalcification 16
Defects/faults/troubleshooting 18
Disposal 20
Energy saving mode 13
Flushing out the machine and internal piping 11
Intended utilization 8
Location of the machine 8
Maintenance 16
Notes on this operating manual 5
Overview of components and controls Page 6
Power switch 10
Quick guide 2
Safety precautions 4
Starting up 8
Starting the machine 10
Steaming out 17
Storage 17
Switching off 13
Switching on / Starting up 10
Technical data 20
Troubleshooting 18
Unpacking 5
Used capsule disposal 20
Water 10
Water tank filling 9
Page 3
2
1l
Quick guide to making your first cup of coffee or tea
Welcome to cremesso
Congratulations on your new cremesso capsule
coffee/tea machine. This high quality product,
manufactured with the greatest care, will give
you a lot of pleasure if well looked after.
Welcome to the exclusive world of cremesso!
This quick guide only explains the main operations.
For safety reasons, please read the complete operating instructions, which explain all the important
functions. Please note also the safety precautions
English
on pages 4 and 8 to avoid risk of electric shock or
fire.
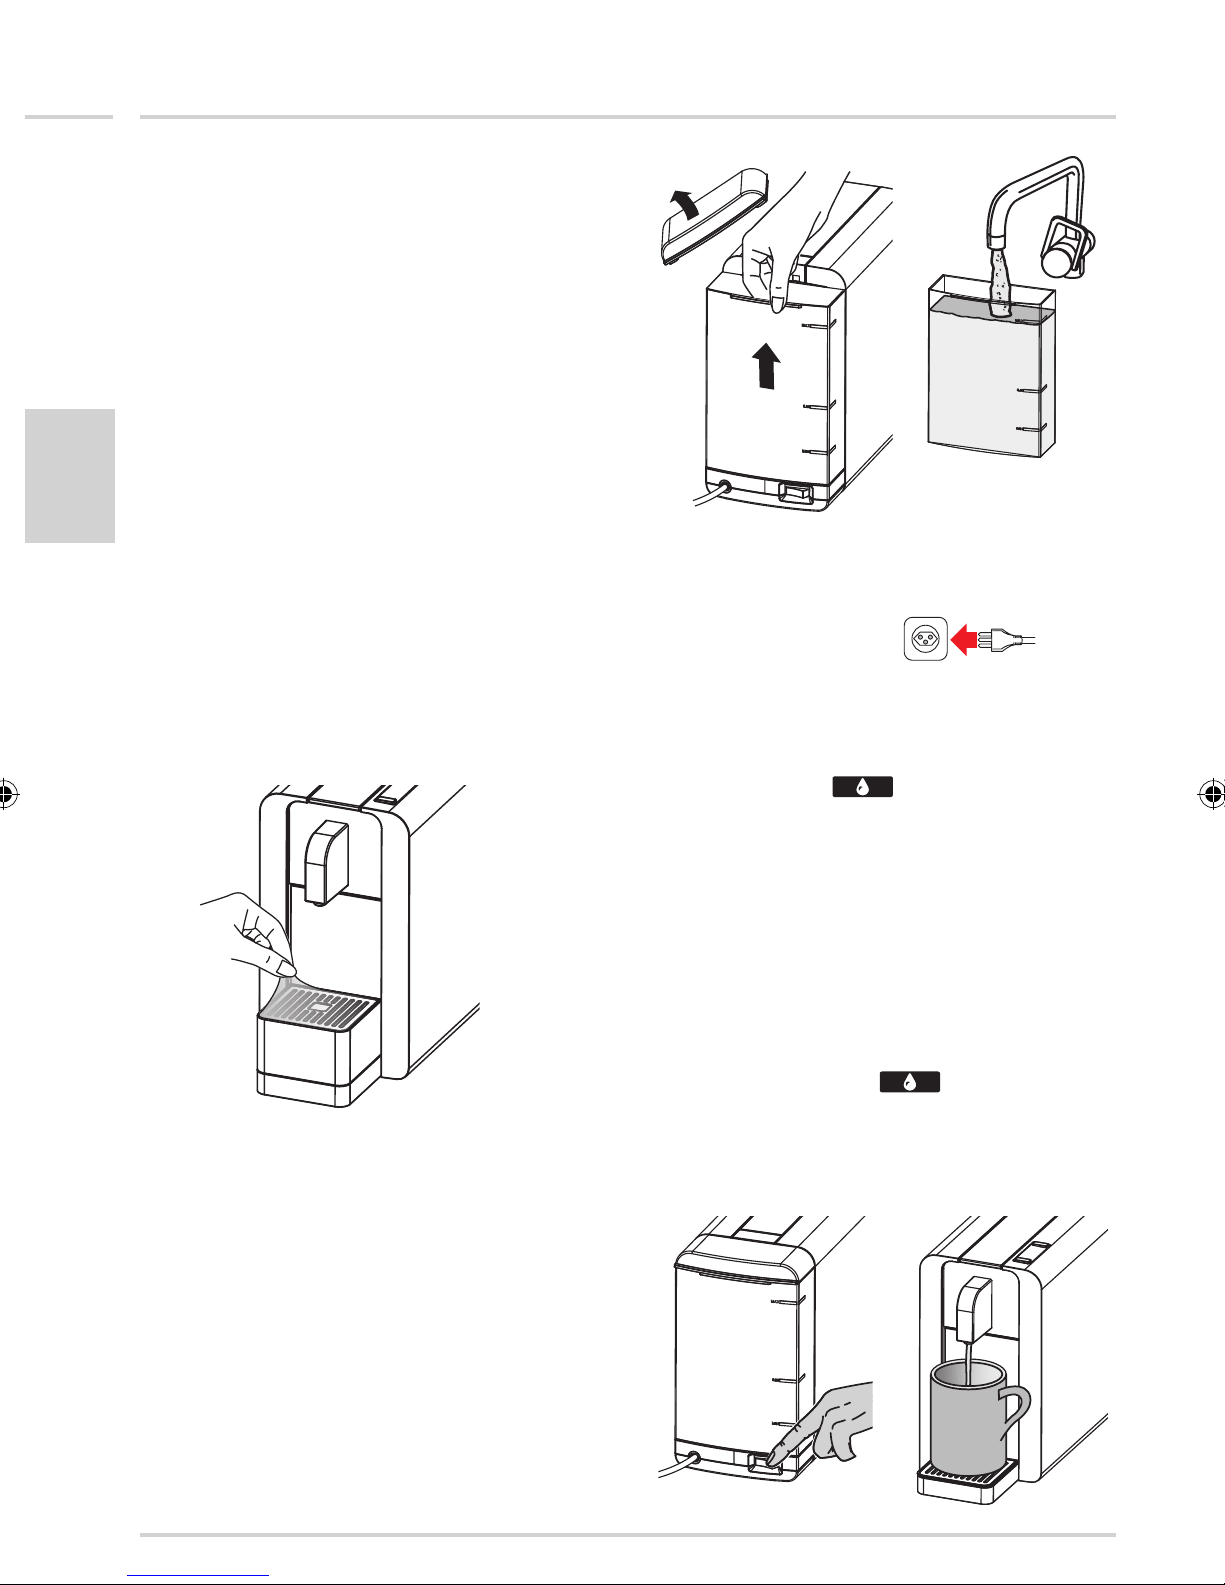
3. Power connection (Details ➜ page: 8)
1. Setting up (Details ➜ page: 8)
Place on a dry, stable, waterproof and heat re-
–
sistant surface
–
Remove protective foil from drip tray grate
– Plug in the power cord
4. Switching on (Details ➜ page: 10)
– Turn on the main power switch
– The cleaning key
energy-saving mode. To activate the machine,
press one of the keys
slowly flickers to indicate
5. Flushing out the piping
(Details ➜ page: 11)
– Turn on the main power switch
– Place a large cup under the coffee/tea/hot-water
dispenser
– Press the cleaning key
sule inserted!)
– Empty the cup afterwards
twice (with no cap-
2. Filling the water tank (Details ➜ page: 9)
– Remove the lid and take out the water tank
– Rinse out the tank and fill with fresh cold water.
Replace the tank and press in firmly
Page 4
Quick guide to making your first cup of coffee or tea
3
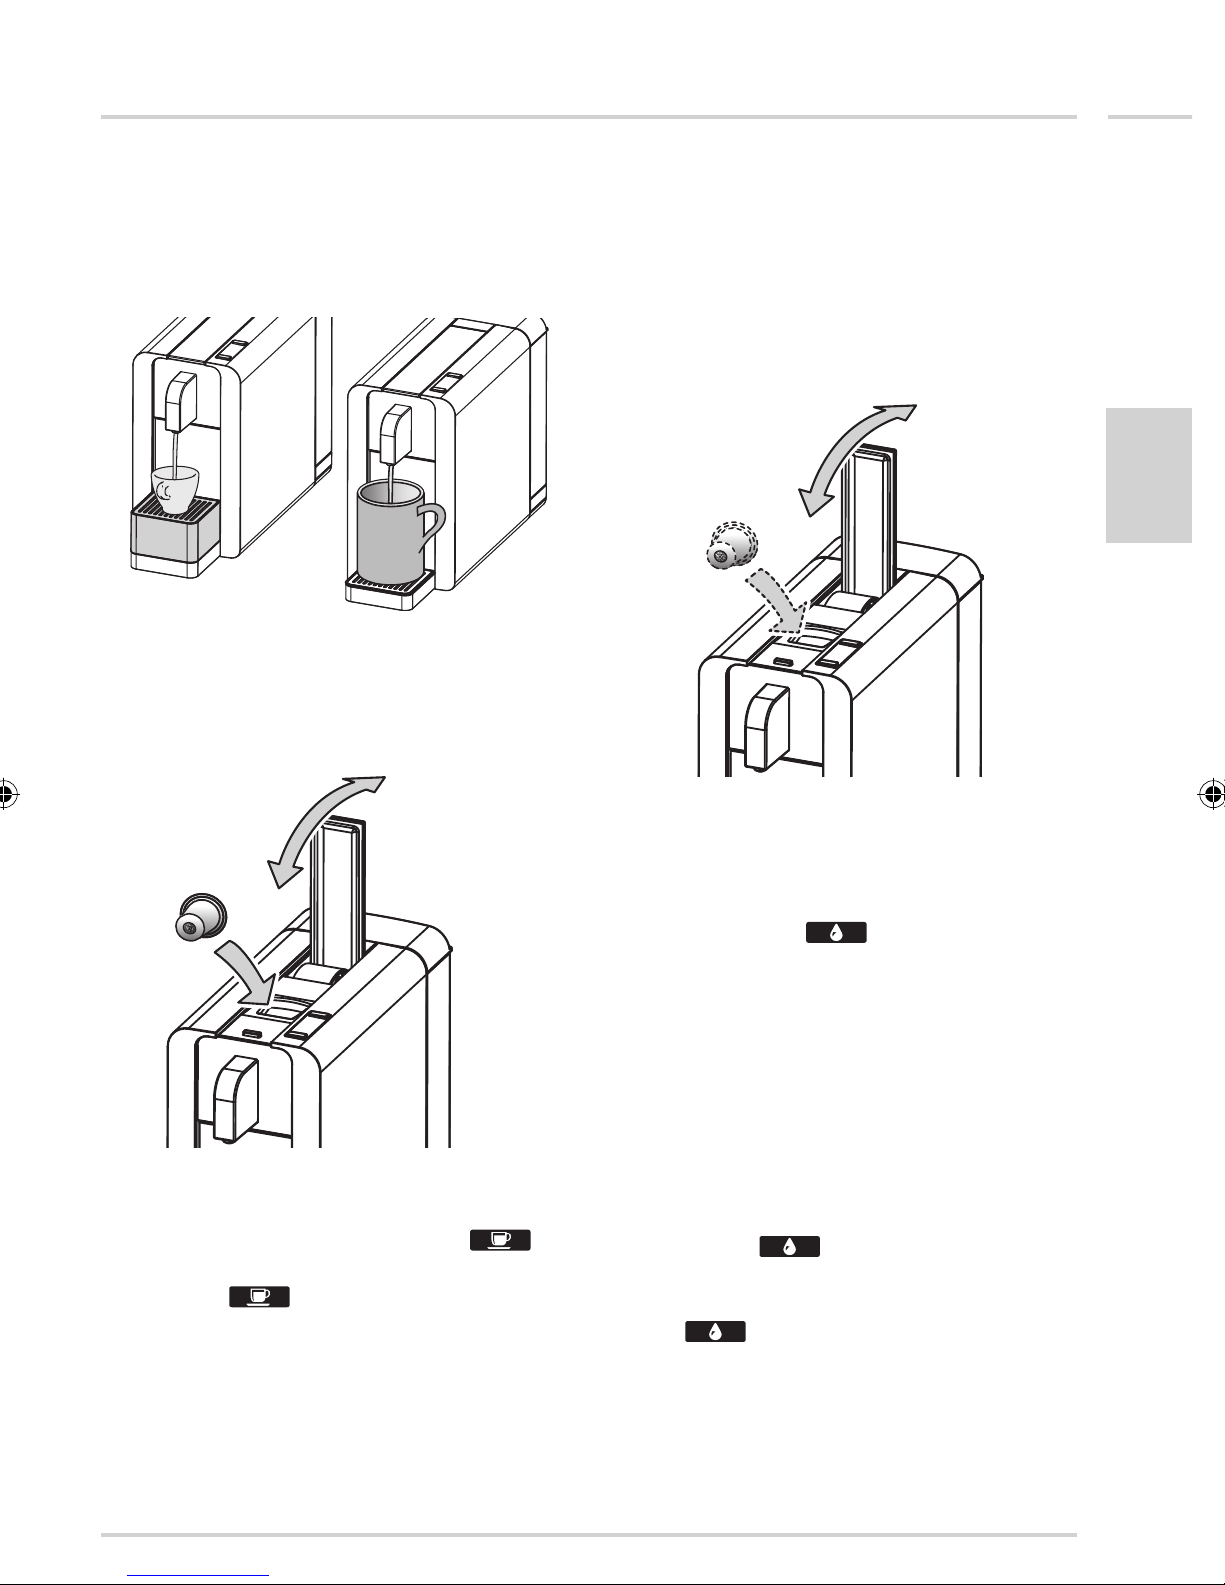
6. Making coffee or tea
(Details ➜ page 11)
– Place a cup under the dispensing head. For bowls
or big cups remove the upper drip tray
1. Push the operating handle right back
2. Let the capsule fall straight into the container
3. Pull the operating handle right forward
7. After making coffee or tea
(Details ➜ page 13)
– Push the operating handle right back (1.):
– For another cup: insert a new capsule (2.), other-
– Pull the operating handle right forward (3.)
empty capsule falls into container
wise leave empty
1.
3.
2.
English
1.
3.
2.
– Make coffee or tea by pressing the key
– Dispensing can be stopped at any time by press-
ing the key
again)
(both keys illuminate in white
8. Energy-saving mode (Details ➜ page 13)
– The cleaning key slowly flickers to in-
dicate energy-saving mode. To activate the machine, press one of the keys
– With both keys illuminated: machine is ready for
making coffee or tea
– If no key is pressed after 60 seconds: energy-
saving mode is reactivated
9. Water shortage (Details ➜ page 9)
– Cleaning key
tank empty
– After refilling the water tank, press the cleaning
key
(both keys illuminated white)
prior to making tea or coffee again
goes blue to indicate water
Page 5

4
Safety precautions
Please take time to read these safety precautions carefully before connecting your machine
to the power supply. It is essential to follow them
and the operating instructions.
− First read this entire operating instructions
− To avoid damage, only use genuine
capsules with this machine
− Danger of electric shock! Never immerse the machine in water or any other liquid
English
– Connect only to a properly grounded power point
(220–240 V) protected by at least a 10 A fuse
– To make sure that the machine is switched off,
remove the plug from the power point
− Always pull out the power plug before:
– relocating the machine
– cleaning or maintenance
– long periods of disuse
− Never clamp or run the power cable over sharp
corners or edges: Danger of electric shock!
− Damaged power cables may only be replaced at
the customer service centre: Danger of electric
shock!
− Never touch the power plug/socket/cable or the
machine with damp or wet hands. Never unplug
by pulling out the power cable; always remove the
plug
− If you need an extension cable, make sure it is
suitable for your machine (3–pole grounded,
and at least 1.0 mm² conductor cross–section),
and lay the cable to avoid tripping
We recommend connecting the machine via an FI
−
circuit–breaker. Consult a specialist if in doubt
− Danger of scalding! Never move the machine during operation!
−
Never operate the machine without water
− Danger of burning! Never touch very hot parts of
the machine (e.g. brew unit during operations)
− Danger of scalding!
− Do not touch the steam or water jets
− Do not move the operating handle when the
machine is still under pressure making coffee or
tea
− Do not start the machine when the operating
handle is still open
cremesso
– Do not insert fingers or hands under the operating
handle: Danger of crushing!
− Do not use the machine in case of:
– faulty operation
– damaged power cable
– after falling or other damage
In such cases immediately have the machine
checked and repaired if necessary at the customer
service centre
− The machine location must meet the following requirements:
– Place on a dry, stable and level surface that is
waterproof and heat–proof
– At least 60 cm (2 feet) away from sink and taps
– Make sure children cannot play or tamper with
the machine
– Only use in dry rooms
− Never place the machine:
– directly on marble surfaces, untreated or oiled
woodwork (risk of non–removable coffee stains;
no claims will be entertained in such cases)
– directly beneath a power socket
– on flammable or meltable objects or surfaces
– on hot surfaces or nearer than 50 cm to open
flames (same applies to the power cable!)
– under any grateing
− This machine is only intended for household use
Pull out the power plug and allow the machine
−
to cool down completely before cleaning and or
maintenance
− To prevent frost damage, do not store the machine
at temperatures below 5 ºC (e.g. in caravans)
− To prevent damage, never use replacement parts
or accessories not recommended by the manufacturer
− Persons, including children, who in view of the
level of their physical, sensory or mental capacities, or their lack of experience or knowledge, are
not in a position to use the equipment with safety,
may not use this machine without supervision or
instruction by a responsible person
Page 6
Notes on this operating manual
5
This sign means danger!
This operating manual cannot grate all possible circumstances. For further information or in case of
problems not adequately grateed in this operating
instructions
centre.
, please contact the service and sales
Please keep this operating instructions safe and
pass it on to the next user.
Unpacking / Safe disposal of packaging materials
− Remove your cremesso Compact Manual
capsule coffee machine from its packaging
1.
2.
− After unpacking, please check that the follow-
ing parts are included:
1. Watertank, with lid
2. cremesso Compact Manual capsule coffee
machine
3. Perforated drip tray grate
4. Drip tray and empty capsule container
(three-piece)
Note:
cremesso
coffee or tea capsules are not included.
English
3.
4.
− Check that your power supply voltage is the
same as marked on the machine rating plate (220240 V)
− Destroy all the plastic bags to prevent danger to
children!
Tip:
Keep the packaging for transporting the machine
−
(e.g. for removals, servicing, etc.) or for environment
friendly disposal
Note:
Water remaining in the tank
− In order to ensure that this machine works perfectly,
it was tested with water before leaving the factory
Page 7
6
3.
4.
10.
2.
1.
6.
11.
5.
7.
8.
9.
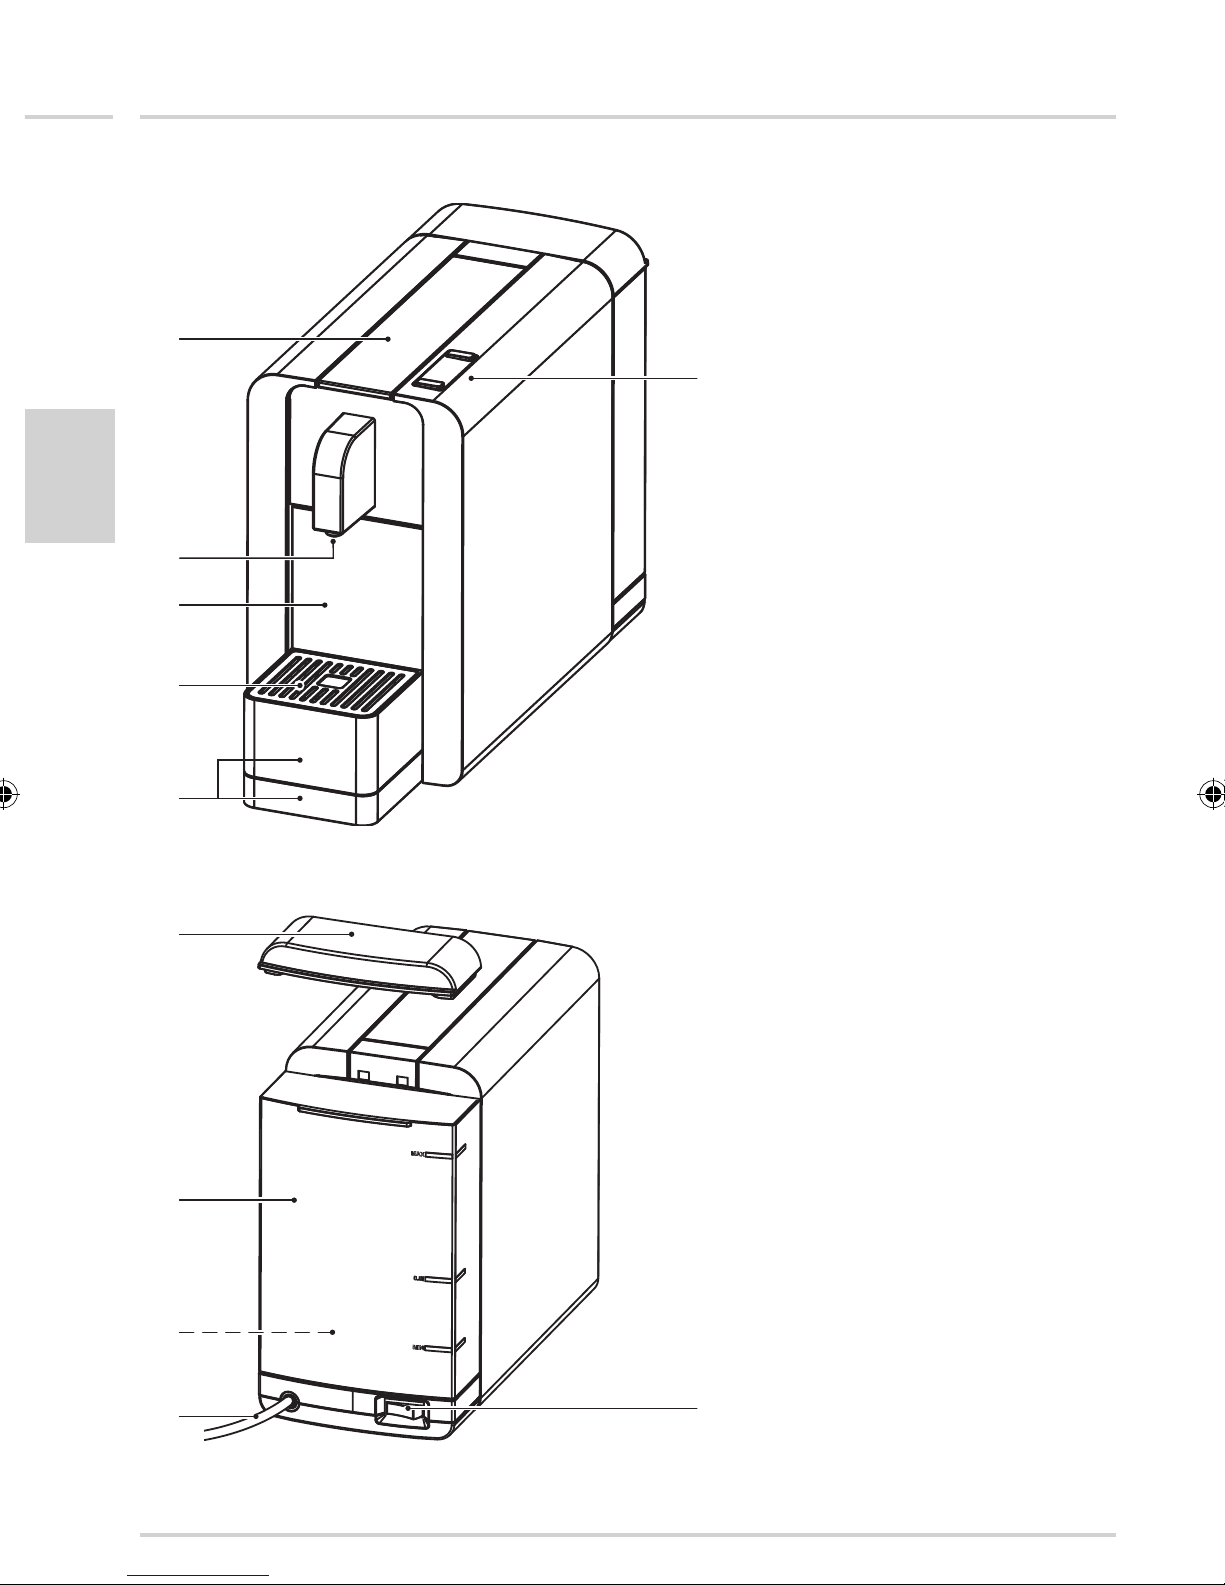
Overview of machine parts and controls
English
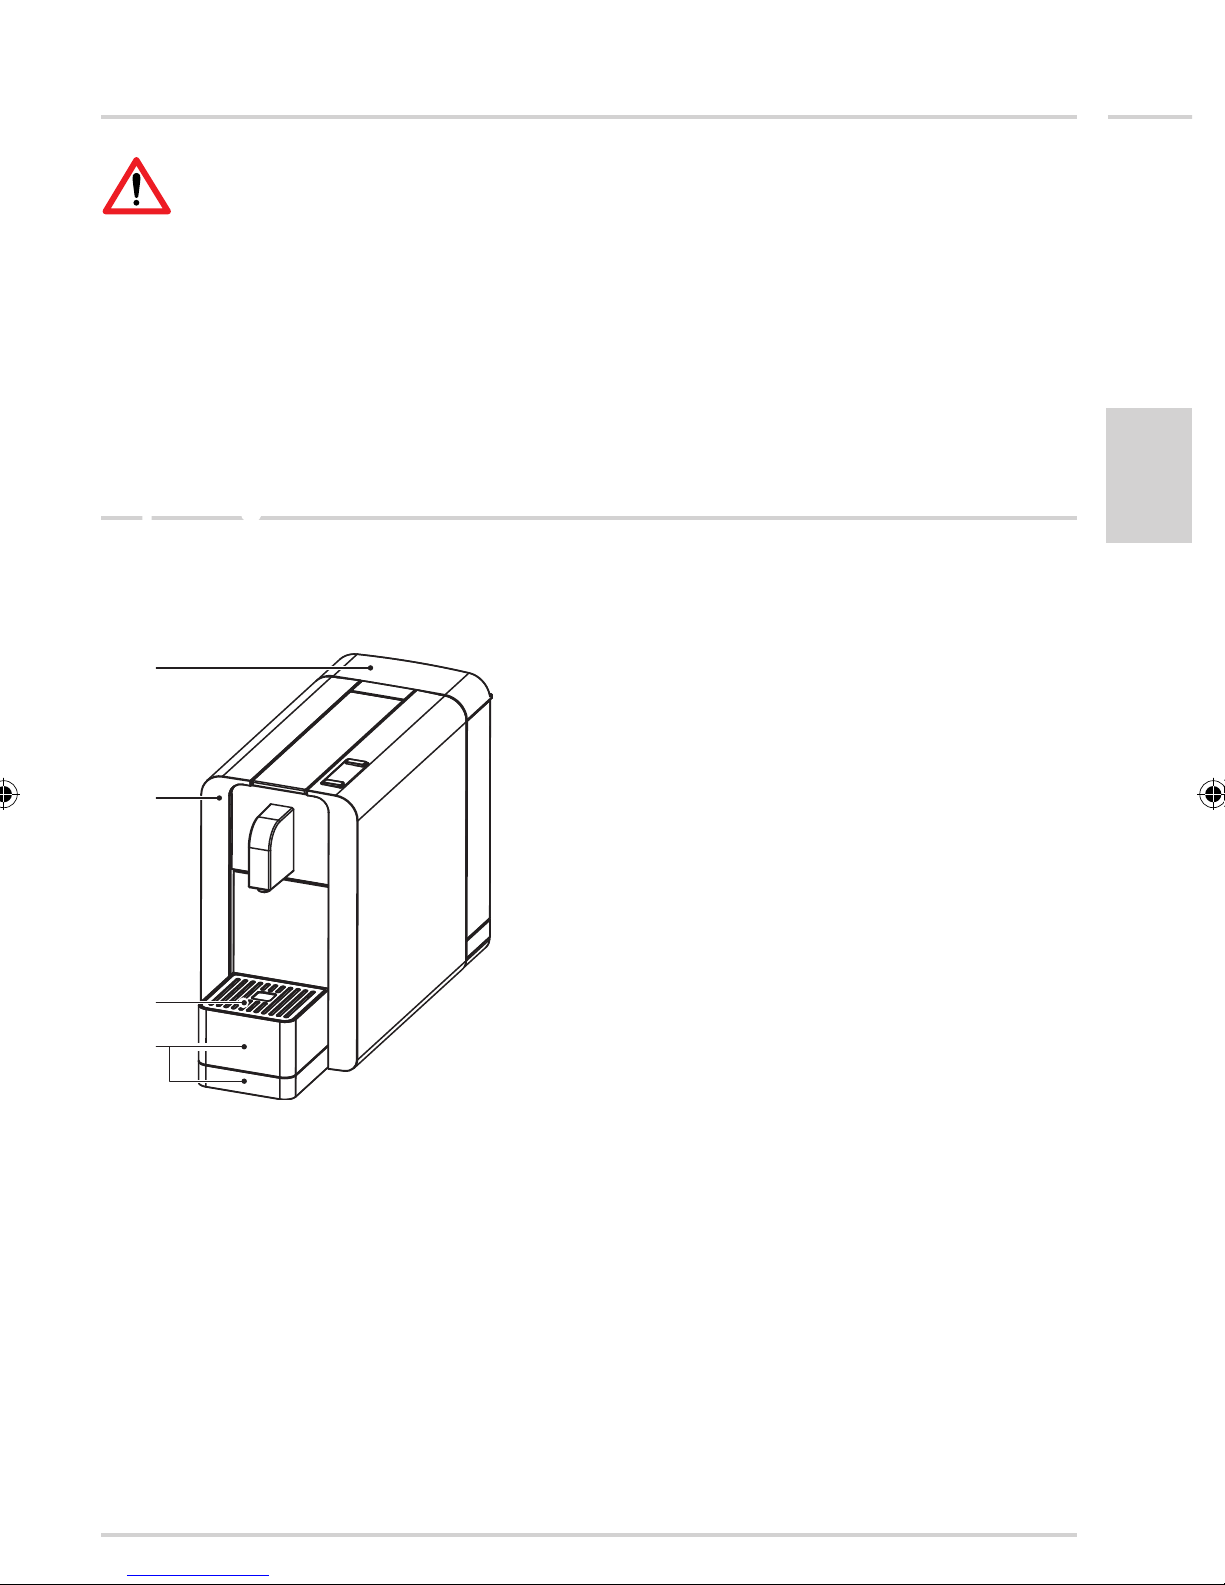
Machine (front):
1. Operating handle for loading
capsules
2. Dispensing head (for coffee,
tea or hot water)
3. Capsule container (remov-
able)
4. Perforated drip tray grate
(with removable drip tray)
5. 2-piece drip tray (removable)
6. Control keys (see adjacent
page)
Machine (back):
7. Water tank lid (removable for
filling)
8. Water tank (lifts out)
9. Water valve (in tank)
10. Power cable with plug
11. Power switch (ON/OFF)
Page 8
Overview of machine parts and controls
12./13.
14.
15.
18.
17.
16.
19.
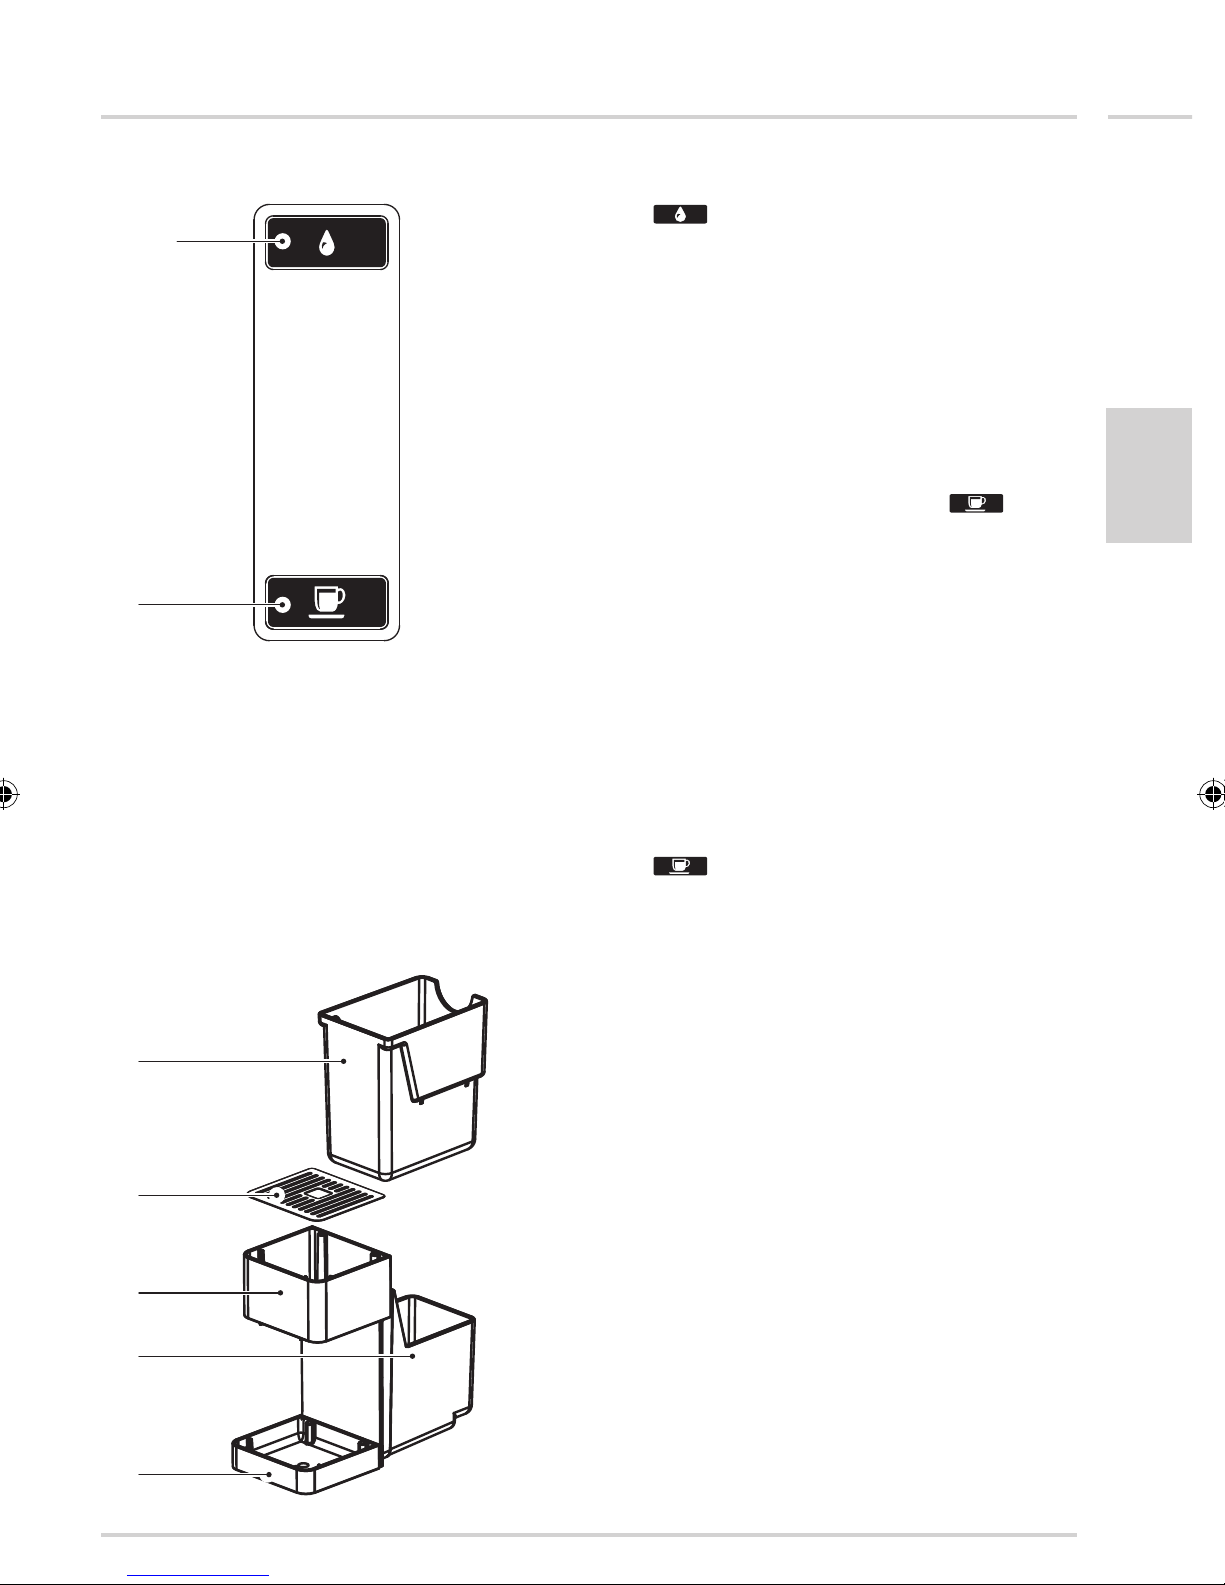
Control keys and displays:
7
12. Cleaning key
For flushing out the piping to prevent taste de-
traction, press before changing between coffee
and tea. See page 11
13. Multifunctional display: Key illuminates
according to operating mode:
– White (intermittent): Energy-saving mode
(see page 13)
– White (both keys): Machine ready for use
(see pages 12, 13)
– White (flashing together with
Steaming out in progress (see page 17)
– Blue: Water shortage (see page 9)
– Blue (flashing): Decalcification in progress
(see page 16)
– Red (flashes while dispensing): Machine
needs decalcifying (see page 16)
– Red: Electronics/temperature fault
(see page 18)
14. Tea or coffee output key (see page 12):
Flashes while heating up
Illuminated = ready for dispensing
Coffee/Tea: Press key for coffee, tea or
hot water and press again to stop
):
English
Capsule container / drip tray:
15. Capsule container (fits into drip tray)
16. Drip tray grate (removable)
17. Upper drip tray (removable)
18. Residual water container (fits on lower drip
tray (19.))
19. Lower drip tray with capsule container holder
Page 9
8
Starting up
English
Before using for the first time
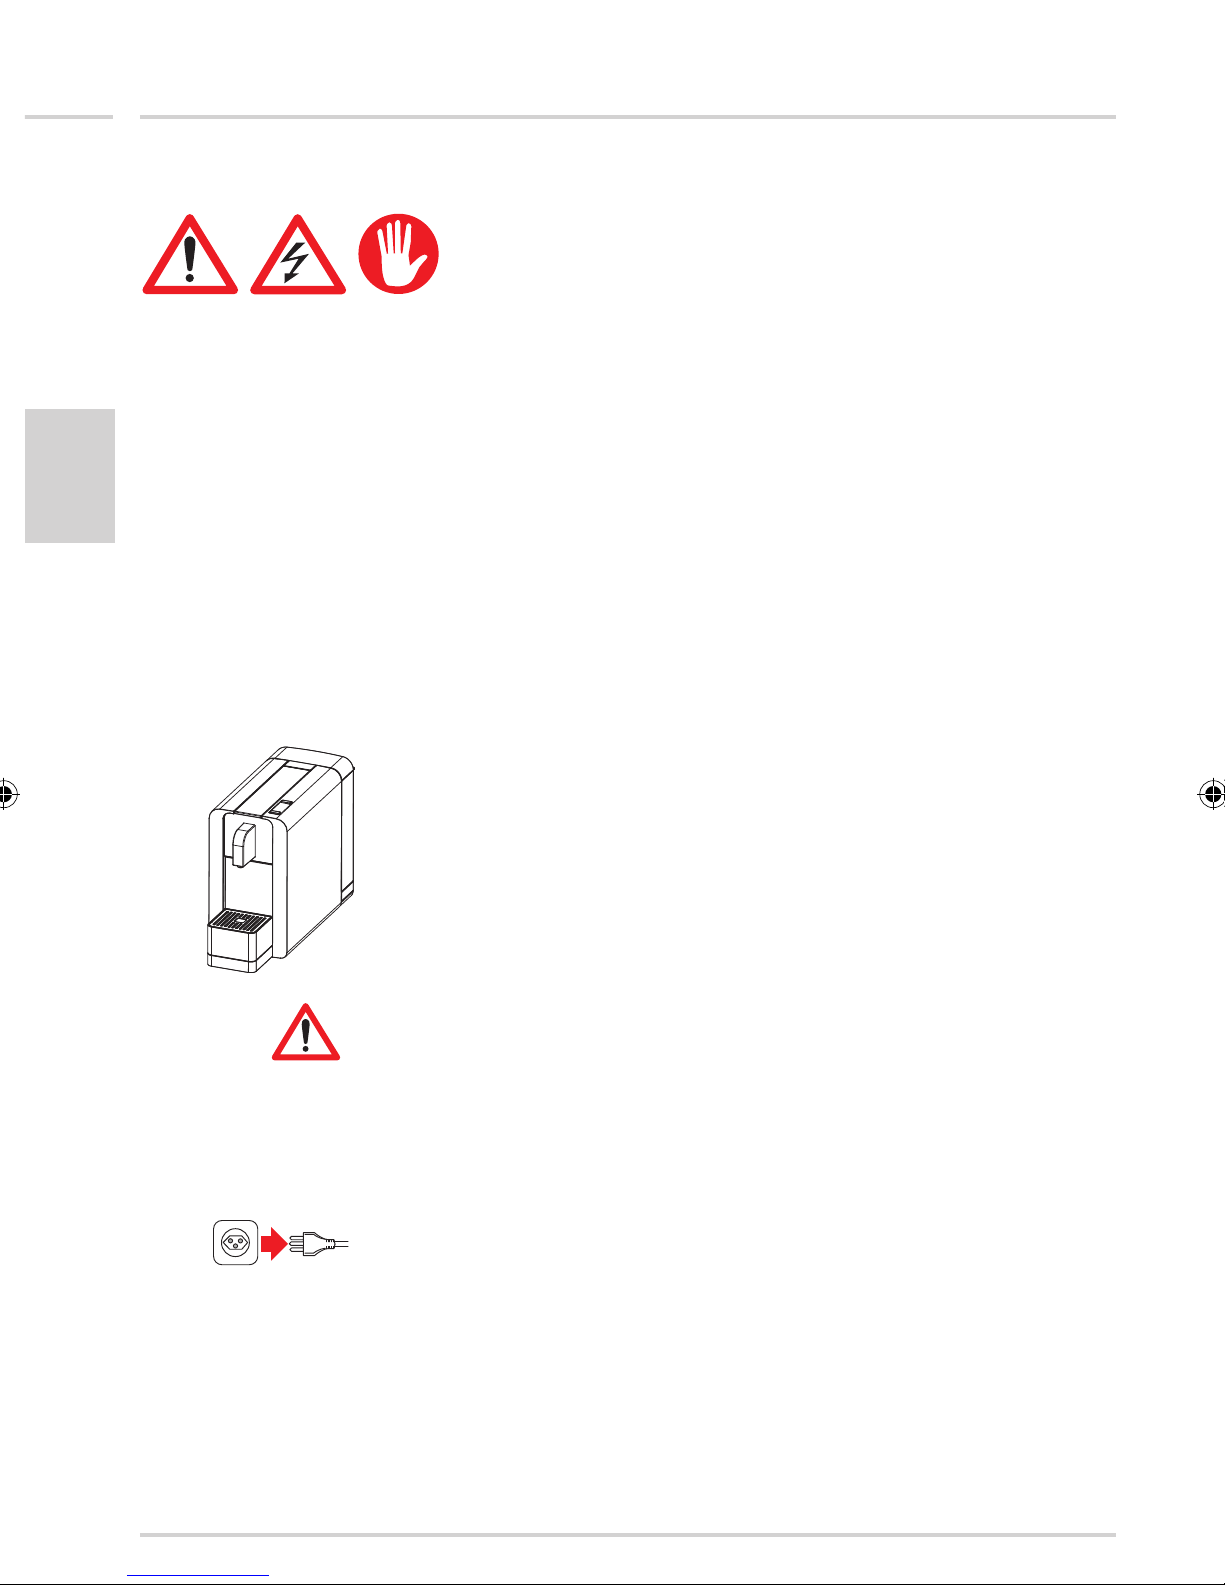
Caution: improper handling of electrical equipment is dangerous
and can be lethal. Please pay attention to the safety precautions on
page 4, in particular the following:
•
Danger of scalding: beware of hot water
•
Do not operate the machine with an empty water tank
•
Always pull out the power plug before cleaning the machine
•
Only use the machine in a dry room
Thoroughly rinse out the water tank with hot water before using for the
first time. Clean the capsule coffee machine using a damp cloth only (see
«Cleaning» on page 14).
Important:
− Before using for the first time the internal piping must be flushed out
(for details see «Flushing machine/internal piping») on page 11
Intended utilization
With the cremesso Compact Manual capsule machine you can effortlessly make excellent espresso, coffee and tea.
This machine uses cremesso capsules - a clean, practical and environment-friendly solution, enabling disposal with normal household waste.
You can always find the latest news on the cremesso capsules system
at www.cremesso.com
Important:
− To avoid damaging your machine, never use other makes of capsule
− This capsule coffee machine is only intended for household use
1. Installation / Power connection
The machine location must meet the following requirements:
– Pull out the power plug
– Place the machine on a dry, stable and level surface, which must be wa-
terproof and heat resistant. Never place the machine directly on marble
surfaces, untreated or oiled woodwork (risk of non-removable coffee
stains) or directly under the power point. Only use the machine in a dry
room
– Never place the machine on or nearer than 50 cm to hot surfaces or
open flames
Page 10
Starting up
9
– Never place the machine nearer than 60 cm to the sink. The power ca-
ble and plug should never be allowed to get wet (risk of electric shock)
– If you need an extension cable, make sure it is suitable for your machine
(3-pole grounded, and at least
lay the cable to avoid tripping
− Remove the protective foil from the perforated drip tray grate and insert
it in the drip tray
Important:
– Danger of electric shock! Never clamp or run the power cable over
sharp corners or edges or hot or wet surfaces
– Pull out the power plug before moving or cleaning/servicing the ma-
chine, or if it won’t be used for a long time (e.g. during vacations)
– To make sure that the machine is switched off, remove the plug from
the power point
1.0 mm²
conductor cross-section), and
English
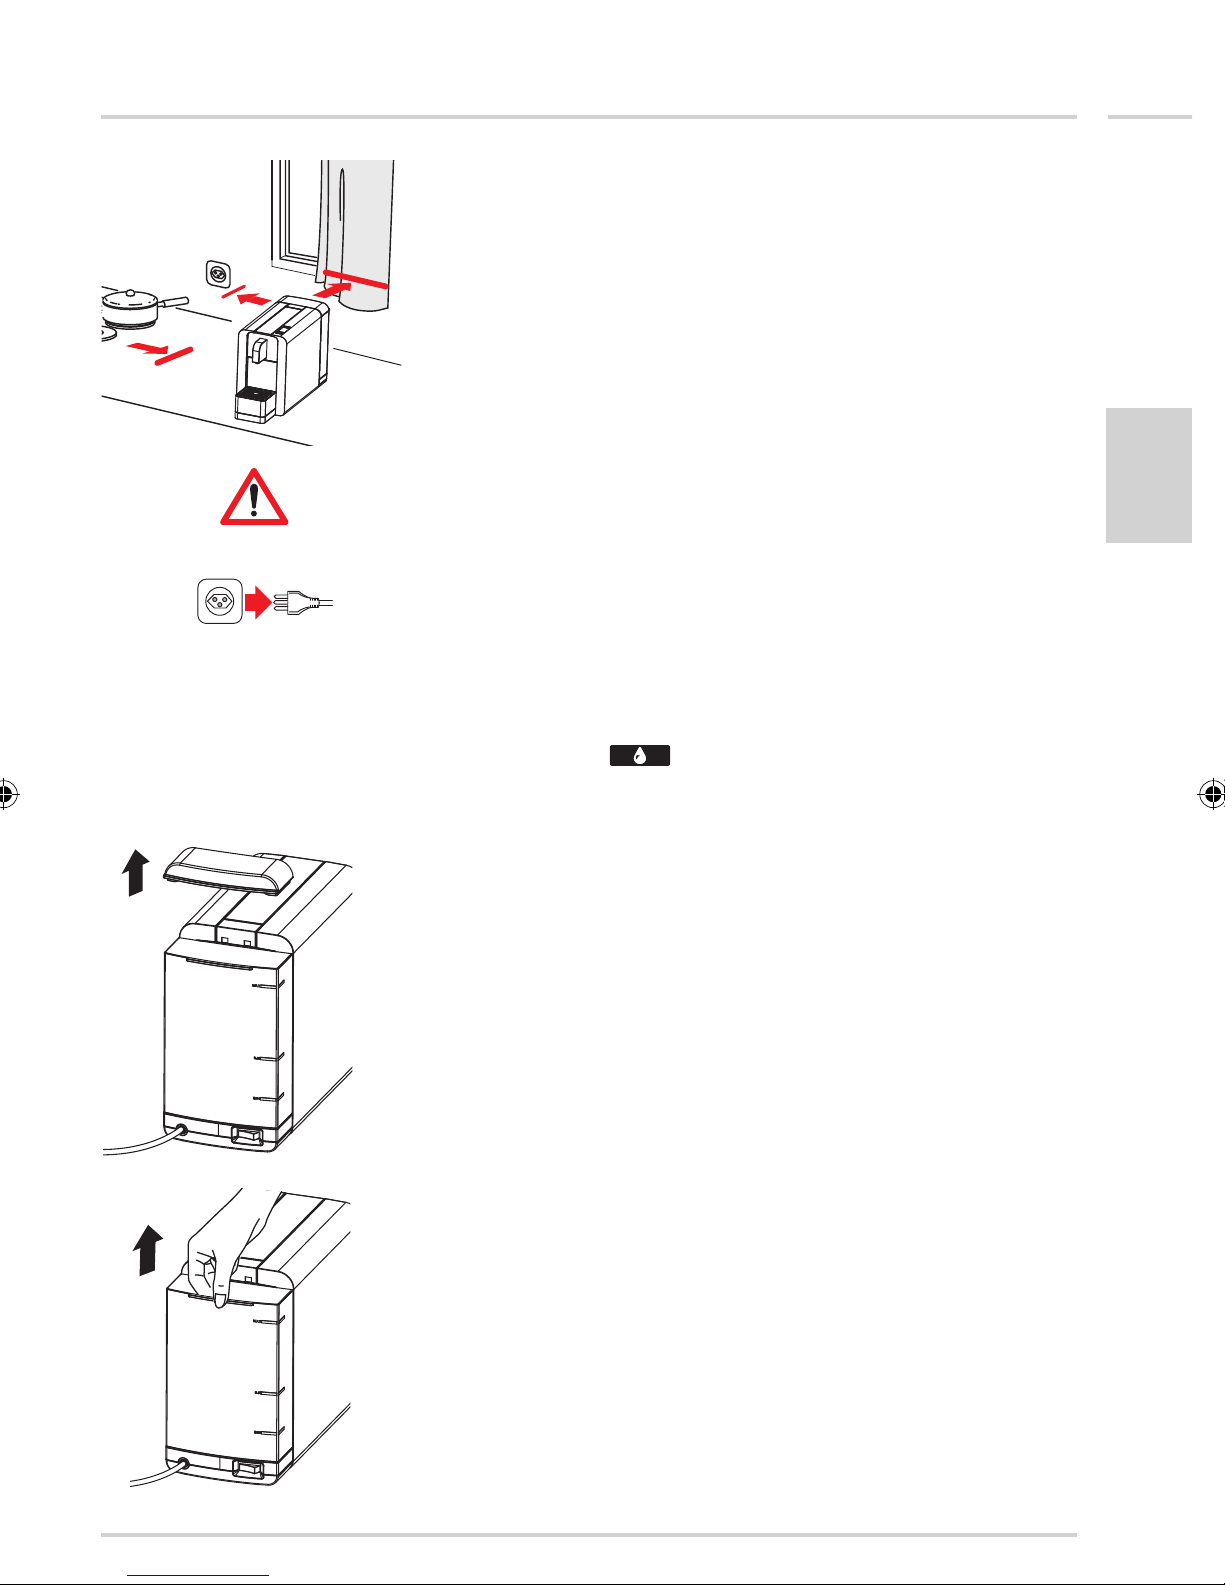
2. Filling / Refilling the water tank
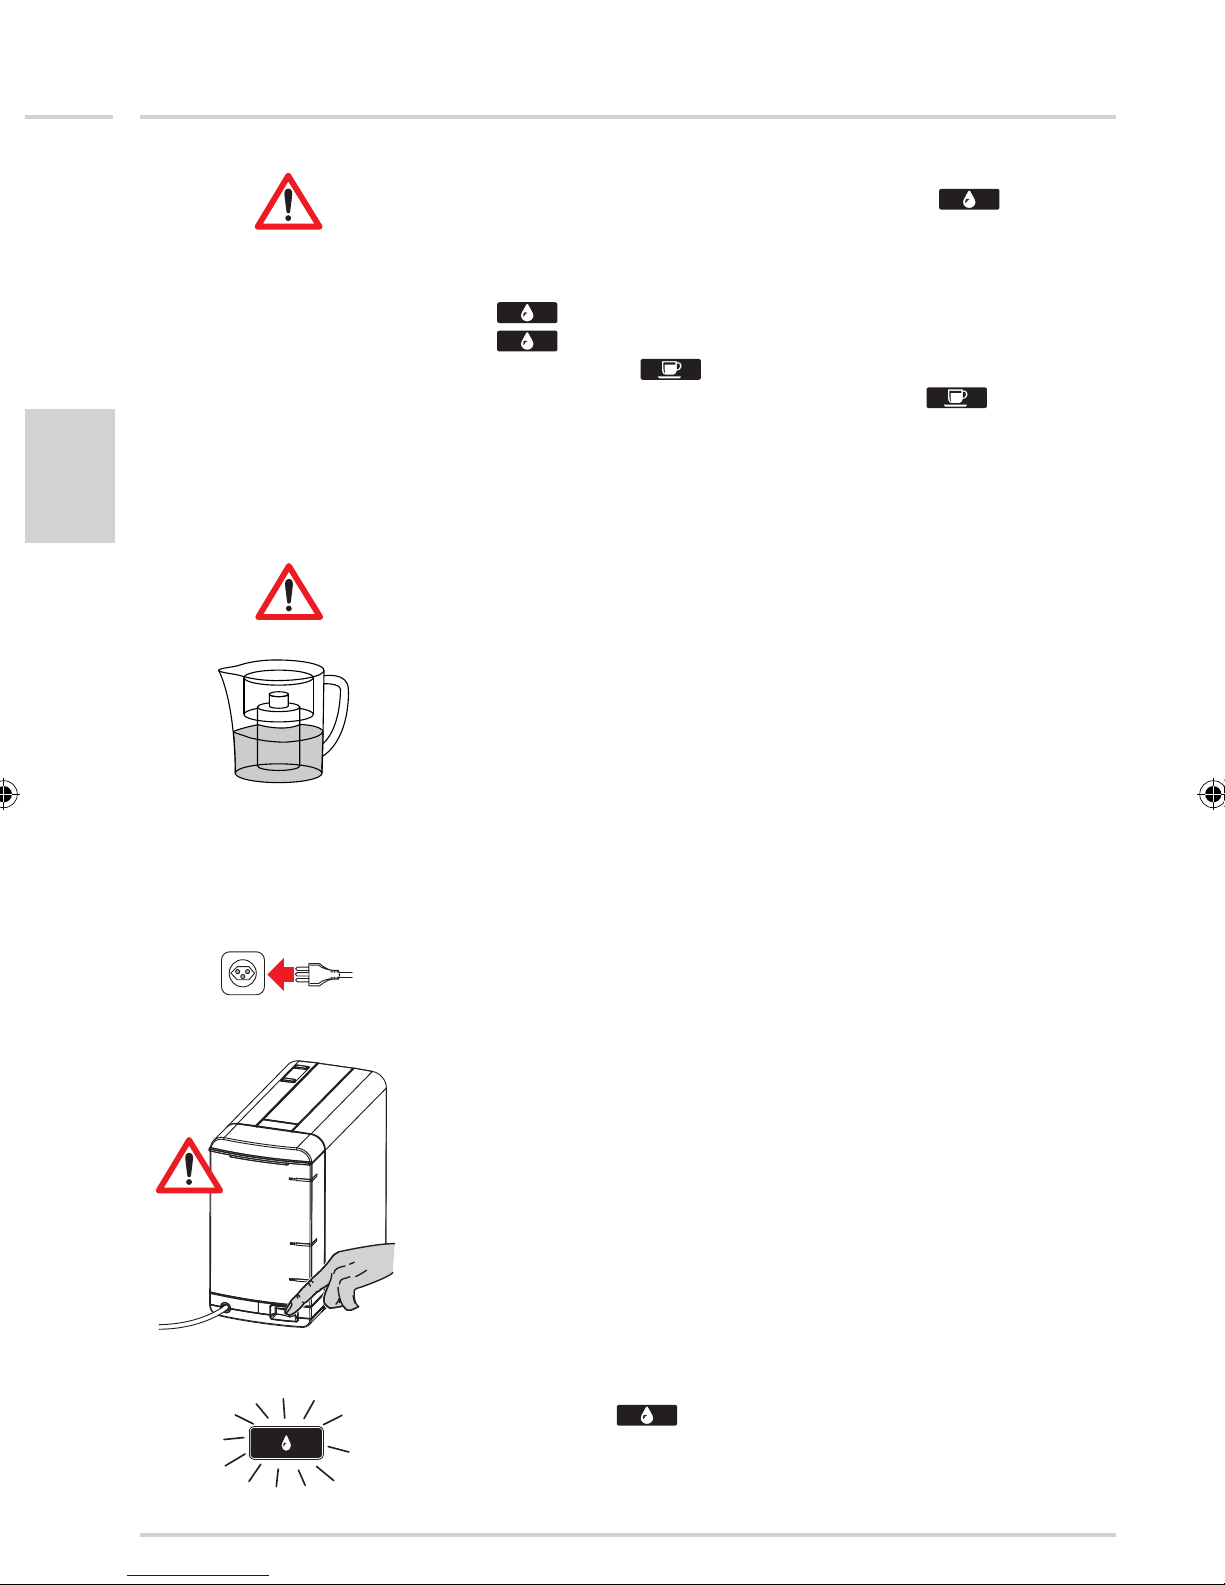
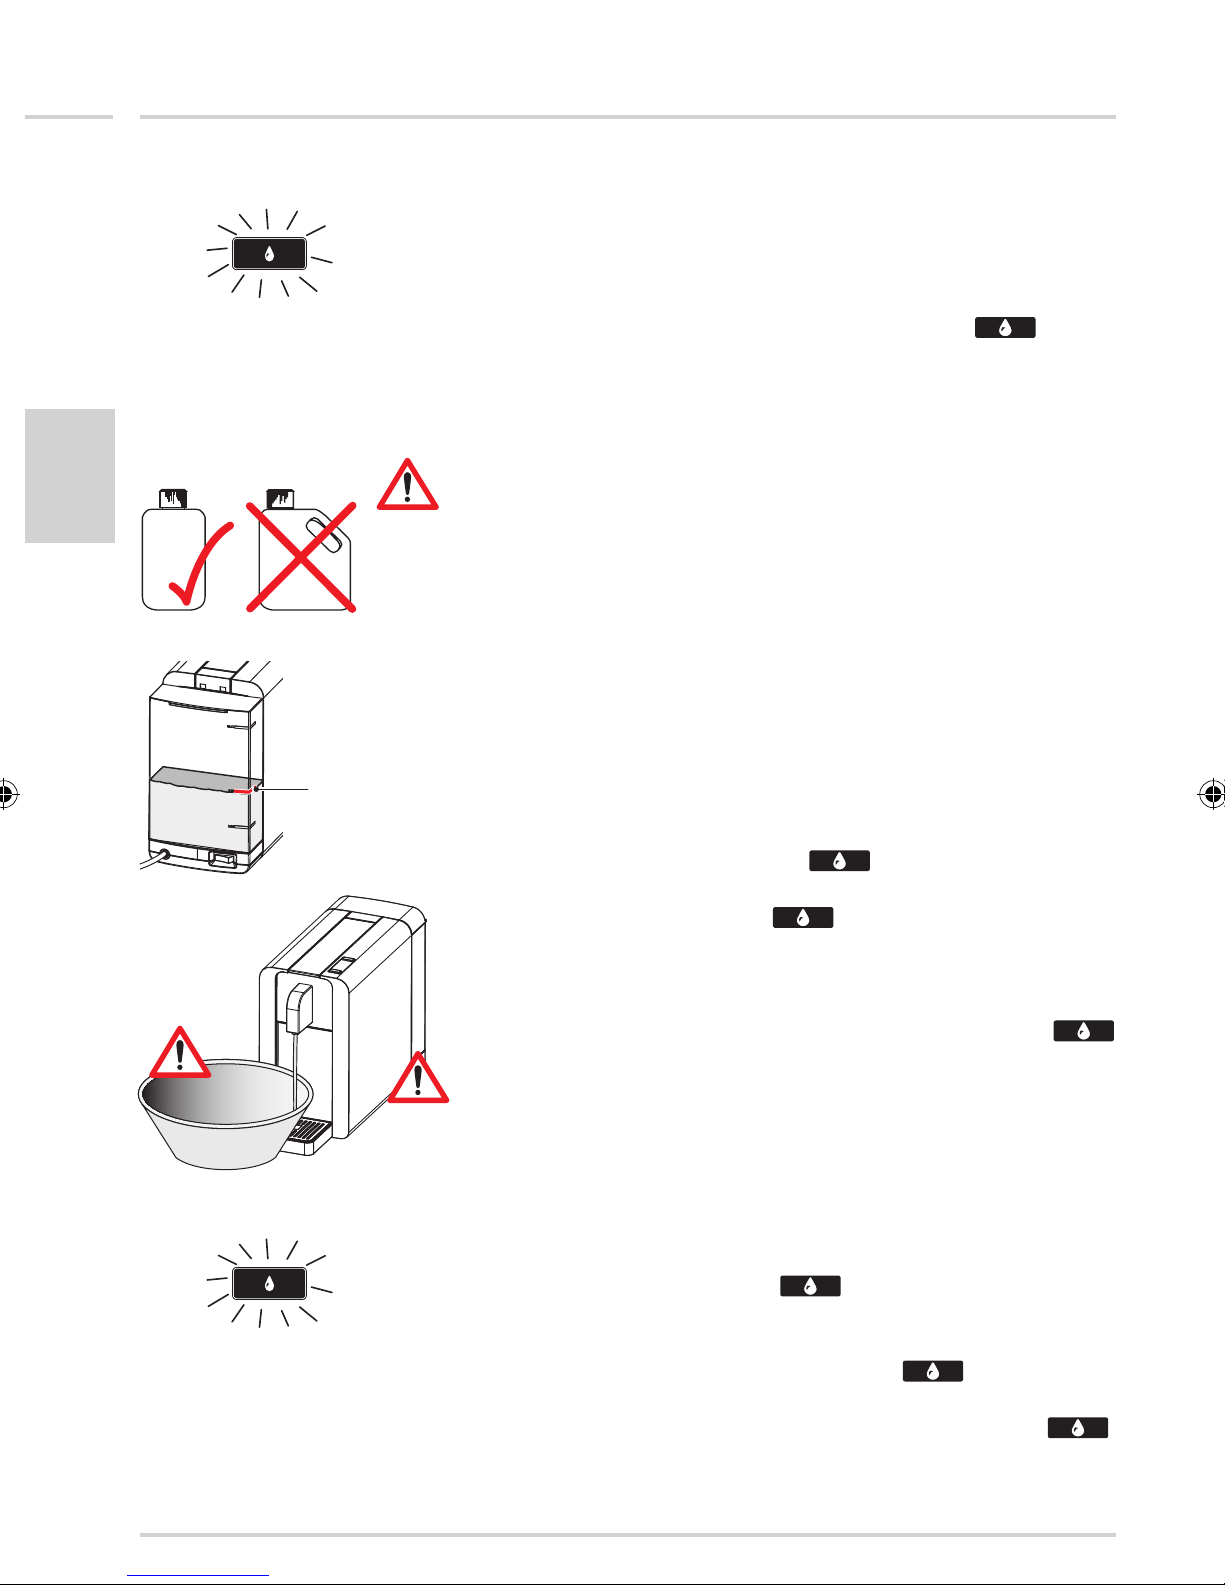
The cleaning key goes blue if the water tank is empty. There
are two ways to fill the water tank: directly into the machine, by using for
example a jug, or by removing the water tank.
Filling without removing the tank
– Remove the water tank lid
– Fill the tank up to the «MAX» mark with cold water (the maximum
capacity is 1 litre)
– Replace the lid
Filling by removing the water tank
– Remove the water tank lid
– Lift up the water tank holding it by the special grip (on the outside of the
water tank) and remove it from the machine
– Fill the tank up to the «MAX» mark with cold water (the maximum
capacity is 1 litre)
– Lower the water tank into place, pushing firmly
– Replace the lid
Continued...
Page 11
10
English
Starting up
Important:
– After filling the water tank, press the cleaning key
ing your next cup of tea or coffee (both keys then light up in white)
– If the water tank is empty the pump makes a loud noise trying to make
coffee or tea. This is not a fault. After a few seconds the cleaning key
lights up in blue. Fill the water tank and press the cleaning key
. The pump can always be stopped by pressing the coffee/tea
dispensing key
– If you do not press the coffee/tea dispensing key
safety switch will stop the pump after about 15 seconds
– If the pump sucks in no water, eject the capsule and press the clean-
ing key
– Do not insert a new capsule until water is pumped in
Notes on water:
– We recommend changing the water daily
– Never use distilled water
– Use ONLY cold tap water
– Tip: Use water that has been softened with a commercially available
water filter.
Important: change the filter cartridges regularly (see filter instructions)
to prevent machine damage not granted by the guarantee
before mak-
,
the automatic
3. Starting up
– Connect the machine to a grounded power point by plugging in the
power plug
– Before turning on the power switch, make sure that:
– the operating handle is closed
– the water tank is full
– the water tank is firmly in place, otherwise water may leak
– the drip tray with the capsule container is completely inserted (never
operate the machine without capsule container, or hot water will run
out)
– Turn on the machine with the main power switch (on the back); the
cleaning key
mode
starts flickering white to indicate energy-saving
Page 12
Starting up
11
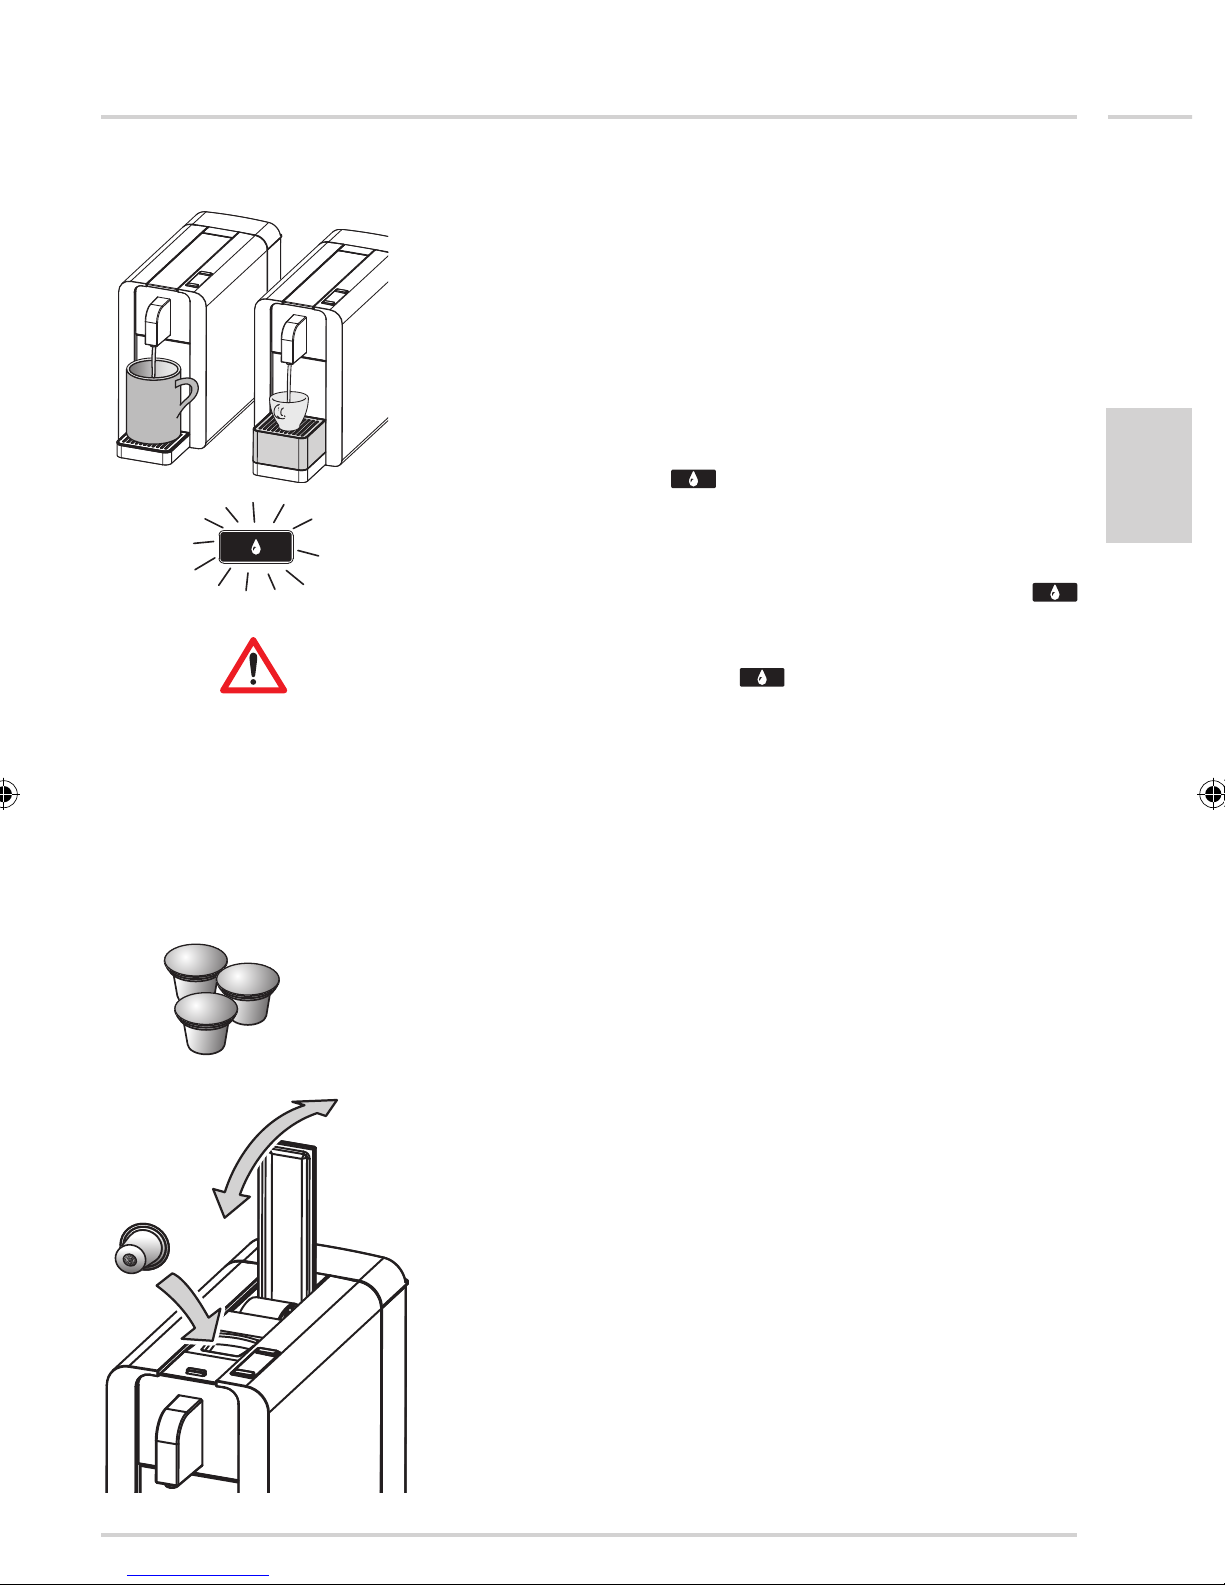
4. Flushing out the machine and internal piping
Before using for the first time or after long pauses (e.g. holidays) and
when changing between tea and coffee capsules, the machine must be
flushed out. This short procedure thoroughly flushes out and cleans the
internal piping.
– Turn on the machine with the main power switch
– Place an empty cup under the coffee dispenser. For large cups remove
the upper drip tray and place the perforated grate on the lower tray.
Important: make sure that there is no capsule in the opening and
close the operating handle
– Press the cleaning key
key again to start flushing (the other key light goes out, and the pump
starts pumping water through the system)
– The pump stops automatically after about 15 seconds (flushing can be
repeated or stopped at any time by pressing the cleaning key
again)
– Caution: Beware of scalding water! Danger of scalding!
– If you pressed the cleaning key
water container (see page 14)
(both keys light up). Press the cleaning
English
several times, empty the residual
2.
3.
1.
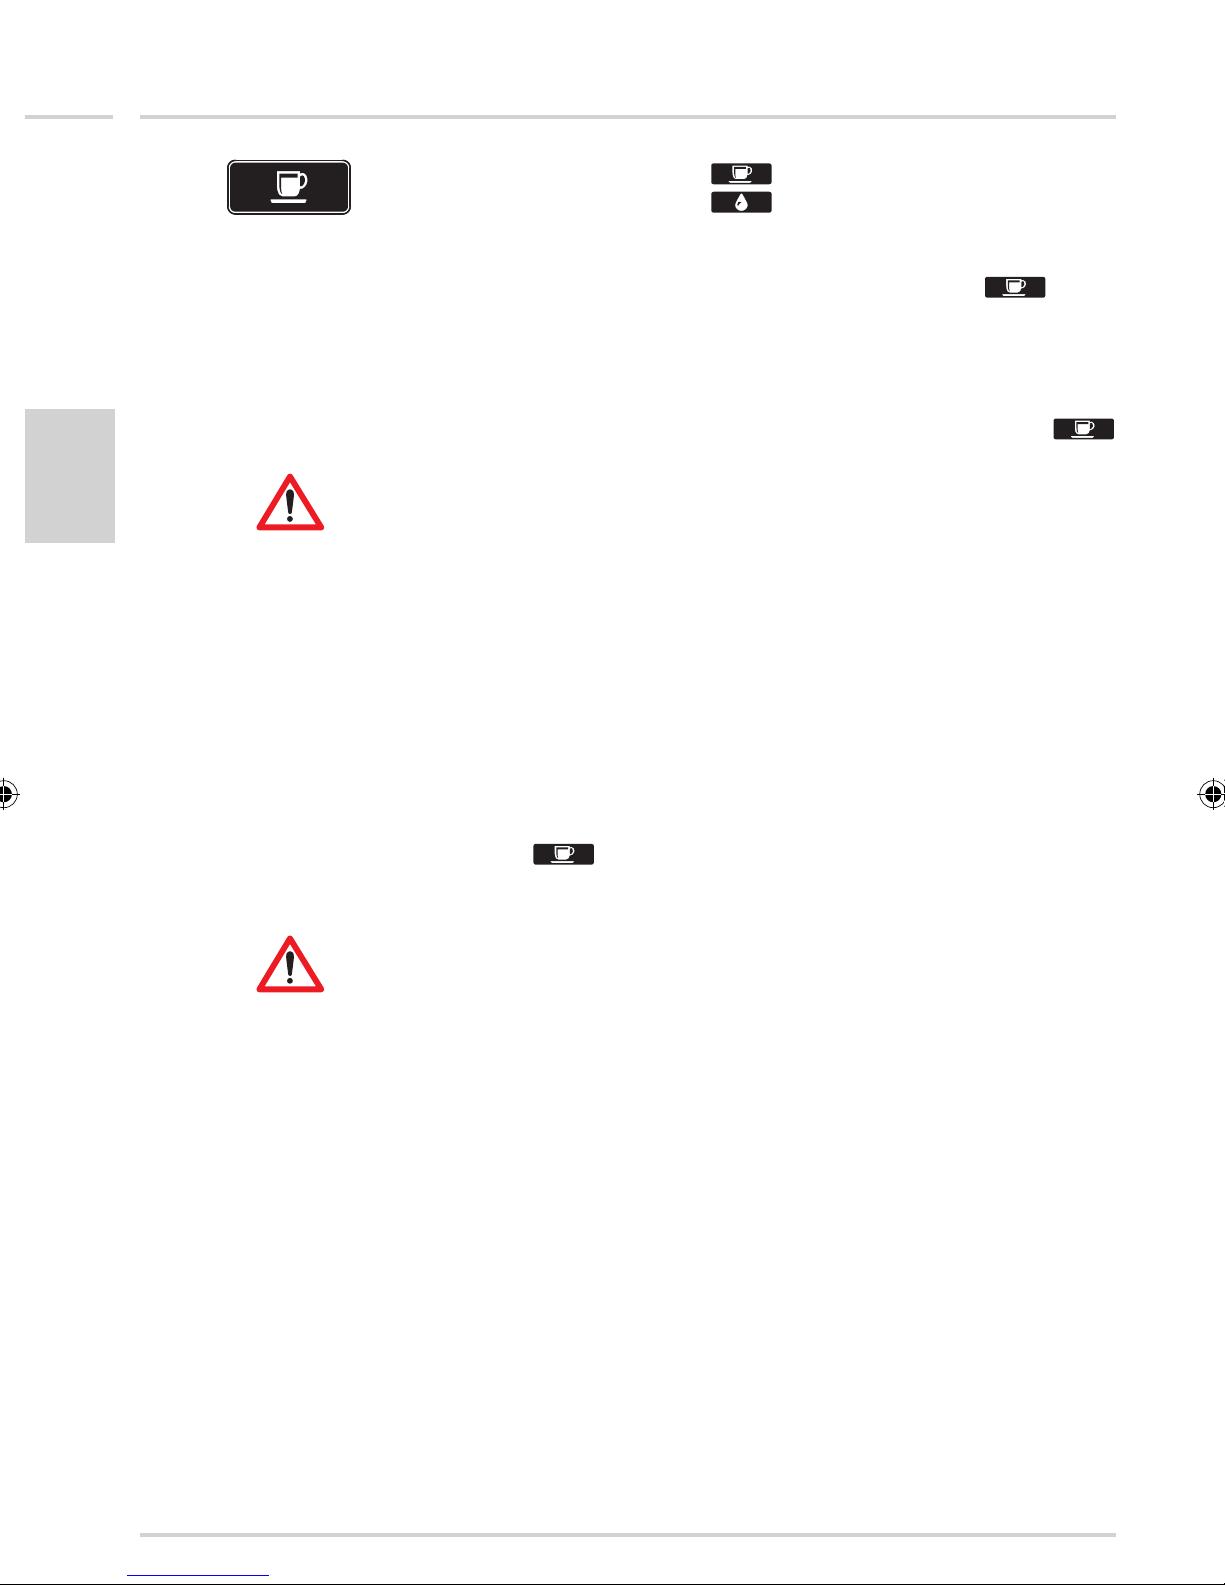
5. Making coffee or tea
To make coffee or tea with this machine you need
Various kinds of coffee (including decaffeinated) and tea are available.
Use one capsule per cup.
Before you make coffee or tea for the very first time or after long pauses
(e.g. after the holidays), clean and flush out the internal piping (see previous section).
– Be sure there is enough water in the tank before making coffee
– Place an empty cup under the dispenser. For large cups remove
the upper drip tray and place the perforated grate on the lower tray
1. Move the operating handle back completely
2.
Let the
tions correctly.
Important
capsule
3. Move the operating handle completely forward to load the capsule
into the brewing position (the capsule foil is «perforated» check)
cremesso
: to avoid damaging your machine, never use other makes of
capsule fall straight into the container so that it posi-
cremesso
capsules.
...Continued
Page 13
12
English
Starting up
The machine has one key for making coffee, tea or hot water:
– When the cleaning key
by (energy-saving) mode. Press any key to activate the machine (both
keys illuminate in white)
– Start coffee or tea dispensing by pressing the key
machine was in standby mode, the key will first flicker white to indicate
heating up. After heating up the key stays illuminated in white and hot
water is pumped through the capsule to dispense coffee or tea into
your cup
– Dispensing can be stopped at any time by pressing the key
(both keys illuminate in white again)
– Caution: Beware of scalding water! Danger of scalding!
Coffee-making tip:
– Ristretto: 30 ml (= «small» cup)
– Espresso: 50 ml (= «medium» cup)
– Lungo or tea: 110 ml (= «large» cup)
flickers white, the machine is in stand-
. If the
Tip:
– Use thick, pre-heated cups for ristretto and espressos in order to pre-
vent cooling down too quickly. Preheat the cup by pressing the coffee
key
Important:
– Prior to changing between coffee and tea flush out the piping (to pre-
vent the taste from being affected, see page 11)
– After opening the operating handle, water may drain into the tank. This
is normal and not a fault
– After dispensing about seven cups, the machine pauses to cool down
(meanwhile the key flashes and no dispensing is possible)
without capsule
Page 14
Starting up
13
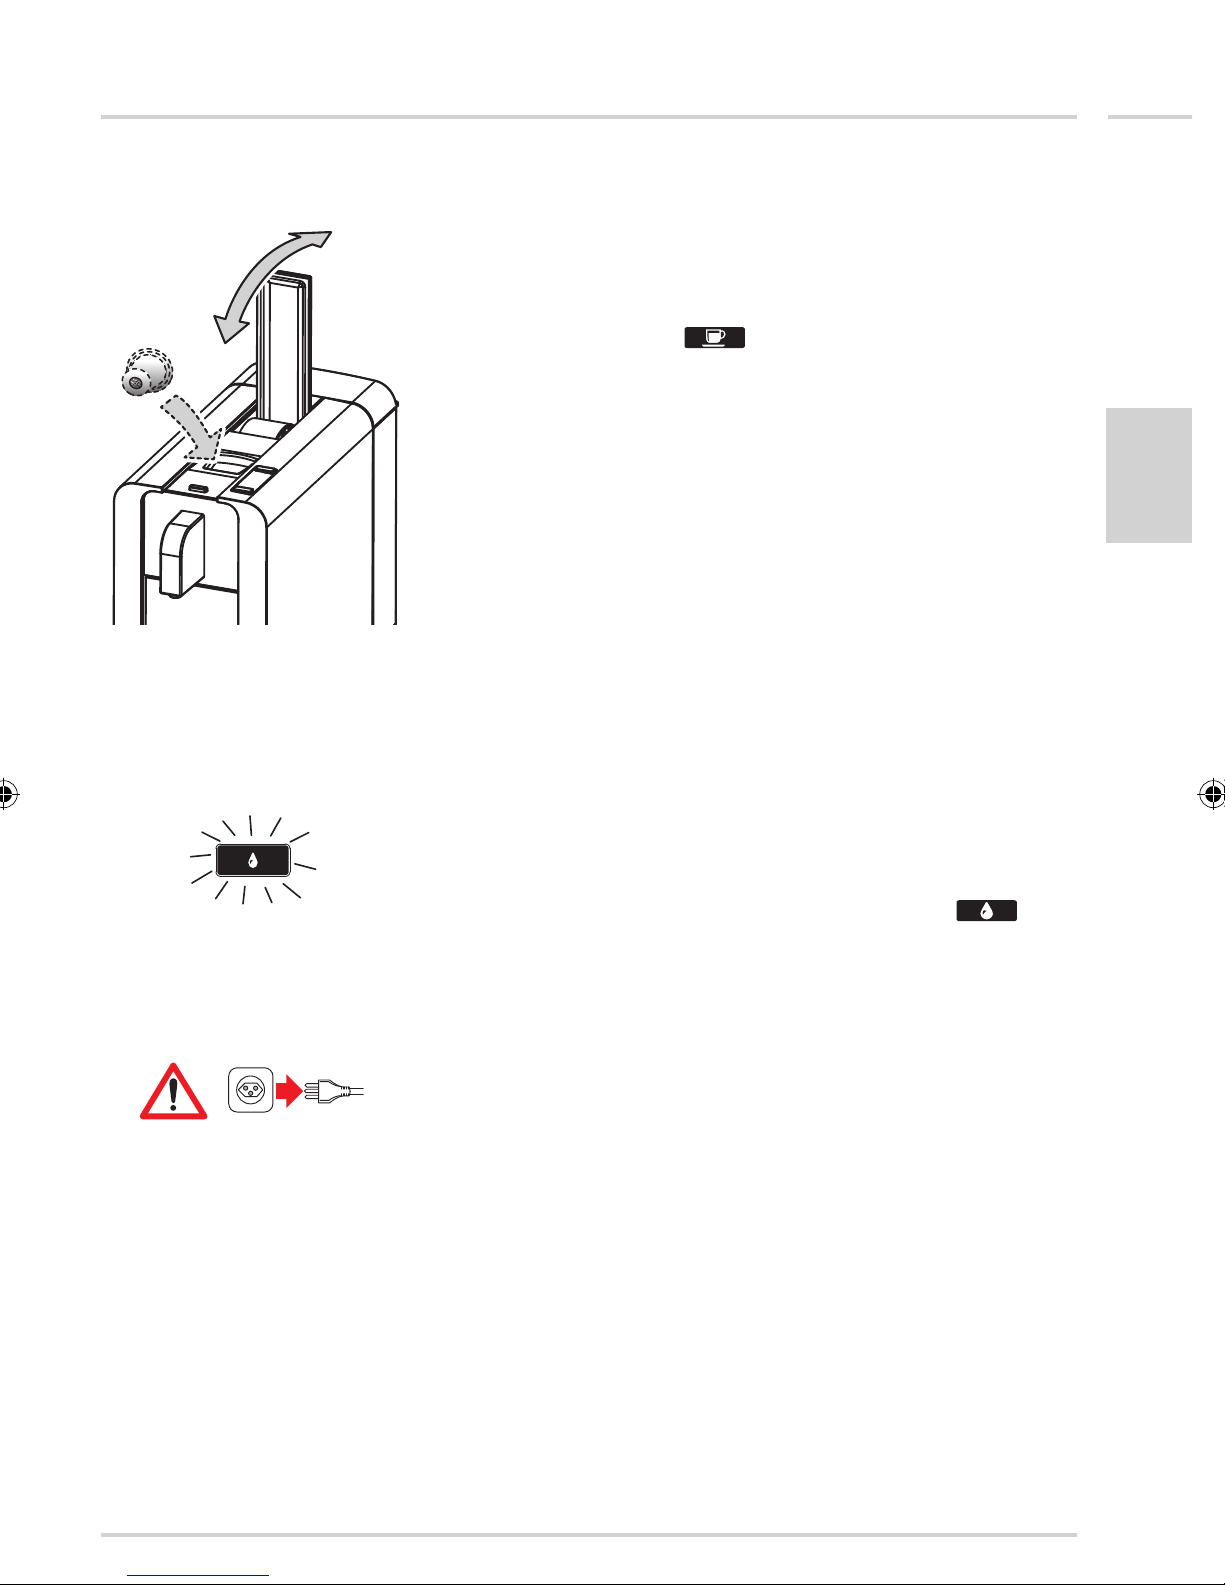
6. After making coffee or tea
2.
3.
1.
After making coffee or tea the empty capsule is ejected as follows:
1. Move the operating handle completely back to eject the empty cap-
sule into the container.
2. If you want another cup of coffee/tea, just insert a new capsule and
press the dispensing key
Important:
– The capsule may stick in the opening if it has been there a long time. If
so open and close the operating handle. If the capsule is still blocked,
push down lightly with a finger. (Caution, hot sharp opening point inside!). After opening the operating handle, water may drain into the
tank. This is normal and not a fault
– The container holds up to 10 used capsules. Regularly empty the used
capsule and drainage water containers (drainage water may otherwise
overflow)
(see page 11).
English
7. Energy saving mode
white flickering
If the machine is not being used, after one minute the energy saving
mode is activated. In this mode the power absorbed by the machine is
very much less at 0.3 watts.
– The energy saving mode is indicated by the cleaning key
lighting up white and fading
– To use the machine press the dispensing key. The machine is ready
to dispense coffee/tea as soon as the key is steadily lit up (see page
11)
– If the machine is not going to be used for an extended period of time
(e.g. during holidays), switch it off and remove the power plug, empty
the water tank, and steam out the machine (see page 17)
slowly
Page 15
14
Clic
Starting up / Cleaning
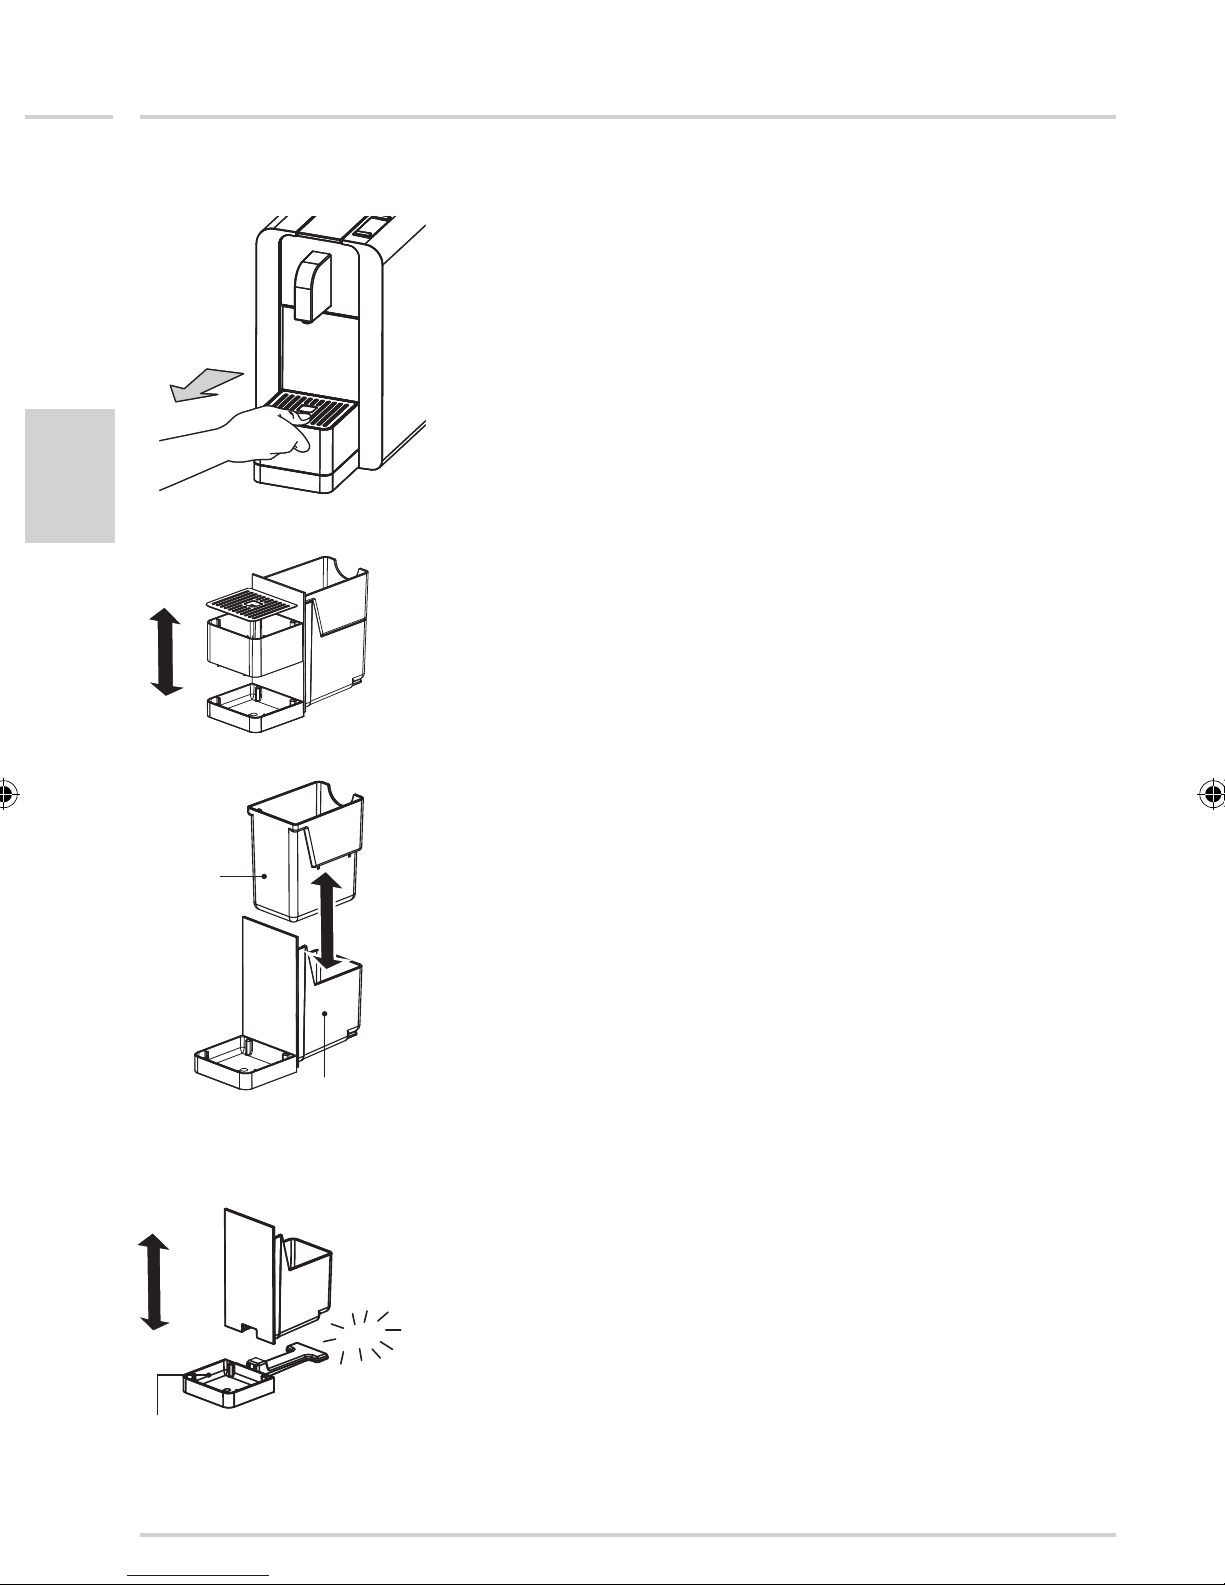
8. Emptying the capsule container and drip tray
The capsule container holds around 10 empty capsules and the residual
water container around 500 mL of residual water. For hygiene reasons we
recommend emptying the capsule container and the drip tray every day.
1.
English
2.
3.
capsule
container
1. Hold the drip tray firmly and pull it out by lifting gently.
2. Remove the perforated drip tray grate and upper drip tray.
3. Pull the capsule container out of the residual water container.
Dispose of used capsules with household refuse.
residual water
container
4.
lower drip tray
4. The residual water container can be removed, if necessary, from the
lower drip tray (snaplock).
– After emptying/cleaning, reassemble the parts in reverse order and in-
sert them in the machine as far as possible
Page 16
Cleaning
15
Coffee machine
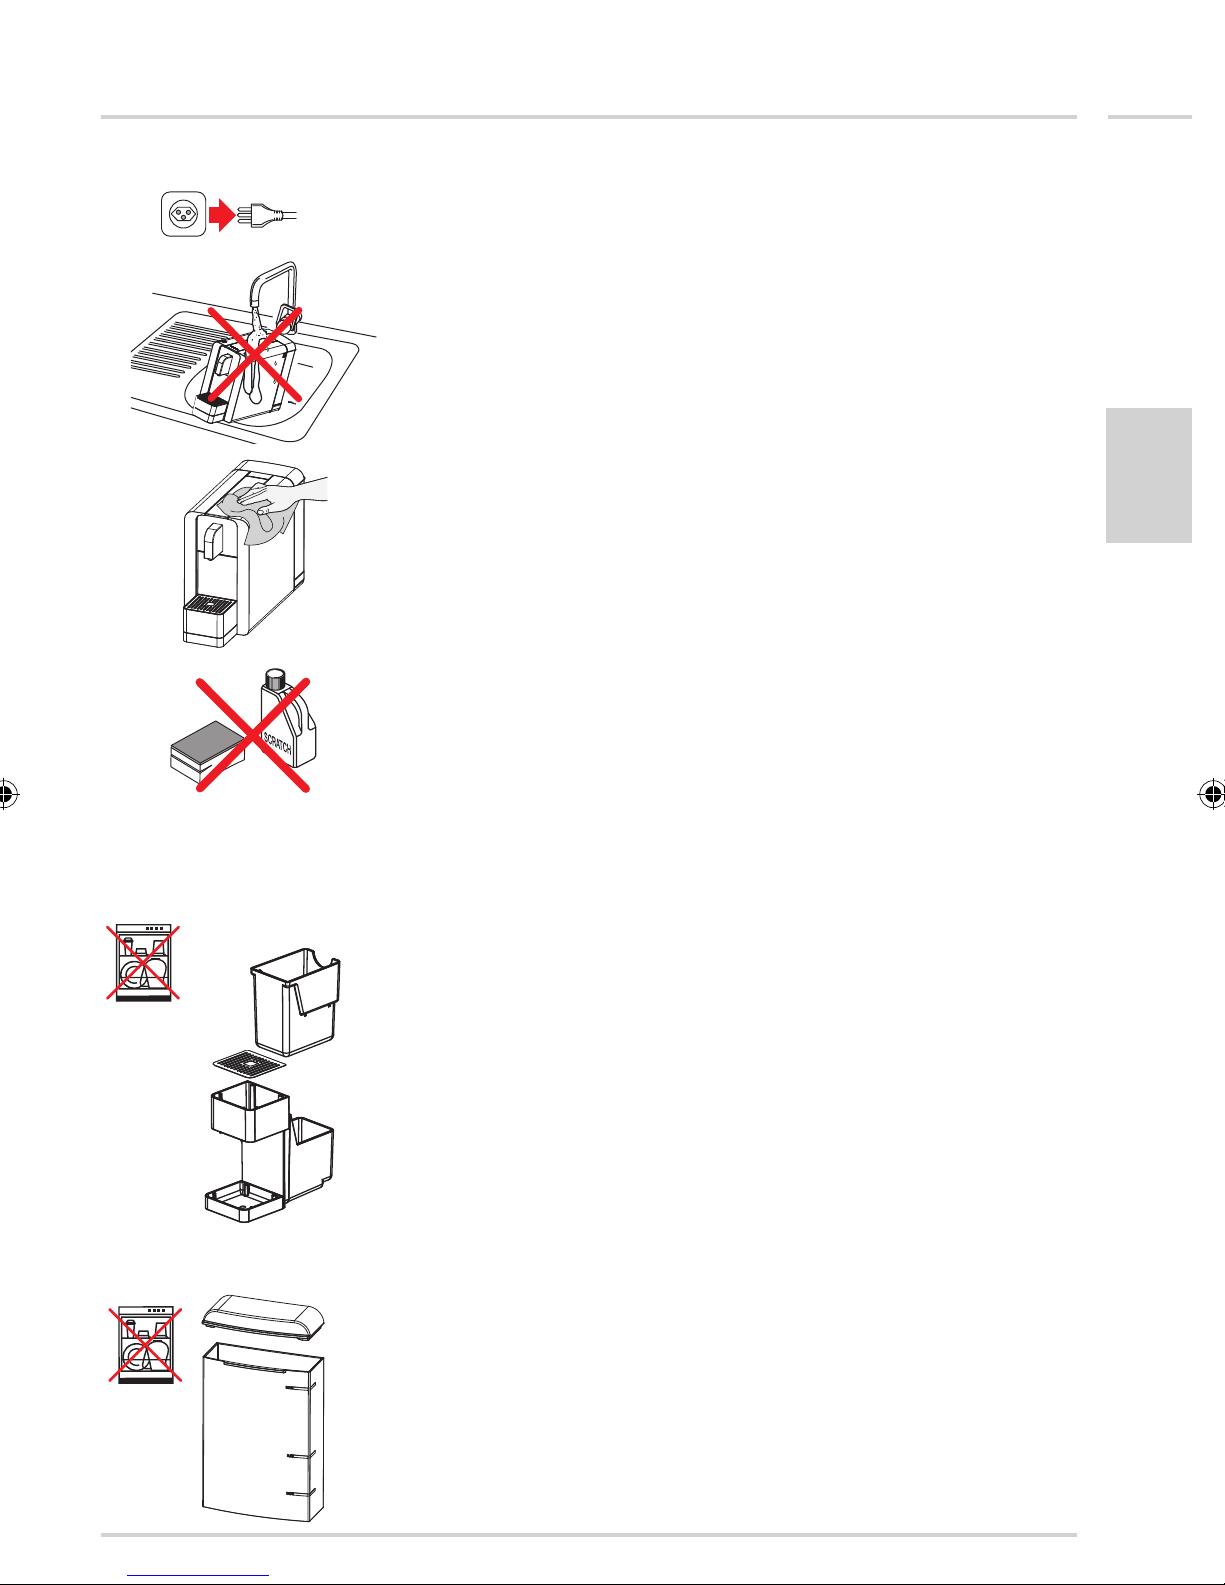
– Always pull out the power plug before cleaning the machine
– Never immerse the machine in water or clean it under running water
− Clean the machine (including dispenser pipe) with a damp cloth
and allow to dry afterwards
English
– Never use abrasive cleaning agents or materials (use e.g. dry rags or
kitchen paper)
Drip tray and grate, capsule container
– Clean the drip trays, perforated grate and capsule container with tepid
water and household detergent
– Never clean them in the dishwasher!
Water tank
– Clean the water tank and lid with tepid water and household detergent
– Never clean them in the dishwasher!
Page 17
16
English
Decalcification / Maintenance
Drinking water varies according to region. The lime particles in hard
drinking water are deposited as residues in the machine and can block
the piping and cause damage. To prevent this, be sure to decalcify the
machine no later than after making 300 cups of coffee or tea, if the
output falls significantly, and in any case after one or two months.
(red flashing)
Anticalc
Essig
Vinaigre
Aceto
Vinegar
«0.5 l»
mark
(blue)
More frequent decalcification is necessary in areas with very hard water.
After making 300 cups of coffee or tea the cleaning key
red during dispensing until decalcification has taken place.
Decalcification must be done correctly to prevent damage. So it is essential to follow these instructions.
Important:
– Never clean the machine with vinegar. This causes damage and
makes your coffee/tea taste bad!
– Damage caused by incorrect decalcification or failure to decalcify is
not granted by the guarantee
– Caution: beware of hot water!
– Follow the safety instructions in the decalcifier packaging
1. Recommendations: Use cremesso special decalcifier, mixed with
water according to the instructions; pour the mixture in the water
tank up to the «0.5 litre» mark
2. Make sure the capsule container is empty
3. Place a large bowl under the dispensing head to collect the de-
calcification liquid and lime residues
4. Turn on the power switch (the machine is in standby (energy sav-
ing) mode and the cleaning key
machine by pressing a key (both keys light up white)
5. Hold down the cleaning key
ing (the cleaning key now flashes blue). The programme pumps decalcifying liquid through the water circuit into the container. Then the
pump stops to let it take effect for about 3 minutes. This procedure
is repeated until the water tank is empty (the cleaning key
lights up blue).
Note: Decalcification should take place when the machine is cold,
but if coffee or tea has just been made the fluid ejected will be very
hot to start with!
6. Empty the bowl of decalcifying liquid
7. Rinse out the water tank well, fill with fresh cold water and replace
the tank
8. Place a large bowl under the dispensing head
9. Press the blue cleaning key
circuit is then flushed with cold water to collect the decalcification
liquid and lime residues. As soon as the water tank is empty, decalcification is complete and the cleaning key
in blue
10. Refill the water tank, replace it, and press the cleaning key
After decalcifying, dispense the first cup without a capsule
will flash
flickers slowly. Activate the
for 3 seconds to start decalcify-
(key starts flashing blue). The
stays illuminated
.
Page 18
Decalcification / Maintenance
Important:
– Use special decalcifying agents with colour indicator according to
manufacturer’s instructions
– The decalcifying programme must not be interrupted
Steaming out / Storage / Transport
17
(white)
(white)
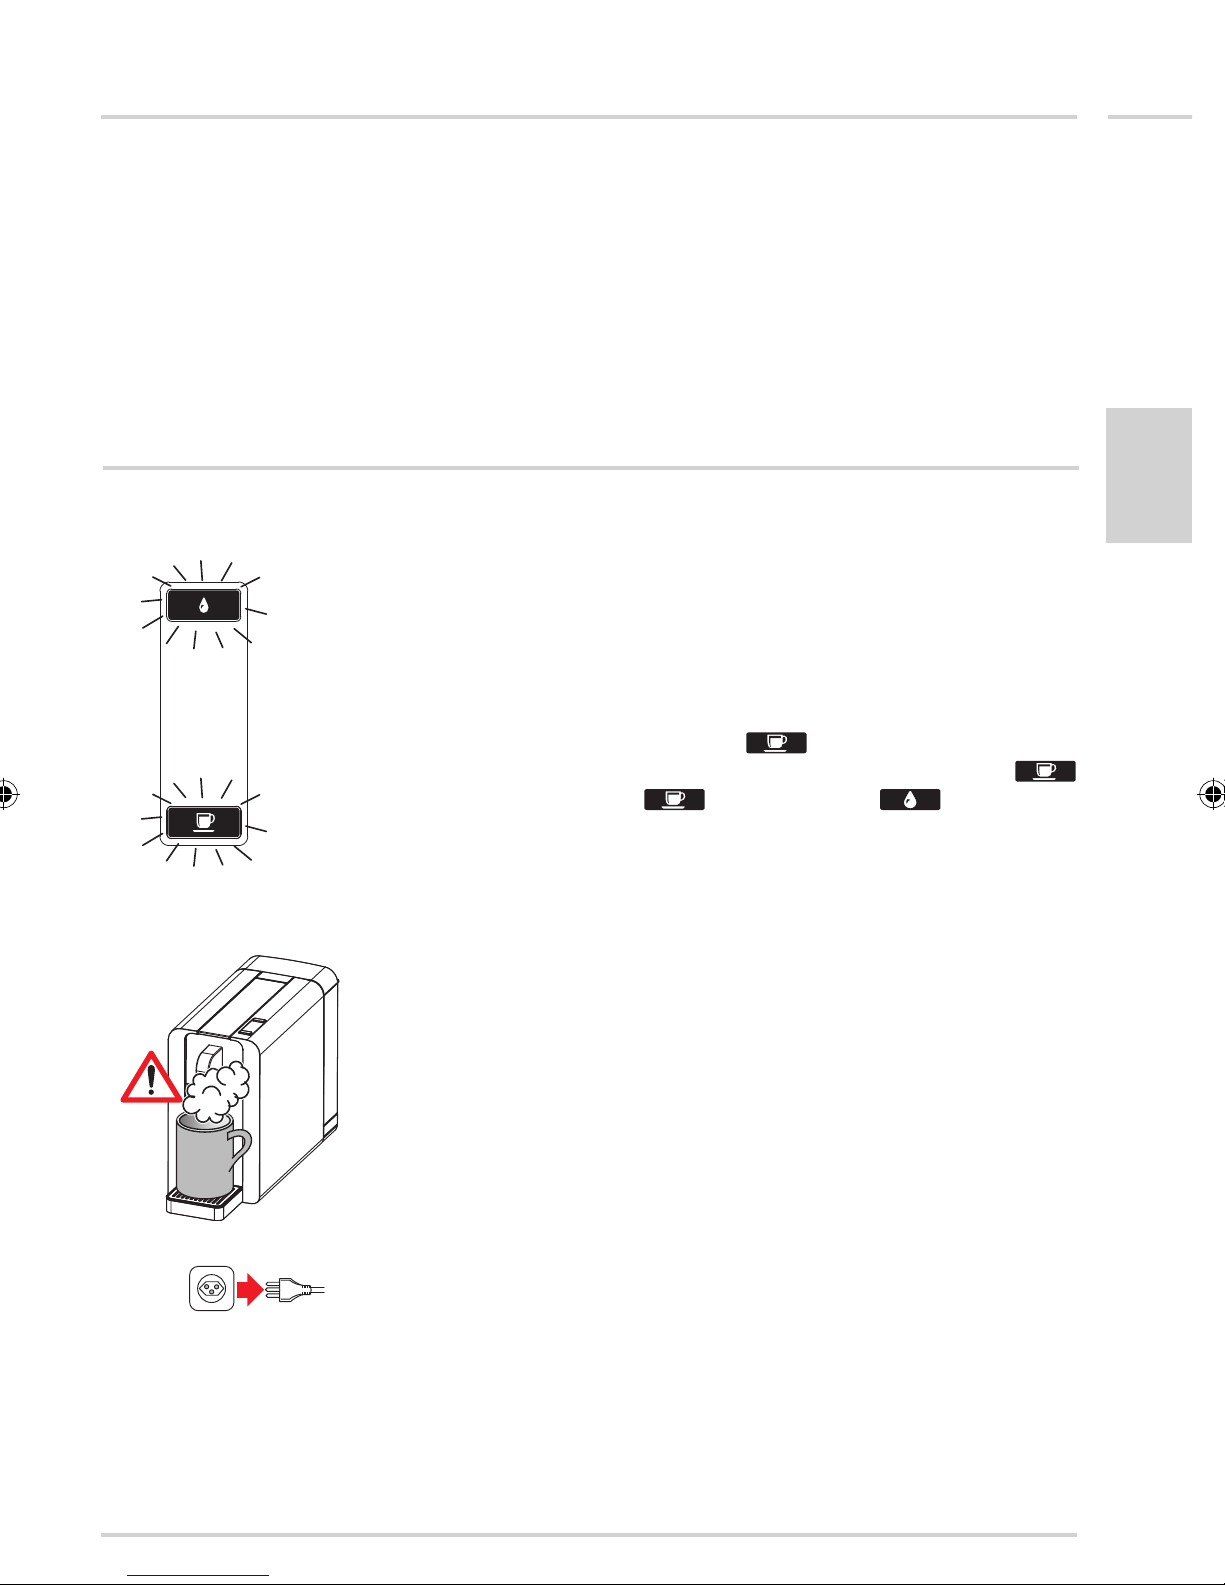
Steaming out
– Prior to long periods of disuse or for storage or transport at tempera-
tures below 5 °C, it is essential to steam out the machine. This re-
moves water from the system to prevent internal frost damage
– Switch off the machine
– Empty the water tank and replace it
– Put an empty cup under the coffee/tea/hot-water dispensing head
– Hold down the Coffee/Tea key
– Steaming out now commences - release the Coffee/Tea key
(the Coffee/Tea key
After a few seconds you will hear the pump. When it stops, the key
lights extinguish
CAUTION:
– Beware of hot steam: danger of scalding!
and cleaning key start flashing).
. Turn on the main switch
English
– Turn off the main switch and pull out the power plug. Let the machine
cool down before removing it
– Keep your coffee machine in a dry, dust-free place inaccessible to
children (tip: use the original packaging)
– Before using again, thoroughly flush out the machine and piping (see
page 11)
Page 19
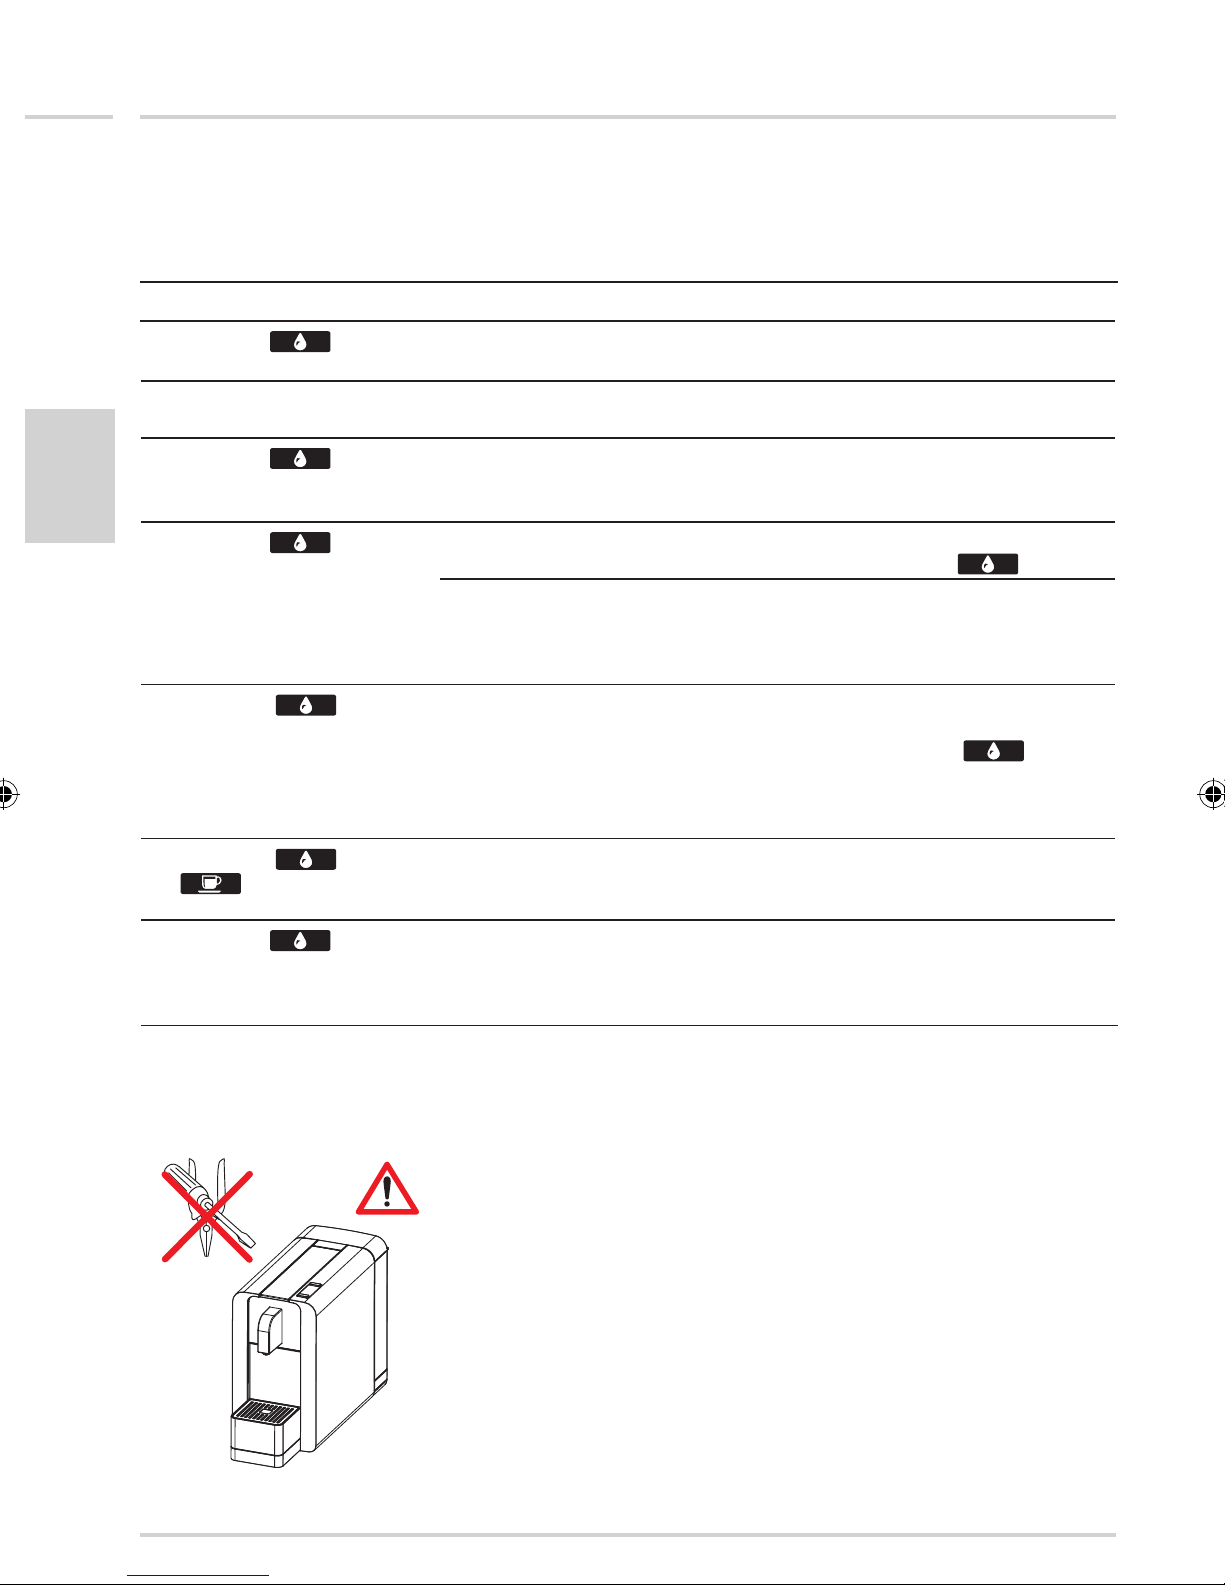
18
Troubleshooting guide
Key colours/displays
– The keys light up in different colours according to operating mode:
Colour Possible cause Remedy Page
Cleaning key
slowly flickers white
Both keys stay white – Machine is ready for making
Cleaning key
flashes red during
coffee/tea dispensing
English
Cleaning key
stays blue
Cleaning key
flashes blue
Cleaning key
key flash white
Cleaning key
stays red
and
– Machine is in standby
(energy-saving) mode
coffee or tea
– More than 300 cups have
been made and the machine
must be decalcified
– Water tank empty – Fill water tank and replace.
– Thermal cutout tripped – Switch machine off, and on
– Decalcification in progress – Wait until key stays blue.
– Steaming out in progress – Wait until both key lights
– Electronics or temperature
error
7, 12
13
– Choose the dispensing key 7, 12
– Decalcify the machine 7, 16
7, 9
Press cleaning key
again after half an hour. If error is not corrected, contact
service centre
Fill and replace water tank.
Press cleaning key
Wait until decalcification is
finished. Do not interrupt the
decalcification process!
extinguish, then turn off main
switch
– Switch machine off, and on
again after half an hour. If
error is not corrected,
contact service centre
7, 16
7, 17
Troubleshooting
Repairs to your machine may only be carried out at the service centre.
Unprofessional repairs and use of non-original replacement parts can be
dangerous for the user.
In case of unprofessional repairs, no liability will be accepted for resultant
damage and the guarantee is invalidated.
If this troubleshooting guide does not help you to solve your problem,
please contact your local sales point.
Important: Pull out the power plug immediately in case of faults, defects
or possible damage to the machine after a fall.
Page 20
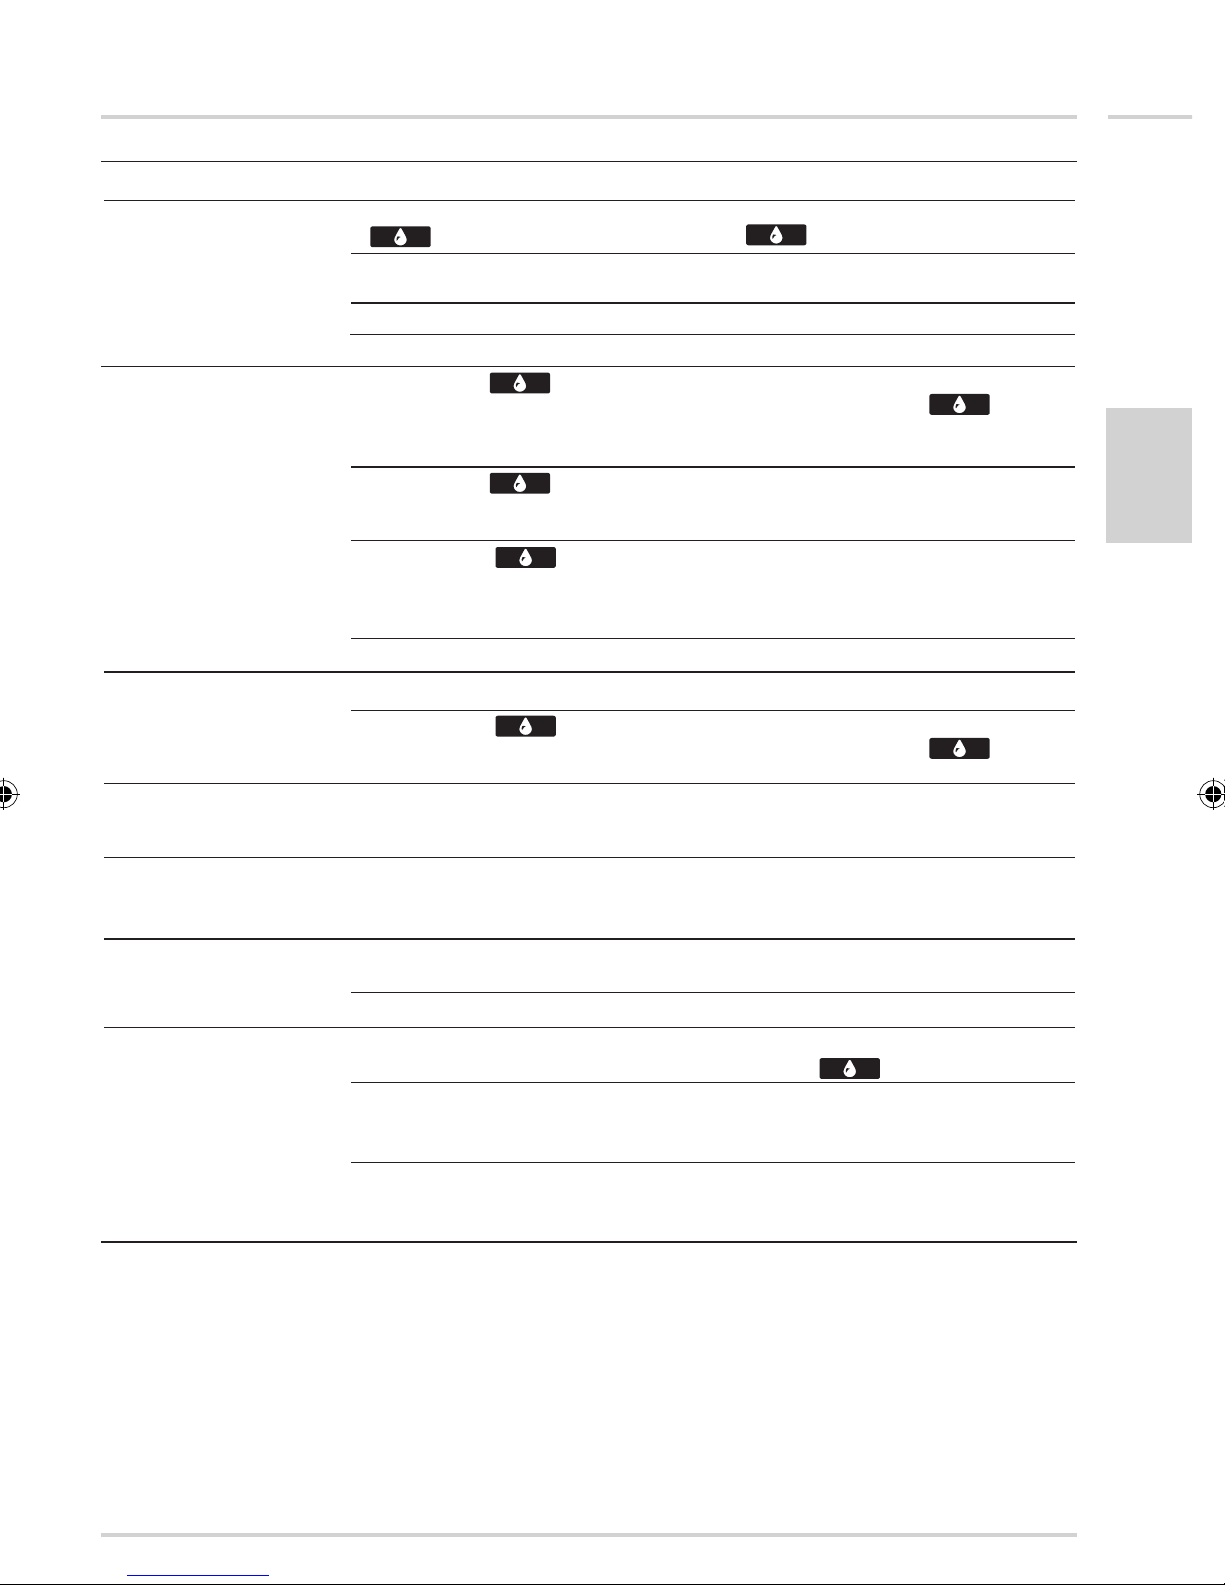
Troubleshooting guide
Problem Possible cause Remedy Page
No coffee/tea output or
insufficient output
No coffee/tea output
– Water tank empty, cleaning key
illuminated blue
– Capsule not (completely)
perforated
– Machine calcified – Decalcify the machine 16
– Defective pump – Contact the service centre
– Cleaning key
water tank empty or wrongly
inserted
stays blue;
– Fill water tank and press cleaning
key
– Use a new capsule, if it happens
again contact the service centre
– Fill and correctly insert water
tank, press cleaning key
7, 9
7, 9
19
– Cleaning key
blue despite a full and correctly
installed water tank
– Cleaning key
– Defective pump – Contact the service centre
Pump sounds very loud – Water tank empty – Fill the water tank 9
– Cleaning key
water tank empty or wrongly
inserted
Water drips continuously
out of the dispensing
head
Occasional drops drip
out of the dispensing
head
Coffee/tea tastes sour – Machine not flushed out enough
No water sucked in after
filling the empty water
tank
– Machine calcified – Decalcify the machine 16
– Empty capsules have remained
in the boiler unit
after decalcifying
– Coffee «good until» date expired – Use a new capsule
– Capsule stuck in brewing unit – Eject capsule and press the
– No capsule in brewing unit – After 30 minutes try again without
lights up in
stays red
stays blue;
– Decalcify the machine 16
– Electronics or temperature error;
Switch machine off, and on again
after half an hour. If error is not
corrected, contact service centre
– Fill and correctly insert water
tank, press cleaning key
– Occasional drops are normal, it is
not a defect
– Eject the capsule
– Flush out the machine again 11
cleaning key
a capsule; if water is sucked in,
decalcify
– After 30 minutes try again without
a capsule; if no water is sucked
in, contact your service agent
18
7, 9
11
7, 16
English
Page 21
20
English
Final disposal
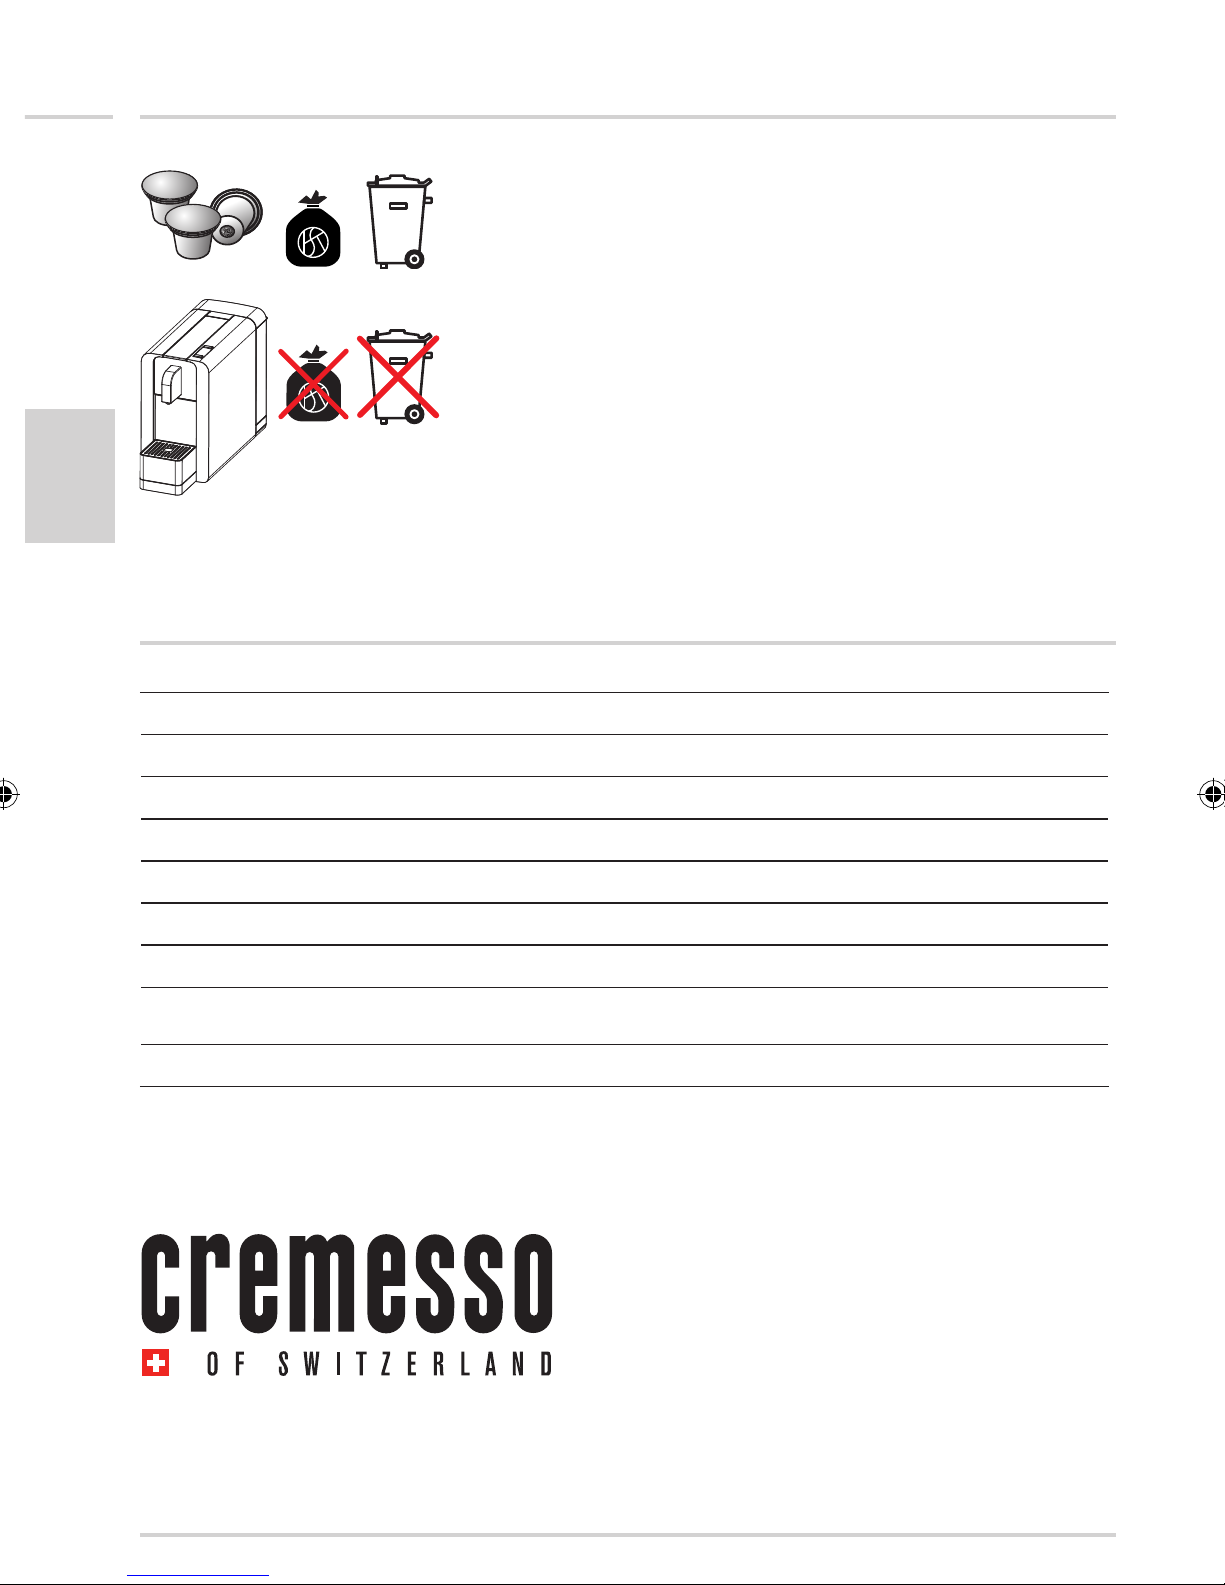
− cremesso coffee and tea capsules can be disposed of with normal
household waste
− Worn-out machines should be returned to your dealer for professional
disposal free of charge
− Machines with dangerous defects must be disposed of immediately to
make sure that they can no longer be used
− For environment protection reasons, never dispose of old or defective
machines with household garbage (protection of the environment!)
Technical data
Rated voltage 220 Volt / 60 Hz
Rated power 1310 Watt
Energy saving mode 0.3 Watt
Basic machine dimensions ca. 140 x 360 x 255 mm (width x depth x height)
Weight (without water) circa. 3.8 kg
Water tank capacity max. 1 L
Materials casing / water tank plastic
Radio interference
suppression
Compliance
Design or execution changes are reserved in the interest of technical progress.
according to EU standards
CE / GS / KC / PCT / RoHS / WEEE
www.cremesso.com
 Loading...