

Cree CR6-625L-27K-12-GU24-FD, CR6-625L-27K-12-E26-FD User Manual

CR6 Series
CR6-625L-27K-12-GU24-FD
CR6-625L-27K-12-E26-FD
IMPORTANT SAFEGUARDS
WARNING - Risk of Electric Shock. Disconnect power at fuse or circuit breaker before
installing or servicing.
READ AND FOLLOW ALL SAFETY INSTRUCTIONS
1. It may be necessary to remove a socket mounting plate for adequate clearance.
2. Each lampholder shall be installed only in its intended manner and orientation.
3. Not all existing recessed housings that meet these requirements will be
compatible with the CR6. To ensure compatibility, a test installation should be
conducted.
4. Suitable for Wet Locations.
5. Do not make or alter any open holes in an enclosure of wiring or electrical
components during kit installation.
6. LED Retrot Kit installation requires knowledge of luminaires electrical systems.
If not qualied, do not attempt installation. Contact a qualied electrician.
7. Min. temperature rating of 0°F or -18 °C.
1
Minimum distance
between edge of
fixture and top of
housing or other
obstruction.
SAVE THESE INSTRUCTIONS FOR FUTURE REFERENCE
RECESSED HOUSING COMPATIBILITY
•The CR6 LED Downlight is designed to install in standard 6” recessed
downlight housings.
• For a list of compatible housings, visit www.cree.com/lighting.
• Compatible with most dimmers when used with multiple CR6 Downlight fixtures. Consult www.cree.com/lighting for a compatibility
chart.
• Compatibility of housings not on this list may be determined by measurement of the housing as detailed in the drawing above. (Figure 1).
INSTALLATION INSTRUCTIONS
6.5”
5 3/4”-6 1/2”
Diameter Range
TO I N S TA L L :
1 of 2
2
3
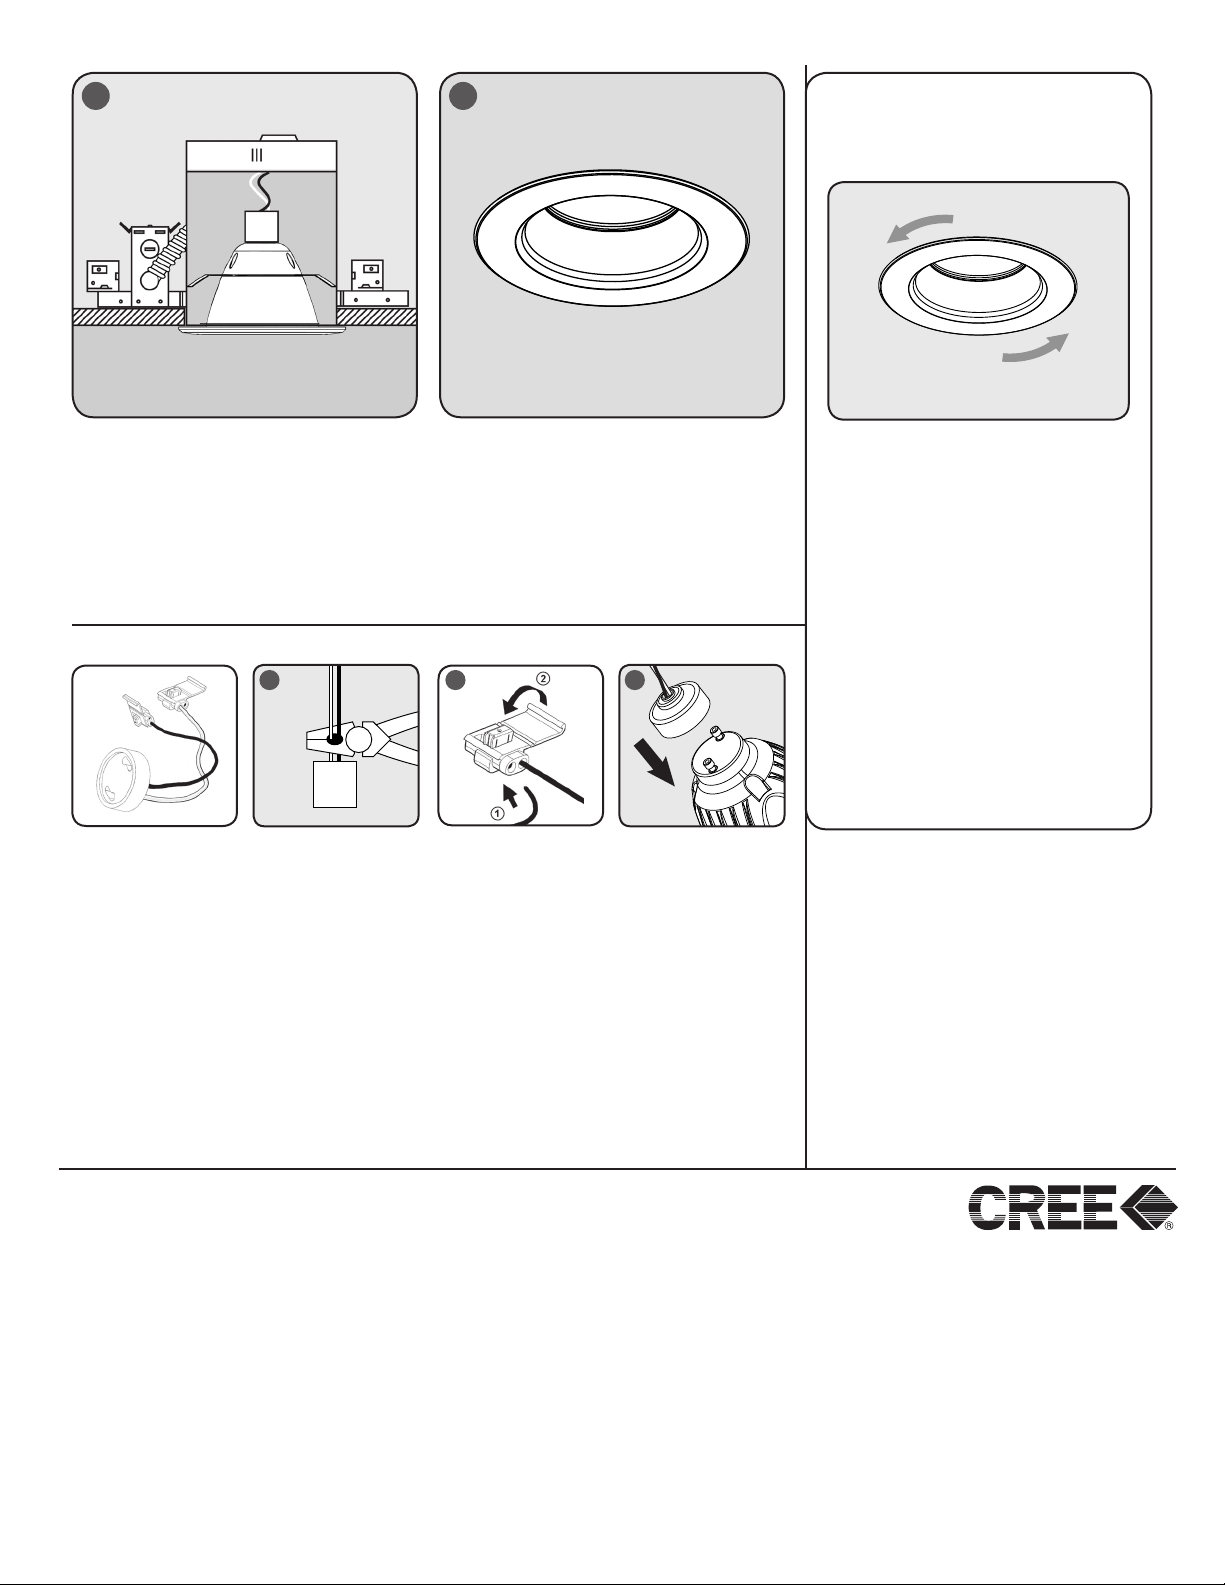
STEP 1:
Remove CR6 fixture from the packaging and
rotate the “Flip Clips” clockwise until the
clips are oriented directly away from the fixture. This position is the “installation ready”
position. See Figure 2.
STEP 2:
Make sure the POWER IS TURNED OFF at
the source to the recessed housing(s) that
you are installing the fixture(s) in.
STEP 3:
Once power has been turned off, remove
existing trim and bulb, revealing the existing
socket.
STEP 4:
Locate the socket in your existing recessed
housing and remove any screws that prevent
4
5
the socket bracket from being removed. See
Figure 3.
STEP 5:
Pull socket assembly, including the bracket,
as low as possible given the existing wire
length available. (May require socket plate
removal) Remove any excess bracketry from
socket. Care should be taken not to damage
wiring during this process. See Figure 4.
WARNING: To prevent wiring damage or
abrasion, DO NOT expose wiring to edges of
sheet metal or other sharp objects
STEP 6:
Once you have removed the excess
bracketry from the socket, you are now
ready to install the CR6 fixture. See Figure
5.
LPN000158_E
6 7
REMOVAL OF CR6 DOWNLIGHT
NOTE: Make sure power to fixture is
disconnected before attempting to remove
CR6 Downlight module from fixture.
STEP 7:
If the existing socket is a GU24-style
socket, or if you are converting the existing
socket from an edison-style socket to a
GU24-style socket, proceed to Step A
under “GU24 Installation” below. (GU24
adapter only included with CR6-GU24
models.)
STEP 8:
Attach CR6 Downlight to recessed housing
socket. Screw CR6 Downlight into the
socket by turning clockwise. See Figure 6.
STEP 9:
Slide CR6 Downlight with clips, in fullydeployed position, up into the recessed
housing firmly until trim ring is flush with
ceiling. See Figure 7.
GU24 INSTALLATION (WHERE REQUIRED)
C1 D G
GU-24 Socket Whip (Provided wit h GU24 units only to convert existing e dison socket fixtures to G U24)
STEP A: Remove GU-24 connector cable
from box.
STEP B: Follow steps 1-6 of “INSTALLATION INSTRUCTIONS” shown on page 1 .
STEP C: If the recessed housing is provided
with a GU24-style socket, Skip to Step G.
STEP C1: To assemble included GU24 whip
(shown above) cut wires on back side
of socket. No stripping is required from
remaining leads.
STEP D: Insert the input wires into the
Insulation Displacement Connectors
provided on the GU-24 Socket whip and
clamp down on the metal u-connector until
flush with the top of the plastic insulator.
STEP E: Close plastic hinged cover and
snap lock.
STEP F: Place “Original Luminaire
Modification Marking” label inside recessed
housing adjacent to existing relamp label.
STEP G: Attach GU24 socket to the CR6 by
inserting pins into the socket and twisting
socket clockwise until locked.
STEP H: Continue to Step 9 shown above.
STEP 1:
To remove CR6 Downlight module,
grip firmly on the trim ring and rotate
1/4 turn counterclockwise to unlock
clips from recessed can.
STEP 2:
Continue to turn counterclockwise
as you pull downward on the CR6
Downlight. This will disengage the
clips allowing the CR6 to pull free.
STEP 3:
Detach CR6 Downlight from recessed
housing socket.
NOTE: This device is not intended
for use with emergency exit fixtures
or emergency exit lights.
In compliance with CA Prop 65, Cree provides the following statement due to the customary
electronics components used in this product. WARNING: This product contains a chemical
known to t he state of California to cause cancer, birth defects or other reproductive harm.
www.cree.com/lighting
Limited Warranty: Cree warrants to the original purchaser (the “Buyer”) of the Cree® CR Series downlight purchased (the “Product”), that the Product will be free from material defects in workmanship and materials under normal use and service and conform
to Cree’s written specications. This limited warranty extends for a period of ve (5) years from the date of original purchase of the Product (the “Warranty Period”). There is NO WARRANTY in cases of damage to the Product in transit or damage caused by
your negligence; abuse; abnormal usage; misuse; accidents; damage due to environmental, corrosive or natural elements; improper power supply; failure to follow Cree’s instructions or applicable electrical codes; improper installation, storage or maintenance;
damage due to acts of God; re; vandalism; civil disturbances; power surges; alteration; mishandling; and incorrectly or improperly performing maintenance or repair by someone other than Cree or its authorized service provider. Remedy: If the Product proves
defective during the Warranty Period and the Product return procedures set forth below are followed, Cree will in its sole discretion, as its sole and exclusive obligation under this warranty, refund you the purchase price of the Product, repair the Product or replace
the Product without charge, F.O.B. Cree’s designated facility. Proof of original purchase date (e.g., sales receipt or original invoice) is required for this limited warranty to apply. CREE SHALL NOT BE LIABLE TO BUYER, OR TO ANYONE CLAIMING UNDER
BUYER, FOR ANY OTHER OBLIGATIONS OR LIABILITIES, INCLUDING, BUT NOT LIMITED TO, OBLIGATIONS OR LIABILITIES ARISING OUT OF BREACH OF CONTRACT OR WARRANTY, NEGLIGENCE OR OTHER TORT OR ANY THEORY OF
STRICT LIABILITY, WITH RESPECT TO THE PRODUCTS OR CREE’S ACTS OR OMISSIONS OR OTHERWISE. This limited warranty does not cover the cost of eld labor or expenses related to the repair or replacement of the Product. Cree reserves the
right to utilize new, reconditioned, refurbished, repaired or remanufactured products or parts in the warranty repair or replacement process. Such products and parts will be comparable in function and performance to an original product or part, as determined
by Cree in its sole discretion, and warranted for the remainder of the original warranty period. This limited warranty applies only to a Product purchased within the United States (including the lower 48 states, the District of Columbia, Hawaii, Alaska, Puerto Rico
and the U.S. Virgin Islands, but excluding APO/FPO addresses that are outside of those named jurisdictions) (collectively, the “Territory”). Replacement and repaired Product or parts will only be shipped to addresses within the Territory, and refunds will only be
credited to accounts located within the Territory. Making a Warranty Claim: Notice of any warranty claim should be sent to Cree at the following address: 9201 Washington Avenue, Racine, WI 53406 or you may call Cree at (800) 236-6800 to receive a RGA#
and instructions for return of the Product, freight prepaid. Further Limitations: TO THE EXTENT PERMITTED BY LAW, THE LIMITED WARRANTY AND REMEDIES SET FORTH ABOVE ARE EXCLUSIVE AND IN LIEU OF ALL OTHER WARRANTIES AND
REMEDIES (INCLUDING WITHOUT LIMITATION, ANY IMPLIED WARRANTIES OF MERCHANTABILITY OR FITNESS FOR A PARTICULAR PURPOSE). IF WE CANNOT LAWFULLY DISCLAIM STATUTORY OR IMPLIED WARRANTIES, THEN TO THE
EXTENT PERMITTED BY LAW, ALL SUCH WARRANTIES WILL BE LIMITED IN DURATION TO THE DURATION OF THIS EXPRESS LIMITED WARRANTY AND TO REFUND, REPAIR OR REPLACEMENT SERVICE AS DETERMINED BY CREE IN ITS
SOLE DISCRETION. Some states do not allow limitations on how long an implied warranty lasts, so the above limitation may not apply to you. IN NO EVENT SHALL CREE BE LIABLE FOR INCIDENTAL, COMPENSATORY, CONSEQUENTIAL, INDIRECT,
SPECIAL OR OTHER DAMAGES. CREE’S AGGREGATE LIABILITY WITH RESPECT TO A DEFECTIVE PRODUCT SHALL BE LIMITED TO THE MONIES PAID TO CREE FOR THAT DEFECTIVE PRODUCT. Some states do not allow the exclusion or limitation of incidental or consequential damages, so the above limitation or exclusion may not apply to you. This limited warranty gives Buyer specic legal rights, and Buyer may also have other rights which vary from state to state. Effective Date: January 1, 2013
2 of 2
LPN000158_E
 Loading...