

Page 1

COOKER HOOD
USER HANDBOOK FOR
INSTALLATION AND OPERATION
MODEL CRN40
Page 2

Using your new Cooker Hood is very simple. Nevertheless,to get the best results it is
important that you read this handbook thoroughly before installing and using your
appliance for the first time.
Electrical Requirements
Any permanent electrical installation must comply with the latest I.E.E.Regulations and
local electricity company regulations. For your own safety,this should be undertaken by a
qualified electrician eg.your local electricity company or a contractor who is on the roll of
the National Inspection Council for Electrical Installation Contracting (NICEIC).
Please ensure that when the appliance is installed it is easily accessible for the engineer
in the event of a breakdown.
INCORRECT INSTALLATION COULD AFFECT THE SAFETY OF THE APPLIANCE
If the Cooker Hood is permanently wired in,it must be via a suitable double pole isolating
switch placed in a readily accessible position adjacent to the unit.
Electrical Connection
Before connecting to the mains supply ensure that the mains voltage corresponds to the
voltage on the rating plate,inside the Cooker Hood.
WARNING: THIS APPLIANCE MUST NO
T BE EARTHED!
It is fitted with a 2 core mains supply cable and must be permanently connected to the
electricity supply via a double pole switch having 3mm minimum contact gap on each
pole. A Switched Fuse Connection Unit to BS 1363 Part 4,is a recommended mains supply
connection accessory to ensure compliance with the Safety Requirements applicable to
fixed wiring instructions.
DISCONNECT THE COOKER HOOD FROM THE MAINS SUPPLY BEFORE CARRYING OUT ANY
KIND OF MAINTENANCE OR CLEANING.
WARNING:
CHILDREN SHOULD NOT BE ALLOWED TO PLAY WITH THE APPLIANCE OR TAMPER WITH
THE CONTROLS.
CE marking certifies that this appliance conforms to the following EEC directives:Low Voltage Equipment - 72/23/EEC
Electromagnetic Compatibility - 89/336/EEC
2
Your new Cooker Hood
Page 3

3
Contents
Page
Electrical Requirements 2
Get to know your Cooker Hood 4
Installing your Cooker Hood 5-9
Installation for Recirculation
Installation for Extraction
Mounting Height
Mounting between Cabinets
Fitting the Decor Panel
Operating your Cooker Hood 10
The Controls
Do’s and Don’ts
Caring for your Cooker Hood 11-12
Filters and their Replacement
Cleaning
How to Replace the Light
Troubleshooting 13
Key Contacts Back Cover
Appliance manufactured in EU.
Retention of the Instruction Book
This Instruction Book must be kept handy for reference as it contains important details on the
safe and proper use of the appliance.
If you sell or pass the appliance to someone else,or move house and leave it behind,make sure
this Book is also provided so the new owner can become familiar with the appliance and safety
warnings.
If the book is lost or damaged a copy may be obtained from:
GDA Ltd.,Morley Way,Peterborough,PE2 9JB
Page 4
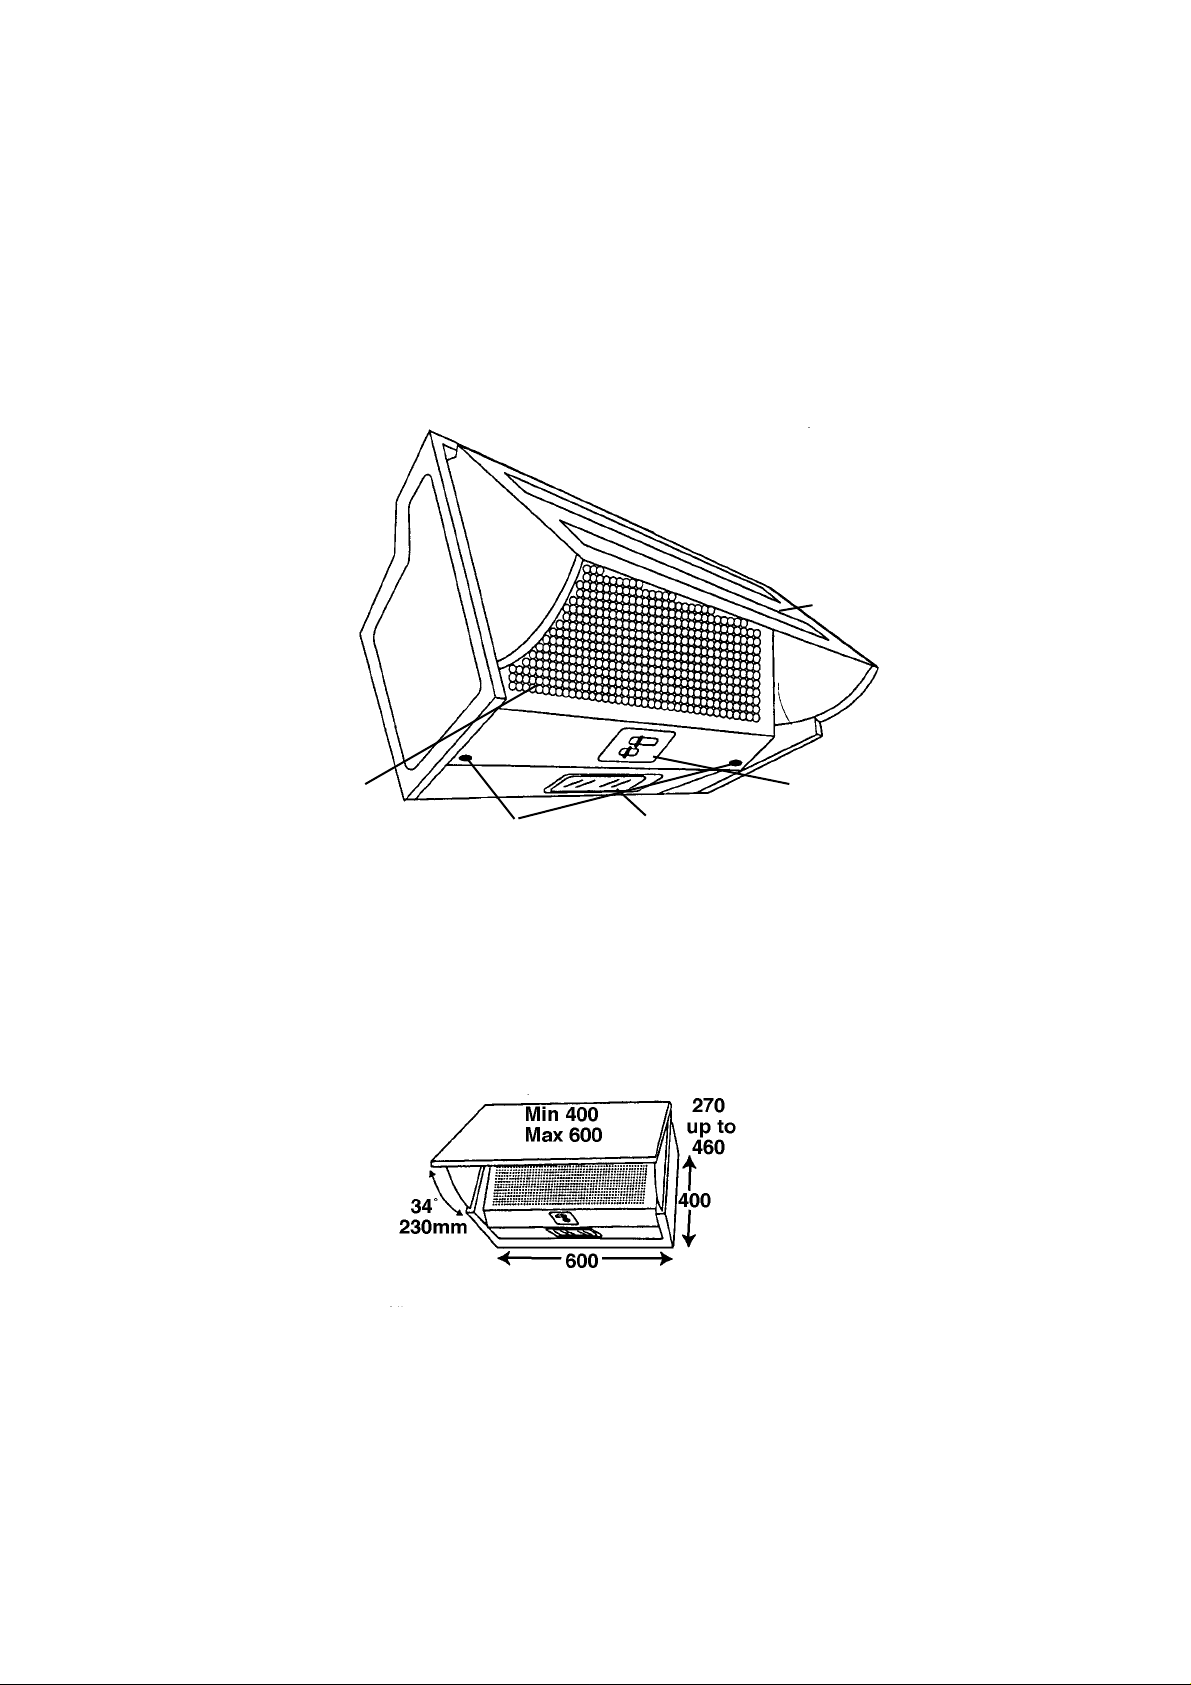
Get to know your Cooker Hood.
4
Unpacking
Before installation,ensure that you have removed all packing pieces.
Dimensions
Height 400mm (15
3
/4in)
Width 600mm (235/8in)
Depth adjustable from:270mm (105/8in) up to 460mm (18in),
excluding the decor panel thickness.
Filter Grille
All measurements are in millimetres.
Light
Controls
Door support
Fitted Door
(not supplied
Grille release
Page 5
Installing your Cooker Hood
5
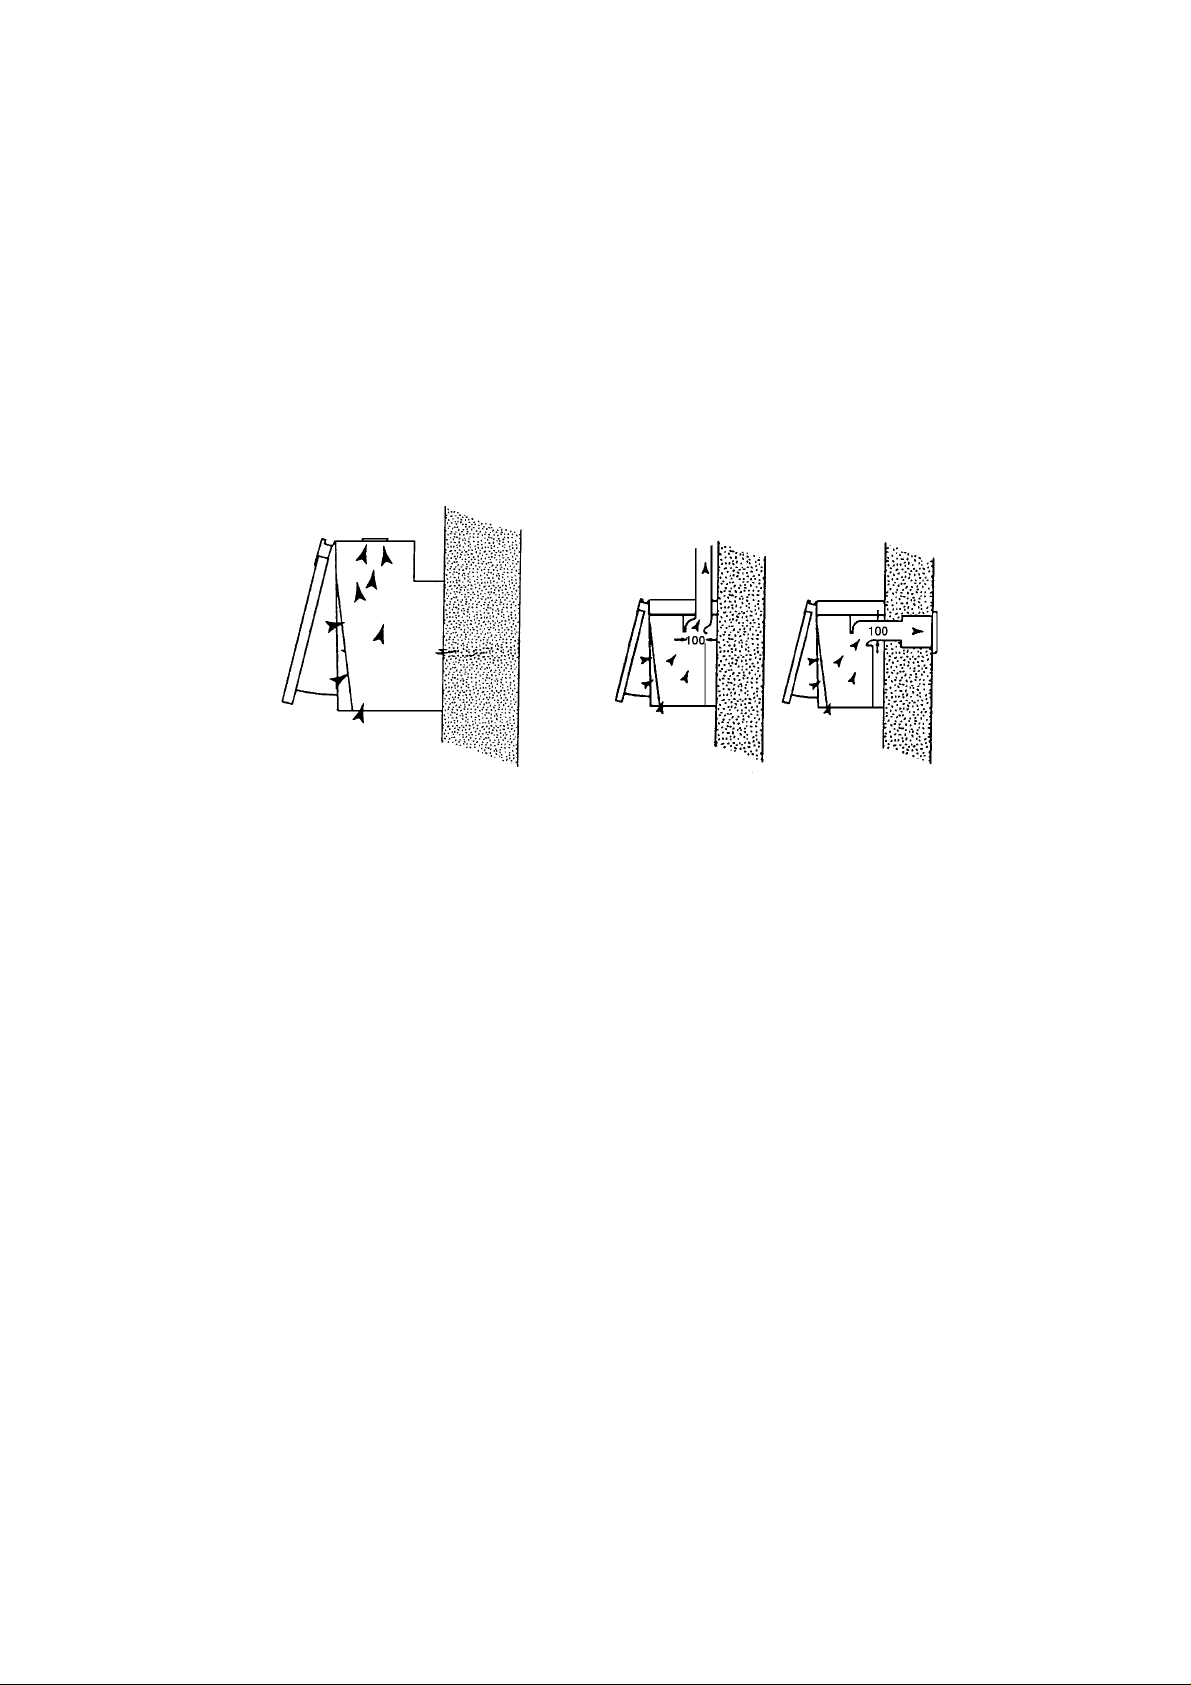
Your new Cooker Hood can be installed either
for recirculation or extraction through an
outside wall. (All fitting supplied)
Installation for Recirculation:
If it is not possible to exhaust to the outside,
the hood can be used to filter and recirculate
the air (Fig.1).
Your hood can be fitted with a carbon filter
(optional extra) to remove odours (for fitting,
see page 11).
To check that the Cooker Hood is set up for
recirculation,open the grill panel and make
sure that the conversion lever is in the
recirculation position. The carbon (charcoal)
filter can then be fitted.
NOTE: The hood is more efficient in the
exhaust mode,therefore this position
should be selected during the warmer
months of the year when no heating is
being used. When the room is being
heated,if the recirculation position is
selected heat will not be wasted.
To obtain the best performance it is
advisable to switch on the hood a few
minutes before you start cooking and leave
it running approximately 15 minutes after
finishing.
Installation for Extraction:
This method is recommended if at all possible.
Fumes and grease laden air are drawn into the
underside of the hood and expelled outside
the kitchen. The air can be expelled either
upwards through a ventilating shaft (Fig.2) or
directly through a wall to the outside (Fig.3).
Ducting will be required if the Cooker Hood is
mounted away from the outside vent.
IMPORTANT: The exhaust air must not be
expelled through a smoke or waste-gas
chimney which is in use or through a shaft
used for ventilating rooms or into the
cavity of a cavity wall.
If the room contains a flued fuel burning
appliance,such as a gas or oil fired central
heating boiler, which is not of the ‘Balanced
Flue’type,you should make sure that there
is adequate air inlet into the room at all
times so that fumes from the boiler are not
drawn back into the room by the Cooker
Hood.
NOTE: All installations must comply with
local authorities and building regulation
requirements for the discharge of exhaust
air into the atmosphere.
Fig.1
Fig.2
Fig.3
Page 6

Installing your Cooker Hood
6
Top or Rear Extraction
Connect the ducting material onto the flange:
blank off the aperture which is not required.
The charcoal filter is not required when the
hood is installed in the ducting cycle.
To remove the grille turn the locks (Fig.5 B)
and pull the grille out and downwards.
Ducting:
In order to obtain satisfactory air extraction,
long ducts should not be used. Exhaust pipes
with as smooth an inner wall as possible are
recommended. The ducting MUST be
manufactured from a fire retardant material.
Wall Vent Kit:
For connecting the Hood either directly
through a wall or in conjunction with a
ducting pipe, we recommend the use of a
Wall Vent Kit. A 3m extension pipe is also
available. These may be obtained from your
nearest retailer or the Genuine Parts and
Accessories Mail Order Hotline (see back
cover) and must be used where there is a
cavity wall. Specific installation instructions
are included with the Wall Vent Kit.
NOTE:The Wall Vent Kit has a diameter of
100mm.
Fig.4
Fig.5
Page 7

Installing your Cooker Hood
7
MOUNTING
Your Cooker Hood is designed to fit between
two wall cupboards 600mm apart and to take
a door panel measuring 400mm (min) to
600mm (max) in height,to match the adjacent
cupboards,
Mounting Height:
The bottom of the hood should be no less
than 650mm above an electric hob,
750mm above a gas hob or mixed fuel cooker,
400-450mm above a high level grill/top oven.
For the best results,the hood should be
mounted as near as possible to the minimum
recommended height.
WARNING: The fan motor of this appliance
incorporates a thermal cut-out device
which will operate if the hood is installed
below the minimum recommended heights
listed above,or if the motor becomes overheated. If the cut-out device is activated,
switch off the fan motor and allow the
hood to cool.
The cut-out device will reset itself when the
fan motor has cooled significantly.
NOTE: This hood has been designed and
approved for installation over an electric
hob with a maximum input of 7kW or a gas
hob with a maximum input of 10kW when
fitted in accordance with the heights
recommended above.
Mounting between cabinets on the Wall:
The hood may be fixed to any rigid vertical
surface. If the hood can only be fixed to a
hollow construction plaster or partition board
structure,then the wall must be sufficiently
reinforced to enable the hood to be fixed
securely in position.
Ensure that the cupboard is securely fixed to
the wall,then proceed as follows:
Place the template provided on the wall
between the cupboards and drill the holes
indicated.
Place the wall plugs provided into the drilled
holes (Fig.6).
In cases where the wall plugs provided are
not suitable for the type of wall ie.plaster
board or cavity,appropriate fittings should be
obtained.
Adjust the position of the upper brackets
(Fig.7 B). Fit the hood to the hooks by means
of the two brackets B. Ensure that the hood is
at the right height,the height of the hood can
be adjusted with the help of the screws
(Fig.7 S).
The hood can be fitted to the cupboards as
detailed under the heading ‘Fitting the Hood
to the Cupboards’.
in the event that the side cupboards are
considered to be inadequate to support the
weight of the hood,the hood should be fixed
to the wall as well as to the side of the
cupboards.
Fig.6
Fig.7
Page 8

Installing your Cooker Hood
8
Fixing the Hood to the Cupboards:
Place the template on the side of the right
cupboard,so that the letter B aligns with the
front part of the cupboard (disregard the
thickness of the door) and drill two holes
2.5mm diameter at points B1 and B2 (Fig.8).
Place the same template on the side of the
left cupboard ensuring that side C aligns with
the front part of the cupboard (disregard the
thickness of the door) and drill two holes
2.5mm diameter at the point C1 and C2
(Fig.9).
Fit the hood to the cupboard by means of the
screws (Fig.10 E).
Replace the visor with decor panel,inserting it
first in the upper slides and then in the lower
slides. Turn the rear locking knobs anti-clockwise until it stops and then mount the grille
by lifting it up - pushing inwards and turn the
locks to secure.
Once the Hood has been fixed,if the cupboards are deeper than the hood,mount
spacer (Fig.11 S) and secure it with the two
screws Fig.11 T) 3.5 x 13 and washers on
the back of the hood.
The spacer is reversible to cover a gap from 1
to 4cm.
Fig.8
Fig.11
Fig.10
Fig.9
Page 9

Installing your Cooker Hood
9
Fitting the Decor Panel:
The hood is designed to be fully integrated
into the kitchen by fitting a decor panel onto
the visor to match the adjoining kitchen
cabinets.
To fit the decor panel remove the complete
visor assembly from the hood.
First open grille (Fig.12 A) turning the locks
(Fig.12 B).
Remove the visor by first turning the two
locking knobs (Fig.13) in clockwise direction.
Place the template supplied on the rear side
of the decor panel,ensuring that the arrow
aligns the upper edge of the panel (Fig.14).
Drill the holes where indicated on the template and fit the door to the decor panel by
means of screws (Fig.15 D).
Fig.12
Fig.13
Fig.14
Fig.15
Page 10

Operating your Cooker Hood
Do’s and Don’ts
The Controls
10
DO
Do take extra care when frying.
Do keep the heating areas on your hob
covered over with pots and pans etc.
when using the hob or Cooker Hood
switch (especially if you are using a gas
hob).
Do make sure that there is an adequate air
inlet into the room if you are using the
hood to vent externally and have a boiler
or fire in the room,so that fumes are not
drawn back from the flue.
DON’T
Don’t use the hood without the grease
filter.
Don’t leave a naked flame under the hood.
Don’t leave cooker/hob hotplates ‘On’
when not covered,as the fan motor
of this cooker hood incorporates a
thermal cut-out device which will
operate if the hood overheats. The
fan motor will take approximately 20
minutes to automatically reset at
which point the hood will resume
normal functions.
NEVER do flambé cooking beneath this
cooker hood.
NEVER leave frying pans or deep fat fryers
unattended during use,overheated
fat/oil may catch fire.
Make sure that the Cooker Hood is wired in
and the power supply is switched on.
The Cooker Hood functions are controlled by
two slide switches located on the right hand
side behind the visor.
Fan Speed
The top slider enables you to select the fan
speed.
Position 1,should be selec ted when
simmering or using only one pan.
Position 2 for normal cooking,up to four pans.
Position 3 when frying or cooking foods with
strong odours.
Work Top Illumination
The lower slider (ON/OFF) enables you to
switch on the work top illumination.
The concealed microswitch acts as an override
and will switch the Hood ‘OFF’when the visor
panel is closed. When the visor panel is
opened the hood will resume working at its
previous setting.
To obtain the best performance, it is advisable
to switch on the hood a few minutes before
you start cooking and leave it running for
approximately 15 minutes after finishing.
Page 11

Caring for your Cooker Hood
11
Before doing any cleaning or replacing the filters or light bulb,always ensure that the electricity supply to the Cooker Hood is switched
‘OFF’.
Filters and their replacement:
THE GREASE FILTER -
Your Cooker Hood is fitted with a grease filter
which absorbs grease,dust etc.and helps to
keep the appliance clean inside. Gradually the
filter will become saturated with grease.
When this happens the grease filter must be
replaced,usually about every two months
depending on use.
IMPORTANT:There could be a possible fire
hazard if the grease filter is not replaced
when necessary and according to these
instructions.
Replacement grease filters are available from
your nearest retailer or our Genuine Parts and
Accessories Mail Order Hotline (see back
cover).
REPLACING THE GREASE FILTER -
1. Pull the visor out as far as it will go.
2. Remove the filter grille by releasing the
two slider catches at each side of the grille.
3. Push the clips to one side and remove.
4. Remove the saturated grease filter when
the stripes become visible through the
grille.
5. Place the new grease filter in the filter
grille.
6. Replace the retaining clips. Refit the grille
panel into the hood.
THE CARBON FILTER (Recirculation only)
The activated carbon filter absorbs odours
arising from the cooking. In use,the filter will
slowly become saturated and gradually less
effective. The filter will normally require
changing every six months,depending on the
amount and type of cooking you have done.
TO FIT THE CARBON FILTERS The deflector
(Fig.17 N) should be
fitted over the hole,
fixing it with the
special screw
provided. The
deflector should be
fixed to ensure the
air flow is away from
the wall to avoid
dirtying or marking
the rear wall .
Place the new carbon filter, ensuring that
points Q and R align (Fig.18). To lock the filter
turn in the direction of the arrow (Fig.18 S).
The Hood must not be connected to ducting
when in the recirculating mode.
Regular replacement of the charcoal filter will
ensure optimum performance from the hood
when recirculating.
TO REPLACE THE CARBON FILTER Remove the grille by turning the locks and
pull the grille out and downwards.
Remove the saturated carbon filter by rotating
it in an anti-clockwise direction (Fig.19) and
replace it with a new one.
Fig.16
Fig.17
Fig.18
Fig.19
Page 12

Caring for your Cooker Hood
12
Cleaning:
The exterior of the Cooker Hood should be
cleaned regularly to keep it looking like new.
Wipe over with a soft cloth,wrung out in
warm water and dry with a clean soft cloth.
Wear protective gloves.
You can use mild non-abrasive cleaners but
always read the manufacturer’s instructions
first. Always test their suitability on a small
area of the Cooker Hood not noticeable in
normal use.
NOTE:DO NOT use scouring pads or
abrasive cleaners as they may scratch the
surface.
How to replace the light:
Should the light fail to work,switch ‘Off’ the
mains supply to the Hood.
Open the grille and check the bulb is screwed
securely into the bulb holder then switch ‘On’
at the mains supply and at the hood ‘ON/OFF’
control.
If the light fails to work do not worry,it will
not affect the working of your hood.
Obtain a replacement 40 watt SES Clear (E14)
bulb. Switch ‘Off’the mains supply. Unscrew
the old bulb anti-clockwise to remove and
replace with the new bulb turning clockwise
until secure. Refit the filter grille and switch
back ‘On’at the mains supply.
NOTE: When changing the bulb,an
identical replacement must be fitted to
ensure the safe operation of the hood.
Page 13

Troubleshooting.
13
First,don’t panic!
There may be nothing wrong at all.Look for
your problem below,then check the things we
suggest.More often than not,this will give you
the answer to your problem,and you’ll be able
to carry on without having to telephone your
Service Office.
It is not working!
Are you using a plug and socket?
- Check that the plug is firmly pushed in.
- Check the power supply,by plugging in
another appliance.
- Has the fuse blown?
It is not working!
Is the mains lead wired directly into a
double pole isolating switch?
- Check that the wires in the mains lead are
correctly connected.(See page 2)
The Cooker Hood is not working
satisfactorily...
- Check you have selected the correct fan
speed.(See page 10)
- Check you have left the cover over the
recirculation grille on top of the Hood
(extraction only),(See page 11).
- Check if the grease filter needs replacing
(See page 11).
The light is not working...
- Check the bulb is screwed in securely.
- Replace the light bulb (See page12)
The Cooker Hood switches off
intermittently...
- Check the mounting height above the
hob is correct (See page 7).
The heat from the hob may cause the fan
motor to overheat/cut-out.
If,after following these instructions,you are
still having problems,contact your nearest
Service Centre (See back cover).
Parts
Please remember your new appliance is a
complex piece of equipment.
‘DIY’repairs or unqualified and untrained
service people may put you in danger,could
damage the appliance and might mean that
you lose cover under the Guarantee.
If you do experience a problem with the
appliance,don’t take any risks,call in a Service
Engineer (See back cover).
Our Parts are designed exclusively to fit only
GDA Ltd appliances. Do not use them for any
other purpose as you may create a safety
hazard.
Page 14

14
Page 15

15
Page 16

Key Contacts
Service
Creda has the largest appliance manufacturer’s service team in Europe,trained
specialists directly employed by us to ensure your complete confidence.
Repair Service
UK:08709 066 066
Republic of Ireland:1850 302 200
You will be asked for the following information:-
Name,address and postcode.
Telephone number
Model / Serial number of the appliance
Clear and concise details of the query or fault
Place and Date of purchase
(Please keep the receipt as evidence will be required when the engineer calls).
Extended Warranty
To join:UK 08709 088 088
Republic of Ireland:1850 502 200
Genuine Parts & Accessories
Mail Order Hotline
UK:08709 077 077
Republic of Ireland:(01) 842 6836
For further product information
08701 54 64 74
All Creda Services are offered as an extra benefit and do not affect your statutory rights.
General Domestic Appliances Limited,Morley Way,Peterborough,PE2 9JB
Part No.FP078-01
 Loading...