

Page 1
Page 1
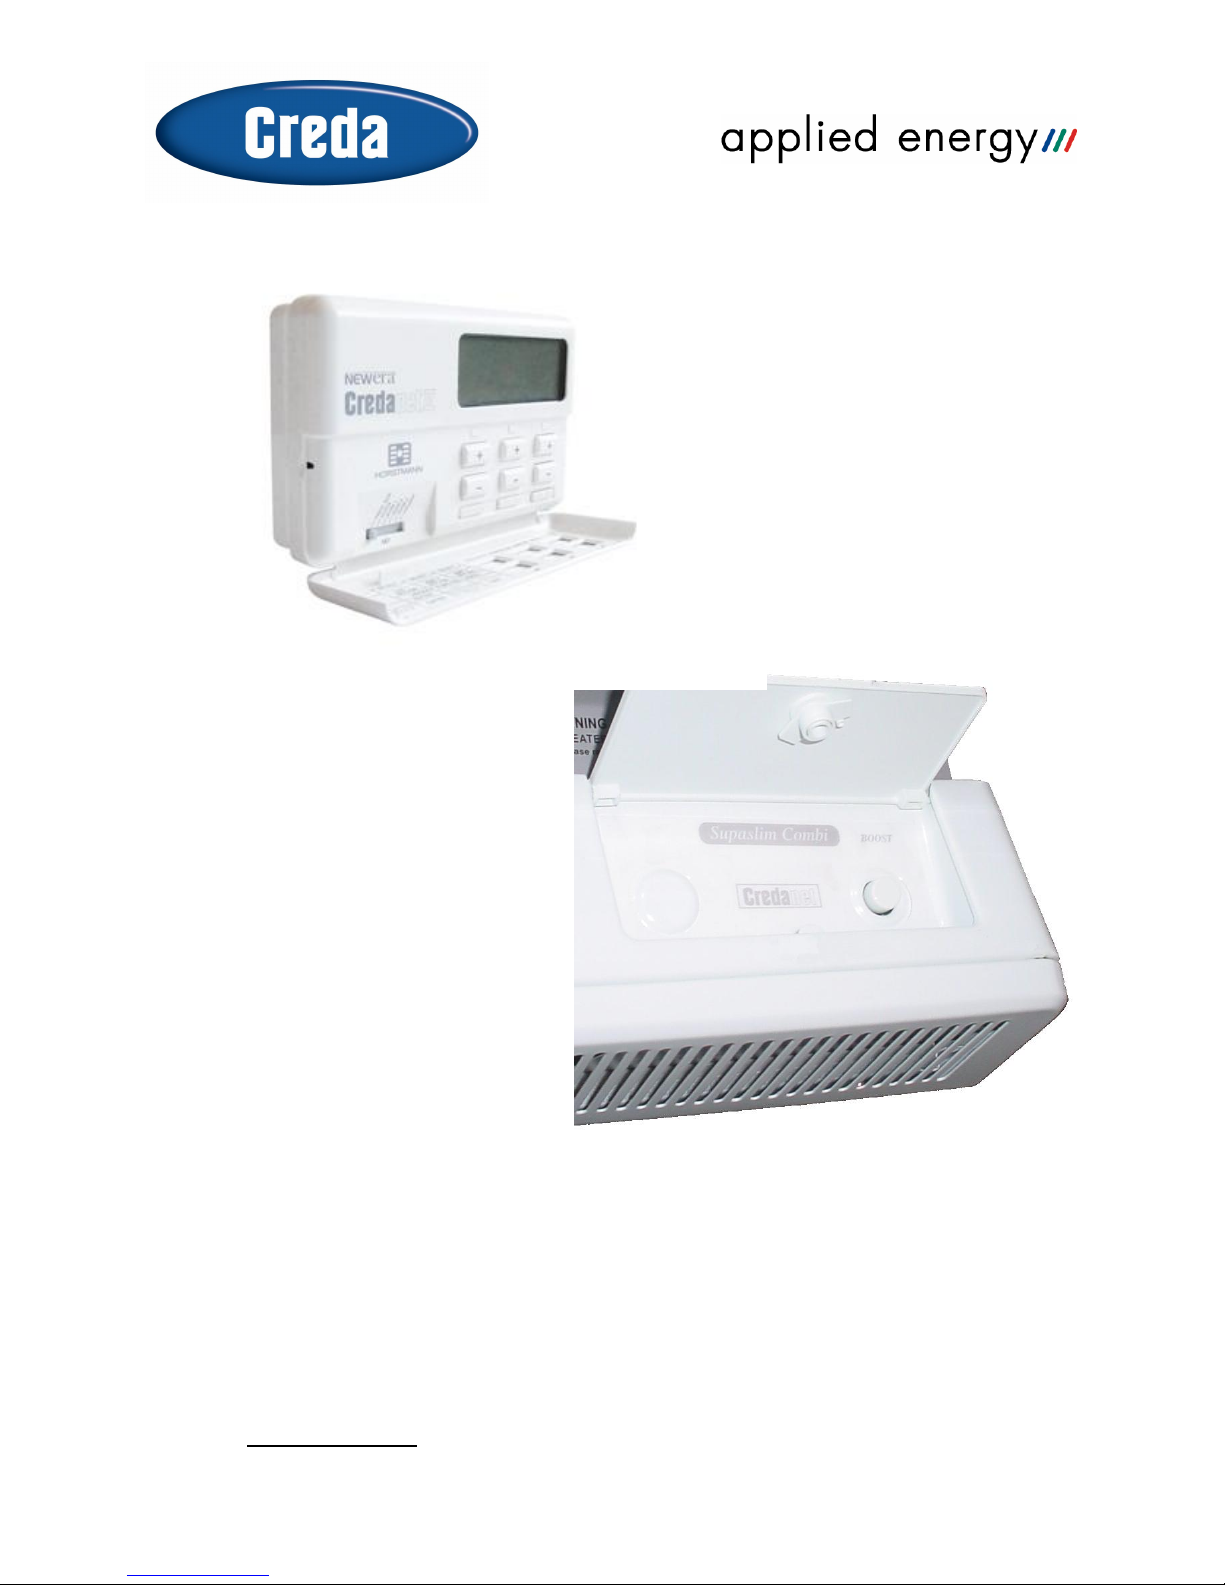
USER’S GUIDE
Controller
Heating System
Credanet II
This Handbook is for the User
Please leave this guide in the vicinity of the
Controller (for future reference).
Note to Installer : For the benefit of the customer please complete
• The Room Allocation Chart on Page 6 and
• Your contact details on Page 14.
Page 2

Page 2
Credanet II – A User’s Guide
Contents
1. Welcome to Credanet II ……………………………………... Page 3
a) Parts of the Credanet II controller
2. Getting Started ……………………………………………….. Page 4
a) Setting the day and time
b) Programme Run (Pre-set programme)
3. Planning your heating ……………………………………….. Page 5
a) Room Allocation Chart
b) Your Heating Plan
4. Changing the settings at the controller ……………………… Page 9
a) Programming Zone 1
b) Programming Zone 2 and 3
5. Useful features ………………………………………………… Page 11
a) What to do if I feel cold
• Boost the whole Zone, at the Controller
• Boost the room only, at the heater
b) What to do if I go away
c) Switching the heating off
d) Switching off an individual heater
e) Checking the settings without changing them
f) Returning the Controller to its original settings
6. Contact details ………………………………………………… Page 14
a) Sales Hotline
b) Creda Spares
c) Creda Technical Services
d) Brochure Hotline
e) Your electricity supplier
f) The Credanet II Installer
7. Guarantee …………………………………………………….. Page 15
Page 3
Page 3
1. Welcome to Credanet II
Before programming your requirements, this section will help you switch on your new Credanet II
system and begin to heat your home
• Your installer will have set your heating system so that the controller will run the heaters
connected to it according to a pre set profile of times and temperatures.
• A picture of a controller in its normal (Program Run) condition is shown below.
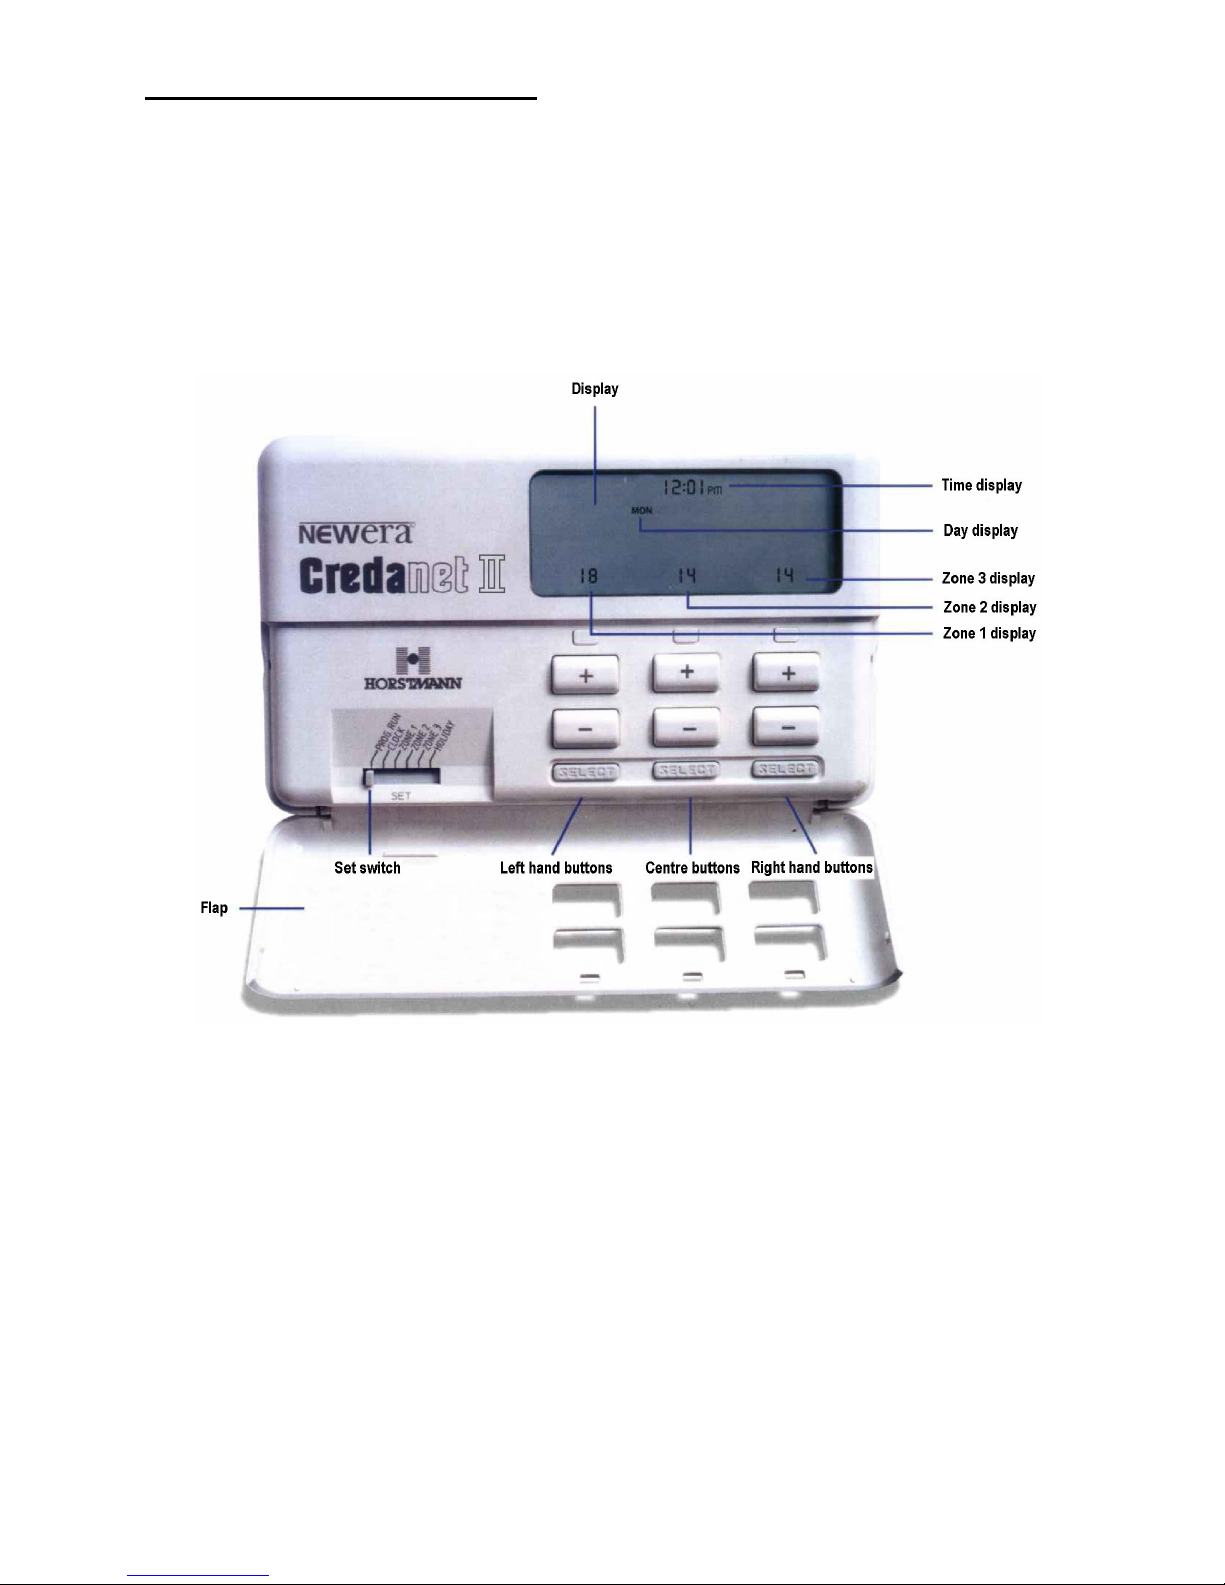
a) Parts of the Credanet II controller
• To get your heating system working without altering any of the time and temperature profiles the
Set switch is left in the “PROG. RUN” position.
• If the Clock needs adjusting see Page 4. (“Setting the day and time”)
IMPORTANT
• The power supply switches next to the heaters MUST be left ON at all times.
All the Credanet II heaters contain an electronic control circuit. The heating will not work properly if
any of the switches next to the heaters are switched off.
If no heating is required in a particular zone then the heaters can be switched of using the controller.
See Page 12 “Switching the heating off ”.
Page 4
Page 4
2. Getting Started
Your heating system has already been programmed with the heating requirements of a typical home.
Once the day and time are correct, your system will automatically start to operate.
NOTE : Please refer to Page 7 (Your Heating Plan) if the heating requirements need to be changed.
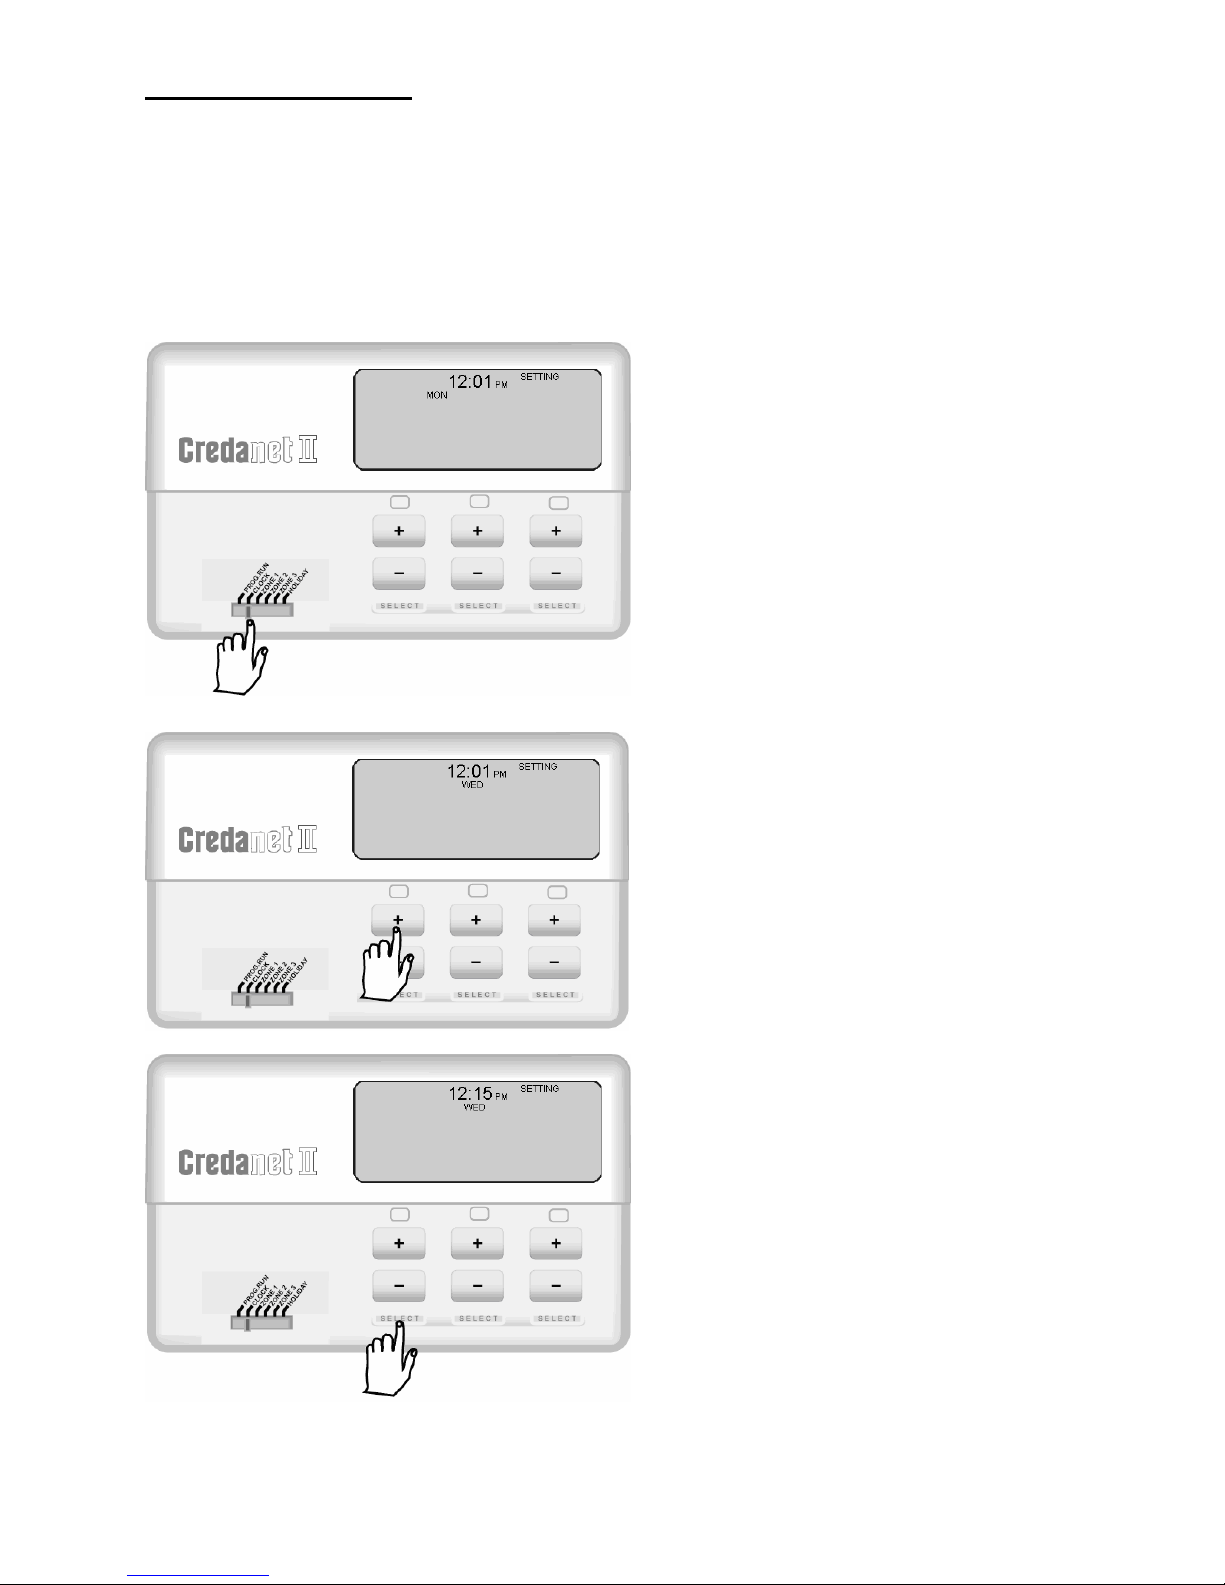
a) Setting the day and time (Refer to “Parts of the Credanet II controller” on Page 3)
Check in the display that the day and time are correctly set.
If not, open the pull down flap on the front of your Credanet II controller.
• Slide the SET switch to CLOCK
• The day will flash
• Use the left hand “+” and “ - ” buttons
to change the day
(e.g. Change from MON to WED)
• Press the left hand SELECT button
when the correct day is shown.
• The time will flash
• Now use the left hand “+” and “ - ”
buttons to change the time
(e.g. Change from 12:01 to 12:15)
Page 5
Page 5
b) Programme Run (Pre-set programme)
• When the Day and Time are correct : Slide the SET switch to PROG. RUN
Your Credanet II system is now ready to operate ~ simply close the flap and your heating will follow the
pre-set programme.
NOTE
If the word OFF appears in the display above any of the “+” or “ - ” buttons, you will need to open the
flap and press the SELECT button below them, before your system will operate. The word OFF will be
replaced by a number.
3. Planning your heating
Your installer will have programmed your Credanet II Controller so that the heating can be set to
different temperatures in different parts of the house. This section explains how to alter these to suit
your individual needs.
a) Room Allocation Chart
• The heating in your property is sorted into zones.
• Each zone, and all the heaters in that zone, can be set to its own temperature and timings.
Example showing Zones within a property :
This Controller has been programmed
with three zones. (Zone 1 downstairs
and Zones 2 and 3 upstairs).
A zone is a group of one or more rooms
with one or more heaters.
A Credanet II installation can be
programmed with one, two or three
zones.
ZONE 1
ZONE 2
ZONE 3
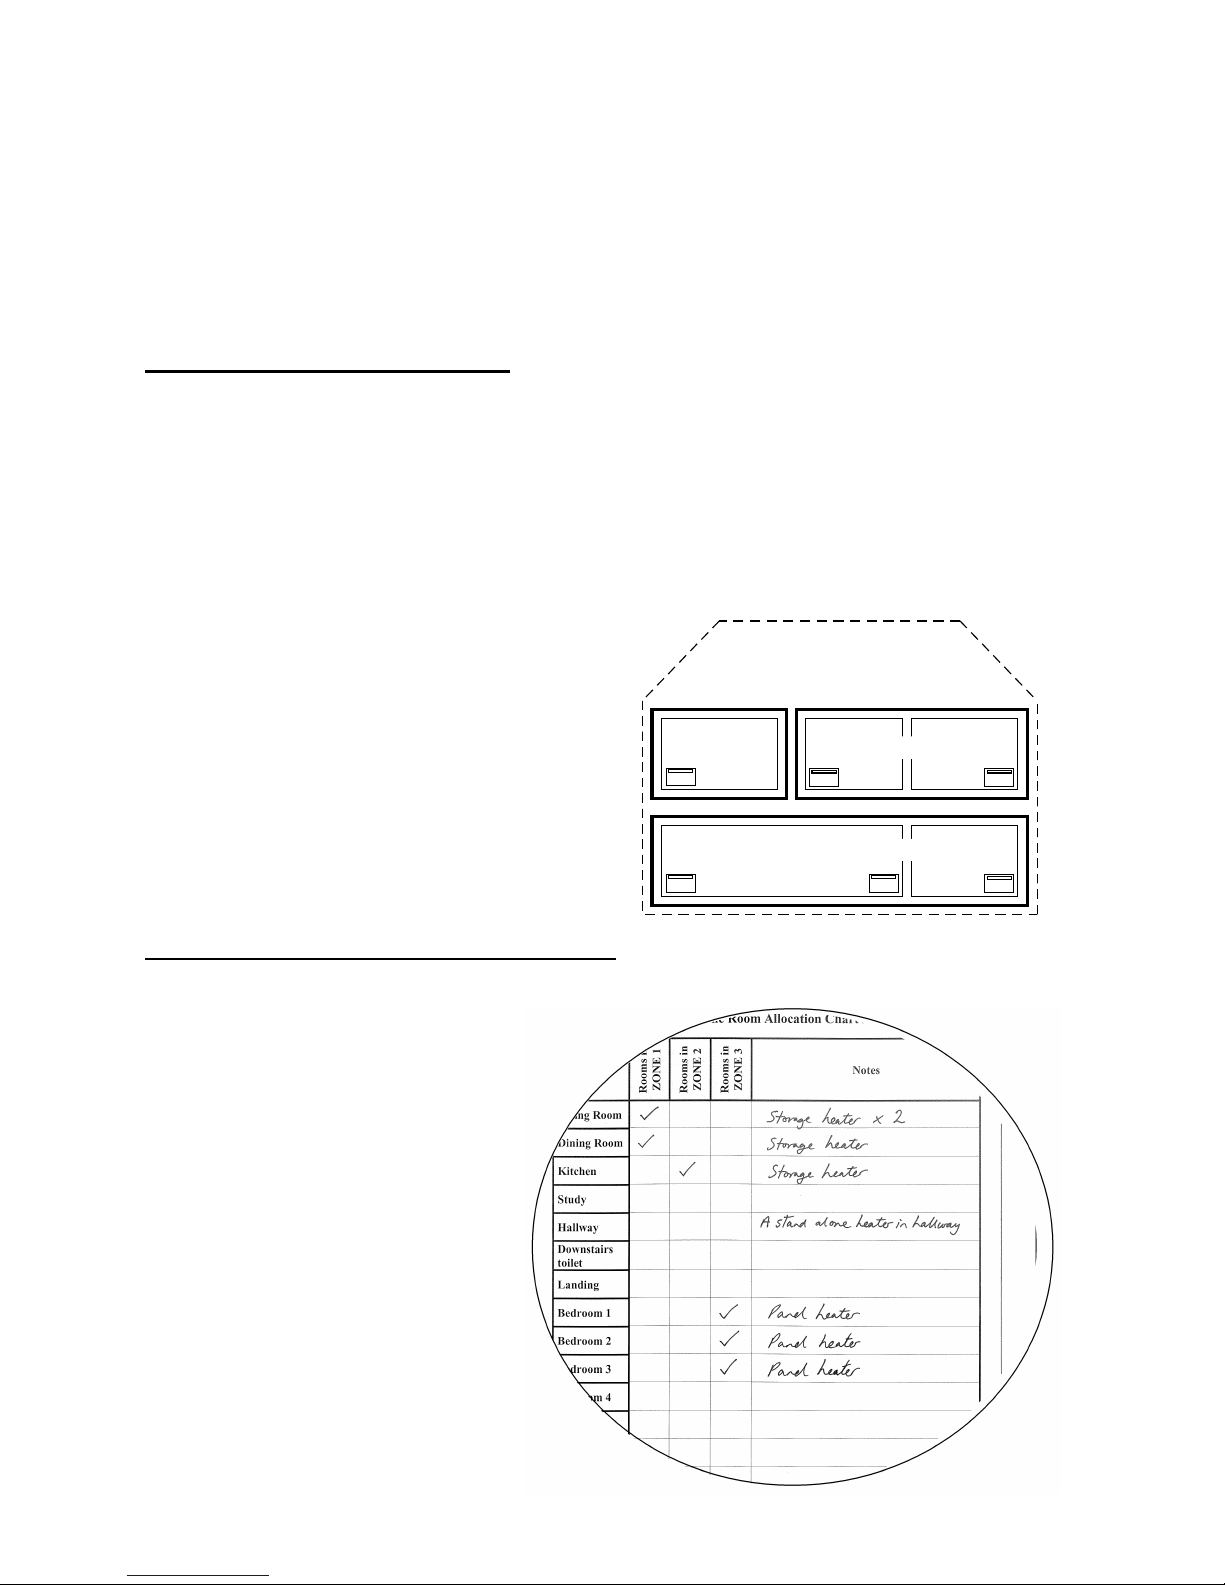
Example of a completed Room Allocation Chart:
An example of a completed Chart is shown below.
In this completed Room Allocation
Chart the property has a Credanet II
controller programmed as follows :
Zone 1
Living Room with 2 storage heaters
Dining Room with 1 storage heater
Zone 2
Kitchen with 1 storage heater
Zone 3
Bedroom 1, 2 and 3, each with a
Panel radiator.
Note
This property also has a “stand
alone” heater fitted in the H
allway.
This is not part of the Credanet II
heating system but is detailed in
this table for clarity.
Page 6

Page 6
NOTE to Installer : Please complete The Room Allocation Chart below
Rooms in
ZONE 1
Rooms in
ZONE 2
Rooms in
ZONE 3
Notes
Living Room
Dining Room
Kitchen
Study
Hallway
Downstairs
toilet
Landing
Bedroom 1
Bedroom 2
Bedroom 3
Bedroom 4
Bedroom 5
Bathroom
En suite
Other
Other
Other
Other
Page 7

Page 7
b) Your Heating Plan
Your heating system has already been programmed with the heating requirements of a typical home.
Once the day and time are correct (see Page 4), your system will automatically start to operate.
NOTE
• In some situations the Heating Plan programmed into the Controller will have been “Locked” by the
Installer so that it cannot be changed. (This is usually on instruction by the property specifier).
If the pre-set heating scheme is not to your requirements then it can be changed to suit your individual
plan.
Before you plan your heating, take a look at the pre-set programme below, already programmed into
the controller. This is the programme that is already set for your system, and which you have started in
“Section 2 – Getting started”.
What is “Comfort temperature”?
The comfort Temperature is how hot or cold you
want the room to be when you are likely to be
using it. You can set this to any level you
choose, and it is measured in °C. (equivalents in
°F shown below)
°C
14° 15° 16° 17° 18° 19° 20° 21° 22°
°F
57° 59° 61° 63° 64° 66° 68° 70° 72°
What is “Fallback temperature”?
When you aren’t using a room, you can
programme Credanet II to let the temperature
“fall back” to a lower level, and the level you
choose for this is called the fallback temperature.
If the temperature falls below this, Credanet II
brings it back up to the fallback level and keeps
it there ~ preventing the room from becoming
too cold.
Use the table on the next page to plan out how you want your heating to run on each day of the week.
This will help you when you come to programme your plan into the controller, and will make a useful
record of your settings.
NOTES
• For each Zone and Day, the controller will not allow overlapping Time slots to be Set.
• Try to avoid setting the Fallback temperature more than 4°C lower than the Comfort temperature.
(A low Fallback temperature will cause the Credanet II system to use more peak rate and less cheap
rate electricity. The running costs are likely to be higher).
Page 8

Page 8
Your Heating Plan Table:
Page 9

Page 9
4. Changing the settings at the controller
Once you have planned your heating requirements, you need to put them into the controller.
This section explains how to programme the controller.
NOTE
• In some situations the Heating Plan programmed into the Controller will have been “Locked” by the
Installer so that it cannot be changed. (This is usually on instruction by the property specifier).
a) Programming Zone 1
Using the information on the completed heating plan (previous page)
Open the pull down flap on the front of your Credanet II controller.
• Slide the SET switch to ZONE 1
• All the days of the week will flash
• If you require each time slot in Zone 1 to be
the same for every day of the week :
v Leave all the days flashing and then
Press the left hand SELECT button
• To change the time slots for an individual
day :
v Select the day to be changed using the
left hand + and – buttons and then
Press the left hand SELECT button
• Pressing the left hand SELECT button will
show the settings for the 1st time slot.
v Use the left hand + and - buttons to change
the Start (On) time
v Use the middle + and - buttons to change
the Comfort temperature
v Use the right hand + and - buttons to
change the End (Off) time
• When the settings for the 1st time slot are
correct Press the middle SELECT button
• Pressing the middle SELECT button will show
the settings for the 2nd time slot.
v Use the + and - buttons to alter the Start
time, Comfort temperature and End time
• When the 2
nd
time slot is correct
• Press the middle SELECT button again to show
the settings for the 3rd time slot.
v As before, use the + and - buttons to make
the required changes
• Press the middle SELECT button to show the
Fallback temperature and use the middle
buttons to change to the required value.
Page 10

Page 10
NOTES
• It may be quicker to set the Zone requirements for all the days of the week and then to change an
individual day afterwards.
• To make changes to other days Press the left hand SELECT button so that the Day flashes and use
the left hand + and – buttons to choose another day.
Summary
• To make changes in Zone 1 slide the SET switch to ZONE 1
• Use the left hand SELECT button to change between Days and Time slots
• When Days is flashing, use the left hand + and – buttons to change between Days.
• When Time slots is displayed, use the middle SELECT button to change between Time
slots 1 and 2 and 3 and the fallback temperature
• For each selection, make changes using the + and – buttons.
b) Programming Zones 2 and 3
Zones 2 and 3 are programmed in the same way as Zone 1. Move the slider to the required Zone
and follow the instructions given above for Zone 1.
Your programme is now complete. Slide the SET switch to PROG RUN and close the flap.
The Credanet II heating system will now follow your individual Heating Plan.
Page 11

Page 11
5. Useful features
Credanet II offers many useful features to help you get the heating in your home exactly as you like it.
The following section details these features.
a) What to do if I feel cold
• Boost the whole Zone, at the Controller
• The temperature throughout a particular zone
can be altered by pressing the + or – buttons on
the controller.
(All the heaters in that zone will work to
maintain the temperature set on the display).
• Credanet II will automatically work to the new
temperature set until the next programme
change for that zone.
(At the next Time slot change the temperature
will revert to your original programme)
• Boost the room only, at the heater
• Credanet II heaters also come with a Boost
button in the control panel on the heater itself.
(On Credanet II Panel heaters this is located
on the right hand side of the heater).
• Press the Boost button and the heater
automatically increases the temperature in just
that room for 1 hour.
(If the heating is in Fallback mode, the boost
raises the temperature to Comfort level. If it is
already at Comfort level then the boost will
increase the temperature by 2°C).
NOTES
• If the temperature in the room is already higher than the new Boost setting, then the heater will remain Off.
(Boost the whole zone instead, see above. Or re-programme the settings ~ See Section 4 Page 9)
• Pressing the Boost button, before the hour has finished, will switch the boost function off.
• The display on the controller will show if there are any
heaters set to Boost within each Zone.
(For example. This display shows a system with Boost
Set, on at least one heater in Zone 1 and also in Zone 3)
Page 12

Page 12
b) What to do if I go away
Credanet II includes a “Holiday” option to take care of this
Open the pull down flap on the front of your Credanet II controller.
• Slide the SET switch to HOLIDAY
• Use the left hand + and – buttons to choose the
number of days you will be away. The display
will show the number of nights plus the day on
which the heating will start to work again.
E.g. This display shows a holiday setting of 5 days
with the heating working again on Saturday
• Slide the SET switch to PROG RUN
NOTES
• In holiday mode, all zones will show “14” (°C) in the display, and will only supply enough heat to
protect your house from frost as required.
• If you return from holiday early, or wish to cancel the setting, simply press any of the SELECT
buttons.
c) Switching the heating off
The heating in a Credanet II system can be switched off using the controller
At the controller: Open the flap on the controller and press the SELECT button for that zone:
• The slider switch stays on PROG RUN
• Use the required SELECT button to turn that
zone Off
E.g. This display shows Zone 1 switched Off while
Zones 2 and 3 are running normally.
• Zone 1: Use the left hand SELECT button
• Zone 2: Use the middle SELECT button
• Zone 3: Use the right hand SELECT button
• To switch the zone back on, open the flap and
Press the SELECT button for that zone again.
d) Switching off an individual heater
Storage heaters use two supplies and Panel heaters use one. These must be left on all the time.
(Individual heaters should only be switched off if a safety issue arises).
What happens if either of the switches next to the heater is switched off
• The controller cannot calculate when the cheap rate electricity is available
• The Storage heater will not be able to store any heat, even if only one switch is turned off.
Page 13

Page 13
e) Checking the settings without changing them
The times and temperatures set for each zone can be checked
• Open the flap on the Controller
• Slide the SET switch to ZONE 1 (or whichever
Zone you want to check).
• Press the left hand + and - button to choose the
day you want to check
• Press the left hand SELECT button when the
correct day is shown
• Use the centre SELECT button to run through
the settings for each slot
If all is OK then slide the SET switch to PROG RUN.
To make changes refer to Section 4 Page 9
Changing the settings at the Controller.
f) Returning the Controller to its original settings
This section describes how to return the Controller to its original settings.
To return your system to its original settings
• Open the flap on the Controller
• Press the right hand + button at the same time as
the right hand SELECT button
The display will go blank and then all the text will
show for a short time.
After about 20 seconds the Controller will have
completed its start up checks and the display will
return to normal.
• Go to Section 2 Page 4 Getting Started in order
to set the day and time on your system.
Page 14

Page 14
6. Contact Details
a) Sales Hotline …………………. Tel 08709 000420 Fax 08709 000520
b) Creda Spares ………………… Tel 08700 102829
c) Creda Technical Services … Tel 08709 000430 Fax 08709 000530
d) Brochure Hotline ………….... Tel 08709 000540
e) Your Electricity Supplier _______________________________
_______________________________
_______________________________
_______________________________
_______________________________
f) The Credanet II Installer _______________________________
_______________________________
_______________________________
_______________________________
_______________________________
Page 15

Page 15
7. Guarantee
The Credanet II Controller and Heaters are covered by a full parts and labour guarantee
for one year from the date of purchase, so should the product become faulty within the
guarantee period, it will be replaced with a new product or repaired by our service
engineers, totally free of charge.
Page 16

Page 16
Applied Energy Products Ltd. Morley Way, Peterborough. PE2 9JJ.
Telephone 01733 456789
Fax 01733 310606
www.applied-energy.com
www.creda-heating.co.uk
Credanet II User’s Guide - Issue 3 Feb 2007
 Loading...