

Page 1
!
USER MANUAL
FULL HD DASH CAM CAR PRO2
!
!
!
!
!!!!!!!!!!!!!
!
!
!!!!!!!!!!!!!!!!!!!!!!!!!!!!!!! !
Page 2

2
Hello! !
Thank you for choosing the CreativeXP products. Your
recognition & support is our motivation and it is our greatest
pleasure to serve you!
Before using the HD Dash Cam, please read this guide
carefully. In addition, due to production date, different batches,
instructions may differ from the actual use of the product. If you
have any suggestions or questions don’t hesitate to contact us
Please check our YouTube HD Dash Cam Channel for more
tutorials & installation videos.
Finally, we sincerely wish you all the best & quiet moments on
the road!
Kind regards,
CreativeXP Team
!
!
!
!
!
Page 3

3
I. Product specifications
!
!
!
!
!
Model!
PRO2!
Focal!Range!
1080!HD!wide-angle!lens!140!degrees!
Display!
4!inches!LTPS!TFT!LCD!
TV!output!
TV!synthesis!signal:!NTSC/PAL!
Photo!
1M!2M!3M!5M!10M!
Video!format!
MJPEG(AVI)!
Video!
1920*1080!1280*720!848*480!(30!frame!/!sec)!640*480!(30!frame!/!
sec)!
Zoom!
NO!
Audio!
Built-in!
Shutter!
Electronic!shutter!
Internal!camera!!
VGA90!degree!
Front!camera!
Up!and!down!adjustable!
Joint!
USB2.0/AV!OUT!
Battery!capacity!
320MAH!
USB!
USB2.0!high-speed!transmission!
Size!!
78*108mm!
Working!temperature!
!!!!!!!!!!!!!!!!!!!!!!!!-20!to!40!degrees!Celsius!/10%-80%!
Power!supply!
Built-in!lithium!battery/vehicle!charger!
Memory!card!
Maximum!support!for!32GB!MicroSD!
Video!format!
1920x1080!720×848!480×640!1280x480!
HDMI!
No!HDMI!HD!video!output!
Microphone!
Built-in!
24-hour!parking!monitoring!
function!
YES!(need!to!be!equipped!with!a !step-down!line!–!AC!Hardwire!
included)!
Mobile!detection!camera!function!
YES!
Gravitational!induction!
YES!
Page 4
4
II. Product Overview
!
!
!
Page 5

5
!
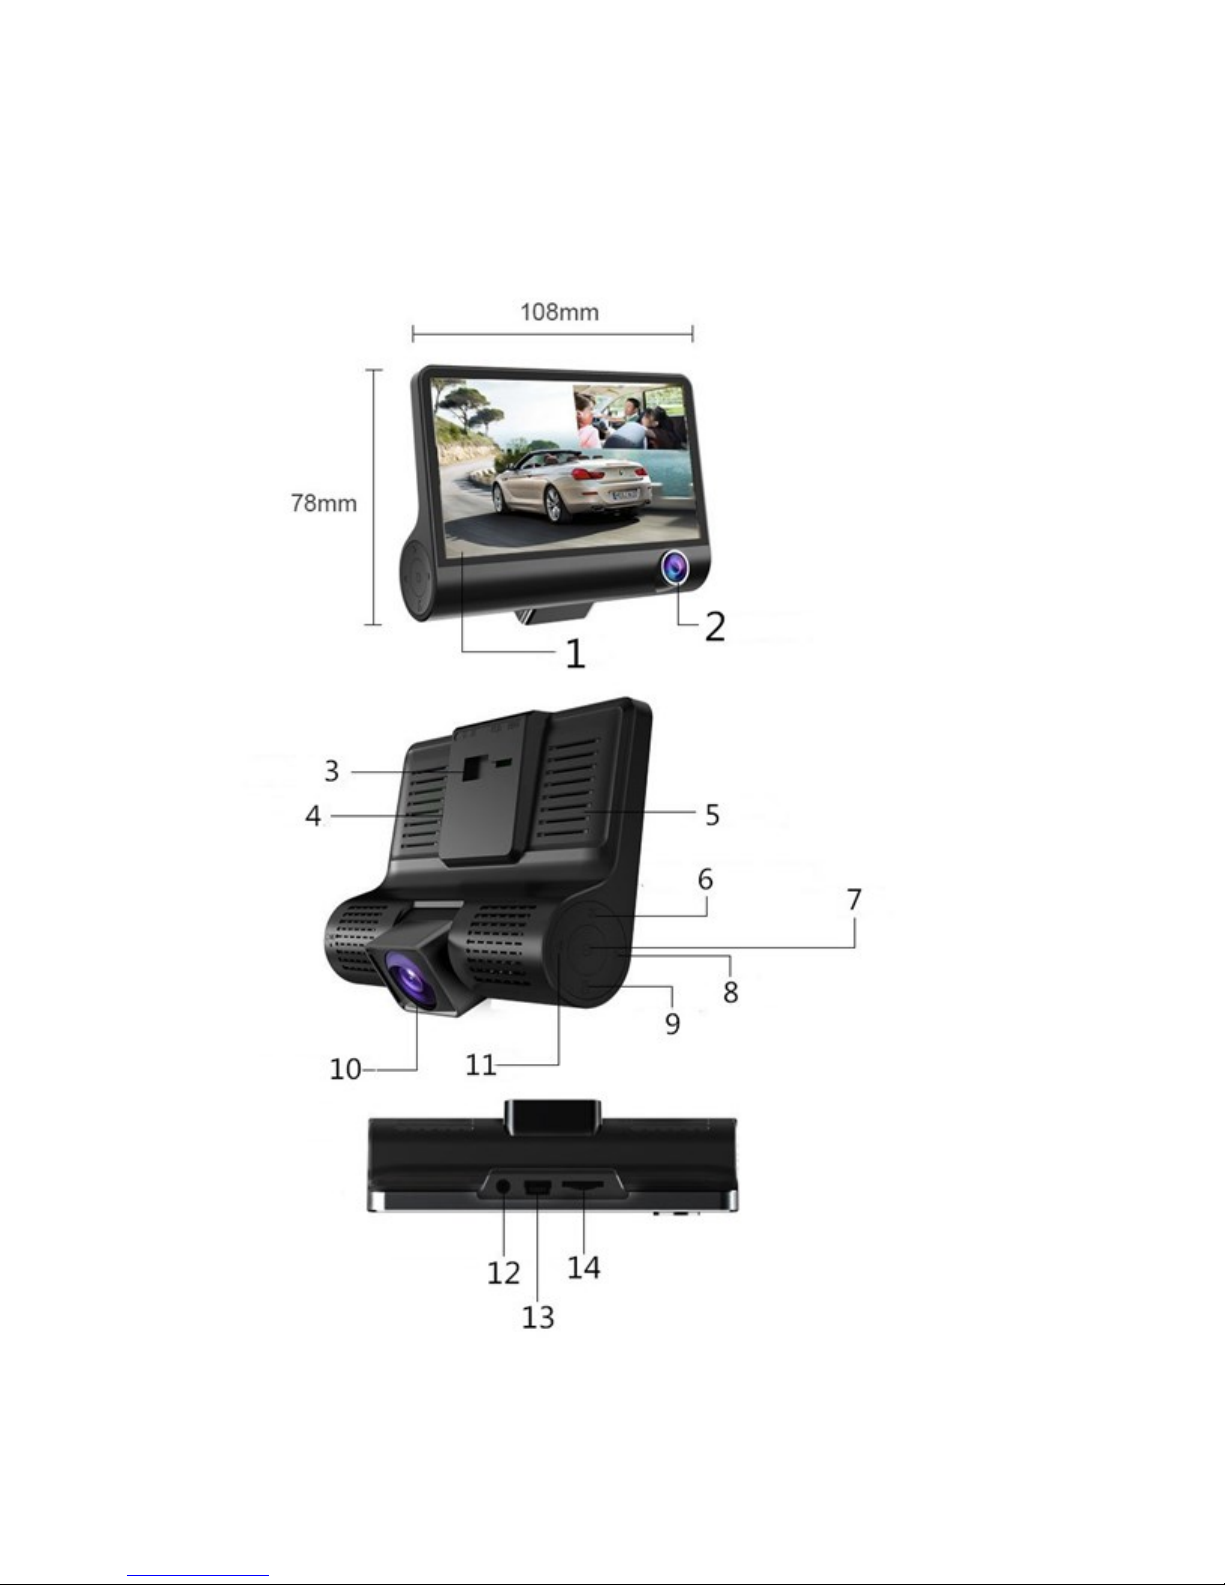
1. LCD Screen
• The video screen of the dash cam which will show the menu and viewing
angles.
• Picture-in-picture mode is available.
2. Camera Lens
• The lens used to photograph the inside of the car. This is perfect for Uber or
taxi drivers and for family road trips.
3. Bracket Clamp
• Connects to the suction cup mount. Use the included accessories for
installation.
4. Reset button
• When the recorder or software stops working properly, the default functions
can be restored by pressing the reset button.
5. Fan
• The heat ventilating fan ensures the use of the HD Dash Cam in the hightemperature environment.
6. Menu / Photo / Playback Key
• Access the menu login option, the collection key of photos and videos, the
playback mode - accessed by the short press or long press.
7. Power Button
• The power button will turn on and off the dashboard recorder – Long Press
• Turn on and off the dash cam screen - Short Press.
8. Down Button
• The downturn key for menu selection and the volume adjustment of the
recorder.
9. Confirmation Button
• The confirmation (OK) button for the menu, and the button to control the
starting and ending of the video recording.
10. Adjustable Front HD Camera
• The lens used to capture HD Video in front of a vehicle. It can be
adjusted up and down for adapting to your car’s height.
Page 6

6
11. Up Button
• The upturn key used in the menu selection of the recorder and the
volume adjustment.
12. Rear View Camera Port
• The interface used to connect the rear-view backup camera to the
recorder.
13. Power Interface
• The interface used to connect a car charger or a step-down line (AC
Hardwire included) to the recorder, or to connect the dash cam to your
computer for data transfer.
14. TF card slot (MicroSD Card)
• Press down the MicroSD to insert and lock. Press down on the MicroSD
to pop it out.
II.1. Few detailed instructions for the camera
buttons functions:
1. Plug the lighter charger into the camera and your cigarette spot. - make sure the
car is turned on because the camera needs power for initial startup. (or hook it up to
the Fuse Box for constant power).
2. Hold the middle "Turn On" button for a few seconds until it turns on.
3. The "M" (UP) button allows you to change the mode (video, photo or view
recorded files). You can hold "M" for a few seconds to go in the "Main Menu".
4. The "Ok" (low) button it's the "Enter" (confirmation button) - you can press it when
you when you want to start recording, take a photo or select a menu option.
5. The 'Right arrow" (the one towards the screen) turns on or off the microphone and
moves down the selection on the menu.
6. The "Left" arrow" (the one towards the back of the camera) changes the recording
mode (only front camera, only rear camera, picture-in-picture etc.) and moves up the
selection on the menu.
Page 7

7
III. Installation Guide
1. Turn off your vehicle engine.
2. Insert the MicroSD card into the dash cam’s slot.
***Please use the high-speed SD card(Class 10 above), capacity of not less than
512MB and the MicroSD card maximum support 64GB (only if formatted, if not, we
recommend 32GB – The loop recording feature ensures that you will always have
enough storage.)
3. The recorder is fixed to the windshield using the included accessories. Its position
can be your choice, but we recommend it to be installed under your rearview mirror
because it doesn’t block much of your viewing angle. Please ensure that the glass
surface is clean, so you can have a stronger adsorption force.
4. Insert the car charger into the car cigarette lighter.
5. Use extension cable to connect car charger and dash cam’s USB port for power
sourcing.
***Charger extension line can lay along the edge of the windshield when wiring.
6. The backup camera is installed in the rear of the vehicle, pay attention to the
direction of installation. Wiring can also be laid along the vehicle roof (not most
common). After the installation is complete, connect rear camera cable to the dash
cam’s rear camera interface.
7. Adjust the lens position to ensure that the lens is parallel to the ground. Although,
the backup camera metal hook is adjustable, please make sure you don’t change its
position very often.
8. Start the engine, check if the recorder has been installed correctly.
***When the machine is properly installed, the system lights work, the dash cam
enters the recording mode, the recording indicator light flashes. Remember to check
on the display screen if it’s normally positioned, if the display screen is mirrored,
please contact us!
9. For any questions regarding installation please contact us at support@creative-
xp.com and we will help you ASAP. Also, we have a YouTube Channel “CreativeXP
HD Dash Cam” where we post tutorials, installation videos etc.
Page 8

8
IV. FAQ
Does this product come with a Micro SD card or would one need to be
purchased separately and if so what size is it capable?
A: Our HD Dash Cam Pro2 doesn’t come with a MicroSD Card because of most
people like buying their own or already have one. The biggest compatible size is
32GB but some of our customers formatted first their 64GB cards and had no issues
– we recommend 32GB.
How do you install the rear camera?
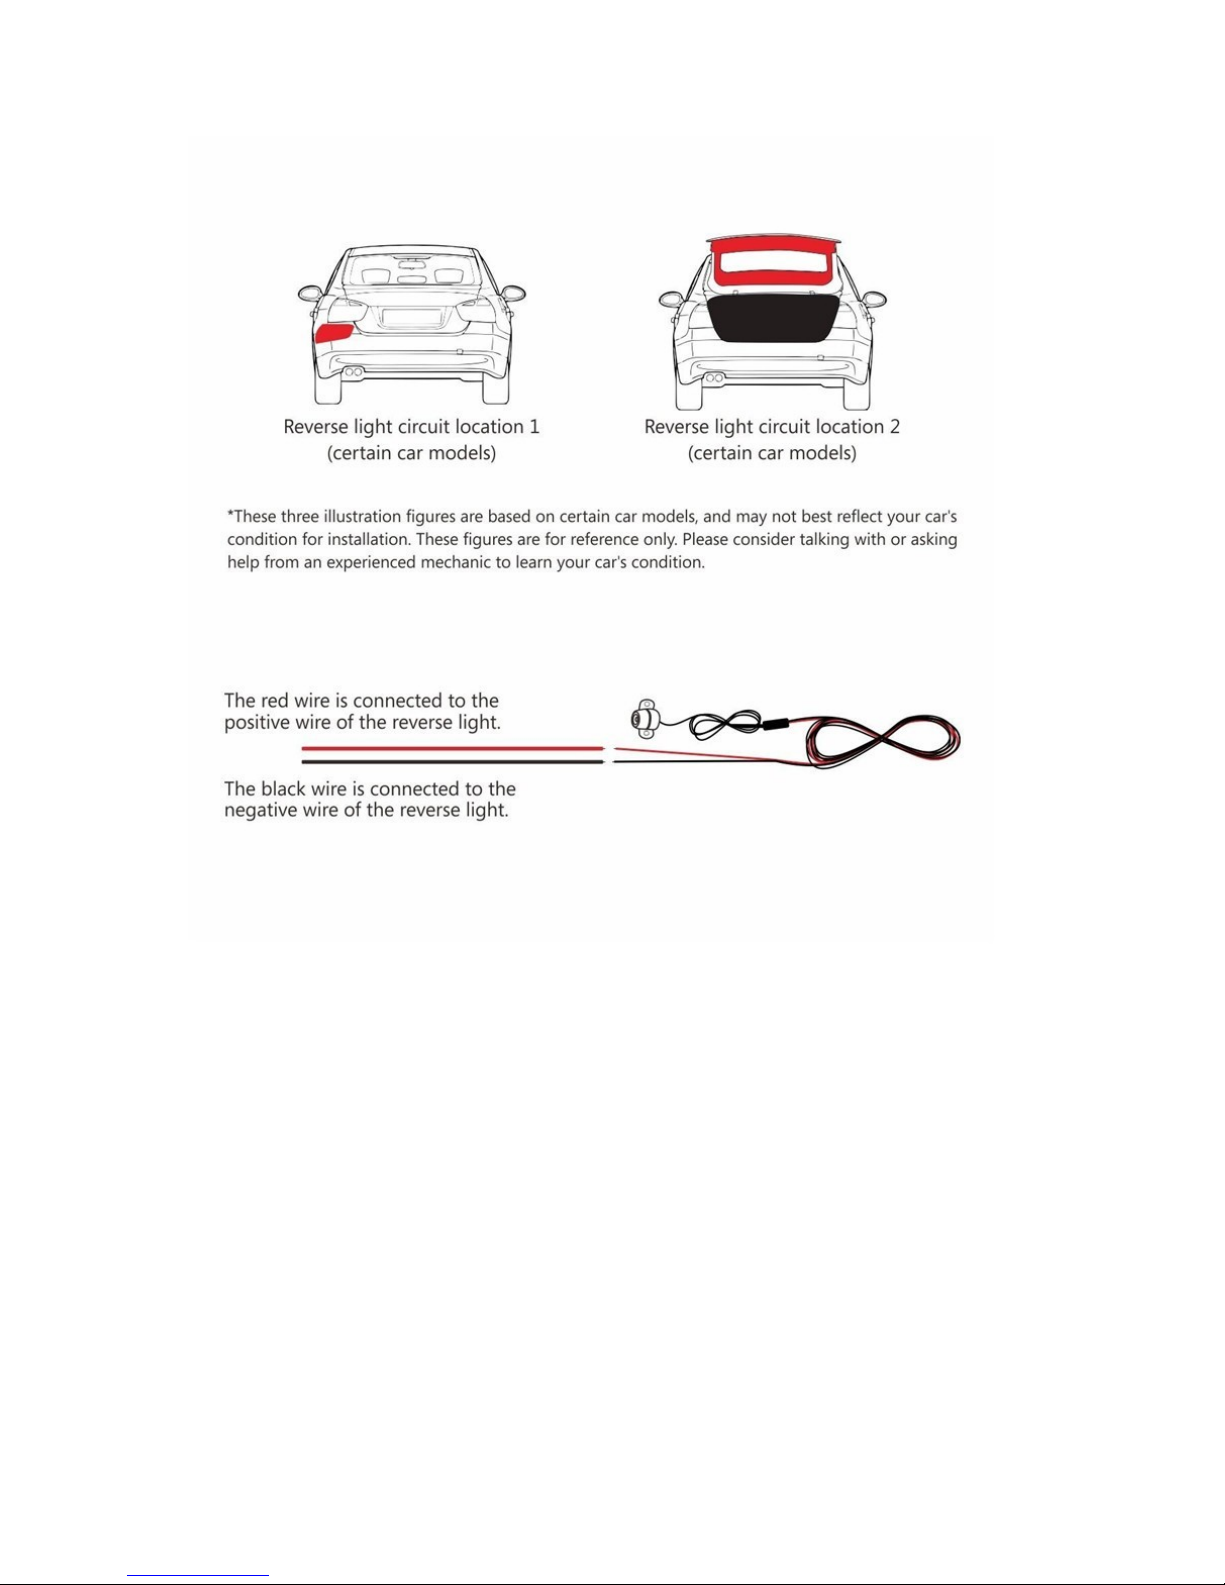
A: There is more than one way to install it (inside the car or above the license plate –
second option more popular) and you will just need to tuck the rear camera cables
under your car’s molding, bring it through the trunk, hook it up to the reverse lights (if
you want parking assistance) and mount the rear view camera above the license
plate. Please check our channel on YouTube for Additional videos!
What is the highest temperature this camera can handle?
A: The highest temperature our dash camera can handle is around 110 F. We
recommend not letting it on the windshield every day during summer because the
battery will lower its performance over time.
Is a lithium battery included?
A: Yes, it does include a lithium battery (150 mAh / 0.55 Wh) but it’s just for short
functionality not for long-term power storage. The dash camera needs to be powered
via lighter charger or hardwired to record long videos.
Does the smart assist beep when you come to close to cars while parking?
A: The backup assistance won’t beep when you come close to cars or objects, but
the parking lines are colored differently to help anticipate the distance, red means
that you are very close.
Does it hook to a USB or cigarette lighter?
A: Yes, our premium package includes a cigarette lighter charger and a hardwire kit
in case you want it to hook it to a permanent source of power.
Does ac power mean air conditioning or alternating current? If alternating
current what is the voltage & current requirement?
A: AC stands for alternating current, which means the electrical current frequently
reverses direction. Your car’s Fuse Box runs this type of energy and it is a
permanent source of current (opposite to lighter charger). A few basic steps in case
you want it to be powered permanently from the AC:
Step 1 - Choose Dash Cam's positioning
Step 2 - Locate your vehicle's fusebox
Step 3 - Begin routing the power cable
Page 9

9
Step 4 - Locate a fuse that is "hot in start"
Step 5 - Install the installation kit add-a-circuit power cable
Step 6 - Locate a ground point
Step 7 - Button up your install
Step 8 - Test your installation
Does this dash car camera record speed or have Wi-Fi?
A: Our current Dash cam doesn't have the Wi-Fi Option or record your car speed.
This would allow anyone to know your exact car position at any time because GPS
automatically would be included, and this is the main reason why we chose not to
add this feature.
What are the mounting options?
A: We included a premium suction cup in the package for positioning on the
windshield, but some people also hook it up with a bike mount to their rear-view
mirror.
What size is the main screen of the Dash Cam Pro2?
A: The main screen is 4-inch LCD and it can show picture-in-picture or just one
camera at a time.
Will this camera record the license plates ahead during low light situations?
Does it have IR lenses?
A: Our current HD Dashcam Pro2 can record license plates ahead during low light
situations (Low light Night Vision included) but it doesn't feature IR lenses for
complete darkness.
Can the rear camera record videos, if yes at what resolution?
A: Yes, the rear-view camera can record and the recording can be shown on the
dashcam's screen for parking assist (or picture-in-picture mode). The resolution for
the rear-view camera is 1280x720P (30FPS).
Does it have 3 video cameras, and does it record all 3 footages? How long is
the wire for rear camera?
A: Yes, all 3 cameras can record video. The rear camera cable is 5 meters / 16 feet
long.
How does this HDR cam compare to WDR? Is it as clear?
A: Our dash cams are WDR because the viewing angles are over 140 degrees for
the front camera and they capture clearly license plates, faces and they even record
audio for road rage etc.
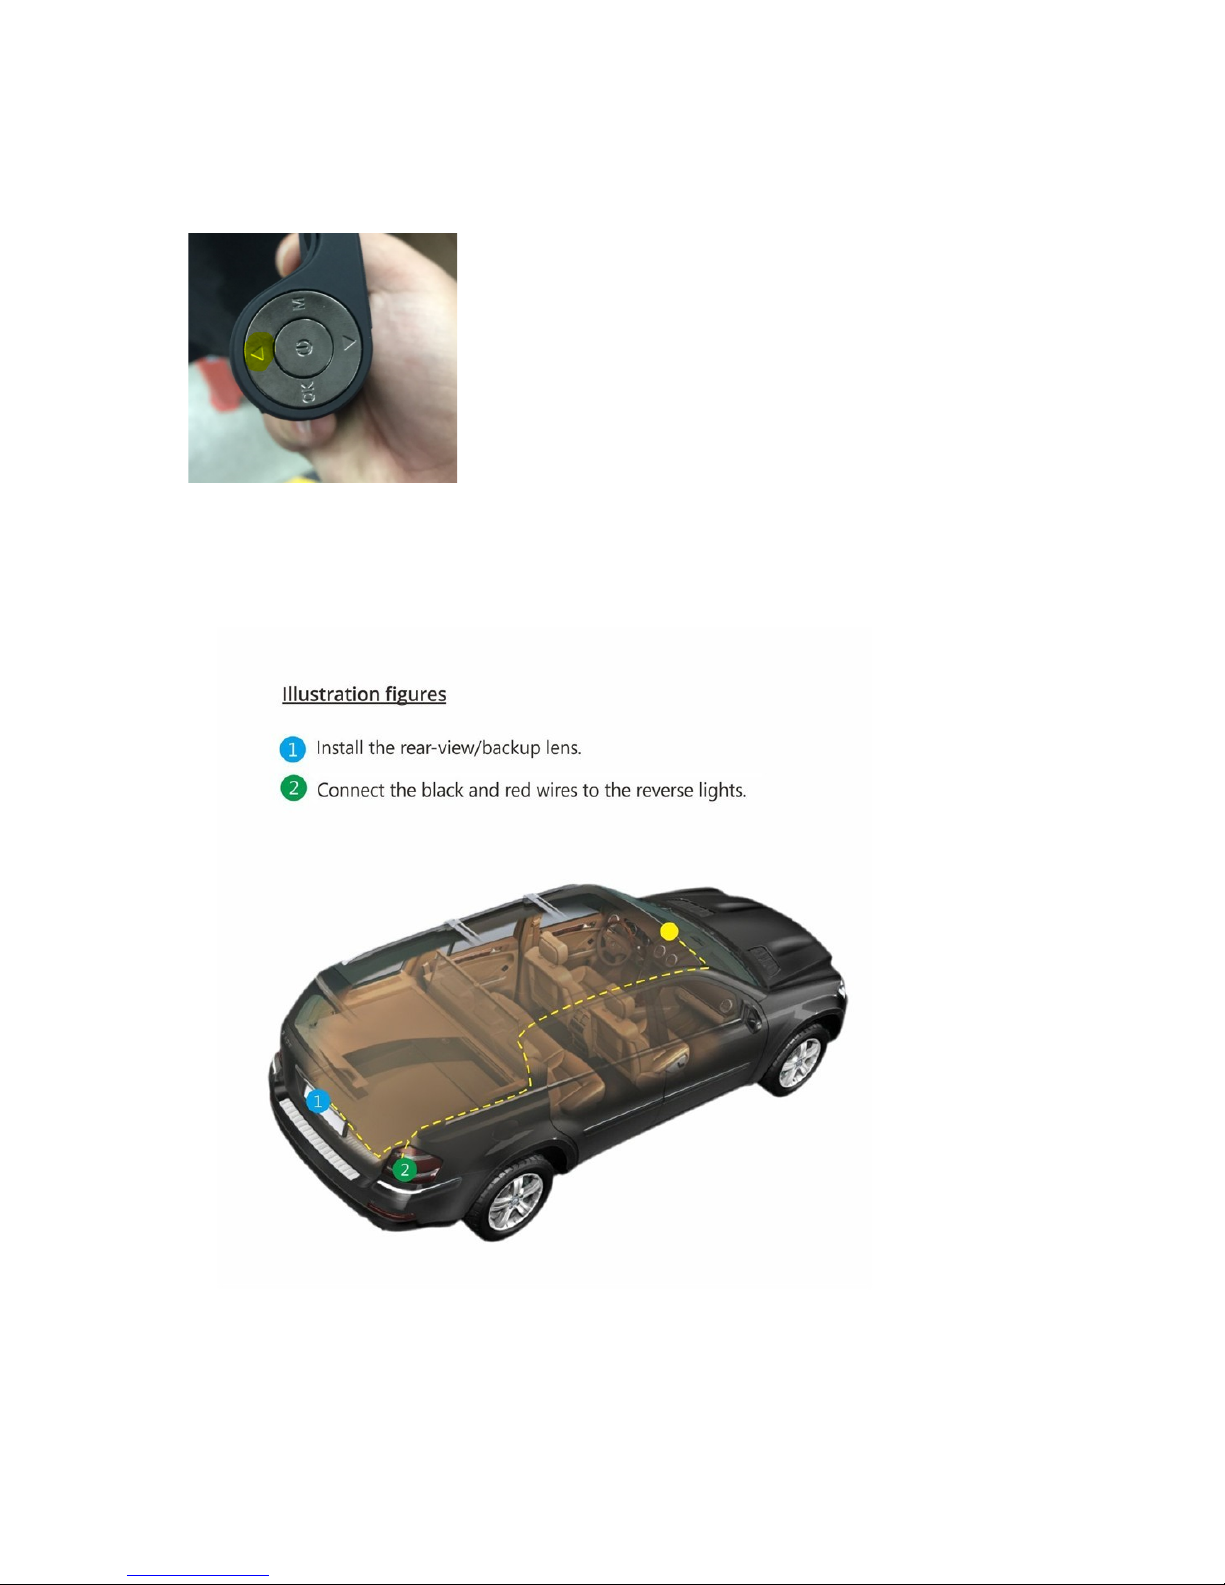
When I go in reverse the LED's light up but the display shows the inside
camera rather than the backup camera. Is there a way to fix this?
Page 10
10
A: The screen can support only two cameras at a time and to switch between them
must HOLD for 1-2 seconds the Left button (photo attached - yellow highlighted) this will change from inside camera to the reverse one.
V. Installation
!
!
!
!
!
!
!
!
!
!
!
!
!
Page 11
11
!
 Loading...