

Creative Technologies Pasta Express X2000, Pasta Express X3000 Recipe & Instruction Booklet
MODELS:
X-2000,
X-3000
When
using
electrical
appliances,
basic
safety
precautions
should
always
be
followed,
including
the
following:
1.
READ
all
instructions.
2
To
protect
against
risk
of
electrical
shak,
DO
NOT
PUT
MAIN
BODY
AND
MOTOR
ASSEMBLY
IN
WATER
OR
OTHER
LIQUID.
3.
CLOSE
SUPERVISION
IS
NECESSARY
WHEN
ANY
APPLIANCE
IS
USED
BY
OR
NEAR
CHILDREN.
4.
UNPLUG
FROM
OUTLET
when
not
in
use,
before
putting
on
or
taking
off
parts,
and
before
cleaning.
5.
AVOID
contacting
MOVING
PARTS.
6.
DO
NOT
OPERATE
any
appliance
with
a
damaged
cord
or
plug
or
after
appliance
malfunctions,
or
is
droppad
or
damaged
in
any
manner.
7.
The
use
of
at
tachmen
ts
not
recommendad
or
=Id
by
CTC
may
cause
fire,
electrical
shock,
or
injury.
8.
Do
not
use
outdoors.
9.
Do
not
let
cord
hang
over
edge
of
table
or
counter
or
twch
hot
surf-
10.
KEEP
FINGERS,
UTENSILS AND
ANY
OTHER
FOREIGN
OBJECTS
OUT
OF
MIXING
BOWL.
11.
DO
NOT
OPERATE
MACHINE
AT
ANY
TIME
WITHOUT
A
FRONT
DIE
IN
PLACE.
12.
DO
NOT
PUT
ANY
PORTION
OF
THIS
MACHINE
IN
DISHWASHER.
Clear
material
is
special
non-stick
plastic
and
requires
only
small
brush
and
soapy
water
to
dean.
13.
ALWAYS
BE
SURE
your
MACHINE
IS
IN
"OFF"
POSITION
before
plugging
cord
into
01
~tlet.
14.
DO
NOT
ATTEMPT
TO
DEFEAT
THE
COVER
INTERLOCK
MECHAMSM.
15.
If
you
have
any
quetions
please
call
our
customer
service
hotline
at
(718)
492-8400
or
(800)
282-5240.
@
SAVE
THESE
INSTRUCTIONS
FOR
HOUSEHOLD
USE
ONLY
1.
WHAT
IS
THE
MOST
IMPORTANT
THING ABOUT
MAKING
GOOD
PASTA
M
THIS
MACHINE?
Getting
the
proper
dough
msfstency.
2.
HOW
CAN
1
GET
THE
PROPER
CONSISTENCY
FOR
MY PASTA?
Pour
the
liquid
in
slowly
white
machins
is
mlxing.
If
you
pwr
it
in
all
at
once,
or
in
too
large
amounts,
you
prevent
the
dough
from
mlxjng
proply.
3.
HOW
CAN
I
STORE
MY
EXTRA
PASTA?
Extra
pastddqh
can
be
placed
In
a
plastic
bag
and
shed
in
your
freaer
for
up
to
a
month
and
in
your
refrigerator
for
up
to
24
hours
4.
WHAT
IF
THE
CTC
PASTA
EXPRESS
NES
NOT
STAR??
[a)
Check
to
h
sure
the
cover
is
properly
latched.
(b)
Check
switch
position.
(c)
Make
sure
unit
is
pIugged
into
a
live
socket
5.
WHAT
IF
THE
PASTWDOUGH
STICKS
TO
THE
MIXING
ARM?
This
means
the
mixture
b
too
wet.
See
Instructions
on
page
4
for
correcting
wet
mixture
or
pour
out
and
start
again
6.
CAN
1
USE
MY COVER
AS
AN
ONIOFF
SWITCH?
No,
it
is
merely
a
safety
precaution.
7.
WHY
SHOULD I PUT
THE
DIE
IN
HOT
WATER?
It
enables
the
pastdchugh
to
flow
through
the
die
smoothly
and
quickly.
8.
CAN
1
USE
THE
MACHINE
TO
MIX
DOUGH
WITHOUT
THE
DIE
ON
THE
mom
No.
never
mlx
dough
or
leave
the
machine
on
wthwt
a
die
on
the
front.
9.
AFER
SOAKING
DIE
IN
HOT
WATER,
SPRAY
PAM
OR
OLIVE
OIL
DIRECTLY
ONTO
THE
DIE
Do
not
pack
the
fIwr
down,
but
gently
tap
the
cup
on
top
oi
your
working
surface
and
till
b
the
brim.
When
cup
is
full,
level
oft
the
bur
gently
with
a
dull
knife
or
spatula
Make
sure
all
the
flour
is
emptied
from
the
cup
before
filling it
again.
Put
dies
in
hot
water
mixed
with 1 tsp
of
d
before
placing
on
machina
Always
make
sure
that
the
dough
is
of
the
fight
consistency,
as
specihed
in
the
instruction
manual
or
indmldud
rm
before
extruding-even
If
you
have
to
add
a
little
more
water
or
flwr
than
called
for.
When
the
first
6
inches
of
dough
have
been
extrudd
stop
the
rnachlne.
Cut
off
the
extruded
dou
h
and
r
ce
it
in
the
container.
Start
the
extrude
cycle
again
and
mtinue
lor
$
cIair&&th
d
or
dough
The
mixing
bowl,
cover,
brrel
and mixing arm
aremade
of
a
new
nnn-stick
pol
ytster
material.
I)ough
will
not
stick
to
their
surfaces
and
they
can
be
easily
deand
by
allowing
parts to
dry
ad
then
wipln
with
a
d
cloth.
Parts
may
then
k
washed
rm~
dotergent.
DO
NOT
P&
THESZPLASTIC
PARTS
IN
YOU.
DISHWASHER
It
you
wish
to
change
a
die
In
the
middle
of
the
extnsde
cycle,
first
stop
the
machina
Place
the
machine
in
the
mix
cycle
for
abut
5
seconds,
then
stop
the
machine
again
Now
YOU
are
ready
to
change
to
the
new
desired
die.
Once
the
die
is
in
place,
start
extnadIng
again
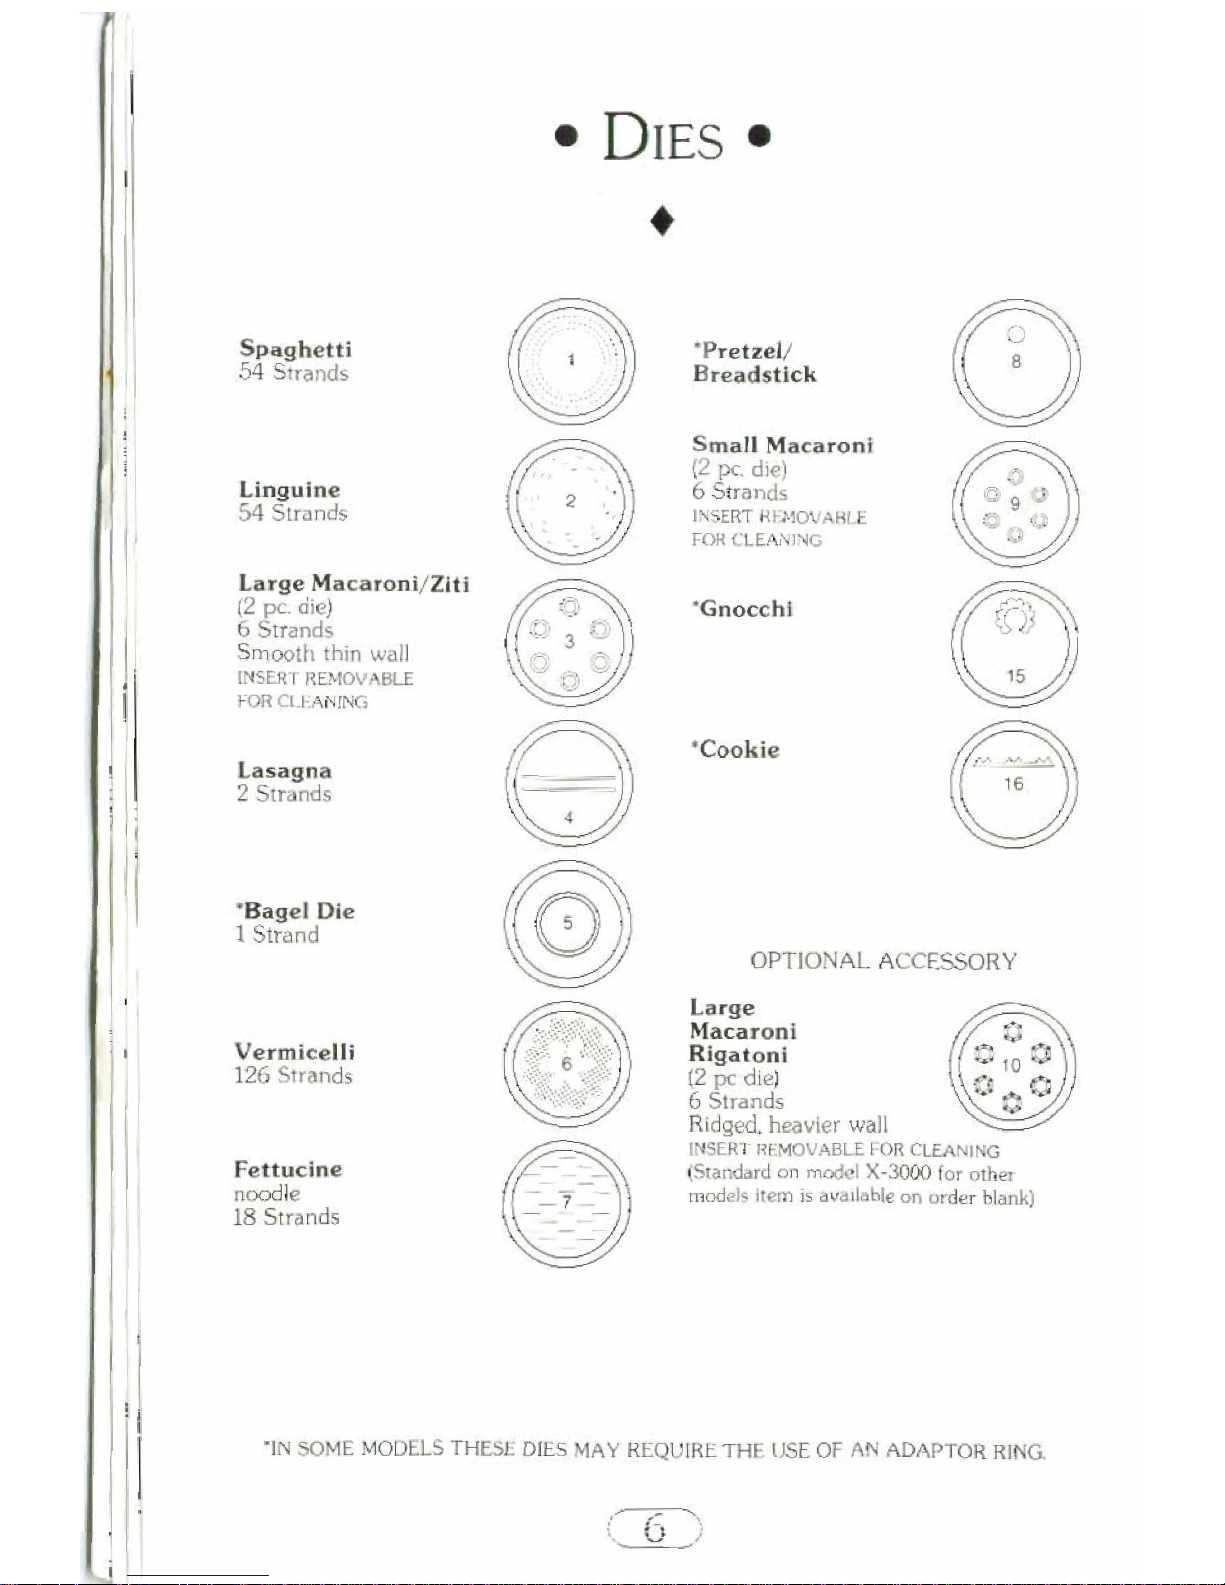
Thediesareeasierto~niftheyareallouredtodrywto~emlght(simply1savethem
at
on
your
counter)
The
next
cia
,
when
the
dwgh
is
dry,
tap
them
on
the
wunter
and
all
the
dried
partides
shwld
Y
all
out.
Any
hok
rernalning
cloggad
can
then
be
pushed
out
wlth
the
cleansing
probe
or
a
toothpick
ANOTHER
METHOD
WOULD
BE
TO
PLACE
THE
DIE
IN
THE
FREEZER
VNTU
THE
DIE
IS
FRO=.
THEN
TAP
ON
CO.UNTER
AND
CLEAN.
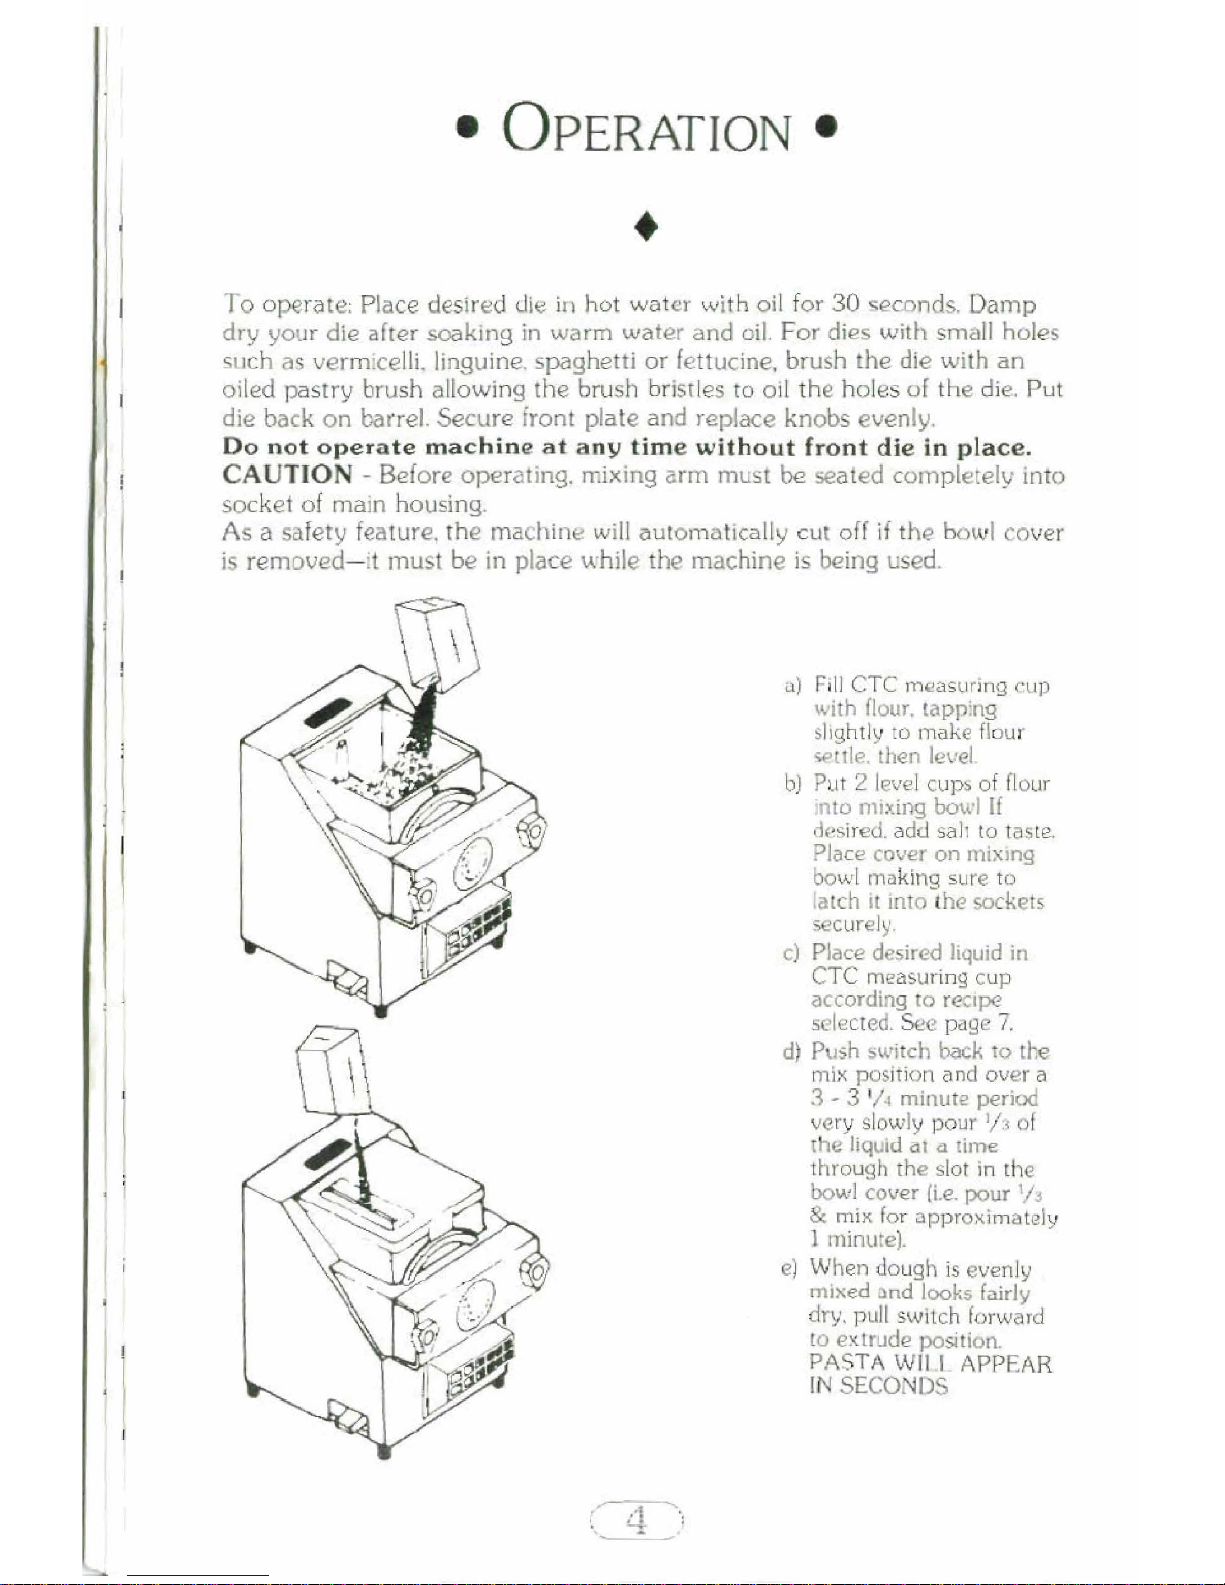
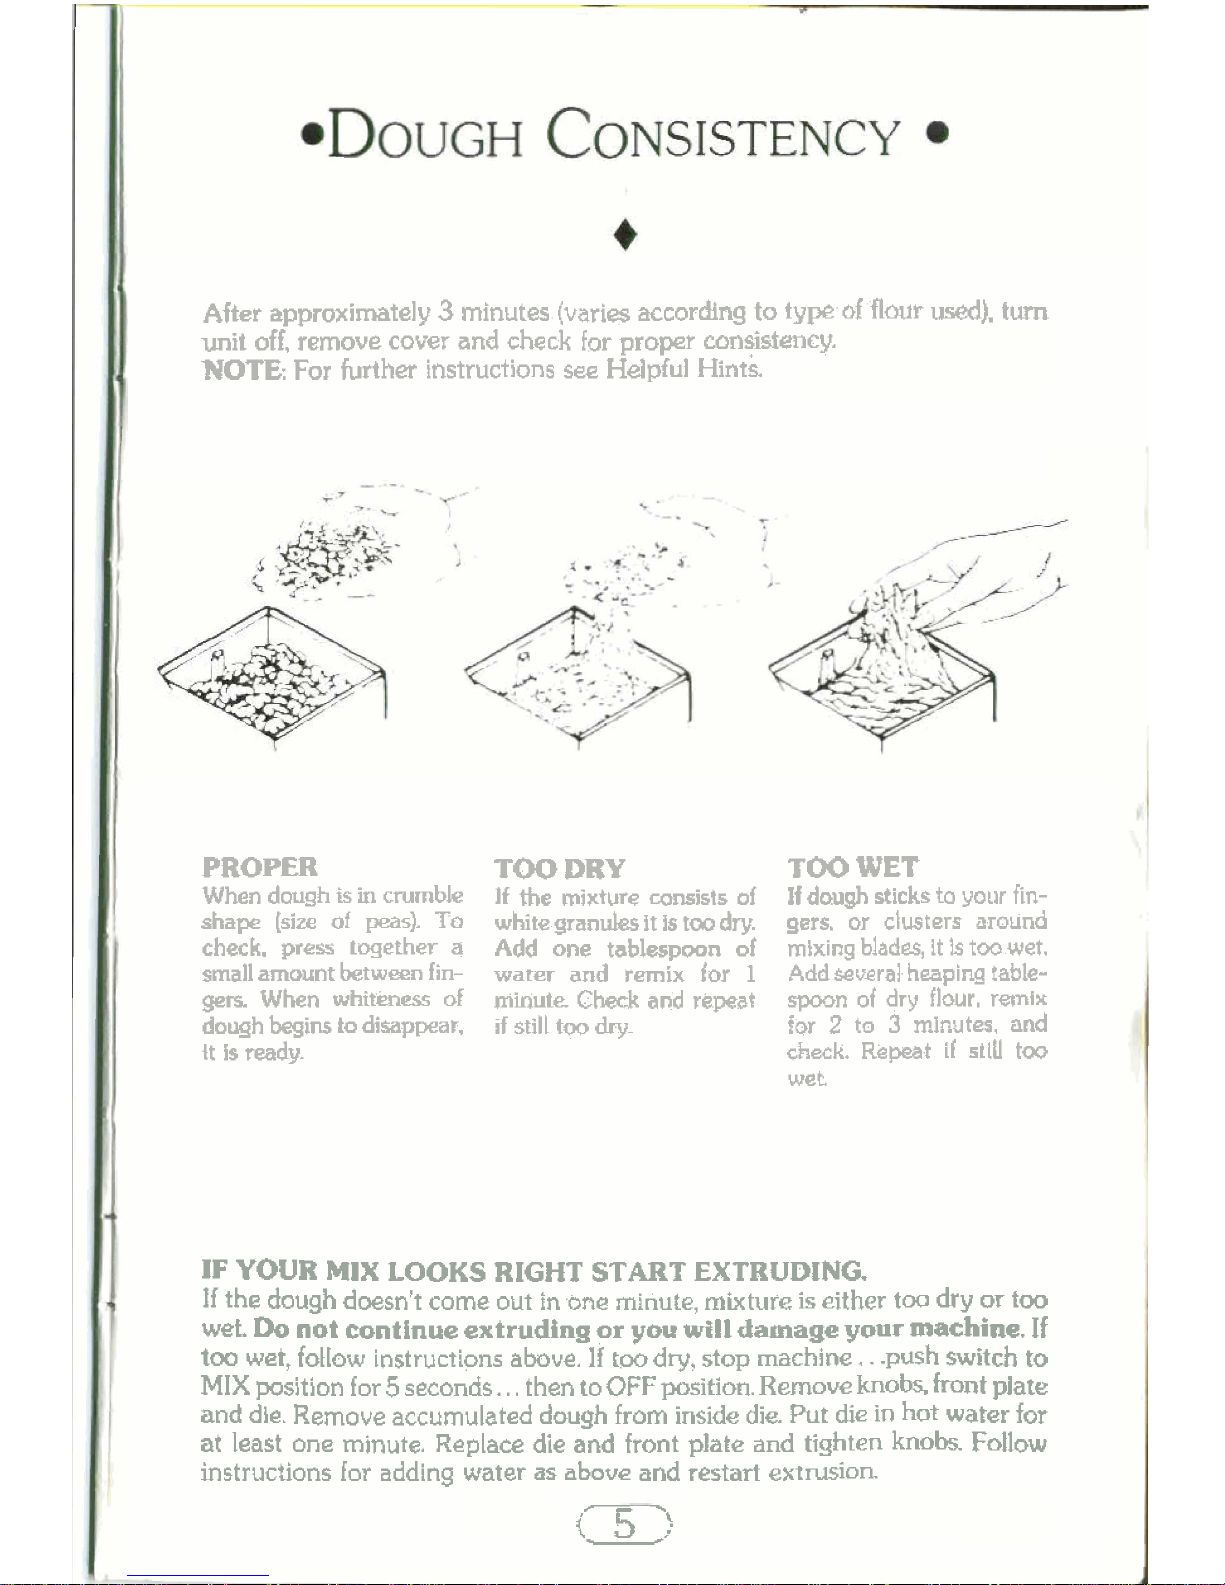
After
approximately
3
minutes
(varies
according
to
type
of
flour
usad).
turn
unit
off,
remove
cover
and
check
for
proper
consistency.
NOTE:
For
further
instructions
see
Helpful
Hints.
PROPER
When
dough
is
in
crumble
shape
(size
of
peas).
To
check.
press
together
a
small
amount
between
fin-
gers.
When
whiteness
of
dough
begins
to
disappear,
It
Is
ready.
TOO
DRY
TOO
WET
If
the
mixture
mists
of
If
dough
sticks
to
your
fin-
white
granules
it
is
tao
dry.
gers,
or
clusters
around
Add
one
tablespoon
of
mixing
blades,
It
Is
too
wet.
water
and
remix
for
1
Add
several
heaping
table-
minut~Checkandrepeat
spoon
of
dry
flour,
remlx
if
still
tw
dry
for
2
to
3
minutes,
and
check.
Repeat
if
stlll
too
wec
IF
YOUR
MIX
LOOKS
RIGHT
START
EXTRUDING
If
the
dough
doesn't
come
out
in
one
minute,
mixture
is
either
toa
dry
or
too
wet.
Do
not
continue
extruding
or
you
wtll
damage
your
machine.
If
too
wet,
follow
instructions
above.
If
too
dry,
stop
machine.
.
.push
switch
to
MIX
position
for
5
seconds..
.
then
to
OFF
position.
Remove
knobs.
front
plate
and
die.
Remove
accumulated
dough
from
inside
die.
Put die
in
hot
water
for
at
least
one
minute.
Replace
die
and
front
plate
and
tighten
knobs.
Follow
instructions
lor
adding
water
as
above
and
restart
extrusion.
<z:
 Loading...