

Creative Playthings NORFOLK II Assembly Manual
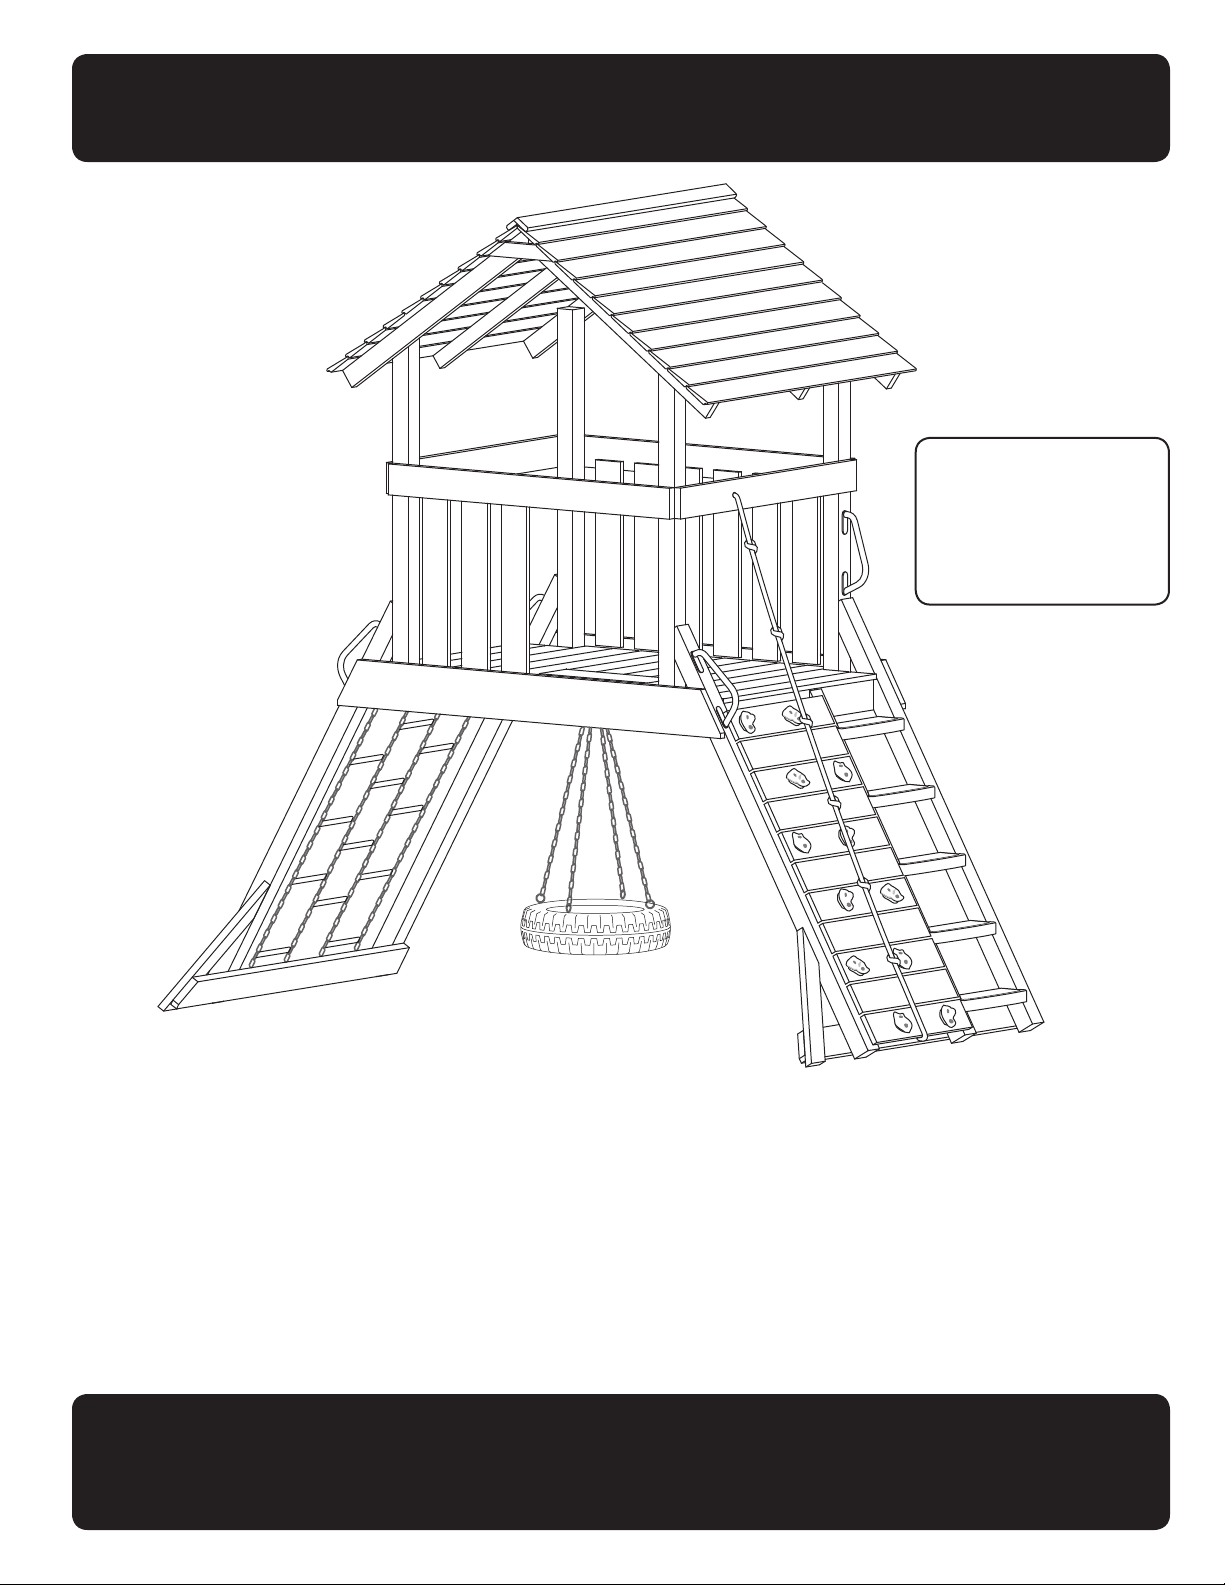
NORFOLK II
ASSEMBLY MANUAL
®
Creative Playthings
All hardware on this set
is coated for corrosion resistance. If non-Creative
Playthings hardware is
used, it must be galvanized
or stainless steel.
Please read the owner’s manual before assembling your play set.
It provides additional information on the care and use of your play set. You must
carefully read the entire instruction manual before proceeding with the assembly
or use of your new play set.
Creative Playthings takes great care to design its products with your child’s safety
in mind. However, only with careful supervision and proper safety instructions,
can you be assured of safe play time on any product designed for children.
This product is intended for single family home/residential use only and
not intended for use in any public setting. Placement in any public setting
constitutes a misuse of this product.

PLAYSET SAFETY
FOR SAFETY SAKE, PLEASE TAKE TIME TO READ ALL INSTRUCTIONS COMPLETELY AND
CAUTION YOUR CHILDREN APPROPRIATELY.
Observing the following statements & warnings reduces the likelihood of serious or fatal injury:
• Children should use equipment only in its intended manner.
• Children should not wear loose or stringed clothing while using playground equipment.
• Children should not play on equipment in wet weather conditions due to potentially slippery surfaces.
• Children should NOT walk too closely in front of, behind, or between moving swings and trapezes.
• Children should NOT swing empty swing seats.
• Children should NOT jump off swings and/or trapeze while they are in motion.
Children should NOT twist swing chains because this will weaken and reduce the strength of the chains.
•
• Children should sit in the center of the swings with their full weight on the seats.
• Children should NOT be on the top surface of the swing beam.
• Children should NOT use the equipment in a manner other than intended.
• Children should NOT get off the equipment while it is in motion.
• On-site adult supervision is required at all times for children of all ages.
• Until assembly is complete, DO NOT let your children use the Play Set.
• Never fasten anything not approved by Creative Playthings to your Play Set. Accessories or items not ap
proved by Creative Playthings include; Dog runs, clothes lines, electrical devices, or bird feeders etc.
• Suspended ropes, chains, and cables must be secured at both ends.
• Suspended ropes, chains, and cables must not be capable of looping back on themselves.
• Do not allow more than 120 lbs. on Single occupancy swing accessories such as the Sling Swing and Trapeze.
• Do NOT allow more than 175 lbs. on multiple use swing accessories such as the Back-to-Back Plastic Glider.
• Do NOT allow more children on the Play Set than can simultaneously use all the swing stations at one time.
• Children MUST NEVER wear bicycle helmets while playing on the play-set.
Assembly Safety:
• Adult assembly required
• Face slide away from the sun.
• Keep the work area clean and clear of obstructions.
• Children should stay out of the work area until the safe play area is cleared of obstacles, the Play Set has been
completely assembled, all hardware has been tightened and checked, and all tools have been picked up.
• Keep children off the Play Set until it has been completely assembled.
• Parts of the assembly process may require help from another competent adult.
-
• Do not stand on the platform until the Play Set has been completely assembled, use a step ladder if you can
not reach high enough.
• Follow the manufacturers' safety recommendations for the tools and equipment you use.
• Avoid assembling your Play Set in poor weather conditions.
• Wear proper clothing and safety equipment (safety glasses, boots, and gloves) while assembling your Play Set.
NORFOLK II
19944-200 Rev E (01-19)
Page 2
© Copyright 2016, Creative Playthings
Assembly
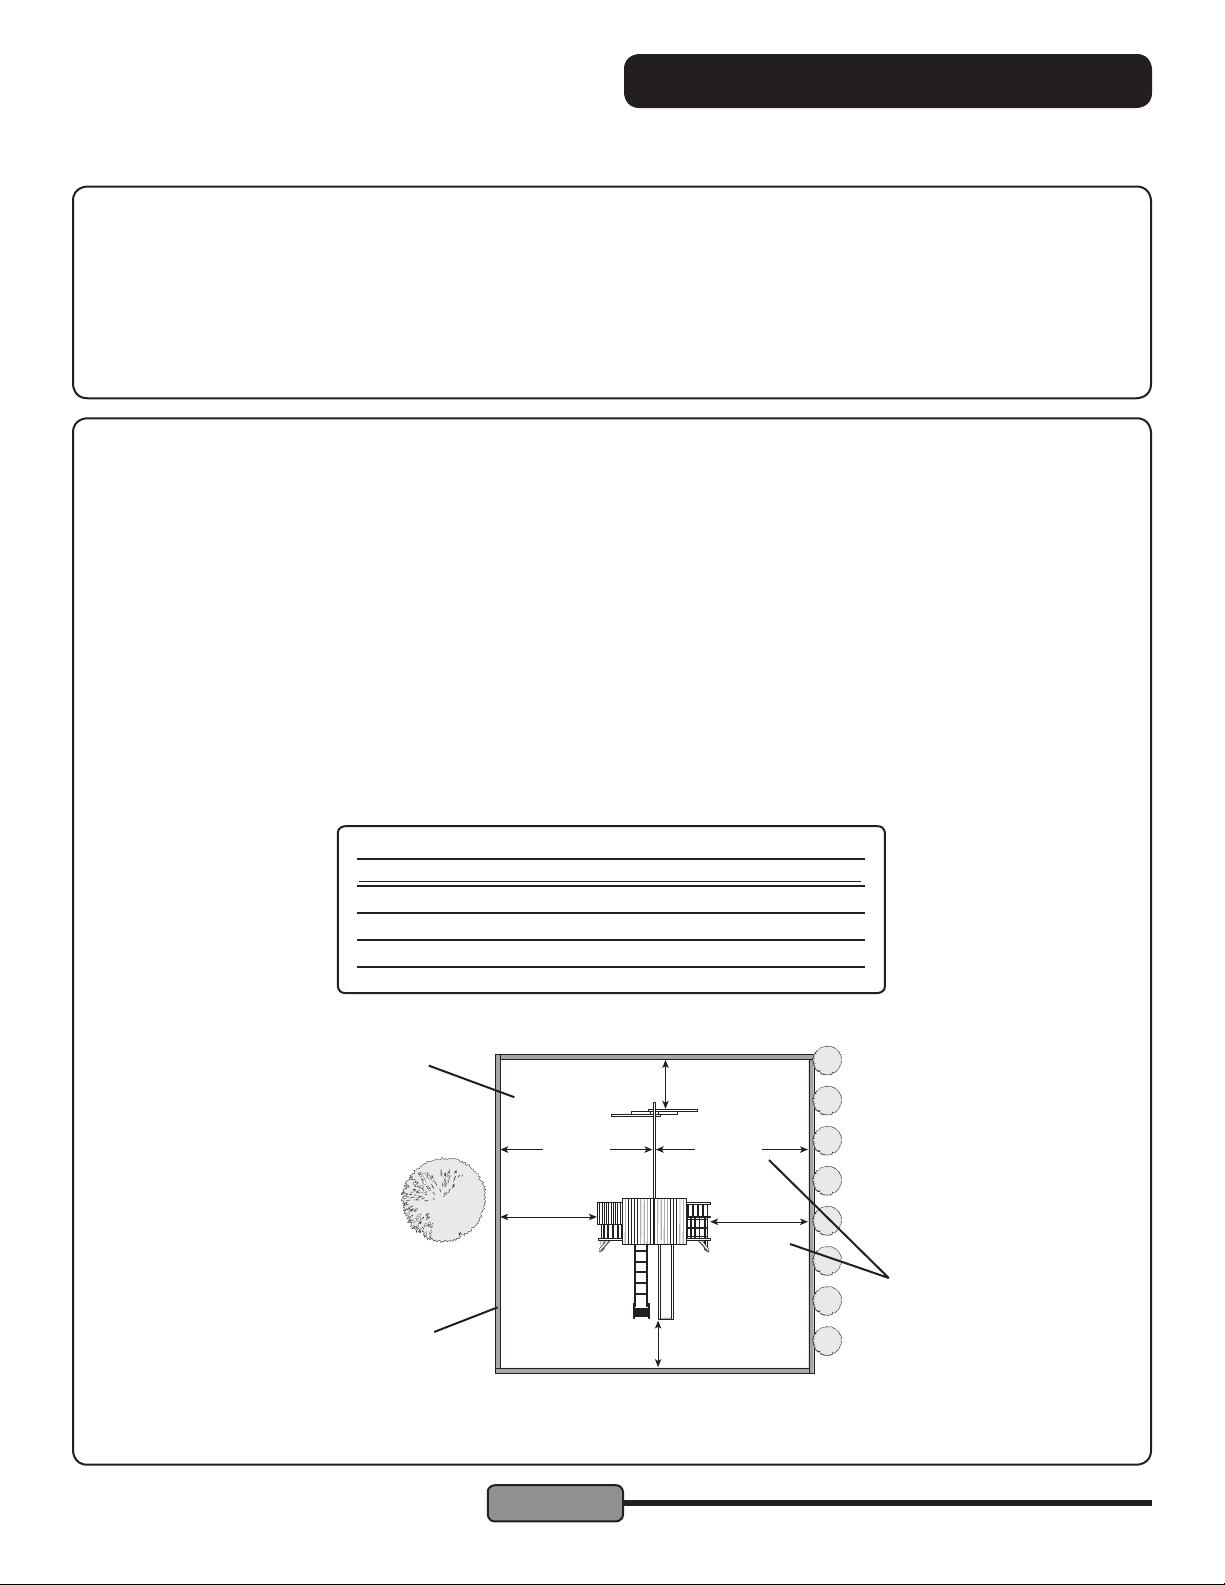
SAFE PLAY AREA
SELECTING THE CORRECT LOCATION FOR YOUR PLAY PRODUCT IS IMPORTANT FOR
YOUR CHILDREN’S SAFETY AND THE PRODUCT’S LONGEVITY.
Playset Dimensions:
• The Norfolk II gym has ground dimensions of 11'-8" x 6'-6".
• The Norfolk II play set requires a level ground surface of 13'-8" x 18'-6' for a Safe Play Area
• Additional accessories such as slide or swing beam may increase the size of the Safe Play Area.
• The maximum fall height for your play set is 87-1/2" as measured from the top of a 7 ft Swing Beam.
Safe Play Area:
• The Safe Play Area refers to a zone extending 6' (2 meters) beyond the Playset on all sides, including the slide
and the space above the Playset. Because children may deliberately jump from a moving swing, the Safe Play
Area must be extended to 14' (4.27 meters) in front of and behind a swinging Accessory.
• The ground surface must be level. Installing your Playset on sloping ground can cause it to lean or “rack”. This
leaning puts additional stress on all connections and joints and in time will cause those connections to loosen
and fail.
• The Safe Play Area must be free of all structures, landscaping, trees and branches, rocks, wires, and other
obstacles to safe play. Children can be seriously injured running, or swinging into these obstacles.
• Remove all tripping hazards from the Safe Play Area. Tripping hazards include; roots, stumps, rocks, landscap
ing, sprinkler heads, railroad ties, plumbing and electrical connections.
• Do not install your Playset over concrete, gravel, asphalt, packed earth, or any other hard surface. The follow
ing is a list of recommended ground covers from the Consumer Product Safety Commission.
RECOMMENDED GROUND COVER
Suggested Material Uncompressed Depth
Double Shredded Bark Mulch 9"
Uniform Wood Chips 12"
Fine Gravel 12"
Fine Sand 12"
• Any edging used to contain the ground cover must be beyond the Safe Play Area. (i.e.. Landscape Timbers)
Safe play area using
recommended ground cover.
14'
(4.27 M)
6'
(2 M)
14'
(4.27 M)
-
-
6'
(2 M)
Whichever is greater
Landscape Timbers 6' from
play structure.
6'
(2 M)
6'
(2 M)
A FALL ONTO A HARD SURFACE COULD RESULT IN SERIOUS
INJURY.
© Copyright 2016, Creative Playthings
Page 3
19944-200 Rev E (01-19)
NORFOLK II
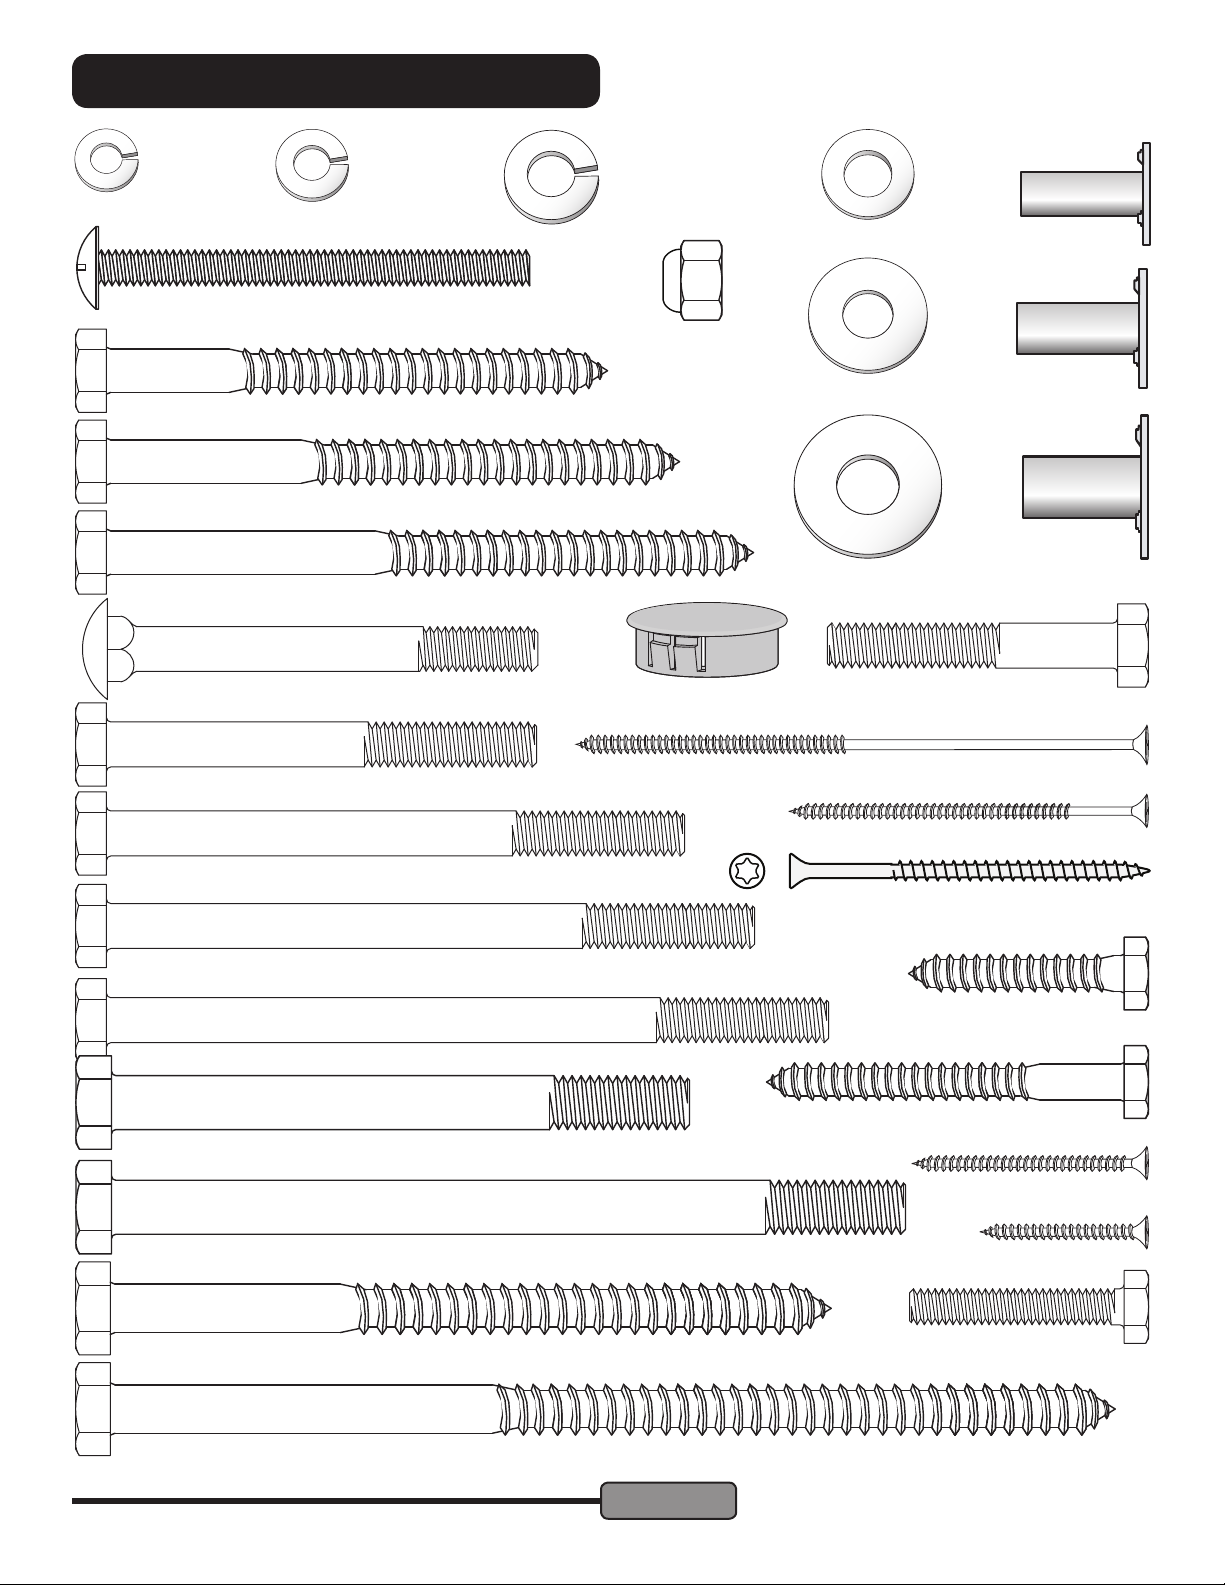
FASTENERS
1/4" Lock
Washer
1/4 x 3" Truss Head Bolt
5/16 x 3-1/2" Lag Screw
5/16 x 4" Lag Screw
5/16 x 4-1/2" Lag Screw
5/16 x 3" Carriage Bolt
5/16" Lock
Washer
3/8" Lock
Washer
5/16" Lock
Nut
Hole Cap
8mm Flat Washer
5/16" Flat Washer
3/8" Flat Washer
1/4" Weld
Nut
5/16" Weld
Nut
3/8" Weld
Nut
5/16 x 2" Hex Bolt
5/16 x 3" Hex Bolt
5/16 x 4" Hex Bolt
5/16 x 4-1/2" Hex Bolt
5/16 x 5-1/2" Hex Bolt
Hex Bolt 3/8 x 4"
Hex Bolt 3/8 x 5-1/2"
3/8 x 5" Lag Screw
#10 x 4-1/2" Screw
#8 x 2-1/2" Screw
#10 x 2-1/2" T25 Deck Screw
1/4 x 1-1/2" Lag Screw
1/4 x 2-1/2" Lag Screw
#8 x 1-5/8" Screw
#8 x 1-1/4" Screw
3/8 x 7" Lag Screw
NORFOLK II
19944-200 Rev E (01-19)
Page 4
1/4 x 1-1/2" Hex Bolt
We have packaged more hardware than is required for assembly.
© Copyright 2016, Creative Playthings
Assembly
FASTENERS
Hardware Bags
50562-700 Hardware, Norfolk II
82 12002-206 Flat Washer 5/16"
58 12017-206 Lock Washer 5/16"
62 17001-105 Weld Nut 5/16"
10 17003-811 Hex Bolt 5/16 X 2"
4 17003-1011 Hex Bolt 5/16 X 2-1/2"
1 17003-1211 Hex Bolt 5/16 X 3"
29 17003-1611 Hex Bolt 5/16 X 4"
4 17003-1811 Hex Bolt 5/16 X 4-1/2"
8 17003-2211 Hex Bolt 5/16 X 5-1/2"
6 17036-1402 Lag Screw 5/16 X 3-1/2"
6 17036-1802 Lag Screw 5/16 X 4-1/2"
26 12002-207 Flat Washer 3/8"
17 12017-207 Lock Washer 3/8"
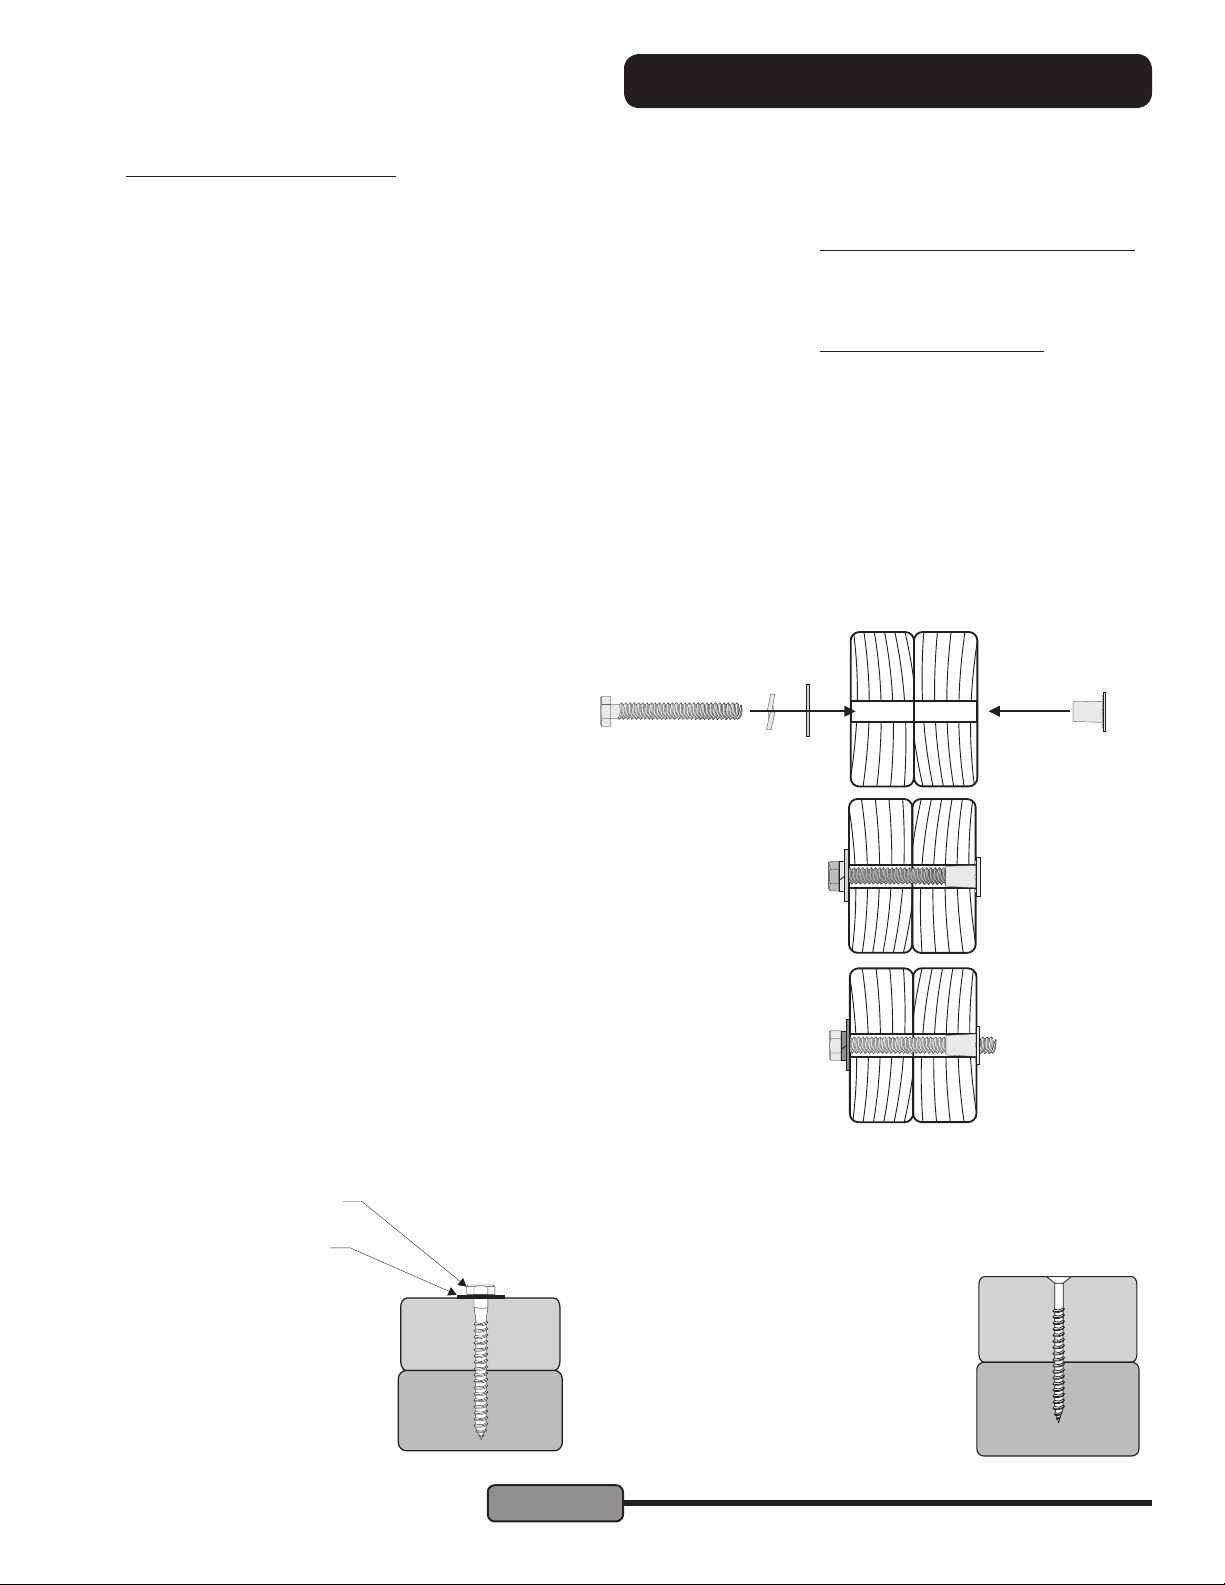
CREATIVE PLAYTHINGS PLAY SETS USE A FEW STANDARD CONNECTIONS. BECOME FAMILIAR WITH
THESE CONNECTIONS TO EASE ASSEMBLY AND ENSURE A SAFER PLAY PRODUCT FOR YOUR CHILDREN.
Hex Bolt & Weld Nut Assembly Procedure:
Assembly Layout:
Align the holes in the parts to be fastened. Start
preliminary tightening of bolt into weld nut by
hand. Tighten each bolt with a wrench until the
lock washer is fully compressed between the
head of the bolt and the at washer.
17 17001-103 Weld Nut 3/8"
13 17003-1613 Hex Bolt 3/8 X 4"
4 17003-2213 Hex Bolt 3/8 X 5-1/2"
4 17036-2003 Lag Screw 3/8 X 5"
4 17036-2803 Lag Screw 3/8 X 7"
158 17020-106 Screw #8 X 1-5/8"
13 17025-104 Screw #8 X 1-1/4"
50 17138-1025 T25 Screw, #10 x 2-1/2"
4 17020-109 Screw #8 X 2-1/2"
22 17020-120 Screw #10 X 4-1/2"
34 12002-203 Flat Washer 8mm
26 12017-205 Lock Washer 1/4"
26 17001-104 Weld Nut 1/4"
26 17003-609 Hex Bolt 1/4 X 1-1/2"
8 17036-601 Lag Screw 1/4 X 1-1/2"
3 17119-1209 Truss Head Bolt 1/4 X 3"
50562-713 Cargo Fastener Pack
8 12052-106 Lock Nut 5/16
8 17015-1211 Carriage Bolt 5/16 x 3"
2 17036-2202 Lag Screw 5/16 x 5-1/2"
50562-200 Hole Caps
77 15081-704 1" Hole Cap, Brown
5 15084-704 1-1/2" Hole Cap, Brown
4 17003-1211 Hex Bolt 5/16 X 3"
2 17036-1001 Lag Screw 1/4 X 2-1/2"
Correct Assembly:
Bolt has been screwed securely into weld nut
and the connection is tight. Check connections periodically for tightness during the life
of the Playset . Do not over tighten.
Incorrect Assembly:
During assembly or maintenance the bolt protrudes 1/8" past the weld nut. Call customer
service or replace the bolt at a local hardware
store. You may be overtightening or using the
wrong size bolt.
Failure to replace this bolt with a shorter
one could result in serious injury.
Typical Installation - Lag Screws:
Lag Screw
Flat Washer
• Pilot drill with the appropriate
diameter drill bit and then use
a socket to tighten.
• DO NOT over tighten
Typical Installation - Wood Screws:
• Use an electric drill or screw gun to drive screws.
• Drill 1/8" pilot holes where required.
• We recommend that you lubricate the
threads of the screws with beeswax or
soap to ease installation and minimize
breaking screws.
• It is very important to make certain
that the tops of all screws are ush
with the surface of the wood and
there are no protruding sharp edges.
© Copyright 2016, Creative Playthings
Page 5
NORFOLK II
19944-200 Rev E (01-19)
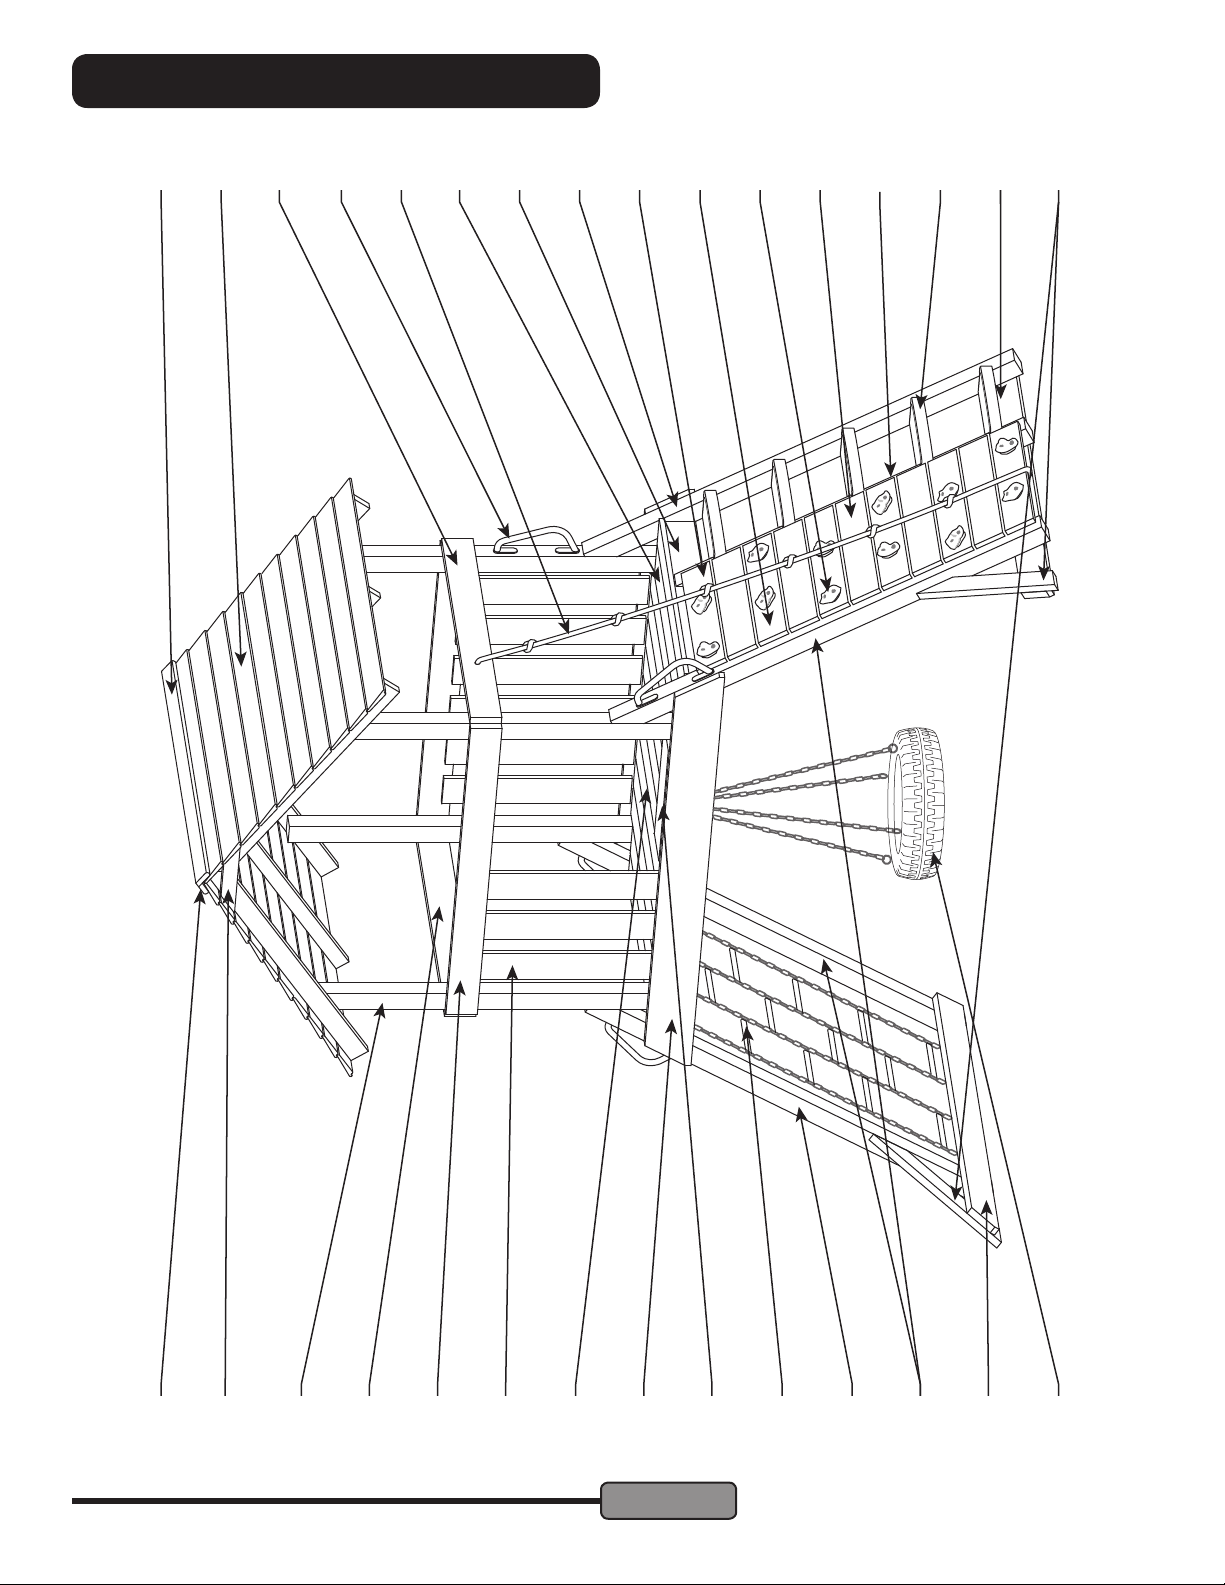
PLAYSET VIEW
DD
F
II
CC
T
Z
HH
X
U1
U2
J
V
Y
K
C
FF
A
EE
NORFOLK II
19944-200 Rev E (01-19)
G
E
D
M
Q
O
Page 6
L
LL
BB
AA
© Copyright 2016, Creative Playthings
B
JJ
 Loading...