

Page 1
CONNECT
Sound Blaster
Wireless MultiPlay System
User’s Guide
Page 2
English
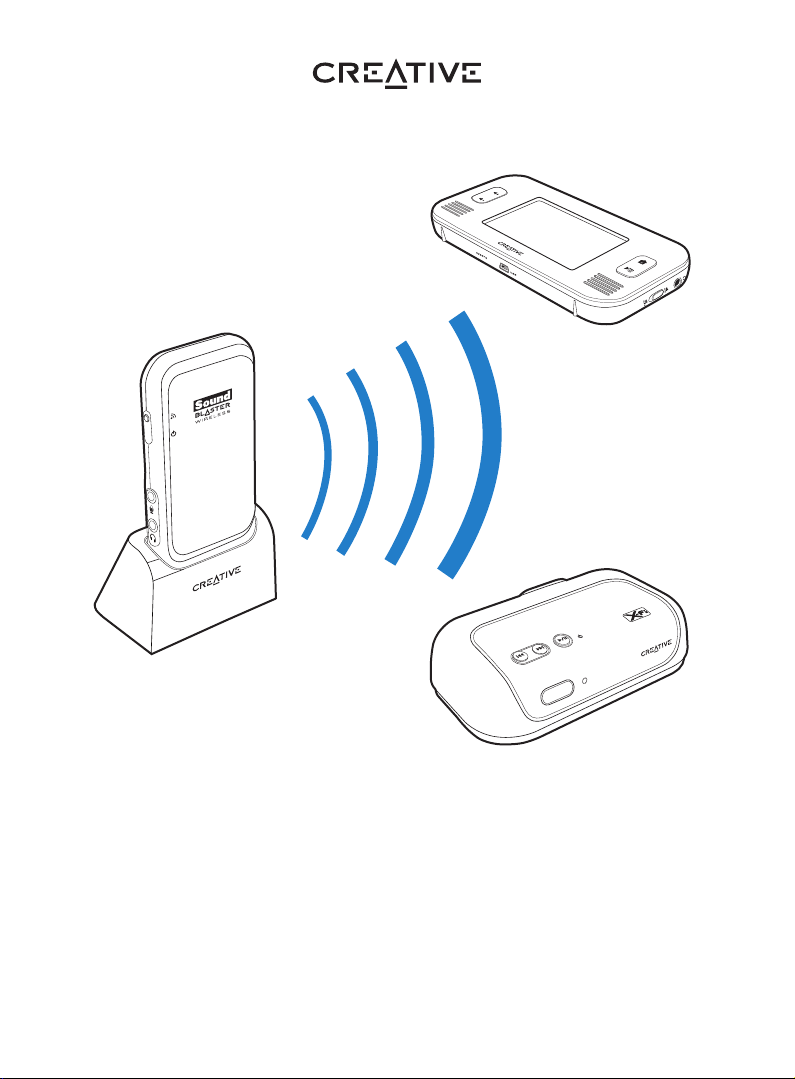
Congratulations!
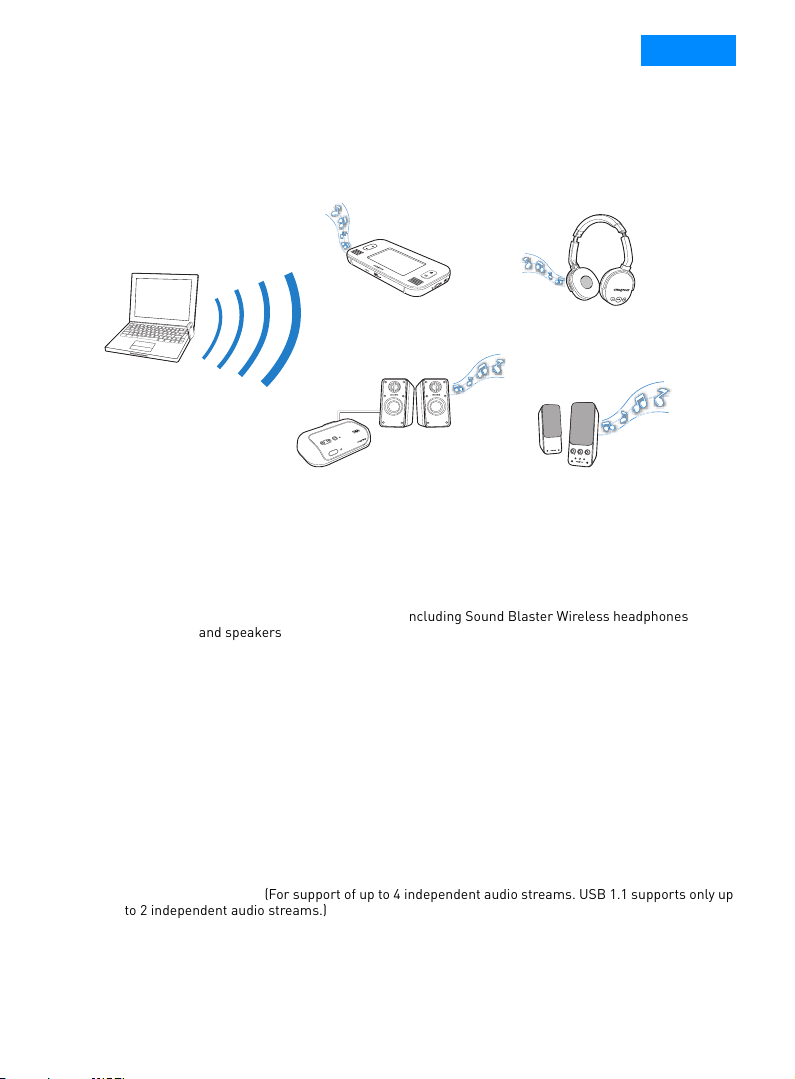
The Sound Blaster® Wireless MultiPlay System, combined with the Creative Music Server
software, lets you playback and control different music simultaneously wherever you are in
your home, wirelessly. You can expand your wireless system by adding on other Sound Blaster
Wireless devices.
Sound Blaster Wireless
C
O
N
N
E
C
T
Tou ch Con trol ler
Sound Blaster Wireless
Headphones*
Sound Blaster
Wireless MultiPlay
B
A
S
S
T
R
E
B
L
E
V
O
L
U
M
E
O
F
F
M
A
X
A
U
X
I
N
T20W Series II*
*Available separately
NOTE
• The following terms used throughout this User’s Guide refer to these devices:
Sound Blaster
Wireless Receiver
Creative GigaWorks
- Transmitter: Sound Blaster Wireless MultiPlay
- Controller: Sound Blaster Wireless Touch Controller
- Receiver: Sound Blaster Wireless Receiver
• You may add up to four receivers, including Sound Blaster Wireless headphones
and speakers, if you are managing different output streams.
• For latest information on other Sound Blaster Wireless devices available to
expand your wireless system, visit www.soundblaster.com.
System Requirements
Minimum Requirements
•Microsoft® Windows® 7 32-bit or 64-bit, Windows Vista® 32-bit or 64-bit with Service Pack 1 or
higher, Windows XP Professional x64 Edition, Windows XP with Service Pack 2 or higher, Windows
XP Media Center Edition (MCE) 2004 or later
®
•Intel
•Intel, AMD
• 1 GB RAM (2 GB RAM recommended)
• 600 MB of free hard disk space
• Available USB 2.0 port (For support of up to 4 independent audio streams. USB 1.1 supports only up
• CD or DVD drive, OR a broadband internet connection (required for software installation)
Core™ Duo, AMD Athlon™ 64x2 Dual Core or equivalent processor, 2.4 GHz or faster
®
or 100% compatible motherboard chipset
to 2 independent audio streams.)
Page 3
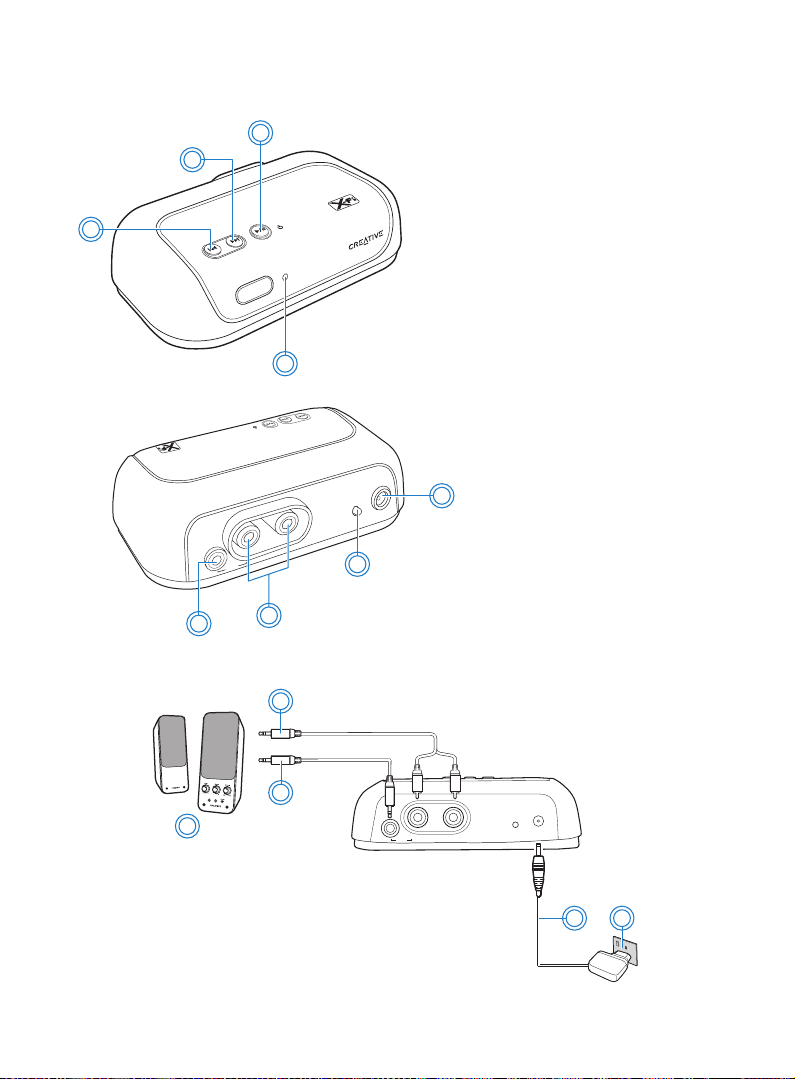
About Your Devices
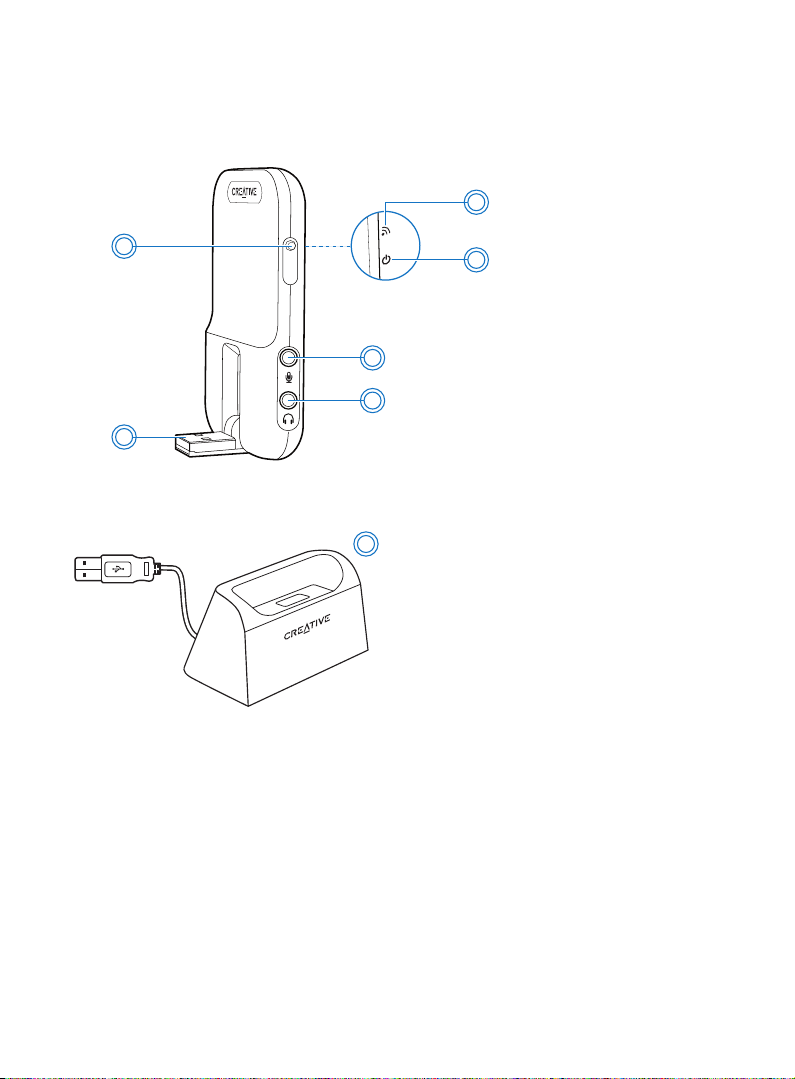
Sound Blaster Wireless MultiPlay (Transmitter)
3
About Your Devices 2
2
CONNECT
4
1 Adjustable USB connector
2 Connect button
5
6
1
3 Connect LED
Lights up green when wireless streaming is
enabled and ready. Flashes to indicate pairing
with a wireless receiver or other supported
device.
4 Power LED
Lights up blue when connected to the
computer’s USB port and computer is turned
on. Flashes when volume is muted.
5 Microphone/Line In jack
6 Headphone/Line Out jack
7
7 USB extension docking station
See Note below.
NOTE
The USB extension docking station allows you to:
• Connect the Transmitter to your computer if it is not physically possible to
connect directly to the USB port due to obstruction of neighboring USB devices.
• Extend or move the Transmitter to another location with better wireless
reception.
Page 4
About Your Devices 3
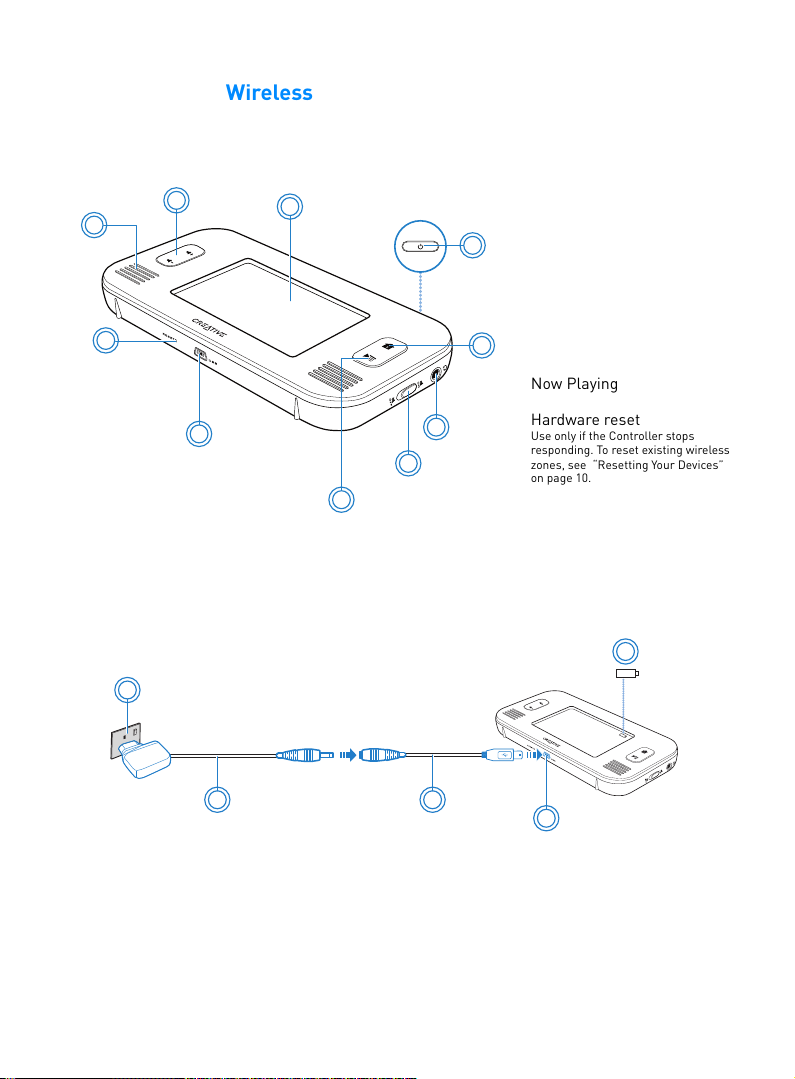
Sound Blaster Wireless Touch Controller (Controller)
The Controller is a wireless receiver designed to let you remotely control the Transmitter’s
music playback and wireless features.
2
1
3
1 Mini speakers
2 Speaker volume buttons
May be used to adjust transmitter
4
volume for certain functions.
3 Touch screen display
4 Power button
Press to turn on.
Press and hold to turn off.
10
5 Home button
5
6 Headphone jack
7 Speaker on/off switch
8Now Playing button
9 5V DC charging port
9
8
6
7
10 Hardware reset
Use only if the Controller stops
responding. To reset existing wireless
zones, see “Resetting Your Devices”
on page 10.
Charging the Controller
Before first use, charge the Controller for at least 6 hours. When fully charged, the “battery
full” icon is displayed on the display screen.
5
1
2 3
1 Power outlet
2 Power adapter
3DC-to-USB cable
4
4 5V DV charging port
5 Battery icon
Page 5
Sound Blaster Wireless Receiver (Receiver)
1
2
3
4
DC
5V
LINK /
CONNECT
1Power/Standby and
2 Next/Fast forward button
3 Previous/Rewind button
4Power LED
5 Line Out jack
6 RCA Audio Line Out jacks
7 Connect LED button
8 5V DC In jack
8
About Your Devices 4
Play/Pause button
Press to turn on.
Press and hold to enable Standby mode.
Press and hold to Fast forward.
Press and hold to Rewind.
Lights up when turned on. Lights up red
when on standby mode.
Lights up green when paired with
transmitter. Flashes to indicate pairing
in progress.
LINE
OUT
5
6
7
Connecting Speakers to your Receiver
2
OR
3
1
1 Powered stereo or 2.1 speakers
2 Stereo to RCA cable
3 Stereo cable (available
separately)
4 Power adapter
5 Power outlet
LINK/
LINE
OUT
CONNECT
5v DC
4
5
Page 6
Setting Up Your Wireless System 5
CONNECT
Setting Up Your Wireless System
This section shows you how to set up your wireless system consisting of your Transmitter,
Controller and Receiver.
• Step 1: Connect the Transmitter to your computer’s USB port ... page 5
• Step 2: Install Software ... page 6
• Step 3: Set up the Transmitter ... page 6
• Step 4: Pair the Controller. ... page 8
• Step 5: Pair the Receiver ... page 9
TIP
• While doing the setup, place your devices near each other and pair (wirelessly
connect) them before placing your receivers at other locations up to 30 meters
away from the Transmitter.
• Signal quality between the Transmitter and Receiver/Controller may be affected
by any object or structure (for example, multiple walls) that is between the units.
Experiment with different positions if necessary.
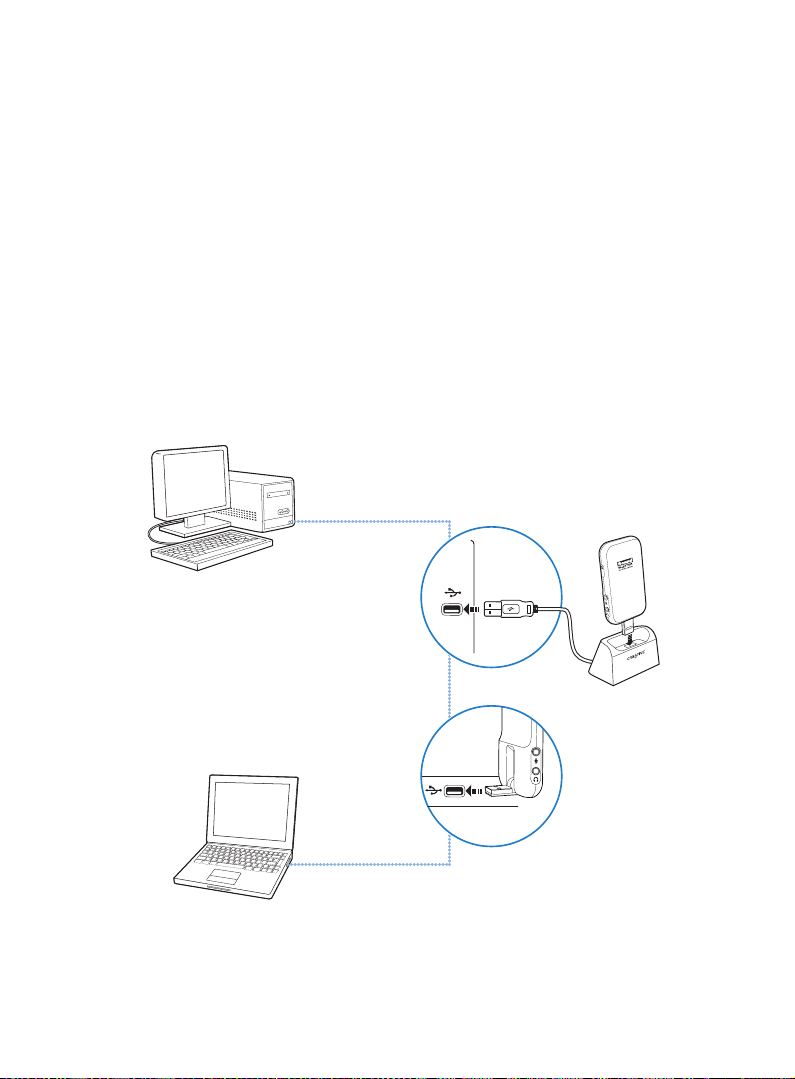
Step 1: Connect the Transmitter to your computer’s USB port
CON
N
ECT
OR
Page 7
Install Software 6
Step 2: Install Software
To control your wireless music streaming and manage separate playlists for each zone, you
must install the drivers and applications provided on the installation CD. If you are using a
notebook that does not have a CD-ROM drive, you can download the installation software from
www.soundblaster.com/SBWirelessMultiPlay.
For all supported Windows OS
1 If prompted for the audio drivers, click the Cancel button.
2 Insert the Installation CD into your CD or DVD drive. Your CD should start automatically. If it
does not, follow the steps below:
i. Click Start -> My Computer.
ii. Right-click the CD or DVD drive icon, and then click Open Autoplay or Autoplay.
3 To complete the installation, follow the instructions on the screen.
4 When prompted, restart your computer.
Step 3: Set up the Transmitter
C
O
N
N
EC
T
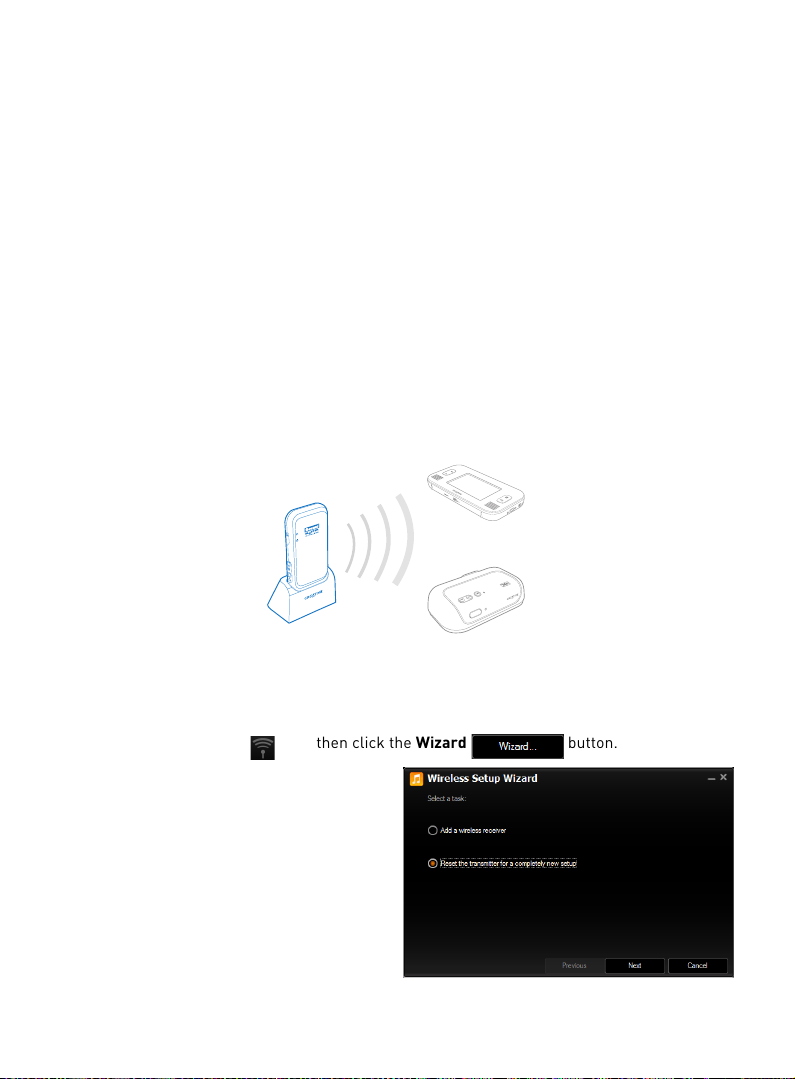
1 Click Start -> Programs or All Programs -> Creative -> Sound Blaster Wireless MultiPlay ->
Creative Music Server.
The first time you launch Creative Music Server, the Wireless Setup Wizard will run
automatically to guide you through setting up your transmitter and receivers. If not, click the
Wireless Control Setup icon, then click the Wizard button.
2 Select the Reset the transmitter for a
completely new setup option.
Page 8
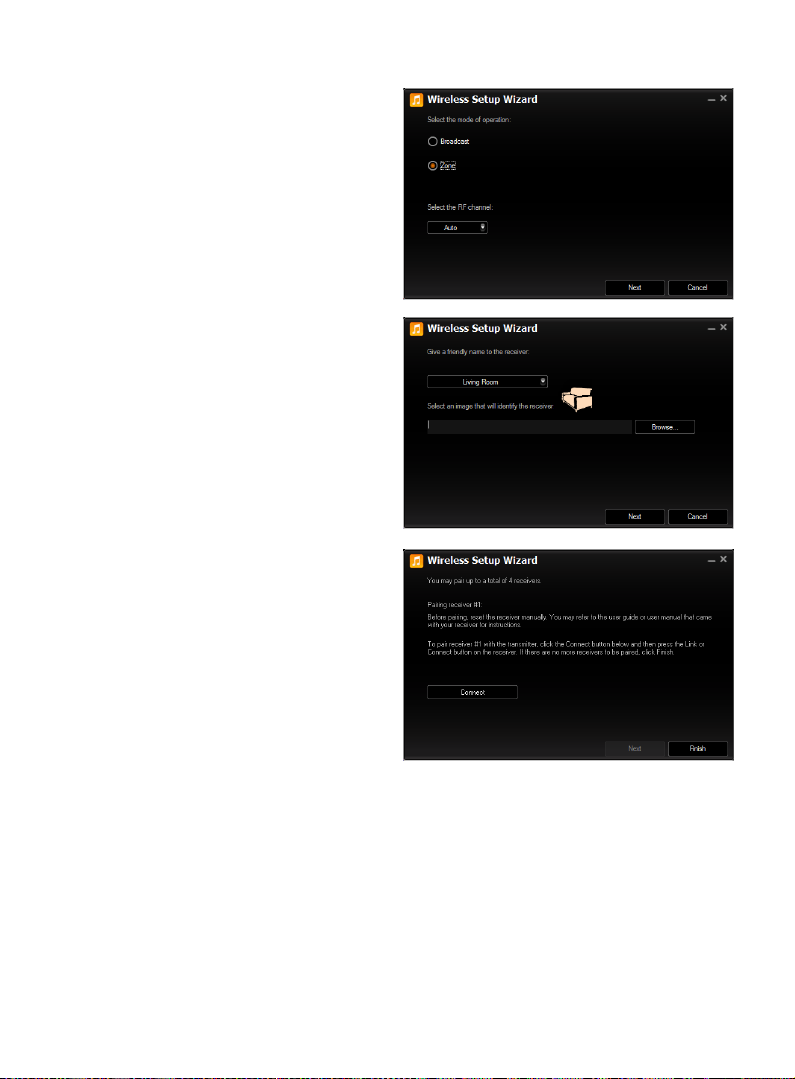
3 Select Zone for the mode of operation,
and Auto for the Radio Frequency (RF)
channel to use.
4 Select “Sound Blaster Wireless Touch
Controller” from the list as you will be
pairing with the Controller next.
5 Click the Connect button.
You should then proceed to perform the
next step within three(3) min to complete
the pairing with the Controller.
Set up the Transmitter 7
Page 9
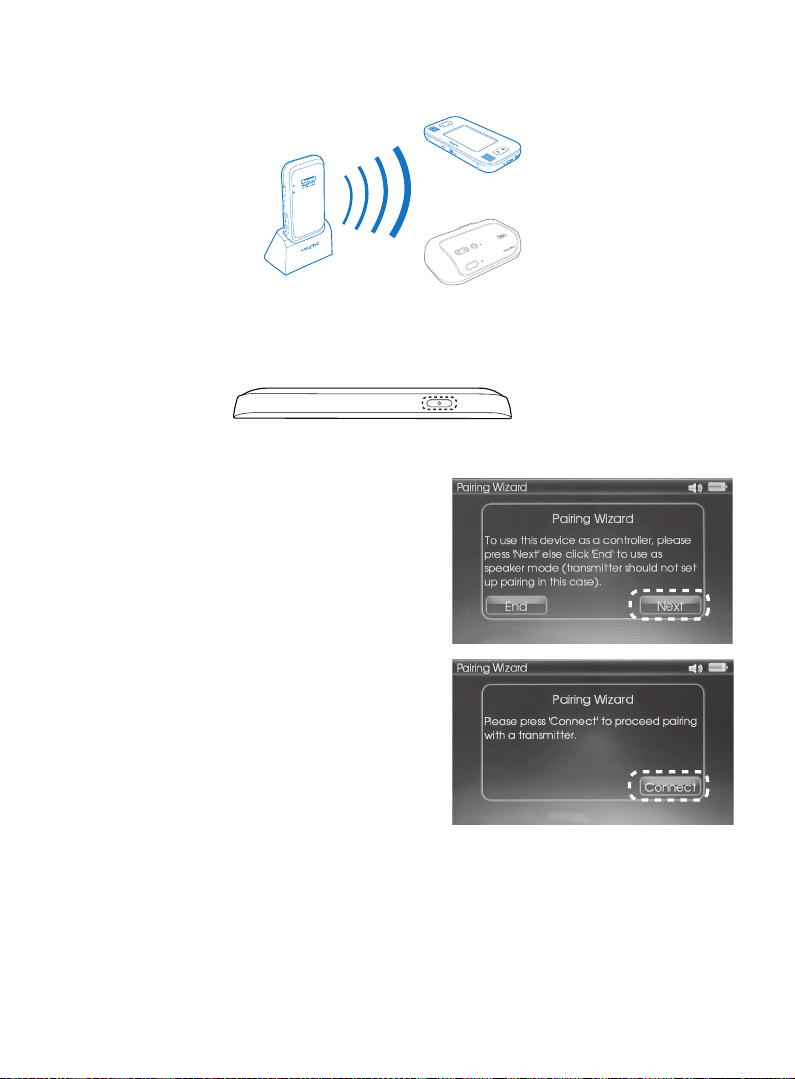
Step 4: Pair the Controller.
C
O
N
N
EC
T
NOTE
You are allowed to pair only one controller for each wireless system.
1 Press the Power button on the Controller to turn it on.
2 Ta p Next on the Pairing Wizard screen.
Pair the Controller. 8
3 Ta p Connect.
Once paired, the Connect LED on the transmitter
will light up green and a Zone will be shown on
the Controller.
4 A test tone will be played to the Controller to
confirm the connection.
Page 10

Pair the Receiver 9
5V DC
LINK /
CONNECT
5V DC
LINK /
CONNECT
Step 5: Pair the Receiver
C
O
N
N
E
C
T
1 Click the Add Receiver... button on the
Wireless Setup Wizard window.
2 Select Zone for the mode of operation,
and Auto for the Radio Frequency (RF)
channel to use.
3 Select “Sound Blaster Wireless
Receiver” from the list. Alternatively, you
can enter or select an appropriate label
and image for the Receiver (e.g., select
“Bedroom” if the Receiver will eventually
be placed in the bedroom).
4 Click the Connect button.
5 Turn on your Receiver and the attached speakers. Press the Connect button at the back of the
receiver. Once the Transmitter and Receiver are paired successfully, the Connect LED lights
up green and remain on. You should also hear a test tone played through the speakers that
are attached to the Receiver.
6 You can now play and enjoy wireless music throughout your home. For more information on
playying and streaming music, see “Playing and Managing Music” on page 12.
Page 11

Pair the Receiver 10
Pairing Additional Receivers
If you wish to reset your transmitter or add more receivers later, follow the steps below:
1 Click the Wireless Control Setup icon in Creative Music Server.
2 Click the Wizard button.
3 Select the Add a wireless receiver
option, then follow the instructions on the
screen as described in the previous
section, “Step 5: Pair the Receiver”.
4 Press the Connect button on the receiver
to complete the pairing with the
transmitter.
Resetting Your Devices
If you wish to reset the zones of your wireless system and start afresh with your wireless
setup, do the following to reset your devices:
• To reset your Transmitter:
- Press and hold the Transmitter’s Connect button for five seconds, OR
- In Creative Music Server, run the Wireless Setup Wizard and select the Reset the
transmitter for a completely new setup option.
• To reset your Controller, tap Settings -> Wireless Settings -> Wireless Reset.
• To reset your Receiver, press and hold the Receiver’s Connect button for five seconds.
NOTE
If you unintentionally reset one device, you should also reset the other devices in
your wireless system, and then pair them again.
Page 12

Using Creative Music Server 11
Using Creative Music Server
Creative Music Server gives you full wireless control over your music streaming and
integrates seamlessly with your iTunes
music tracks in your computer and other sources, such as the audio track of movies and
Internet radio from other applications.
Use your existing playlists, or create new ones from your music library. You can have a
separate play queue for each of the four wireless zones! You can also adjust your audio
settings to get the best audio experience.
Overview
1 293 4
11
Right-click on the interface for more
software options.
TIP
10
®
or Windows Media library. You can playback any
1 Local zone
Lets you control playback to your headphones/
speakers that are connected to your Transmitter.
2 Wireless zones
5
6
7
8
Click to control music streaming to that zone.
3 Standby toggle
Lets you turn on/off wireless streaming to that
zone.
4 Check status of all zones
5 Wireless Control Setup
Manage your wireless settings.
6 Play From...
Opens the Sources window to browse your
computer for music and playlists.
7 Audio settings
Lets you adjust audio enhancement settings. See
See “Adjusting Audio Settings” on page 13.
8 Music playback controls
9 Play queue window
10 Play Queue management
Manage tracks in your play queue and save them
as playlists.
11 Click to select playback mode:
- Normal, Repeat All, Repeat Track or Shuffle.
Using the Controller
Apart from using Creative Music Server, your Controller gives you the additional flexibility to
control your music playback and wireless features wherever you are, away from the PC. In the
following sections, you will learn how to manage your music and wireless features using
either Creative Music Server or the Controller.
Page 13

Playing and Managing Music 12
Playing and Managing Music
Playing Music
Using Creative Music Server
1 Click the zone you wish to stream music to. This step is not required if you are in Broadcast
mode.
2 Click the Play From... button to display the Music Server - Sources window. You can browse
through your computer for songs or playlists, then click and drag them into the play queue
window. You can press and hold the Shift key to click and select multiple tracks.
3 Select a song, then click .
Using the Controller
1 From the Home screen, tap the zone you wish to stream music to.
2 Select a song by tapping the track title, then tap Play.
Managing Play Queues
A “play queue” contains a list of tracks that you have selected for a particular zone. Use the
Play Queue management controls to add or remove tracks from the current play queue, or
you can save the current play queue as a playlist so that you can easily retrieve it in the future.
To retrieve your saved playlists, click the Play From... button to display the Sources window,
then click the My Playlist Library tab.
Page 14

Playing and Managing Music 13
Adjusting Audio Settings
You can enhance your music listening experience with these settings:
Crossfading is used to create smooth transitions between songs by fading out the volume at
the end of one song and fading in the volume of the next song gradually.
Crystalizer restores the natural dynamic range that is lost when iTunes and MP3 music gets
compressed.
Smart Volume Management (SVM) monitors the volume level across different audio sources
and music tracks to prevent sudden changes in volume level from disrupting the listening
experience.
Using Creative Music Server
1 Click the CrossFade or Crystalizer button, then drag the slider to adjust the amount of
enhancement to apply to your music output.
2 Click the Smart Volume button to toggle this enhancement on or off.
Using the Controller
1 Ta p Settings -> System Settings -> Audio Settings.
2 Ta p CrossFade or Crystalizer, then drag the slider to adjust the amount of enhancement to
apply to your music output. .
3 Ta p Smart Volume to toggle this enhancement on or off.
Page 15

Managing Broadcast and Zone modes 14
Managing Broadcast and Zone modes
Use the Broadcast feature to playback the same song to all your receivers simultaneously.
This quick and easy method is perfect for occasions such as parties when you want everyone
to listen to the same song throughout your home.
Use the Zone Control feature to allow people in your home to listen to the songs they want,
and each zone can have their own playlist. For example, you can playback classical music in
your study, and playback the latest pop hits in the living room.
Broadcasting
Using Creative Music Server
1 Click the Wireless Control Setup icon.
2 Under Broadcast, click the On option, then close the Wireless Settings window.
3 Select the song you wish to stream, then click .
R R
R
R
Transm itt er
T
Receiver
R
T
Using the Controller
1 Ta p Settings -> Wireless Settings -> Modes and Zones.
2 Under Broadcast, tap ON. Then tap Done.
3 OR Select one of the “link” icon at main screen and select Play All.
Page 16

Managing Broadcast and Zone modes 15
Zone Control
Your transmitter and receivers may automatically pair with each other the first time they are
switched on. However, to use zone control, you must manually pair your transmitter and
receivers so that the zones are correctly assigned. To do this, follow the steps in “Setting Up
Your Wireless System” on page 5.
Using Creative Music Server
1 Click the Wireless Control Setup icon.
2 Under Zone, click the On option, then close the Wireless Settings window.
3 Select the zone to stream music to.
4 Select the song to stream, then click .
5 Repeat steps 3 and 4 for streaming music to other zones.
R1
R2
R3
Transm itt er
T
Receiver
R
TIP
Click the Standby icon on the zone to turn on/off wireless streaming to that zone.
R4
T
Using the Controller
1 Ta p Settings -> Wireless Settings -> Modes and Zones.
2 Under Zone, tap ON. Then tap the zones you wish to enable wireless streaming to.
3 Ta p Done when you have completed your selection.
4 Ta p Yes to confirm the selection.
Page 17

Managing Broadcast and Zone modes 16
Grouping Zones
Zones that are grouped together share the same play queue. Each zone can only belong to
one group, but you can create multiple groups. Each group can have their own play queue.
This lets you play songs to only some of your receivers simultaneously. For example, you can
group the kitchen and dining room together for classical music, and group the living room and
the bedroom for rock music.
Using Creative Music Server
1 Click the inactive Link icon below the zone that you wish to group with the currently
selected zone. To ungroup the zone, click the active Link icon below the zone you wish to
remove from the currently selected group.
1
Using the Controller
1 On the Home screen, tap the “link” icon.
2 Tap the zones you wish to group.
3 Ta p Done when you have completed your selection.
NOTE
To stream audio generated from other computer applications or web browsers
(for example, internet radio, YouTube, etc.) to a particular zone, group that zone
with the Local zone.
Page 18

Using Your Audio Device 17
Using Your Audio Device
Communicating with Voice over Internet Protocol (VoIP)
Use a headphones and microphone combination, or a headset with your audio device to enjoy
outstanding acoustic performance for your VoIP applications like Skype
messaging applications like Yahoo!
®
Messenger.
®
, or instant
L
1
1 Headset
2 Stereo cable
(available separately)
3 Powered stereo or 2.1
speakers
CONNECT
2
5
4
4 Headphones
5 Microphone
IMPORTANT
Do not listen to audio on your
headphones or headset at high
volumes for prolonged periods
of time as hearing loss might
result.
3
To adjust the microphone recording volume, use the mixer in Creative Entertainment Console
and drag the Line-In/Mic-In slider to the desired level.
Page 19

Using Your Audio Device 18
Playing / Recording Music
You can play music from, and/or record music to external devices (for example, MP3 players,
Digital Audio Tape players/recorders and MiniDisc players/recorders) by connecting them to
your audio device.
Playing Music from external devices
1
CONNECT
1 Stereo-to-RCA cable
(available separately)
2DAT player
3 Stereo cable
(available separately)
4 MP3 players, MD players
Recording Music to external devices
CONNECT
1Stereo-to-RCA cable
2 DAT recorder
3 Stereo cable
4 MD recorders
2
3
4
1
2
3
4
(available separately)
(available separately)
NOTE
If you enable line-in monitoring during recording, you should disable the wireless
features because you may experience audio latency while streaming your music
to your receivers.
Page 20

Software Suite 19
Playing Games
Your audio device is equipped with Creative's cutting edge audio technologies and software to
enhance the audio in your games.
EAX ADVANCED HD
Make your games come alive with EAX
Hear multiple audio effects being played simultaneously, and precise environment settings
applied to them to create a life-like environment and heighten the sense of realism.
Each effect is also accurately positioned in its 3D environment, allowing you to tell where it is
coming from relative to your location.
Crystalizer
With Crystalizer
lows to give you a greater dynamic range.
®
, your audio content is re-mastered in real-time to enhance the highs and
®
ADVANCED HD™!
Software Suite
The included software is designed for you to access the basic as well as the advanced features
of your audio device. For more information on each application, refer to its online help.
Creative Software Suite
For PC:
• Audio Control Panel
• Entertainment Console
• Creative Music Server
•Creative ALchemy
• Creative Sound Blaster Plugin for Windows Media Center Edition
• Volume Panel
NOTE
• The applications included with your audio device may differ from those listed
here. Your audio device may also come with third party applications.
• Some applications are available for certain operating systems only.
Page 21

Standalone Operation (Optional) 20
Standalone Operation (Optional)
You can also use Sound Blaster Wireless MultiPlay as a standalone transmitter for your other
audio playback devices. If you choose to use it in this manner, you can enjoy only one wireless
music stream which is transmitted to all receivers (Broadcast mode). Your Controller will
simply function as speakers, and no additional controls will be available.
5
1
CONNECT
1 USB Power Adapter (5V, 1A)
(available separately)
2 USB Connector
3 Microphone/Line In jack
4
4 Stereo cable
(available separately)
5 External audio sources
2
3
Auto Pairing
Your transmitter and receivers pair automatically when turned on. The Connect LEDs on your
receivers flash and then light up green when pairing is successful.
NOTE
If your transmitter and receiver do not pair, simply reset them. On one unit at a
time, press and hold the Connect button for five seconds.
If you have paired your transmitter and receivers previously, you can reset them by holding
down the Connect button on the units for five seconds.
Manual Pairing
Although your transmitter and receivers may pair automatically, you may wish to manually
pair them to establish a more robust wireless connection.
1 Press the Connect button on your transmitter. The transmitter’s Connect LED flashes.
2 Press the Connect button on your first receiver. This must be done within three minutes after
pressing the Connect button on the transmitter (Step 1). Once the transmitter and receiver
are paired successfully, the Connect LED on both units light up green and remain on.
3 Press the Connect button on your transmitter again.
4 Press the Connect button on your second receiver. Once paired successfully, the Connect LED
on both units light up green and remain on. Repeat the steps 3 and 4 to pair your third and
fourth receivers (if applicable).
Page 22

Troubleshooting 21
Troubleshooting
Problems with Sound
No sound from headphones or speakers.
Check the following:
• The default sound playback device under Microsoft Volume panel shows the correct audio
device. If the audio device selected is correct, refer to “Problems with Multiple Audio
Devices”
• If any audio applications were running when your audio device was plugged in, close and
open them again.
• The headphones or powered speakers are connected to the audio device’s Headphone/
Line Out jack.
No audio output when playing digital files such as .WAV, MIDI files or AVI clips.
Check the following:
• The speakers' volume control knob, if any, is set at mid-range. Adjust the playback volume
in Creative Music Server or Microsoft Volume panel, if necessary.
• There is no hardware conflict between the audio device and a peripheral device.
• The speakers and headphone selection in Entertainment Console corresponds to your
speaker or headphone configuration.
There is clipping/distortion during audio playback.
Check the following:
• Your computer system should be running in high performance mode. You may need to
disable any power saving features.
Problems with Multiple Audio Devices
The onboard audio chipset seems to be in conflict with the Transmitter.
Disable your computer's onboard audio chipset. See your computer's motherboard
documentation for details
Problems with Wireless Features
Music is not being transmitted to my paired devices.
Check the following:
• Your Transmitter and your paired devices are turned on.
• Your Controller’s speaker on/off switch is set to ON, and headphones have not been
connected to your Controller’s headphone jack.
• Your Transmitter’s wireless features are enabled by default and the device’s Connect LED
should light up green. If not, do the following:
1 Launch Creative Music Server.
2 Click the Wireless Control Setup icon.
Page 23

3 Select the Enable Wireless Music Control check box.
Troubleshooting 22
1
32
The receivers seem to be picking up extra noise, or there are intermitten pauses.
The position of your Sound Blaster Wireless devices as well as signals from other wireless
routers or Bluetooth equipment may affect the quality of the transmissions.
Try the following:
• In the Wireless Music Control section of Creative Music Server, change the RF Channel
from Auto to either Ch 1, 2 or 3.
• Place your transmitter and receivers closer to each other. For best performance, your
devices should be operating on the same floor. Use the docking station for more flexibility
in placing your transmitter.
• Place your transmitter away from other devices that transmit wireless signals, and away
from large metal surfaces.
• Reposition your devices so that there are fewer objects (for example, multiple walls or
large metal structures) between them.
• Set your wireless LAN router's channel to Auto, 1 or 11. To do this, refer to your router's
user documentation.
• Refrain from doing large file transfers via the wireless internet or Bluetooth connection
while you are streaming music. Alternatively, stop streaming music during intensive file
transfers.
Page 24

General Specifications 23
General Specifications
Connectivity
Sound Blaster Wireless MultiPlay
• One 3.5 mm (1/8”) stereo jack for Analog Line In or Microphone
• One 3.5 mm (1/8”) stereo jack for Analog Line Out or Headphones
Sound Blaster Wireless Touch Controller
• One 3.5 mm (1/8”) stereo jack for Headphones
Sound Blaster Wireless Receiver
• One 3.5 mm (1/8”) stereo jack for Analog Line Out
• A pair of RCA jacks for Analog Line Out
Power Adapter
• Supply Voltage: 5V +/- 5%
• Current: 1 A
• Power: 5 W
Common to all devices
Interfaces
• Sound Blaster Wireless technology transmitter to connect with supported wireless
devices.
Radio Frequency (RF)
• Operating RF range: 2400 - 2483.5 MHz
• Number of RF channels: 3
• RF transmitter power output: 16 dBm (typical)
NOTE
You cannot tune the RF channels.
Page 25

Safety Information 24
Safety Information
Refer to the following information to use your product safely, and to reduce the chance of electric shock,
short-circuiting, damage, fire, hearing impairment or other hazards. Improper handling may void the
warranty for your product. For more information, read the warranty available with your product.
• Read these instructions.
• Keep these instructions.
• Heed all warnings.
• Follow all instructions.
• Do not use this apparatus near water.
• Clean only with dry cloth.
• Do not block any ventilation openings. Install the product in accordance with the instructions.
• Do not install near heat sources such as radiators, heat registers, stoves, or other apparatus
(including amplifiers) that produce heat.
• Do not expose your product to temperatures outside the range of 0°C to 40°C (32°F to 104°F).
• Do not pierce, crush or set fire to your product.
• Keep your product away from strong magnetic objects.
• Do not subject your product to excessive force or impact.
• Do not defeat the purpose of the polarized or grounding-type plug. A polarized plug has two blades
with one wider than the other. A grounding type plug has two blades and a third grounding prong.
The wide blade or the third prong are provided for your safety. If the provided plug does not fit into
your outlet, consult an electrician for replacement of the obsolete outlet.
• Protect the power cord from being walked on or pinched particularly at plugs, convenience
receptacles, and the point where they exit from the apparatus.
• Only use attachments/accessories specified by the manufacturer.
• Use only with the cart, stand, tripod, bracket or table specified by the manufacturer, or sold with the
apparatus. When a cart is used, use caution when moving the cart/apparatus combination to avoid
injury from tip-over.
• Unplug this apparatus during lightning storms or when unused for long periods of time.
• Do not dismantle or attempt to repair your product.
Refer all servicing to authorized and qualified service personnel. Servicing is required when the
apparatus has been damaged in any way, such as power-supply cord or plug is damaged, liquid has
been spilled or objects have fallen into the apparatus, the apparatus has been exposed to rain or
moisture, does not operate normally, or has been dropped.
• WARNING: To reduce the risk of fire or electric shock, do not expose your product to water or
moisture. If your product is moisture-resistant, take care not to immerse your product in water or
expose it to rain.
Earphones
When a conductive apparatus, such as earphones, is used in close proximity with a CRT television or
•
CRT monitor, the latter may emit an electrostatic discharge. The electrostatic discharge can be felt
as a static shock. While this static shock is usually harmless, it is good practice to avoid close
contact with CRT devices when using earphones.
• Do not listen to audio on your earbuds or headphones at high volume for prolonged periods of time
as hearing loss may result. For users in the United States, go to www.hei.org for more information.
• Do not listen to your audio device at high volume when driving, cycling or crossing the road,
especially in heavy traffic, or in any other traffic condition where such use will hinder safe travel on
the roads. We recommend that consumers be extremely cautious when using this device on the
road.
Embedded Battery
• Do not attempt to remove the embedded battery.
The product must be disposed of according to local environmental regulations. To replace the
battery, return your product to your regional support office. For product service information, go to
www.creative.com.
Wireless Device
• Switch off the device where it is prohibited, or when its use may cause danger or interference such
as inside an aircraft, hospitals, or near refuelling points.
Page 26

Regulatory Information 25
Regulatory Information
Notice for the USA
FCC Part 15: This equipment has been tested and found to comply with the limits for a Class B digital
device, pursuant to Part 15 of the FCC Rules. These limits are designed to provide reasonable protection
against harmful interference in a residential installation. This equipment generates, uses and can radiate
radio frequency energy and, if not installed and used in accordance with instructions, may cause harmful
interference to radio communications. However, there is no guarantee that interference will not occur in a
particular installation. If this equipment does cause harmful interference to radio or television reception,
which can be determined by turning the equipment off and on, the user is encouraged to try to correct the
interference by one or more of the following measures:
• Reorient or relocate the receiving antenna.
• Increase the separation between the equipment and receiver.
• Connect the equipment into an outlet on a circuit different from that to which the receiver is
connected.
• Consult the dealer or an experienced radio/TV technician for help.
This device complies with part 15 of the FCC Rules. Operation is subject to the following two conditions:
1 This device may not cause harmful interference, and
2 This device must accept any interference received, including interference that my cause undesired
operation.
CAUTION: To comply with the limits of the Class B digital device, pursuant to Part 15 of the FCC Rules, this
device must be installed with computer equipment certified to comply with Class B limits.
All cables used to connect to the computer and peripherals must be shielded and grounded. Operation with
non-certified computers or non-shielded cables may results in interference to radio or television reception.
MODIFICATION: Any changes or modifications not expressly approved by the grantee of this device could
void the user’s authority to operate the device.
WARNING: To satisfy FCC RF exposure requirements for mobile transmitting devices, a separation
distance of 20 cm or more should be maintained between the antenna of this device and persons
during device operation.
To ensure compliance, operations at closer than this distance is not recommended. The antenna used for
this transmitter must not be co-located in conjunction with any other antenna or transmitter.
California Proposition 65 Statement
WARNING: Handling this product may expose you to chemicals known to the State of California to cause
cancer and birth defects or other reproductive harm.
Wash hands after handling.
Explanatory Note: California Safe Drinking Water and Toxic Enforcement Act of 1986 (Proposition 65)
requires special product labeling for products containing certain chemicals known to the State of California
to cause cancer, birth defects or other reproductive harm. Creative has chosen to provide a warning based
on its knowledge about the presence of one or more listed chemicals without attempting to evaluate the
level of exposure. With Creative's products, the exposure may be below the Proposition 65 level of concern,
or could even be zero. However, out of an abundance of caution, Creative has elected to place the
Proposition 65 warning on its products.
Déclaration de la Proposition 65 de la Californie
AVERTISSEMENT: La manipulation de ce produit peut vous exposer à des produits chimiques qui sont
reconnus par l'État de la Californie comme pouvant provoquer le cancer, des anomalies congénitales ou
d'autres effets nuisibles à la reproduction.
Veuillez vous laver les mains après l'avoir manipuler.
Note explicative: La Proposition 65 (California Safe Drinking Water and Toxic Enforcement Act of 1986) de
la Californie sur les matières dangereuses et l'eau potable exige un étiquetage spécial pour les produits
contenant certains produits chimiques qui sont reconnus par l'État de la Californie comme pouvant
provoquer le cancer, des anomalies congénitales ou d'autres effets nuisibles à la reproduction. Creative a
choisi d'inclure une mise en garde s'appuyant sur sa connaissance de la présence d'un ou de plusieurs de
ces produits chimiques sans essayer d'en évaluer le niveau d'exposition. Pour les produits de Creative, le
Page 27

Regulatory Information 26
niveau d'exposition peut être inférieur au niveau critique établi par la Proposition 65 ou même être nul.
Néanmoins, par souci extrême de prudence, Creative a choisi de placer l'avertissement de la Proposition
65 sur ses produits.
European Compliance
This product conforms to the following:
EMC Directive 2004/108/EC.
Mains operated products for the European market comply with Low Voltage Directive 2006/95/EC.
Communication / RF wireless products for the European market comply with R&TTE Directive 1999/5/EC.
CAUTION: To comply with the Europe CE requirement, this device must be installed with CE certified
computer equipment which meet with Class B limits.
All cables used to connect this device must be shielded, grounded and no longer than 3m in length.
Operation with non-certified computers or incorrect cables may result in interference to other devices or
undesired effects to the product.
MODIFICATION: Any changes or modifications not expressly approved by Creative Technology Limited or
one of its affiliated companies could void the user’s warranty and guarantee rights.
WEEE DIRECTIVE 2002/96/EC
The use of the WEEE Symbol indicates that this product may not be treated as household
waste. By ensuring this product is disposed of correctly, you will help protect the
environment. For more detailed information about the recycling of this product, please
contact your local authority, your household waste disposal service provider or the shop
where you purchased the product.
BATTERIES DIRECTIVE 2006/66/EC
For Removable Battery
This product may contain one or more of the following removable batteries:
Li-ion/polymer, button/coin cells, cylindrical cells. In this case, the following applies:
The crossed-out wheeled bin symbol indicates that the battery in this product should not
be treated as unsorted municipal waste upon reaching its end of life. Instead it should be
taken to separate collection and recycling schemes. Batteries containing heavy metal
content will have a two-letter symbol for the chemical under the crossed-out wheeled bin
symbol. 'Cd' stands for cadmium, 'Pb' for lead, and 'Hg' for mercury. You can help the
environment and avoid public health hazards by recycling the battery at an authorized
recycling facility or the place of purchase. To find the nearest authorized recycle centre
contact your local authority. Instructions for removing the battery can be found in the
product user manual. The instructions should be followed carefully before attempting to
remove the battery.
For Integrated Battery
This product may contain a Lithium ion/polymer battery that should only be removed by an
authorized recycling centre. By recycling this product at your local authorized recycling
centre or the place of purchase, the battery will be removed and recycled separately.
Information in this document is subject to change without notice and does not represent a commitment on the part of Creative
Technology Ltd. No part of this manual may be reproduced or transmitted in any form or by any means, electronic or mechanical,
including photocopying and recording, for any purpose without the written permission of Creative Technology Ltd.
Copyright © 2009 Creative Technology Ltd. All rights reserved. Creative, the Creative logo, Sound Blaster, X-Fi, CMSS, Crystalizer,
EAX and GigaWorks are trademarks or registered trademarks of Creative Technology Ltd. in the United States and/or other
countries. Microsoft, Windows and Windows Vista are registered trademarks of Microsoft Corporation. All other products are
trademarks or registered trademarks of their respective owners.
Version 1.0
April 2010
 Loading...