

Page 1

Regulatory Information
Page
1
of 2Regulatory Information
13/6/2008
file://C:\Users\Lee Fong\AppData\Local\Temp\~hh24FE.htm
The following sections contain notices for various countries:
CAUTION: This product is intended for use with FCC/CE certified computer equipment. Please check the
equipment operating/installation manual and/or with the equipment manufacturer to verify/confirm if your
equipment is suitable prior to the installation or use of the product.
Federal Communication Commission (FCC) Interference Statement
FCC Part 15: This equipment has been tested and found to comply with the limits for a Class B digital
device, pursuant to Part 15 of the FCC Rules. These limits are designed to provide reasonable protection
against harmful interference in a residential installation. This equipment generates, uses and can radiate
radio frequency energy and, if not installed and used in accordance with the instructions, may cause
harmful interference to radio communications. However, there is no guarantee that interference will not
occur in a particular installation. If this equipment does cause harmful interference to radio or television
reception, which can be determined by turning the equipment off and on, the user is encouraged to try to
correct the interference by one or more of the following measures:
Reorient or relocate the receiving antenna.
Increase the separation between the equipment and receiver.
Connect the equipment into an outlet on a circuit different from that to which the receiver is
connected.
Consult the dealer or an experienced radio/TV technician for help.
This device complies with part 15 of the FCC Rules. Operation is subject to the following two conditions:
1. This device may not cause harmful interference, and
2. This device must accept any interference received, including interference that may cause undesired
operation.
CAUTION: To comply with the limits of the Class B digital device, pursuant to Part 15 of the FCC Rules,
this device must be installed with computer equipment certified to comply with Class B limits.
All cables used to connect to the computer and peripherals must be shielded and grounded. Operation
with non-certified computers or non-shielded cables may results in interference to radio or television
reception.
MODIFICATION: Any changes or modifications not expressly approved by the grantee of this device could
void the user's authority to operate the device.
Federal Communication Commission (FCC) Radiation Exposure Statement
This equipment complies with FCC radiation exposure limits set forth for an uncontrolled environment.
This transmitter must not be co-located or operating in conjunction with any other antenna or transmitter.
For body operation, Sound Blaster X-Fi Notebook has been tested and meets the FCC RF exposure
guidelines when used directly against the body. Specific Absorption Rate, or SAR is a measurement of
radio frequency energy. The FCC permits a maximum SAR value of 1.6 mW/g. The highest SAR value for
this product when used on the body, as described in this user guide, is 0.292 mW/g.
California Proposition 65 Statement
WARNING: Handling this product may expose you to chemicals known to the State of California to cause
cancer and birth defects or other reproductive harm.
Wash hands after handling.
Explanatory Note: California Safe Drinking Water and Toxic Enforcement Act of 1986 (Proposition 65)
requires special product labeling for products containing certain chemicals known to the State of California
to cause cancer, birth defects or other reproductive harm. Creative has chosen to provide a warning based
on its knowledge about the presence of one or more listed chemicals without attempting to evaluate the
level of exposure. With Creative's products, the exposure may be below the Proposition 65 level of
concern, or could even be zero. However, out of an abundance of caution, Creative has elected to place
Page 2

the Proposition 65 warning on its products.
Page
2
of 2Regulatory Information
13/6/2008
file://C:\Users\Lee Fong\AppData\Local\Temp\~hh24FE.htm
Déclaration de la Proposition 65 de la Californie
AVERTISSEMENT: La manipulation de ce produit peut vous exposer à des produits chimiques qui sont
reconnus par l'État de la Californie comme pouvant provoquer le cancer, des anomalies congénitales ou
d'autres effets nuisibles à la reproduction.
Veuillez vous laver les mains après l'avoir manipuler.
Note explicative: La Proposition 65 (California Safe Drinking Water and Toxic Enforcement Act of 1986)
de la Californie sur les matières dangereuses et l'eau potable exige un étiquetage spécial pour les
produits contenant certains produits chimiques qui sont reconnus par l'État de la Californie comme
pouvant provoquer le cancer, des anomalies congénitales ou d'autres effets nuisibles à la reproduction.
Creative a choisi d'inclure une mise en garde s'appuyant sur sa connaissance de la présence d'un ou de
plusieurs de ces produits chimiques sans essayer d'en évaluer le niveau d'exposition. Pour les produits de
Creative, le niveau d'exposition peut être inférieur au niveau critique établi par la Proposition 65 ou même
être nul. Néanmoins, par souci extrême de prudence, Creative a choisi de placer l'avertissement de la
Proposition 65 sur ses produits.
Notice for Canada
This Class B digital apparatus complies with Canadian ICES-003.
Cet appareil numérique de la classe B est conforme à la norme NMB-003 du Canada.
CANADIAN CLASS B STATEMENT: This digital device does not exceed the Class B limits for radio noise
emissions from digital apparatus as set out in the interference-causing equipment standard entitled "Digital
Apparatus," ICES-003 of the Department of Communications.
Cet appareil numerique respecte les limites de bruits radioelectriques applicables aux appareils
numeriques de Classe B prescrites dans la norme sur le materiel brouilleur: "Appareils Numeriques,"
NMB-003 edictee par le ministre des Communications.
MODIFICATION: Any changes or modifications not expressly approved by the grantee of this device could
void the user's authority to operate the device.
Toute modification non approuvée explicitement par le fournisseur de licence de l'appareil peut entraîner
l'annulation du droit de l'utilisateur à utiliser l'appareil.
European Compliance
This product conforms to the following:
General Product Safety Directive 2001/95/EC.
EMC Directive 2004/108/EC.
Mains operated products for the European market comply with Low Voltage Directive 2006/95/EC.
Communication / RF wireless products for the European market comply with R&TTE Directive 1999/5/EC.
CAUTION: To comply with the Europe CE requirement, this device must be installed with CE certified
computer equipment which meet with Class B limits.
All cables used to connect this device must be shielded, grounded and no longer than 3m in length.
Operation with non-certified computers or incorrect cables may result in interference to other devices or
undesired effects to the product.
MODIFICATION: Any changes or modifications not expressly approved by Creative Technology Limited or
one of its affiliated companies could void the user's warranty and guarantee rights.
Page 3

How to use this manual
Page
1
of 19How to use this manual
17/4/2008
file://C:\Users\Lee Fong\AppData\Local\Temp\~hhC3B1.htm
This document is designed to provide you with direct access to vital product knowledge. You can resize
the document window, print this document and access linked web sites.
To jump to a linked topic or web site:
Click the underlined blue text, or the hand symbol whenever it appears.
To print portions of this document:
1. On the Contents tabbed page to your left, click a topic heading.
2. On the Menu, click the Print button.
3. In the dialog box that appears, click the option to print one topic only, or all topics under a heading,
then click the OK button.
Introduction
Congratulations on your purchase of Creative's audio revolution for notebooks, Sound Blaster® X-FiTM
Notebook! With cutting edge technology from the leaders in PC audio, Sound Blaster X-Fi Notebook will
give you years of reliable entertainment on your ExpressCardTM-enabled notebook.
Your Sound Blaster X-Fi Notebook is also capable of streaming music wirelessly to supported devices and
control them using the software provided. For a list of supported devices, visit www.x-fi.com.
This User's Guide contains software installation and usage information for your audio device.
What is ExpressCard?
This technology is the latest standard in expansion modules for your computer. ExpressCard modules are
lighter, thinner and faster than the older PCMCIA modules, and can be inserted or taken out without
turning off your computer.
Your Sound Blaster X-Fi Notebook is an ExpressCard module that takes advantage of your computer's
PCI Express® and USB 2.0 capabilities. ExpressCard modules also use less power, saving your notebook
batteries for critical tasks.
System Requirements
Minimum Requirements
Microsoft® Windows Vista® 64-bit with Service Pack 1 (SP1), Windows Vista 32-bit with SP1,
Windows® XP Professional x64 Edition, Windows XP Service Pack 2 (SP2) or Service Pack 3
(SP3), Windows XP Media Center Edition (MCE) 2004 or later
Intel® Pentium® M, Intel CoreTM, AMD TurionTM series or equivalent mobile processor 1.66 GHz, or
faster
Intel, AMD® or 100% compatible motherboard chipset
For Windows Vista: 512 MB RAM (1 GB RAM recommended)
For Windows XP: 256 MB RAM
600 MB of free hard disk space
Available ExpressCard/34 or ExpressCard/54 slot
CD-ROM/CD-RW or DVD-ROM drive required for software installation
Additional Requirements (where applicable)
DVD-Video
6x or faster DVD-ROM drive
DVD player software such as InterVideo® WinDVD® or CyberLink® PowerDVDTM (latest version
recommended) installed
Headphones or amplified speakers (optional)
Page 4

Notes
Page
2
of 19How to use this manual
17/4/2008
file://C:\Users\Lee Fong\AppData\Local\Temp\~hhC3B1.htm
Other applications may have higher system requirements. Refer to the applications' documentation
for details.
More Help
Visit www.soundblaster.com/X-Fi for the latest news and products for X-Fi and Sound Blaster. The site
also includes information on making purchases, technical help, and the latest driver updates.
Using Creative Software AutoUpdate
Locating, downloading, and installing updates for your Creative products is now simpler and faster with the
web-based Creative Software AutoUpdate system.
When you connect to Creative Software AutoUpdate via the Internet, the web site will analyze your
computer system to determine what operating system (OS), language, and Creative products are installed
in your system.
After the online analysis, you will be able to select from a list of only the most relevant software and driver
updates. The files will then be retrieved and installed on your system for you.
To learn more about Creative Software AutoUpdate, go to www.soundblaster.com/support.
Notes
First-time users of Creative Software AutoUpdate may be prompted to authorize the download of a
browser component required for system inspection. Ensure that the content is signed by Creative
Labs, Inc., then click the Yes button.
Ensure that all your Creative products are connected and installed on the same computer running
Creative Software AutoUpdate.
About Your Hardware
Refer to the Quick Start leaflet for instructions on installing your audio device.
To learn more about your product, consult the following sections:
Your Sound Blaster X-Fi Notebook
Notes
Actual products may differ slightly from those shown in this chapter.
Your Sound Blaster X-Fi Notebook
Your audio device has the jacks and connectors below to enable the attachment of a wide variety of
devices. It also includes the following features:
Connectivity or
Features
Description
Page 5

Microphone In/Line In
Page
3
of 19How to use this manual
17/4/2008
file://C:\Users\Lee Fong\AppData\Local\Temp\~hhC3B1.htm
1.
jack
Connects to line-level sources (for example, MP3 players) or microphones with a
3.50 mm (1/8-inch) plug.
Headphone/Line Out
2.
jack
3. Connect LED button
4. Power LED
Connects to the Front Left and Front Right inputs on powered analog speakers or
stereo headphones with a 3.50 mm (1/8-inch) plug.
Lights up green when wireless streaming is enabled and ready. Flashes green when
button is pressed to indicate pairing with a wireless receiver or other supported
device.
Lights up blue when Sound Blaster X-Fi Notebook is connected to your notebook and
turned on.
Installing and Uninstalling Software
To take full advantage of your Sound Blaster X-Fi Notebook, you need to install device drivers and
applications. At times, you may also need to uninstall or reinstall some or all of the device drivers and
applications to correct problems, change configurations, or upgrade outdated drivers or applications. To
learn how to do so in all supported Windows operating systems, consult the following sections:
Installing Drivers and Applications
Reinstalling Drivers and Applications
Uninstalling Drivers and Applications
Installing/Uninstalling Selected Drivers and Applications
Installing Drivers and Applications
Ensure that your audio device is installed before proceeding. For instructions on installing your
audio device, consult your Quick Start leaflet.
After you have installed your audio device into the ExpressCard slot, turn on your notebook. Windows
automatically detects your audio device and searches for device drivers.
For Windows Vista
1. Insert the Installation and Applications CD into your CD-ROM/DVD-ROM drive. Your CD should
start automatically. If it does not, follow the steps below:
i. Click Start Computer.
ii. Right-click the CD-ROM/DVD-ROM drive icon, and then click Open Autoplay.
2. To complete the installation, follow the instructions on the screen.
3. When prompted, restart your notebook.
For Windows XP
When prompted for the audio drivers, click the Cancel button.
1. Insert the Installation and Applications CD into your CD-ROM/DVD-ROM drive. Your CD should
start automatically. If it does not, follow the steps below:
i. Double-click the My Computer icon on your desktop.
Alternatively, click Start My Computer.
ii. Right-click the CD-ROM/DVD-ROM drive icon, and then click Autoplay.
2. To complete the installation, follow the instructions on the screen.
3. When prompted, restart your notebook.
Reinstalling Drivers and Applications
For Windows Vista
1. Click Start Control Panel Uninstall a program.
2. Select the Sound Blaster X-Fi Notebook entry.
Page 6

3. Click the Uninstall/Change button.
Page
4
of 19How to use this manual
17/4/2008
file://C:\Users\Lee Fong\AppData\Local\Temp\~hhC3B1.htm
If the User Account Control dialog box appears, click the Continue button.
4. In the InstallShield Wizard dialog box, select the Repair option.
When prompted, insert the Installation and Applications CD into your CD-ROM/DVD-ROM drive,
and click the OK button.
5. To repair an application, select the application check box.
6. Click the Yes button.
7. When prompted, restart your notebook.
For Windows XP
1. Click Start Control Panel.
2. Double-click the Add or Remove Programs icon.
3. Select the Sound Blaster X-Fi Notebook entry.
4. Click the Change/Remove button.
5. In the InstallShield Wizard dialog box, select the Repair option.
When prompted, insert the Installation and Applications CD into your CD-ROM/DVD-ROM drive,
and click the OK button.
6. To repair an application, select the application check box.
7. Click the Yes button.
8. When prompted, restart your notebook.
After you have completed the steps above, you can check your notebook to see if the reinstalled software
works properly.
Uninstalling Drivers and Applications
Before you begin, close all running audio applications. Applications that are still running during
uninstallation will not be removed.
For Windows Vista
1. Click Start Control Panel Uninstall a program.
2. Select the Sound Blaster X-Fi Notebook entry.
3. Click the Uninstall/Change button.
If the User Account Control dialog box appears, click the Continue button.
4. In the InstallShield Wizard dialog box, select the Remove All option.
5. Click the Yes button.
6. When prompted, restart your notebook.
For Windows XP
1. Click Start Control Panel.
2. Double-click the Add or Remove Programs icon.
3. Select the Sound Blaster X-Fi Notebook entry.
4. Click the Change/Remove button.
5. In the InstallShield Wizard dialog box, select the Remove All option.
6. Click the Yes button.
7. When prompted, restart your notebook.
After you have completed the steps above, you can install the original or updated device drivers and
applications for Sound Blaster X-Fi Notebook. For instructions on installing the software, consult Installing
Drivers and Applications.
Installing/Uninstalling Selected Drivers and Applications
Page 7

For Windows Vista
Page
5
of 19How to use this manual
17/4/2008
file://C:\Users\Lee Fong\AppData\Local\Temp\~hhC3B1.htm
1. Click Start Control Panel Uninstall a program.
2. Select the Sound Blaster X-Fi Notebook entry.
3. Click the Uninstall/Change button.
If the User Account Control dialog box appears, click the Continue button.
4. In the InstallShield Wizard dialog box, select the Add option to add new software components to
your existing installation, or the Remove option to remove previously installed software components
from your system.
5. To install or uninstall an application, select the application check box.
6. Click the Next button.
When prompted, insert the Installation and Applications CD into your CD-ROM/DVD-ROM drive,
and click the OK button.
7. When prompted, restart your notebook.
For Windows XP
1. Click Start Control Panel.
2. Double-click the Add or Remove Programs icon.
3. Select the Sound Blaster X-Fi Notebook entry.
4. Click the Change/Remove button.
5. In the InstallShield Wizard dialog box, select the Add option to add new software components to
your existing installation, or the Remove option to remove previously installed software components
from your system.
6. To install or uninstall an application, select the application check box.
7. Click the Next button.
When prompted, insert the Installation and Applications CD into your CD-ROM/DVD-ROM drive,
and click the OK button.
8. When prompted, restart your notebook.
Connecting Speakers and Headphones
You can connect speakers and headphones to Sound Blaster X-Fi Notebook. Alternatively, you can also
play audio through your onboard speakers. To learn how to do so, consult the following sections:
Connecting Headphones and Headsets
Connecting Analog Speaker Systems
Enabling Audio Playback Through Onboard Notebook Speakers
To enjoy an optimal audio experience, use Entertainment Mode to select the correct speakers or
headphones setting and enable X-Fi CMSS-3D.
Notes
Actual products may differ slightly from those shown in this chapter.
Select the correct speaker setup or headphone option in Entertainment Mode to get the best
experience.
The cables shown in this chapter may be bundled with your peripheral or are available separately
from www.creative.com.
For more information on the Creative peripherals mentioned in this chapter, visit
www.creative.com.
Connecting Headphones and Headsets
Do not listen to audio on your headphones or headset at high volumes for prolonged periods of
time as hearing loss might result.
For headphones:
Page 8

Page
6
of 19How to use this manual
17/4/2008
file://C:\Users\Lee Fong\AppData\Local\Temp\~hhC3B1.htm
Connectivity or Cable
1. Headphone/Line Out jack Connects to stereo headphones with a 3.50 mm (1/8-inch) plug.
For headsets:
Description
Jack, Connector or Cable
1. Microphone In/Line In jack Connects to the 3.50mm (1/8-inch) microphone plug of your headset.
2. Headphone/Line Out jack Connects to the 3.50 mm (1/8-inch) headphone plug of your headset.
Notes
Use an adapter if the plug comes in a different size.
Connecting Analog Speaker Systems
You can connect 2.1 analog speaker systems to your Sound Blaster X-Fi Notebook.
Description
Page 9

Page
7
of 19How to use this manual
17/4/2008
file://C:\Users\Lee Fong\AppData\Local\Temp\~hhC3B1.htm
1. Headphone/Line Out jack
2. 2 channel audio cable (available separately)
3. Audio Input jack
Connectivity or Cable
Enabling Audio Playback Through Onboard Notebook Speakers
Your Sound Blaster X-Fi Notebook supports playback through notebook speakers when headphones or
external speakers are not connected.
To enable playback through notebook speakers
1. Disconnect any earphones, headphones or speakers connected to Sound Blaster X-Fi Notebook.
2. Launch Entertainment Mode console.
3. Click the Playback through Notebook Speakers button.
4. Select the Enable audio playback through Notebook Speakers check box.
Adjusting onboard speaker volume
Onboard speaker volume is determined by both your onboard audio device and Sound Blaster X-Fi
Notebook.
To set the playback volume:
For Windows Vista
1. Launch the Microsoft Volume Mixer panel.
2. Click the Device tab and select Speakers for your onboard audio device.
3. Adjust the Speakers slider to the desired level.
4. Repeat steps 2 and 3, select Speakers for Sound Blaster X-Fi Notebook, and adjust the Speakers
slider to the desired level.
For Window XP
Page 10

1. Launch the Microsoft Volume Control panel.
Page
8
of 19How to use this manual
17/4/2008
file://C:\Users\Lee Fong\AppData\Local\Temp\~hhC3B1.htm
2. Click Options Properties.
3. Under Mixer device, select your onboard audio device.
4. Under Adjust volume for, select the Playback option.
5. Click the OK button.
6. Adjust the Volume Control slider to the desired level.
7. Repeat steps 2 - 6, select Sound Blaster X-Fi Notebook under Mixer device, and adjust the
Volume Control slider to the desired level.
Notes
Your onboard audio device must be enabled.
Using Your Sound Blaster X-Fi
Your Sound Blaster X-Fi Notebook works seamlessly with many external devices to give you endless
hours of listening, and music authoring pleasure. To learn more about these features and how to connect
additional devices, consult the following sections:
Watching DVDs
Communicating with Voice over Internet Protocol (VoIP)
Playing Games
Streaming Music Wirelessly
Playing/Recording Music
Creating Music
Notes
Actual products may differ slightly from those shown in this chapter.
The cables shown in this chapter may be bundled with your peripheral or are available separately
from www.creative.com.
For more information on the Creative peripherals mentioned in this chapter, visit
www.creative.com.
Watching DVDs
You can watch DVDs on your notebook by using a software DVD player. X-Fi CMSS-3D upmixes the
audio output and enables you to enjoy amazing surround sound even over headphones or stereo
speakers. To get an optimal audio experience with X-Fi CMSS-3D, configure your software DVD player for
multichannel output if possible. For more information on configuring your software DVD player, consult the
documentation of your player.
You can download the following software and codecs:
CyberLink PowerDVD player
MPEG-2 decoder
Dolby Digital decoding codec
DTS decoding codec
Your product model enables you to upgrade PowerDVD, and download its codec, in the following ways:
Click Start Programs or All Programs Creative Get PowerDVD.
Notes
Additional charges may be incurred if you choose to upgrade PowerDVD and/or download codecs.
Communicating with Voice over Internet Protocol (VoIP)
You can connect the supplied earset to your Sound Blaster X-Fi Notebook to enjoy outstanding acoustic
performance for your Voice over Internet Protocol (VoIP) applications like Skype®, or instant messaging
applications like Yahoo!® Messenger.
Page 11
You can also use a headphones and microphone combination, or a headset with your audio device. For
Creative
ALchemy is a powerful tool that restores the audio for a DirectSound
3D game running on
Page
9
of 19How to use this manual
17/4/2008
file://C:\Users\Lee Fong\AppData\Local\Temp\~hhC3B1.htm
instructions on how to connect them, consult Connecting Headphones and Headsets.
Connectivity or Features
1. Microphone In/Line In jack Connects to the 3.50 mm (1/8-inch) microphone plug of your earset.
2. Headphone/Line Out jack Connects to the 3.50mm (1/8-inch) earphone plug of your earset.
Description
Playing Games
Your Sound Blaster X-Fi Notebook is equipped with Creative's cutting edge audio technologies and
software to enhance the audio in your games. Playing games will be more exhilarating than ever before!
To learn more about the following audio technologies, visit www.soundblaster.com.
EAX ADVANCED HD
Make your games come alive with EAX® ADVANCED HDTM and immerse yourself in worlds that their
creators envisioned!
Hear multiple audio effects being played simultaneously, and precise environment settings applied to them
to create a life-like environment and heighten the sense of realism.
Each effect is also accurately positioned in its 3D environment, allowing you to tell where it is coming from
relative to your location, and you will be able to discern where your teammates and enemies are using
only these audio cues.
EAX ADVANCED HD is a weapon that will give you the competitive edge, especially in multiplayer games.
X-Fi CMSS-3D
Why settle for stereo when you can enjoy the pleasures of surround sound? Let X-Fi CMSS®-3D upmix
your stereo audio content into multichannel content for playback over your stereo headphones, stereo or
multichannel speakers, and put yourself in the center of the experience.
X-Fi Crystalizer
With X-Fi CrystalizerTM, your audio content is re-mastered in real-time to enhance the highs and lows to
give you a greater dynamic range. Hear the difference and clarity in your audio content and enjoy the
subtleties that were missing before!
Creative ALchemy
®
Page 12

Windows Vista to its former glory - in full surround sound with hardware accelerated audio mixing,
Page
10
of 19How to use this manual
17/4/2008
file://C:\Users\Lee Fong\AppData\Local\Temp\~hhC3B1.htm
sampling rate conversion and EAX effects.
Streaming Music Wirelessly
Your Sound Blaster X-Fi Notebook is capable of streaming music wirelessly to supported devices. For
example, you can pair up one or more Creative wireless receivers, and control playback using the
Broadcast and Zone features in Entertainment Mode to enjoy music throughout your house.
The Broadcast feature enables you to stream music to any number of wireless receivers and/or supported
devices. It can be used without manual pairing.
The Zone feature enables you to stream music to a maximum of four selected wireless receivers and/or
supported devices. It requires manual pairing and each device is assigned to an available zone. You can
also rename the four zones.
For a list of supported devices, visit www.x-fi.com.
Connectivity or
1. Connect LED button
2. Power LED
To enable wireless streaming
1. Launch Entertainment Mode console.
2. Click the Wireless Music Control button.
3. Select the Enable Wireless Music Control check box.
4. To play back music on all wireless receivers, select Broadcast.
5. If you wish to see the status of the Wireless Music Control settings when your notebook starts up,
Features
Lights up green when wireless streaming is enabled and ready. Flashes green when
button is pressed to indicate pairing with a wireless receiver or other supported
device.
Lights up blue when Sound Blaster X-Fi Notebook is connected to your notebook and
turned on.
OR
To play back music on selected receivers, select Zone.
or Sound Blaster X-Fi Notebook is inserted into your notebook, select the Show Wireless Music
Control status on startup check box.
Description
Notes
Do not enable wireless streaming while travelling on an airplane.
The Entertainment Mode console automatically saves your wireless settings, you only need to
configure it once.
Once you have enabled wireless streaming, select one of the following methods to pair Sound
Blaster X-Fi Notebook with a Creative wireless receiver.
Page 13

For auto pairing
Page
11
of 19How to use this manual
17/4/2008
file://C:\Users\Lee Fong\AppData\Local\Temp\~hhC3B1.htm
1. Turn on your wireless receiver, it will automatically search for a signal from your audio device and
establish a connection.
For manual pairing
1. Press the Connect LED button on your audio device.
The LED flashes green.
2. Turn on your wireless receiver and press its Connect button, it will search for a signal from your
audio device and establish a connection.
The LED stops flashing.
Notes
While the LED is flashing, you have three minutes to pair a device. If you have not done so before
the time is up, the LED stops flashing and you will have to press the Connect LED button again.
To erase all paired zones and reset settings to their factory default values, press and hold the
Connect LED button for five seconds. It will flash twice and turn off for two seconds. You must also
reset your wireless receiver or supported device. For instructions on how to do so, consult the
documentation of the device.
Other supported devices may have different ways to initiate pairing. For details, consult the
documentation of the device.
Playing/Recording Music
You can play music from, and/or record music to external devices (for example, MP3 players, Digital Audio
Tape players/recorders and MiniDisc players/recorders) by connecting them to your Sound Blaster X-Fi
Notebook.
Playing music from external devices:
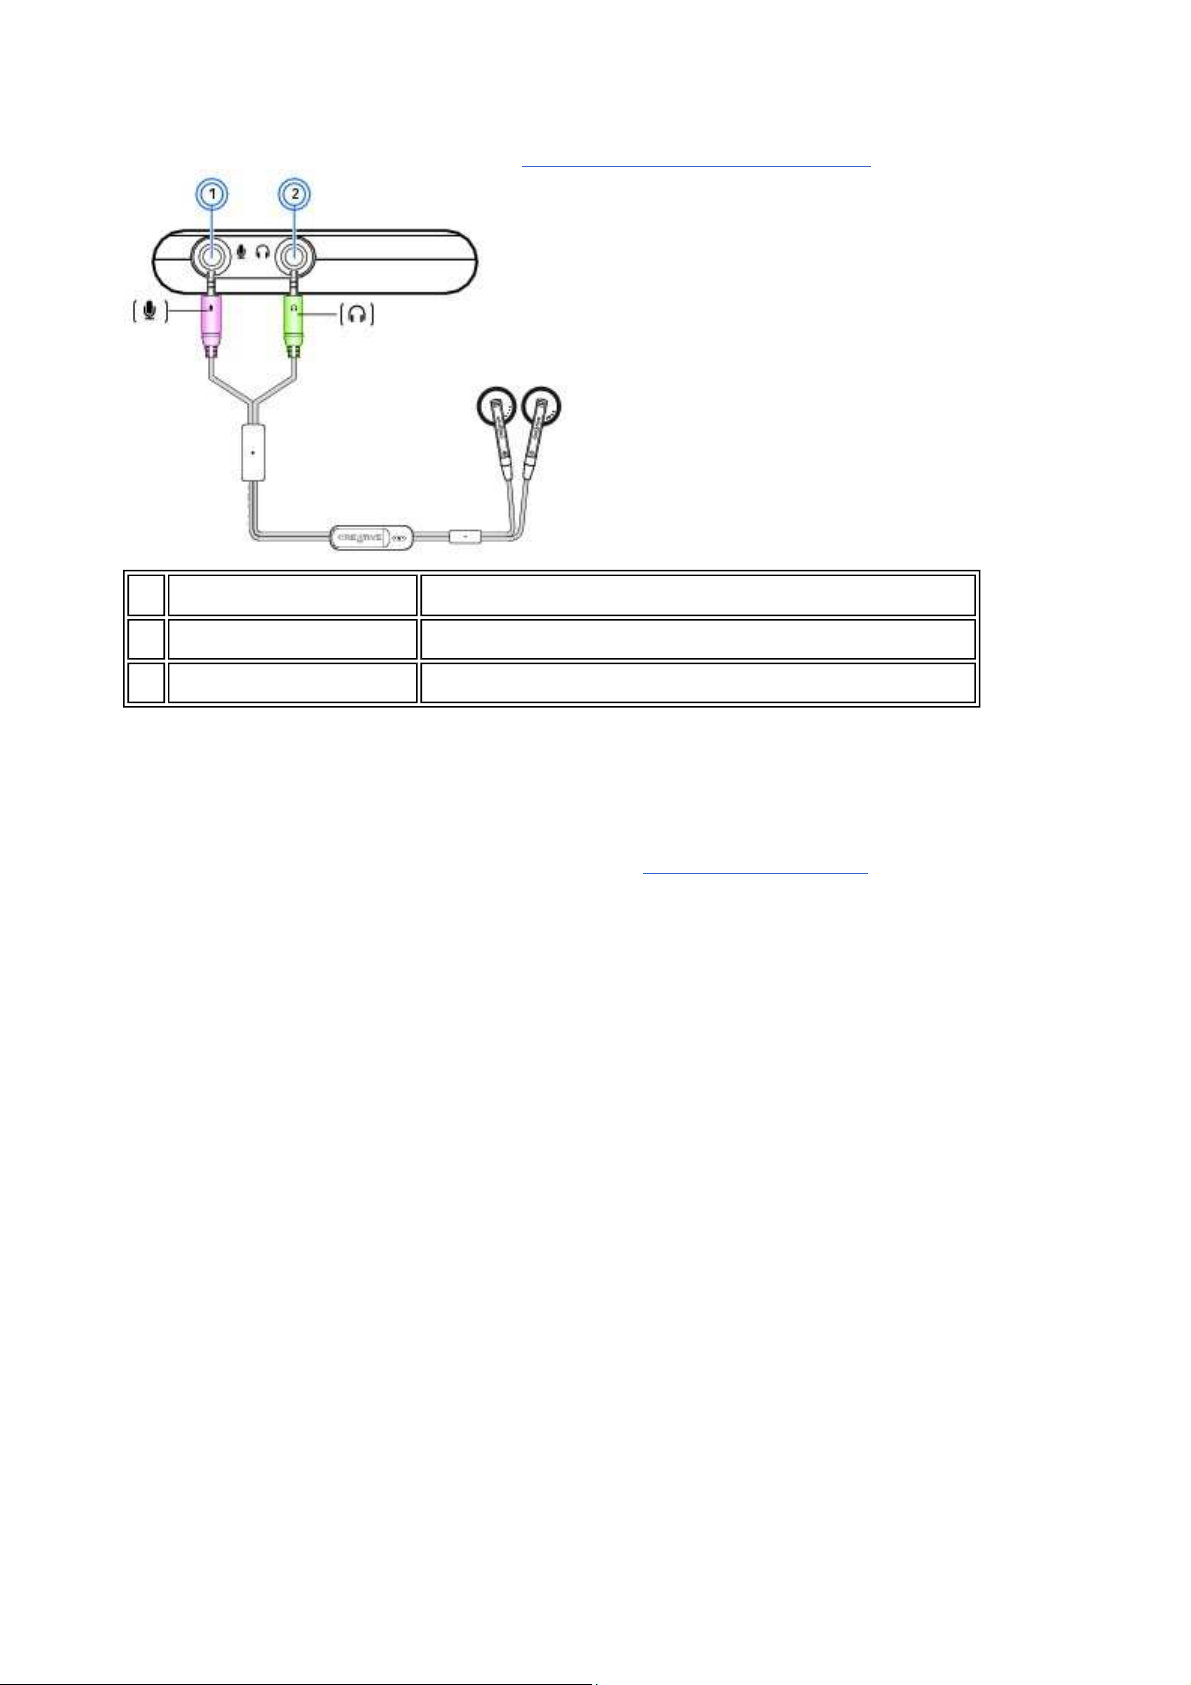
Connecting your MP3 player
Connectivity or Features Description
Page 14

1. Microphone In/Line In jack Connects to the Headphone jack on your playback device.
Page
12
of 19How to use this manual
17/4/2008
file://C:\Users\Lee Fong\AppData\Local\Temp\~hhC3B1.htm
2 channel audio cable (available
2.
separately)
Connects the playback device to your Sound Blaster X-Fi Notebook.
3. Headphone jack
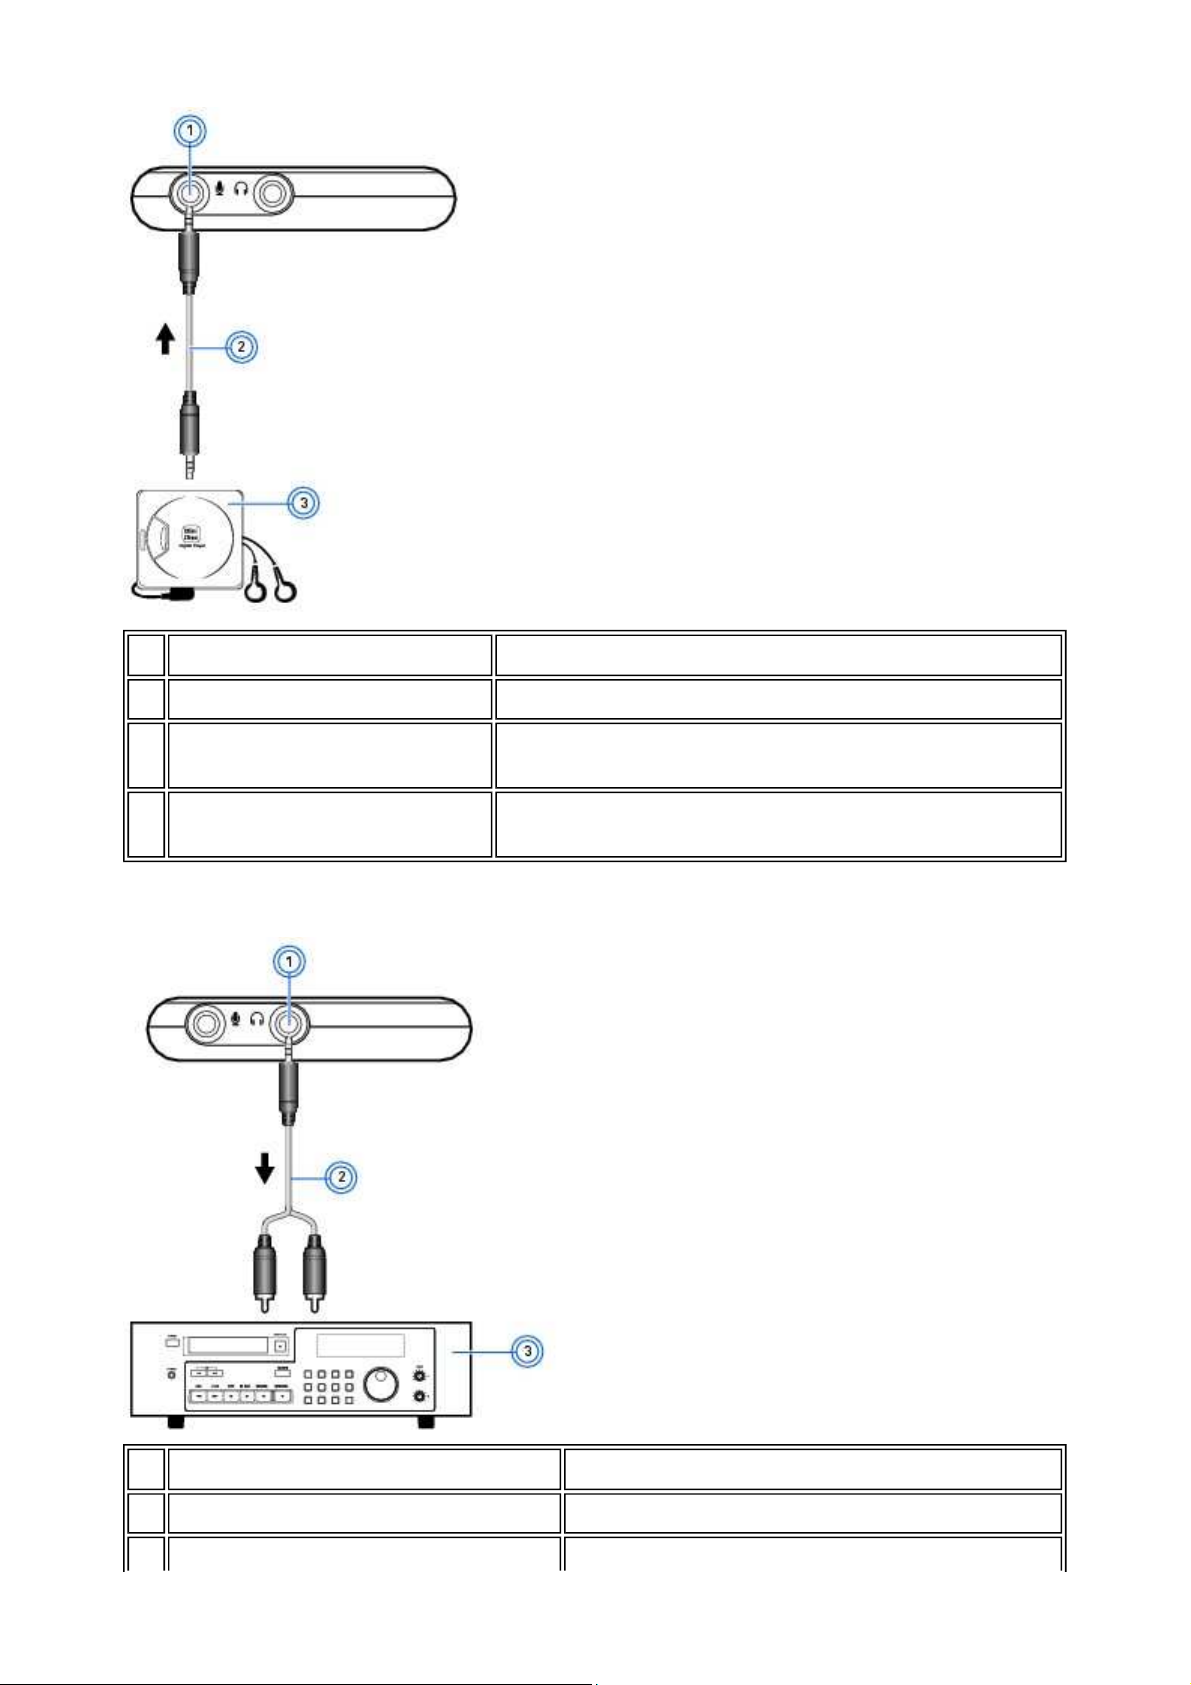
Connecting your DAT player
Connects to the Microphone In/Line In jack on your Sound Blaster XFi Notebook.
1. Microphone In/Line In jack Connects to the Line Out jacks on your playback device.
3.50mm (1/8-inch) stereo-to-RCA cable
2.
(available separately)
3. Line Out jacks
Connectivity or Features Description
Connects the playback device to your Sound Blaster X-Fi
Notebook.
Connects to the Microphone In/Line In jack on your Sound
Blaster X-Fi Notebook.
Connecting your MD player
Page 15
Page
13
of 19How to use this manual
17/4/2008
file://C:\Users\Lee Fong\AppData\Local\Temp\~hhC3B1.htm
1. Microphone In/Line In jack Connects to the Headphone jack on your playback device.
2.
3. Headphone jack
Recording music to external devices:
Connecting your DAT recorder
Connectivity or Features Description
2 channel audio cable (available
separately)
Connects the playback device to your Sound Blaster X-Fi Notebook.
Connects to the Microphone In/Line In jack on your Sound Blaster XFi Notebook.
1. Headphone/Line Out jack Connects to the Line In jacks on your recording device.
Connectivity or Features Description
Page 16

3.50mm (1/8-inch) stereo-to-RCA cable
Page
14
of 19How to use this manual
17/4/2008
file://C:\Users\Lee Fong\AppData\Local\Temp\~hhC3B1.htm
2.
(available separately)
Connects the recording device to your Sound Blaster X-Fi
Notebook.
3. Line In jacks
Connecting your MD recorder
Connects to the Headphone/Line Out jack on your Sound
Blaster X-Fi Notebook.
1. Headphone/Line Out jack Connects to the Line In jack on your recording device.
2.
3. Line In jack
Connectivity or Features Description
2 channel audio cable (available
separately)
Connects the recording device to your Sound Blaster X-Fi Notebook.
Connects to the Headphone/Line Out jack on your Sound Blaster XFi Notebook.
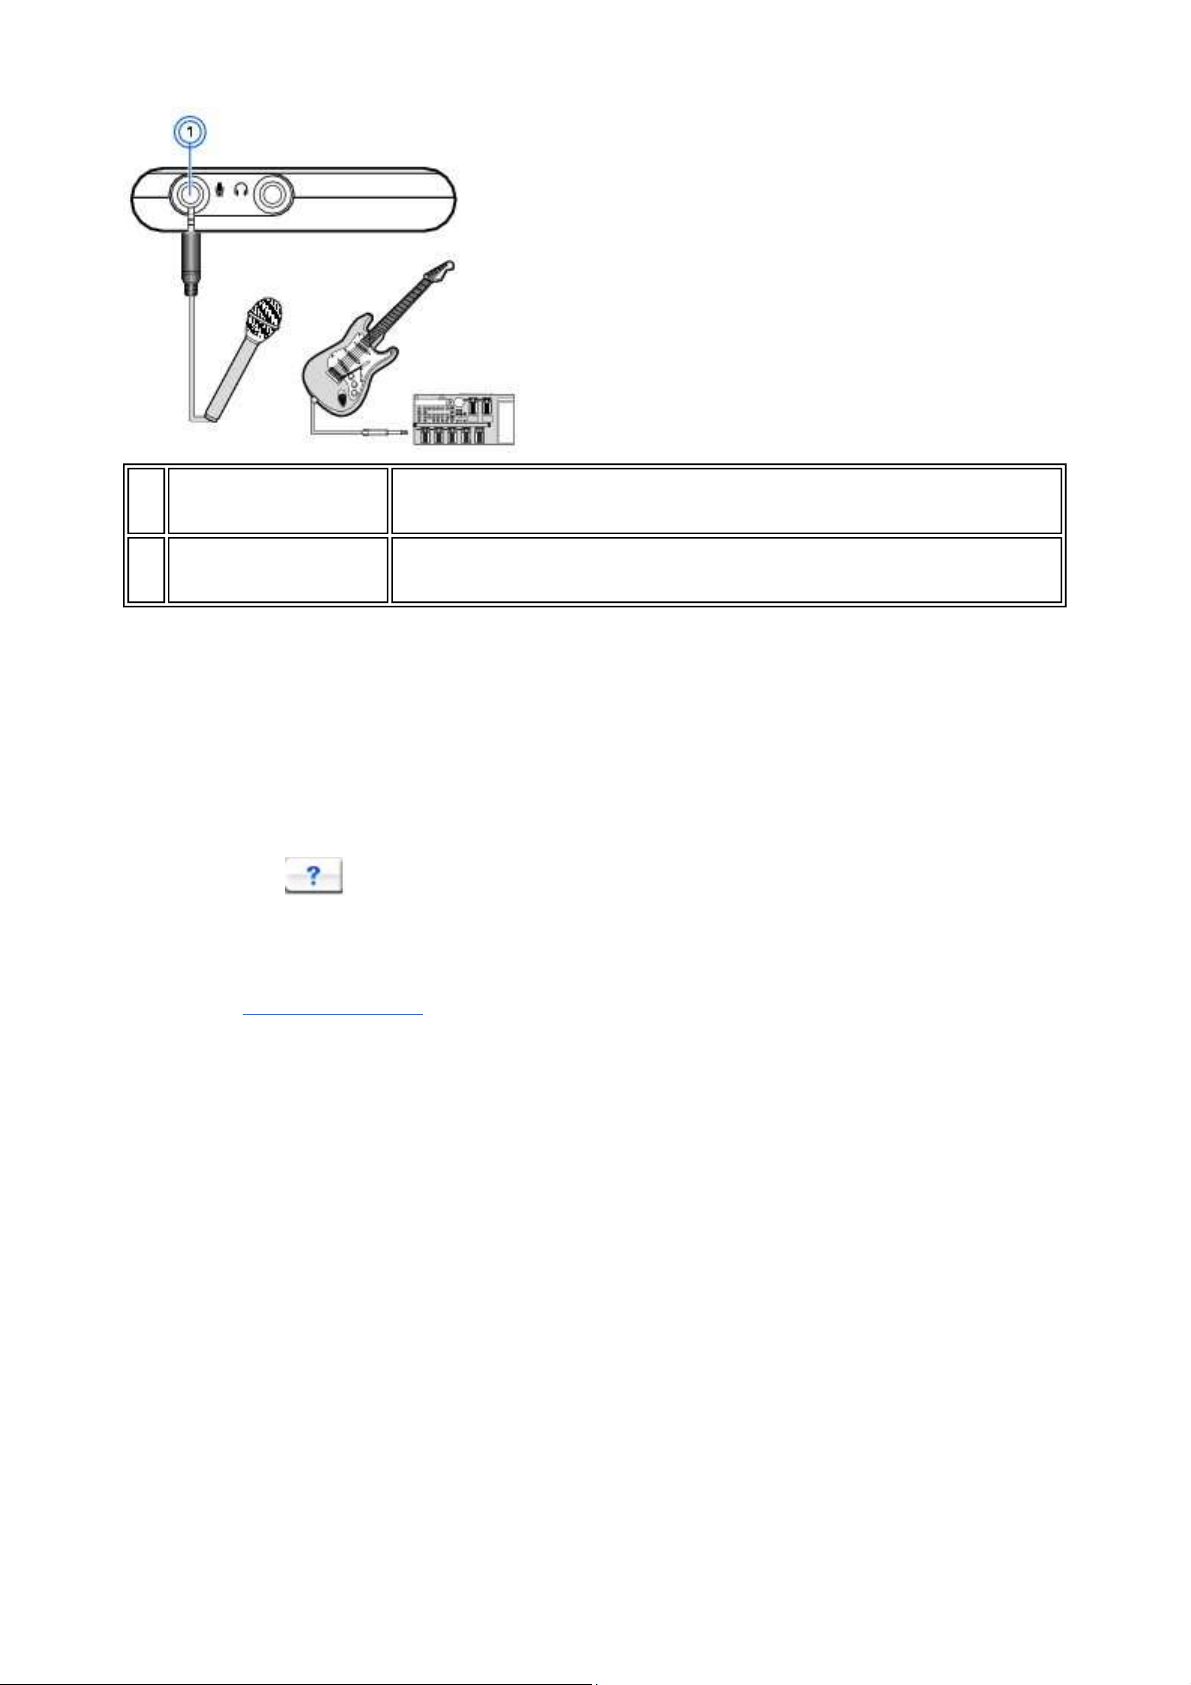
Creating Music
You can set up a home music studio using your Sound Blaster X-Fi Notebook.
Put together your own productions consisting of multiple music tracks from a MIDI Synthesizer or an
electric guitar. Alternatively, connect your electric guitar using a Pre-amp Box to the Microphone In/Line In
jack (3.50 mm or 1/8-inch jack). Use a convertor if your Pre-amp Box comes with a larger connector, for
example, a 6.35 mm (1/4-inch) connector.
Page 17
Page
15
of 19How to use this manual
17/4/2008
file://C:\Users\Lee Fong\AppData\Local\Temp\~hhC3B1.htm
1.
Connectivity or
Features
Microphone In/Line In
jack
Connects to line-level sources (for example, MP3 players) or microphones with a
3.50 mm (1/8-inch) plug.
Description
Notes
Your audio device only supports dynamic and low-powered electret microphones.
Creative Software Suite
The following software is designed for you to access the basic as well as the advanced features of your
audio device. We recommend that you familiarize yourself with their functions in order to make full use of
the rich features of your audio device.
For more information on each application, refer to its online help. Depending on the application, you can
do this by clicking on the toolbar of the application, or selecting Help Topics from the Help menu.
Creative Software Suite
Audio Console
Console Launcher
Entertainment Mode
Creative ALchemy
Creative MediaSource
Creative Sound Blaster Plugin for Windows Media Center Edition
Volume Panel
Diagnostic and troubleshooting utilities
Diagnostics
Notes
The applications included with your audio device may differ from those described here. Your audio
device may also come with third party applications.
Some applications are available for certain operating systems only.
Entertainment Mode
With Entertainment Mode, your audio device is optimized for movie soundtrack and music playback.
Page 18

Page
16
of 19How to use this manual
17/4/2008
file://C:\Users\Lee Fong\AppData\Local\Temp\~hhC3B1.htm
In the Entertainment Mode console, you can:
Select speakers/headphones configuration
1. Click the Speakers button.
2. Select your Speaker System or Headphones from the drop down list.
Enable environment effects with EAX
1. Click the EAX Effects button.
2. Select the Enable EAX Effects check box.
3. Select your desired environment effect.
4. Drag the Amount slider right or left to increase or decrease the amount of enhancement to apply.
Enhance playback with X-Fi CMSS-3D
1. Click the X-Fi CMSS-3D button.
2. Select the Enable X-Fi CMSS-3D Headphone or Enable X-Fi CMSS-3D Virtual check box.
3. Drag the Stereo Envelopment slider up or down to adjust the upmix balance between the front and
surround speakers.
4. For the most compelling upmix effect, drag the slider to its middle position, or click the arrow icon to
revert to the default setting.
Enhance playback with X-Fi Crystalizer
1. Click the X-Fi Crystalizer button.
2. Select the Enable X-Fi Crystalizer check box.
3. Drag the Amount slider right or left to increase or decrease the amount of enhancement to apply.
Adjust EQ settings
1. Click the EQ button.
2. Select the Enable EQ check box.
3. Drag the Amount sliders up or down to increase or decrease the amount of enhancement to apply.
Alternatively, you can also select a preset from the drop down list.
Adjust volume mixer settings
Page 19

1. Click the Mixer button.
Page
17
of 19How to use this manual
17/4/2008
file://C:\Users\Lee Fong\AppData\Local\Temp\~hhC3B1.htm
2. Drag the Amount sliders up or down to increase or decrease the volume of each component.
Adjust performance settings
1. Click the Performance button.
2. Select the desired bit-depth from the drop down list.
3. Select the desired sampling rate from the drop down list.
Playback audio through onboard speakers
1. Click the Playback through Notebook Speakers button.
2. Select the Enable audio playback through Notebook Speakers check box.
Control wireless music settings
1. Click the Wireless Music Control button.
2. Select the Enable Wireless Music Control check box.
3. Select Broadcast or Zone
4. Select the Show Wireless Music Control status on startup check box.
General Specifications
Versatile Audio Features
Playback of up to 64 audio channels, each at an arbitrary sample rate
24-bit Analog-to-Digital conversion of analog inputs at 48 kHz sampling rate
16-bit Digital-to-Analog conversion of digital sources at 48 kHz to stereo output
16-bit Digital-to-Analog conversion of stereo digital sources at 48 kHz to stereo output
16-bit recording sampling rates: 8, 11.025, 16, 22.05, 24, 32, 44.1, and 48 kHz.
Notes
Depending on your system configuration, output sampling frequency may only be available at 48
kHz.
X-Fi CMSS-3D
X-Fi CMSS-3D Headphone: Provides a multichannel playback experience over headphones for all
types of content
X-Fi CMSS-3D Virtual: Provides a multichannel playback experience over two loudspeakers for all
types of content
Connectivity
Sound Blaster X-Fi Notebook
Audio Inputs
One 3.50 mm (1/8-inch) stereo jack for Analog Line In or Microphone In
Audio Outputs
One 3.50 mm (1/8-inch) stereo jack for Analog Line Out or Headphones
Interfaces
Wireless transmitter to connect with supported wireless devices.
Troubleshooting
Page 20

This section provides solutions to problems you may encounter during installation or normal use. This
Notes
Page
18
of 19How to use this manual
17/4/2008
file://C:\Users\Lee Fong\AppData\Local\Temp\~hhC3B1.htm
includes:
Problems with Multiple Audio Devices
Problems with Sound
Problems with Sound and CD-ROMs
Problems with Wireless Features
If you have a technical problem with this product, you can consult our selfhelp tool "Knowledge Base" for
online troubleshooting and solutions. Visit www.soundblaster.com/support.
Problems with Multiple Audio Devices
The onboard audio chipset seems to be in conflict with Sound Blaster X-Fi Notebook.
Disable your notebook's onboard audio chipset. See your notebook's motherboard documentation for
details.
Problems with Sound
No sound from the headphones.
Check the following:
The headphones are connected to the Headphone jack.
In the Speakers tab of Audio Console, the Headphones option is selected in the
Speaker/Headphone Selection box.
OR
In the speakers and headphone selection of Entertainment Mode, the Headphones option is
selected.
No audio output when playing digital files such as .WAV, MIDI files or AVI clips.
Check the following:
The speakers' volume control knob, if any, is set at mid-range. Adjust the volume mixer settings in
Entertainment Mode, if necessary.
The powered speakers or external amplifier are connected to the card's Headphone jack.
There is no hardware conflict between the card and a peripheral device.
The speakers and headphone selection in Entertainment Mode corresponds to your speaker or
headphone configuration.
Problems with Sound and CD-ROMs
No audio output when playing audio CDs.
To solve this problem:
Enable digital CD playback (for Windows XP only):
1. Click Start Settings Control Panel or Start Control Panel.
2. In the Control Panel dialog box, double-click the System icon.
3. In the System Properties dialog box, click the Hardware tab.
4. Click the Device Manager button.
5. Double-click the DVD/CD-ROM drives icon.
Your computer drives appear.
6. Right-click the disk drive icon. A menu appears.
7. Click Properties.
8. In the Digital CD Playback box of the next dialog box, click the Enable digital CD audio for this
CD-ROM device check box to select it.
Page 21

Page
19
of 19How to use this manual
17/4/2008
file://C:\Users\Lee Fong\AppData\Local\Temp\~hhC3B1.htm
This feature is enabled in Windows Vista by default.
Problems with Wireless Features
Electronic interference is occuring with other wireless devices.
Do the following:
Place your notebook away from your other devices (for example, wireless routers) that transmit
wireless signals.
If you have two or more Sound Blaster X-Fi Notebook units transmitting simultaneously, ensure that
they are placed at least five meters apart to prevent inteference.
Place your notebook or wireless receivers away from large metal surfaces.
Music is not being transmitted to my paired devices.
Check the following:
Sound Blaster X-Fi Notebook and your paired devices are turned on.
Under the Wireless Music Control setting of Entertainment Mode, the Enable Wireless Music
Control checkbox is selected.
License and Copyright
Information in this document is subject to change without notice and does not represent a commitment on the part of Creative
Technology Ltd. No part of this manual may be reproduced or transmitted in any form or by any means, electronic or mechanical,
including photocopying and recording, for any purpose without the written permission of Creative Technology Ltd.
The Software License Agreement is found in a separate folder on the Installation and Applications CD.
Copyright © 2008 by Creative Technology Ltd. All rights reserved. Creative, the Creative logo, Sound Blaster, the Sound Blaster
logo, X-Fi, the Sound Blaster X-Fi logo, Xtreme Fidelity, CMSS, Crystalizer and Creative MediaSource are trademarks or
registered trademarks of Creative Technology Ltd. in the United States and/or other countries. Intel, Pentium and Intel Core are
trademarks, or registered trademarks of Intel Corporation. AMD and AMD Turion are trademarks, or registered trademarks of
Advanced Micro Devices, Inc. Microsoft, Windows, the Windows logo and Windows Vista are trademarks, or registered
trademarks of Microsoft Corporation. Dolby and the double-D symbol are registered trademarks of Dolby Laboratories, Inc. DTS
is a trademark of Digital Theater Systems, Inc. WinDVD is a registered trademark of InterVideo, Inc. CyberLink and PowerDVD
are registered trademarks or trademarks of CyberLink Corp. PCI Express and PCIe are registered trademarks of PCI-SIG. All
other products are trademarks or registered trademarks of their respective owners.
This product is covered by one or more of the following U.S. patents:
4,506,579; 4,699,038; 4,987,600; 5,013,105; 5,072,645; 5,111,727; 5,144,676; 5,170,369; 5,248,845; 5,298,671; 5,303,309;
5,317,104; 5,342,990; 5,430,244; 5,524,074; 5,596,644; 5,698,803; 5,698,807; 5,729,612; 5,748,747; 5,763,800; 5,790,837;
5,802,180; 6,405,163; 6,549,884; 6,577,736; 6,772,021; 6,798,889; 6,819,732; 6,858,790; 6,868,377; 6,917,686; 6,978,027;
7,099,482; 7,107,401; 7,149,314; 7,167,567; 7,219,194; 7,231,054.
Version 1.0
April 2008
 Loading...