

Page 1

1
Page 2

Safety instructions
English
Please read the following before using Creative products:
· To be completely disconnected from the power input, the mains plug has to be disconnected/
detached from the mains.
· Disconnect the mains plug when the device is expected to be unused for several days.
· Remove the batteries when not in use for an extended period of time.
Additional guidelines for
· The short wave radio frequency signals of a
electronic and medical devices
· Switch off the device where it is prohibited. Do not use the device in medical facilities, aircraft,
refueling points, close to automatic doors, automatic fi re alarms or other automatically
controlled devices
· Keep this device at least 20 cm from pacemakers and other medical devices. Radio waves may
impair the operation of pacemakers and other medical devices
Bluetooth
devices
Bluetooth
device may impair the operation of other
Safety information for battery
· The battery must be recycled or disposed of properly. Contact local agencies for recycling and
disposal information.
· Do not allow metal objects to touch the terminal of the battery.
· If there is leakage, an offensive odor, discoloration or deformation during charging or use, remove
the battery and do not use it again.
· Clean your hands well before touching food or sensitive areas, such as, your eyes.
· Do not expose to excessive heat such as sunshine, fi re or the like.
· The following statement only applicable to products containing “CR” type lithium coin cells:
Perchlorate material special handling may apply
see www.dtsc.ca.gov/hazardouswaste/perchlorate
CAUTION: Risk of explosion if battery is replaced by incorrect types.
Technical Specifi cations
• Input Rating: 100 - 240V ~ 50/60Hz 400mA
•
Bluetooth
Version :
Bluetooth
• Operating Frequency: 2402 - 2480 MHz
• Supported
AVRCP (
• Operating Range: Up to 10 meters (Measured in open space. Walls and structures may affect
range of device.)
Bluetooth
Bluetooth
Remote Control)
2.1 + EDR (Enhanced Data Rate)
profi les* : A2DP (Wireless Stereo
Bluetooth
),
Compatibility Disclaimer
Wireless performance is dependent on your device’s
device manufacturer’s manual.
Creative will not be liable for any loss of data or leakage resulting from the use of these devices.
Bluetooth
wireless technology. Refer to your
Notes
* Refer to your
website for supported profi les.
1
Compatible with PC (Windows XP/Vista/7), Apple Macintosh equipped with
2
Compatible with most major brands of
mobile phones (including iPhone, Windows Mobile)
Bluetooth
device (notebook1, PC1, mobile device2) manufacturer’s documentation/
Bluetooth
Bluetooth
A2DP enabled mobile phones and A2DP enabled
wireless stereo
2 3
Page 3
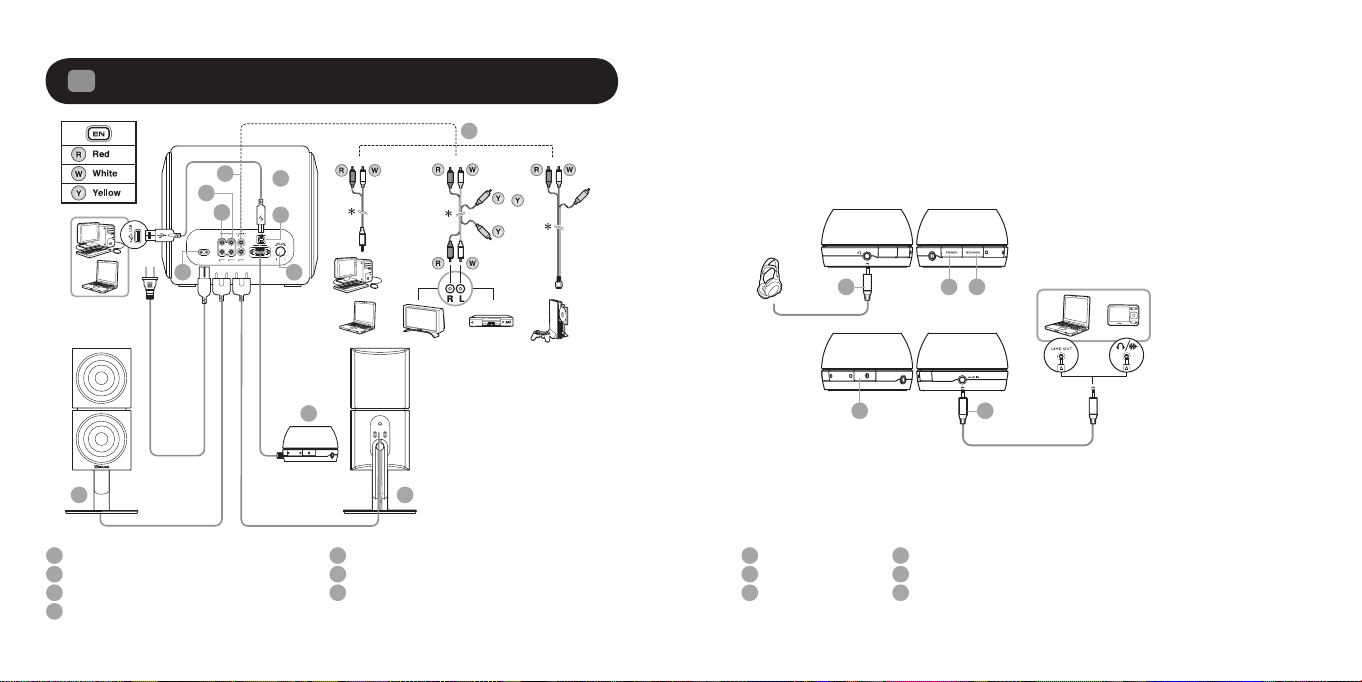
Product Overview / Connectivity Diagram
1
4
4
3
1
13
2
5
7
Side views of the Audio Control Pod:
8 9 10
[
6
11
12
*
Audio Control Pod LED status
2 3
AC IN
1
Right Satellite Speaker
2
Left Satellite Speaker
3
Audio In - To analog audio in
4
4 5
USB – USB Audio
5
Audio Control Pod
6
Bass Level Control
7
* optional (sold separately)
Headphone
8
Power ON/OFF
9
Source
10
CONNECT Button –
11
AUX In – Auxiliary line-in for Audio Devices
12
™
Subwoofer
SLAM
13
Bluetooth
indications:
GREEN – Line-In/ AUX In
AMBER – USB Audio
BLUE –
Bluetooth
Pair and Connection
* optional (sold separately)
Connection
Page 4

Remote Control overview
2
Enjoy high performance wireless audio from ZiiSound T6 via
3
Bluetooth® Audio Transmitter BT-D1
2
5
6
7 8
1
1
4
3
9
Power
2
AUX Source
3
USB Audio
4
Bluetooth Stereo Source
5
Volume +
6
Previous Track
7
Play/ Pause
8
Volume -
9
Next Track
Bluetooth® Audio BT-D1 is paired with ZiiSound
A
T6 at factory. Simply insert the BT-D1 into your
PC to enjoy the high quality wireless audio.
2
Wait for computer to install hardwareB
1
1: LED Status Indicator
Indicate the current status of the USB
Transmitter
2: CONNECT button
A multi function button used to perform pairing
and disconnection
Your new
Installing
device . . .
hardware is
installed
and ready
to use.
Bluetooth
Your hard ware
is installed and
ready to use.
To replace the battery in the remote control
Power on the speaker and the LED status
• Depress (A) and pull out (B)
• Replace the battery with the positive polarity facing upward and push (B) back to remote control
A
The remote control
B
uses a CR2025 3V
lithium coin battery
C
indicator will show green.
Note: Allow the fl ashing LED indicators to stop after
plugging the speaker system to the mains. This indicates
that the speaker system is initialized and ready to be
powered ON.
Press once and release the CONNECT button.
D
The LED will show blinking Blue then steady
Blue LED indicating ZiiSound T6 is ready to
stream music.
6 7
Page 5

To pair and CONNECT the ZiiSound T6 with other
4
Bluetooth
Power on the speaker and the LED status indicator will show green.
A
Note: Allow the fl ashing LED indicators to stop after plugging the speaker system to the mains. This indicates
that the speaker system is initialized and ready to be powered ON.
Press and hold CONNECT button for 3 seconds while ZiiSound T6 is ON.
B
BLUE LED will light up and fast blink.
i. Turn on the
ii. Search for ZiiSound T6
iii. Pair and connect to ZiiSound T6. If prompted for passcode, enter 0000.
iv. Pairing successful, ready to stream music
devices
Pairing
i. ii. iii. iv.
Bluetooth
Network
Connections
Operator
Internet
USB
Bluetooth
feature on your device
ON
ConnectivityConnectivity
Search results
ZiiSound T6
ZiiSound T6 ZiiSound T6
PAS S CO D E
0000
. . . . . .
CONNECT ED
Switching between Paired Devices
5
Switch between your current connected device to your previous connected devices by following
these steps:
Action LED status Status
Press CONNECT button for 1 second ZiiSound T6 LED blinks and
Press the
Bluetooth
icon on the remote control to switch between paired devices.
Note: Ensure that your next paired devices’
Reset to factory setting
6
stay lit in Blue
Bluetooth
feature is ON and ready to accept connections.
Ready to stream music
Follow these steps to return to factory settings and to clear paired device memory in the ZiiSound T6:
Action LED status Status
Power OFF the speaker.
Press and hold Power button for 7
seconds.
ZiiSound T6 will auto Power up. When
the Blue LED starts to blink, ZiiSound
T6 is ready for pairing.
Blue LED fast blinks Pairing mode. Ready to
accept connection from
other devices
Note: The above are generic steps to pair a
connectivity for your device, please consult your manufacturer’s manual.
Bluetooth
device, for more specifi c instructions on
Bluetooth
8 9
Page 6

To establish a new connection between BT-D1 with ZiiSound T6
7
To reconnect the BT-D1 to a previously paired device
8
Press and hold CONNECT button for 3 seconds while ZiiSound T6 is ON.
A
Pairing
Put the BT-D1 into pairing mode for pairing
B
Press and hold the CONNECT button for 3 seconds then release.
C
Wait for LED pattern to turn from Pairing pattern to Connected pattern.
Pairing
Connected ( 2 sec blink interval )
Ready to stream music from computer
D
10 11
. . . . . .
. . .
. . .
For Mac® OS:
a) Go to “System Preferences”, choose “Sound”
b) Choose the Output tab, select “Creative
Audio D1”
Bluetooth
After the BT-D1 has been paired to device, it will always attempt to reconnect to the previously
paired device when the BT-D1 is plugged into a USB port. Always ensure that the receiving device
has its
Bluetooth
enabled and ready to accept connections. You may also try the following.
A) Ensure that the receiving device has its
B1) With the BT-D1 in the computer USB port, press the CONNECT button on the BT-D1 to initiate a
connection to your device.
OR
B2) Plug out and plug in your BT-D1 from the computer and wait for it to auto connect
Note: The BT-D1 will stream any audio (including startup, shutdown or warning tones) played from your
computer. Ensure that the volume is kept to a comfortable level.
To disconnect from The BT-D1
To stop streaming music from the BT-D1 to your receiving
the BT-D1 or press the CONNECT button once. Pressing once more will reconnect the BT-D1 back to
its last connected
Bluetooth
device.
Bluetooth
enabled and ready to accept connections
Bluetooth
device, simply either plug out
Page 7

Enjoy 5.1 audio via USB connection
9.1
Windows XP setup
1. Plug in the USB cable, wait for a series of “Found New Hardware” messages to appear on your
computer screen.
Note: If you do not see these messages, the capability to display them may be disabled in your computer.
Wait for 1-2 minutes before proceeding to the next step. Alternatively, you could try another USB port.
Found New Hardware
ZiiSound T6 USB Audio
Found New Hardware
USB Composite Device
Found New Hardware
ZiiSound T6 USB Audio
Found New Hardware
USB Audio Device
Found New Hardware
ZiiSound T6 USB Audio
In Windows XP Control Panel, open Sounds and Audio Devices Properties.
Under the Audio tab, verify that ZiiSound T6 USB Audio is selected under Sound playback.
Under Sound playback setting, click the Advanced button to open Advanced Audio Properties.
In the Speaker setup drop list, select 5.1 surround sound speakers.
Click Apply and then OK.
Your ZiiSound T6 is now ready for use.
Found New Hardware
USB Human Interface Device
Found New Hardware
Your new hardware is installed and
ready to use
12 13
Page 8

Windows Vista / 7 Setup
9.2
Please ensure that the correct audio source is selected by right clicking on the Volume icon on
A
the system tray.
Select Playback Devices.B
Select ZiiSound T6 USB Audio and click Set default.C
Click on Confi gure and ensure that 5.1 surround is selected under Audio Channels.D
Click Next for the next few confi guration windows to accept defaults until setup is fi nished.E
14 15
Page 9

9.3
Open the Applications, Utilities then Audio MIDI Setup.A
Mac OS
®
X audio setup
Select 5.1 Surround, click Apply and then click Done.C
Select on ZiiSound T6 USB Audio, click on Output, click on Confi gure SpeakersB
Close all panels. Your ZiiSound T6 is now ready for use.D
16 17
Page 10

Playback with other audio devices via AUX In
10
Optional (sold separately)
Wall-mountable satellites
11
Ziisound T6 satellites can be wall-mountable, for more specifi c instructions on wall mounting,
please consult your wall mount adapter manufacturer’s manual.
For more information, please refer to creative.com/products/speakers/wallmount
18 19
Page 11

FAQ
Perform the following trouble-shooting steps before sending it for servicing. For more information, please
refer to support.creative.com
There’s no
Bluetooth
- Delete the ZiiSound T6 name entry from your
Section 4 (To pair and connect the ZiiSound T6 with other
ZiiSound T6
- Position them within 1 meter or closer to each other if you experience pairing diffi culties
- Ensure that both your
Bluetooth
- With some built-in
may be required to manually specify/ setup the audio output as ZiiSound T6, e.g., (under sound and audio
devices section on your computer’s operating system) Please consult your manufacturer’s documentation
for further information.
link between my device and the ZiiSound T6. What should I do?
Bluetooth
device and ZiiSound T6 are not connected to any other devices
link is established and paired between the devices but there’s no music. What should I do?
Bluetooth
enable computers, 3rd party USB
Bluetooth
device paired memory list and perform the steps
Bluetooth
devices) to re-pair your device with
Bluetooth
dongles or other devices, you
European Compliance
This product conforms to the following:
EMC Directive 2004/108/EC.
Mains operated products for the European market comply with Low Voltage Directive 2006/95/EC and
Commission Regulation(s) Implementing Directive (2005/32/EC).
Communication / RF wireless products for the European market comply with R&TTE Directive 1999/5/EC.
CAUTION:
To comply with the Europe CE requirement, this device must be installed with CE certifi ed computer equipment
which meet with Class B limits.
All cables used to connect this device must be shielded, grounded and no longer than 3m in length. Operation
with non-certifi ed computers or incorrect cables may result in interference to other devices or undesired
effects to the product.
MODIFICATION:
Any changes or modifi cations not expressly approved by Creative Technology Limited or one of its affi liated
companies could void the user’s warranty and guarantee rights.
DECLARATION OF CONFORMITY
According to LVD Directive (2006/95/EC) and R&TTE Directive (1999/5/EC)
Company Name : Creative Technology Ltd
Company Address : 31, International Business Park
Creative Resource
Singapore 609921
Declare under our sole responsibility that the product(s):
Speaker Product Name : ZiiSound T6
Speaker Model Number : MF0375
USB Transmitter Model Number : MZ0440
Intended Use : Offi ce and Home Usage
Restrictive use : Nil
To which this declaration relates are in conformity with the following standard(s):
Radio : EN 300 328 V1.7.1: 2006
EMI/EMC : EN 55013: 2001 + A1: 2003 + A2: 2006
EN 55020: 2007
EN 55022: 2006 + A1:2007
EN55024:1998 + A1:2001 + A2: 2003
EN 61000-3-2:2006 + A1:2009 + A2:2009
EN 61000-3-3:2008
EN 301 489-1 V1.8.1: 2008
EN 301 489-17 V2. 1.1:2009
Safety : IEC 60065: 2001 + A1: 2005 + A2:2010 / EN 60065: 2002 + A1: 2006 + A11: 2008
EN 50371: 2002
Energy Effi ciency : EN 62301: 2005 + Annex II of EC No.1275/2008
Technical documentation for this product(s) is retained at the following address:
Company Name : Creative Technology Ltd
Company Address : 31, International Business Park
Creative Resource
Singapore 609921
20 21
 Loading...